Breakfast

- 4 medium russet potatoes - 1 tablespoon extra-virgin olive oil - 1 teaspoon garlic powder - 1 teaspoon onion powder - 1 teaspoon smoked paprika - ½ teaspoon salt - ½ teaspoon black pepper - Optional: 1 teaspoon cayenne pepper (for a spicier kick) Crispy breakfast potatoes start with simple ingredients. I use four medium russet potatoes. They have a great texture and flavor. Make sure to wash and peel them well. Next, I add a tablespoon of extra-virgin olive oil. This oil helps the potatoes crisp up nicely. For flavor, I mix in garlic powder, onion powder, and smoked paprika. Each spice brings its own taste. I also add salt and black pepper for balance. If you like some heat, cayenne pepper is a great optional choice. These ingredients come together to create a tasty dish. You can adjust the spices to suit your taste. Just remember, fresh ingredients lead to the best flavor! {{ingredient_image_2}} Start by cutting the peeled russet potatoes into uniform ½-inch cubes. This size is key for even cooking. Rinse the potato cubes under cold water. Why rinse? It removes excess starch. Less starch means extra crispiness when you bake. In a large mixing bowl, combine the rinsed potato cubes with one tablespoon of extra-virgin olive oil. Add one teaspoon of garlic powder, one teaspoon of onion powder, and one teaspoon of smoked paprika. Don’t forget the salt and black pepper. If you like heat, toss in one teaspoon of cayenne pepper. Mix everything well. Make sure every potato cube gets a good coating. Preheat your oven to 425°F (220°C). While it heats up, line a large baking sheet with parchment paper. This helps with easy cleanup. Spread the seasoned potato cubes in a single layer on the sheet. This spacing helps them crisp up nicely. Bake for about 25-30 minutes. Halfway through, flip the potatoes with a spatula. This ensures they brown evenly on all sides. When they turn golden brown, they are ready to come out. Let them cool for a few minutes before serving. To get crispy breakfast potatoes, cut the russet potatoes into even ½-inch cubes. This size helps them cook evenly. If some are too big, they won’t crisp up right. Rinse the cubes under cold water to remove excess starch. This step is key for that perfect crunch. Bake the potatoes at 425°F (220°C). Use parchment paper on your baking sheet to help with cleanup. Spread the cubes out in a single layer. If they are too crowded, they will steam instead of crisp. During baking, flip the potatoes halfway through. This ensures they brown on all sides. You can personalize your potatoes by adjusting the seasoning. Start with the basic spices: garlic powder, onion powder, smoked paprika, salt, and pepper. If you want more heat, add cayenne pepper. Mix it all well so that each cube gets coated. Feel free to experiment with herbs and spices. Try adding dried oregano or thyme for fresh flavor. Fresh herbs can also be a great touch. Just chop them finely and mix them in before baking. For serving, place the crispy potatoes in a bright bowl or on a wooden platter. This makes them look even more appealing. Garnish them with fresh parsley for a pop of color. You can also serve them with fluffy scrambled eggs or a fried egg on top for a hearty breakfast. The eggs add creaminess that pairs well with the crispy texture of the potatoes. Pro Tips Cut Evenly: Ensure that your potato cubes are cut into uniform ½-inch pieces for even cooking and consistent crispiness. Rinse for Crispiness: Rinsing the potato cubes under cold water helps remove excess starch, which contributes to a crispier texture when baked. Use Parchment Paper: Lining your baking sheet with parchment paper not only prevents sticking but also makes for an easier cleanup. Don’t Overcrowd: Spread the potatoes in a single layer on the baking sheet to ensure they roast properly and achieve that desired golden-brown crisp. {{image_4}} You can switch up the potatoes for more flavor. While russet potatoes work great, Yukon Gold potatoes offer a creamy texture. They have a buttery taste that adds depth. You can also use red potatoes. They hold their shape well and have a nice, smooth skin. This adds color to your dish. Want to kick it up a notch? Add spicy flavors! You can mix in cayenne pepper, as in the original recipe. This gives a nice heat. You can also try paprika for a smoky twist. If you love heat, consider adding chili powder or crushed red pepper flakes. These spices bring warmth and excitement to each bite. Herbs can take your crispy breakfast potatoes to a new level. Fresh herbs like rosemary or thyme add a fragrant touch. Just chop them finely and mix them in with your potatoes. If you don't have fresh herbs, dried herbs work too. Oregano or Italian seasoning can bring a lovely flavor. Adding herbs makes each bite fresh and bright. To store leftover crispy breakfast potatoes, let them cool first. Place them in an airtight container. This helps keep the potatoes fresh. Store them in the fridge for up to three days. To maintain their crispiness, avoid stacking them. Instead, layer them flat in the container. For the best reheating, use an oven or an air fryer. Preheat your oven to 400°F (200°C). Spread the potatoes on a baking sheet. Bake for about 10 minutes, or until hot and crispy. If using an air fryer, set it to 350°F (175°C) and cook for 5-7 minutes. Avoid using the microwave, as it makes them soggy. You can freeze crispy potatoes if needed. First, let them cool completely. Spread them out on a baking sheet in a single layer. Freeze for about an hour. Once frozen, transfer them to a freezer bag. They can stay in the freezer for up to three months. To thaw, move them to the fridge overnight. Reheat in the oven or air fryer for best results. To make your breakfast potatoes crispier, you can follow a few simple tips: - Soak the Potatoes: Rinse the potato cubes in cold water. Soaking them for 30 minutes removes extra starch. This step helps achieve better crispiness. - Use High Heat: Bake at 425°F (220°C). The high heat promotes a golden, crunchy exterior. - Single Layer: Spread potatoes in a single layer on the baking sheet. This ensures hot air can reach all sides. - Flip Halfway: Flip the potatoes halfway through baking. This helps them brown evenly. - Oil Coating: Use enough olive oil to coat the potatoes. This adds flavor and helps with crisping. These tips will give you that perfect crunch! Yes, you can prepare crispy breakfast potatoes in advance with these best practices: - Prep Ahead: Cut and soak the potatoes a day before. Store them in cold water in the fridge. - Seasoning: Mix the oil and spices ahead of time. This saves time in the morning. - Refrigerate: Keep the seasoned potatoes in the fridge until ready to bake. When you're ready to serve, just bake them. They will still taste great! Crispy breakfast potatoes pair well with many breakfast items: - Eggs: Fluffy scrambled eggs or sunny-side-up eggs are classic choices. - Bacon or Sausage: The salty flavor of bacon or sausage complements the potatoes nicely. - Avocado: Sliced or smashed avocado adds creaminess to your plate. - Fresh Herbs: Sprinkle with fresh parsley or chives for a bright finish. Mix and match these ideas to create a delicious breakfast spread! In this post, we explored making crispy breakfast potatoes. We covered essential ingredients like russet potatoes, seasonings, and tips for even cooking. Remember to cut the potatoes evenly for the best results. You can customize flavors with different spices or herbs. Keep your leftovers crispy by storing them right. Enjoy these potatoes at breakfast or with any meal. With simple steps, you can create a delicious dish that impresses everyone!
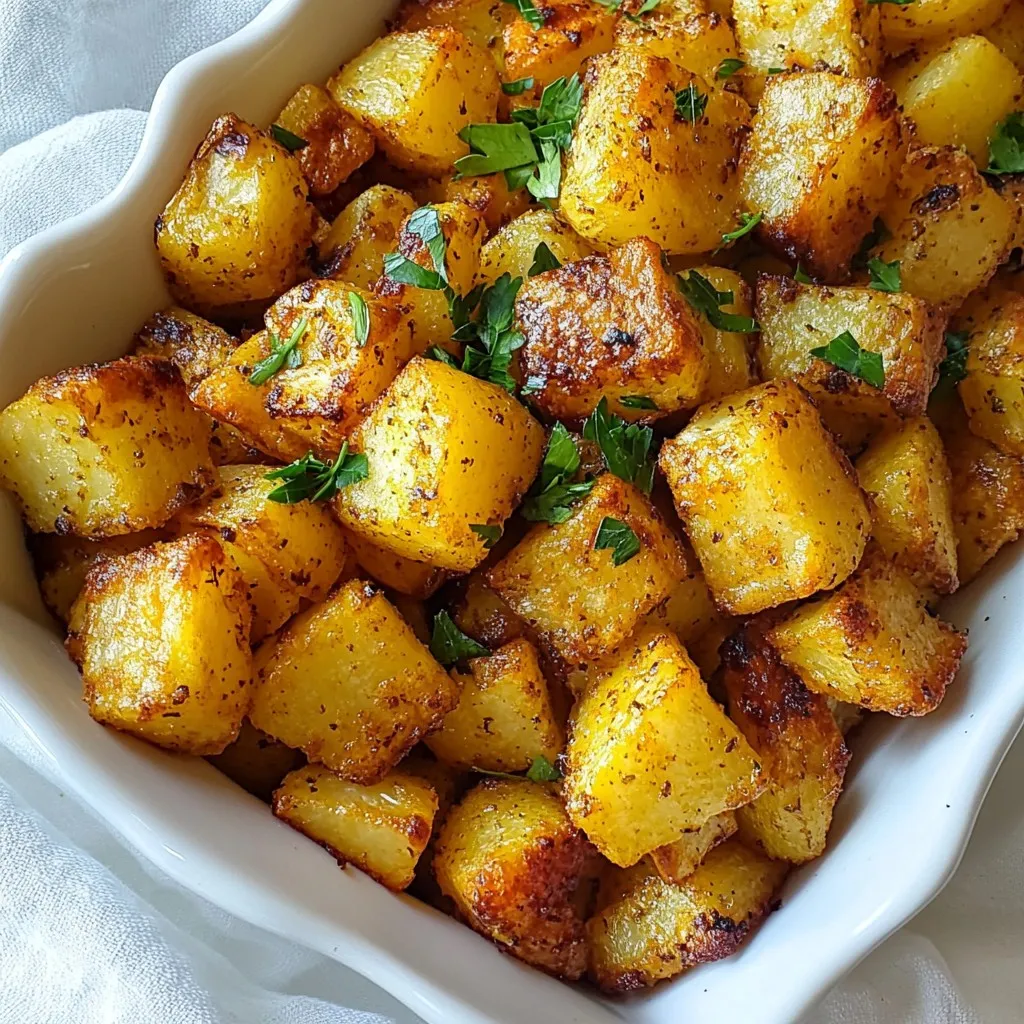
Crispy Breakfast Potatoes Simple and Tasty Recipe
Are you ready to elevate your breakfast routine? I’m excited to share my simple and tasty Crispy Breakfast Potatoes recipe. With just a few ingredients
To make these tasty coffee cake muffins, you need: - 1 ½ cups all-purpose flour - ½ cup granulated sugar - ½ cup firmly packed brown sugar - 1 teaspoon baking powder - ½ teaspoon baking soda - ½ teaspoon salt - 1 teaspoon ground cinnamon - ½ cup unsalted butter, melted and cooled - 2 large eggs - 1 cup strong brewed coffee, cooled - 1 teaspoon vanilla extract - ½ cup chopped walnuts or pecans (optional) These ingredients combine to create a fluffy and rich muffin. The strong brewed coffee adds depth and flavor. For the crumb topping, gather these items: - ½ cup all-purpose flour - ¼ cup firmly packed brown sugar - ¼ teaspoon ground cinnamon - ¼ cup unsalted butter, softened The crumb topping gives a sweet crunch. It contrasts nicely with the soft muffins. If you need to adapt the recipe, here are some ideas: - For gluten-free muffins, use a gluten-free flour blend. - To replace eggs, try mashed banana or applesauce. - Coconut sugar can work instead of brown sugar for a healthier option. These choices let you enjoy coffee cake muffins no matter your diet. You can also switch nuts for seeds to make it nut-free. {{ingredient_image_2}} Start by preheating your oven to 350°F (175°C). This step is key for even baking. Next, prepare a muffin tin. You can use paper liners or grease the cups lightly with some butter. This helps the muffins come out easily. In a small bowl, whisk together ½ cup of all-purpose flour, ¼ cup of brown sugar, and ¼ teaspoon of ground cinnamon. Mix well until all dry ingredients combine. Add in ¼ cup of softened butter. Use a fork or your fingers to mix until it looks like coarse crumbs. Set this aside; you will use it later. In a large bowl, combine 1 ½ cups of all-purpose flour, ½ cup of granulated sugar, ½ cup of brown sugar, 1 teaspoon of baking powder, ½ teaspoon of baking soda, ½ teaspoon of salt, and 1 teaspoon of ground cinnamon. Use a whisk to mix thoroughly. In a different bowl, whisk together ½ cup of melted butter, 2 large eggs, 1 cup of cooled brewed coffee, and 1 teaspoon of vanilla extract. Blend until smooth. Gently pour the wet mixture into the bowl with the dry ingredients. Use a spatula to fold them together. Don’t overmix; a few lumps are okay. If you want, you can fold in ½ cup of chopped walnuts or pecans. Now, distribute the batter into the muffin cups, filling each about ¾ full. Generously sprinkle the crumb topping over each muffin. Place the muffin tin in your preheated oven. Bake for 18 to 22 minutes. To test if they are done, insert a toothpick into the center. If it comes out clean and the tops look golden brown, they are ready. Once baked, let them sit in the tin for 5 minutes. Then, carefully transfer them to a wire rack to cool completely. Enjoy your muffins warm or at room temperature! To keep your muffins moist, use fresh ingredients. Make sure your baking powder and baking soda are not expired. Mixing wet and dry ingredients just until combined is key. Overmixing can lead to dry muffins. Also, adding a bit of extra liquid, like a splash of coffee, can help. For a great crumb topping, use softened butter. Mix it with flour and brown sugar until it feels like wet sand. You want small, crumbly pieces. This gives them a nice crunch. Don't forget to sprinkle it generously on top of the batter before baking. If you prefer less sweetness, cut back on the sugar. You can use half brown sugar and half granulated sugar for balance. For added flavor, try swapping vanilla for almond extract. Mixing in spices like nutmeg or cardamom can also add warmth. Pro Tips Use Fresh Coffee: For the best flavor, use freshly brewed coffee that has cooled. Avoid using coffee that has been sitting for a long time to ensure optimal taste. Don't Overmix: When combining wet and dry ingredients, mix until just combined. Overmixing can lead to dense muffins, so a few lumps are perfectly fine. Customize Your Nuts: Add variety by using different nuts such as almonds or hazelnuts. Alternatively, you can omit nuts altogether for a nut-free version. Store Properly: To keep muffins fresh, store them in an airtight container at room temperature for up to 3 days or freeze for longer storage. {{image_4}} If you want nut-free muffins, just leave out the chopped walnuts or pecans. You can replace the nuts with a bit more flour, or add seeds for crunch. Sunflower seeds work well. They add a nice texture without changing the taste too much. For a fun twist, add chocolate chips or fruit. You can mix in ½ cup of chocolate chips for a rich flavor. If you like fruit, try ½ cup of blueberries or diced apples. Just fold them into the batter gently to keep the muffins fluffy. These additions can really brighten up the muffins. To make gluten-free muffins, swap all-purpose flour for a gluten-free blend. Look for a blend that includes xanthan gum. This helps keep the muffins from crumbling. You may also need to add a bit more liquid, like coffee or milk, to get the right batter consistency. These changes will let everyone enjoy the muffins, regardless of their diet. To keep your coffee cake muffins fresh, store them in an airtight container. Place a piece of parchment paper between layers to prevent sticking. If you keep them at room temperature, they last for about 2 to 3 days. For longer freshness, move them to the fridge. This can help them last up to a week. Freezing muffins is a great option. First, let them cool completely. Then, wrap each muffin in plastic wrap. Place the wrapped muffins in a freezer bag or container. They can stay in the freezer for up to 3 months. When you're ready to enjoy them, simply thaw them overnight in the fridge, or heat them in the microwave for a quick treat. To reheat muffins, the oven works best. Preheat your oven to 350°F (175°C). Place the muffins on a baking sheet and cover them with foil. Heat for about 10 minutes. If you use a microwave, heat one muffin for about 15 to 20 seconds, but keep in mind that it may become a bit soggy. Enjoy your muffins warm for the best taste! Yes, you can use instant coffee. Just mix it with hot water to make a strong brew. Use the same amount as the brewed coffee in the recipe. This will give your muffins that rich coffee flavor. Check your muffins at 18 minutes. Insert a toothpick into the center. If it comes out clean, they are done. The tops should also look golden brown. If you see wet batter on the toothpick, give them a few more minutes. You can use applesauce or a flaxseed meal. For applesauce, use 1/4 cup for each egg. For flaxseed, mix 1 tablespoon of flaxseed meal with 2.5 tablespoons of water. Let it sit until it thickens. Both options work well to keep your muffins moist. Serve these muffins warm or at room temperature. A light dusting of powdered sugar adds a nice touch. Arrange them on a pretty platter next to a pot of fresh coffee. This creates a lovely setting for any meal or snack time. These coffee cake muffins are easy to make and fun to customize. We covered key ingredients, tasty variations, and helpful tips. From crumb topping to storage, each step matters. You can adapt these muffins to fit your diet. Enjoy them fresh or freeze for later. Now, it’s your turn to bake and enjoy these delicious treats. Happy baking!
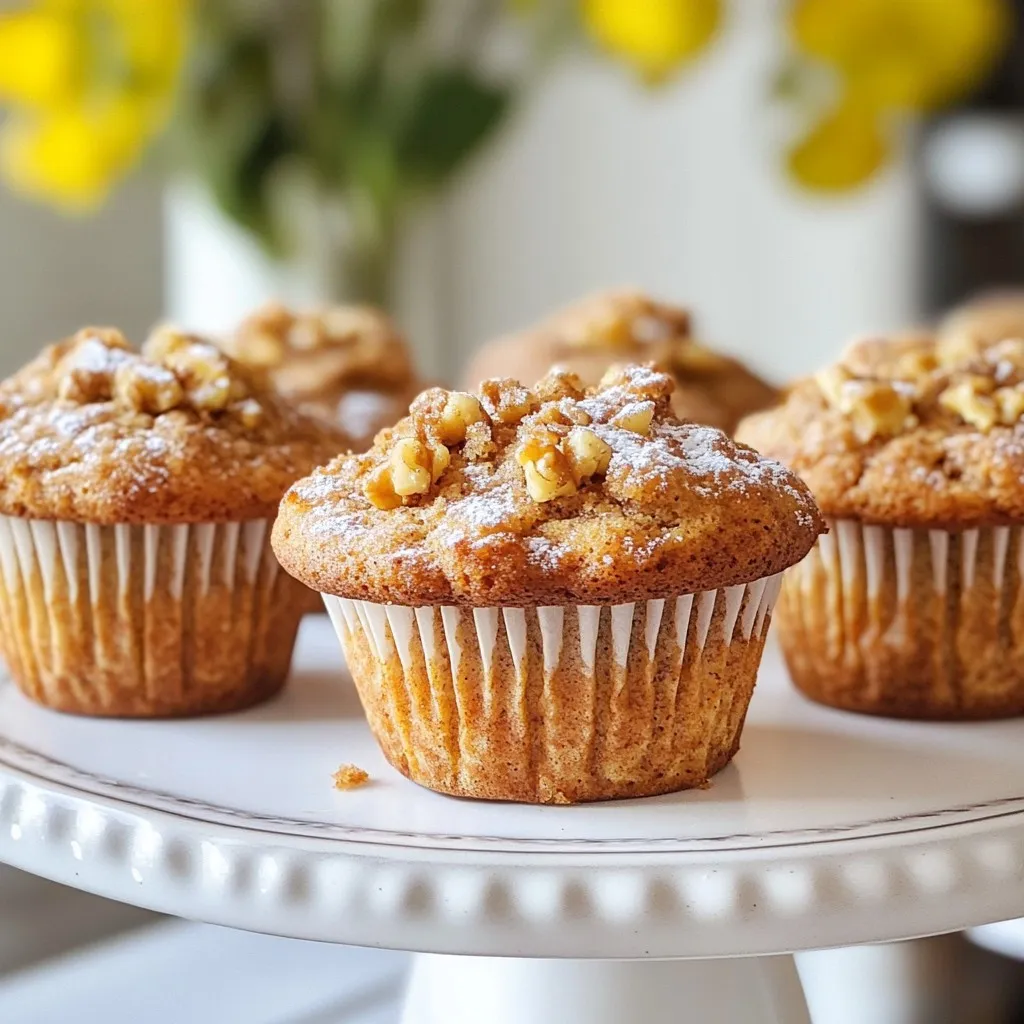
Savory Coffee Cake Muffins Easy and Flavorful Treat
Are you craving a warm, sweet treat to enjoy with your coffee? Look no further! These Savory Coffee Cake Muffins are easy to make and
To make tasty veggie egg muffins, gather these key items: - 6 large eggs - 1 cup fresh spinach, chopped - 1/2 cup bell peppers, diced (use red and yellow) - 1/2 cup cherry tomatoes, halved - 1/4 cup red onion, finely chopped - 1/2 cup shredded cheese (sharp cheddar or feta) - 1/4 teaspoon salt - 1/4 teaspoon black pepper - 1/4 teaspoon garlic powder - 1/4 teaspoon smoked paprika - Cooking spray or olive oil for greasing You can make your veggie egg muffins even better with these fun extras: - Zucchini, grated - Mushrooms, chopped - Broccoli, finely chopped - Fresh herbs like basil or parsley - Hot sauce for a kick Feel free to mix and match these to fit your taste. Using fresh, high-quality ingredients makes a big difference. Choose vibrant veggies for better flavor and color. Fresh eggs will give you a fluffier texture. If using cheese, go for a good brand to enhance taste. Organic options can also add nutritional value. When you focus on quality, your muffins will shine! {{ingredient_image_2}} Start by preheating your oven to 375°F (190°C). This helps the muffins rise nicely. Next, take a standard muffin tin and generously grease it. You can use cooking spray or a drizzle of olive oil. This step is key to making sure the muffins come out easily after baking. In a large bowl, crack all 6 eggs. Whisk them well until the yolks and whites mix together. This makes the base fluffy. Now, add in the fresh spinach, diced bell peppers, cherry tomatoes, and chopped red onion. Don’t forget your choice of shredded cheese. It adds flavor! Sprinkle in salt, black pepper, garlic powder, and smoked paprika. Mix everything together well so the veggies are coated in egg. Carefully pour the egg and veggie mix into the muffin tin. Fill each cup about three-quarters full. This allows space for the muffins to puff up while baking. Place the muffin tin in your preheated oven. Bake for about 18-20 minutes. You’ll know they’re done when they rise, and a toothpick comes out clean. Once baked, take the tin out of the oven. Let it cool for a few minutes. To remove the muffins, gently run a butter knife around the edges. Enjoy them warm or cool them completely before storing in an airtight container. They last up to four days! To make fluffy veggie egg muffins, whisk the eggs well. This mixes the yolks and whites. It adds air and helps them rise. Use fresh veggies for the best flavor. Chop the spinach and bell peppers into small pieces. This ensures even cooking and nice bites. Fill each muffin cup about three-quarters full. This allows room for puffing as they bake. Bake them at 375°F (190°C) for 18-20 minutes. They should rise and have a clean toothpick when done. Prevent sticking by greasing the muffin tin well. Use cooking spray or a drizzle of olive oil. Make sure to cover all sides of the cups. After baking, let the muffins cool for a few minutes. Then, run a butter knife around the edges. This helps them release easily. If you find they still stick, try using silicone muffin cups. They help muffins pop out without fuss. Serve the veggie egg muffins warm for the best taste. They pair well with fresh fruit or a light salad. Try a side of avocado slices or a dollop of salsa. You can also serve them on a colorful platter. This makes your meal look bright and inviting. For a fun twist, add herbs like basil or cilantro on top. Enjoy these muffins as a healthy breakfast or snack! Pro Tips Mix It Up: Feel free to swap out the vegetables based on your preferences or what you have on hand. Broccoli, zucchini, or even mushrooms can add a delightful twist! Cheese Choices: Experiment with different cheeses to change the flavor profile of your muffins. Goat cheese, mozzarella, or pepper jack can all add unique tastes. Storage Secrets: To keep the muffins fresh, store them in an airtight container in the fridge. Reheat in the microwave for a quick breakfast on busy mornings. Perfect Portioning: Use a measuring cup or a ladle to pour the egg mixture into the muffin tin for even distribution and consistent baking. {{image_4}} You can change up the veggies in your muffins. Try adding zucchini, mushrooms, or broccoli. These options add flavor and nutrients. For a spicy kick, add jalapeños or diced green chilies. Remember to chop any veggies finely so they mix well with the eggs. Mixing colors makes the muffins fun and bright! Cheese adds creaminess and flavor to your muffins. You can use sharp cheddar, feta, or even mozzarella. If you want a stronger taste, try blue cheese or pepper jack. Each cheese changes the flavor, so feel free to experiment. For a lighter option, use low-fat cheese. You can make these muffins without eggs! Use 1/4 cup of chickpea flour mixed with 1/2 cup of water for each egg. This mix binds well and adds protein. You can also use silken tofu. Blend it smooth before mixing with your veggies. These alternatives keep your muffins tasty and healthy. After you make these tasty veggie egg muffins, let them cool first. Once cool, place them in an airtight container. This keeps them fresh for up to four days in the fridge. If you don’t have an airtight container, wrap them tightly in plastic wrap or foil. Make sure they are fully sealed to avoid drying out. To save these muffins for later, freezing is a great option! First, let them cool completely. Then, wrap each muffin in plastic wrap. Place them in a freezer-safe bag or container. Label the bag with the date. They can last for up to three months in the freezer. This way, you’ll have a healthy breakfast ready when you need it. When you’re ready to enjoy your veggie egg muffins again, reheating is simple. For the best results, use the oven or microwave. If you’re using the oven, preheat it to 350°F (175°C). Place the muffins on a baking sheet and heat for about 10-15 minutes. If you’re in a hurry, the microwave works too! Heat them for about 30-60 seconds. Just be careful not to overheat them, or they may get rubbery. Enjoy your delicious muffins fresh! Yes, you can make Veggie Egg Muffins ahead. They store well in the fridge for up to four days. Just cool them first and place them in an airtight container. You can also freeze them for longer storage. To thaw, simply leave them in the fridge overnight. You can use many vegetables in these muffins. I love fresh spinach, bell peppers, and cherry tomatoes. Other great options include zucchini, mushrooms, or broccoli. Feel free to mix and match to suit your taste. The more colorful your veggies, the better your muffins look! Check for doneness with a toothpick. Insert it into the center of a muffin. If it comes out clean, the muffins are ready. You can also look for a golden top and a firm texture. They will puff up nicely as they bake. Yes, you can use egg substitutes. Options like flaxseed meal or silken tofu work well. For every egg, use 1 tablespoon of flaxseed mixed with 2.5 tablespoons of water. Let it sit to thicken. This makes a good binder for your muffins. You learned about making veggie egg muffins today. We covered key ingredients, steps for baking, and tips for success. You can mix and match veggies to suit your taste. Proper storage and reheating keep them fresh longer. Remember, these muffins are easy to customize and perfect for busy mornings. With the right ingredients and methods, you can enjoy fluffy muffins that everyone loves. Try these ideas next time you cook!
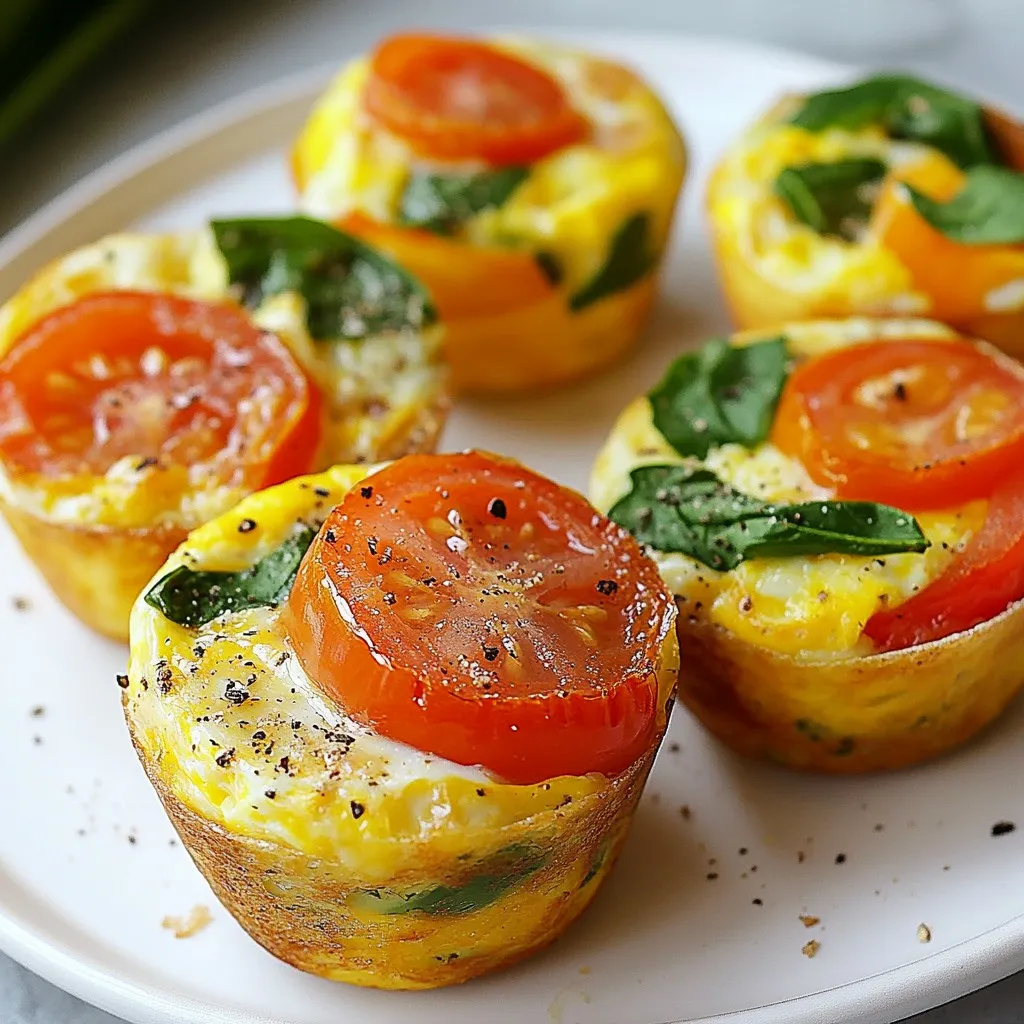
Veggie Egg Muffins for a Healthy Breakfast Boost
Start your day with a boost of flavor and nutrition! Veggie egg muffins are not only easy to make, but they also pack a punch
To make a delicious cheesy potato egg scramble, gather these items: - 3 medium potatoes, peeled and diced into small cubes - 4 large eggs - 1 cup shredded sharp cheddar cheese - 1/2 cup milk (whole or low-fat) - 1 small onion, finely chopped - 1 bell pepper (your choice of color), diced - 2 tablespoons olive oil - Salt and freshly ground black pepper to taste - Fresh chives or parsley, chopped for garnish (optional) You can easily change this recipe to suit your tastes. Here are a few ideas: - Swap potatoes for sweet potatoes for a sweeter flavor. - Use different veggies like spinach, mushrooms, or zucchini for added nutrients. - Try adding diced tomatoes for a fresh twist. - Replace olive oil with butter for a richer taste. While cheddar cheese is great, feel free to experiment with other types: - Monterey Jack adds a creamy texture. - Pepper Jack gives a spicy kick. - Feta cheese offers a tangy twist. - Goat cheese can create a rich and unique flavor. These options can enhance your cheesy potato egg scramble and make it your own! {{ingredient_image_2}} Start by peeling the potatoes. Once peeled, dice them into small cubes. This helps them cook quickly and evenly. Heat the olive oil in a large skillet over medium heat. When the oil is hot, add the diced potatoes. Cook them for about 10 to 12 minutes. Stir them occasionally to get a nice golden color. You want them tender enough to pierce with a fork. Season the potatoes with a pinch of salt and pepper while they cook. This simple step boosts their flavor. After the potatoes soften, it's time to add in the vegetables. Finely chop the onion and dice the bell pepper. Once the potatoes are golden brown, add the chopped onion and diced bell pepper to the skillet. Stir them in and sauté for another 4 to 5 minutes. This cooks the veggies and brings out their sweet aroma. You want them to be tender and fragrant. Your kitchen should smell amazing at this point! While the veggies cook, crack the eggs into a mixing bowl. Whisk in the milk until the mixture is smooth and blended. Season this egg mix with a bit more salt and freshly ground black pepper. Once the vegetables are ready, carefully pour the egg mixture over them. Gently stir everything together in the skillet. Cook this mixture on low heat for about 5 to 7 minutes. Stir occasionally to ensure even cooking. You want the eggs cooked through but still creamy. When the eggs are almost set, remove the skillet from heat. Sprinkle the shredded cheddar cheese over the top. Cover the skillet to let the cheese melt. After a few minutes, give it a gentle stir to mix in the melted cheese. Now, it’s ready to serve! To get the best texture, start with the potatoes. Cut them into small cubes. This helps them cook evenly. Cook them until they are golden brown and fork-tender. This usually takes about 10-12 minutes. Stir them often so they don't stick. The eggs should be creamy but not overcooked. Cook them on low heat and stir only as needed. For great flavor, use salt and pepper while cooking. A pinch goes a long way. You can also add garlic powder or paprika for extra taste. Fresh herbs like chives or parsley add color and flavor. Mix them in just before serving for the best result. One common mistake is overcooking the eggs. Keep an eye on them and use low heat. Another mistake is not seasoning enough. Taste the dish before serving and adjust as needed. Lastly, do not rush the potato cooking stage. If they aren't cooked well, the whole dish will not taste great. Take your time for the best results. Pro Tips Use Starchy Potatoes: For the best texture, opt for starchy potatoes like Russets. They become fluffy when cooked and create a perfect base for your scramble. Customize Your Veggies: Feel free to add or substitute other vegetables like spinach, mushrooms, or zucchini to enhance the flavor and nutritional value of your dish. Don’t Overcook the Eggs: To keep the eggs creamy and soft, remove the skillet from heat just before they are fully set. The residual heat will finish cooking them. Experiment with Cheeses: While cheddar is delicious, try mixing in other cheeses like feta, mozzarella, or pepper jack for a unique flavor twist in your scramble. {{image_4}} You can boost the flavor of your cheesy potato egg scramble by adding more veggies. Spinach, diced tomatoes, or mushrooms work well. You can also try zucchini or broccoli for a fresh twist. Just remember to chop them small. This size helps them cook evenly with the potatoes. Adding colorful veggies makes your dish look great, too! If you want to make your scramble heartier, add some protein. Cooked sausage or bacon gives a nice flavor. You can also use diced ham or turkey. If you prefer a plant-based option, try black beans or chickpeas. They add texture and protein without meat. Just mix in your choice once the veggies are tender to heat them through. While sharp cheddar is a classic, don’t be afraid to experiment with cheese. Try pepper jack for a spicy kick. Swiss cheese melts beautifully and adds a nutty flavor. For something bold, use blue cheese. Mix and match your favorites to create your own unique taste. Just remember to adjust the amount based on how strong the cheese is. Store any leftovers in an airtight container. Let the cheesy potato egg scramble cool first. This helps keep the texture. Place it in the fridge for up to three days. Label the container with the date. This way, you know when to eat it. To reheat, use a skillet over medium heat. Add a splash of milk to keep it moist. Stir often to heat evenly. You can also use a microwave. Place it in a bowl and cover it. Heat in short bursts, stirring in between. This keeps the eggs from getting rubbery. You can freeze the cheesy potato egg scramble, but the texture may change. Let it cool completely before freezing. Use a freezer-safe container or bag. Label it with the date. It can last up to three months in the freezer. To eat, thaw it overnight in the fridge. Then, reheat as mentioned above. You can use sweet potatoes, cauliflower, or even zucchini. Each option adds a unique taste. Sweet potatoes offer a hint of sweetness. Cauliflower adds a light, fluffy texture. Zucchini gives a fresh crunch. Adjust the cooking time based on what you choose. Yes, you can make this dish ahead of time. Cook it fully, then let it cool. Store it in an airtight container. Refrigerate for up to three days. When ready to eat, just reheat it on the stove or in the microwave. Absolutely! This recipe fits well into meal prep. It’s easy to make in larger batches. Portion it into containers for quick breakfasts. Just add a sprinkle of fresh herbs before serving for a pop of color and flavor. This post covered the key ingredients for a tasty Cheesy Potato Egg Scramble. I shared ideas for ingredient swaps, cheese choices, and vegetable options. The step-by-step guide helps you prepare it easily. Remember to follow my tips for the best texture and to avoid common mistakes. You can store leftovers or even freeze some. Keep experimenting, and enjoy your meals!
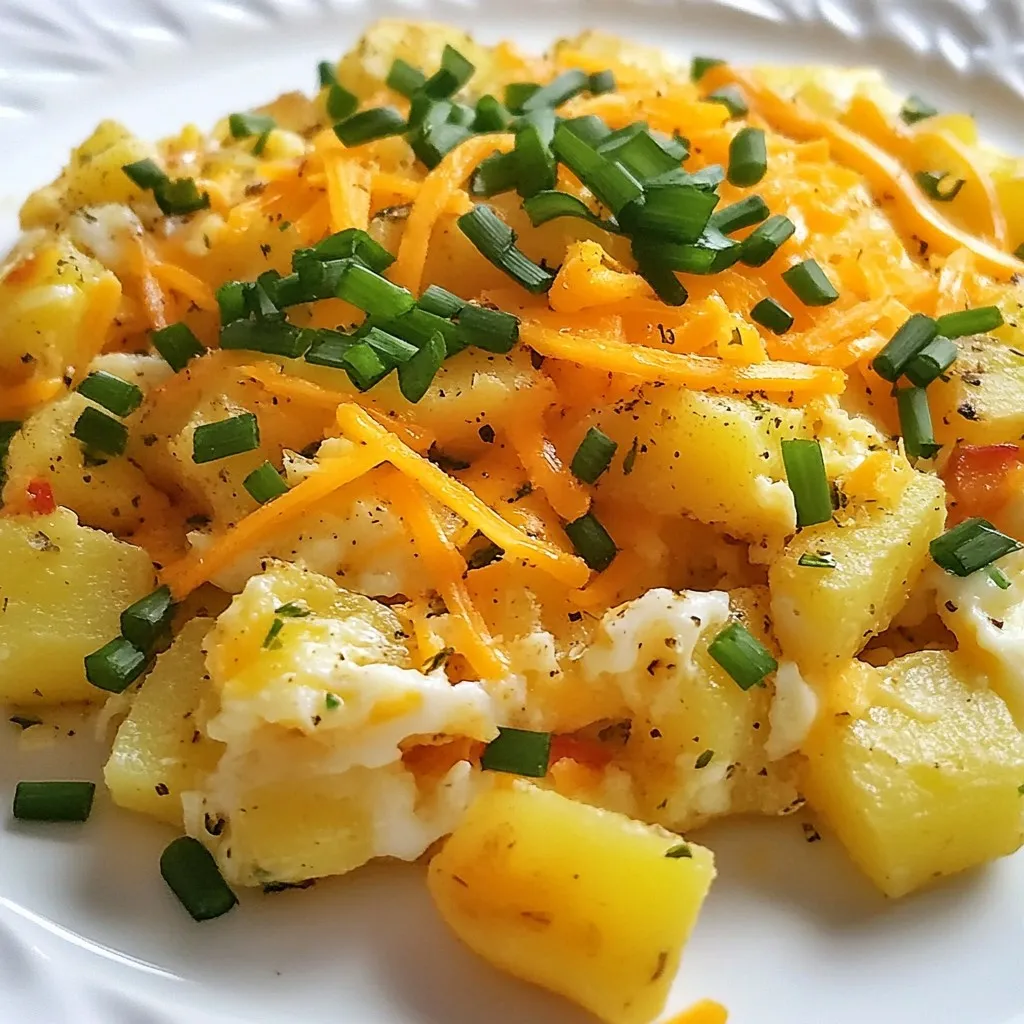
Cheesy Potato Egg Scramble Flavorful Breakfast Delight
Start your day right with my Cheesy Potato Egg Scramble! This dish blends creamy eggs and savory potatoes into a perfect breakfast. It’s quick, tasty,
- 1 lb breakfast sausage (mild or spicy) - 4 cups frozen hash browns (thawed) - 1 cup shredded sharp cheddar cheese - 1 medium red bell pepper (diced) - 1 small onion (finely diced) - Garlic powder - Onion powder - Salt - Black pepper - 6 large eggs - 1 cup whole milk - Fresh parsley (for garnish) Gathering the right ingredients is key for a great casserole. Start with the sausage. You can pick mild or spicy based on your taste. The hash browns give it a nice texture. Make sure they are thawed for even cooking. Next, choose a sharp cheddar cheese for a bold flavor. Add some color with a diced red bell pepper and a finely diced onion. These veggies bring sweetness and crunch. Season with garlic powder, onion powder, salt, and black pepper to enhance the taste. For the creamy base, you’ll need six large eggs and a cup of whole milk. Lastly, don’t forget the fresh parsley! It adds a pop of color and freshness on top. This mix of ingredients creates a delicious and filling breakfast casserole. {{ingredient_image_2}} Set your oven to 375°F (190°C). This step gets your oven ready for the casserole. Heat a large skillet over medium heat. Place the breakfast sausage in the skillet. Break it apart with a spatula as it cooks. Brown until it's fully cooked, then drain the extra fat. In the same skillet, add the diced onion and red bell pepper. Cook for about 3-4 minutes. Stir often until they soften and smell great. In a large bowl, mix the cooked sausage, sautéed onion, and bell pepper with the thawed hash browns. Stir in half of the shredded cheddar cheese. Make sure everything is well combined. In another bowl, whisk together the eggs, milk, garlic powder, onion powder, salt, and pepper. Mix until smooth. This will make your casserole fluffy. Grease a 9x13-inch baking dish. Spread the sausage and hash brown mix evenly on the bottom. Pour the egg mixture over the top. Let it seep through the hash browns. Finally, sprinkle the rest of the cheddar cheese on top. Place the dish in the oven and bake for 30-35 minutes. Check that the egg is set in the center and the top is golden brown. To boost the flavor, try adding spices. You can mix in a pinch of paprika for a smoky taste. A dash of cayenne pepper adds heat if you like spice. Fresh herbs like thyme or oregano can bring brightness. Just chop them finely and stir them into the egg mix. Don’t forget to adjust salt and pepper to taste. This ensures your casserole shines with flavor. For the best results, watch your oven temperature. Preheat it to 375°F (190°C) to get even cooking. Bake the casserole for 30-35 minutes. Check that the center is set and firm. This means the eggs are fully cooked. A golden top is your sign that it’s ready to serve. If you notice it browning too fast, cover it lightly with foil. Serve your casserole hot, sliced into squares. For a colorful plate, add fresh fruit salad on the side. You can also include sliced avocado for creaminess. A sprinkle of fresh parsley adds a nice touch. This not only looks great but also makes for a balanced meal. Your guests will love the look and taste of your dish! Pro Tips Choose the Right Sausage: Opt for mild or spicy breakfast sausage based on your preference to customize the flavor of your casserole. Thaw Your Hash Browns: Ensure your frozen hash browns are thoroughly thawed to help them crisp up nicely during baking. Cheese Variations: Experiment with different types of cheese like pepper jack or gouda for a unique twist on flavor. Make Ahead: Prepare the casserole the night before and refrigerate it overnight. Just pop it in the oven the next morning for an easy breakfast! {{image_4}} You can easily make a vegetarian version of this casserole. Just swap the sausage for plant-based sausage or crumbled tofu. For added flavor, try using smoked paprika or cumin. You can also add more veggies like zucchini, mushrooms, or spinach to boost nutrition and taste. These options will keep the dish hearty and satisfying. While sharp cheddar cheese is a classic choice, there are many other options. You might like using pepper jack for a spicy kick. Mozzarella will give a gooey texture, while feta adds a tangy flavor. Mixing cheeses can also create a unique taste. Just be sure to adjust the amount to your liking. Want to get creative? You can add extras to your casserole. Chopped mushrooms, spinach, or even diced tomatoes work well. You could also include cooked bacon or ham for extra protein. Think about what you enjoy and mix it in. This dish is flexible, so have fun making it your own! Store your sausage hash brown breakfast casserole in an airtight container. Let it cool down first. It will keep well in the fridge for up to four days. When you want to eat it, simply take out the portion you need. This way, you ensure each slice stays fresh and tasty. You can freeze this casserole if you want to save some for later. Cut it into individual portions for easy thawing. Wrap each piece well in plastic wrap. Then, place them in a freezer-safe bag. This way, you can enjoy your casserole for up to two months. Just remember to label the bags with the date. To reheat your casserole, the best method is the oven. Preheat it to 350°F (175°C). Place the casserole in an oven-safe dish and cover it with foil. Heat for about 20 minutes or until warmed through. If you're in a hurry, you can use the microwave. Heat it in short bursts, stirring in between, to avoid hot spots. Enjoy your delicious leftovers! Yes, you can make this casserole ahead of time. Here are some tips for preparing it in advance: - Prep the Night Before: You can assemble the casserole the night before. Cover it and store it in the fridge. Bake it in the morning for a hot breakfast. - Chill the Egg Mixture: Mix the eggs, milk, and spices and store them separately. Pour it over the hash browns just before baking. - Reheat for Best Flavor: If you prepare it early, let it sit at room temp for 30 minutes before baking. This helps it cook evenly. To check if the casserole is done, look for these signs: - Golden Top: The top should be a lovely golden brown. This shows it's cooked well. - Set Center: Insert a knife into the center. If it comes out clean, the casserole is ready. - Firm Texture: The egg should be firm, not jiggly. This means it’s fully cooked. You can serve this casserole with these tasty sides for a balanced breakfast: - Fresh Fruit Salad: A mix of berries, melons, and citrus adds sweetness. - Sliced Avocado: Creamy avocado pairs well and adds healthy fats. - Toast or English Muffins: Serve with a side of whole-grain bread for extra crunch. - Yogurt: A small bowl of yogurt adds creaminess and protein. This breakfast casserole combines bold flavors with simple steps. You learned about the key ingredients like sausage, cheese, and veggies. We explored cooking methods and some great tips to enhance your dish. I shared variations to fit your taste and ways to store leftovers. Now you can enjoy a tasty meal anytime. Don't be afraid to experiment with flavors. Happy cooking!
Sausage Hash Brown Breakfast Casserole Delightful Dish
Start your day off right with my Sausage Hash Brown Breakfast Casserole! This hearty dish blends savory sausage, crispy hash browns, and rich cheese into
To make fluffy cinnamon roll pancakes, you need simple ingredients that blend well. Here’s what you’ll need: - 1 cup all-purpose flour - 2 tablespoons granulated sugar - 1 tablespoon baking powder - 1/2 teaspoon sea salt - 3/4 cup whole milk - 1 large egg - 2 tablespoons unsalted butter, melted - 1 teaspoon pure vanilla extract - 1/4 cup packed brown sugar - 1 tablespoon ground cinnamon - 1/4 cup cream cheese, softened (for drizzle) - 1 tablespoon pure maple syrup (for drizzle) These ingredients combine to create a sweet treat. Each one plays a key role in making your pancakes fluffy and delicious. All-purpose flour gives structure. Granulated sugar adds sweetness. Baking powder helps the pancakes rise. Sea salt enhances the flavors. Whole milk makes the batter creamy. The large egg binds everything together. Unsalted butter adds richness, while vanilla extract infuses a warm flavor. The brown sugar and cinnamon create a tasty swirl. Finally, the cream cheese and maple syrup make a delightful drizzle. Gather these ingredients, and you’ll be ready to make a tasty breakfast that will impress anyone! {{ingredient_image_2}} Start by grabbing a large mixing bowl. Add 1 cup of all-purpose flour. Next, add 2 tablespoons of granulated sugar. Then, mix in 1 tablespoon of baking powder and 1/2 teaspoon of sea salt. Use a whisk to blend these dry ingredients well. This step helps create a uniform batter. In another bowl, blend together 3/4 cup of whole milk, 1 large egg, 2 tablespoons of melted unsalted butter, and 1 teaspoon of pure vanilla extract. Stir until the mixture is smooth. This creates a rich base for your pancakes. Carefully pour the wet mixture into the dry mixture. Gently fold them together using a spatula. Do not overmix; a few small lumps are okay. Overmixing can lead to tough pancakes, and we want them fluffy! In a small bowl, combine 1/4 cup of packed brown sugar and 1 tablespoon of ground cinnamon. Mix them well. This sweet filling adds a delicious twist to your pancakes. Preheat your non-stick skillet over medium heat. Lightly grease the surface with melted butter or cooking spray. For each pancake, pour about 1/4 cup of batter onto the skillet. While the edges are still wet, sprinkle a teaspoon of the cinnamon filling in a spiral pattern over the batter. Cook for 2-3 minutes until bubbles form. Then, flip and cook for another 2 minutes until golden brown. In a small bowl, mix 1/4 cup of softened cream cheese with 1 tablespoon of pure maple syrup. Stir until smooth and creamy. If needed, add a splash of milk to reach your desired drizzle consistency. This drizzle makes the pancakes extra special! To make fluffy pancakes, you must not overmix the batter. When you combine the wet and dry ingredients, mix gently. It is okay to have small lumps in the batter. Overmixing can lead to tough pancakes. Remember, fluffiness comes from keeping some air in the batter. Cooking at the right temperature is key. Preheat your skillet over medium heat. If the skillet is too hot, the pancakes will burn on the outside and stay raw inside. If it’s too cool, they won’t rise well. A properly heated skillet will create a nice golden crust. Presentation makes your pancakes even more fun! Try drizzling the cream cheese mixture in a zigzag pattern on top. You can add a sprinkle of ground cinnamon for color. Fresh fruit like sliced bananas or berries also adds a nice touch. A dollop of whipped cream can make it feel special! Pro Tips Use Room Temperature Ingredients: Allow your milk and egg to sit at room temperature for about 30 minutes before mixing. This helps the batter come together more smoothly and results in fluffier pancakes. Don’t Overmix the Batter: It’s okay if there are a few lumps in the batter. Overmixing can lead to tough pancakes, so mix until just combined for the best texture. Perfect Cooking Temperature: Make sure your skillet is preheated to medium heat. If it's too hot, the pancakes will burn on the outside while remaining raw inside. Customize Your Filling: Feel free to add chocolate chips, nuts, or dried fruit to the cinnamon sugar filling for an extra twist. Just make sure not to overload the pancakes! {{image_4}} You can take your pancakes to the next level. Try adding nuts or fruits. Walnuts add a nice crunch. Bananas bring a sweet flavor. These options enhance taste and nutrition. Just chop them up and mix them in the batter. You can also sprinkle them on top when serving. Want a healthier twist? Use whole wheat flour instead of all-purpose flour. Whole wheat adds fiber and nutrients. You can also swap regular milk for almond or oat milk. This makes the pancakes dairy-free. These changes keep the taste delicious while making them a bit lighter. Syrup can change the game! Instead of regular maple syrup, try flavored ones. Cinnamon syrup adds a warm touch. Berry syrup brings a sweet and tangy twist. Chocolate syrup is a fun option for special days. Just pour it on top before serving for a burst of flavor. To keep your fluffy cinnamon roll pancakes fresh, start by letting them cool. Place the cooled pancakes in a single layer on a plate. If you have many pancakes, use parchment paper between layers. This prevents sticking. Transfer the plate to the fridge and cover it with plastic wrap. Your pancakes will stay good for about three days. If you want to keep them longer, consider freezing them. Just stack them with parchment paper and place them in a freezer-safe bag. They can last up to three months in the freezer. To warm your pancakes, you have a few choices. The microwave is quick and easy. Just place a pancake on a microwave-safe plate. Heat it for about 20 to 30 seconds. Check if it's hot enough; if not, heat it a bit more. For a crispier texture, use the skillet method. Preheat a non-stick skillet over medium heat. Place the pancake in the skillet for about one minute on each side. This method brings back the pancakes' fluffy texture and warmth. Enjoy your delicious breakfast again! Yes, you can prepare the batter ahead of time. Mix the dry and wet ingredients separately. Keep them in the fridge until you're ready to cook. This way, you save time during busy mornings. Just remember to mix them well before cooking. The batter may thicken in the fridge. If you want to skip eggs, use applesauce or mashed banana. Use 1/4 cup of either for each egg. You can also try flaxseed meal mixed with water. Combine 1 tablespoon of flaxseed meal with 2.5 tablespoons of water. Let it sit for a few minutes before using it in your recipe. To make these pancakes gluten-free, swap the all-purpose flour for a gluten-free blend. Many brands offer a one-to-one flour substitute. You can also use almond flour or oat flour, but the texture may change. Always check the labels to ensure they are certified gluten-free. Serve your pancakes warm with a drizzle of cream cheese. You can add fresh fruit like berries or banana slices for extra flavor. A sprinkle of chopped nuts adds a nice crunch. If you love maple syrup, pour some over the top for a sweet finish. In this post, we covered every step to make delicious cinnamon roll pancakes. You learned about key ingredients, mixing methods, and cooking tips. We also shared fun variations, storage advice, and answers to common questions. Enjoying these pancakes can be a delightful treat any day. Remember to experiment with flavors and toppings. Happy cooking!
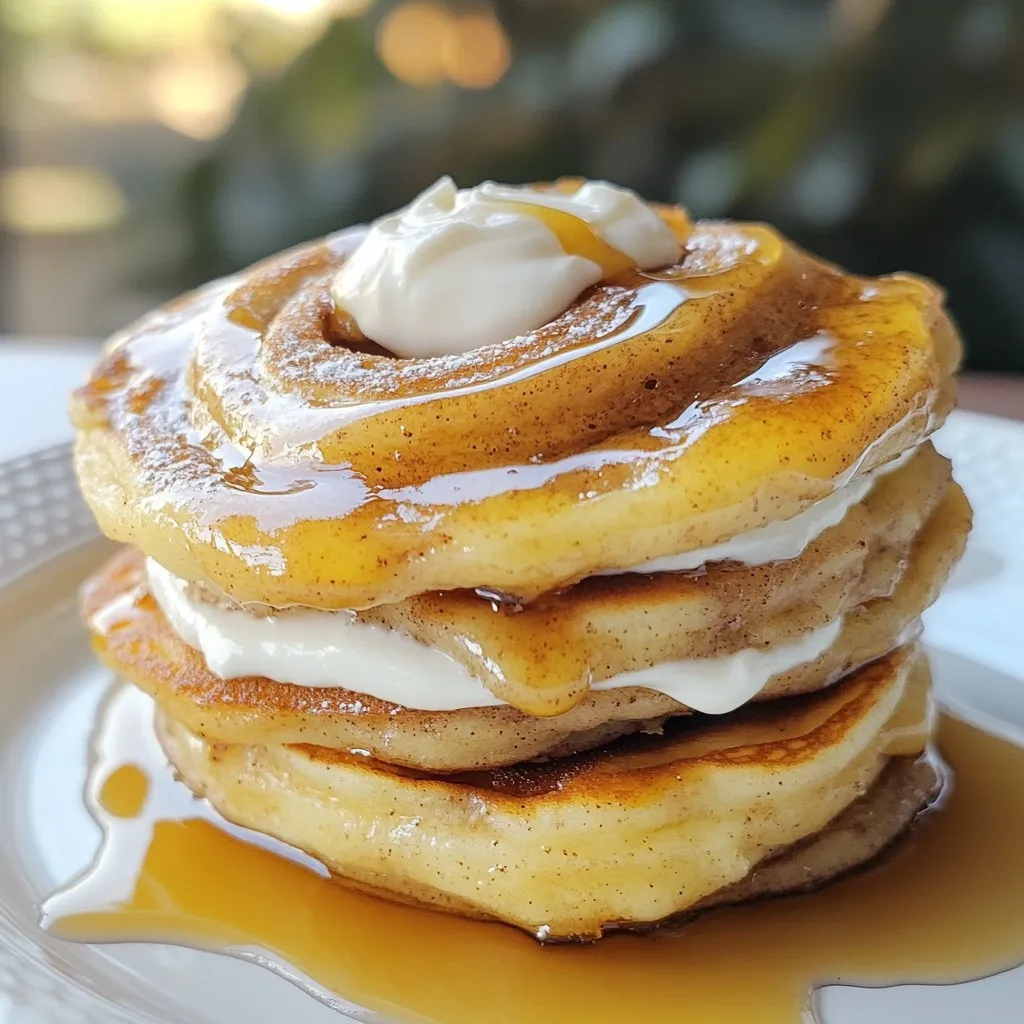
Fluffy Cinnamon Roll Pancakes Easy Breakfast Delight
Start your day with a twist on a classic! Fluffy cinnamon roll pancakes are a dreamy breakfast treat that blend warm, gooey cinnamon with soft,
For these skinny blueberry muffins, I use whole wheat flour and almond flour. Whole wheat flour gives a hearty taste and adds fiber. Almond flour makes the muffins moist and adds healthy fats. Together, they create a great base for our muffins. I like to use honey or maple syrup as my sweeteners. Both options are natural and add a light sweetness. Honey gives a rich flavor while maple syrup adds a hint of earthiness. You can pick whichever you love best! Chia seeds are a fantastic add-in for these muffins. They provide extra fiber and healthy omega-3 fats. Plus, they add a nice texture. You can add 2 tablespoons of chia seeds to your mix for more nutrition. They help make these muffins even healthier! {{ingredient_image_2}} First, preheat your oven to 350°F (175°C). This step warms the oven and helps your muffins rise well. Next, take your muffin tin and line it with paper liners or lightly grease each cup with cooking spray or oil. Greasing helps the muffins come out easily after baking. In a large mixing bowl, combine these dry ingredients: - 1 cup whole wheat flour - ½ cup almond flour - ½ cup rolled oats - 1 teaspoon baking powder - ½ teaspoon baking soda - ½ teaspoon salt - 1 teaspoon ground cinnamon Use a whisk to mix everything well. This ensures no lumps remain. Mixing well helps the flavors blend evenly. In another bowl, whisk together: - ¼ cup honey or maple syrup - 1 cup unsweetened applesauce - 1 large egg, at room temperature - 1 teaspoon vanilla extract Whisk until smooth. This step adds air, making the muffins fluffier. Now, gently pour the wet mixture into the dry ingredients. Stir with a spatula or wooden spoon just until combined. A few lumps are okay; don’t overmix. Finally, fold in 1 cup of fresh blueberries. If you want extra texture, add 2 tablespoons of chia seeds. Gently fold to keep the blueberries intact. Now, you’re ready to bake! To get fluffy muffins, mix gently. Overmixing makes muffins tough. When you add wet and dry ingredients, stir just until combined. You want small lumps in the batter. This keeps your muffins light and airy. When it’s time to add blueberries, be gentle. Use a spatula to fold them into the batter. This helps keep the berries whole. If you squish them too much, the muffins turn blue. A few gentle turns will spread the blueberries evenly. For a nice rise, fill each muffin cup about three-quarters full. This allows room for the muffins to expand as they bake. Also, preheating your oven is key. An oven at 350°F (175°C) helps set the muffins quickly, giving them a lovely dome shape. Pro Tips Use Room Temperature Egg: Using a room temperature egg helps to create a smoother batter and contributes to a fluffier texture in your muffins. Don’t Overmix: Overmixing can lead to dense muffins. Stir the ingredients until just combined for a light and airy result. Fresh vs. Frozen Blueberries: If using frozen blueberries, do not thaw them before adding to the batter. This prevents the batter from turning blue and maintains the muffin's appearance. Store Properly: To keep your muffins fresh, store them in an airtight container at room temperature for up to 3 days or freeze them for longer storage. {{image_4}} To make these muffins gluten-free, swap the whole wheat flour with a gluten-free blend. You can find many good blends at stores. Just make sure it can replace regular flour cup for cup. Almond flour already works well, so keep that. This change gives you light and fluffy muffins without gluten. If you want to cut sugar, try using unsweetened applesauce as the main sweetener. It adds moisture and natural sweetness. You can also use mashed bananas instead of honey or maple syrup. This gives a unique flavor while keeping it healthy. Just remember, the muffins may be less sweet, but still tasty! Feel free to change up the blueberries! You can add raspberries, chopped strawberries, or diced peaches. Each fruit adds its own flavor and fun twist. If you choose a juicier fruit, reduce the applesauce a bit. This keeps the muffins from getting too wet. Try mixing berries for a colorful muffin too! To keep your muffins fresh, store them in an airtight container. This helps prevent them from drying out. Place a paper towel at the bottom of the container. This absorbs any moisture and keeps the muffins soft. You can store them at room temperature for up to three days. If you want to enjoy them longer, consider freezing them. Freezing is a great way to save muffins for later. First, let the muffins cool completely. Then, wrap each muffin in plastic wrap. After that, place them in a freezer-safe bag or container. Make sure to squeeze out as much air as possible. Muffins can stay fresh in the freezer for up to three months. This way, you can always have a healthy snack ready! When you’re ready to eat a muffin, there are easy ways to reheat them. For the best texture, use the oven. Preheat it to 350°F (175°C). Place the muffin on a baking sheet and heat for about 5-10 minutes. You can also use a microwave. Just pop the muffin on a plate and heat for 15-20 seconds. Enjoy your warm, soft muffin like it’s fresh out of the oven! To make these muffins vegan, swap the egg for a flax egg. Just mix one tablespoon of ground flaxseed with three tablespoons of water. Let it sit for five minutes until it thickens. Use maple syrup instead of honey if you prefer. This keeps it plant-based and delicious. Yes, you can use frozen blueberries. They work well in this recipe. Just add them directly to the batter without thawing. This helps keep your muffins moist and adds a lovely burst of flavor. Be careful when folding them in, so they don't break apart too much. Each muffin has about 150 calories. They contain 4 grams of protein and 3 grams of fiber. You also get healthy fats from almond flour and chia seeds. These muffins are low in sugar, making them a great snack or breakfast option. You learned about making Skinny Blueberry Muffins from scratch using healthy ingredients like whole wheat flour and almond flour. We covered step-by-step instructions to get the mix just right. You also discovered tips for mixing and different variations to try. These muffins are easy to store and can stay fresh for days. Whether you choose to go gluten-free or add new fruits, the options are endless. So, grab your ingredients and start baking these tasty, healthy muffins today!
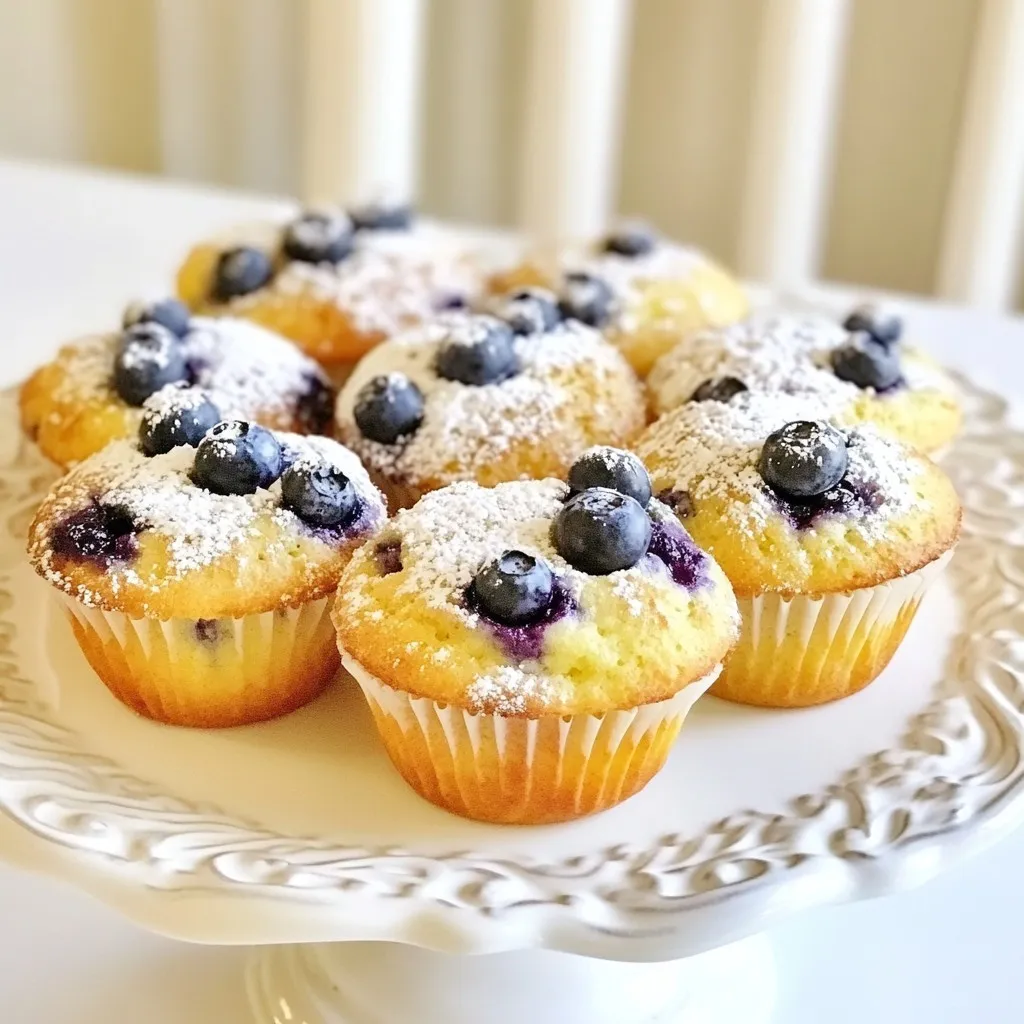
Skinny Blueberry Muffins Healthy and Easy Recipe
Are you craving a delicious yet healthy treat? These Skinny Blueberry Muffins are your answer! Packed with wholesome ingredients like whole wheat flour and chia
- 1 cup rolled oats - 2 tablespoons creamy peanut butter - 1 cup almond milk - 1 scoop vanilla protein powder - 2 tablespoons chia seeds - 1 tablespoon honey or maple syrup - A pinch of salt - Fresh banana slices - Chopped nuts (almonds or walnuts) - Extra peanut butter for drizzling I love making high-protein peanut butter overnight oats. They are easy and quick. You need just a few main ingredients to start. First, grab 1 cup of rolled oats. They give a great base. Next, add 2 tablespoons of creamy peanut butter. This adds richness and taste. Finally, use 1 cup of almond milk. You can swap it for any milk you like. Now, let's add some extra goodness. Use 1 scoop of vanilla protein powder for a protein boost. This helps keep you full longer. Add 2 tablespoons of chia seeds for texture and nutrition. They are small but mighty! For sweetness, include 1 tablespoon of honey or maple syrup. A pinch of salt balances the flavors well. Once your oats are ready, it's time to think about toppings. Fresh banana slices add a sweet touch. Chopped nuts, like almonds or walnuts, give a nice crunch. Don't forget to drizzle extra peanut butter on top for that creamy finish. These oats are not just tasty; they are also packed with protein! {{ingredient_image_2}} - Combine dry ingredients in a bowl. In a medium mixing bowl, add 1 cup of rolled oats, 1 scoop of vanilla protein powder, and 2 tablespoons of chia seeds. Stir gently to mix them well. This helps to evenly distribute the ingredients. - Whisk together wet ingredients in a separate bowl. In another bowl, whisk together 1 cup of almond milk, 2 tablespoons of creamy peanut butter, 1 tablespoon of honey (or maple syrup), and a pinch of salt. Mix until everything is smooth. - Pour wet mixture over dry and stir. Carefully pour the wet mixture over the dry oats. Stir thoroughly until all ingredients are fully combined. Make sure the oats are well-coated with the wet mixture. - Transfer to a storage container. Spoon the mixture into a mason jar or an airtight container. Seal it tightly to keep it fresh. - Refrigerate overnight. Place the container in the refrigerator. Let it chill overnight or for at least 4 hours. This allows the oats to absorb the liquid and soften. - Stir and adjust consistency before serving. The next morning, take the container out of the fridge. Give the oats a good stir. If the mixture is too thick, add a splash of almond milk to reach your desired consistency. Serve in bowls or jars. Top with fresh banana slices, extra peanut butter, and a sprinkle of chopped nuts. Enjoy your delicious breakfast! To get the best texture, adjust with more liquid. If your oats are too thick, add a splash of almond milk. This makes them creamy and smooth. Allowing adequate chilling time is key. Let your oats sit overnight. This helps the oats absorb all the liquid and flavors. You can add many flavors to your oats. Try mixing in a scoop of cocoa powder for a chocolate twist. You can also add cinnamon for warmth. For toppings, use fresh fruits. Banana slices are great. You can also top with chopped nuts for crunch. Drizzle more peanut butter on top for extra flavor. Batch cooking is smart. Make extra servings for busy mornings. Store them in airtight containers. This keeps them fresh longer. Refrigerate your oats for up to five days. Always check for freshness before eating. Enjoy your tasty and healthy breakfast all week long! Pro Tips Use Overnight Soaking: Allow your oats to soak overnight for the best texture and flavor absorption. Experiment with Toppings: Feel free to mix up your toppings with seasonal fruits, seeds, or even a dollop of yogurt for variety. Protein Powder Alternatives: If you prefer plant-based options, consider using pea protein or hemp protein powder. Adjust Sweetness: Customize the sweetness to your liking by adjusting the amount of honey or maple syrup used. {{image_4}} To make your oats dairy-free, you can swap almond milk for other milk types. Here are some great options: - Oat milk - Soy milk - Coconut milk - Cashew milk These alternatives work well. Each brings a unique flavor to your oats. Want to spice up your overnight oats? You can add different flavors easily. Try mixing in: - 1 tablespoon cocoa powder for a chocolatey twist - 1 teaspoon cinnamon for warmth and comfort These additions can change your dish's taste and make breakfast exciting. If you want to up your protein game, many powders can help. Consider these: - Pea protein for a plant-based option - Whey protein for a classic choice - Hemp protein for more fiber and nutrients Using different protein powders can change both taste and texture. Experiment to find what you like best! Store your high-protein peanut butter overnight oats in an airtight container. This keeps them fresh. After making, seal the container tightly. Place it in the refrigerator right away. If you use jars, make sure they have a good lid. This helps prevent spills and keeps flavors intact. These overnight oats can last in the fridge for up to five days. They stay tasty and safe to eat during this time. Just remember, the longer they sit, the softer they get. If you like a bit of crunch, enjoy them sooner. Yes, you can freeze overnight oats! Use freezer-safe containers for this. You can store them for up to three months. To eat, let them thaw in the fridge overnight. You may need to add a splash of milk to restore the creamy texture. Enjoy your oats whenever you want! To make your overnight oats thicker, use less liquid. You can also add more chia seeds, as they absorb liquid and create a creamy texture. If you mix the oats well and let them sit overnight, they will swell and thicken nicely. Yes, you can use flavored protein powder. It adds fun flavors to your oats. Just remember to adjust the sweetness if needed, as flavored powders can be sweeter than plain ones. Peanut butter overnight oats can stay good for up to five days in the fridge. Keep them in a sealed container to keep them fresh. If they start to smell or look bad, it’s best to toss them. You can use many toppings for your oats! Try berries, seeds, yogurt, or even dark chocolate chips. Adding different nuts or a sprinkle of cinnamon can also change the flavor and texture. Overnight oats are simple and fun to make. We covered the key ingredients, from oats to toppings. The step-by-step guide makes preparation easy. I shared tips for texture and flavor, and ways to store your oats. You can personalize your oats with different flavors or protein boosts. With the right steps, you’ll enjoy delicious and nutritious meals. Embrace this easy recipe for a great start to your day!
High-Protein Peanut Butter Overnight Oats Recipe
Looking for a quick, delicious breakfast that fuels your day? High-Protein Peanut Butter Overnight Oats are the answer! With just a few simple ingredients, you’ll
To make a tasty Tater Tot Breakfast Bowl, gather these simple ingredients: - 2 cups frozen tater tots - 4 large eggs - 1 cup shredded cheddar cheese - 1 cup fresh spinach, chopped - 1/2 cup cherry tomatoes, halved - 1/4 cup green onions, sliced - 1/2 avocado, diced - 1 tablespoon olive oil - Salt and pepper to taste - Optional: Salsa for garnish Each ingredient plays a role in the dish's flavor and texture. The tater tots give a crispy base that contrasts with the soft eggs and creamy avocado. Fresh spinach adds a healthy touch, while cherry tomatoes bring sweetness and color. Green onions add a nice crunch and a bit of bite. You can adjust these ingredients based on your taste or what you have at home. Enjoy the fun of mixing flavors and colors! {{ingredient_image_2}} - Preheat your oven to 425°F. - Prepare a baking sheet with parchment paper. This helps with cleanup. - Spread the frozen tater tots in a single layer. Bake until golden brown, about 20-25 minutes. Turn them halfway through for even crispiness. - Heat one tablespoon of olive oil in a skillet over medium heat. - Add one cup of chopped spinach. Cook for 2-3 minutes until it wilts. - Season the spinach lightly with salt and pepper. Transfer it to a bowl and set aside. - Crack four large eggs directly into the same skillet. - Cook the eggs to your liking: scrambled, sunny-side up, or fried. - Season them with salt and pepper. For a cheesy touch, add one cup of shredded cheddar cheese just before they finish cooking. This will melt beautifully. To get crispy tater tots, turn them halfway through baking. This helps both sides get golden brown. Check the doneness based on the brand instructions. Most tater tots take about 20-25 minutes at 425°F. You can cook the eggs in many ways. Try scrambled, sunny-side up, or fried. Each style offers a different taste. Don’t forget to add spices or herbs for extra flavor. A pinch of paprika or fresh herbs can make a big difference. When serving, arrange the ingredients in bowls. Start with a layer of tater tots. Next, add spinach and eggs. Top with tomatoes, avocado, and green onions. This makes it look appealing. For a nice touch, add garnishes like sliced green onions or a side of salsa. Enjoy the vibrant colors as you dig in! Pro Tips Use Fresh Ingredients: Opt for fresh spinach and ripe avocado for the best flavor and nutrition. Fresh ingredients will elevate the overall taste of your breakfast bowl. Customize Your Toppings: Feel free to add or substitute ingredients based on your preferences. Consider adding cooked bacon, sausage, or different types of cheese for variety. Perfectly Cooked Eggs: For perfectly cooked eggs, consider using a lid on your skillet while frying or scrambling. This helps to cook the tops evenly and keep them fluffy. Make It Ahead: You can prepare the tater tots and sautéed spinach ahead of time. Store them separately in the fridge and assemble your bowls in minutes for a quick breakfast. {{image_4}} You can easily make a vegetarian Tater Tot Breakfast Bowl. Try using tofu scramble instead of eggs. Tofu absorbs flavors well. Just sauté it with spices like turmeric and garlic powder. You can also add more veggies. Bell peppers work great for color and crunch. Mix them in with the spinach for a hearty meal. If you enjoy meat, add bacon or sausage to your bowl. Cook the bacon until crispy, then chop it up. Sausage can be crumbled and browned in the skillet. Both add rich flavors and protein. Pair them with your eggs for a satisfying start to your day. Need a gluten-free option? Look for gluten-free tater tot brands. They taste just as good! You can also swap tater tots for hash browns. Just prepare them in the same way. Both options provide a crispy base for your bowl. Enjoy these alternatives without worry! After enjoying your tater tot breakfast bowl, you may have some leftovers. Store them in the fridge. Use an airtight container to keep them fresh. This helps prevent moisture loss and keeps flavors intact. Reheat your tater tots in the oven for best results. Set the oven to 375°F (190°C). Spread the tots on a baking sheet. Heat for about 10 minutes or until they crisp up again. To keep your eggs tasty, reheat them gently in a skillet. Use low heat to avoid overcooking. Stir gently to maintain their shape and flavor. You can freeze components separately for later use. Freeze cooked tater tots and eggs in different containers. This way, they stay fresh longer. When you want to enjoy them again, thaw the items in the fridge overnight. Reheat the tater tots in the oven and the eggs in a skillet. This method works well to keep everything tasty. To make your tater tots crispy, follow these tips: - Bake at high heat: Preheat your oven to 425°F (220°C). This high heat helps them crisp up fast. - Use parchment paper: Line your baking sheet with parchment paper. It prevents sticking and makes cleanup easier. - Spread in a single layer: Arrange the tater tots flat on the baking sheet. Crowding them can lead to sogginess. - Turn halfway: Flip the tater tots halfway through baking. This ensures even crispiness on all sides. - Try an air fryer: If you have one, air fryers work wonders for crisping. Cook at the same temperature and check often. Yes, you can prepare parts of this dish in advance. Here are some best practices: - Prep the tater tots: You can bake them ahead of time. Just reheat them in the oven for a few minutes before serving. - Cook the spinach: Sauté the spinach and store it in the fridge. It stays fresh for up to three days. - Make the eggs later: Eggs taste best when fresh. Cook them right before serving to keep them fluffy. - Assemble just before eating: Layering the bowls ahead of time can lead to soggy ingredients. Build your bowls just before serving for the best texture. If you want to replace eggs, here are some great options: - Tofu scramble: Crumble firm tofu and sauté it like eggs. Add spices for flavor. - Chickpea flour: Mix chickpea flour with water. Cook it like scrambled eggs for a vegan option. - Aquafaba: Use the liquid from canned chickpeas. It can bind and add moisture to dishes. - Flaxseed meal: Mix 1 tablespoon of flaxseed meal with 2.5 tablespoons of water. Let it sit for a few minutes to thicken. - Silken tofu: Blend silken tofu until smooth to use in place of eggs in recipes. These substitutes work well and keep your meal tasty! This recipe combines tater tots, eggs, and fresh veggies for a tasty meal. You learned how to prepare each ingredient and cook them step-by-step. Remember, you can customize this dish with proteins or more veggies. Store any leftovers properly and enjoy them later. With these tips, you can make a perfect breakfast or brunch anytime. Get creative and have fun with this dish!
Tater Tot Breakfast Bowl Flavorful and Easy Recipe
Are you ready for a breakfast that packs a punch? My Tater Tot Breakfast Bowl combines crispy tater tots, fluffy eggs, and fresh veggies into
To make delicious Cinnamon French Toast Sticks, gather these simple ingredients: - 4 thick slices of brioche or challah bread - 2 large eggs - 1/2 cup milk (use almond milk for a dairy-free version) - 1 tablespoon vanilla extract - 1 teaspoon ground cinnamon - 2 tablespoons sugar (opt for brown sugar for a richer flavor) - Pinch of salt - 2 tablespoons butter (or coconut oil) for cooking - Maple syrup and powdered sugar for serving These ingredients come together to create a sweet and warm treat. The brioche or challah bread gives a rich flavor and soft texture. Eggs and milk form the base of the egg mixture. Vanilla extract and cinnamon add warmth and depth. Sugar sweetens it all up, while a pinch of salt balances the flavors. Butter or coconut oil helps to cook the sticks until golden. Finally, maple syrup and powdered sugar provide the finishing touch. Enjoy crafting this simple yet delightful dish! {{ingredient_image_2}} - Whisking the Ingredients Start with a big bowl. Crack in the two eggs. Then, add the milk, vanilla, ground cinnamon, sugar, and a pinch of salt. Use a whisk to mix well. Keep whisking until the mixture looks smooth and blended. - Ensuring a Smooth Consistency Check the mix for lumps. You want it to be even. A smooth texture helps the bread soak well and taste great. - Cutting the Bread Take four thick slices of brioche or challah bread. Cut each slice into sticks about one inch wide. These should be easy to dip and cook. - Soaking in the Egg Mixture Dip each bread stick into the egg mixture. Let it soak for a moment. Make sure it absorbs the mix but does not fall apart. A quick dip works best. - Preheating the Skillet Place a skillet or griddle on medium heat. Add two tablespoons of butter or coconut oil. Let it melt so it coats the pan. - Cooking Time and Techniques Arrange the soaked bread sticks in the hot skillet. Cook them for 2-3 minutes on each side. Look for a golden brown color. Adjust the heat if they cook too fast. - Removing and Draining Excess Oil Once cooked, take the sticks out and place them on a paper towel-lined plate. This helps soak up any extra oil. They will be ready to enjoy with a sprinkle of powdered sugar and warm maple syrup! Ideal Bread Choices I recommend using thick slices of brioche or challah bread. These breads soak up the egg mix well without falling apart. They also have a soft texture that turns crispy when cooked. Other good choices are Texas toast or even sourdough. Choose bread that is slightly stale for the best results. Fresh bread can get too soggy. Soaking Techniques Soaking the bread sticks is key to flavor and texture. Dip each stick in the egg mix, but don’t let it soak too long. A quick dip allows the bread to absorb just enough mix. If you let it sit too long, the sticks may break apart. You want them soft, but still strong. Using a Non-Stick Pan A non-stick pan makes cooking easier. It helps the sticks brown nicely without sticking. You can use a griddle too, but make sure it’s well greased. Always preheat your pan before adding the sticks for even cooking. Adjusting Heat Levels Keep the heat at medium. If it’s too low, the sticks might not cook through. Too high can burn the outside before the inside is done. Watch them closely and turn them when they are golden brown. Adjust the heat as needed to keep them cooking evenly. Presentation Ideas For a fun presentation, stack the French toast sticks on a platter. Use a small bowl of warm maple syrup for dipping. Add fresh fruit like strawberries or blueberries to make the dish pop with color. A dusting of powdered sugar on top adds a sweet touch. Accompaniments for Enjoyment Serve your French toast sticks with maple syrup, but don’t stop there. Consider adding whipped cream or yogurt for a creamy contrast. You can also sprinkle nuts or chocolate chips on top for extra flavor and crunch. Enjoy these sticks as a snack, breakfast, or dessert! Pro Tips Use Day-Old Bread: For the best texture, use bread that is a day or two old. It will soak up the egg mixture better without falling apart. Customize Your Spices: Feel free to experiment with additional spices like nutmeg or cardamom for a unique flavor twist. Keep Them Warm: If you're making a large batch, keep the cooked French toast sticks warm in a low oven (around 200°F) until ready to serve. Dip Variations: Try different dips like chocolate sauce or yogurt for a fun and delicious alternative to maple syrup. {{image_4}} You can easily switch up the flavors in your Cinnamon French Toast Sticks. Seasonal ingredients really shine here. For fall, try adding pumpkin spice or a hint of nutmeg to the egg mixture. Both of these spices add warmth and depth. During the summer, consider using fresh vanilla or even a bit of almond extract for a light twist. Adding chocolate chips or nuts can also make your sticks more exciting. Toss in some mini chocolate chips for a sweet treat. If you prefer a crunch, try adding chopped nuts like pecans or walnuts. These not only taste great but add texture too. If you need gluten-free options, use gluten-free bread. Many stores offer tasty gluten-free varieties that work well. Just make sure to check the package for a good texture. For those following a vegan diet, you can substitute the eggs with a mix of flaxseed and water. Use one tablespoon of flaxseed meal mixed with two and a half tablespoons of water for each egg. You can also use almond milk or any other plant-based milk in the recipe. This keeps your French toast sticks delicious and animal-free. Toppings can make your French toast sticks even better. Fresh berries like strawberries or blueberries add color and flavor. You can also add whipped cream for extra richness. Another fun idea is to sprinkle some crushed nuts on top for a crunchy finish. If you're feeling adventurous, you can make a savory version. Try adding cheese or fresh herbs like chives or basil. These can give your dish a unique twist that is both tasty and fun. Enjoy exploring all the different ways to serve these sticks! To keep your Cinnamon French Toast Sticks fresh, allow them to cool first. Cooling helps avoid moisture build-up. Stack them in an airtight container. This prevents them from getting soggy. You can also use a zip-top bag. Just remove as much air as you can. Store them in the fridge for up to three days. You can reheat your French toast sticks in two ways. The microwave is quick but may make them soft. Heat them for 20-30 seconds at a time. The oven gives better results. Preheat it to 350°F. Place the sticks on a baking sheet for about 10 minutes. This keeps them crispy while warming. Freezing is a great option if you want to save some for later. Make sure they are fully cool. Lay them flat on a baking sheet and freeze for about an hour. This prevents them from sticking together. Once frozen, transfer them to a zip-top bag. They can last up to a month in the freezer. For thawing, place them in the fridge overnight. If you need them fast, use the microwave. Just heat them gently, so they do not get rubbery. To make your French toast sticks crispy, use thick slices of brioche or challah bread. Soak them briefly in the egg mixture to avoid sogginess. Cook on medium heat, ensuring the butter or oil is hot before adding the sticks. This helps create a golden crust. Flip them once, and watch for that perfect brown color! Yes, you can prepare the egg mixture ahead of time. Store it in the fridge for up to 24 hours. You can also cut the bread into sticks in advance. Just keep them in an airtight container. When you’re ready, dip and cook them fresh for the best taste! If you need an egg substitute, try using flaxseed meal or chia seeds. Mix one tablespoon of either with three tablespoons of water. Let it sit for a few minutes until it thickens. You can also use a quarter cup of unsweetened applesauce for each egg. The sticks are perfect when they turn golden brown on each side. This usually takes about 2-3 minutes per side. You can also check by pressing lightly. If they feel firm but spring back, they are ready! Absolutely! You can add nutmeg or pumpkin spice for a different flavor. Try cardamom for a warm touch, or even a dash of vanilla powder for extra sweetness. Feel free to get creative with your spice choices! French toast sticks are fun and tasty. We covered the key ingredients, from brioche to toppings. I shared a step-by-step guide for easy prep and cooking. Remember the tips for perfect sticks and variations to try. Proper storage keeps leftovers fresh and tasty. Finally, the FAQs help clear up common questions. Enjoy making these treats and share them with friends and family!
Cinnamon French Toast Sticks Simple and Tasty Treat
Are you ready to whip up a delightful breakfast treat? These Cinnamon French Toast Sticks are simple, tasty, and perfect for any time of day.