Breakfast

- 1 large ripe banana - 1 cup rolled oats - 1 cup milk (dairy or non-dairy) To make these pancakes, you need just three simple ingredients. First, pick a large ripe banana. The riper, the better! It adds natural sweetness and flavor. Next, grab one cup of rolled oats. They give the pancakes their hearty texture. Finally, get one cup of milk, which can be dairy or any non-dairy type you prefer. - Fresh banana slices - Honey or pure maple syrup - Greek yogurt or berries You can make these pancakes even more delightful with toppings. Fresh banana slices add a nice touch. Drizzling honey or pure maple syrup gives sweetness. Greek yogurt or berries can add creaminess and color. These toppings make your pancakes look great and taste even better! {{ingredient_image_2}} - Start by peeling the ripe banana and breaking it into chunks. - In a blender, combine the banana pieces with the rolled oats and milk. Blend on high speed until the mixture is smooth. This should take about 30 to 60 seconds. A smooth batter is key for fluffy pancakes. - While the blender runs, preheat a non-stick skillet over medium heat. - Lightly grease the skillet with cooking spray or a small amount of oil. - Use a measuring cup to pour about 1/4 cup of batter onto the skillet for each pancake. - Cook for 2 to 3 minutes or until bubbles form on the surface. The edges should look set. - Carefully flip each pancake with a spatula. Cook for another 1 to 2 minutes until golden brown. - Remove the pancakes from the skillet and place them on a warm plate. - Stack them high for a great look. - You can add toppings like fresh banana slices, honey, or syrup to make them even better. To make the best three-ingredient banana oat pancakes, blending is key. You want a smooth batter. If you blend well, there will be no lumps. This makes your pancakes fluffy and light. Blend for about 30 to 60 seconds. Check the batter’s texture before cooking. Cooking temperature also matters. If it’s too high, pancakes can burn. If it’s too low, they may not cook well. I like to preheat my skillet on medium heat. Adjust as needed. Look for bubbles forming on the surface of the pancakes. That’s a good sign they are ready to flip! I often make extra pancakes for busy mornings. After cooking, let them cool. Then, place them in an airtight container. You can store them in the fridge for up to three days. Reheat in the microwave or on the skillet. This way, you save time and enjoy tasty pancakes! Freezing is another great option. To freeze, stack pancakes with parchment paper in between. This helps prevent sticking. Place them in a freezer-safe bag. They will last for up to three months. To reheat, pop them in the toaster or microwave. Enjoy quick meals anytime! Pro Tips Use Ripe Bananas: The riper the bananas, the sweeter and more flavorful your pancakes will be. Look for bananas with brown spots for the best taste! Adjust Consistency: If the batter is too thick, add a little more milk. Conversely, if it’s too thin, mix in a few more oats to achieve the perfect pancake batter consistency. Cook at the Right Temperature: Ensure your skillet is properly heated before adding the batter. Too hot can burn the pancakes, while too cool will lead to uneven cooking. Experiment with Add-Ins: Feel free to customize your pancakes by adding ingredients like chocolate chips, nuts, or spices to the batter for a fun twist on the classic recipe! {{image_4}} You can make your pancakes even better! A splash of vanilla extract adds a sweet note. Try half a teaspoon for a lovely flavor. You can also add a sprinkle of cinnamon. It gives warmth and spice to each bite. Want to make it richer? Add a spoonful of peanut butter. It mixes well and packs protein. For a fun twist, toss in some chocolate chips. They melt and create a sweet surprise in every pancake. If you need gluten-free pancakes, switch to gluten-free oats. These oats work just as well and keep the pancakes fluffy. You can also try different milk options. Almond milk, soy milk, or oat milk are great dairy-free choices. Each gives a unique taste but keeps the pancakes delicious. Adjusting these ingredients makes the recipe fit your diet perfectly! You can store your three-ingredient banana oat pancakes in the fridge. They will last for about three days. Make sure to place them in an airtight container. This keeps them fresh and prevents them from drying out. Reheat them in a skillet or microwave when you are ready to eat. Freezing pancakes is a great way to save some for later. To freeze, let the pancakes cool completely. Then, stack them with parchment paper in between each one. Place the stack in a freezer-safe bag. This prevents them from sticking together. You can store them for up to three months. To reheat frozen pancakes, take them out and place them directly in a toaster or microwave. If using a microwave, heat them for 30-45 seconds. Check if they are warm enough. If not, heat for another 15 seconds. Enjoy your pancakes just like fresh! You can use different oats for this recipe. Each type gives a unique texture. - Rolled oats are the best choice. They blend smoothly and create nice pancakes. - Quick oats work too. They cook faster and blend easily. Pancakes may be slightly softer. - Steel-cut oats are not ideal. They are too coarse and won't blend well. Your pancakes will be gritty. Yes, you can swap the banana for other fruits. Here are some options: - Applesauce is a great choice. It keeps the pancakes moist but changes the flavor. - Mashed sweet potatoes add sweetness and a lovely color. They will make the pancakes denser. - Pumpkin puree gives a fall flavor. It adds moisture but alters the taste and texture. Checking if your pancakes are done is easy. Look for these signs: - Bubbles form on the surface. This shows the batter is cooking. - The edges should look set and dry. - When you flip them, the underside should be golden brown. - Gently press the pancake. It should spring back. If it leaves a dent, it needs more time. These pancakes are simple and fun to make. You only need a ripe banana, oats, and milk. You can add toppings like honey or yogurt for extra flavor. Blend well for a smooth batter and cook until golden brown. Remember, you can freeze extras for later. With these tips, anyone can make these tasty pancakes. Try different flavors, and make them your own! Enjoy your homemade pancakes fresh or reheated, and impress your friends and family.
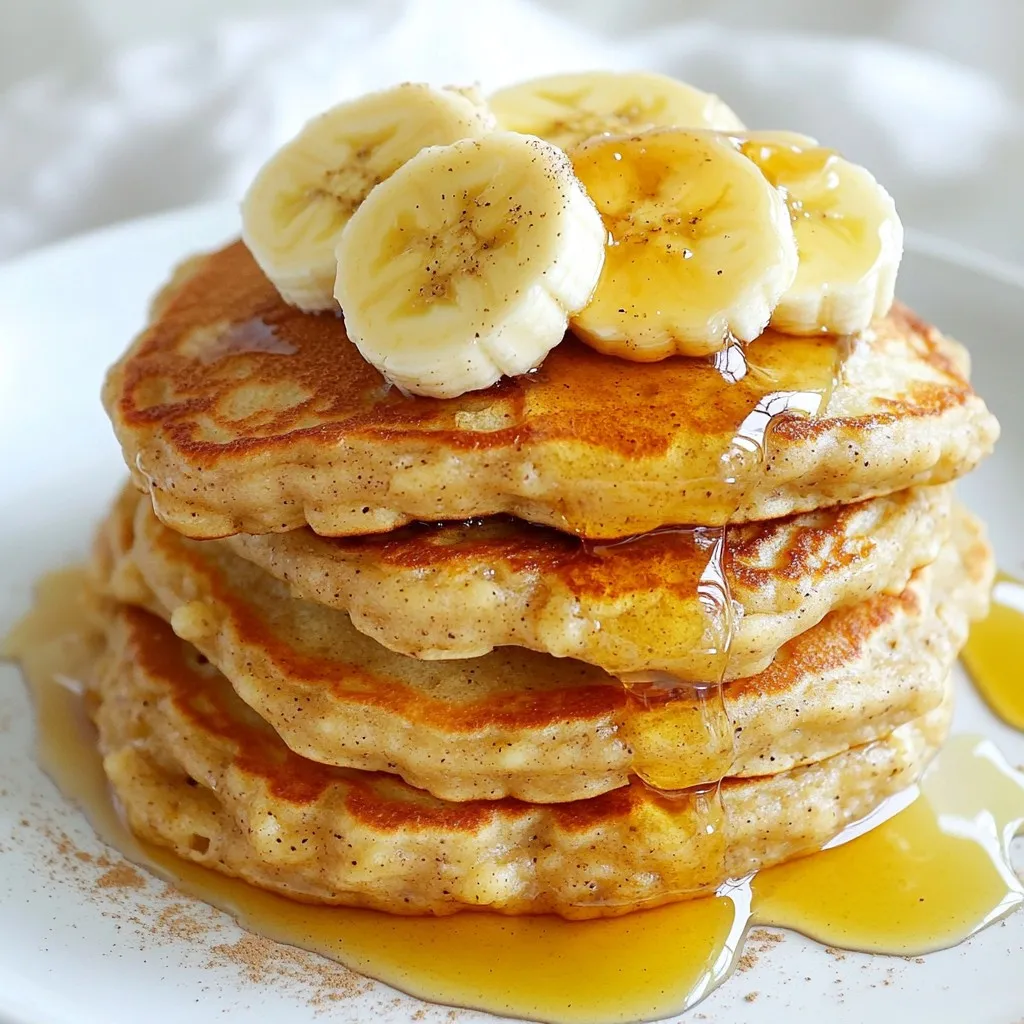
Three Ingredient Banana Oat Pancakes Simple Delight
Welcome to the world of three-ingredient banana oat pancakes! These simple delights are not just easy to make but also deliciously healthy. With ripe bananas,
- 2 cups rolled oats - 2 cups unsweetened applesauce - 1 medium tart apple, diced - 1/4 cup chopped walnuts or pecans - 1/4 cup raisins or dried cranberries - 1 teaspoon baking powder - 1 teaspoon ground cinnamon - 1/2 teaspoon salt When making Amish-Style Apple Cinnamon Baked Oatmeal, you need simple ingredients. Start with rolled oats. They give the dish its hearty base. Next, use unsweetened applesauce. This adds natural sweetness and moisture. A medium tart apple adds a nice crunch and flavor. I usually pick Granny Smith for its tang. You can include optional ingredients for extra taste. Chopped walnuts or pecans add a delightful crunch. Raisins or dried cranberries give a touch of sweetness. Key seasonings elevate this dish. Baking powder helps the oatmeal rise. Ground cinnamon adds warmth and makes it smell amazing. Salt balances the sweetness and enhances flavors. This recipe is easy and fun. You can find the Full Recipe for all the steps to create this delicious dish. Enjoy your cooking! First, preheat your oven to 350°F (175°C). This step is key to ensuring even baking. Next, take a 9-inch square baking dish and grease it. You can use cooking spray or butter. This prevents the oatmeal from sticking. In a large bowl, combine the rolled oats, baking powder, ground cinnamon, and salt. Mix these dry ingredients well. This helps spread the baking powder and spices evenly. In another bowl, whisk together the applesauce, eggs, milk, brown sugar (or coconut sugar), and vanilla extract. Make sure this mixture is smooth and well blended. The wet ingredients add moisture and sweetness to your dish. Carefully pour the wet mixture into the dry ingredients. Stir it gently until just combined. Do not overmix, as this can change the texture. You want a fluffy oatmeal, not a dense one. Pour the oatmeal mixture into your prepared baking dish. Spread it out evenly. This helps it bake uniformly. Place the dish in the oven and bake for 30-35 minutes. Check for doneness by inserting a toothpick in the center. It should come out clean when the oatmeal is ready. To ensure your oatmeal bakes just right, avoid overmixing the batter. Mixing too much can make it dense. Just stir until you see no dry spots. Once baked, let it cool for a few minutes. This cooling time helps with slicing into neat squares. For a sweet touch, serve your baked oatmeal with maple syrup or drizzled honey. These add a lovely sweetness that pairs well with apples. You can also sprinkle ground cinnamon on top for that extra burst of flavor. This adds warmth and depth to each bite. Make your dish look inviting by serving it warm with fresh fruit or nuts on top. Slices of banana or a handful of berries add color and taste. You could also sprinkle some chopped walnuts or pecans for crunch. This simple touch will impress your family and friends. For the full recipe, check the details provided. {{image_4}} You can adjust the recipe to fit your diet. If you need a gluten-free option, use certified gluten-free oats. This way, you can enjoy the same great taste without worry. For those who prefer dairy-free, switch the milk for almond, oat, or coconut milk. These options work well and keep the dish creamy. Feel free to get creative with flavors! You can add other fruits like blueberries or pears to the mix. Each fruit gives a unique twist. You can also try different spices. Nutmeg and ginger can add warmth and a fun kick to your oatmeal. It’s all about finding what you love. If you have nut allergies, simply omit the nuts from the recipe. You can still enjoy all the flavors without them. This keeps the baked oatmeal safe for everyone while still being delicious. Enjoy this nut-free version as a great option for family gatherings or potlucks. For the full recipe, check out the complete guide above. To keep your Amish-Style Apple Cinnamon Baked Oatmeal fresh, store it in airtight containers. This helps prevent moisture and keeps the flavors intact. You can keep it in the fridge for up to five days. Make sure to let it cool completely before sealing. When you're ready to enjoy your leftovers, reheating is easy. For the microwave, place a square on a plate. Heat for about 30 seconds to 1 minute, checking to see if it’s warm. If using the oven, set it to 350°F (175°C). Place the oatmeal in a baking dish and cover it with foil. Heat for about 10-15 minutes until warmed through. For longer storage, you can freeze the baked oatmeal. Cut it into squares and wrap each piece tightly in plastic wrap. Then, place them in a freezer-safe bag or container. This way, you can enjoy it for up to three months. When you're ready to eat, let it thaw in the fridge overnight before reheating. You can use quick oats, but the texture will change. Quick oats cook faster and make the oatmeal softer. Rolled oats hold their shape better, adding a nice chewiness. For a hearty dish, stick with rolled oats. To make this recipe vegan, swap the eggs for flax eggs. Mix 1 tablespoon of ground flaxseed with 2.5 tablespoons of water, then let it sit for 5 minutes. For milk, use almond, soy, or oat milk. These swaps keep the dish tasty and plant-based. Serve it warm for the best taste. Top with maple syrup or a drizzle of honey. You can add fresh fruit like banana or berries for extra flavor. A sprinkle of nuts or seeds adds crunch and nutrition. Yes, you can prepare it the night before. Mix the ingredients and store them in the fridge. Bake it in the morning for a warm breakfast. You can also bake it ahead of time and reheat it. Just store it in an airtight container. Enjoy it all week long! For the full recipe, check here. This baked oatmeal recipe is simple and easy to follow. You have learned about the ingredients, instructions, tips, and storage options. Feel free to mix in your favorite fruits or nuts. You can also make this dish gluten-free or dairy-free, based on your needs. With the right tweaks, you can enjoy this treat any time. Take these ideas and make this recipe your own. Enjoy every bite and share it with friends and family!
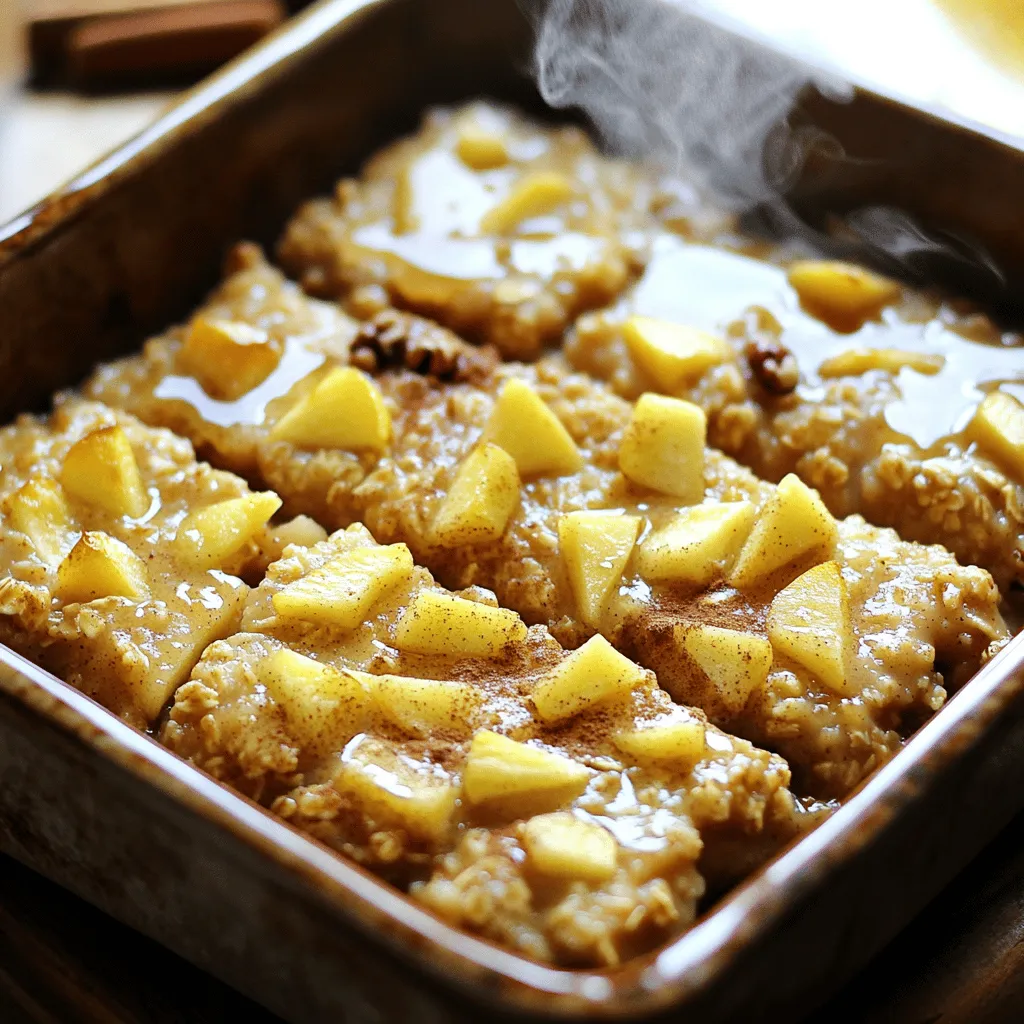
Amish-Style Apple Cinnamon Baked Oatmeal Delight
Are you ready to bring a taste of Amish comfort to your kitchen? In this post, I’ll guide you through making Amish-Style Apple Cinnamon Baked
To make the Healthy Breakfast Oatmeal Apple Cake, you will need: - 2 cups rolled oats - 1 cup unsweetened applesauce - 2 medium apples, peeled and diced - 1/2 cup honey or maple syrup - 1/2 cup almond milk (or any milk of your choice) - 1/4 cup coconut oil, melted - 2 teaspoons baking powder - 1 teaspoon ground cinnamon - 1/2 teaspoon ground nutmeg - 1/4 teaspoon salt - 1/2 cup chopped nuts (walnuts or almonds, optional) - 1/4 cup raisins or dried cranberries (optional) Each ingredient in this cake serves a purpose. Here’s how they help you: - Rolled oats: Great for fiber. They keep you full and help digestion. - Unsweetened applesauce: Reduces sugar and adds moisture. It’s also low in calories. - Apples: Packed with vitamins. They add sweetness and crunch. - Honey or maple syrup: Natural sweeteners that provide antioxidants. They boost energy without spikes. - Almond milk: A low-calorie option. It’s also dairy-free and full of vitamins. - Coconut oil: Provides healthy fats. It can give you quick energy. - Baking powder: Helps the cake rise, making it light and fluffy. - Cinnamon and nutmeg: Add warmth and flavor. They also have anti-inflammatory properties. - Salt: Enhances all the flavors, making the cake taste better. - Chopped nuts: Offer healthy fats and protein. They add a nice crunch. - Raisins or dried cranberries: Provide extra sweetness and nutrients. You can swap out some ingredients based on your needs or preferences: - Rolled oats: Try quick oats or gluten-free oats for a different texture. - Unsweetened applesauce: Use mashed bananas for a fruity twist. - Honey or maple syrup: Agave syrup or coconut sugar works well too. - Almond milk: Any milk works, like soy or oat milk. - Coconut oil: Use olive oil or melted butter if you prefer. - Chopped nuts: Sunflower seeds can replace nuts if you have allergies. - Raisins or dried cranberries: Use fresh berries for a fresher taste or leave them out entirely. This Healthy Breakfast Oatmeal Apple Cake is fun to customize. Feel free to mix and match to suit your taste! First, I preheat my oven to 350°F (175°C). I get a 9x9-inch baking pan ready by greasing it lightly or lining it with parchment paper. This makes for easy removal later. In a large mixing bowl, I add the rolled oats, baking powder, ground cinnamon, ground nutmeg, and salt. I mix these dry ingredients well. Next, I take another bowl and whisk the wet ingredients. I combine unsweetened applesauce, honey or maple syrup, almond milk, and melted coconut oil. I ensure everything blends well. After that, I pour the wet mix into the dry mix. I stir gently until just combined. Over-mixing can make the cake tough. Then, I fold in the diced apples carefully. If I want some crunch, I add chopped nuts and maybe some raisins or dried cranberries. These extras add nice texture and flavor. Once my batter is ready, I transfer it to the prepared pan. I use a spatula to spread the mix evenly. Then, I place the pan in the oven. I bake it for about 30-35 minutes. To check if it’s done, I insert a toothpick into the center. If it comes out clean, the cake is ready. To avoid being tricked, I always check in the middle of the cake. If I see any wet batter on the toothpick, it needs more time. I can also look for a golden-brown color on top. After baking, I let the cake cool in the pan for about 10 minutes. Then, I move it to a wire rack to cool completely. This helps keep it moist and fluffy. To make your Healthy Breakfast Oatmeal Apple Cake fluffy, avoid over-mixing. When you combine wet and dry ingredients, stir gently until just mixed. This keeps air in the batter. Also, make sure your baking powder is fresh. Old baking powder can lead to a dense cake. One common mistake is adding too much liquid. Stick to the recipe for the best texture. Another mistake is not cooling the cake properly. Let it cool for about 10 minutes in the pan. This helps the cake set and makes it easier to cut. Lastly, resist the urge to skip the apples. They add moisture and flavor. Serve your cake warm or at room temperature. Top it with a dollop of Greek yogurt for creaminess. A light sprinkle of cinnamon enhances the flavors. You can also pair it with fresh fruit for extra nutrition. For a fun twist, add a drizzle of honey or maple syrup. This will make your breakfast even sweeter! Enjoy your cake with a cup of tea or coffee for the perfect morning treat. For the complete recipe, check out the Full Recipe. {{image_4}} You can easily make this cake gluten-free. Just use certified gluten-free rolled oats. This way, you can enjoy your cake without worry. Other gluten-free flours, like almond or coconut flour, work too. Adjust the amount of liquid in the recipe if you use these flours. Adding spices can really lift the flavor. Try adding 1 teaspoon of vanilla extract for a sweet aroma. You could also mix in 1/4 teaspoon of ground ginger for a warm kick. If you love coconut, try adding shredded coconut to the batter. It adds a fun texture and taste. If you prefer less sugar, use ripe mashed bananas instead of honey or syrup. This change keeps your cake sweet and moist. You can also use stevia or monk fruit sweetener for a low-calorie option. Remember to adjust the amounts to taste, as these sweeteners are often sweeter than honey or maple syrup. For more details, check out the Full Recipe. To keep your Healthy Breakfast Oatmeal Apple Cake fresh, store it in an airtight container. Place it at room temperature for up to three days. If you want to keep it longer, refrigerate it for up to a week. Always let it cool completely before storing. This helps prevent moisture buildup, which can make the cake soggy. Freezing is a great option if you want to save some for later. Cut the cake into individual squares. Wrap each piece tightly in plastic wrap or aluminum foil. Then, place the wrapped pieces in a freezer bag. This way, they stay fresh for about three months. When you're ready to enjoy, simply thaw the pieces in the fridge overnight. To reheat, use the microwave or oven. If using a microwave, heat each square for about 30 seconds. If you prefer the oven, set it to 350°F (175°C) and warm for about 10 minutes. This helps restore the cake’s soft texture. Enjoy it warm with a touch of yogurt or honey for extra flavor. Yes, you can use instant oats. However, they may make your cake softer. Rolled oats give the cake more texture. Instant oats absorb liquid quickly. This can change the cake’s final texture. For the best results, stick with rolled oats. They provide a nice chewiness and a hearty feel. The cake stays fresh for about three days at room temperature. Store it in an airtight container. If you want it to last longer, keep it in the fridge. In the fridge, it can last up to a week. You can also freeze it for up to three months. Just wrap individual pieces well. This way, you can enjoy a slice anytime! Absolutely! This cake is great for meal prep. It’s easy to make and keeps well. You can bake it on a Sunday. Cut it into squares and store them. Grab a piece each morning for a quick breakfast. It’s healthy and filling. You’ll love having a nutritious option ready to go! For the full recipe, check out the details above. The blog post covered many aspects of baking a Healthy Breakfast Oatmeal Apple Cake. We reviewed the key ingredients, their health benefits, and tasty alternatives. I provided step-by-step instructions for making the batter and baking it, along with tips for perfect results. Additionally, I shared variations and smart storage tips. Remember, avoiding common mistakes leads to a fluffy cake. With these insights, you can bake a delicious cake that fits your needs. Enjoy creating and sharing this wholesome treat!
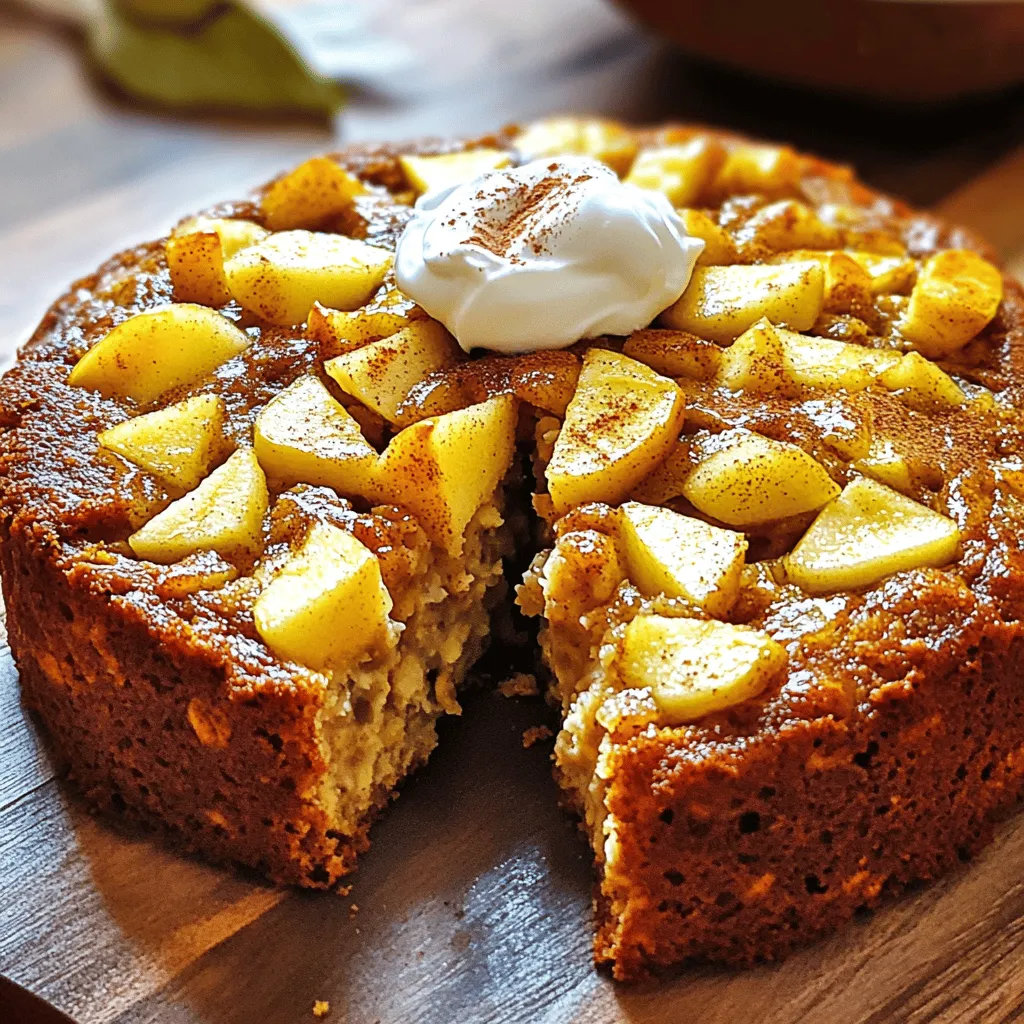
Healthy Breakfast Oatmeal Apple Cake for Light Mornings
Start your mornings off right with my Healthy Breakfast Oatmeal Apple Cake! This tasty treat combines wholesome ingredients for a delightful start. Not only is
For this dish, you will need: - 1 cup cottage cheese - 4 large eggs - 1/2 cup bell pepper, diced - 1/4 cup green onion, thinly sliced - 1/2 teaspoon garlic powder - 1/2 teaspoon smoked paprika - Salt and freshly cracked black pepper to taste - 1/2 cup shredded cheese (cheddar or mozzarella) - Fresh parsley, finely chopped for garnish These main ingredients create a rich and creamy base. The cottage cheese brings protein, while the eggs add fluffiness. I love using bell peppers and green onions for a fresh crunch. You can enhance this dish with: - Spinach or kale for extra greens - Cherry tomatoes for a sweet burst - Crumbled feta for a tangy twist - Hot sauce for a bit of heat These optional ingredients let you customize your baked cottage cheese eggs. Adding greens boosts nutrition, while tomatoes add color and flavor. To make this dish, gather: - A mixing bowl - A whisk or fork - A baking dish (about 8x8 inches) - A spatula - An oven These tools help you mix and bake the ingredients smoothly. Using a whisk ensures the eggs and cottage cheese blend well for a perfect texture. First, set your oven to 375°F (190°C). This step is key for even cooking. Grab a medium baking dish, about 8x8 inches. Lightly grease it with non-stick spray or a dab of olive oil. This helps prevent the eggs from sticking. In a large bowl, put in 1 cup of cottage cheese and 4 large eggs. Whisk them together until the mix is smooth and fluffy. Next, add in the diced bell pepper, green onion, garlic powder, smoked paprika, salt, and pepper. Gently fold these in, making sure everything mixes well. Now, pour the mixture into your greased baking dish. Spread it out evenly with a spatula. Sprinkle 1/2 cup of shredded cheese on top for that delicious cheese crust. Place the dish in the oven and bake for 25-30 minutes. You’ll know it’s done when the top is golden brown and bubbly. Once baked, let it cool for 5 minutes. Garnish with fresh parsley and cut into squares to serve. Enjoy this simple yet satisfying dish! For the complete recipe, check out the Full Recipe section. To get the best texture in your baked cottage cheese eggs, use fresh cottage cheese. The creaminess of the cottage cheese gives a nice contrast to the eggs. Whisk the eggs and cottage cheese until they are smooth. This step adds air, making the dish fluffy. Avoid over-mixing after adding the veggies. This keeps the texture light and airy. Bake until the edges are golden brown and the center is just set. Let it cool for a few minutes before slicing. This helps the dish firm up nicely. Choosing the right cheese can elevate your dish. I love adding cheddar for a sharp flavor. Mozzarella gives a nice gooey texture. You can also mix in some feta for a tangy twist. If you want something different, try adding goat cheese. It adds a creamy richness that pairs well with the eggs. Use a blend of cheeses for a more complex flavor. This will make your baked cottage cheese eggs even more delicious. For a complete meal, serve your baked cottage cheese eggs with fresh fruit or a light salad. The sweetness of fruit balances the savory eggs. A side of greens adds color and crunch. You can also pair it with whole grain toast for added fiber. If you want more protein, add a slice of smoked salmon. This combo will keep you full and satisfied. For a fun twist, top with sliced avocado or a dollop of salsa. This adds freshness and flavor to your dish. Explore the [Full Recipe] for more ways to enjoy baked cottage cheese eggs! {{image_4}} If you want a low-carb version of Baked Cottage Cheese Eggs, try using fewer eggs. You can also swap out the cottage cheese for ricotta. This keeps the dish creamy without the extra carbs. Add spinach or zucchini for more volume without extra carbs. These veggies pack in nutrients and help you feel full. For a veggie boost, add mushrooms, kale, or cherry tomatoes. These ingredients add great flavor and texture. You can also throw in some chopped spinach for extra color. Consider using feta cheese instead of cheddar for a tangy twist. This keeps your dish vegetarian and adds more nutrients, too. If you love heat, add diced jalapeños or red pepper flakes. These will give your dish a nice kick. You can also mix in a dash of hot sauce before baking. For a smoky flavor, try adding chorizo or smoked sausage. This will enhance the taste and make it even more satisfying. For the full recipe, check out the section above. Enjoy experimenting with these variations! To store leftovers, let the dish cool first. Cover it tightly with plastic wrap or a lid. Place it in the fridge. It keeps well for up to 3 days. Make sure to label the container with the date. You can freeze Baked Cottage Cheese Eggs for later. Cut the dish into portions and place them in freezer-safe containers. Wrap each piece in plastic wrap and then foil. This keeps them fresh for up to 3 months. When ready to eat, thaw them in the fridge overnight. Reheat your baked eggs in the oven for the best texture. Preheat your oven to 350°F (175°C). Place the dish in an oven-safe container. Cover it with foil to keep moisture in. Heat for about 15-20 minutes, or until hot. You can also use a microwave for quick reheating. Just cover it and heat in 30-second intervals. Enjoy your leftovers like they are fresh! Yes, you can substitute cottage cheese. Use ricotta or Greek yogurt for a creamier texture. Both options bring a mild flavor. They also keep the dish moist and rich. However, cottage cheese offers a unique texture. If you want to keep the dish true to its nature, stick with cottage cheese. Absolutely! Baked cottage cheese eggs work great for meal prep. You can make a batch ahead of time and store it in the fridge. Cut it into squares for easy serving. Just reheat individual portions in the microwave. This dish stays fresh for about 3-4 days in the fridge. Baking takes about 25-30 minutes. It's best to check for a golden top and set eggs. The time can vary based on your oven. Make sure to preheat your oven to 375°F (190°C) for even cooking. Baked cottage cheese eggs are packed with protein. Each serving provides a good amount of calcium as well. The eggs add healthy fats and vitamins. Plus, the veggies boost fiber and antioxidants. This dish is a great choice for a balanced meal. You can enjoy it any time of the day! Baked cottage cheese eggs are easy to make and full of flavor. We covered the best ingredients, tools, and step-by-step baking methods. I shared tips for texture, cheese pairings, and serving suggestions, along with tasty variations. You can store leftovers well or even freeze them for later. Don't forget, this dish packs nutrition and suits meal prep. Now, it's time to get creative in your kitchen and enjoy this delightful meal!
Baked Cottage Cheese Eggs Simple and Satisfying Dish
Looking for a simple and satisfying meal? Baked Cottage Cheese Eggs are your answer! This dish is easy to make and packs a punch of
For this dish, you need a few key ingredients: - 4 large eggs - 1 cup fresh spinach, chopped - 1 cup mushrooms, sliced (button, cremini, or shiitake) - 1/4 cup milk (or plant-based milk) - 1 tablespoon olive oil or butter - 1/4 teaspoon garlic powder - Salt and pepper to taste - Grated cheese (optional, like cheddar or feta) These ingredients come together to create a tasty, colorful meal. You can enhance the taste with these optional ingredients: - Fresh herbs (like parsley or chives) - Hot sauce or chili flakes for heat - Onions or bell peppers for extra crunch - A splash of soy sauce for umami Feel free to mix and match based on what you like. You can easily swap some ingredients. Use these ideas: - Eggs: Try egg whites for a lighter dish. - Milk: Any milk alternative works well. - Cheese: Nutritional yeast gives a cheesy flavor for vegan dishes. - Spinach: Kale or Swiss chard can be good substitutes. - Mushrooms: Zucchini or asparagus can add different flavors. These substitutions help you tailor the dish to your taste or diet. For the full recipe, check out the previous sections! To start, gather your eggs, milk, garlic powder, salt, and pepper. Crack four large eggs into a bowl. Pour in one-fourth cup of milk. Add garlic powder, salt, and pepper to taste. Whisk the mix until it looks frothy. This step gives the eggs a light and fluffy texture. Next, heat one tablespoon of olive oil or butter in a non-stick skillet on medium heat. Wait until the oil shimmers or the butter melts. Then, add one cup of sliced mushrooms. Spread them out evenly in the skillet. Cook for about three to four minutes. Stir them occasionally until they turn golden brown. This step brings out their rich flavor. Once the mushrooms are cooked, add one cup of chopped spinach. Cook it for one to two minutes until it wilts. Now, pour your egg mixture into the skillet. Tilt the pan to spread it evenly. Let it sit for a moment. As the edges begin to set, gently fold the eggs with a spatula. Mix in the mushrooms and spinach. Cook for about three to five minutes until the eggs are soft and creamy. If you want cheese, sprinkle some on top before serving. Enjoy your Mushroom-Spinach Scrambled Eggs! For more details, check out the Full Recipe. To get soft, fluffy scrambled eggs, focus on your mixing. Whisk the eggs well. This adds air and makes them light. Use a non-stick skillet to prevent sticking. Cook over medium heat to avoid burning. Stir gently and don’t rush. The key is to fold the eggs slowly. This keeps them creamy and smooth. For added taste, think beyond salt and pepper. Garlic powder adds depth, and cheese adds richness. Try different mushrooms for unique flavors. Cremini or shiitake mushrooms give a nice earthy taste. Fresh herbs, like parsley or chives, brighten the dish. A sprinkle of red pepper flakes can add a kick. Experiment until you find your favorite mix. Using the right tools makes cooking easier. A good non-stick skillet is a must. It helps eggs cook evenly and slide out easily. A whisk is important for mixing the eggs well. A spatula helps fold the eggs gently. Finally, a mixing bowl is needed for the egg mixture. These basic tools make the process smooth and fun. For the full recipe, check out the complete guide above! {{image_4}} You can add bacon or sausage to your mushroom-spinach scrambled eggs for a tasty boost. Cook the bacon until crispy, then chop it into small pieces. For sausage, use breakfast sausage links or patties. Cook them in the skillet before adding mushrooms and spinach. This adds a savory flavor and extra protein to your meal. If you follow a vegan diet, you can still enjoy this dish. Use tofu or chickpea flour as an egg substitute. For tofu, crumble it and sauté it like the eggs. For chickpea flour, mix it with water to create a batter. Cook it in the skillet just like you would with eggs. Both options provide a creamy base that pairs well with mushrooms and spinach. Cheese can add a rich flavor to your scrambled eggs. Cheddar is a popular choice for its meltiness. Feta brings a tangy twist and pairs well with spinach. You can also try goat cheese for a creamier texture. Add cheese right before serving, so it melts into the warm eggs. This elevates the dish and adds depth to every bite. For the full recipe, check out the details above! To keep your scrambled eggs fresh, let them cool first. Then, place them in an airtight container. Store them in the fridge for up to three days. Make sure to label the container with the date. This way, you’ll know when to eat them. To reheat, you can use a microwave or a skillet. If using a microwave, place the eggs in a bowl. Heat on low power for 30-second bursts, stirring in between. This helps them warm evenly. If you prefer a skillet, add a little olive oil over low heat. Stir gently until warmed through, which takes about 5 minutes. You can freeze Mushroom-Spinach Scrambled Eggs, but they may change texture. To freeze, let them cool completely. Then, place the eggs in a freezer-safe bag. Remove as much air as possible before sealing. They can last up to two months in the freezer. When you want to eat them, thaw overnight in the fridge. Reheat as mentioned before. For the full recipe, check out the details above. Yes, you can prepare Mushroom-Spinach Scrambled Eggs in advance. To do this, cook the eggs fully and let them cool. Store them in an airtight container in the fridge for up to three days. When you are ready to eat, reheat them gently in a pan. Add a splash of water to keep them moist. This way, you can enjoy a quick meal without extra cooking time. Mushroom-Spinach Scrambled Eggs pair well with many sides. Here are some tasty options: - Whole-grain toast - Sliced avocado - Fresh fruit salad - Crispy bacon or turkey bacon - A light green salad These sides add flavor and nutrition, making your meal more complete. You can mix and match based on what you prefer. Yes, you can easily make Mushroom-Spinach Scrambled Eggs dairy-free. Just swap the milk for a plant-based alternative. Good options include almond milk, oat milk, or soy milk. If you want cheese, look for dairy-free cheese products. These swaps keep the dish creamy while fitting your dietary needs. You still get all the great flavors! For the full recipe, check the earlier section. Mushroom-spinach scrambled eggs are easy and tasty. We covered key ingredients and options for great flavors. You learned how to cook them perfectly and enhance their taste. Storage tips help keep leftovers fresh, while answers to common questions offer more insights. Try different proteins or cheese for fun twists. This dish fits many diets and tastes. Enjoy making it your own, and don’t be afraid to experiment.
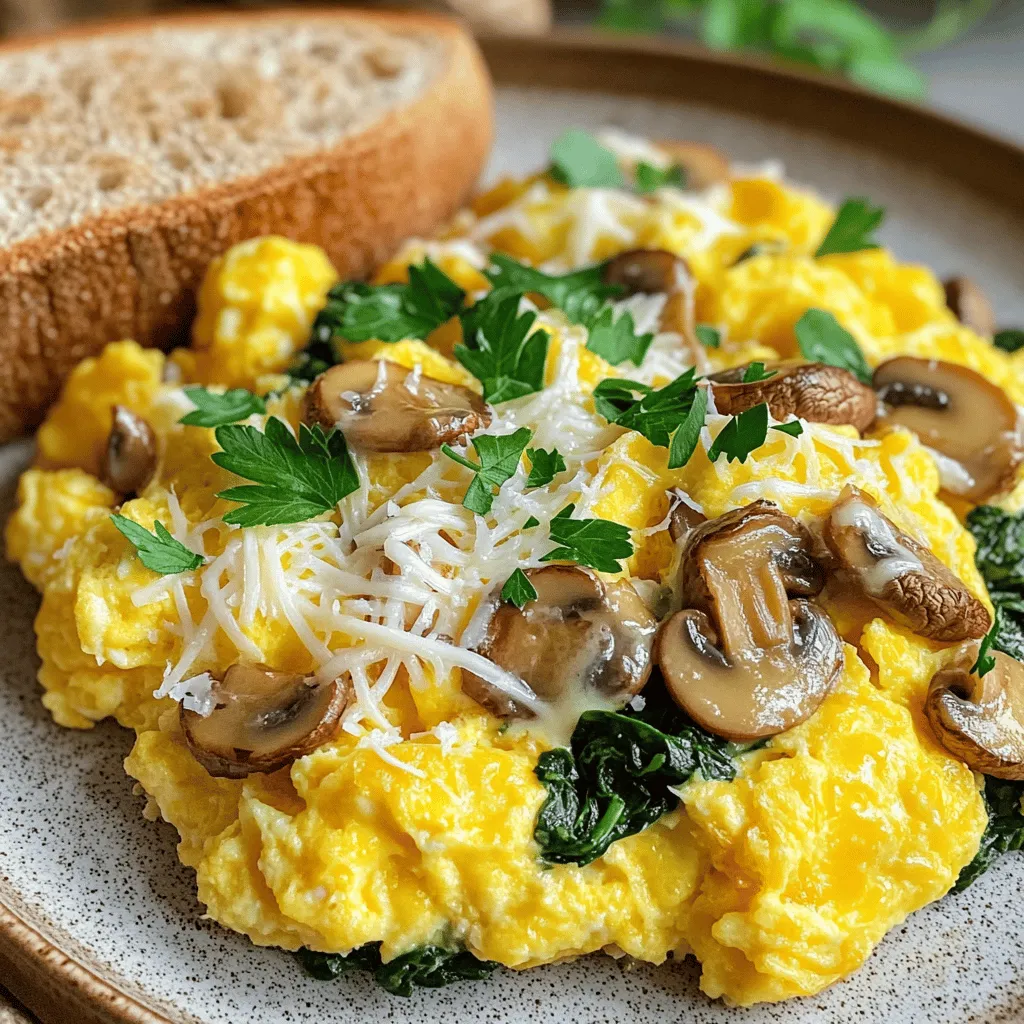
Mushroom-Spinach Scrambled Eggs Quick and Easy Meal
Looking for a quick and easy meal that packs a punch? Try my Mushroom-Spinach Scrambled Eggs! This dish is not only simple to whip up
- 2 cups cottage cheese - 6 large eggs - 1 cup fresh spinach, chopped - 1 small bell pepper, diced - 1/2 cup onion, finely chopped Cottage cheese forms the creamy base of this dish. It brings protein and moisture. Eggs add richness and help bind everything together. Fresh spinach offers color and nutrition. The bell pepper brings sweetness, while onion adds depth. - 1 teaspoon garlic powder - 1 teaspoon salt - 1/2 teaspoon black pepper - 1/2 teaspoon smoked paprika These seasonings elevate the flavor. Garlic powder gives a nice punch. Salt enhances all the tastes. Black pepper adds a mild kick, while smoked paprika brings warmth and a hint of smokiness. - 1 cup cherry tomatoes, halved - 1/2 cup shredded cheese (cheddar or mozzarella) - Fresh herbs for garnish (parsley or chives) Cherry tomatoes add a pop of freshness and color. Shredded cheese on top melts beautifully, creating a golden crust. Fresh herbs make a lovely garnish, adding brightness and a touch of elegance. For the full recipe, check out the Cottage Cheese Egg Bake Delight. - Preheat the oven to 350°F (175°C). - Prepare your baking dish with non-stick spray. This helps prevent sticking and makes serving easy. - In a large bowl, whisk together the cottage cheese and eggs. Make sure they blend well. - Add the chopped spinach, diced bell pepper, finely chopped onion, halved cherry tomatoes, garlic powder, salt, black pepper, and smoked paprika. Stir gently until all the ingredients are mixed. - Carefully pour the mixture into the prepared baking dish. Spread it out evenly for uniform baking. - Generously sprinkle the shredded cheese on top. This will create a nice, bubbly crust. - Place the baking dish in the preheated oven. Bake for 30-35 minutes until the edges are golden brown. To check doneness, insert a toothpick into the center; it should come out clean. This easy recipe will help you create a tasty Cottage Cheese Egg Bake that's perfect for any meal. Check out the Full Recipe for all the delicious details! To get the best texture, whisk your eggs well. This creates a smooth and creamy mix. Once you add the vegetables, stir gently. Overmixing can make it tough. You can boost the flavor by trying different spices. Italian seasoning works well. Also, use your favorite cheese. This gives your dish a unique twist. Serve your Cottage Cheese Egg Bake warm. Add fresh herbs like parsley or chives for a pop of color. It pairs nicely with toast or fruit for a balanced meal. For more details, check out the Full Recipe. {{image_4}} You can make this dish even more colorful. Add chopped zucchini or mushrooms to boost flavor and nutrition. Fresh herbs like basil or dill also enhance the taste. They add a fresh touch that brightens up each bite. For a heartier meal, mix in diced ham or cooked bacon. You can also use sausage for a savory twist. If you want to switch it up, try ricotta cheese instead of cottage cheese. This swap gives a creamy texture and a different flavor. Always check labels to ensure your added ingredients are gluten-free. You can pair this dish with gluten-free sides. Fresh fruit or a simple salad makes a great match. These sides keep your meal light and fresh. For the full recipe, check the detailed instructions above. Store your leftover cottage cheese egg bake in an airtight container. It keeps well in the fridge. For best taste, consume it within 3-4 days. This way, you can enjoy the rich flavors and soft texture. When you're ready to eat, you have options. Microwave individual portions for a quick meal. Just heat for about 1-2 minutes. If you want a crispy top, use the oven. Preheat it to 350°F (175°C) and bake for 10-15 minutes. Want to save some for later? Freeze portions in freezer-safe containers. Make sure they are sealed tightly. When you're ready to eat, thaw them in the fridge overnight. After thawing, follow the reheating suggestions for the best taste. You can prepare the mixture the night before. Just mix everything and store it in the fridge. Then, bake it in the morning. This saves time and makes breakfast easy. Yes, you can use other cheeses. Feta or gouda work great because they melt well. Feel free to pick your favorite cheese for a new taste. Pair it with fresh fruit, a mixed greens salad, or toast. These sides make a complete meal. You can also use leftovers for a snack later. Insert a toothpick in the center of the bake. If it comes out clean, it’s done. The edges should be golden brown, and the center firm. Yes, Cottage Cheese Egg Bake freezes well. Store it in an airtight container. This way, you can enjoy it later without losing flavor. This blog post covered a simple and tasty Cottage Cheese Egg Bake. We discussed key ingredients, how to mix and bake them, and ways to customize your dish. I shared tips for great texture and flavor enhancement that make this meal special. Lastly, I provided guidance on storage and reheating to enjoy leftovers later. Remember, you can easily adapt this recipe to fit your taste and needs. Try it out and enjoy a delicious meal any time!
Cottage Cheese Egg Bake Flavorful and Easy Recipe
Looking for a simple yet tasty meal? This Cottage Cheese Egg Bake is your answer. Packed with fresh spinach, colorful bell peppers, and creamy cottage
When I make Pumpkin Spice French Toast, I choose the best ingredients for great taste. Here’s what you need: - 4 thick slices of bread (brioche or challah recommended for a rich flavor) - 2 large eggs - ½ cup of milk (choose between dairy or non-dairy alternatives) - ¼ cup canned pumpkin puree (ensure it's pure pumpkin, not pie filling) - 1 teaspoon pure vanilla extract - 1 teaspoon pumpkin pie spice (or adjust to taste) - 1 tablespoon brown sugar (packed) - 1 tablespoon unsalted butter (for cooking) - Maple syrup (for drizzling) - Whipped cream (optional topping) - Ground cinnamon (for garnish) These ingredients make the toast fluffy and full of flavor. The bread choice is key. Brioche and challah add richness. The pumpkin puree brings warmth, while the spices give it that cozy fall flavor. Don't skip the brown sugar; it adds sweetness that balances the spices. Feel free to get creative with the toppings. Whipped cream is a fun addition, and a sprinkle of cinnamon can elevate the dish. Each bite will remind you of autumn. Enjoy the process of gathering your ingredients and preparing this delightful meal! {{ingredient_image_2}} Start by grabbing a mixing bowl. In this bowl, you will whisk together two large eggs and a half cup of milk. You can choose dairy or a non-dairy option. Make sure to mix them well. This helps the eggs blend smoothly with the milk. Next, add in ¼ cup of canned pumpkin puree. Ensure it is pure pumpkin, not pie filling. This is key for that rich pumpkin flavor. Then, add one teaspoon of pure vanilla extract for sweetness. Sprinkle in one teaspoon of pumpkin pie spice. This is where the magic happens! Finally, mix in one tablespoon of packed brown sugar. This adds a nice touch of sweetness. Keep whisking until the mixture is smooth and all the ingredients are mixed well. Now it’s time to cook! Preheat a non-stick skillet or griddle over medium heat. Once it is warm, add one tablespoon of unsalted butter. Let it melt and coat the skillet evenly. Take your thick slices of bread. Dip each slice into the pumpkin mixture. Make sure both sides are fully coated. Let any extra batter drip off. This prevents the toast from becoming soggy. Place the coated slices on the hot skillet. Cook for about 3-4 minutes on each side. You want them to turn golden brown and have a slight crisp. Keep an eye on the heat. Adjust it if needed to avoid burning. Once the French toast is cooked, transfer the slices to a warm oven. Set the oven to low heat. This keeps the toast warm while you finish cooking the rest. When serving, arrange the French toast on a plate. Drizzle maple syrup over the top. For extra flair, you can add whipped cream on top. Sprinkle some ground cinnamon for a finishing touch. To impress your guests, stack the slices off-center. Drizzle syrup decoratively around the edges. This makes your dish look beautiful and ready to eat! To make your Pumpkin Spice French Toast even better, adjust the spices to your taste. If you love a warm kick, add more pumpkin pie spice. You can also mix cinnamon or nutmeg for extra warmth. Choosing the right bread is key for texture. I suggest using thick slices of brioche or challah. These breads soak up the mix well and get a soft, fluffy inside. Plus, they add a rich flavor that pairs perfectly with pumpkin. To avoid sogginess, make sure to dip the bread quickly. Coat both sides but let extra batter drip off. This helps keep your toast crisp. Using the right heat settings is important. Cook on medium heat to get a nice golden brown. If the heat is too high, the outside burns while the inside stays wet. For the best breakfast, serve your French toast with maple syrup. You could also add fresh fruit like bananas or berries. A warm drink like coffee or chai pairs well too. Get creative with your serving style. Stack the slices slightly off-center for a nice look. Drizzle syrup around the plate and add a dollop of whipped cream on top. A sprinkle of cinnamon adds a festive touch. Pro Tips Choose the Right Bread: Opt for thick slices of brioche or challah for a rich, custardy texture that soaks up the pumpkin mixture beautifully. Adjust the Spice Level: Feel free to increase or decrease the amount of pumpkin pie spice based on your personal preference for a stronger or milder flavor. Perfect Cooking Temperature: Maintain a medium heat while cooking to ensure the French toast cooks through without burning, achieving a golden-brown crust. Keep it Warm: Use a low oven to keep cooked French toast warm while frying the remaining slices, preventing them from getting cold and soggy. {{image_4}} You can easily adapt this recipe to fit your needs. If you want a dairy-free version, use almond or oat milk. For gluten-free, choose a gluten-free bread. Both options taste great and keep the recipe flavorful. If you want to cut back on sugar, swap the brown sugar for a sugar substitute. You can also use mashed bananas for natural sweetness. This keeps the dish tasty without extra sugar. For a fun twist, try different spice blends. Cinnamon and nutmeg add warmth. You could also mix in some ground ginger or cardamom for a unique taste. Toppings matter too! Consider adding chocolate chips or chopped nuts. Walnuts or pecans give a nice crunch. They can elevate your French toast to a new level. This recipe shines in the fall. Pair your French toast with fresh apples or pears. Sauté them in a little butter and cinnamon for added flavor. You can also add seasonal ingredients like cranberries or figs. These fruits add color and a burst of flavor. Enjoy exploring these variations to make your Pumpkin Spice French Toast special! To keep your pumpkin spice French toast fresh, store it in the fridge. Place the slices in an airtight container. This helps keep them moist. Ideally, eat the leftovers within three days for the best flavor. When you are ready to eat, reheat the toast. You can use a skillet or microwave. For the skillet, heat it over medium. Add a bit of butter and warm each slice for about one minute per side. The microwave works too; heat for about 30 seconds. If you want to save pumpkin spice French toast for later, freezing is a great option. First, let the toast cool down completely. Then, wrap each slice in plastic wrap. Place the wrapped slices in a freezer bag. This way, they won’t stick together. You can freeze them for up to one month. When you are ready to enjoy, take out the desired number of slices. Thaw them in the fridge overnight. For reheating, use the oven. Preheat it to 350°F (175°C) and bake the slices for about 10 minutes. This will make them warm and crispy again. You can make Pumpkin Spice French Toast using simple steps. First, gather your ingredients: - 4 thick slices of bread (brioche or challah recommended) - 2 large eggs - ½ cup of milk (dairy or non-dairy) - ¼ cup canned pumpkin puree - 1 teaspoon pure vanilla extract - 1 teaspoon pumpkin pie spice - 1 tablespoon brown sugar - 1 tablespoon unsalted butter - Maple syrup (for drizzling) - Whipped cream (optional) - Ground cinnamon (for garnish) Start by whisking the eggs, milk, pumpkin puree, vanilla, pumpkin pie spice, and brown sugar in a bowl. Mix until smooth. Heat your skillet over medium heat and melt the butter. Dip each slice of bread in the mixture, coating both sides. Cook the slices for 3-4 minutes on each side until golden brown. Keep them warm in a low oven until ready to serve. Drizzle with maple syrup and, if you like, top with whipped cream and cinnamon. You can use regular bread, but it changes the taste and texture. Brioche and challah add sweetness and richness. They soak up the mixture well without becoming soggy. Regular bread may not hold the pumpkin flavor as well. It can also be less fluffy. If you use plain bread, make sure it’s thick enough to hold up when dipped. Pumpkin Spice French Toast pairs well with many sides and drinks. Here are some ideas: - Fresh fruit like sliced bananas, berries, or apples - Crispy bacon or sausage for a savory touch - Yogurt for a creamy contrast - Coffee or chai tea for a warm beverage - Spiced apple cider for a seasonal drink These options will enhance your breakfast experience and balance the sweetness of the French toast. Enjoy! This blog post covered how to make Pumpkin Spice French Toast. We explored the best ingredients, including bread choices, pumpkin puree, and spices. Step-by-step instructions guided you through preparation and cooking. I shared tips for enhancing flavor, modifications for diets, and serving ideas. In summary, this dish is simple and delicious. Enjoy experimenting with flavors and presentations. Happy cooking!
Pumpkin Spice French Toast Easy and Flavorful Recipe
Fall is here, and it’s time to start your mornings with a cozy twist. My Pumpkin Spice French Toast recipe is the perfect blend of
- 1 cup rolled oats - 2 cups almond milk (or any milk of your choice) - 1 ripe banana, neatly sliced - 1/2 cup Greek yogurt (choose between non-fat or regular) - 1/4 cup nutritious chia seeds - 1 tablespoon honey or maple syrup (optional for sweetness) - 1/2 cup mixed berries (fresh or frozen for convenience) - 1/4 cup crunchy granola These ingredients are simple and easy to find. Rolled oats are the base for this tasty breakfast. They provide fiber and keep you full. Almond milk adds creaminess, while banana gives natural sweetness. Greek yogurt adds protein and a nice tang. For toppings, chia seeds boost nutrition and add a nice crunch. Honey or maple syrup can sweeten your bowl. Mixed berries add color and flavor. Granola gives a satisfying crunch, making each bite fun. You can mix and match these ingredients to fit your taste. For the full recipe, check the section above. - In a medium saucepan, combine 1 cup of rolled oats and 2 cups of almond milk. - Add a pinch of cinnamon for flavor. - Heat over medium heat. Stir often for about 5 minutes until thickened. - While the oats cook, divide 1/2 cup of Greek yogurt into four bowls. - Pour cooked oats over the yogurt in each bowl. - Arrange banana slices and mixed berries on top. - Drizzle with honey or maple syrup for sweetness. - Sprinkle with 1/4 cup of chia seeds and granola for crunch. These steps will help you create a tasty breakfast bowl in just 10 minutes. For the full recipe with all the details, check out the instructions above. Enjoy a gourmet meal that’s both quick and satisfying! - Use quick-cooking oats for faster preparation. They cook in just a few minutes. - Prepare toppings in advance to save time in the morning. Slice fruits or measure out nuts ahead of time. - Layer ingredients for visual appeal. A beautiful bowl makes breakfast more fun. - Use colorful toppings for an attractive display. Bright berries and bananas will catch your eye. - Swap Greek yogurt for dairy-free alternatives. Coconut yogurt works well for a vegan option. - Experiment with different fruits or nut toppings. Try mango, kiwi, or almonds for a new taste. By following these tips, you can create quick and delicious breakfast bowls that fit your style! Check out the Full Recipe for more ideas. {{image_4}} To spice up your breakfast bowls, you can try different flavors. - Chocolate Banana Version: Add cocoa powder or chocolate drizzle to your oats. This gives a sweet twist. Top with banana slices and a sprinkle of nuts for crunch. - Tropical Fruit Bowl with Coconut: Use coconut milk instead of almond milk. Top with mango, pineapple, and shredded coconut. It’s like a vacation in a bowl! You can easily adjust these bowls for your needs. - Gluten-Free Options: Use gluten-free oats instead of regular oats. This makes your breakfast safe for those with gluten sensitivities. - Vegan Alternative: Skip the Greek yogurt and use coconut yogurt or almond yogurt. This keeps your meal plant-based and tasty. Portion control helps with busy mornings. - Making Single-Serve Portions: Use small jars or bowls to create single servings. This makes it easy to grab one and go. - Batch Preparation: Prepare several bowls at once. Store them in the fridge for quick breakfasts throughout the week. This saves time and keeps you full! For the full recipe, check out the 10-Minute Gourmet Grab & Go Breakfast Bowls. To keep your breakfast bowls fresh, refrigerate them right after you make them. This method makes it easy to grab a bowl each morning. Use airtight containers to help maintain freshness. These containers keep out air and moisture, ensuring your breakfast stays tasty. - Store individual bowls in the refrigerator. - Choose airtight containers for best results. If you want to save time, you can freeze your prepared oats. This is an easy way to have breakfast ready whenever you need it. To reheat, simply take the oats out of the freezer and let them thaw overnight in the fridge. - Freeze cooked oats for future breakfasts. - Reheat in a saucepan over low heat or in the microwave for best results. You can find the full recipe for these delicious breakfast bowls in this article, which will help you enjoy a quick, healthy meal all week long. You can easily make these breakfast bowls vegan. Just substitute Greek yogurt with non-dairy yogurt. There are many options available, like almond or coconut yogurt. This swap keeps the creamy texture while making it plant-based. Yes, you can prepare the oats in advance. Cook the oats and let them cool. Store them in the fridge in an airtight container. When you're ready, just mix them with the yogurt and toppings. This saves time on busy mornings. These breakfast bowls typically last 3-5 days when stored properly. Use airtight containers to keep them fresh. If you notice any change in smell or texture, it’s best to discard them. Enjoy your meals without worry! These breakfast bowls are quick, tasty, and easy to customize. You mix rolled oats and almond milk to create a base, then add Greek yogurt and your favorite toppings. You can make a chocolate version or go tropical. Store them in the fridge or freezer for convenience. With some quick prep and layering tips, you can create an eye-catching meal. Enjoy making your morning routine fun and nutritious!
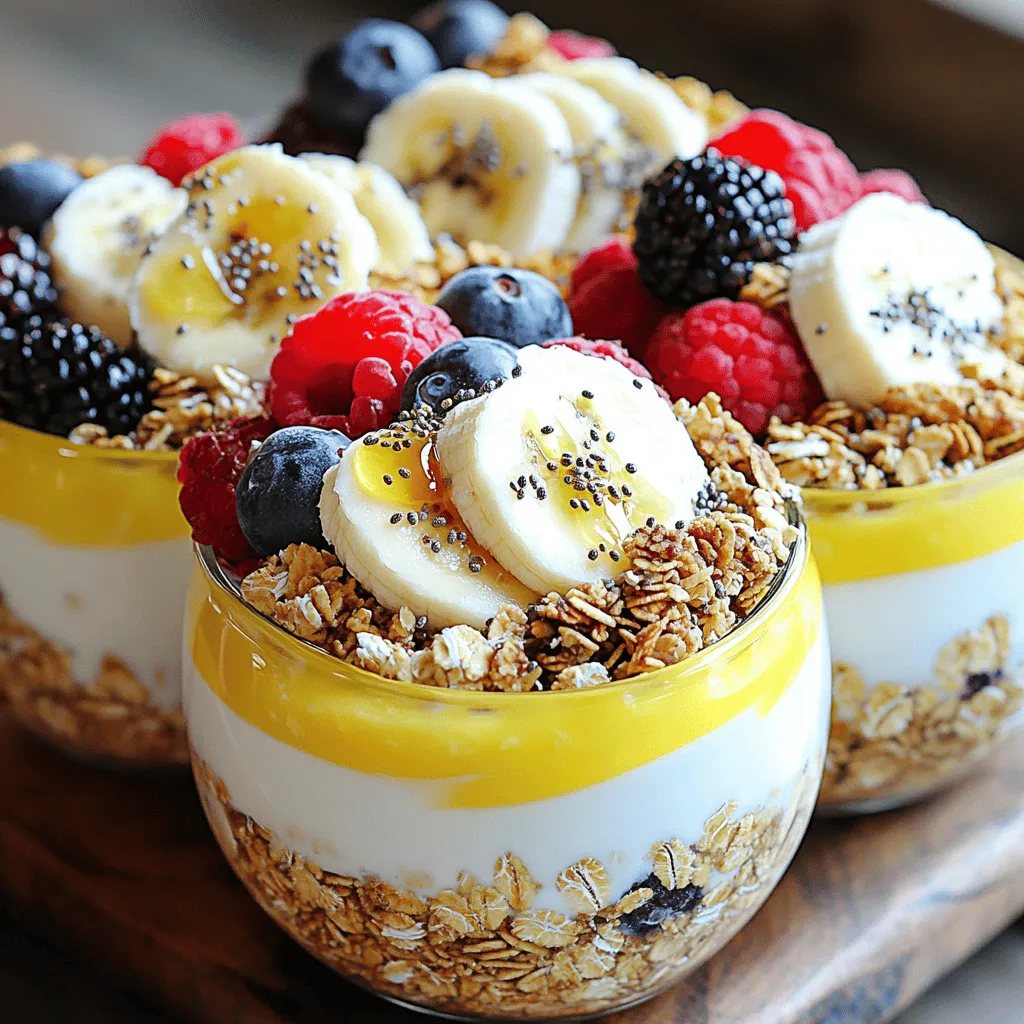
10 Minute Grab & Go Breakfast Bowls Easy and Quick
Mornings can be hectic, but breakfast doesn’t have to be! With these 10-minute grab and go breakfast bowls, you can fuel your day with ease.
For my healthy meal prep breakfast bowls, I use simple yet tasty ingredients. Here’s what you need: - 1 cup quinoa, thoroughly rinsed - 2 cups vegetable broth or water - 4 large fresh eggs - 1 cup cherry tomatoes, halved - 1 cup canned black beans, drained and rinsed - 1 ripe avocado, diced - 1 cup fresh kale, chopped into bite-sized pieces - 1 tablespoon extra virgin olive oil - 1 teaspoon garlic powder - 1 teaspoon paprika - Salt and pepper to taste - Fresh cilantro leaves, for garnish Each ingredient packs a punch of nutrition. Here’s what they bring to the table: - Quinoa: This grain is rich in protein and fiber. It helps keep you full. - Eggs: Eggs are a great source of protein and healthy fats. They support muscle health. - Cherry tomatoes: These are high in vitamins A and C. They boost your immune system. - Black beans: Packed with protein and fiber, black beans help regulate digestion. - Avocado: This fruit provides healthy fats and potassium. It’s great for heart health. - Kale: Kale is loaded with vitamins K, A, and C. It has strong antioxidants. - Olive oil: Rich in healthy fats, olive oil supports heart health too. - Garlic powder: This adds flavor and has many health benefits, like boosting immunity. - Paprika: It adds a smoky taste and is high in antioxidants. - Cilantro: This herb adds freshness and may help detoxify the body. Choosing fresh produce makes your breakfast bowls even better. Here are some tips: - Quinoa: Look for grains that are clean and dry. Avoid any with a musty smell. - Tomatoes: Choose firm, bright tomatoes. They should feel slightly soft when you press them. - Avocado: Pick avocados that yield slightly when pressed. They should not be too hard or mushy. - Kale: Select kale with deep green leaves. Avoid any yellow or wilting leaves for freshness. - Cilantro: Fresh cilantro should be bright green with no brown spots. Smell it for freshness. Use these tips to gather fresh ingredients for your nourishing meal prep breakfast bowls. Enjoy your cooking! Start by rinsing 1 cup of quinoa under cold water. This step removes any bitter taste. In a medium pot, bring 2 cups of vegetable broth or water to a boil. Once boiling, add the rinsed quinoa. Reduce the heat to low and cover the pot. Let it simmer for about 15 minutes. After that, the quinoa should be fluffy, and the liquid will be absorbed. Remove from heat and let it cool a bit. While your quinoa cooks, preheat your oven to 375°F (190°C). Line a baking sheet with parchment paper. Spread 1 cup of halved cherry tomatoes evenly on the sheet. Drizzle 1 tablespoon of extra virgin olive oil over them. Sprinkle with 1 teaspoon of garlic powder, 1 teaspoon of paprika, salt, and pepper to taste. Toss gently to coat the tomatoes. Roast them in the oven for 15 minutes. They should be soft and slightly caramelized. In a large skillet, heat a little olive oil over medium heat. Add 1 cup of chopped kale. Sauté for about 3-5 minutes until the kale is tender and wilted. Season with salt and pepper, then set aside. For the eggs, fill a separate saucepan with water and bring it to a gentle simmer. Crack 4 large eggs into small bowls. Carefully slide the eggs into the simmering water, one at a time. Poach for 3-4 minutes. The whites should be set, and the yolks stay runny. Use a slotted spoon to lift them out and place them on a plate. To assemble your bowls, divide the cooked quinoa among four meal prep containers. Layer each bowl with the sautéed kale. Next, add the black beans, roasted cherry tomatoes, and a poached egg. Top with diced avocado. Finally, garnish each bowl with fresh cilantro leaves. You can add a sprinkle of salt and pepper for extra flavor. This meal prep is not only easy but also tasty! For the full recipe, check out the Nourishing Meal Prep Breakfast Bowls. To make your breakfast bowls quick and easy, planning is key. Here are some smart techniques for meal prep: - Cook in bulk: Make a larger batch of quinoa at once. Store it in the fridge for up to five days. - Use one pan: Roast tomatoes and sauté kale on the same baking sheet. This saves time and helps with cleanup. - Chop ahead: Dice your avocado and chop kale the night before. This makes morning assembly quick. - Portion wisely: Use clear containers to divide your meals. This way, you can easily grab one on busy mornings. Poached eggs can elevate your breakfast bowls. Here’s how to get them just right: - Fresh eggs: Use the freshest eggs you can find. They hold their shape better when poached. - Gentle simmer: Keep the water at a gentle simmer, not a rolling boil. This helps the egg whites stay together. - Vinegar trick: Add a splash of vinegar to the water. It helps the egg whites firm up faster. - Timing matters: Poach the eggs for about three to four minutes. This gives you a runny yolk that’s perfect for topping. Avoid these common pitfalls for the best breakfast bowls: - Overcooking quinoa: Watch your quinoa closely. It should be fluffy, not mushy. - Skipping seasoning: Don’t forget to season your veggies. A little salt and pepper make a big difference. - Making too much: Start with a smaller batch if you're new to meal prep. You can always make more later. - Ignoring storage: Use airtight containers to keep your breakfast bowls fresh. This prevents spoilage and keeps flavors vibrant. These tips will help you create healthy meal prep breakfast bowls that are easy and delicious. For the full recipe, check back in the earlier sections! {{image_4}} You can change the protein in your breakfast bowl. Tofu is a great option. It absorbs flavors well and is rich in protein. Just cube some firm tofu and sauté it with your favorite spices. Chicken is another choice. Cooked, shredded chicken adds a nice texture. Use leftover roasted chicken for ease. You can also try beans like chickpeas or lentils for added protein. Each option offers unique flavors and fits well with the quinoa base. Feel free to mix up your vegetables. Spinach, bell peppers, or zucchini work great. You can even use frozen vegetables if you’re short on time. Each vegetable brings its own taste and nutrients. For seasonings, try adding cumin, chili powder, or even fresh herbs. Experiment with different spices to find your favorite flavor combinations. This will keep your breakfast bowls fresh and exciting. To make your breakfast bowl vegan, skip the eggs. Instead, add more avocado or some vegan cheese. You can also use chickpea flour to create a scramble. This will give you a similar texture and flavor. If you want it gluten-free, ensure your quinoa is certified gluten-free. Most quinoa is naturally gluten-free, but it’s always good to check. Enjoy these bowls without worry about dietary restrictions. For a complete guide on creating these nourishing meals, check the Full Recipe. I recommend using glass or BPA-free plastic containers. Glass is great because it keeps food fresh. It also resists stains and odors. Plastic containers are lightweight and easy to handle. Look for ones with tight-fitting lids to prevent spills. If possible, choose containers that are microwave-safe. This makes reheating easier. These breakfast bowls can last up to four days in the fridge. Make sure to store them in airtight containers. This helps keep the flavors fresh. Label each container with the date you made them. This way, you can track how long they have been stored. If you notice any changes in color or smell, throw them away. When reheating, try to use the microwave for quick meals. Remove the lid to let steam escape. Heat in short intervals, about 30 seconds at a time. Stir between each interval to heat evenly. If you prefer the oven, cover the bowl with foil to keep moisture. Bake at 350°F (175°C) until heated through. This method helps keep the toppings from getting soggy. To make healthy meal prep breakfast bowls, start with your base. I love using quinoa. It cooks fast and is full of protein. Rinse one cup of quinoa well. Boil it in two cups of vegetable broth or water. Cook it for 15 minutes. While that cooks, roast your veggies. I suggest halved cherry tomatoes, drizzled with olive oil and some spices. Bake them at 375°F for 15 minutes. Sauté kale in a pan with a bit of olive oil until soft. Poach fresh eggs until the whites are firm but the yolks are soft. Next, divide the quinoa into meal prep containers. Add the kale, black beans, roasted tomatoes, and a poached egg on top. Finish with diced avocado and cilantro. Check out the Full Recipe for exact steps. Yes, you can freeze breakfast bowls! Just make sure to cool them first. Place them in airtight containers. They will last up to three months in the freezer. To enjoy, thaw them overnight in the fridge. Reheat in the microwave or on the stove. This makes busy mornings easy! You can customize your breakfast bowls with different ingredients. Try adding roasted sweet potatoes, spinach, or bell peppers. For protein, use tofu or chicken. You can also mix in nuts or seeds for crunch. Experiment with different herbs, too! To make more servings, simply double or triple each ingredient. For example, use two cups of quinoa and four cups of broth for eight servings. Adjust cooking times if needed, especially for the eggs. You can prepare everything in larger batches. Store in separate containers for easy meals. This blog post covered the key ingredients for healthy breakfast bowls, their benefits, and how to choose fresh produce. I shared step-by-step cooking methods and tips for prepping meals efficiently. You learned about variations, suitable protein options, and how to store your bowls for later use. Remember, easy meals can be both tasty and healthy. Your breakfast can be fun and diverse with a bit of creativity. Enjoy your culinary journey!
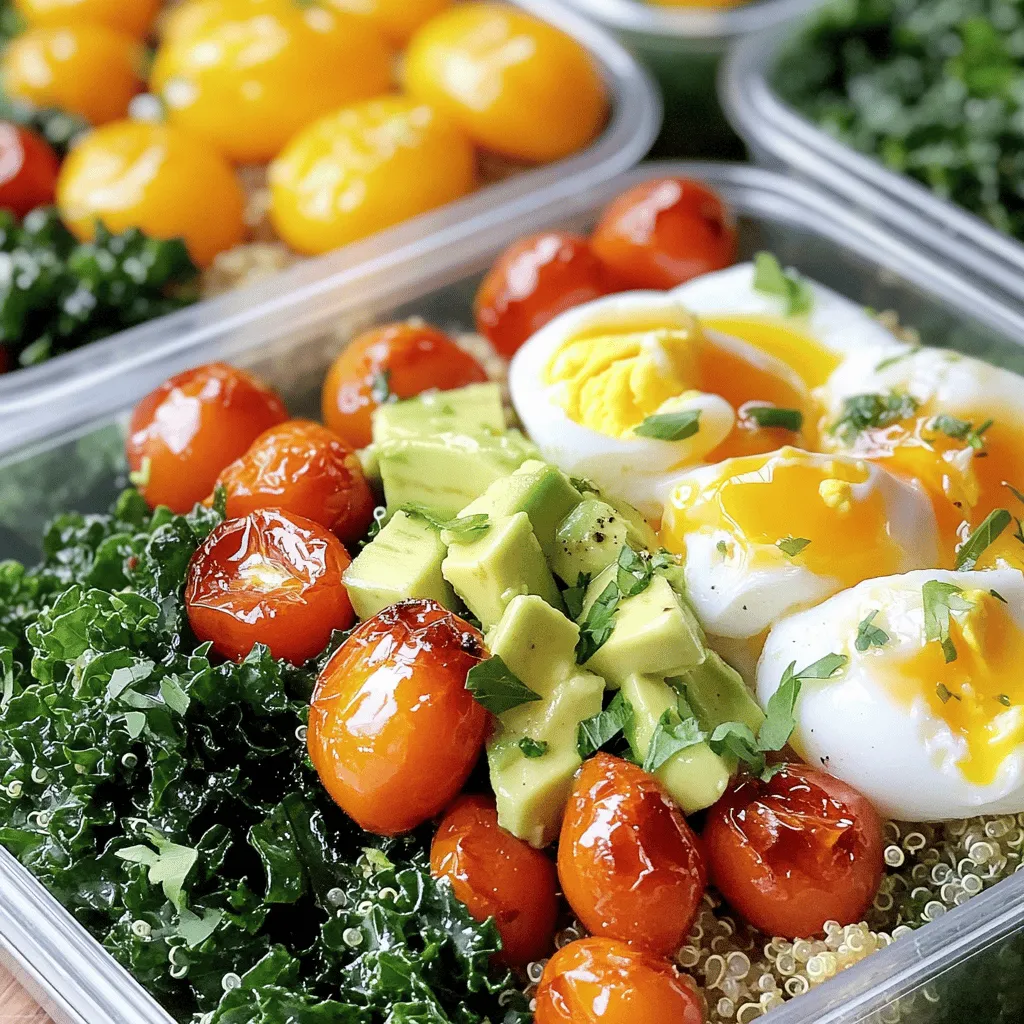
Healthy Meal Prep Breakfast Bowls for Simple Mornings
Starting your day with a healthy breakfast can be simple and fun! In this post, I’ll show you how to make delicious meal prep breakfast
To make tasty breakfast egg muffins, you need a few simple ingredients. Here’s what you’ll need: - 6 large eggs - 1/2 cup milk (or your preferred dairy-free alternative) - 1 cup fresh spinach, finely chopped - 1/2 bell pepper, diced (choose your favorite color) - 1/4 cup red onion, minced - 1/2 cup cherry tomatoes, halved - 1/2 cup shredded cheese (such as cheddar, feta, or cheese of your choice) - Seasoning: Salt, black pepper, garlic powder, oregano - Cooking spray or oil These ingredients combine to create a delicious and nutritious breakfast option. The eggs serve as a great base, adding protein and richness. The veggies bring color and flavor, while the cheese adds a nice melt and taste. Feel free to switch up the veggies or cheese to match your taste. For example, you can use mushrooms or zucchini instead of bell peppers. Each combination offers a new twist on this easy recipe. With this list, you’re ready to make your breakfast egg muffins. For the full recipe, check out the details above. - Preheat the oven to 350°F (175°C). - Grease the muffin tin with cooking spray or oil. - In a large bowl, whisk eggs and milk together until smooth. - Season the egg mixture with salt, pepper, garlic powder, and oregano. - Fold in spinach, bell pepper, red onion, and cherry tomatoes carefully. - Pour the mixture into the muffin cups, filling them about 3/4 full. - Sprinkle cheese over each filled muffin cup. - Bake in the preheated oven for 20-25 minutes until set and golden. - Cool the muffins for 5 minutes before removing them from the tin. - Use a knife to run around the edges to help pop them out. - Serve warm on a colorful platter, garnished with fresh herbs. - Pair with juicy fruit for a complete breakfast display. To ensure even cooking, preheat your oven to 350°F (175°C). This helps the muffins cook at the same rate. Place the muffin tin in the center of the oven for the best heat distribution. If your oven runs hot or cold, adjust the baking time. Check for doneness a few minutes early to avoid overcooking. Adding herbs and spices can boost flavor. Try fresh basil or a pinch of chili flakes for more zing. You can also mix different types of cheese. Cheddar and feta create a nice contrast. Experiment with your favorite cheeses to find the perfect blend. Chopping vegetables can be easy. Use a sharp knife to cut through them quickly. For even pieces, chop all veggies into similar sizes. When mixing ingredients, use a large bowl to give yourself space. Stir gently to keep the egg mixture fluffy. This ensures every muffin is packed with flavor and veggies. For the full recipe, check out the Breakfast Egg Muffins Extravaganza. {{image_4}} You can easily adjust this recipe to fit your needs. For gluten-free options, just use gluten-free flour or skip the flour entirely. The egg muffins will still taste great! If you want a vegan-friendly version, replace the eggs with a mix of silken tofu and nutritional yeast. Blend them until smooth. Add a bit of turmeric for color and flavor. Egg muffins shine with different veggies. Try adding broccoli or zucchini for a fresh twist. Chop them small so they cook evenly. You can also mix in cooked meats. Ham and bacon add a savory kick. Just dice them into small pieces and fold them into the egg mixture. Want to travel the world with your breakfast? Make Mediterranean-inspired muffins by adding feta cheese and sun-dried tomatoes. For a Mexican-style twist, mix in black beans, corn, and a sprinkle of taco seasoning. These flavors change your muffins and bring excitement to the table. Enjoy experimenting! To keep your breakfast egg muffins fresh, store them in the fridge. Place them in an airtight container. This helps keep moisture in and smells out. You can also wrap them tightly in plastic wrap. If you plan to eat them later, freezing is a great option. Just place them in a freezer-safe bag or container. Squeeze out as much air as you can. This helps prevent freezer burn. When you want to enjoy your muffins again, reheating is easy. You can use the microwave for quick heating. Just heat for about 30-60 seconds. If you prefer a crispier texture, use the oven. Preheat it to 350°F (175°C) and heat for about 10 minutes. This keeps the muffins fluffy and warm. Meal prep works best if you eat them within 3-5 days from the fridge. If frozen, they can last up to three months. In the fridge, your breakfast egg muffins stay fresh for about 5 days. In the freezer, they last up to three months. Just remember to label your containers with the date. This way, you can track how long they’ve been stored. Enjoy your delicious muffins with confidence, knowing they are safe to eat! How long do breakfast egg muffins last in the fridge? Breakfast egg muffins last about 4 to 5 days in the fridge. Store them in an airtight container. This keeps them fresh and tasty. Can I make these muffins in advance? Yes! You can make these muffins in advance. They freeze well too. Just bake, cool, and store them in freezer bags. Are breakfast egg muffins healthy? Yes, breakfast egg muffins are healthy. They are high in protein and packed with vegetables. You control the ingredients, making them great for your diet. What to do if the muffins are too dry? If your muffins are too dry, try adding more liquid next time. You can add extra milk or eggs. Also, avoid overbaking them. How to prevent sticking in the muffin tin? To prevent sticking, use cooking spray or oil generously. Grease the muffin tin well before adding the mixture. This helps them pop out easily. What goes well with breakfast egg muffins? Breakfast egg muffins pair well with fresh fruit or a side salad. You can also serve them with hot sauce for extra flavor. Can you serve them cold or should they be warm? You can serve them cold, but they taste best warm. Heating them enhances their flavors and makes the cheese melty and delicious. Your breakfast egg muffins are easy and fun to make. With just a few ingredients, you create a tasty meal. We covered how to prepare, mix, and bake your muffins for best results. We also shared tips on flavors and variations to keep things exciting. Don't forget how to store and reheat them to enjoy later. With these straightforward steps, you can make a great dish anytime. Enjoy your muffins and the joy they bring to your meals!
Breakfast Egg Muffins Tasty and Easy Recipe Idea
Looking for a quick and healthy breakfast? Let me introduce you to Breakfast Egg Muffins! This tasty and simple recipe is packed with protein and