Appetizers

- Chicken: Use 1 pound of boneless, skinless chicken breasts. Cut them into bite-sized cubes. This ensures even cooking and easy eating. - Cheese: Choose ½ cup of freshly grated Parmesan cheese. Fresh cheese melts and flavors better than pre-grated options. - Coating: I recommend using ½ cup of seasoned breadcrumbs. These breadcrumbs add flavor and texture. Unseasoned breadcrumbs will lack flavor, so avoid them. - Garlic powder versus fresh garlic: I often use 2 tablespoons of garlic powder for its ease and strong flavor. Fresh garlic is great, too, but it can be harder to measure and may burn. - Importance of smoked paprika: Use 1 teaspoon of smoked paprika. This spice adds a lovely smokiness and depth to the dish. - Balancing salt and pepper: Add ½ teaspoon of fine sea salt and ¼ teaspoon of freshly cracked black pepper. This balance enhances all the flavors without overpowering them. - Fresh herbs: Fresh parsley works well. If you want alternatives, consider basil or chives for a different taste. - Suggested dips for serving: Marinara sauce and ranch dressing make great dips. They add extra flavor and keep things fun. Enjoy your chicken bites! Start by preheating your oven to 400°F (200°C). This temperature helps the chicken cook evenly. Make sure to set a timer for this step. While the oven heats, prepare your baking sheet. Line it with parchment paper. This paper keeps the chicken from sticking and makes cleanup easy. Take your pound of boneless, skinless chicken breasts. Cut them into bite-sized cubes, about one inch each. This size ensures they cook well and stay tender. Next, place the cubes in a bowl. Drizzle olive oil over the chicken. Use about ¼ cup. Toss the chicken gently with your hands. Make sure every piece is coated well. This step adds flavor and helps the breading stick. In a large bowl, mix the dry ingredients. Combine ½ cup grated Parmesan cheese, ½ cup seasoned breadcrumbs, 2 tablespoons garlic powder, 1 teaspoon smoked paprika, ½ teaspoon fine sea salt, and ¼ teaspoon black pepper. Stir well to blend all the flavors together. Now, take the oiled chicken cubes and place them in the bowl with the breadcrumb mix. Toss the chicken until each piece is evenly coated. This step is key for tasty bites. Spread the coated chicken on the prepared baking sheet. Arrange them in a single layer. Avoid overcrowding, as this helps them become crispy. Follow the baking instructions closely to ensure perfect chicken bites. For the full recipe, check out the provided details. To get crispy coatings, dry the chicken pieces well. Moisture can ruin the crunch. After coating, let the chicken rest for a few minutes. This helps the coating stick better. Bake the chicken at 400°F (200°C) for 20-25 minutes. The chicken should reach an internal temperature of 165°F (74°C) to be safe to eat. These chicken bites go great with dipping sauces. Marinara sauce and ranch dressing are popular choices. Serve them on a nice platter with lemon wedges. This adds color and flavor. You can also pair them with a fresh salad or veggies for a complete meal. You can prep chicken bites in advance. Coat them and place them in the fridge for a few hours. This makes them ready for baking later. If you want to store them longer, freeze the coated chicken. Just remember to thaw them in the fridge before baking. This way, you'll have a quick meal ready to go! {{image_4}} You can spice up your garlic Parmesan chicken bites with cayenne pepper. Just add a pinch to the breadcrumb mix for some heat. This small change makes a big difference. If you want to switch up the cheese, try using sharp cheddar or mozzarella. Each cheese gives a unique taste to the dish, making it fun to experiment. If you prefer a healthier option, use gluten-free breadcrumbs. They work just as well for a crispy coating. You can also swap chicken for turkey or tofu. Both options keep the dish tasty while cutting down on fat. Tofu absorbs flavors well and is a great plant-based choice. You can easily turn these chicken bites into a salad. Just toss them with greens and your favorite dressing. This makes a quick and filling meal. If you have leftovers, use them in wraps or sandwiches. They add great flavor and protein, making your lunch more exciting. For the full recipe, check out the main section. To keep your cooked chicken bites fresh, place them in an airtight container. This method helps retain moisture and flavor. You can store the chicken bites in the fridge for up to three days. If you want to enjoy them later, ensure you heat them thoroughly before serving. For longer storage, freeze the chicken bites. Place them in a freezer-safe bag or container. Make sure to remove as much air as possible to prevent freezer burn. You can freeze them for up to three months. When ready to eat, thaw them overnight in the fridge. To reheat, bake them in the oven at 350°F (175°C) until heated through. This keeps them crispy and tasty. Look for signs of spoilage, like an off smell or changes in color. If the chicken bites appear slimy or dry, it’s best to discard them. Use glass or BPA-free plastic containers for storage. These options work well to keep your food safe and fresh. Cooking these chicken bites is quick and simple. The prep time is around 10 minutes. Once you pop them in the oven, they need 20 to 25 minutes to bake. So, in total, you’ll spend about 35 minutes from start to finish. Yes, you can use frozen chicken! Make sure to thaw it safely in the fridge overnight. This way, it cooks evenly. If you use the microwave, cook it right after thawing. Avoid refreezing thawed chicken. These chicken bites taste great with many dips. Popular options include marinara sauce, ranch dressing, or creamy garlic sauce. You can also make a quick dip by mixing Greek yogurt with lemon juice and garlic powder. This adds a nice zing! To wrap it up, we covered everything you need for EASY Garlic Parmesan Chicken Bites. We explored key ingredients, essential seasonings, and clever tips. You learned how to prep, coat, and bake the chicken to get that crispy finish. I shared variations for flavor and health, plus storage tips for leftovers. When you make these chicken bites, you'll impress everyone at the table. Enjoy experimenting and finding your own spin on this dish!
EASY Garlic Parmesan Chicken Bites Tasty Recipe Guide
Looking for a simple yet delicious meal? You’ll love these EASY Garlic Parmesan Chicken Bites! In this guide, I’ll show you how to make tender,
- 2 medium zucchinis, sliced into 1/4-inch thick rounds - 1 cup Italian-seasoned breadcrumbs - 1/2 cup freshly grated Parmesan cheese - 1 teaspoon garlic powder - 1 teaspoon Italian seasoning blend - 1 large egg, beaten - 1/2 cup all-purpose flour - Salt and freshly ground black pepper to taste - Olive oil spray for coating Gather these ingredients for a tasty treat. The zucchinis are the star. They give a nice crunch. The breadcrumbs and Parmesan add great flavor. You can use fresh cheese for a better taste. Garlic powder and Italian seasoning boost the dish even more. You can set up your breading station with flour, egg, and the breadcrumb mix. The salt and pepper help the flavors pop. Using olive oil spray ensures your zucchini bites will get nice and crispy. For the full recipe, check out the details above. Enjoy crafting this easy air fryer dish! 1. Preheat the air fryer: Start by setting your air fryer to 375°F (190°C). This helps the zucchini crisp up nicely. 2. Set up the breading station: You need three shallow dishes. In the first dish, add 1/2 cup of flour. In the second dish, beat 1 large egg until smooth. In the third dish, mix 1 cup of Italian-seasoned breadcrumbs with 1/2 cup of grated Parmesan cheese, 1 teaspoon of garlic powder, 1 teaspoon of Italian seasoning, salt, and pepper. 1. Dredge the zucchini in flour: Take a zucchini slice and coat it in the flour. Shake off any extra flour. This light coating helps the egg stick. 2. Coat in egg and breadcrumbs: Dip the floured zucchini into the beaten egg. Make sure it is fully covered. Then, place it in the breadcrumb mix. Press gently to help the crumbs stick. Repeat this for all zucchini slices. 1. Place zucchini in the air fryer: Lightly spray the air fryer basket with olive oil to prevent sticking. Arrange the breaded zucchini in a single layer. Do not overcrowd the basket. Spray the tops with olive oil for extra crispiness. 2. Cooking time and temperature adjustments: Air fry the zucchini for 12-15 minutes at 375°F. Halfway through, flip the slices for even browning. Cook until they are golden and crispy. Enjoy your crispy air fryer zucchini parmesan bites hot! For more details, check the Full Recipe. To get your zucchini bites crispy, don't overcrowd the basket. If you pack them in too tightly, they won't cook evenly. Each piece needs room for hot air to move around. This method gives you that golden crunch. Also, use olive oil spray wisely. A light coat on both sides of the zucchini helps create that crispy texture. It works better than pouring oil directly. Just a quick spray before and after you place them in the air fryer is all you need. Adjust the seasoning to fit your taste. This recipe is just a starting point. If you love garlic, add more garlic powder. Prefer a kick? Sprinkle in some red pepper flakes. The beauty of cooking is making it your own. You can also substitute ingredients based on your needs. For gluten-free options, use gluten-free breadcrumbs. If you're vegan, swap the egg for a flaxseed mixture. These small changes can still give you great flavor. For dips, marinara sauce works perfectly. Its rich taste pairs well with the crispy zucchini. You might also try ranch or a yogurt dip for a twist. When serving, place the zucchini bites on a colorful platter. A sprinkle of fresh parsley or basil adds a nice touch. This makes your dish look as good as it tastes. For the full recipe, check the earlier section! {{image_4}} You can easily change the taste of your air fryer zucchini parmesan. Try using different cheese types. Mozzarella offers a gooey texture, while Asiago adds a sharp zing. You can also mix cheeses for a unique flavor. Incorporating spices is another great way to enhance your dish. Add paprika for a smoky flavor or cayenne for heat. Italian herbs like oregano and thyme can brighten each bite. Experiment and find what you love! If you need gluten-free options, swap the all-purpose flour with almond flour. You can also use gluten-free breadcrumbs. This keeps the dish tasty while meeting your needs. For vegan modifications, replace the egg with a flaxseed mixture. Simply mix one tablespoon of ground flaxseed with three tablespoons of water. Let it sit for a few minutes to thicken. Use a vegan cheese alternative for a creamy, cheesy taste. Zucchini isn't your only option for this recipe. Yellow squash works well, too. It has a similar texture and cooks just as nicely. Eggplant is another fun choice. It absorbs flavors well and gives a different taste. You can also use seasonal vegetables. In summer, try using fresh bell peppers or asparagus. In fall, sweet potatoes can add a new twist. Be creative and enjoy the variety! To keep your air-fried zucchini fresh, store it in an airtight container. This will help keep the moisture out and the zucchini crispy. You can use glass containers or plastic ones with a tight seal. Both options work well. Make sure to let the zucchini cool down before sealing the container. This step helps to prevent condensation, which can make your zucchini soggy. When you want to enjoy your leftovers, reheating them properly is key. The best method is to use an air fryer or an oven. Set the air fryer to 350°F (175°C) and cook for about 5-7 minutes. This method will help regain that crispy texture. If you use the microwave, place a paper towel under the zucchini to absorb excess moisture. This helps avoid sogginess. Yes, you can freeze zucchini parmesan! However, it’s best to freeze them before cooking. Lay the breaded zucchini slices on a baking sheet in a single layer and freeze them for 1-2 hours. Once frozen, transfer them to a freezer bag. Make sure to remove as much air as possible to prevent freezer burn. When you’re ready to eat, cook them straight from frozen. Just add a few extra minutes to the cooking time. To make zucchini parmesan in an air fryer, follow these steps: 1. Preheat your air fryer to 375°F (190°C). 2. Set up your breading station: Put flour in one dish, beaten egg in another, and mix breadcrumbs, Parmesan cheese, garlic powder, Italian seasoning, salt, and pepper in a third dish. 3. Bread the zucchini: Take a slice, coat it in flour, dip it in egg, then press it into the breadcrumb mix. 4. Prepare the air fryer: Lightly spray the basket with olive oil. 5. Arrange the zucchini: Place the breaded slices in a single layer in the basket. Spray the tops lightly with olive oil. 6. Cook: Air fry for 12-15 minutes, flipping halfway until golden brown and crispy. 7. Serve hot: Let them cool a bit before enjoying. This method gives you crispy, tasty bites. For the complete process, check the Full Recipe. Yes, you can use different cheeses! Here are some ideas: - Mozzarella: It melts well and adds a nice stretch. - Cheddar: This gives a sharp flavor and golden color. - Pecorino Romano: For a saltier, bolder taste. Mixing cheeses can create unique flavors. Try what you like best! You can serve zucchini parmesan with various healthy side dishes and dips. Here are some options: - Marinara sauce: Great for dipping and adds flavor. - Greek yogurt dip: Offers a creamy, tangy contrast. - Salad: A fresh side salad with greens complements the dish well. - Steamed veggies: Pair with broccoli or green beans for added nutrients. These ideas make your meal balanced and even more tasty! Air-frying zucchini parmesan is simple and fun. You start with fresh zucchinis and tasty ingredients. Proper prep and breading give you a great crunch. Remember not to overcrowd the basket for best results. You can add your favorite flavors or change up the diet. Storing leftovers and reheating wisely keeps things fresh. Enjoy experimenting and find the best ways to make your dish shine. Embrace this delicious recipe and impress your family with your cooking skills.
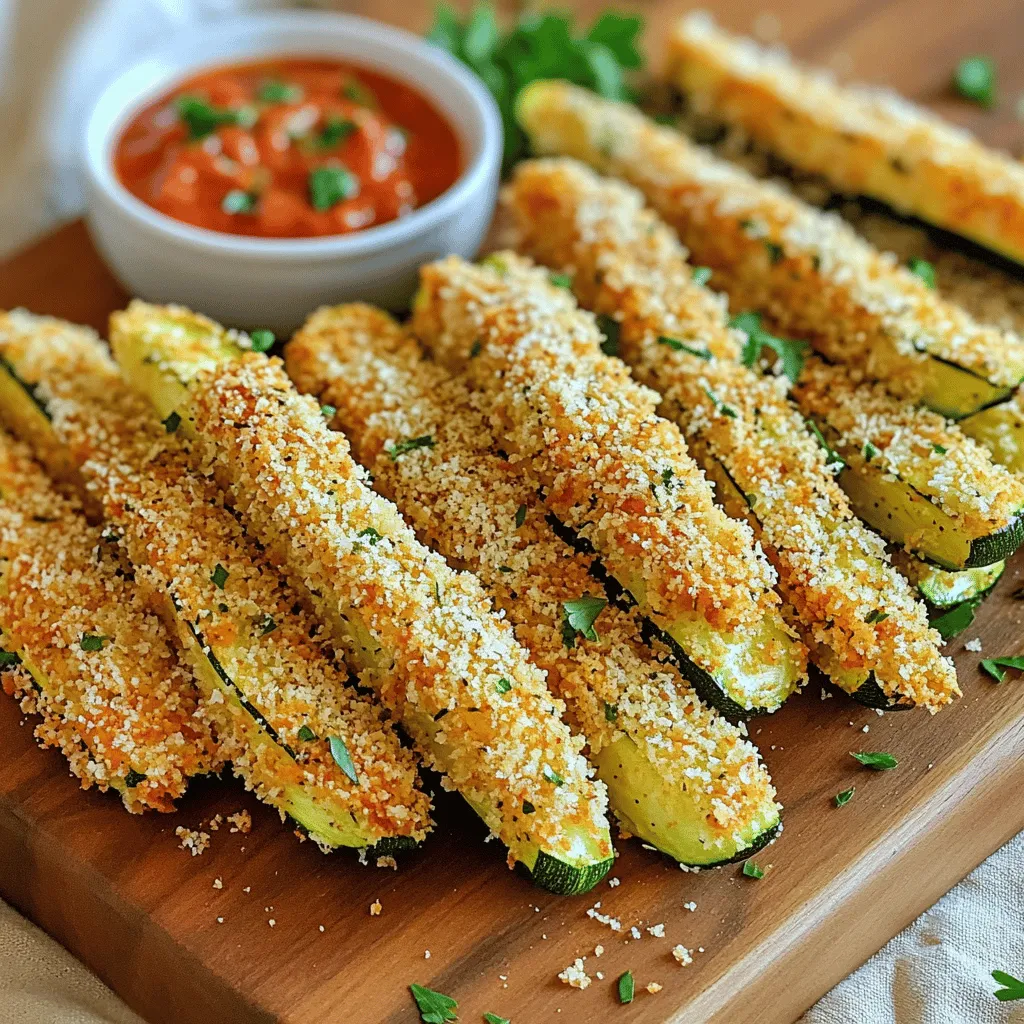
Easy Air Fryer Zucchini Parmesan Crispy and Delicious
Are you ready to dive into a crispy delight? This Easy Air Fryer Zucchini Parmesan recipe is the perfect answer for snacks or sides. With
To make healthy air fryer zucchini fries, you need fresh ingredients. Here’s what you will need: - 2 medium zucchinis, cut into julienne strips - 1 cup whole wheat breadcrumbs - 1/2 cup grated Parmesan cheese (optional) - 1 teaspoon garlic powder - 1 teaspoon onion powder - 1 teaspoon Italian seasoning - Salt and freshly ground pepper to taste - 2 large eggs, beaten - Cooking spray or olive oil spray These ingredients create a tasty and crispy snack. Zucchini is low in calories and packed with vitamins. Whole wheat breadcrumbs add crunch and fiber. Parmesan cheese brings a savory touch, but you can skip it if you prefer. The spices boost the flavor, making each bite delicious. You’ll love how easy it is to prepare this dish! For the full recipe, check out the details above. 1. Preheating the air fryer: Start by preheating your air fryer to 400°F (200°C). This step helps the zucchini fries cook evenly and become crispy. A hot air fryer is key for that perfect crunch. 2. Preparing the coating mixture: In a shallow dish, mix 1 cup of whole wheat breadcrumbs, 1/2 cup of grated Parmesan cheese (optional), 1 teaspoon of garlic powder, 1 teaspoon of onion powder, 1 teaspoon of Italian seasoning, and salt and pepper to taste. Stir well to combine. This mixture is what makes your zucchini fries flavorful. 3. Beating the eggs for batter: In a separate bowl, whisk 2 large eggs until well beaten. This egg wash helps the breadcrumbs stick to the zucchini strips, giving them that tasty coating. 1. Dipping zucchini strips in egg: Take each zucchini strip and dip it into the beaten egg. Make sure to let any extra egg drip off. This step is crucial for a good coating. 2. Coating in breadcrumb mixture: Next, coat the zucchini strip in your breadcrumb mixture. Press gently to ensure the crumbs stick well. This will create a crunchy layer when you air fry them. 1. Arranging zucchini fries in the air fryer: Place your coated zucchini fries in a single layer in the air fryer basket. Avoid overcrowding; this helps them crisp up nicely. If you have a lot, work in batches. 2. Cooking time and flipping recommendation: Air fry the zucchini fries for about 10-12 minutes. Flip them halfway through cooking. This step ensures they brown evenly and reach that perfect golden color. Now, enjoy your crispy air fryer zucchini fries! For the full recipe, check out the details above. To get the best crispiness from your zucchini fries, avoid crowding the air fryer basket. When fries touch, they steam instead of crisping. Cook in batches if needed, allowing space for air to flow. Using the right spray makes a big difference too. I recommend using cooking spray or olive oil spray to coat the fries lightly. This helps them brown and crisp up nicely during cooking. For a fun presentation, serve the zucchini fries in a small basket or on a plate. Adding a sprinkle of fresh parsley or extra Parmesan enhances the look and flavor. Dipping sauces can elevate your snack. Try marinara sauce for a classic touch or a yogurt dip for a cool contrast. These add flavor and make your zucchini fries even more enjoyable. For the full recipe, check the complete guide! {{image_4}} You can make your zucchini fries even better by changing the flavor. First, use different types of breadcrumbs. Instead of whole wheat, try panko for extra crunch. You can also use seasoned breadcrumbs for added taste. Next, think about herbs and spices. Fresh herbs like basil or oregano can brighten the flavor. You can also add a pinch of cayenne for some heat. Don't be afraid to experiment; the options are endless! If you need gluten-free options, use gluten-free breadcrumbs. Many brands offer them, and they work just as well. You can also make your own by grinding gluten-free oats or nuts. For those who want a dairy-free option, skip the Parmesan cheese. You can replace it with nutritional yeast for a cheesy taste without dairy. Both substitutions keep your fries tasty and healthy. For the full recipe, check out the detailed instructions above. To keep your zucchini fries fresh, let them cool completely. Then, pack them in an airtight container. This helps keep moisture out and maintains crispness. I recommend using glass containers. They help avoid any weird smells from plastic. You can also line the bottom with paper towels to absorb extra moisture. For reheating, the oven or air fryer works best. Preheat your air fryer to 375°F (190°C). Place the fries in a single layer. Heat them for about 3-5 minutes. If using an oven, set it to 375°F and bake for 8-10 minutes. This way, you keep the fries crispy. Avoid using the microwave; it makes them soggy. For a crunchier bite, spray a little olive oil before reheating. Enjoy your crispy zucchini fries again! Yes, you can use frozen zucchini. However, frozen zucchini has more water than fresh. This can affect the crispiness of your fries. To improve texture, thaw and drain the zucchini well. Pat them dry with a paper towel to remove extra moisture. This helps them crisp up better when you air fry them. You can boost the flavor in several ways. First, add more spices to the coating. Try paprika, cayenne, or even smoked salt for a unique taste. You can also mix in fresh herbs like basil or thyme for added freshness. Don't forget dips! Serve your fries with marinara, ranch, or yogurt dip. These add extra taste and keep things exciting. Air fryers are great for many vegetables. You can try carrots, sweet potatoes, or bell peppers. Cauliflower and broccoli also air fry well. Just cut them into similar sizes for even cooking. Season them the same way as zucchini for a fun mix of flavors. You'll enjoy trying different veggies in your air fryer! In this article, we discussed how to make crunchy zucchini fries using simple ingredients. You learned about preparing and coating the zucchini, as well as air frying them to perfection. We also shared tips for crispiness, serving suggestions, and storage methods. Finally, I showed you variations and answered common questions about this dish. Try making these fries for a healthy snack. Experiment with flavors and enjoy every bite!
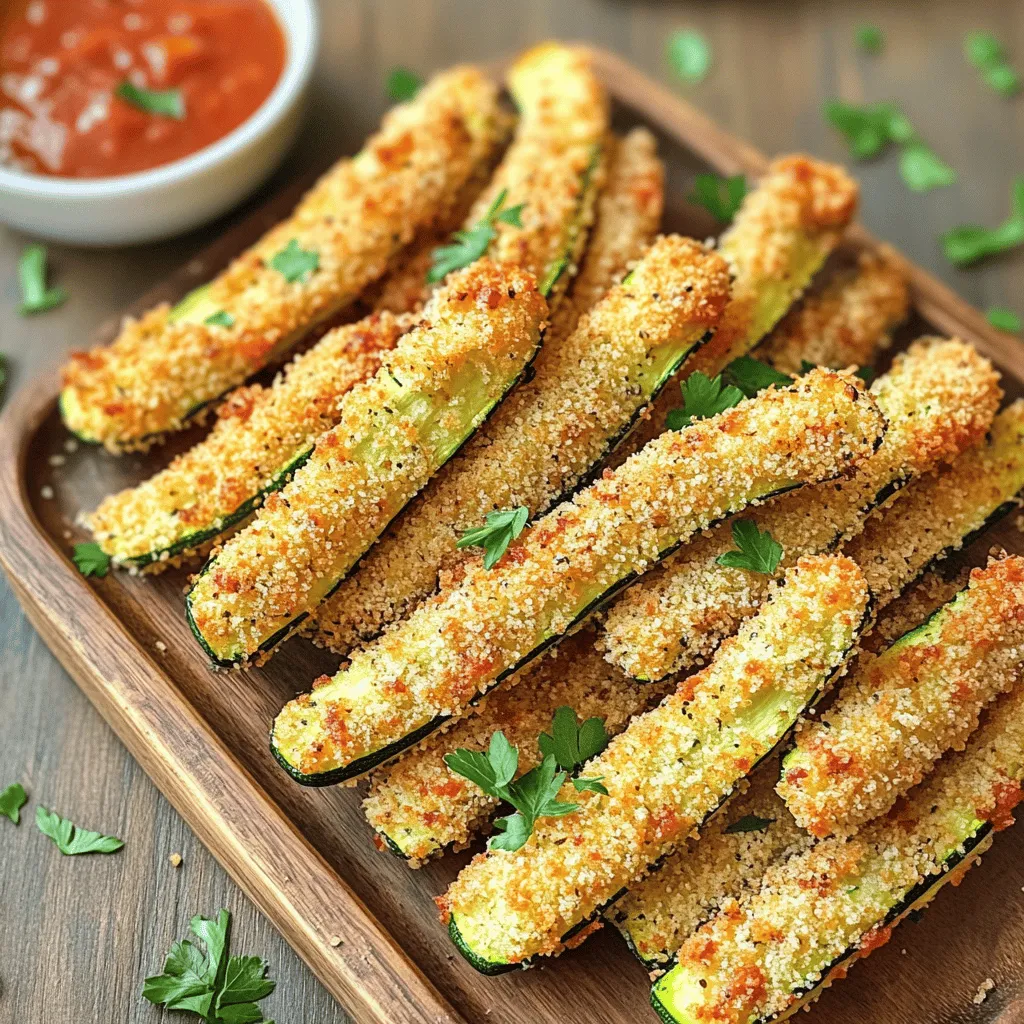
Healthy Air Fryer Zucchini Fries Crispy and Simple Snack
Looking for a tasty and guilt-free snack? These Healthy Air Fryer Zucchini Fries are crispy, easy, and a great way to enjoy your veggies! With
- 2 medium zucchinis, grated - 1/2 cup all-purpose flour or whole wheat flour - 1/4 cup freshly grated Parmesan cheese - 2 large eggs, beaten - 1/4 cup fresh parsley, finely chopped - 2 green onions, finely chopped - Olive oil for frying - 1 teaspoon salt (to sweat the zucchini) - 1 teaspoon garlic powder - 1/2 teaspoon freshly ground black pepper - Gluten-free flour options - Vegan substitutes (e.g., flaxseed egg) To make these fritters, you start with fresh zucchinis. Grating them gives you the right texture. Salt helps draw out moisture, making them crispy. I often use a mix of all-purpose and whole wheat flour for added flavor and texture. Parmesan cheese adds a nice salty kick. You can switch up the herbs. Fresh parsley and green onions bring brightness. The garlic powder and black pepper spice things up without being too strong. For those avoiding gluten, try rice flour or chickpea flour. If you're vegan, a flaxseed egg works well. These options help everyone enjoy this tasty snack. You can find the full recipe for Zesty Zucchini Fritters 🥒 to see how these ingredients come together. First, grate the zucchinis using a box grater. Place the grated zucchini in a fine colander. Next, sprinkle the zucchini with salt. This step helps draw out extra moisture. Let the zucchini rest for about 15 minutes. You’ll notice it will start to sweat. This is a key step for crispy fritters. After 15 minutes, rinse the grated zucchini under cold water. This removes the salt. Take a clean kitchen towel and wrap the zucchini in it. Squeeze gently to get rid of any remaining moisture. Now, in a large mixing bowl, add the drained zucchini. Combine it with flour, Parmesan cheese, beaten eggs, parsley, green onions, garlic powder, and black pepper. Stir until all ingredients mix well into a batter. Heat oil in a large skillet over medium heat. Make sure to coat the bottom of the pan generously with oil. Wait until the oil shimmers but does not smoke. Using a spoon, scoop a heaping tablespoon of the batter into the skillet. Flatten it gently to shape the fritter. Repeat this until the skillet is filled, leaving space between each fritter. Cook them for about 3-4 minutes on each side. They should turn golden brown and crispy. Once done, transfer them to a plate lined with paper towels. This helps absorb extra oil. Continue frying the rest of the batter in batches, adding more oil if needed. To make your zucchini fritters crispy, remove excess moisture from the zucchini. When you grate the zucchini, sprinkle it with salt and let it rest for about 15 minutes. This process helps pull out water. After that, rinse the zucchini under cold water and squeeze it dry with a clean towel. This step is key. Frying at the right temperature is also important. Heat your skillet over medium heat and add enough olive oil to coat the bottom. The oil should shimmer but not smoke. If the oil is too cold, the fritters will absorb it and become soggy. I love serving these fritters with a dollop of creamy Greek yogurt or sour cream. This cool topping balances the warm fritters nicely. You can also garnish with fresh herbs like parsley or chives for added color and flavor. The fresh herbs brighten the dish and make it even more appealing. One common mistake is overcrowding the pan. If you add too many fritters at once, they won’t fry evenly. Leave space between each fritter. Another mistake is not letting the zucchini sweat enough. If you skip the salting step, your fritters may turn out soggy. Remember, moisture is the enemy of crispiness. Follow these tips and you will have tasty, crispy zucchini fritters every time! {{image_4}} To make gluten-free zucchini fritters, use rice flour or chickpea flour. Both options work well. You might need to adjust cooking times slightly. Watch for browning to ensure they cook evenly. If you want a vegan fritter, replace eggs with a flaxseed or chia egg. Mix one tablespoon of ground flaxseed or chia seeds with three tablespoons of water. Let it sit for five minutes to thicken. You can also use nutritional yeast instead of cheese. It gives a nice cheesy flavor without dairy. To spice up your fritters, add cumin or paprika. These spices add warmth and depth. You can also incorporate grated carrots or corn for added sweetness and texture. Both options make your fritters even more delicious and colorful. To store leftover fritters, let them cool completely first. Place them in an airtight container. This keeps them fresh and prevents moisture loss. I recommend using glass containers for better results. They help keep the fritters crispy and tasty. To freeze fritters, allow them to cool completely. Then, layer them between sheets of parchment paper. Place them in a freezer-safe bag or container. This technique helps prevent sticking. When you’re ready to eat, just take out the desired amount. Reheat them in the oven for about 10–15 minutes at 375°F (190°C). This method keeps them crispy and warm. In the fridge, cooked fritters last about 3 to 4 days. Always check for signs of spoilage. If you see mold or a sour smell, it’s best to toss them. Fresh fritters should look golden brown and smell delightful. Enjoy them while they are still tasty and fresh! To make zucchini fritters gluten-free, you can use different types of flour. Here are some great options: - Rice flour - Chickpea flour - Almond flour - Oat flour These substitutes work well to keep the fritters light and crispy. Just swap the all-purpose flour for your choice. Yes, you can prepare zucchini fritters in advance. Here are some best practices: - Grate and sweat the zucchini a day ahead. - Store it in the fridge, covered. - Mix the batter just before cooking. This helps keep the fritters fresh and tasty. Zucchini fritters pair well with many sides and dips. Here are some ideas: - Greek yogurt or sour cream for dipping - Fresh salsa for a kick - A simple salad for balance - Hummus for a creamy touch These sides add flavor and texture to your meal. For the full details on making Zesty Zucchini Fritters 🥒, refer to the complete recipe. In this blog post, we covered how to make delicious and healthy zucchini fritters. We discussed the main ingredients, seasoning options, and handy tips for crispy results. You learned how to prepare, cook, and even store fritters. Remember, you can switch the ingredients to fit your needs. Whether you go gluten-free or vegan, there's a tasty option for everyone. Enjoy making these fritters at home for a quick meal or snack that everyone will love!
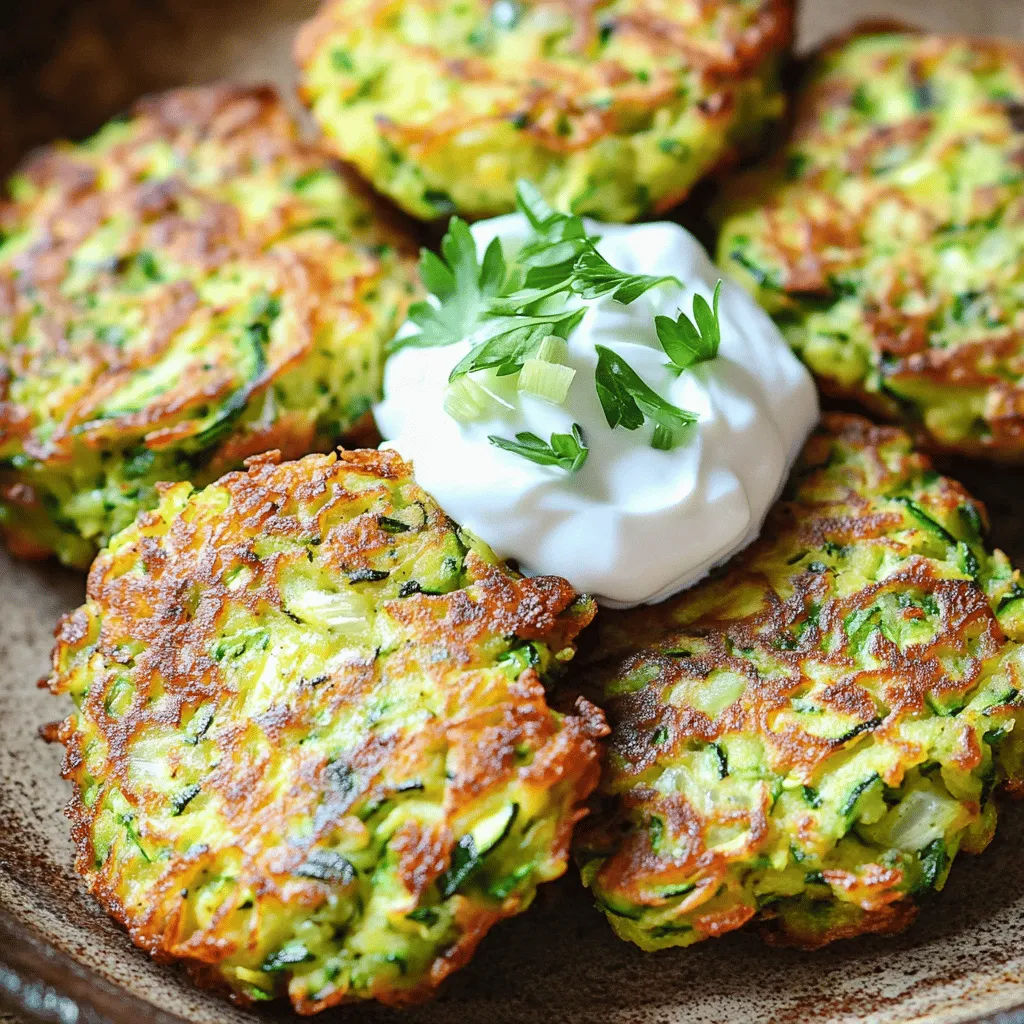
Healthy Zucchini Fritters Crispy and Flavorful Snack
Looking for a fresh twist on snacking? These Healthy Zucchini Fritters are your answer! With crispy edges and savory flavors, they transform simple ingredients into
To make crispy air fryer zucchini fries, you need: - 2 medium zucchini, cut into fry shapes - 1/2 cup whole wheat flour - 2 large eggs, beaten until frothy - 1 cup panko breadcrumbs - 1/2 teaspoon garlic powder - 1/2 teaspoon Italian seasoning - 1/4 teaspoon cayenne pepper (optional for a kick) - Salt and freshly ground black pepper to taste - Olive oil spray for crisping You can add some flair to your zucchini fries with these options: - Paprika for a smoky flavor - Parmesan cheese for a savory touch - Lemon zest for a fresh zing - Dried herbs like oregano or thyme Dipping sauces can enhance your zucchini fries. Here are some tasty suggestions: - Marinara sauce for a classic pairing - Creamy garlic aioli for a rich flavor - Ranch dressing for a cool taste - Spicy sriracha mayo for extra heat These ingredients and dips will make your air fryer zucchini fries a hit. Enjoy the mix of flavors and textures! For the full recipe, check the details above. Start by preheating your air fryer. Set it to 400°F (200°C) and let it heat for about 5 minutes. This step ensures your zucchini fries cook evenly. A hot air fryer gives you that crispy texture you want. Next, create your breading station. You will need three shallow bowls. In the first bowl, add 1/2 cup of whole wheat flour. In the second bowl, pour in 2 large eggs and beat them until frothy. In the third bowl, combine 1 cup of panko breadcrumbs with 1/2 teaspoon of garlic powder, 1/2 teaspoon of Italian seasoning, and 1/4 teaspoon of cayenne pepper if you like heat. Don’t forget to add salt and pepper to taste. Now it’s time to bread the zucchini fries. Take one fry at a time. Start by dredging it in the flour, shaking off the extra flour. Then dip it into the beaten eggs, letting any excess egg drip off. Finally, roll the fry in the panko mixture until it is fully coated. Repeat this until all the fries are breaded. Place the coated zucchini fries in the air fryer basket in a single layer. Avoid crowding them; this helps them stay crispy. Lightly spray the fries with olive oil to enhance their crunch. Air fry the zucchini fries for 10-12 minutes. Flip them halfway through to get a nice golden brown color. After cooking, carefully take them out and let them cool for about a minute. This allows them to firm up. For the full recipe, check out the details above. To get your zucchini fries crispy, follow these steps: - Preheat the air fryer. Always start by preheating to 400°F (200°C). This helps cook the fries evenly. - Use panko breadcrumbs. They are lighter and airier than regular breadcrumbs, giving that perfect crunch. - Don’t overcrowd the basket. Place the fries in a single layer. This allows hot air to circulate well. - Mist with olive oil. A light spray helps create a golden crust without adding too much fat. Here are some common pitfalls to watch out for: - Skipping the flour. Always dredge your zucchini fries in flour first. It helps the egg stick better. - Not flipping halfway. Flip your fries halfway through cooking. This ensures they cook evenly and get crispy all over. - Using too much moisture. Make sure to dry your zucchini well before breading. Excess moisture can make them soggy. For a delightful experience, try these serving ideas: - Dipping sauces. Serve with marinara sauce or garlic aioli for added flavor. - Garnish. Sprinkle fresh parsley on top for a pop of color and taste. - Side dishes. Pair with a fresh salad or grilled chicken for a complete meal. For the complete recipe and more tips, check out the [Full Recipe]. Enjoy your cooking adventure! {{image_4}} You can switch up the coating for your zucchini fries. Instead of whole wheat flour, try almond flour. It adds a nutty flavor and is gluten-free. For a crunchier bite, use crushed cornflakes or tortilla chips. These will give your fries a fun twist! Get creative with your seasonings! Instead of garlic powder, try onion powder or smoked paprika. These will change the taste while keeping it delicious. You can also mix in different herbs. Fresh thyme or basil can add a bright, fresh touch. Experiment and find your favorite blend! Don't stop at zucchini! You can air fry other veggies too. Sweet potatoes make a great fry alternative. Just cut them into sticks and follow the same steps. Broccoli or cauliflower florets also work well. They become crispy and are perfect for dipping. Try mixing different veggies for a colorful plate! To store leftover zucchini fries, first let them cool completely. Place them in an airtight container. You can keep them in the fridge for up to three days. Make sure to layer them with paper towels. This helps absorb any moisture and keeps them crispy. To reheat your zucchini fries, use the air fryer for the best results. Preheat the air fryer to 375°F (190°C). Place the fries in a single layer in the basket. Heat them for about 3-5 minutes. This will help restore their crispiness. You can also use an oven at 350°F (175°C) for about 10 minutes if you prefer. If you want to freeze your air-fried zucchini, let them cool first. Arrange them on a baking sheet in a single layer. Freeze them for about 1 hour. Once frozen, transfer the fries to a freezer-safe bag. You can store them for up to three months. When ready to eat, cook them straight from the freezer in the air fryer. Adjust the cooking time by a few minutes to ensure they are crispy. For the full recipe, check out my Crispy Air Fryer Zucchini Fries 🥒. You should cook zucchini in an air fryer for about 10 to 12 minutes. This time frame ensures they turn golden and crispy. I recommend flipping them halfway through to get an even cook. Check them at the 10-minute mark. If they need a bit more time, let them go for another minute or two. Yes, you can use different types of zucchini! Green zucchini is the most common, but yellow squash works well too. Both will become soft and flavorful in the air fryer. Just cut them into similar fry shapes for even cooking. Feel free to experiment with other summer squashes for a fun twist. Air fryer zucchini fries pair wonderfully with many dips. Consider serving them with marinara sauce or creamy garlic aioli. They also go great with ranch dressing or tzatziki sauce. For a full meal, serve them alongside grilled chicken or fish. You can also add a fresh salad for a light and tasty spread. Check out the Full Recipe for more ideas! You learned how to make tasty air fryer zucchini fries. We covered the right ingredients, easy steps, and helpful tips. You now know how to keep them crispy and avoid common mistakes. We also looked at fun variations and how to store leftovers. Remember, cooking should be fun and creative. Enjoy your delicious fries with your favorite dips. Now, it's your turn to try this recipe and share it with friends!
Air Fryer Zucchini Crispy and Flavorful Recipe
Looking to spice up your veggie game? Try my Air Fryer Zucchini recipe that turns simple zucchini into crispy, flavorful fries! This dish is perfect
- 2 medium zucchinis - 1 cup panko breadcrumbs - 1/2 cup freshly grated Parmesan cheese - 1 teaspoon garlic powder - 1 teaspoon Italian seasoning - Salt and black pepper, to taste - 2 large eggs - Olive oil spray Gather these ingredients before you start cooking. The zucchinis are the star of the show. Their fresh taste brings joy to each bite. Panko breadcrumbs add that perfect crunch. The Parmesan cheese gives a rich flavor. Garlic powder and Italian seasoning enhance the taste even more. You’ll need eggs to bind the coating. They help the panko stick well to the zucchini. A light spray of olive oil helps crisp the fries as they cook. With these simple ingredients, you can create a tasty snack that everyone will love. For the full recipe, check the details above and get ready for some fun in the kitchen! 1. First, preheat your air fryer to 400°F (200°C) for about 5 minutes. This helps get that nice crunch. 2. Take your two medium zucchinis and cut them into fry shapes. Aim for even sizes to cook well. 1. In a shallow bowl, mix together the panko breadcrumbs, Parmesan cheese, garlic powder, Italian seasoning, salt, and black pepper. This gives the fries a great taste. 2. In another bowl, beat the two large eggs until frothy. 3. Dip each zucchini fry into the egg mixture, letting the extra egg drip off. 4. Next, roll the fry in the breadcrumb mix, pressing it gently to coat evenly. This step is key for that crispy texture. 1. Place the coated zucchini fries in the air fryer basket. Make sure not to overcrowd them. This helps them cook evenly. 2. Lightly spray the tops with olive oil. This adds to the crunchiness as they cook. 3. Air fry the zucchini for 10-12 minutes. Flip them halfway through for even cooking. Look for a golden brown color. 4. Once done, let the fries cool for a couple of minutes before serving. This helps keep them crispy. For a full recipe, check out Crispy Air Fryer Zucchini Fries 🥒. Preheating the air fryer is key. It helps the zucchini fry evenly and become crispy. I recommend setting it to 400°F (200°C) for about 5 minutes. This step makes a big difference in texture. Using olive oil spray also aids in crispness. A light mist over the zucchini fries creates a golden, crunchy coating while cooking. This is a simple trick to elevate your dish. If you have many zucchini fries, cook them in batches. Overcrowding the basket can lead to soggy fries. Give each fry space to cook well. Flipping the fries halfway through cooking is important. This ensures they cook evenly on both sides. You want every bite to be just as crispy as the last. Pair your crispy zucchini fries with marinara sauce or ranch dip. These dips add flavor and make your snack even more fun. For added flair, garnish with fresh parsley. A sprinkle of herbs makes your dish pop on the plate. Enjoy your creation and the compliments that follow! {{image_4}} You can give your zucchini fries a kick by adding cayenne pepper. Just sprinkle a bit into your breadcrumb mix. Adjust the amount based on your heat preference. If you want a cheesy twist, substitute Parmesan with another cheese like cheddar or mozzarella. Each cheese offers a unique flavor and texture. For those who need gluten-free options, use gluten-free breadcrumbs. They work just as well and keep the crunch. You can also mix in fresh herbs or spices. Try oregano, paprika, or even dill. This adds depth and makes your fries stand out. Serve your zucchini fries with different dips. Marinara sauce or ranch dip are great choices. You can also try a spicy aioli for a zesty flavor. If you want a fun twist, make zucchini bites instead of fries. Simply cut your zucchini into thicker pieces and follow the same steps. It’s a fun way to enjoy this healthy snack. For the full recipe, check the original instructions above. To keep your leftover zucchini fries fresh, place them in an airtight container. This method prevents moisture from making them soggy. You can store them in the fridge for up to three days. Always check for any signs of spoilage before eating. To enjoy crispy zucchini fries again, reheating is key. The best method is using your air fryer. Set it to 350°F (175°C) and cook for about 5 minutes. This restores their crunch and flavor. If you don't have an air fryer, you can use the oven. Just place them on a baking sheet and heat at 350°F (175°C) for 10 minutes. You can freeze zucchini fries for later. If you freeze them before cooking, arrange them in a single layer on a baking sheet and freeze until firm. Then, transfer them to a freezer bag. This way, they stay fresh for up to three months. To freeze after cooking, let them cool first. Then, store in a freezer-safe container. For thawing, leave them in the fridge overnight. Reheat in the air fryer as mentioned before for the best results. You can find the Full Recipe for crispy air fryer zucchini fries to make this easy. To make your air fryer zucchini fries crispy, start by preheating the air fryer. Set it to 400°F (200°C) and let it heat for about 5 minutes. Preheating helps achieve that golden crunch. Use a light spray of olive oil on the fries before cooking. This oil helps to create a nice crispy texture. - Preheat air fryer to 400°F (200°C). - Spray zucchini fries lightly with olive oil. - Avoid overcrowding the basket to ensure even cooking. Yes! You can use many vegetables in an air fryer. Try eggplant, sweet potatoes, or bell peppers. Each vegetable may require slight changes in cooking time. For example, sweet potatoes may need a few extra minutes. Cut them into similar sizes to ensure even cooking. - Eggplant: Slice into fries, cook for 12-15 minutes. - Sweet potatoes: Cut into sticks, air fry for 15-18 minutes. - Bell peppers: Cut into strips, cook for 8-10 minutes. For the best results, air fry zucchini fries for 10-12 minutes. Flip them halfway through the cooking time. This helps them cook evenly. Keep an eye on them in the last few minutes. They should be golden brown and crispy. - Recommended cooking time: 10-12 minutes. - Flip halfway for even cooking. - Check for a golden brown color. Air fryer zucchini fries are easy and fun to make. You only need simple ingredients, like zucchini, breadcrumbs, and cheese. Start by prepping and coating the zucchini. Then, air fry them for a crispy texture. Remember to follow tips for best results, like preheating and flipping the fries. You can also try different flavors and serving ideas. Enjoy your crunchy, healthy snack!
Air Fryer Zucchini Crispy and Flavorful Snack Delight
Looking for a delicious snack that’s both crispy and healthy? You’ve found it! These air fryer zucchini fries are packed with flavor and easy to
- 4 medium zucchinis - 1 cup cream cheese, softened - 1/2 cup sharp shredded cheddar cheese - 1/4 cup crumbled feta cheese - 2 jalapeños, finely chopped - 1/4 cup fresh green onions, chopped - 1/2 teaspoon garlic powder - 1/2 teaspoon onion powder - Salt and pepper to taste - 1/2 cup panko breadcrumbs - Olive oil for drizzling When I make Jalapeno Popper Zucchini Boats, I start with fresh zucchinis. These are the stars of the dish. I slice them in half to create little boats, perfect for holding the filling. The filling is creamy and cheesy. I mix cream cheese, sharp cheddar, and feta for a rich taste. Next, I add finely chopped jalapeños for heat. You can remove the seeds if you want it milder. I also include fresh green onions for a touch of brightness. Garlic powder and onion powder give it depth. I sprinkle salt and pepper to make all the flavors pop. For the topping, I use panko breadcrumbs. They turn golden and crunchy when baked. A drizzle of olive oil helps them crisp up nicely. This combination creates a tasty dish that is also fun to eat. Each bite is a mix of creamy, cheesy, and spicy goodness. You can find the full recipe in the section below for all the details! - Preheat oven to 375°F (190°C). - Slice zucchini in half lengthwise and scoop out the flesh. Start by setting your oven to 375°F. This is the perfect temperature for baking. Next, take your zucchinis and cut them in half lengthwise. Use a spoon to scoop out the flesh. Leave about 1/4 inch of skin. This creates a sturdy boat for your filling. Place the zucchini halves cut-side up on a baking sheet lined with parchment paper. This helps with cleanup later. - Combine cheese and seasonings in a bowl. - Add jalapeños and green onions. Now for the filling! In a large bowl, mix the softened cream cheese, cheddar cheese, and feta cheese. Add the finely chopped jalapeños and green onions to the mix. Include garlic powder, onion powder, and a pinch of salt and pepper. Stir until everything blends together and looks creamy. This mixture is the heart of the dish. - Fill zucchini with mixture. - Top with breadcrumbs and drizzle olive oil. - Bake and cool before serving. It's time to assemble! Take your cheese mixture and fill each zucchini boat generously. Pack it in well, so it overflows a bit. Next, sprinkle panko breadcrumbs on top for that crunchy texture. Drizzle some olive oil over the breadcrumbs for extra crispiness. Now, place the baking sheet in your preheated oven. Bake for 25-30 minutes until the zucchini is tender and the breadcrumbs are golden brown. Once done, let them cool slightly before serving. Enjoy this flavorful dish! For the full recipe, check out the instructions above. To make the best Jalapeño Popper Zucchini Boats, avoid overcooking the zucchini. Overcooked zucchini can become mushy. Aim for a tender texture while keeping a slight crunch. Use fresh ingredients for maximum flavor. Fresh jalapeños and creamy cheeses create a tasty filling. Fresh green onions add a nice bite. These zucchini boats shine when paired with a dipping sauce. A cool ranch or spicy salsa can enhance the flavors. They are perfect for appetizers or as a side dish. Serve them at parties or family dinners for a fun treat. For an appealing look, garnish with finely chopped green onions. A sprinkle of fresh cilantro adds color and flavor. Serve the zucchini boats on a rustic wooden platter. This gives a charming, homey touch. Enjoy your dish while impressing your guests with both taste and style! {{image_4}} You can switch up the cheese in your jalapeño popper zucchini boats. If you want a different flavor, try these substitutes for cream cheese: - Greek yogurt for tanginess - Ricotta cheese for a lighter taste - Vegan cream cheese for dairy-free options For more depth, consider these cheese options: - Smoked gouda for a rich, smoky flavor - Pepper jack cheese for extra spice - Parmesan cheese for a salty kick Adjusting the heat is easy with jalapeños. Remove the seeds and membranes for a milder dish. If you want more heat, leave some seeds in. You can also use these spices for flavor: - Cayenne pepper for a fiery touch - Chili powder for a warm taste - Paprika for a smoky flavor without too much heat For a vegan version, use these cheese alternatives: - Cashew cheese for creaminess - Nutritional yeast for a cheesy flavor If you need gluten-free breadcrumbs, try: - Crushed cornflakes for crunch - Ground almonds for a nutty base Feel free to get creative! Each variation can bring a new twist to your zucchini boats. For the full recipe, check out the details above. To keep your Jalapeno Popper Zucchini Boats fresh, store them in the fridge. Place them in an airtight container. This keeps moisture in and air out. You can also wrap them tightly in plastic wrap. They will stay good for 3-4 days. When reheating, I suggest using the oven. Preheat it to 350°F (175°C). Place the boats on a baking sheet. Cover them with foil to keep them moist. Heat for about 10-15 minutes. This helps to keep the texture and flavor intact. Yes, you can freeze zucchini boats! However, they freeze best before cooking. To freeze, wrap each boat in plastic wrap. Then, place them in a freezer bag. They can last for up to 3 months. To thaw, place them in the fridge overnight. Cook them right after thawing for the best taste. Yes, you can make these ahead of time. Prepare the zucchini boats up to the point of baking. Once you fill them, cover them tightly with plastic wrap. Store them in the fridge for up to 24 hours. When ready, remove them from the fridge and bake as directed. This helps save time on busy days. To add more heat, keep the seeds in the jalapeños. You can also use hotter peppers like serranos. Adding a dash of cayenne pepper or red pepper flakes to the cheese mix boosts the spice level too. Mix in some hot sauce for a kick. You can adjust the spice to suit your taste. One common mistake is overcooking the zucchini. If overcooked, they turn mushy. Make sure to scoop out enough flesh but leave enough to hold the filling. Another pitfall is not seasoning the cheese mixture well. Taste it as you mix, and adjust salt and pepper as needed. Finally, don't skip the breadcrumbs; they add great crunch. For the complete Jalapeno Popper Zucchini Boats recipe, check out the [Full Recipe]. In this post, we explored the tasty world of Jalapeño Popper Zucchini Boats. We covered the key ingredients, step-by-step instructions, and useful tips for cooking and serving. Remember, fresh ingredients make a big difference. Adjust the heat to suit your taste and feel free to experiment with different cheeses. These boats are fun to make and great for sharing. Enjoy your cooking adventure, and don’t forget to check out the full recipe for more details!
Jalapeno Popper Zucchini Boats Flavorful and Easy Dish
Are you ready to spice up your dinner routine? Jalapeno Popper Zucchini Boats offer a tasty twist on classic flavors. This crowd-pleaser combines creamy cheese
- 4 ears of fresh corn, husked and silks removed - 4 tablespoons unsalted butter, softened - 1 teaspoon garlic powder - 1 teaspoon smoked paprika - 1 teaspoon sea salt - 1/2 teaspoon freshly ground black pepper - Fresh herbs (cilantro or parsley) for garnish - Lime wedges for serving Fresh corn is key. Look for ears with bright green husks. The kernels should feel plump and firm. You want corn that is sweet and juicy. Husk the corn and remove the silks. Rinsing it under cold water helps clean off any dirt. For seasoning, I use butter mixed with garlic powder, smoked paprika, sea salt, and black pepper. This combo gives the corn a rich, savory flavor. Softened butter spreads easily, so it covers the corn well. Garnishes make your dish pop. Fresh herbs like cilantro or parsley add color and flavor. Lime wedges are perfect for serving. A squeeze of lime brings a bright, zesty touch to each bite. This flavorful mix of ingredients makes oven-roasted corn on the cob a simple yet delicious dish. For the full recipe, you can refer to the earlier sections. Set your oven temperature to 400°F (200°C). This helps the corn roast well. Husk the corn by removing the outer green layers. Pull off any silks and rinse the ears under cold water. This gets rid of dirt and dust. Pat the corn dry with a clean kitchen towel. Dry corn helps the butter stick better. In a bowl, mix softened butter with garlic powder, smoked paprika, sea salt, and black pepper. Stir until everything blends well. This seasoned butter adds a tasty twist to the corn. With a brush or your hands, apply the seasoned butter evenly over each ear of corn. Make sure to coat every part. This step ensures every bite is full of flavor. Take a piece of aluminum foil. Place one ear of corn in the center and wrap it securely. Close the ends tightly to hold in steam. Repeat for all ears of corn. This keeps the corn moist while it cooks. Align the wrapped corn on a baking sheet. Place the sheet in the preheated oven. Roast for 25-30 minutes. Turn the cobs halfway through for even cooking. When it’s done, unwrap the corn carefully. Watch out for steam! Serve the corn hot with fresh herbs and lime wedges. Enjoy the burst of flavors! For the full recipe, check out the details above. To get the best corn, look closely at the husks. You want bright green husks that feel firm. The kernels should be plump and full. If you can, squeeze the corn gently. You should feel the kernels inside. Fresh corn smells sweet and earthy. Always pick corn that feels heavy for its size. You can have fun with flavors! Try different herbs and spices. For a fresh taste, add cilantro or parsley. If you like heat, sprinkle in some chili powder. You can even mix in cheese for a creamy twist. The great thing about this recipe is how easy it is to change the taste. Your family will love trying new flavors. Cooking time may change based on corn size. For larger cobs, add a few extra minutes. Smaller cobs will cook faster. Always check the corn halfway through. Rotate them to ensure even cooking. The goal is to have tender corn that bursts with flavor. Keep an eye on your corn so it doesn’t overcook. For a full recipe, check the section above. {{image_4}} For a cheesy twist, I love adding shredded cheese. Before you wrap the corn, sprinkle your favorite cheese like cheddar or mozzarella over the seasoned butter. This extra layer melts beautifully as it roasts, creating a rich and creamy flavor. It’s a fun way to elevate your corn and make it even more delicious. If you enjoy heat, consider adding spice. Mix in chili powder or cayenne pepper with your seasoning. This tweak gives the corn a nice kick and adds depth to the flavor. Adjust the amount based on your heat preference. You can start with a small pinch and add more to find the perfect level of spice. For a sweet treat, brush the corn with honey or maple syrup. This adds a lovely sweetness that pairs well with the savory butter. The caramelization that happens during roasting enhances the flavors. You can use this method with the cheese variation too for a sweet and cheesy corn delight. For full details on preparing oven-roasted corn, check the Full Recipe. Store leftover roasted corn in an airtight container in the fridge. This keeps it fresh for about three days. Be sure to let the corn cool before sealing it. You can also wrap it in plastic wrap if you prefer. To freeze leftover corn, first let it cool completely. Wrap each ear tightly in plastic wrap or foil. Place them in a freezer bag and remove as much air as possible. This helps prevent freezer burn. You can store it for up to six months. When you want to use it, thaw in the fridge overnight. Reheat the corn using one of these methods: - Oven: Preheat to 350°F (175°C). Wrap the corn in foil and heat for about 10-15 minutes. - Microwave: Place the corn on a plate and cover with a damp paper towel. Heat for 2-3 minutes. - Stovetop: Place corn in boiling water for about 5 minutes. These methods keep the corn tender and delicious. Yes, you can roast corn with the husk on. This method keeps the corn moist. The husks act like a natural wrapper, locking in steam and flavor. However, it can take longer to cook. You might not get as much smoky flavor without the direct heat. You know the corn is done when it turns bright yellow. The kernels should feel tender when you pierce them with a fork. If you see steam escaping when you unwrap it, that's a good sign too. I suggest roasting for 25-30 minutes for the best results. Absolutely! You can use vegan butter instead of regular butter. There are many great options available now. You could also try olive oil for a lighter taste. Both choices give the corn a nice flavor without dairy. In this guide, I shared a simple way to roast fresh corn. We covered the ingredients, from the corn itself to tasty seasoning blends. I shared step-by-step instructions to ensure perfect cooking every time. We also explored tips, variations, and storage options to help you enjoy this dish later. Roasted corn is easy and fun to make. With these tips, you can enjoy flavorful, fresh corn at home. Try different flavors and make it your own!
Oven-Roasted Corn on the Cob Flavorful and Simple Recipe
Looking for the perfect way to enjoy sweet, juicy corn on the cob? Look no further! My easy oven-roasted corn on the cob recipe brings
- 1 pound fresh green beans, trimmed - 3 cloves garlic, peeled and smashed - 1 cup distilled white vinegar - 1 cup water - 2 tablespoons granulated sugar - 1 tablespoon salt - 1 teaspoon mustard seeds - 1 teaspoon red pepper flakes - 1 teaspoon black peppercorns - 1 bay leaf To make quick pickled green beans, you need fresh, vibrant ingredients. Start with one pound of green beans. Look for beans that are firm and bright green. Trim the ends off to ensure they fit nicely in your jars. Next, grab three cloves of garlic. Smash them gently with the flat side of a knife. This lets the garlic flavor seep into the beans as they pickle. Now, let's talk about the pickling liquid. You will need one cup of distilled white vinegar. This gives the pickles a nice tangy taste. Add one cup of water to balance the acidity. To sweeten the brine, include two tablespoons of granulated sugar. Finally, mix in one tablespoon of salt for flavor. Next, we add some excitement with flavor enhancements. Use one teaspoon of mustard seeds for a hint of spice. If you like heat, toss in one teaspoon of red pepper flakes. Add one teaspoon of black peppercorns for depth. Lastly, drop in one bay leaf to round out the taste. These ingredients come together to create a crunchy and flavorful treat. Follow the [Full Recipe] to see how these elements transform into a delightful snack! To start, I combine vinegar, water, sugar, and salt in a medium saucepan. I pour in 1 cup of distilled white vinegar and 1 cup of water. Then, I add 2 tablespoons of granulated sugar and 1 tablespoon of salt. I place the saucepan over medium heat. I stir the mixture until the sugar and salt dissolve. Once everything is mixed well, I let it come to a rolling boil. This step is key for building flavor. While the brine heats up, I prepare the green beans. I take 1 pound of fresh green beans and trim the ends. Then, I pack the beans tightly into clean jars. I like to arrange them straight for a nice look. I add 3 smashed garlic cloves, 1 teaspoon of mustard seeds, 1 teaspoon of red pepper flakes, 1 teaspoon of black peppercorns, and 1 bay leaf to each jar. These ingredients add a tasty kick! Once the brine cools slightly, I carefully pour it over the green beans in the jars. I make sure the beans are fully covered. If they float, I gently press down with the back of a spoon. This keeps them submerged. After filling the jars, I seal the lids tightly. I let them cool to room temperature before placing them in the fridge. For the best flavor, I let them pickle for at least 4 hours. However, I find they taste even better after a night in the fridge. For the full recipe, check the details above! To keep green beans crunchy, start with fresh beans. Select firm, bright green ones. Trim the ends before pickling. This helps the beans absorb the brine while staying firm. For cooling times, wait about 5 minutes after boiling the brine. This short pause prevents cooking the beans when added. To adjust spice levels, add more or less red pepper flakes based on your taste. If you want a milder flavor, reduce the amount. You can also add herbs for variation. Fresh dill or thyme can enhance the taste. Experiment with flavors to find your perfect balance. For serving suggestions, place the pickled green beans in a mason jar. It makes a lovely centerpiece. You can also serve them on a rustic cheese platter. Their vibrant colors create a feast for the eyes. Enhance visual appeal by adding cherry tomatoes or olives. This adds more color and texture to the table. {{image_4}} To make your quick pickled green beans spicier, add extra red pepper flakes. A teaspoon gives a mild heat. If you crave more spice, try two teaspoons. This kick enhances the flavor and adds depth. The garlic also gives a bold taste, complementing the pepper. I love to enjoy these with sandwiches or as a snack. Incorporating herbs like dill or thyme can change the flavor profile. Dill adds a fresh taste, while thyme provides warmth. You can add a few sprigs directly to the jars with the green beans. This variation pairs well with roasted meats or as a side dish. Experiment with the amount until you find your perfect mix. If you prefer a sweeter taste, modify the sugar in the brine. You can increase the sugar to three tablespoons for a richer sweetness. This blend pairs well with spicy foods, balancing the heat. It also makes a great addition to salads, giving them a unique twist. Enjoy the process of finding the right sweetness for your taste! For the complete recipe, check out the Full Recipe. Store your quick pickled green beans in the fridge. They last about two weeks. For the best taste, keep them in an airtight container. A glass jar works well. Always place the jar in the coldest part of your fridge. Avoid opening it often, as this can let warm air in. If you want to store them for longer, consider canning. Follow these steps for safe canning: - Use clean, sterilized jars. - Pack beans into jars with spices. - Pour hot brine over the beans, leaving space at the top. - Seal jars with lids and process them in a boiling water bath for 5–10 minutes. - Let them cool completely before storing. Check your pickled green beans for signs of spoilage. If you see mold or an off smell, discard them. If the brine is cloudy, it’s also a warning sign. Always trust your senses. If in doubt, throw them out! Quick pickled green beans last about two weeks in the fridge. After that, they may lose their crunch. Always check for any off smell or discoloration before eating. Yes, you can pickle many veggies! Try carrots, cucumbers, or radishes. Just adjust the pickling time based on the vegetable's size and texture. Each will give you a unique flavor. Serve pickled green beans chilled as a snack. They also add a nice crunch to salads or sandwiches. For a fun touch, place them in a cocktail or on a charcuterie board. No, you don’t need to sterilize jars for quick pickles. Just make sure they are clean. This keeps your beans safe and tasty. Yes, you can easily scale the recipe. Just keep the same ratio of ingredients. Whether you want more or less, adjust as needed for your gatherings. For the full recipe, check out Zesty Quick Pickled Green Beans. Quick pickling green beans is simple and fun. We covered the best fresh ingredients, the perfect brine mix, and ways to enhance flavor. Keeping your beans crunchy and choosing the right storage are key. You can even create unique variations to match your taste. Enjoy your pickling journey! Experiment with flavors and share your results with others. Your homemade pickles can add zest to meals and impress friends. Happy pickling!
Quick Pickled Green Beans Crunchy and Flavorful Treat
Looking for a crunchy snack that’s packed with flavor? Quick pickled green beans are your answer! In just a few steps, you can turn fresh
To make Cajun spiced chicken wings, you need the following core ingredients: - 2 pounds of fresh chicken wings - 2 tablespoons of high-quality olive oil - 2 teaspoons of smoked paprika - 1 teaspoon of cayenne pepper - 1 teaspoon of garlic powder - 1 teaspoon of onion powder - 1 teaspoon of dried oregano - 1 teaspoon of dried thyme - 1 teaspoon of kosher salt - 1/2 teaspoon of freshly ground black pepper The spice blend gives the wings their bold flavor. Here are the key components: - Smoked paprika adds a rich, smoky taste. - Cayenne pepper provides heat. Adjust it to fit your spice level. - Garlic powder and onion powder enhance the savory taste. - Dried oregano and thyme bring a touch of earthiness. - Kosher salt and black pepper round out the flavor profile. You can elevate your wings with these optional ingredients: - 1 tablespoon of honey adds a sweet note. - Fresh parsley, finely chopped, adds color and freshness. Check out the Full Recipe for exact measurements and details on preparation. ``` Start by preheating your oven to 400°F (200°C). This temperature helps the wings cook well. Next, take a baking sheet and line it with aluminum foil. This makes cleanup easy. Place a wire rack on top of the foil. Using a wire rack allows hot air to flow around the wings. This helps them get crispy and cook evenly. In a large bowl, mix the olive oil with the smoked paprika, cayenne pepper, garlic powder, onion powder, oregano, thyme, kosher salt, and black pepper. Stir until you create a thick paste. This spice mix is what gives the wings their Cajun flavor. Adjust the cayenne pepper if you want more or less heat. Now, add the fresh chicken wings to your spice mixture. Use your hands or a spatula to coat each wing completely. Make sure every part of the wings is covered. This way, each bite will be full of flavor. The olive oil helps the spices stick well to the wings. Arrange the wings in a single layer on the wire rack. This helps them cook evenly. Bake the wings for 40-45 minutes. Flip them halfway through for even browning. They should turn golden brown and crispy. In the last 5 minutes, drizzle honey over the wings. This will add a nice sweetness. Once done, take them out and let them rest for a few minutes. Sprinkle chopped parsley on top before serving. This adds color and freshness. For the complete recipe, check out the Full Recipe. To get crispy chicken skin, you need to keep the wings dry. Start by patting the wings with paper towels. This removes moisture. Moisture can make the skin soggy. Using a wire rack is key. It allows hot air to flow around the wings. This promotes even cooking. Flip the wings halfway through baking. This helps both sides crisp up nicely. Baking them at 400°F makes a big difference in texture. Cajun spice can be strong. Adjust the heat to your liking. If you want less heat, cut down on cayenne pepper. Start with half a teaspoon. You can always add more spice later. For a sweeter touch, add honey. It balances the heat well. Tasting the spice mix before applying it to the wings also helps. This lets you know if you need to add more salt or spice. Presentation makes a big impact. Serve your wings on a large, colorful platter. Add fresh parsley for a pop of color. Lime wedges on the side add brightness. This also gives a zesty flavor when squeezed over the wings. For a fun twist, serve with dipping sauces. A creamy ranch or blue cheese dip pairs well. You can also include celery sticks for a crunchy side. These simple touches make your wings shine at any gathering. {{image_4}} To make grilled Cajun chicken wings, you need to change the cooking method. Start by marinating the wings in the same spice mix. Then, preheat your grill to medium-high. Place the wings on the grill, turning them often. Grill for about 20-25 minutes or until they are cooked through and crispy. This method adds a smoky flavor that is hard to beat. The grill gives the wings a nice char that complements the spices well. If you want a sweet twist, try honey garlic Cajun wings. You can use the same spices and add a sauce made from honey and minced garlic. Mix equal parts honey and vinegar with minced garlic. After baking or grilling the wings, toss them in the sauce. This method creates a sticky glaze that pairs perfectly with the Cajun flavor. The sweet and spicy combination will make your taste buds dance. You can easily switch up the spice mix for different flavors. For a milder option, try using Italian herbs like basil and rosemary. For a zesty kick, add lemon zest to the mix. You might also want to try a dry rub with cumin and chili powder for a different taste. Marinades can include soy sauce or mustard for a unique twist. Experiment with what you have at home, and have fun with it! Each variation brings its own flair to the classic Cajun wing. For the full recipe, check out the details above. Once you finish your Cajun spiced chicken wings, let them cool completely. This helps keep them crispy. Place the wings in an airtight container. Use parchment paper between layers if you stack them. This will stop them from sticking together. Store the container in the fridge. They will stay fresh for about 3 to 4 days. Make sure to label the container with the date. This way, you know when to eat them. When it’s time to enjoy your leftovers, choose the oven for reheating. Preheat it to 350°F (175°C). Lay the wings on a baking sheet. Heat them for about 10 to 15 minutes. This method keeps the skin crispy. If you’re in a hurry, you can use a microwave. Place the wings on a microwave-safe plate. Heat them in short bursts of 30 seconds until warm. But remember, the skin may not be as crispy. Freezing is a great way to save wings for later. Place the cooled wings in a single layer on a baking sheet. Freeze them for about 1 hour. This prevents them from sticking together. Once frozen, transfer the wings to a freezer-safe bag or container. Squeeze out the air to avoid freezer burn. They can last for up to 3 months in the freezer. When you’re ready to eat, thaw them overnight in the fridge. Then, reheat them as mentioned above. Enjoy your tasty Cajun spiced chicken wings again! Cajun cuisine comes from Louisiana. It blends French, Spanish, and African flavors. The food is bold and spicy. Common spices include paprika, cayenne, and garlic. Cajun dishes often use fresh herbs, like thyme and oregano. This mix creates deep, rich flavors in every bite. Cajun food is famous for its hearty feel and warmth. To add more heat, use extra cayenne pepper. You can also try hot sauce in the spice mix. Another option is to add ground pepper or chili powder. If you like smoky flavors, smoked paprika gives heat with a twist. Start with small amounts, then taste as you go. Adjust according to your heat preference. Yes, you can use frozen chicken wings. Just thaw them before cooking. Thawing can be done in the fridge overnight or in cold water for a quicker method. After thawing, pat them dry with paper towels. This step helps the wings get crispy when baked. Follow the same steps in the Full Recipe for great results. Cajun spiced chicken wings are simple to make and full of flavor. We explored essential ingredients, preparation steps, and helpful tips to achieve the best results. Remember, adjusting spice levels can suit your taste. Variations like grilled wings or honey garlic add fun twists. Proper storage keeps leftovers tasty, while reheating helps maintain that crunch. Enjoy cooking, experimenting, and sharing these wings with friends. Delicious food brings people together, and these wings will surely impress!
Cajun Spiced Chicken Wings Easy and Flavorful Recipe
Looking to spice up your next meal? These Cajun Spiced Chicken Wings are easy to make and bursting with flavor! I’ll guide you through every