Appetizers

- 4 large tortillas - 1 cup pizza sauce - 2 cups shredded mozzarella cheese - 1 cup sliced pepperoni - 1/2 cup bell peppers, finely chopped - Grated Parmesan cheese for topping - 1 teaspoon Italian seasoning - 1/4 teaspoon garlic powder - Olive oil for brushing Creating Easy Kids' Lunch Pizza Roll Ups is fun! You start with large tortillas as a base. They hold all the tasty fillings. The pizza sauce adds a rich and tangy flavor. I like using a full cup, but you can add less if you prefer. Next, sprinkle two cups of mozzarella cheese. It melts beautifully and pulls apart in cheesy strands. Kids love that! You can personalize your roll-ups with optional ingredients. Sliced pepperoni adds a classic taste, while bell peppers bring color and crunch. If you want an extra cheesy touch, top with grated Parmesan. Don’t forget the seasonings! Italian seasoning gives a warm flavor, and garlic powder adds depth. A light brush of olive oil before baking helps everything turn golden. These ingredients make for a tasty and colorful lunch that kids will enjoy. For the Full Recipe, check out the instructions section! - Preheat the oven to 400°F (200°C). - Prepare a clean, flat surface for assembly. First, we need to get our oven ready. Preheating helps the roll-ups cook evenly. A clean surface is key for making assembly easy. - Lay a tortilla flat and spread pizza sauce. - Add cheese, pepperoni, and optional bell peppers. Next, grab a large tortilla and lay it flat. Spread 1/4 cup of pizza sauce on it. Make sure to leave some space at the edges. This keeps the sauce from spilling out when you roll it. Now sprinkle 1/2 cup of shredded mozzarella cheese over the sauce. Add some pepperoni slices and bell peppers if you want a crunchy bite. - Sprinkle with seasonings and roll tightly. - Arrange on a baking sheet, brush with oil, and bake. Now comes the fun part! Sprinkle a pinch of Italian seasoning and garlic powder over the toppings. Then, start rolling the tortilla tightly from one edge. Once you have a nice log shape, place it seam-side down on a baking sheet. Brush the tops with olive oil for a golden color. If you like, add some grated Parmesan cheese on top for extra flavor. Bake these tasty roll-ups in your preheated oven for 15-20 minutes. You want them golden brown and the cheese bubbly. After that, let them cool for a bit before slicing them into pinwheels. Enjoy your Easy Kids' Lunch Pizza Roll Ups! You can find the Full Recipe in the earlier section. To make sure your pizza roll-ups do not spill, seal the edges well. After rolling, press the edges to keep everything inside. You can also adjust the ingredient amounts to fit your taste. If you love cheese, add more mozzarella! Prefer less sauce? Just drizzle a little. You can prepare pizza roll-ups in advance. Just roll them up as usual and place them in the fridge. They stay fresh for about a day. When you want to eat them, preheat your oven and bake. To keep them crispy, cover them with foil for the first few minutes. Then, uncover to let them brown. Pair your roll-ups with a small bowl of pizza sauce for dipping. You can add a side salad or fruit to complete the meal. For creative presentation, cut the roll-ups into pinwheels. Arrange them on a colorful plate to make lunchtime fun. Kids will love the look and taste! For precise details on making these tasty roll-ups, check out the Full Recipe. {{image_4}} You can change the cheese and sauce to fit your taste. Try cheddar or pepper jack instead of mozzarella. For a twist, use barbecue sauce or pesto. Mix in some feta for a fun flavor. You can also swap meats. If your kids love ham, use it instead of pepperoni. Cooked chicken or turkey works well too. Want more veggies? Add spinach or mushrooms. These changes keep meals exciting and new. If gluten is a concern, choose gluten-free tortillas. Many brands offer tasty options. You can find them at most grocery stores. For a vegetarian meal, skip the meat and load up on veggies. Zucchini and olives add great flavor. If you want vegan roll-ups, use non-dairy cheese. There are many good brands available now. These swaps keep everyone happy at mealtime. Explore global tastes with your pizza roll-ups. For a Mexican flair, add black beans and corn. Use taco seasoning instead of Italian spices. Top with salsa for extra zest! For Italian vibes, include sun-dried tomatoes and basil. You can also sprinkle some oregano for a true Italian touch. Try adding some spices like cumin or smoked paprika for a unique spin. These ideas bring the world to your kitchen. Check the Full Recipe for more tips and tricks on creating your own delightful variations! To store leftover pizza roll-ups, place them in an airtight container. This keeps them fresh. You can also wrap them in plastic wrap. They stay good in the fridge for about 3 to 4 days. If you want to keep them longer, consider freezing. To freeze pizza roll-ups, let them cool completely first. Then, wrap each roll-up in plastic wrap. Place them in a freezer-safe bag or container. This way, they can last for up to 2 months in the freezer. To reheat frozen roll-ups, place them in the oven at 350°F (175°C) for about 20 minutes. This keeps them warm and crispy. Always follow food safety rules. Wash your hands before handling food. Make sure your fridge is at 40°F (4°C) or below. This helps to keep food safe. If you see any signs of spoilage, throw it away. Keep your kitchen clean to avoid any foodborne illness. To make pizza roll-ups crispy, follow these tips: - Preheat your oven to 400°F (200°C). - Brush the tops with olive oil before baking. - Bake until golden brown, around 15-20 minutes. - Place the roll-ups seam-side down on the baking sheet. These steps help crisp the outside while keeping the inside cheesy and gooey. Yes, you can use whole wheat tortillas. They add a nutty flavor and extra fiber. Whole wheat is a healthier choice. Many kids enjoy the taste, too. You can easily swap them for regular tortillas in this recipe. Kids love dipping sauces! Here are some fun options: - Marinara sauce for a classic pizza taste. - Ranch dressing for a creamy contrast. - Garlic sauce for a zesty twist. Feel free to try what your kids like best! Pizza roll-ups take about 15-20 minutes to bake at 400°F (200°C). Keep an eye on them. You want them golden and crispy. Check for bubbling cheese inside to know they’re ready. Absolutely! Adding veggies boosts nutrition and flavor. Consider these options: - Spinach for added greens. - Mushrooms for a savory touch. - Zucchini for extra moisture and taste. Feel free to mix and match your family's favorites! In this blog post, we explored how to create delicious pizza roll-ups. I shared key ingredients, from tortillas to toppings, and provided step-by-step instructions. We discussed tips to perfect your roll-ups and variations to suit different tastes. Remember, you can easily make these ahead and store them for later. Enjoy experimenting with flavors and serving options. Dive into this fun recipe, and let your creativity shine in the kitchen!
Easy Kids’ Lunch Pizza Roll Ups Delightful Recipe
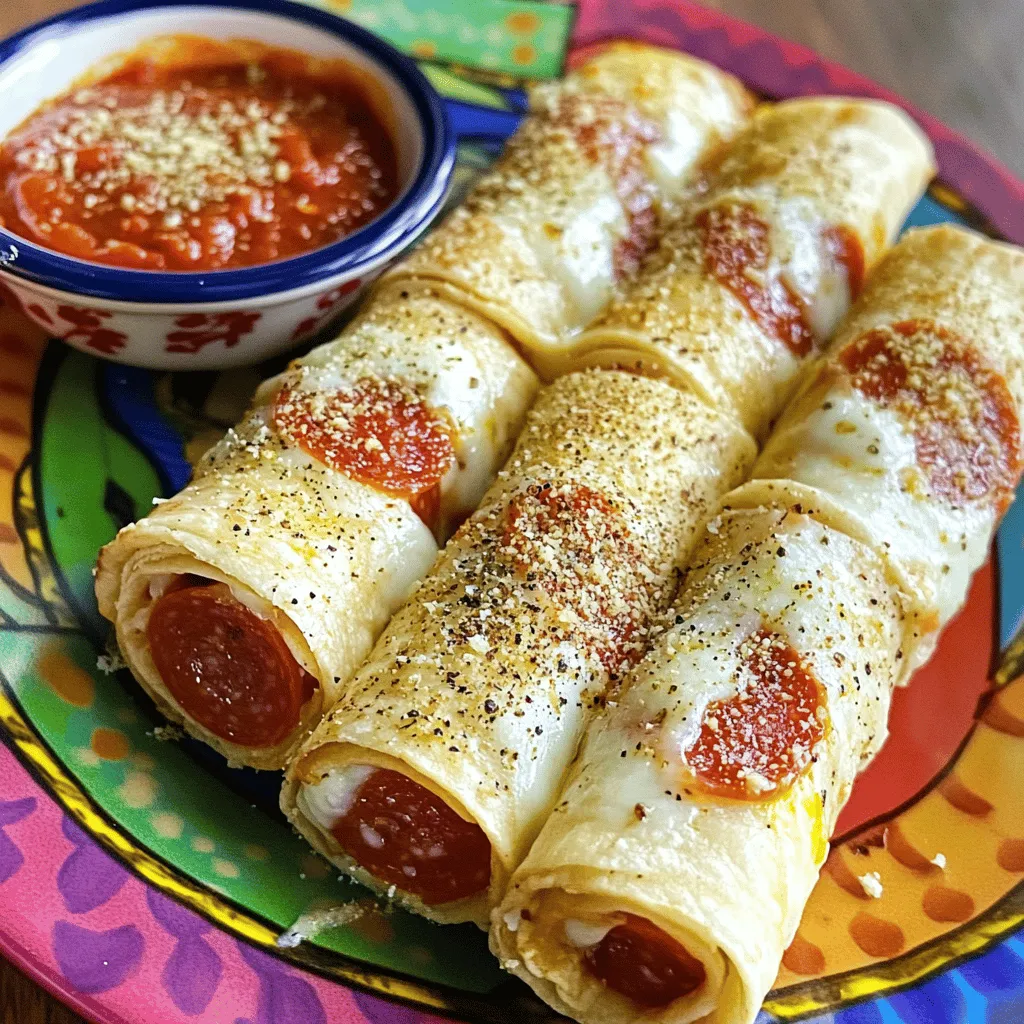
Are you looking for a fun and easy lunch that your kids will love? Try my Easy Kids’ Lunch Pizza Roll Ups! These tasty treats
- 1 package of refrigerated pizza dough - 1 cup shredded mozzarella cheese - 1/2 cup sliced pepperoni - 1/4 cup cream cheese, softened - 1 teaspoon Italian seasoning - 1 tablespoon olive oil - 1/2 teaspoon garlic powder - Marinara sauce for dipping (optional) You will need a few simple items to make Cheesy Pepperoni Roll-Ups. First, grab a package of refrigerated pizza dough. This dough is easy to find and perfect for our recipe. Next, you will need shredded mozzarella cheese. It adds a gooey, cheesy taste that you will love. Sliced pepperoni gives the roll-ups a savory kick. You’ll also want softened cream cheese. This ingredient adds a smooth richness that binds everything together. Italian seasoning brings in an herby flavor that enhances the taste. Olive oil helps to achieve a golden brown finish when baking. Lastly, garlic powder adds a nice touch of flavor. Marinara sauce is optional but great for dipping. - Calories per roll-up: about 130 - Macronutrient breakdown: 7g protein, 9g fat, 10g carbs - Allergen information: Contains dairy and gluten Each roll-up contains around 130 calories. They provide a good mix of protein, fats, and carbs. Each roll-up has about 7 grams of protein, 9 grams of fat, and 10 grams of carbs. Be aware that these roll-ups contain common allergens like dairy and gluten. If you have allergies, make sure to adjust the ingredients to suit your needs. For the full recipe, check the section above. 1. Preheat the oven and prepare the baking sheet: Start by setting your oven to 400°F (200°C). This is key for a crispy finish. Next, line a baking sheet with parchment paper. This prevents sticking and makes cleanup a breeze. 2. Roll out the pizza dough: Take your refrigerated pizza dough and place it on a lightly floured surface. Roll it out into a rectangle, about 1/4 inch thick. This gives you a strong base for all the tasty fillings. 1. Spread cream cheese and add toppings: Grab your softened cream cheese and spread it evenly over the dough. Leave about a half-inch border around the edges. This helps keep your filling inside when you roll. Next, sprinkle shredded mozzarella cheese generously on top of the cream cheese. Then, add the sliced pepperoni evenly over the cheese. 2. Sprinkle seasoning for enhanced flavor: To make each bite pop, sprinkle Italian seasoning and garlic powder over the top. This adds a nice depth of flavor that complements the cheese and pepperoni. 1. Form and slice the log: Starting from one long edge, roll the dough tightly toward the opposite edge. Make sure to pinch the seams securely to keep everything inside. Once rolled, use a sharp knife to slice the log into 1-inch thick pieces. 2. Bake and cool before serving: Arrange the slices cut-side up on your prepared baking sheet. Brush the tops with olive oil for a nice golden color. Bake in the preheated oven for 15-20 minutes. Watch for them to turn golden and for the cheese to bubble. After baking, let them cool for a few minutes. This makes them easier to handle. For exact measurements and additional details, check out the Full Recipe. To make your Cheesy Pepperoni Roll-Ups just right, focus on your rolling technique. Start from one long edge of the dough and roll it tightly. This will help keep the filling inside. As you roll, make sure to keep the filling even. If you find some areas have too much filling, adjust as you go. Sealing the edges is very important. After rolling, pinch the seams together firmly. This prevents the cheese and pepperoni from oozing out during baking. If you miss this step, you might end up with a messy oven and less tasty roll-ups. If you want vegan roll-ups, you can swap the cheese. Use vegan cheese made from nuts or soy. Many brands offer great flavors. For the cream cheese, look for a vegan version at your local store. For those needing gluten-free options, there are gluten-free pizza doughs available. These doughs work well for roll-ups. Just make sure to follow the package instructions for best results. Pair your roll-ups with delicious dips. Marinara sauce is a classic choice. It adds a nice flavor and helps make each bite extra tasty. You can also try ranch or garlic sauce for a twist. To make your roll-ups look great, garnish the plate. Fresh herbs like basil or parsley add color and flavor. You can sprinkle some on top or place them around the roll-ups. This will impress your guests and make your snack even more fun! For the full recipe, check out the [Full Recipe]. {{image_4}} You can change up the fillings to suit your taste. Adding veggies like bell peppers or mushrooms gives a nice crunch and flavor. These ingredients add color and nutrition too. You can also mix different cheeses for unique flavors. Try cheddar or pepper jack for a spicy twist. Each cheese brings its own magic to the roll-ups. Want to spice things up? Add jalapeños for a kick. They bring heat and a tasty zing to each bite. If you like sweet flavors, try adding pizza sauce or pesto to the mix. These options give you a fun, fresh twist on the classic recipe. You can even spread a thin layer of sauce inside before rolling. If you’re busy, meal prep is key. You can make these roll-ups ahead of time and bake them later. Just roll them up, slice, and store in the fridge. This way, they are ready when you need a quick snack. They are also freezer-friendly. You can freeze them before baking. Just thaw them in the fridge and bake when you're ready. For the full recipe, check out the details! To keep your leftover roll-ups fresh, refrigerate them. Place them in an airtight container. This helps lock in moisture and flavor. They stay good in the fridge for up to three days. When you want to enjoy them again, reheat gently. Use a microwave or oven. If using a microwave, heat for about 30 seconds. For the oven, set it to 350°F (175°C) and warm for 10 minutes. This method keeps the roll-ups crispy. You can freeze Cheesy Pepperoni Roll-Ups before or after baking. If freezing before baking, slice the roll-ups and lay them on a baking sheet. Freeze them for about an hour. Then, transfer them to a freezer-safe bag. This method prevents them from sticking together. If you bake them first, let them cool completely. Wrap each roll-up in plastic wrap and place them in a freezer bag. They can last up to three months in the freezer. When you're ready to eat, thaw the roll-ups overnight in the fridge. For reheating, use the oven at 350°F (175°C). Bake for about 15-20 minutes if they are cooked. If they are frozen and uncooked, bake for 25-30 minutes. This way, they will taste fresh and delicious. You can tell the roll-ups are done when they turn golden brown. Look for the cheese to bubble up nicely. This means the insides are warm and melty. If you see a nice crust, your roll-ups are ready to eat! Yes, you can prepare the roll-ups in advance. You can roll them up and store them in the fridge. Just cover them tightly with plastic wrap. You can also pre-prep the ingredients. Keep the pizza dough and fillings ready, then assemble them when you want to bake. These roll-ups taste great with many sides. You can serve them with marinara sauce for dipping. A side salad adds freshness and a nice crunch. For drinks, try soda, lemonade, or even a light beer. They all pair well! In this blog post, we explored the tasty world of Cheesy Pepperoni Roll-Ups. We covered ingredients, preparation steps, and baking instructions. I shared tips for perfecting your roll-ups and offered variations to keep meals exciting. These roll-ups are easy, fun, and great for any meal. Whether you're prepping for busy nights or just want a snack, they fit the bill. With the right storage, you can enjoy them later too. Happy cooking, and enjoy your delicious creations!
Cheesy Pepperoni Roll-Ups Flavorful and Easy Snack
Craving a quick, tasty snack? Look no further! Cheesy Pepperoni Roll-Ups are your perfect answer. These little bites pack flavor and are easy to make.
- 6 hot dogs, sliced into bite-sized pieces - 1 cup shredded sharp cheddar cheese - 1 cup all-purpose flour - 2 teaspoons baking powder The main ingredients create a tasty base for cheesy hot dog bites. The hot dogs bring a savory bite, while cheddar cheese melts beautifully, adding richness. The flour and baking powder help bind everything together, giving the bites their fluffy texture. - 1/2 teaspoon garlic powder - 1/2 teaspoon smoked paprika - 1/2 teaspoon salt Spices and seasonings enhance flavor. Garlic powder adds a nice depth. Smoked paprika gives a hint of warmth and smokiness, while salt boosts all the flavors. This blend makes each bite pop with taste. - 1/2 cup whole milk - 1 large egg, beaten - 1/4 cup unsalted butter, melted Wet ingredients keep the bites moist. Whole milk adds creaminess, while the egg helps bind everything. Unsalted butter gives a rich flavor and keeps the bites tender. All together, they create a perfect batter. For the full recipe, check out the instructions above. First, preheat your oven to 375°F (190°C). This ensures the bites cook evenly. Next, prepare a baking sheet by lining it with parchment paper. This helps prevent sticking and makes cleanup easier. In a large mixing bowl, combine the all-purpose flour, baking powder, garlic powder, smoked paprika, and salt. Whisk these dry ingredients well. This step ensures even seasoning throughout the bites. In a separate medium bowl, whisk together the whole milk, beaten egg, and melted unsalted butter. Mix until smooth and well combined. Now, pour this mix into the bowl with dry ingredients. Stir gently until just combined. Do not overmix, as this can make the bites tough. Next, fold in the shredded sharp cheddar cheese. Make sure it’s evenly distributed in the batter. Then, gently incorporate the sliced hot dog pieces. Fold them in carefully to ensure they are well coated. Using a small cookie scoop or spoon, drop rounded portions of the mixture onto the prepared baking sheet. Leave space between each bite for even cooking. Place the baking sheet in the oven and bake for about 15-20 minutes. They are done when golden brown and a toothpick comes out clean. After baking, let them cool for a few minutes before serving. Enjoy your cheesy hot dog bites! For the complete recipe, check the Full Recipe. To get soft, fluffy bites, avoid overmixing the batter. When you combine the wet and dry ingredients, stir gently. It’s okay if there are a few lumps. Overmixing makes the dough tough, which you don’t want. Aim for a smooth mix without disturbing the air bubbles. This helps create a light texture in each bite. Presentation matters! Arrange the cheesy hot dog bites on a bright platter. This makes them look even more appetizing. You can add small bowls of mustard and ketchup for dipping. To make your dish pop, sprinkle fresh parsley on top. This adds color and freshness, making it a fun treat for guests. Dipping sauces can elevate your cheesy hot dog bites. Mustard and ketchup are classic choices. They bring a nice tang and sweetness. You can also try ranch dressing for a creamy dip. If you like spice, sriracha or hot sauce can add a kick. Serve different options to please all your guests! {{image_4}} You can switch up the cheese for a new taste. Try using mozzarella for a stretchy, gooey bite. Pepper jack adds a nice kick with its spicy flavor. If you prefer a stronger taste, use aged cheddar or gouda. Mixing different cheeses can also create a delightful blend. Experiment to find your favorite combination! Adding vegetables can boost the flavor and nutrition of your cheesy hot dog bites. Diced jalapeños bring heat and a crunchy texture. Bell peppers add sweetness and color. You can also try finely chopped onions or spinach for extra health benefits. Just fold them into the batter with the hot dogs. It’s an easy way to make the dish more exciting. If you want to mix it up, use different proteins. Turkey hot dogs work great for a leaner option. Veggie dogs are perfect for those who prefer plant-based meals. They can also add a unique flavor. Feel free to get creative with your choice of protein! It’s all about what you enjoy. For the full recipe, check the earlier section! To keep your cheesy hot dog bites fresh, follow these tips: - Refrigerate: Place leftovers in an airtight container. They stay good for about 3-4 days. - Freeze: If you want to store them longer, freeze the bites. Use a freezer-safe bag or container. They last up to 2 months in the freezer. Reheating is simple! For the best texture and flavor: - In the Oven: Preheat your oven to 350°F (175°C). Place the bites on a baking sheet. Heat for about 10-15 minutes until warm. - In the Microwave: Place bites on a microwave-safe plate. Heat for 30 seconds to 1 minute. Check to avoid overcooking. These methods keep your cheesy hot dog bites tasty and enjoyable! For the full recipe, click here. Cheesy hot dog bites can last in the refrigerator for up to three days. To keep them fresh, store them in an airtight container. If you want to maintain their crunch, place a paper towel in the container to absorb extra moisture. This helps keep them tasting great. Yes, you can make cheesy hot dog bites ahead of time. Prepare the batter and fill the baking sheet, but do not bake them right away. Cover the tray with plastic wrap and place it in the fridge. When you're ready, just pop them in the oven. They might need a few extra minutes to bake from cold. You can serve cheesy hot dog bites with a variety of dips. Mustard and ketchup are classic choices. You can also try ranch dressing or barbecue sauce for a twist. Pair them with fresh veggies or a simple salad for a complete meal. Absolutely! Cheesy hot dog bites are a hit with kids. Their fun shape and cheesy flavor make them perfect for little hands. They are great for parties, after-school snacks, or family movie nights. Kids enjoy dipping them in sauces too, which adds to the fun. Yes, you can make a gluten-free version of cheesy hot dog bites. Simply swap the all-purpose flour with a gluten-free flour blend. Make sure it is a blend that works well for baking. This way, everyone can enjoy these tasty bites! For the full recipe, check out my detailed instructions above! Cheesy hot dog bites mix simple ingredients for tasty fun. We covered main ingredients such as hot dogs, cheese, and spices. You learned how to prepare, bake, and serve these treats with helpful tips. Variations let you get creative with flavors and textures. Storing leftovers and reheating ensures you enjoy every bite later. Whether for kids or a snack yourself, these bites are sure to please. Try them out and customize to your liking!
Cheesy Hot Dog Bites Quick and Easy Snack Idea
Looking for a quick and tasty snack? You’ve found it! Cheesy hot dog bites are fun to make and even better to eat. With just
To make a great homemade salsa, you need fresh and simple ingredients. Here’s what you should gather: - 4 ripe Roma tomatoes, diced into bite-sized pieces - 1 medium red onion, finely chopped for a sharp flavor - 1 jalapeño pepper, carefully seeded and minced to control heat - 1 cup fresh cilantro, chopped to release its vibrant aroma - 2 cloves garlic, minced for a robust depth - Juice of 2 limes, freshly squeezed for brightness - 1 teaspoon ground cumin for earthiness - 1 teaspoon smoked paprika to add a touch of warmth - Salt and freshly ground pepper to taste These ingredients work together to create a salsa that bursts with flavor. The Roma tomatoes give a juicy base while the lime juice adds a bright touch. If you want to take your salsa to the next level, consider these optional add-ins: - Diced bell peppers for sweetness - Chopped avocado for creaminess - Fresh corn for a sweet crunch - Black beans for protein and texture - A dash of hot sauce for extra heat These additions can boost flavor and texture. Feel free to mix and match according to your taste. You might not have all the ingredients on hand, and that's okay! Here are some easy swaps: - Use any ripe tomatoes if Roma is unavailable. - Yellow onion can replace red onion if you prefer a milder taste. - Green chili can stand in for jalapeño for a different heat level. - If cilantro isn't your thing, parsley can work too. These substitutions will still give you a tasty salsa. Just remember, fresh ingredients make all the difference! For the full recipe, check out Zesty Garden Fiesta Salsa. Start by gathering all your fresh ingredients. You will need: - 4 ripe Roma tomatoes, diced into bite-sized pieces - 1 medium red onion, finely chopped for a sharp flavor - 1 jalapeño pepper, carefully seeded and minced to control heat - 1 cup fresh cilantro, chopped to release its vibrant aroma - 2 cloves garlic, minced for a robust depth - Juice of 2 limes, freshly squeezed for brightness - 1 teaspoon ground cumin for earthiness - 1 teaspoon smoked paprika to add a touch of warmth - Salt and freshly ground pepper to taste Wash the tomatoes and cilantro well. Dice the tomatoes carefully. Chop the red onion finely for a strong taste. Mince the jalapeño, but keep it small. You want the heat to blend well but not overpower. In a large bowl, combine the diced tomatoes, red onion, and minced jalapeño. These three ingredients form the base of your salsa. Next, add the chopped cilantro and minced garlic. Mix them well to ensure the flavors spread evenly. Now, squeeze the fresh lime juice over the mixture. This adds a bright taste that balances the salsa. Sprinkle in the ground cumin and smoked paprika. These spices give warmth and depth to the dish. Finally, season with salt and freshly ground pepper. Use a spatula or large spoon to gently toss everything together. Make sure all the ingredients are coated in flavor. Cover the bowl with plastic wrap. Let it rest at room temperature for at least 30 minutes. This step is crucial. It allows the flavors to meld beautifully. You will notice a big difference in taste after this resting time. Before serving, give the salsa a gentle stir. This helps mix any settled ingredients. Your salsa is now ready to enjoy! You can find the Full Recipe above for more details. To make your salsa shine, use the freshest ingredients. Ripe Roma tomatoes give the best flavor. Chop everything evenly for a nice texture. Mix well so every bite tastes great. Let the salsa rest before serving. This helps the flavors blend and become more vibrant. If you like a kick, add more jalapeño. For less heat, remove the seeds and ribs. You can also add mild peppers, like bell peppers, for a different flavor. If your salsa gets too spicy, add more tomatoes. This balances the heat well. Serve your salsa in a colorful bowl. A bright bowl makes it eye-catching. Add a sprig of cilantro on top for a fresh look. Lay out crispy tortilla chips around the bowl. It invites guests to dip right in. This setup makes your salsa a star at any gathering. For the full recipe, check the section above. {{image_4}} If you love heat, try adding more jalapeño or serrano peppers. You can also include hot sauce for a kick. For a smoky flavor, mix in chipotle peppers in adobo sauce. You can keep some seeds in the jalapeño for extra spice. If you want to go bold, add a dash of cayenne pepper. Each option offers a new level of heat that can excite your taste buds. For those who prefer mild flavors, use sweet bell peppers instead of jalapeños. Sweet onions, like Vidalia, can give a gentle taste. You can also skip the peppers entirely and focus on tomatoes and onions. Adding a bit of sugar can balance the acidity without adding heat. These options make a great salsa without overwhelming spice. Fruit salsas are a fun twist! Try mango, pineapple, or peach for sweetness. Chop the fruit and mix it with lime juice. Add a hint of mint or basil for freshness. For a zesty kick, include finely chopped jalapeño, but keep it light. Fruit salsa pairs well with grilled meats or as a dip. You can find more recipe ideas in the Full Recipe section. To keep your salsa fresh, store it in a clean, airtight container. Glass jars work well because they won’t absorb smells. Avoid metal containers since they can react with the acidity of salsa. Always make sure to seal the container tightly. This helps to lock in flavors and keep out air. Homemade salsa can last about 3 to 5 days in the fridge. After that, it may lose its taste and freshness. If you notice any signs of spoilage, like mold or an off smell, it’s best to toss it. Always remember to check the salsa before enjoying! If you want to keep your salsa longer, freezing is a great option. First, let the salsa cool completely. Then, use freezer-safe containers or bags. Leave some space at the top to allow for expansion. When you want to use it, thaw the salsa in the fridge overnight. While freezing may change the texture, the flavor will still be delicious. To get the full recipe, check the section above. You can serve homemade salsa with many tasty options. Tortilla chips are a classic choice. They are crunchy and perfect for dipping. You can also use salsa on tacos or burritos. It adds a fresh kick. Try it with grilled chicken or fish for a bright flavor. You can even use it in salads or as a topping for baked potatoes. The possibilities are endless! Yes, you can make salsa in advance. This can help the flavors mix well. I recommend making it a few hours before serving. If you have time, let it sit overnight in the fridge. This rest time really helps the taste. However, don’t add salt until just before serving. This keeps the salsa fresh and firm. To make salsa less watery, choose firm tomatoes, like Roma tomatoes. You can also seed the tomatoes before dicing them. This step removes extra juice. Another tip is to let the salsa sit in a colander for a few minutes. This drains excess liquid. If it’s still too watery, add a bit of diced bell pepper or avocado. These ingredients help absorb moisture while adding flavor. Making homemade salsa is easy and fun. You learned how to pick the best ingredients and add your own twist with optional add-ins. We walked through simple steps to prepare, mix, and let the flavors meld together. I shared tips to adjust spice levels and make your salsa shine. With variations for everyone, there’s a salsa for every taste. Remember, proper storage keeps your salsa fresh longer. Enjoy your salsa journey and share it with friends!
Homemade Salsa Recipe Fresh and Flavorful Delight
Are you ready to elevate your next gathering with a burst of fresh flavors? This homemade salsa recipe is a must-try! I’ll guide you through
- 2 large whole wheat tortillas - 1 cup cooked chicken breast, shredded - 1 small cucumber, thinly sliced - 1/2 red bell pepper, julienned - Fresh cilantro leaves, for garnish To make healthy chicken wraps, you need whole wheat tortillas. They are a great choice because they are higher in fiber than white tortillas. Next, add cooked chicken breast. Shredded chicken is easy to mix and adds good protein. Fresh vegetables elevate your wraps. Sliced cucumber offers crunch, while julienned red bell pepper adds sweetness. Finally, cilantro gives a fresh kick to each bite. - 1 ripe avocado, mashed - 1/4 cup Greek yogurt - 1 teaspoon garlic powder - 1 teaspoon smoked paprika For flavor, use mashed avocado. It creates a creamy texture and adds healthy fats. Greek yogurt is another great choice. It makes the chicken filling smooth and tangy. Spices like garlic powder and smoked paprika bring depth to the dish. They enhance the taste without extra calories. - 1 tablespoon fresh lime juice - Salt and black pepper to taste To finish, add fresh lime juice. It brightens up the flavors and adds a zesty touch. Season with salt and black pepper to your liking. These simple additions make the wraps even better. For the full recipe, check out Zesty Avocado Chicken Wraps. Start by shredding the cooked chicken breast. You can use your hands or forks to pull it apart. Next, mash the ripe avocado in a bowl until smooth. Slice the cucumber thinly and julienne the red bell pepper. These fresh veggies add crunch and color to your wrap. Now, mix the shredded chicken with Greek yogurt, lime juice, garlic powder, smoked paprika, salt, and black pepper. Stir until the chicken is well coated. Take a whole wheat tortilla and spread half of the mashed avocado on one side. This creamy layer adds taste and keeps the wrap moist. On the same side, spoon half of the chicken mixture. Add the sliced cucumber and julienned red bell pepper. Finally, sprinkle some fresh cilantro leaves for extra flavor. To roll your wrap, start at the end with the fillings. Lift the edge and roll it away from you. Tuck in the sides to secure the filling. Slice the wrap in half diagonally for easy eating. Serve the wraps on a bright plate, adding extra cilantro and lime wedges on the side. This adds a pop of color and flavor to your meal. For the full recipe, refer to the instructions provided earlier. To create the best healthy chicken wraps, always use fresh ingredients. Fresh veggies add bright flavors and crunch. I recommend using ripe avocados and crisp cucumbers. Adjust the seasoning based on your taste. If you love spice, add more garlic powder or smoked paprika. These wraps pair well with simple side dishes. A fresh green salad adds crunch and color. You can also serve them with baked sweet potato fries. For dipping, try Greek yogurt mixed with herbs. Hummus or salsa also make tasty options. To make these wraps kid-friendly, swap out any disliked ingredients. Use shredded carrots or sliced apples in place of cucumbers. Let your kids help with prep. They can mash avocados or roll the wraps. This makes them more excited to eat what they helped make. For the full recipe, check out the Zesty Avocado Chicken Wraps. {{image_4}} If you want a low-carb meal, try lettuce wraps. They have fewer carbs than tortillas. You can use large leaves of romaine or butter lettuce. This keeps your meal light and crunchy. You can also swap out chicken for turkey or tofu. Turkey offers a similar taste with fewer calories. Tofu is a great choice for plant-based meals. Both options are easy to prepare and taste great. For a vegetarian wrap, consider using beans or legumes. Black beans or chickpeas add protein and fiber. They also bring a nice texture to your meal. If you need gluten-free options, choose corn tortillas. They work well with all the same fillings. You can also use a large leaf of collard greens as a wrap. This makes your meal fresh and fun. To spice things up, add jalapeños or hot sauce. This gives your wrap a nice kick. You can also make a Mediterranean version. Use olives, feta cheese, and hummus for a tasty twist. For an Asian-inspired wrap, add teriyaki sauce and shredded carrots. This change brings a new flavor to your meal. You can mix and match different ingredients to find what you love most. To keep your healthy chicken wraps fresh, place them in the fridge. Wrap each wrap in plastic wrap or foil. This prevents the tortillas from drying out. If you use parchment paper, it helps keep the wraps moist. You can store them for up to three days. After that, the taste and texture may change. Yes, you can freeze chicken wraps! Wrap each one tightly in plastic wrap. Then, place them in an airtight container or a freezer bag. They can last up to three months in the freezer. To thaw, leave them in the fridge overnight. For reheating, use a microwave or a skillet. This helps keep the wrap warm and soft. For storing wraps, use airtight containers. Glass or BPA-free plastic containers work well. This keeps air out and keeps the wraps fresh. You can also use foil or plastic wrap for a quick option. Wrapping the wraps tightly helps preserve their texture and taste. Chicken wraps offer many health benefits. They are a great source of lean protein. Lean protein helps build muscle and keeps you full. Whole grains in the tortillas provide fiber. Fiber aids digestion and helps control blood sugar levels. Nutritional information breakdown: - Each wrap is low in calories but high in nutrients. - They contain vitamins from fresh veggies. - Avocado adds healthy fats, which are good for your heart. Whole grains and lean protein are essential for overall health. Whole grains provide energy and help maintain a healthy weight. Lean protein, like chicken, is key for muscle repair and growth. Yes, you can make these wraps ahead of time! Meal prepping saves time and stress. You can make a batch and enjoy them throughout the week. Tips for meal prepping healthy chicken wraps: - Prepare the chicken filling and slice the veggies in advance. - Store the ingredients separately to keep them fresh. - Assemble wraps just before eating to maintain texture. To keep ingredients fresh, wrap them in parchment paper. This keeps moisture out and helps them stay crisp. You can also use airtight containers for added freshness. If you need a substitute for Greek yogurt, there are many options. For dairy-free choices, try dairy-free yogurt made from almond or coconut. These options still offer a creamy texture. Low-fat alternatives if desired: - You can use low-fat sour cream instead of Greek yogurt. - Cottage cheese is another great choice. It has similar protein content and a nice flavor. Experiment with these alternatives to find what you like best in your healthy chicken wraps. Healthy chicken wraps are simple to make and full of flavor. We covered key ingredients like whole wheat tortillas, fresh veggies, and tasty flavor enhancers. I shared step-by-step instructions on preparation, assembly, and serving tips. Variations can fit different diets, and smart storage helps keep them fresh. These wraps are not only nutritious but also fun to make, especially with kids. Enjoy crafting your healthy chicken wraps, and let your creativity shine!
Healthy Chicken Wraps Nourishing and Simple Meal
Are you looking for a quick, healthy meal that packs a flavor punch? Look no further than these Healthy Chicken Wraps! With just a few
Fresh salsa shines with vibrant, crisp flavors. Here’s what you need for this tasty dish: - 4 ripe tomatoes, diced into small cubes - 1 red bell pepper, finely chopped - 1 yellow bell pepper, finely chopped - 1 small red onion, finely minced - 1 jalapeño pepper, deseeded and finely minced - 1 cup fresh corn kernels, cooked until tender - 1/2 cup fresh cilantro, finely chopped - Juice of 2 limes, about 1/4 cup - 1 teaspoon ground cumin - Salt and freshly cracked black pepper, to taste These ingredients bring your salsa to life. Each adds a unique taste and texture. The ripe tomatoes give juiciness, while the bell peppers add crunch and sweetness. The red onion offers a sharp bite, and the jalapeño brings just the right amount of heat. Fresh corn adds a sweet pop, and cilantro gives a fresh herbal note. Lime juice brightens the mix, while cumin deepens the flavor. Using fresh ingredients makes a big difference in taste. If you can, choose organic and locally sourced items. They often have more flavor and nutrients. Now that you have the ingredients, let’s get started on making your fresh salsa. For detailed steps, check the Full Recipe. Start by dicing the ripe tomatoes. Cut them into small cubes. This helps release their juicy goodness. Next, chop the red and yellow bell peppers finely. The colors add a nice touch to your salsa. For the onion, mince it very small. This allows its flavor to blend well. For the jalapeño, first, remove the seeds. Then, finely mince it. This step controls the heat in your salsa. If you prefer less spice, use less jalapeño. Now, combine all the prepared ingredients in a mixing bowl. Add the diced tomatoes, chopped peppers, minced onion, and jalapeño. Also, include the cooked corn. Gently fold the mixture together. This keeps the textures intact. Folding is key; it is different from stirring. Stirring can mash the ingredients, which you want to avoid. Folding allows each piece to stay whole and bright. Next, it’s time to season the salsa. Squeeze the lime juice over the mixture. Use about a quarter cup of juice. This adds a nice tangy flavor. Then, sprinkle in some salt and freshly cracked black pepper. Taste the salsa after mixing. Adjust the lime juice or salt as needed. If it tastes flat, add a bit more lime juice. Let the salsa rest for at least 15 minutes. This helps all the flavors blend nicely together. For the full recipe, check back to the beginning of this article. Enjoy your fresh salsa with tortilla chips or as a topping for your favorite dishes! To make your salsa shine, let it rest for at least 15 minutes. This waiting time allows the flavors to combine and deepen. The longer you wait, the better the taste! Always remember to taste as you go. This step helps you adjust flavors before serving. If the salsa seems too tart, add a pinch of sugar. If it lacks brightness, squeeze in more lime juice. You can easily change the spice level with jalapeños. For a milder salsa, use just a little. If you like heat, add more. You can also substitute ingredients based on what you have. For example, if you don't have fresh corn, try canned corn. If cilantro isn't your thing, replace it with parsley or green onions. These swaps keep the salsa fresh and fun! {{image_4}} You can make salsa more fun with a tropical twist. Adding mango or pineapple gives it a sweet taste. These fruits add bright colors and a fresh flavor. You can also mix in avocado to make it creamy. The smoothness of avocado pairs well with the sweet fruit. This blend makes a great dip or topping for grilled fish. Another tasty twist is a bean and corn salsa. Use black beans or chickpeas for protein. They add texture and make the salsa more filling. You can change the flavor by adding different herbs. Try cilantro, parsley, or even some basil for a unique taste. Each herb brings its own charm to the mix. Enjoy this salsa with tortilla chips or as a taco topping. To keep your fresh salsa tasting great, choose the right container. Use an airtight glass jar or a plastic container. Glass keeps flavors fresh and does not absorb smells. Make sure the lid seals tightly to prevent air from getting in. Store your salsa in the fridge right after you make it. Salsa contains fresh ingredients that can spoil. Keeping it cold slows down the growth of bacteria. Avoid leaving it out at room temperature for more than two hours. How long does salsa last in the fridge? Fresh salsa can last 3 to 5 days in the fridge. After that, the taste and quality may decline. Always check for signs of spoilage, like off smells or discoloration. If you see these, it’s best to throw it away. What can you do with leftover salsa? You can use it in many ways! Try adding it to scrambled eggs for a zesty breakfast. Mix it into your next batch of chili for extra flavor. You can also blend it into a salad dressing or use it as a topping for baked potatoes. To make salsa less spicy, start by removing seeds from jalapeños. The seeds hold most of the heat. You can also add more tomatoes or bell peppers to dilute the spice. Mixing in some sugar can help balance the heat. If it's still too hot, consider adding a bit of sour cream or yogurt. These creamy options will cool it down. Yes, you can use canned tomatoes. Canned tomatoes are convenient and save time. They can add flavor, but fresh tomatoes have a better texture. Canned tomatoes can make your salsa watery, so drain them well. Fresh tomatoes offer brightness and crunch. For the best taste, I prefer fresh, but canned can work in a pinch. Fresh salsa pairs well with many foods. Use it as a dip with tortilla chips. It's also great on tacos, grilled chicken, or fish. You can top nachos with it for extra flavor. Try it with eggs for a tasty breakfast twist. The options are endless! For detailed steps, check out the [Full Recipe](#) for Zesty Rainbow Salsa. In this blog, I shared how to make fresh salsa with simple ingredients. You learned how to prepare, mix, and season your salsa for the best taste. I included tips for enhancing flavor and customizing your recipe. Remember, let your salsa rest before serving for better taste. Store it well, and enjoy your salsa with chips or on tacos. Fresh salsa brings flavor and fun to any meal. Try it and share your tasty creations!
Fresh Salsa Recipe Flavorful and Easy to Make
If you love fresh flavors, you’ll enjoy this easy homemade salsa recipe. Using bright, ripe ingredients, it’s perfect for any gathering. In just a few
- 1 can (15 oz) black beans - 1 can (4 oz) diced green chiles - 1 cup cream cheese - 1 cup shredded sharp cheddar cheese - 1/2 cup sour cream - 1 teaspoon ground cumin - 1/2 teaspoon garlic powder - Salt and black pepper - Finely chopped fresh cilantro - Tortilla chips for serving When you gather these ingredients, you set the stage for a creamy, flavorful dip. Black beans give it body, while green chiles add a nice kick. Cream cheese and cheddar make it rich and smooth. Sour cream balances everything with its tang. The spices enhance the flavors. Cumin adds warmth, and garlic powder gives it depth. Salt and pepper can make a big difference, so season to taste. You can add fresh cilantro for a burst of freshness. It looks great and tastes even better. Serve this dip with crispy tortilla chips to scoop it up. Each bite is a treat! For the full recipe, check out the details above. Happy cooking! - Drain and rinse black beans. - Keep diced green chiles undrained. Start by opening the can of black beans. Drain them well and rinse them under cold water. This step removes excess salt and helps keep the dip fresh. Next, open the can of diced green chiles. Do not drain them; the liquid adds flavor and moisture. - Mash black beans to desired chunkiness. - Combine with cream cheese, cheddar, and sour cream. In a large mixing bowl, add the drained black beans and the undrained green chiles. Use a fork or a potato masher to mash the black beans. You can make them as smooth or chunky as you like. I prefer a mix for a nice texture. Then, add the softened cream cheese, shredded cheddar cheese, and sour cream. Stir everything together until it is smooth and creamy. This is where it all comes together! - Mix in cilantro, cumin, garlic powder, salt, and pepper. Now, it’s time to add some flavor! Fold in finely chopped cilantro, ground cumin, and garlic powder. These ingredients give your dip a zesty kick. Don’t forget to season with salt and freshly cracked black pepper to taste. Stir until all the flavors blend well. - Transfer to oven-safe dish and bake for 15-20 minutes. Once your dip is ready, transfer the mixture to an oven-safe dish. Spread it out evenly. Preheat your oven to 350°F (175°C). When it’s hot, place the dip inside and bake for about 15 to 20 minutes. You want the top to be bubbly and slightly golden. After baking, let it cool for a few minutes. This helps the dip firm up for easy scooping. Enjoy your zesty appetizer with tortilla chips! For the complete recipe, check out the Full Recipe. To get the best texture, mash the black beans just right. I like to use a fork or a potato masher. You should leave some beans whole for that nice chunky feel. This adds depth to your dip. Next, to make it creamy, use softened cream cheese and shredded cheddar. Blend them well with the sour cream. This mix creates a smooth and rich base. Add extra spices to kick up the flavor. For this dip, I suggest using smoked paprika or chili powder. These spices give a warm, smoky taste. Fresh herbs can also boost your dip. Chopped cilantro adds a bright, fresh flavor. You could also try fresh oregano or green onions for a different twist. Letting the dip cool a bit before serving is key. This helps it firm up, which makes it easier to scoop. When you serve, sprinkle some extra cilantro or cheddar on top. This adds a nice pop of color. Serve with a colorful platter of tortilla chips for a fun and inviting display. Enjoy your zesty dip with friends and family! {{image_4}} You can easily swap black beans for pinto beans. Pinto beans add a creamier texture and a different taste. If you want to change the cheese, try pepper jack for a spicy twist. This cheese melts well and gives a nice kick. To adjust the heat, use different chili types. For a milder dip, choose mild green chiles. If you love spice, add diced jalapeños or a dash of hot sauce. Just remember, you can always add more heat, but it’s hard to take it away! If you want a vegan dip, swap cream cheese and sour cream for plant-based versions. There are many tasty options out there. Also, consider nut-based cheeses for a creamy texture. They can mimic the flavor of dairy cheese well. After making your green chile bean dip, you'll want to store any leftovers properly. First, let the dip cool to room temperature. Then, transfer it to an airtight container. Glass or plastic containers work well. Make sure the lid seals tight to keep the dip fresh. Store the dip in the fridge for up to five days. If you want to keep the dip longer, freezing is a great option. To freeze, place the dip in a freezer-safe container. Leave some space at the top for expansion. You can also use freezer bags. Just squeeze out the air before sealing. When you're ready to enjoy it, thaw the dip in the fridge overnight. To reheat, warm it in the oven at 350°F until hot. Stir it well to ensure even heating. In the fridge, your dip will stay fresh for about five days. If you notice any strange smells or changes in color, it's best to throw it away. If the dip feels slimy or has mold, do not eat it. Always trust your senses when checking food freshness. Yes, you can make this dip ahead of time. Prepare it the day before your event and store it in the fridge. Use an airtight container to keep it fresh. When you're ready to serve, just bake it. This way, you save time and enjoy the party. This dip pairs well with many snacks. Here are some great options: - Tortilla chips - Fresh veggies like carrots or bell peppers - Pita bread or crackers - Sliced jalapeños for an extra kick Feel free to mix and match! The spice level of this dip is mild. The diced green chiles add flavor without too much heat. If you want more spice, add jalapeños or hot sauce. This way, everyone can enjoy it! Yes, you can bake the dip in advance. Bake it as directed, then let it cool. Cover it and store it in the fridge. To serve, reheat it in the oven at 350°F (175°C) for about 10-15 minutes. This will make it warm and bubbly again. Enjoy it fresh from the oven! For the full recipe, check out the [Full Recipe]. This green chile bean dip is easy to make and fun to enjoy. We covered the main ingredients, from black beans to sharp cheddar. The step-by-step guide ensures you mix, bake, and serve with confidence. You learned tips for texture and flavor, plus tasty variations and storage ideas. Whether you serve it warm with chips or try different spices, this dip is a winner for any occasion. Enjoy the process and share this delicious treat with friends and family!
Green Chile Bean Dip Creamy and Flavorful Treat
If you’re searching for a delicious, creamy treat to elevate your next snack or party, look no further! My Green Chile Bean Dip combines the
To make your Fall Snack Mix, gather these simple ingredients: - 2 cups mixed nuts (almonds, walnuts, pecans) - 1 cup pumpkin seeds - 1 cup salted pretzels - 1 cup dried cranberries - 1 cup candy corn - 1 teaspoon ground cinnamon - 1 tablespoon maple syrup - 1 tablespoon melted coconut oil - Sea salt to taste These ingredients blend well together. The nuts add crunch, while the pretzels give saltiness. The cranberries provide a sweet touch, and the candy corn adds color and fun. You can adjust these ingredients based on your needs: - Nuts: Use any nut you like, such as cashews or pecans. - Seeds: Swap pumpkin seeds for sunflower seeds for a different flavor. - Sweeteners: If you want a different sweet taste, use honey or agave syrup. - Gluten-free: Ensure you pick gluten-free pretzels if needed. These swaps keep your snack mix tasty while matching your dietary needs. If you run out of an ingredient, here are some easy swaps: - Nuts: Use seeds if nuts are not an option. - Dried fruit: Replace cranberries with raisins or dried apples. - Cereal: Add your favorite cereal instead of pretzels for more crunch. - Spices: Try adding pumpkin pie spice instead of cinnamon for a fall twist. These substitutions will still give you a tasty mix. Don't be afraid to experiment! For the full recipe, check out the complete instructions above. Start by gathering all your ingredients. You will need mixed nuts, pumpkin seeds, pretzels, dried cranberries, and candy corn. In a large bowl, mix these ingredients well. This gives a nice blend of flavors and textures. Next, prepare the coating. In a small bowl, whisk together ground cinnamon, maple syrup, and melted coconut oil. This mixture adds warmth and sweetness to your snack mix. Pour this over your nut mixture and stir until everything is well coated. Preheat your oven to 350°F (175°C). This temperature is perfect for roasting. Spread your snack mix onto a baking sheet lined with parchment paper. This makes cleanup easy and prevents sticking. Bake for 15-20 minutes. Stir the mix every 7-10 minutes to ensure even roasting. For the best mix, make sure to coat all ingredients well. Use a spatula to fold the mixture gently. This prevents breaking the nuts or pretzels. If you want a bit more flavor, you can add a pinch of sea salt. Just remember to taste as you go. Let your mix cool completely before storing it. This keeps it crunchy and fresh. You can find the full recipe for this delightful treat in the previous section. Enjoy your tasty Fall Snack Mix! To keep your snack mix crunchy, bake it right. Heat your oven to 350°F. Make sure to stir the mix every 7-10 minutes while it bakes. This helps each piece get golden brown. Once baked, let it cool completely before storing. Storing it while warm can add moisture and make it soggy. Fall is all about warm flavors. You can add spices like nutmeg or allspice for a cozy touch. Try adding a splash of vanilla for extra sweetness. If you want a bit of heat, sprinkle some cayenne pepper into your mix. Sweeten it up with honey or more maple syrup. These small changes can make your snack mix feel festive. Always check for allergies before serving your snack mix. Nuts are a common allergy, so label your mix clearly. You can use seeds instead of nuts for a nut-free option. For gluten-free diets, ensure your pretzels are gluten-free. If you’re unsure about ingredients, it’s best to ask guests. Keeping everyone safe helps everyone enjoy your tasty treat. {{image_4}} Creating unique variations of the Fall Snack Mix adds fun and flavor. Here are three delightful ideas for you to try. For a cozy twist, make a Pumpkin Spice Snack Mix. Add pumpkin spice to your mix. Use: - 2 cups mixed nuts (almonds, walnuts, pecans) - 1 cup pumpkin seeds - 1 cup pretzels - 1 cup dried cranberries - 1 cup candy corn - 1 teaspoon pumpkin pie spice - 1 tablespoon maple syrup - 1 tablespoon melted coconut oil - Sea salt to taste Follow the same steps from the Full Recipe, but swap the cinnamon for pumpkin pie spice. This gives your mix a warm, autumn flavor. Next, try an Apple Cinnamon Snack Mix. This mix has a sweet, fruity vibe. You need: - 2 cups mixed nuts (cashews, pecans, almonds) - 1 cup apple chips - 1 cup pretzels - 1 cup dried cranberries - 1 cup candy corn - 1 teaspoon ground cinnamon - 1 tablespoon maple syrup - 1 tablespoon melted coconut oil - Sea salt to taste Replace the dried cranberries with apple chips. Follow the Full Recipe steps, using cinnamon for a sweet apple flavor. Last, make a Caramel Apple Snack Mix. This mix tastes like a treat from the fair. Use: - 2 cups mixed nuts (peanuts, walnuts, almonds) - 1 cup caramel popcorn - 1 cup pretzels - 1 cup dried apples - 1 cup candy corn - 1 tablespoon melted caramel sauce - Sea salt to taste Mix in caramel popcorn and dried apples. Drizzle with caramel sauce before baking, then follow the Full Recipe steps. This mix brings sweet and salty together in a tasty way. Feel free to explore these variations and find your favorite! Store your Fall Snack Mix in an airtight container. This keeps it fresh and crunchy. You can use glass jars or plastic bins. Make sure to seal the lid tightly. Place the container in a cool, dry place. Avoid direct sunlight. A pantry shelf works great! Your snack mix can last up to two weeks when stored correctly. After that, it may lose its crunch. To keep it fresh, check for signs of moisture. If it feels soggy, toss it out. You can also add a small packet of silica gel to absorb extra moisture. If you want to keep your snack mix longer, freezing is a good option. Place it in a freezer-safe bag or container. Remove as much air as possible before sealing. It can stay fresh for up to three months. When you're ready to eat, just thaw it in the fridge overnight. Enjoy your crunchy treat anytime with this storage method! I love using mixed nuts in my Fall Snack Mix. Almonds, walnuts, and pecans work great. They add crunch and flavor. Almonds are light and nutty. Walnuts give a rich taste. Pecans add sweetness. You can also try hazelnuts or cashews. Both add a fun twist. Just make sure to choose nuts you enjoy. Yes, you can easily make this snack mix vegan. Just swap the honey for maple syrup. Use a vegan butter or oil instead of regular. The rest of the recipe is already plant-based. This way, everyone can enjoy it. Don't forget to check the labels on snacks. Some may contain dairy or eggs. Serving Fall Snack Mix is simple and fun. Use a big bowl or a nice jar. You can even add small cups for guests. This makes it easy for them to grab some. For a festive touch, add some autumn leaves or tiny pumpkins. This snack mix is great for parties or movie nights. It looks nice and tastes amazing! You learned how to create a delicious fall snack mix. We covered the best ingredients and their variations to suit all diets. I shared helpful preparation steps and tips for getting that perfect crunch. You also discovered fun flavor ideas, like pumpkin spice and caramel apple. Lastly, you now know how to store your mix for freshness. Enjoy your crunchy creation and share it with friends. Your fall gatherings will be a hit!
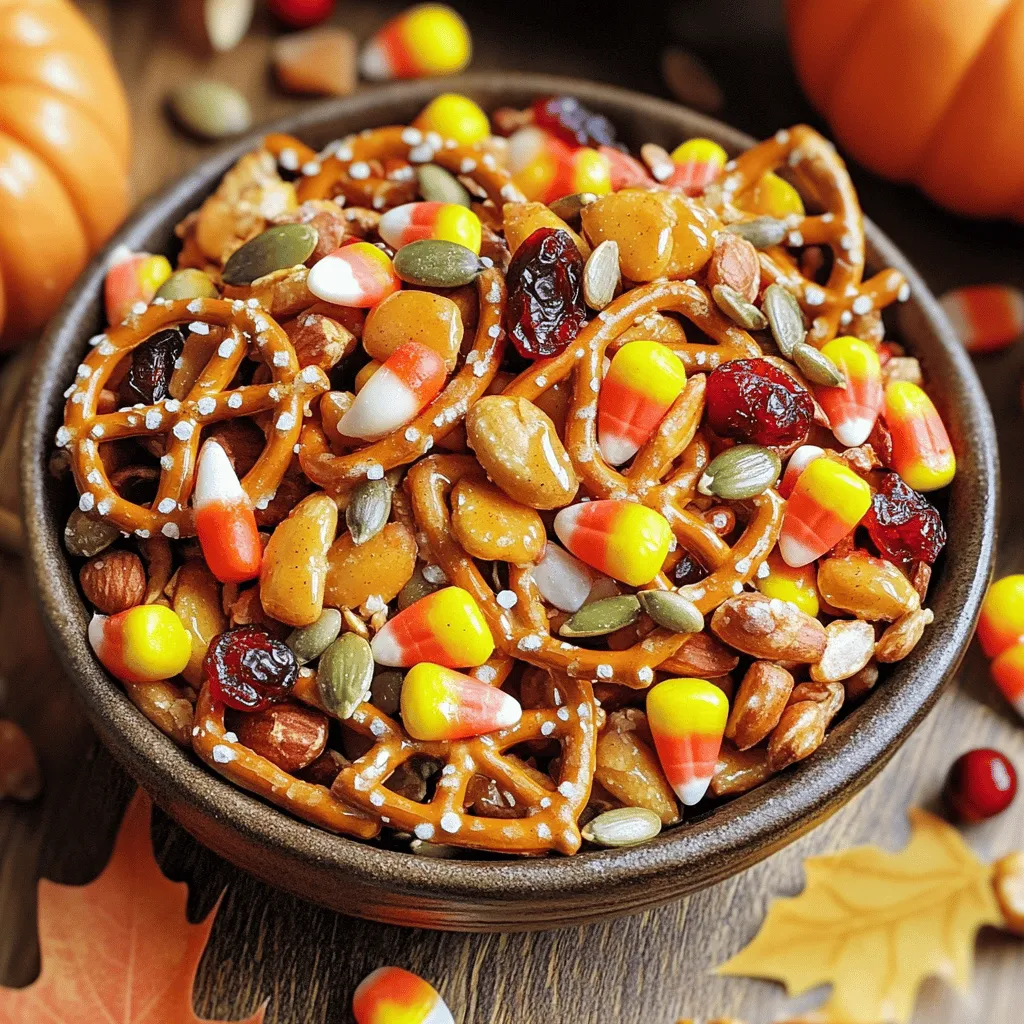
Fall Snack Mix Delightfully Crunchy and Easy Treat
As the leaves change and the air turns crisp, it’s time to indulge in a delightful Fall Snack Mix! This easy treat combines your favorite
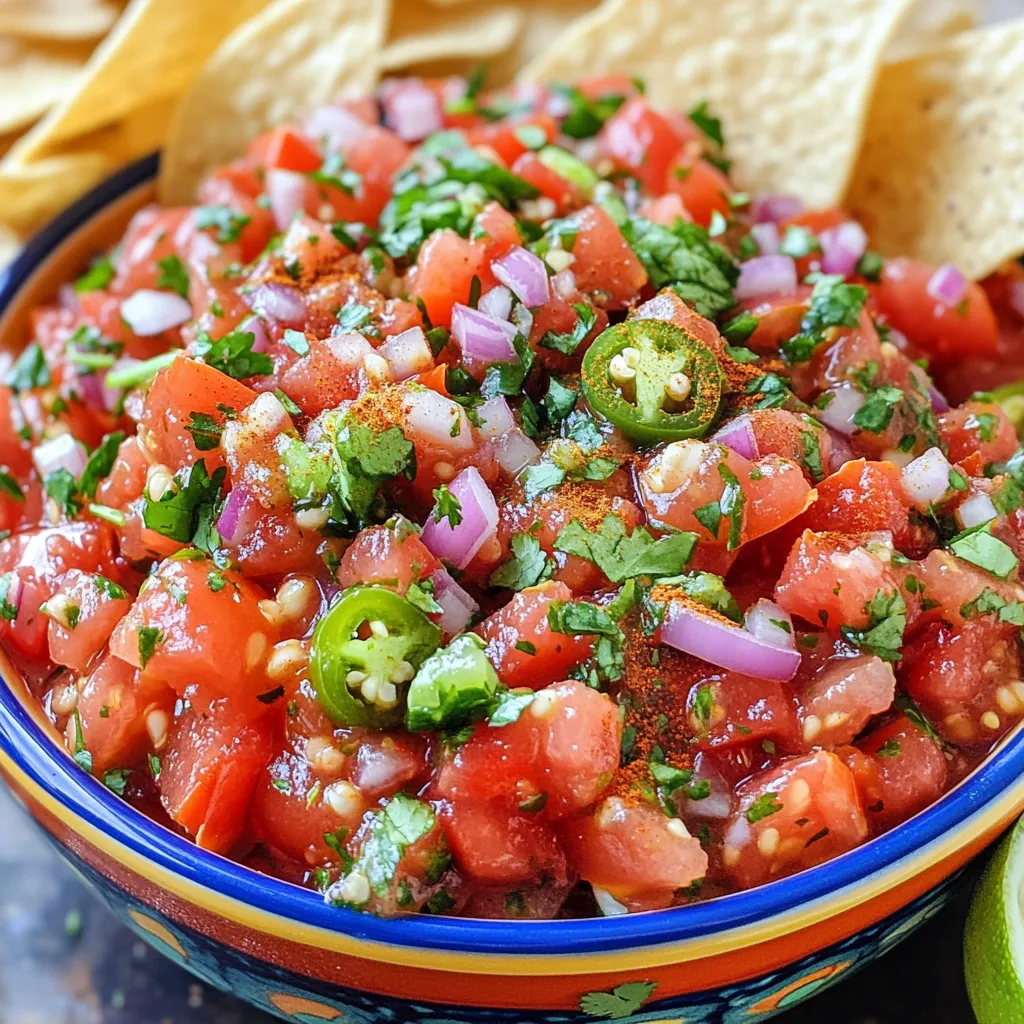
To make a great homemade salsa, you need fresh, bright flavors. Here are the key ingredients: - 1 ripe mango, peeled and diced into small pieces - 1 cup fresh pineapple, peeled and diced into small chunks - 1 small red onion, finely chopped - 1 jalapeño pepper, deseeded and minced for a mild heat - 1/4 cup fresh cilantro, roughly chopped for brightness - Juice of 2 limes, freshly squeezed for that zesty kick - Salt, to taste, for balancing flavors These ingredients form a base that bursts with fruity goodness. When you combine them, you get a sweet and tangy flavor. Fresh ingredients are best for making salsa. Fresh fruits and vegetables taste better and have more nutrients. They also bring out the colors and textures in your dish. Canned ingredients can work in a pinch, but they may lack that fresh kick. If you want a vibrant salsa, stick with fresh! You can customize your salsa with some fun add-ins. Here are a few ideas: - Diced bell peppers for extra crunch - A pinch of cumin for warmth - Chopped avocado for creaminess - A splash of apple cider vinegar for tang These optional ingredients can take your salsa to the next level. Feel free to mix and match based on what you like! For the full recipe, check out the Zesty Mango Pineapple Salsa. Start by gathering your fresh fruits. You need one ripe mango and one cup of fresh pineapple. Peel and dice both fruits into small pieces. This makes them easy to mix and eat. Use a medium mixing bowl to combine the diced mango and pineapple. Fresh fruit gives the best taste and texture. Next, add flavor with aromatics. Chop one small red onion finely. This adds a nice crunch and a bit of sweetness. Then, take one jalapeño pepper. Remove the seeds and mince it. This gives the salsa a mild heat. Add both the red onion and jalapeño to the bowl with the fruits. Stir gently to mix everything well. Now, it’s time for fresh herbs. Take a 1/4 cup of fresh cilantro and chop it roughly. This adds a bright flavor and aroma. Gently fold the chopped cilantro into the fruit mix. The herbs will lift the salsa and enhance its taste. After this, squeeze the juice of two limes over the mixture. This brightens up the flavors even more. Make sure to catch any lime seeds. After that, use a large spoon to toss all the ingredients together. Be careful not to mash the fruits. Finally, add salt to taste. This balances the flavors perfectly. Let the salsa rest for at least 15 minutes. This will allow the flavors to meld beautifully. For the complete recipe, check the Full Recipe section. One big mistake is chopping ingredients unevenly. If your pieces are not the same size, some bites may taste strong while others lack flavor. Always aim for uniform cuts. Another common error is skipping the resting time. Allowing the salsa to rest helps the flavors mix well. If you add too much lime juice, the salsa can be too tart. Start with less and taste as you go. The heat level of your salsa can change based on the jalapeño. If you want less heat, remove the seeds and membranes. For more spice, add another jalapeño or use a hotter pepper, like serrano. You can also add a pinch of cayenne pepper for an extra kick. Remember, it’s easier to add heat than to take it away. To make your salsa taste great, always use fresh ingredients. Fresh herbs, ripe fruit, and good-quality onions really shine. Mix in the juice of fresh limes, as it brightens the salsa. Letting your salsa sit at room temperature for at least 15 minutes allows the flavors to come together. This is key for a balanced taste. For a creative twist, try adding a touch of honey or a sprinkle of cumin for depth. This zesty mango pineapple salsa is a great recipe to try with these tips in mind. Check the [Full Recipe] for all the details! {{image_4}} You can create many types of homemade salsa. Each type brings its unique taste. For a classic blend, use tomatoes, onion, and cilantro. This is the base of many salsas. If you love heat, try a tomatillo salsa. Tomatillos give a tangy kick. You can also make fruit salsas. They add sweetness and freshness. Fruit salsa with mango or peach pairs well with fish. Mixing flavors can bring excitement to your salsa. One popular combo is mango and pineapple. The sweet fruit works great with lime juice. You can add jalapeños for a bit of spice. Another tasty mix is black beans and corn. This creates a hearty salsa. Add red onion and cilantro for extra flavor. Experiment with your favorite herbs too! Using seasonal ingredients makes salsa special. In summer, fresh tomatoes shine. Add cucumbers and bell peppers for crunch. In fall, think about pumpkin salsa. Combine pumpkin with spices like cumin and chili powder. This gives a warm, cozy flavor. In winter, use roasted vegetables. They add depth and warmth. Fresh herbs can brighten up winter flavors. You should store your homemade salsa in an airtight container. Glass jars work great for this. Make sure the lid seals tightly. This keeps the salsa fresh and safe from air. Place the container in the fridge right after making it. Homemade salsa lasts about 5 to 7 days in the fridge. Always check for signs of spoilage. Look for changes in color or smell. If it smells sour or looks off, it’s best to throw it away. To keep the flavors bright, try not to mix in salt until serving. Salt can draw out moisture and make it watery. You can freeze salsa for later use. This is a smart way to save extra salsa. Use freezer-safe containers or bags. Leave some space at the top for expansion. Salsa can last up to 3 months in the freezer. Thaw it in the fridge overnight before using. It may lose some texture, but the flavor will still be great! For the full recipe, check out the Zesty Mango Pineapple Salsa. To thicken homemade salsa, you can use a few simple tricks. One way is to let it sit. As the salsa rests, water will drain out. This can help thicken the mix. You can also add more diced fruit, like mango or pineapple. This will add body while keeping the flavor bright. Another option is to blend some of the salsa. This creates a thicker base without losing taste. When you blend, leave some chunks for texture. Yes, you can use frozen fruits for salsa, but fresh is best. Frozen fruits can be watery when thawed. To use frozen fruits, thaw them first and drain excess liquid. Chop them into small pieces for better texture. Frozen fruits can still add great flavor, especially in off-seasons. Just remember to adjust the salt and lime juice, as frozen fruits can be sweeter. To make your salsa spicier, add more jalapeño or use a hotter pepper. You can also try adding red pepper flakes or hot sauce. Start with small amounts, then taste as you go. This way, you can control the heat level. If it gets too spicy, add more diced fruit to balance the heat. Lime juice can also help tone down spiciness if needed. Homemade salsa pairs well with many dishes. It’s great with tortilla chips as a snack. You can also serve it on grilled chicken or fish for added flavor. Tacos and burritos love a fresh salsa topping, too. Use it as a dip for fresh veggies, or mix it into scrambled eggs for breakfast. The possibilities are endless! For a full recipe, check out the Zesty Mango Pineapple Salsa. In this article, we explored how to make delicious homemade salsa. We covered essential ingredients, preparing the base, and adding flavor with herbs. We shared tips on avoiding common mistakes and adjusting spice levels. You learned about variations and how to store salsa for later. Homemade salsa is fun and easy. You can create it to match your taste. Enjoy making your own fresh flavors!
Homemade Salsa Fresh and Flavorful Recipe Guide
Welcome to your ultimate guide on making homemade salsa! With just a few fresh ingredients, you can create a dip that bursts with flavor. Whether
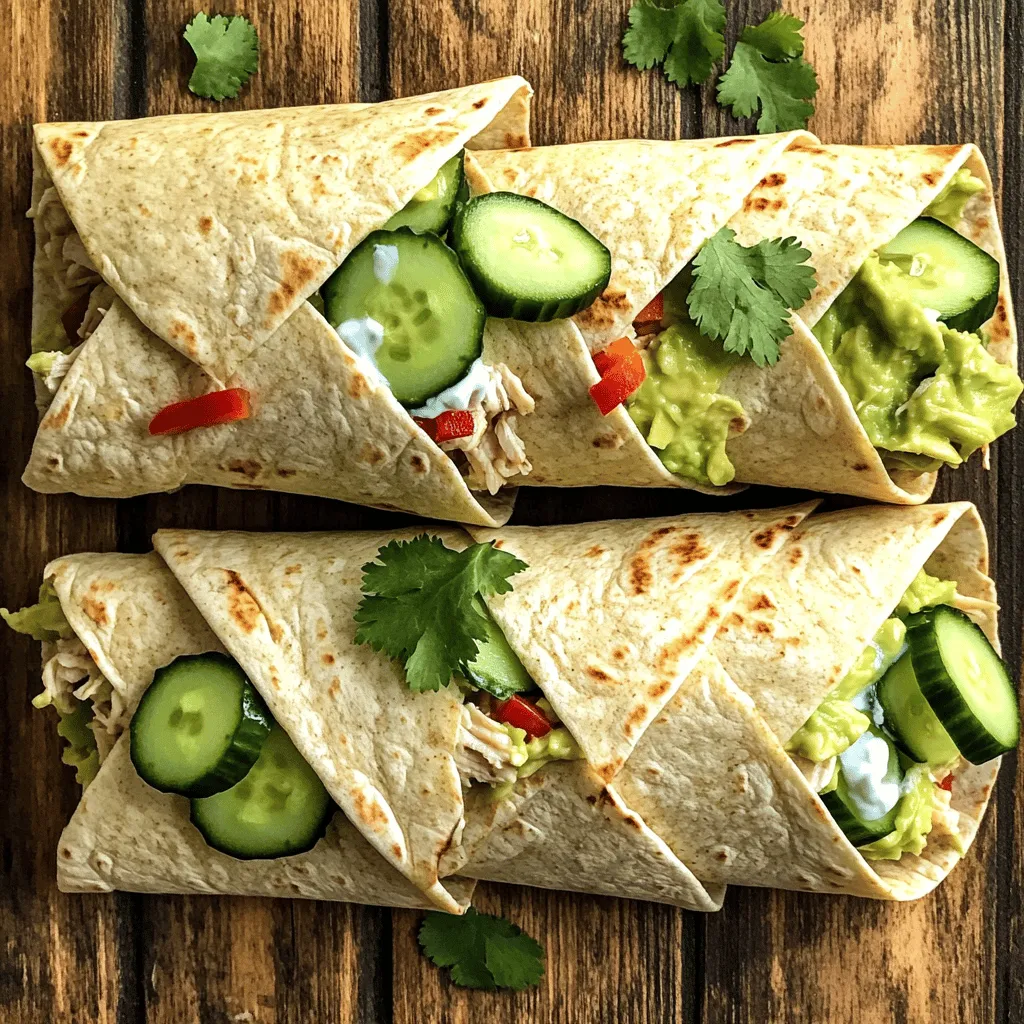
- 1 pound ground chicken - 1/2 cup breadcrumbs - 1/4 cup grated Parmesan cheese - 1/4 cup fresh parsley, finely chopped - 1 large egg Ground chicken is the star here. It is lean and juicy. You can swap it for ground turkey if you wish. Breadcrumbs add texture and help bind the meatballs. For a gluten-free option, use almond flour or gluten-free breadcrumbs. Grated Parmesan cheese gives a savory kick. If you don’t have it, try feta cheese for a different flavor. Fresh parsley adds color and freshness. Dried parsley can work, but fresh is best. The egg helps hold everything together. If you're vegan, you can use a flax egg instead. You will need a large mixing bowl to combine the ingredients. A baking sheet lined with parchment paper helps with easy cleanup. A meat thermometer is important to check the doneness of the meatballs. Finally, having a spoon or your hands ready is key for mixing and shaping the meatballs. This simple setup makes the cooking process smooth and fun. If you'd like the full recipe, click here: [Full Recipe]. To make these 5-Ingredient Chicken Meatballs, start by gathering your ingredients. You'll need ground chicken, breadcrumbs, Parmesan cheese, parsley, and an egg. This simple list makes it easy to whip up a tasty meal. First, preheat your oven to 400°F (200°C). This helps the meatballs cook evenly. Next, line a baking sheet with parchment paper. This keeps the meatballs from sticking and makes cleanup easy. In a large bowl, mix the ground chicken with the breadcrumbs, cheese, parsley, and egg. Use your hands to combine them gently. Be sure not to overmix; this keeps the meatballs soft. Now, take a small amount of the mixture and roll it into a ball, about 1 inch wide. Place each ball on the baking sheet with some space between them. Bake the meatballs in your preheated oven for 20-25 minutes. They should be golden brown and fully cooked. Use a meat thermometer to check that they reach 165°F (75°C) inside. Once they’re done, let them cool for a few minutes before serving. To make sure your meatballs turn out great, follow these tips. First, only mix the ingredients until they’re just combined. This helps keep them tender. Second, try not to pack the meatballs too tightly when rolling them. This also helps maintain a light texture. Lastly, if you want extra flavor, consider adding more herbs or spices to the mix. For the full recipe and more details, check out the [Full Recipe]. When making 5-Ingredient chicken meatballs, avoid overmixing the meat. This can make them tough. Mix just until combined. Another mistake is not measuring ingredients. Accurate measurements help in flavor and texture. Lastly, do not skip preheating the oven. This ensures even cooking and a nice brown color. You can boost the flavor of your meatballs easily. Try adding a teaspoon of garlic powder or onion powder to the mixture. Fresh herbs like basil or oregano also add depth. If you like heat, add a pinch of red pepper flakes. For a tangy twist, mix in a tablespoon of lemon zest. Serve your meatballs in many ways. Place them on a platter with fresh parsley for a pop of color. Pair them with marinara sauce for dipping. You can also serve them over pasta or in a sub sandwich. For a lighter meal, enjoy them on a salad. Check out the Full Recipe for more details on preparation. {{image_4}} You can swap ground chicken for other proteins. Ground turkey works great. It has a similar taste and texture. For a beefy flavor, use ground beef. You can even try ground pork for a richer taste. Each option gives you a new twist on this easy recipe. To make your meatballs even tastier, add herbs or spices. Fresh basil or oregano can add a lovely aroma. You can also mix in garlic powder for a savory kick. If you like heat, red pepper flakes will spice things up. A tablespoon of Dijon mustard can add a nice depth. Remember to keep the balance of your ingredients so it stays simple and flavorful. You don’t have to bake these meatballs. Frying is another great option. Just heat some oil in a pan and cook them until brown. You can also grill the meatballs for a smoky flavor. Just ensure they are cooked through, reaching 165°F (75°C). Each cooking method provides a unique taste and texture, allowing you to enjoy your meatballs in different ways. For the complete recipe, check the Full Recipe section. To keep your 5-Ingredient chicken meatballs fresh, store them properly. First, let them cool completely after cooking. Then, place them in an airtight container. This helps prevent drying out. You can store them in the fridge for up to three days. If you plan to keep them longer, freezing is your best bet. Freezing your meatballs is easy. Start by laying them on a baking sheet in a single layer. Freeze for about one hour until they are firm. Then, transfer them to a freezer-safe bag or container. Remove as much air as possible to avoid freezer burn. These meatballs can last up to three months in the freezer. When you are ready to eat the meatballs, reheating them is simple. For the best taste, use the oven. Preheat your oven to 350°F (175°C). Place the meatballs on a baking sheet and heat for 10-15 minutes. You can also microwave them, but be cautious. Heat them in short bursts to avoid drying. Adding a splash of sauce can help keep them moist as they warm up. Enjoy your delicious meal! To check if the meatballs are done, use a meat thermometer. It should read 165°F (75°C). You can also cut one in half. The meat should be white and not pink. If you see pink, cook them a bit longer. Yes, you can use ground turkey instead of chicken. Both work well in this recipe. The taste will change slightly. Turkey may be a bit drier, so consider adding a little extra seasoning or moisture. These meatballs pair well with many sides. You can serve them with: - Pasta and marinara sauce - Rice or quinoa - A fresh salad - Mashed potatoes - Veggies like broccoli or green beans Try to match the sides with your meal's vibe. For more ideas, check the Full Recipe section for serving tips. In this post, we covered the key ingredients and tools for making 5-ingredient chicken meatballs. I shared step-by-step cooking instructions, tips for perfect meatballs, and variations to try. Additionally, you learned proper storage and reheating tips to keep your meatballs fresh. Enjoy experimenting with flavors and make this dish your own. Cooking should be fun and tasty. Now, step into the kitchen and create something delicious!
5-Ingredient Chicken Meatballs Flavorful and Easy Meal
You can whip up a delicious meal with just five simple ingredients! In this post, I’ll show you how to make flavorful chicken meatballs that