Appetizers

- 1 large head of cauliflower, cut into bite-sized florets - 1 cup all-purpose flour - 1 cup buffalo sauce (store-bought or homemade) - 1 teaspoon garlic powder - 1 teaspoon onion powder - 1/2 teaspoon smoked paprika - 1/2 teaspoon salt - 2 tablespoons olive oil - Chopped green onions and celery sticks for serving Let’s dive into the ingredients you need to make these tasty buffalo cauliflower bites. First, you need a large head of cauliflower. This veggie is the star of the show. Cut it into bite-sized florets so they cook evenly. Next, grab one cup of all-purpose flour. This will help create a nice, thick batter. The flour coats the cauliflower and gives it that crispy texture we all love. Now, for the flavor, you can't skip the buffalo sauce. One cup of your favorite brand will do. You can also make your own if you want a unique touch. For seasoning, gather some garlic powder, onion powder, smoked paprika, and salt. Each of these adds a punch of flavor. The garlic and onion powders give a savory taste, while the smoked paprika adds a hint of warmth. If you want, you can use some olive oil to help with the cooking. It adds richness and helps the batter stick. For serving, consider chopped green onions and crunchy celery sticks. They add a fresh contrast to the spicy bites. With these ingredients, you’re set to make a delicious snack that’s sure to please everyone! First, wash the cauliflower under cold water. Remove any dirt or bugs. Cut the cauliflower into bite-sized florets. Aim for even sizes. This helps them cook evenly. In a large bowl, mix one cup of all-purpose flour with one cup of water. Add one teaspoon of garlic powder, one teaspoon of onion powder, and half a teaspoon of smoked paprika. Sprinkle in half a teaspoon of salt. Whisk until smooth. The batter should be thick enough to coat the florets well. Take each floret and dip it into the batter. Make sure it's fully covered. Let any extra batter drip off. Place the coated florets on a plate. Preheat your air fryer to 375°F (190°C). Place the cauliflower in a single layer in the air fryer basket. This ensures good air flow. Cook for 12 to 15 minutes. Shake the basket halfway through to help them brown evenly. When the cauliflower looks golden and crispy, take them out. Place the bites in a large bowl. Pour one cup of buffalo sauce over them. Toss gently until each piece is well coated. For an even crunchier bite, return the sauced florets to the air fryer. Cook for an extra 3 to 5 minutes at the same temperature. This step makes them extra crispy and delicious! To make your buffalo cauliflower bites super crispy, the batter is key. Use a thick batter made from flour and water. This helps the batter stick well. Dip each floret in the batter. Shake off extra batter before cooking. Make sure to air fry in a single layer. Overcrowding can lead to soggy bites. Shake the basket halfway through cooking to ensure even crispiness. Buffalo sauce can be spicy. You can adjust the heat to suit your taste. If you like it milder, mix in a bit of ranch dressing. For a hotter kick, add more hot sauce to your buffalo sauce. You can even mix in honey for a sweet and spicy taste. Experiment with different sauces to find your favorite blend. Serve your buffalo cauliflower with creamy dips. Ranch or blue cheese dressing pairs well. You can also add crunchy celery sticks for a fresh taste. Chopped green onions make a great garnish. These add color and flavor. Feel free to mix and match sides to enhance your snack time. {{image_4}} You can boost the flavor of your buffalo cauliflower bites by exploring different seasonings. Here are a few ideas: - Cajun seasoning: Adds heat and depth. - Italian herbs: Bring a fresh, herbal taste. - Chili powder: Spice things up with some kick. Mix and match these spices into your batter. Experimenting with flavors makes cooking fun. If you like a sweet twist, try adding honey or maple syrup. Here’s how: - After coating your bites in buffalo sauce, drizzle a bit of honey or maple syrup on top. - Toss gently to mix. This blend of sweet and spicy creates a unique taste that will surprise your palate. You can easily make this dish vegan or gluten-free. Here are some alternatives for the batter: - Chickpea flour: Mix it with water for a gluten-free option. - Almond flour: Great for a nutty flavor and gluten-free too. These options keep the dish delicious while meeting different dietary needs. To keep your buffalo cauliflower bites fresh, place them in an airtight container. Store them in the fridge for up to three days. Make sure they cool down before sealing to avoid moisture. This helps maintain their crunch. To regain that crispy texture, use your air fryer. Set it to 375°F (190°C) and heat for about 4-5 minutes. This method makes them crispy again. You can also use an oven at the same temperature for about 10 minutes. Avoid using a microwave, as it makes them soggy. If you want to freeze them, first let the bites cool completely. Arrange them in a single layer on a baking sheet, then freeze for 1-2 hours. Once frozen, transfer them to a freezer bag or container. They can last for up to three months. When ready to eat, cook them straight from the freezer in the air fryer. Yes, you can use frozen cauliflower. Just ensure it is thawed and drained well. This helps avoid excess moisture, which can make the batter soggy. Frozen cauliflower may not be as crispy, but it will still be tasty. You can use other hot sauces or BBQ sauce. Try sriracha or harissa for a different flavor. If you want a milder option, mix hot sauce with ranch dressing for a creamy twist. To increase the heat, add more buffalo sauce or mix in cayenne pepper. You can also use a spicier hot sauce or add chili flakes to the batter. Adjust to your taste for the perfect kick! Absolutely! These bites store well in the fridge. Just make sure they cool completely before storing. Pack them in an air-tight container for up to four days. The cauliflower is ready when it turns golden brown and crispy. Use a fork to test its tenderness. You should feel a slight crunch but no rawness inside. If it needs more time, continue cooking in short bursts. In this post, we explored a tasty buffalo cauliflower recipe. You learned about key ingredients, step-by-step instructions, and helpful tips. We also shared variations to customize flavors and storage ideas. Buffalo cauliflower is easy to make and fun to share. You can enjoy it any time. Try experimenting with spice levels or dips. There’s always room for creativity in the kitchen! Enjoy your cooking adventure!
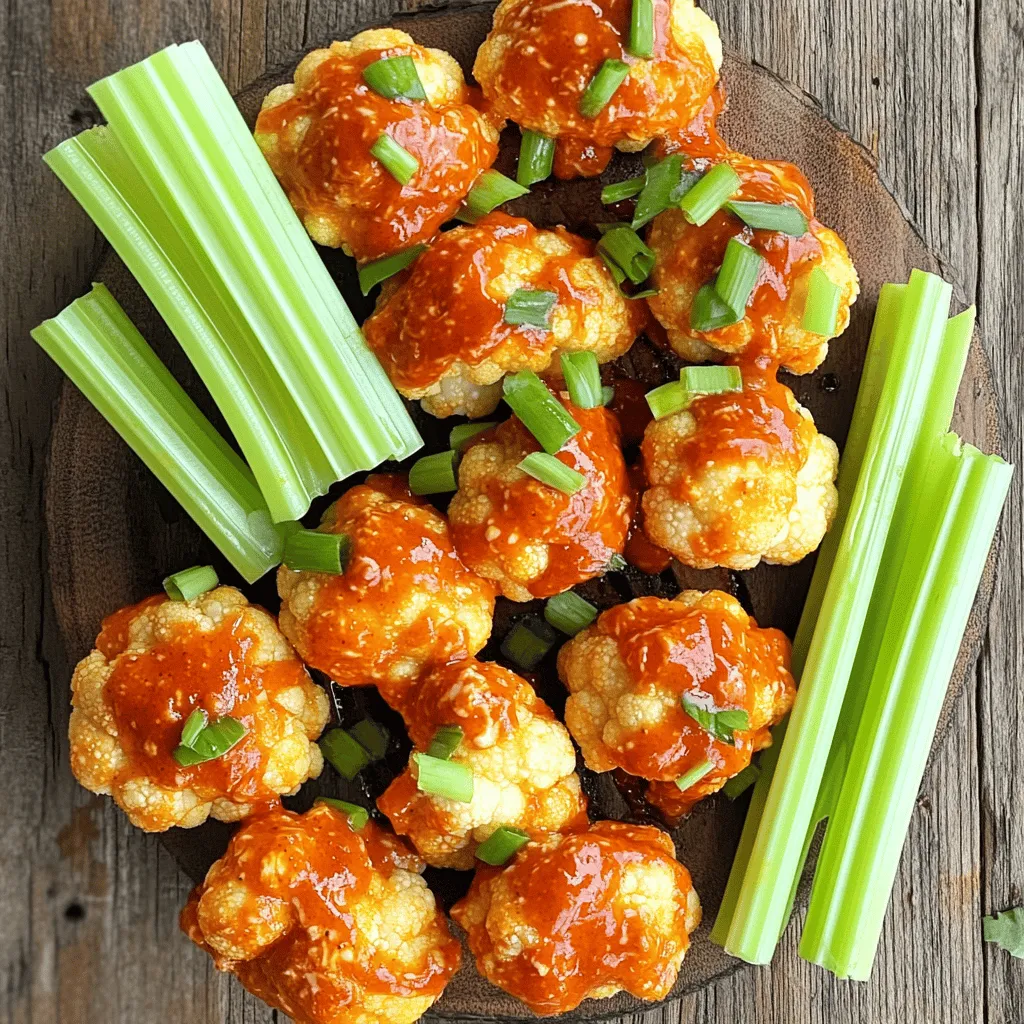
Air Fryer Buffalo Cauliflower Bites Crispy Delight
Are you ready to spice up your snack game? My Air Fryer Buffalo Cauliflower Bites are crispy, tasty, and oh-so-simple to make. With just a
- 1 lb Brussels sprouts, trimmed and halved - 4 tablespoons extra-virgin olive oil - 4 cloves garlic, minced - 1/2 cup freshly grated Parmesan cheese - 1 teaspoon sea salt - 1/2 teaspoon freshly ground black pepper - 1/4 teaspoon crushed red pepper flakes (optional) - Fresh parsley, finely chopped (for garnish) Gather these simple ingredients to make Garlic Parmesan Roasted Brussels Sprouts. The Brussels sprouts are the star of the dish. They have a great nutty flavor when roasted. You need fresh sprouts for the best taste. The olive oil adds richness and helps the sprouts brown nicely. Garlic brings a wonderful aroma and taste to the dish. Use fresh garlic for the best flavor. Parmesan cheese adds a savory, cheesy touch. Seasoning is key to making these sprouts shine. Sea salt enhances all the flavors. Black pepper adds a bit of heat. If you like spice, add crushed red pepper flakes. Fresh parsley is for garnish. It adds color and a fresh taste. Make sure you have everything ready before you start cooking. This dish is easy and fun to make! Enjoy the process of preparing these tasty sprouts. - Preheat your oven to 400°F (200°C). - Line a baking sheet with parchment paper. Start by making your oven warm. This helps the Brussels sprouts roast well. The parchment paper on the baking sheet keeps them from sticking and makes cleaning easy. - Toss Brussels sprouts with olive oil, garlic, salt, and pepper. - Optional: Add crushed red pepper flakes for extra spice. Next, take a big bowl. Put in your halved Brussels sprouts. Add the olive oil, minced garlic, sea salt, and black pepper. Mix everything well. Make sure each sprout gets a coat of the tasty mix. If you want some heat, add crushed red pepper flakes. It gives a nice kick. - Spread Brussels sprouts on the baking sheet. - First roasting phase: 20 minutes. - Add Parmesan cheese and return to oven for an additional 10-15 minutes. Now, move the seasoned Brussels sprouts to the baking sheet. Place them cut-side down. This helps them brown nicely. Roast them in the oven for 20 minutes. After that, take them out and sprinkle the grated Parmesan cheese on top. Return them to the oven for another 10-15 minutes. Look for a golden brown color and melted cheese. It should smell amazing! To get the best results, arrange your Brussels sprouts with the cut sides down. This gives them a nice caramelized surface. Use a large baking sheet and spread them out. Always roast in a single layer. This way, the heat can reach all the sprouts evenly. If they are crowded, they will steam instead of roast. You can add other herbs and spices to boost the taste. Try rosemary, thyme, or even a pinch of garlic powder. If you want to change the cheese, use Gruyère or feta for a twist. Each cheese brings its own unique flavor, so experiment to find your favorite. Serve your Brussels sprouts in a decorative bowl for a beautiful display. Drizzle some extra olive oil on top for shine and flavor. Add a sprinkle of Parmesan cheese just before serving. This small touch makes a big difference, adding texture and taste. Enjoy the delightful look as much as the taste! {{image_4}} To make a vegan dish, swap out Parmesan with nutritional yeast. This gives a cheesy flavor that is perfect. Nutritional yeast adds a nutty taste and is packed with nutrients. You can also try different seasonings. Use garlic powder, onion powder, or smoked paprika to boost flavor. You can add extra veggies for more color and taste. Carrots and sweet potatoes work great here. They add sweetness and texture. If you add carrots, cut them into sticks. For sweet potatoes, chop them into cubes. Adjust the cooking time to about 25-30 minutes for these extras. Check for tenderness and caramelization. Want more heat? Increase the crushed red pepper flakes. A little goes a long way! For less spice, reduce the amount or skip it. You can also add other spices. Try cumin for warmth or smoked paprika for depth. Each spice gives a unique twist to the dish. To store leftovers, place the Brussels sprouts in airtight containers. This helps keep them fresh. Make sure to do this within two hours of cooking. When stored correctly, they can last for up to three days in the fridge. If you plan to eat them later, check for any signs of spoilage before enjoying. The best way to reheat roasted Brussels sprouts is to use the oven. Preheat it to 350°F (175°C). Spread the sprouts on a baking sheet. Heat them for about 10-15 minutes. This method helps maintain their crispiness. You can also use a skillet on medium heat. Just add a little olive oil to help them crisp up again. Avoid using the microwave, as it can make them soggy. Yes, you can use frozen Brussels sprouts. However, they may not be as crisp. The cooking time will also change. You should roast them longer, about 30-40 minutes. Make sure to thaw and drain them well. This helps avoid soggy sprouts. You’ll know Brussels sprouts are done when they are golden brown and tender. Look for a nice caramelization on the outside. The cheese should be melted and bubbly, adding to the flavor. A fork should easily pierce them. These Brussels sprouts pair well with many dishes. Try serving them with grilled chicken or salmon. They also go great with a hearty steak. For a meatless option, serve them with quinoa or a fresh salad. In this post, we explored how to make Garlic Parmesan Roasted Brussels Sprouts. We covered key ingredients, easy steps, and some helpful tips. Remember, the right seasoning and cooking time can make a big difference. You can even try different veggies or a vegan twist. Store your leftovers properly to enjoy them later. Now go ahead and make this tasty dish your own. Happy cooking!
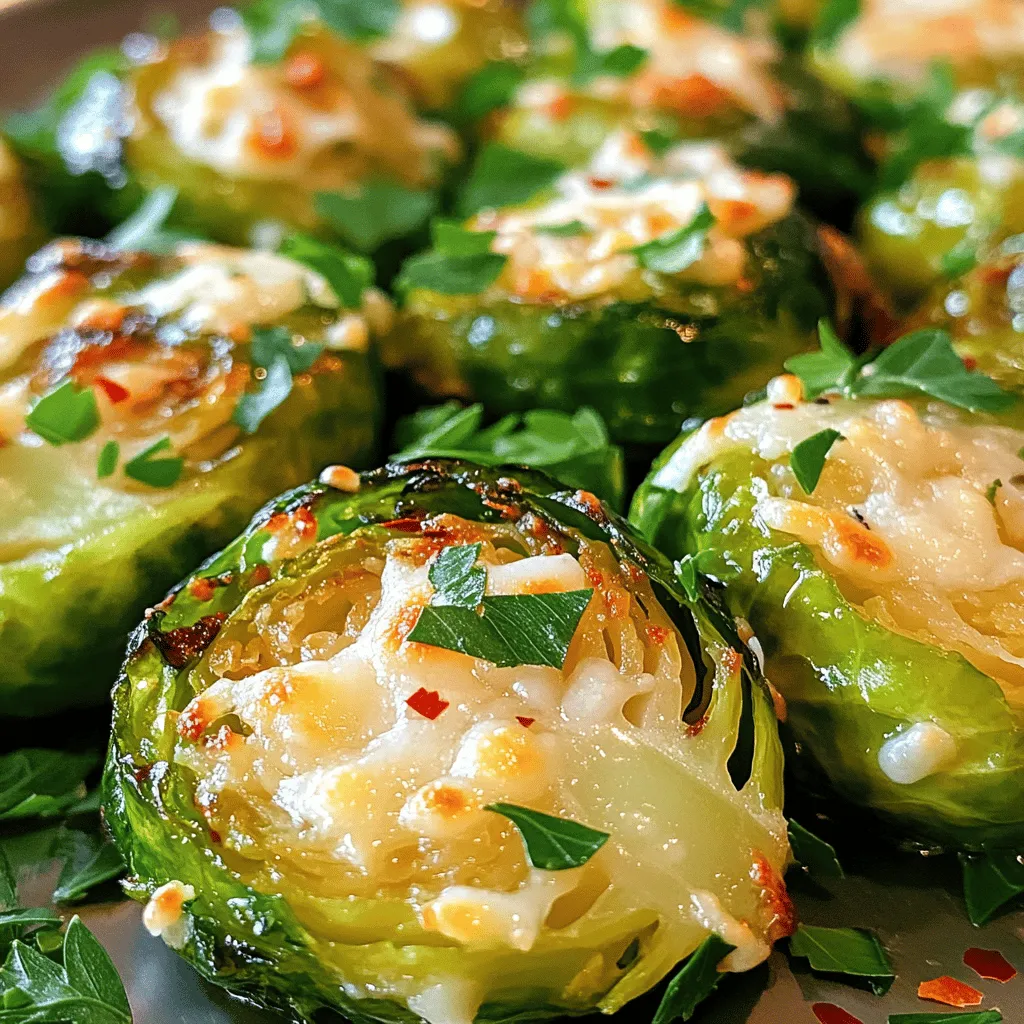
Garlic Parmesan Roasted Brussels Sprouts Delight
If you are looking for a tasty side dish, try Garlic Parmesan Roasted Brussels Sprouts! This recipe is simple and quick, perfect for busy weeknights.
- 1 lb ground beef (or a blend of beef and pork) - 1/2 cup fresh breadcrumbs - 1/4 cup finely grated Parmesan cheese - 1/4 cup thinly sliced green onions (reserve some for garnishing) - 1 large egg, lightly beaten - 2 cloves garlic, finely minced - 1/2 teaspoon sea salt - 1/4 teaspoon freshly cracked black pepper - 1 cup sweet chili sauce - 1 tablespoon soy sauce - 1 tablespoon rice vinegar - 1 tablespoon sriracha sauce (adjust for spice preference) - Toasted sesame seeds for garnishing You can swap ground beef for ground turkey or chicken for a lighter option. If you need a gluten-free recipe, use gluten-free breadcrumbs. No Parmesan? Try Pecorino Romano or nutritional yeast for a vegan touch. For a milder flavor, reduce the sriracha or skip it entirely. You can also add chopped herbs like cilantro or parsley for freshness. Using fresh ingredients makes a big difference. Fresh breadcrumbs add better texture and taste. Fresh garlic gives a strong flavor that dried garlic can’t match. Green onions add a nice crunch and brightness. When you use fresh ingredients, you get a more vibrant dish. It is worth the extra effort to find quality items. They enhance the overall taste and enjoyment of your sweet chili crockpot meatballs. Start by gathering your ingredients. You need ground beef, fresh breadcrumbs, Parmesan cheese, and green onions. You also need a large egg, minced garlic, sea salt, and black pepper. In a big bowl, mix the ground beef with the breadcrumbs, cheese, green onions, egg, garlic, salt, and pepper. Use your hands or a spatula to combine everything. Mix until just combined; don’t overmix. Overmixing makes tough meatballs. Now, it’s time to shape the meatballs. Take small amounts of the mixture and roll them into balls about one inch wide. This size helps them cook evenly. You should make 20 to 24 meatballs, depending on how large you want them. Put them on a baking tray lined with parchment paper to keep them from sticking. Next, you need to make the sauce. In a separate bowl, whisk together sweet chili sauce, soy sauce, rice vinegar, and sriracha. Taste the sauce and adjust it if you want more spice. Prepare your crockpot by lightly spraying the bottom with cooking spray or a bit of olive oil. Place the meatballs in the crockpot. Pour the sauce over them. Make sure each meatball gets coated. Cover the crockpot. Cook on low for 4 to 5 hours or on high for 2 to 3 hours. The meatballs are done when they are cooked through and tender. Once cooked, carefully remove the meatballs using a slotted spoon. Place them on a serving platter. Drizzle extra sauce over them for more flavor. Before serving, sprinkle on some toasted sesame seeds and reserved green onions for extra color and taste. To make sure your meatballs stay tender, mix the meat gently. If you overmix, they may turn tough. I like to combine ground beef and pork for more flavor. This mix adds zest and keeps the meatballs juicy. Aim for small balls, about one inch wide. This size helps them cook evenly. The sauce makes these meatballs shine. Mix sweet chili sauce, soy sauce, rice vinegar, and sriracha in a bowl. Taste the sauce before pouring it over the meatballs. Adjust the sriracha to fit your spice level. A little more sriracha brings a nice kick! Drizzle extra sauce over the meatballs when serving for added flavor. These meatballs are great as an appetizer or a meal. Serve them warm, with rice or noodles. The rice soaks up the delicious sauce well. You can also garnish with green onions and sesame seeds for a pop of color. Pair with a fresh salad for a complete meal. These tips will help you impress your guests! {{image_4}} You can swap ground beef for other meats. Try ground turkey or chicken for a lighter option. For a richer flavor, use a mix of beef and pork. Each meat brings its unique taste. This allows you to find the perfect match for your family. If you prefer a plant-based dish, use lentils or chickpeas. You can mash them and mix with breadcrumbs and spices. Add finely chopped veggies for more texture. Use a vegan sweet chili sauce to keep it plant-friendly. This way, everyone can enjoy the meal together. Adjust the heat with sriracha in the sauce. Add more for a fiery kick or less for mild flavor. Taste the sauce before pouring it over the meatballs. You can also add red pepper flakes for extra spice. Customize it to fit your taste buds. Keep experimenting until you find the right balance. After you enjoy your sweet chili meatballs, store any leftovers in a safe way. First, let the meatballs cool down to room temperature. Next, place them in an airtight container. This helps keep them fresh. You can store them in the fridge for up to three days. If you want to save them longer, consider freezing. Freezing meatballs is easy and great for meal prep. To freeze, first arrange the meatballs on a baking sheet. Make sure they are not touching each other. Place the sheet in the freezer for about an hour. This helps them freeze individually. Once frozen, transfer the meatballs to a freezer bag. Remove as much air as possible. Label the bag with the date. They can last for up to three months in the freezer. When you're ready to eat the meatballs, reheating is simple. For the best flavor, heat them on the stove or in the oven. If using the stove, place the meatballs in a skillet with a splash of sauce. Heat on medium until warm. If using the oven, preheat it to 350°F. Place the meatballs in a baking dish with some sauce. Cover with foil and heat for about 15-20 minutes. You can also use the microwave for a quick option. Just place them in a microwave-safe dish and cover. Heat in short bursts until warm. Enjoy your delicious meatballs again! Yes, you can bake these meatballs in the oven. Preheat your oven to 400°F. After forming the meatballs, place them on a baking tray lined with parchment paper. Bake for about 20-25 minutes. Make sure they are cooked through and browned. Oven cooking gives a nice crisp outside while keeping them juicy inside. Serve them with the sweet chili sauce for the same great flavor. You can store cooked meatballs in the fridge for about 3-4 days. Place them in an airtight container. Make sure they cool down before sealing. This helps keep them fresh. If you want to enjoy them later, consider freezing them. Just remember to label your container so you know when you made them. These meatballs are great on their own, but they pair well with many sides. Here are some ideas: - Steamed rice: It absorbs the sweet chili sauce well. - Noodles: Any type of noodles adds a nice touch. - Fresh veggies: A simple salad or stir-fried veggies work great. - Skewers: Serve them on skewers for a fun appetizer. - Toasted sesame seeds: A sprinkle adds crunch and flavor. Feel free to mix and match these sides to find your favorite! We explored how to make delicious meatballs in a crockpot. You learned about key ingredients and substitutions. Fresh ingredients are vital for the best flavor. The step-by-step guide showed you how to prepare and cook meatballs with ease. Tips were shared to ensure tenderness and boost taste. Variations allow you to customize for diets or spice levels. Lastly, proper storage keeps your meatballs fresh for later. Now, you're ready to create your own delightful meatballs! Enjoy experimenting in the kitchen.
Sweet Chili Crockpot Meatballs Easy and Flavorful Recipe
Ready for a tasty dish that’s easy to make and packed with flavor? My Sweet Chili Crockpot Meatballs are the perfect choice! You’ll enjoy tender
- 2 cups cooked shredded chicken - 1 (8 oz) package cream cheese, softened - 1/2 cup Greek yogurt - 1/2 cup buffalo sauce - 1 cup shredded cheddar cheese - 1/2 cup blue cheese crumbles (optional) - 1/4 cup fresh green onions, chopped - Salt and pepper to taste - Tortilla chips or celery sticks for serving Buffalo chicken dip brings joy to any gathering. It’s rich, creamy, and packed with flavor. You need a mix of key ingredients to create this dip. First, use cooked shredded chicken. It gives the dip its heartiness. Then, add cream cheese and Greek yogurt. These make the dip smooth and creamy. Next, add buffalo sauce. This sauce gives the dip its signature kick. You can adjust the amount based on how spicy you want it. I always recommend starting with half a cup and tasting as you go. Cheddar cheese is a must for flavor and texture. I love using a full cup. If you enjoy blue cheese, add some crumbles for extra zing. Green onions add freshness and a nice crunch. Don't forget salt and pepper to balance the flavors. Finally, serve this dip with crunchy tortilla chips or fresh celery sticks. Each bite is a blend of flavors and textures. It’s perfect for parties or game days. Enjoy! - Preheat the oven: First, set your oven to 350°F (175°C). This step warms it up for baking. - Mix cream cheese and Greek yogurt: In a large bowl, add the softened cream cheese and Greek yogurt. Blend these together until smooth. You want a creamy base with no lumps. - Incorporate shredded chicken: Next, stir in the cooked shredded chicken. Make sure the chicken gets well mixed with the creamy base. - Add buffalo sauce and stir: Pour in the buffalo sauce. Use a spatula or spoon to mix it in well. This adds the spicy kick to your dip. - Fold in cheeses and green onions: Gently add the shredded cheddar cheese, blue cheese crumbles if you like, and chopped green onions. Stir them in without breaking the cheese. - Transfer to baking dish: Spoon the mixture into a baking dish. Spread it evenly, making sure it fills the dish. - Bake in the oven: Put the dish in the preheated oven. Bake for about 20-25 minutes. Look for bubbling at the edges and a golden top to know it’s ready. - Recommended baking duration: Aim for 20-25 minutes in the oven. - Indicators that the dip is ready: Check for a bubbly edge and a light golden top. - Cooling time before serving: Once out of the oven, let it cool for a few minutes. This helps avoid burns when you scoop it up! To make your buffalo chicken dip perfect, start with smooth mixing. Combine softened cream cheese and Greek yogurt in a large bowl. Use a hand mixer or whisk to ensure no lumps remain. This makes the dip creamy and rich. Next, balance flavors with seasoning. After mixing in the chicken and buffalo sauce, taste your dip. Add salt and pepper to enhance the flavors. This step is key for a delicious result. Adjusting the spice level is also important. If you like it hot, add more buffalo sauce. For a milder dip, reduce the sauce. Find the right heat that works for you and your guests. When serving, choose ideal dippers. Tortilla chips work great for crunch. Celery sticks add a fresh crunch and a nice contrast. Both options are crowd-pleasers. For presentation, put your dip in a nice dish. Garnish with chopped green onions on top. This adds color and freshness. A little flair goes a long way in making your dish look appealing. {{image_4}} If you want a vegetarian twist, swap the chicken for cooked beans or lentils. This change keeps the dip hearty and flavorful. You can also use tofu for a protein boost. For cream cheese and yogurt, try using dairy-free options like cashew cream or coconut yogurt. These will mimic the creamy texture while being vegan-friendly. To amp up the flavor, consider adding spices like garlic powder, onion powder, or smoked paprika. If you love heat, a dash of cayenne pepper or extra hot sauce works wonders. Mixing in different cheeses can also change the dip's taste. Use pepper jack for a spicy kick or mozzarella for a milder flavor. Combining several cheeses adds depth and richness. To store leftovers, let your dip cool first. Then, place it in an airtight container. This keeps the dip fresh and tasty. You can store it in the fridge for up to four days. For longer storage, you can freeze it. Use a freezer-safe container and label it with the date. The best method for reheating Buffalo Chicken Dip is in the oven. Preheat your oven to 350°F (175°C). Place the dip in a baking dish and cover it with foil. Heat for about 20 minutes or until hot. You can also use a microwave for quick reheating. Heat in short bursts, stirring in between, to keep the texture smooth. To maintain texture and flavor, avoid heating it too long. Check it often and stir to mix the layers. If the dip seems dry, add a splash of buffalo sauce or Greek yogurt. This keeps it creamy and delicious! How long can Buffalo Chicken Dip be stored? You can store Buffalo Chicken Dip in the fridge for about 3 to 4 days. Make sure to keep it in an airtight container. This helps keep it fresh and tasty. Can I make Buffalo Chicken Dip ahead of time? Yes, you can prepare the dip a day in advance. Just mix all the ingredients and store them in the fridge. Bake it when you are ready to serve. This saves time and makes hosting easier. What are some good substitutes for chicken? If you want alternatives to chicken, try shredded turkey or canned tuna. For a vegetarian option, use shredded jackfruit or chickpeas. These substitutes still give a great taste. Is it possible to prepare Buffalo Chicken Dip in a slow cooker? Absolutely! You can make it in a slow cooker. Just mix all the ingredients in the cooker and set it on low for about 2 to 3 hours. Stir it occasionally for even heating. Can I freeze Buffalo Chicken Dip? Yes, you can freeze the dip. Place it in a freezer-safe container and store it for up to 3 months. When you want to eat it, thaw it in the fridge overnight and bake it as usual. This blog post covered how to make a tasty Buffalo Chicken Dip. You learned about the ingredients, step-by-step instructions, and tips for serving and storing. The dip is easy, delicious, and perfect for any occasion. You can adjust the flavors and ingredients to fit your taste. Whether you’re making it for a party or just for yourself, this dip is sure to impress. Enjoy your cooking and happy dipping!
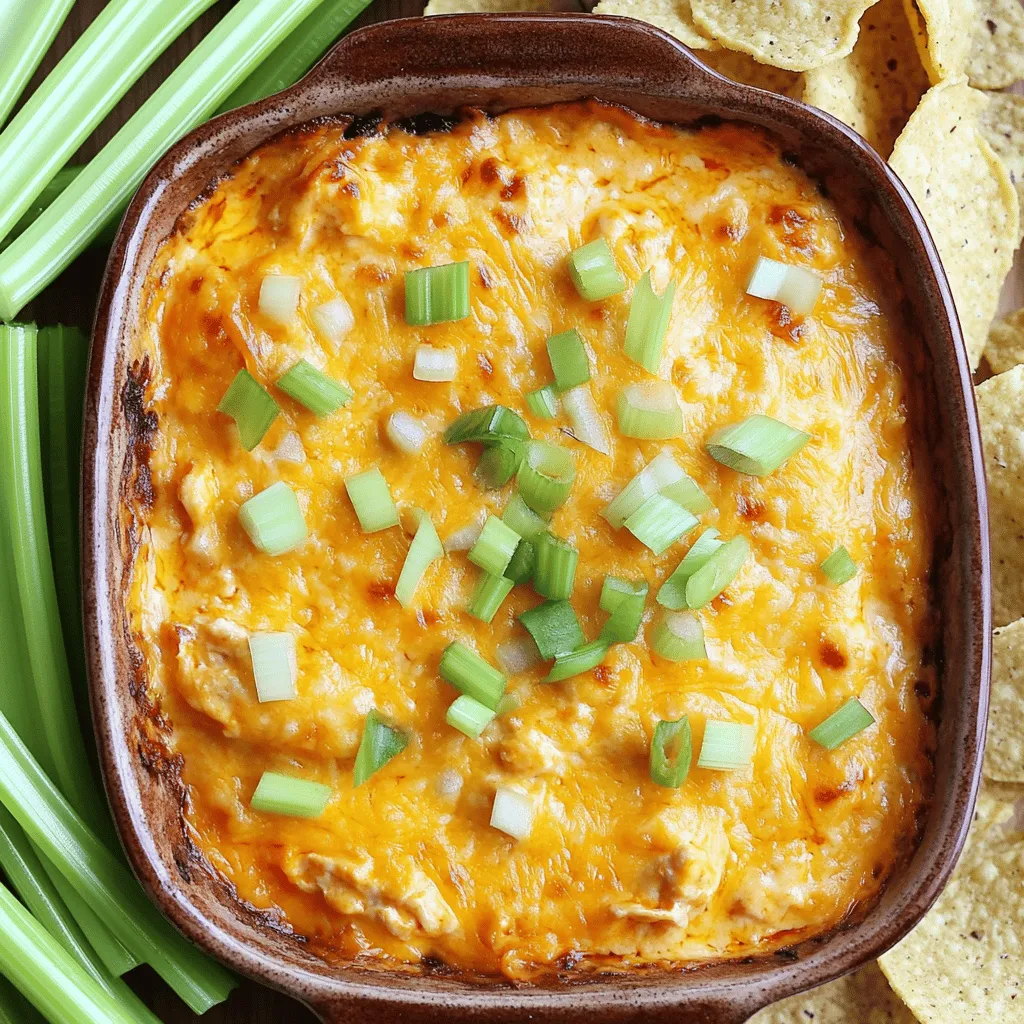
Buffalo Chicken Dip Rich and Flavorful Appetizer
If you’re looking for a crowd-pleasing appetizer, you’ve found it! Buffalo Chicken Dip is rich, creamy, and packed with flavor. Whether it’s game day or
When making Cheesy Spinach Artichoke Dip, the right ingredients are key to that rich, creamy taste. Here’s what you need: - 1 cup frozen spinach, thawed and thoroughly drained - 1 cup canned artichoke hearts, finely chopped - 1/2 cup cream cheese, softened to room temperature - 1/2 cup sour cream - 1/2 cup mayonnaise - 1 cup mozzarella cheese, shredded - 1/2 cup Parmesan cheese, freshly grated - 2 cloves garlic, minced - 1 teaspoon onion powder - 1/2 teaspoon red pepper flakes (optional for heat) - Salt and freshly cracked black pepper to taste - Tortilla chips or sliced baguette for serving These ingredients create a blend of flavors that makes this dip a hit. The creamy base comes from the cream cheese, sour cream, and mayonnaise. The cheeses add richness and depth. Spinach and artichokes provide a tasty twist. I love using frozen spinach since it’s easy and quick. Just make sure to drain it well to avoid a watery dip. Canned artichoke hearts save time too. You can also use fresh ones if you prefer. The garlic gives a nice kick, and the red pepper flakes add a hint of spice. Adjust the salt and pepper to your taste. When you gather these ingredients, you set the stage for a delicious dip. It’s perfect for parties or a cozy night in. - Preheat your oven to 350°F (175°C). This step is key for great baking. - In a large bowl, blend 1/2 cup of cream cheese, 1/2 cup of sour cream, and 1/2 cup of mayonnaise. Use a spatula or whisk to mix. You want it smooth and creamy. - Next, fold in 1 cup of thawed and drained frozen spinach, and 1 cup of finely chopped canned artichoke hearts. - Add 1 cup of shredded mozzarella cheese and 1/2 cup of freshly grated Parmesan cheese. - Toss in 2 minced garlic cloves, 1 teaspoon of onion powder, and 1/2 teaspoon of red pepper flakes if you like some heat. - Season with salt and freshly cracked black pepper to taste, then mix everything well. - Carefully transfer the mixture to a baking dish. Smooth the top with your spatula. - Bake in the preheated oven for 25-30 minutes. Look for a golden, bubbly dip. - Once it's done, let it cool for a few minutes. This prevents burns when you dig in. To make the best Cheesy Spinach Artichoke Dip, you need to drain your spinach well. If you skip this step, your dip may turn watery. I recommend squeezing out any extra water. This keeps your dip creamy and thick. Using fresh cheeses is another key tip. They add a rich flavor that makes your dip shine. Look for freshly grated Parmesan and high-quality mozzarella. These cheeses melt beautifully and enhance the taste. For serving, I love using tortilla chips or sliced baguette. Both options are great for scooping up the dip. Lay them out around your dip for a fun and inviting display. Garnishes can elevate your dish. A sprinkle of extra Parmesan on top adds a nice touch. Fresh herbs, like parsley or chives, also brighten up the dish and add color. This small step enhances both presentation and flavor. {{image_4}} You can change a few ingredients in this dip to suit your taste. If you want to swap out cream cheese and mayo, here are some options: - Greek yogurt: Use this for a tangy flavor and extra protein. - Silken tofu: This creates a creamy texture without dairy. - Ricotta cheese: This adds a light and fluffy texture. By mixing different cheeses, you can create unique flavors in your dip. Try these: - Cheddar cheese: This adds sharpness and depth. - Gouda cheese: This brings a smoky twist. - Feta cheese: This gives a tangy and salty note. Want to add some heat? Here are some easy ways to do that: - Jalapeños: Add finely chopped fresh or pickled jalapeños. - Hot sauce: A few drops can bring warmth without changing the dip's base. - Cayenne pepper: A pinch can elevate the spice level. Herbs can also change the flavor of your dip. Consider using: - Fresh basil: Adds a sweet and fresh taste. - Chives: Offers a mild onion flavor. - Thyme: This brings an earthy note to the dip. Feel free to play with these options to make the dip your own! After enjoying your dip, let it cool down. Once cool, transfer it to an airtight container. You can store it in the fridge for up to four days. Make sure you keep it well-sealed to avoid any other food smells. If you want to store it for longer, consider freezing it. Just place it in a freezer-safe container. It can last up to three months in the freezer. When ready to use, let it thaw in the fridge overnight before reheating. To reheat your cheesy spinach artichoke dip, use the oven for the best results. Preheat your oven to 350°F (175°C). Place the dip in an oven-safe dish and cover it with foil. Bake for about 15-20 minutes. This keeps it moist and helps prevent burning. If you want a crispy top, remove the foil for the last 5 minutes. You can also use the microwave, but it may not keep the texture as well. Heat in short bursts of 30 seconds, stirring in between until warm. Yes, you can make this dip ahead of time. Prepare it and store it in the fridge. Use a covered dish to keep it fresh. I recommend making it the day before serving. This lets the flavors meld together nicely. When you're ready to bake it, just remove it from the fridge. Allow it to sit at room temperature for about 15 minutes. This helps it bake evenly. Bake it as directed until it gets bubbly and golden. To lighten up this dip, swap some ingredients. Use Greek yogurt instead of sour cream and mayonnaise. This cuts calories and adds protein. You can also use reduced-fat cream cheese. If you want more veggies, add chopped bell peppers or mushrooms. These add texture and flavor. You can even mix in fresh herbs like parsley or basil. This gives a fresh taste without extra calories. This dip pairs well with many things. Tortilla chips are a classic choice. They add a nice crunch. Sliced baguette is also great for dipping. You can try fresh veggies like carrots or celery sticks. They add a nice crunch and freshness. For a twist, serve it with pita chips. They bring a unique flavor to the mix. You can also consider serving it with crackers for a salty bite. This blog post shared a simple way to make Cheesy Spinach Artichoke Dip. We covered the key ingredients like frozen spinach, artichokes, and various cheeses. I also explained the steps, tips for storage, and a few fun variations. Making this dip can bring friends and family together. Remember, you can easily adjust flavors and ingredients to fit your taste. Enjoy your next gathering with this warm, cheesy dish that everyone will love!
Cheesy Spinach Artichoke Dip Irresistible Flavor Fix
Get ready to wow your taste buds! In this post, I’ll show you how to whip up the perfect Cheesy Spinach Artichoke Dip. It’s creamy,
- 4 ears of fresh corn - 1/2 cup mayonnaise - 1/2 cup sour cream - 1 teaspoon chili powder - 1/2 teaspoon smoked paprika The main stars of elote are fresh corn, mayonnaise, and sour cream. The corn must be sweet and juicy. You can find it at farmers' markets or grocery stores. The mix of mayonnaise and sour cream creates a creamy base that holds all the flavors. Chili powder and smoked paprika add a nice kick. These spices give elote its unique taste. You can adjust the spice levels based on your liking. If you love heat, use more chili powder. If you prefer less heat, cut back. - 1/4 cup crumbled cotija cheese - 1/4 cup fresh cilantro, finely chopped - 1 lime, juiced Garnishes are the finishing touches that make elote pop. Crumbled cotija cheese brings a salty flavor that balances the creaminess. Fresh cilantro adds a bright, herbaceous note. Finally, lime juice gives a zesty punch that brightens every bite. You can add lime wedges on the side. Squeeze fresh lime juice over the corn just before eating. This extra step enhances the flavors even more. Enjoy your flavorful elote! Preheating the Grill Start by preheating your grill to medium-high heat. A hot grill helps the corn cook evenly. Make sure the grates are clean for the best results. Husking the Corn Next, husk the corn. Remove the green leaves and silk. Rinse the ears under cold water to clean off any dirt. This helps the corn stay fresh and tasty. Grilling Technique and Timing Place the husked corn directly on the grill grates. Grill the corn for about 10-12 minutes. Rotate it every few minutes. This ensures even cooking and gives it a nice char. Tips for Achieving the Perfect Char Watch the corn closely. You want it to have a light char but not burn. The char adds flavor and texture. If you see dark spots forming, simply rotate the corn to a cooler part of the grill. Mixing Ingredients While the corn grills, it’s time to make the elote sauce. In a medium mixing bowl, combine 1/2 cup mayonnaise, 1/2 cup sour cream, 1 teaspoon chili powder, and 1/2 teaspoon smoked paprika. Add the juice of 1 lime. Mix until creamy. Achieving the Right Consistency Make sure the sauce is smooth. If it feels too thick, add a bit more lime juice. The sauce should coat the corn well without being too runny. Coating the Grilled Corn Once the corn is done grilling, carefully take it off the grill. Let it cool for about 2-3 minutes. Then, using a brush or spatula, coat each ear with the elote sauce. Cover all sides for full flavor. Adding Toppings and Final Touches After coating, sprinkle 1/4 cup of crumbled cotija cheese on top. Then, add 1/4 cup of finely chopped cilantro. For an extra zing, serve with lime wedges on the side. This makes every bite pop with flavor! Avoiding Burnt Corn To keep your corn from burning, watch the heat. Use medium-high heat for great flavor. Place the corn directly on the grill. Turn it often. This helps the corn cook evenly. You want a nice char, not a burnt taste. Rotating Corn for Even Cooking Rotate the corn every few minutes. This simple step ensures every side gets nice heat. It helps the kernels stay juicy and tender. Use tongs to turn the corn safely. This way, you can avoid hot spots and get perfect results. Adjusting Spice Levels Want more kick? Add extra chili powder to the sauce. For a milder taste, cut back on the spice. You can always taste and adjust as you mix. This keeps the flavor just right for your group. Creaminess Factor: Mayonnaise vs. Sour Cream Ratios The mix of mayonnaise and sour cream is key to elote's taste. For a thicker sauce, use more mayo. If you like tang, add more sour cream. Play around with the ratios to find what you love best. Serving Suggestions Serve your elote on a bright platter. A colorful display makes it tempting. Place lime wedges on the side for a zesty touch. This adds a nice pop of color and taste. It looks great and makes for a fun meal. Creative Ways to Garnish Get creative with your garnishes! Try adding more cotija cheese or extra cilantro on top. You can even add a sprinkle of chili powder for color and flavor. These small touches make your elote feel special and fancy. {{image_4}} Traditional Mexican elote is simple and full of flavor. You start with fresh corn on the cob. After grilling, you coat it in a mix of mayonnaise, sour cream, and spices. The key spices are chili powder and smoked paprika. Then, you sprinkle crumbled cotija cheese on top. Finally, add fresh cilantro and a squeeze of lime juice. This classic version bursts with taste and has a fun texture. You can also add creative twists to elote. Want it spicy? Add extra chili powder or some hot sauce. For a sweet version, mix in honey or use sweet chili sauce. Both variations keep the essence of elote while giving it a new flair. You can cook elote in different ways, each giving a unique taste. Boiling corn is quick, but it lacks the smoky flavor of grilling. If you boil it, just cook for about 5-7 minutes. After boiling, you can still coat it with the same sauce. Roasting corn brings out its natural sweetness. It also adds a nice char. Roasting takes longer than boiling but is worth it. You can roast corn in the oven at 400°F for about 25-30 minutes. Elote can be served on the cob or off. Serving it on the cob is the classic way. It’s fun to eat and looks great. If you prefer, you can cut the kernels off the cob for easier eating. This version is great for parties or potlucks. Just mix the corn with the elote sauce and serve in cups. Each method offers a tasty way to enjoy this classic dish. To keep leftover elote fresh, store it in the fridge. Place the corn in an airtight container. This helps avoid drying out. Use it within three days for the best taste. When you want to eat it again, take it out and check for any signs of spoilage. For reheating, I recommend the oven or stovetop. Preheat your oven to 350°F (175°C). Wrap the elote in foil to keep it moist. Heat for about 10-15 minutes. If using a stovetop, place it in a pan with a splash of water. Cover and heat on medium for about 5 minutes. You can freeze elote for longer storage. First, let it cool completely after grilling. Wrap each ear tightly in plastic wrap or foil. Then, place them in a freezer-safe bag. You can keep them in the freezer for up to three months. When you're ready to use it, thaw the elote in the fridge overnight. You can also use leftover elote in other dishes. Chop it up and add it to salads, tacos, or quesadillas. This way, you can enjoy the flavors of elote in new and fun ways. Elote is a popular Mexican street food. It is grilled corn on the cob, often served with creamy sauces and spices. The dish has roots in Mexico's rich culinary history. Vendors sell elote in markets and during festivals, making it a beloved snack. The flavors reflect the warmth and spirit of Mexican culture. It brings people together, often shared during gatherings and celebrations. Yes, you can! If you don’t have a grill, you can boil or roast the corn. To boil, place the husked corn in a pot of boiling water. Cook for about 5-7 minutes until tender. For roasting, preheat your oven to 400°F (200°C). Place the corn on a baking sheet and roast for 20-25 minutes. This method gives a nice flavor too. You can easily modify the elote recipe. For a gluten-free version, check that all ingredients are certified gluten-free. Swap out the mayonnaise and sour cream for dairy-free options, like cashew cream or coconut yogurt. To make it vegan, use plant-based mayo and skip the cheese or use a vegan cheese alternative. These changes keep the dish delicious while meeting dietary needs. You can find elote at many local food vendors and markets. Look for food trucks or stands at fairs and festivals. Mexican restaurants often serve elote too. If you want to try making it at home, many grocery stores sell fresh corn and ingredients online. This way, you can enjoy the taste of authentic elote in your own kitchen. The blog post shared how to make delicious elote at home. We covered essential ingredients like fresh corn, mayo, and spices. I provided step-by-step grilling tips and ways to enhance flavor. You learned about variations, storage methods, and answers to common questions. Elote is a fun dish that anyone can enjoy. Experiment with your favorite flavors and toppings to make it your own. Happy grilling!
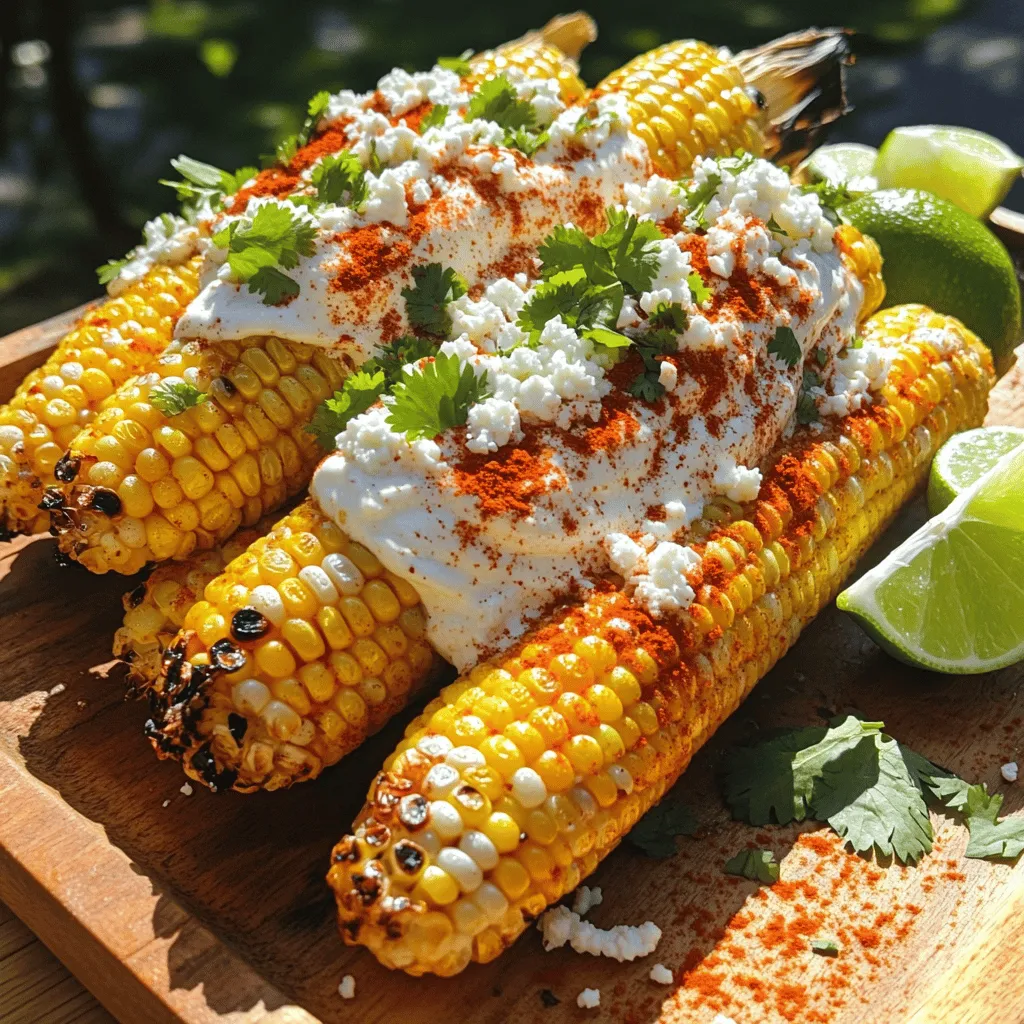
Elote Mexican Street Corn Easy and Flavorful Recipe
Do you want to bring the vibrant taste of Mexico to your kitchen? Elote, or Mexican street corn, is a fun and tasty dish that
- 2 large sweet potatoes, sliced into 1/4-inch thick rounds - 1 cup canned black beans, rinsed and drained - 1 cup cherry tomatoes, halved The main ingredients make the base of your loaded sweet potato nachos. Sweet potatoes bring a sweet and hearty flavor. Black beans add protein and fiber, making this dish filling. Cherry tomatoes add a fresh, juicy burst to each bite. - 1 ripe avocado, diced - 1 cup shredded cheddar cheese (or vegan cheese for a plant-based option) - 1/2 cup Greek yogurt (or a dairy-free alternative like vegan sour cream) Toppings elevate your nachos. Avocado gives a creamy texture and rich taste. Cheese options let you customize for your preference. Greek yogurt or a dairy-free alternative adds a tangy creaminess that balances the flavors perfectly. - 2 tablespoons olive oil - 1 teaspoon chili powder - 1 teaspoon ground cumin Spices and oils bring depth to your dish. Olive oil helps the sweet potatoes crisp up in the oven. Chili powder adds a mild heat and flavor. Ground cumin offers a warm, earthy taste that enhances the overall dish. With these ingredients, you create a colorful and tasty plate that everyone will love. Get ready to enjoy a fun twist on nachos that packs a flavorful punch! First, we need to preheat the oven to 425°F (220°C). This hot temperature helps make the sweet potatoes crispy. Next, take your two large sweet potatoes. Slice them into 1/4-inch thick rounds. On a large baking sheet, spread the slices in a single layer. Drizzle two tablespoons of olive oil over them. Then, sprinkle one teaspoon of chili powder, one teaspoon of ground cumin, salt, and black pepper. Use your hands or a spatula to mix. Make sure every slice is coated with oil and spices. Now, place the baking sheet in the preheated oven. Bake the sweet potato slices for about 20 to 25 minutes. Halfway through, flip the slices. This flipping helps them get golden and crispy on both sides. Once baked, take the sweet potato rounds out of the oven. Transfer them onto a colorful plate or a serving platter. Start building your nachos by adding a cup of rinsed and drained black beans evenly over the sweet potatoes. Next, scatter one cup of halved cherry tomatoes, one diced avocado, and jalapeño slices if you like it spicy! Now, generously sprinkle one cup of shredded cheddar cheese on top of the loaded sweet potatoes. Make sure to cover all the ingredients below. Pop the nachos back into the oven for an additional 5 to 10 minutes. Watch closely and take them out when the cheese is melted and bubbly. After removing them from the oven, drizzle 1/2 cup of Greek yogurt on top. This adds a nice creaminess. Finally, sprinkle 1/4 cup of finely chopped cilantro over everything for a fresh burst of flavor. Enjoy your delicious loaded sweet potato nachos! When picking sweet potatoes, look for firm ones. Avoid any with soft spots or blemishes. The skin should be smooth and free of wrinkles. Bigger sweet potatoes give you more slices. However, medium-sized ones can have better taste. Ask your local store for fresh stock if needed. To get crunchy sweet potato chips, cut them evenly. Aim for 1/4-inch thick rounds. This helps them cook at the same rate. Toss them with olive oil and spices before baking. Bake at 425°F (220°C) for 20-25 minutes. Flip them halfway through to help them crisp up. Keep an eye on them during the last minutes. These nachos pair well with drinks like iced tea or lemonade. You can also serve them with a side of salsa for extra flavor. If you want a lighter option, try a green salad. This adds freshness to your meal and balances the richness of the nachos. Enjoy these nachos warm for the best taste! {{image_4}} You can easily make these nachos vegetarian or vegan. Just swap the cheese for vegan cheese. It melts well and tastes great. For a creamy touch, use dairy-free sour cream instead of Greek yogurt. You can find many brands that are tasty and easy to use. Want to kick up the heat? Add more jalapeños on top for extra spice. You can even mix in some diced serrano peppers or a dash of hot sauce. Just remember to taste as you go. This way, you keep the flavor balanced. Cheese lovers have options! Cheddar works great, but try pepper jack for a spicy twist. You can also use a blend of mozzarella and gouda for a different taste. Each cheese brings its own flavor, making your nachos unique and fun. To keep your loaded sweet potato nachos fresh, store them in the fridge. Use an airtight container to prevent moisture loss. Make sure to cool them down before sealing. They can last up to three days this way. Avoid stacking them too high, as that can make them soggy. When you’re ready to eat, reheating is easy. Preheat your oven to 350°F (175°C). Spread the nachos on a baking sheet. Heat for about 10-15 minutes. This helps keep the sweet potatoes crispy. If you prefer, you can also use the microwave. Just heat for 1-2 minutes, but the texture may change. Serve your loaded sweet potato nachos right after baking. This timing ensures maximum flavor and crunch. They make a great appetizer or snack for parties. Enjoy them warm for the best experience! Yes, you can use other potatoes! Regular white or yellow potatoes work well. They add a different taste and texture. However, sweet potatoes offer a natural sweetness that balances the savory toppings. If you choose regular potatoes, just slice them thinly for crispiness. Also, note that cooking time may vary. Check for doneness by piercing with a fork. To ensure this dish is gluten-free, focus on the ingredients. Sweet potatoes, black beans, and fresh veggies are all gluten-free. For the cheese, choose a brand that is labeled gluten-free. Always check labels on pre-packaged items, like yogurt, to avoid hidden gluten. Using fresh, whole foods is the best way to keep your nachos safe and tasty. If you need a substitute for Greek yogurt, try sour cream. It adds creaminess just like yogurt. For a dairy-free option, use vegan sour cream or cashew cream. Both choices give a similar taste and texture. You can also use mashed avocado for a rich, creamy touch. Each option will still enhance the nachos beautifully. In this article, we explored how to make delicious sweet potato nachos. We discussed main ingredients like sweet potatoes, black beans, and cherry tomatoes. We also covered helpful tips on the best toppings, spices, and oils to use. Cooking techniques ensure crispy chips and tasty layers. Remember, you can mix it up with different cheese and add heat as you like. Serve fresh for the best taste. Enjoy crafting your nachos and impressing everyone with your skills!
Loaded Sweet Potato Nachos Flavorful and Easy Recipe
Craving a tasty snack that’s both healthy and easy to make? You’re in luck! My Loaded Sweet Potato Nachos pack a flavor punch using simple
For this tasty dish, you will need: - 1 pound boneless chicken thighs, cut into bite-sized pieces - 1/2 cup honey - 1/4 cup low-sodium soy sauce - 4 cloves garlic, minced - 1 tablespoon freshly grated ginger - 1 tablespoon apple cider vinegar - 2 tablespoons cornstarch - 2 tablespoons olive oil - Salt and pepper to taste These ingredients mix to create a sweet and savory flavor. The chicken thighs stay juicy, while the honey gives a nice glaze. To make your chicken bites even better, consider these garnishes: - Sesame seeds - Chopped green onions These garnishes add color and crunch. They also bring more flavor to the dish. Here are the tools you will need: - A medium mixing bowl - A large skillet - A whisk for mixing - A separate bowl for coating the chicken Having these tools ready makes cooking smooth. You’ll find it easier to create those delicious honey garlic chicken bites! First, grab a medium mixing bowl. In it, combine 1/2 cup honey, 1/4 cup low-sodium soy sauce, 4 minced garlic cloves, 1 tablespoon freshly grated ginger, and 1 tablespoon apple cider vinegar. Whisk these ingredients together until they blend well. This sauce is key to the flavor. Set it aside for now. Next, take 1 pound of boneless chicken thighs. Cut them into bite-sized pieces. Place the chicken in a separate bowl. Sprinkle 2 tablespoons of cornstarch, salt, and pepper over the chicken. Toss the pieces until they are evenly coated. This step helps the chicken get a nice, crispy texture when cooked. Now, heat a large skillet over medium-high heat. Add 2 tablespoons of olive oil and let it get hot. Once the skillet is ready, add the coated chicken pieces in a single layer. Cook them for about 5-7 minutes. Turn the chicken occasionally until it turns golden brown and is cooked through. After cooking, reduce the heat to medium. Pour the honey garlic sauce you made earlier over the chicken. Stir gently to coat all the pieces. Let it simmer for an extra 2-3 minutes, stirring often, until the sauce thickens a bit. Finally, remove the skillet from the heat. Let the chicken bites rest for about a minute. This allows the sauce to settle. Before serving, sprinkle sesame seeds and chopped green onions on top for a nice finish. Enjoy these tasty bites! To get the best texture, use boneless chicken thighs. They stay juicy and tender. Cut them into bite-sized pieces for even cooking. Coat the chicken with cornstarch before cooking. This helps create a nice, crispy layer. Make sure the skillet is hot enough before adding the chicken. This step seals in moisture and gives a golden brown color. To boost flavor, use fresh ingredients. Fresh garlic and ginger add a bright taste. You can also experiment with different soy sauce types. For a sweeter flavor, add more honey. If you like a tangy twist, a splash of lemon juice works great. Garnishing with sesame seeds and green onions adds both taste and color. One common mistake is overcrowding the skillet. This can make the chicken steam instead of sear. Cook in batches if needed. Another mistake is not letting the chicken rest. Allowing it to sit helps the sauce soak in better. Lastly, avoid skipping the cornstarch coating. This step is crucial for achieving that crispy outside. {{image_4}} You can add veggies to your honey garlic chicken bites. Broccoli, bell peppers, and snap peas work great. Chop the vegetables into small pieces. Toss them in with the chicken during cooking. This adds color and nutrition. You can also steam the veggies separately and serve them on the side. If you like heat, try adding Sriracha sauce. Mix a tablespoon or two into the honey garlic sauce. This gives your dish a spicy kick. Adjust the amount based on your taste. You can also drizzle Sriracha on top when serving for extra heat. Want to switch up the protein? You can use shrimp or tofu instead of chicken. Cut the shrimp into bite-sized pieces or cube the tofu. Adjust the cooking times as needed. Shrimp cooks faster, while tofu may need a bit more time to brown. These swaps keep the dish exciting and cater to different diets. After you make honey garlic chicken bites, store any leftovers in an airtight container. Let the chicken cool down first. This helps keep the sauce from getting too thick. Place the container in the fridge. The chicken will stay fresh for up to three days. If you want to keep it longer, consider freezing it. When you are ready to enjoy your leftovers, reheating is easy. You can use a microwave or a skillet. If using a microwave, place the chicken on a microwave-safe plate. Heat it in short bursts, around 30 seconds at a time. Stir in between to avoid hot spots. If you prefer the skillet, add a little olive oil. Heat on medium until warmed through, about five minutes. This keeps the bites crispy. To freeze honey garlic chicken bites, place them in a freezer-safe bag or container. Make sure to remove as much air as possible. This helps prevent freezer burn. You can freeze them for up to three months. When you’re ready to eat, thaw in the fridge overnight. Then, reheat as mentioned above. Enjoy a quick meal that tastes fresh! To make the chicken crispier, coat each piece well with cornstarch. This adds a nice crunch. Heat the skillet until it's hot before adding the chicken. Avoid crowding the pan. Cook in batches if needed. This helps the chicken brown evenly and gets that perfect crispy texture. Yes, you can use chicken breasts. They will work well in this recipe. Just cut them into bite-sized pieces like the thighs. Breasts may cook a bit faster, so keep an eye on them. Adjust the cooking time to avoid drying them out. Honey garlic chicken bites go great with many sides. Here are a few ideas: - Steamed broccoli - Rice or quinoa - Coleslaw - Roasted vegetables - Garlic bread These sides complement the sweet and savory flavors of the chicken. Enjoy mixing and matching! This article covered how to make honey garlic chicken bites. We went over the main ingredients, optional garnishes, and the tools you need. I shared steps to prepare the marinade and coat the chicken. We also discussed tips for texture, flavor, and avoiding common mistakes. You can add veggies or spice it up, too. Remember to store leftovers well and reheat them properly. Enjoy creating this dish and share it with friends for fun meals!
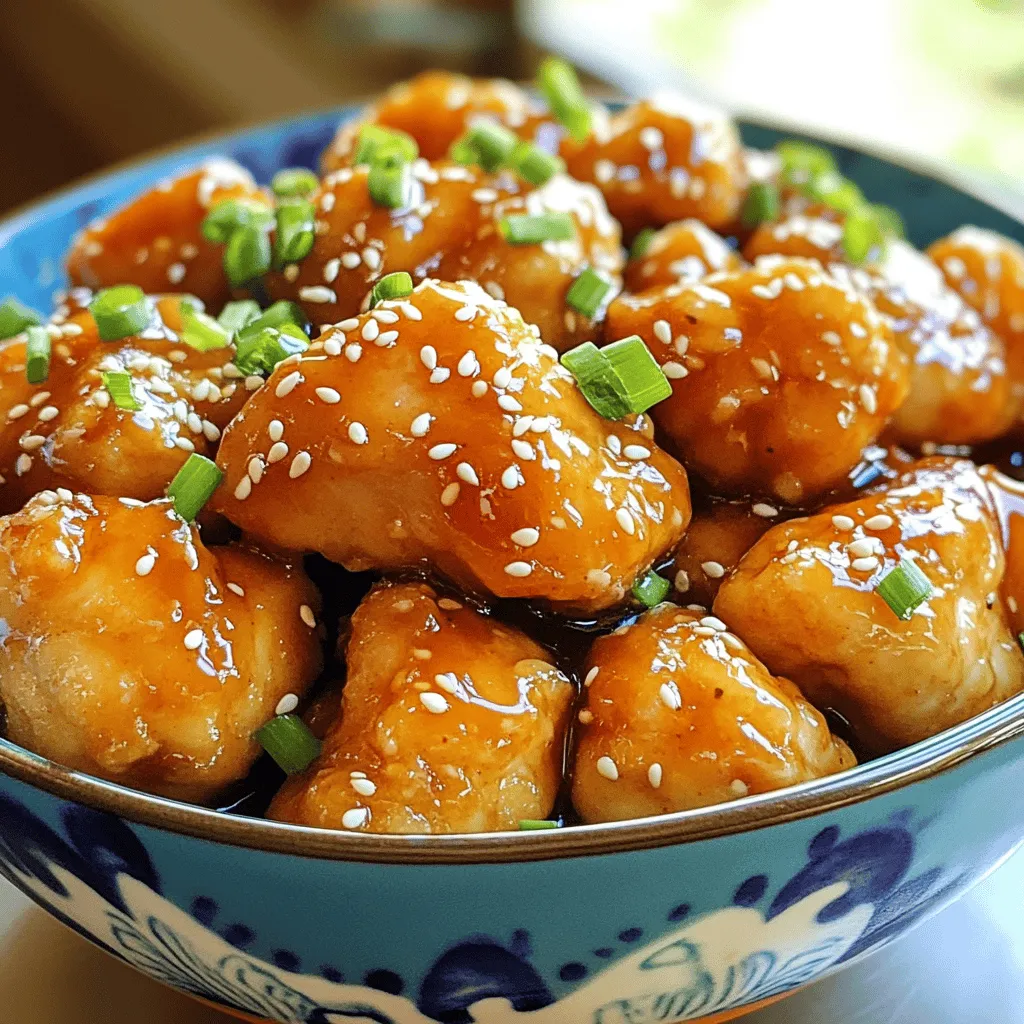
Honey Garlic Chicken Bites Tasty and Easy Recipe
Are you ready for a simple yet delicious meal? Honey Garlic Chicken Bites are your answer! This tasty dish mixes sweet honey and savory garlic
- 12 large jalapeño peppers - 200g chorizo sausage, finely chopped - 1 cup cream cheese - 1 cup shredded sharp cheddar cheese - 1/2 cup shredded mozzarella cheese - 2 cloves garlic, minced - 1 teaspoon smoked paprika - 1 teaspoon onion powder - Salt and freshly ground black pepper - Fresh cilantro (for garnish) - Olive oil (for drizzling) Tips for selecting fresh jalapeños Choose jalapeños that are firm and bright green. Look for smooth skin and no blemishes. The size should be large enough to hold the filling well. Best types of chorizo to use Use Spanish chorizo for a smoky flavor. Mexican chorizo gives a spicy kick. Choose one that is fresh and not too greasy. Choosing the right cheese for stuffing Cream cheese creates a smooth base. Sharp cheddar adds a rich taste. Mozzarella gives a nice stretch and melts well. Mixing these cheeses makes the filling creamy and tasty. - Preheat the oven to 375°F (190°C). - Slice each jalapeño in half lengthwise. - Use a small spoon to scoop out the seeds. When you cut the jalapeños, watch for the heat. Removing the seeds and membranes helps lower the spiciness. If you like more heat, leave some seeds in. - Heat a skillet over medium heat. - Add 200g of finely chopped chorizo. - Cook for about 5-7 minutes until browned. - Stir in 2 minced garlic cloves and cook for 1 more minute. Cooking the chorizo adds flavor to the filling. The garlic brings a nice aroma that makes your kitchen smell amazing. - In a bowl, mix 1 cup of softened cream cheese, 1 cup of shredded sharp cheddar, and 1/2 cup of shredded mozzarella. - Add the chorizo mixture, 1 teaspoon of smoked paprika, 1 teaspoon of onion powder, and salt and pepper. - Mix everything well until it’s smooth. A good filling should be creamy and easy to scoop. Make sure all the flavors blend together for the best taste. - Use a spoon to fill each jalapeño half with the cheese mixture. - Pack the filling in well for great flavor. Filling the jalapeños tightly ensures every bite has that delicious mix of cheese and chorizo. - Arrange the stuffed jalapeños on a baking sheet lined with parchment paper. - Drizzle olive oil over each one for added flavor. This oil helps the jalapeños cook evenly and gives them a lovely golden finish. - Bake in the preheated oven for 20-25 minutes. - Watch for the cheese to melt and turn golden brown. The jalapeños should be tender when done. The cheese will be bubbly and inviting. - Let them cool for a few minutes before serving. - Top with freshly chopped cilantro for color and taste. These steps turn jalapeños into irresistible bites you will love to share! To keep your jalapeños firm, don’t overbake them. Bake for 20-25 minutes, checking for softness. For a golden cheese crust, drizzle a little olive oil on top before baking. I love how this enhances the flavor and gives a nice finish. For gatherings, arrange the stuffed jalapeños on a colorful platter. Add lime wedges and extra cilantro for a fresh look. Serve with dipping sauces like ranch or salsa for a tasty contrast. Everyone loves a little extra dip! To make your jalapeños milder, remove all the seeds and membranes. For a spicier kick, leave some seeds in. You can also try different fillings, like ground beef or black beans, to mix up the flavors. Each option brings a new twist to these bites! {{image_4}} You can change the taste of your cheese and chorizo stuffed jalapeños easily. Try adding fresh herbs like parsley or cilantro to the filling. These herbs boost the flavor and add freshness. You can also mix in spices like cumin or cayenne for a kick. If you want to try different sausages, use Italian sausage or spicy sausage. Each will give a unique twist to the dish. If you want a vegetarian version, replace chorizo with black beans or lentils. These options add protein while keeping the dish hearty. You can also use tofu crumbles, which soak up flavors well. For gluten-free choices, ensure your sausage is gluten-free. Use gluten-free breadcrumbs if you want a crunch on top. Always check labels to be sure. Grilling jalapeños gives them a smoky flavor. Just prepare them the same way, then place them on the grill. Cook them until the cheese melts and the peppers soften. For a healthier option, try air frying. Set the air fryer to 375°F (190°C) and cook for about 10-15 minutes. This method cuts down on oil but keeps them crispy and delicious. To keep your stuffed jalapeños fresh, store them in the fridge. Place them in an airtight container. They will stay good for about 3-5 days. If you want to save them for longer, freezing is a great option. Wrap each jalapeño in plastic wrap. Then, place them in a freezer-safe bag. They can last up to 3 months in the freezer. When you’re ready to enjoy them again, reheating is key. The best way to reheat stuffed jalapeños is in the oven. Preheat your oven to 350°F (175°C). Place them on a baking sheet for about 10-15 minutes. This keeps them crispy and prevents sogginess. If you’re in a hurry, you can use the microwave. Heat them for about 1-2 minutes. Microwaving is quick but may make them a bit soft. How long do stuffed jalapeños last in the fridge? Stuffed jalapeños last about 3 to 5 days in the fridge. Store them in a tight container. This keeps them fresh and tasty. Can I prepare them ahead of time? Yes, you can prepare stuffed jalapeños ahead of time. Just fill and cover them, then chill. Bake them when you are ready to serve. What’s the best way to serve them warm? Serve them warm right out of the oven. Set them on a nice platter and add a garnish of cilantro. This makes them look great and taste even better. How do I know when they are fully cooked? Jalapeños are fully cooked when they are tender and the cheese is melted. Look for a golden brown color on top. Can I make them in advance and freeze them? Yes, you can freeze stuffed jalapeños. Just freeze them before baking. Wrap them well to avoid freezer burn. Bake them directly from the freezer when you are ready. What can I use instead of cream cheese? You can use ricotta cheese or Greek yogurt. Both will give a nice creamy texture. Are there any low-fat cheese alternatives? Yes, you can use low-fat cream cheese or reduced-fat cheddar. These options help cut calories while still tasting good. Stuffed jalapeños are fun to make and a hit at any gathering. We covered key ingredients, tips for selection, and step-by-step cooking instructions. You can adjust flavors, storage tips, and reheating methods to fit your taste. Experiment with variations to keep things fresh. With these ideas, you can create crowd-pleasing snacks that everyone will enjoy. Dive in and make them your own!
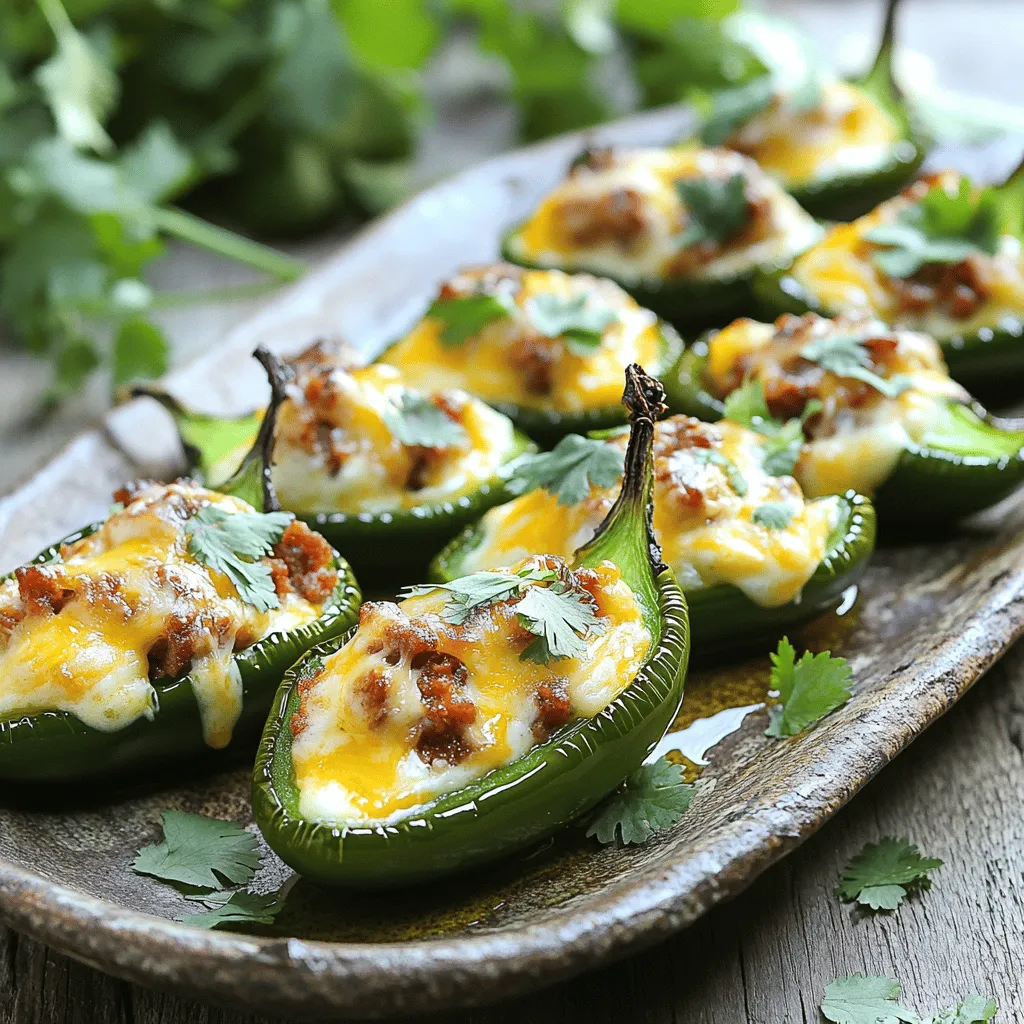
Cheese and Chorizo Stuffed Jalapeños Irresistible Bites
If you love bold flavors, then Cheese and Chorizo Stuffed Jalapeños are for you! These spicy bites combine the heat of fresh jalapeños with the
To make the best elote, you need these key ingredients: - 4 ears of fresh corn, husked - 1/2 cup mayonnaise - 1/2 cup sour cream - 1 teaspoon chili powder - 1/2 teaspoon smoked paprika - 1/4 cup crumbled cotija cheese - 1/4 cup fresh cilantro, finely chopped - 1 lime, juiced - Salt and freshly cracked black pepper, to taste These ingredients create a creamy and flavorful sauce that pairs perfectly with the sweet grilled corn. The cotija cheese adds a salty kick, while the lime juice brightens the dish. You can also add these ingredients for extra flavor: - Garlic powder for a savory touch - Hot sauce if you like heat - Avocado for creaminess and richness - Other herbs, like parsley or chives, for a fresh twist These options let you customize elote to fit your taste. Experiment and have fun with it! To make elote, gather these tools: - A grill or grill pan for cooking - A basting brush or spatula for spreading sauce - A medium mixing bowl for the elote sauce - A whisk to mix the ingredients Having the right tools will make your cooking experience smoother. Enjoy the process of making this fun dish! Start with fresh corn. Husk four ears, removing all silk. Rinse the corn under cool water. This helps remove any dirt. Pat the corn dry with a towel. Dry corn grills better. Preheat your grill to medium-high heat. This step is key for great flavor. In a bowl, mix 1/2 cup mayonnaise and 1/2 cup sour cream. Add 1 teaspoon chili powder and 1/2 teaspoon smoked paprika. This mix adds a nice kick. Squeeze in the juice of one lime for brightness. Season with salt and pepper to taste. Whisk all the ingredients until smooth and creamy. Set this sauce aside for later. Once the grill is hot, place the corn right on the grates. Grill the corn for 10 to 12 minutes. Turn the corn every few minutes. This ensures even cooking and charred spots. Look for tender kernels with nice grill marks. Remove the corn from the grill and let it cool for a minute. This will make it easier to handle. To get the best flavor from elote, always use fresh corn. Fresh corn gives you sweet and juicy kernels. Grill the corn until it has nice charred spots. This adds a smoky flavor that elevates the dish. When you make the sauce, mix the mayonnaise and sour cream well. This gives a creamy base for the spices. Remember to add lime juice to brighten the flavors. The chili powder and smoked paprika add warmth and depth. One common mistake is grilling corn with the husks on. This prevents the kernels from charring properly. Also, do not skip the lime juice. It brings out the sweetness of the corn. Avoid overcooking the corn. If you cook it too long, it can become mushy. Be sure to coat the corn evenly with the sauce. This ensures every bite is rich and flavorful. Lastly, don’t forget to season with salt and pepper. This simple step makes a big difference. For a beautiful display, use a colorful platter. Arrange the corn so it looks inviting. Sprinkle extra cilantro on top for a pop of green. Add lime wedges on the side for extra zing. You can also sprinkle a bit more chili powder for a vibrant look. Serve the corn hot, as it tastes best fresh off the grill. Your guests will love the bright colors and flavors! {{image_4}} Traditional elote is simple yet full of flavor. It uses grilled corn, mayo, cheese, and spices. The classic way adds lime juice and chili powder. You coat the corn with a rich sauce to enhance its taste. Modern twists can include a variety of toppings. Some use different cheeses or add hot sauce for heat. Others swap mayo for avocado or yogurt for a fresh feel. This keeps the dish exciting and allows for personal touches. You can easily make a vegan version of elote. Instead of mayo, use plant-based options like cashew cream or vegan mayo. For the cheese, try nutritional yeast or crumbled tofu. These substitutes keep the creamy texture and flavor intact. You can still add lime juice and chili powder for a zesty kick. This way, everyone can enjoy the delicious taste of elote. Elote varies across Mexico, showcasing local flavors. In some areas, vendors add cheese and spices unique to their region. In Oaxaca, you might find smoky chipotle chili. In Yucatán, they often use a tangy sauce made with sour orange. Each region adds its flair to this beloved dish. These variations reflect the rich culinary culture of Mexico. Exploring these regional styles makes every bite an adventure. If you have leftover elote, store it in an airtight container. Let it cool down first. Place the corn in the fridge within two hours after serving. It will stay fresh for up to three days. Make sure to keep the sauce separate if possible. This helps maintain flavor and texture. To reheat elote, you can use a grill or a skillet. Heat the grill or skillet over medium heat. Place the corn on it for about five minutes. Turn it often to warm it evenly. You can also microwave it, but this may make the corn a bit soggy. If using a microwave, cover it with a damp paper towel for better results. To freeze elote, first, remove the corn from the cob. Place the kernels in a freezer-safe bag. You can also freeze the sauce in a separate container. Be sure to label the bags with the date. The corn can last up to six months in the freezer. When ready to use, thaw it in the fridge overnight and reheat as needed. Elote is a popular Mexican street food made from grilled corn on the cob. It’s usually coated with a mix of mayonnaise, sour cream, chili powder, and cheese. The corn is grilled until it’s tender and smoky. It’s a fun snack that bursts with flavor in every bite. To spice up your elote, add more chili powder to the sauce. You can also use hot sauce for a kick. For more heat, try adding diced jalapeños or a sprinkle of cayenne pepper. Adjust the spice level to match your taste. Yes, you can cook elote in the oven. Preheat your oven to 400°F. Wrap the corn in foil and bake for 20 to 25 minutes. You can also broil it for a few minutes to get a charred effect. Just keep an eye on it to avoid burning. You can find authentic elote at street fairs, food trucks, and festivals in Mexico. Many Mexican restaurants in the U.S. offer it too. You can also make it at home for a fun cooking project. Cotija cheese is the best choice for elote. It has a crumbly texture and a salty flavor that pairs well with the corn. If you can’t find cotija, you can use feta cheese as a substitute. In this post, we explored the essential ingredients and steps for making elote. We discussed tips for the best flavor and common mistakes to avoid. You learned about variations and storage options, ensuring your elote stays delicious. I encourage you to try making this dish at home. With a few simple steps and some creativity, you can enjoy a tasty treat anytime. Elote is not just food; it’s a fun experience to share!
Elote Mexican Street Corn Flavorful and Fun Recipe
Are you ready to take your taste buds on a vibrant journey? Elote, or Mexican street corn, bursts with flavor and fun! It’s a popular