Appetizers

To make crispy air fryer BBQ chicken tenders, gather these main ingredients: - 1 pound chicken tenders - 1/2 cup of your favorite BBQ sauce These chicken tenders are the star of the dish. They are tender and juicy, perfect for air frying. Next, you need some seasoning to boost the flavor: - 1 teaspoon smoked paprika - 1 teaspoon garlic powder - 1 teaspoon onion powder - Salt and black pepper, to taste This mix brings a nice depth to the chicken. The smoked paprika adds a warm, smoky flavor. Garlic and onion powders give it a savory kick. Finally, we need the coating to give that crispy texture: - 1 cup panko breadcrumbs - 1/2 cup all-purpose flour - 2 large eggs, beaten - Olive oil spray Panko breadcrumbs make the tenders super crunchy. The flour helps the coating stick, and the eggs bind it all together. A light spray of olive oil at the end ensures crispiness. Start by rinsing the chicken tenders under cold water. This step cleans them well. Use paper towels to pat them dry. Make sure they are not wet. Next, season each tender with salt and black pepper. This adds great flavor. Prepare three bowls for breading. In the first bowl, mix the all-purpose flour with smoked paprika, garlic powder, and onion powder. This blend gives a nice taste. In the second bowl, whisk the eggs until they are fully mixed. The third bowl holds the panko breadcrumbs. This will make the tenders crispy. Take a chicken tender and dredge it in the flour mixture first. Shake off any excess flour. Then, dip it into the beaten eggs. Let the extra egg drip back into the bowl. Finally, coat the tender in the panko breadcrumbs. Press gently so they stick well. Repeat for all the chicken tenders. Preheat your air fryer to 400°F (200°C) for about 5 minutes. Lightly spray the air fryer basket with olive oil spray. Arrange the breaded chicken tenders in a single layer. Make sure they do not overlap. This helps them cook evenly. Air fry the tenders for about 8-10 minutes. Flip them halfway through for even browning. They should be golden brown and reach an internal temperature of 165°F (74°C). In the last 2 minutes, brush BBQ sauce over the tops of each chicken tender. Add more sauce if you want a bolder flavor. Once done, take the tenders out of the air fryer and let them rest for a few minutes. This keeps them juicy. Serve them on a platter, garnished with fresh herbs or sliced green onions for an extra pop. Enjoy your crispy and flavorful BBQ chicken tenders! To get that perfect crunch, use panko breadcrumbs. Panko adds a light, airy crunch that regular breadcrumbs can't match. Be sure to coat each tender well. Press the panko onto the chicken so it sticks. Avoid crowding the air fryer basket. Space allows hot air to circulate, making your tenders crispy all around. Choose a BBQ sauce you love. A sweeter sauce balances well with the savory chicken. Brush the sauce on during the last two minutes of cooking. This keeps the sauce sticky and rich without burning. For an extra kick, mix in a bit of hot sauce. That small addition can boost the flavor profile. Don’t skip seasoning the flour mix. Salt and spices enhance the taste of the chicken. Also, check the air fryer temperature. If it's too low, your tenders won’t cook right. Lastly, flipping the tenders halfway is key. This ensures even browning and helps them cook through completely. {{image_4}} You can try many sauces for your chicken tenders. Instead of BBQ, use ranch, honey mustard, or buffalo sauce. Each sauce gives a unique taste. For a sweet touch, try teriyaki sauce. For spicy flavors, sriracha or chipotle sauce works well. Feel free to mix your favorite sauces for a new flavor. Change the seasoning for a new twist. Instead of smoked paprika, try cayenne pepper for heat. Italian seasoning adds a nice herbal flavor, while lemon pepper gives a zesty kick. You can also use a taco seasoning blend for a fun twist. Experiment with different spices to find your favorite mix. If you don’t have chicken tenders, don’t worry! You can use chicken breasts cut into strips. They work just as well. For a lighter option, try turkey tenders. You can also use plant-based chicken substitutes if you prefer a meatless meal. The air fryer will still make them crispy and tasty. You can store leftover chicken tenders in the fridge. Place them in an airtight container. They stay fresh for up to 3 days. Make sure the tenders cool down before sealing them. This helps keep them crispy. To freeze, wait until the chicken tenders are cold. Arrange them in a single layer on a baking sheet. Freeze until solid, then move them to a freezer bag. They last up to 3 months. Label the bag with the date for easy tracking. For the best texture, reheat in the air fryer. Preheat the air fryer to 375°F (190°C). Cook the tenders for about 5 minutes. This keeps them crispy and warm. You can also use an oven, but the air fryer works best. You should air fry chicken tenders for about 8 to 10 minutes. Flip them halfway for even cooking. The tenders will be crispy and golden brown when done. Yes, you can make these tenders gluten-free. Use gluten-free flour and gluten-free panko breadcrumbs. This way, you still get that crispy texture without the gluten. You can serve BBQ chicken tenders with many sides. Here are some tasty options: - French fries - Coleslaw - Corn on the cob - Fresh veggies - Garlic bread These sides complement the tenders and make for a great meal. To check if chicken tenders are done, use a meat thermometer. The internal temperature should reach 165°F (74°C). The chicken should also be golden brown and crispy on the outside. If it looks juicy and feels firm, it’s ready to eat. This blog post covered how to make crispy BBQ chicken tenders. We explored key ingredients, including seasonings and coatings, to boost flavor. I provided clear steps for prepping, breading, and air frying the chicken. You also learned tips to ensure crispiness and enhance BBQ taste while avoiding common mistakes. In the end, these tenders are versatile and easy to customize. Enjoy experimenting with different sauces and sides to make this dish your own. Happy cooking!
Air Fryer BBQ Chicken Tenders Crispy and Flavorful
Are you ready to enjoy crispy and flavorful Air Fryer BBQ Chicken Tenders? I’ll guide you through each step, from prepping the chicken to the
To make Air Fryer Garlic Butter Salmon Bites, gather these ingredients: - 1 lb fresh salmon fillet, skin removed and cut into bite-sized cubes - 3 tablespoons unsalted butter, melted - 4 cloves garlic, finely minced - 1 tablespoon fresh parsley, washed and chopped - 1 teaspoon lemon zest, freshly grated - 1/2 teaspoon paprika (smoked or sweet based on preference) - Salt and freshly ground black pepper to taste - Lemon wedges, for serving If you need to change an ingredient, here are some ideas: - Use olive oil instead of unsalted butter for a different flavor. - Substitute garlic powder for fresh garlic if you are short on time. - Dried parsley can replace fresh parsley if needed, but fresh gives a better taste. - Instead of lemon zest, use the juice of half a lemon for brightness. - You can use other fish, like trout or cod, if salmon is not available. Choose the best salmon for your dish with these tips: - Look for bright, vibrant colors. Fresh salmon should look pink or orange. - Check for a fresh, clean smell. There should be no fishy odor. - Feel the flesh; it should be firm and bounce back when pressed. - Ask your fishmonger for wild-caught salmon for the best flavor. - If possible, choose salmon with clear eyes and shiny skin; this indicates freshness. Start by gathering your ingredients. In a medium bowl, combine these items: - 3 tablespoons unsalted butter, melted - 4 cloves garlic, finely minced - 1 tablespoon fresh parsley, chopped - 1 teaspoon lemon zest - 1/2 teaspoon paprika - Salt and black pepper to taste Mix them well. This garlic butter marinade will give the salmon a rich flavor. The butter melts and combines with the garlic and spices, creating a fragrant mix. Take your fresh salmon fillet and cut it into bite-sized cubes. You need about 1 pound. Gently add the salmon cubes to the bowl with the marinade. Use a spatula or spoon to coat each piece. This step is key for flavor. Let the salmon marinate for 15 to 20 minutes. This time allows the flavors to soak in while you preheat your air fryer. Preheat your air fryer to 380°F (190°C) for about 5 minutes. This helps the salmon cook evenly. Once preheated, carefully place the marinated salmon bites in the air fryer basket. Make sure they do not touch each other. This keeps them from sticking and promotes even cooking. Air fry the salmon for 8 to 10 minutes. Halfway through, pause the air fryer to flip the bites. This step ensures browning on all sides. The salmon is done when it turns light golden and is fully cooked. Cooking times may vary, so keep an eye on it. When finished, remove the bites carefully. Place them on a serving plate. Garnish with extra parsley and lemon wedges for a fresh touch. Enjoy the garlic butter taste right away! To cook the salmon bites evenly, arrange them in a single layer. Make sure they do not touch each other. This helps hot air circulate freely and cooks each piece perfectly. If you have many bites, cook them in batches. It’s better than overcrowding the basket. Overcooking salmon can dry it out. To prevent this, check the salmon at the 8-minute mark. The fish should flake easily with a fork. If it still looks raw in the center, add a minute or two. Remember, it will continue to cook after you take it out. Always preheat your air fryer. This helps the salmon get that nice golden color. Adjust the cooking time based on the size of your salmon cubes. For smaller pieces, reduce the time slightly. Lastly, clean your air fryer basket after each use to keep it in good shape. {{image_4}} You can switch up the flavor of your salmon bites by adding herbs. Try dill for a fresh taste. Basil gives a sweet note, while thyme adds warmth. You can also use spices. Chili flakes bring heat, and cumin adds depth. If you don’t have an air fryer, no problem! You can bake your salmon bites in the oven. Set it to 400°F (200°C) and cook for 12-15 minutes. Broiling is another option. It gives a nice char; just keep an eye on it. You can also pan-sear the salmon in a skillet for a crispy crust. These salmon bites shine when served with fresh sides. A garden salad adds crunch and brightness. Pair with rice or quinoa for a filling meal. Don’t forget lemon wedges! They add a zesty kick. You can also serve them with a creamy dip, like tzatziki or garlic aioli, for extra flavor. After you enjoy your salmon bites, save the leftovers. Place them in an airtight container. They can stay fresh in the fridge for up to three days. Make sure they cool down before sealing the container. This helps keep them tasty and safe. To reheat your salmon bites, use the air fryer again. Set it to 350°F (175°C) for about 4-5 minutes. This method helps the salmon regain its crispy texture. You can also use a microwave, but be careful. Microwaving can make the salmon dry. You can freeze salmon bites if you have too many. Wrap them tightly in plastic wrap and then in foil. This helps avoid freezer burn. They can last up to three months in the freezer. When ready to eat, thaw them in the fridge overnight. Then, reheat as mentioned above. Refrigerating is best for short-term storage. Freezing works for longer storage needs. You can pair these salmon bites with many sides. Here are some great options: - Steamed vegetables: Broccoli or green beans add color and nutrition. - Rice or quinoa: These grains soak up the flavors well. - Salad: A fresh green salad with light dressing complements the dish. - Mashed potatoes: Creamy potatoes balance the garlic butter taste. Salmon is fully cooked when it flakes easily with a fork. Look for a light pink color in the center. The fish should not look raw. Use a food thermometer for best results. Aim for an internal temperature of 145°F (63°C). If it reaches this, you can enjoy it with confidence. Yes, you can use other fish for this recipe. Here are some good alternatives: - Trout: It has a mild flavor and cooks quickly. - Cod: This white fish is flaky and absorbs flavors well. - Tilapia: It is a budget-friendly option with a mild taste. Adjust cooking times based on the thickness and type of fish. Enjoy experimenting with flavors! You learned how to make delicious Air Fryer Garlic Butter Salmon Bites. We covered the key ingredients, cooking steps, and helpful tips to ensure your salmon turns out great. Remember to select fresh salmon, marinate well, and use your air fryer correctly. Feel free to try different herbs and pairings to mix things up. Proper storage also keeps your leftovers tasty. Now, enjoy your cooking and impress your friends with this easy and fun recipe!
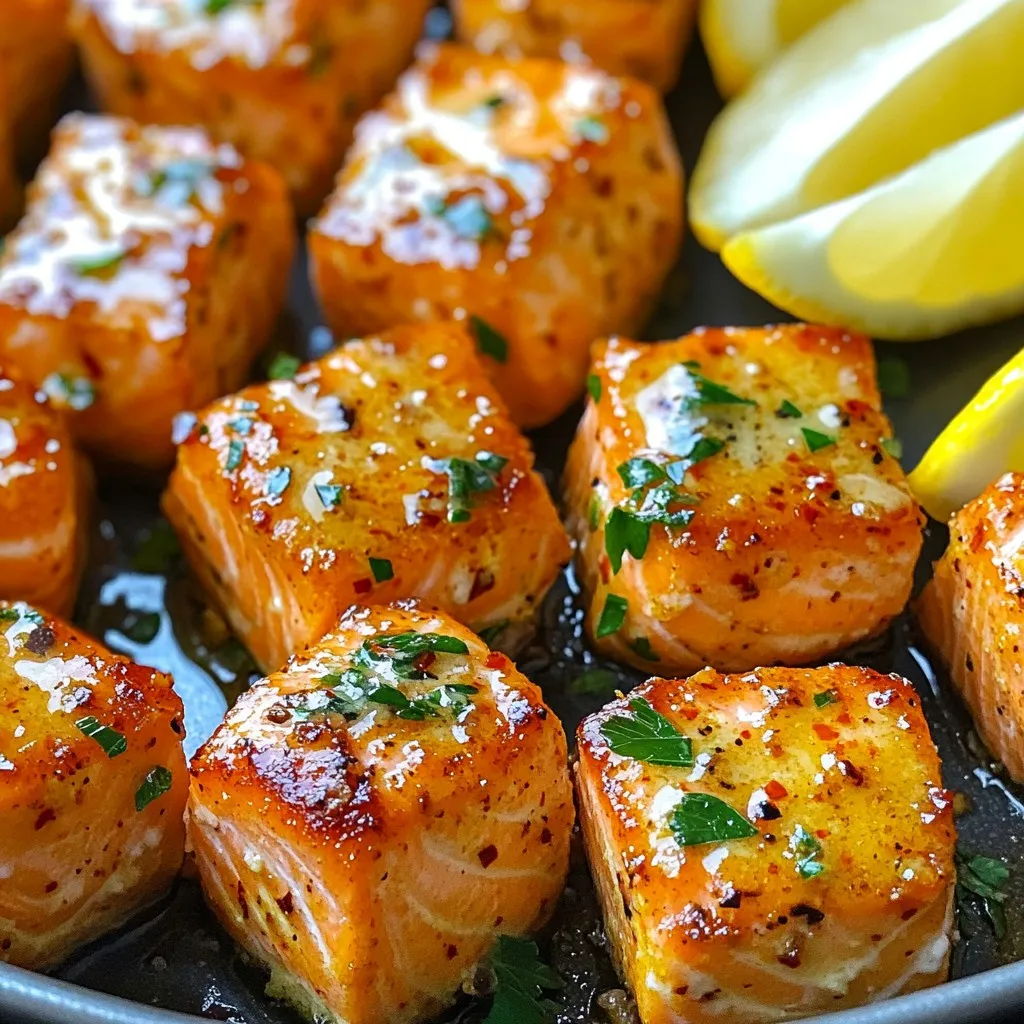
Air Fryer Garlic Butter Salmon Bites Flavorful Dish
Get ready to elevate your dinner game with Air Fryer Garlic Butter Salmon Bites! This flavor-packed dish is not only easy to make, but it
- 1 medium head of cauliflower, cut into bite-sized florets - 1 cup all-purpose flour - 1 cup water - 1 teaspoon garlic powder - 1 teaspoon onion powder - 1 teaspoon paprika - Salt and black pepper, to taste - 1 cup buffalo sauce - 2 tablespoons olive oil - Fresh parsley, chopped (for garnish) You can swap all-purpose flour for gluten-free flour. This makes the dish gluten-free. Instead of buffalo sauce, try barbecue sauce for a milder flavor. You can also use almond milk instead of water for a creamier batter. If you want a kick, add cayenne pepper to the batter. Using fresh ingredients makes a big difference in taste. Fresh cauliflower gives a crisp bite. It holds up well in the air fryer. Fresh herbs, like parsley, add color and flavor at the end. Always check for signs of spoilage when choosing your ingredients. Fresh items ensure your buffalo cauliflower bites taste great. Start with one medium head of cauliflower. Cut it into bite-sized florets. Make sure the pieces are similar in size. This helps them cook evenly. Once cut, rinse the florets under cold water. This step helps remove any dirt. Pat them dry with a clean towel. Removing moisture is key for crispiness. In a large bowl, combine one cup of all-purpose flour. Add one cup of water to the flour. Whisk until the batter is smooth. It should not have lumps. Then, mix in one teaspoon of garlic powder, one teaspoon of onion powder, and one teaspoon of paprika. Sprinkle in salt and freshly cracked black pepper to taste. This blend adds great flavor to the batter. Preheat your air fryer to 400°F (200°C). This step is important for a good cook. Dip each cauliflower floret into the batter. Make sure it is fully coated. Let the excess batter drip off. Lightly spray the air fryer basket with olive oil. Arrange the florets in a single layer. Avoid overcrowding the basket. Cook them for 12-15 minutes. Shake the basket halfway through for even cooking. After cooking, transfer the bites to a bowl. Pour one cup of prepared buffalo sauce over them. Toss gently to coat each piece. For an extra kick, return them to the air fryer for 3-4 more minutes. This helps the sauce set nicely. When done, remove them carefully and sprinkle with chopped parsley. They are now ready to serve! To make your cauliflower bites extra crispy, follow these steps: - Ensure the batter is smooth. No lumps mean better coating. - Dip each floret in the batter. Make sure it's fully coated. - Do not overcrowd the air fryer basket. Space helps crispness. - Shake the basket halfway through cooking. This promotes even browning. - For a final touch, air fry them with buffalo sauce for a few extra minutes. Here are some common pitfalls to watch out for: - Using too much batter can make the bites soggy. - Overcrowding the basket leads to uneven cooking. - Not preheating the air fryer can cause longer cooking times. - Forgetting to shake the basket means less crispy texture. - Skipping the olive oil spray can cause sticking. To elevate your buffalo cauliflower bites, consider these ideas: - Add more spices to your batter, like cayenne or chili powder. - Mix in some grated cheese for a cheesy twist. - Serve with a side of ranch or blue cheese dressing for extra flavor. - Garnish with fresh herbs like cilantro or chives for added freshness. - Try different hot sauces for varied heat levels and flavors. {{image_4}} You can boost the heat in your buffalo cauliflower bites. Try mixing in cayenne pepper or red pepper flakes with the batter. You can also use a hotter buffalo sauce. This adds a kick that spice lovers will enjoy. If you want to experiment, add chopped jalapeños to the batter. This gives extra flavor and heat in every bite. If you need a gluten-free version, use gluten-free flour. Almond flour or rice flour works well in the batter. You can also use cornstarch to coat the cauliflower. This makes the bites crispy without gluten. Make sure to check your buffalo sauce, as some brands contain gluten. Look for certified gluten-free sauces to keep it safe. Buffalo sauce is delicious, but there are many other options. Try using barbecue sauce for a sweet twist. A garlic or teriyaki sauce can add new flavors, too. If you want to keep it light, a lemon herb sauce works well. Experiment with different sauces to find your favorite. Each one brings a unique taste to your cauliflower bites. To store your buffalo cauliflower bites, let them cool first. Then, place them in an airtight container. Keep them in the fridge for up to three days. This way, they stay fresh and tasty. If you want to enjoy them later, don't forget to refrigerate them right after they cool. When you're ready to eat your leftovers, reheating is easy. Preheat your air fryer to 350°F (175°C). Place the cauliflower bites in the basket in a single layer. Heat them for about 5-7 minutes. This method keeps them crispy. You can also use a microwave if you’re in a hurry, but they may not be as crunchy. If you want to freeze the bites, it’s best to do this before adding the buffalo sauce. Place the uncooked, battered cauliflower florets on a baking sheet in a single layer. Freeze them for about an hour. Then, transfer them to a freezer bag. They can last up to three months in the freezer. When you're ready to cook, no need to thaw; just toss them in the air fryer. Cook them for a few extra minutes to ensure they get hot all the way through. To make your cauliflower bites crispy, follow these steps: - Preheat your air fryer to 400°F (200°C). - Use a thin batter made from flour and water. - Coat each floret well but not too thickly. - Avoid overcrowding the air fryer basket; leave space for air to flow. - Shake the basket halfway through cooking to promote even crispiness. These tips help achieve that perfect crunch you crave. Yes, you can use frozen cauliflower. Just thaw it first. Pat it dry with a towel. This step removes excess moisture. Moisture can lead to soggy bites. After drying, follow the same steps as fresh cauliflower. You will still get tasty buffalo bites. Buffalo cauliflower bites pair well with many sides. Consider these options: - Crunchy celery sticks - Carrot sticks - Cool ranch dressing - Zesty blue cheese dressing These sides balance the heat from the buffalo sauce. They also add fun to your meal. Enjoy your tasty bites! This blog post covered everything you need to make tasty buffalo cauliflower bites. We explored the right ingredients, offered step-by-step instructions, and shared useful tips for the best results. You learned about variations, storage tips, and answered common questions. Now, you can enjoy a great snack that’s healthy and easy to make. Remember to use fresh ingredients for more flavor and keep experimenting with your twist on the recipe. Happy cooking!
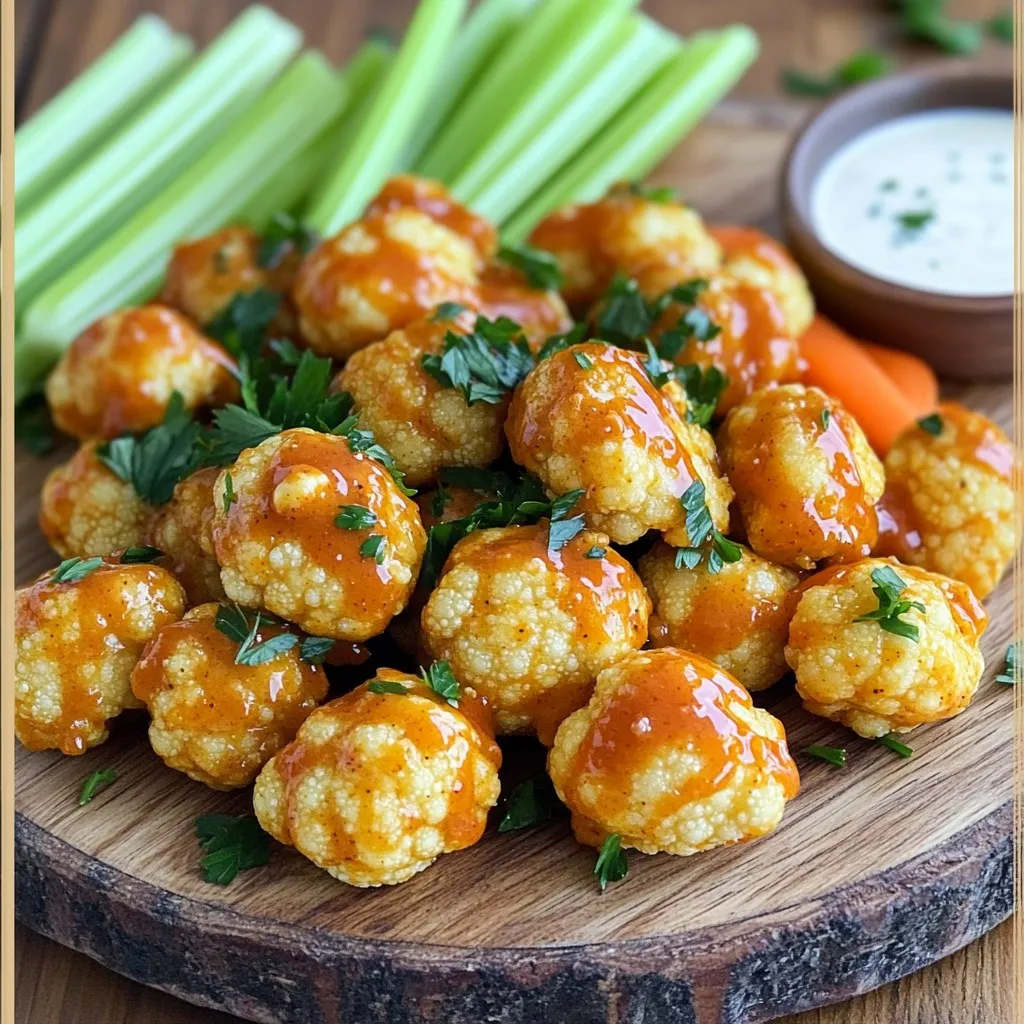
Air Fryer Buffalo Cauliflower Bites Tasty and Simple
Are you ready to try a tasty snack that’s simple to make? Air Fryer Buffalo Cauliflower Bites bring bold flavor and crispy texture right to
- 2 cups cooked chicken, shredded - 1/2 cup buffalo sauce - 1 cup shredded cheddar cheese - 1 tablespoon cream cheese, softened To start, you need the main ingredients. The shredded chicken gives the taquitos their base. I love using rotisserie chicken for quick prep. The buffalo sauce adds heat and flavor. Cheese and cream cheese make them creamy and rich. - 1 teaspoon garlic powder - 1/2 teaspoon onion powder - Salt and pepper to taste Next, we add seasoning. Garlic powder brings a nice taste. Onion powder adds depth. Salt and pepper help balance the flavors. Adjust these seasonings to match your taste buds. - 10 small corn tortillas - Olive oil spray for coating - Fresh cilantro, chopped for garnish (optional) Finally, we need tortillas. Corn tortillas work best for rolling. They hold the filling well. Olive oil spray helps achieve a crispy finish in the air fryer. Consider garnishing with fresh cilantro for a pop of color and flavor. Start by mixing the filling. In a large bowl, combine: - 2 cups cooked chicken, shredded - 1/2 cup buffalo sauce - 1 cup shredded cheddar cheese - 1 tablespoon cream cheese, softened - 1 teaspoon garlic powder - 1/2 teaspoon onion powder - Salt and pepper to taste Use a spatula to mix well. Make sure every bit of chicken gets coated. You want a nice, creamy texture. Taste the mixture. Adjust the salt and pepper if needed. This is your chance to make it just right. Next, we need to warm the corn tortillas. Heat them in the microwave for about 30 seconds. This step is key. Warm tortillas roll better and do not crack. To avoid cracks, handle them gently. Keep them stacked and covered. If you find any cracks, just warm them a bit longer. This will ensure every taquito rolls up perfectly. Now, let's roll the taquitos. Take one tortilla and lay it flat. Spoon about 2 tablespoons of the buffalo chicken mixture on the bottom third. Spread it evenly. Roll the tortilla tightly from the bottom. Tuck in the edges as you roll. This keeps the filling inside. Repeat this until you use all the filling. You should have ten taquitos ready to go. Preheat your air fryer to 375°F (190°C). This helps cook the taquitos evenly. Lightly spray the taquitos on all sides with olive oil. This will help them get crispy and golden. Place the taquitos in the air fryer basket. Leave space between them for air to circulate. Cook for 8-10 minutes. Flip them halfway through for even cooking. When they are golden brown and crispy, they are done. Let them cool for a couple of minutes before serving. Enjoy with your favorite dipping sauce! To get crispy taquitos, use olive oil spray. A light, even coat helps them brown well. Spray all sides of the taquitos before cooking. Preheat your air fryer to 375°F (190°C). Cook for 8-10 minutes. This temperature gives you that golden, crunchy finish. Place taquitos in a single layer in the air fryer basket. Make sure they have space between them. This allows hot air to circulate, cooking them evenly. Flip the taquitos halfway through cooking. This step ensures both sides get crispy and brown. For a fun presentation, arrange the taquitos on a platter. You can place a small bowl of dipping sauce in the center. Ideal sauces include ranch dressing or extra buffalo sauce. You can also sprinkle chopped cilantro on top for a pop of color. This makes your dish look inviting and tasty. {{image_4}} You can swap chicken for turkey or tofu. Both work well in this recipe. Turkey gives a lighter taste. Tofu adds a plant-based option. Use firm tofu and crumble it for best results. For sauces, try ranch or barbecue sauce. These alternatives change the flavor profile while keeping it fun. For gluten-free options, choose corn tortillas. Many brands offer great choices. If you want a vegan version, use tofu and a vegan cream cheese. This keeps the dish creamy without dairy. You can also replace the buffalo sauce with a vegan hot sauce. These swaps make the dish friendly for different diets. Adding spices can kick up the flavor. Try cumin or smoked paprika for a twist. Fresh herbs, like cilantro or parsley, brighten the taste. You can also sneak in veggies like spinach or bell peppers. These add nutrition and color to your taquitos. Mixing in these extras makes your meal unique and delicious. To keep your taquitos fresh, place them in an airtight container. This helps prevent them from drying out. You can store them in the fridge for up to three days. If you want to enjoy them later, freezing is a great option. To reheat your taquitos, the air fryer works best. Preheat your air fryer to 375°F (190°C). Place the taquitos inside and heat for about 5-7 minutes. This keeps them crispy. If you want a quick method, you can use the microwave. But, be aware that they may become soggy. To freeze taquitos, wrap them tightly in plastic wrap. Then, place them in a freezer-safe bag. This helps keep out air and prevents freezer burn. They can last for up to three months in the freezer. When you're ready to eat, thaw them overnight in the fridge. Then, cook them in the air fryer straight from frozen. Just add a couple of extra minutes to the cooking time for the best results. Yes, you can use store-bought rotisserie chicken. It saves time and adds great flavor. The chicken is already cooked, so you just shred it and mix. This makes your meal prep quick and easy. To make your taquitos spicier, add more buffalo sauce. You can also mix in some diced jalapeños or hot sauce. If you love heat, sprinkle some cayenne pepper into the filling. Adjust the spice to your taste. Pair your taquitos with a side of fresh veggies. Sliced carrots and celery work well. You can also serve them with creamy ranch or blue cheese dressing. A crisp salad or chips are great choices too! Making Buffalo Chicken Taquitos at home is simple and fun. You learned key ingredients like chicken, buffalo sauce, and spices. Following easy steps for preparation, rolling, and air frying ensures a tasty outcome. I shared tips for perfect crispiness and creative serving ideas. Try variations to cater to dietary needs. Store leftovers properly to enjoy later. Remember, making taquitos is all about creativity and flavor. Enjoy this dish with your friends and family!
Air Fryer Buffalo Chicken Taquitos Easy and Tasty Meal
Craving a quick meal that packs a spicy punch? Let me introduce you to Air Fryer Buffalo Chicken Taquitos! With just a few simple ingredients,
- 1 medium head of cauliflower, cut into bite-sized florets - 1 cup all-purpose flour - ½ cup honey - 4 cloves garlic, minced These ingredients are the stars of your crispy honey garlic cauliflower bites. The cauliflower gives you that nice crunch, while the honey and garlic add sweet and savory flavors that make each bite delicious. - 1 teaspoon garlic powder - 1 teaspoon onion powder - ½ teaspoon smoked paprika - ½ teaspoon salt - ¼ teaspoon black pepper - 1 cup breadcrumbs (preferably panko for extra crunch) These seasonings help elevate the taste of the cauliflower. Garlic powder and onion powder bring depth, while smoked paprika gives a hint of warmth. Panko breadcrumbs are key for that extra crunch we all love. - 2 tablespoons low-sodium soy sauce - 1 tablespoon sesame oil (optional for added richness) - Chopped green onions for garnish - Sesame seeds for garnish Optional ingredients can take your bites to the next level. Soy sauce adds umami, while sesame oil gives a rich flavor. Garnishes like green onions and sesame seeds add color and texture, making your dish look as good as it tastes. - Preheat oven to 425°F (220°C). - Line a baking sheet with parchment paper. This will make cleanup easy. - Combine flour, water, garlic powder, onion powder, smoked paprika, salt, and black pepper. - Whisk until you achieve a smooth, lump-free consistency. This batter will coat the cauliflower well. - Dip each cauliflower floret in the batter. Make sure it's fully coated. - Let excess batter drip off, then roll in breadcrumbs. Place on the lined baking sheet in a single layer. - Bake for 25-30 minutes. Flip the florets halfway to ensure they become crispy and golden. - In a saucepan, combine honey, minced garlic, soy sauce, and sesame oil if you like. - Simmer on medium heat for about 5 minutes. Stir until it thickens slightly. This sauce brings sweet and savory flavors. - Once the cauliflower bites are crispy, transfer them to a bowl. - Drizzle the honey garlic sauce over them and toss gently. Make sure each piece gets coated. - Garnish with chopped green onions and sesame seeds. This adds color and crunch. To make your cauliflower bites crispy, use panko breadcrumbs. Panko gives a light and airy crunch. Regular breadcrumbs can make the bites dense. Make sure you coat each floret evenly with batter. Dip it fully, then let excess batter drip off. After that, roll it in panko. A full coating traps the crunch inside. You can add sesame oil to the honey garlic sauce. This gives a rich depth of flavor that balances the sweetness. If you want a sweeter bite, adjust the honey. Add more honey for a sweeter flavor or less for a lighter taste. For a lovely serve, arrange the cauliflower bites in a small wooden bowl. Drizzle some extra honey garlic sauce on top. Then, sprinkle chopped green onions and sesame seeds for a pop of color. This makes the dish look more inviting and appetizing. {{image_4}} If you need a gluten-free option, use almond flour or chickpea flour in place of all-purpose flour. Both give a nice texture and flavor. For a vegan alternative to honey, try maple syrup or agave nectar. These sweeteners add similar sweetness without animal products. You can spice things up by adding cayenne or turmeric to the batter. A pinch of cayenne brings heat, while turmeric adds a warm color and earthy taste. Also, feel free to experiment with different sauces. Try a spicy sriracha sauce or a tangy barbecue sauce instead of the honey garlic. To complement the bites, serve them with a fresh salad or roasted veggies. They also pair well with rice or quinoa for a fuller meal. For dips, try ranch or blue cheese dressing. A simple yogurt dip can also balance the sweetness of the honey garlic sauce. To store your leftover crispy honey garlic cauliflower bites, let them cool first. Place them in an airtight container to keep them fresh. They will stay good in the fridge for about 3 to 4 days. If you want the best taste, eat them within two days. When reheating, I recommend using the oven or an air fryer. This helps them stay crispy. Preheat your oven to 350°F (175°C) and place the bites on a baking sheet. Heat them for about 10 to 15 minutes. Avoid using the microwave, as it can make them soggy. To freeze the cauliflower bites, first let them cool completely. Place them in a single layer on a baking sheet and freeze for about 1 hour. Once frozen, transfer them to a freezer-safe bag. They will keep well for up to 3 months. When ready to eat, thaw them in the fridge overnight and reheat as mentioned above. You can easily make these bites gluten-free. Use almond flour or chickpea flour in place of all-purpose flour. For the breadcrumbs, look for gluten-free options or crush rice crackers as a crunchy alternative. This way, you can enjoy the same crispy texture without gluten. Yes, you can prepare the honey garlic sauce ahead of time. Simply mix the honey, minced garlic, soy sauce, and sesame oil in a saucepan. After cooking, allow the sauce to cool. Store it in an airtight container in the fridge for up to one week. Just reheat it when you’re ready to use it. Several sauces pair great with these cauliflower bites. Consider ranch dressing for a creamy option. Sweet chili sauce adds a nice kick. You can also try a spicy mayo for heat. For something lighter, a yogurt-based sauce with herbs works well too. Mix and match to find your favorite! This blog shows how to make tasty cauliflower bites with a sweet and savory sauce. You learned about key ingredients, like cauliflower and honey, as well as essential seasonings. I provided steps for perfecting the batter and frying the bites to crisp perfection. Don't forget the tips for storage and reheating to keep them fresh. Experiment with different flavors and pairings to make this dish your own. Enjoy these healthy snacks at any meal or gathering!
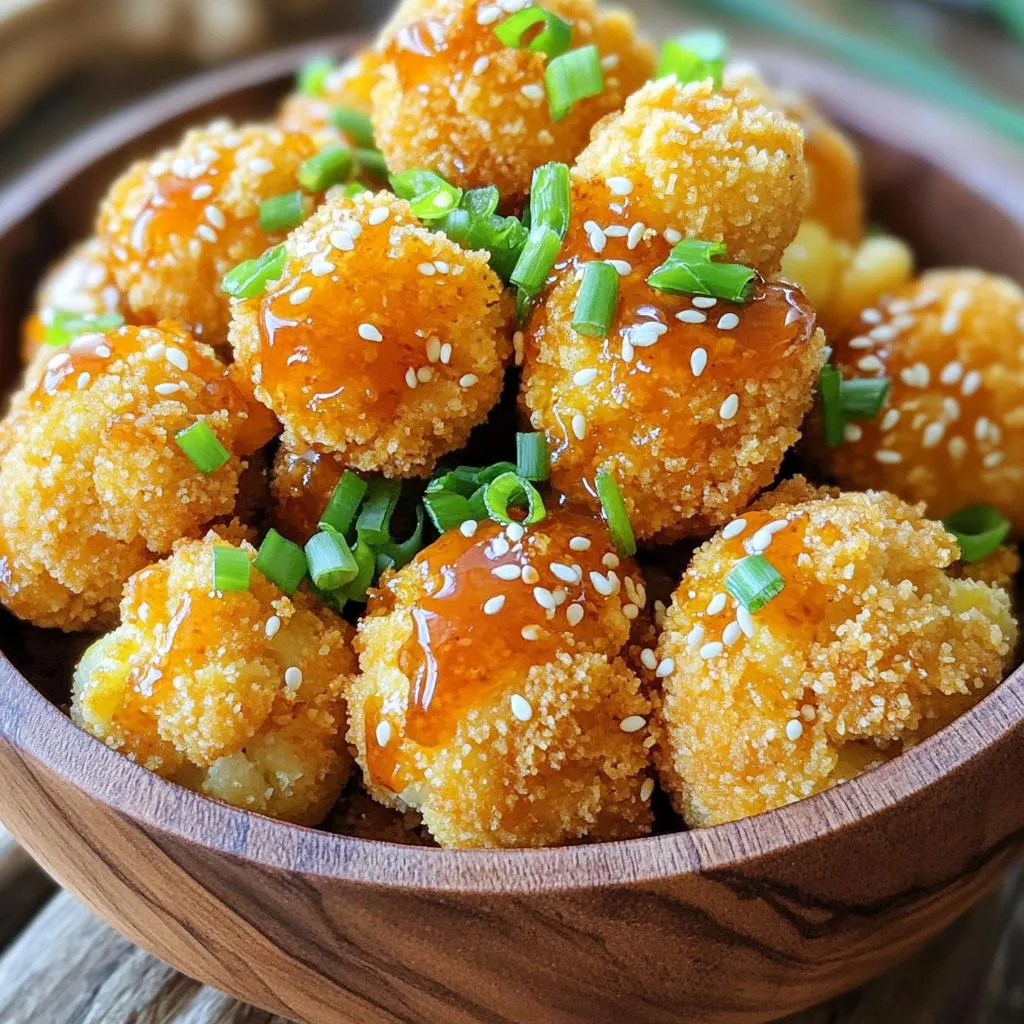
Crispy Honey Garlic Cauliflower Bites Easy Snack Idea
Are you ready for a snack that’s both crispy and sweet? These Crispy Honey Garlic Cauliflower Bites are just what you need! Made with fresh
To make Air Fryer Garlic Parmesan Potato Wedges, you need simple yet tasty ingredients. Here’s what you need: - 4 medium-sized russet potatoes, thoroughly washed and cut into wedges - 3 tablespoons extra-virgin olive oil - 4 cloves of garlic, finely minced - 1 teaspoon dried oregano - 1 teaspoon onion powder - 1 teaspoon smoked paprika - ½ cup freshly grated Parmesan cheese - Salt and freshly ground black pepper to taste - Fresh parsley, chopped, for garnish (optional) These ingredients come together to create a crispy, flavorful snack or side dish. I love using russet potatoes for this recipe. They have a great texture and hold up well in the air fryer. The olive oil helps the spices stick to the wedges and adds a rich flavor. Minced garlic gives a wonderful aroma and taste. You can adjust the spices to your liking. If you love garlic, add more! The Parmesan cheese makes the wedges cheesy and savory. Fresh parsley adds a pop of color and a hint of freshness. Gather these ingredients, and you're on your way to a delicious treat! Start by preheating your air fryer to 400°F (200°C). This takes about 5 minutes. Preheating helps cook the wedges evenly. A hot fryer gives you that perfect crisp. Take 4 medium-sized russet potatoes. Wash them well and cut each into wedges. Aim for uniform size. This helps them cook at the same rate. In a large bowl, add the potato wedges. Drizzle 3 tablespoons of extra-virgin olive oil over them. Toss with your hands or a spatula. Make sure every wedge is coated. Next, add 4 cloves of minced garlic, 1 teaspoon of dried oregano, 1 teaspoon of onion powder, and 1 teaspoon of smoked paprika. Season with salt and pepper to taste. Mix well so every wedge is flavorful. Carefully place the seasoned potato wedges in the air fryer basket. Arrange them in a single layer. Avoid overcrowding to ensure they cook well. If needed, cook in batches. Set your air fryer to cook for 15-20 minutes. Halfway through, pause to shake the basket. This step is key for even cooking and crispiness. Once done, remove the wedges and let them cool for a couple of minutes. This helps them hold their crisp texture. If you like, garnish with fresh parsley for color and taste. Serve warm and enjoy every bite! I love using russet potatoes for this recipe. They have a nice starch level, making them fluffy inside and crispy outside. Look for medium-sized russets that are firm and free from any dark spots. This way, you get the best texture and flavor. To cook the wedges evenly, cut them into similar sizes. Aim for about 1-inch thick wedges. This helps them cook at the same rate. Remember to shake the air fryer basket halfway through cooking. This gives them a nice, even crisp. For extra crunch, make sure the potato wedges are dry before adding oil. After washing them, pat them down with a kitchen towel. Also, avoid overcrowding the basket. Give them space to let hot air circulate. This will help you achieve that perfect crispy texture. Feel free to change up the seasonings! You can add chili powder for heat or rosemary for a fragrant twist. Even try adding some grated cheese like cheddar or feta for a new taste. Get creative and find what your taste buds love. {{image_4}} You can change the flavor by using different cheeses. Try mozzarella for a gooey texture. For a sharp bite, use aged cheddar. You can also mix cheeses. Blend Parmesan with feta or goat cheese for a unique taste. Each cheese brings its character to the dish. Experiment with what you have in your fridge! Want some heat? Add red pepper flakes to the mix. Start with a pinch and taste as you go. You can also use hot sauce in the olive oil. If you prefer milder flavors, skip the spices altogether. Tailor the spice level to match your taste. It’s all about what you enjoy! You can make this dish healthier with a few swaps. Use sweet potatoes for a twist and extra vitamins. Swap olive oil for a light spray to cut calories. Instead of Parmesan, try nutritional yeast for a cheesy flavor without dairy. These changes keep the dish tasty while being mindful of health. Enjoy guilt-free! To keep your garlic Parmesan potato wedges fresh, let them cool first. Place them in an airtight container. Store them in the fridge for up to three days. This keeps them tasty and prevents moisture loss. Avoid stacking them too high. This can cause them to become soggy. When you want to enjoy your leftovers, reheating is key. Preheat your air fryer to 350°F (175°C). Place the wedges in the basket in a single layer. Heat them for about 5 to 7 minutes. This helps restore the crispiness. You can also use a microwave, but they may lose some crunch. If you want to save some for later, freezing works well. Lay the cooled potato wedges flat on a baking sheet. Freeze them until solid, about one to two hours. Then, transfer them to a freezer bag. They can last up to three months in the freezer. When ready to eat, air fry them from frozen. Cook for about 15 to 20 minutes at 400°F (200°C). Enjoy your quick treat! Yes, you can use different potatoes. Yukon Gold or sweet potatoes work well. They have great flavor and texture. Just cut them into wedges like russet potatoes. Adjust the cooking time if needed, as different potatoes may cook at different speeds. Crispiness lasts about 20 to 30 minutes after cooking. To keep them crisp, place them on a wire rack. Avoid stacking them in a bowl, as steam can make them soggy. For best results, serve them right after frying. These wedges are great on their own. Pair them with dips like ranch or ketchup. They also go well with grilled chicken, burgers, or salads. You can serve them as a side dish at a barbecue or party. Yes, you can! Preheat your oven to 425°F (220°C). Arrange the wedges on a baking sheet in a single layer. Bake for 25 to 30 minutes, flipping halfway through. They will still be delicious but may not be as crispy as in the air fryer. Add more spices to the mix for a kick. Consider using cayenne pepper or chili powder. You can also toss in some red pepper flakes for heat. Adjust the amount to suit your taste. Enjoy the spicy twist! You learned how to make tasty garlic Parmesan potato wedges in this article. We covered ingredients, cooking steps, and helpful tips for the best results. You have options for variations, storage, and FAQs to guide you. Enjoy making this dish in the air fryer. It gives a crispy bite everyone loves. Don't be afraid to try new flavors or spices. Get creative with your toppings! Happy cooking!
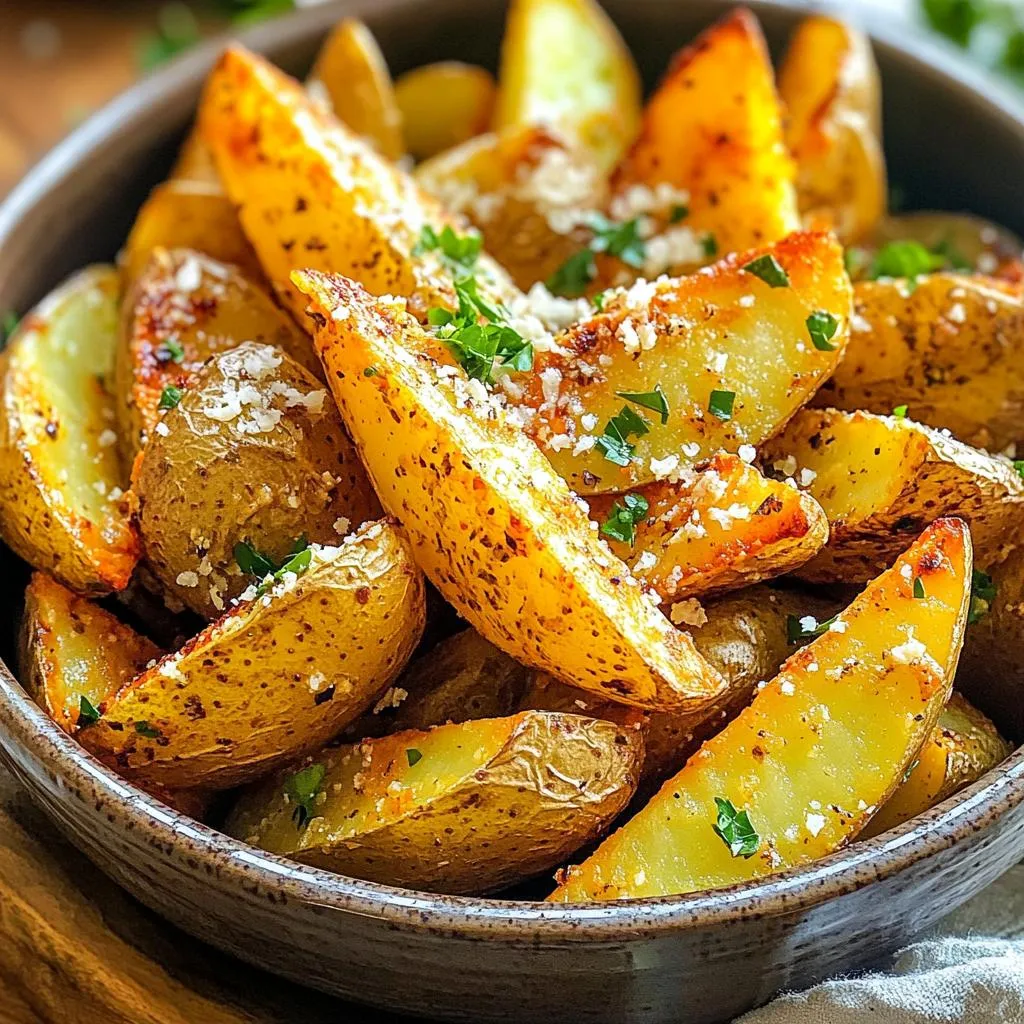
Air Fryer Garlic Parmesan Potato Wedges Simple Joys
Tired of the same old snacks? Let’s spice things up with Air Fryer Garlic Parmesan Potato Wedges! These crispy, golden wedges are easy to make
- 1 medium head of cauliflower - 1 cup all-purpose or gluten-free flour - 1 cup cold water - 1 teaspoon garlic powder - 1 teaspoon onion powder - 1 teaspoon smoked paprika - Salt and pepper to taste - 1 cup buffalo wing sauce - 2 tablespoons extra virgin olive oil - Fresh parsley for garnish To make Air Fryer Buffalo Cauliflower Bites, gather these ingredients. Start with a medium head of cauliflower. Cut it into bite-sized florets. This helps with even cooking. You can also use one cup of flour. All-purpose flour works well, but gluten-free flour is fine too. Use one cup of cold water to mix with the flour. Next, for flavor, add one teaspoon of garlic powder. Onion powder adds a nice touch too, so use one teaspoon. Smoked paprika gives a smoky taste, so add another teaspoon. Season with salt and pepper to your liking. For the sauce, you will need one cup of buffalo wing sauce. This will give the bites that spicy kick. You can adjust the heat by choosing a mild or hot sauce. Finish with two tablespoons of extra virgin olive oil for a rich flavor. Don’t forget fresh parsley to sprinkle on top. This adds color and freshness to your dish. - Rinse and dry the florets. - Cut into bite-sized pieces. Start by rinsing the cauliflower under cold water. This helps remove dirt and makes it clean. After that, dry the florets with a clean towel. This step is key for the batter to stick well. Next, cut the cauliflower into bite-sized pieces. Aim for uniform sizes so they cook evenly. - Mixing dry ingredients. - Adding cold water for consistency. In a large bowl, mix the flour, garlic powder, onion powder, smoked paprika, salt, and pepper. These spices add great flavor. Once mixed well, slowly add the cold water. Stir until you have a smooth batter. It should be thick but pourable, like a pancake batter. - Dipping cauliflower in batter. - Arranging in the air fryer basket. - Cooking time and temperature. Take each cauliflower piece and dip it into the batter. Make sure it’s fully coated. Shake off any extra batter to avoid clumps. Preheat your air fryer to 400°F (200°C) for about 5 minutes. Lightly spray the basket with cooking spray to prevent sticking. Place the battered cauliflower in a single layer. Cook for 10 minutes, shaking the basket halfway through for even cooking. - Transferring to a bowl. - Coating with buffalo sauce. When the cauliflower bites are golden and crispy, transfer them to a bowl. Pour the buffalo wing sauce over them while warm. Toss gently to ensure each piece is coated well. The sauce gives them that signature spicy flavor. - Returning to the air fryer. - Crisping up the coated bites. Now, put the coated cauliflower bites back into the air fryer basket. Air fry them for another 5 minutes. This step helps the sauce caramelize and makes the bites extra crispy. - Presentation ideas. - Recommended dipping sauces. Carefully take the bites out of the air fryer. Drizzle them with olive oil for extra flavor. Sprinkle freshly chopped parsley on top for a nice touch. Serve these bites on a platter with celery sticks. A small bowl of ranch or blue cheese dressing pairs well for dipping. This makes your dish not only tasty but also eye-catching! To get that perfect crunch, preheat your air fryer to 400°F (200°C). This step helps the cauliflower get crispy and golden. The heat creates a nice outer layer, sealing in moisture. Airflow is key in the air fryer. Make sure not to overload the basket. This allows hot air to circulate, cooking the bites evenly. Choosing the right buffalo sauce is crucial for flavor. Some sauces are hotter than others. If you want a milder taste, look for sauces labeled as "mild" or "medium." You can also mix in some ranch dressing or yogurt to tone down the heat. To coat the cauliflower evenly, dip each floret fully into the batter. Make sure each piece is covered well. After dipping, gently shake off any extra batter. This step stops clumps from forming and gives you a nice, even coating. If you notice clumps, you can use a fork to break them apart before cooking. {{image_4}} You can change the coating to suit your taste. Try using panko breadcrumbs for a crunchier texture. Panko gives a great bite. You can mix it with spices for extra flavor. For a vegan option, substitute the flour with chickpea flour. This creates a light batter that holds well. Want to add a cheesy taste? Try adding nutritional yeast to the batter. It gives a nice umami kick without dairy. You can also experiment with spices like cayenne or cumin. Adding these spices can create a unique twist on the classic flavor. These bites are perfect with different sauces. Pair them with ranch or blue cheese for dipping. You can also use a spicy aioli for a kick. If you want to be fancy, serve them on a salad. They make a fun appetizer or a tasty topping for greens. To keep your buffalo cauliflower bites fresh, store them in an airtight container. Place a paper towel in the container to absorb moisture. This helps maintain their crispiness. Your leftover bites will stay good for up to three days. When ready to eat, try to reheat them instead of eating cold. To reheat your bites, use an air fryer or oven. Preheat the air fryer to 350°F (175°C) and cook for about 5 minutes. This method helps keep them crispy. If using an oven, place them on a baking sheet. Bake at 375°F (190°C) for 10 minutes. Avoid using the microwave, as it can make them soggy. To freeze your buffalo cauliflower bites, first let them cool completely. Arrange them in a single layer on a baking sheet. Freeze for about an hour until solid. Then, transfer them to a freezer-safe bag. They can last for up to three months. To thaw, place them in the fridge overnight. Reheat using the methods above for best results. Yes, you can make this recipe gluten-free. Just substitute the all-purpose flour with gluten-free flour. Many brands offer great options that work well. Look for a flour blend that is designed for baking. It will help keep the texture light and crispy. To keep the batter on your cauliflower, dry the florets well after rinsing. Excess moisture can make the batter slide off. Make sure to coat each piece evenly but not too thick. You can also let the coated florets sit for a few minutes before air frying. This helps the batter stick better. Yes, you can bake them. Preheat your oven to 425°F (220°C). Arrange the battered cauliflower on a baking sheet lined with parchment paper. Bake for about 25-30 minutes, flipping halfway through. Keep an eye on them to make sure they crisp up nicely. To boost the heat, use a hotter buffalo sauce. You can also add cayenne pepper to the batter for extra kick. Another option is to toss the finished bites in a bit of hot sauce right before serving. This gives a fresh burst of flavor. To wrap up, we covered how to make crispy buffalo cauliflower bites. We discussed essential ingredients like cauliflower, flour, and spices. You learned the step-by-step instructions, plus tips for crispiness and storage. Experiment with flavors and dipping options to make them your own. Enjoy these bites as a snack or appetizer. With a few simple steps, you can impress your friends or family with this tasty dish.
Air Fryer Buffalo Cauliflower Bites Tasty Snack Recipe
Are you craving a tasty snack that’s easy and healthy? Look no further! My Air Fryer Buffalo Cauliflower Bites are a perfect choice. These delicious
To make crispy jalapeño popper bites, you need a few key ingredients. Here’s what you'll need: - 10 fresh jalapeños, halved and seeds removed - 1 cup cream cheese, softened to room temperature - 1/2 cup sharp cheddar cheese, finely shredded - 1/4 cup green onions, thinly sliced - 1 teaspoon garlic powder - 1/2 teaspoon smoked paprika - 1 cup panko breadcrumbs - 1 tablespoon olive oil Each ingredient plays an important role. The jalapeños bring spice, while cream cheese adds a rich, creamy texture. Sharp cheddar cheese gives a nice bite. Green onions add freshness and flavor. Garlic powder and smoked paprika enhance the taste, making every bite delicious. Panko breadcrumbs create that perfect crunch, and olive oil helps them crisp up nicely in the air fryer. Gather these ingredients, and you’re ready to create a tasty snack that everyone will love! 1. Preheat your air fryer to 375°F (190°C). This helps the bites cook evenly. 2. In a bowl, mix the cream cheese, cheddar cheese, green onions, garlic powder, smoked paprika, salt, and pepper. Use a fork to blend it well. 3. Take each jalapeño half and fill it with the cheese mixture. Press gently to pack it in. 1. In a shallow bowl, mix the panko breadcrumbs with olive oil. Ensure the breadcrumbs are well-coated. 2. Coat each stuffed jalapeño half with the panko mixture. Press lightly so they stick well. 3. Place the coated jalapeño bites in a single layer in the air fryer basket. Avoid crowding them. 4. Air fry the popper bites for 8-10 minutes. Look for a golden brown color and crispy texture. 5. Use tongs to remove the bites from the air fryer. Let them cool for a minute before serving. To ensure even cooking, preheat your air fryer to 375°F (190°C). This step helps cook the poppers quickly and evenly. Place the jalapeño bites in a single layer. Avoid overcrowding the basket, as this can lead to uneven cooking. If needed, cook in batches. To achieve maximum crispiness, coat the panko breadcrumbs with olive oil. This makes them golden and crunchy. Press the breadcrumbs onto the jalapeños firmly. This step helps the coating stick well during cooking. For an attractive presentation, serve the jalapeño popper bites on a colorful platter. Garnish with chopped green onions or fresh cilantro. This adds color and flavor. Pair them with dipping sauces like ranch or blue cheese dressing. These creamy dips balance the spice of the jalapeños perfectly. {{image_4}} Cheese alternatives You can swap the cream cheese for ricotta or goat cheese. These cheeses give a unique twist. If you want a sharper taste, try using pepper jack cheese. It adds creaminess and a spicy kick. Spicy additions For a bolder flavor, add diced jalapeños or a splash of hot sauce to your cheese mix. You can also mix in some cooked chorizo for a meaty bite. This will make your jalapeño poppers even more exciting. Baking in the oven If you don’t have an air fryer, you can bake these poppers. Preheat your oven to 400°F (200°C). Place the stuffed jalapeños on a baking sheet lined with parchment paper. Bake for about 20 minutes or until golden brown. This method gives you a nice crunch, too. Alternative frying methods You can also deep-fry these bites. Heat oil in a deep pot to 350°F (175°C). Carefully add the stuffed jalapeños and fry until golden and crispy. This method is quick and gives you a classic fried taste. Just remember to drain them on paper towels after frying. To keep your jalapeño popper bites fresh, store them properly. Place them in an airtight container. This helps prevent moisture and keeps them tasty. You can refrigerate them for up to 3 days. If you want to save them longer, freezing is a great option. For freezing, wrap each bite in plastic wrap. Then, place them in a freezer bag. They can last up to 2 months in the freezer. When you want to eat your leftovers, reheating is key. The best method is to use the air fryer. Set the temperature to 350°F (175°C). Cook for about 5 minutes. This method brings back the crispiness. If you don’t have an air fryer, you can use an oven. Preheat it to 350°F (175°C) and bake for about 10 minutes. This will keep the texture nice and crunchy. Avoid using a microwave, as it can make them soggy. To make jalapeño poppers less spicy, you can remove the seeds and membranes. These parts hold most of the heat. You can also choose milder jalapeños, like Anaheim peppers. Another option is to mix in more cream cheese. This softens the spice and makes each bite creamy and smooth. Yes, you can make jalapeño popper bites in advance. Prepare the filling and stuff the jalapeños. Then, coat them in breadcrumbs. Place them on a tray and cover. Store in the fridge for up to a day. When ready, air fry them right from the fridge. No need to thaw! You can serve jalapeño popper bites with various dips. Ranch and blue cheese are popular choices. You might also try salsa or guacamole for a twist. For sides, consider tortilla chips or a fresh salad. This adds color and balance to your meal. Enjoy these bites at parties or game nights! In this article, we explored how to make delicious jalapeño poppers. You learned about the key ingredients, step-by-step instructions, and helpful tips for cooking and serving. We also discussed variations and storage methods to keep your poppers fresh. These easy-to-make snacks are perfect for any gathering. By remembering these tips, you can impress your guests with tasty, crispy treats. Enjoy your cooking and share your creations!
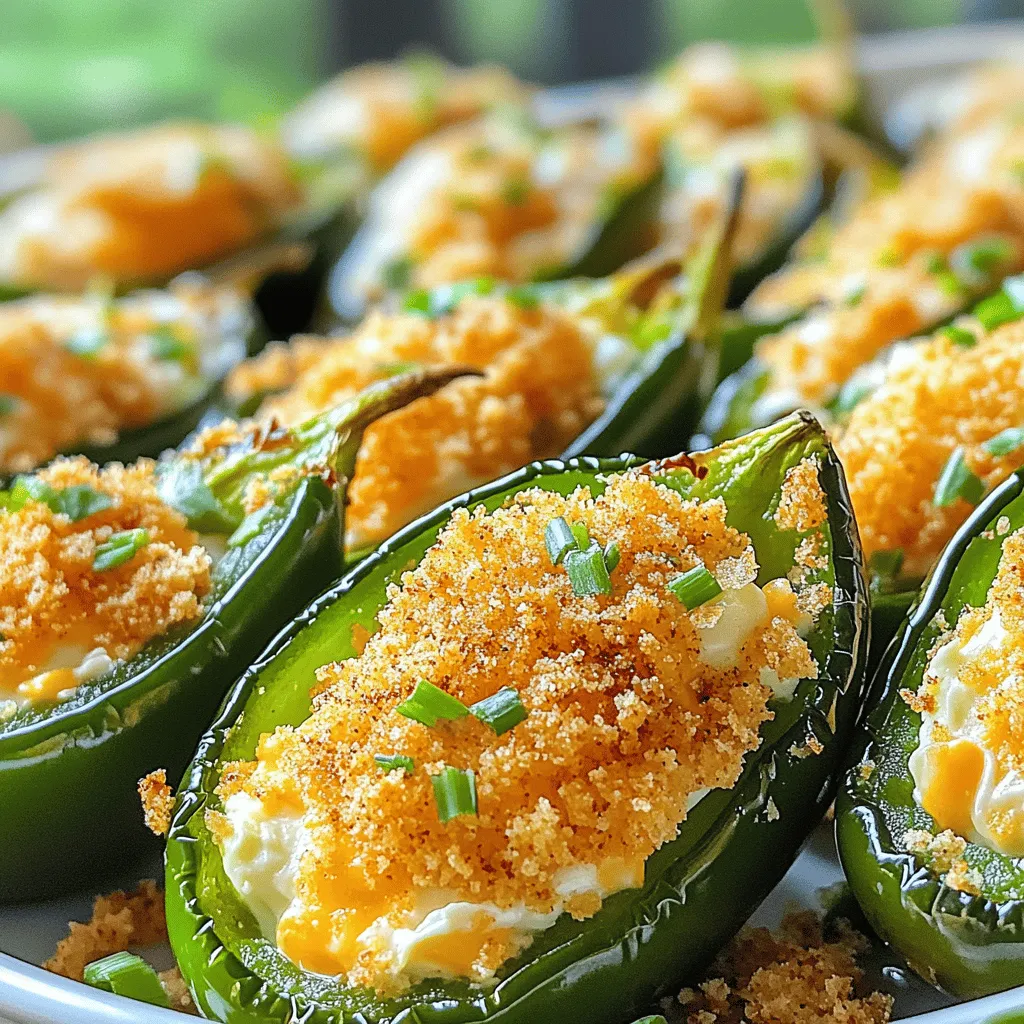
Air Fryer Crispy Jalapeño Popper Bites Recipe
Are you craving a spicy snack that’s easy to make and packed with flavor? Look no further! My Air Fryer Crispy Jalapeño Popper Bites are
- 1 medium head of cauliflower, cut into bite-sized florets - 1/2 cup freshly grated Parmesan cheese - 1/2 cup breadcrumbs (whole grain or panko recommended for extra crunch) - 2 tablespoons extra virgin olive oil - 1 teaspoon garlic powder - 1 teaspoon onion powder - 1/2 teaspoon smoked paprika - Salt and pepper to taste - Fresh parsley, chopped These ingredients come together for a tasty snack. The cauliflower provides a nice crunch. The Parmesan cheese adds a savory, rich flavor. Breadcrumbs give the bites a crispy texture. Olive oil ensures they cook perfectly in the air fryer. The spices bring warmth and depth. You can adjust the salt and pepper to fit your taste. Fresh parsley adds a pop of color and freshness. When choosing your ingredients, use fresh cauliflower for the best results. Grating the Parmesan cheese fresh makes a big difference in flavor. Whole grain breadcrumbs add a nice texture. You can also use panko breadcrumbs for an extra crunch. Set your air fryer to 400°F (200°C). This step is key for crispy bites. Preheating helps cook the cauliflower evenly and gives it a nice crunch. In a large bowl, mix together these ingredients: - 1/2 cup freshly grated Parmesan cheese - 1/2 cup breadcrumbs - 1 teaspoon garlic powder - 1 teaspoon onion powder - 1/2 teaspoon smoked paprika - Salt and freshly ground black pepper Stir everything well. You want all the flavors to blend together. In a separate bowl, add the cauliflower florets. Drizzle 2 tablespoons of extra virgin olive oil over them. Toss well to coat each piece. This oil helps the breading stick and makes them crispy. Next, take a handful of the oiled florets. Dip them into the breadcrumb mixture, pressing lightly for good coverage. Place the coated florets on a plate. Repeat until all pieces are breaded. Arrange the coated cauliflower bites in a single layer in the air fryer basket. Make sure not to overcrowd them. This allows hot air to circulate and crisp them nicely. Cook for 12-15 minutes. Shake the basket halfway through for even cooking. They should be golden and crispy when done. Once they are cooked, carefully remove the bites from the air fryer. If you made a big batch, repeat the cooking process as needed. For a nice touch, garnish with chopped fresh parsley. Serve the bites warm with a bowl of marinara or aioli for dipping. Enjoy your crispy delight! To get your cauliflower bites nice and crispy, follow these steps: - Coat Well: Make sure each floret is covered in oil. This helps the breading stick. - Use Panko: Panko breadcrumbs give a crunchier texture than regular breadcrumbs. - Press Down: When breading, press the mixture onto the cauliflower. It helps the coating stay on during cooking. Using your air fryer right can make a big difference. Here’s how to get the best results: - Don’t Overcrowd: Place the cauliflower in a single layer. This ensures hot air circulates well. - Shake Midway: Halfway through cooking, shake the basket. This helps with even browning. - Preheat: Always preheat your air fryer. This sets the stage for crispy bites. Want to switch things up? Here are some fun ideas: - Spice It Up: Add cayenne pepper for heat or Italian herbs for flavor. - Cheese Swap: Try cheddar or mozzarella for a different taste. - Add Nuts: Mixing in some crushed nuts gives extra crunch and flavor. These tips will help you create tasty, crispy Air Fryer Parmesan Cauliflower Bites every time! {{image_4}} You can switch out the Parmesan for other cheeses. Here are some great options: - Cheddar: It adds a sharp flavor. - Mozzarella: This cheese melts nicely and gives a gooey texture. - Feta: Crumbled feta brings a tangy taste. - Nutritional Yeast: For a cheesy flavor without dairy, use this. Each cheese brings its own taste to the bites, so feel free to experiment! Just remember, some cheeses melt differently, which can change the texture. To make these bites dairy-free, you can easily adjust the recipe. Swap the Parmesan with nutritional yeast or a vegan cheese. Here’s how to do it: - Replace Parmesan with 1/2 cup of nutritional yeast. - Use vegan breadcrumbs to keep everything plant-based. - Drizzle a bit of extra virgin olive oil to keep it moist. This way, you still get a tasty crunch without any dairy! Want to mix things up? Try these unique seasoning blends to change the flavor: - Spicy Kick: Add cayenne pepper and chili powder for heat. - Herb Blend: Mix in dried oregano and thyme for a fresh taste. - Asian Twist: Use sesame oil and sprinkle with sesame seeds and soy sauce. Each blend gives the bites a new and exciting flavor. Don't hesitate to get creative with your spices! To keep your cauliflower bites fresh, place them in an airtight container. Refrigerate the bites within two hours of cooking. This keeps them from getting soggy. Use paper towels to absorb moisture before sealing. This method helps maintain their crunch. For the best crunch when reheating, use your air fryer. Preheat it to 350°F (175°C). Place the cauliflower bites in a single layer. Heat them for about 5-7 minutes. Check often to avoid burning. This method revives their crispiness, making them just as tasty as when fresh. If you want to freeze the bites, do it before cooking. Arrange the breaded cauliflower on a baking sheet. Freeze them until solid, then transfer to a freezer bag. They can last up to three months. To enjoy, thaw them overnight in the fridge. Then, air fry as usual for a delightful snack or side. Cooking cauliflower in the air fryer usually takes 12-15 minutes at 400°F (200°C). The time can change based on the size of the florets. Smaller florets cook faster, while larger ones need more time. For perfectly crispy bites, always shake the basket halfway through cooking. This helps them brown evenly. Yes, you can use frozen cauliflower! Just make sure to thaw and drain it first. Pat it dry with a towel to remove excess moisture. This step is key for crispiness. If you skip it, your bites may turn out soggy. Follow the same coating and cooking steps as fresh florets. Cauliflower bites taste great with many dips. Here are some tasty options: - Marinara sauce for a classic touch - Garlic aioli for a creamy finish - Ranch dressing for a cool flavor - Spicy sriracha for a kick - Honey mustard for a sweet twist Experiment with different sauces to find your favorite pairing! You learned how to make tasty air fryer cauliflower bites. We covered key ingredients, including cauliflower, cheese, and spices. I shared steps for preparing and cooking your bites for maximum crunch. Tips on storing and reheating help keep them fresh. Remember, variations add fun! Try different cheeses or spices to suit your taste. Enjoy your crispy, flavorful bites, and share them with friends. They will love your cooking!
Air Fryer Parmesan Cauliflower Bites Crispy Delight
Are you ready to enjoy a crispy, tasty treat? Air Fryer Parmesan Cauliflower Bites are your answer! These bites are packed with flavor and perfect
To make Air Fryer Jalapeño Cheddar Pretzel Bites, you need the following: - 1 ½ cups warm water (around 110°F/43°C) - 1 packet (2 ¼ teaspoons) active dry yeast - 1 tablespoon sugar - 4 cups all-purpose flour - ½ cup baking soda - 1 teaspoon salt - 1 cup sharp cheddar cheese, finely shredded - 2 jalapeños, seeds removed and finely chopped - Coarse sea salt for finishing - 1 egg, beaten (for egg wash) You can swap some ingredients if needed: - Use whole wheat flour for a healthier bite. - If you don’t have jalapeños, try green bell peppers. - Use a different cheese, like pepper jack, for a spicy twist. - For a vegan option, use a flax egg instead of the real egg. Quality makes a big difference in flavor. Here’s what to look for: - Choose fresh jalapeños; they should be firm and bright. - Select sharp cheddar for a bold taste; it enhances the bites. - Use active dry yeast that is not expired for best results. - Opt for unbleached all-purpose flour for better texture and taste. By focusing on these quality ingredients, you set the stage for delicious pretzel bites that impress. To start, grab a large mixing bowl. Pour in 1 ½ cups of warm water. The water should feel warm, like a cozy bath, around 110°F. Add 1 tablespoon of sugar to the water. This sugar feeds the yeast. Next, sprinkle 1 packet of active dry yeast over the top. Stir gently. Let it sit for about 5 minutes. You want it to become frothy and bubbly. This means your yeast is activated and ready to work. Now, let’s mix the dough. Slowly add 4 cups of all-purpose flour and 1 teaspoon of salt to the yeast mixture. Use your hands or a wooden spoon to mix until a rough dough forms. Then, it's time to add flavor! Fold in 1 cup of finely shredded sharp cheddar cheese and 2 finely chopped jalapeños. Make sure they’re spread evenly throughout the dough. This will give your bites that tasty kick! Once your dough is ready, it needs to rise. Cover the bowl with a damp cloth. Place it in a warm spot for about 30 minutes. You want it to double in size. After that, punch the dough down to release the air. Now, divide it into small pieces, about the size of a marble. Roll each piece into a small log shape or twist the ends together for classic pretzel shapes. For simpler bites, leave them as logs. Next, we prepare the baking soda solution. In a separate bowl, dissolve ½ cup of baking soda in a cup of hot water. Dip each pretzel bite in this solution for about 30 seconds. This step is key for that beautiful golden color. After soaking, place them on a lightly greased surface. Finally, brush each bite with a beaten egg for shine. Sprinkle coarse sea salt over them. Now they are ready to air fry! Place them in a single layer in the air fryer basket. Make sure not to overcrowd them. Air fry for 8-10 minutes. When they turn golden brown, they are done! Let them cool slightly on a wire rack before serving. Enjoy these delightful bites warm and fresh! To make great pretzel bites, the dough needs the right feel. It should be soft and slightly sticky. When mixing, add flour slowly to avoid a dry dough. If it's too sticky, sprinkle a little more flour while kneading. Knead the dough for about five minutes. This helps develop gluten, giving your bites that chewy texture we love. Air frying is fast and fun! Always preheat your air fryer to 375°F (190°C). This step makes sure your bites cook evenly. Don't overcrowd the basket. Give them space to puff up. Cook in batches if needed. Keep an eye on them; they usually take 8-10 minutes. Look for that golden brown color! Serving can be part of the fun! Place your pretzel bites on a rustic board. A basket lined with parchment paper makes for a nice touch too. Pair them with zesty mustard or spicy cheese sauce. These dips enhance the flavor and add a tasty kick. Enjoy them warm for the best experience! {{image_4}} If you love heat, add more jalapeños! Try using a mix of fresh and pickled jalapeños for a tangy kick. You can also add diced serrano peppers or a splash of hot sauce to the dough. This adds fire and flavor, making your pretzel bites even more exciting. Want a twist on the cheese? Swap sharp cheddar for pepper jack or gouda. You can also mix in fresh herbs, like rosemary or thyme. These herbs add a great aroma and taste. For a richer flavor, consider using a blend of cheeses, such as cream cheese or feta. To make these pretzel bites gluten-free, use a gluten-free flour blend. Look for one that contains xanthan gum; it helps the dough rise. For a vegan version, replace the egg wash with plant milk. You can also use vegan cheese instead of cheddar. These swaps keep the taste fantastic while catering to different diets. To keep your pretzel bites fresh, store them in an airtight container. Let them cool first. This keeps them from getting soggy. If you have leftover pretzel bites, place a paper towel on the bottom of the container. This helps absorb any moisture. Store them at room temperature for up to two days. For longer storage, consider freezing. Reheat pretzel bites for the best taste. Use your air fryer to bring back their crunch. Set the air fryer to 350°F (175°C). Heat for about 3-5 minutes. This will keep them warm and crisp. If you don’t have an air fryer, use the oven. Preheat it to 350°F (175°C) and bake for 5-7 minutes. Freezing is a great way to save pretzel bites. After shaping and egg washing, place them on a baking sheet. Freeze them for about an hour until firm. Then, transfer them to a freezer bag. They can last up to three months in the freezer. When you want to eat them, no need to thaw. Just air fry them straight from the freezer for about 10-12 minutes. Enjoy freshly made bites again! You can tell if the yeast is activated when it becomes frothy. After mixing the warm water and sugar, sprinkle the yeast on top. Wait about five minutes. If the mixture bubbles up, your yeast is ready. This means it can help your dough rise well. If it doesn’t froth, your yeast may be old. Try with fresh yeast for best results. Yes, you can make the dough ahead of time. After mixing the dough, let it rise as usual. Once it has doubled in size, cover it and place it in the fridge. This keeps the dough fresh for up to 24 hours. When you’re ready to bake, just take it out, shape the bites, and let them rest. This saves time on busy days. Most air fryers work well for this recipe. I recommend models with adjustable temperature settings. Look for a basket style that allows air to flow around the pretzel bites. This helps them cook evenly. Brands like Philips, Cosori, and Ninja are great choices. Always check the size of your air fryer. Make sure it fits all the pretzel bites in a single layer for best results. In this article, we explored how to make delicious pretzel bites from scratch. We covered essential ingredients, tips for selecting quality items, and substitutions. I detailed each step of the process, from activating yeast to shaping the dough. You learned key techniques for air frying and serving your pretzel bites. With variations for spice lovers and those needing gluten-free options, there's something for everyone. Remember, storing and reheating your pretzels correctly ensures you enjoy them longer. Dive into this fun recipe, and enjoy your tasty creation!
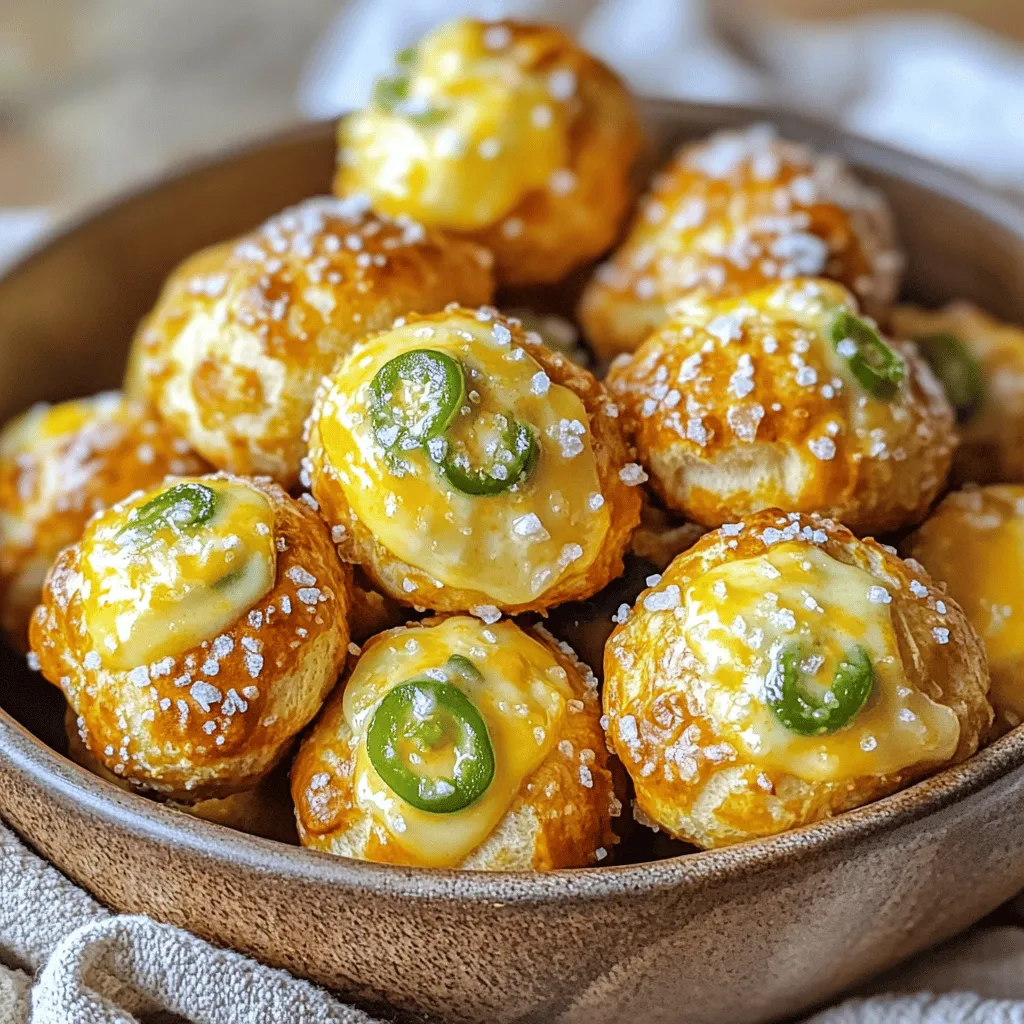
Air Fryer Jalapeño Cheddar Pretzel Bites Delight
Get ready to indulge in a snack that’s both fun to make and packed with flavor! In this guide, I’ll show you how to whip