Appetizers

To make a tasty Strawberry Pineapple Fruit Salsa, you need fresh, vibrant ingredients. Here’s what you will need: - 1 cup fresh strawberries, hulled and diced into bite-sized pieces - 1 cup fresh pineapple, peeled and diced into small chunks - 1/4 cup red onion, finely chopped for a sweet crunch - 1 jalapeño, deseeded and minced (optional for heat, adjust to taste) - 2 tablespoons fresh cilantro, roughly chopped for freshness - 1 tablespoon honey or agave syrup for a touch of sweetness - Juice of 1 fresh lime to brighten the flavors - Salt to taste These ingredients bring bright colors and bold flavors to your dish. Want to make your salsa even more unique? Here are some optional ingredients you can add: - Diced bell peppers for extra crunch - Mango for a tropical twist - A dash of cumin for a warm flavor - Chopped avocado for creaminess Feel free to mix and match to suit your taste! This salsa is not just delicious; it’s also packed with nutrients. Here’s a quick look: - Calories: About 70 per serving - Fiber: Around 3 grams, which is great for digestion - Vitamin C: High in vitamin C, boosting your immune system - Low in fat: This dish is naturally low in fat You get a healthy snack or topping that is fun to make and eat. For the full recipe, check the details above. Enjoy creating this colorful dish! Start by gathering your ingredients. You will need fresh strawberries and pineapple. Wash the strawberries and remove the greens. Cut them into bite-sized pieces. For the pineapple, peel it and remove the core. Cut it into small chunks. Next, finely chop the red onion. If you want some heat, deseed and mince the jalapeño. Finally, roughly chop the cilantro. In a medium bowl, combine the diced strawberries and pineapple. Make sure they mix well. Add in the red onion and jalapeño, if you chose to include it. Next, sprinkle the chopped cilantro over the fruit. Drizzle honey or agave syrup on top for sweetness. Squeeze the juice of one lime over everything. This juice will brighten the flavors. Gently fold the mixture using a spatula. Be careful not to mash the fruits. Add a pinch of salt to enhance the flavors. Taste the salsa and adjust it if needed. You can add more honey for sweetness or more lime for acidity. Let the salsa sit for at least 15 minutes. This resting time helps the flavors blend. Serve your strawberry pineapple fruit salsa in a colorful bowl. Enjoy it with tortilla chips or as a topping for grilled meats. For the full recipe, check the earlier section. To make a great strawberry pineapple fruit salsa, you need fresh and ripe fruits. Look for strawberries that are bright red and firm. They should smell sweet. For pineapple, choose those with a sweet aroma and a little give when you press them. Avoid fruits with bruises or soft spots. Using ripe fruits makes your salsa taste better and more colorful. You can enhance the flavor of your salsa with a few simple tricks. Use fresh lime juice as it brightens the taste. Adding a pinch of salt brings out the sweetness of the fruits. If you like heat, include minced jalapeño. Adjust the amount based on your spice preference. You can also sweeten your salsa with honey or agave syrup. Taste as you go, and balance the sweet and sour flavors. Serve your strawberry pineapple fruit salsa in a colorful bowl. A sprig of cilantro on top adds a nice touch. This salsa pairs well with tortilla chips for a fun snack. You can also use it as a topping for grilled chicken or fish. The fresh salsa adds fruity brightness and makes any dish pop. For more ideas, check the full recipe. {{image_4}} You can easily swap ingredients in your salsa to change the taste. For example, use mango or peach instead of pineapple. Both fruits add a sweet twist. If you want a fun crunch, try using diced cucumber. It will give your salsa a refreshing feel. You can also substitute strawberries with raspberries for a tart flavor. The key is to keep it colorful and fresh. Get creative by adding unexpected ingredients to your salsa. Consider adding diced kiwi for a unique twist. It brings a bright color and tangy taste. You can also mix in some diced bell peppers for extra crunch and color. If you love herbs, add some mint for a refreshing touch. These unconventional ingredients add depth and surprise to your salsa. Adjust the spice level to suit your taste. If you like heat, add more jalapeño or try a pinch of cayenne pepper. For a sweeter salsa, increase the honey or agave syrup. You can also add a splash of orange juice for a sweet and citrusy kick. Balancing the sweet and spicy will create a salsa that excites your palate. For the full recipe, check out the detailed instructions to make your perfect Strawberry Pineapple Fruit Salsa. To keep your strawberry pineapple fruit salsa fresh, store it in an airtight container. Make sure the container is clean and dry before adding the salsa. This method helps lock in flavors and keeps out air. You can also place a piece of plastic wrap directly on the surface of the salsa before sealing the lid. This adds an extra layer of protection against spoilage. When stored properly, your salsa lasts about 3 to 5 days in the fridge. Look for signs of spoilage, like a change in color or smell. If it smells off or looks slimy, it's best to throw it away. For the best taste and freshness, enjoy your salsa within the first few days after making it. You can freeze strawberry pineapple fruit salsa, but the texture may change once thawed. If you want to freeze it, use a freezer-safe container, leaving some space for expansion. It can last for about 2 to 3 months in the freezer. When you're ready to use it, thaw it overnight in the fridge. Stir it well before serving, as some juices may separate during freezing. For the best experience, use the salsa fresh whenever possible. Check out the Full Recipe for more details on making this delicious dish! Strawberry Pineapple Fruit Salsa stays fresh in the fridge for about 3 days. After that, the fruits may start to lose their crunch. The juices will blend more, which changes the texture. I always recommend enjoying it within this time for the best flavor and texture. Yes, you can make this salsa ahead of time. It tastes even better after sitting for a bit. The flavors meld together nicely. I suggest making it a few hours before serving. Just remember to store it in an airtight container in the fridge. Fruit salsa pairs well with many dishes. Here are some ideas: - Grilled chicken or fish for a fresh topping. - Tacos or quesadillas to add a fruity twist. - Tortilla chips for a fun appetizer. - Salads for a burst of flavor. You can find the full recipe for Strawberry Pineapple Fruit Salsa earlier in the article. Enjoy experimenting with these pairings! In this blog post, I shared how to make a fresh and tasty Strawberry Pineapple Fruit Salsa. We covered the best ingredients to use and the steps to mix them perfectly. I also offered tips to help you choose ripe fruits and suggested some fun variations to try. Remember, proper storage is key to keeping your salsa fresh. You can enjoy this versatile dish with many meals. So, get creative and have fun mixing your unique flavors!
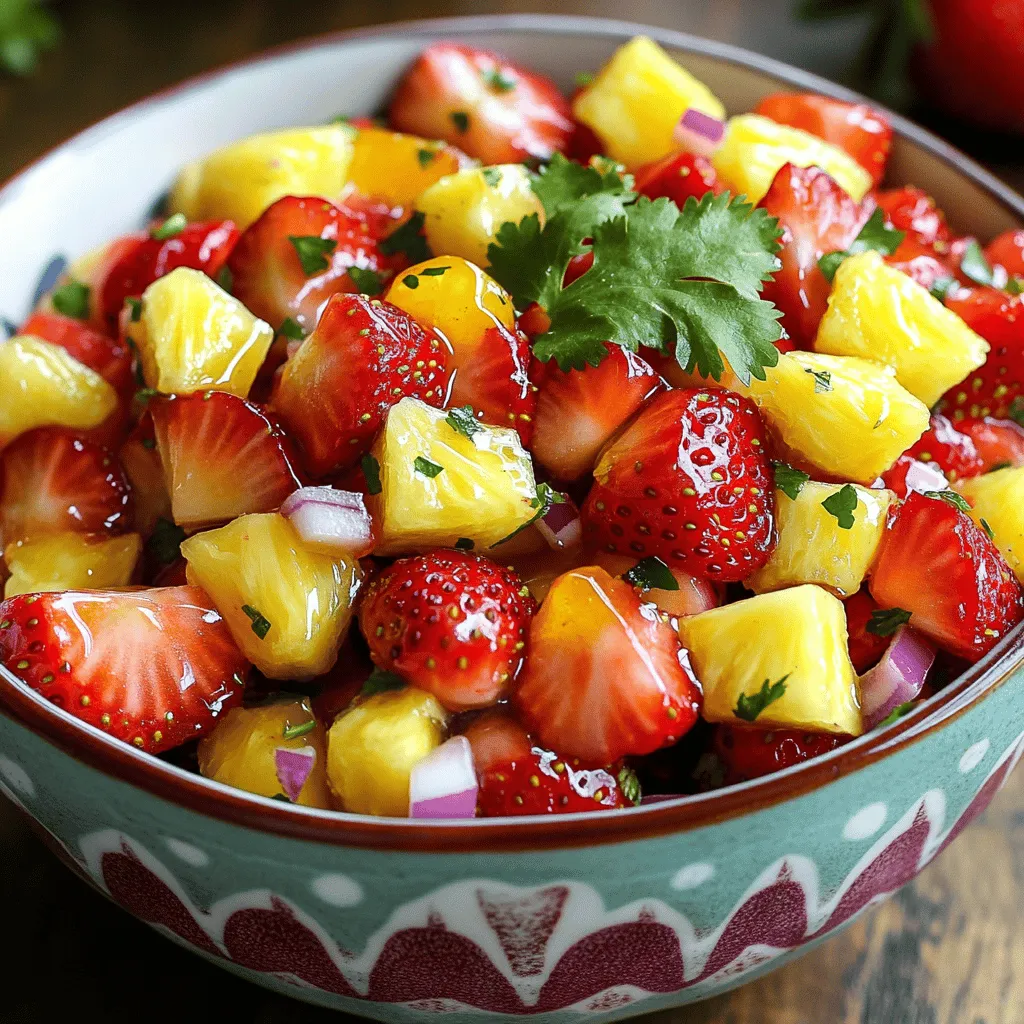
Strawberry Pineapple Fruit Salsa Tasty and Colorful Dish
Are you ready to brighten up your meals? Strawberry Pineapple Fruit Salsa is a fun and colorful dish that’s easy to make. With fresh ingredients
- 2 cups sushi rice - 2 ½ cups water - 1 lb fresh salmon, skinless, diced - 1 tablespoon soy sauce - 1 tablespoon sriracha sauce - 1 teaspoon sesame oil - 1 avocado, sliced - 2 green onions, finely chopped - 1 tablespoon rice vinegar - 1 teaspoon sugar - Sea salt, to taste - Nori sheets, cut into strips for garnish - Toasted sesame seeds, for garnish - Additional toppings or garnishes - Vegetables to complement the dish When I create Crispy Rice with Spicy Salmon, I love to start with fresh, high-quality ingredients. Sushi rice is key here. It gives that sticky texture we all love. Also, fresh salmon makes a big difference in taste. Dicing it into small pieces helps it mix well with the sauces. Soy sauce and sriracha add depth and a kick to the dish. Sesame oil brings a nutty essence that balances everything out. I always use ripe avocados for a creamy contrast. Green onions add a nice crunch and brightness. For extra flair, nori strips and toasted sesame seeds make the dish pop visually. Plus, they add fun textures. I often think about customizing this dish. You can play with different toppings or even add vegetables like cucumber or radish. This way, you can cater the dish to your taste. If you want the full recipe, check out the details to get started on this flavorful adventure! - Rinse the Rice: Start by rinsing the sushi rice with cold water. Keep rinsing until the water runs clear. This step helps remove excess starch and makes the rice less sticky. - Cook the Rice: In a medium pot, mix the rinsed rice with 2 ½ cups of water. Turn the heat to high and bring it to a boil. Once it boils, lower the heat and cover the pot. Let it simmer for 20 minutes until the water is gone. After that, remove it from heat but keep it covered for another 10 minutes to steam. - Season the Rice: In a small bowl, mix rice vinegar and sugar until the sugar dissolves. Gently fold this mixture into the cooked rice. This adds flavor and helps the rice cool to room temperature. - Prepare the Salmon: In a bowl, combine diced salmon, soy sauce, sriracha, sesame oil, and a pinch of sea salt. Mix well to coat the salmon. Let it marinate for 10 to 15 minutes at room temperature. - Crisp the Rice: Heat a non-stick skillet over medium heat and lightly oil it. Take some cooled rice and form a patty about ½ inch thick. Cook it in the skillet for 4 to 5 minutes until it is golden brown and crispy. Flip it over and cook for another 4 to 5 minutes. Repeat with the rest of the rice. - Assemble the Dish: Once all rice patties are crispy, place them on a plate. Top each patty with a generous scoop of the marinated salmon. - Garnish: Add slices of avocado around the patties. Sprinkle with green onions and toasted sesame seeds. For an extra touch, place nori strips on top. - What to watch for when cooking the rice: Make sure the rice absorbs all the water. If it’s too wet, it won’t get crispy. - Tips for marinating salmon effectively: Let the salmon sit in the marinade long enough to soak up the flavors but not too long that it gets mushy. About 10 to 15 minutes works best. For the full recipe, check out the [Full Recipe]. - Achieving the perfect crispy texture: To get that ideal crunch, use cold, cooked sushi rice. When you shape the rice into patties, make them firm but not too tight. This helps them hold together while crisping nicely. Use a non-stick skillet to prevent sticking. Heat the skillet to medium. Let each rice patty cook for 4-5 minutes until golden brown, then flip and repeat. - How to balance flavors with garnishes: The right garnishes can elevate your dish. Sliced avocado adds creaminess, while green onions give a fresh crunch. Nori strips contribute a nice umami flavor. A sprinkle of sesame seeds adds a nutty touch. Drizzle extra sriracha for more heat if you like it spicy. These elements create a balanced taste in each bite. - Overcooking the rice: Cooking sushi rice can be tricky. If you overcook it, the rice will become mushy. Follow the cooking time closely. Once the water is absorbed, let it steam for an extra 10 minutes. This step is key to fluffy rice. - Incorrect marinating time: Marinating salmon is crucial for flavor. Don’t rush this step. Let the salmon sit in the marinade for 10-15 minutes at room temperature. If you marinate for too long, the fish can become too salty or lose its texture. Keep an eye on the clock for the best results. You can find the full recipe for Crispy Rice with Spicy Salmon [here](#). {{image_4}} You can switch up the protein in this dish. Try using diced tuna or shrimp instead of salmon. Both options provide a fresh taste and a unique twist. If you prefer a milder flavor, opt for cooked shrimp. For a bolder choice, use spicy tuna with extra sriracha. Experiment with different seasonings, too. Add a dash of lime juice for a zesty kick. You can also sprinkle some chili flakes for added heat. Garlic powder or ginger can enhance the aroma. Each option allows you to create a new flavor profile. Crispy Rice with Spicy Salmon pairs beautifully with a few side dishes. Consider serving it with a light cucumber salad. The crunch and freshness balance the richness of the salmon. Another great choice is pickled vegetables, which add a tangy contrast. For drinks, chilled green tea works wonders. Its subtle flavor complements the dish without overpowering it. A light, fruity sake also enhances your dining experience. Both options refresh the palate and elevate your meal. You can find the full recipe for this dish to explore more variations. To keep your crispy rice tasty, store leftovers in an airtight container. This helps maintain the texture and flavor. Place the rice in the fridge within two hours after cooking. It stays fresh for up to three days. To reheat, try using a non-stick skillet. Heat the skillet over medium heat and add a little oil. Place the rice patties in the skillet for about 2-3 minutes on each side. This method helps regain that crispy texture. You can also use a microwave, but the texture may not be as good. Yes, you can freeze crispy rice! This is great for meal prep or saving extra servings. Cut the rice patties into individual pieces for easy thawing. Use freezer-safe containers or bags. Make sure to remove as much air as possible to prevent freezer burn. Label your containers with the date. They can last up to three months in the freezer. When you’re ready to eat, thaw them overnight in the fridge. Then, reheat using the skillet method for the best results. This way, you can enjoy the bold flavors of crispy rice with spicy salmon any time! For the full details on making this dish, check the Full Recipe. What is the best rice for making crispy rice? The best rice for crispy rice is sushi rice. It has the right stickiness to hold together. This type of rice cooks well and gives a nice bite. Other short-grain rice can work too, but sushi rice is my top choice. Can I make this recipe ahead of time? Yes, you can prepare the rice and salmon mix ahead of time. Keep the rice in the fridge and the salmon mixture in a separate container. When you're ready, crisp the rice patties in a hot skillet. This keeps everything fresh and tasty. Is this dish suitable for meal prep? Absolutely! This dish works great for meal prep. You can make extra rice patties and store them in the fridge. Just crisp them up when you want to eat. The salmon mixture can also be stored, making it easy to enjoy later. Where to find the best restaurants serving Crispy Rice with Spicy Salmon? To find the best spots, check online reviews and food blogs. Look for restaurants that focus on Asian cuisine. Sushi bars often serve crispy rice dishes that are delicious. You can also explore food festivals for local favorites. Can I adjust the spice level in this recipe? Yes! You can adjust the spice level to fit your taste. Add less sriracha for a milder flavor. If you want more heat, add some chili flakes or even a dash of hot sauce. Tailor it to what you enjoy. - For more delicious ideas, check out my other recipes like spicy tuna tartare or avocado toast. - Watch video tutorials online for step-by-step guidance on making crispy rice and perfecting your salmon. These can help you see the techniques in action. This blog post covered how to make crispy rice with spicy salmon. We discussed essential ingredients, detailed steps, and tips to avoid mistakes. You can customize your dish with optional toppings and find the best pairings for serving. Remember to pay attention to cooking times and marinating techniques. By following these guidelines, you'll enjoy a flavorful meal. Whether you share it or savor it solo, this dish brings joy to your table. Dive into your cooking adventure, and delight in the crispy joy!
Crispy Rice with Spicy Salmon Bold Flavor Delight
Are you ready to experience a burst of flavor? This Crispy Rice with Spicy Salmon recipe packs a punch that will thrill your taste buds.
For these easy Bang Bang Salmon Bites, you will need: - 1 lb salmon fillet, skinless and boneless - 1/4 cup cornstarch - 1/2 teaspoon salt - 1/2 teaspoon black pepper - 1 teaspoon garlic powder - 1 teaspoon smoked paprika - 1/4 cup mayonnaise - 2 tablespoons sriracha (adjust according to your spice preference) - 1 tablespoon honey - 1 teaspoon fresh lime juice These ingredients come together to create a tasty snack. The cornstarch gives the salmon a nice crunch. The spices add depth and flavor. The sauce ties it all together. You can elevate your dish with some simple garnishes. Consider adding: - Chopped green onions - Sesame seeds These garnishes not only look good but also add a fresh taste. They make your salmon bites pop on the plate. To make Bang Bang Salmon Bites, have these tools ready: - Baking sheet - Parchment paper - Mixing bowls - Whisk - Knife and cutting board These items will help you prepare and cook your dish easily. They make the process smooth and fun. Don't forget to check the [Full Recipe] for all steps! To start, preheat your oven to 400°F (200°C). This temperature gives your salmon bites a nice crisp. Next, take your skinless, boneless salmon fillet. Cut it into 1-inch cubes. Make sure the pieces are similar in size. This helps them cook evenly. In a mixing bowl, combine the cornstarch, salt, black pepper, garlic powder, and smoked paprika. Stir well to mix all the dry ingredients. Now, gently add your salmon cubes to this bowl. Toss them carefully until each piece is coated in the cornstarch mix. This will give your salmon bites a crispy outer layer when baked. Place the coated salmon bites in a single layer on a lined baking sheet. Leave some space between each piece. This allows heat to circulate and makes them crispier. Bake the salmon bites for 12 to 15 minutes. They should be cooked through and slightly crispy on the outside. While they bake, prepare the bang bang sauce. Mix mayonnaise, sriracha, honey, and lime juice in a small bowl. Once the salmon bites are done, let them sit for a minute. Serve them drizzled with the bang bang sauce or on the side for dipping. Don't forget to garnish with green onions and sesame seeds for a lovely touch! For the full recipe, check out the detailed instructions above. To make the best bang bang sauce, balance is key. Start with mayonnaise for a creamy base. Then, add sriracha for heat. You can adjust the sriracha amount based on your spice level. Mix in honey for sweetness. Finally, add lime juice for a zesty kick. This sauce shines as a dip or drizzle. For perfect salmon bites, cut your salmon into even cubes. Aim for one-inch pieces. This size helps them cook evenly. Coating them in cornstarch gives a nice crunch. Bake until golden brown. Your salmon should flake easily when cooked. You can prepare the salmon bites in advance. Cut and coat the salmon, then chill it in the fridge. You can also mix the bang bang sauce ahead of time. Store it in a sealed container. When ready to eat, bake the salmon bites fresh. This keeps them crispy! Explore the [Full Recipe] for more details on preparation. {{image_4}} You can switch up the bang bang sauce for fun. Try using a spicy mayo for a kick. Mix mayonnaise with hot sauce for a fast sauce. You can also blend yogurt and herbs for a cool twist. If you want a sweet touch, mix honey and mustard. Each sauce brings a new flavor. To make your bites even spicier, add fresh peppers. Diced jalapeños or serrano peppers work great. You can also sprinkle on red pepper flakes for heat. If you want a smoky flavor, add chipotle powder. Experiment and find the heat level you love. You can cook salmon bites in many ways. Air frying gives them a nice crisp. Set your air fryer to 400°F and cook for about 10 minutes. Grilling adds a smoky flavor. Just preheat your grill and cook for 3-4 minutes on each side. Both methods make for tasty bites. For full details on making these bites, check the Full Recipe. To keep your Bang Bang Salmon Bites fresh, store them in an airtight container. Make sure they cool down before sealing. This prevents steam and keeps them crispy. They stay good in the fridge for up to three days. Reheat them in the oven for the best texture. For reheating, the oven is your best friend. Preheat it to 350°F (175°C). Place the salmon bites on a baking sheet. Heat for about 10 minutes. This keeps them crunchy. You can also use an air fryer. Set it to 350°F (175°C) and cook for 5 minutes. You can freeze Bang Bang Salmon Bites for later. Place them in a freezer-safe bag or container. They last up to three months. To thaw, move them to the fridge overnight. Reheat them in the oven or air fryer once thawed. Enjoy your tasty snack anytime! For more details, check out the Full Recipe. To tone down the heat in the sauce, reduce the sriracha. You can also add more mayonnaise to balance the spice. Mixing in some Greek yogurt works well too. This will keep the sauce creamy while making it milder. Yes, you can use frozen salmon. Just make sure to thaw it first. Place the salmon in the fridge overnight for the best results. If you're short on time, you can also submerge it in cold water for about 30 minutes. After thawing, pat it dry to ensure the coating sticks well. Bang Bang Salmon Bites work great with various sides. Here are some tasty options: - Steamed broccoli: Its mild flavor complements the spicy bites. - Rice: White or brown rice absorbs the sauce nicely. - Salad: A fresh green salad adds crunch and lightness. - Coleslaw: Its creaminess balances the heat of the salmon. Feel free to explore more sides to match your taste! For the full recipe, check out the Bangin' Bang Bang Salmon Bites. You’ve learned how to make easy Bang Bang Salmon Bites, from key ingredients to cooking methods. We discussed sauces, texture, and even storage tips to keep your bites fresh. Don’t forget, you can customize flavors and try different techniques, like grilling or air frying. Always feel free to tweak the recipe to fit your taste. Enjoy these bites as a fun snack or a meal. You’re now ready to impress family and friends with your cooking skills!
Easy Bang Bang Salmon Bites Flavorful and Simple Snack
Looking for a quick snack that bursts with flavor? You’ll love these Easy Bang Bang Salmon Bites! This tasty treat is simple to whip up
To make pistachio compound butter, you need: - 1 cup unsalted butter, softened to room temperature - 1/2 cup shelled pistachios, finely chopped - 2 tablespoons honey - 1 teaspoon pure vanilla extract - Zest of 1 freshly washed lemon - A pinch of fine sea salt Choosing the right ingredients makes all the difference. Always go for fresh, high-quality butter. Look for unsalted butter to control the saltiness. Select vibrant green pistachios. They should be firm, not soft. When picking lemons, choose ones that feel heavy for their size. This means they are juicy. Pure vanilla extract is best. Avoid imitation vanilla for the best flavor. If you have allergies, you can make simple swaps. Use dairy-free butter for a vegan option. If you can't have nuts, skip them and try fresh herbs. You might use chives or basil instead. For sweetness, agave syrup works well if you need a vegan sweetener. Adjust the lemon zest based on your taste or use lime zest instead. Always make sure to check labels for allergens. For the full recipe, check the detailed instructions above. Start by gathering your ingredients. You need: - 1 cup unsalted butter, softened - 2 tablespoons honey - 1 teaspoon pure vanilla extract - Zest of 1 lemon - A pinch of fine sea salt In a medium bowl, add the softened butter. Mix in the honey, vanilla extract, lemon zest, and sea salt. You can use a hand mixer or a spatula to blend. Blend until the mixture is smooth and creamy. This step sets the base for your flavorful butter. Now, it’s time to add the pistachios. You need: - 1/2 cup shelled pistachios, finely chopped Gently fold the finely chopped pistachios into the butter mixture. Ensure the nuts are spread evenly. This adds a nice crunch and a burst of flavor. The green color of the pistachios also makes the butter look great! Next, prepare to shape the butter. Grab a sheet of parchment paper. Spoon the mixture onto the paper. Use your hands to form it into a log shape. Once shaped, roll the parchment around the log. Twist the ends tightly. This keeps the butter in shape. Place the wrapped butter in the fridge for at least 1-2 hours. This step is important for it to firm up. After chilling, unwrap the butter and slice it into round discs. You can now enjoy your pistachio bliss compound butter! To get that creamy, smooth texture, start with soft butter. Leave it out for about an hour. This step makes mixing easier. Blend the butter and other ingredients well. You want a uniform mix without lumps. If it's too soft, chill it longer. If it’s too firm, let it sit for a few minutes. You can add different flavors to make it special. Fresh herbs like thyme or rosemary are great. For a spicy kick, try a pinch of cayenne pepper. You can also experiment with different nuts. Almonds or walnuts work well too. Each nut gives a unique flavor twist. Don’t forget about spices like cinnamon for a sweet touch. Serve your pistachio compound butter on a nice cutting board. This makes it look inviting. Cut the butter into rounds after it firms up. Place it next to a cute butter knife. Add some whole pistachios and lemon slices for color. This adds a fresh look to your spread. Enjoy it with warm bread or crackers for a tasty treat. {{image_4}} You can switch up the nuts in your compound butter. Almonds, walnuts, or hazelnuts work great. Each nut brings a unique flavor and texture. If you want a milder taste, try cashews. For a crunchier bite, go with pecans. The key is to finely chop the nuts, just like you do with pistachios. This keeps the butter smooth and spreads easily. Herbs and spices can take your compound butter to the next level. Try adding fresh herbs like basil or thyme for a savory twist. If you prefer warmth, a pinch of cinnamon or nutmeg can add depth. Citrus zest, like orange or lime, brightens the flavor. Mix and match to find what you love most. Just remember to keep a balance so no flavor overpowers the rest. You can create sweet or savory versions of your butter. For sweet butter, add a bit more honey and some cinnamon. This pairs well with pancakes or waffles. For a savory touch, try garlic powder or chopped chives. This version goes great on grilled meats or vegetables. You can easily create a variety of flavors with just a few tweaks. Explore the options and enjoy the journey! To keep your pistachio compound butter fresh, wrap it tightly. Use parchment paper or plastic wrap to cover it. Make sure there are no air pockets. This helps prevent freezer burn and keeps the butter from absorbing smells. Store it in the fridge if you plan to use it soon. If you want to save your butter for later, freezing is the best option. Cut the butter into smaller pieces. This way, you can take out just what you need. Place the wrapped butter in an airtight container or a freezer bag. It can last up to three months in the freezer. In the fridge, your compound butter will stay good for about two weeks. After that, check for any off smells or changes in texture. If it looks or smells strange, it’s best to throw it away. Use your butter on toast, veggies, or grilled meats for a burst of flavor. Feel free to mix it into dishes or use it as a flavorful spread. Enjoy! You can use pistachio compound butter in many ways. Spread it on warm bread for a tasty treat. It adds a rich flavor to roasted veggies. You can also use it on grilled meats for a zesty kick. Try it on pancakes or waffles for a special brunch. This butter can be a fun way to elevate simple dishes. Yes, you can! Substitute the unsalted butter with a dairy-free alternative. Use coconut oil or a vegan butter spread. Both options work well and taste great. Just make sure to soften the dairy-free option like you would with regular butter. Your pistachio compound butter will still be creamy and delicious. It takes about 1-2 hours for the butter to set. After you shape the butter into a log, wrap it tightly in parchment paper. Place it in the fridge so it can firm up. This step is key for easy slicing later. If you want it to set faster, you can chill it in the freezer for 30 minutes. Absolutely! You can easily double the recipe. Just use 2 cups of butter and adjust the other ingredients. This way, you can make enough for a party or family gathering. Keep in mind that you may need a larger mixing bowl. Ensure that everything blends well for the best flavor. If your butter is too soft, try chilling it longer. Wrap it tightly and place it in the fridge for another 30 minutes. If it’s still soft, you may need to add more finely chopped pistachios. This can help thicken it up. Be sure to mix well to distribute the nuts evenly. To make pistachio compound butter, start with quality ingredients and mix well. I covered how to shape and chill your butter for the right texture. Don't forget to experiment with flavors or nuts that you like best. Proper storage will keep your butter fresh for longer use. With these tips, you can enjoy this tasty treat in many ways. Simple adjustments allow it to fit your needs. Enjoy making and sharing your homemade pistachio compound butter!
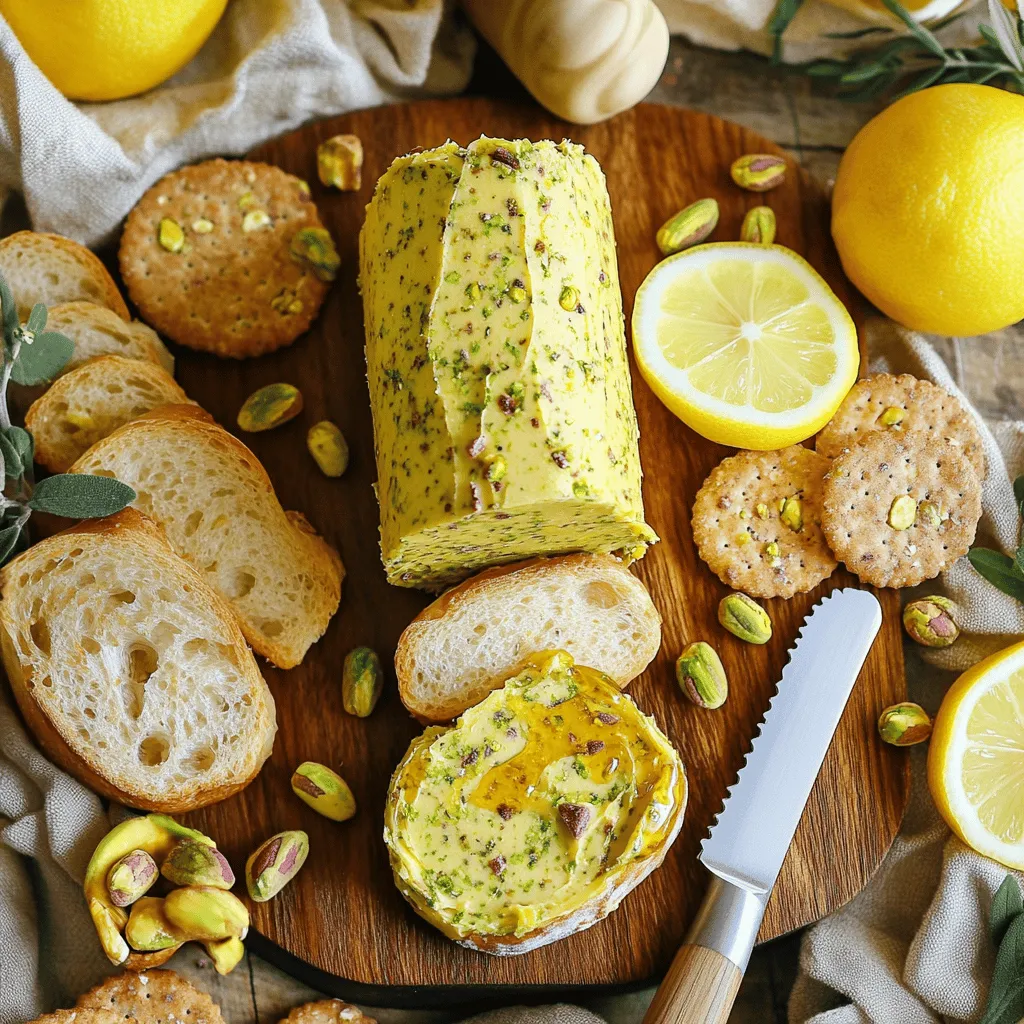
How to Make Pistachio Compound Butter Deliciously
Have you ever wanted to elevate your meals with a simple twist? Making pistachio compound butter is a fantastic way to boost flavors and impress
- 1 lb shrimp, peeled and deveined - 1 tablespoon sriracha - 1 tablespoon mayonnaise - 1 cup sushi rice - 1 1/4 cups water - 1 tablespoon rice vinegar - 1 teaspoon sugar - 1/2 teaspoon salt - 1 avocado, thinly sliced - 1 cucumber, halved and sliced - 3 sheets nori, cut into small squares - Sesame seeds, for garnish - Pickled ginger and wasabi, for serving To make Spicy Shrimp Sushi Stacks, you need a few key ingredients. First, use fresh shrimp. They give the best taste. The spicy mayo, made from sriracha and mayonnaise, adds a kick to the dish. Next, sushi rice is crucial. It should be sticky and fluffy. This rice binds the stacks together. Rinse it well to remove extra starch. The fresh toppings are vital for color and flavor. Creamy avocado and crisp cucumber balance the spice of the shrimp. Nori adds a nice touch too. It gives a slight crunch. Don't forget sesame seeds! They add a nutty flavor and look great on top. You can serve these sushi stacks with pickled ginger and wasabi. They enhance the dish and bring a traditional touch. For the full recipe, check out the [Full Recipe]. - Rinse the sushi rice under cold water. - Combine rice and water in saucepan and bring to boil. - Simmer and steam the rice. Start by rinsing the sushi rice. This helps remove extra starch. Rinse it in cold water until the water runs clear. Then, combine the rinsed rice with 1 1/4 cups of water in a medium saucepan. Bring this mixture to a boil over medium-high heat. Once it boils, reduce the heat to low. Cover the pot and let it simmer for 15 minutes. After this, turn off the heat. Let the rice steam in the pot for another 10 minutes. This step is key for fluffy sushi rice. - Whisk together rice vinegar, sugar, and salt. - Heat mixture until sugar dissolves. - Fluff the cooked rice and fold in the seasoning. In a small bowl, whisk together rice vinegar, sugar, and salt. Heat this mixture in the microwave for about 30 seconds. You want the sugar to dissolve completely. Once the rice is cooked, fluff it with a fork. Gently fold in the vinegar mixture. This adds flavor and shine to your rice. - Mix sriracha and mayonnaise to create spicy mayo. - Sauté shrimp until pink and opaque. - Toss shrimp in spicy mayo until coated. For the spicy shrimp, mix sriracha and mayonnaise in a bowl. This is your spicy mayo. In a large skillet, heat a little oil over medium heat. Add the shrimp and sauté for 3-4 minutes. Cook until the shrimp turn pink and opaque. Remove the skillet from the heat and toss the shrimp in the spicy mayo until they are well coated. This step makes the shrimp flavorful and creamy. - Layer sushi rice, spicy shrimp, avocado, and cucumber in mold. - Repeat layers until mold is full. - Ensure layers are pressed down gently. To assemble the sushi stacks, you need a round mold. Start with a layer of sushi rice at the bottom. Press it down gently. Next, add a layer of the spicy shrimp, followed by slices of avocado and cucumber. Repeat the layers until the mold is full. Make sure each layer is pressed down gently. This helps the stacks hold their shape. - Carefully lift the mold to reveal sushi stacks. - Sprinkle sesame seeds and garnish with nori. - Serve with pickled ginger and wasabi. Once assembled, lift the mold off slowly. You will see your beautiful sushi stacks. For a finishing touch, sprinkle sesame seeds on top. You can also add small squares of nori around the base for extra flavor. Serve your delicious sushi stacks with a side of pickled ginger and a dab of wasabi. These details enhance the overall experience. For the full recipe, check out the complete guide. To make great sushi rice, you must rinse it well. Rinsing removes extra starch. This gives the rice a nice, chewy texture. Rinse until the water runs clear. This step is key for great sushi. After cooking, let the rice rest. This resting time helps the rice firm up. It also allows the flavors to develop. You can boost flavors with different sauces or spices. Try adding spicy mayo, sesame oil, or even a splash of lime juice. Each adds a unique twist. Choosing the right sushi vinegar is also important. It adds depth and a slight sweetness. Taste as you go to find your perfect mix. Plating can make your sushi stacks pop. Use a clean plate to showcase your work. Create height with your stacks for visual appeal. Color balance is key too. Use fresh ingredients like bright avocado and crisp cucumber. Add some sesame seeds on top for a nice crunch. This makes your dish not only tasty but beautiful too. {{image_4}} You can switch out shrimp for other proteins. Crab, salmon, or even tofu work well. Each protein brings its own flavor. Crab gives a sweet taste, while salmon offers a rich, buttery texture. Tofu is great for a plant-based option and soaks up flavors well. Using different seafood options keeps your meal exciting and fresh. If you want a vegan take, skip the shrimp. Load your stack with fresh veggies instead. Think cucumbers, carrots, and bell peppers. You can also add avocado for creaminess. For sauces, try a soy sauce blend or a sweet chili sauce. These flavors complement your veggies and create a tasty dish. Do you prefer spicy or mild? You can easily adjust the heat level. Add more sriracha for a kick or use less for a milder flavor. You can also try adding toppings like mango or shredded carrots. These add sweetness and crunch to your sushi stacks. Experiment with what you like best! For the complete recipe, check out the [Full Recipe]. To keep your spicy shrimp sushi stacks fresh, refrigerate leftovers in an airtight container. This helps maintain their flavor and texture. They last about 1-2 days in the fridge. If you see any signs of spoilage, like an off smell or change in color, toss them out. You can freeze sushi stacks, but it is tricky. Do not freeze them with the toppings like avocado or cucumber. They do not freeze well. Instead, freeze only the sushi rice and shrimp in a separate container. When reheating, thaw in the fridge overnight. Heat gently in a skillet. This keeps the texture nice. Serve your sushi stacks fresh for the best taste. Add pickled ginger and wasabi on the side for a kick. Pair them with a light salad or miso soup. A crisp white wine or sake works well to enhance the meal. Enjoy your delicious sushi stacks with friends and family! Don't forget to check out the Full Recipe for more details. The best rice for sushi is short-grain rice. It is sticky and holds together well. Varieties like Koshihikari and Calrose are popular choices. They help create the perfect texture for sushi rolls and stacks. Sticky rice allows for easy handling and a great bite. Yes, you can prep sushi stacks ahead. Cook your sushi rice and shrimp earlier in the day. Store them in the fridge. Assemble the stacks just before serving. This keeps the rice fresh and the shrimp tasty. Cooked shrimp turns pink and opaque. When done, it curls into a C shape. Avoid overcooking, as shrimp can become tough. It usually takes about 3 to 4 minutes of cooking time. Keep an eye on the color for the best results. Yes, you can use gluten-free soy sauce. Brands like Tamari and Coconut Aminos are great alternatives. They offer a similar taste without gluten. Always check labels to ensure they meet your dietary needs. Many sauces enhance the flavor of sushi stacks. Soy sauce is classic, but you can try spicy mayo too. A drizzle of eel sauce or ponzu adds a nice touch. For a kick, wasabi or sriracha work well too. To get perfect sushi rice, rinse it well before cooking. This removes excess starch. Use the right water-to-rice ratio, which is usually 1.25 cups water for 1 cup rice. Let the rice rest after cooking for the best texture. Fluff it gently with a fork before serving. For the full recipe of Spicy Shrimp Sushi Stacks, check out the earlier sections. In this blog post, we explored the key ingredients and steps to create delicious spicy shrimp sushi stacks. From preparing sushi rice to adding fresh toppings, each part is essential for great taste. Remember, you can play with flavors and even swap proteins for variety. Enjoy experimenting with these stacks and impress your friends at your next gathering. Lastly, follow the tips to store and serve these sushi stacks perfectly. Your efforts will surely lead to tasty rewards!
Spicy Shrimp Sushi Stacks Tasty and Simple Recipe
Are you ready to elevate your sushi game? With my simple Spicy Shrimp Sushi Stacks recipe, you can create a delicious and visually stunning dish
- 4 large flour tortillas - 1 cup shredded cheddar cheese - 1 cup shredded mozzarella cheese - 1 cup cooked chicken, shredded (or black beans for vegetarian) - 1 small bell pepper, diced - ½ small red onion, finely chopped - 1 tablespoon taco seasoning - Cooking spray or olive oil for brushing - Optional toppings: sour cream, guacamole, salsa When I make air fryer quesadillas, I always start with fresh ingredients. The flour tortillas serve as the perfect base. I like to use a mix of cheddar and mozzarella cheese for great meltiness. If you enjoy meat, shredded chicken is my go-to. For a veggie option, black beans work wonderfully. Diced bell peppers add a nice crunch and sweetness. I choose a small red onion for its mild taste. Taco seasoning gives a burst of flavor that makes these quesadillas memorable. Don’t forget the cooking spray or olive oil! It’s key for crispiness. For a fun finishing touch, I recommend toppings like sour cream, guacamole, or salsa. They really enhance the whole experience. With these ingredients, you are on your way to making a crispy and flavorful delight. For the full recipe, check out the detailed instructions that follow! - Preheat the air fryer to 375°F (190°C) for 5 minutes. - Combine shredded chicken (or black beans) with diced bell pepper, red onion, and taco seasoning. To get the best flavor, mix the chicken or black beans with the veggies and seasoning. This will add depth and taste to your quesadillas. Make sure the seasoning is well mixed into the filling. - Distribute cheese evenly on two tortillas, then layer with the chicken mixture, and top with remaining cheese. - Place the second tortilla on top of each. Start by laying out two tortillas. Add a good amount of cheese first. Next, spoon the chicken mixture on top. It’s key to use enough cheese to keep everything together. Finally, add the last layer of cheese and put another tortilla on top. - Brush the tops with cooking spray or olive oil before air frying. - Air fry for 8-10 minutes, flipping halfway through to ensure even cooking. Before placing the quesadillas in the air fryer, brush the tops with cooking spray or olive oil. This step makes them crispy and golden. Cook them for 8-10 minutes. Flip them halfway through to cook evenly. Check for that perfect golden brown color before removing them. Enjoy your crispy and flavorful delight! For more details, check out the Full Recipe. Preheating the air fryer is key. It helps the quesadillas cook evenly and get that nice crunch. Set your air fryer to 375°F (190°C) for about 5 minutes. This small step makes a big difference. Brushing the tortillas with oil is important, but you want to avoid too much oil. Use a light touch. A cooking spray works well here. If you don't have that, a paper towel dipped in oil can help spread a thin layer. Want to make your quesadillas even tastier? Try adding extra spices or herbs to the filling. A dash of cumin or some fresh cilantro can really elevate the flavor. Mixing different cheeses can also change things up. Try using pepper jack for heat or goat cheese for creaminess. The combination of cheddar and mozzarella is always a hit, but don’t be afraid to experiment! For the perfect meal, think about what to serve with your quesadillas. Dips like sour cream, guacamole, and salsa are classic choices. They add freshness and flavor that complement the crispy quesadillas. Presentation matters too! Slice the quesadillas into wedges and arrange them on a colorful plate. Add some chopped cilantro on top for a nice touch. This makes the dish look more inviting and fun to eat. {{image_4}} You can easily make air fryer quesadillas vegetarian. Just swap the chicken for black beans. Black beans add protein and fiber. You can also mix in assorted veggies like spinach, mushrooms, or zucchini for more flavor and nutrition. Add more fun with various cheeses, meats, or veggies. Try pepper jack for a spicy kick. You can also add cooked chorizo or pulled pork for more depth. If you enjoy bold tastes, mix in jalapeños or roasted red peppers. For a unique flavor, consider adding herbs like cilantro or basil. If you need gluten-free options, use gluten-free tortillas. Many brands offer great tasting choices. For dairy-free diets, look for dairy-free cheese. There are many tasty alternatives available now. Just check the package for the best melting options. Enjoy your culinary creativity while meeting your dietary needs! To keep your air fryer quesadillas fresh, let them cool first. Wrap each quesadilla tightly in plastic wrap. You can also put them in an airtight container. This helps to keep them from drying out. For longer storage, freeze the wrapped quesadillas. They can last in the freezer for up to three months. To reheat quesadillas, I recommend using your air fryer for the best results. Preheat the air fryer to 350°F (175°C). Place the quesadillas in the basket, making sure not to overcrowd. Heat them for about 5 minutes, flipping halfway. This method keeps them crispy and warm. You can also use an oven. Set it to 350°F (175°C) and bake for 10-15 minutes. You can safely store quesadillas in the refrigerator for about 3 to 4 days. If you freeze them, they last much longer, around 2 to 3 months. Always check for any signs of spoilage before eating. If they smell off or look strange, it’s best to throw them away. To make your quesadillas crispy, preheat your air fryer to 375°F. This step helps achieve that perfect crunch. Brush the outside of the tortillas with a little olive oil or cooking spray. This adds flavor and helps with browning. Cook the quesadillas for about 8-10 minutes, flipping them halfway through. Keep an eye on them; you want them golden brown. Yes, you can make quesadillas ahead of time. Assemble them as usual and store them in the fridge. Wrap each quesadilla in plastic wrap to keep them fresh. You can air fry them later when you're ready to eat. For best results, eat them within two days. Many sides go well with quesadillas. I love serving them with fresh salsa, guacamole, or sour cream. A simple salad with lime dressing adds a nice touch too. Chips and a dip like queso or bean dip make great snacks on the side. Yes, corn tortillas work well too! They give a different flavor and a chewier texture. If you use corn tortillas, reduce the cooking time slightly. They can cook faster than flour tortillas. Just keep an eye on them to avoid overcooking. In this article, we covered how to make delicious air fryer quesadillas. You learned about the ingredients needed, from tortillas to spices. I shared step-by-step instructions to prepare and cook them perfectly. Tips for crispiness and variations for different diets add extra fun. Enjoy your cooking adventure! Feel free to experiment until you find your favorite combination. Happy cooking!
Air Fryer Quesadillas Crispy and Flavorful Delight
Are you ready to elevate your snack game? Air fryer quesadillas are the perfect mix of crispy and delicious, making them a must-try! With just
- 12 large jalapeño peppers - 1 pound shrimp, peeled and deveined - 1 cup cream cheese, softened to room temperature - 1/2 cup shredded sharp cheddar cheese - 1/4 cup green onions, finely chopped - 2 cloves garlic, minced - 2 tablespoons Cajun seasoning - 1 tablespoon olive oil - Salt and freshly ground black pepper to taste - Cooking spray or additional olive oil for greasing Fiery Cajun Shrimp Stuffed Jalapeños start with fresh ingredients. The star here is the jalapeño. I love using large peppers for this dish. They have enough space for plenty of stuffing. You need shrimp to bring flavor and protein. Always choose fresh shrimp. Make sure they are peeled and deveined, so they are ready to cook. Cream cheese is vital for that rich and creamy texture. It helps balance the heat of the jalapeños. Sharp cheddar cheese adds depth to the flavor. Green onions give a fresh crunch. Don’t skip the garlic; it adds a nice aroma. Cajun seasoning gives a bold kick to the filling. Olive oil helps in cooking the shrimp. You can use salt and pepper to taste. Lastly, cooking spray or extra olive oil prevents sticking when baking. These ingredients come together to create a delightful treat. For the full recipe, check the details above. - Preheat the oven to 375°F (190°C). - Slice jalapeños in half lengthwise and remove seeds and membranes. Start by preheating your oven. This step ensures the jalapeños cook evenly. While the oven heats, prepare your peppers. Carefully cut each jalapeño in half. Use a spoon to scoop out the seeds and membranes. This helps lower the heat. If you want less spice, wear gloves to protect your hands. - Warm olive oil in a skillet and sauté minced garlic. - Add shrimp and Cajun seasoning, cooking until shrimp are pink and opaque. Next, heat olive oil in a skillet over medium heat. Add minced garlic and sauté for about one minute. You want the garlic fragrant, not browned. Then, toss in the shrimp and Cajun seasoning. Cook the shrimp for three to four minutes. Stir often until they turn pink and opaque. Once done, remove from heat and let them cool slightly. - Combine cream cheese, cheddar cheese, green onions, and cooked shrimp. - Season the mixture with salt and pepper. In a large bowl, mix softened cream cheese and shredded cheddar cheese. Add finely chopped green onions along with the cooked shrimp. Stir everything together until it’s well combined. Then, season with salt and freshly ground black pepper to taste. This mixture is creamy and full of flavor. - Fill each jalapeño half with the shrimp mixture using a spoon or piping bag. Now it’s time to stuff the jalapeños. Use a spoon or piping bag to fill each half with the shrimp mixture. Make sure to heap the filling for a tasty bite. Each jalapeño should look full and inviting. - Arrange jalapeños on a baking sheet and bake for 15-20 minutes until tender. Place the stuffed jalapeños on a baking sheet. Bake them in the preheated oven for 15 to 20 minutes. Look for them to be tender and the cheese melted into a bubbly, golden topping. After baking, let them cool for a few minutes. This helps enhance the flavors. Enjoy your delicious creation! For the full recipe, check out the detailed cooking instructions. To control heat, you can remove the seeds and membranes from the jalapeños. This simple step helps tone down the spice. If you want a milder flavor, you can also use other peppers, like bell peppers or banana peppers. Both of these options keep the dish vibrant and tasty without too much heat. If you want a lighter option, choose low-fat cream cheese. This swap cuts calories without losing flavor. For those who avoid dairy, dairy-free cream cheese works well too. Brands like Tofutti or Kite Hill offer great alternatives that blend smoothly with the filling. Broiling the stuffed jalapeños gives them an extra crispy top. After baking, switch to broil for a few minutes. Watch them closely to avoid burning. Another great option is air frying. It cooks them evenly and adds a nice crunch. Just set the temperature to 375°F and cook for about 10-12 minutes. For the Full Recipe, check the section above. Enjoy making this delicious treat! {{image_4}} You can switch up the protein in these stuffed jalapeños. Try using crab, chicken, or sausage instead of shrimp. Each option brings a unique flavor. If you want a vegetarian version, use black beans or corn. Both options add a hearty touch and keep the dish tasty. Cheese plays a big role in flavor. You can experiment with different cheeses like gouda or pepper jack. Both add a rich taste and creaminess. Another option is to add cream cheese flavors, such as garlic herb. This gives a nice twist and enhances the overall taste. Spice is key in Cajun cooking. You can use different spice blends like taco seasoning for a fun twist. If you crave more heat, add chopped jalapeños or a splash of hot sauce to the stuffing. This will amp up the flavor and heat. Each variation keeps the dish exciting and fresh. Store your stuffed jalapeños in an airtight container. This keeps them fresh longer. I suggest refrigerating them for up to three days. After that, they may lose their taste and texture. You can reheat stuffed jalapeños in three ways: oven, microwave, or air fryer. If you want the best results, use the oven. Preheat it to 350°F (175°C) and heat for about 10 minutes. This method keeps the jalapeños crisp. In the microwave, place them on a plate and cover with a damp paper towel. Heat for 30-second intervals until warm. This method is quick but may make them soft. For the air fryer, set it to 350°F (175°C) and cook for about 5 minutes. This method also keeps them crispy. No matter how you reheat, enjoy your flavorful treat! For the full recipe, visit the earlier section. Yes, you can prepare these jalapeños in advance. First, stuff the jalapeños with the shrimp mixture. Then, cover them and place them in the fridge. They can stay fresh for up to 24 hours. When you are ready to bake, just take them out and follow the baking steps. This makes hosting easy and fun! The spice level can vary. Jalapeños can be mild or hot based on their ripeness. If you want less heat, remove the seeds and inner membranes. You can also use milder peppers like bell peppers. If you enjoy heat, add more Cajun seasoning or a dash of hot sauce to the filling. These stuffed jalapeños pair well with various dips and sides. Sour cream or ranch dressing cools the heat. You can also serve them with guacamole or a fresh salsa. For a complete meal, add a side salad or chips and dip. The jalapeños are done when they are tender and the cheese is bubbly and golden. You can also poke one with a fork. If it feels soft, they are ready. Keep an eye on them to avoid overcooking. To make Fiery Cajun Shrimp Stuffed Jalapeños, we covered ingredients, cooking steps, and tips. You can adjust spiciness or change proteins to fit your taste. Don’t forget about storage and reheating options to keep leftovers fresh. These stuffed jalapeños offer flavor and fun for any gathering. Enjoy making this tasty dish, whether for yourself or a crowd. Get ready to share some spicy goodness!
Fiery Cajun Shrimp Stuffed Jalapeños Irresistible Treat
If you crave a burst of flavor, these Fiery Cajun Shrimp Stuffed Jalapeños are for you! Packed with juicy shrimp, creamy cheese, and just the
- 12 pre-cooked meatballs (homemade or store-bought) - 1 pound slider buns (soft, preferably brioche) - 1 cup marinara sauce - 1 cup shredded mozzarella cheese - 1/2 cup grated Parmesan cheese - 1/4 cup unsalted butter, melted - 3 cloves garlic, minced - 1 teaspoon dried oregano - 1 teaspoon dried parsley - Salt and pepper to taste - Fresh basil leaves for garnish (optional) Gathering these ingredients is key to making your Pull-Apart Meatball Sliders shine. You want the best flavors to come together. Using pre-cooked meatballs saves time, but feel free to make your own if you prefer. For the buns, brioche adds a soft touch, but any slider bun works. The marinara sauce adds a rich depth, while the mozzarella cheese brings that gooey texture we crave. Don't skip the garlic or Parmesan butter; it gives the sliders an extra kick. Season with oregano and parsley to enhance flavor. Finally, fresh basil adds a nice pop of color and freshness on top. For the full recipe and details, check out the link to the Full Recipe. - Preheat your oven to 375°F (190°C). This helps ensure even cooking. - Combine melted butter with minced garlic, oregano, and parsley. Mix well. - Slice the slider buns in half, keeping the tops and bottoms connected. - Arrange the bottom halves in a greased baking dish. - Spread a layer of marinara sauce over the buns. - Place the pre-cooked meatballs on top of the sauce, close together. - Sprinkle shredded mozzarella cheese over the meatballs. - Add another layer of marinara sauce, then top with grated Parmesan. - Place the top halves of the buns back on and press down slightly. - Brush the garlic Parmesan butter over the top of the buns. - Cover the dish tightly with aluminum foil. - Bake for 15 minutes covered, then remove the foil. - Bake for an additional 10 minutes until golden brown and bubbly. This method gives you sliders that are warm and flavorful. For the full recipe, check the details above. Enjoy creating these tasty sliders! To make the garlic butter just right, start with melted butter. Mix in minced garlic, dried oregano, and dried parsley. The butter should be smooth and easy to brush on. If you want a milder taste, try using garlic powder instead of fresh garlic. This gives you a different flavor but still keeps the essence of garlic. These sliders shine on their own but pair well with sides. Serve them with crispy potato wedges or a fresh salad. For a fun twist, add a side of marinara for dipping. When presenting, slice the sliders into pieces. Arrange them on a wooden board for a rustic vibe. Drizzle any leftover garlic butter on top for extra flavor. You can prepare these sliders in advance for easy meals. Assemble them a few hours before cooking. Cover them tightly in the fridge. When you are ready to bake, just pop them in the oven. To reheat, cover them with foil to keep them moist. Bake until warm and the cheese is gooey. This way, you can enjoy a tasty meal without much fuss. {{image_4}} You can switch up the meatballs for different flavors. Turkey meatballs work great if you want a lighter option. They are juicy and taste fantastic. If you prefer plant-based meals, try vegetarian meatballs. These give a nice texture and flavor too. You can also customize the flavor of your meatballs. Add some heat with spicy seasonings or keep it savory with herbs. This way, you can make the sliders fit your taste. Cheese can change the whole dish. While mozzarella is classic, you can explore other cheeses too. Try provolone for a mild taste or cheddar for a sharper kick. You can mix different cheeses for a unique flavor. Creamy cheeses like ricotta can add a rich texture. On the other hand, a crumbly cheese like feta gives a nice contrast. Finding the right balance between creaminess and sharpness can make your sliders even better. The type of bun you choose matters. Soft brioche buns are lovely, but you can try whole wheat buns for a healthier option. They add a nutty flavor and are hearty. If gluten is a concern, gluten-free buns work well too. Don't forget about toppings! Adding fresh veggies like lettuce or pickles gives a nice crunch. You can also drizzle sauces like ranch or sriracha for an extra kick. Get creative with your toppings to make your sliders stand out. You can find the Full Recipe for these delicious Pull-Apart Meatball Sliders with Garlic Parmesan Butter to start your culinary adventure! To keep your sliders fresh, place them in an airtight container. This helps prevent air from making them dry. Make sure the container seals tightly. If you leave them out, they spoil quickly. Store the sliders in the fridge for tasty snacks later. Want to save sliders for later? You can freeze them! Wrap each slider in plastic wrap. Then, place them in a freezer bag. They stay fresh for about three months. When you're ready to eat, take them out and thaw in the fridge overnight. To reheat, place them in the oven at 350°F (175°C) for 15 minutes. This keeps the sliders warm and tasty. In the fridge, your sliders last about three days. After that, they may spoil. Look for signs like a strange smell or mold. If they smell off, it's best to throw them away. Enjoy your Pull-Apart Meatball Sliders with Garlic Parmesan Butter from the Full Recipe while they are fresh! Yes, you can use fresh meatballs! Fresh meatballs add a juicy flavor. They cook right in the oven. This makes the sliders even tastier. You can make your own or buy them from the store. If you choose to make your own, use simple ingredients. Ground beef, breadcrumbs, and spices work great. Fresh meatballs will give a homemade feel to your sliders. These sliders are quick to prepare. The total time is about 35 minutes. Here’s the breakdown: - Prep time: 10 minutes - Cook time: 25 minutes You will spend the first 10 minutes prepping. This includes mixing the garlic butter and slicing the buns. Then, baking takes about 25 minutes. First, cover with foil for 15 minutes. After that, uncover and bake for another 10 minutes. Easy and fast! You can serve many tasty sides with these sliders. Here are some great options: - Fresh salad for a light touch - Crispy potato wedges for crunch - Garlic bread for extra flavor - Marinara sauce for dipping These sides will complement your sliders perfectly. They add variety and keep the meal fun! Enjoy experimenting with different combinations. For more ideas, check the Full Recipe. This recipe for pull-apart meatball sliders combines tasty ingredients and easy steps. We used pre-cooked meatballs and soft buns, making it simple. The garlic butter adds flavor and richness. You can customize it with different meats and cheeses. Don’t forget to consider sides and presentation for a fun meal. These sliders are perfect for gatherings or a quick dinner. Store leftovers wisely and enjoy them later. Transform your next meal with this easy and delicious recipe. You’ll love how it brings everyone together.
Pull-Apart Meatball Sliders with Garlic Parmesan Butter
Get ready to enjoy Pull-Apart Meatball Sliders with Garlic Parmesan Butter! These sliders are a perfect mix of soft buns, juicy meatballs, and rich cheese,
- 2 medium zucchinis - 1 cup all-purpose flour - 1/2 cup freshly grated Parmesan cheese - 2 large eggs - 1/4 cup finely chopped fresh parsley - 1/4 teaspoon garlic powder - 1 teaspoon sea salt - 1/4 teaspoon freshly ground black pepper - 1/2 teaspoon baking powder - Vegetable oil for frying Gather these ingredients before you start cooking. Fresh zucchinis are key for flavor. The grated Parmesan adds a nice richness. I like to use large eggs for binding. Fresh parsley gives a burst of color and taste. Garlic powder enhances the flavor without being overpowering. You need sea salt to help draw out moisture from the zucchini. Black pepper adds a hint of heat. Baking powder helps the fritters puff up a bit, making them light. Vegetable oil is crucial for frying. You want enough oil to cover the bottom of the skillet for even cooking. For the full recipe, make sure to check the instructions. You will love how simple it is to make these crispy zucchini fritters! Grate the zucchinis using a box grater or a food processor. Place the grated zucchini in a colander and sprinkle it with 1 teaspoon of sea salt. This step helps pull out excess moisture. Let the zucchini sit for about 10-15 minutes. During this time, you will see water gather at the bottom. This moisture removal is key to keeping your fritters crispy. After letting the zucchini rest, it’s time to squeeze out the liquid. Take a clean kitchen towel or several layers of paper towels. Place the grated zucchini inside and press down firmly. You want to remove as much liquid as possible. The drier the zucchini, the crunchier your fritters will be. Now for the fun part! In a large mixing bowl, combine the drained zucchini with the following ingredients: - 1 cup all-purpose flour - 1/2 cup freshly grated Parmesan cheese - 2 large eggs, beaten - 1/4 cup finely chopped fresh parsley - 1/4 teaspoon garlic powder - 1/4 teaspoon freshly ground black pepper - 1/2 teaspoon baking powder Stir the mixture until all the ingredients blend well. You should have a thick batter that holds together. Next, heat vegetable oil in a large skillet. Pour enough oil to cover the bottom by about 1/4 inch. Heat the oil over medium heat until it shimmers. This means it is ready for frying. Using a tablespoon or small ice cream scoop, drop about 2 tablespoons of the zucchini mixture into the hot skillet. Lightly flatten each scoop with the back of a spoon. Be careful not to overcrowd the skillet. Fry the fritters for about 3-4 minutes on each side. Look for a golden brown color, which shows they are done. Use a slotted spoon to transfer the fried fritters to a plate lined with paper towels. This absorbs any excess oil. Repeat this process until all the zucchini mixture is cooked. For the full recipe, check the details above. To make crispy zucchini fritters, you must remove moisture from the zucchini. Grating the zucchini is just the start. After grating, sprinkle it with sea salt and let it sit for 10-15 minutes. This step draws out excess water. Next, wrap the zucchini in a clean kitchen towel or paper towels. Squeeze hard to remove as much liquid as you can. The drier the zucchini, the crispier your fritters will be. For frying, heat the oil until it shimmers. This shows that it’s hot enough, usually around 350°F. Frying at the right temperature will give your fritters a golden brown color. Crispy zucchini fritters taste great with dips. I love to pair them with creamy Greek yogurt or tangy sour cream. These dips add a nice contrast to the fritters. For an added touch, garnish your fritters with freshly chopped parsley. It makes the dish look vibrant and fresh. You can also serve them on a colorful platter to impress your guests. When frying, work in batches. Overcrowding the skillet can lower the oil's temperature. This makes your fritters soggy instead of crispy. Keep an eye on the heat. If the fritters start to burn, turn down the heat. You want them to cook evenly and stay golden brown. {{image_4}} To make your crispy zucchini fritters even more exciting, try adding herbs and spices. Fresh herbs like dill or cilantro can brighten the flavor. Just chop a handful and mix them in. They add a fresh twist that pairs well with the zucchini. You can also boost the taste with spices. A dash of paprika gives a smoky kick. For a bit of heat, cayenne pepper works great. Start with a small amount and adjust to your liking. These options let you customize your fritters for a unique flavor each time. If you need gluten-free options, substitute all-purpose flour with almond flour or chickpea flour. Both options work well and keep the fritters tasty. For those avoiding dairy, try using a non-dairy cheese alternative, like cashew cheese. It melts nicely and adds creaminess without the dairy. When cooking for a crowd, it’s easy to scale up this recipe. Simply double or triple the ingredients. This way, everyone gets a taste of your delicious fritters. If you're cooking for just one or two, you can make half the recipe. Just remember to adjust the cooking time slightly. Smaller batches cook faster, so keep an eye on them. For the full recipe, check out the original instructions to guide you through. To keep your leftover fritters fresh, store them in the fridge. Place them in an airtight container. This will help them stay crispy and tasty. Try to eat them within three days for the best flavor. When reheating, I recommend using an oven. Preheat it to 350°F (175°C) and place fritters on a baking sheet. Bake for about 10 minutes. This method helps keep the fritters crispy. If you use a microwave, they may turn soggy. To freeze fritters, first let them cool completely. Then, layer them in a freezer-safe container with parchment paper in between. This prevents sticking. When ready to eat, thaw in the fridge overnight. Reheat in the oven for the best texture. Enjoy a warm treat anytime! For the full recipe, check out the Crispy Zucchini Fritters instructions. To make zucchini fritters crispy, you must remove moisture. Start by grating the zucchinis and sprinkle them with sea salt. Let them sit in a colander for about 10-15 minutes. This process helps draw out the water. After resting, take a clean towel and place the grated zucchini inside. Twist the towel to squeeze out as much liquid as you can. The drier the zucchini is, the better your fritters will turn out. Yes, you can bake zucchini fritters for a healthier option. Preheat your oven to 425°F (220°C). Line a baking sheet with parchment paper. Form the fritters as you normally would, but place them on the baking sheet. Brush them lightly with vegetable oil on both sides. Bake for about 20-25 minutes, flipping halfway through. This method gives you a nice crisp without frying. Zucchini fritters pair well with various dips and sides. I suggest serving them with creamy Greek yogurt or sour cream. They also taste great with a tangy tzatziki sauce. You can add a simple salad with cherry tomatoes and arugula for a fresh side. These options complement the flavors of the fritters and make for a tasty meal. To check if the oil is hot enough, add a small piece of zucchini. If it sizzles and rises to the top, the oil is ready. Another method is to sprinkle a few drops of water into the oil. If they dance and evaporate quickly, your oil is hot. Frying at the right temperature ensures a golden, crispy fritter. For the full recipe, check out the detailed cooking instructions. Zucchini fritters are simple yet delicious. We covered all you need to know. Start by preparing fresh zucchini, mixing ingredients, and frying for crispiness. Don’t forget quick tips for flavor and storage. Feel free to try new herbs and seasonings. Whether for a small snack or a big feast, these fritters can shine at your table. Enjoy making and sharing these tasty treats!
Crispy Zucchini Fritters Flavorful and Easy Recipe
Are you craving a tasty snack that’s both crunchy and healthy? Look no further! My Crispy Zucchini Fritters recipe is simple, fun, and packed with
To make the best crunchy zucchini chips, you need just a few simple ingredients. Here’s what you will need: - 2 medium zucchinis - 2 tablespoons olive oil - 1 teaspoon garlic powder - 1 teaspoon onion powder - 1 teaspoon smoked paprika - 1/2 teaspoon sea salt - 1/4 teaspoon black pepper - 1/4 cup grated Parmesan cheese (optional) - Cooking spray These ingredients come together to create a tasty and healthy snack. Each item adds a unique flavor that makes the chips irresistible. You can adjust the spices to match your taste. If you want more heat, add chili powder. For a fresh kick, try some lemon zest. The olive oil keeps the chips from sticking and helps them crisp up nicely in the oven. Garlic and onion powders add depth, while smoked paprika gives a subtle smokiness. Parmesan cheese, while optional, brings a savory richness that enhances the flavor. When you gather these items, you are ready to make your crunchy zucchini chips. Check out the [Full Recipe] for detailed steps to create this delicious snack! Start by rinsing the zucchinis under cold water. This removes dirt and ensures they are clean. Next, slice the zucchinis thinly, about 1/8 inch thick. You can use a mandolin slicer or a sharp knife. It is very important to keep the slices even. This way, each chip cooks at the same rate. Uniform thickness leads to crispy results. In a large bowl, combine the zucchini slices with olive oil, garlic powder, onion powder, smoked paprika, sea salt, and black pepper. If you want a stronger taste, add grated Parmesan cheese. Using your hands or a spatula, toss the zucchini slices gently. Make sure every piece gets coated with oil and spices. This gives each chip a delicious flavor. Prepare your baking sheet by lining it with parchment paper. You can also lightly spray it with cooking spray. Lay the zucchini slices in a single layer on the sheet. Avoid overlapping to ensure they get crispy. Place the baking sheet in your preheated oven at 225°F (110°C). Bake for about 2 to 2.5 hours. Flip the chips halfway through. This helps them cook evenly. Keep an eye on them as they bake. You want them golden, not burnt. Once done, let the chips cool on the baking sheet. This cooling time helps them crisp up even more. Enjoy your crunchy zucchini chips right away! For the full recipe, check out the details provided above. To get the best crunch from your zucchini chips, start by baking them at the right temperature. I recommend 225°F (110°C). This low heat helps remove moisture. When you place the zucchini slices on the baking sheet, space them out. Lay them in a single layer. Avoid overlapping slices. This way, they can crisp up perfectly. Flip them halfway through baking. This helps both sides cook evenly. You can boost the flavor of your zucchini chips easily. Try adding different spices like cayenne for heat or Italian herbs for a fresh taste. If you want a cheesy kick, sprinkle some grated Parmesan cheese over the slices. You can also try other cheeses like cheddar or mozzarella. Each cheese brings its own unique flavor. If your chips are not crispy, check your baking time. They may need a bit longer in the oven. Keep an eye on them during the last few minutes to avoid burning. If they are burnt, your oven may be too hot. Lower the temperature next time. For undercooked chips, ensure they are thinly sliced and spaced properly. Use the full recipe for precise instructions. Enjoy snacking! {{image_4}} You can spice up your zucchini chips in many ways. If you love heat, try adding cayenne pepper. A sprinkle of this fiery spice gives your chips a nice kick. Mix in about 1/2 teaspoon with the other seasonings for a bold flavor. For a more earthy taste, use fresh herbs like rosemary or thyme. Chop them finely, and add a tablespoon to your seasoning mix. The herbs will add a lovely aroma and flavor to your zucchini chips. While baking is the classic method, you can also air fry zucchini chips. An air fryer cooks them faster and keeps them crispy. Set your air fryer to 350°F and cook in small batches for 10-15 minutes. Check often to avoid burning. You can also use a dehydrator for a different approach. A dehydrator uses low heat to remove moisture slowly. This can take around 4-6 hours but results in ultra-crisp chips. If you don’t have a dehydrator, you can even cook them on the stovetop. Just heat a skillet over medium heat and cook the slices in batches until crispy. Zucchini chips are great on their own, but they shine even more with dips. Hummus or guacamole pairs well with their crunch. You can also try a cheesy dip made from cream cheese and herbs for a rich treat. If you want to make a meal, use zucchini chips as a crunchy topping. They work well on salads or soups. You can even layer them in a sandwich for extra texture. With these ideas, you can enjoy your crunchy zucchini chips in many fun ways. For the full recipe, check out Best Crunchy Zucchini Chips. To keep your crunchy zucchini chips fresh, store them in a cool place. Use an airtight container to keep them crispy. Avoid using plastic bags, as they can trap moisture. Instead, try glass jars or metal containers. You can also layer paper towels between the chips to soak up extra moisture. This helps maintain their crunch. If you want to enjoy your chips again, reheating is the way to go. Use an oven or a toaster oven to bring back their crunch. Preheat it to 350°F (175°C). Place the chips in a single layer on a baking sheet for even heating. Bake them for about 5 to 10 minutes. Keep an eye on them to prevent burning. Avoid using the microwave, as it can make them soggy. You can keep zucchini chips for about a week if stored properly. Check for any signs of spoilage, like a soft texture or off smell. If the chips feel damp or lose their crunch, it's time to toss them. For the best taste, enjoy them fresh or within a few days of making them. You can easily make zucchini chips in your oven. Start by slicing the zucchini thin, about 1/8 inch thick. This helps them dry out evenly. Preheat your oven to 225°F (110°C). Spread the slices on a baking sheet lined with parchment paper. Make sure they do not overlap. Bake for about 2 to 2.5 hours, flipping halfway. Keep an eye on them as they bake. You want them crispy but not burnt. Yes! Many veggies work well for chips. Try sweet potatoes, carrots, or kale. They all have great flavors and textures. You can follow the same steps as zucchini chips. Just adjust the baking time based on how thick you slice them. Homemade zucchini chips are a smart snack choice. Zucchini is low in calories and high in fiber. They have vitamins A and C too. When you make them at home, you control the oil and salt. This means you can keep them healthy and tasty. Seasoning is key for flavor. I recommend these spices: - Garlic powder - Onion powder - Smoked paprika - Sea salt - Black pepper You can also add cheese for extra flavor. Try Parmesan or nutritional yeast for a dairy-free option. Yes, you can freeze zucchini chips. First, let them cool completely. Place them in an airtight container. They will keep their crunch better this way. To thaw, just bring them to room temperature. For a crispier snack, reheat them in the oven for a few minutes. Enjoy your tasty, healthy snack anytime! For the full recipe, check out the Best Crunchy Zucchini Chips. Zucchini chips are a fun and healthy snack. We discussed ingredients, steps, and tips to make them tasty. You can try different seasonings and cooking methods for variety. Remember to store and reheat them right to keep them crisp. These chips can enhance meals and are a great way to enjoy vegetables. With all this, you’re ready to make your own delicious zucchini chips at home. Enjoy the crunch and flavor!
Best Crunchy Zucchini Chips for a Healthy Snack
Looking for a tasty and healthy snack? You’ve come to the right place! I bring you the best crunchy zucchini chips, a guilt-free treat that’s