Appetizers

Chicken cranberry pinwheels are a delightful snack. They mix sweet and savory flavors. This recipe is simple and quick to make. You will love the taste and ease of these pinwheels. - Chicken - Cream Cheese - Dried Cranberries - Green Onions - Garlic Powder - Honey - Salt and Pepper - Tortillas - Spinach Leaves For this recipe, you need cooked chicken. Shred it into small pieces. Cream cheese adds a rich, creamy texture. Dried cranberries bring a sweet burst of flavor. Green onions add a mild onion taste. Garlic powder gives a hint of zest. Honey adds a touch of sweetness. Use salt and pepper to enhance the flavors. Large flour tortillas hold everything together. Fresh spinach leaves provide a nice crunch. Gather these ingredients to create tasty chicken cranberry pinwheels. This mix of flavors makes every bite delicious. To begin, gather your ingredients. You will need cooked chicken, cream cheese, dried cranberries, green onions, garlic powder, honey, salt, pepper, tortillas, and spinach leaves. In a large bowl, mix the shredded chicken with softened cream cheese. Add the chopped cranberries, sliced green onions, garlic powder, honey, salt, and pepper. Use a fork or spatula to blend everything well. You want a smooth and even mixture. Now, lay one tortilla flat on a clean surface. With a spatula, spread one-fourth of the chicken mixture across the tortilla. Leave an inch at the edges for easy rolling. Next, place some fresh spinach leaves over the chicken mixture. This adds a nice crunch. Start rolling the tortilla from one edge, pressing gently to keep the filling inside. Once it's fully rolled, press the edge to seal it. Repeat this for the other tortillas until you have four pinwheels. Take a sharp knife and slice each pinwheel into bite-sized pieces, about one inch thick. This will show the colorful filling inside. Arrange the slices on a serving platter. For a fresh touch, add more spinach leaves around the pinwheels. This adds color and makes the dish look inviting. Enjoy your Chicken Cranberry Pinwheels right away, or keep them for later. For more details, check the Full Recipe. To make your Chicken Cranberry Pinwheels shine, focus on balance. The sweet cranberries pair well with savory chicken. Here are some tips to enhance the taste: - Use fresh herbs like parsley or cilantro for a bright touch. - Add a squeeze of lemon juice for a zesty kick. - Adjust the honey level to suit your taste. More honey means sweeter pinwheels. These small changes can elevate your dish to a new level. You can easily prepare these pinwheels ahead of time. This saves you stress during busy days. Here’s how: - Make the chicken mixture the night before. Store it in an airtight container in the fridge. - Roll the pinwheels and slice them just before serving. This keeps them fresh and crisp. - You can also freeze the rolled pinwheels. Wrap them tightly in plastic wrap and store in a freezer-safe bag. They can last up to three months. Just thaw them in the fridge when you need them. A beautiful presentation makes any dish more appetizing. For your Chicken Cranberry Pinwheels, consider these ideas: - Use a bright platter to make the colors pop. - Arrange the pinwheels in a circular pattern for a fun look. - Add garnishes like fresh spinach leaves or edible flowers for charm. - Include small bowls of dipping sauce like ranch or honey mustard for extra flavor. These details will impress your guests and make your dish memorable. {{image_4}} If you have dietary needs, you can easily adapt this recipe. For a gluten-free option, use gluten-free tortillas. If you need a dairy-free choice, try vegan cream cheese. You can also swap chicken for shredded turkey or even chickpeas for a plant-based option. Adjust the honey based on your sweetness level. Always taste your mixture to get it just right. Feel free to get creative with flavors! Add some diced jalapeños for a kick. You can also mix in shredded cheese for extra creaminess. Try fresh herbs like cilantro or parsley for a burst of freshness. If you love a tangy taste, consider adding a splash of lemon juice. Each twist brings a new taste sensation to your pinwheels. These pinwheels shine at any gathering. You can cut them smaller for bite-sized snacks. Pair them with a tangy dip like ranch or a spicy salsa. To impress guests, serve on a colorful platter with fresh veggies. Arrange your pinwheels with vibrant bell peppers and cherry tomatoes. They not only taste great but look beautiful, too. For more fun, mix in other wraps like ham and cheese or veggie pinwheels. Enjoy the Full Recipe and get ready to wow your guests! To keep your Chicken Cranberry Pinwheels fresh, wrap them well. Use plastic wrap or place them in an airtight container. This helps prevent them from drying out. Store them in the fridge for up to three days. If you want to freeze them, wrap each pinwheel in plastic. Then, place them in a freezer bag. They can last up to three months in the freezer. When it's time to eat your leftover pinwheels, reheating is key. You can use the microwave for quick warmth. Place one or two pinwheels on a plate and cover them with a damp paper towel. Heat for 30 seconds, checking often to avoid overcooking. If you prefer a crispier texture, use a skillet. Heat the skillet over medium heat. Add the pinwheels and cook for a few minutes on each side until they warm up. Understanding the shelf life of your ingredients is important. Cooked chicken lasts about three to four days in the fridge. Cream cheese should be used within a week after opening. Dried cranberries can last for up to a year if stored in a cool, dry place. Green onions stay fresh for about a week. Honey can last indefinitely if kept sealed and stored properly. Always check for signs of spoilage before using any ingredient. Yes, you can make Chicken Cranberry Pinwheels ahead of time. I often prepare them a few hours before serving. Just store them in the fridge. This keeps their flavors fresh. If you plan to make them a day ahead, wrap them in plastic wrap. This helps prevent drying out. When you're ready to serve, just slice and enjoy! If you need a substitute for cream cheese, try Greek yogurt. It adds creaminess without the extra fat. You can also use cottage cheese for a lighter option. Another good choice is hummus, which adds a nice flavor. Each of these options will change the taste a bit, but they work well in this recipe. Yes, there are gluten-free tortilla options available. Many brands offer gluten-free wraps made from rice or corn. You can find these in most grocery stores. Just check the labels to ensure they meet your needs. These tortillas will keep your Chicken Cranberry Pinwheels tasty and gluten-free! For the full recipe, refer to the initial section. In this blog post, we explored how to make tasty Chicken Cranberry Pinwheels. We covered ingredients, preparation steps, and tips to enhance flavor. You learned ways to customize the recipe and store leftovers for later. These pinwheels are fun to make and share. They fit any gathering. Enjoy experimenting with new flavors and making them your own! Keep these tips in mind for a stress-free cooking experience.
Chicken Cranberry Pinwheels Flavorful and Easy Recipe
Are you looking for a quick and tasty snack that impresses? Look no further than Chicken Cranberry Pinwheels! These colorful wraps pack a punch with
The ingredients for Parmesan Potato Stacks are simple and easy to find. Here’s what you need: - 4 large russet potatoes, peeled and sliced into thin, uniform rounds - 1 cup grated Parmesan cheese - ½ cup shredded mozzarella cheese - 4 tablespoons unsalted butter, melted - 2 tablespoons olive oil - 2 teaspoons garlic powder - 1 teaspoon dried oregano - Salt and freshly cracked pepper to taste - Fresh parsley, chopped (for garnish) These ingredients work together to create a delicious dish. The russet potatoes give a fluffy texture inside, while the melted cheese creates a crispy top. The garlic powder and oregano add a warm, savory flavor. Using fresh parsley for garnish not only looks nice but also adds freshness to the dish. You can adjust the amount of cheese based on your taste. If you want it cheesier, feel free to add more! For the full recipe, check out the section above. These stacks are great for a side dish or as an appetizer. Enjoy cooking! - Preheat oven to 400°F (200°C). - Prepare muffin tin with grease. Start by heating your oven. This helps the potato stacks cook evenly. Greasing the muffin tin is key so the stacks come out easily. I use cooking spray or melted butter for this. - Combine melted butter and olive oil with seasonings. In a large bowl, mix melted butter and olive oil. Add garlic powder, oregano, salt, and pepper. This mix gives the potatoes great flavor. Stir well to combine. - Layer potato and cheese evenly in muffin tin cavities. Take your thin potato slices and coat them in the oil mix. Then, place a slice in each muffin tin. Add a layer of Parmesan and mozzarella cheese. Keep layering potatoes and cheese until you reach the top. Press down gently to pack them tightly. - Bake for 30-35 minutes until golden brown. Place the muffin tin in your hot oven. Bake until the tops are golden brown. This usually takes about 30 to 35 minutes. You want the potatoes to be tender inside and crispy outside. - Remove from tin and garnish with parsley. Once baked, let the stacks cool for a moment. Use a fork or knife to lift them out of the tin. Garnish with fresh parsley for a pop of color. Enjoy your delicious Parmesan Potato Stacks! For the full recipe, check out the earlier section. To get the best texture, use thin, uniform potato slices. A mandoline is great for this. Thin slices cook evenly and crisp nicely. Aim for about 1/8 inch thick. This way, the layers stack well, and each bite is crunchy. Add your personal touch by using different herbs and spices. You can try basil, thyme, or even a hint of rosemary. Adding spices like paprika or cayenne can give a nice kick. Mix and match to find your favorite flavors. It makes the dish even more fun to enjoy. These tasty stacks make great appetizers at gatherings. Pair them with dips like sour cream or a spicy aioli. You can also serve them as a side dish with grilled meats or salads. They look beautiful on a plate and taste even better. {{image_4}} You can switch up the cheeses for more flavor. Gruyère adds a nutty taste. Cheddar gives a sharp kick. Mixing these cheeses can make your stacks even more exciting. Feel free to use what you have on hand. Just remember to keep the cheese in good balance for melting. Adding herbs or spices can transform your dish. Fresh herbs like rosemary or thyme enhance the taste. If you want heat, sprinkle some paprika or cayenne pepper on the layers. This change can make the dish pop and suit your taste buds better. You can make these stacks vegan too! Use plant-based cheese instead of dairy cheese. Look for brands that melt well for the best results. This way, everyone can enjoy the stacks, no matter their diet preference. The flavor will still shine through, giving you a delicious treat. To store leftover Parmesan Potato Stacks, let them cool completely. Place them in an airtight container. Store in the fridge for up to three days. When ready to eat, you can reheat them in the oven or microwave. Reheating in the oven keeps them crisp. If using the microwave, cover them with a damp paper towel to prevent drying. For best results, freeze the stacks before baking. Arrange uncooked stacks on a baking sheet and freeze until solid. Once frozen, transfer them to a freezer bag. You can keep them for up to three months. When ready to enjoy, bake from frozen. Preheat your oven to 400°F (200°C) and bake for 40-45 minutes. This way, you'll have fresh, delicious stacks anytime. For the full recipe, check back to the main article. Yes, you can make Parmesan Potato Stacks ahead of time. Prepare the stacks and assemble them in the muffin tin. Then, cover the tin with plastic wrap and store it in the fridge. When you're ready to bake, remove the wrap and let them sit at room temperature for about 10 minutes. Bake as directed. If you want to reheat leftovers, place them in a warm oven at 350°F (175°C) for about 10-15 minutes. They’ll regain their crispness and be ready to enjoy again. Russet potatoes are the best choice for this recipe. They are starchy and create a fluffy inside, while also crisping nicely on the outside. Yukon Gold potatoes work too, as they have a creamy texture. Avoid waxy potatoes like red or new potatoes, since they won’t give you the same texture and flavor. To make Parmesan Potato Stacks healthier, consider these tips: - Use less butter and olive oil. You can reduce the amounts by half. - Swap in low-fat cheese options. Look for part-skim mozzarella or reduced-fat Parmesan. - Add vegetables like spinach or zucchini to the stacks for extra nutrients. - You can also use an air fryer instead of baking. This method cuts down on oil while keeping them crispy. For the full recipe, check out the earlier section. Enjoy your cooking! In this article, we covered how to make delicious Parmesan Potato Stacks. You learned about the key ingredients, step-by-step instructions, and helpful tips for perfecting texture and flavor. I shared variations to try and easy storage options for leftovers. Remember, you can customize these stacks to your taste and serve them at any gathering. Enjoy creating this tasty dish that your friends and family will love!
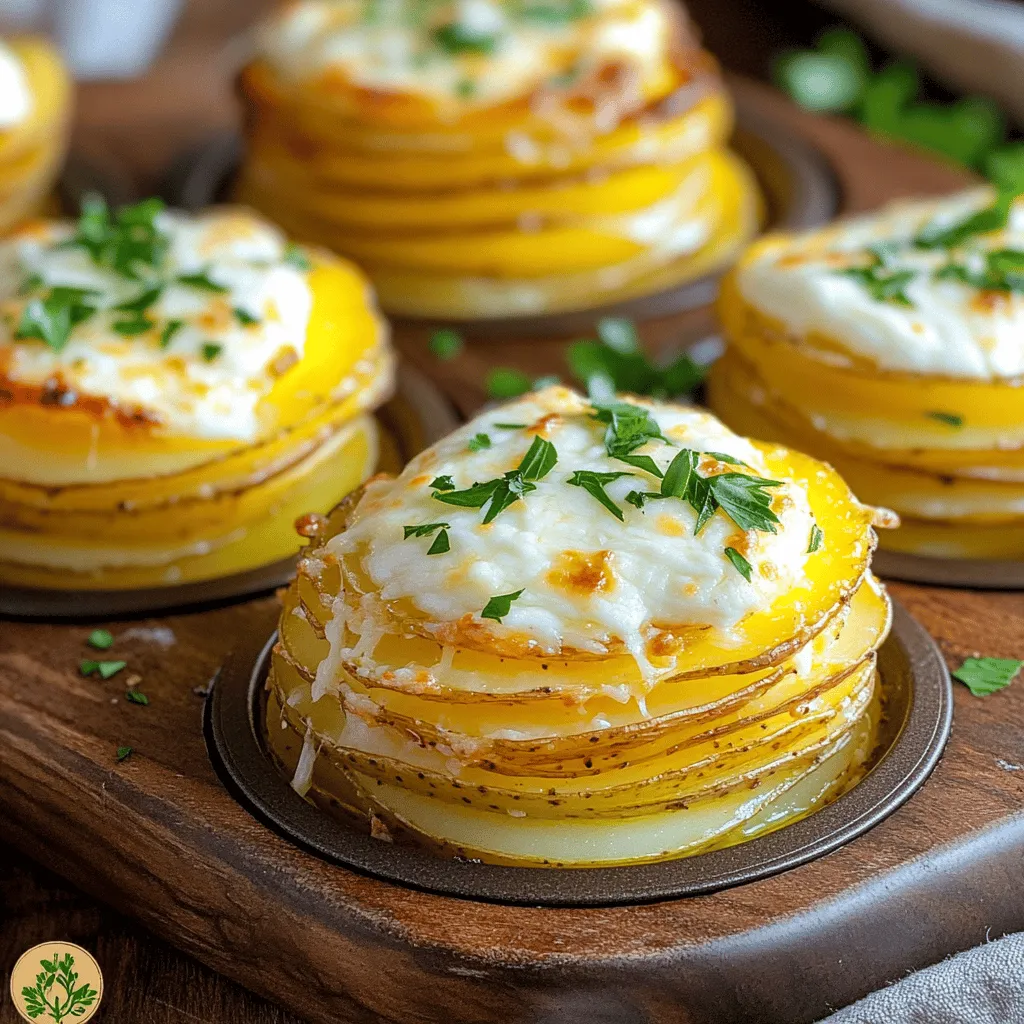
Parmesan Potato Stacks Flavorful and Simple Recipe
Looking for a simple, tasty side dish that will impress your friends? You’ve found it! Parmesan Potato Stacks are not only flavorful but also easy
- 12 slider buns - 1 pound Italian sausage, casings removed - 1 cup sliced pepperoni - 1 cup shredded mozzarella cheese - 1/2 cup shredded provolone cheese - 1/2 cup roasted red peppers, sliced - 1/4 cup banana peppers, sliced - 2 tablespoons olive oil - 1 teaspoon garlic powder - 1 teaspoon Italian seasoning - Salt and pepper, to taste - Fresh basil leaves, for garnish The slider buns serve as the base. They hold all the flavors together. Choose soft, fresh buns for the best texture. Italian sausage gives a rich, meaty flavor. It adds spice and depth. Use high-quality sausage for the best taste. Pepperoni adds a classic Italian touch. Its salty, spicy flavor balances well with the cheeses. Mozzarella and provolone cheeses create a gooey, melty layer. Together, they bring creaminess to every bite. Roasted red peppers add sweetness and color. They brighten the sliders and add texture. Banana peppers give a tangy kick. Adjust the amount based on your spice preference. Olive oil helps to crisp the buns. It also enhances the flavors of the seasonings. Garlic powder and Italian seasoning blend perfectly. They boost the overall flavor profile of the dish. Salt and pepper enhance every ingredient. Use them to taste, making sure to balance flavors. Fresh basil leaves add a pop of color. They also give a fresh aroma when served. - Additional toppings: sliced olives, fresh tomatoes, or arugula - Spreads: mayonnaise, mustard, or pesto - Dietary variations: gluten-free slider buns or vegan cheese You can customize your sliders with extra toppings. Sliced olives add a briny taste, while fresh tomatoes give a juicy burst. Arugula offers a peppery crunch. Spreads can elevate your sliders too. Mayonnaise adds creaminess, while mustard gives a sharp bite. Pesto brings herbaceous flavor and pairs well with the meats. For dietary needs, look for gluten-free buns. They work just as well. You can also swap regular cheese for vegan cheese if desired. Consider serving with condiments like marinara sauce. It makes a great dip and adds extra flavor. Enjoy your sliders with these enhancements! For the full recipe, check the details in the main article. 1. Preheat your oven to 350°F (175°C). This is key for a great bake. 2. In a large skillet, add 1 pound of Italian sausage. Break it into small bits with a wooden spoon. Cook until it's brown, around 5-7 minutes. 3. After cooking, stir in 1 teaspoon of garlic powder and 1 teaspoon of Italian seasoning. Add salt and pepper to taste. Remove the skillet from heat. 4. Slice 12 slider buns in half and place the bottoms in a baking dish. Make sure they fit tightly. 5. Spoon the sausage mix evenly over the bottom halves of the buns. 6. Layer on 1 cup of sliced pepperoni, then sprinkle 1 cup of shredded mozzarella, 1/2 cup of provolone cheese, and add 1/2 cup of roasted red peppers, plus 1/4 cup of banana peppers. 7. Place the top halves of the buns on the fillings. Brush the outside with 2 tablespoons of olive oil for crispiness. 8. Cover the dish tightly with aluminum foil. Bake for 15 minutes. Remove the foil and bake for another 10 minutes. The cheese should be melted and bubbly. 9. Once you take them out, let the sliders cool for a few minutes. Garnish with fresh basil leaves before serving. - To get the best cheese melt, make sure to use good-quality cheese. - After baking, you can add some extra fresh herbs or crushed red pepper for flavor. - For fun, try adding different meats like ham or turkey. You can also use different cheeses like cheddar or gouda. Enjoy crafting these Hot Italian Sub Sliders! For the full recipe, check out the details above. - Common mistakes to avoid while preparing sliders One mistake is overcooking the sausage. It should be browned but not dry. Another is using stale buns. Fresh slider buns make the best base. Lastly, don't skip the seasoning. It boosts the flavor. - Timing tips for ensuring optimal results Preheat your oven to 350°F before starting. This ensures even baking. Bake the sliders covered first to keep them moist. Remove the foil later to let the cheese brown nicely. - Recommended kitchen tools for easy assembly Use a large skillet for cooking sausage. A wooden spoon helps break it up. A baking dish with high sides holds all the sliders well. A pastry brush makes oiling the buns easy. - Ideas for side dishes that pair well with sliders Serve with a simple salad or crispy fries. You can also add potato chips for crunch. Pickles or coleslaw bring a nice contrast too. - Creative ways to present the sliders at gatherings Arrange sliders on a large platter. Cut them into individual pieces for easy serving. Add small bowls of marinara sauce for dipping. A sprinkle of fresh basil on top makes them look great. - Pairing sliders with beverages Pair sliders with soda or sparkling water. Beer also complements the flavors well. For a fun twist, try a light red wine like Pinot Noir. {{image_4}} You can customize your Hot Italian Sub Sliders in many ways. Change up the meats or cheeses for new tastes. Try using: - Sliced turkey or ham - Salami or capicola - Provolone or fontina cheese These ingredients add a fresh twist. For those who prefer plant-based meals, you can create a vegetarian version. Use sautéed mushrooms or grilled zucchini in place of meat. Replace cheeses with a vegan option, like vegan mozzarella. If you want to explore international flavors, consider these ideas: - Add kimchi for a Korean twist. - Use tzatziki sauce for a Greek flavor. - Try spicy harissa for a North African kick. You can turn your sliders into a complete meal with sides. Serve them with: - Crispy fries - A fresh salad - Roasted vegetables These sides balance the rich flavors of the sliders. Want to make sliders for breakfast or brunch? Use scrambled eggs and cheese, along with sautéed peppers. You can even add breakfast sausage or bacon for a hearty start to your day. For a fun twist, create a slider bar. Set out different toppings and let guests build their own sliders. This keeps everyone engaged and happy! For the full recipe, check out the details above. To keep leftover sliders fresh, store them in an airtight container. You can also wrap them tightly in foil or plastic wrap. This helps prevent them from drying out. Place them in the fridge if you plan to eat them within three days. When ready to reheat, avoid the microwave if you want a crispy texture. Instead, use an oven or toaster oven. Reheat at 350°F (175°C) for about 10 to 15 minutes. Check for warmth in the center. If they smell off or look soggy, it's time to toss them. You can freeze sliders before or after baking. For best results, wrap each slider in foil. Then place them in a freezer bag. They can last up to three months in the freezer. If you freeze them before baking, follow these steps: 1. Assemble the sliders without baking. 2. Wrap them tightly. 3. Label the bag with the date. To defrost, place them in the fridge overnight. For baked sliders, reheat them straight from the freezer. Preheat your oven to 350°F (175°C) and bake for 20 to 30 minutes. This helps restore their crispy outer layer. Enjoy the flavors of your Hot Italian Sub Sliders with ease! For the complete recipe, check out the [Full Recipe]. To reheat leftover sliders, follow these steps: 1. Preheat your oven to 350°F (175°C). 2. Place the sliders in a baking dish. 3. Cover them with foil to keep moisture. 4. Heat for about 10-15 minutes. 5. Remove the foil and bake for an extra 5 minutes. This method keeps the buns soft and the cheese melty. To add some heat, try these tips: - Use spicy Italian sausage instead of regular. - Add sliced jalapeños or crushed red pepper flakes. - Mix hot pepper cheese into your cheese blend. - Swap regular pepperoni for spicy varieties. These changes will give your sliders a nice kick. Yes, you can make these sliders ahead. Here’s how: - Prepare the filling and let it cool. - Assemble the sliders but do not bake. - Cover tightly with plastic wrap or foil. - Store in the fridge for up to 24 hours. When ready, bake straight from the fridge. Just add a few extra minutes to the baking time. Hot Italian sub sliders are a treat. With quality ingredients and clear steps, you can whip up a delicious meal fast. Remember to layer well and watch those baking times for the perfect melt. There are endless ways to customize these sliders to suit your taste. Whether you want to spice them up or make them healthier, the options are many. Store leftovers right and enjoy them later. I hope you try making these sliders and impress family and friends. Enjoy your cooking!
Hot Italian Sub Sliders Savory and Simple Delight
Looking for a tasty, easy dish for your next gathering? Hot Italian Sub Sliders are your answer! These little bites pack big flavor and are
To make tasty air fryer chicken skewers, you need a few key items: - 1 lb (450g) boneless, skinless chicken breast, cut into 1-inch cubes - 2 tablespoons extra virgin olive oil - 2 tablespoons low-sodium soy sauce - 1 tablespoon pure honey - 2 cloves fresh garlic, finely minced - 1 teaspoon ground cumin - 1 teaspoon smoked paprika - 1 teaspoon dried oregano - Salt and freshly ground black pepper, to taste These ingredients give the chicken its rich flavor and tender texture. The marinade brings all the flavors together. You will mix: - Extra virgin olive oil - Low-sodium soy sauce - Pure honey - Fresh garlic - Ground cumin - Smoked paprika - Dried oregano - Salt and pepper Whisk these together to create a tasty blend. This marinade adds depth and keeps the chicken moist. Adding veggies makes the skewers colorful and healthy. I suggest: - 1 vibrant bell pepper (any color), cut into 1-inch squares - 1 medium red onion, cut into 1-inch squares These veggies cook well and add sweetness. They also balance the savory chicken. You can mix and match other veggies like zucchini or cherry tomatoes if you like! Start with a medium bowl. Add 2 tablespoons of extra virgin olive oil. Next, pour in 2 tablespoons of low-sodium soy sauce. Then, mix in 1 tablespoon of pure honey. Add 2 cloves of fresh garlic, finely minced. Sprinkle in 1 teaspoon of ground cumin, 1 teaspoon of smoked paprika, and 1 teaspoon of dried oregano. Finally, add salt and freshly ground black pepper to taste. Whisk all these ingredients together until you have a well-blended marinade. Take 1 pound of boneless, skinless chicken breast. Cut it into 1-inch cubes. Place the chicken into the marinade. Make sure every piece gets coated well. Cover the bowl with plastic wrap or a lid. Let the chicken marinate in the fridge for at least 30 minutes. For even more flavor, let it sit for up to 2 hours. While the chicken marinates, prepare your veggies. Cut a vibrant bell pepper and a medium red onion into 1-inch squares. Now it’s time to assemble! Grab your wooden or metal skewers. Thread the marinated chicken cubes onto the skewers. Alternate with the squares of bell pepper and red onion. Make sure to leave a little space between each piece. This helps with even cooking and air flow. Once done, your skewers are ready to cook. For the full recipe, check out the detailed instructions above. Marinating chicken is key for great flavor. Always use a mix of oil, acid, and seasonings. The oil helps keep the meat moist. The acid, like soy sauce or lemon juice, adds tang and helps tenderize. Aim to marinate for at least 30 minutes. For best results, let it sit for 2 hours. The flavor will be deeper and richer. Cooking chicken skewers in an air fryer is fast and easy. Preheat your air fryer to 400°F (200°C). Cook the skewers for 10 to 12 minutes. Flip them halfway for even cooking. Always check that the chicken hits 165°F (75°C) inside. If you have thicker pieces, add a few extra minutes. Thin pieces may cook quicker, so keep an eye on them. Use even-sized pieces of chicken and vegetables. This ensures they cook at the same rate. Alternate chicken with vegetables on the skewers. Leave small gaps between each piece. This gap allows hot air to circulate and cook everything well. If using wooden skewers, soak them in water for 30 minutes. This prevents burning and helps them hold up during cooking. For more detailed steps, check out the Full Recipe. {{image_4}} You can switch up the marinade for your chicken skewers. Try using lemon juice for a zesty kick. If you love spicy food, add chili flakes or hot sauce. For a sweet twist, use maple syrup instead of honey. You could also mix in fresh herbs like basil or thyme for extra flavor. Each change gives the chicken a new taste, making it fun to experiment. Don’t feel limited to just chicken. You can use shrimp, beef, or firm tofu as protein options. For veggies, try zucchini, cherry tomatoes, or mushrooms. These alternatives will add variety to your skewers. Mixing different proteins and veggies keeps every meal exciting and fresh. You can also marinate the veggies for added flavor. Serve your chicken skewers in many fun ways. Try them over a bed of rice or quinoa for a full meal. You can also serve them as appetizers at a party. Pair them with a refreshing salad or grilled corn on the side. For dipping sauces, yogurt or peanut sauce works well. These sides and sauces enhance the flavors of the skewers. Don’t forget to check the Full Recipe for more serving ideas! After your meal, let the skewers cool down. Place them in an airtight container. This helps keep them fresh. Store the container in the fridge. They will stay good for up to 3 days. Make sure to label the container with the date. This way, you know when to use them. To reheat your chicken skewers, use the air fryer. Set it to 350°F (175°C). Heat the skewers for about 5-7 minutes. This method keeps them crispy. You can also use a microwave, but it may make them soggy. If you choose the microwave, heat them in short bursts of 30 seconds. Check often to avoid overcooking. If you want to save them for later, freezing is a great option. Wrap each skewer tightly in plastic wrap. Then, place them in a freezer-safe bag. Remove as much air as possible. Label the bag with the date. The skewers can stay frozen for up to 2 months. To thaw, place them in the fridge overnight. After thawing, reheat them in the air fryer for the best taste. Enjoy your savory air fryer chicken skewers whenever you crave them! For the full recipe, check here: [Full Recipe]. It takes about 10 to 12 minutes to cook chicken skewers in an air fryer. The key is to preheat your air fryer to 400°F (200°C) first. Cook the skewers for 5 to 6 minutes, then flip them over. Check that the chicken reaches 165°F (75°C) inside for safe eating. This short cooking time makes air fryers great for quick meals. Yes, you can use other meats like beef, pork, or shrimp for skewers. Each type has its own cooking time. For example, shrimp takes only about 5 to 7 minutes. Beef should be cut thin for quick cooking, while pork needs around 12 to 15 minutes. Just make sure to marinate them well for great flavor. Several dipping sauces go well with chicken skewers. Here are some tasty options: - Creamy ranch dressing - Tangy barbecue sauce - Cool tzatziki sauce - Sweet chili sauce - Spicy sriracha mayo These sauces add flavor and fun to your meal. You can even mix and match them for a variety of tastes. For the full recipe, check out the Crispy Air Fryer Chicken Skewers! In this guide, we covered everything you need for air fryer chicken skewers. We discussed essential ingredients, marinade tips, and suggested vegetables. We also outlined step-by-step instructions for marinating and assembling skewers. Best practices for cooking ensure great taste every time. You can try various flavors and different proteins too. Finally, we shared storage tips so you can enjoy leftovers. Make these skewers a fun and tasty meal option! Enjoy your delicious creations!
Savory Air Fryer Chicken Skewers Simple and Tasty Recipe
Get ready to impress your taste buds with these savory air fryer chicken skewers! In this simple and tasty recipe, you’ll learn how to make
The ingredients for air fryer mozzarella sticks are simple yet essential for that perfect crunch and flavor. Here is what you will need: - 12 sticks of string cheese (mozzarella) - 1 cup all-purpose flour - 2 large eggs, beaten - 1 cup breadcrumbs (panko recommended for extra crunchiness) - 1 teaspoon garlic powder - 1 teaspoon Italian seasoning - ½ teaspoon salt - ½ teaspoon black pepper - Cooking spray - Marinara sauce, warm, for serving These ingredients work together to create a tasty and crispy snack. The mozzarella cheese gives a rich, creamy center, while the panko breadcrumbs add great crunch. The spices enhance the flavors and make these sticks irresistible. Using warm marinara sauce for dipping adds a nice touch. When you gather all these ingredients, you set yourself up for a delicious treat. First, cut each string cheese stick in half. You will get 24 shorter sticks. This size is perfect for dipping and helps them cook evenly. Next, set up a breading station. Use three plates: one for flour, one for beaten eggs, and one for breadcrumbs mixed with seasonings. This setup makes breading quick and easy. Now, dredge each cheese stick in flour. Make sure it is fully coated. Shake off any extra flour. This helps the egg and breadcrumbs stick better. Next, dip the floured stick into the beaten eggs. Let any extra egg drip off. This layer is key for the breadcrumbs to attach. Roll the egg-coated stick in the breadcrumb mix. Press gently to get a nice coating. Repeat this for all cheese sticks. After breading, arrange the sticks on a baking sheet. Freeze them for about 30 minutes. This step is crucial to keep the cheese from oozing out. While they freeze, preheat your air fryer to 390°F (200°C). Lightly spray the basket with cooking spray to avoid sticking. Once the cheese sticks are firm, place them in the air fryer basket. Make sure they don’t touch each other. You may need to cook them in batches. Air fry the sticks for 6 to 8 minutes. Flip them halfway for even cooking. Keep an eye on them until they turn golden brown and crispy. The cheese inside should melt just right. For the complete recipe, check out [Full Recipe]. To get that perfect crunch, freezing is key. After you bread the cheese sticks, place them in the freezer for about 30 minutes. This step helps firm up the cheese. If you skip this, the cheese may ooze out during cooking, and we don’t want that! Using the right cooking spray is also important. I recommend a high-quality, non-stick cooking spray. This ensures that your mozzarella sticks come out crisp and golden without sticking to the basket. Want to kick up the flavor? You can add spices to your breadcrumbs. I love using garlic powder and Italian seasoning. You might also try paprika for a little heat. Mix these in well for a tasty coating. For dipping sauces, marinara is a classic choice, but you can get creative! Try ranch dressing, garlic aioli, or even spicy mustard. Each of these adds a unique twist to your snack. When cooking in an air fryer, batch cooking is smart. Place just a few mozzarella sticks in the basket at a time. This allows hot air to flow around them and gives a crispier result. Keep an eye on the cooking time. I recommend checking after 6 minutes. Flip the sticks halfway for even cooking. When they turn golden brown, they are ready to enjoy! For the full recipe, refer to the earlier section. {{image_4}} You can use many types of cheese for your mozzarella sticks. Besides mozzarella, try cheddar or pepper jack for a kick. If you prefer a plant-based option, vegan mozzarella works great too. Brands like Daiya or Violife melt well and taste good. You can change the breadcrumbs to mix things up. Try crushed cornflakes or potato chips for a new crunch. For those who need gluten-free options, use almond flour or gluten-free breadcrumbs. They still give that crispy texture we love. To give your mozzarella sticks more flavor, add spices to the breadcrumb mix. Try paprika, cayenne, or even ranch seasoning. You can also add fillings for a twist. Stuff some with jalapeños for heat or little bits of pepperoni for extra taste. These variations make every bite exciting! To keep your mozzarella sticks fresh, cool them down first. Place them in an airtight container. They will stay good in the fridge for up to three days. If you want to save them longer, you can freeze cooked mozzarella sticks. Lay them flat in a single layer on a baking sheet. Freeze for about one hour, then move them to a freezer bag. They can last in the freezer for up to three months. To bring back that crispy texture, the air fryer is the best choice. Preheat it to 350°F (175°C). Place the leftover mozzarella sticks in the basket. Cook them for about 3-5 minutes, checking often. If you don't have an air fryer, you can use the oven. Preheat to 375°F (190°C) and bake for about 10 minutes. A microwave is the quickest method, but it may make them soft. Heat them for 30 seconds, but check carefully to avoid melting the cheese too much. You should cook air fryer mozzarella sticks for 6 to 8 minutes at 390°F (200°C). This time range ensures a crispy outside while the cheese inside melts perfectly. Keep an eye on them to avoid burning. Flipping them halfway through helps achieve even browning, giving you that golden, crunchy texture. Yes, you can prepare these mozzarella sticks ahead of time. After breading, freeze them for about 30 minutes. Once they are firm, you can store them in a freezer bag. They will stay fresh for up to a month. When you're ready to cook, just pop them into the air fryer straight from the freezer. No need to thaw! If your mozzarella sticks ooze, it’s often due to not freezing them long enough before cooking. Freezing helps firm up the cheese, preventing it from leaking out. Make sure to freeze them for at least 30 minutes. Using a higher temperature can also help seal the coating quicker, reducing the chance of oozing. You can use regular breadcrumbs, but panko is best for crunchiness. Panko breadcrumbs are lighter and crispier than regular ones. They create a better texture when air-fried. If you use regular breadcrumbs, your mozzarella sticks might be a bit denser and less crispy, but they will still be tasty. In this blog post, we explored how to make perfect air fryer mozzarella sticks. You learned about the key ingredients, step-by-step instructions, and tips for great taste. Experimenting with different cheeses and breadcrumbs adds fun and flavor. Don't forget to store your leftovers properly and reheat them for the best results. Making these cheesy treats can be easy and rewarding. Enjoy your crunchy snacks at home, and impress your friends and family!
Air Fryer Mozzarella Sticks Crunchy and Delicious Snack
If you’re craving a crunchy and cheesy snack that’s easy to make, you’ve found the right recipe! Air fryer mozzarella sticks come out golden and
- 1 lb salmon fillet, skin removed, and cut into bite-sized cubes - 1 cup panko breadcrumbs - 1/2 cup all-purpose flour - 2 large eggs, beaten - 1 teaspoon smoked paprika - 1/2 teaspoon garlic powder - Salt and pepper to taste These core ingredients give the salmon bites their crunchy texture and rich flavor. The salmon fillet is fresh and tender. Panko breadcrumbs create a delightful crunch. The flour helps the coating stick, while the eggs bind everything together. Smoked paprika adds a nice depth, and garlic powder brings in warmth. - 1/2 cup mayonnaise - 2 tablespoons sweet chili sauce - 1 tablespoon Sriracha - 1 tablespoon freshly squeezed lime juice The Bang Bang sauce is what makes the dish pop! Mayonnaise provides a creamy base, while sweet chili sauce adds sweetness. Sriracha brings heat, and lime juice gives a zesty kick. Mix these together for a smooth sauce that pairs perfectly with the salmon bites. - Fresh cilantro - Additional spice or seasoning options Garnishes can elevate your dish. Fresh cilantro adds color and freshness. You can also use extra spices to fit your taste. A sprinkle of chili flakes can add more heat if you like. For the full recipe, check out the details above. Preheating the Oven First, heat your oven to 400°F (200°C). This temperature helps get the salmon bites crunchy. Line a baking sheet with parchment paper. This prevents sticking and makes cleanup easy. Preparing the Coating Mixtures Get three shallow bowls ready. In the first bowl, mix together flour, smoked paprika, garlic powder, salt, and pepper. In the second bowl, pour in the beaten eggs. The third bowl holds the panko breadcrumbs. This setup keeps the coating process smooth. Coating the Salmon Take a salmon piece and dip it into the flour mix. Make sure it’s fully coated. Then, dip the salmon in the eggs, letting the extra drip off. Finally, coat it in the panko. Press gently to make the coating stick. Repeat for each piece of salmon. Arranging on the Baking Sheet Place the coated salmon bites on the prepared baking sheet. Make sure they are in a single layer. Leave space between them for even baking. Baking Process Put the baking sheet in the oven. Bake for about 12-15 minutes. The bites should turn golden brown and be cooked through. Check that they flake easily with a fork. Whisking Ingredients Together While the salmon cooks, make the bang bang sauce. In a bowl, whisk together mayonnaise, sweet chili sauce, Sriracha, and lime juice. Blend until smooth and creamy. Adjusting Seasonings Taste the sauce and adjust the seasoning if needed. You can add more Sriracha for heat or more lime juice for brightness. Set the sauce aside until the salmon is ready. For the complete recipe, check out the Full Recipe. Ensuring Even Coating To get a great crunch, coat each salmon cube well. Start with the flour mix, then dip in eggs, and finish with panko. Make sure to press the panko onto the fish. This helps it stick better. Preventing Sticking To stop your salmon bites from sticking, use parchment paper on your baking sheet. Arrange the bites with space in between them. This allows hot air to flow and keeps them from sticking together. Baking vs. Frying Baking is healthier and easier. It gives you a nice crunch without the mess of oil. Frying can add a richer taste but can be greasy. Choose what fits your taste and mood. Checking Doneness To check if your bites are done, gently press them with a fork. They should flake easily. The inside should be opaque and not raw. If you're unsure, use a thermometer. The ideal temperature for salmon is 145°F (63°C). Pairing with Dipping Sauces The bang bang sauce is a must! It adds a creamy, spicy kick. You can also try sweet chili sauce or a zesty lime sauce. Serve sauces in small bowls for dipping. Ideal Side Dishes Serve the salmon bites with fresh veggies or a light salad. Rice or quinoa also pairs well. These sides balance the flavors and make a complete meal. {{image_4}} You can easily amp up the flavors of your Bang Bang Salmon Bites. Here’s how: - Adding Extra Spices: Try adding cayenne pepper for heat or smoked paprika for depth. A pinch of cumin can also bring a warm, earthy taste. - Incorporating Herbs: Fresh herbs like dill or parsley can brighten the dish. You could mix chopped cilantro into the bang bang sauce for an extra kick. If you want to switch things up, you can use different proteins: - Substituting with Chicken: Chicken breast works well. Just cut it into bite-sized pieces and follow the same coating and baking steps. - Plant-Based Options: Tofu or tempeh can replace salmon for a veg-friendly version. Press and cube them, then coat and bake like the salmon. How you present your Bang Bang Salmon Bites can change the vibe: - Creative Presentation Ideas: Arrange the bites on a colorful platter. Use small bowls for the bang bang sauce and garnishes. - Appetizer vs. Main Dish: Serve these bites as a fun appetizer at parties. For a meal, pair them with rice or a fresh salad. For the full recipe, check out the earlier sections. Storing Leftovers After you enjoy your Bang Bang salmon bites, store leftovers in an airtight container. Let them cool to room temperature first. Place a paper towel at the bottom to absorb extra moisture. This keeps them fresh longer. Store in the fridge for up to three days. Freezing Salmon Bites For longer storage, freeze your salmon bites. Place them in a single layer on a baking sheet. Freeze until solid, then transfer to a freezer bag. This method prevents them from sticking together. They can last up to three months in the freezer. Oven vs. Microwave For the best taste, reheat in the oven. Preheat your oven to 375°F (190°C). Place the salmon bites on a baking sheet. Bake for about 10 minutes or until heated through. If using a microwave, heat in short bursts. This can make them soggy. Maintaining Crispy Texture To keep that crispy texture, try not to cover them while reheating. Air circulation helps maintain their crunch. If you use the microwave, place a paper towel over the plate to help absorb moisture. How Long do They Last? If stored properly, Bang Bang salmon bites last three days in the fridge. In the freezer, they can last up to three months. Signs of Spoilage Look for changes in color or texture. If they smell off or feel slimy, do not eat them. Always trust your senses when checking for spoilage. Bang Bang sauce comes from Asian cuisine, mainly Thai and Chinese. It blends sweet, spicy, and creamy flavors. Many believe it got its name from a popular dish served in American restaurants. The sauce became a favorite for its tasty kick and smooth texture. Yes, you can use frozen salmon. Just make sure to fully thaw it first. This helps the fish cook evenly and stay juicy. Pat it dry with a paper towel to remove excess moisture. This step ensures the coating sticks better. To make these salmon bites gluten-free, swap all-purpose flour with gluten-free flour. Use gluten-free panko breadcrumbs for the crispy coating. Check the labels on all sauces, especially the sweet chili sauce, to confirm they are gluten-free. Enjoy the same great taste without the gluten. Leftover Bang Bang sauce is a treat! Store it in an airtight container in the fridge for up to a week. Use it as a dip for veggies or spring rolls. You can also drizzle it over grilled chicken or salads for a flavor boost. Yes, you can meal prep Bang Bang Salmon Bites! Prepare and bake them ahead of time. Let them cool, then store in a container in the fridge for up to three days. Reheat them in the oven to keep them crispy. Enjoy a quick, tasty meal whenever you want! For the full recipe, check out the complete details above. In this blog post, we explored how to make Bang Bang Salmon Bites. You learned the key ingredients, including salmon, panko, and the tasty Bang Bang sauce. I shared step-by-step instructions for preparing and cooking these bites. Tips for perfecting your dish and variations to try were also included. These salmon bites are simple and fun to make. Enjoy them as an appetizer or main dish!
Bang Bang Salmon Bites Crunchy and Flavorful Delight
Are you ready to treat your taste buds? Bang Bang Salmon Bites are here to steal the show! This crunchy, flavorful delight blends crispy salmon
- 1 lb (450g) ground beef - 1 cup (100g) shredded cheddar cheese - 1/2 cup (120g) cream cheese, softened at room temperature - 1/2 cup (50g) grated Parmesan cheese - 1 teaspoon garlic powder - 1 teaspoon onion powder - 1 teaspoon Worcestershire sauce - 1 package of refrigerated biscuit dough (8-count) You need good quality ground beef for these bombs. It gives the best flavor. Adding cheddar cheese makes the filling creamy and rich. Cream cheese helps bind everything together for a smooth texture. Parmesan brings a nice salty kick. Garlic and onion powder add depth. Worcestershire sauce boosts the savory flavor. The biscuit dough wraps all this goodness perfectly. - 2 tablespoons melted butter - 2 tablespoons fresh parsley, finely chopped (for garnish) - Dipping sauces You can brush the tops with melted butter. This gives them a golden brown color. Fresh parsley adds a nice touch of green and freshness. Dipping sauces like ketchup or ranch make great pairings. They add extra flavor and fun for dipping. - Mixing bowl - Baking sheet - Parchment paper A mixing bowl helps combine the filling well. Use a baking sheet to hold the bombs while they bake. Parchment paper keeps them from sticking. This means cleaner bombs and an easier cleanup. For the full recipe, check the complete details on how to make Garlic Parmesan Cheeseburger Bombs. 1. Preheat your oven to 375°F (190°C). This temperature will give the bombs a nice, golden color. 2. Line a baking sheet with parchment paper. This step helps the bombs not stick while baking. 3. In a large bowl, combine the ground beef, shredded cheddar cheese, cream cheese, and grated Parmesan cheese. 4. Add garlic powder, onion powder, Worcestershire sauce, and salt and pepper. 5. Use your hands or a spatula to mix everything well. You want a smooth, tasty filling. 1. Open the biscuit dough package and separate each biscuit. 2. Flatten each biscuit into a circle about 4 inches wide. You can use your fingers or a rolling pin for this. 3. Spoon about 1 tablespoon of the cheeseburger filling into the center of each biscuit. 4. Fold the edges of the biscuit over the filling. Pinch them together to seal. Make sure no filling can escape. 5. Place the sealed bombs seam-side down on your lined baking sheet, leaving space between each one. 1. Brush the tops of the bombs with melted butter. This adds flavor and helps them brown. 2. Optionally, sprinkle more grated Parmesan cheese and garlic powder on top for extra taste. 3. Bake in the preheated oven for 12-15 minutes. They should be golden brown and cooked inside. 4. The meat should reach 160°F (70°C) to be safe. 5. Let the bombs cool for a few minutes after baking. Garnish with fresh parsley for a pop of color. You can find the full recipe in the recipe section above. Enjoy making these tasty Garlic Parmesan Cheeseburger Bombs! To make the best cheeseburger bombs, mix your filling well. Combine the ground beef, cheeses, and spices until smooth. This ensures each bite is packed with flavor. Use your hands or a spatula for even mixing. For sealing the biscuits, flatten each dough piece to about four inches wide. Add a tablespoon of filling in the center. Fold the edges over the filling and pinch them tightly. Make sure there are no gaps. This keeps the cheesy goodness inside while baking. You can easily boost the flavor of your cheeseburger bombs. Add spices like smoked paprika or chili powder for a kick. Fresh herbs like basil or thyme also work great. They add a nice twist to the classic taste. If you want to switch up the cheese, try using pepper jack or gouda. Each cheese brings a different taste and melts beautifully. Experimenting with cheese can lead to exciting new flavors. Presentation matters when serving your bombs. Arrange them on a rustic wooden platter for a cozy feel. Garnish with fresh parsley for color and aroma. This simple touch makes your dish look fancy. For dips, ketchup is a classic choice. You can also try ranch dressing or spicy mustard. Each dip enhances the flavors and adds variety to each bite. Don't hesitate to explore different dips to find your favorite. For the full recipe, check out the details above. Enjoy your cooking adventure! {{image_4}} You can swap ground beef for ground turkey or chicken. This change makes the bombs lighter. If you want a different taste, try mixing cheeses. Blend mozzarella or gouda with the cheddar and Parmesan. Each cheese brings its own unique flavor. If you're gluten-free, look for gluten-free biscuit dough. Many brands make tasty options now. For vegetarian bombs, replace the meat with a mix of mushrooms and beans. This keeps the dish hearty without losing flavor. Want a spicy kick? Add jalapeños to the meat mix. You can also sprinkle in cayenne pepper or hot sauce. For a twist, try different seasoning blends like taco or barbecue spices. Each option gives the bombs a fun new taste. Explore the Full Recipe for more ideas and tips! To store your leftover Garlic Parmesan Cheeseburger Bombs, first let them cool. Place them in an airtight container. This keeps them fresh and tasty. You can store them in the fridge for up to three days. If you want them to last longer, freezing is a great option. To freeze the cheeseburger bombs, wrap each one tightly in plastic wrap. Then, place them in a freezer bag. Squeeze out extra air to prevent freezer burn. They can last for up to three months in the freezer. When you want to enjoy them, take them out and thaw them in the fridge overnight. When it’s time to eat, there are a few ways to reheat your bombs. You can use an oven, which keeps them crispy. Preheat the oven to 350°F (175°C). Place the bombs on a baking sheet and heat for about 10-15 minutes. You can also use an air fryer for a quick reheating. This gives them a nice crunch. Avoid using the microwave, as it can make them soggy. For the best taste, enjoy them warm! Garlic Parmesan Cheeseburger Bombs are tasty bites filled with ground beef and cheese. You wrap seasoned beef and creamy cheese in biscuit dough. When baked, they turn golden brown and crispy. The garlic and Parmesan add a rich flavor that many love. They are perfect for parties or a fun family meal. Yes, you can make these bombs ahead of time. Prepare them up to the baking step, then store them in the fridge. Cover them tightly with plastic wrap or foil. You can keep them in the fridge for about 24 hours. When ready, just bake them straight from the fridge. They may need an extra minute or two to bake. You can serve these bombs with many sides and drinks. Here are some ideas: - French fries - Potato salad - Fresh salad - Veggie sticks with dip For drinks, try: - Soda - Beer - Lemonade These options pair well and make your meal even more enjoyable. For the full recipe, check out the earlier section! In this post, we explored how to make delicious cheeseburger bombs. We covered the main ingredients needed, like ground beef and cheeses, and discussed kitchen tools for easy prep. You learned step-by-step instructions for mixing, assembling, and baking. Plus, I shared tips for flavor and variations to suit diets. Storing and reheating leftovers was also covered. Now, you can enjoy these tasty bites anytime. They’re fun to make and share! Enjoy serving them with your favorite dips and sides.
Garlic Parmesan Cheeseburger Bombs Easy Bake Recipe
If you love burgers and garlic, you’re in for a treat! Garlic Parmesan Cheeseburger Bombs are easy to make and delicious. With just a few
- 1 large head of cauliflower, cut into bite-sized florets - 1 cup all-purpose flour - 1 cup plant-based milk (such as almond or soy) - 1/2 cup Asian BBQ sauce - 1 teaspoon garlic powder - 1 teaspoon onion powder - 1 teaspoon smoked paprika - 1 cup panko breadcrumbs - Sesame seeds - Chopped green onions To make your Air-Fryer Asian BBQ Cauliflower Wings, you need a few simple components. First, the cauliflower serves as the star of the dish. It gives you that bite and texture. Next, flour and plant-based milk create a nice batter. The Asian BBQ sauce adds rich flavor, making your wings tasty. For seasonings, garlic powder, onion powder, and smoked paprika bring warmth and depth. Panko breadcrumbs give the wings their crunch. Lastly, sprinkle on sesame seeds and chopped green onions for garnish. These give a fresh touch to your dish. Remember, you can find the full recipe above for precise measurements and instructions. Enjoy making this fun and flavorful dish! Start by cutting the cauliflower into bite-sized florets. This size helps them cook evenly. Next, mix the dry ingredients in a large bowl. Combine 1 cup of flour, 1 teaspoon of garlic powder, 1 teaspoon of onion powder, 1 teaspoon of smoked paprika, salt, and pepper. Whisk until everything is well mixed. Now it’s time to make the batter. Gradually pour 1 cup of plant-based milk into the dry mixture. Whisk it well to get a smooth, lump-free batter. This batter coats the cauliflower wings perfectly. Take each floret and dip it into the batter. Make sure it’s fully covered. Let any extra batter drip off. Then, roll the floret in 1 cup of breadcrumbs. Panko breadcrumbs work best for a crunchier texture. Repeat this for all the florets. Preheat your air fryer to 375°F (190°C) for about 5 minutes. This step is key for crispy wings. Place the cauliflower wings in a single layer in the basket. If needed, cook in batches. This helps avoid overcrowding. Lightly spray the wings with cooking spray for extra crispiness. Air fry for 15-18 minutes, flipping halfway. Look for a golden brown color to know they are done. While the wings cook, mix your BBQ glaze. In a small bowl, combine 1/2 cup of Asian BBQ sauce, 1 tablespoon of sesame oil, and 1 tablespoon of soy sauce. Stir until fully blended. This glaze adds great flavor to the wings. After cooking, transfer the wings to a large bowl. Drizzle the BBQ glaze over them and toss gently. Make sure each piece is well-coated in sauce. To finish, return the wings to the air fryer for another 3-5 minutes. This step caramelizes the glaze for a sticky, tasty finish. For the full recipe, check out the detailed instructions above. To get the best crispy wings, start with the right batter consistency. You want it thick enough to coat but not too thick. If you mix it perfectly, it will stick well to the cauliflower. Use a whisk to combine your dry and wet ingredients until smooth. Frying in batches is key too. If you crowd the air fryer, your wings won’t crisp up. Make sure to leave space between each floret. This allows hot air to circulate and cook evenly. To amp up the taste, consider adding spices to the batter. A pinch of cayenne or some black pepper can elevate the flavor. Experiment with different spices to find your favorite mix. You can also use homemade sauce options. Making your own sauce lets you control the flavor. Try mixing your favorite ingredients for a unique twist. Pair your cauliflower wings with sides that complement their flavor. A fresh salad or some crunchy veggies work well. You can also serve them with a dipping sauce for an extra kick. For presentation, arrange the wings on a platter with fresh lettuce leaves. This adds color and makes your dish stand out. Garnish with sesame seeds and chopped green onions for a beautiful finish. {{image_4}} For a gluten-free version, swap regular flour with gluten-free flour. It works just as well. You can use almond flour or coconut flour for a different flavor. For breadcrumbs, choose gluten-free panko or crushed rice crackers. These options keep the crunch without gluten. If you love heat, add hot sauce to the glaze. Just mix in about one tablespoon for a nice kick. You can also sprinkle chili flakes into the batter. This gives the wings a spicy crunch that pairs perfectly with the BBQ sauce. To make these wings lighter, reduce the oil in the recipe. Instead of using a lot of oil, you can use a light spray. For sweeteners in the glaze, consider maple syrup or agave. Both add sweetness without extra calories. These changes keep the flavor while making it healthier. For the complete recipe, check out the Full Recipe. To keep your cauliflower wings fresh, refrigerate leftovers right away. Place them in an airtight container. This helps prevent them from getting soggy. Make sure they cool down before sealing the container. For extra crunch, store them separately from the sauce. To keep the wings crispy, avoid stacking them. Lay them flat in the container. You can also place a paper towel inside to absorb excess moisture. This little tip helps maintain that delicious crunch. To reheat, the air fryer is your best choice. Preheat it to 375°F (190°C). Place the wings in a single layer. Heat them for about 5 to 7 minutes. This keeps them crispy and tasty. If you need to reheat in the oven, set it to the same temperature. Bake the wings for about 10 minutes. This method also works well, but the air fryer wins for crispiness. The microwave can make them soft, so I don’t recommend it. If you want to prep for freezing, do it before cooking. After you coat the cauliflower, place the wings on a baking sheet. Freeze them for about an hour. Once they are firm, transfer them to a freezer bag. This prevents them from sticking together. For the best way to store before cooking, use parchment paper between layers. This keeps them separate. When you're ready to cook, no need to thaw. Just cook them straight from the freezer. Enjoy the same great taste! Find the full recipe for these wings to get started. Air-fryer cauliflower wings last about 3-5 days in the fridge. Store them in an airtight container. They taste best when fresh, so enjoy them soon! Yes, you can use frozen cauliflower. Just thaw it first and pat it dry. This step helps the batter stick better for a nice crunch. Cauliflower wings pair well with many sides. Try serving them with: - Rice or quinoa - Fresh vegetables - A simple salad - Dipping sauces like ranch or extra BBQ sauce To add heat, mix in some hot sauce or chili flakes. You can also use spicy Asian BBQ sauce for a kick. Adjust the spice level to your taste! The batter gives the wings a crunchy coating. While you can skip it, the wings may lack that crispy texture. The batter also helps the sauce stick better. Yes, you can prep the cauliflower and batter ahead of time. Store them separately in the fridge. When you're ready, coat the cauliflower and air fry them for a quick meal. For the full recipe, check out the earlier sections. In this blog post, we explored how to make tasty air-fryer cauliflower wings. We covered the key ingredients, including cauliflower, flour, and Asian BBQ sauce. I shared tips on achieving the perfect batter and how to coat and air fry the wings. We discussed variations like gluten-free options and how to store leftovers. To sum up, you can enjoy a healthy snack or meal that’s simple to make. With a few tweaks, these wings can fit any diet. Now, grab your ingredients and have fun experimenting with this recipe!
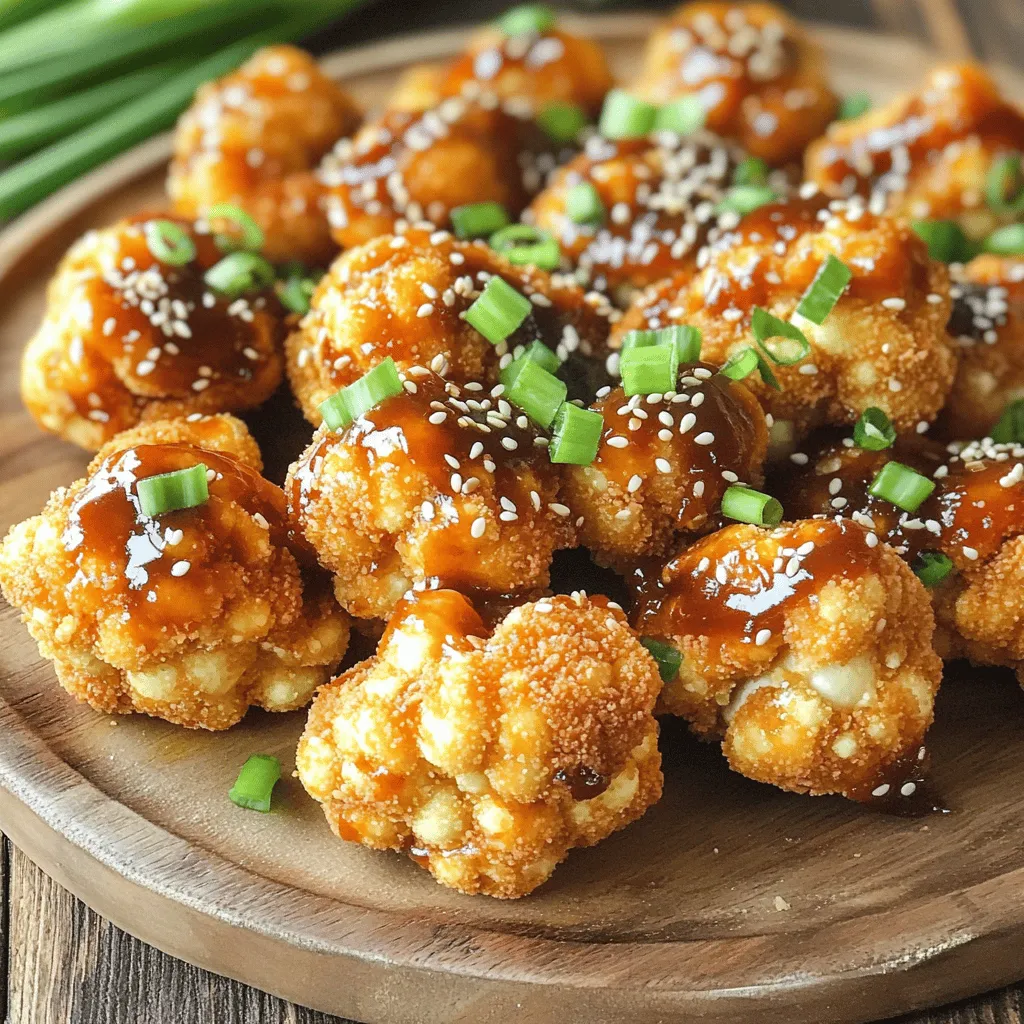
Air-Fryer Asian BBQ Cauliflower Wings Delight
Looking for a tasty plant-based treat? Try my Air-Fryer Asian BBQ Cauliflower Wings! These delicious wings combine crunchy cauliflower and sweet Asian BBQ sauce for
- 1 can refrigerated crescent roll dough - 1 pound ground beef or turkey - 1 packet taco seasoning - 1 cup shredded sharp cheddar cheese - ½ cup finely diced onions - ½ cup diced ripe tomatoes - ¼ cup sliced jalapeños (optional for heat) These main ingredients form the tasty base of your taco bombs. The crescent roll dough serves as a flaky shell, while the seasoned meat and cheese bring the bold taco flavor. Fresh onions and tomatoes add crunch and color, and jalapeños spice things up if you like heat. - Extra spices for flavor enhancement - Toppings for serving like salsa and guacamole Feel free to play with your spices! Adding extra chili powder or cumin can boost the flavor. When serving, salsa and guacamole make great partners. They add freshness and creaminess that pairs well with the crispy bombs. - Gluten-free alternatives for crescent roll dough - Vegetarian options for meat substitution For gluten-free eaters, look for gluten-free crescent roll dough. You can also swap the ground meat for black beans or lentils for a tasty vegetarian option. Both ways ensure everyone enjoys these delicious treats. Set your air fryer to 350°F (175°C). Preheating helps cook the taco bombs evenly. This step makes sure you get that crispy outside while keeping the filling warm and tasty. Start by heating a medium skillet on medium heat. Add 1 pound of ground beef or turkey. Cook it until it's brown, breaking it apart with a spatula. This should take about 5-7 minutes. After browning, drain any extra fat. This keeps your taco bombs from being greasy. Now, mix in 1 packet of taco seasoning and follow the water amount on the packet. Stir well and cook for 2-3 more minutes until hot. Lay out your crescent roll dough on a floured surface. Carefully unroll it and cut it into triangles. Place a spoonful of the meat mixture in the center of each triangle. Then, top it with 1 cup of shredded cheddar cheese, ½ cup of diced onions, ½ cup of diced tomatoes, and ¼ cup of sliced jalapeños if you want some heat. To seal, fold the corners over the filling. Pinch the seams tightly to create a sealed shape. This prevents any filling from leaking out while cooking. Arrange the taco bombs in the air fryer basket. Make sure to leave space between each bomb for air to flow. You may need to cook in batches. Set the timer for 8-10 minutes. Check them halfway through to see if they are golden brown. If needed, adjust the time. Once done, carefully take them out and place them on a plate. Enjoy your tasty Air Fryer Taco Bombs! Check the Full Recipe for more details. - Overfilling the taco bombs: It’s easy to want to add more filling, but this can lead to messy bombs. Stick to a small spoonful of meat and cheese. This keeps them from bursting open while cooking. - Not sealing properly: Make sure to pinch the seams tightly. If there are gaps, the filling can ooze out. A good seal makes for the perfect bite. - How to adjust cooking time based on air fryer models: Different air fryers heat in unique ways. Start with 8 minutes, but check them at 7 minutes. If they need more time, add a minute or two. - Tips for achieving the perfect golden color: Lightly spray the taco bombs with cooking spray before cooking. This helps them turn a lovely golden brown. Flip them halfway through for even cooking. - Best plating practices for serving: Arrange the taco bombs on a nice plate. Keep them warm until you serve. This makes them look great and keeps them tasty. - Suggestions for garnishing: Add some chopped cilantro on top for a pop of color. Serve with bowls of salsa and guacamole for dipping. This adds flavor and makes your dish look even better. For the full recipe, check out the details above and enjoy making these tasty Air Fryer Taco Bombs! {{image_4}} You can switch up the meat in your taco bombs. Try ground chicken or beef for a twist. For a meatless option, use black beans or lentils. Both choices taste great with taco seasoning. Cheese is another area to explore. Instead of sharp cheddar, use pepper jack for a spicy kick. You can also try mozzarella for a milder flavor. Each cheese adds a unique taste to your taco bombs. Dipping sauces make taco bombs even better. Salsa is a classic choice. It adds freshness and zing. Creamy guacamole is another favorite. You can also serve sour cream for smoothness. Want to make your own dip? Mix yogurt with lime juice and cilantro for a refreshing sauce. This simple homemade dip pairs well with the flavors of your taco bombs. Add spices from around the world to your taco bombs. Try cumin and coriander for a Middle Eastern twist. A dash of curry powder gives a warm flavor. You can also adapt the recipe to fit different cuisines. For a Mexican flair, add chipotle peppers. To go Italian, use Italian sausage and sprinkle with oregano. Each spice opens up new taste possibilities and keeps your meals exciting. To keep your taco bombs fresh, place them in an airtight container. This helps maintain their crunch. Store them in the fridge for up to three days. After that, the texture may change. To re-crisp your taco bombs, use the air fryer. Set it to 350°F (175°C) and heat for 3-5 minutes. This method helps avoid sogginess. You can also use the oven, but the air fryer is best for keeping them crispy. You can freeze taco bombs either before or after cooking. If you freeze them raw, assemble them and place in a single layer on a baking sheet. Once frozen solid, transfer them to a freezer bag. To reheat, cook from frozen in the air fryer for about 10-12 minutes at 350°F (175°C). If cooked first, thaw them overnight in the fridge before reheating. This keeps them safe and tasty. Yes, you can prepare taco bombs in advance. Here are some tips: - Prepare the Filling: Cook and season the meat ahead of time. Store it in the fridge. - Assemble and Chill: You can assemble taco bombs and keep them in the fridge. Wrap them well to avoid drying out. - Freeze for Later: For longer storage, freeze the assembled taco bombs. Place them on a baking sheet, freeze until solid, then transfer to a freezer bag. You can get creative with fillings! Here are some popular options: - Beans: Black beans or refried beans add protein and flavor. - Cheese Varieties: Try Monterey Jack or pepper jack for a spicy kick. - Veggies: Bell peppers, corn, or zucchini can add crunch and sweetness. - Meats: Swap ground beef for chicken, pork, or even shrimp. Customize your taco bombs to suit your taste buds! To ensure perfect taco bombs, look for these signs: - Golden Brown Color: They should be golden and look crispy on the outside. - Filling Bubbles: You might see some filling bubbling out, which is a good sign. - Internal Temperature: Use a meat thermometer. The center should reach 165°F (74°C). Checking these signs will help you serve perfect taco bombs every time! In this blog post, we explored how to make delicious Air Fryer Taco Bombs. We covered key ingredients, including dough, meat, and spices. I shared step-by-step instructions and tips to avoid mistakes. You learned how to store leftovers and even variations to suit your taste. Taco bombs are fun and easy to make. They are great for parties or quick meals. Try customizing them with different fillings and dips. I hope you enjoy making your own tasty creations!
Air Fryer Taco Bombs Flavorful and Easy to Make
Are you ready to impress your taste buds with a fun twist on tacos? Air Fryer Taco Bombs are here to save your weeknight dinner!
To make crispy garlic air fryer broccoli, gather these ingredients: - 1 lb fresh broccoli florets - 3 tablespoons olive oil - 4 cloves garlic, minced - 1/2 teaspoon red pepper flakes (optional) - 1 teaspoon garlic powder - 1 teaspoon onion powder - Salt and pepper to taste - Zest of 1 lemon - 2 tablespoons grated Parmesan cheese (optional) If you don't have some ingredients, here are options: - Use avocado oil instead of olive oil for a different flavor. - Substitute fresh garlic with garlic paste or powder if you're in a pinch. - Try nutritional yeast instead of Parmesan for a vegan option. - Use lemon juice if you don't have zest. When picking broccoli, look for these signs of freshness: - Choose bright green florets with no yellow spots. - Stems should feel firm and not bend easily. - Fresh broccoli should smell sweet, not bitter. - If possible, buy organic to avoid pesticides. These tips help you select the best broccoli for your dish. For the full recipe, check the steps to bring your crispy garlic air fryer broccoli to life! First, rinse 1 pound of fresh broccoli florets under cool water. Make sure to wash them well to remove any dirt. Next, dry the broccoli thoroughly using a kitchen towel or paper towels. This step is very important. Drying helps the broccoli get crispy when cooked. In a large bowl, combine 3 tablespoons of olive oil and 4 minced garlic cloves. If you like some heat, add 1/2 teaspoon of red pepper flakes. Next, include 1 teaspoon of garlic powder and 1 teaspoon of onion powder. Don’t forget a pinch of salt and pepper! Mix everything until well combined. This mixture is key for great flavor. Now it’s time to coat the broccoli. Add the dry broccoli florets to the bowl with the garlic mixture. Gently toss the florets until they are fully covered in the oil and spices. Make sure each piece gets some of that tasty mix. This step ensures that every bite will be bursting with flavor. For the full recipe, check the details above. Preheating your air fryer is key for crispy broccoli. I set mine to 375°F (190°C). Give it about 3-5 minutes to heat up. This step helps the broccoli cook evenly and get that nice crunch. When I air fry, I arrange the broccoli in one layer. This leaves space between the florets. Good air flow is essential. I also shake the basket halfway through cooking. This ensures all sides get that perfect golden color. Cook the broccoli for 10-12 minutes. Keep an eye on it; you want it vibrant and crispy. If you like extra crunch, check it a minute or two sooner. Tossing in lemon zest and Parmesan after cooking adds flavor and a nice finish. For more tips, check the Full Recipe. {{image_4}} To make your broccoli extra crispy, start with fresh florets. Dry them well after washing. Any moisture will steam the broccoli, making it soggy. Toss the florets in olive oil and seasonings evenly. This helps them cook well. When you place them in the air fryer, ensure they are in a single layer. If they overlap, they won't get as crispy. Shake the basket halfway through to help them cook evenly. To bring out the garlic flavor, use fresh garlic cloves. Minced garlic gives a stronger taste than garlic powder. You can even roast the garlic before adding it to the mix. This adds a sweet, rich taste. Adding lemon zest at the end brightens the garlic flavor and gives a fresh twist. If you want more heat, add red pepper flakes to the garlic mix. Crispy garlic air fryer broccoli is a great side dish for any meal. Serve it alongside grilled chicken or fish for a balanced plate. It also pairs well with pasta dishes or as a topping on salads. For extra flair, sprinkle more Parmesan cheese on top or add toasted nuts for crunch. Enjoy it hot for the best taste! You can change the flavor of your crispy garlic air fryer broccoli easily. Try adding spices like cumin or paprika for a smoky taste. A dash of soy sauce can give it an umami kick. You can also use fresh herbs like thyme or rosemary for a garden-fresh flavor. Mix and match to find your favorite blend! Broccoli is great, but you can mix in other veggies for variety. Cauliflower, carrots, or bell peppers work well with this recipe. Just chop them into similar sizes as the broccoli florets. This way, they cook evenly. You can create a colorful veggie medley that’s tasty and visually appealing. If you want a vegan dish, skip the Parmesan cheese. You can use nutritional yeast instead. It adds a cheesy flavor without dairy. You can also try adding a splash of lemon juice for brightness. This keeps your dish light and vibrant. For more creaminess, consider using tahini or a vegan cheese alternative. Enjoy the same great taste with a plant-based twist! It takes about 10-12 minutes to cook broccoli in an air fryer. Cooking times can vary based on the size of the florets. I recommend checking for doneness at the 10-minute mark. The broccoli should be bright green and crispy. Yes, you can use frozen broccoli, but it will change the texture. Frozen broccoli often has more water, so it may not get as crispy. If you use frozen broccoli, cook it a bit longer. Start with 12-15 minutes and check for crispiness. Crispy garlic air fryer broccoli pairs well with many dishes. Here are some ideas: - Grilled chicken or fish - Pasta with olive oil and garlic - Quinoa or rice dishes - Tofu stir-fries - A fresh salad These options create a balanced meal that is both healthy and tasty. For the full recipe, check out the earlier section. To sum it up, we explored how to make crispy garlic air fryer broccoli. We covered ingredient choices, cooking steps, and tips for the best results. You learned how to achieve crispiness and enhance flavor. Finally, we offered variations and answered your common questions. Use these tips for a delicious dish that pleases everyone. Try new seasonings and veggies to keep it fun. Enjoy your cooking and savor every bite!
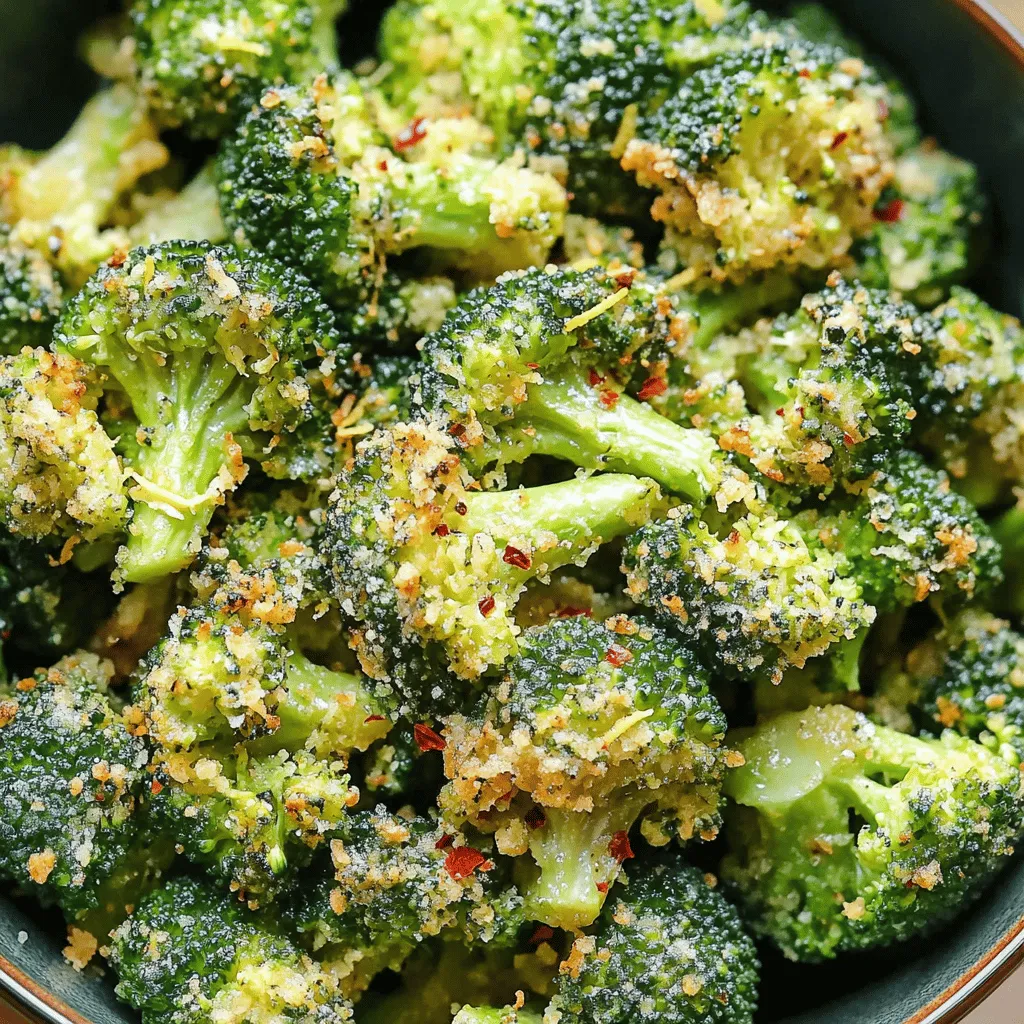
Crispy Garlic Air Fryer Broccoli Simple Side Dish
Are you ready to elevate your dinner game? Crispy Garlic Air Fryer Broccoli is a simple side dish that packs a flavor punch. In just