Appetizers

Here is what you will need to make Grilled Mexican Street Corn: - Fresh corn on the cob - Creamy mayonnaise - Cotija cheese - Chili powder - Smoky paprika - Garlic powder - Lime juice - Fresh cilantro - Salt and pepper - Lime wedges Each ingredient plays a key role in bringing this tasty dish to life. The corn gives a sweet crunch, while the creamy mayonnaise provides a rich base. Cotija cheese adds a salty, tangy flavor. Chili powder and smoky paprika bring warmth and depth. Garlic powder gives an added kick, and the lime juice brightens every bite. Fresh cilantro adds a burst of color and freshness. Don't forget the salt and pepper; they help balance the flavors. Lime wedges are perfect for a zesty finish. For the full recipe, see above. You'll find all the steps to create this delicious dish. Enjoy every bite! First, you need to preheat the grill to a medium-high temperature. This step is key for perfect grilling. A hot grill gives the corn a nice char. The heat helps to lock in the juices and flavors. To husk corn, grab an ear and pull back the green leaves. Remove all the silk strands. Make sure to get it all off for the best taste. When the corn is clean, it is ready for grilling. Now, let’s make the flavor mixture. In a small bowl, mix together the mayonnaise, chili powder, smoky paprika, garlic powder, lime juice, and a pinch of salt and pepper. Stir until smooth and well blended. This mixture will add a creamy, zesty touch to the corn. Place the husked corn directly on the grill. Grill the corn for about 10-15 minutes. Turn the corn every few minutes to get an even char. Look for a nice golden-brown color. This is when the corn is ready to come off the grill. Once the corn cools a bit, coat each ear with your mayo mixture. Use a pastry brush or the back of a spoon to spread it out. Make sure every bit of corn is covered. Then, sprinkle crumbled cotija cheese over each ear, allowing it to stick to the mayo. To serve, arrange the grilled corn on a platter. Garnish with fresh cilantro and a sprinkle of chili powder. Add lime wedges on the side for guests to squeeze over the corn. This will add a refreshing zing right before they take a bite. Enjoy your tasty grilled Mexican street corn! For the complete recipe, check out the Full Recipe. To avoid overcooking the corn, watch the time closely. Grill the ears for about 10 to 15 minutes. Turn them every few minutes for even cooking. You want a nice golden-brown color but not burnt. If you see the kernels drying out, take them off the heat. You can spice things up with some extra seasonings. Try adding cayenne pepper for heat. Smoked paprika gives a nice flavor too. You could also add some zest from lime for a fresh twist. Get creative! Mix and match to find your perfect blend. For an attractive display, use a wooden platter or a simple white dish. Lean the grilled corn against each other for a fun look. Scatter fresh cilantro around the corn for color. Place lime wedges on the side. This way, guests can squeeze fresh lime juice over the corn right before eating. Enjoy the vibrant colors and flavors! {{image_4}} You can make this dish vegetarian by swapping out a few items. Use vegan mayonnaise instead of regular mayo. For cheese, try using dairy-free options like cashew cheese or nutritional yeast. Both choices give a tasty twist while keeping it meat-free. This way, you can enjoy the same street corn feel without using animal products. Want to heat things up? Add hot sauce to the mayo mix for a spicy kick. You can also chop some fresh jalapeños and sprinkle them on top. This adds flavor and nice heat to the corn. Adjust the amount based on how spicy you like it. This variation makes your grilled corn stand out at any cookout. Cotija cheese is traditional, but there are many tasty options. You can use feta cheese if you want something a bit different. For a creamier texture, try goat cheese. Each cheese brings its own flavor, so feel free to experiment. This lets you find the perfect cheese that fits your taste buds and adds a new twist to the classic recipe. To store leftover grilled corn, let it cool first. Wrap each ear tightly in plastic wrap or foil. You can also place it in an airtight container. This helps keep the corn fresh. Store it in the fridge for up to three days. If you want to enjoy it later, check for any signs of spoilage before using. To reheat grilled corn, use a grill or stovetop. Heat your grill to medium heat. Place the corn on the grill for about 5 minutes. This will help revive the flavors. You can also use a microwave. Wrap the corn in a damp paper towel and heat for 1-2 minutes. This method keeps the corn moist and tasty. Freezing corn on the cob is simple. First, husk the corn and remove all silk. Blanch the corn by boiling it for 4-5 minutes. Then, cool it in ice water for the same time. Pat it dry and wrap each ear in plastic wrap. Place them in a freezer bag, and label the bag with the date. You can freeze the corn for up to six months. When you're ready to eat it, just thaw it overnight in the fridge or cook it from frozen. Enjoy that fresh flavor anytime! Grilled Mexican street corn, or elote, is a popular snack in Mexico. It features fresh corn on the cob, grilled to perfection. Vendors often serve it on the street, slathered with creamy toppings. The dish combines flavors of mayonnaise, cheese, lime, and spices. This dish reflects the rich food culture of Mexico and brings joy to many. Yes, you can prep some parts before serving. Husk the corn a few hours in advance. You can also mix the mayo sauce ahead of time. Just store it in the fridge until you are ready to grill. Cook the corn fresh to keep it warm and tasty. To make it mild, skip the chili powder or use a small amount. For medium heat, stick to the recipe. For a hot version, add cayenne pepper or diced jalapeños. Taste the mayo mix and adjust the spices to your liking. Grilled Mexican street corn pairs well with many dishes. Try it with tacos, grilled meats, or a fresh salad. It also goes nicely with beans or rice. You can serve it at parties or cookouts for a fun twist! Grilled Mexican Street Corn is a tasty treat you can easily make. We covered the best ingredients, from fresh corn to creamy toppings. I shared steps for grilling and tips for perfect flavors. You can add your twists, too, like spicy or vegetarian options. Store leftovers correctly for later enjoyment. Now, you have the tools to impress friends and family with this delicious dish. Enjoy your cooking and have fun experimenting with flavors!
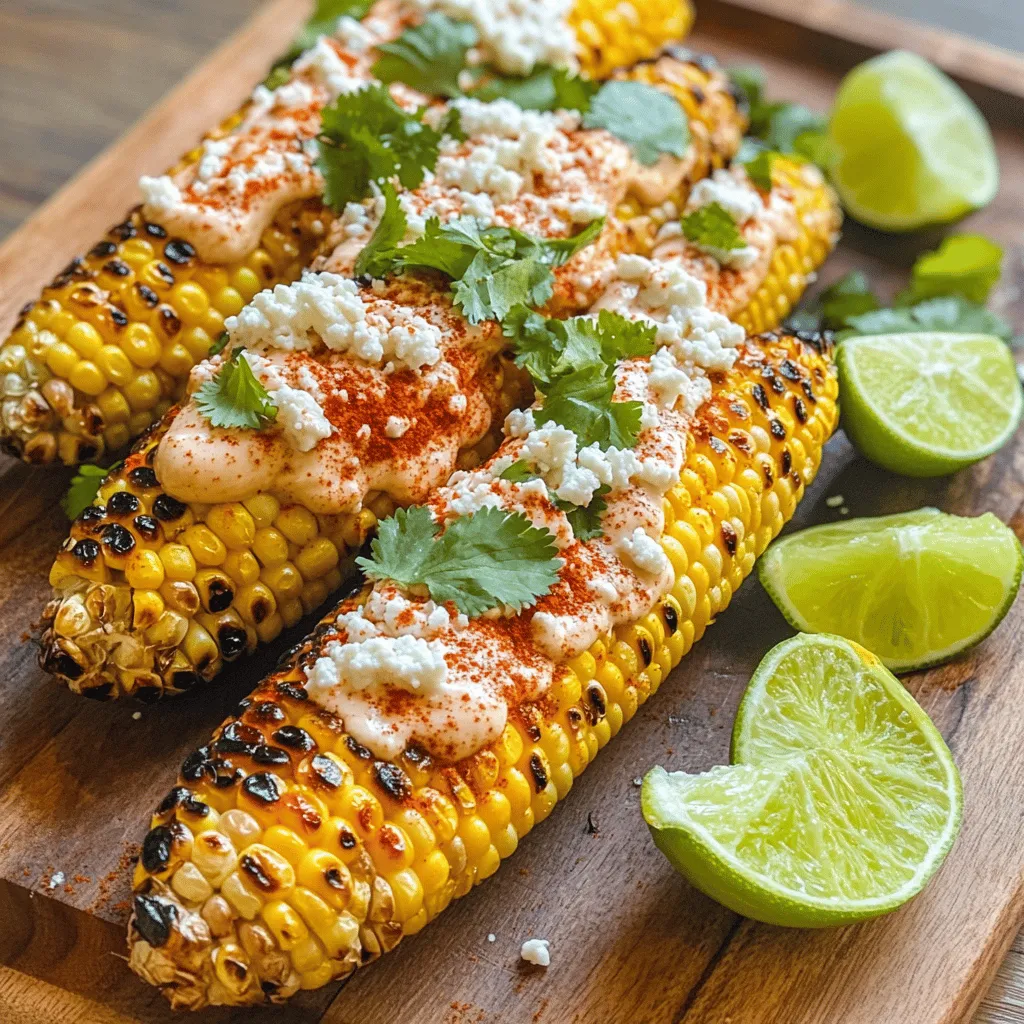
Grilled Mexican Street Corn Flavorful and Easy Recipe
If you’re craving a dish that bursts with flavor, Grilled Mexican Street Corn is a must-try! This easy recipe takes fresh corn on the cob
To make Gordon Ramsay’s pickled onions, you will need: - 2 large red onions, carefully peeled and thinly sliced - 1 cup apple cider vinegar - 1 cup water - 1 tablespoon granulated sugar - 1 tablespoon coarse sea salt - 1 teaspoon whole black peppercorns - 1 teaspoon mustard seeds - 1 teaspoon red pepper flakes (adjust based on desired spice level) - 2 cloves fresh garlic, lightly crushed If you don't have some ingredients, here are easy swaps: - Use white vinegar instead of apple cider vinegar for a sharper taste. - Swap granulated sugar with honey for a natural sweetness. - Coarse sea salt can be replaced with kosher salt. - For a milder flavor, try using yellow onions instead of red. To keep your pickled onions fresh: - Choose firm onions without any soft spots. - Store in a clean glass jar with a tight lid. - Keep the jar in the fridge for the best flavor and crunch. - Use the onions within 2-4 weeks for the best taste. - After they are ready, always make sure they are submerged in the brine. Using these tips, you can ensure your pickled onions stay fresh and flavorful! For the full recipe, check out the detailed steps to enjoy this zesty treat. Start with two large red onions. Peel them carefully to avoid waste. Use a sharp knife or mandoline to slice them thinly. Aim for even slices, which helps in pickling. Place the sliced onions in a bowl. Set them aside while you make the brine. Grab a medium saucepan for the brine. Add one cup of apple cider vinegar and one cup of water. Sprinkle in one tablespoon of granulated sugar and one tablespoon of coarse sea salt. Heat the mixture over medium heat. Stir gently until the sugar and salt dissolve completely. Next, add one teaspoon of whole black peppercorns and one teaspoon of mustard seeds. If you like spice, toss in one teaspoon of red pepper flakes. Add two lightly crushed garlic cloves, too. Let this mixture simmer for 2-3 minutes to blend the flavors. Remove the saucepan from heat and let the brine cool for a few minutes. This step helps the onions stay crisp. In a clean, sterilized jar, layer the sliced onions. Carefully pour the warm brine over them. Ensure the onions are completely submerged. Allow the jar to cool to room temperature before sealing it tightly. Finally, place the jar in the fridge. Let it sit for at least 24 hours before enjoying your pickled onions. To pickle onions perfectly, start by cutting them thin. Thin slices soak up the brine well. Use a mandoline slicer for even cuts. This tool makes the job quick and easy. Once cut, let them breathe in a bowl. This step helps them soften before pickling. For best results, use fresh onions. Their crispness adds to the crunch in your dish. Spice is personal, and you should adjust it to your taste. Gordon's recipe calls for red pepper flakes. Start with one teaspoon for a mild kick. If you want more heat, add more flakes. You can also try adding sliced jalapeños for a fresh twist. Remember, you can always add spice, but you can't take it away. So, start small and taste as you go. You can bring new life to your pickled onions by adding extra ingredients. Try fresh herbs like thyme or dill for a fragrant touch. You can also add a few slices of ginger for a zing. Another option is to include a splash of fruit juice. Pineapple or orange juice can add sweetness and depth. Mix and match to find your perfect blend. For more ideas, check the Full Recipe for inspiration. {{image_4}} You can switch the apple cider vinegar for other types. White vinegar works well if you want a sharper taste. Rice vinegar offers a milder flavor that is sweeter. Each type of vinegar gives a unique twist to your onions. Feel free to experiment until you find your favorite. There are many ways to boost the taste of your pickled onions. Adding fresh herbs like thyme or dill will add a fresh hint. You can also try adding a few slices of fresh ginger for warmth. Another option is to include a bay leaf, which enhances the overall depth. Adjust the spices based on what you enjoy most. Pickled onions can change with the seasons. In summer, add fresh peaches or berries for a fruity touch. In fall, consider adding cinnamon sticks or cloves for warmth. These seasonal twists make your pickled onions exciting all year round. Have fun creating new flavors that match the time of year. To store pickled onions, place them in a clean jar. Make sure the onions are fully submerged in the brine. Seal the jar tightly and keep it in the fridge. This helps keep them fresh and crisp. Always use a clean spoon when scooping out onions. This prevents any bacteria from getting into the jar. Pickled onions can last in the fridge for about two to four weeks. They may lose some crunch over time, but they will still taste great. Check for mold or any off smells before using them. If they smell bad or look strange, it's best to throw them away. You can reuse the brine for a new batch of onions. Just strain out any old bits before adding new onions. However, the flavor might change slightly. If you want a stronger taste, feel free to add more spices or vinegar. This is a great way to cut down on waste while still enjoying tasty pickled onions! Pickled onions can last up to two weeks in the fridge. After that, they may lose their crunch. Keep them in a sealed jar to keep them fresh. You can also freeze pickled onions for longer storage. They will change texture but still taste great. Yes, you can use white onions. They will taste a bit different but still work well. White onions have a sharper flavor compared to red onions. If you want a milder taste, soak them in water for a bit before pickling. Pickled onions are great on many dishes, such as: - Tacos - Sandwiches - Salads - Burgers - Charcuterie boards Their tangy flavor adds a nice kick and brightens up your meals. Absolutely! You can customize your pickled onions with various spices. Some great options include: - Coriander seeds - Dill seeds - Bay leaves Feel free to experiment with spices to find your favorite flavor. Pickling onions is fun and rewarding. We covered the key ingredients, substitutions, and tips for freshness. I shared step-by-step instructions for brining and chilling the onions. You learned how to enhance flavors and adjust spice levels. We also explored variations, storage tips, and answered common questions. Pickled onions are a versatile topping that can boost any meal. Try making your own and enjoy the fresh taste!
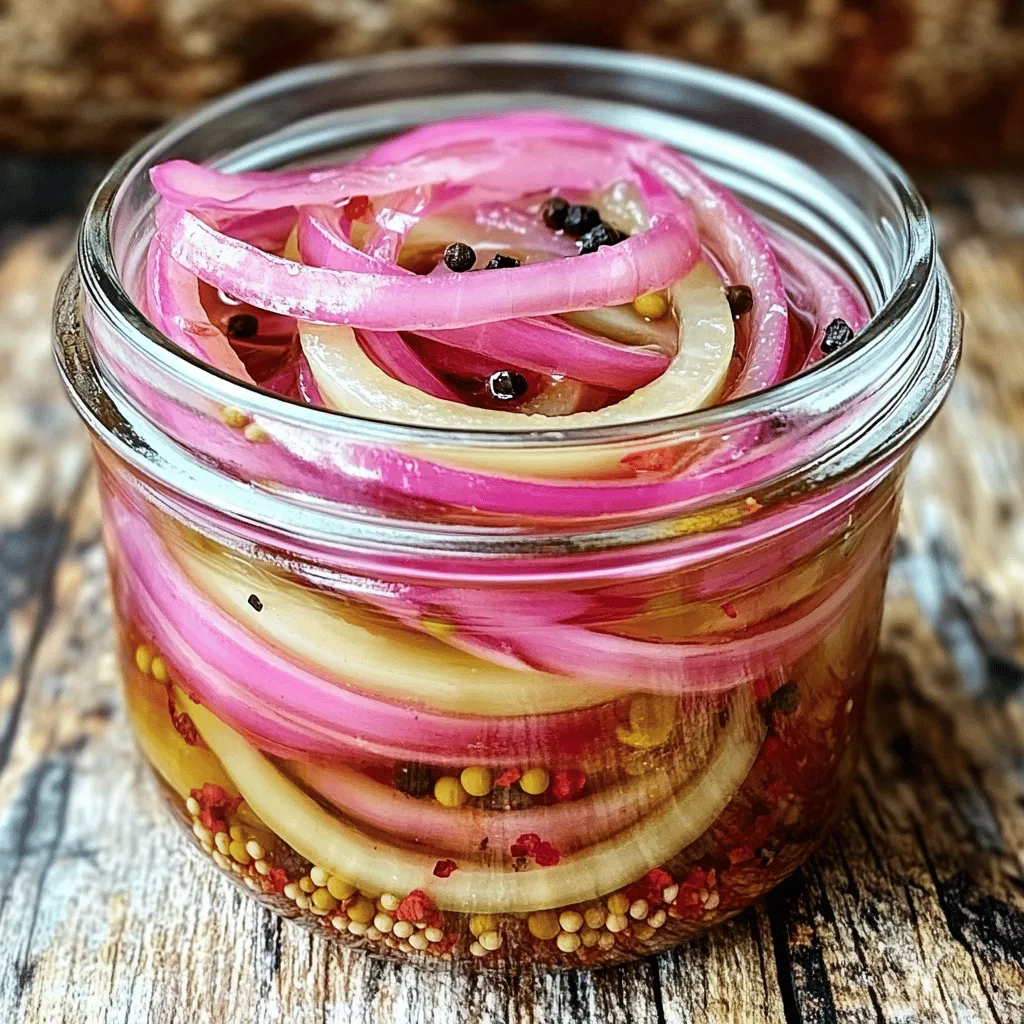
Gordon Ramsay Pickled Onions Tasty and Simple Recipe
If you love adding zing to your meals, you’ll adore this recipe for Gordon Ramsay pickled onions! These tasty bites are quick to make and
- Puff pastry - Cherry tomatoes - Fresh basil - Mozzarella cheese For the main ingredients, I love using puff pastry. It gives a nice crunch and is easy to handle. Cherry tomatoes are sweet and juicy, adding great flavor. Fresh basil brings a bright note to the dish. Mozzarella cheese melts beautifully and adds creaminess. - Extra virgin olive oil - Garlic powder - Salt and pepper When it comes to seasoning, I use extra virgin olive oil for richness. Garlic powder gives a nice kick without being too strong. A sprinkle of salt and pepper enhances all the flavors and makes everything taste better. - Baking sheet - Parchment paper - Rolling pin You will need a baking sheet to hold the pastries while they bake. Parchment paper prevents sticking and makes clean-up easy. A rolling pin helps roll out the puff pastry evenly, ensuring a perfect shape for each pastry. For the full recipe, check out the details on how to make these delicious treats! - Preheat the oven to 400°F (200°C). - Prepare the baking sheet with parchment paper. - Roll out the puff pastry on a floured surface. - Cut into 4x4-inch squares. - Combine halved cherry tomatoes, chopped basil, and shredded mozzarella cheese. - Add olive oil, garlic powder, salt, and pepper. Toss until well coated. - Spoon the filling onto the center of each pastry square. - Seal the corners by pinching them together. Brush with beaten egg. - Arrange the pastries on the baking sheet. - Bake for 18-20 minutes until golden brown. Enjoy the delightful flavors of tomato and basil in every bite! For the complete recipe, see the Full Recipe. - Always ensure the puff pastry is thawed properly. This helps it puff up well. - Avoid overfilling the pastries. Too much filling can make them soggy. - Use egg wash generously on top of each pastry. This gives them a nice shine. - Bake at the right temperature of 400°F (200°C). This ensures a crisp finish. - Garnish with fresh basil leaves. This adds color and flavor. - Serve with marinara sauce for dipping. It complements the pastries perfectly. For the full recipe, check out the details above! {{image_4}} You can easily change the flavor of your tomato basil pastries. Try adding feta cheese or goat cheese. Both cheeses add a creamy texture and a nice tang. You can also use sun-dried tomatoes for a twist. These add a rich, sweet flavor that pairs well with the fresh basil. If you want to mix it up, swap basil for oregano or thyme. These herbs bring a different taste that can surprise your guests. You can also add spinach for extra greenery. Spinach adds color and a healthy boost to your pastries. For those with dietary needs, there are great options. You can find gluten-free puff pastry at many stores. This makes the recipe accessible for gluten-free eaters. You can also make vegan variations using plant-based cheese. This way, everyone can enjoy these tasty treats. For the full recipe, check out the details above. Store your tomato basil pastries in an airtight container at room temperature. This keeps them fresh for a short time. If you place them properly, they will stay tasty and enjoyable. You can freeze uncooked pastries for later baking. This method allows you to enjoy them whenever you like. Just wrap each pastry well in plastic wrap before placing them in a freezer bag. If you have cooked pastries, refrigerate them for up to 3 days. Make sure they are in a sealed container to maintain their flavor. To reheat your pastries, use the oven for the best texture. Preheat it to 350°F (175°C) and bake for about 10 minutes. This keeps the pastry crisp. Avoid microwaving, as it can make the pastries soggy and less pleasant to eat. Yes, store-bought puff pastry works great. It saves time and effort. I often use it when I'm in a hurry. Just thaw it before using. It puffs up nicely and tastes fantastic. Prepare and freeze before baking. Just assemble the pastries and place them on a baking sheet. Cover them tightly and pop them in the freezer. When ready, bake straight from the freezer. This is so handy for unexpected guests! Marinara sauce and pesto are excellent choices. The savory flavors mix well with the pastries. You can even try a garlic aioli for a kick. Experiment with your favorites! Yes, they are vegetarian-friendly! The fresh tomatoes, basil, and cheese make a great combo. Even meat lovers enjoy these tasty bites. They fit well in any gathering or meal. Pair with a salad or serve as appetizers. A light side salad adds freshness. You can also offer them at parties. They are great for sharing and fun to eat. For the full recipe, check out the details above! You can create delicious tomato basil pastries easily. We explored the essential ingredients, tools, and steps to make them. I shared tips to perfect your pastries and suggested tasty variations. These treats are not only easy to store but also versatile for any occasion. Remember, using fresh ingredients makes a big difference in flavor. Enjoy making these yummy bites and impress your friends and family!
Tomato Basil Pastries Savory and Simple Treat
Are you ready to impress your guests with a mouthwatering treat? Tomato Basil Pastries are easy to make and bursting with flavor! Using just a
For a perfect batch of air fryer okra, you need these main ingredients: - 1 pound fresh okra, trimmed and sliced into 1/2-inch pieces - 1 cup cornmeal - 1/2 cup all-purpose flour - 1 large egg, beaten - 1 tablespoon olive oil These ingredients make a tasty and crunchy snack. Fresh okra is key for the best texture. To make your okra flavorful, mix in these seasonings: - 1 teaspoon garlic powder - 1 teaspoon onion powder - 1/2 teaspoon smoked paprika - 1/2 teaspoon cayenne pepper (adjust to taste) - 1 teaspoon salt - 1/2 teaspoon freshly ground black pepper These spices add a kick that makes each bite pop with flavor. The cornmeal and flour give the okra a great crunch. Want to make your okra even more exciting? Consider these add-ins: - Grated Parmesan cheese for a cheesy twist - Fresh herbs like parsley or cilantro for a fresh touch - A squeeze of lemon juice for brightness These extras can turn your snack into something special. Feel free to experiment and find your favorite mix! Start by gathering your ingredients. You will need: - 1 pound fresh okra, trimmed and sliced into 1/2-inch pieces - 1 cup cornmeal - 1/2 cup all-purpose flour - 1 teaspoon garlic powder - 1 teaspoon onion powder - 1/2 teaspoon smoked paprika - 1/2 teaspoon cayenne pepper (adjust to taste) - 1 teaspoon salt - 1/2 teaspoon freshly ground black pepper - 1 large egg, beaten - 1 tablespoon olive oil First, preheat your air fryer to 400°F (200°C). This helps the okra cook evenly. In a medium bowl, mix the cornmeal, flour, garlic powder, onion powder, smoked paprika, cayenne pepper, salt, and black pepper. Whisk them together well. Next, in a separate bowl, beat the egg. Add the sliced okra to the egg and toss to coat each piece. This step ensures the coating sticks well. Now, take the egg-coated okra and transfer it to the bowl with the cornmeal mix. Toss the okra gently until all pieces are coated. Drizzle the olive oil over this mixture. Mix again to coat every piece lightly. Arrange the okra in a single layer in the air fryer basket. Make sure to leave space between the pieces. If needed, cook in batches for best results. Cook the okra for 10-12 minutes. Shake the basket halfway through to promote even cooking. Keep an eye on them. They should turn golden brown and crispy. Once done, carefully remove the okra from the air fryer. Serve the crispy okra right away. Use a colorful platter for a nice touch. You can garnish with fresh herbs like parsley or cilantro. For an extra treat, pair it with a zesty dipping sauce. A homemade garlic aioli or a tangy yogurt dip works great. Enjoy your crispy snack! To make your air fryer okra crispy, follow these steps: - Coat evenly: Make sure each okra piece gets a good mix of the egg and dry ingredients. This helps the coating stick well. - Use oil wisely: A light drizzle of olive oil enhances crispiness. Don’t skip this step! - Single layer: Place the okra in a single layer. Avoid overcrowding the basket to allow proper air flow. Here are some common pitfalls you should steer clear of: - Skipping the preheat: Always preheat your air fryer. This helps the okra cook evenly and become crispy. - Too much moisture: Ensure the okra is dry before coating. Excess moisture can lead to soggy pieces. - Ignoring cooking times: Keep an eye on the okra. Cooking times can vary. Aim for a golden brown color. For the best results, set your air fryer to: - Temperature: 400°F (200°C) - Time: Cook for 10-12 minutes. Shake the basket halfway through for even cooking. Following these tips helps you create a deliciously crispy snack. Enjoy your air fryer okra! For more detailed steps, check the Full Recipe. {{image_4}} To make spicy air fryer okra, add more cayenne pepper. Start with 1 teaspoon, or adjust as you like. You can also mix in some chili powder for extra heat. This snack packs a punch and is perfect for those who love bold flavors. The heat will balance with the natural taste of the okra, making it a great treat. For cheesy air fryer okra, sprinkle some grated cheese on top. Try using Parmesan or cheddar. Add the cheese halfway through cooking to let it melt perfectly. This gives a creamy texture and rich flavor. The cheese blends well with the crispy coating, making every bite delightful. To make vegan-friendly air fryer okra, skip the egg. Use a flax egg instead. Mix one tablespoon of ground flaxseed with three tablespoons of water. Let it sit for five minutes to thicken. This acts as a great binder for the coating. The flavor stays just as tasty, and it is a healthy option too. Enjoy this version as a guilt-free snack that pleases everyone. To keep your leftover air fryer okra fresh, let it cool first. Place it in an airtight container. This helps prevent moisture. Store it in the fridge. It will stay good for up to three days. If you want to enjoy it later, freezing is a great option. To reheat your okra and keep it crispy, use the air fryer again. Preheat the air fryer to 350°F (175°C). Place the okra in a single layer. Heat for about 5-7 minutes. This will restore its crunch. You can also use an oven. Set it to 350°F (175°C) and bake for 10 minutes. Avoid using the microwave, as it makes the okra soggy. If you have extra okra, freezing is easy. Start by blanching the okra first. Boil water, then add the okra for 3 minutes. Quickly transfer it to ice water to stop cooking. Drain and pat dry. Place the okra in a freezer bag, removing as much air as possible. Label it with the date. You can freeze it for up to six months. When you're ready to use it, cook from frozen in your air fryer. Enjoy the taste of fresh okra anytime! Yes, you can use frozen okra in the air fryer. Just make sure to thaw it first. Pat it dry with a paper towel to remove excess moisture. This helps the coating stick and keeps the okra crispy. Adjust the cooking time as frozen okra may need a few extra minutes to cook through. Air frying okra is a healthier choice than deep frying. It uses less oil, which cuts down on calories and fat. Okra is also rich in vitamins and minerals. It has fiber, which aids digestion. Plus, it contains antioxidants that help fight disease. To prevent soggy okra, follow these tips: - Use fresh, dry okra. - Coat the okra lightly with oil. - Do not overcrowd the air fryer basket. - Shake the basket halfway through cooking. These steps help circulate air and keep each piece crisp. Air fryer okra is simple and tasty. We covered ingredients, steps, and tips to make it right. You can add spice, cheese, or keep it vegan for fun flavors. Remember to store leftovers properly to keep them crisp. These tips help you enjoy okra in new ways. Now, you’re ready to impress family and friends with your delicious air fryer okra!
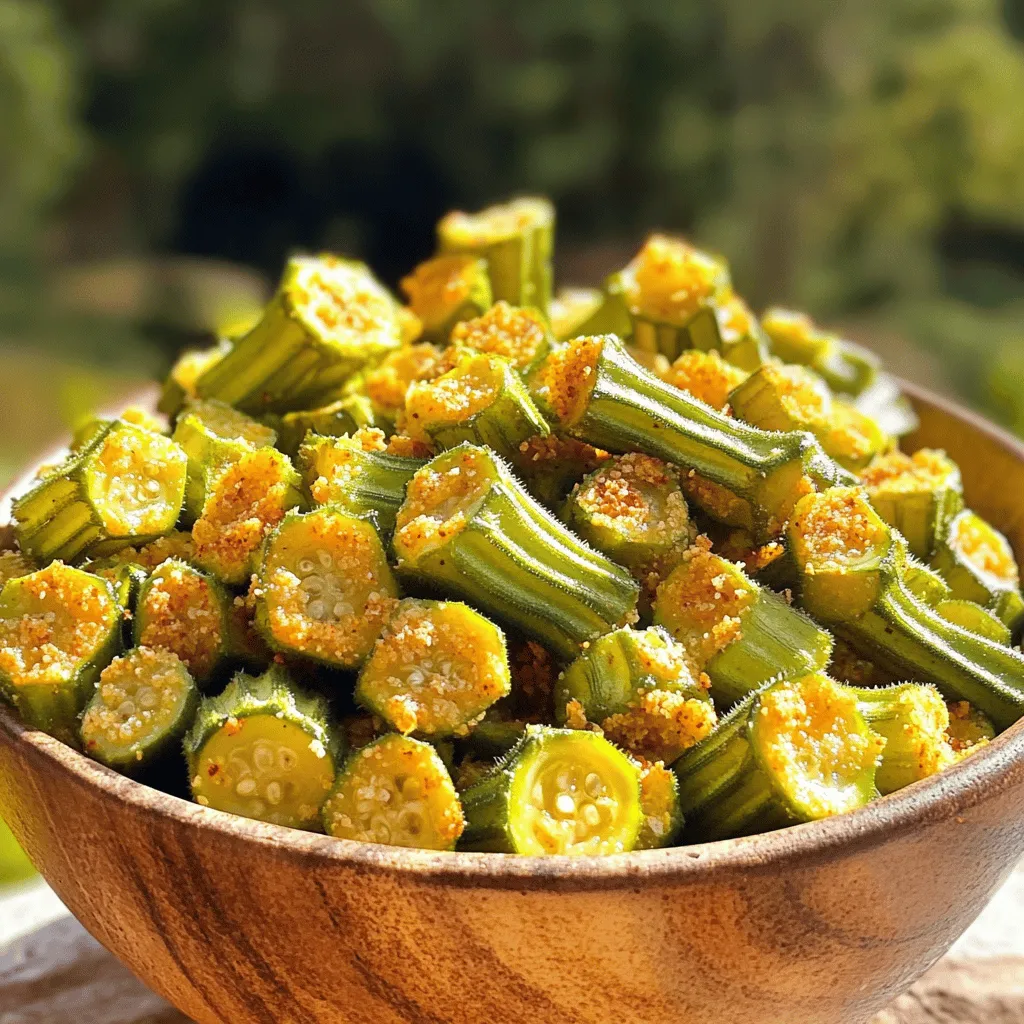
Air Fryer Okra Crispy and Flavorful Snack Recipe
Looking for a tasty snack? Try my Air Fryer Okra! This crispy and flavorful treat is easy to make and perfect for any occasion. With
- 4 medium bell peppers (any color), sliced into rings - 1 cup apple cider vinegar - 1 cup water - 3 tablespoons granulated sugar - 1 tablespoon salt - 1 teaspoon garlic powder - 1 teaspoon black peppercorns - 1 teaspoon crushed red pepper flakes (optional for added heat) - 2 cloves garlic, smashed - Fresh herbs (such as dill or thyme) for garnish The main star of this dish is the bell pepper. You can choose red, yellow, or green peppers. Each color has its own taste. Red peppers are sweeter, while green ones are more bitter. The apple cider vinegar gives the pickles a nice tang. It balances the sweetness from the sugar. Granulated sugar is important to make the pickling liquid tasty. It helps to cut through the acidity of the vinegar. Salt adds flavor and helps preserve the peppers. Garlic powder and black peppercorns give a warm taste that makes these pickled peppers pop. Smashed garlic cloves add a strong garlic flavor. I love the crunch of the peppers mixed with the garlic. If you like some heat, crushed red pepper flakes are a great choice. They bring a little kick without being too spicy. You can add various herbs and spices to change the flavor. Try adding fresh dill or thyme for a herby touch. If you want more spice, consider adding some sliced jalapeños. Another option is to include a bay leaf for a deeper flavor. Mixing in sliced onions can also add a nice crunch. You can even use different vinegars, like rice or white vinegar, for a unique taste. The choice is yours! Feel free to experiment and make these pickled peppers your own. For the full recipe, check the previous section. To start, wash your bell peppers well under cold water. You want them clean and fresh. Next, slice each pepper into thin, even rings. Be sure to remove the seeds and stems for the best taste. Set the sliced peppers aside on a clean cutting board. This simple step makes a big difference in how they turn out. Now, let’s make the pickling liquid. Take a medium-sized saucepan and mix together the apple cider vinegar, water, granulated sugar, salt, garlic powder, black peppercorns, and crushed red pepper flakes. Heat this mixture over medium heat. Stir it often until the sugar and salt dissolve. This usually takes a few minutes. Once everything is dissolved, remove the saucepan from the heat and let it cool slightly. This liquid is key to making your peppers flavorful. You’re almost done! Grab a clean mason jar or an airtight container. Add the sliced peppers to the jar along with the smashed garlic cloves. Carefully pour your warm pickling liquid over the peppers. Make sure every slice is covered in the liquid. Seal the jar tightly with a lid. Let it cool to room temperature, then put it in the refrigerator. For the best taste, let the peppers marinate for at least 1 hour, but overnight is even better. Enjoy these zesty pickled peppers as a snack, on sandwiches, or in salads. For the complete recipe, check out the Full Recipe. Store your pickled peppers in a clean glass jar. A mason jar works well. Make sure the jar has a tight lid. This keeps air out and helps flavors mix. Place the jar in the fridge immediately after sealing. The cold helps the peppers stay crisp and fresh. You can add more to the pickling liquid for extra flavor. Try using whole spices like mustard seeds or coriander seeds. Fresh herbs like basil or oregano can also boost taste. If you like heat, add more crushed red pepper flakes. A few slices of onion or carrot can add sweetness and crunch. One common mistake is not using enough salt. Salt helps with flavor and preservation. Another mistake is not letting the peppers sit long enough. For best flavor, give them at least one hour to pickle. Avoid using metal containers for storage, as they can react with the vinegar. Always use clean utensils to prevent spoilage. Explore these tips to make your Quick Refrigerator Pickled Peppers even better. For the full recipe, check out the instructions above. {{image_4}} You can pick many types of peppers for this recipe. Bell peppers add sweetness and crunch. If you want a kick, use jalapeños or serranos. For a milder taste, try banana peppers. Each pepper brings its own flavor and texture. Mix and match them for fun results! Apple cider vinegar works great, but it’s not your only choice. White vinegar gives a sharper taste. Rice vinegar is milder and sweeter. You can even use malt vinegar for a unique twist. Each vinegar changes the flavor profile, so feel free to experiment! Spices can transform your pickled peppers. Try adding mustard seeds for a tangy flavor. Coriander seeds bring a warm, citrusy touch. You can also add bay leaves or dill for extra depth. Don’t be afraid to get creative with spices. Each choice can make your pickled peppers truly special. To store your pickled peppers, use a clean mason jar or an airtight container. After making the peppers, pour the warm pickling liquid over the sliced peppers. Make sure all slices are under the liquid. Seal the jar tightly with a lid. This keeps the peppers fresh and flavorful. Quick refrigerator pickled peppers can last up to 2-3 weeks in the fridge. For the best taste, eat them within the first week. Store them in the coldest part of the fridge. This helps maintain their crunch and flavor. If you want to keep them longer, consider canning them. Check your pickled peppers for any signs of spoilage. If you see mold or an off smell, it's time to toss them. If the liquid looks cloudy or the peppers have changed color, do not eat them. Always trust your senses. When in doubt, throw it out! Yes, you can use other types of vinegar. White vinegar works well. It gives a sharp taste. You can also try rice vinegar for a milder flavor. Each vinegar adds a unique twist to your pickled peppers. Experiment with different options to find your favorite. Pickled peppers last about two weeks in the fridge. Make sure to keep them in a sealed jar. After two weeks, the flavor will still be good, but the texture may change. Always check for any signs of spoilage before eating. You can serve pickled peppers in many ways. They make a great snack on their own. You can also add them to sandwiches or tacos. Use them to spice up salads or grain bowls. For more ideas, check the Full Recipe for serving suggestions. In this article, we covered the key steps to making pickled peppers. We started with listing essential ingredients and shared their detailed descriptions. I detailed how to prepare the peppers and make the pickling liquid. I also shared tips for storage and common mistakes to avoid. Variations let you experiment with different ingredients and storage info to keep your peppers fresh. Making pickled peppers is fun and tasty. Enjoy the crunch and zesty flavor in your meals.
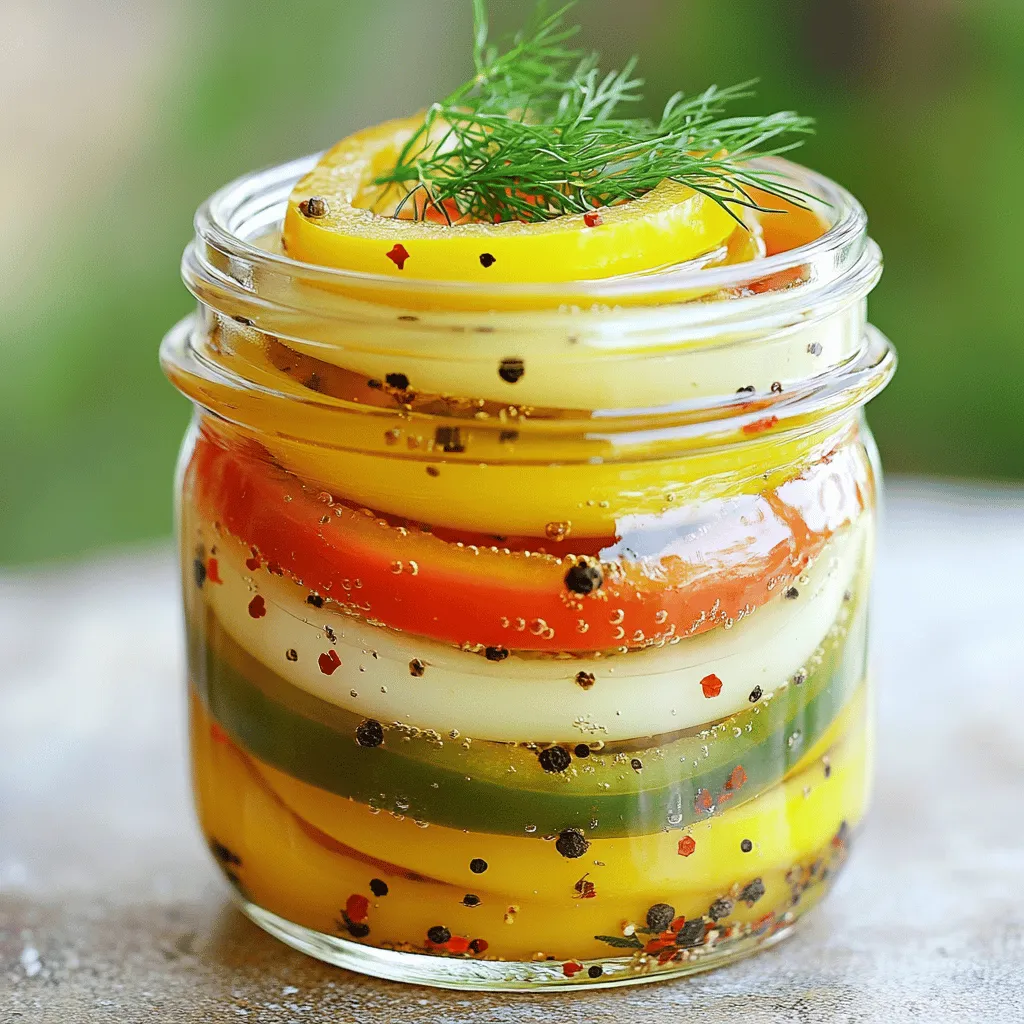
Quick Refrigerator Pickled Peppers Flavorful and Easy
Are you ready to add a burst of flavor to your meals? Quick refrigerator pickled peppers are the answer! They are easy to make and
To make delicious cucumber sandwiches, you need the right ingredients. Here is a simple list: - 1 large cucumber, thinly sliced - 8 slices of whole grain bread - 4 ounces cream cheese, softened - 1 tablespoon fresh dill, finely chopped - 1 tablespoon fresh lemon juice - 1 teaspoon garlic powder - Salt and freshly ground pepper, to taste - 1 cup arugula or mixed salad greens These ingredients create a light and tasty treat. The cucumber adds crunch, while the cream cheese brings creaminess. Whole grain bread gives a nice texture. The dill, lemon juice, and garlic powder add flavor. You can make your cucumber sandwiches even better with some add-ins. Here are a few ideas: - Thin slices of radish for crunch - A sprinkle of paprika for a hint of spice - Sliced avocado for creaminess These options let you try new flavors. Feel free to mix and match to find your favorite! Cucumber sandwiches are not only tasty but also healthy. Each serving has about: - Calories: 150 - Protein: 5 grams - Fat: 6 grams - Carbohydrates: 22 grams - Fiber: 3 grams These sandwiches are low in calories and high in nutrients. They make a great snack or light meal. Enjoy them with a side salad or some fruit for a complete meal. For the full recipe, check the details above. Start by gathering your ingredients. You need cream cheese, dill, lemon juice, garlic powder, salt, and pepper. In a medium bowl, mix the softened cream cheese with the dill and lemon juice. Add garlic powder, salt, and pepper. Stir until smooth. This creamy spread gives the sandwiches a rich flavor. Now, lay out the bread on a clean surface. Take a slice and spread a generous layer of the cream cheese mixture on it. Make sure to reach the edges. Next, layer thin cucumber slices over the cream cheese. Cover the entire slice with cucumber for a nice crunch. On top of the cucumbers, add a handful of arugula or mixed greens. This adds freshness and color. Finally, place another slice of bread on top, cream cheese side down. To make the sandwiches look nice, trim the crusts off with a sharp knife. Cut each sandwich into quarters for easy eating. If you want to impress, add thin radish slices on top of the cucumbers. These little touches make your cucumber sandwiches pop! For the full recipe, check the details above. Slice cucumbers thinly for the best taste. A sharp knife helps create even slices. Aim for about 1/8 inch thick. This size gives a nice crunch and flavor in each bite. You can also use a mandoline for perfect slices. Remember to wash the cucumber before slicing. This step removes dirt and germs. Soggy sandwiches are a common problem. To keep your sandwiches dry, salt the cucumber slices first. Let them sit for about 10 minutes. This process draws out extra moisture. After that, pat them dry with a paper towel. Another tip is to spread cream cheese on both slices of bread. This extra layer acts as a barrier. Cucumber sandwiches are light and refreshing. They pair well with a variety of drinks. Try serving them with iced tea or lemonade for a classic touch. You can also add some fruit on the side. Fresh strawberries or grapes complement the flavors nicely. For a full meal, serve them with a light soup or salad. For more details on how to make these sandwiches, check the Full Recipe. {{image_4}} You can easily make cucumber sandwiches vegan. Instead of cream cheese, use hummus. Hummus adds a nice, creamy texture and rich flavor. Choose your favorite flavor, like roasted red pepper or garlic. Spread it evenly on the bread. Then, add thin cucumber slices and a sprinkle of salt. For extra crunch, toss in some fresh sprouts. This simple swap makes your sandwiches plant-based and tasty. For a gluten-free version, use gluten-free bread. Many brands offer great-tasting options now. Follow the same steps as the original recipe. Spread the cream cheese mixture on the gluten-free slices. You can also use a gluten-free wrap if you prefer. Fill it with cucumbers and greens, just like before. Enjoy your fresh and crunchy sandwiches without any gluten. You can get creative with your spreads. Try avocado spread for a creamy, healthy twist. Mash ripe avocado with some lime juice and salt. This spread pairs well with cucumber. You can also use pesto for a burst of flavor. Layer it under the cucumbers for a herbaceous kick. Other options include yogurt-based spreads or even a spicy mustard. Feel free to mix and match your favorite flavors to make each sandwich unique. For the full recipe, check out the Crispy Cucumber Delight Sandwiches. To keep your cucumber sandwiches fresh, store any leftovers in the fridge. Place them in an airtight container. This helps prevent them from drying out. Make sure to eat them within two days. The longer they sit, the soggier they get. Freezing cucumber sandwiches isn’t the best idea. Cucumbers hold water, which turns mushy when thawed. Instead, you can freeze the cream cheese mixture. Just store it in a freezer-safe bag. When you’re ready, spread it on fresh bread with cucumbers. Use a flat, shallow container for storing sandwiches. This keeps them from getting squished. Line the container with wax paper or parchment. This helps absorb excess moisture. You can also cover the sandwiches with a damp paper towel before sealing the container for extra freshness. Yes, you can make cucumber sandwiches ahead of time. Just remember, they taste best fresh. If you prepare them a few hours in advance, keep them covered in the fridge. Wrap them tightly in plastic wrap to prevent drying out. If you store them too long, the bread may get soggy. For best flavor, enjoy them within 24 hours. The best bread for cucumber sandwiches is soft and fresh. Whole grain bread adds a nice texture and flavor. White bread also works well for a classic taste. You can try rye or sourdough for a twist. Just avoid bread that is too crusty. It can make biting into the sandwich difficult. Adding protein to cucumber sandwiches is easy. You can spread a layer of hummus or add slices of turkey or chicken. Cream cheese is a great base and can be mixed with smoked salmon. Another option is to include hard-boiled eggs, sliced thinly. These choices add flavor and keep you full longer. For a fun and tasty cucumber sandwich, check out the Full Recipe! Cucumber sandwiches are a delightful treat to make and enjoy. We explored key ingredients, efficient preparation steps, and helpful tips for perfect sandwiches. You learned about variations, storage info, and answers to common questions. Now, you can create tasty cucumber sandwiches that impress everyone. With these tips, you can enhance flavor, keep them fresh, and serve something special. Get creative and enjoy the process!
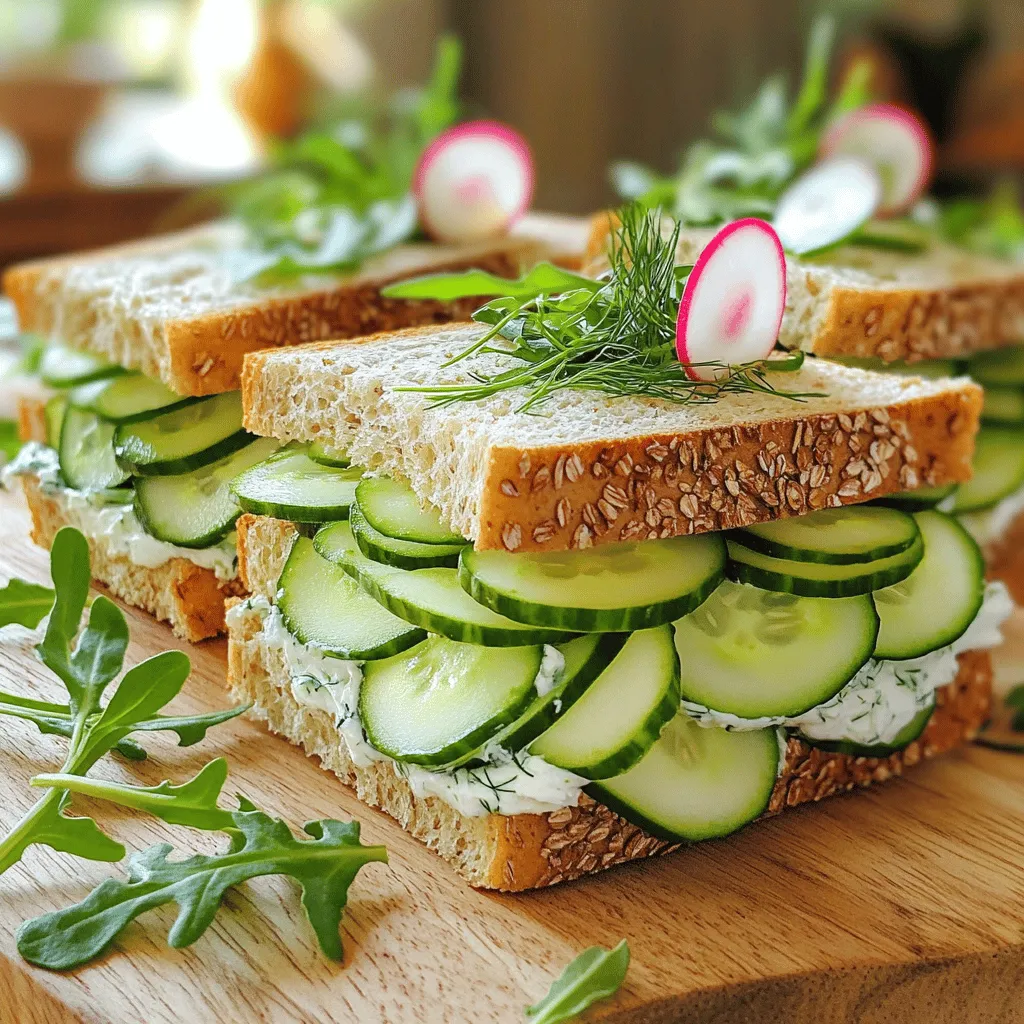
Cucumber Sandwiches Fresh and Flavorful Delight
If you’re looking to impress your guests or treat yourself, cucumber sandwiches are the way to go. Light, crisp, and packed with flavor, they make
For this recipe, you need fresh chicken breast. Use about 1 lb, cut into strips. The marinade is key for juicy chicken. Soak the strips in 1 cup of buttermilk. This helps tenderize the meat and adds flavor. You can marinate for 30 minutes or leave it overnight for more taste. The dry coating gives the tenders their crispy crunch. You need: - 1 cup all-purpose flour - 1 cup Panko breadcrumbs - 1 teaspoon garlic powder - 1 teaspoon onion powder - 1 teaspoon smoked paprika - 1/2 teaspoon cayenne pepper (optional) - Salt and pepper to taste Mix these ingredients well in a bowl. The flour helps the breadcrumbs stick. Panko breadcrumbs add extra crunch. The spices bring out great flavor, so don’t skip them! To make your chicken tenders even tastier, think about adding some extra ingredients. You can use: - Grated Parmesan cheese for a cheesy crust - Fresh herbs like parsley or thyme for a hint of freshness - Lemon zest for a bright, zesty touch These additions can elevate your dish and impress your guests. Follow the Full Recipe for guidance on how to bring it all together! Start by preheating your oven to 400°F (200°C). This step is key for crispiness. Use parchment paper on your baking sheet to prevent sticking. It makes cleanup easy and keeps the tenders intact. In a medium bowl, add the chicken strips. Pour in the buttermilk, covering each piece. This helps keep the chicken juicy. Cover the bowl with plastic wrap and place it in the fridge. Let it sit for at least 30 minutes, or longer for better taste. In a separate bowl, mix the all-purpose flour, garlic powder, onion powder, smoked paprika, cayenne pepper, and a good pinch of salt and pepper. This blend gives the chicken a flavorful crust. Whisk it well to combine all the spices evenly. Take the chicken out of the buttermilk. Let the excess drip off. First, coat each strip in the flour mixture. Make sure each piece is well-covered. Next, dip it into the Panko breadcrumbs. Press lightly to help them stick. This step is crucial for that crispy finish. Arrange the coated chicken on the baking sheet. Place them in a single layer, leaving space between each piece. Lightly spray or drizzle the tops with cooking spray or olive oil. Bake for 15-20 minutes. Flip them halfway through to ensure even cooking. They should be golden brown and reach an internal temperature of 165°F (75°C). Once baked, let the chicken tenders cool for a few minutes on the baking sheet. This helps them stay crispy. Serve them hot with your favorite dipping sauce. Enjoy every crunchy bite! For the full recipe, check out the details shared earlier. To get the best crunch, start with the chicken. Use fresh chicken breast cut into strips. Marinating in buttermilk helps. The acids in buttermilk tenderize the meat. This also adds flavor. After marinating, coat the chicken in flour first. This helps the breadcrumbs stick better. Use Panko breadcrumbs for extra crunch. They are lighter and crispier than regular breadcrumbs. A light spray of oil before baking helps too. It promotes browning and crispiness as the chicken cooks. One common mistake is overcrowding the baking sheet. Leave space between each chicken tender. This allows hot air to circulate. If you don't, they will steam instead of crisp. Another mistake is skipping the marination step. It may seem fast, but marinating adds so much flavor. Avoid using too much flour or breadcrumbs. This can make the coating thick and soggy. Finally, don't forget to flip them halfway through cooking. This ensures they brown evenly on both sides. For this recipe, a few tools can help. Use a sharp knife to cut the chicken easily. A whisk is great for mixing the dry ingredients. Bowls for marinating and breading are essential. Parchment paper keeps the chicken from sticking. A baking sheet is needed for cooking. I also recommend a meat thermometer. This ensures your chicken reaches 165°F (75°C). Having these tools ready makes the process smooth. For the full recipe, check out the complete guide. {{image_4}} You can easily make gluten-free chicken tenders. Instead of all-purpose flour, use almond flour or gluten-free flour. For breadcrumbs, try gluten-free Panko or crushed rice cereal. These swaps keep the crispy texture while meeting gluten-free needs. To make your chicken tenders spicy, add cayenne pepper to the dry mixture. You can also mix in hot sauce with the buttermilk. For extra heat, use a spicy seasoning blend. This variation brings a kick that many will enjoy. You can add different flavors to your chicken tenders. Try mixing dried herbs, like thyme or oregano, into the coating. Adding grated Parmesan cheese to the Panko gives a savory twist. Lemon zest in the buttermilk also brightens the dish. These simple changes make your tenders unique and tasty. For the full recipe, see above. To keep your crispy baked chicken tenders fresh, store them in an airtight container. Make sure they cool down before sealing. This way, they won’t get soggy. You can keep them in the fridge for up to three days. If you want to save some for later, freezing is a great option. Place the chicken tenders in a single layer on a baking sheet. Freeze them for about an hour until firm. Then, transfer them to a freezer bag. This prevents them from sticking together. You can freeze them for up to three months. To reheat, use the oven for best results. Preheat your oven to 400°F (200°C). Place the chicken tenders on a baking sheet. Bake for about 10-15 minutes, or until heated through. This helps keep them crispy. Avoid using the microwave, as it makes them soggy. Enjoy your delicious tenders again! Yes, you can use chicken thighs. They are juicy and flavorful. Thighs have more fat, adding richness. Just adjust the cooking time slightly. Bake them until they reach 165°F (75°C). To boost flavor, try using these tips: - Marinate longer: Let the chicken soak in buttermilk for at least 2 hours. - Spices: Add herbs like thyme or rosemary to the dry mix. - Seasoning: Mix in more garlic or onion powder for a punch. - Citrus: Squeeze lemon juice over the cooked tenders for brightness. My favorite dipping sauce is honey mustard. It’s sweet and tangy, perfect with the crispy tenders. You can also try: - BBQ sauce for smokiness. - Ranch dressing for a creamy option. - Sriracha mayo for a spicy kick. Check the internal temperature. It should reach 165°F (75°C). Use a meat thermometer for the best accuracy. Look for a golden brown color too. If you cut into the chicken, the juices should run clear. Enjoy your crispy chicken tenders! For the Full Recipe, refer to the main section. Crispy baked chicken tenders are simple to make and full of flavor. We covered all you need: chicken prep, dry coating mixes, and cooking tips. Remember, you can adjust the recipe for extra zest or dietary needs. Always use the right tools and avoid common mistakes for the best results. Enjoy your crispy tenders with your favorite dipping sauce. Whether you make spicy or gluten-free versions, these tenders are a hit. Try these methods, and you’ll impress everyone at the table. Happy cooking!
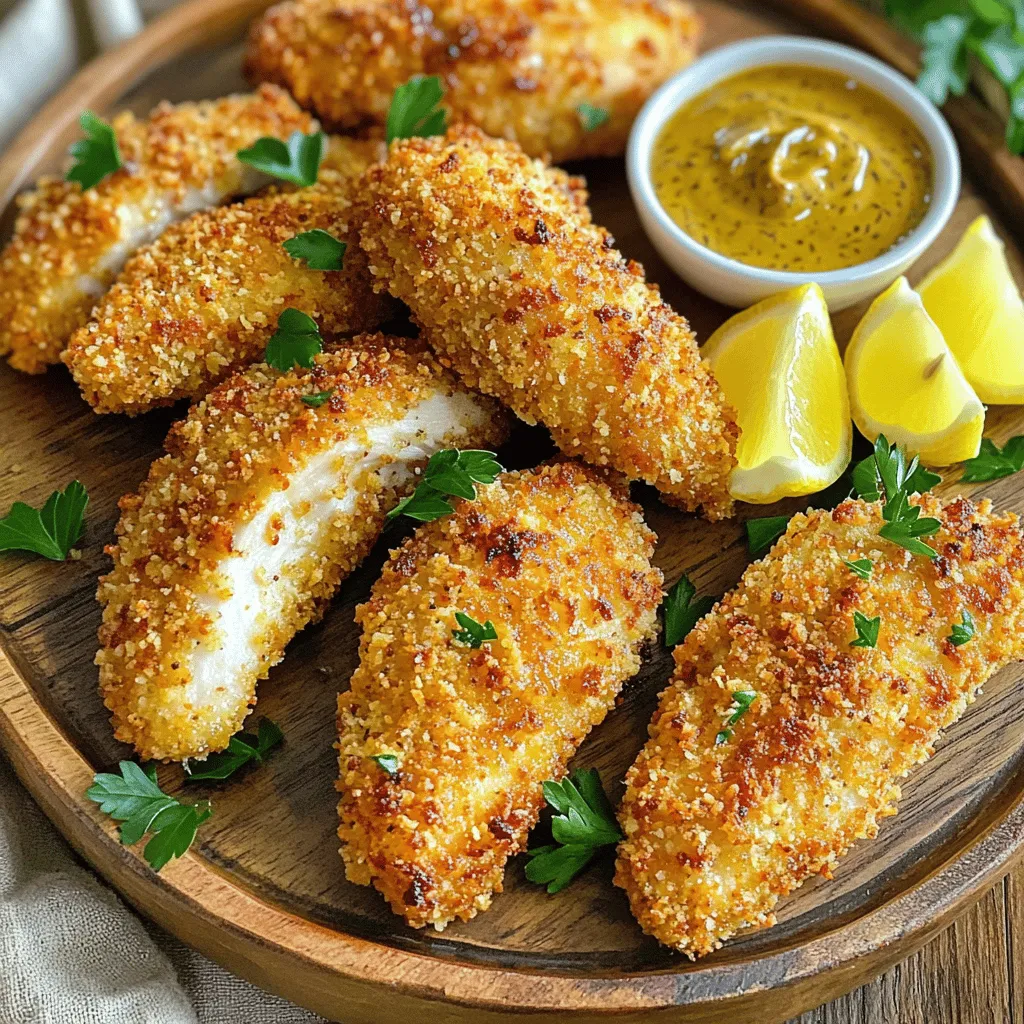
Crispy Baked Chicken Tenders Flavorful and Easy Dish
If you’re craving crispy baked chicken tenders that are easy to make, you’re in the right place! I’ll guide you through each step, from marinating
To make crispy and flavorful homemade chicken nuggets, gather these items: - 2 boneless, skinless chicken breasts - Seasoning options: - 1 teaspoon garlic powder - 1 teaspoon onion powder - 1 teaspoon paprika - 1 teaspoon dried thyme - 1 teaspoon dried oregano - Breading components: - 1 cup all-purpose flour - 2 large eggs, beaten - 1 cup panko breadcrumbs - Oil for frying - Salt and pepper These ingredients create the perfect blend of flavor and crunch. I love using panko breadcrumbs for an extra crispy finish. This recipe really shines with the right spices. The chicken breasts are the star, and they soak up the seasoning well. You can mix and match the spices to suit your taste. For the frying oil, choose vegetable or canola oil. Both work great for cooking. The right oil helps achieve that golden brown color. Make sure you have enough oil to cover the nuggets as they fry. This will keep them crispy and prevent sticking. If you want to read the full recipe, check out the [Full Recipe]. Error: Error code: 429 - {'error': {'message': 'Rate limit reached for gpt-4o-mini in organization org-zFeAnX8gJvsCtEtJubNX3NN3 on tokens per min (TPM): Limit 200000, Used 198944, Requested 2165. Please try again in 332ms. Visit https://platform.openai.com/account/rate-limits to learn more.', 'type': 'tokens', 'param': None, 'code': 'rate_limit_exceeded'}} To get that perfect crunch, heat the oil to about 350°F (175°C). This temperature ensures the nuggets fry quickly, sealing in moisture. I love using panko breadcrumbs. They give the nuggets a light, airy crunch that regular breadcrumbs can’t match. Make sure to press the panko onto the chicken for better adhesion. Marinating the chicken is key to keeping it juicy. I suggest letting it sit for at least 20 minutes. This allows the flavors to soak in. When you fry, cook the nuggets for about 4-5 minutes on each side. Check for a golden brown color and ensure they’re cooked through. For dipping sauces, consider honey mustard, barbecue, or ranch. These add great flavor and fun to the meal. When plating, arrange the nuggets on a nice platter. A sprinkle of fresh herbs or paprika can make it look vibrant and inviting. Serve small bowls of sauces for a delightful dining experience. {{image_4}} You can make chicken nuggets healthier by baking them instead of frying. To bake, preheat your oven to 400°F (200°C). Place the breaded nuggets on a baking sheet lined with parchment paper. Bake for about 15-20 minutes, flipping halfway through. This method gives you crispy nuggets without the added oil. Another great option is using an air fryer. Preheat the air fryer to 375°F (190°C). Place the breaded nuggets in a single layer in the basket. Cook for about 10-12 minutes or until they turn golden brown. This method uses less oil and still gives you a tasty crunch. You can easily customize your chicken nuggets by adding spices or herbs. Try mixing in some cumin or chili powder for a spicy kick. Fresh herbs like parsley or cilantro can also add a nice touch. Want to get cheesy? You can incorporate shredded cheese into the chicken mixture. Cheddar or mozzarella works well. This addition makes the chicken nuggets even more delicious and gives them a unique twist. You can also add finely chopped vegetables like spinach or bell peppers for extra flavor and nutrition. To keep your homemade chicken nuggets fresh, let them cool completely first. Place them in an airtight container. This helps prevent moisture. You can refrigerate them for up to three days. If you want to store them longer, freezing is the best choice. For freezing, use a freezer-safe container or a resealable bag. Lay the nuggets flat in the bag to save space. Separate layers with parchment paper to avoid sticking. They can stay in the freezer for up to three months. When it comes to reheating, the oven is best for crispness. Preheat your oven to 400°F (200°C). Place the nuggets on a baking sheet in a single layer. Bake for about 10 to 12 minutes. This method keeps them crunchy and delicious. If you're in a hurry, the microwave works too. However, it may not keep the nuggets as crispy. Heat them for about 1 to 2 minutes. Check them frequently to avoid overheating. They are best when served warm. For full details on making these tasty bites, check out the Full Recipe. Yes, you can use chicken thighs. They add a richer flavor and stay moist. Chicken thighs have more fat, which makes them juicy. If you prefer a softer bite, thighs are great. Just cut them into bite-sized pieces like breasts. Using thighs can change the taste and texture, making them a fun option. You can store homemade chicken nuggets in the fridge for three to four days. Make sure to keep them in an airtight container. For longer storage, freeze them. They last up to three months in the freezer. Just remember to cool them completely before freezing. Many sauces go well with chicken nuggets. Here are some tasty options: - Honey mustard: Sweet and tangy. - Barbecue sauce: Smoky and bold. - Ranch dressing: Creamy and herby. - Ketchup: A classic favorite. - Sweet and sour sauce: A fun twist. Try mixing and matching to find your favorite! In this post, we explored how to make tasty chicken nuggets from scratch. You learned about the right ingredients, step-by-step instructions, and smart tips for crispiness. Our variations showed how to bake and add flavors, while storage info helped plan for leftovers. Making chicken nuggets at home is fun and rewarding. With these simple steps, you can enjoy a delicious snack any time!
Homemade Chicken Nuggets Crispy and Flavorful Treat
Are you ready to transform your kitchen into a crispy nugget haven? Homemade chicken nuggets are a game-changer! With juicy chicken, flavorful spices, and a
To make Cheesy Garlic Chicken Wraps, you need some tasty ingredients. Here’s a list: - 2 chicken breasts, cooked and shredded - 1 cup shredded mozzarella cheese - 1/2 cup cream cheese, softened - 3 cloves garlic, minced - 1 teaspoon garlic powder - 1 teaspoon Italian seasoning blend - 4 large flour tortillas - 1 cup fresh spinach leaves - 1/2 cup diced tomatoes - Salt and pepper to taste - Olive oil for sautéing Each ingredient plays a big role in the flavor and texture of the wraps. The chicken gives protein, while the cheeses add creaminess. Garlic brings a strong flavor, and spinach adds freshness. The tortillas hold everything together, making them easy to eat. Using fresh ingredients helps make the dish even better. I love to use fresh spinach and ripe tomatoes. They add color and nutrients. You can find these ingredients at your local store or farmer’s market. For the full recipe, check out the details above. First, you need to prepare the chicken filling. In a medium bowl, combine the shredded chicken and both cheeses. I love using mozzarella for its meltiness and cream cheese for its smooth texture. Next, add the minced garlic, garlic powder, Italian seasoning, and a pinch of salt and pepper. Mix everything well until you have a creamy and cheesy filling. This step is key to getting that rich flavor in every bite. Now, it’s time to assemble the wraps. Lay out the tortillas on a clean surface. Take one tortilla and scoop a quarter of the chicken mixture into the center. Spread it out slightly so it covers a good area. Next, add a handful of fresh spinach leaves on top. The spinach adds a nice crunch and color. Finish with a sprinkle of diced tomatoes for freshness. Carefully fold the sides of the tortilla in and roll it tightly from the bottom up. Repeat this with the rest of the tortillas and filling. Now, let’s cook the wraps. Preheat a skillet over medium heat and drizzle in some olive oil. Once the skillet is hot, place the wraps seam side down. Cook them for about 2-3 minutes on each side, or until they turn golden brown. This is where the magic happens! The wraps will get crispy and delicious. Once done, move them to a cutting board and let them cool for a moment. Slice each wrap in half to show off that gooey filling. Enjoy your cheesy garlic chicken wraps! For the full recipe, check the details above. To ensure even filling distribution, spoon the chicken mixture into the center of the tortilla. Spread it out slightly. This helps every bite taste great. For optimal cooking temperature, preheat your skillet over medium heat. A hot skillet cooks the wraps evenly and gives them a nice crisp. For presentation, arrange the wraps on a rustic wooden board or a colorful plate. This makes the dish look inviting. I recommend serving with a small bowl of salsa or your favorite dipping sauce. This adds flavor and makes it fun to eat. You can add spices or herbs to boost the taste. Try a pinch of cayenne pepper for heat or fresh basil for a twist. Experimenting with different cheeses can also change the flavor. Cheddar or pepper jack can add a new layer of taste. For the full recipe, check the section above. Enjoy your cooking! {{image_4}} You can change the protein in these wraps. Turkey or beef works well. Cooked turkey adds a lighter taste. Ground beef gives a hearty flavor. Both options blend nicely with the cheese and garlic. If you prefer a meat-free option, try beans or lentils. They add protein and fiber. You can also use tofu for a tasty twist. Just season them well to enhance the flavor. Cheese is key to these wraps. While I love mozzarella, feel free to mix it up. Cheddar brings a sharp taste. Pepper jack adds a spicy kick. If you want vegan options, use cashew cheese or vegan mozzarella. They melt nicely and keep the wraps creamy. You can make these wraps even better with extra fillings. Adding veggies like bell peppers or onions boosts nutrition. Avocado adds creaminess and taste. You can also try different toppings, like fresh herbs or hot sauce, for a flavor punch. For more ideas, check the Full Recipe for inspiration. To keep your cheesy garlic chicken wraps fresh, place them in the fridge. The wraps stay good for about 3 to 4 days. Use airtight containers to prevent them from drying out. This helps keep all the flavors locked in. If you don't have airtight containers, wrap them tightly in plastic wrap. You can freeze these wraps for longer storage. First, let them cool completely. Then, wrap each one in plastic wrap and place them in a freezer bag. Make sure to remove as much air as possible. This helps prevent freezer burn. To thaw, place the wraps in the fridge overnight. When you're ready to eat, reheat them in a skillet over medium heat. This keeps the wraps crispy. You can also microwave them for a quick meal, but the texture might differ. For the full recipe, check out the details above! You can make Cheesy Garlic Chicken Wraps healthier by swapping out some ingredients. Use low-fat cream cheese instead of regular cream cheese. You can also choose low-fat mozzarella cheese. This change cuts calories and fat but keeps the great taste. Adding more veggies, like bell peppers or zucchini, boosts nutrition too. These swaps allow you to enjoy your wraps without guilt. Yes, you can prepare these wraps ahead of time. Make the filling and store it in the fridge for up to three days. You can also wrap the tortillas tightly and keep them in the fridge. When ready to eat, just cook them as directed. This makes meal prep easy and quick. You can enjoy a tasty meal even on busy days. You can pair these wraps with many tasty side dishes. A fresh green salad adds a nice crunch. You can also serve them with sweet potato fries for a fun twist. Another great option is a bowl of salsa or guacamole for dipping. These sides enhance the meal and add great flavors. In this post, we explored how to make cheesy garlic chicken wraps. You learned about the key ingredients, easy steps for preparation, and tips for cooking. We also discussed possible variations and storage options to keep your wraps fresh. These wraps are versatile and can fit any taste. Try different proteins and cheeses to make them your own. With simple steps and tasty results, these wraps will be a hit in your home. Enjoy cooking!
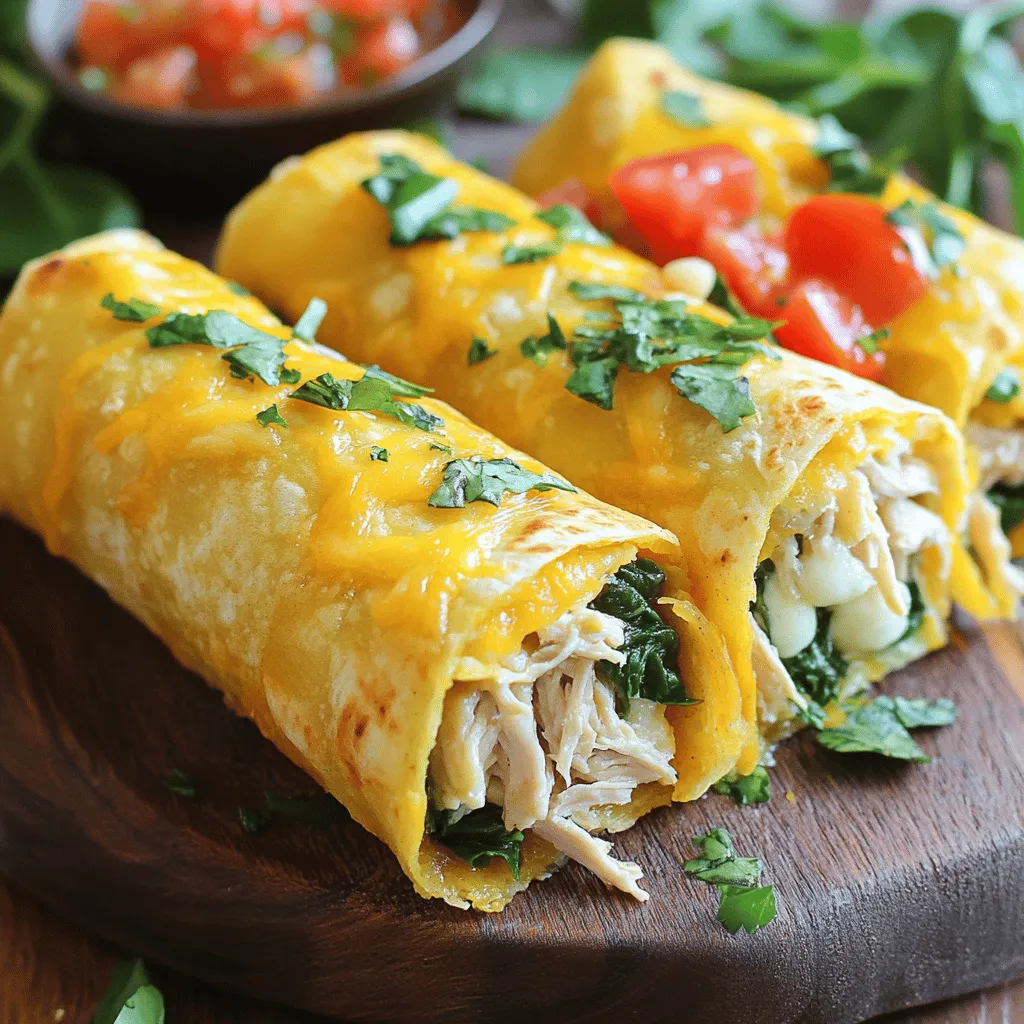
Cheesy Garlic Chicken Wraps Flavorful and Easy Meal
Craving a quick and tasty meal? These Cheesy Garlic Chicken Wraps are just what you need! Made with cooked chicken, creamy cheeses, and fresh veggies,
- 2 cups assorted bell peppers (red, yellow, green), diced - 1 medium red onion, thinly sliced - 1 cup apple cider vinegar - 1/2 cup granulated sugar - 1/2 cup water - 2 teaspoons salt - 1 teaspoon mustard seeds - 1 teaspoon whole black peppercorns - 1/2 teaspoon garlic powder - 1/4 teaspoon red chili flakes (optional) When I make Tangy Pickled Pepper & Onion Relish, I start with vibrant bell peppers. Choose any color you like! The mix of red, yellow, and green brings a splash of color and flavor. I dice them into small pieces. This helps them soak up the tangy brine well. Next, I slice a medium red onion thinly. The onion adds sweetness and crunch. It balances the tanginess of the vinegar. The apple cider vinegar is key. It gives that sharp, zesty flavor we love in pickles. Then, I measure out the additional ingredients. I use half a cup of sugar to add sweetness. This helps offset the vinegar's acidity. A half cup of water makes the brine lighter. Finally, I add two teaspoons of salt for taste. Salt enhances all the flavors in the relish. Now for the spices and seasonings! I always add mustard seeds and whole black peppercorns. They bring warmth and depth. Garlic powder gives a subtle kick. If you like heat, toss in some red chili flakes. Adjust this to your taste; you can make it as spicy as you want! Using these fresh ingredients lets the relish shine. The mix of flavors bursts in every bite. For the full recipe, check out the details above. 1. First, gather your ingredients in a medium saucepan. You’ll need the apple cider vinegar, sugar, water, salt, mustard seeds, black peppercorns, garlic powder, and red chili flakes if you want some heat. 2. Next, place the saucepan over medium heat. Stir the mixture occasionally. Heat it until the sugar and salt dissolve completely. 3. Once dissolved, let it simmer gently for a moment. Then, remove it from heat. This step is key to avoiding overcooking the liquid. 1. Now, prepare your glass jar(s). Make sure they are clean and sanitized. This keeps your relish fresh and safe. 2. Begin layering the diced peppers and sliced onions in the jar. Pack them in tightly but do not crush them. This ensures each bite is full of flavor. 1. Carefully pour the warm pickling liquid over the packed peppers and onions. Make sure all the veggies are submerged. 2. Leave about an inch of space at the top of the jar. This space allows for any expansion as it cools. 3. Seal the jar(s) with a tight lid. Allow them to cool to room temperature. This cooling step is very important for the pickling process. 4. Once cooled, transfer the jars to the refrigerator. Let the relish chill for at least 24 hours. The flavors will blend beautifully during this time. For even richer taste, let it sit for a few days! For the full recipe, check out the detailed instructions provided earlier. Enjoy your tangy pickled pepper and onion relish! To get the best taste from your tangy relish, allow the flavors to develop for a few days. This wait lets the peppers and onions soak up the pickling liquid. The longer they sit, the better they taste. Always use fresh, high-quality ingredients. Fresh peppers and onions bring bright flavors that canned or old ones cannot match. Sanitizing your jars is key to keeping your relish safe. Clean jars prevent bad bacteria from growing. To do this, wash jars in hot, soapy water, then rinse well. You can also heat them in the oven or boil them in water. Store your relish in the fridge for optimal flavor. It lasts longer and stays crisp when chilled. When serving this relish, use a small bowl to show off its colors. A charming bowl adds a nice touch to any gathering. Garnish with a sprig of fresh parsley for a pop of color. This relish makes a great topping for sandwiches, burgers, or tacos. It adds a zesty kick that enhances your dishes. For more ideas, check out the Full Recipe for serving tips. {{image_4}} You can change the heat in your Tangy Pickled Pepper & Onion Relish easily. Start by adjusting the red chili flakes. If you like it hotter, add more flakes. If you prefer it milder, use less. Another great idea is to add jalapeños or other spicy peppers. These peppers can add a fresh kick to your relish. Just slice them thin and mix them in with the other veggies. Feel free to swap out some ingredients to make this relish your own. You can use different types of vinegar, like white or malt vinegar. Each type will give a unique flavor. You can also add other vegetables, such as carrots or cucumbers. These additions can bring new colors and crunch to your relish. To boost the flavor, try adding fresh herbs like dill or cilantro. These herbs can add a bright taste that pairs well with the tangy pickles. You can also experiment with sweeteners. Honey or maple syrup can add a touch of sweetness that balances the vinegar. Don’t be afraid to play around with these options to find your favorite flavor mix. For the full recipe, check out the earlier section. Once you make Tangy Pickled Pepper & Onion Relish, store it in the fridge. This relish lasts about two weeks when kept cold. To keep it fresh, always use a clean spoon when serving. Avoid letting the spoon touch other foods. Store it in a tightly sealed jar to prevent air from entering. In the fridge, this relish stays good for up to two weeks. Look for signs of spoilage, like a strange smell or mold on the surface. If you notice any of these signs, it’s best to throw it out. Trust your senses; they are your best guide. You can freeze this relish, but it may change texture. If you choose to freeze it, use an airtight container. Leave some space at the top for expansion. This way, the relish stays safe and tasty. When you’re ready to use it, thaw it in the fridge overnight for the best results. For the full recipe, check out the earlier sections. You can use this relish in many ways. It adds a bright touch to sandwiches. Top your burgers with it for a punch of flavor. It works great in tacos, too. Try it as a dip with chips or crackers. This relish pairs well with meats like chicken or pork. It also complements cheeses such as goat cheese or sharp cheddar. The tangy taste balances rich and savory dishes. Yes, you can can this relish. First, prepare the jars by boiling them to sanitize. Fill the jars with relish, leaving space at the top. Then, use a canning lid and ring to seal tightly. Place the jars in a boiling water bath for ten minutes. This process helps kill bacteria and seals the jars. Make sure to check for proper sealing after cooling. Always follow safety tips for home canning. If jars do not seal, store them in the fridge. Pickled vegetables are healthy for you. They can help improve digestion. The pickling process preserves nutrients from the veggies. They also can be lower in calories than fresh veggies. Some pickled veggies are fermented, which adds probiotics. Probiotics help your gut stay healthy. Eating pickled foods can boost your immune system, too. Enjoying this relish gives you a tasty way to add more nutrients to your diet! In this article, we explored making Tangy Pickled Pepper and Onion Relish. We covered the ingredients, including bell peppers, onions, and spices. I shared step-by-step instructions for preparing the pickling liquid and layering the vegetables. You learned helpful tips for flavor and storage, as well as variations to suit your taste. Pickling offers a fun way to enjoy veggies. With practice, you can create your unique take on this relish. Dive into the process, and enjoy the delicious results!
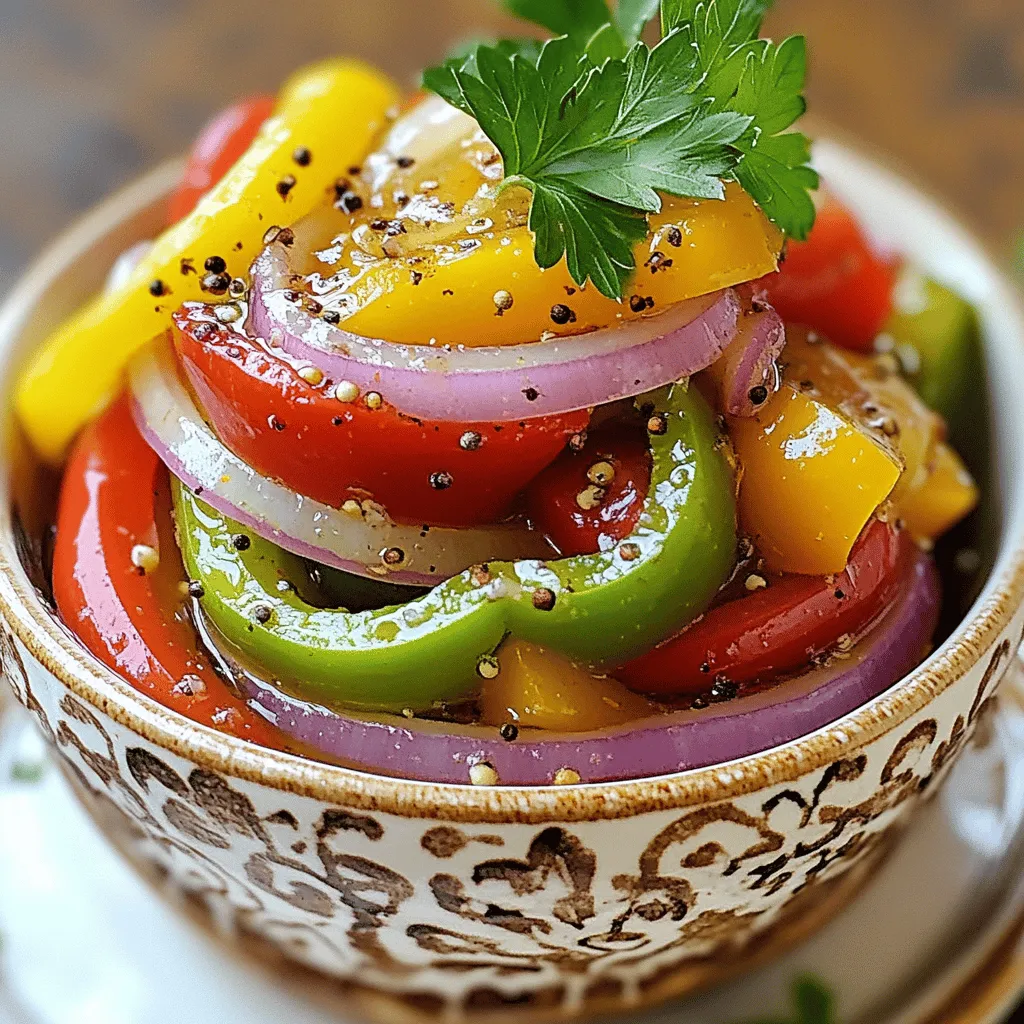
Tangy Pickled Pepper & Onion Relish Bold and Flavorful
Are you ready to add bold flavor to your meals? This Tangy Pickled Pepper & Onion Relish will do just that! Made with vibrant peppers,