Skip to content
Melted Recipes
  • Home
  • Appetizers
  • Desserts
  • Salads
  • Breakfast
  • Dinner
  • Privacy Policy
  • Contact
  • About

Chef Miles

Mediterranean Ground Beef Stir Fry Quick and Flavorful

June 9, 2025 by Chef Miles
- 1 lb (450g) ground beef - 1 medium onion, finely diced - 2 cloves garlic, minced - 1 red bell pepper, thinly sliced - 1 medium zucchini, sliced into half-moons - 1 cup cherry tomatoes, halved - 1 cup cooked quinoa or couscous - 1 tablespoon ground cumin - 1 tablespoon smoked paprika - ½ teaspoon dried oregano - Salt and freshly ground black pepper to taste - Fresh parsley, chopped - Crumbled feta cheese Gather these ingredients before you start cooking. The ground beef serves as the main protein, while fresh vegetables add color and crunch. Cooked quinoa or couscous acts as a hearty base. The spices, including cumin and paprika, give the dish that warm Mediterranean flavor. Don't forget the optional parsley and feta for a fresh touch! This recipe is versatile, so feel free to mix and match based on what you like. For the complete recipe, check out the Full Recipe section. How do you prepare the vegetables? Start by washing all your fresh produce. Dice the onion into small pieces. Cut the red bell pepper into thin slices. Slice the zucchini into half-moons. Halve the cherry tomatoes. Keep your veggies ready and separate for easy cooking. What are tips for measuring out spices? Use measuring spoons for accurate amounts. Ground cumin and smoked paprika are strong. A little goes a long way. Keep your spices fresh; this enhances flavor. How do you heat the olive oil? In a large skillet or wok, pour in two tablespoons of olive oil. Set the heat to medium-high. Wait until the oil shimmers, which shows it is hot enough. How do you brown the ground beef? Add one pound of ground beef to the hot skillet. Break it up with a spatula. Cook for about 5-7 minutes until the beef turns brown. Drain any extra fat to keep it light. How do you sauté the aromatics? Lower the heat slightly. Stir in the diced onion and minced garlic. Sauté them for 2-3 minutes. You want the onions to be soft and fragrant. How do you incorporate the vegetables? Add the sliced red bell pepper, zucchini, and halved cherry tomatoes to the skillet. Stir-fry this mix for another 5-7 minutes. Make sure the veggies are tender but still crisp. How do you season the mixture? Sprinkle ground cumin, smoked paprika, dried oregano, salt, and pepper over the veggies and beef. Stir well to mix the spices evenly throughout the dish. How do you mix in the quinoa or couscous? Fold in one cup of cooked quinoa or couscous into the skillet. Stir gently until all the ingredients are well combined and heated through. This should take about 2-3 minutes. For the full recipe, check the details above. Enjoy your Mediterranean Ground Beef Stir Fry! To make your Mediterranean Ground Beef Stir Fry truly shine, seasoning is key. Use fresh herbs and spices for a burst of flavor. Salt and pepper enhance the taste, while cumin, smoked paprika, and oregano add warmth. Always taste as you cook; adjust seasonings as needed for your desired flavor. Selecting fresh ingredients is also vital. Look for bright, firm vegetables. Choose ground beef with good color and minimal fat. Fresh garlic and onions will boost the aroma and taste of your dish. You can even visit local markets for seasonal produce, ensuring the best quality. Stir-frying is quick and fun. Heat your oil until it shimmers before adding the beef. This step locks in flavor and gives a nice sear. Break the beef into small pieces for even cooking. When adding vegetables, keep them crisp. Stir-fry over high heat and avoid overcrowding the pan. This ensures they cook quickly and stay vibrant. Aim for a mix of textures; you want tender yet crunchy veggies in every bite. To serve, create a beautiful presentation. Use shallow bowls for your stir fry. Garnish with fresh parsley and crumbled feta for a pop of color and flavor. For a complete meal, pair the stir fry with a simple green salad. A lemon vinaigrette adds freshness and balances the dish. You can also serve it over rice or in pita bread for added texture. Enjoy exploring the Mediterranean flavors with each bite! For the full recipe, click here. {{image_4}} You can switch ground beef for chicken, turkey, or even plant-based meat. Each protein offers a unique taste. You can also mix and match vegetables. Use broccoli, spinach, or even eggplant. They add different flavors and colors. Want a twist? Add spices like cinnamon or coriander. These will change the taste. You can also use sauces to enhance the dish. Try tahini for creaminess or yogurt for tang. Each sauce brings new flavors to your meal. If you need gluten-free options, use quinoa instead of couscous. Quinoa is a great substitute and tasty too. For a low-carb dish, skip the grains. Load up on extra vegetables for a healthy boost. These changes keep the meal satisfying while meeting dietary needs. For the complete recipe, check out the Full Recipe section. After cooking, let your Mediterranean Ground Beef Stir Fry cool down. Place it in an airtight container. Store it in the fridge. The dish stays fresh for up to three days. When you’re ready to eat, reheat it in a skillet over medium heat. Stir occasionally to ensure even heating. You can also microwave it. Use a microwave-safe dish and cover it to keep moisture in. If you want to keep it longer, freezing works well. Let the stir fry cool completely. Portion it into freezer bags or containers. Squeeze out as much air as you can to prevent freezer burn. It can last for up to three months in the freezer. To defrost, move it to the fridge overnight. You can also use the microwave on the defrost setting. Leftovers are best eaten within three days if stored in the fridge. Look for signs of spoilage before eating. If the meat has an off smell or the vegetables seem slimy, it's time to toss it. Always trust your senses; they guide you well. Enjoy your tasty meals safely! You can prepare this dish in advance for easy meals. Start by cooking the ground beef and vegetables as the recipe states. Let them cool before storage. Place the stir fry in an airtight container. Store it in the fridge for up to three days. You can also freeze it for up to three months. To reheat, warm it on the stove or in the microwave. This makes meal prep easy and quick! Yes, you can use rice or pasta instead of quinoa. White or brown rice works well and cooks quickly. If you prefer pasta, choose a short shape like penne or fusilli. Cook either option according to package instructions. Add them at the same step as quinoa in the recipe. This gives you flexibility based on what you have at home. Each serving offers a balanced mix of nutrients. You get about 400 calories per serving. It includes protein from ground beef and fiber from vegetables. The dish has healthy fats from olive oil and optional feta cheese. Key nutrients include iron, vitamin C, and calcium. This meal is not only tasty but also good for you! This blog post covered the essential ingredients and steps for making a tasty Mediterranean Ground Beef Stir Fry. You learned how to prepare fresh veggies, season your dish, and combine flavors for the best taste. Remember, you can swap ingredients to match your diet and store leftovers safely for later meals. Keep experimenting to find your favorite flavors and enjoy your cooking. A few small changes can make a big difference. Happy cooking!

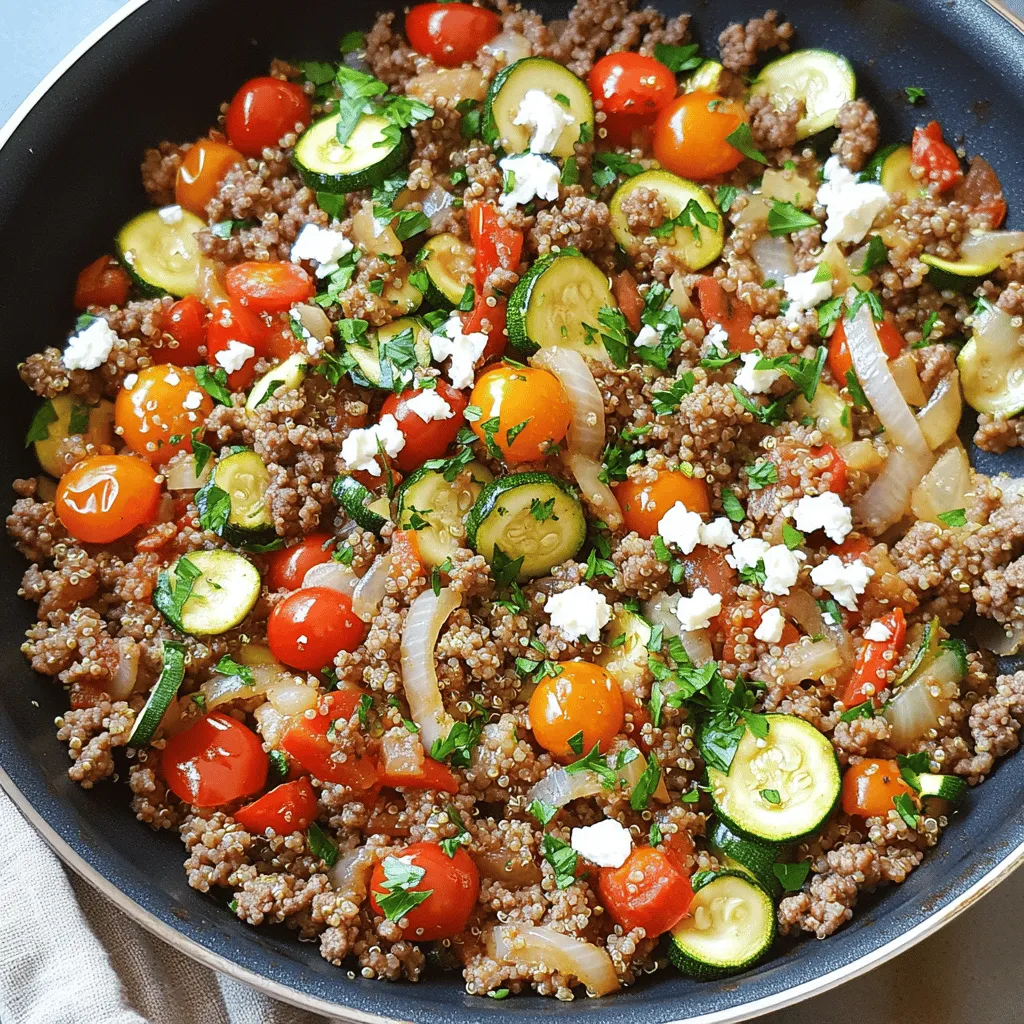
Looking for a quick meal that bursts with flavor? My Mediterranean Ground Beef Stir Fry is just the ticket. It combines ground beef, fresh veggies, and aromatic spices to create …

Read more

Categories Dinner

Ground Beef Potato Bake Hearty and Simple Dish

June 9, 2025 by Chef Miles
- 1 lb (450g) ground beef - 4 large russet potatoes, thinly sliced - 1 medium onion, diced - 2 cloves garlic, minced Ground beef is the star of this dish. It gives a savory taste and adds protein. I prefer using russet potatoes for their creaminess when baked. Slice them thin for better cooking. The onion and garlic bring in a sweet, aromatic flavor that makes everything better. - 1 cup (100g) shredded cheddar cheese - 1 cup (240g) sour cream Cheddar cheese adds a rich, melty layer. It creates a lovely golden crust on top. Sour cream gives a creamy tang, balancing the dish nicely. These dairy components make the bake comforting and indulgent. - 1 teaspoon smoked paprika - 1 cup (240ml) beef broth - Salt and pepper to taste Smoked paprika adds a hint of warmth and depth. It makes the dish more complex without being too spicy. Beef broth keeps everything moist and flavorful. Don't forget to season well with salt and pepper. They elevate the taste of all the ingredients. For the full recipe and detailed instructions, check out the [Full Recipe]. - Preheat your oven to 375°F (190°C). This step is key for even cooking. - Grease your baking dish. I like to use cooking spray or butter. This helps keep the dish from sticking. - In a large skillet, add the ground beef. Cook it over medium heat. Stir often until it’s brown and crumbly, about 5-7 minutes. Drain any extra fat when done. - Next, add the diced onion and minced garlic to the skillet. Sauté for about 5 minutes. The onion should look clear and the garlic should smell great. - Stir in the smoked paprika, dried oregano, and a pinch of salt and pepper. Mix well to spread the spices. Take the skillet off the heat once mixed. - In a big bowl, combine the thinly sliced potatoes and the seasoned beef mixture. Toss gently to coat the potatoes in the beef and spices. - Spread half of the potato-beef mixture in the bottom of your greased baking dish. Top it with half of the sour cream. Add half of the shredded cheese on top. - Pour half of the beef broth over this layer. This keeps it moist while cooking. - Repeat this process with the rest of the potato-beef mixture, sour cream, and cheese. Pour the last of the beef broth over the top layer. - Cover the baking dish tightly with aluminum foil. Place it in your preheated oven. Bake for 45 minutes. This lets all the flavors blend and softens the potatoes. - After 45 minutes, take off the foil. Return the dish to the oven for another 15 minutes. Bake until the top is golden brown. The potatoes should be tender when you poke them with a fork. Enjoy this hearty and simple dish! For the complete recipe, check out the Full Recipe. How to avoid a soggy bottom To keep the bottom from getting soggy, layer your ingredients carefully. Start with a thin layer of potatoes. This allows the heat to circulate well. Use a baking dish that is not too deep. It helps the moisture escape. Ensuring even cooking For even cooking, slice your potatoes thinly. Thin slices cook faster and more uniformly. Layer the beef and potatoes evenly. If you mix them well, every bite has flavor. Stir the mixture gently to keep everything combined without mashing. Serving suggestions For a rustic look, serve the dish right from the baking dish. Use a large spoon to scoop out portions. For a fancier touch, plate individual servings. This makes it feel special for guests. Garnishing ideas Garnish with fresh parsley for a pop of color. You can also sprinkle some additional cheese on top. A drizzle of sour cream adds a nice touch. These small details make your dish look and taste great. Adding extra spices Want more flavor? Try adding red pepper flakes for heat. A pinch of cumin gives a warm depth. Experiment with your favorite spices to find your perfect blend. Using fresh herbs Fresh herbs can elevate your dish. Chopped basil or thyme can add freshness. You can mix them into the beef or sprinkle them on top. This adds aroma and enhances the overall taste. {{image_4}} You can swap ground beef for ground turkey or chicken. These meats are lighter but still tasty. They lower the fat and calories in the dish. For cheese, try using mozzarella or pepper jack. Mozzarella offers a milder flavor, while pepper jack adds a spicy kick. Both melt well and will keep your bake creamy. For gluten-free needs, use gluten-free broth and ensure your cheese is safe. Many cheese brands offer gluten-free options. This makes the dish safe for those with gluten sensitivities. If you need a dairy-free option, try cashew cream instead of sour cream. Nutritional yeast adds a cheesy flavor without dairy. You can also use dairy-free cheese that melts well. You can boost your bake by adding vegetables like bell peppers or spinach. These add color and nutrients. Just chop them small and mix them in with the beef. Incorporating herbs like thyme or basil can elevate the taste. Fresh herbs bring a bright flavor. Just sprinkle them in during the cooking process to enhance the dish. For more details, check out the Full Recipe. To store your Ground Beef Potato Bake, let it cool first. Then, place it in an airtight container. You can keep it in the fridge for about 3 to 4 days. If you want to save it longer, freezing is a good option. - Refrigeration tips: Store in a shallow container to cool quickly. This helps keep the food safe. - Freezing guidelines: Wrap tightly with plastic wrap or foil. You can also use a freezer-safe container. It will keep well for up to 3 months. When you're ready to enjoy leftovers, reheating is simple. The best way to do this is in the oven. It helps keep the dish nice and warm. - Best methods for reheating: Preheat your oven to 350°F (175°C). Cover the dish with foil to prevent it from drying out. Bake for about 20-30 minutes, or until heated through. - Ensuring moisture retention: Add a splash of beef broth if it seems dry. This will help keep it moist and tasty. Knowing how long your Ground Beef Potato Bake lasts is key. It helps ensure you enjoy it at its best. - How long it lasts in the fridge: As mentioned, it’s safe for 3 to 4 days. - Signs of spoilage: Check for off smells, strange colors, or a slimy texture. If you see any of these signs, it’s best to throw it away. How can I make it spicier? You can add chili powder or cayenne pepper for heat. Start with a small amount. Taste as you go to reach your desired spice level. You can also use spicy sausage instead of ground beef for a different flavor. Can I use other types of meat? Yes, you can use ground turkey or chicken. These options are leaner but will still taste great. Just adjust your cooking time as needed. Is it possible to make this ahead of time? Absolutely! You can prepare it a day before. Just assemble the layers and cover it. Store in the fridge. Bake it when you are ready to eat. Can I use frozen potatoes? Frozen potatoes work well but thaw them first. This helps them cook evenly. If they are precooked, you can layer them directly into the dish. What cheese melts best for this recipe? Cheddar cheese is a great choice. It melts well and adds a nice flavor. You can mix in mozzarella for extra creaminess. How do I know when it's fully cooked? Check if the potatoes are tender when pierced with a fork. The top should also be golden brown. If unsure, use a food thermometer; the beef should reach 160°F (71°C). What should my baking dish size be? A 9x13 inch (23x33 cm) dish works best. This size allows enough space for even cooking. If you have a smaller dish, consider reducing the recipe. For more details on the recipe, check out the [Full Recipe]. This dish combines simple ingredients like ground beef, potatoes, and cheese. Following step-by-step instructions, you can create a delicious meal with ease. I shared tips to avoid soggy layers and offered ways to customize it. Whether you want to store leftovers or make it spicy, you now have the tools. Get creative and enjoy your cooking journey. The possibilities are endless!

Are you ready to whip up a dinner that’s both hearty and easy? My Ground Beef Potato Bake combines simple ingredients like ground beef, potatoes, and cheese to create a …

Read more

Categories Dinner

Savory Slow Cooker Chicken Burrito Bowl Recipe

June 9, 2025 by Chef Miles
- 1.5 lbs boneless, skinless chicken breasts - 1 can (15 oz) black beans, drained and rinsed - 1 can (15 oz) corn, drained - 1 tsp chili powder - 1 tsp ground cumin - 1 tsp garlic powder - ½ tsp smoked paprika - 1 cup long-grain rice (uncooked) - 2 cups chicken broth (or low-sodium option) - Optional toppings: diced avocado, shredded cheese, sour cream, fresh cilantro When making a slow cooker chicken burrito bowl, the right ingredients make all the difference. The main items include chicken breasts, black beans, and corn. These create a tasty base for your meal. Next, spices bring flavor. I use chili powder, cumin, garlic powder, and smoked paprika. These spices work together to give the dish a nice kick. Rice is essential too. It helps soak up the broth and adds heartiness. I choose long-grain rice for its texture and flavor. Finally, toppings are where you can get creative. Diced avocado, shredded cheese, sour cream, and fresh cilantro add freshness and creaminess to every bite. For the complete slow cooker chicken burrito bowl experience, check the Full Recipe for all the details! 1. Place chicken breasts in the slow cooker. 2. In a bowl, mix black beans, corn, salsa, chili powder, ground cumin, garlic powder, and a pinch of salt and pepper. 1. Pour the bean mixture over the chicken. 2. Rinse the rice under cold water until the water runs clear. Layer the rinsed rice on top of the bean mixture. 1. Pour chicken broth over the rice. 2. Cover and cook on low for 6-7 hours or high for 3-4 hours. Once cooked, shred the chicken with two forks. Mix it with the beans, corn, and rice. Taste and adjust seasoning as needed. The dish can sit for 10-15 minutes to deepen the flavors. Serve hot with your choice of toppings. For the full recipe, check out the earlier section. To make your Slow Cooker Chicken Burrito Bowl just right, you can adjust spice levels to your taste. If you like more heat, add extra chili powder. For a milder flavor, use less or pick a gentle salsa. Finding the right balance makes a big difference. To achieve perfectly cooked rice, rinse the rice well before using it. This step removes extra starch, so your rice cooks up fluffy. Layer the rinsed rice evenly over the bean mix in the slow cooker. This way, it cooks just right without getting mushy. For a great presentation, serve the burrito bowl in bright bowls. This makes the dish look fresh and inviting. Add lime wedges on the side for a zesty kick. It brightens the flavors and adds fun to your meal. For toppings, try creamy diced avocado or a sprinkle of shredded cheese. These add richness and texture. A dollop of sour cream can make it even more satisfying. Fresh cilantro leaves on top give a burst of color and flavor, making your bowl look appealing. Cooking times can change based on your slow cooker model. If yours cooks faster, check the chicken after 5 hours on low. If it takes longer, you may need to add more time. Always ensure the chicken is tender and easy to shred. For storing leftovers, let the dish cool before placing it in the fridge. Keep it in an airtight container for best freshness. You can enjoy the flavors for a few days. If you want to save it longer, freeze it in portions. This way, you can have a tasty meal ready anytime! {{image_4}} You can easily change up your slow cooker chicken burrito bowl. Try adding different beans or grains for a fresh taste. Black beans work great, but pinto or kidney beans are also good. For grains, consider quinoa or brown rice. These options boost protein and fiber content. If you want to switch proteins, use turkey or tofu. They both soak up flavors well. You can also try shredded beef or pork for a heartier meal. Each choice brings its own special taste to your bowl. Making this dish gluten-free is simple. Just use gluten-free chicken broth. Most beans and rice are gluten-free too. Always check labels to be sure. For vegetarian or vegan options, replace chicken with jackfruit or chickpeas. Both work well and add lots of flavor. You can also swap regular broth for vegetable broth. These changes keep the meal tasty while meeting dietary needs. For a Mexican-inspired twist, add fresh cilantro and lime juice. These bright flavors enhance the dish. You can also sprinkle crumbled queso fresco on top for a creamy finish. If you want an Asian flavor, try adding soy sauce and ginger. This mix gives a unique taste. You can even serve the bowl over rice noodles for a fun change. For Mediterranean flavors, add olives and feta cheese. These ingredients offer a salty kick. You can also use spices like oregano and thyme for extra depth. These variations make your slow cooker chicken burrito bowl fun and exciting! Check the Full Recipe for more details and ideas. To keep your Slow Cooker Chicken Burrito Bowl fresh, store leftovers in an airtight container. Place them in the fridge within two hours of cooking. This helps avoid bacteria growth. Use the following tips for best results: - Divide into portions for easy meal prep. - Label containers with the date to track freshness. If you want to save some for later, you can freeze it. Here’s how: - Cool the dish completely before freezing. - Use freezer-safe bags or containers. - Remove as much air as possible to prevent freezer burn. When you're ready to enjoy your leftovers, reheating is simple. You can use either a microwave or stovetop. Here’s how: - Microwave: Place in a bowl, cover with a lid or plastic wrap, and heat for 2-3 minutes. Stir halfway for even heating. - Stovetop: Heat in a pot over medium heat, stirring often until warm. To keep flavor and texture, add a splash of chicken broth or water while reheating. This helps prevent drying out. In the fridge, your Slow Cooker Chicken Burrito Bowl lasts about 3-4 days. If you freeze it, it’s best enjoyed within 2-3 months for peak taste. Look for these signs of spoilage: - Off smell or unusual odor. - Change in color or texture. - Visible mold or sliminess. Trust your senses! If it seems off, it's best to discard it. To add heat, use spicy salsa or diced jalapeños. You can also add extra chili powder. For an extra kick, mix in cayenne pepper. Start with a small amount. Taste as you go to find your perfect spice level. Yes, you can use frozen chicken. Just increase the cooking time. Cook on low for 8-9 hours or on high for 4-5 hours. Always check that the chicken reaches 165°F. This ensures it is safe to eat. You can serve your burrito bowl with tortilla chips. A fresh salad with lime vinaigrette is also great. Consider adding guacamole or pico de gallo. These sides enhance the meal and bring more flavor. Yes, you can skip the rice. Instead, serve the chicken mix in lettuce wraps. You can also use quinoa or cauliflower rice for a low-carb option. This keeps the meal light and fresh. Store leftovers in an airtight container. Keep them in the fridge for up to three days. You can also freeze the dish. It lasts up to three months in the freezer. Yes, you can make a vegetarian version. Replace the chicken with extra black beans or chickpeas. You can also use mushrooms for a meaty texture. Adjust the cooking time as needed. Add colorful veggies like bell peppers or corn. Fresh toppings like diced tomatoes and cilantro add color too. Serve with lime wedges for a vibrant touch. This makes your bowl more appealing and fun to eat. This blog post showed you how to make a tasty Slow Cooker Chicken Burrito Bowl. We covered the main ingredients, from chicken breasts to black beans and rice. You learned the step-by-step process, plus tips for perfecting the dish. I shared variations to suit different diets and flavors. Don’t forget about storage and reheating tips to keep your leftovers fresh. Enjoy trying this recipe and make it your own! You’ll love the easy meal prep and delightful flavors.

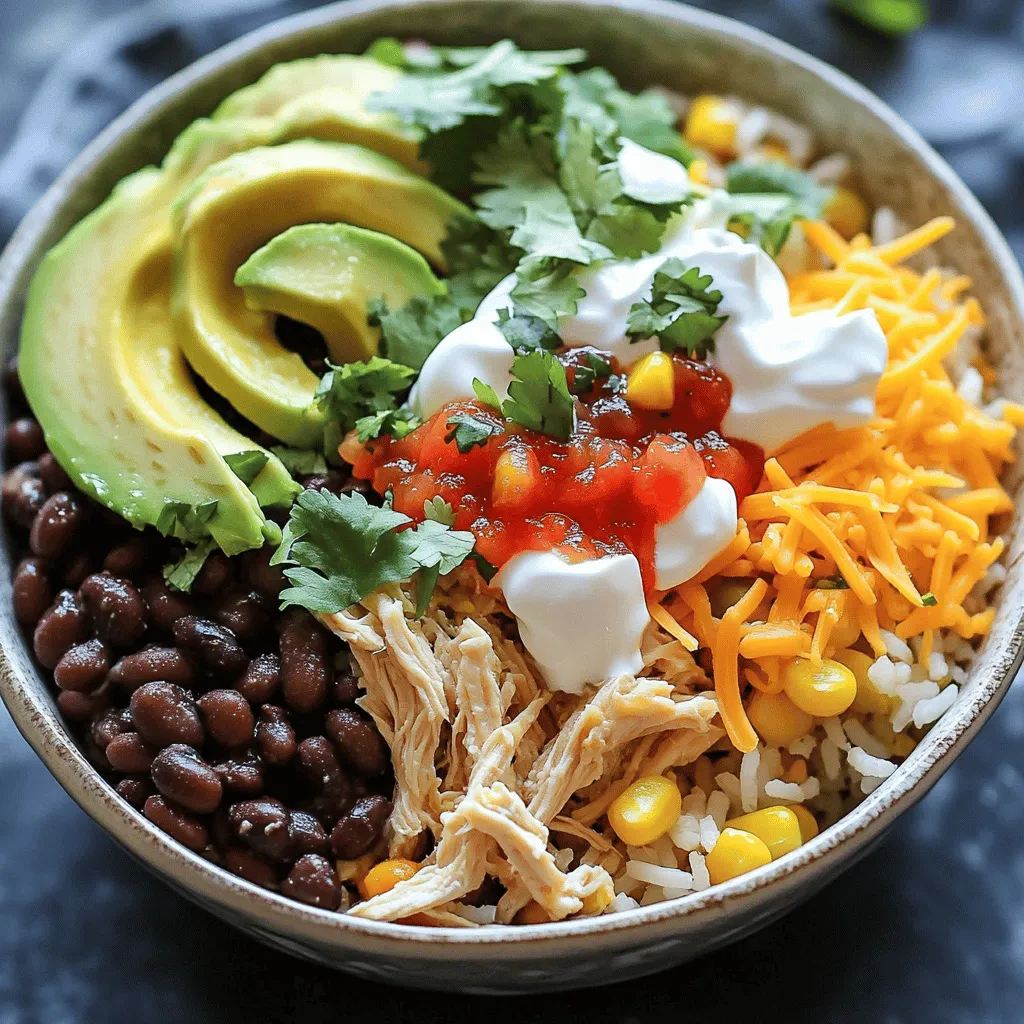
Are you ready to whip up a delicious and easy meal? My Savory Slow Cooker Chicken Burrito Bowl recipe is here to save your busy weeknights. With tender chicken, hearty …

Read more

Categories Dinner

Chicken Cranberry Pinwheels Flavorful and Easy Recipe

June 9, 2025 by Chef Miles
Chicken cranberry pinwheels are a delightful snack. They mix sweet and savory flavors. This recipe is simple and quick to make. You will love the taste and ease of these pinwheels. - Chicken - Cream Cheese - Dried Cranberries - Green Onions - Garlic Powder - Honey - Salt and Pepper - Tortillas - Spinach Leaves For this recipe, you need cooked chicken. Shred it into small pieces. Cream cheese adds a rich, creamy texture. Dried cranberries bring a sweet burst of flavor. Green onions add a mild onion taste. Garlic powder gives a hint of zest. Honey adds a touch of sweetness. Use salt and pepper to enhance the flavors. Large flour tortillas hold everything together. Fresh spinach leaves provide a nice crunch. Gather these ingredients to create tasty chicken cranberry pinwheels. This mix of flavors makes every bite delicious. To begin, gather your ingredients. You will need cooked chicken, cream cheese, dried cranberries, green onions, garlic powder, honey, salt, pepper, tortillas, and spinach leaves. In a large bowl, mix the shredded chicken with softened cream cheese. Add the chopped cranberries, sliced green onions, garlic powder, honey, salt, and pepper. Use a fork or spatula to blend everything well. You want a smooth and even mixture. Now, lay one tortilla flat on a clean surface. With a spatula, spread one-fourth of the chicken mixture across the tortilla. Leave an inch at the edges for easy rolling. Next, place some fresh spinach leaves over the chicken mixture. This adds a nice crunch. Start rolling the tortilla from one edge, pressing gently to keep the filling inside. Once it's fully rolled, press the edge to seal it. Repeat this for the other tortillas until you have four pinwheels. Take a sharp knife and slice each pinwheel into bite-sized pieces, about one inch thick. This will show the colorful filling inside. Arrange the slices on a serving platter. For a fresh touch, add more spinach leaves around the pinwheels. This adds color and makes the dish look inviting. Enjoy your Chicken Cranberry Pinwheels right away, or keep them for later. For more details, check the Full Recipe. To make your Chicken Cranberry Pinwheels shine, focus on balance. The sweet cranberries pair well with savory chicken. Here are some tips to enhance the taste: - Use fresh herbs like parsley or cilantro for a bright touch. - Add a squeeze of lemon juice for a zesty kick. - Adjust the honey level to suit your taste. More honey means sweeter pinwheels. These small changes can elevate your dish to a new level. You can easily prepare these pinwheels ahead of time. This saves you stress during busy days. Here’s how: - Make the chicken mixture the night before. Store it in an airtight container in the fridge. - Roll the pinwheels and slice them just before serving. This keeps them fresh and crisp. - You can also freeze the rolled pinwheels. Wrap them tightly in plastic wrap and store in a freezer-safe bag. They can last up to three months. Just thaw them in the fridge when you need them. A beautiful presentation makes any dish more appetizing. For your Chicken Cranberry Pinwheels, consider these ideas: - Use a bright platter to make the colors pop. - Arrange the pinwheels in a circular pattern for a fun look. - Add garnishes like fresh spinach leaves or edible flowers for charm. - Include small bowls of dipping sauce like ranch or honey mustard for extra flavor. These details will impress your guests and make your dish memorable. {{image_4}} If you have dietary needs, you can easily adapt this recipe. For a gluten-free option, use gluten-free tortillas. If you need a dairy-free choice, try vegan cream cheese. You can also swap chicken for shredded turkey or even chickpeas for a plant-based option. Adjust the honey based on your sweetness level. Always taste your mixture to get it just right. Feel free to get creative with flavors! Add some diced jalapeños for a kick. You can also mix in shredded cheese for extra creaminess. Try fresh herbs like cilantro or parsley for a burst of freshness. If you love a tangy taste, consider adding a splash of lemon juice. Each twist brings a new taste sensation to your pinwheels. These pinwheels shine at any gathering. You can cut them smaller for bite-sized snacks. Pair them with a tangy dip like ranch or a spicy salsa. To impress guests, serve on a colorful platter with fresh veggies. Arrange your pinwheels with vibrant bell peppers and cherry tomatoes. They not only taste great but look beautiful, too. For more fun, mix in other wraps like ham and cheese or veggie pinwheels. Enjoy the Full Recipe and get ready to wow your guests! To keep your Chicken Cranberry Pinwheels fresh, wrap them well. Use plastic wrap or place them in an airtight container. This helps prevent them from drying out. Store them in the fridge for up to three days. If you want to freeze them, wrap each pinwheel in plastic. Then, place them in a freezer bag. They can last up to three months in the freezer. When it's time to eat your leftover pinwheels, reheating is key. You can use the microwave for quick warmth. Place one or two pinwheels on a plate and cover them with a damp paper towel. Heat for 30 seconds, checking often to avoid overcooking. If you prefer a crispier texture, use a skillet. Heat the skillet over medium heat. Add the pinwheels and cook for a few minutes on each side until they warm up. Understanding the shelf life of your ingredients is important. Cooked chicken lasts about three to four days in the fridge. Cream cheese should be used within a week after opening. Dried cranberries can last for up to a year if stored in a cool, dry place. Green onions stay fresh for about a week. Honey can last indefinitely if kept sealed and stored properly. Always check for signs of spoilage before using any ingredient. Yes, you can make Chicken Cranberry Pinwheels ahead of time. I often prepare them a few hours before serving. Just store them in the fridge. This keeps their flavors fresh. If you plan to make them a day ahead, wrap them in plastic wrap. This helps prevent drying out. When you're ready to serve, just slice and enjoy! If you need a substitute for cream cheese, try Greek yogurt. It adds creaminess without the extra fat. You can also use cottage cheese for a lighter option. Another good choice is hummus, which adds a nice flavor. Each of these options will change the taste a bit, but they work well in this recipe. Yes, there are gluten-free tortilla options available. Many brands offer gluten-free wraps made from rice or corn. You can find these in most grocery stores. Just check the labels to ensure they meet your needs. These tortillas will keep your Chicken Cranberry Pinwheels tasty and gluten-free! For the full recipe, refer to the initial section. In this blog post, we explored how to make tasty Chicken Cranberry Pinwheels. We covered ingredients, preparation steps, and tips to enhance flavor. You learned ways to customize the recipe and store leftovers for later. These pinwheels are fun to make and share. They fit any gathering. Enjoy experimenting with new flavors and making them your own! Keep these tips in mind for a stress-free cooking experience.

Are you looking for a quick and tasty snack that impresses? Look no further than Chicken Cranberry Pinwheels! These colorful wraps pack a punch with juicy chicken, creamy cheese, and …

Read more

Categories Appetizers

Irresistible Strawberry Cheesecake Cookies Delight

June 9, 2025 by Chef Miles
To make these amazing cookies, gather the following ingredients: - 1 cup unsalted butter, softened to room temperature - 1 cup granulated sugar - 1/2 cup packed brown sugar - 1 large egg, at room temperature - 1 teaspoon pure vanilla extract - 2 cups all-purpose flour - 1 teaspoon baking powder - 1/2 teaspoon baking soda - 1/4 teaspoon salt - 1 cup cream cheese, softened - 1 cup fresh strawberries, hulled and diced - 1/2 cup white chocolate chips (optional) - 1/2 cup crushed graham crackers (for topping) These ingredients work together to create a soft and chewy cookie that bursts with strawberry flavor. You can add some fun twists to your cookies. Here are some optional ingredients you might enjoy: - White chocolate chips for a sweet touch - Crushed graham crackers for extra crunch - Chopped nuts like pecans or walnuts for added texture - A splash of lemon juice for a zesty kick Feel free to mix and match based on your taste! Choosing the right ingredients is key for great cookies. Here are my tips: - Use fresh strawberries. Look for firm, plump berries with bright color. - Select high-quality butter. It enhances the flavor of your cookies. - Choose real vanilla extract over imitation for the best taste. - Pick full-fat cream cheese for a rich, creamy texture. When you use fresh, quality ingredients, your cookies will shine! For the full recipe, follow the steps in the earlier sections. First, gather all your ingredients. You will need butter, sugars, an egg, vanilla, flour, baking powder, baking soda, salt, cream cheese, strawberries, and optional white chocolate chips. Start by preheating your oven to 350°F (175°C). Line a baking sheet with parchment paper. In a large bowl, cream the softened butter with the granulated and brown sugars. Mix until light and fluffy, about 2-3 minutes. Then, add the egg and vanilla. Mix well until everything is combined. In another bowl, whisk the flour, baking powder, baking soda, and salt together. Gradually add this dry mix to the butter mixture. Stir gently until just combined. Avoid overmixing, as this can make the cookies tough. Next, fold in the softened cream cheese. Make sure it mixes evenly. Then, add the diced strawberries and white chocolate chips if you want. Mix until everything is well combined. Using a cookie scoop, portion out dough balls. Place them on the baking sheet, leaving about 2 inches apart. Lightly sprinkle crushed graham crackers on top. This adds a nice cheesecake touch. Now it’s time to bake! Place the baking sheet in the preheated oven. Bake the cookies for 10-12 minutes. Watch them closely. The edges should look golden, but the centers might seem a bit soft. This is perfect, as they will firm up while cooling. Once baked, remove the sheet from the oven and let the cookies cool for about 5 minutes. This will help them set before moving. After cooling on the sheet, transfer the cookies to a wire rack. Let them cool completely for the best texture. For serving, arrange the cookies on a nice plate. Dust with powdered sugar for a special touch. You can also add whole strawberries on the side. This makes a beautiful and fresh presentation. For the full recipe, check out the detailed instructions above. Enjoy your delicious strawberry cheesecake cookies! One common mistake is overmixing the dough. This can make your cookies tough. Mix just until the ingredients combine. Another mistake is not measuring flour correctly. Too much flour can lead to dry cookies. Always spoon flour into your measuring cup, then level it off with a knife. To get that creamy texture, use room temperature cream cheese. It blends better with the butter and sugars. Make sure your butter is also soft. If it’s too cold, the dough won’t mix well. For chewy cookies, don’t bake them too long. They should look slightly underbaked in the center when you pull them out. Store your cookies in an airtight container. This keeps them soft and fresh. You can add a slice of bread to help keep them moist. If you need to keep them longer, freeze them. Place baked cookies in a freezer bag, and they will last for up to three months. For the Full Recipe, check above and enjoy making your own batch! {{image_4}} You can change up the fruit in these cookies. Instead of strawberries, try blueberries, raspberries, or even peaches. Each fruit brings a unique taste. For example, blueberries add a burst of sweetness, while raspberries bring a nice tartness. Just chop the fruit into small pieces, so they mix well into the dough. This keeps the texture light and fluffy. Toppings can enhance your cookies. Instead of crushed graham crackers, consider using crushed nuts or coconut flakes. Both options add crunch and flavor. You can also drizzle melted chocolate on top for an extra sweet touch. Try adding a dollop of whipped cream or yogurt when serving. These toppings make your cookies even more special. You can easily make these cookies gluten-free. Just swap the all-purpose flour for a gluten-free blend. Many options are available today that work great in baking. For a low-sugar version, reduce the sugar in the recipe. You can also use a sugar substitute like stevia or monk fruit. These adjustments keep your cookies healthy without losing flavor. For the full recipe, check out the details above. Enjoy experimenting with these ideas to find your perfect cookie! To keep your strawberry cheesecake cookies fresh, place them in an airtight container. Make sure they are completely cool before you store them. This helps prevent sogginess. Layer parchment paper between the cookies to avoid sticking. Store them at room temperature for the best taste. You can freeze these cookies to enjoy later. First, let them cool completely. Once cool, place the cookies in a single layer on a baking sheet. Freeze them for about an hour. This keeps them from sticking together. After that, transfer the cookies to a freezer-safe bag or container. They can last up to three months in the freezer. Strawberry cheesecake cookies taste best within the first week. After that, they may lose some of their flavor. If stored properly, they can last up to ten days at room temperature. For the best experience, enjoy them fresh or within a week. If you freeze them, remember to thaw them at room temperature before eating. This ensures they regain their soft texture. For the full recipe, refer to the earlier section. Yes, you can use frozen strawberries. Thaw them first and drain excess juice. This helps keep your cookie dough from getting too wet. Frozen strawberries work well when you want that fruity flavor. Just chop them into small pieces to mix in easily. You can substitute cream cheese with Greek yogurt. Use the same amount for a creamy texture. This change keeps the cookies soft and adds a nice tang. You can also use ricotta cheese as another option. It gives a different flavor but still works well. Serve these cookies warm or at room temperature. They taste great with a glass of milk or a scoop of ice cream. For a fun touch, dust them with powdered sugar. You can also plate them with fresh strawberries for a lovely display. Check out the Full Recipe for more serving ideas! Strawberry cheesecake cookies are fun to make and share. We’ve covered key ingredients, step-by-step baking, and useful tips to avoid mistakes. Remember to explore variations that suit your taste. Proper storage keeps cookies fresh for longer. Don’t hesitate to try different fruits or toppings for unique flavors. With these insights, you can enjoy delicious cookies every time. Happy baking, and may your treats impress everyone who tastes them!

Get ready to indulge in a sweet treat that combines two favorites: strawberries and cheesecake! In today’s post, I’ll guide you through making irresistible strawberry cheesecake cookies. With simple steps, …

Read more

Categories Desserts

Creamy Ground Beef Alfredo Pasta Delightful Dinner dish

June 9, 2025 by Chef Miles
To make creamy ground beef Alfredo pasta, you'll need some key ingredients: - 8 ounces fettuccine pasta - 1 pound ground beef - 3 tablespoons olive oil - 4 cloves garlic, finely minced - 1 cup heavy cream - 1 cup grated Parmesan cheese - 1 teaspoon Italian seasoning - Salt and freshly cracked black pepper to taste - Fresh parsley, finely chopped (for garnish) These ingredients create a rich and hearty dish that pleases everyone at the table. You can add some fun twists to your pasta. Here are a few ideas: - Mushrooms: Sauté sliced mushrooms with the beef. - Spinach: Stir in fresh spinach right before serving. - Red pepper flakes: Add for a spicy kick. - Lemon zest: A sprinkle brightens the flavor. These optional enhancements will make the dish even more exciting. If you have dietary needs, here are some easy swaps: - Gluten-free pasta: Use gluten-free fettuccine for a gluten-free option. - Ground turkey or chicken: Swap the beef for leaner meat. - Dairy-free cream: Use coconut milk or cashew cream instead of heavy cream. - Nutritional yeast: Replace Parmesan cheese with nutritional yeast for a vegan touch. These substitutions let everyone enjoy this creamy delight without worry. For the complete recipe, check the Full Recipe section. To start, fill a large pot with water. Add a big pinch of salt to it. Bring the water to a boil over high heat. Once it boils, carefully add the fettuccine. Cook the pasta until it is al dente, usually around 8-10 minutes. After cooking, drain the pasta in a colander. Keep a small cup of pasta water for later. This water can help adjust the sauce later if needed. In a large skillet, heat the olive oil on medium heat. When the oil shimmers, add the ground beef. Use a spatula to break the meat apart as it cooks. Stir occasionally until the beef is browned and cooked through. This should take about 5-7 minutes. If there’s too much fat in the skillet, carefully drain it. This helps keep the dish light and tasty. With the beef still in the skillet, add the minced garlic. Stir for about a minute until the garlic smells nice but doesn't brown. This step adds great flavor to the dish. Now, reduce the heat to low. Pour in the heavy cream and stir well. Gradually add the grated Parmesan cheese and the Italian seasoning. Keep stirring until the cheese melts and the sauce is smooth. If it feels too thick, add a splash of the reserved pasta water to reach your preferred consistency. Add the drained fettuccine directly into the skillet with the creamy beef sauce. Use tongs or a large spoon to toss the pasta until it’s well coated. Taste the dish and add salt and freshly cracked pepper as needed. To create a creamy sauce, use heavy cream. This adds richness and smoothness. Gradually add grated Parmesan cheese for a velvety texture. Stir the sauce gently to combine all the flavors. If it gets too thick, add a little reserved pasta water. This helps adjust the creaminess without losing flavor. Start by boiling water with a pinch of salt. This adds flavor to the pasta. Cook the fettuccine until it is al dente, which means it should be firm but tender. Drain the pasta, but save some water. This water can help bind the sauce to the pasta. Toss the pasta in the sauce quickly to prevent it from sticking. To make your dish pop, use fresh garlic. It adds a strong, sweet flavor. Italian seasoning is great for an herb blend. Don't forget to taste and adjust salt and pepper. A sprinkle of freshly cracked black pepper can brighten the dish. Finally, finish with chopped parsley for a fresh touch. For more tips, check the Full Recipe. {{image_4}} You can make a tasty vegetarian version of creamy ground beef Alfredo pasta. Instead of ground beef, use plant-based ground meat. Options like lentils or crumbled tofu work well. They add protein and keep the dish hearty. For added flavor, season the plant-based meat with garlic and Italian herbs as you cook it. This gives you a rich taste without meat. If you want a low-carb meal, swap regular pasta for zucchini noodles or spaghetti squash. These options keep the dish light and fresh. You can still use the same creamy Alfredo sauce. Just ensure to cook the zucchini noodles quickly to avoid sogginess. This way, you enjoy the creamy goodness without the carbs. Boost the nutrition of your creamy ground beef Alfredo pasta by adding vegetables. Spinach, broccoli, or bell peppers are great choices. You can sauté them with the beef for added flavor. This not only makes the dish colorful but also adds vitamins and minerals. Plus, it creates a more balanced meal that is good for you. For complete cooking steps, check the [Full Recipe]. To keep your creamy ground beef Alfredo pasta fresh, store it in an airtight container. Make sure the pasta has cooled down to room temperature first. This helps prevent condensation, which can make the dish soggy. The pasta lasts in the fridge for up to three days. When you’re ready to eat, check for any off smells or changes in texture. If you want to freeze your creamy ground beef Alfredo pasta, it’s best to do this right after cooking. Use a freezer-safe container and divide the pasta into single servings. This makes it easy to thaw only what you need. You can freeze it for up to three months. Just remember to label the container with the date. To thaw, place it in the fridge overnight. When reheating, add a splash of cream or a bit of pasta water to keep it creamy. Heat the pasta in the microwave or on the stovetop. If using the stovetop, do so over low heat. Stir often to avoid burning. Aim to heat it until just warm throughout. This will help maintain its delicious flavor and texture. Enjoy your meal, just like when it was fresh! For the full recipe, check out the details above. Cooking Creamy Ground Beef Alfredo Pasta takes about 30 minutes. This includes 10 minutes for prep and 20 minutes for cooking. You can have a tasty meal ready in no time! Yes, you can use any pasta you like! Penne, rigatoni, or even spaghetti work well. Just make sure to adjust the cooking time based on the pasta you choose. You can serve a simple side salad or garlic bread with this dish. A light green salad adds freshness. Garlic bread brings a nice crunch. Both pair perfectly with the creamy pasta! In this blog post, we covered the key ingredients and step-by-step methods for making creamy ground beef Alfredo pasta. I shared tips for achieving a rich sauce and suggested variations for different diets. You learned how to store and reheat leftovers for the best taste. This dish is simple to make and perfect for any occasion. Enjoy crafting your own version and let your taste buds shine. Happy cooking!

Are you ready to whip up a comforting meal that the whole family will love? This Creamy Ground Beef Alfredo Pasta is a delightful dinner dish that balances rich flavor …

Read more

Categories Dinner

Parmesan Potato Stacks Flavorful and Simple Recipe

June 8, 2025 by Chef Miles
The ingredients for Parmesan Potato Stacks are simple and easy to find. Here’s what you need: - 4 large russet potatoes, peeled and sliced into thin, uniform rounds - 1 cup grated Parmesan cheese - ½ cup shredded mozzarella cheese - 4 tablespoons unsalted butter, melted - 2 tablespoons olive oil - 2 teaspoons garlic powder - 1 teaspoon dried oregano - Salt and freshly cracked pepper to taste - Fresh parsley, chopped (for garnish) These ingredients work together to create a delicious dish. The russet potatoes give a fluffy texture inside, while the melted cheese creates a crispy top. The garlic powder and oregano add a warm, savory flavor. Using fresh parsley for garnish not only looks nice but also adds freshness to the dish. You can adjust the amount of cheese based on your taste. If you want it cheesier, feel free to add more! For the full recipe, check out the section above. These stacks are great for a side dish or as an appetizer. Enjoy cooking! - Preheat oven to 400°F (200°C). - Prepare muffin tin with grease. Start by heating your oven. This helps the potato stacks cook evenly. Greasing the muffin tin is key so the stacks come out easily. I use cooking spray or melted butter for this. - Combine melted butter and olive oil with seasonings. In a large bowl, mix melted butter and olive oil. Add garlic powder, oregano, salt, and pepper. This mix gives the potatoes great flavor. Stir well to combine. - Layer potato and cheese evenly in muffin tin cavities. Take your thin potato slices and coat them in the oil mix. Then, place a slice in each muffin tin. Add a layer of Parmesan and mozzarella cheese. Keep layering potatoes and cheese until you reach the top. Press down gently to pack them tightly. - Bake for 30-35 minutes until golden brown. Place the muffin tin in your hot oven. Bake until the tops are golden brown. This usually takes about 30 to 35 minutes. You want the potatoes to be tender inside and crispy outside. - Remove from tin and garnish with parsley. Once baked, let the stacks cool for a moment. Use a fork or knife to lift them out of the tin. Garnish with fresh parsley for a pop of color. Enjoy your delicious Parmesan Potato Stacks! For the full recipe, check out the earlier section. To get the best texture, use thin, uniform potato slices. A mandoline is great for this. Thin slices cook evenly and crisp nicely. Aim for about 1/8 inch thick. This way, the layers stack well, and each bite is crunchy. Add your personal touch by using different herbs and spices. You can try basil, thyme, or even a hint of rosemary. Adding spices like paprika or cayenne can give a nice kick. Mix and match to find your favorite flavors. It makes the dish even more fun to enjoy. These tasty stacks make great appetizers at gatherings. Pair them with dips like sour cream or a spicy aioli. You can also serve them as a side dish with grilled meats or salads. They look beautiful on a plate and taste even better. {{image_4}} You can switch up the cheeses for more flavor. Gruyère adds a nutty taste. Cheddar gives a sharp kick. Mixing these cheeses can make your stacks even more exciting. Feel free to use what you have on hand. Just remember to keep the cheese in good balance for melting. Adding herbs or spices can transform your dish. Fresh herbs like rosemary or thyme enhance the taste. If you want heat, sprinkle some paprika or cayenne pepper on the layers. This change can make the dish pop and suit your taste buds better. You can make these stacks vegan too! Use plant-based cheese instead of dairy cheese. Look for brands that melt well for the best results. This way, everyone can enjoy the stacks, no matter their diet preference. The flavor will still shine through, giving you a delicious treat. To store leftover Parmesan Potato Stacks, let them cool completely. Place them in an airtight container. Store in the fridge for up to three days. When ready to eat, you can reheat them in the oven or microwave. Reheating in the oven keeps them crisp. If using the microwave, cover them with a damp paper towel to prevent drying. For best results, freeze the stacks before baking. Arrange uncooked stacks on a baking sheet and freeze until solid. Once frozen, transfer them to a freezer bag. You can keep them for up to three months. When ready to enjoy, bake from frozen. Preheat your oven to 400°F (200°C) and bake for 40-45 minutes. This way, you'll have fresh, delicious stacks anytime. For the full recipe, check back to the main article. Yes, you can make Parmesan Potato Stacks ahead of time. Prepare the stacks and assemble them in the muffin tin. Then, cover the tin with plastic wrap and store it in the fridge. When you're ready to bake, remove the wrap and let them sit at room temperature for about 10 minutes. Bake as directed. If you want to reheat leftovers, place them in a warm oven at 350°F (175°C) for about 10-15 minutes. They’ll regain their crispness and be ready to enjoy again. Russet potatoes are the best choice for this recipe. They are starchy and create a fluffy inside, while also crisping nicely on the outside. Yukon Gold potatoes work too, as they have a creamy texture. Avoid waxy potatoes like red or new potatoes, since they won’t give you the same texture and flavor. To make Parmesan Potato Stacks healthier, consider these tips: - Use less butter and olive oil. You can reduce the amounts by half. - Swap in low-fat cheese options. Look for part-skim mozzarella or reduced-fat Parmesan. - Add vegetables like spinach or zucchini to the stacks for extra nutrients. - You can also use an air fryer instead of baking. This method cuts down on oil while keeping them crispy. For the full recipe, check out the earlier section. Enjoy your cooking! In this article, we covered how to make delicious Parmesan Potato Stacks. You learned about the key ingredients, step-by-step instructions, and helpful tips for perfecting texture and flavor. I shared variations to try and easy storage options for leftovers. Remember, you can customize these stacks to your taste and serve them at any gathering. Enjoy creating this tasty dish that your friends and family will love!

Looking for a simple, tasty side dish that will impress your friends? You’ve found it! Parmesan Potato Stacks are not only flavorful but also easy to make. With layers of …

Read more

Categories Appetizers

Burger Bowls Packed with Flavorful Ingredients

June 8, 2025 by Chef Miles
- 1 lb ground beef or plant-based ground meat - 4 cups of mixed salad greens (like arugula, spinach, or romaine) - 1 cup cherry tomatoes, halved - 1 cup cucumber, diced - ½ cup pickles, sliced - ½ cup shredded cheddar cheese - ¼ cup red onion, thinly sliced - ¼ cup mustard or your favorite burger sauce - ¼ cup ketchup (optional) For the main ingredients, choose either ground beef or plant-based meat. Both options taste great. The salad greens add crunch and freshness. Cherry tomatoes and cucumbers give a burst of flavor. Pickles add a nice tang, while cheddar cheese brings creaminess. Red onions add a sharp taste that balances the bowl. - 1 avocado, sliced - Additional sauces You can add avocado for creaminess and a nutrient boost. Try different sauces for more flavor. Experimenting here can make your burger bowl unique and delicious. - Calories: About 500 per serving - Protein: 30g - Carbohydrates: 30g - Fat: 25g A burger bowl packs in protein from the meat or plant-based options. The veggies add fiber and vitamins. If you add the avocado, you increase healthy fats, which is great for your diet. This makes a well-rounded meal, perfect for lunch or dinner. To make the burger patties, start by mixing the ingredients. In a large bowl, combine 1 pound of ground beef or plant-based meat with 1 teaspoon of garlic powder and 1 teaspoon of onion powder. Add salt and pepper to taste. Mix until everything is well combined. Next, form the mixture into patties. You can choose the thickness you like best. Now, let's cook the patties. Heat a skillet over medium-high heat. If you are using ground beef, add a splash of oil. Place the patties in the skillet. Cook for about 4 to 5 minutes on each side. You want them to be juicy, so check the doneness. The internal temperature should reach 160°F for beef. When cooked, remove the patties and let them rest for a few minutes. This helps keep them juicy. While the patties cook, prepare the bowl base. Start with 4 cups of mixed salad greens. You can use arugula, spinach, or romaine. Place the greens in a large serving bowl or individual bowls for a fun touch. Next, layer the toppings. Add 1 cup of halved cherry tomatoes, 1 cup of diced cucumber, and ½ cup of sliced pickles. Then, sprinkle on ½ cup of shredded cheddar cheese and ¼ cup of thinly sliced red onion. This creates a bright and colorful base. Once the patties have rested, slice each one into strips. Arrange the strips on top of the salad. If you want to add creaminess, include slices of avocado. Now it’s time to add sauces. Drizzle ¼ cup of mustard or your favorite burger sauce over the top. You can also add ¼ cup of ketchup if you like. To finish, gently toss all the ingredients together to mix the flavors. You can also serve the bowl as is for a beautiful look. Enjoy your burger bowls packed with flavor! For more details, check the Full Recipe. To get the best burger patties, you need to know how to cook them right. - Achieving the ideal doneness: Cook your beef patties for 4-5 minutes on each side. Use a meat thermometer to check for an internal temp of 160°F for beef. If you prefer a medium patty, stop cooking at 145°F. For plant-based meat, follow package instructions. - Alternative cooking methods: You can grill your patties for a smoky flavor. Or, use an air fryer for a healthier option. Each method gives a unique taste. Make your burger bowl your own. Start with the basics but have fun with extras. - Suggested substitutions and additions: Swap ground beef for turkey or chicken. Use quinoa or brown rice instead of salad greens. Add roasted veggies for a warm touch. - Flavor pairings: Try feta cheese with olives for a Greek twist. Or, add spicy sriracha for heat. Fresh herbs like basil or cilantro can brighten your bowl. How you serve your burger bowl counts. A good look makes the food taste better! - Plating techniques: Use a large bowl for sharing or small bowls for each person. Layer the ingredients for a colorful effect. Keep the toppings on top for a pretty view. - Garnishing options: Add fresh herbs like parsley or basil scattered on top. A slice of lime or lemon can add color and zing. For crunch, sprinkle nuts or seeds before serving. {{image_4}} You can switch up the protein in your burger bowls. Ground turkey or chicken works great. These meats are leaner and offer a different taste. They also cook quickly. If you use turkey, add herbs for more flavor. Chicken can be seasoned with spices like paprika or cumin. If you prefer plant-based options, try lentils or chickpeas. These are high in protein and fiber. You could also use plant-based ground meat. They mimic beef well and soak up flavors nicely. Get creative with your burger bowl's flavor! Mix unique ingredients for tasty combinations. Try adding a spicy salsa for a kick. You could also use mango salsa for a sweet twist. Themed burger bowls are fun too! For a Tex-Mex vibe, add black beans and corn. Top it with avocado and a dollop of sour cream. For an Italian twist, use pesto and fresh mozzarella. Making your burger bowl fit your diet is easy. For gluten-free options, skip the sauces with gluten. Instead, use a fresh salsa or guacamole. They add lots of flavor without gluten. If you're vegan, there are many substitutions. Use a plant-based protein for the burger. Choose vegan cheese or skip it altogether. You can make a rich dressing with tahini or avocado. These options keep your bowl tasty and satisfying. For more ideas, check out the Full Recipe. To keep your burger bowls fresh, store leftovers in the fridge. Use an airtight container. Make sure to separate the meat and veggies. This way, they stay crisp. You can store them for up to three days. If you want to keep them longer, freezing is a good choice. For freezing, use freezer-safe bags or containers. Remove as much air as possible to prevent freezer burn. You can freeze your cooked burger patties for up to three months. The veggies, however, do not freeze well. They may lose their crunch. To reheat your burger bowls, the best method is using a skillet. Heat the skillet on medium heat. Add a splash of water to keep it moist. Place the burger strips in the skillet. Heat for about 3-4 minutes, stirring often. This method keeps the flavors rich. If you use a microwave, cover the bowl with a damp paper towel. Heat in short bursts of 30 seconds. Stir after each burst to avoid hot spots. Make sure the internal temperature reaches 165°F. Most ingredients have a shelf life. Cooked burger patties last about 3-4 days in the fridge. The salad greens should be eaten within 2-3 days. Tomatoes and cucumbers are best within a week. Check for signs of spoilage. Look for changes in color or texture. If it smells bad, it’s time to toss it. Always trust your senses when it comes to food safety. The best toppings can make or break your burger bowl. Popular toppings include: - Shredded cheese - Sliced avocado - Fresh herbs like cilantro or parsley - Crispy bacon bits - Jalapeños for a spicy kick You can also try unique toppings like: - Roasted corn for a sweet crunch - Fried onions for extra texture - Kimchi for a tangy twist - BBQ sauce for a smoky flavor Mix and match these toppings to create your perfect bowl. Yes, you can make burger bowls ahead of time. This saves time on busy days. Here are some meal prep tips: - Cook your burger patties and store them in the fridge. - Prep your veggies and toppings in separate containers. - Assemble your bowls just before serving for freshness. For storage, keep all components in airtight containers. This way, they stay fresh longer. Burger bowls can last up to three days in the fridge. For the best taste, eat them within this time. Here are some safety tips: - Always cool leftovers before storing. - Use clean utensils to avoid cross-contamination. - If things smell off or look strange, throw them away. Staying safe in the kitchen is key to enjoying your meals! Access the complete Burger Bowls recipe [here](#). Burger bowls combine great flavor and fun. We explored main ingredients like beef and greens. Adding toppings or sauces boosts taste. Cooking tips helped you grill perfect patties and layer bowls well. We shared how to customize your bowl with different proteins and flavors. Remember, store leftovers properly and know their shelf life. You can make burger bowls your own while enjoying a mix of textures and nutrition. Dive in and create your best burger bowl today!

Are you ready to dive into a dish that’s bursting with flavor? Burger bowls mix your favorite burger ingredients into one tasty bowl. You get juicy meat or plant-based options, …

Read more

Categories Dinner

Easy Boston Cream Pie Cookie Bites Irresistible Treat

June 8, 2025 by Chef Miles
To make Easy Boston Cream Pie Cookie Bites, gather these key ingredients: - 1 cup all-purpose flour - 1/2 teaspoon baking powder - 1/4 teaspoon salt - 1/2 cup unsalted butter, softened to room temperature - 1/2 cup granulated sugar - 1 large egg - 1 teaspoon pure vanilla extract - 1/2 cup pastry cream (can be store-bought or homemade for an extra touch) - 1 cup semi-sweet chocolate chips - 2 tablespoons heavy cream To take your cookie bites to the next level, consider adding: - A pinch of nutmeg for warmth - A splash of almond extract for depth - A dollop of whipped cream for extra richness Using quality ingredients makes a big difference. Here’s why: - Fresh Eggs: Fresh eggs provide better flavor and texture. Choose large eggs for best results. - Good Quality Chocolate: Using high-quality chocolate chips enhances the taste of your ganache. Look for brands with high cocoa content. - Unsalted Butter: This allows you to control the salt level, ensuring balanced flavor. Always use room-temperature butter for easy mixing. By focusing on these ingredients, you can create a treat that’s not only delicious but also memorable. For the full recipe, check out the detailed steps to bring these cookie bites to life. First, gather all your ingredients. You need flour, baking powder, salt, unsalted butter, sugar, an egg, and vanilla extract. In a small bowl, mix the flour, baking powder, and salt. This blend will help the cookies rise nicely. Set this bowl aside. Now, in a larger bowl, cream the softened butter and sugar together. Use an electric mixer for about 2-3 minutes. It should look light and fluffy. Add the egg and vanilla. Mix until smooth. Gradually add the dry ingredients. Blend until no flour streaks are visible. Be careful not to overmix. Preheat your oven to 350°F (175°C). Line a baking sheet with parchment paper. This helps with easy removal later. Use a tablespoon to scoop dough and drop it onto the sheet. Space them about 2 inches apart. Bake for 10-12 minutes. Look for lightly golden edges. Once done, take them out and let them cool on a wire rack. Once your cookies are cool, it’s time to fill them. Use a small knife to hollow out the center of each cookie. You can also use a piping bag for this. Fill each hollow with pastry cream, a lovely surprise in every bite. For the chocolate ganache, mix chocolate chips and heavy cream in a microwave-safe bowl. Heat in 30-second intervals, stirring in between. Once melted and smooth, drizzle this rich ganache over your filled cookies. Let it set for a few minutes before serving. Your Easy Boston Cream Pie Cookie Bites are now ready to impress! To get the best texture for your cookie bites, follow these tips: - Use room temperature butter. This helps create a light and fluffy mix. - Don’t overmix the dough. Mix until no flour streaks show. This keeps the cookies soft. - Chill the dough. If it's too soft, chill it for 10-15 minutes. This makes it easier to scoop. You can make your pastry cream unique with these ideas: - Add flavors. Stir in some lemon zest or almond extract for a twist. - Try different milks. Use whole milk or even coconut milk for a different taste. - Make it thicker. Add more cornstarch if you want a firmer cream. Melting chocolate can be tricky. Here are some tips: - Use a microwave-safe bowl. This avoids spills and mess. - Heat in short bursts. Microwave for 30 seconds, then stir. Repeat until melted. - Add heavy cream. This helps the chocolate become smooth and glossy. These tips will make your Easy Boston Cream Pie Cookie Bites even better! Check the Full Recipe for more detailed steps. {{image_4}} You can change the flavor of the pastry cream easily. Try adding lemon zest for a bright touch. A hint of almond extract can give a nutty flavor. For chocolate lovers, mix cocoa powder into the cream. You can even fold in fresh fruit puree, like strawberry or raspberry, for a fruity twist. Each variation brings a new taste to your cookie bites. The ganache can also be varied to match your taste. Use dark chocolate for a rich flavor. If you like milk chocolate, swap it in for a sweeter treat. White chocolate provides a creamy option that pairs well with berry fillings. You can even add a splash of flavored liqueur, like coffee or orange, for a fun kick. These changes keep the bites fresh and exciting. Creating vegan or gluten-free cookie bites is simple. For a vegan option, use plant-based butter and a flax egg instead of a regular egg. Replace the heavy cream with coconut cream to keep the ganache rich. For gluten-free bites, swap all-purpose flour with a gluten-free blend. Make sure the chocolate chips are dairy-free if you're going vegan. These adjustments keep your treats delicious and friendly for all diets. Check the Full Recipe for more details! To keep your Boston cream pie cookie bites fresh, store them in an airtight container. This will help retain their moist texture and rich flavor. You can place a layer of parchment paper between layers of cookie bites. This prevents them from sticking together. Never store them in the fridge unless it's very hot, as the cold can dry them out. These cookie bites stay fresh for about 3 to 5 days at room temperature. If you store them properly, they'll maintain their taste and texture. After a few days, they might lose some moisture but will still taste good. To freeze your cookie bites, place them in a single layer on a baking sheet. Freeze them for about an hour. Once they are firm, transfer them to a freezer-safe bag. They can last up to 3 months in the freezer. When you're ready to enjoy them, simply thaw at room temperature for a few hours. You can even warm them in the microwave for a few seconds for that fresh-baked taste. To make Boston cream pie cookie bites from scratch, start by mixing your dry ingredients. Combine 1 cup of all-purpose flour, 1/2 teaspoon of baking powder, and 1/4 teaspoon of salt in a bowl. Then, cream 1/2 cup of softened unsalted butter with 1/2 cup of granulated sugar until fluffy. Add in 1 large egg and 1 teaspoon of pure vanilla extract. Gradually mix in the dry ingredients. Scoop the dough onto a baking sheet and bake at 350°F for 10-12 minutes. Once cooled, hollow out the centers, fill with 1/2 cup of pastry cream, and drizzle with chocolate ganache made from 1 cup of chocolate chips and 2 tablespoons of heavy cream. For the full recipe, check the earlier section. Yes, using store-bought cookie dough is a great time-saver! Just scoop the dough onto your baking sheet and bake as directed. Make sure to let the cookies cool before you fill them. This option still allows you to enjoy the delicious pastry cream and chocolate ganache. The best way to fill the cookies is by using a piping bag. If you don’t have one, a small knife works well, too. Hollow out the center of each cookie gently. Then, fill each hollow with the pastry cream. Ensure you fill each cookie generously so every bite is a delightful treat! You can make the cookie bites ahead of time easily! Prepare the cookies and let them cool. Fill them with pastry cream and drizzle with chocolate ganache. Store the filled cookies in an airtight container in the fridge. They stay fresh for up to three days. You can also freeze the unfilled cookies for longer storage if needed. We explored how to create delicious Boston cream pie cookie bites. You learned about the essential and optional ingredients for great flavor. I shared step-by-step instructions to help you prepare, bake, fill, and decorate these treats. We discussed tips for perfect texture and customization options, plus storage best practices. Now, you can impress friends and family with these treats. Enjoy experimenting with flavors and make them your own. Happy baking!

Are you ready to indulge in a sweet treat that combines the joy of cookies with the classic flavor of Boston cream pie? In this article, I’ll show you how …

Read more

Categories Desserts

Crunchy Honeycomb Cheesecake Tempting Dessert Recipe

June 8, 2025 by Chef Miles
- 200g digestive biscuits, crushed - 100g unsalted butter, melted - 400g cream cheese, softened - 200g sour cream - 150g powdered sugar - 2 teaspoons vanilla extract - 3 large eggs - 100g honeycomb pieces, chopped - 50g dark chocolate, grated (for garnish) - Additional honeycomb pieces (for decoration) The ingredients are simple but make a big impact. I love using digestive biscuits for the crust. They add a great crunch and balance well with the creamy filling. Mixing them with melted butter creates a solid base. Cream cheese adds richness to the cheesecake. It gives that smooth, creamy texture we all adore. Sour cream enhances the flavor and makes it extra creamy. I always use powdered sugar for sweetness. It blends well and keeps the filling smooth. The vanilla extract adds a nice aroma and flavor. Eggs bind everything together. They create the perfect creamy consistency. Honeycomb pieces add a delightful crunch and sweetness. For decoration, dark chocolate grated on top is a must. It gives a nice contrast to the dessert. Using extra honeycomb pieces makes it look stunning. You can find the full recipe linked above. Enjoy creating this delightful treat! - Preheat your oven to 160°C (320°F). - Prepare a 9-inch springform pan with parchment paper. - In a bowl, mix 200g of crushed digestive biscuits with 100g of melted butter. - Press this mixture firmly into the bottom of the pan. - Beat 400g of cream cheese in a bowl until smooth. - Add 200g of sour cream, 150g of powdered sugar, and 2 teaspoons of vanilla extract. - Mix until well combined. - Add 3 large eggs one at a time, mixing gently after each addition. - Pour the filling over the cooled crust. - Bake in the oven for 50-60 minutes until the edges are firm. - After baking, turn off the oven and let the cheesecake cool for one hour inside. To get that crunchy texture in your cheesecake, mixing is key. Start by blending your digestives with melted butter well. This creates a strong base. When adding eggs, mix gently. Overmixing can make the filling dense. For the honeycomb, fold it in carefully. This keeps the pieces intact and adds great bites of flavor. Baking time can vary based on your oven. Keep an eye on the edges; they should be set while the center wobbles slightly. After baking, let the cheesecake cool in the oven with the door ajar. This step helps prevent cracks. Once cooled, chill it in the fridge for at least four hours. Chilling is very important for the best texture. A great way to make your cheesecake look stunning is by garnishing it with dark chocolate. Shave the chocolate and sprinkle it on top. Adding honeycomb pieces on the surface gives a beautiful finish. For the best experience, serve slices with extra honeycomb on the side. This will delight your guests and elevate the dessert! You can find the full recipe for this Crunchy Honeycomb Cheesecake online. {{image_4}} You can change the taste of your Crunchy Honeycomb Cheesecake easily. Here are some fun ideas: - Adding fruit purees: Blend berries or mangoes into a puree. Swirl this into the cheesecake for a fruity twist. - Experimenting with different extracts: Use almond or lemon extract instead of vanilla. This adds a unique flavor that surprises your taste buds. - Alternative toppings: Top with fresh fruits or a drizzle of caramel sauce. You can also use crushed cookies for extra crunch. If you need to change some ingredients, here are some options: - Gluten-free options for the crust: Use gluten-free cookies instead of digestive biscuits. This makes the recipe safe for gluten-free diets. - Non-dairy creams and cheeses: Swap cream cheese for a non-dairy cream cheese. Coconut cream is a great choice for a rich texture. - Sugar alternatives: Try using honey or maple syrup instead of powdered sugar. These sweeteners give a nice flavor while being more natural. Make your cheesecake fit the season with these ideas: - Holiday-inspired flavors: Add spices like cinnamon or nutmeg for a festive taste. You can also make a pumpkin version for fall. - Summer fruit additions: Mix in fresh strawberries or peaches for a light and refreshing dessert. These fruits brighten up the cheesecake. - Themed decorations: Use edible flowers or colored sprinkles for fun, festive looks. This makes your cheesecake stand out at any gathering. For the full recipe, check the details above. Enjoy exploring these variations! After you enjoy your Crunchy Honeycomb Cheesecake, store leftovers in the fridge. Wrap the cheesecake tightly in plastic wrap or place it in an airtight container. This keeps it fresh. Enjoy your cheesecake within 3 to 5 days for the best taste and texture. Want to save some cheesecake for later? You can freeze it! First, slice the cheesecake into portions. Wrap each piece in plastic wrap, then place them in a freezer-safe bag. This helps keep the flavor. You can freeze it for up to 3 months. When you're ready to eat, take out a slice. Let it thaw in the fridge for 4 to 6 hours or overnight for best results. If you want to serve it warm, you can gently reheat the cheesecake. Place a slice on a microwave-safe plate. Heat it for about 10 to 15 seconds. Check often to avoid melting the texture. You want it warm, not hot. This keeps the cheesecake smooth and creamy. Enjoy your delicious dessert! For the complete recipe, check out the Full Recipe for Crunchy Honeycomb Cheesecake. Crunchy honeycomb cheesecake is a delightful dessert. It has a smooth, creamy filling with honeycomb pieces. The crust is made from crushed digestive biscuits and butter. This cheesecake combines rich cream cheese, sour cream, and sweet honey. Topping it with dark chocolate makes it extra special. You get a mix of creamy and crunchy textures in every bite. Yes, you can make this cheesecake ahead of time. It tastes even better after chilling. Prepare it a day before serving for best results. After baking, let it cool completely. Then, refrigerate it for at least four hours or overnight. This helps the flavors meld together. You can find honeycomb at many local grocery stores. Look in the baking aisle or near the honey. Specialty food stores often carry it too. If you cannot find it locally, try online shops. Websites like Amazon or specialty food retailers offer honeycomb. You can use store-bought cheesecake, but it has pros and cons. A store-bought cheesecake saves time. It might not have the same texture or flavor as homemade. If you want to save effort, it’s a good option. However, making it yourself gives you control over taste and texture. Check the edges of the cheesecake during baking. They should look firm while the center remains slightly wobbly. This means it is done but not overcooked. After baking, let it cool in the oven for an hour. This helps avoid cracks. Always chill it properly before serving. This blog post shared how to make a delicious Crunchy Honeycomb Cheesecake. I covered essential ingredients, step-by-step instructions, and tips for a perfect texture. You learned about variations, storage, and even FAQs to guide you. Baking can be fun and rewarding, especially with unique recipes like this one. Give it a try, and enjoy a treat that impresses everyone! The effort will be worth it when you serve this delightful dessert.

Are you ready to indulge in a dessert that perfectly blends creamy goodness with crunchy texture? This Crunchy Honeycomb Cheesecake is a delight for your taste buds. With simple ingredients …

Read more

Categories Desserts
Older posts
Newer posts
← Previous Page1 … Page96 Page97 Page98 … Page112 Next →

MELTED RECIPES

where delicious ideas melt into life, from stovetop to backyard. Always warm, simple, and irresistibly satisfying. 🍳🔥🧀

PAGES

Home About Contact Privacy Policy Terms & Conditions Cookie Policy GDPR Policy Copyright Policy Disclaimer

CATEGORIES

Appetizers Desserts Salads Breakfast Dinner

Contact

  • Pinterest
  • Mail
Copyright © 2025 Melted Recipes. All rights reserved.