Easy Honey Garlic Ground Beef and Broccoli Recipe Delight
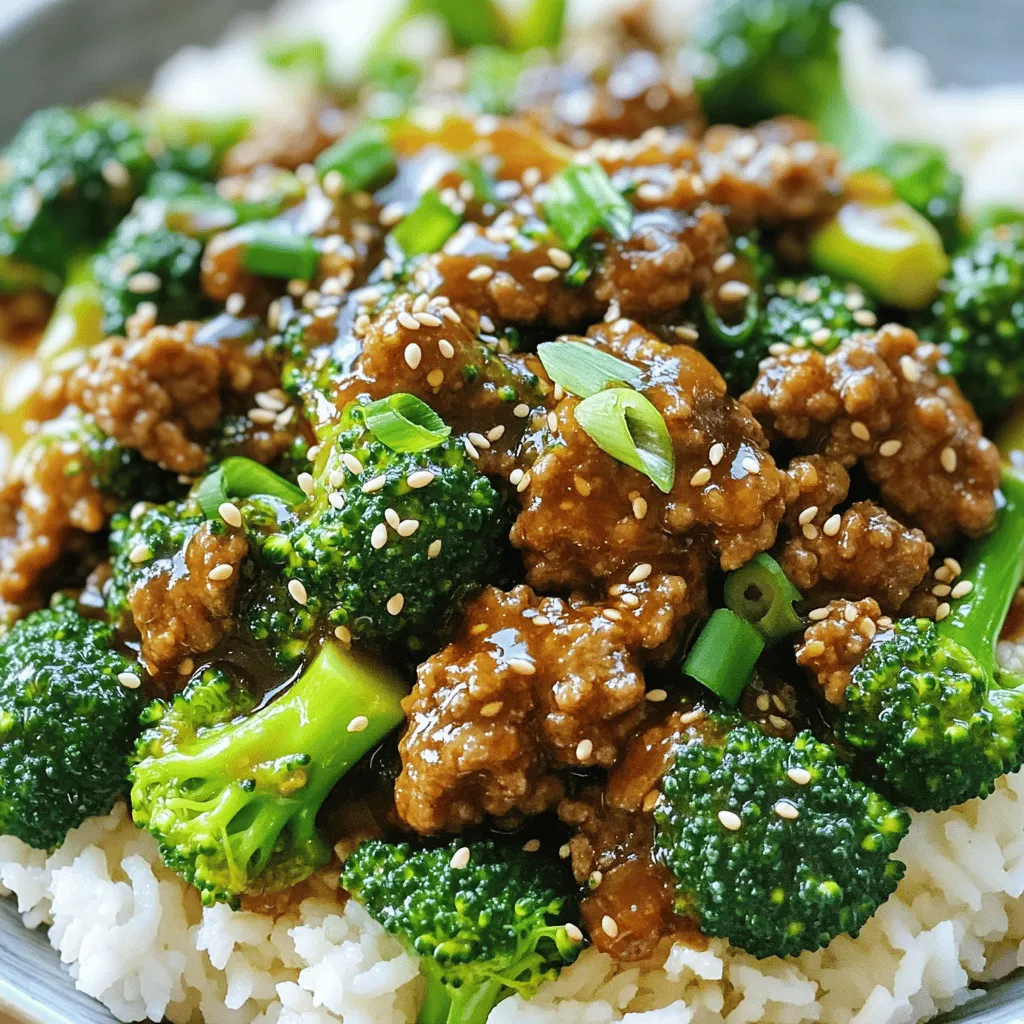
Looking for a quick and tasty meal? You’ve found it! My Easy Honey Garlic Ground Beef and Broccoli recipe is a winner. With just a few simple ingredients, you can …
Looking for a quick and tasty meal? You’ve found it! My Easy Honey Garlic Ground Beef and Broccoli recipe is a winner. With just a few simple ingredients, you can …
![To make these delightful raspberry swirl cupcakes, gather these main ingredients: - 1 ½ cups all-purpose flour - 1 cup granulated sugar - ½ cup unsalted butter, softened - 2 large eggs - 1 teaspoon pure vanilla extract - ½ cup whole milk - 2 teaspoons baking powder - ½ teaspoon salt - 1 cup fresh raspberries - 2 tablespoons raspberry jam These ingredients help create a soft and fluffy cupcake that bursts with flavor. For the frosting and a lovely touch, you will need: - 1 cup powdered sugar (for frosting) - 4 tablespoons unsalted butter, softened (for frosting) - 1 tablespoon whole milk (for frosting) - Additional fresh raspberries (for garnish) This frosting adds sweetness and creaminess, making the cupcakes even more irresistible. When picking fresh raspberries, consider these tips: - Look for bright red berries with no mold. - Choose firm berries; they should not be mushy. - Smell for a sweet aroma; this indicates freshness. - Buy organic when possible to avoid pesticides. Fresh raspberries enhance flavor and add a beautiful swirl. Be sure to pick the best ones for your cupcakes! Start by preheating your oven to 350°F (175°C). This step is vital for even baking. Line a standard cupcake pan with paper cupcake liners. This will help you easily remove the cupcakes later. In a large bowl, cream together ½ cup of softened butter and 1 cup of granulated sugar. Use an electric mixer for about 3-4 minutes. The mix should look light and fluffy, which means it’s ready. Next, add 2 large eggs, one at a time. Make sure to beat well after each addition. Now, pour in 1 teaspoon of pure vanilla extract and mix it in. Slowly add ½ cup of whole milk and stir until everything is smooth. In another bowl, whisk together 1 ½ cups of all-purpose flour, 2 teaspoons of baking powder, and ½ teaspoon of salt. Gently fold this dry mix into your wet ingredients. Remember, mix just until combined to keep the cupcakes light. In a small bowl, gently crush 1 cup of fresh raspberries with a fork. You want to break them apart but keep some texture. Stir in 2 tablespoons of raspberry jam to create a colorful sauce. Now, fill each cupcake liner about 1/3 full with batter. Add about a teaspoon of your raspberry mixture on top. Then, add more batter until each liner is about 2/3 full. To create the swirl, use a toothpick or skewer. Gently swirl the raspberry mixture through the cupcake batter. This gives each cupcake a lovely marbled look. For the full recipe and details, check the [Full Recipe]. To get that lovely swirl in your raspberry cupcakes, work carefully. Start by filling each cupcake liner with batter. Then, add a spoonful of your raspberry mixture. Use a toothpick to swirl it gently. Avoid over-mixing to keep the swirl effect. Each swirl should look unique and inviting. Moisture makes a cupcake great. Use fresh ingredients for the best results. Make sure your butter is soft, but not melted. Cream the butter and sugar well; this adds air. Don't overmix your batter after adding flour. This will keep your cupcakes light and fluffy. Having the right tools helps a lot. Here’s what you’ll need: - Mixing bowls - Electric mixer - Cupcake pan - Cupcake liners - Toothpick or skewer - Measuring cups and spoons These tools make your baking easier and more fun. With them, you can create perfect raspberry swirl cupcakes every time. For more details, check the Full Recipe. {{image_4}} You can easily swap raspberries for other fruits. Strawberry and blueberry work great. For strawberry, use fresh or pureed berries. Add them just like raspberries for a yummy swirl. Blueberries can be crushed lightly, too. They create a sweet and tangy flavor. Each fruit brings its unique taste and color to your cupcakes, making them fun and fresh. You can make these cupcakes gluten-free. Just use gluten-free flour instead of all-purpose flour. For a vegan version, switch eggs with flaxseed meal. Mix one tablespoon of flaxseed with three tablespoons of water for each egg. Use plant-based butter and milk, too. These changes keep the taste great while meeting dietary needs. The frosting can change the cupcake's whole vibe. Try lemon or cream cheese frosting for a fresh twist. Chocolate frosting adds richness and depth. You can even mix flavors by swirling two frostings together. Each option gives a new taste and makes your cupcakes more exciting. Explore these variations to find your favorite. For the basic recipe, check the Full Recipe for guidance. To keep your Raspberry Swirl Cupcakes fresh, store them in an airtight container. Place parchment paper between layers if stacking. This prevents sticking and keeps the frosting intact. Store the cupcakes at room temperature for up to two days. If you want them to last longer, refrigerate them. Cupcakes stay fresh for about a week in the fridge. Freezing is a great way to save extras. First, let the cupcakes cool completely. Once cooled, wrap each cupcake in plastic wrap. Then, place them in a freezer-safe bag or container. Make sure to remove as much air as possible. You can freeze them for up to three months. When ready to eat, thaw them in the fridge overnight. For quick thawing, leave them at room temperature for a few hours. Raspberry Swirl Cupcakes last up to two days at room temperature. In the fridge, they last about a week. If you freeze them, they can last for three months. To reheat, place a cupcake in the microwave for about 10-15 seconds. This warms it up without drying it out. Enjoy your cupcakes at their best! For the full recipe, check out the detailed instructions above. To stop the raspberries from sinking, coat them in a bit of flour before mixing. This light dusting helps them stay suspended in the batter. Another trick is to add the raspberries just before baking. Swirl them in gently after putting the batter in the liners. This keeps them near the top. You can use many fruits instead of raspberries. Strawberries, blueberries, or blackberries work well. Each fruit gives a unique taste. You can also experiment with fruit jams. Just make sure to adjust the sweetness in the batter if the jam is very sweet. Yes, you can make the batter in advance. Mix it and store it in the fridge for up to two days. When you're ready, simply scoop it into the liners and bake. This makes it easy to prepare for a last-minute gathering. For the best results, don’t wait too long before baking. Always use the batter fresh for the best taste and texture. For the full recipe, check the ingredients and steps outlined earlier. Raspberry swirl cupcakes are a fun and tasty treat. We discussed key ingredients, including tips for choosing fresh raspberries. I shared step-by-step instructions to help you create that beautiful swirl. To make the cupcakes more enjoyable, we explored useful tips, variations, and storage options. Baking can be simple and rewarding. With these insights, you're ready to make delicious cupcakes that everyone will love. Enjoy baking!](https://meltedrecipes.com/wp-content/uploads/2025/06/4962e2e2-dca2-4fe2-9d48-33d7e1d1ae0d.webp)
Get ready to indulge in something sweet! My recipe for Raspberry Swirl Cupcakes is a true delight. These cupcakes combine moist batter with a stunning raspberry swirl that looks as …

Craving a tasty snack that’s simple to make? These Irresistible Mashed Potato Cheese Puffs are your answer! With leftover mashed potatoes and gooey cheese, they’re a delight for any meal …
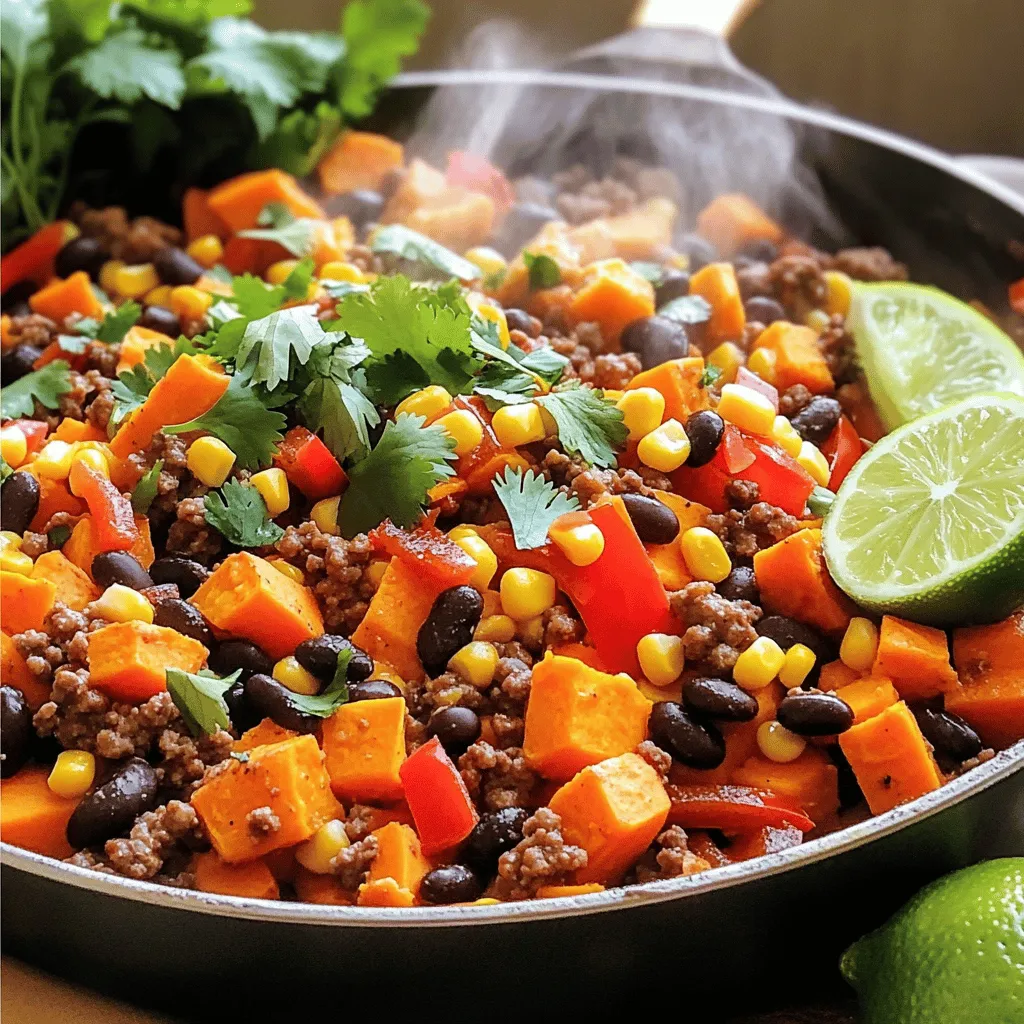
Are you ready to whip up a delicious meal that’s both hearty and healthy? My Southwestern Ground Beef Sweet Potato Skillet is packed with flavor and easy to make. You’ll …
![To make Beef and Garlic Butter Pasta, gather these fresh items: - 250g spaghetti or your preferred pasta - 300g ground beef - 4 tablespoons unsalted butter - 5 cloves garlic, finely minced - 1 small onion, chopped finely - 1 teaspoon dried oregano - 1 teaspoon chili flakes (optional for a kick) - Salt and freshly ground black pepper to taste - ½ cup grated Parmesan cheese - Fresh parsley, chopped (for garnish) - Zest of 1 lemon While spaghetti is a classic choice, you can use other types of pasta too. I love fettuccine for its wide texture. Penne holds sauce well, making it a great option. If you're feeling adventurous, try pappardelle for a fun twist. Remember, choose pasta that cooks to an al dente texture for the best bite. Fresh herbs bring bright flavors to your dish. I recommend using fresh parsley and oregano if you can find them. They add a burst of freshness. Dried herbs work too and provide convenience. Use one teaspoon of dried oregano if fresh is not available. Just remember, dried herbs have a stronger taste. Adjust the amount to suit your preference. Start by filling a large pot with water. Add a good amount of salt. Bring the water to a boil. Once boiling, add 250g of spaghetti or your favorite pasta. Stir it gently to keep it from sticking. Cook according to the package instructions until it is al dente. When it's done, save 1 cup of the starchy water, then drain the pasta. This water will help make the sauce creamy. In a large skillet, heat 2 tablespoons of butter over medium heat. Once melted, add 1 small chopped onion and 5 finely minced garlic cloves. Sauté them for about 3 minutes. You want the onion to turn soft and clear. The garlic should smell nice and fragrant. This step builds flavor for your dish. Now, raise the heat to medium-high. Add 300g of ground beef to the skillet. Use a spatula to break it apart as it cooks. Cook for about 5-7 minutes until the beef is brown. If you see too much fat, be careful and drain it off. Then, sprinkle in 1 teaspoon of dried oregano, chili flakes if you want heat, and a good pinch of salt and pepper. Stir it all together and let it cook for another 1-2 minutes to blend the flavors. For the complete recipe, check the [Full Recipe]. To get the right pasta texture, cook your pasta until al dente. This means it should be firm but not hard. Use a large pot with plenty of salted water. This helps the pasta cook evenly. Remember to stir it often. After cooking, save some pasta water. This starchy water helps to make your sauce creamy. You can boost the flavor of your dish with a few simple extras. Adding fresh herbs like basil or thyme makes it fresh. A splash of lemon juice brightens the dish. You can also toss in some sautéed mushrooms or spinach for added nutrition. If you love spice, try adding more chili flakes. Each of these tweaks can take your pasta to the next level. One common mistake is overcooking the pasta. Always check the cooking time on the package. Another mistake is not seasoning enough. A little salt in the cooking water and while cooking the beef goes a long way. Lastly, don’t skip the cheese! It adds rich flavor. Follow these tips for perfect beef and garlic butter pasta every time. For the full recipe, check the link above. {{image_4}} You can boost the healthiness of your Beef and Garlic Butter Pasta by adding vegetables. Veggies add color and nutrients. Consider adding spinach, bell peppers, or zucchini. Just chop them small and sauté them with the onions and garlic. They will soften and blend well with the dish. This not only makes it healthier but also adds a nice crunch. If you want to change things up, try using different proteins. Ground turkey or chicken work great instead of beef. You can also use shrimp or tofu for a lighter meal. Each protein brings its unique flavor. Adjust the cooking time based on what you choose. For shrimp, cook until they turn pink, which takes about 3-4 minutes. For those who love heat, making the dish spicy is easy. You can add more chili flakes or even some sliced fresh jalapeños. Another option is to use spicy sausage instead of ground beef. This will give your pasta a bold kick. Just remember, spice levels vary. Start with a small amount and taste as you go. You can store leftover Beef and Garlic Butter Pasta in the fridge. Place it in an airtight container. It stays fresh for up to three days. Make sure to cool it down before sealing the container. This helps keep the pasta from getting mushy. If you want to save the pasta for later, freezing works great. Place the cooled pasta in freezer-safe bags or containers. Remove as much air as possible to avoid freezer burn. It can last in the freezer for about two months. When ready to eat, thaw in the fridge overnight. To reheat, you have a few options. For the best taste, use the stove. Add a splash of water or broth in a skillet over low heat. Stir often until it’s hot. You can also microwave it. Place the pasta in a bowl and cover it with a damp paper towel. Heat in short bursts, stirring in between, until warmed through. Enjoy your Beef and Garlic Butter Pasta just as delicious as the first time! For the full recipe, check the earlier section. To make this dish gluten-free, use gluten-free pasta. Many brands offer great options that taste good. Ensure all sauces and seasonings are also gluten-free. This way, you can enjoy the same great flavors without gluten. Yes, you can use any pasta you like! Penne, fusilli, or even zucchini noodles work well. Each type will give a new twist to the dish. Choose your favorite for a fun meal. This pasta pairs well with a simple salad or garlic bread. You can also serve it with steamed veggies for a healthy side. A light wine or sparkling water can enhance the meal. You can prepare the beef and garlic butter sauce ahead of time. Just cook it as usual, let it cool, and store it in the fridge. When you’re ready to eat, just cook the pasta and mix everything together. Absolutely! This dish is great for meal prep. You can store servings in airtight containers. It stays tasty for up to three days in the fridge. Just reheat it in the microwave or on the stovetop for a quick meal. For the full recipe, check the details above. In this blog post, we explored the key ingredients, step-by-step cooking, and helpful tips for Beef and Garlic Butter Pasta. We covered everything from fresh herbs to cooking techniques. Remember, you can easily customize the dish by adding veggies or changing the protein. Always aim to avoid common mistakes for the best results. With these guidelines, you can store or reheat your dish perfectly. Enjoy the process and create a meal that your whole family will love. Happy cooking!](https://meltedrecipes.com/wp-content/uploads/2025/06/01eb0804-0c1b-4b15-9956-832cf4ab192f.webp)
Are you ready for a dinner that’s both easy and packed with flavor? This Savory Beef and Garlic Butter Pasta recipe is your go-to dish! I’ll show you how to …
![- 1 box of vanilla cake mix - 3 large eggs - 1/2 cup vegetable oil - 1 cup water - 1/2 cup frosting - 12 mini ice cream cones - 1 cup white chocolate chips - 2 tablespoons coconut oil - Optional: sprinkles for decoration When you make Ice Cream Cone Cake Pops, you need simple ingredients. First, grab a box of vanilla cake mix. This mix gives a sweet base. Next, add three large eggs to bind everything. A half cup of vegetable oil keeps the cake moist. For hydration, use one cup of water. Frosting is key for flavor. I suggest a half cup of vanilla frosting. You'll also need twelve mini ice cream cones. These cones serve as fun holders for your cake pops. For the coating, gather one cup of white chocolate chips. To make it smooth, add two tablespoons of coconut oil. If you want to jazz them up, sprinkles make a great decoration. You can find all these items at your local store. Having everything ready makes cooking more fun! - Step 1: Preheat your oven to 350°F (175°C). Line a muffin tin with paper liners. - Step 2: In a large bowl, combine the vanilla cake mix, eggs, vegetable oil, and water. Mix until smooth. - Step 3: Pour the batter into the lined muffin cups, filling them halfway. Bake for 15-18 minutes. Cool the cupcakes in the pan for 5 minutes before moving them to a wire rack. - Step 4: Once the cupcakes cool, crumble them into a large mixing bowl. Break them down until they are fine crumbs. - Step 5: Add the frosting to the crumbled cupcakes. Mix well until the frosting is evenly spread and moist. - Step 6: Roll the mixture into 1-inch balls. Place them on a baking sheet lined with parchment paper. Freeze for 30 minutes. - Step 7: While the cake balls freeze, melt the white chocolate chips in a microwave-safe bowl. Heat in 20-second intervals, stirring in between. - Step 8: After freezing, gently insert a mini ice cream cone into each cake ball. Dip the cake pops into the melted chocolate. - Step 9: Allow any excess chocolate to drip off. Sprinkle colorful sprinkles on top before the chocolate hardens. Place the cake pops upright in a block of floral foam or a tall glass until set. For the complete recipe, check out the [Full Recipe]. Cooling your cupcakes is key. If you skip this step, they may crumble too much. After baking, let them cool for about 5 minutes in the tin. Then move them to a wire rack. This helps them cool completely. When they are cool, you can crumble them evenly. For best results, break them into small pieces. Use your hands or a fork to get fine crumbs. This makes mixing easier. Melting chocolate can be tricky. To avoid burning, use a microwave-safe bowl. Heat the chocolate chips in 20-second intervals. Stir after each interval until it’s smooth. For a shiny finish, add coconut oil. It helps the chocolate coat better and makes it glossy. If you don’t have coconut oil, use shortening. Both will help you get that perfect dip. Get creative with your sprinkles! Use different colors and shapes. You can mix and match them for fun designs. If you want to use white chocolate, you can add food coloring. Dip the cake pops in white chocolate first, before adding sprinkles. This way, the colors will stick better. Let your imagination run wild with your cake pop designs! {{image_4}} You can change up the flavor of your cake pops easily. Instead of vanilla, try using chocolate cake mix. This adds a rich and delightful taste. You can also switch up the frosting flavors. Think about using chocolate, strawberry, or cream cheese for a unique twist. Each flavor adds its own charm and fun. Coating your cake pops doesn’t have to be plain white chocolate. Colored candy melts make your pops pop! They come in many colors. You can mix and match for a beautiful look. Sprinkles and nuts are great alternatives too. They add crunch and color, making each bite exciting. Presentation can make your cake pops shine at any event. Try arranging them in a fun display. Use a cute cup filled with colorful edible rocks or sprinkles. This makes a great centerpiece for parties. You can also theme them for seasons. For Halloween, use orange and black sprinkles. For Christmas, think red and green. The options are endless! Be sure to check out the Full Recipe for specific instructions! You can store your cake pops at room temperature. Keep them in an airtight container. This helps keep them fresh for a few days. If you want them to last longer, place them in the fridge. Just make sure they are in a sealed container to avoid drying out. These cake pops can stay fresh for about five days at room temperature. In the fridge, they can last up to a week. If you want to freeze them, wrap each cake pop in plastic wrap. Then, place them in a freezer bag. When ready to eat, let them thaw at room temperature. If your cake pops need a refresh, you can warm them slightly. Use a microwave for about 10 seconds. This helps soften the chocolate. Avoid melting it completely. Be careful not to overheat them as this can ruin their shape. Enjoy your tasty treats! Yes, you can use a gluten-free cake mix. This makes the recipe accessible to those with gluten sensitivities. Just choose a brand you like, and follow the same steps as the regular cake mix. It will taste just as great! You can make these ice cream cone cake pops two days ahead of time. Store them in an airtight container at room temperature. This allows the flavors to meld, making them even more tasty when served. Yes, kids can help with this fun recipe! They can mix the cake batter and roll the cake balls. Just keep an eye on them when using the oven and the melting chocolate. Safety first! To transport cake pops, place them in a sturdy box. Use a piece of foam or a small container to hold them upright. This keeps them from tipping over. You want them to stay looking cute for your event! In this post, I covered how to make fun cake pops using simple ingredients. You learned to prepare the cake base and form, coat, and assemble the pops. I shared helpful tips for texture and melting chocolate. You also discovered variations and storage tips to keep your treats fresh. Making cake pops is a fun way to get creative in the kitchen. Enjoy your baking!](https://meltedrecipes.com/wp-content/uploads/2025/06/a53fe2a1-b1ea-4243-9bc3-9884a9201988.webp)
Looking for a fun and tasty treat? Ice cream cone cake pops are the perfect snack! These mini delights combine the joy of cake with the whimsy of ice cream …

If you’re craving a sweet treat that requires no baking, you’ve come to the right place! The Best Easy No-Bake Peanut Butter Haystacks Delight offers a quick and tasty way …

Are you craving a quick, tasty dinner that’s both simple and satisfying? My Easy Mediterranean Ground Beef Stir Fry is the answer! Packed with fresh veggies and bold flavors, this …
![For this tasty bake, you need: - 2 cups cooked chicken, shredded - 3 cups broccoli florets (fresh or frozen) These two ingredients bring great flavor and nutrition. The cooked chicken adds protein. Broccoli gives it a nice crunch and color. Next, you’ll need the following: - 10 oz fettuccine pasta - 2 cups Alfredo sauce (store-bought or homemade) Fettuccine is perfect for this dish. It holds the sauce well. The Alfredo sauce is creamy and ties everything together. Finally, gather these extra ingredients: - 1 cup shredded mozzarella cheese - 1/2 cup grated Parmesan cheese - 2 tablespoons olive oil - 2 cloves garlic, minced - 1 teaspoon Italian seasoning - Salt and pepper to taste - Fresh parsley, chopped (for garnish) The cheeses add richness. Olive oil and garlic boost the flavor. Italian seasoning gives a nice touch. Salt and pepper help balance everything. Don't forget the parsley for a fresh finish! For the full recipe, check out the details above. Start by shredding the cooked chicken. You can use store-bought rotisserie chicken for ease. Next, prep the broccoli. If using fresh broccoli, cut the florets into bite-sized pieces. If using frozen, just thaw them. In a large mixing bowl, combine the shredded chicken, broccoli florets, and cooked fettuccine pasta. Pour in the Alfredo sauce and stir gently. Make sure every piece gets coated well. Boil a big pot of salted water. Add the fettuccine pasta and cook according to the instructions on the package. You want it to be al dente, meaning it should still have a little bite. After cooking, drain the pasta and set it aside. This step is key to avoid mushy pasta later. Now it’s time to put everything together. Heat olive oil in a skillet over medium heat. Add minced garlic and sauté for about one minute. Stir it often, so it doesn’t burn. Mix this garlic into your chicken and broccoli mixture. Add Italian seasoning, salt, and pepper, then stir well. Pour this mixture into a greased 9x13 inch baking dish. Spread it out evenly. Top it with shredded mozzarella and grated Parmesan cheese. Put the dish in a preheated oven at 375°F (190°C). Bake for 25-30 minutes, or until the cheese is bubbly and golden. Once it’s done, let it cool for a few minutes, then garnish with chopped parsley. This adds a nice touch before serving. For the complete recipe, check out the [Full Recipe]. To get the best pasta, cook it al dente. This means it should be firm but not hard. Follow the package directions closely. Taste a piece before draining it. If it feels slightly firm, it’s ready. Drain it quickly and rinse with cool water to stop the cooking process. This helps keep the pasta from getting mushy in the bake. Always use fresh ingredients when possible. Fresh broccoli adds a nice crunch and bright color. You can also use fresh garlic instead of jarred. It gives a stronger taste. If you have fresh parsley, chop it finely for garnish. Fresh herbs brighten up the dish. Using fresh ingredients makes every bite more delicious. For the best cheese melt, use a mix of mozzarella and Parmesan. Mozzarella gets gooey, while Parmesan adds sharp flavor. Spread the cheese evenly across the top. This ensures every bite is cheesy. Bake it until the cheese is bubbling and golden brown. If it browns too fast, cover it loosely with foil. This keeps it from burning while the inside cooks through. {{image_4}} You can switch out chicken for other proteins. Try turkey for a leaner choice. Shrimp also works well; just cook it until pink. If you like beef, use shredded roast. Each option keeps the dish tasty and fun. To make this bake vegetarian, skip the chicken. Add more veggies instead, like bell peppers or mushrooms. You could also use chickpeas for some protein. A mix of veggies adds color and flavor. For a gluten-free version, choose gluten-free pasta. Many brands offer great options that taste delicious. You can also make your own pasta from rice flour. Just ensure your Alfredo sauce is gluten-free too. This way, everyone can enjoy the dish! For more detailed cooking steps, check the Full Recipe. After enjoying your Irresistible Chicken and Broccoli Alfredo Bake, let it cool first. Place any leftovers in an airtight container. Store it in the fridge for up to three days. Make sure to keep it covered to prevent it from drying out. If you want to enjoy it later, consider freezing. To reheat, preheat your oven to 350°F (175°C). Place the leftovers in an oven-safe dish. Cover it with foil to keep moisture in. Bake for about 20 minutes or until heated through. You can also microwave it in a bowl. Heat in short bursts, stirring in between, until warm. If you want to freeze your Chicken and Broccoli Alfredo Bake, do so before baking it. Prepare the dish in a freezer-safe container. Cover it tightly with plastic wrap and foil. It stays fresh for up to three months. When ready to cook, thaw it in the fridge overnight. Then, bake it as directed in the Full Recipe. This way, you can enjoy a quick meal anytime! Yes, you can use homemade Alfredo sauce. It adds a fresh taste to your dish. Making it at home is easy and fun. Just mix butter, cream, and Parmesan cheese. You can also add garlic for extra flavor. This sauce can make your Chicken and Broccoli Alfredo Bake even more special. Great sides to serve include: - Garlic bread - Simple green salad - Steamed vegetables - Roasted potatoes These sides complement the creamy pasta well. They add freshness and crunch. A green salad can balance the richness of the bake. To make it spicier, add these ingredients: - Red pepper flakes - Hot sauce - Diced jalapeños Mix these into the chicken and broccoli before baking. Start with a small amount and taste as you go. This way, you can find the perfect heat level. Spice can bring out new flavors in your dish! This dish combines chicken, broccoli, pasta, and sauce to create a tasty meal. You learned how to prepare the ingredients, cook them, and make it all come together. Remember to use fresh ingredients for great taste and perfect your pasta texture. With simple swaps, anyone can enjoy this recipe. Store leftovers properly for tasty meals later. Now, you can impress friends and family with this easy bake. Enjoy making your delicious meal!](https://meltedrecipes.com/wp-content/uploads/2025/06/70b3fbb0-706f-4454-8af6-01deb7bad5c9.webp)
Craving a cozy dinner that is both delicious and easy? Try my Irresistible Chicken and Broccoli Alfredo Bake! This dish blends tender chicken, fresh broccoli, and creamy Alfredo sauce over …
![- 12 ounces cheese tortellini - 8 ounces ribeye steak, thinly sliced - 1 cup provolone cheese, shredded - 1 medium onion, thinly sliced - 1 green bell pepper, thinly sliced - 2 cloves garlic, minced - 1 tablespoon olive oil - 1 tablespoon Worcestershire sauce - Salt and pepper to taste - Fresh parsley, finely chopped The key to this dish is the balance of flavors and textures. First, choose high-quality cheese tortellini. Fresh tortellini adds a wonderful bite and helps soak up the sauce. Ribeye steak brings rich flavor and tenderness. Slice it thin to ensure quick cooking and a melt-in-your-mouth experience. For the sauce, provolone cheese is essential. It melts beautifully and gives a creamy texture. Pair it with sautéed onions and bell peppers for sweetness and a hint of crunch. Garlic adds a punch of flavor, while Worcestershire sauce enhances the savory notes. Finally, fresh parsley brings color and brightness to the dish. It’s a simple touch that makes a big difference. You can find the complete recipe for Cheesesteak Tortellini in Rich Provolone Sauce [Full Recipe]. Enjoy crafting this delightful meal! To start, bring a large pot of salted water to a boil. Add the cheese tortellini and cook until al dente, which means they should be firm to the bite. This texture is key because it keeps the tortellini from getting mushy in the sauce. After cooking, drain the tortellini but don’t rinse them. Rinsing removes the starch that helps the sauce stick. Next, heat a spacious skillet over medium-high heat and add olive oil. When the oil is hot, add your thinly sliced ribeye steak. Season it well with salt and pepper. Sear the steak for about 3 to 4 minutes. It should be browned but still tender. Once cooked, remove the steak from the skillet and place it on a plate. This step is important to keep the steak juicy. In the same skillet, toss in the sliced onion and green bell pepper. Cook these for about 5 to 6 minutes until they are soft and golden. Stir often to ensure they cook evenly. Then, add the minced garlic and sauté for just 1 more minute. This step releases a wonderful aroma that fills your kitchen and enhances the dish. Lower the heat to medium and pour in the heavy cream over the sautéed vegetables. Mix well, allowing it to gently simmer. The cream creates a rich base for our sauce. Gradually sprinkle in the shredded provolone cheese and Worcestershire sauce. Keep stirring until the cheese melts completely. This creates a smooth, creamy sauce that coats everything beautifully. Now it’s time to combine everything. Add the cooked ribeye steak back into the skillet, along with the drained tortellini. Gently fold the tortellini and steak into the rich provolone sauce. Make sure everything is well-coated. Taste your dish and adjust the seasoning with more salt or pepper if needed. For a great presentation, serve the dish in shallow bowls. This shows off the creamy sauce and vibrant colors. Garnish with freshly chopped parsley for a burst of color and freshness. I recommend pairing it with garlic bread, perfect for dipping into any leftover sauce. Enjoy your meal! For the complete recipe, check [Full Recipe]. To bring out the best flavors in your cheesesteak tortellini, use fresh herbs. I recommend: - Parsley: It adds a fresh touch. - Thyme: This herb brings warmth and depth. - Oregano: A classic choice that pairs well with beef. For cooking techniques, always sauté your vegetables first. This step builds a rich base for your sauce. Don’t rush this part; let them caramelize slightly for extra flavor. Maintaining the right texture of tortellini is key. Cook them just until al dente. This keeps them firm and prevents them from getting mushy in the sauce. For the cream sauce, if it feels too thick, add a splash of pasta water. This helps thin it out while keeping the flavor intact. If it's too thin, let it simmer a bit longer to thicken. One common mistake is overcooking the steak. Ribeye cooks quickly, so keep an eye on it. Aim for a nice brown color while keeping it tender. Another mistake is not balancing flavors. Taste your dish as you go. If it’s too salty, add more cream. If it’s bland, a touch more Worcestershire sauce can enhance the depth. Following these tips will help you create a dish that shines. For the full recipe, check out the complete guide! {{image_4}} You can switch the ribeye steak for other meats. Try chicken or turkey for lighter options. Ground beef or pork also work well. If you want to keep it meatless, use mushrooms or tofu. These choices add their own unique flavors and textures. Provolone cheese gives a creamy taste. But you can try mozzarella for a mild flavor. Cheddar adds sharpness, while gouda brings a smoky touch. Each cheese changes the dish's taste and feel. Mix and match to find your favorite! Want to boost nutrition? Add spinach or kale for color and vitamins. Broccoli or zucchini also works great in this dish. You can play with seasonings too. Try adding Italian herbs or a pinch of red pepper flakes for warmth. Each twist makes your meal special. For the detailed recipe, check the Full Recipe. To keep your cheesesteak tortellini fresh, store it in an airtight container. Place the dish in the fridge within two hours of cooking. It stays good for about three to four days. Make sure to let it cool down before sealing. This helps prevent moisture buildup. When reheating, avoid the microwave if possible. Instead, use a skillet over low heat. This keeps the texture nice and creamy. Add a splash of cream or broth to boost the sauce's flavor. Stir gently until heated through. You can also sprinkle some extra provolone cheese on top for a richer taste. You can freeze cheesesteak tortellini for later. Just make sure it is completely cool before freezing. Divide it into portions and use freezer-safe bags. It can last for up to three months in the freezer. When you’re ready to eat, thaw it in the fridge overnight. Reheat it on the stove, following the same method for best results. Cheesesteak tortellini combines two favorites: the classic cheesesteak and cheesy pasta. It hails from Philadelphia, where the cheesesteak was born. The dish features cheese-filled tortellini tossed with ribeye steak, peppers, and a rich provolone sauce. This meal brings comfort and flavor into one bowl, making it a perfect choice for family dinners. Yes, you can prepare cheesesteak tortellini in advance. Cook the tortellini and sauce separately. Store them in the fridge for up to two days. When you’re ready to eat, heat them together in a skillet. This way, you’ll keep the flavors fresh and delicious. Pair cheesesteak tortellini with garlic bread or a fresh salad. A side of sautéed vegetables also complements the dish well. These sides add texture and balance to the rich flavors of the tortellini. Absolutely! You can substitute provolone with mozzarella, gouda, or cheddar. Each cheese will change the flavor slightly. For a sharper taste, try aged cheddar. For creaminess, mozzarella works well. Experimenting with different cheeses can make the dish unique. To make cheesesteak tortellini gluten-free, choose gluten-free tortellini. Many brands offer this option, and they taste great. Check the labels for gluten-free ingredients in the sauce too. This way, everyone can enjoy this tasty dish. For the full recipe, click here. This blog post detailed how to make a delightful cheesesteak tortellini dish, featuring key ingredients like cheese tortellini, ribeye steak, and provolone cheese. We covered step-by-step instructions for preparation, cooking, and serving. Remember, the right texture and seasoning make all the difference. Explore variations to fit your taste, and store leftovers properly to enjoy later. With these tips and tricks, you can confidently whip up this dish any time. Happy cooking; delicious meals await!](https://meltedrecipes.com/wp-content/uploads/2025/06/cd39353b-bf86-4db2-8d29-a5c6f0d0a9ad.webp)
Are you ready to elevate your pasta night? Savory Cheesesteak Tortellini in Rich Provolone Sauce combines tender ribeye steak, creamy tortellini, and gooey provolone for a warm hug in a …