Skip to content
Melted Recipes
  • Home
  • Appetizers
  • Desserts
  • Salads
  • Breakfast
  • Dinner
  • Privacy Policy
  • Contact
  • About

Chef Miles

30-Minute Moist Banana Cream Cheese Muffins Recipe

June 11, 2025 by Chef Miles
- 2 ripe bananas, thoroughly mashed - 4 oz cream cheese, brought to room temperature - 1/3 cup coconut oil, melted - 1/2 cup packed brown sugar - 1/4 cup granulated sugar The main ingredients create the base of these muffins. Ripe bananas bring natural sweetness and moisture. Cream cheese adds a rich and creamy texture, making the muffins soft. Coconut oil gives a light flavor and keeps them moist. Brown and granulated sugars balance the sweetness and enhance the muffin's flavor. - 1/2 cup chopped walnuts - 1/2 cup chocolate chips - 1/2 teaspoon ground cinnamon You can add mix-ins to change things up. Chopped walnuts add crunch and heartiness. Chocolate chips give a sweet burst of flavor. Ground cinnamon can add warmth and spice, making the muffins even more delightful. - Muffin tin - Mixing bowls - Electric mixer or whisk - Spatula Having the right tools is key to a great baking experience. A muffin tin helps shape the muffins perfectly. Mixing bowls allow you to combine ingredients easily. An electric mixer or whisk makes blending smooth and quick. A spatula helps you fold in ingredients without overmixing, which is important for keeping the muffins light. For the complete recipe, check the [Full Recipe]. - Preheat the oven to 350°F (175°C). - Prepare the muffin tin with liners or nonstick spray. - In a large bowl, combine the ripe bananas, cream cheese, brown sugar, and granulated sugar. - Blend until smooth using an electric mixer or a whisk. - In a separate bowl, whisk together the flour, baking powder, baking soda, and salt. - Gradually add the dry mix to the wet mixture, stirring carefully. - If you want, fold in chopped walnuts or chocolate chips. - Fill muffin cups about two-thirds full with batter. - Bake for 18-20 minutes in the preheated oven. - Use a toothpick to test for doneness; it should come out clean. These steps will guide you through making moist banana cream cheese muffins in just 30 minutes. For full details, check the Full Recipe. Enjoy the process of baking! To make the best muffins, avoid overmixing the batter. When you mix too much, your muffins become tough. Stir just until the dry and wet ingredients blend together. This keeps the muffins light and airy. Using ripe bananas is key for moisture. They have natural sugars that make muffins sweet and soft. Look for bananas with brown spots. These ripe bananas add flavor and moisture. Adding cinnamon can boost the taste of your muffins. Try half a teaspoon for a warm spice. You can also mix in nuts for crunch. Chopped walnuts or chocolate chips are great options. They add texture and flavor. For a fun twist, pair muffins with fruits or sauces. Fresh berries or a drizzle of honey can enhance the taste. Consider serving with a scoop of yogurt for creaminess. Presentation matters when serving your muffins. Arrange them on a colorful platter. This makes them look inviting. A sprinkle of powdered sugar on top can add a nice touch. It gives a sweet look without too much fuss. You can also add some fresh fruit on the side. This adds color and flavor. Serve your muffins warm for the best experience. For the full recipe, check out the 30-Minute Moist Banana Cream Cheese Muffins. {{image_4}} You can make a few swaps to boost health. Try these ideas: - Swap coconut oil for applesauce. Applesauce keeps muffins moist while cutting fat. - Use whole wheat flour. This adds fiber and nutrients, making muffins heartier. Change the taste with seasonal flavors. Here are two fun options: - Pumpkin spice variation for fall. Add pumpkin spice mix for a cozy, autumn treat. - Lemon zest for a fresh twist. Zest a lemon into the batter for bright flavor. Enjoy these muffins even if you avoid gluten. Here’s how: - Gluten-free flour options. Use blends made for baking, like almond or oat flour. - Ensuring no cross-contamination. Check labels and clean your tools to stay safe. Experiment with these variations to find your favorite! For the full recipe, take a look above. To keep your muffins fresh, store them at room temperature. Place them in a sealed container. This helps keep them soft and moist. You can also wrap them in plastic wrap for extra protection. If you want to store them in the refrigerator, place them in an airtight container. This will extend their freshness for a few more days. Freezing muffins is a great way to save some for later. First, let them cool completely. Then, wrap each muffin in plastic wrap. Place them in a freezer bag or container. Be sure to remove as much air as possible. This helps prevent freezer burn. To thaw, take a muffin from the freezer and leave it at room temperature for about an hour. You can also microwave it for 15-20 seconds to enjoy it warm. To keep your muffins soft when reheating, use an oven or microwave. If using the oven, preheat it to 350°F (175°C). Place muffins on a baking sheet and warm them for about 5-10 minutes. This will keep the texture nice. If you prefer the microwave, heat the muffin for 10-15 seconds. This method is quick but may make them a bit softer. Enjoy your moist banana cream cheese muffins any time! For the full recipe, check out the earlier section. Banana muffins stay fresh for 2 to 3 days at room temperature. Keep them in an airtight container to maintain moisture. If you want them to last longer, store them in the fridge for about a week. Just remember, cold muffins may lose some softness. Yes, you can! Using frozen bananas is a great option. Simply thaw them before using. To thaw, leave them in the fridge overnight or microwave them for a few seconds. Once thawed, mash them well before adding to your mix. This will keep your muffins moist and tasty. To soften cream cheese quickly, cut it into small cubes. Place the cubes in a bowl and let them sit at room temperature for about 15 to 20 minutes. If you're in a hurry, you can microwave it for 10 seconds. Just be careful not to melt it! Soft cream cheese blends better and gives your muffins a rich flavor. For the full recipe, check out the [Full Recipe]. These banana muffins mix ripe bananas and cream cheese for a moist, tasty treat. You learned about essential ingredients and tools, along with simple steps to bake them perfectly. I shared tips on flavor, presentation, and storage. You can even try healthy variations! With these ideas, you can enjoy baking muffins that both taste great and look impressive. Enjoy every bite and feel free to share with friends!

Do you love warm, moist muffins that come together in just 30 minutes? I’m excited to share my recipe for Moist Banana Cream Cheese Muffins! With ripe bananas, creamy goodness, …

Read more

Categories Desserts

Healthy Meal Prep Breakfast Bowls for Simple Mornings

June 11, 2025 by Chef Miles
For my healthy meal prep breakfast bowls, I use simple yet tasty ingredients. Here’s what you need: - 1 cup quinoa, thoroughly rinsed - 2 cups vegetable broth or water - 4 large fresh eggs - 1 cup cherry tomatoes, halved - 1 cup canned black beans, drained and rinsed - 1 ripe avocado, diced - 1 cup fresh kale, chopped into bite-sized pieces - 1 tablespoon extra virgin olive oil - 1 teaspoon garlic powder - 1 teaspoon paprika - Salt and pepper to taste - Fresh cilantro leaves, for garnish Each ingredient packs a punch of nutrition. Here’s what they bring to the table: - Quinoa: This grain is rich in protein and fiber. It helps keep you full. - Eggs: Eggs are a great source of protein and healthy fats. They support muscle health. - Cherry tomatoes: These are high in vitamins A and C. They boost your immune system. - Black beans: Packed with protein and fiber, black beans help regulate digestion. - Avocado: This fruit provides healthy fats and potassium. It’s great for heart health. - Kale: Kale is loaded with vitamins K, A, and C. It has strong antioxidants. - Olive oil: Rich in healthy fats, olive oil supports heart health too. - Garlic powder: This adds flavor and has many health benefits, like boosting immunity. - Paprika: It adds a smoky taste and is high in antioxidants. - Cilantro: This herb adds freshness and may help detoxify the body. Choosing fresh produce makes your breakfast bowls even better. Here are some tips: - Quinoa: Look for grains that are clean and dry. Avoid any with a musty smell. - Tomatoes: Choose firm, bright tomatoes. They should feel slightly soft when you press them. - Avocado: Pick avocados that yield slightly when pressed. They should not be too hard or mushy. - Kale: Select kale with deep green leaves. Avoid any yellow or wilting leaves for freshness. - Cilantro: Fresh cilantro should be bright green with no brown spots. Smell it for freshness. Use these tips to gather fresh ingredients for your nourishing meal prep breakfast bowls. Enjoy your cooking! Start by rinsing 1 cup of quinoa under cold water. This step removes any bitter taste. In a medium pot, bring 2 cups of vegetable broth or water to a boil. Once boiling, add the rinsed quinoa. Reduce the heat to low and cover the pot. Let it simmer for about 15 minutes. After that, the quinoa should be fluffy, and the liquid will be absorbed. Remove from heat and let it cool a bit. While your quinoa cooks, preheat your oven to 375°F (190°C). Line a baking sheet with parchment paper. Spread 1 cup of halved cherry tomatoes evenly on the sheet. Drizzle 1 tablespoon of extra virgin olive oil over them. Sprinkle with 1 teaspoon of garlic powder, 1 teaspoon of paprika, salt, and pepper to taste. Toss gently to coat the tomatoes. Roast them in the oven for 15 minutes. They should be soft and slightly caramelized. In a large skillet, heat a little olive oil over medium heat. Add 1 cup of chopped kale. Sauté for about 3-5 minutes until the kale is tender and wilted. Season with salt and pepper, then set aside. For the eggs, fill a separate saucepan with water and bring it to a gentle simmer. Crack 4 large eggs into small bowls. Carefully slide the eggs into the simmering water, one at a time. Poach for 3-4 minutes. The whites should be set, and the yolks stay runny. Use a slotted spoon to lift them out and place them on a plate. To assemble your bowls, divide the cooked quinoa among four meal prep containers. Layer each bowl with the sautéed kale. Next, add the black beans, roasted cherry tomatoes, and a poached egg. Top with diced avocado. Finally, garnish each bowl with fresh cilantro leaves. You can add a sprinkle of salt and pepper for extra flavor. This meal prep is not only easy but also tasty! For the full recipe, check out the Nourishing Meal Prep Breakfast Bowls. To make your breakfast bowls quick and easy, planning is key. Here are some smart techniques for meal prep: - Cook in bulk: Make a larger batch of quinoa at once. Store it in the fridge for up to five days. - Use one pan: Roast tomatoes and sauté kale on the same baking sheet. This saves time and helps with cleanup. - Chop ahead: Dice your avocado and chop kale the night before. This makes morning assembly quick. - Portion wisely: Use clear containers to divide your meals. This way, you can easily grab one on busy mornings. Poached eggs can elevate your breakfast bowls. Here’s how to get them just right: - Fresh eggs: Use the freshest eggs you can find. They hold their shape better when poached. - Gentle simmer: Keep the water at a gentle simmer, not a rolling boil. This helps the egg whites stay together. - Vinegar trick: Add a splash of vinegar to the water. It helps the egg whites firm up faster. - Timing matters: Poach the eggs for about three to four minutes. This gives you a runny yolk that’s perfect for topping. Avoid these common pitfalls for the best breakfast bowls: - Overcooking quinoa: Watch your quinoa closely. It should be fluffy, not mushy. - Skipping seasoning: Don’t forget to season your veggies. A little salt and pepper make a big difference. - Making too much: Start with a smaller batch if you're new to meal prep. You can always make more later. - Ignoring storage: Use airtight containers to keep your breakfast bowls fresh. This prevents spoilage and keeps flavors vibrant. These tips will help you create healthy meal prep breakfast bowls that are easy and delicious. For the full recipe, check back in the earlier sections! {{image_4}} You can change the protein in your breakfast bowl. Tofu is a great option. It absorbs flavors well and is rich in protein. Just cube some firm tofu and sauté it with your favorite spices. Chicken is another choice. Cooked, shredded chicken adds a nice texture. Use leftover roasted chicken for ease. You can also try beans like chickpeas or lentils for added protein. Each option offers unique flavors and fits well with the quinoa base. Feel free to mix up your vegetables. Spinach, bell peppers, or zucchini work great. You can even use frozen vegetables if you’re short on time. Each vegetable brings its own taste and nutrients. For seasonings, try adding cumin, chili powder, or even fresh herbs. Experiment with different spices to find your favorite flavor combinations. This will keep your breakfast bowls fresh and exciting. To make your breakfast bowl vegan, skip the eggs. Instead, add more avocado or some vegan cheese. You can also use chickpea flour to create a scramble. This will give you a similar texture and flavor. If you want it gluten-free, ensure your quinoa is certified gluten-free. Most quinoa is naturally gluten-free, but it’s always good to check. Enjoy these bowls without worry about dietary restrictions. For a complete guide on creating these nourishing meals, check the Full Recipe. I recommend using glass or BPA-free plastic containers. Glass is great because it keeps food fresh. It also resists stains and odors. Plastic containers are lightweight and easy to handle. Look for ones with tight-fitting lids to prevent spills. If possible, choose containers that are microwave-safe. This makes reheating easier. These breakfast bowls can last up to four days in the fridge. Make sure to store them in airtight containers. This helps keep the flavors fresh. Label each container with the date you made them. This way, you can track how long they have been stored. If you notice any changes in color or smell, throw them away. When reheating, try to use the microwave for quick meals. Remove the lid to let steam escape. Heat in short intervals, about 30 seconds at a time. Stir between each interval to heat evenly. If you prefer the oven, cover the bowl with foil to keep moisture. Bake at 350°F (175°C) until heated through. This method helps keep the toppings from getting soggy. To make healthy meal prep breakfast bowls, start with your base. I love using quinoa. It cooks fast and is full of protein. Rinse one cup of quinoa well. Boil it in two cups of vegetable broth or water. Cook it for 15 minutes. While that cooks, roast your veggies. I suggest halved cherry tomatoes, drizzled with olive oil and some spices. Bake them at 375°F for 15 minutes. Sauté kale in a pan with a bit of olive oil until soft. Poach fresh eggs until the whites are firm but the yolks are soft. Next, divide the quinoa into meal prep containers. Add the kale, black beans, roasted tomatoes, and a poached egg on top. Finish with diced avocado and cilantro. Check out the Full Recipe for exact steps. Yes, you can freeze breakfast bowls! Just make sure to cool them first. Place them in airtight containers. They will last up to three months in the freezer. To enjoy, thaw them overnight in the fridge. Reheat in the microwave or on the stove. This makes busy mornings easy! You can customize your breakfast bowls with different ingredients. Try adding roasted sweet potatoes, spinach, or bell peppers. For protein, use tofu or chicken. You can also mix in nuts or seeds for crunch. Experiment with different herbs, too! To make more servings, simply double or triple each ingredient. For example, use two cups of quinoa and four cups of broth for eight servings. Adjust cooking times if needed, especially for the eggs. You can prepare everything in larger batches. Store in separate containers for easy meals. This blog post covered the key ingredients for healthy breakfast bowls, their benefits, and how to choose fresh produce. I shared step-by-step cooking methods and tips for prepping meals efficiently. You learned about variations, suitable protein options, and how to store your bowls for later use. Remember, easy meals can be both tasty and healthy. Your breakfast can be fun and diverse with a bit of creativity. Enjoy your culinary journey!

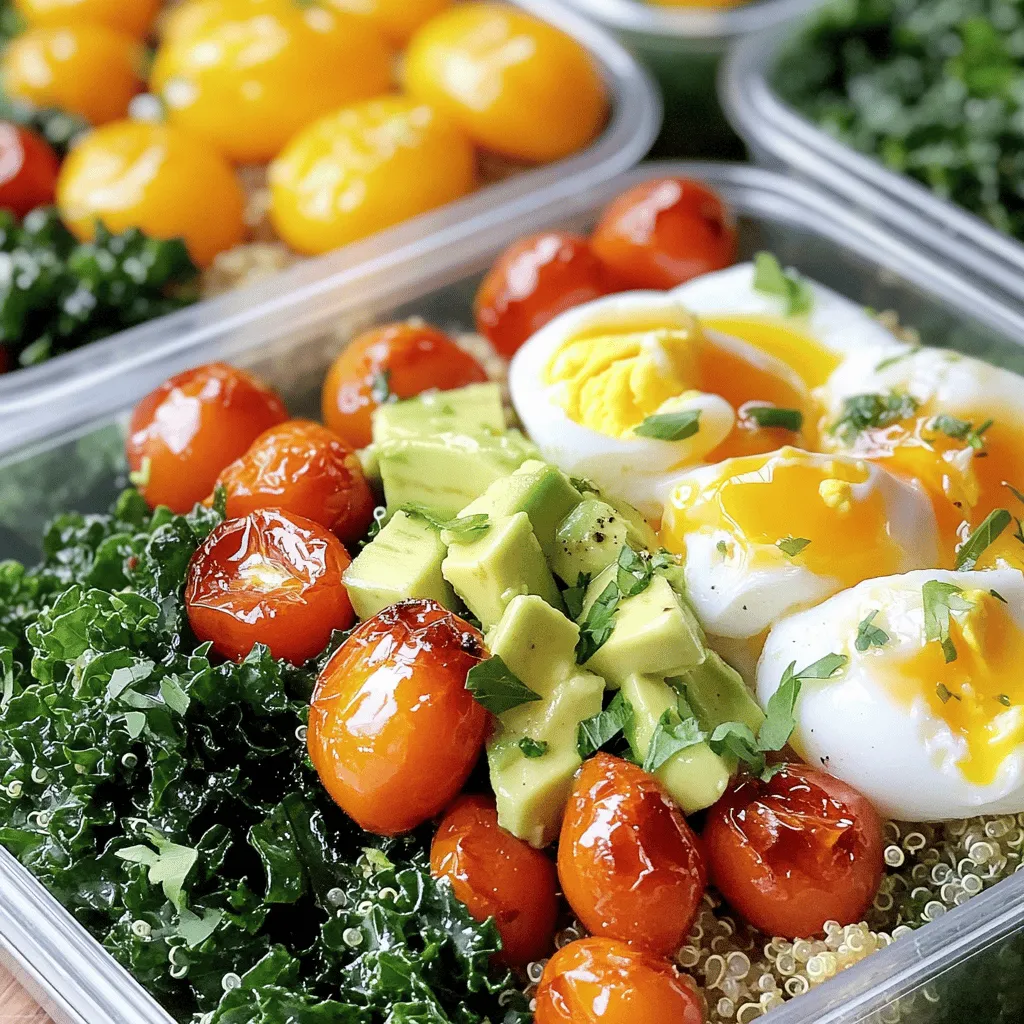
Starting your day with a healthy breakfast can be simple and fun! In this post, I’ll show you how to make delicious meal prep breakfast bowls that are perfect for …

Read more

Categories Breakfast

Super Easy Creamy Tomato Pasta Delightful Recipe

June 11, 2025 by Chef Miles
- Pasta (300g, spaghetti or penne) - Crushed tomatoes (1 can, 400g) - Heavy cream (1 cup) - Extra-virgin olive oil (2 tablespoons) - Onion (1 medium, finely chopped) - Garlic (3 cloves, minced) - Dried oregano (1 teaspoon) - Dried basil (1 teaspoon) - Sea salt and freshly cracked black pepper to taste Gather these ingredients before you start cooking. The pasta is the star, so choose your favorite type. I love using spaghetti or penne for this dish. The crushed tomatoes create a rich base. Heavy cream adds that creamy touch we all crave. Next, we have the flavor enhancers. Extra-virgin olive oil gives a nice depth. Onions add sweetness, while garlic brings that aromatic punch. For spices, dried oregano and basil really round out the flavor. Sea salt and black pepper will help to enhance everything. This list is simple, but each item plays a key role. When combined, they create a creamy tomato delight that is sure to impress. For the full recipe, check out the details above. Start by bringing a large pot of salted water to a boil. Add 300g of pasta, like spaghetti or penne. Cook it until it is al dente, about 8-10 minutes. Al dente means it has a slight bite. Once the pasta is done, drain it but keep about 1 cup of the starchy pasta water. This water helps make the sauce creamy. Set the cooked pasta aside. In a large skillet, heat 2 tablespoons of extra-virgin olive oil over medium heat. Add 1 medium onion, finely chopped, and sauté it for 4-5 minutes until soft. Next, add 3 cloves of minced garlic and cook for 1 more minute. The garlic should smell great but not burn. Now, pour in 1 can of crushed tomatoes (400g), along with 1 teaspoon of dried oregano and 1 teaspoon of dried basil. Stir it well and let it simmer for about 10 minutes. This step helps all the flavors blend together. After simmering the sauce, reduce the heat to low. Slowly stir in 1 cup of heavy cream. Mix until the sauce looks rich and creamy. Season it with sea salt and freshly cracked black pepper. Now, gently add the cooked pasta into the skillet. Toss it to coat every piece with the sauce. If the sauce is too thick, add the reserved pasta water a bit at a time. This will help reach your desired creamy consistency. Serve your creamy tomato delight pasta warm. Don’t forget to garnish with fresh basil leaves and sprinkle some grated Parmesan cheese on top. Enjoy! To make your creamy tomato pasta even better, try adding extra spices. A pinch of red pepper flakes adds heat. Fresh herbs like parsley or thyme can brighten the dish. Fresh basil brings a burst of flavor that dried herbs can’t match. If you have fresh tomatoes, use them instead of canned for a fresh taste. Just chop them up and cook them down to make a sauce. Want to save time? Try meal prepping. Chop your onions and garlic ahead of time. You can store them in the fridge for up to three days. When cooking, use one pot for everything. Cook the pasta and sauce in the same pot to cut down on dishes. Just drain the pasta, then add the sauce right into the pot. This makes cleanup easy. When it’s time to eat, think about sides. Garlic bread pairs well with this pasta. A fresh salad adds a nice crunch. For drinks, a light white wine like Pinot Grigio works great. It balances the creaminess of the dish. Enjoy your meal with a warm smile and good company. For the full recipe, check out the link above. {{image_4}} You can make this creamy tomato pasta even better by adding protein. Grilled chicken or shrimp works great. Just cook them separately and toss them in at the end. For a vegetarian option, try chickpeas or fresh spinach. They add a nice texture and boost the nutrition. If you want to skip the cream, you have options. Cashew cream is a great choice. Just soak raw cashews in water, blend, and stir it in. You can also use coconut milk. It adds a nice flavor and keeps the dish creamy. For a gluten-free meal, choose pasta made from rice or corn. These options taste great and give a nice bite. Many brands offer gluten-free versions that cook well and hold the sauce nicely. Enjoy a delicious meal without the gluten! After enjoying your creamy tomato pasta, you might have leftovers. To store them properly, let the pasta cool to room temperature first. Then, transfer it to an airtight container. This helps keep the pasta fresh. You can store it in the fridge for up to three days. When you are ready to eat, just take it out and reheat. If you want to save your creamy tomato pasta for later, freezing is a great option. Allow the pasta to cool completely before freezing. Place it in a freezer-safe container or a resealable bag. Make sure to remove as much air as possible. Your pasta can stay fresh in the freezer for about three months. To reheat, you can use a microwave or stovetop. If using the microwave, heat it in short bursts, stirring in between. If using the stovetop, add a splash of water or more cream to keep it creamy. Heat it on low until warmed through. This way, you will keep the flavor and texture just right. For the full recipe, check out the instructions above. Making creamy tomato pasta takes about 25 minutes in total. You will spend around 5 minutes on prep and 20 minutes cooking. This quick time makes it perfect for busy evenings or last-minute meals. Yes, you can prepare creamy tomato pasta ahead of time. Cook the pasta and sauce separately. Store them in airtight containers in the fridge for up to three days. When you want to eat, just reheat the sauce. Add the pasta to the sauce, and warm it on the stove. If the sauce is too thick, add a splash of water or extra cream to loosen it up. If you want a lighter or dairy-free version, try these alternatives: - Coconut milk: It adds a creamy texture with a hint of coconut flavor. - Cashew cream: Soak cashews and blend them with water for a rich, creamy option. - Greek yogurt: This gives a tangy taste and adds protein. - Almond milk with cornstarch: Mix almond milk with cornstarch to thicken it. These substitutes will keep your pasta delicious while catering to your dietary needs. This blog post covered how to make creamy tomato pasta from start to finish. We reviewed key ingredients, including pasta, crushed tomatoes, and heavy cream. I provided step-by-step instructions to help you cook efficiently. You learned about flavor enhancements, variations, and storage tips to keep your dish fresh. As you try this recipe, remember to make it your own! Adjust spices and add proteins as you like. Enjoy cooking and savoring every bite of your delicious meal.

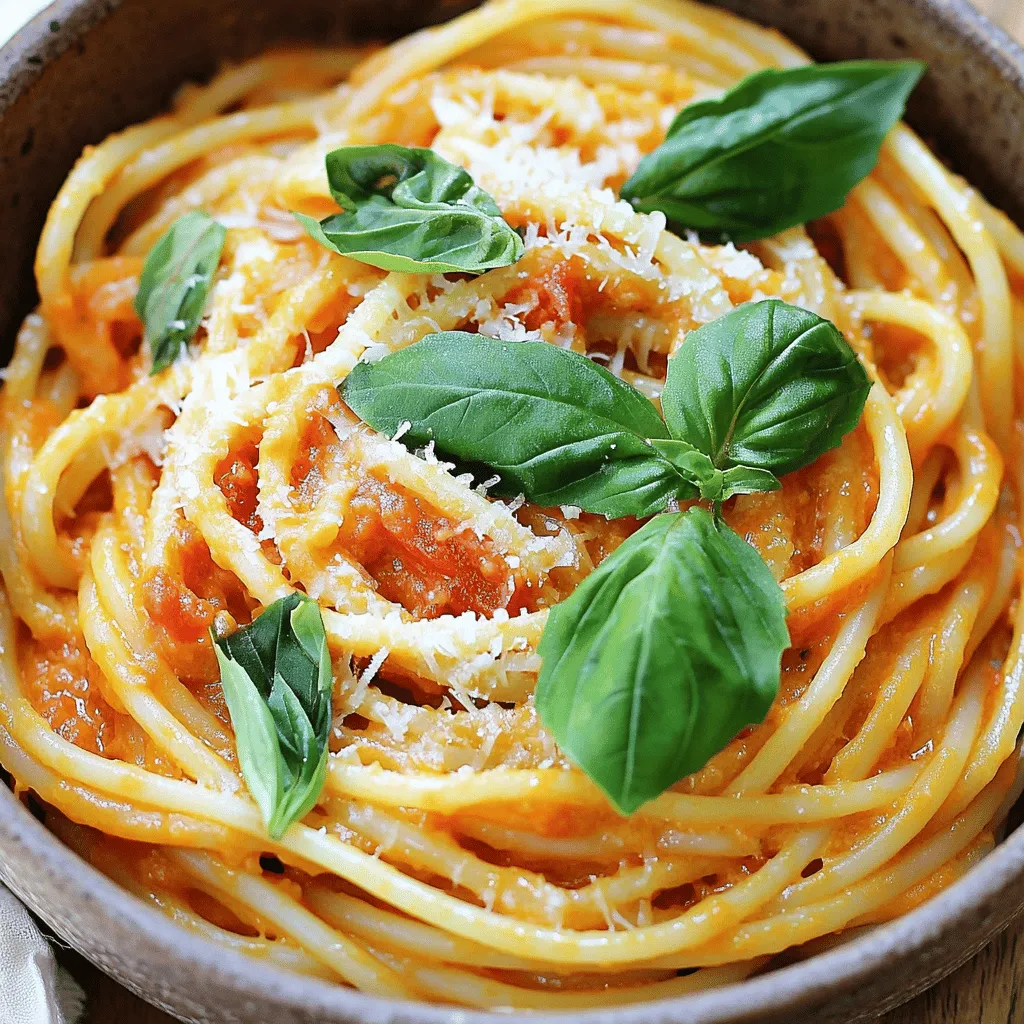
If you’re craving a simple yet delightful dish, this Super Easy Creamy Tomato Pasta is for you! With just a few ingredients, you can whip up a delicious meal that’s …

Read more

Categories Dinner

Crispy Orange Salmon Bowls Packed with Flavorful Goodness

June 11, 2025 by Chef Miles
- 2 skin-on salmon fillets - 1 cup cooked quinoa - 1 cup fresh broccoli florets - 1 bell pepper, sliced (choose any vibrant color) - Zest of 1 large orange - Juice of 1 large orange - 1 tablespoon honey - 1 teaspoon soy sauce (or tamari for a gluten-free option) - 2 tablespoons olive oil, divided - Salt and freshly cracked black pepper to taste - 1 tablespoon toasted sesame seeds - Fresh cilantro leaves, for garnish This recipe highlights the main items you need to make crispy orange salmon bowls. You’ll see how each ingredient plays a role in creating the dish's vibrant flavors and textures. The salmon fillets provide a rich, buttery taste. The quinoa adds a nutty base, while the colorful veggies bring crunch and freshness. The orange sauce is where the magic happens. Its sweet and tangy notes boost the salmon's flavor. The honey adds sweetness, and the soy sauce gives it depth. Don't forget the sprinkle of sesame seeds and cilantro for extra flavor and flair! For the full recipe, you can follow along with the preparation steps to craft this delicious dish. - Preheat your oven to 425°F (220°C). - Line a baking sheet with parchment paper. To start, I love using skin-on salmon fillets. They stay moist and add a nice crunch. Once the oven is hot, place the salmon on the prepared sheet. Brush each fillet with olive oil. Sprinkle some salt, pepper, and orange zest on top. Finally, squeeze half of the orange over the fillets for that zesty flavor. - Bake for 12-15 minutes. - Broil for extra crispness. Next, put the salmon in the oven. Bake until it is flakey and cooked through. This usually takes about 12 to 15 minutes. If you want a crispy skin, switch to broil for the last 2 minutes. Keep an eye on it to avoid burning. - Heat olive oil in a skillet. - Sauté broccoli and bell pepper for 5-7 minutes. While the salmon cooks, grab a large skillet. Heat the remaining olive oil over medium heat. Add the fresh broccoli florets and sliced bell pepper. Sauté these veggies for about 5 to 7 minutes. They should be tender yet still have a bit of crunch. Season with salt and pepper to taste. - Combine honey, soy sauce, and orange juice. - Mix until smooth. Now let’s make the orange sauce. In a small bowl, mix honey, soy sauce, and the juice from the other half of the orange. Stir it well until smooth. This sauce will give the dish a sweet and tangy kick. - Layer cooked quinoa in serving bowls. - Add sautéed vegetables and salmon fillet. - Drizzle with orange sauce. To assemble your bowls, start with a layer of cooked quinoa in each bowl. This acts as the base. Next, pile on the sautéed veggies. Place a crispy salmon fillet on top of the veggies. Drizzle the orange sauce over everything for a burst of flavor. - Top with toasted sesame seeds. - Add cilantro for a fresh finish. For the final touch, sprinkle toasted sesame seeds on top. Then, add a handful of fresh cilantro leaves. This not only looks great but adds a nice herbal note to the dish. If you want, you can check out the Full Recipe for more details! To get that crispy salmon, start by baking at 425°F. Always place the salmon skin-side down on the baking sheet. This helps keep the fish moist and allows the skin to crisp up nicely. Bake it for 12 to 15 minutes. If you want an extra crunch, broil it for the last 2 minutes. Just keep an eye on it to prevent burning. For your veggies, aim to keep them crisp. Sauté the broccoli and bell pepper over medium heat for about 5 to 7 minutes. This will cook them while still keeping that nice crunch. Season them simply with salt and pepper. You can also add garlic or ginger for a flavor boost. Use fresh ingredients whenever you can. Fresh orange juice beats bottled juice for taste. Try adding fresh herbs like cilantro or parsley for extra flavor. If you want to spice things up, consider using a pinch of red pepper flakes or a splash of sriracha in the orange sauce. These small changes can make a big difference in flavor. For the complete recipe, refer to [Full Recipe]. {{image_4}} If you want to switch proteins, chicken or tofu works great. For chicken, use boneless, skinless thighs or breasts. Cook chicken until it reaches 165°F (74°C). Tofu offers a nice vegetarian option. Press and cube it, then roast or sauté until golden. Adjust cooking times: chicken may take 20-25 minutes, while tofu needs about 10-15 minutes. You can replace quinoa with brown rice, farro, or even cauliflower rice. Brown rice adds fiber and has a nutty flavor. Farro gives a chewy texture and is packed with nutrients. Cauliflower rice is lower in carbs and adds more veggies to your bowl. Each option brings unique health benefits, making your meal even better. For an extra kick, try other citrus fruits like lime or grapefruit. Fresh herbs like basil or mint can also brighten your dish. You can change the sauce too! Mix in chili flakes for heat or add a dash of maple syrup for sweetness. These twists keep your Crispy Orange Salmon Bowls exciting and new. For the full recipe, check out the earlier section. To keep your crispy orange salmon bowls fresh, store any leftovers right away. Place the salmon and veggies in separate containers. This helps maintain the salmon's crispy texture. Use airtight containers to prevent odors and moisture. Refrigerate within two hours of cooking. Your leftovers will stay good for up to three days. To reheat without drying out the salmon, use the oven or a skillet. If using the oven, preheat it to 350°F (175°C). Place the salmon and veggies on a baking sheet. Heat for about 10 minutes. This keeps them warm and moist. If using a skillet, add a splash of water and cover it. Heat on low for about 5 minutes. This method will help keep the salmon juicy. If you want to save some bowls for later, freezing is a great option. To freeze, let the salmon and veggies cool completely. Wrap them tightly in plastic wrap, then place them in a freezer-safe bag. They can last in the freezer for up to two months. When you're ready to eat, thaw them overnight in the fridge. Reheat as described above. This way, you enjoy your meal with that crispy texture! Yes, you can use frozen salmon. Just remember to thaw it first. Place the frozen salmon in the fridge overnight. If you need it faster, submerge it in cold water for about an hour. Once thawed, pat it dry before cooking. This helps keep the skin crispy. If you want a different grain, try brown rice or farro. Both are great choices. For brown rice, cook it in water for about 30-40 minutes. Farro takes about 25-30 minutes to cook. They both add a nutty flavor and texture that pairs well with salmon. Look for a few signs. Cooked salmon should easily flake with a fork. It should also have an opaque color. If you have a food thermometer, the inside should reach 145°F (63°C). This means it's safe and ready to eat. Yes, this recipe is great for meal prep. Store the salmon and veggies in airtight containers. They can last in the fridge for about three days. When reheating, use the microwave or a skillet. This helps keep the salmon moist and flavorful. Feel free to add some sides! Steamed green beans or a fresh salad work well. You can also serve it with avocado slices or pickled vegetables. These add extra crunch and flavor to your meal. Check out the [Full Recipe] for more ideas! This blog post guides you through creating Crispy Orange Salmon Bowls. You learned about key ingredients like salmon, quinoa, and fresh veggies. I explained step-by-step instructions, tips for perfect results, and variations to suit your taste. Remember, using fresh ingredients boosts flavor. Try different grains or proteins to mix things up. Whether for a weeknight dinner or meal prep, this dish shines. Enjoy your delicious, healthy creation!

Get ready to savor a burst of flavor with my Crispy Orange Salmon Bowls! This dish combines juicy salmon, colorful veggies, and a zesty orange sauce, making it a delicious …

Read more

Categories Dinner

California Roll Sushi Bowls Flavorful and Fresh Meal

June 11, 2025 by Chef Miles
The key to a great California Roll Sushi Bowl lies in fresh, quality ingredients. Here’s what you need: - 1 cup sushi rice - 1 ¼ cups water - 2 tablespoons rice vinegar - 1 tablespoon sugar - ½ teaspoon salt These main ingredients create the base of your sushi bowl. Sushi rice is sticky and perfect for forming that classic texture. The water is essential for cooking the rice just right. The rice vinegar, sugar, and salt will season the rice, adding a tangy flavor. - 1 ripe avocado, sliced - 1 cucumber, julienned - 1 cup imitation crab meat, shredded - 2 sheets nori, cut into thin strips - 2 tablespoons sesame seeds Toppings add both color and flavor. The avocado offers creaminess. Cucumber adds crunch and freshness. Imitation crab meat gives that classic sushi taste, while nori strips provide an umami boost. Sesame seeds add a nutty finish. - Soy sauce, for drizzling - Wasabi and pickled ginger, for serving These condiments elevate the dish. Soy sauce adds a savory depth, while wasabi gives a spicy kick. Pickled ginger cleanses your palate between bites. For the full recipe, check out the [Full Recipe]. Enjoy crafting your California Roll Sushi Bowls! - Rinse sushi rice until water is clear. - Combine rice with 1 ¼ cups of water and bring to boil. - Simmer until rice is tender, about 20 minutes. To make perfect sushi rice, start by rinsing it well. This helps remove excess starch. You want the water to run clear. Once rinsed, add the rice to a pot with water. Bring it to a gentle boil. Then, reduce the heat and cover the pot. Let it cook until all the water is absorbed. This step is key to fluffy rice. - Whisk together rice vinegar, sugar, and salt. - Fold vinegar mixture into cooked rice. While your rice cooks, prepare the seasoning. In a bowl, mix rice vinegar, sugar, and salt. Whisk until the sugar dissolves. Once the rice is done, let it sit covered for 10 minutes. Then, transfer the rice to a mixing bowl. Gently fold the vinegar mixture into the rice. Be careful not to mash it. This seasoning gives your sushi bowls that classic flavor. - Place seasoned rice in serving bowls. - Artfully arrange toppings over the rice. - Sprinkle sesame seeds and nori strips on top. - Drizzle with soy sauce to taste. Now it's time to assemble your bowls! Start with a generous scoop of seasoned rice in each bowl. Next, add your toppings. Arrange sliced avocado, cucumber, and imitation crab meat nicely on top. This makes your bowl look inviting. Then, sprinkle sesame seeds and nori strips for extra crunch. Finally, drizzle some soy sauce on top. You can adjust the amount based on your taste. Enjoy this fresh and flavorful meal with a side of wasabi and pickled ginger for that extra zing! For the complete recipe, check out [Full Recipe]. Rinsing sushi rice is key for perfect texture. Start by washing the rice under cold water. Keep rinsing until the water runs clear. This removes excess starch. It helps the rice become fluffy, not sticky. After rinsing, drain the rice well. To achieve the right texture, use the right water ratio. For one cup of rice, use 1 ¼ cups of water. Bring the mixture to a boil, then lower the heat. Cover with a lid and let it simmer for about 20 minutes. The rice should be tender and fluffy when done. Get creative with toppings for your sushi bowls. Besides avocado and cucumber, you can add shredded carrots or sliced radishes. Consider using crab, shrimp, or even tofu for a protein boost. For crunch, sprinkle on some crushed almonds or crispy onions. Pair your sushi bowls with refreshing side dishes. Miso soup or seaweed salad works well. You can also serve edamame for a healthy crunch. These sides complement the flavors and add more variety. If you want vegan alternatives, try using tofu or tempeh instead of crab. You can also replace the imitation crab with marinated mushrooms for a savory taste. Adding more veggies like bell peppers or zucchini can make it even better. For gluten-free options, ensure your soy sauce is gluten-free. You can use tamari or coconut aminos as a substitute. This way, everyone can enjoy the dish without worry. Customize your bowls to fit your diet and taste! {{image_4}} To add a kick, you can use spicy mayo or sriracha. This will give your bowl a nice heat. You can also add jalapeños or spicy tuna for extra flavor. This spicy twist makes the dish exciting and fun. If you prefer a vegetarian dish, you can swap shrimp or crab with tofu. Tofu absorbs flavors well, making it a great choice. You can also add more veggies, like carrots or bell peppers. These will add color and crunch to your bowl. Try using different bases like quinoa or brown rice. This gives you a nutty flavor and adds more fiber. You can also serve it as a sushi salad. Just mix all the ingredients in a bowl, and you have a fresh and tasty meal. For the complete recipe, check out the Full Recipe. After making California Roll Sushi Bowls, you want to store them right. Keep the rice and toppings separate. This way, the rice stays fresh and does not get soggy. Use airtight containers for each part. Store the sushi rice in one container and the toppings in another. They will remain tasty for up to three days in the fridge. To maintain the best flavor, avoid mixing the toppings into the rice. You can reheat the rice in a microwave. Just add a splash of water to keep it moist. For toppings, use them cold or at room temperature. This keeps the flavors and textures vibrant. Can you freeze sushi rice? Yes, you can! Freezing sushi rice is easy. Allow the rice to cool before you freeze it. Place it in an airtight container, and it can last for up to a month. When you are ready to eat, thaw it overnight in the fridge. To reheat, add a splash of water and microwave until warm. The rice may lose some texture, but it will still taste good. You can freeze toppings, too, but avoid freezing avocado and cucumber. They do not hold up well in the freezer. Stick with crab meat and nori if you want to freeze extra toppings. A California roll is a type of sushi. It is made with rice, seaweed, and fillings. The main fillings are imitation crab, avocado, and cucumber. It is often rolled inside out, so the rice is on the outside. This roll is a great way to enjoy sushi for those new to it. No, you should not use regular rice. Sushi rice is sticky and short-grain. This helps the rice hold together in rolls. Regular rice is long-grain and does not stick well. The texture of sushi rice is key for sushi bowls. For best results, always choose sushi rice. You can store California Roll Sushi Bowls in the fridge for up to two days. Keep the rice and toppings in separate containers. This helps maintain the rice's texture and the freshness of the toppings. Before eating, check for any signs of spoilage. Always enjoy your sushi bowls fresh for the best taste. In this article, we explored how to make delicious California Roll Sushi Bowls. We covered key ingredients, step-by-step instructions, and tips for perfect sushi rice. You can customize your bowls with different toppings and make them spicy or vegan. Proper storage can help keep leftovers fresh. Enjoy creating these tasty bowls at home. They are fun to make and share with friends.

Have you ever craved the bright flavors of a California roll? Now, you can enjoy them in a fun bowl! In this article, I’ll guide you through making California Roll …

Read more

Categories Dinner

Sheet Pan Chicken Chipotle Pineapple Tacos Delight

June 11, 2025 by Chef Miles
- 1.5 lbs boneless, skinless chicken thighs - 1 cup fresh pineapple - 2 tablespoons chipotle sauce - 8 small corn tortillas - Fresh cilantro for garnish - Lime wedges and avocado slices - 1 tablespoon olive oil - 1 teaspoon ground cumin - 1 teaspoon smoked paprika - 1 teaspoon garlic powder - 1 teaspoon onion powder - Salt and black pepper - Large baking sheet - Parchment paper - Mixing bowl - Aluminum foil When making Sheet Pan Chicken Chipotle Pineapple Tacos, gather your ingredients first. The chicken thighs are the star here. They cook well and stay juicy. Fresh pineapple adds a sweet twist that balances the spice from the chipotle sauce. You need a good mix of spices to bring out the flavors. Olive oil helps the spices stick to the chicken. Cumin and smoked paprika add depth. Garlic and onion powder enhance the savory notes. Don't forget salt and black pepper; they tie everything together. For equipment, you only need a few things. A large baking sheet makes cooking easy. Parchment paper helps with cleanup. A mixing bowl is where the magic happens. Lastly, aluminum foil warms the tortillas without making a mess. Make sure you have everything ready before you start. This method saves time and keeps your cooking smooth. You can find the Full Recipe to follow along. Enjoy the process! - Preheat the oven to 400°F (200°C). - In a large bowl, mix the diced chicken thighs with chipotle sauce, olive oil, ground cumin, smoked paprika, garlic powder, onion powder, salt, and black pepper. - Fold the diced pineapple into the chicken mixture. - Spread the mixture evenly on the baking sheet. - Roast in the oven for 20-25 minutes. The chicken should be cooked through and caramelized. - Warm the corn tortillas while the chicken cooks. Wrap them in aluminum foil and place in the oven for the last 5-10 minutes. - Once the chicken and pineapple are done, remove them from the oven. - Take a warm tortilla and fill it with the roasted chicken and pineapple. - Top your tacos with fresh cilantro, avocado slices, and a drizzle of lime juice. Serve right away. For the full recipe, check out the details above! To get the best flavor from chicken thighs, marinate them well. Use a bowl to mix the chicken with spices and chipotle sauce. This helps the flavors soak in. Aim for a marinating time of at least 30 minutes. If you can, let it sit in the fridge for up to two hours. This gives the chicken a deeper flavor. Roasting the chicken to perfection is key. Set your oven to 400°F (200°C) for a nice, hot roast. Ensure the chicken pieces are spread out on the sheet pan. This allows for even cooking and browning. Stir the mixture halfway through roasting. This helps cook the chicken evenly and mixes the flavors together. Toppings make tacos fun! Fresh cilantro adds a nice touch of flavor. You can also add avocado slices for creaminess. For a zesty kick, drizzle lime juice over your tacos. Try serving the tacos with extra lime wedges on the side. This allows everyone to adjust the flavor to their taste. Get creative with presentations by stacking the tacos or serving them in a fun way! {{image_4}} You can switch up the protein in this recipe. Shrimp or tofu works well. Both options add their own unique flavor. If you want a fruity twist, try using mango or peach instead of pineapple. These fruits add sweetness and a fresh taste. If you like things spicy, add more chipotle sauce. For milder tacos, reduce the sauce. You can also mix in other veggies. Peppers, onions, or corn can add extra crunch and color. Each veggie brings its own taste to your dish. For a gluten-free option, use corn tortillas. You can also try low-carb wraps. Lettuce leaves work great too as a fresh, crunchy alternative. This way, you can enjoy your tacos while sticking to your diet. To keep your taco leftovers fresh, place them in an airtight container. Make sure to cool them to room temperature before sealing. Store the container in the fridge. The tacos stay good for up to three days. If you notice any change in smell or texture, it’s best to throw them away. You can freeze the chicken and pineapple mixture for future meals. First, let it cool completely. Then, place it in a freezer-safe bag or container. Remove as much air as possible before sealing. This way, it can last for up to three months in the freezer. To reheat, thaw it overnight in the fridge. Then, warm it in a skillet over medium heat until it’s hot throughout. These tacos shine with simple side dishes. Consider serving them with a fresh salad or some black beans. They pair nicely with a zesty corn salad too. For dips, try a cool avocado crema or a spicy salsa. Both add extra flavor and excitement to your meal. You should bake the chicken thighs for 20-25 minutes. This time ensures they cook through and develop a nice caramelized look. I recommend stirring the mixture halfway for even cooking. Make sure the chicken reaches an internal temperature of 165°F to be safe. Yes, you can prepare this taco recipe ahead of time. You can marinate the chicken and pineapple mixture the night before. Keep it in the fridge. This helps the flavors meld together. Just bake when you are ready to enjoy your tacos. Leftovers can last three to four days in the fridge. These tacos pair well with a variety of side dishes. You could serve them with: - Mexican rice - Black beans - Grilled corn - Chips and salsa - A fresh green salad For drinks, try serving them with a light beer or a refreshing limeade. These choices will make your meal even more delightful. This blog post covered everything you need to make delicious chicken chipotle pineapple tacos. We discussed the key ingredients, spices, and equipment you'll need. I provided step-by-step instructions and tips on marinating and cooking. You also learned about tasty variations and how to store leftovers. In the end, these tacos are simple and fun to make. Enjoy cooking and sharing them with friends!

If you’re craving a meal that combines spice, sweetness, and ease, you’re in the right place! My Sheet Pan Chicken Chipotle Pineapple Tacos delight your taste buds with juicy chicken …

Read more

Categories Dinner

Chickpea Caesar Salad Wraps Nourishing and Tasty Meal

June 11, 2025 by Chef Miles
Chickpeas are the star of this dish. They are packed with protein and fiber. They help keep you full and satisfied. Fresh romaine lettuce adds a crisp texture and bright flavor. It is key for that classic Caesar crunch. You can also add optional toppings. Consider avocado, croutons, or even olives for extra flavor. Each topping brings its own taste and texture. You can use store-bought Caesar dressing to save time. However, making your own can add a personal touch. If you want to skip the cheese, try nutritional yeast. It gives a cheesy flavor without dairy. For spices, consider adding a pinch of smoked paprika or cayenne. These spices can elevate the taste and add a kick. Start by mixing the chickpeas, lettuce, tomatoes, and cheese in a bowl. Use a fork to crush some chickpeas. This adds creaminess to the salad. Make sure the dressing coats everything evenly. You want each bite to be flavorful. To fold your tortillas, lay one flat on a clean surface. Place the salad mixture in the center, but don't overfill it. Fold in the sides and roll it from the bottom up. This keeps your wrap secure and neat. Cut each wrap in half for a pretty presentation. Serve with lemon wedges for a zesty kick. For the full recipe, check out the sections above. To elevate your Chickpea Caesar Salad Wraps, consider these tips: - Suggested add-ins for more texture: Try adding diced cucumbers or sliced bell peppers. These will add crunch and freshness. You can also toss in some sunflower seeds for a nutty bite. - Using fresh herbs for added freshness: Chopped parsley or basil can brighten up the dish. Fresh herbs add layers of flavor that make each bite exciting. - Balancing flavors with acidity and seasoning: A squeeze of fresh lemon juice can bring out the flavors. Adjust the salt and pepper to taste. A bit of zest can make a big difference. Watch out for these common pitfalls: - Overfilling wraps: It may seem tempting to load them up, but too much filling can lead to messy wraps. Keep it simple for easier handling. - Not mashing chickpeas enough: A few mashed chickpeas create a creamy texture. Don’t skip this step; it helps bind the salad. - Using wilted lettuce or veggies: Always use fresh, crisp produce. Wilted greens can ruin the taste and look of your wraps. If you want to switch things up, consider these options: - Substituting chickpeas with other beans: You can use black beans or kidney beans. They provide a different flavor while still being healthy. - Adding grilled chicken or tofu for non-vegans: For more protein, grilled chicken or tofu works well. Just season them to match the Caesar flavor profile. - Considerations for flavor adjustment: If you change the main protein, adjust the seasoning as needed. Different beans or proteins may need a different touch. You can change the dressing to suit your taste: - Recipes for homemade versions: Making your own Caesar dressing is easy. Blend garlic, anchovies, lemon juice, and oil for a fresh taste. - Vegan dressing options to consider: For a vegan option, try blending cashews with lemon juice and nutritional yeast. This creates a creamy and tasty version. - Using yogurt or avocado as a base: Both yogurt and mashed avocado can create a rich dressing. They add creaminess without the need for mayo. For the full recipe, check out the detailed instructions above. To keep your Chickpea Caesar Salad Wraps fresh, you need to store them well. If you have leftovers, refrigerate them right away. Always aim to eat the wraps fresh for the best taste. Use airtight containers to keep the wraps intact. This helps prevent them from getting soggy. You can also wrap them in foil or plastic wrap for extra protection. Store wraps in the fridge for up to three days. After that, the flavors may fade, and the texture can change. If you want to reheat your wraps, do it carefully. The goal is to warm them without losing their great taste. The oven is the best choice for reheating. Preheat it to 350°F (175°C). Wrap your Chickpea Caesar Salad Wrap in foil and heat for about 10-15 minutes. This keeps them soft and tasty. You can also use a microwave if you’re short on time. Place the wrap on a microwave-safe plate. Heat it for about 30 seconds to 1 minute. Check to see if it’s warm enough. Remember, microwaving can make the wrap a bit soggy, so use it as a last resort. Following these tips ensures your wraps stay delicious and enjoyable! For more details on making these wraps, check the Full Recipe. {{image_4}} Each serving of Chickpea Caesar Salad Wraps has about 300 calories. You get 10 grams of protein, 12 grams of fat, and 40 grams of carbs. Chickpeas are high in fiber, which helps digestion. Romaine lettuce adds vitamins A and K. Parmesan cheese gives calcium for strong bones. This meal is not just tasty; it also fuels your body. For gluten-free options, use corn tortillas or lettuce wraps instead of whole wheat tortillas. If you want a lower-calorie version, skip the cheese or use a lighter dressing. Always check the ingredient labels for allergens. This wrap contains chickpeas, dairy, and wheat. If you or your guests have allergies, choose your ingredients wisely. These wraps are great for many diets. You can adjust the ingredients to fit your needs. Whether you’re vegan, gluten-free, or just health-conscious, you can make this dish work for you. Remember, Chickpea Caesar Salad Wraps are not just good for you; they are also fun to eat! For more details, check the Full Recipe. To make these wraps vegan, you can swap out the Parmesan cheese for a plant-based version. Nutritional yeast is a great choice for a cheesy flavor without dairy. For the dressing, look for a vegan Caesar dressing at the store, or make your own using tahini, lemon juice, and garlic. These options keep all the rich flavors while being plant-based. Yes, you can prepare Chickpea Caesar Salad Wraps in advance. To do this, mix the salad filling the night before. Store it in an airtight container in the fridge. Wrap the tortillas separately to keep them fresh. When you’re ready to eat, simply assemble your wraps. This method keeps the wraps crisp and tasty. You can serve these wraps with a variety of side dishes. A light soup, like tomato basil, pairs well. You might also enjoy a fresh fruit salad for a sweet touch. For drinks, consider iced tea or sparkling water. These options complement the flavors of the wraps nicely. Chickpea Caesar Salad Wraps are tasty and easy to make. We explored the key ingredients, from chickpeas to fresh romaine lettuce. I shared steps for mixing the salad and making secure wraps. Tips on storage and reheating help keep your wraps fresh. In conclusion, this dish is flexible and healthy. It's perfect for lunch or dinner. You can customize it to fit your taste. Getting creative with flavors will make this meal even better. Enjoy your wraps and the health benefits they bring!

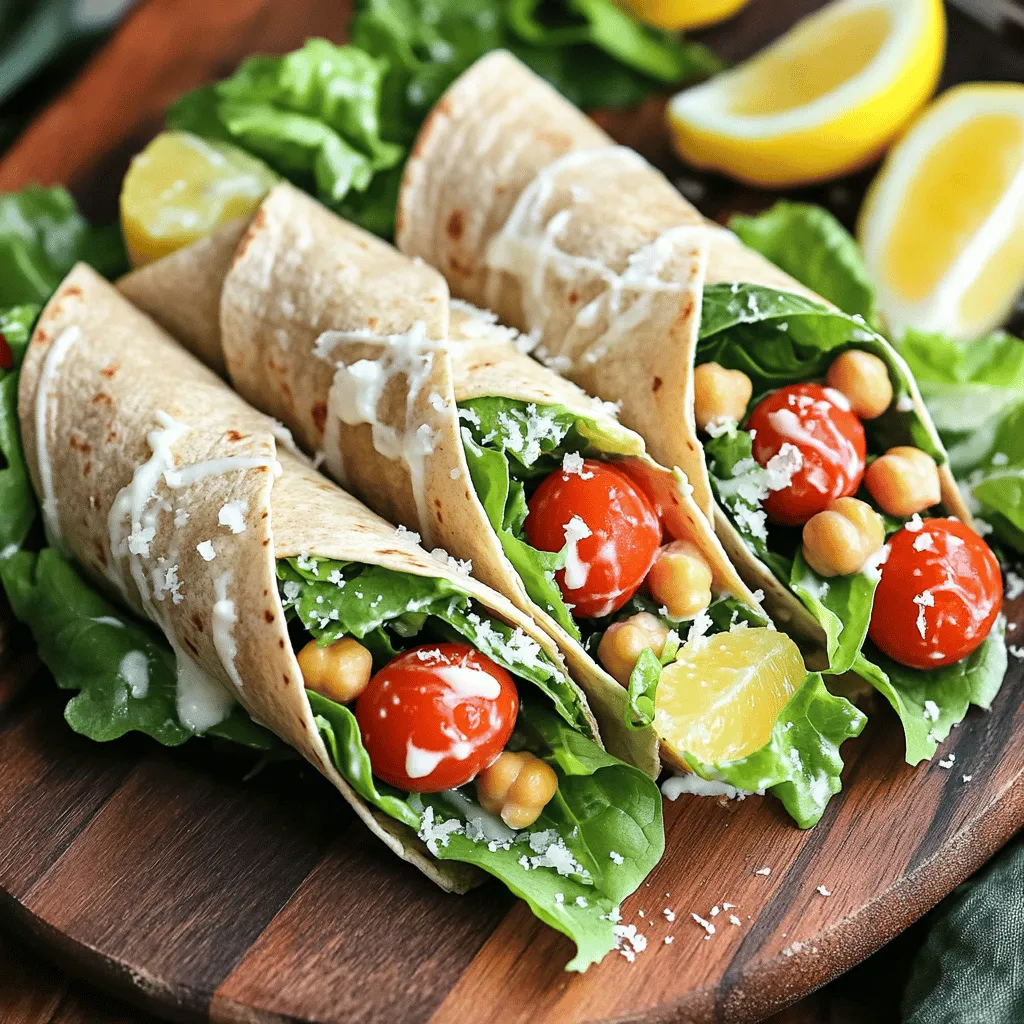
If you’re looking for a meal that’s both nourishing and tasty, look no further than Chickpea Caesar Salad Wraps! Packed with protein-rich chickpeas and fresh romaine, this wrap is a …

Read more

Categories Salads

One Pot French Onion Pasta Flavorful Comfort Meal

June 11, 2025 by Chef Miles
To create this delicious One Pot French Onion Pasta, you will need the following ingredients: - 12 ounces pasta (fusilli or penne) - 2 medium onions, thinly sliced - 3 cloves garlic, minced - 4 cups vegetable broth - 1 tablespoon balsamic vinegar - 1 teaspoon sugar - 2 tablespoons olive oil - 1 tablespoon unsalted butter - 1 teaspoon dried thyme - 1 teaspoon fresh rosemary, finely chopped - 1 cup grated Gruyère cheese - Salt and pepper to taste - Fresh parsley for garnish (optional) Each ingredient plays a key role in the overall flavor. The onions bring sweetness and depth, while garlic adds a fragrant touch. The vegetable broth serves as a savory base, making the pasta soak up all the wonderful flavors. Gruyère cheese melts beautifully, giving the dish a creamy texture. Using fresh herbs can elevate the taste even more. If you want to customize this dish, consider adding a splash of white wine or a pinch of red pepper flakes for heat. For the full recipe and step-by-step instructions, check out the Full Recipe. Enjoy cooking! - Start by heating olive oil and butter in a large pot over medium heat. - Add the thinly sliced onions and sprinkle the sugar on top. - Sauté the onions for about 15-20 minutes. Stir them often to avoid burning. - You want the onions to turn a rich golden brown. This step makes them sweet and tasty. - Once the onions are ready, add minced garlic, dried thyme, and chopped rosemary. - Cook for 2-3 minutes, stirring often. The garlic will smell great! - Now, pour in the vegetable broth and balsamic vinegar. Mix everything well. - Season it with salt and pepper to your liking. - Next, add your pasta to the pot. Make sure it is fully submerged in the broth. - Raise the heat to bring it to a boil. Once boiling, reduce the heat to a gentle simmer. - Cover the pot and let it cook for 10-12 minutes. Stir occasionally to keep it from sticking. - After the pasta is cooked, take the pot off the heat. - Stir in the grated Gruyère cheese. Mix until it melts and the sauce is creamy. - Taste the dish and adjust the seasoning if needed. More salt or pepper can enhance the flavor. - Let it sit for a few minutes to thicken before serving. For the complete recipe, check out the Full Recipe. To get sweet and tasty onions, start by slicing them thin. Use a heavy pot to heat olive oil and butter on medium heat. Add the onions and sprinkle sugar on top. Stir often to help the onions cook evenly. This takes about 15-20 minutes. Watch closely so they don't burn. If they start to brown too fast, lower the heat. Good caramelization means soft, golden onions that add depth to your dish. To make this pasta even more special, think about adding herbs. Fresh thyme and rosemary give great flavor. You can also try adding a pinch of nutmeg or a dash of red pepper flakes for heat. If you want cheese variations, Gruyère is classic, but you can use cheddar or mozzarella too. Each cheese brings a unique taste, so mix and match to find your favorite. For a beautiful dish, serve the pasta in shallow bowls. Add extra cheese on top for a lovely finish. A sprinkle of fresh parsley adds a pop of color and freshness. Pair this meal with a simple side salad or crusty bread. A light white wine, like Sauvignon Blanc, complements the flavors nicely. Enjoy your cozy meal with family or friends! {{image_4}} You can make this dish vegetarian by swapping some ingredients. Try using different vegetables like mushrooms or spinach. These add great flavor and texture. You can also add plant-based proteins like lentils or chickpeas. They make the meal filling and nutritious. This way, you keep the comfort of the dish while making it plant-based. If you want to add meat, chicken or beef works great. For chicken, cut it into small pieces and add it when you sauté the onions. For beef, use ground beef and cook it until brown. Adjust the cooking time by adding a few extra minutes. Make sure the meat is fully cooked before adding the pasta. This adds depth and richness to your dish. For a gluten-free option, choose gluten-free pasta. Brands like brown rice or chickpea pasta are great choices. You may need to adjust the cooking time, as gluten-free pasta often cooks faster. Keep an eye on it, so it doesn’t become mushy. Enjoy the same great taste without gluten! Explore these variations to make the One Pot French Onion Pasta fit your taste and needs. For the full recipe, check the recipe section above. To keep your One Pot French Onion Pasta fresh, cool it down before storing. Place the pasta in an airtight container. It will stay good in the fridge for up to three days. If you want to save space, use shallow containers. This helps cool the pasta quicker. When reheating, use the stovetop or microwave. For the stovetop, add a splash of broth or water. Heat it over low to medium heat. Stir often to keep it creamy. In the microwave, cover the dish loosely. Heat in short bursts, stirring in between. This method helps maintain the pasta's texture and flavor. You can freeze One Pot French Onion Pasta for longer storage. Allow the pasta to cool completely before freezing. Use freezer-safe containers or bags. Remove as much air as possible to prevent freezer burn. To thaw, place it in the fridge overnight. Reheat on the stovetop or microwave, adding a bit of liquid to keep it moist. You can prepare this dish up to a day early. Cook the pasta as directed in the recipe. Let it cool completely before storing it in an airtight container. When you are ready to serve, reheat it gently on the stove. Add a splash of broth to keep it creamy. Stir well to mix everything together. Yes, you can swap Gruyère for other cheeses. Good options include mozzarella, fontina, or gouda. Each cheese brings its own flavor. Just make sure the cheese melts well. This will help keep the dish creamy and delicious. This pasta is tasty on its own, but a few sides enhance it. A fresh green salad pairs nicely. You can also serve garlic bread for a crunchy side. Roasted vegetables can add more flavor and nutrients, making the meal well-rounded. To make fewer servings, simply cut the ingredients in half. Use 6 ounces of pasta instead of 12. Adjust the broth and cheese amounts too. This way, you keep the same great taste but make just what you need. You can use any large pot, such as a Dutch oven or a deep skillet. Just ensure it has enough space for the pasta and sauce. The key is to maintain even heat. This helps the pasta cook evenly and absorb all those amazing flavors from the broth. This blog post covered how to make One Pot French Onion Pasta. You learned the key ingredients, step-by-step instructions, and tips for success. You also discovered variations for different diets and storage info. Cooking should be fun and creative. This recipe allows you to explore flavors and enjoy delicious meals. I hope you try it and share it with others. Happy cooking!

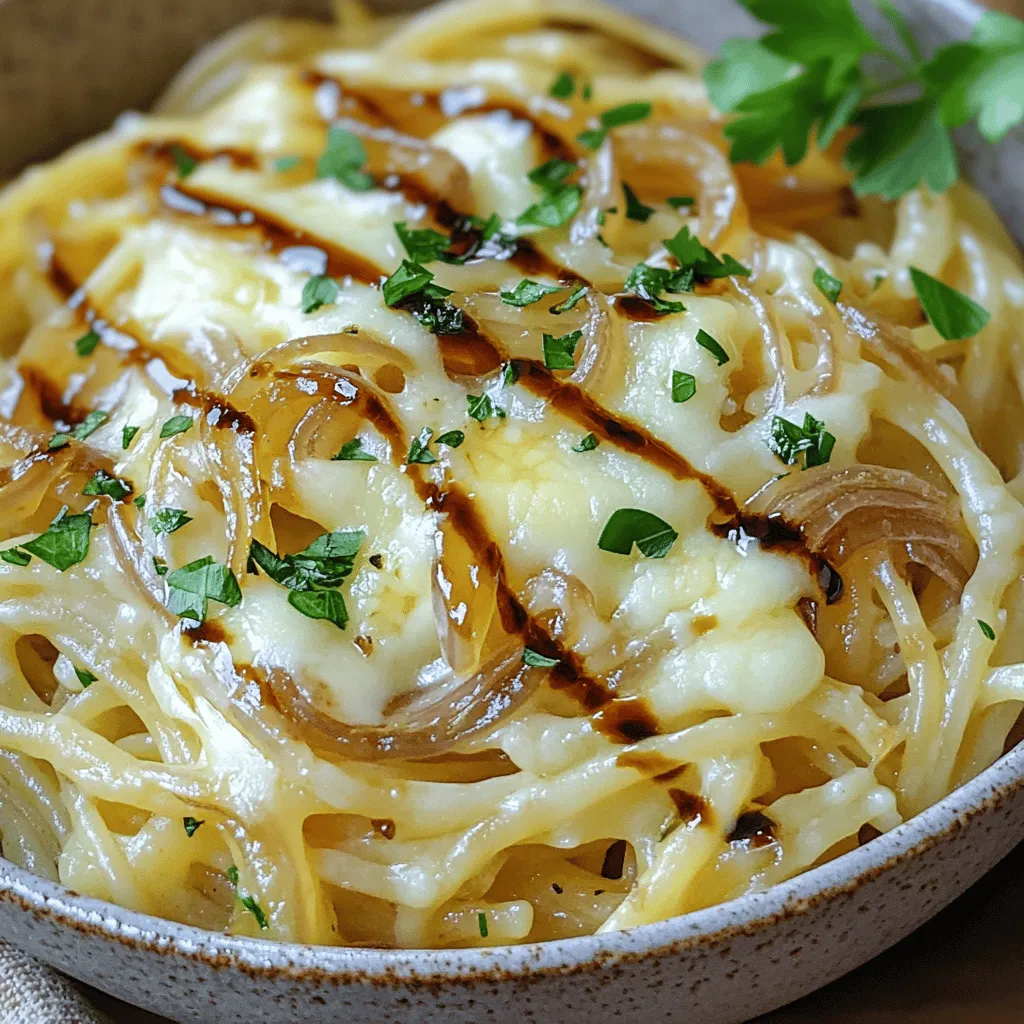
If you’re looking for a cozy meal to warm your soul, you’ve come to the right place. One Pot French Onion Pasta combines the rich flavors of caramelized onions, fresh …

Read more

Categories Dinner

10-Minute Lemon Ricotta Pasta with Spinach Delight

June 11, 2025 by Chef Miles
- 8 oz spaghetti or preferred pasta variety - 1 cup creamy ricotta cheese - 1 cup fresh spinach, coarsely chopped - 1 medium lemon, zested and juiced - 2 cloves garlic, finely minced - 2 tablespoons extra virgin olive oil - Salt and freshly ground black pepper, to taste - Fresh basil leaves for garnish - Grated Parmesan cheese for serving (optional) Gathering these ingredients is easy. I love using fresh spinach for its bright color and taste. The creamy ricotta brings a rich texture that pairs well with the lemon. You can choose any pasta you like, but spaghetti adds a nice touch. The lemon zest and juice brighten the dish, making it refreshing. You can find the full recipe above for detailed steps on how to bring everything together. When you have all these ingredients ready, you can create a tasty meal in just 10 minutes. Cooking this 10-Minute Lemon Ricotta Pasta with Spinach is simple. Let’s break it down step by step. - Bring a large pot of salted water to a boil. - Add 8 oz of spaghetti and cook according to package instructions. - Reserve 1/2 cup of pasta water before draining. - Heat 2 tablespoons of extra virgin olive oil in a skillet over medium heat. - Add 2 finely minced garlic cloves and cook until aromatic. - Introduce 1 cup of coarsely chopped spinach, sautéing until it wilts. - Reduce the heat and stir in 1 cup of creamy ricotta cheese. - Add the juice and zest of 1 medium lemon. - Mix well, adding reserved pasta water for a creamy texture. - Add the drained pasta to the skillet, mixing thoroughly. - Plate the pasta and garnish with fresh basil leaves. - Optionally, sprinkle with grated Parmesan cheese for extra flavor. For the full recipe, you can check out the complete guide to this dish. Enjoy your cooking! To get the sauce just right, use the reserved pasta water. This water holds starch, which helps thicken the sauce. Start by adding a little, then mix. Keep adding more until it feels creamy. Always taste your dish. Adjust the salt and pepper to match your taste. You want it to be perfect for you. Not all pasta has to be the same. You can try whole wheat pasta for a heartier bite. Gluten-free pasta works well too if you need it. For cheese, mix it up! Cottage cheese gives a nice texture. Goat cheese adds a tangy kick. Don’t be afraid to use what you have on hand. If you like a bit of heat, add crushed red pepper flakes. Just a pinch can change the dish. You can also play with herbs. Fresh parsley or thyme can really brighten the flavors. Let your taste buds guide you! This dish is ready for your creative touch. For the full recipe, check the details above. {{image_4}} Adding your own twist to the 10-Minute Lemon Ricotta Pasta with Spinach makes it even more fun. Here are some tasty ideas. You can make this dish even more colorful. Adding peas or cherry tomatoes brings a fresh pop of color and extra nutrients. These vegetables cook quickly and blend well with the creamy sauce. You might also try sautéed mushrooms or zucchini. They add heartiness and earthy flavors. Just cook them until soft, then mix them in. Want to make your pasta more filling? Incorporate grilled chicken or shrimp for an extra protein boost. Both options add flavor and texture. If you prefer a vegetarian choice, use chickpeas. They offer a great source of protein and blend well with the dish. Just toss them in at the end to warm through. You can adjust the creaminess of your pasta. If you want a richer sauce, add more ricotta. For a lighter dish, use less. You can also swap some ricotta for a plant-based alternative. This makes it a great vegan option. Just ensure the substitute has a nice creaminess to keep the sauce smooth. Using these variations lets you customize the dish to your taste. Feel free to get creative and make it your own! For the full recipe, check out the details above. Store any leftover pasta in an airtight container in the fridge. It will stay fresh for up to 3 days. Keep in mind that pasta may absorb the sauce over time. This can change the texture and flavor a bit. If you want to freeze it, portion the pasta into small containers. This way, you can reheat only what you need. Make sure to thaw the pasta overnight in the fridge before reheating. This helps keep the taste and texture nice. When it’s time to reheat, do it gently on the stovetop. Add a splash of water or broth to keep it moist. Avoid using the microwave because it can heat unevenly and change the texture. Enjoy your pasta just like it was fresh! The entire recipe takes approximately 10 minutes of active cooking time. This quick dish is perfect for busy days. Yes, you can omit spinach or replace it with another leafy green like kale. Both options will still taste great. Any pasta type works, such as fettuccine, penne, or gluten-free alternatives. Choose what you like best. Yes, but it’s best to store the sauce and pasta separately for optimal freshness. This keeps the pasta from getting soggy. Yes, the recipe features vegetarian ingredients, making it a great choice for vegetarian diets. Enjoy it with a side salad for balance. For more details, check the Full Recipe. This blog post covered a quick and tasty Lemon Ricotta Pasta with Spinach. We explored main ingredients, flavor boosters, and seasoning tips. You learned how to cook the pasta, sauté spinach, and blend everything into a creamy dish. I shared options for variations and substitutions to suit your taste. Remember, cooking should be fun and easy. Enjoy the process and get creative!

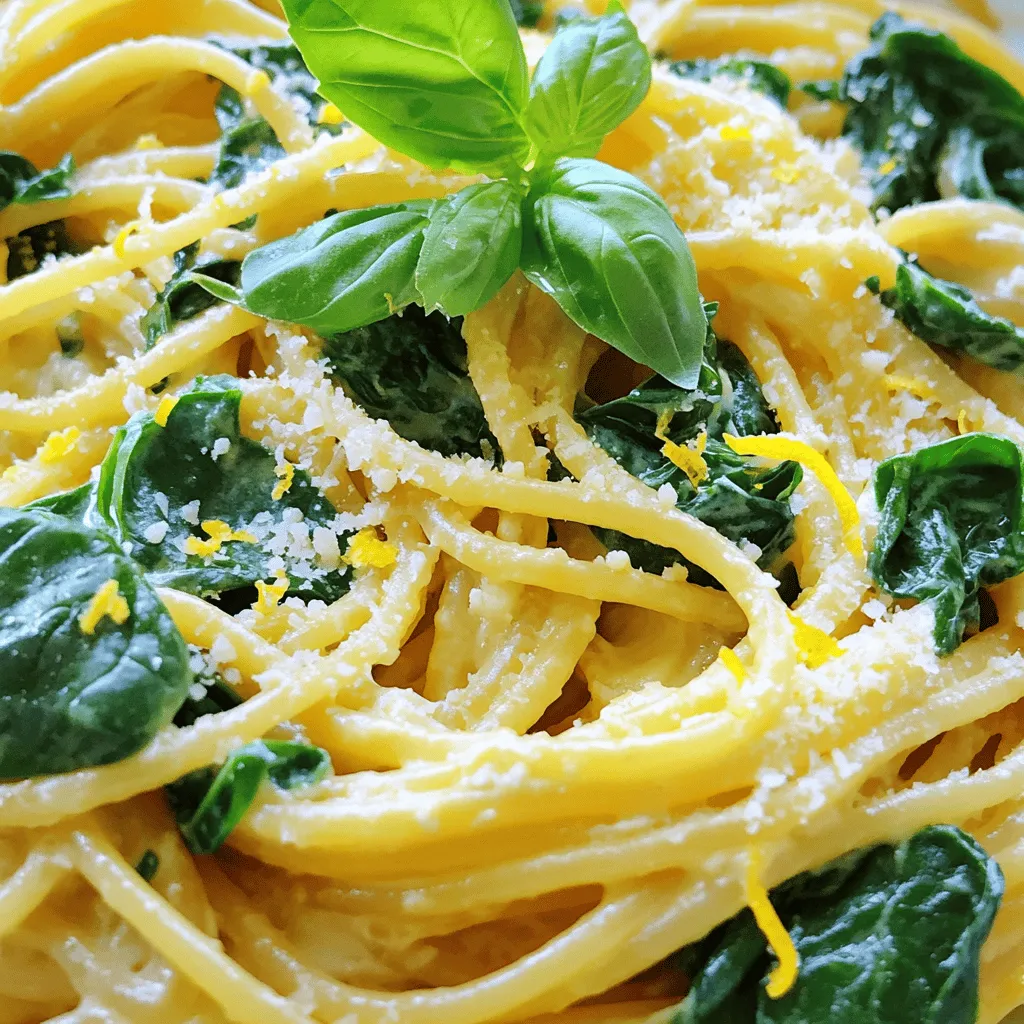
If you crave a quick and tasty meal, you’re in the right spot! This 10-Minute Lemon Ricotta Pasta with Spinach is a fresh, creamy delight that you’ll love. With just …

Read more

Categories Dinner

Easy Egg Roll in a Bowl Simple and Flavorful Dish

June 11, 2025 by Chef Miles
- 1 lb ground chicken (or turkey) - 4 cups coleslaw mix (cabbage and carrots) - 2 green onions, chopped - 2 cloves garlic, minced - 1 tablespoon fresh ginger, grated - 3 tablespoons soy sauce - 1/2 teaspoon crushed red pepper flakes - Toasted sesame seeds for garnish When I create Easy Egg Roll in a Bowl, I focus on fresh, quality ingredients. The ground chicken or turkey gives great flavor and protein. The coleslaw mix adds crunch and color. Green onions bring a fresh taste to the dish. For seasoning, garlic and ginger are key. They add depth and aroma that make this dish shine. Soy sauce ties everything together with its salty, umami flavor. If you like a little heat, crushed red pepper flakes are a perfect touch. Garnishing with toasted sesame seeds gives a nice finish. They add a nutty flavor and a bit of texture. This recipe is simple and allows for some creativity. You can mix and match ingredients to suit your taste. Check out the Full Recipe for the complete guide! Heat sesame oil in a skillet or wok over medium heat. The oil should shimmer, signaling it's ready. This oil adds rich flavor and helps prevent sticking. Using a good quality oil makes a big difference. Add 1 pound of ground chicken or turkey to the hot oil. Sauté the meat until it turns brown. This takes about 5 to 7 minutes. Use a spatula to break the meat apart as it cooks. This way, it browns evenly and cooks faster. Once the meat is cooked, add 2 cloves of minced garlic and 1 tablespoon of grated ginger. Stir for 1 to 2 minutes. This lets the flavors blend well. Then, add 4 cups of coleslaw mix to the skillet. Stir gently until the cabbage and carrots begin to wilt, which takes about 3 to 4 minutes. Next, drizzle in 3 tablespoons of soy sauce and 1 teaspoon of rice vinegar. If you like heat, add 1/2 teaspoon of crushed red pepper flakes. Mix everything well and cook for another 2 to 3 minutes. This helps all the flavors come together. Adjust the seasoning with salt and black pepper to taste. Finally, fold in 2 chopped green onions. Remove the skillet from heat and let it cool slightly before serving. You can find the Full Recipe to guide you through each step. To avoid burning garlic and ginger, keep the heat on medium. If your pan is too hot, these ingredients can cook too fast. Add them after your meat is browned. Let them cook for just one to two minutes. This way, you get the full flavor without the bitterness. If you want more heat, simply add more crushed red pepper flakes. Start with just a pinch and taste as you go. You can also add a splash of hot sauce for a different kick. Adjust the soy sauce to balance the flavors if it's too spicy for you. To enhance flavor, use garnishes like chopped green onions and toasted sesame seeds. A drizzle of extra soy sauce adds a nice touch. You can also serve it with a side of lime wedges. The zest from lime brightens each bite, making this dish even more enjoyable. For more detailed steps, check out the Full Recipe. {{image_4}} You can switch the ground chicken for other proteins. Tofu is a great choice if you want a vegetarian option. Just cut the tofu into small cubes and sauté until golden. Shrimp also works well. It cooks quickly and adds a nice flavor. Use about 1 pound of shrimp, peeled and deveined. Add it at the same time as the chicken in the skillet. This way, you'll have a tasty and protein-rich meal. Feel free to add more veggies to boost nutrition. Bell peppers add sweetness and color. You can also include snap peas for a nice crunch. Mushrooms add a savory flavor. Just chop them small and toss them in with the coleslaw mix. Other great options are zucchini or broccoli florets. Each vegetable brings its own flavor and health benefits. Experiment to find your favorite mix! Want to give your dish a twist? Try different sauces for a unique taste. Hoisin sauce adds sweetness and depth. You can mix in a tablespoon or two when you add the soy sauce. Another great option is sriracha for heat. Just a bit will spice things up! For a creamy touch, drizzle some peanut sauce on top before serving. You can customize your egg roll in a bowl to fit your cravings. To store leftovers, let the dish cool first. Then, place it in an airtight container. This keeps it fresh and tasty. You can store it in the fridge for up to three days. Make sure to cover it well so it does not dry out. To reheat, use a skillet over medium heat. Add a splash of water or broth to keep it moist. Stir often to avoid burning. Cook until it is heated through, about 5 to 7 minutes. You can also use a microwave. Heat it in short bursts, stirring in between, for even warming. Yes, you can freeze Egg Roll in a Bowl! To do this, let it cool completely. Then, pack it in a freezer-safe container. It can last for up to three months in the freezer. When you're ready to eat, thaw it in the fridge overnight. Reheat it as mentioned above for the best taste and texture. An egg roll in a bowl is a fun twist on the classic egg roll. You get all the great flavors but without the wrapper. This dish has savory ground meat and fresh vegetables. It is quick to make and easy to serve. Many love it for its crunchy texture and bright taste. Plus, it is low-carb and healthy, making it a favorite for many home cooks. Yes, you can make this dish vegetarian! Just swap the ground chicken or turkey for tofu or tempeh. You can also use mushrooms for extra flavor. Just make sure to cook the tofu well so it has a nice texture. You can add more vegetables like bell peppers or snap peas for a colorful touch. This way, you keep the dish tasty and healthy. This recipe is quick to whip up! It takes about 10 minutes to prep and 20 minutes to cook. In just 30 minutes, you can have a delicious meal ready to eat. This makes it perfect for busy weeknights when you need something fast. You can find the full recipe above for all the details. This article covered how to make Egg Roll in a Bowl, from key ingredients to storage tips. You learned about the main components, seasoning, and optional add-ins that boost flavor. I highlighted cooking techniques to enhance your dish and variations for more options. Remember, customizing your bowl makes it unique to your taste. Enjoy creating this quick, healthy meal anytime. Your kitchen can become a place for fun and easy cooking adventures.

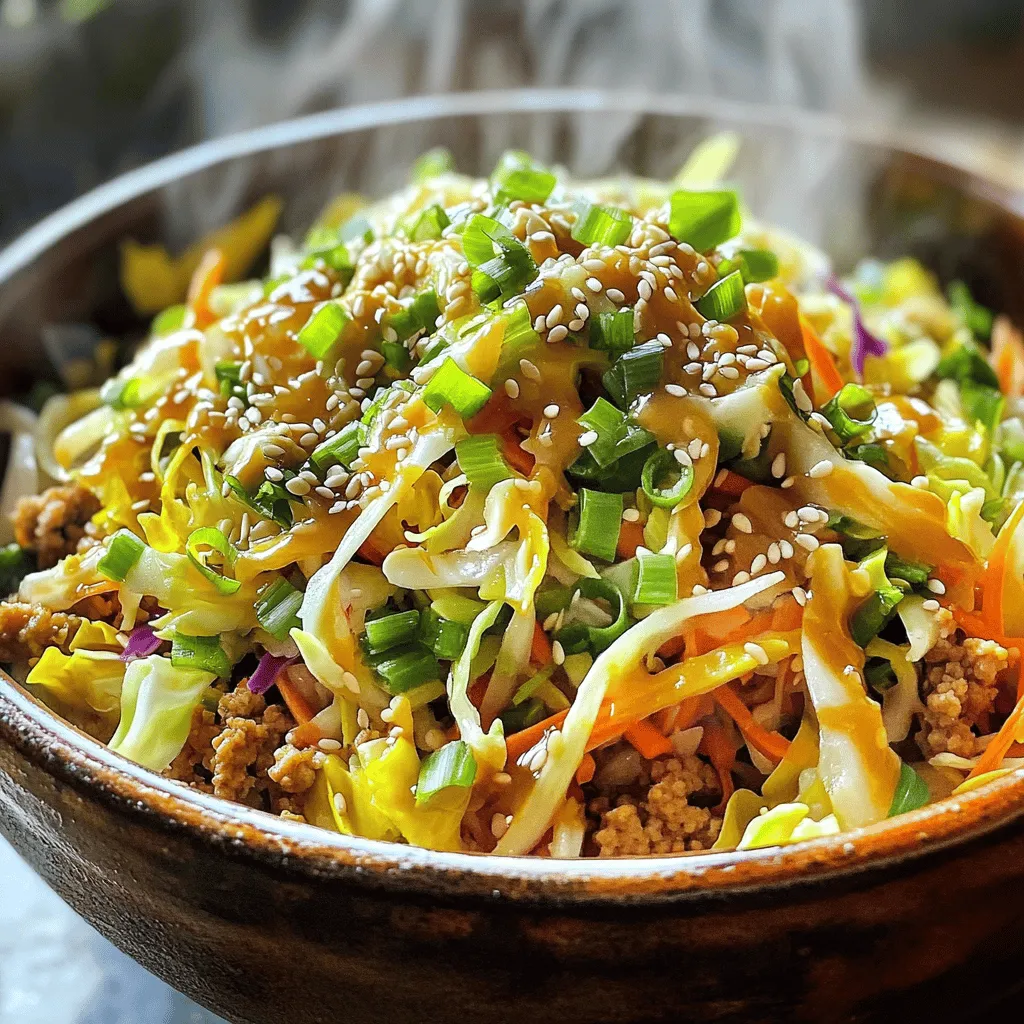
Looking for a quick and tasty meal? My Easy Egg Roll in a Bowl recipe delivers bold flavors in just minutes! This simple dish combines ground chicken and crunchy coleslaw, …

Read more

Categories Dinner
Older posts
Newer posts
← Previous Page1 … Page93 Page94 Page95 … Page112 Next →

MELTED RECIPES

where delicious ideas melt into life, from stovetop to backyard. Always warm, simple, and irresistibly satisfying. 🍳🔥🧀

PAGES

Home About Contact Privacy Policy Terms & Conditions Cookie Policy GDPR Policy Copyright Policy Disclaimer

CATEGORIES

Appetizers Desserts Salads Breakfast Dinner

Contact

  • Pinterest
  • Mail
Copyright © 2025 Melted Recipes. All rights reserved.