Skip to content
Melted Recipes
  • Home
  • Appetizers
  • Desserts
  • Salads
  • Breakfast
  • Dinner
  • Privacy Policy
  • Contact
  • About

Chef Miles

Chocolate Chip Cookie Pie Simple and Delicious Recipe

June 13, 2025 by Chef Miles
To make a tasty chocolate chip cookie pie, you need simple ingredients. Here’s what you will need: - 1 ½ cups all-purpose flour - ½ teaspoon baking soda - ½ teaspoon fine sea salt - ½ cup unsalted butter, softened - ¾ cup packed light brown sugar - ½ cup granulated sugar - 1 teaspoon pure vanilla extract - 2 large eggs, at room temperature - 1 cup semi-sweet chocolate chips - ½ cup chopped walnuts (optional) - 1 tablespoon milk (if needed) These ingredients blend together to create a wonderful pie. Each one plays a role in making the pie chewy and sweet. For example, the butter adds richness, while the sugars contribute to that lovely sweetness. If you want to add a nutty crunch, consider using walnuts. They pair well with chocolate. Make sure to have everything measured before you start. This makes the process smoother and more fun! You can find the full recipe [here](#). 1. Preheat your oven to 350°F (175°C). Prepare a 9-inch pie pan by greasing it with butter or cooking spray. This will help the pie come out easily. 2. In a medium bowl, sift together 1 ½ cups of all-purpose flour, ½ teaspoon of baking soda, and ½ teaspoon of fine sea salt. Set this dry mix aside. 3. In a large bowl, cream together ½ cup of softened unsalted butter, ¾ cup of packed light brown sugar, and ½ cup of granulated sugar. Mix until it looks light and fluffy, about 2-3 minutes. 1. Add 1 teaspoon of pure vanilla extract and 2 large eggs, one at a time. Mix well after each egg until everything is combined. 2. Gradually add the dry flour mix to the butter mixture. Stir gently until just combined. If the batter feels too thick, add 1 tablespoon of milk to reach your desired consistency. 3. Fold in 1 cup of semi-sweet chocolate chips and ½ cup of chopped walnuts, if you like a crunch. Make sure they are evenly mixed in. 4. Carefully pour the batter into the greased pie pan. Use a spatula to smooth the top. 1. Place the pie pan in the preheated oven and bake for 25-30 minutes. Look for golden edges and a firm center. 2. To check for doneness, insert a toothpick into the center. It should come out with a few moist crumbs, not wet batter. For the full recipe, check out the complete instructions and ingredient list. To make your cookie pie great, start by using room temperature butter. Cold butter does not mix well. It can lead to a lumpy batter. Next, remember not to overmix the batter. Mixing too much can make the pie tough. Finally, parchment paper is your friend. It helps you remove the pie easily from the pan. When serving, I love to add a scoop of vanilla ice cream on top. The warm pie and cold ice cream work perfectly together. Drizzle some chocolate syrup on the pie for extra sweetness. For a fancy touch, sprinkle a bit of sea salt over the top. Extra chocolate chips can also add a nice look. One mistake is over or underbaking the pie. Keep an eye on it while it bakes. If you take it out too soon, it can be gooey. If you bake it too long, it can dry out. Another mistake is using cold eggs or butter. Always use room temperature eggs and butter for the best results. {{image_4}} If you need a gluten-free option, you can still enjoy this pie. Use almond flour or a gluten-free blend instead of all-purpose flour. These alternatives work well and give the pie a nice texture. Almond flour adds a nutty flavor that pairs well with chocolate. Gluten-free blends make it easy since they often have a mix of flours. You can make this pie vegan by swapping some ingredients. For eggs, use flax eggs or unsweetened applesauce. Flax eggs are simple to make: mix one tablespoon of ground flaxseed with three tablespoons of water and let it sit for a few minutes. This gives the pie great moisture. Also, choose vegan butter and dairy-free chocolate chips for a full vegan treat. Want to change it up? There are many ways to add your favorite flavors. Try using dark or white chocolate chips for a twist. You can also add spices like cinnamon or espresso powder to enhance the taste. Just a pinch can bring a whole new layer of flavor to your pie. Enjoy experimenting to find your perfect mix. For a complete guide on making this delicious dessert, check out the Full Recipe. To keep your chocolate chip cookie pie fresh, store it in the refrigerator. Place it in an airtight container or cover it tightly with plastic wrap. This helps keep moisture in and prevents it from drying out. You can also wrap it in foil for extra protection. If you want to store it longer, freeze it. Wrap the pie tightly in plastic wrap and then in foil. This way, it stays fresh for up to three months. You can reheat your pie in the microwave or oven. For the microwave, place a slice on a plate and heat for about 10-15 seconds. This warms it quickly but may make it a bit soft. For the oven, preheat it to 350°F (175°C). Place the pie on a baking sheet and heat for about 10 minutes. This method keeps the crust crunchy and the inside warm. At room temperature, your chocolate chip cookie pie lasts about two days. Make sure to cover it to avoid drying out. In the refrigerator, it can last up to a week. This keeps it fresh and tasty. If you freeze it, remember to thaw it in the fridge overnight before serving. Enjoy your pie at its best! To make your Chocolate Chip Cookie Pie chewy, use more brown sugar than white sugar. Brown sugar has molasses, which helps add moisture. Bake the pie for a shorter time, about 25 minutes. This keeps the center soft. You can also add a little extra butter for richness. These small changes make a big difference in texture. Yes, you can make this recipe ahead of time! Prepare the batter and store it in the fridge for up to two days. When you're ready to bake, just pour it into the pie pan and bake it fresh. You can also bake the pie and let it cool. Cover it tightly and store it in the fridge. Reheat it gently before serving. This pie pairs well with many treats! A scoop of vanilla ice cream adds creaminess. You can also serve it with whipped cream or a drizzle of chocolate syrup. For drinks, try coffee or milk. These options create a delightful balance with the sweetness of the pie. Yes, you can adjust the sweetness of your pie. If you want it less sweet, reduce the sugar by a quarter cup. You could also use dark chocolate chips, which are less sweet. For a healthier option, try using coconut sugar or maple syrup. These alternatives change the flavor a bit but keep it delicious. You learned how to make a delicious Chocolate Chip Cookie Pie. We covered ingredients, steps, and tips for success. Remember to avoid common mistakes like using cold eggs. You can also try fun variations, such as gluten-free or vegan options. Store leftovers properly for freshness, and enjoy serving ideas like ice cream. With these tips, you can create a tasty treat every time. Enjoy baking and sharing this dessert with friends and family!

If you love cookies, you’ll adore this Chocolate Chip Cookie Pie! It combines the best of both worlds: a warm, gooey cookie experience packed into a pie. This simple recipe …

Read more

Categories Desserts

Chicken Alfredo Lasagna Rolls Flavorful and Simple Dish

June 13, 2025 by Chef Miles
- 9 lasagna noodles - 2 cups cooked chicken, shredded - 1 cup ricotta cheese - 1 ½ cups mozzarella cheese, shredded - 1 cup Parmesan cheese, grated - 2 cups Alfredo sauce - 1 large egg - 1 teaspoon garlic powder - 1 teaspoon Italian seasoning - Salt and pepper to taste - Fresh parsley, chopped Each ingredient plays a key role in the dish. The lasagna noodles create a great base. I use cooked chicken for a hearty filling. Shredded mozzarella and grated Parmesan add a rich, cheesy flavor. Ricotta cheese gives the filling a creamy texture. The Alfredo sauce ties it all together, making every bite flavorful. For seasoning, I stick to garlic powder and Italian seasoning. A bit of salt and pepper lets the other flavors shine. Finally, fresh parsley adds a nice touch. It makes the dish look pretty and adds a hint of freshness. You can find the full recipe at the end for more detailed steps. Enjoy cooking! - Preheat the oven to 375°F (190°C). - Cook lasagna noodles and drain them well. Start by preheating your oven. This step is key. A hot oven helps your rolls bake evenly. Next, cook your lasagna noodles. Follow the package instructions closely. When they are tender yet firm, drain them. Lay the noodles flat to avoid sticking. - Combine chicken, ricotta, mozzarella, Parmesan, egg, and seasonings. In a large bowl, mix your filling. Add the shredded chicken first. Then, scoop in the ricotta cheese. Next, add the mozzarella and Parmesan. Crack in the egg for creaminess. Sprinkle in garlic powder and Italian seasoning. Don’t forget to add salt and pepper to taste. Stir until everything blends well. The mixture should be creamy and inviting. - Spread Alfredo sauce in the baking dish. - Roll the noodles with the filling and place in the dish. - Top with remaining Alfredo sauce and cheese. Now comes the fun part—assembling! Grab your baking dish and spread a layer of Alfredo sauce. Use about one cup to coat the bottom. This helps prevent sticking. Take a lasagna noodle and spoon 2-3 tablespoons of the filling onto it. Spread it out evenly. Carefully roll the noodle up from one end to the other. Place it seam-side down in the dish. Repeat this until all noodles are filled. Once they’re all in, pour the rest of the Alfredo sauce over the top. Make sure each roll is coated. Then sprinkle the rest of the mozzarella and Parmesan cheese on top. This will give you that gooey, cheesy finish when baked. Cover the dish with foil, sprayed lightly to avoid sticking. Bake for 25 minutes. After that, take off the foil and bake for another 15 minutes. You want the cheese to be bubbly and golden. Once done, let it cool for five minutes. Garnish with fresh parsley for a pop of color. Enjoy your Chicken Alfredo Lasagna Rolls! - How to cook lasagna noodles perfectly: To cook lasagna noodles well, boil them in salted water. Stir them lightly to keep them from sticking. Cook until they are al dente, which means they should still have a slight bite. This ensures they roll nicely without tearing. - Avoiding wet noodles for rolling: After cooking, drain the noodles and lay them flat on a clean towel. This helps absorb any extra water. Wet noodles can be hard to roll and may break apart. You want dry noodles for easy handling. - Keeping leftovers fresh: Place any leftovers in an airtight container. Store them in the fridge for up to three days. Make sure the rolls are fully cooled before sealing them. This keeps them tasty and safe to eat. - Reheating tips for best flavor and texture: When reheating, use the oven for best results. Preheat to 350°F (175°C) and cover the dish with foil. This keeps the rolls moist. Heat for about 20 minutes or until warm throughout. Enjoy them just like fresh! For the complete recipe, check the Full Recipe. {{image_4}} You can change up this recipe by using different cheeses. Try using fontina or gouda for a twist. You can mix in some feta for a salty bite. Each cheese adds its own flavor and texture. For sauces, you might switch the Alfredo for a homemade béchamel. It gives a creamy base with a hint of nutmeg. If you want, use a tomato sauce for a brighter taste. You can also play with meats. Swap out chicken for turkey or even mushrooms for a vegetarian option. Each choice brings new life to this dish. If you need gluten-free options, use gluten-free lasagna noodles. Many brands offer tasty alternatives that hold up well. They make it easy to enjoy this dish without worry. For a lighter meal, opt for low-fat cheese. You can find reduced-fat ricotta and mozzarella that still melt beautifully. This way, you enjoy the same creamy goodness with fewer calories. These changes allow everyone to enjoy Chicken Alfredo Lasagna Rolls without missing out on flavor. You can store Chicken Alfredo Lasagna Rolls in the fridge for about three to five days. Make sure to place them in an airtight container. This keeps them fresh and tasty. Always let the rolls cool down to room temperature before sealing them. If you want, you can also cover them tightly with plastic wrap. This helps prevent any fridge odors from seeping in. Freezing Chicken Alfredo Lasagna Rolls is a great way to save some for later. To do this, let the rolls cool completely first. Then, wrap each roll tightly in plastic wrap. After that, place them in a freezer-safe bag or container. Label it with the date so you remember when you made them. They can stay in the freezer for up to three months. When you're ready to eat, take the rolls out of the freezer. Thaw them in the fridge overnight. If you need them sooner, you can thaw them in the microwave on the defrost setting. To reheat, place the rolls in a baking dish with a bit of Alfredo sauce. Cover with foil and heat in the oven at 350°F (175°C) for about 20 minutes. This keeps them moist and delicious. Enjoy your Chicken Alfredo Lasagna Rolls! For the complete recipe, check out the Full Recipe section. To make Chicken Alfredo Lasagna Rolls from scratch, you need to start with a rich homemade Alfredo sauce. Make it using butter, heavy cream, and freshly grated Parmesan cheese. Melt butter over low heat, then stir in cream. Gradually add the cheese, stirring until it melts. Season with salt and pepper for added flavor. This sauce will bring creaminess and depth to your rolls. Yes, you can make Chicken Alfredo Lasagna Rolls ahead of time. Prepare the rolls and place them in the baking dish. Cover with plastic wrap and store in the fridge for up to 24 hours. This way, you save time on busy nights. Just remember to take them out of the fridge about 30 minutes before baking. This helps them cook evenly. For sides that complement Chicken Alfredo Lasagna Rolls, consider a fresh garden salad. A simple green salad with a light vinaigrette adds a nice crunch. Garlic bread is also a great choice. It soaks up the delicious Alfredo sauce. You could even serve steamed vegetables like broccoli or green beans for added nutrition. In this blog post, we covered how to make Chicken Alfredo Lasagna Rolls. We discussed the main ingredients, seasoning, and detailed steps for preparing the dish. We also shared tips for cooking, storing, and even variations you can try. In conclusion, this recipe is simple and fun to make. It allows for creativity with different ingredients. Enjoy your lasagna rolls, and don't forget to share them with friends!

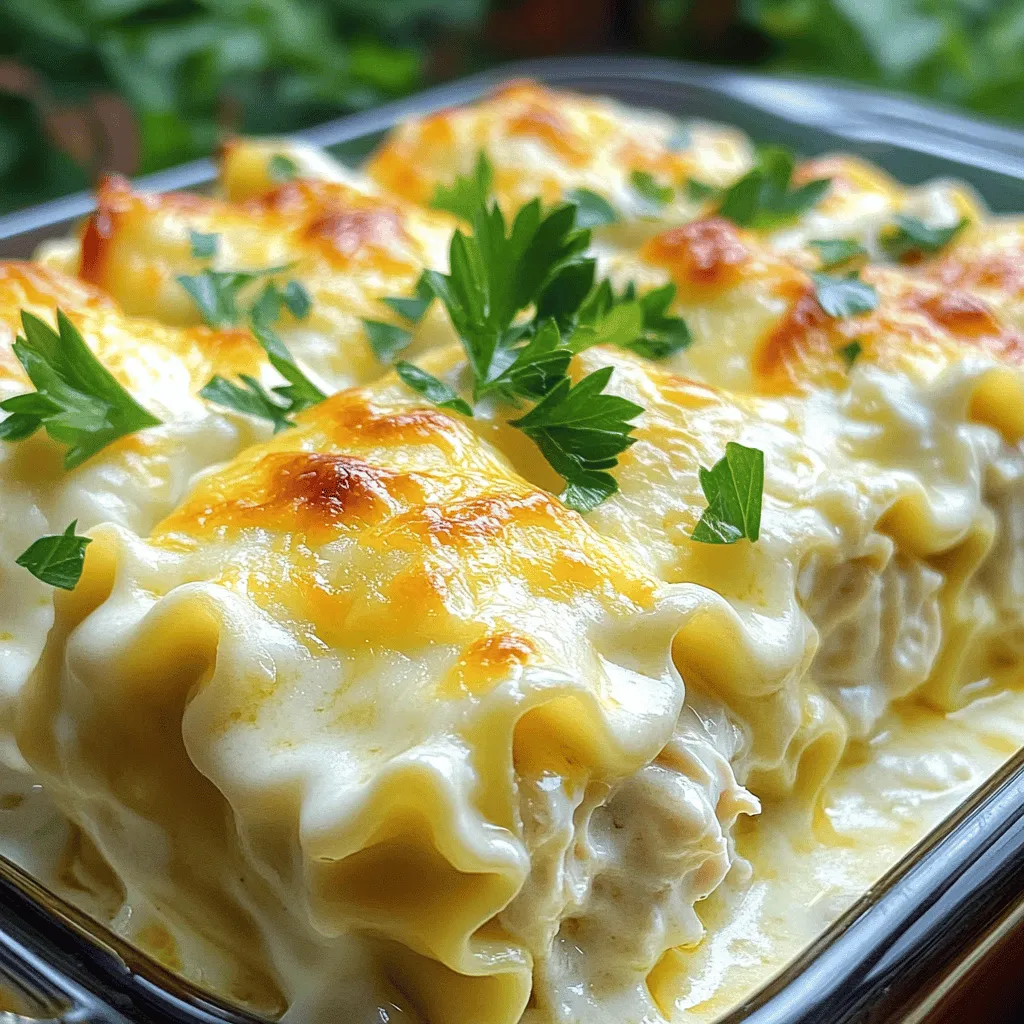
Looking for a tasty dish that’s easy to make? Chicken Alfredo Lasagna Rolls combine creamy goodness with savory chicken. This recipe is perfect for family dinners or special occasions. With …

Read more

Categories Dinner

Lemon-Dill Chicken Bowls Fresh and Flavorful Meal

June 13, 2025 by Chef Miles
To make Lemon-Dill Chicken Bowls, you need fresh and simple ingredients. Here’s what you will need: - 1 lb boneless, skinless chicken breasts - 2 tablespoons extra virgin olive oil - Zest and juice of 1 fresh lemon - 2 tablespoons fresh dill, finely chopped (or 1 tablespoon dried dill) - 2 cloves garlic, minced - 1 teaspoon kosher salt - 1/2 teaspoon freshly ground black pepper - 1 cup quinoa, thoroughly rinsed - 2 cups vegetable broth or water - 1 cucumber, diced into bite-sized pieces - 1 cup cherry tomatoes, halved - 1 ripe avocado, sliced - 1/4 cup feta cheese, crumbled (optional) - Additional fresh dill and lemon wedges for garnish These ingredients bring freshness and flavor to the bowl. Each item plays a key role in creating a balanced meal. The chicken adds protein, while quinoa provides fiber. The veggies add crunch and color. Feta gives a bit of creaminess. Don't forget to check out the Full Recipe for all steps to prepare this dish! To make the marinade, mix together olive oil, lemon zest, lemon juice, dill, garlic, salt, and pepper in a bowl. This blend adds a fresh flavor. You want to coat the chicken well. Let the chicken marinate for at least 30 minutes in the fridge. If you have time, two hours brings out the best taste. Cooking notes: Always marinate in the fridge to keep the chicken safe. Use a sealed container or cover the bowl tightly. To cook the quinoa, rinse it well under cold water. This removes the bitter coating. In a saucepan, add the rinsed quinoa and vegetable broth or water. Heat on medium-high until it boils. Reduce the heat to low, cover, and let it cook for about 15 minutes. Once all the water is absorbed, the quinoa should be fluffy and light. Timing and consistency are key. You’ll know it’s done when the grains appear to have popped open. For cooking, you need a grill pan or a skillet. Preheat it on medium heat. Take the marinated chicken and place it in the hot pan. Cook each side for 6-7 minutes. The chicken is done when the juices run clear and it reaches 165°F. Tips for perfect chicken: Let the chicken rest for a few minutes after cooking. This keeps it juicy. Start with a scoop of quinoa as your base. This is your canvas. Layer the sliced chicken on top. Then, add diced cucumber, halved cherry tomatoes, and avocado slices around the chicken. For extra flavor, sprinkle feta cheese on top. Presentation matters! Arrange everything neatly to make it look appealing. To finish, sprinkle fresh dill on each bowl. Add lemon wedges on the side for that zesty touch. You can also serve the bowls with a drizzle of olive oil for richness. These simple garnishes enhance both flavor and visual appeal, making your meal even more enjoyable. Ensuring Juiciness To keep your chicken juicy, marinate it for at least 30 minutes. The lemon juice adds moisture and flavor. Always cook the chicken on medium heat. This helps to avoid burning the outside while keeping the inside moist. Avoiding Overcooking To prevent dry chicken, use a meat thermometer. Cook the chicken until it reaches 165°F. After cooking, let it rest for a few minutes. This step allows the juices to settle back into the meat. Fluffing Techniques Once your quinoa is cooked, let it sit for five minutes. Then, use a fork to fluff it gently. This helps separate the grains and makes it light and airy. Enhancing Flavor Cook quinoa in vegetable broth instead of water. This adds depth to the flavor. You can also add a pinch of salt or a squeeze of lemon juice while cooking to boost taste. Alternative Garnishes If you want to mix it up, try using fresh herbs like parsley or chives. You can also add nuts for crunch, like toasted almonds or walnuts. Seasonal Variations In summer, add fresh corn or bell peppers for sweetness. In fall, roasted pumpkin cubes add warmth and color. Each season brings new flavors to explore! {{image_4}} Alternative Protein Options If you want to switch up the protein, try these options: - Salmon or shrimp for a seafood twist - Tofu for a plant-based choice - Turkey breast for a leaner alternative These proteins can soak up the lemon-dill flavor just like chicken does. Gluten-Free Quinoa Quinoa is a great choice for a gluten-free base. It's packed with protein and fiber. If you want something different, try: - Brown rice for a hearty option - Cauliflower rice for a low-carb swap - Millet for a nutty taste Each option works well with the dish's bright flavors. Vegan Adaptation To make this dish vegan, replace the chicken with marinated jackfruit or chickpeas. Use a vegan feta cheese for the topping. This keeps the meal fresh and plant-based. Low-Carb Alternatives For a low-carb version, skip the quinoa. Use spiralized zucchini or lettuce leaves as your base. This will keep the dish light and still full of flavor. Additional Herbs and Spices You can boost the flavor with more herbs. Try: - Chives for a mild onion taste - Parsley for a fresh kick - Basil for a sweet touch These herbs add depth and freshness to your bowls. Sauce Ideas If you want to add more zing, consider these sauces: - A yogurt sauce with mint - A spicy aioli for heat - A balsamic glaze for sweetness These sauces can elevate your lemon-dill chicken bowls and make them even more delightful. Container Recommendations For storing your Lemon-Dill Chicken Bowls, use airtight containers. Glass containers work best, as they keep the food fresh. Make sure the lid seals tightly to prevent air from getting in. Refrigeration Guidelines Place the bowls in the fridge right after you finish your meal. The cool air helps keep the food safe. Leftovers can last up to three days in the refrigerator. Always check for any signs of spoilage before eating. How to Freeze Bowls If you want to save your Lemon-Dill Chicken Bowls for later, freezing is a great option. Let the bowls cool down to room temperature first. Then, use freezer-safe containers or bags. Make sure to remove as much air as possible before sealing. Thawing Recommendations When you're ready to eat, thaw the bowls in the fridge overnight. This keeps the food safe and tasty. If you're in a hurry, you can also use the microwave to defrost, but do it carefully to avoid uneven heating. Best Methods for Reheating The best way to reheat your Lemon-Dill Chicken Bowls is in the microwave. Use a microwave-safe dish and cover it with a lid or a damp paper towel. This helps keep the moisture in. Heat in short bursts, checking often. Maintaining Flavor and Texture To keep your dish flavorful, add a splash of fresh lemon juice before reheating. This brightens up the taste. Stir the contents halfway through reheating to ensure even warmth. Enjoy your delicious meal just like the first time! To make Lemon-Dill Chicken Bowls, you need to follow a few steps. First, marinate 1 pound of chicken breasts in a mix of olive oil, lemon zest, lemon juice, dill, garlic, salt, and pepper. Let it sit for at least 30 minutes. Then, cook 1 cup of rinsed quinoa with 2 cups of vegetable broth until fluffy. Grill the marinated chicken until cooked through. Assemble the bowls with quinoa, sliced chicken, diced cucumber, cherry tomatoes, avocado, and optional feta cheese. Garnish with fresh dill and lemon wedges. For the complete recipe, check out the Full Recipe section. You can use several other grains in place of quinoa. Some great options include: - Brown rice - Farro - Barley - Couscous - Bulgur Each grain brings a unique flavor and texture to your dish. Choose one based on what you like. Yes, you can use dried dill instead of fresh. However, the flavors differ. Fresh dill has a bright, crisp taste. Dried dill is more intense and concentrated. Use about one-third of the amount—1 tablespoon of dried dill equals 2 tablespoons of fresh. Adjust based on your taste. Leftovers can last in the fridge for about 3 to 4 days. Store them in an airtight container. Always check for off smells or changes in texture before eating. If you want to keep them longer, consider freezing the bowls. In this article, we covered how to make Lemon-Dill Chicken Bowls with step-by-step guides. We looked at key ingredients, cooking methods, and ways to assemble your meal. Remember to marinate your chicken for a tasty bite. You can also customize your bowls with swaps for ingredients to fit your diet. Store your extras safely to enjoy later. With these tips, you'll make delicious, healthy meals that impress!

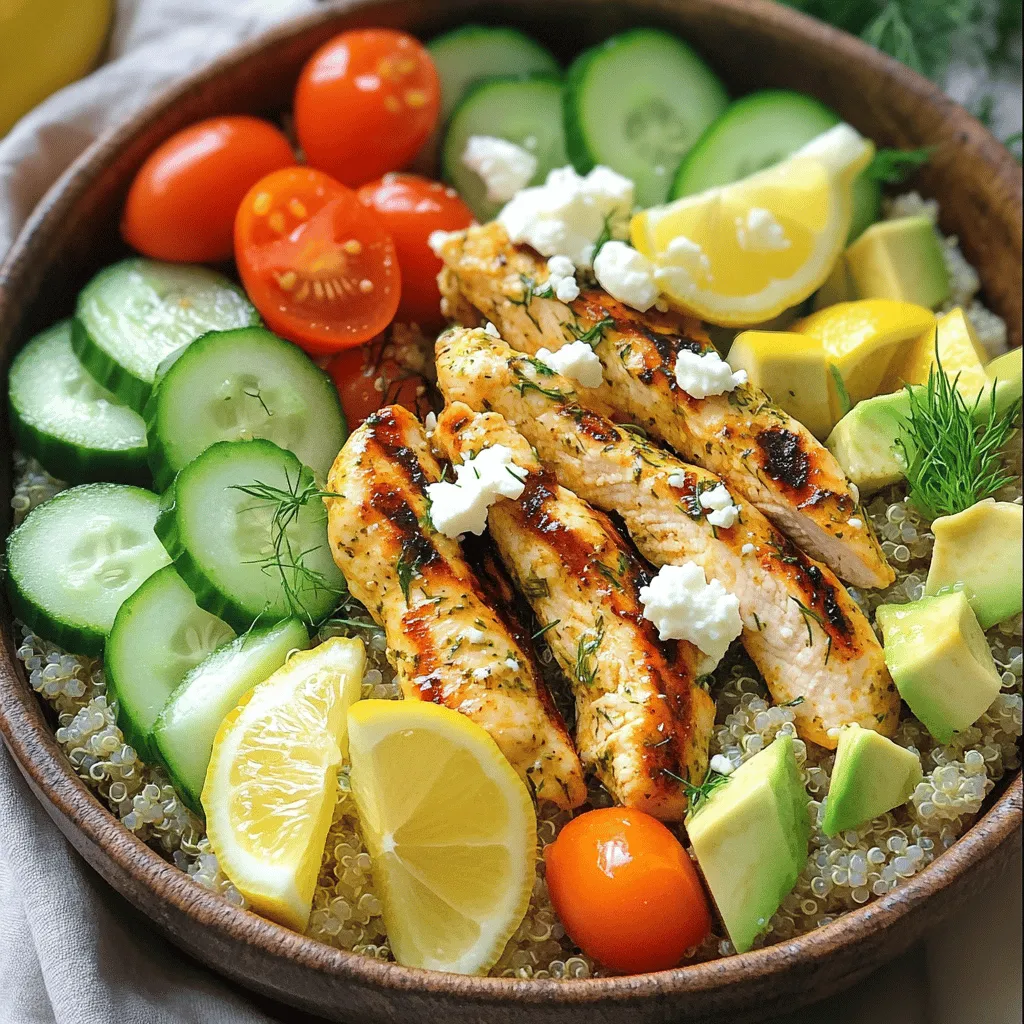
Looking for a fresh and easy meal that’s packed with flavor? Let me introduce you to Lemon-Dill Chicken Bowls. This dish combines tender chicken, fluffy quinoa, and vibrant veggies, all …

Read more

Categories Dinner

Healthy No Bake Cookies Simple and Tasty Recipe

June 13, 2025 by Chef Miles
- 1 cup rolled oats - 1/2 cup nut butter (almond, peanut, or cashew) - 1/3 cup honey or maple syrup - 1/4 cup unsweetened cocoa powder - 1/2 teaspoon pure vanilla extract - 1/4 cup unsweetened shredded coconut - 1/4 cup dark chocolate chips or cacao nibs - Pinch of fine sea salt For this recipe, I love using rolled oats. They give the cookies a hearty texture. The nut butter adds creaminess and flavor. You can choose almond, peanut, or cashew butter based on your taste. Sweetness comes from honey or maple syrup. Both options work well in these cookies. Cocoa powder adds a rich, chocolate taste without added sugar. Pure vanilla extract gives a nice aroma and taste. Don't forget the shredded coconut! It adds a fun texture and slight sweetness. Dark chocolate chips or cacao nibs add a delightful crunch. Finally, a pinch of sea salt enhances all the flavors in your cookies. You can find the full recipe above for all the details! - First, mix the dry ingredients. In a large bowl, combine 1 cup of rolled oats, 1/4 cup of unsweetened cocoa powder, and 1/4 cup of shredded coconut. Stir well until everything is blended. - Next, combine the nut butter and sweetener. In a small saucepan, heat 1/2 cup of your chosen nut butter and 1/3 cup of honey or maple syrup over low heat. Stir until warm and smooth. - After that, incorporate the wet mixture with the dry ingredients. Pour the warm nut butter mix into the bowl with the dry ingredients. Use a spatula to mix until everything is coated. - Now, scoop dough portions. With your hands, take small amounts of the dough. Aim for about 1 inch in size. - Shape the dough into cookies. Form each scoop into a round shape using your palms. - Finally, place the cookies on a parchment-lined baking sheet. Space them out to avoid sticking. - After shaping, refrigerate the cookies to firm up. Chill them for at least 30 minutes. This helps them hold their shape. - For checking firmness, gently press the cookies. They should feel set but still soft. If they are too soft, chill them longer. Now you're ready to enjoy your delicious no-bake cookies! - Low-sugar options: Use ripe bananas or unsweetened applesauce instead of honey or syrup. These choices add natural sweetness. - Gluten-free variations: Choose certified gluten-free oats. This keeps your cookies safe for those with gluten sensitivities. - Vegan alternatives: Replace honey with maple syrup or agave nectar. This switch makes your cookies fully plant-based. - Adjusting sweetness: Taste your mixture before shaping. If you prefer more sweetness, add a little extra sweetener. - Managing stickiness during shaping: If the dough sticks to your hands, wet them slightly with water. This trick helps the dough release easily. - Serving suggestions: Place cookies on a colorful plate. Pair them with fresh fruit for a bright look. - Garnishing tips for visual appeal: Dust cookies with cocoa powder or sprinkle extra coconut flakes on top. These touches make your cookies look gourmet. Explore the [Full Recipe] for more details on creating these tasty treats! {{image_4}} You can easily switch up the flavor of your no-bake cookies. Adding spices like cinnamon or nutmeg gives a warm touch. These spices create a cozy flavor that many love. You can also mix in dried fruits, such as raisins or cranberries. These fruits add natural sweetness and chewiness. They make your cookies even more delightful. If you have nut allergies, don’t worry! You can use sunbutter instead of nut butter. It gives a rich taste without nuts. Also, you can make no-added sugar versions. Use ripe bananas or applesauce as sweeteners. These options keep your cookies tasty and healthy. Get creative with seasonal flavors! For fall, try adding pumpkin spice to your batch. This gives a lovely autumn flavor. During the winter holidays, peppermint is a great choice. Just a hint of peppermint extract makes everything feel festive. These seasonal variations make your cookies fun for any time of year! Feel free to explore the full recipe to see how these variations can come together. To keep your cookies fresh, store them in airtight containers. This prevents air from making them dry. If you have a large batch, separate layers with parchment paper. This helps keep their shape. Always place the container in the fridge. This will help the cookies stay firm and tasty. These cookies last about one week in the fridge. If you want to keep them longer, freezing is a great option. They can stay fresh in the freezer for up to three months. Just wrap them in plastic wrap, then place in a freezer-safe bag. If you have leftover rolled oats or nut butter, don’t worry! You can add oats to smoothies or yogurt. They give a nice texture. For nut butter, use it in sandwiches or on toast. You can also mix it into oatmeal for extra flavor and protein. To make these cookies, you first need to mix the dry ingredients. In a large bowl, combine 1 cup of rolled oats, 1/4 cup of unsweetened cocoa powder, and 1/4 cup of unsweetened shredded coconut. Stir until mixed well. Then, in a small saucepan over low heat, combine 1/2 cup of nut butter and 1/3 cup of honey or maple syrup. Stir until smooth. Remove it from the heat and add 1/2 teaspoon of vanilla extract and a pinch of sea salt. Pour this warm mixture over the dry ingredients and mix well. Finally, fold in 1/4 cup of dark chocolate chips or cacao nibs. Shape the mixture into cookies and chill them for at least 30 minutes. Yes, you can replace honey with a sugar substitute. Maple syrup works well too. If you prefer a low-calorie option, use a sugar-free syrup or sweetener. Keep in mind that the texture might change slightly. Always taste as you go to ensure the sweetness fits your liking. Definitely! To make vegan no-bake cookies, simply use maple syrup instead of honey. Also, choose a nut butter that does not have any added ingredients. Most nut butters are naturally vegan, making this a simple swap. Chill the cookies for at least 30 minutes. This helps them firm up nicely. If you want them extra firm, you can leave them longer. Just check to see if they hold their shape. Yes, you can freeze these cookies! They freeze well. Place them in an airtight container or a freezer bag. They can last for up to three months in the freezer. When you're ready to eat them, just thaw them in the fridge or at room temperature. Enjoy your delicious treats anytime! These Healthy No Bake Cookies are simple, tasty, and fun to make. We covered the ingredients, steps, and tips to help you create the best cookies. You learned how to customize flavors, make substitutions, and store your treats. Now, enjoy creating your own cookie variations. Share them with friends and family. These cookies can fit any diet and are a guilt-free treat. Happy baking!

Do you crave a sweet snack that’s quick and good for you? Look no further! In this article, I’ll share my simple and tasty recipe for Healthy No Bake Cookies. …

Read more

Categories Desserts

Fish Puttanesca Delightful and Flavorful Recipe

June 13, 2025 by Chef Miles
- 2 white fish fillets (cod or tilapia work beautifully) - 2 tablespoons extra virgin olive oil - 3 cloves of garlic, finely minced - 1 small red onion, finely chopped - 1 can (14 oz) diced tomatoes, with juices - 1/4 cup pitted kalamata olives, halved for added texture - 2 tablespoons capers, well drained - 1 teaspoon red pepper flakes (adjust to your desired spice level) - 1 tablespoon fresh parsley, finely chopped (plus extra for garnish) - Salt and freshly ground black pepper to taste - Zest of 1 lemon for a fresh burst of flavor Fish puttanesca has simple yet bold flavors. The fish fillets soak up the rich sauce. The diced tomatoes offer sweetness, while olives add a salty bite. Capers give a briny twist, and garlic brings depth. You can't go wrong with this mix! To make your dish even better, focus on flavor enhancers. Fresh parsley adds a fresh note. Lemon zest brightens everything up. Red pepper flakes let you adjust heat levels. Each ingredient balances the others. Together, they create a robust sauce you’ll love. You can swap ingredients based on what you have. If you can’t find cod or tilapia, use salmon or halibut. For olives, green olives work, too. If you dislike capers, try chopped pickles for a similar taste. Each change can lead to new flavors and fun discoveries. Explore what you enjoy! For the full recipe, check out the detailed instructions. Start by drying your fish fillets. Use a paper towel to remove excess moisture. This helps achieve a nice sear. Next, season both sides of the fish with salt, pepper, and lemon zest. This adds a fresh flavor that brightens the dish. Grab a large skillet and heat your olive oil over medium heat. Wait until the oil shimmers. Then, add the minced garlic and chopped red onion. Sauté for about 3-4 minutes. Stir occasionally until the onion is soft and fragrant. This step builds the base flavor for your sauce. Now it’s time to make the sauce! Add the diced tomatoes with their juices to the skillet. Then, toss in the halved kalamata olives and drained capers. Sprinkle in the red pepper flakes for some heat. Stir everything together and let it simmer gently for 5-7 minutes. This allows the flavors to blend well. Gently place your seasoned fish fillets into the sauce. Tuck them in slightly to ensure they soak up the flavors. Use a spoon to ladle some sauce over the fish. This adds extra taste. Cover the skillet and cook for 8-10 minutes. The fish should turn opaque and flake easily with a fork. Before serving, stir in the freshly chopped parsley. Taste the sauce and adjust seasoning as needed. If you want a zing, add more lemon zest. For serving, carefully transfer the fish to plates. Spoon the puttanesca sauce generously over the fish. For a beautiful touch, serve with crusty bread or over fluffy couscous. A sprinkle of parsley and a lemon wedge on the side complete the dish. Enjoy your Fish Puttanesca delight! To get a great sear on your fish, start with dry fillets. Moisture on the surface will make it hard to brown. Season well with salt and lemon zest. Heat olive oil until it shimmers. Place the fish in the pan gently. Do not move it for a few minutes. This will create that beautiful crust. Flip the fish carefully when it is golden brown. This step enhances both flavor and texture. Fish Puttanesca needs a balance of salty, tangy, and fresh flavors. The olives and capers add saltiness. The tomatoes bring sweetness and acidity. Fresh parsley and lemon zest brighten the dish. Taste the sauce before adding the fish. Adjust with more salt or lemon as needed. This balance makes every bite enjoyable and satisfying. One common mistake is overcooking the fish. Fish cooks quickly and becomes rubbery if left too long. Keep an eye on it while it simmers. Another mistake is not allowing the sauce to blend. Let it simmer so flavors mix well. Lastly, don’t skip the fresh herbs. They add a burst of flavor that brings the dish to life. Following these tips will give you a delightful Fish Puttanesca. For full details, check the Full Recipe. {{image_4}} You can try different fish for this recipe. Cod and tilapia are great, but other options work too. Salmon brings a rich flavor, while halibut offers a firm texture. Each fish has its own taste and texture. Choose what you like best. Adding veggies boosts flavor and nutrition. You can toss in diced bell peppers or zucchini for a colorful mix. Spinach wilts down nicely and adds a fresh taste. Mushrooms add earthiness too. Feel free to get creative with seasonal veggies. Adjusting the spice level is easy. If you want it milder, use less red pepper flakes. To make it spicier, add more flakes or a pinch of cayenne pepper. Always taste as you go to find your perfect heat. Enjoy experimenting! To keep your Fish Puttanesca fresh, store leftovers in the fridge. Place the fish in an airtight container. It will stay good for up to three days. Before eating, check for any off smells or changes in texture. You can freeze Fish Puttanesca if you want to save some for later. Wrap the fish tightly in plastic wrap, then place it in a freezer-safe bag. It can last up to three months in the freezer. However, the sauce may change texture when thawed. When you're ready to eat, take the fish out of the fridge or freezer. If frozen, thaw it overnight in the fridge. To reheat, use a skillet over medium heat. Add a splash of water or broth to keep it moist. Cook until heated through. Enjoy your meal like it was fresh! Fish Puttanesca is made with a few key ingredients. You will find fish, tomatoes, olives, and capers. The dish often uses white fish like cod or tilapia. It combines bold flavors from garlic, red onion, and red pepper flakes. This mix creates a tasty and hearty sauce. Yes, you can use frozen fish! Just be sure to thaw it first. Pat it dry with a towel to remove excess moisture. This helps the fish sear nicely in the pan. Frozen fish can be just as good as fresh fish when cooked well. Fish Puttanesca pairs well with crusty bread or pasta. You can also serve it over rice or couscous. These options soak up the delicious sauce. A fresh salad with lemon dressing can add a nice touch, too. To add more spice, increase the red pepper flakes. You can also add chopped fresh chili peppers. Consider using spicy olives or hot sauce for an extra kick. Just remember to taste as you go, so it doesn’t become too hot. Fish Puttanesca comes from Italy, especially Naples. The dish has a rich history tied to the region's culinary traditions. It uses simple, flavorful ingredients that are easy to find. The name "puttanesca" hints at its bold flavors, which are meant to excite the palate. For the full recipe, check out the detailed instructions above. To make Fish Puttanesca, gather these key ingredients: - 2 white fish fillets (cod or tilapia) - 2 tablespoons extra virgin olive oil - 3 cloves of garlic, finely minced - 1 small red onion, finely chopped - 1 can (14 oz) diced tomatoes, with juices - 1/4 cup pitted kalamata olives, halved - 2 tablespoons capers, well drained - 1 teaspoon red pepper flakes - 1 tablespoon fresh parsley, finely chopped - Salt and freshly ground black pepper to taste - Zest of 1 lemon Instructions: 1. Pat the fish fillets dry. This helps them sear well. Season both sides with salt, pepper, and lemon zest. 2. Heat olive oil in a large skillet. Add minced garlic and chopped onion. Cook until the onion is soft. 3. Add diced tomatoes, olives, capers, and red pepper flakes. Stir and simmer for about 5-7 minutes. 4. Place the fish fillets gently into the sauce. Spoon sauce over the fish. Cover and cook for 8-10 minutes. 5. Stir in chopped parsley. Adjust seasoning if needed with salt, pepper, or lemon zest. 6. Serve the fish on plates with the sauce on top. Enjoy! Fish Puttanesca is not just tasty; it's also nutritious. Each serving of this dish provides: - High protein from the fish - Healthy fats from olive oil and olives - Fiber from tomatoes and capers - Essential vitamins from fresh parsley and lemon This meal is a balanced choice for anyone looking to eat well. Serve Fish Puttanesca with: - Crusty bread to soak up the sauce - A side of fluffy couscous or quinoa for a hearty touch - A fresh green salad for added crunch Finish your plate with a lemon wedge and extra parsley for a pop of color. Enjoy your delightful creation! In this post, we explored the key ingredients for Fish Puttanesca, including flavor enhancers and substitutions. We walked through step-by-step instructions for preparation, cooking, and final presentation. I shared useful tips for achieving the perfect sear and avoiding common mistakes. We also discussed variations, storage info, and answered common questions. Remember, Fish Puttanesca is flexible. You can swap ingredients and adjust spice levels. Enjoy making this dish your own while savoring its rich flavors. Happy cooking!

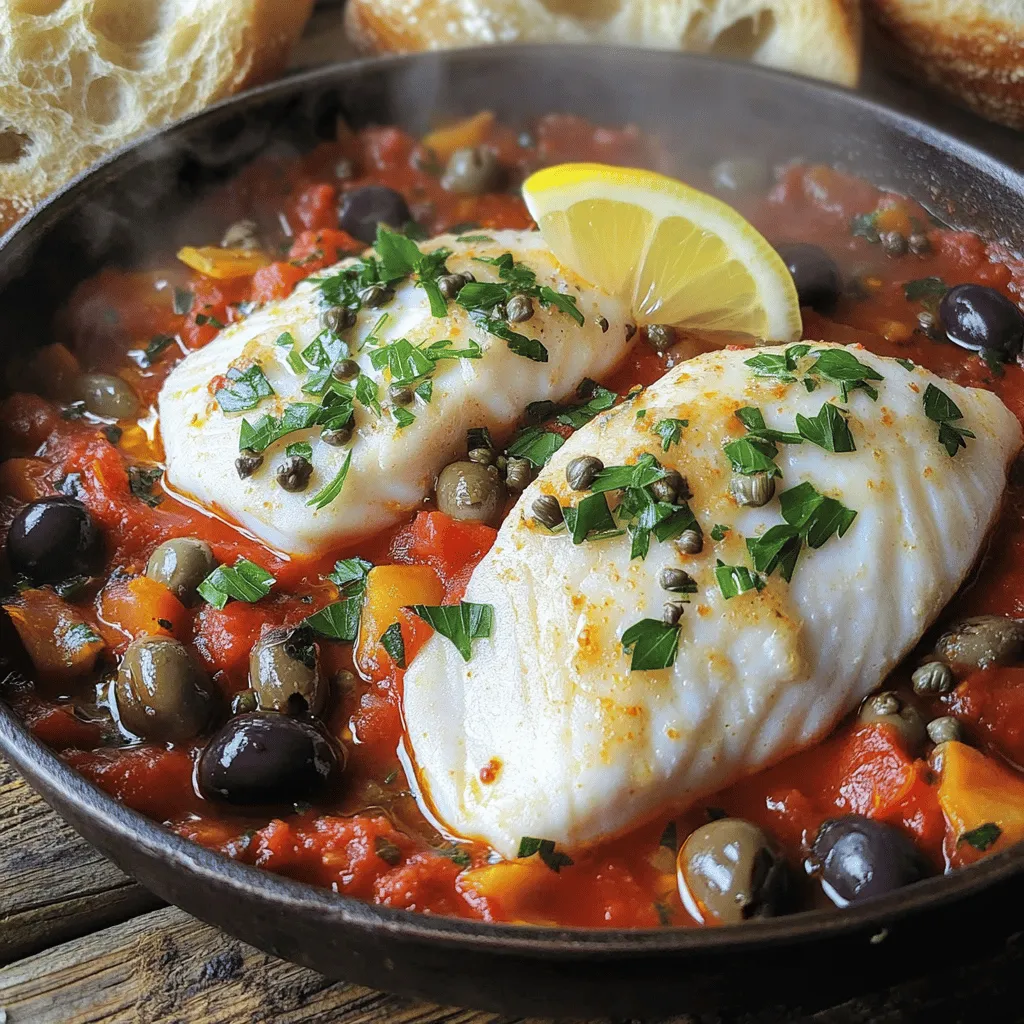
Welcome to a taste adventure with Fish Puttanesca! This dish offers a burst of flavors that will excite your taste buds. Using fresh fish, bold ingredients, and simple steps, this …

Read more

Categories Dinner

Spicy Chili Garlic Deviled Eggs Tasty Party Snack

June 13, 2025 by Chef Miles
- 6 large hard-boiled eggs - 3 tablespoons creamy mayonnaise - 1 teaspoon Dijon mustard - 1 tablespoon chili garlic sauce - 1 teaspoon sriracha (optional) - 1 teaspoon rice vinegar - Salt and freshly cracked black pepper - 1 green onion, finely chopped - 1 teaspoon smoked paprika The main ingredients are simple yet effective. The hard-boiled eggs serve as a creamy base. The mayonnaise adds smoothness, while the Dijon mustard gives a tangy kick. The chili garlic sauce brings the heat, and sriracha can add even more spice. Rice vinegar adds a bit of acidity, balancing the flavors well. Finally, the green onion and smoked paprika provide a perfect finish. - Chopped fresh herbs (like cilantro or parsley) - A dash of lemon juice - Crumbled bacon bits - Avocado for creaminess These optional ingredients can elevate the dish. Fresh herbs add brightness. A splash of lemon juice enhances the taste. Bacon bits bring texture and a smoky flavor, and avocado can make it even creamier. - Use avocado or hummus in place of mayonnaise for dairy-free options. - Choose a gluten-free mustard if needed. - Use a different vinegar like apple cider if rice vinegar is not available. These substitutions ensure everyone can enjoy this tasty treat. They cater to various dietary needs while keeping the dish delicious. For the full recipe, check out the detailed cooking instructions. Start by peeling six large hard-boiled eggs. Rinse them under cold water to remove any shell bits. This step helps keep the eggs smooth and clean. Next, slice each egg in half lengthwise. Carefully remove the yolks and place them in a mixing bowl. Make sure to keep the egg whites intact for filling later. In the bowl with the yolks, add three tablespoons of creamy mayonnaise. Then, add one teaspoon of Dijon mustard. For a spicy kick, mix in one tablespoon of chili garlic sauce. If you like more heat, you can also add one teaspoon of sriracha. Next, add one teaspoon of rice vinegar. Season with salt and freshly cracked black pepper to taste. Use a fork to mash the yolks and mix everything until it is smooth and creamy. Taste the filling and adjust the flavor as needed. Once the filling is ready, it's time to fill the egg whites. You can either spoon the yolk mixture into each egg half or use a piping bag for a fancier look. If you choose the piping bag, use a star tip for a nice design. After filling the eggs, sprinkle a dash of smoked paprika on top for extra flavor. Garnish with finely chopped green onion for a fresh touch. For the best taste, serve the deviled eggs right away or chill them for about 15-20 minutes. This wait helps the flavors blend perfectly. For the full recipe, check the top section of this article. To get hard-boiled eggs just right, start with older eggs. Fresh eggs are harder to peel. Place your eggs in a pot and cover them with cold water. Bring the water to a boil over medium heat. Once boiling, cover the pot and turn off the heat. Let the eggs sit for 12-14 minutes. Afterward, cool them in an ice bath for easy peeling. This method gives you smooth, bright yellow yolks for your deviled eggs. You can prepare Spicy Chili Garlic Deviled Eggs in advance. Cook and peel the eggs a day ahead. Store them in a covered container in the fridge. Mix the yolk filling a few hours before your event for the best flavor. Just fill the egg whites right before serving. This way, the flavors stay fresh. You’ll impress your guests without stress! Presentation matters with deviled eggs. For a beautiful look, use a piping bag to fill the egg whites. A star tip gives the filling a nice design. You can also sprinkle smoked paprika and top with green onion for color. Arrange them on a nice platter for a festive touch. A stunning display makes your dish even more inviting. {{image_4}} You can switch up the heat with different spicy sauces. Instead of chili garlic sauce, try using sambal oelek or harissa for a unique flavor. Both sauces add depth. You can also use a smoky chipotle sauce for a different kick. Adjust the amount based on how spicy you want your deviled eggs. Try adding unique ingredients for an extra twist. For example, mix in some pickled jalapeños for crunch. You can also toss in a bit of curry powder for warmth. Another fun option is to add crumbled bacon for a savory touch. Each addition brings new flavors to your deviled eggs, making them exciting. If you want a vegetarian option, swap the mayonnaise for a plant-based version. Many brands offer creamy vegan mayo that tastes great. For a fun twist, use mashed avocado instead. It adds creaminess and a fresh taste. You can still keep the chili garlic sauce to maintain that spicy kick. These swaps make your deviled eggs friendly for everyone. To keep your spicy chili garlic deviled eggs fresh, store them in the fridge. Use an airtight container to prevent any odors from mixing. If you have leftovers, try to eat them within a few days for the best taste. Reheating deviled eggs is not common, but you can try it. If you want, place them in the microwave for a few seconds. Keep an eye on them to avoid cooking the eggs further. Spicy chili garlic deviled eggs last about three to five days in the fridge. Look for changes in color or smell. If they smell off or have a slimy texture, throw them away. Always trust your senses when it comes to food safety. Yes, you can make Spicy Chili Garlic Deviled Eggs ahead of time. Prepare them up to two days in advance. Store them in the fridge in an airtight container. This way, you save time on party day. The flavors will mix well and taste even better after resting. Deviled eggs pair well with many foods. Here are some options: - Crisp veggie sticks like carrots and celery - Fresh fruit like grapes or berries - Crackers or toasted bread for crunch - A light salad for balance These sides add color and variety to your spread. To make the filling creamier, add more mayonnaise. You can also try using sour cream or Greek yogurt. These ingredients add rich flavor and smooth texture. Whip the filling until it is light and fluffy for the best results. Yes, you can use store-bought mayo. It saves time and works well in the recipe. While homemade mayo can taste fresher, store-bought will still give great flavor. Choose a brand you like for the best results. In this blog post, we discussed how to make spicy chili garlic deviled eggs. We covered ingredients, step-by-step instructions, helpful tips, and fun variations. Remember, achieving the perfect hard-boiled egg is key. Don't be afraid to try new flavors or alternatives for your guests. Storing properly helps keep them fresh for longer. Whether you make them for a party or a snack, these deviled eggs will shine. Keep experimenting and enjoy your tasty creations!

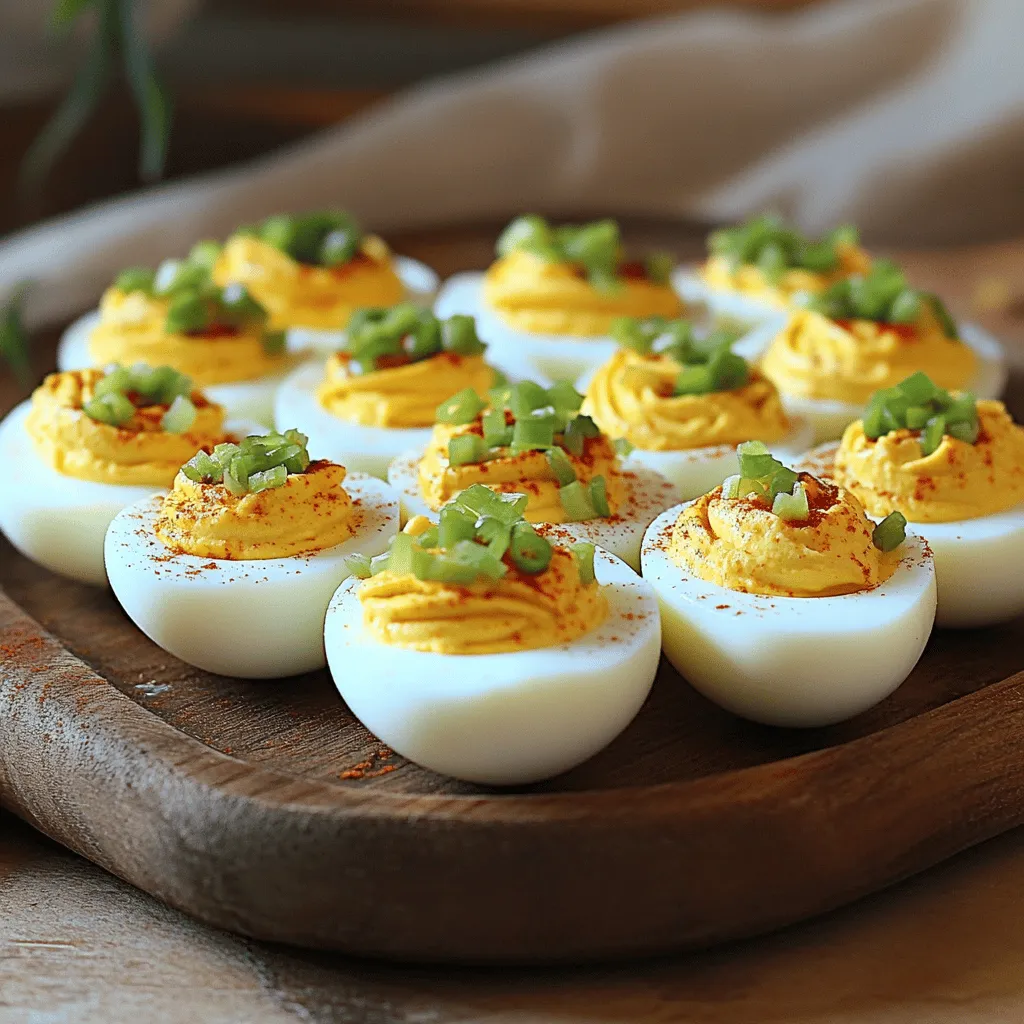
Looking for a fun and spicy twist on a timeless snack? Try these Spicy Chili Garlic Deviled Eggs! They pack bold flavors and are perfect for any party. With simple …

Read more

Categories Appetizers

Marry Me Salmon Irresistible Dinner Recipe

June 13, 2025 by Chef Miles
- Salmon fillets - Olive oil - Fresh herbs (thyme and rosemary) - Garlic - Lemon (zest and juice) - Honey - Cherry tomatoes - Balsamic vinegar - Fresh basil for garnish Gather these ingredients to make Marry Me Salmon, a dish that shines. The star here is the salmon fillets. They should be thick and fresh. Choose good quality salmon for the best taste. For the marinade, olive oil adds richness. Fresh thyme and rosemary give a nice earthy taste. Garlic brings a punch of flavor. Don't forget the lemon! The zest and juice make the dish bright and fresh. The honey balances the flavors with a touch of sweetness. If you want to enhance your dish, consider cherry tomatoes. They roast nicely and add color. A drizzle of balsamic vinegar boosts their flavor. Fresh basil makes a lovely garnish and adds a fresh note. This recipe is all about balance and flavor. Each ingredient plays a key role. With the right mix, you create a meal that is hard to resist. For the full recipe, check the details above. Enjoy your cooking adventure! - Preheat your oven to 400°F (200°C). This hot oven helps cook the salmon evenly. - In a small bowl, whisk together: - 2 tablespoons olive oil - 3 cloves garlic, finely minced - 1 teaspoon fresh thyme leaves - 1 teaspoon fresh rosemary, finely chopped - Zest and juice of 1 lemon - 1 tablespoon honey - Salt and freshly cracked pepper to taste This marinade will add great flavor to the salmon. - Arrange the salmon fillets in a baking dish, skin side down. - Pour the marinade over the salmon fillets evenly. Make sure each piece is well coated. - Scatter 1 cup of halved cherry tomatoes around the salmon. This adds color and taste. - Drizzle 2 tablespoons of balsamic vinegar over the tomatoes. This will make them sweet and tasty. - Place the baking dish in the oven and bake for 15–20 minutes. The salmon should flake easily with a fork. - Once done, take the dish out and let the salmon rest for a couple of minutes. This keeps it juicy. - Serve by drizzling the pan juices over the salmon. Add fresh basil leaves on top for flavor. This recipe is a wonderful way to impress at dinner. For the full recipe, check the earlier section. To cook salmon just right, timing is key. Bake the salmon for 15-20 minutes at 400°F (200°C). Check if it flakes easily with a fork. This means it’s done! Letting salmon rest for a few minutes after cooking is very important. This helps keep it juicy and tasty. You can make the marinade even better! Try adding spices like paprika or chili flakes for heat. Fresh herbs like dill can also add great flavor. Adjust the acidity by adding more lemon juice. This brightens the dish and balances the flavors. Plating is important for a romantic dinner. Place the salmon beside the roasted tomatoes for color. Drizzle the pan juices over each fillet for shine. For a final touch, add a lemon wedge on the side. This adds a pop of color and a hint of zest. This makes your meal look as good as it tastes! {{image_4}} You can get creative with Marry Me Salmon by swapping ingredients. - Using different types of fish: Instead of salmon, try trout or halibut. Both have a nice flavor and cook well. They also soak up the marinade nicely. This change can give you a fresh twist on the dish. - Substituting herbs or vegetables: If you want a different taste, swap thyme and rosemary for dill or parsley. You can also add spinach or zucchini for a pop of color and nutrition. These swaps keep the dish exciting. You have options when it comes to cooking Marry Me Salmon. - Grilling versus baking: Grilling can add a smoky flavor. Just preheat your grill and cook the salmon until it flakes easily. Baking is great too. It keeps the salmon moist and is very easy. - Pan-searing option: If you like a crispy skin, try pan-searing. Heat oil in a skillet, skin side down. Cook until crispy, then flip to finish cooking. This method gives you a delicious texture. You can easily adapt Marry Me Salmon to fit different diets. - Making it gluten-free: All the ingredients are gluten-free! Just make sure your balsamic vinegar has no additives. - Low-carb alternatives: This dish is already low in carbs! To make it even lower, skip the honey and use a sugar-free sweetener. Enjoy the rich flavors without the extra carbs. Feel free to play around with these variations and find your perfect version of Marry Me Salmon! For the full recipe, check out the main article. To keep your Marry Me Salmon fresh, store it in the fridge. Place the salmon in an airtight container. This keeps it moist and tasty. It will last for up to three days in the fridge. If you want to store it longer, consider freezing. You can reheat your salmon in a few ways. The best method is to use an oven. Preheat the oven to 350°F (175°C). Place the salmon on a baking sheet. Heat it for about 10 minutes. This will help keep the salmon juicy. You can also use a microwave. Just place the salmon on a microwave-safe plate. Heat it for 30 seconds at a time. Check often to avoid overcooking. You can freeze Marry Me Salmon both before and after cooking. If freezing raw, wrap the fillets tightly in plastic wrap. Place them in a freezer bag. Label the bag with the date. For cooked salmon, let it cool first. Then wrap it well before freezing. To thaw, place the salmon in the fridge overnight. You can also use cold water for quick thawing. Just make sure to cook it right after thawing. Marry Me Salmon tastes great with many side dishes. Here are some ideas: - Salad: A fresh green salad with mixed greens and a lemon vinaigrette. - Grains: Lightly seasoned quinoa or fluffy rice for a filling option. - Vegetables: Roasted asparagus, steamed broccoli, or sautéed spinach add color and nutrients. You can store Marry Me Salmon in the fridge for up to three days. Make sure to keep it in an airtight container. This helps maintain its flavor and texture. Always check for any off smells before eating leftovers. Yes, you can use other fish if you like. Here are some good options: - Trout: It has a similar texture and flavor. - Cod: A mild fish that cooks well with the same marinade. - Tilapia: This fish is light and flaky, making it a good choice. Marry Me Salmon is great for meal prep! You can prepare the salmon and marinade ahead of time. Store the salmon and marinade separately in the fridge for up to two days. This helps the flavors soak in better. When ready to cook, just follow the recipe steps. Enjoy your meal anytime! In this blog post, we covered how to prepare Marry Me Salmon using fresh ingredients and easy steps. We outlined key ingredients like salmon, olive oil, and herbs, and shared tips for perfect cooking. You can mix things up with swaps or cooking methods. Storing leftovers and meal prep options were also discussed. This dish is simple and flavorful, making it great for any meal. Enjoy the cooking process and the tasty results that will impress anyone.

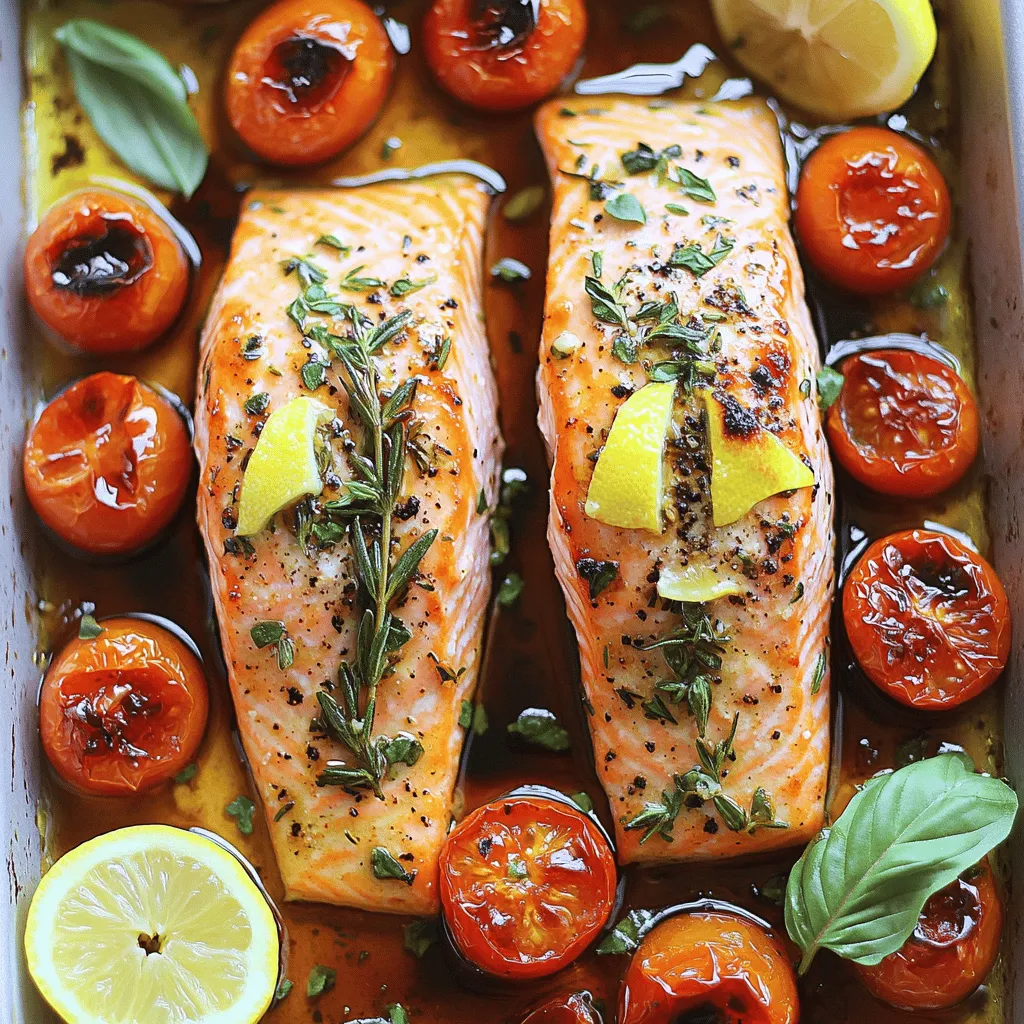
Are you ready to impress at dinner? This Marry Me Salmon recipe is sure to win hearts. With its perfect blend of fresh herbs, garlic, and zesty lemon, this dish …

Read more

Categories Dinner

Salmon Crispy Rice Tasty and Simple Delight Recipe

June 11, 2025 by Chef Miles
- 2 cups sushi rice - 2 tablespoons rice vinegar - 1 tablespoon sugar - 1 teaspoon salt - 1 ¼ pounds fresh salmon fillet - 1 tablespoon low-sodium soy sauce - 1 tablespoon sesame oil - 1 tablespoon nori flakes (seaweed) - 1 tablespoon sesame seeds - 1 tablespoon green onions, finely chopped - 1 avocado, sliced thinly - 1 cucumber, sliced thinly - Sriracha or spicy mayo for drizzling (optional) In this recipe, we focus on quality ingredients. Sushi rice gives the dish its unique texture. The fresh salmon fillet is key for taste. You will also need seasonings like vinegar, sugar, and salt to enhance the rice flavor. For a touch of freshness, I love to add avocado and cucumber. They pair well with the crispy rice and salmon. If you like a kick, sriracha or spicy mayo adds a nice heat. This combo makes each bite delightful! For the full recipe, make sure to follow the steps to create this tasty dish. Enjoy crafting your Salmon Crispy Rice! 1. Rinse the sushi rice under cold water. Keep rinsing until the water runs clear. This helps remove extra starch. 2. Cook the sushi rice according to your rice cooker instructions. Once finished, transfer it to a large bowl. Let it cool for a bit. 3. In a small bowl, mix rice vinegar, sugar, and salt. Stir until dissolved. 4. Drizzle this mixture over the warm rice. Gently fold it in with a spatula. Be careful not to mash the rice. Allow the rice to cool to room temperature. 1. Take your fresh salmon fillet and slice it into thin strips, about ¼ inch thick. 2. Place the salmon strips in a bowl. Drizzle them with low-sodium soy sauce. 3. Let the salmon marinate for about 10 minutes. This enhances its flavor and makes it taste great. 1. Heat sesame oil in a large non-stick skillet over medium heat. 2. Wet your hands to avoid sticking. Take a handful of seasoned sushi rice. 3. Mold it into small rectangular or square cakes. 4. Carefully place the rice cakes in the hot skillet. Cook for about 3-4 minutes. 5. Flip the rice cakes gently. Cook the other side until it is crispy and golden. 1. Once the crispy rice cakes are ready, take each one out of the skillet. 2. Place them on serving plates. 3. Top each rice cake with a slice of marinated salmon. 4. Add slices of avocado and a few cucumber slices for crunch. 5. Finish by sprinkling nori flakes and sesame seeds on top. 6. If you like spice, drizzle with sriracha or spicy mayo. Enjoy this delicious dish while it’s warm! For more details, check out the Full Recipe. Rinsing sushi rice is key. It removes extra starch, which helps the rice stay fluffy. If you skip this step, your rice may turn out sticky. Always rinse until the water runs clear. This shows you've washed away the starch. For the best sushi rice, use a rice cooker. It cooks the rice evenly and perfectly. Follow the rice cooker instructions for the right water-to-rice ratio. This ensures you get the ideal softness. To get crispy rice, timing is everything. Cook the rice cakes for 3-4 minutes on each side. Look for a golden color to know they are ready. If you leave them too long, they might burn. Using a non-stick skillet is a must. This prevents the rice from sticking and breaking apart. Heat the skillet well before adding the rice cakes. This helps achieve that beautiful crispy texture. You can try different marinades for the salmon. A mix of soy sauce and lemon juice adds brightness. Honey and ginger also make a tasty glaze. Feel free to experiment with flavors you love. For seasonings, consider adding sesame oil. It gives a rich, nutty taste. You can also sprinkle on some sea salt or chili flakes. These add depth and kick to your dish. For the full recipe, check the detailed instructions provided. {{image_4}} You can make this dish even healthier. Try using quinoa instead of sushi rice. Quinoa adds protein and fibers. It also has a nutty taste that goes well with salmon. For toppings, consider using fresh herbs like cilantro or basil. They add bright flavors and a splash of color. Want to change up the taste? Experiment with different sauces. A tangy ponzu sauce can add a citrus kick. You can also use a spicy teriyaki sauce for a sweet twist. Seasonal vegetables work great too. Try adding roasted bell peppers or fresh radishes for crunch and color. When you serve this dish, make it special. Arrange the rice cakes on a large platter. You can garnish with colorful vegetables and herbs. For a fun twist, create a sushi platter. Mix and match with different toppings. Guests will love trying different flavors, and it looks amazing! To store crispy rice, start by letting it cool down. Place the rice in an airtight container. This keeps the rice fresh. You can store it in the fridge for up to three days. For salmon, wrap it tightly in plastic wrap or foil. This helps prevent it from drying out. Proper refrigeration keeps your salmon safe for up to two days. When you reheat crispy rice, use a non-stick skillet. Heat it over medium-low heat. Add a splash of water to create steam. Cover the skillet with a lid. This helps keep the rice moist. To avoid sogginess, don’t microwave crispy rice. The microwave makes it soft. Instead, reheat it in the skillet until it’s warm and crispy again. Enjoy your delicious meal! To make the best crispy rice, focus on a few key techniques. First, rinse your sushi rice well. This removes excess starch. Less starch means better texture. Cook the rice properly according to the package instructions. After cooking, let the rice cool slightly before seasoning. Use a mix of rice vinegar, sugar, and salt to enhance the flavor. When shaping the rice cakes, wet your hands. This helps prevent the rice from sticking. Finally, cook them in a hot non-stick skillet with sesame oil. Flip them carefully to ensure both sides get crispy. Yes, you can use frozen salmon for this recipe. Just make sure to thaw it properly. A good way to thaw salmon is to place it in the fridge overnight. If you're short on time, you can also run it under cold water. After thawing, slice the salmon thinly and marinate it. The soy sauce adds great flavor, even to frozen salmon. If you can't find sushi rice, there are some good substitutes. You can use short-grain rice or medium-grain rice. Both of these have a similar texture. Another option is to use quinoa for a healthier twist. Just be sure to cook it correctly and let it cool. The flavor and texture will differ, but it can still be tasty. Fresh salmon can last about one to two days in the refrigerator. Make sure to store it properly. Wrap it tightly or keep it in an airtight container. Cooked salmon can last three to four days if stored correctly. Always check for any off smells or changes in color before using it. This article covers how to make delicious crispy rice with salmon. We explored key ingredients like sushi rice and fresh salmon. You learned how to prepare, cook, and assemble the dish with optional toppings. Remember to rinse the rice and use a non-stick skillet for the best results. Feel free to try different flavors and garnishes. Your kitchen can shine with these tasty treats! Enjoy creating your own versions and sharing them with others. Happy cooking!

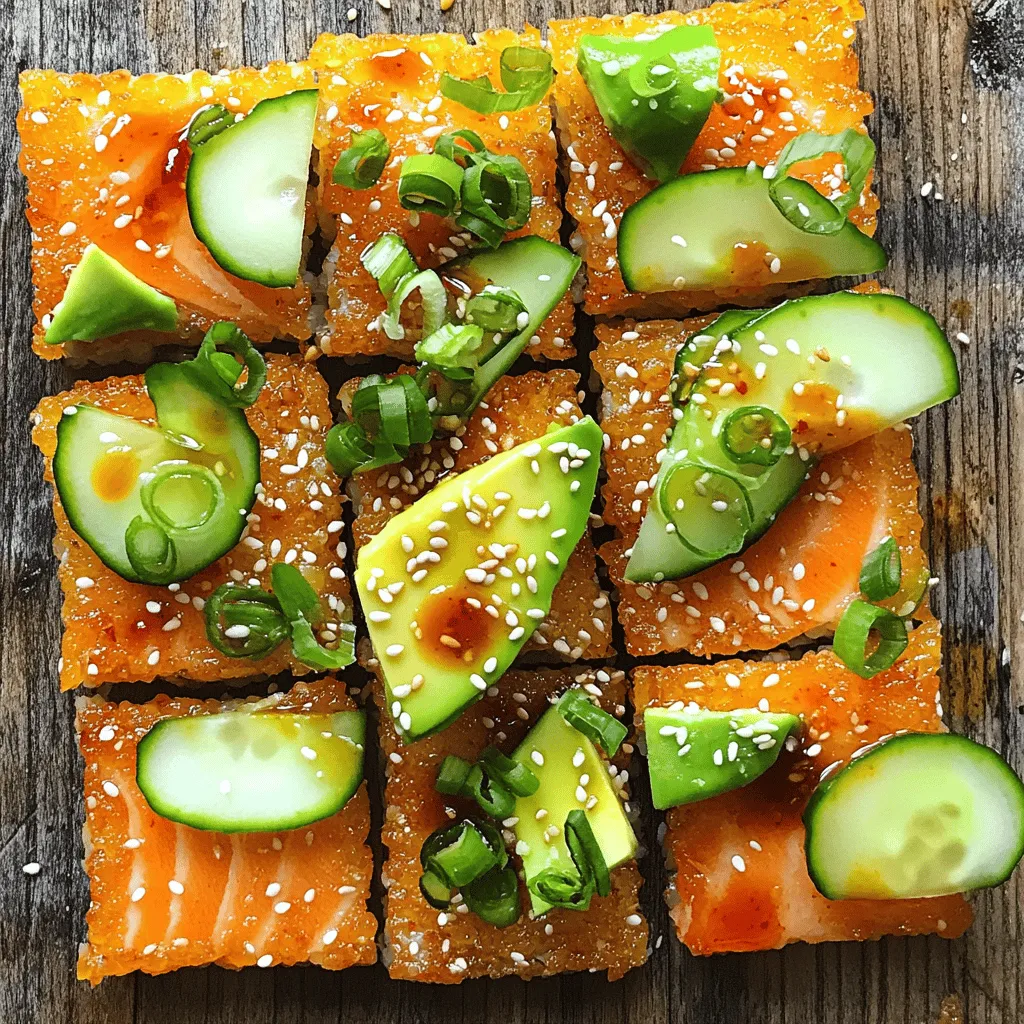
Imagine a dish that’s both tasty and easy to make—a true crowd-pleaser! With my Salmon Crispy Rice recipe, you’ll whip up a delightful meal that dazzles the senses. This dish …

Read more

Categories Appetizers

Tasty Baked Cod in Coconut Lemon Cream Sauce Delight

June 11, 2025 by Chef Miles
- 4 cod fillets (approximately 6 oz each) - 1 cup full-fat coconut milk - Zest of 1 lemon - 2 tablespoons freshly squeezed lemon juice - 2 garlic cloves, finely minced - 1 teaspoon freshly grated ginger - 1 tablespoon honey (or maple syrup for a vegan alternative) - 1 tablespoon soy sauce (or tamari for gluten-free option) - 1 teaspoon crushed red pepper flakes (optional) - Salt and freshly ground black pepper to taste - Fresh cilantro leaves, chopped (for garnish) - Lemon wedges (for serving) The ingredients for this tasty baked cod dish are simple yet full of flavor. Cod is a mild fish that absorbs flavors well. The creamy coconut milk adds richness, while the lemon brings brightness. Fresh garlic and ginger add depth. Honey or maple syrup balances the flavors, and soy sauce adds umami. If you like heat, crushed red pepper flakes give a nice kick. When shopping for ingredients, look for fresh cod fillets. They should be firm and have a mild smell. The coconut milk should be full-fat for the best creaminess. Fresh lemon is key for zest and juice. Gather your fresh herbs to add a pop of color and taste at the end. This dish is not only delicious but also quick to make. With just these ingredients, you can create a meal that impresses. For the full recipe, check out the detailed steps. - Preheat the Oven Set your oven to 400°F (200°C). This helps cook the cod just right. - Prepare the Coconut Lemon Sauce In a medium pot, mix 1 cup of coconut milk, lemon zest, 2 tablespoons of lemon juice, 2 minced garlic cloves, 1 teaspoon of grated ginger, 1 tablespoon of honey (or maple syrup), 1 tablespoon of soy sauce, and optional red pepper flakes. Heat this on medium. Stir well and let it simmer for about 5 minutes until it thickens slightly, then take it off the heat. - Season the Cod Fillets While the sauce cooks, sprinkle salt and black pepper on both sides of your cod fillets. This adds great flavor. - Arrange in a Baking Dish Lightly grease a baking dish. Place the seasoned cod fillets in a single layer. Pour the creamy coconut lemon sauce over the cod. Make sure each fillet is well covered. - Bake the Cod Put the baking dish in your oven. Bake for 15-20 minutes. The cod is ready when it looks opaque and flakes easily with a fork. Cooking time may change based on how thick the fillets are. - Garnish and Serve After baking, take the dish out of the oven. Sprinkle chopped cilantro on top for freshness. Serve the cod hot with lemon wedges for extra zest. For the full recipe, check out the instructions above. Enjoy your tasty baked cod! To ensure your cod is perfectly flaky, you must not overcook it. Bake it for 15 to 20 minutes at 400°F. Check it with a fork; it should flake easily. Also, let the cod rest for a few minutes after baking. This helps keep it moist. If you want to adjust spice levels, add crushed red pepper flakes. Start with a small amount, taste, and add more if you like it spicier. You can also leave it out if you prefer a milder dish. Adding herbs or spices can boost the flavor of the dish. Fresh cilantro adds brightness, while a sprinkle of paprika gives depth. Try fresh dill or basil for a different twist. For side dishes, consider serving steamed rice or quinoa. They soak up the coconut lemon sauce well. You can also serve with roasted vegetables or a simple salad for a fresh crunch. {{image_4}} You can switch up how you cook cod to suit your taste. - Grilling options for a smoky flavor: Grilling cod adds a nice smoky taste. To do this, preheat your grill to medium-high heat. Lightly oil the grill grates to prevent sticking. Marinate your cod in the coconut lemon sauce for 30 minutes. Then, cook it on the grill for about 4-5 minutes on each side. The fish will be flaky and infused with that smoky flavor. - Stovetop version for a quicker meal: For a fast meal, you can cook the cod on the stovetop. Start by heating a non-stick skillet over medium heat. Add a little oil and place the seasoned cod fillets in the pan. Cook for 5-6 minutes on each side. Pour the coconut lemon sauce over the fish in the last few minutes of cooking. This method keeps the fish moist and delicious. You can customize the sauce to match your mood or diet. - Using different fruits in the sauce: While the classic combination is lemon and coconut, you can try other fruits too. Pineapple or mango can add a tropical twist. Just blend them into the sauce. You’ll get a new flavor profile that works great with the cod. - Substituting ingredients for dietary restrictions: If you have allergies or dietary needs, swap out some ingredients. Use coconut cream instead of coconut milk for a richer sauce. For a vegan option, replace honey with maple syrup. You can also use tamari instead of soy sauce to keep it gluten-free. Adjust these ingredients to make the dish perfect for you. For the complete recipe, check out the Full Recipe section. To store leftover baked cod, let it cool first. Place the cod in an airtight container. Make sure to cover it well. It will stay fresh in the fridge for up to three days. When you want to eat it again, reheat it gently. - Tips for reheating: - Preheat your oven to 350°F (175°C). - Put the cod in a baking dish. - Cover it with foil to keep it moist. - Heat for about 10-15 minutes. This method helps keep the flavor and texture intact. You can also use the microwave but be careful not to overcook it. Freezing baked cod is a great way to save it for later. Make sure the cod is completely cool. Wrap each piece in plastic wrap tightly. Then, place the wrapped cod in a freezer-safe bag. It can last for up to three months in the freezer. - Best practices for defrosting cod: - Move the cod from the freezer to the fridge. - Let it thaw overnight for best results. - If you are short on time, you can defrost it in cold water. This keeps the fish safe and tasty. Always cook it again after defrosting, and enjoy your delicious meal! For the full recipe, check the recipe section above. Can I use a different type of fish? Yes, you can! Fish like haddock, tilapia, or salmon work well. These fish have a mild taste that pairs well with the coconut lemon sauce. How can I tell when the cod is fully cooked? The cod is done when it looks opaque and flakes easily. Use a fork to check the texture. If it falls apart, it's ready to eat! What can I serve with baked cod? I love serving this cod with rice or quinoa. Steamed veggies or a fresh salad are great sides too. You can even add some crusty bread to soak up the sauce. Can I make the sauce ahead of time? Absolutely! You can prepare the coconut lemon sauce a day in advance. Just store it in the fridge. When you're ready to cook, reheat it gently. How do I make this recipe dairy-free? This recipe is already dairy-free! It uses coconut milk instead of cream. If you want to add a bit more creaminess, just add a touch more coconut milk. Enjoy! For the full recipe, check out the detailed instructions above! This blog post covered how to make a tasty baked cod dish with coconut lemon sauce. We talked about ingredients, easy steps, and helpful tips. You can grill or modify the recipe to suit your taste. Remember to store leftovers properly for later. Cooking fish can be easy and fun. Experiment with flavors and enjoy this healthy meal anytime!

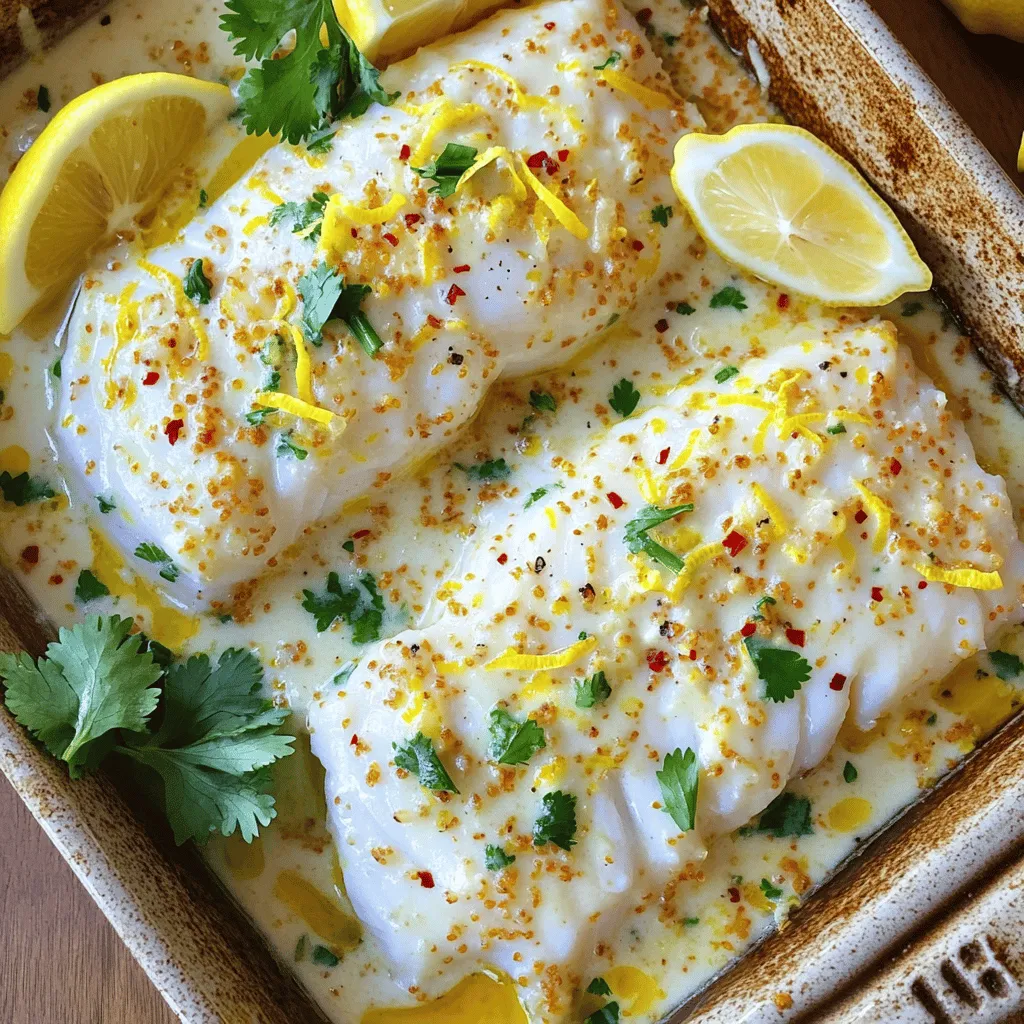
Get ready to impress your taste buds with my Tasty Baked Cod in Coconut Lemon Cream Sauce! This dish blends fresh flavors like lemon and coconut, creating a rich, creamy …

Read more

Categories Dinner

10 Minute Grab & Go Breakfast Bowls Easy and Quick

June 11, 2025 by Chef Miles
- 1 cup rolled oats - 2 cups almond milk (or any milk of your choice) - 1 ripe banana, neatly sliced - 1/2 cup Greek yogurt (choose between non-fat or regular) - 1/4 cup nutritious chia seeds - 1 tablespoon honey or maple syrup (optional for sweetness) - 1/2 cup mixed berries (fresh or frozen for convenience) - 1/4 cup crunchy granola These ingredients are simple and easy to find. Rolled oats are the base for this tasty breakfast. They provide fiber and keep you full. Almond milk adds creaminess, while banana gives natural sweetness. Greek yogurt adds protein and a nice tang. For toppings, chia seeds boost nutrition and add a nice crunch. Honey or maple syrup can sweeten your bowl. Mixed berries add color and flavor. Granola gives a satisfying crunch, making each bite fun. You can mix and match these ingredients to fit your taste. For the full recipe, check the section above. - In a medium saucepan, combine 1 cup of rolled oats and 2 cups of almond milk. - Add a pinch of cinnamon for flavor. - Heat over medium heat. Stir often for about 5 minutes until thickened. - While the oats cook, divide 1/2 cup of Greek yogurt into four bowls. - Pour cooked oats over the yogurt in each bowl. - Arrange banana slices and mixed berries on top. - Drizzle with honey or maple syrup for sweetness. - Sprinkle with 1/4 cup of chia seeds and granola for crunch. These steps will help you create a tasty breakfast bowl in just 10 minutes. For the full recipe with all the details, check out the instructions above. Enjoy a gourmet meal that’s both quick and satisfying! - Use quick-cooking oats for faster preparation. They cook in just a few minutes. - Prepare toppings in advance to save time in the morning. Slice fruits or measure out nuts ahead of time. - Layer ingredients for visual appeal. A beautiful bowl makes breakfast more fun. - Use colorful toppings for an attractive display. Bright berries and bananas will catch your eye. - Swap Greek yogurt for dairy-free alternatives. Coconut yogurt works well for a vegan option. - Experiment with different fruits or nut toppings. Try mango, kiwi, or almonds for a new taste. By following these tips, you can create quick and delicious breakfast bowls that fit your style! Check out the Full Recipe for more ideas. {{image_4}} To spice up your breakfast bowls, you can try different flavors. - Chocolate Banana Version: Add cocoa powder or chocolate drizzle to your oats. This gives a sweet twist. Top with banana slices and a sprinkle of nuts for crunch. - Tropical Fruit Bowl with Coconut: Use coconut milk instead of almond milk. Top with mango, pineapple, and shredded coconut. It’s like a vacation in a bowl! You can easily adjust these bowls for your needs. - Gluten-Free Options: Use gluten-free oats instead of regular oats. This makes your breakfast safe for those with gluten sensitivities. - Vegan Alternative: Skip the Greek yogurt and use coconut yogurt or almond yogurt. This keeps your meal plant-based and tasty. Portion control helps with busy mornings. - Making Single-Serve Portions: Use small jars or bowls to create single servings. This makes it easy to grab one and go. - Batch Preparation: Prepare several bowls at once. Store them in the fridge for quick breakfasts throughout the week. This saves time and keeps you full! For the full recipe, check out the 10-Minute Gourmet Grab & Go Breakfast Bowls. To keep your breakfast bowls fresh, refrigerate them right after you make them. This method makes it easy to grab a bowl each morning. Use airtight containers to help maintain freshness. These containers keep out air and moisture, ensuring your breakfast stays tasty. - Store individual bowls in the refrigerator. - Choose airtight containers for best results. If you want to save time, you can freeze your prepared oats. This is an easy way to have breakfast ready whenever you need it. To reheat, simply take the oats out of the freezer and let them thaw overnight in the fridge. - Freeze cooked oats for future breakfasts. - Reheat in a saucepan over low heat or in the microwave for best results. You can find the full recipe for these delicious breakfast bowls in this article, which will help you enjoy a quick, healthy meal all week long. You can easily make these breakfast bowls vegan. Just substitute Greek yogurt with non-dairy yogurt. There are many options available, like almond or coconut yogurt. This swap keeps the creamy texture while making it plant-based. Yes, you can prepare the oats in advance. Cook the oats and let them cool. Store them in the fridge in an airtight container. When you're ready, just mix them with the yogurt and toppings. This saves time on busy mornings. These breakfast bowls typically last 3-5 days when stored properly. Use airtight containers to keep them fresh. If you notice any change in smell or texture, it’s best to discard them. Enjoy your meals without worry! These breakfast bowls are quick, tasty, and easy to customize. You mix rolled oats and almond milk to create a base, then add Greek yogurt and your favorite toppings. You can make a chocolate version or go tropical. Store them in the fridge or freezer for convenience. With some quick prep and layering tips, you can create an eye-catching meal. Enjoy making your morning routine fun and nutritious!

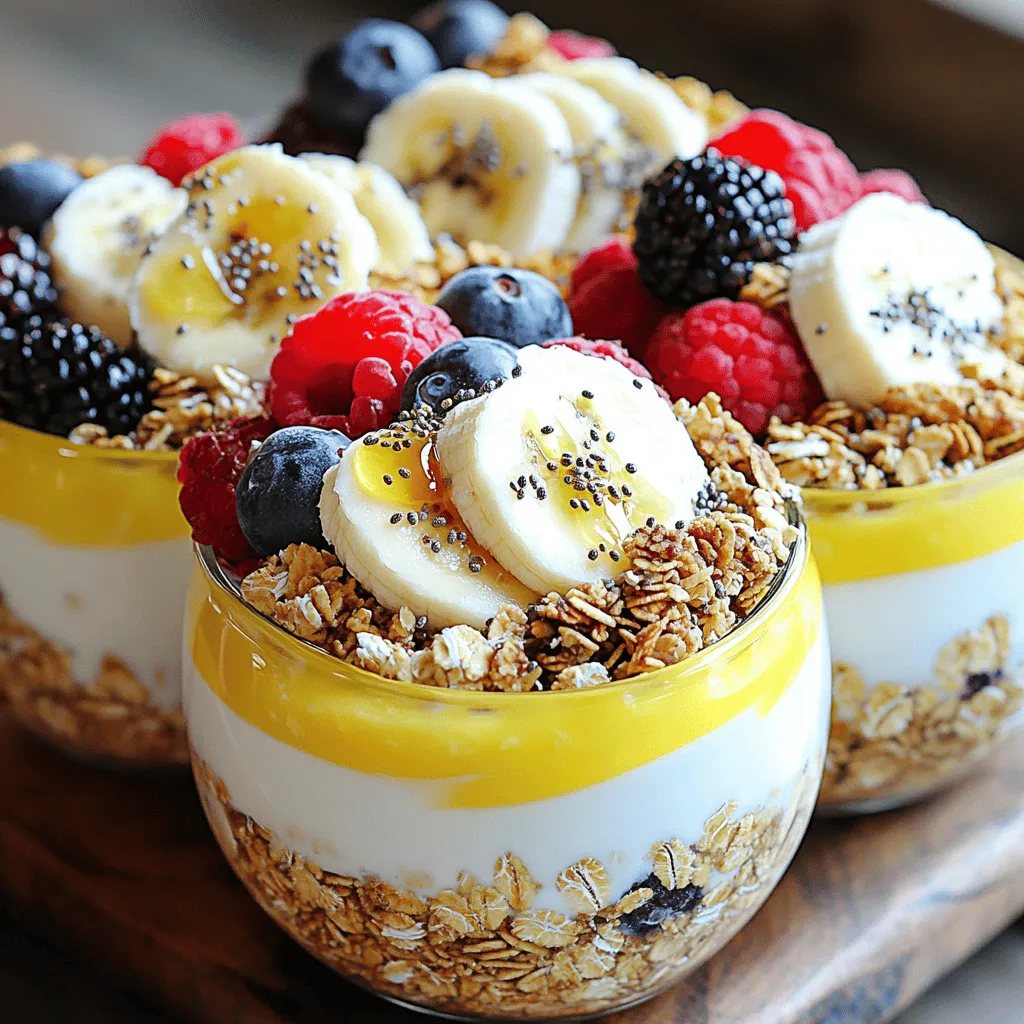
Mornings can be hectic, but breakfast doesn’t have to be! With these 10-minute grab and go breakfast bowls, you can fuel your day with ease. Packed with wholesome ingredients like …

Read more

Categories Breakfast
Older posts
Newer posts
← Previous Page1 … Page92 Page93 Page94 … Page112 Next →

MELTED RECIPES

where delicious ideas melt into life, from stovetop to backyard. Always warm, simple, and irresistibly satisfying. 🍳🔥🧀

PAGES

Home About Contact Privacy Policy Terms & Conditions Cookie Policy GDPR Policy Copyright Policy Disclaimer

CATEGORIES

Appetizers Desserts Salads Breakfast Dinner

Contact

  • Pinterest
  • Mail
Copyright © 2025 Melted Recipes. All rights reserved.