Skip to content
Melted Recipes
  • Home
  • Appetizers
  • Desserts
  • Salads
  • Breakfast
  • Dinner
  • Privacy Policy
  • Contact
  • About

Chef Miles

No Bake Chocolate Almond Butter Granola Bars Recipe

October 10, 2025 by Chef Miles
- 1 cup rolled oats - 1/2 cup smooth almond butter - 1/4 cup honey or maple syrup - 1/2 cup dark chocolate chips - 1/2 cup chopped almonds - 1/4 cup chia seeds - 1/2 teaspoon pure vanilla extract - A pinch of sea salt These ingredients make a tasty treat. Rolled oats provide a great base. Almond butter gives a creamy texture and nutty flavor. The honey or maple syrup adds sweetness. Dark chocolate chips bring a rich taste, while chopped almonds add crunch. Chia seeds offer nutrition and help bind the bars. Vanilla extract enhances the flavor, and sea salt balances the sweetness. You can use vegan options for honey. Maple syrup works well in place of honey. If you want nut-free bars, try sunflower seed butter. You can also switch almonds for pumpkin seeds or dried fruit for added flavor. These simple swaps keep the recipe flexible and fun. 1. Gather your ingredients. You will need rolled oats, almond butter, honey or maple syrup, dark chocolate chips, chopped almonds, chia seeds, vanilla extract, and sea salt. 2. In a medium bowl, mix the rolled oats, chopped almonds, chia seeds, and a pinch of sea salt. Use a wooden spoon to blend them well. 3. In a small saucepan, warm almond butter and honey or maple syrup over low heat. Stir constantly until the mix is smooth. Be careful not to let it get too hot. Remove it from the heat and add the vanilla extract. 4. Pour the warm almond butter and honey mixture over the dry ingredients. Use a spatula to mix everything until the oats and almonds are well coated. 5. Gently fold in the dark chocolate chips, making sure they spread evenly throughout the mixture. 6. Line an 8-inch square baking dish with parchment paper. Leave some paper hanging over the sides. This makes it easier to lift out the bars later. 7. Spoon the mixture into the prepared baking dish. Use your hands or a spatula to press it down firmly. This helps the bars hold their shape. 8. Place the dish in the refrigerator for at least 1 hour. This chilling time allows the bars to set properly. 9. After an hour, lift the bars out using the parchment paper. Cut them into squares or bars of your preferred size. 10. Store the granola bars in an airtight container in the fridge. They will stay fresh for up to a week. - Ensuring proper binding: Use smooth almond butter. It helps everything stick well. If your mixture feels dry, add a little more almond butter or syrup. The right texture is key for firm bars. - Optimal storage for freshness: Keep the bars in an airtight container. This keeps them fresh and tasty for up to one week in the fridge. You can also freeze them for longer storage. Just wrap each bar tightly. - Overheating almond butter: Heat the almond butter gently. If it gets too hot, it can lose its smooth texture. Stir constantly to keep it just warm. - Not packing the mixture tightly enough: When you press the mixture into the baking dish, pack it down firmly. This step is crucial. If it’s loose, the bars will crumble when you cut them. {{image_4}} You can make these bars even better with a few simple tweaks. - Adding dried fruits: Dried fruits like cranberries, apricots, or raisins can boost flavor and nutrition. They add natural sweetness and chewiness, making each bite fun. Just chop them up and mix them in when you add the chocolate chips. - Incorporating seeds or nuts for texture: Try adding pumpkin seeds, sunflower seeds, or more nuts. This gives the bars a nice crunch and extra nutrients. Mix them in with your dry ingredients for even distribution. You can also play around with different sweeteners to find what you like best. - Experimenting with agave or stevia: If you're looking for lower-calorie options, agave syrup or stevia can be great substitutes. They offer sweetness with fewer calories. Just remember, you might need to adjust the amount based on how sweet you want your bars. - Using flavored syrups: Flavored syrups, like vanilla or caramel, can add a unique twist. This change can make your granola bars stand out. Just swap them in for honey or maple syrup. These variations let you customize your granola bars to fit your taste. Enjoy the process of making them your own! To keep your no bake chocolate almond butter granola bars fresh, use an airtight container. This prevents air from making them stale. Store the bars in the refrigerator. This helps them stay firm and tasty. You can enjoy them for up to one week when stored properly. If you want to keep the bars longer, freezing is a great option. To freeze, wrap each bar in plastic wrap. Then, place the wrapped bars in a freezer-safe bag. This will keep them fresh for up to three months. When you're ready to eat them, thaw the bars in the fridge overnight. This way, they stay soft and delicious. No bake chocolate almond butter granola bars are tasty and healthy snacks. They combine rolled oats, almond butter, and chocolate for a sweet treat. These bars are quick to make, needing no oven. They pack energy and nutrition, making them great for breakfast or a snack. Plus, they are easy to grab on the go. The mix of oats and nuts gives you fiber and protein, which is great for your body. These granola bars can last up to one week in the fridge. To keep them fresh, store the bars in an airtight container. This helps to lock in flavor and moisture. You can also wrap each bar in parchment paper for easy access. If you want them to last longer, consider freezing them. Just remember to thaw them before you eat. Yes, you can customize these granola bars to fit your taste. If you don't have almond butter, try peanut butter or sunflower seed butter. For a vegan option, use maple syrup instead of honey. You can also add in your favorite nuts, seeds, or dried fruits. Check your pantry and get creative! You learned how to make no-bake chocolate almond butter granola bars step by step. We covered ingredients, substitutions, and helpful tips to avoid common mistakes. Remember, you can customize flavors and storage methods to suit your taste. Keep these bars fresh and tasty with proper techniques. Enjoy the process and share these recipes with friends. Making these granola bars can be fun and rewarding. Dive into your kitchen, and get started on your delicious treat today!

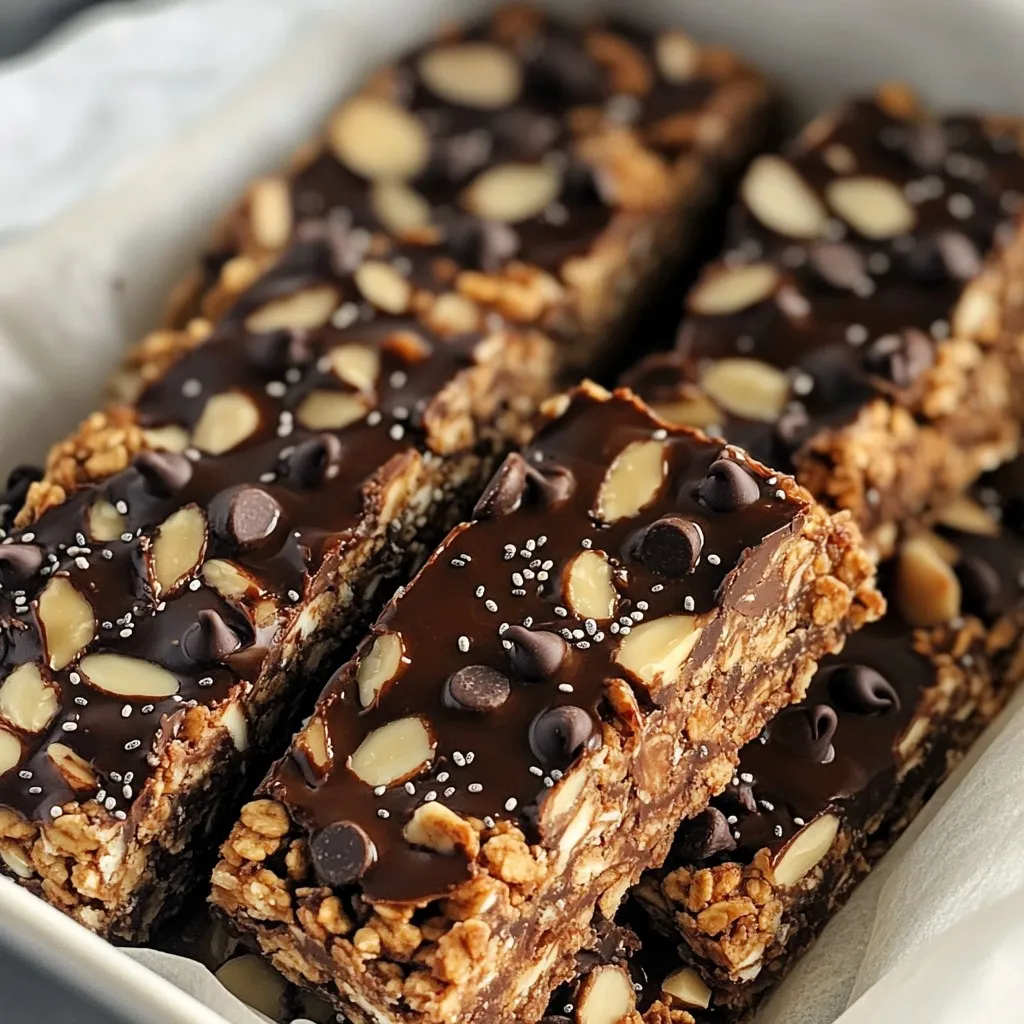
Get ready to indulge in a delicious and healthy treat! This No Bake Chocolate Almond Butter Granola Bars Recipe is simple and perfect for busy days. With just a few …

Read more

Categories Desserts

Sheet Pan Balsamic Glazed Chicken and Vegetables Dish

October 10, 2025 by Chef Miles
- 4 boneless, skinless chicken thighs - 2 cups Brussels sprouts, halved - 1 cup cherry tomatoes, halved - 1 red bell pepper, sliced into strips - 1 medium red onion, cut into thick slices - 1/4 cup balsamic vinegar - 2 tablespoons honey - 2 tablespoons olive oil - 4 cloves garlic, minced - 1 teaspoon dried thyme - 1 teaspoon dried oregano - Salt and pepper to taste - Fresh basil leaves for garnish Each ingredient plays a key role in the dish. If you want to switch out the chicken, try chicken breasts or even tofu for a vegetarian option. For the veggies, feel free to swap Brussels sprouts with green beans or broccoli. The balsamic vinegar gives a sweet and tangy taste, but you can use red wine vinegar if you need a different flavor. Honey adds sweetness, but maple syrup works too. This dish serves four people and is wholesome. Each serving has about: - Calories: 350 - Protein: 30g - Carbohydrates: 25g - Fat: 15g - Fiber: 5g This meal gives you a great balance of protein, veggies, and healthy fats. Enjoying it will surely satisfy your taste buds while keeping your meal plan on track. 1. Preheat the Oven: Heat your oven to 425°F (220°C). This warms the oven for roasting. 2. Make the Marinade: In a bowl, mix 1/4 cup balsamic vinegar, 2 tablespoons honey, 2 tablespoons olive oil, and 4 cloves minced garlic. Add 1 teaspoon dried thyme, 1 teaspoon dried oregano, and a pinch of salt and pepper. Whisk until blended. 3. Marinate the Chicken: Place 4 boneless, skinless chicken thighs in a large bowl. Pour half the marinade over them. Toss to coat well. Let it marinate for 15 minutes. 4. Prepare the Vegetables: On a large sheet pan, arrange 2 cups halved Brussels sprouts, 1 cup halved cherry tomatoes, 1 sliced red bell pepper, and 1 medium thickly sliced red onion. Drizzle the remaining marinade over the veggies. Toss gently to coat. 5. Arrange on Sheet Pan: Make space in the middle of the sheet pan. Place the marinated chicken thighs there. Do not overcrowd. 6. Roast the Dish: Place the sheet pan in the oven. Roast for 25-30 minutes. The chicken should reach 165°F (74°C). The veggies should be tender and caramelized. 7. Broil for Extra Glaze: For the last 5 minutes, set the oven to broil. This creates a nice glaze on the chicken. Watch closely to avoid burning. 8. Garnish and Serve: Take the sheet pan out of the oven. Let it rest for a few minutes. Top with fresh basil leaves for color and flavor. - Use fresh ingredients. They give a better flavor. - Don't skip the broiling step. It adds a delicious finish. - Let the chicken rest before serving. This helps keep it juicy. - Experiment with spices. Add a dash of red pepper flakes for heat. This sheet pan balsamic glazed chicken and vegetables dish is simple yet full of flavor. Enjoy your cooking! You can easily change this recipe to fit your tastes. Swap chicken thighs for breasts if you like leaner meat. You can also try different veggies, like zucchini or carrots. If you want more spice, add red pepper flakes to the marinade. For a sweeter taste, use maple syrup instead of honey. This dish is all about what you love! If you're busy, you can marinate the chicken the night before. Just keep it in the fridge until you are ready to cook. You can also chop the veggies ahead of time. Store them in a sealed bag or container. If you forget to marinate, no worries! Just let the chicken sit in the marinade for 15 minutes while you prepare the veggies. Pair this dish with a simple grain, like rice or quinoa. A fresh green salad also goes well with it. For a heartier meal, serve it with roasted potatoes. You can even add some crusty bread to soak up the glaze. Each side will help make your meal more filling and tasty! {{image_4}} You can switch the veggies in this dish to suit your taste. Try using green beans, zucchini, or carrots. Each adds a unique flavor and texture. For proteins, swap chicken for turkey or tofu. Tofu absorbs the marinade well and gives a nice touch. Want to spice it up? Add paprika, cumin, or chili flakes to the marinade. This will give your dish a warm kick. You can also mix in a little soy sauce or mustard for depth. These additions make each bite exciting. This dish is easy to make gluten-free. Just check your balsamic vinegar and honey for hidden gluten. For a low-carb option, skip the honey or use a sugar substitute. You can also add more non-starchy veggies like broccoli or cauliflower for a filling meal. After enjoying your sheet pan balsamic glazed chicken and veggies, store leftovers in an airtight container. Make sure to cool the dish to room temperature first. This way, the flavor stays fresh. You can keep it in the fridge for up to three days. If you want to keep it longer, consider freezing. When you're ready to eat leftovers, reheating is simple. Preheat your oven to 350°F (175°C). Spread the chicken and veggies on a baking sheet. Heat for about 15-20 minutes or until warmed through. This helps keep the chicken juicy and the veggies tender. You can also use a microwave, but the oven gives a better texture. To freeze, place the cooled chicken and veggies in a freezer-safe bag or container. Squeeze out as much air as possible to prevent freezer burn. You can freeze them for up to three months. When ready to eat, thaw overnight in the fridge before reheating. This way, the flavors stay intact. Enjoy your meal even later! You can use red wine vinegar or apple cider vinegar. They both have a tangy taste. If you prefer a sweeter option, try using a mix of vinegar and a bit of honey. This will mimic the balsamic flavor without losing the balance. Check the internal temperature of the chicken. It should reach 165°F (74°C). You can use a meat thermometer for the best results. If you don’t have a thermometer, cut into the chicken. The juices should run clear and the meat should no longer be pink. Yes, you can use bone-in chicken thighs. They will add more flavor, but they will take longer to cook. Adjust the cooking time to about 35-40 minutes to ensure they are fully cooked. Make sure to check the temperature in the thickest part of the thigh. Absolutely! You can adapt this recipe for an air fryer. Cook the chicken and vegetables at 375°F (190°C) for about 20-25 minutes. Be sure to shake the basket halfway through for even cooking. The air fryer will give you a nice crisp on the chicken. This guide covered the essential ingredients, step-by-step cooking, and helpful tips. You learned how to customize your dish, store leftovers, and make variations. In the end, cooking is about finding joy in each bite. Use the tips and tricks to make your dish unique and tasty. I hope you feel inspired to create a delicious meal. Happy cooking!

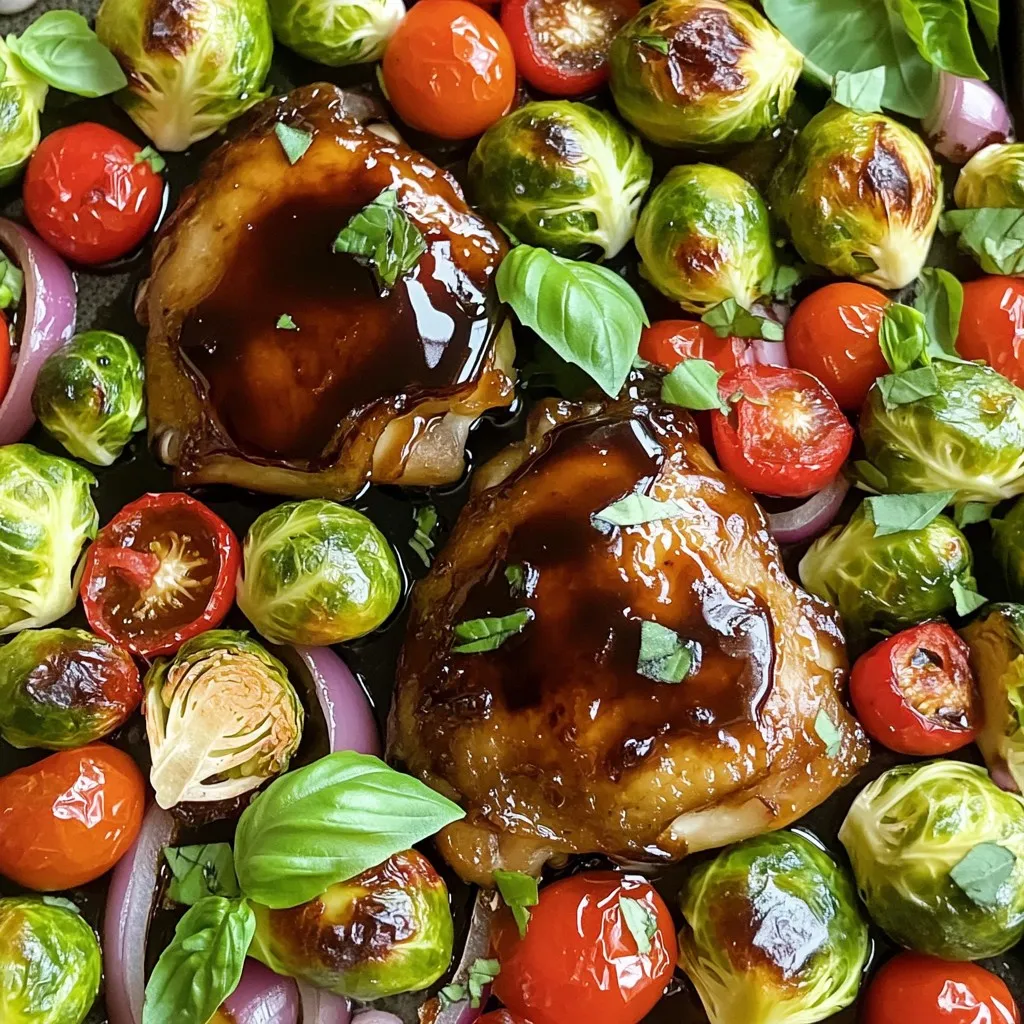
Looking to impress at dinner without spending hours in the kitchen? My Sheet Pan Balsamic Glazed Chicken and Vegetables dish is your perfect solution! This easy recipe combines juicy chicken …

Read more

Categories Dinner

Brown Sugar Streusel Muffins Easy and Tasty Delight

October 9, 2025 by Chef Miles
- 2 cups all-purpose flour - 1 cup brown sugar, packed - 1 tablespoon baking powder - 1/2 teaspoon baking soda - 1/2 teaspoon salt - 1/2 cup unsalted butter, melted - 2 large eggs - 1 cup buttermilk (or milk with vinegar substitute) - 1 teaspoon vanilla extract - 1/2 cup chopped nuts (optional) To create these tasty muffins, you need simple yet key ingredients. The all-purpose flour gives structure, while brown sugar adds sweetness and moisture. Baking powder and baking soda help the muffins rise. You also need salt to enhance flavor. Melted butter brings richness, and eggs bind everything together. Buttermilk adds tang and moisture, making the muffins tender. Finally, vanilla extract gives a warm, inviting aroma. If you like nuts, add some for crunch. - 1/3 cup all-purpose flour - 1/3 cup brown sugar, packed - 1 teaspoon ground cinnamon - 2 tablespoons unsalted butter, cold and diced The streusel topping is easy to make. You mix flour and brown sugar for sweetness. Ground cinnamon adds warmth and spice. Cold butter gives it a crumbly texture. This topping makes the muffins even more delightful. Using these ingredients, you will create a batch of muffins that everyone will love. The combination of flavors and textures will make your baking experience fun and rewarding. - Preheat oven to 350°F (175°C) - Prepare muffin tin using liners or non-stick spray First, start your oven. Set it to 350°F (175°C). This step warms it up for the muffins. Next, grab your muffin tin. You can line it with paper liners or spray it with non-stick spray. This will help the muffins come out easily. - Whisk together flour, brown sugar, baking powder, baking soda, and salt In a big bowl, add two cups of all-purpose flour. Then, mix in one cup of packed brown sugar. Next, add one tablespoon of baking powder, half a teaspoon of baking soda, and half a teaspoon of salt. Use a whisk to blend everything well. This mix makes the base of your muffins. - Mix melted butter, eggs, buttermilk, and vanilla until smooth Now, take another bowl. Pour in half a cup of melted butter. Crack in two large eggs. Add one cup of buttermilk and one teaspoon of vanilla extract. Whisk these together until the mix is smooth. This mixture adds moisture and flavor to your muffins. - Gradually add wet ingredients to dry, mix gently, and fold in nuts (if using) Next, pour the wet mix into the bowl with the dry mix. Stir it gently until just combined. Don’t overmix! A few lumps are okay. If you want, fold in half a cup of chopped nuts like walnuts or pecans. They add a nice crunch. - Blend flour, brown sugar, cinnamon, and cold butter until crumbly For the streusel topping, take a small bowl. Add one-third cup of all-purpose flour, one-third cup of packed brown sugar, and one teaspoon of ground cinnamon. Cut in two tablespoons of cold, diced butter. Use a fork or your fingers to mix until it looks like coarse crumbs. This topping gives a sweet and crunchy finish to your muffins. - Distribute batter in muffin cups, sprinkle streusel topping, and bake Now, scoop the muffin batter into the prepared muffin cups. Fill them about two-thirds full. Then, sprinkle the streusel topping generously over each muffin. Place the tin in the oven and bake for 18 to 20 minutes. Check the muffins with a toothpick. If it comes out clean, they are ready. Let them cool in the tin for about 5 minutes before moving them to a wire rack to cool fully. Enjoy your warm, sweet muffins! To get light and fluffy muffins, avoid overmixing. When you mix, stop as soon as the wet and dry ingredients come together. A few lumps in the batter are okay. They help keep the muffins soft. When measuring flour, use a spoon to fill your measuring cup. Then, level it off with a knife. This method gives you the right amount without packing it down. You can add extra spices to boost flavor. Consider cinnamon, nutmeg, or even ginger for a warm taste. For a twist, try adding vanilla or almond extract to the batter. Just a little can change the whole muffin experience. You could also mix in some citrus zest, like lemon or orange, for freshness. To check if your muffins are done, use a toothpick. Stick it in the center of a muffin. If it comes out clean, they are ready. If it has wet batter on it, bake for another minute or two. This simple test helps ensure your muffins are perfectly baked every time. {{image_4}} You can make these muffins even more fun with add-ins. Try adding fruits like blueberries or mashed bananas. They add sweetness and moisture. You can also mix in nuts like almonds or pecans for a nice crunch. Each choice brings a unique flavor that makes each bite special. If you want a healthier muffin, swap all-purpose flour for whole wheat flour. This change adds fiber and nutrients. You can also use gluten-free flour if you need a gluten-free option. For sweetening, consider using honey or maple syrup instead of brown sugar. These alternatives can reduce sugar while still keeping the muffins sweet. Seasonal spices can take your muffins to the next level. In the fall, add pumpkin spice for a cozy flavor. For the holidays, mix in cranberries or even chocolate chips. These variations not only change the taste but also make your muffins festive and fun for any occasion. To keep your Brown Sugar Streusel Muffins fresh, store them at room temperature. Place them in an airtight container. This helps lock in moisture and flavor. If you want them to last longer, you can refrigerate them. However, the fridge might dry them out a bit. So, I recommend room temperature for best taste. Freezing is a great option if you want to save some muffins for later. To freeze them, let the muffins cool completely. Then, wrap each muffin in plastic wrap tightly. Place them in a freezer-safe bag or container. They can stay fresh in the freezer for up to three months. When you want to enjoy a muffin, take it out and thaw it. You can leave it at room temperature for a few hours. Or, if you're in a hurry, pop it in the microwave for about 20 seconds. This keeps them soft and tasty. Enjoy your muffins anytime! Yes, you can use regular milk. To make it like buttermilk, add 1 tablespoon of vinegar to 1 cup of milk. This mixture will curdle slightly, creating a tangy flavor. Buttermilk helps keep the muffins moist and tender. It also reacts with baking soda, giving your muffins a nice rise. If you lack brown sugar, use white sugar instead. Mix in 1 tablespoon of molasses per cup of white sugar to mimic brown sugar. This will change the flavor slightly, but it will still taste great. Brown sugar adds moisture and a rich flavor that white sugar may lack. To prevent sticking, lightly spray the paper liners with cooking spray before adding the batter. You can also use silicone muffin cups, which help muffins release easily. Another tip is to let the muffins cool a bit before removing them from the liners. This makes for a clean release. Yes, you can make mini muffins! Use a mini muffin pan and fill each cup about halfway. Bake for 10-12 minutes, checking for doneness with a toothpick. They will bake faster than regular muffins, so keep an eye on them. Enjoy bite-sized treats! You learned how to make delicious muffins with a crumbly streusel topping. Key ingredients include flour, brown sugar, butter, and eggs. You now know how to mix and bake them for the best texture and flavor. Remember to check your muffins with a toothpick to ensure they’re done. Feel free to explore add-ins and variations to suit your taste. Enjoy your baking journey and make each batch your own!

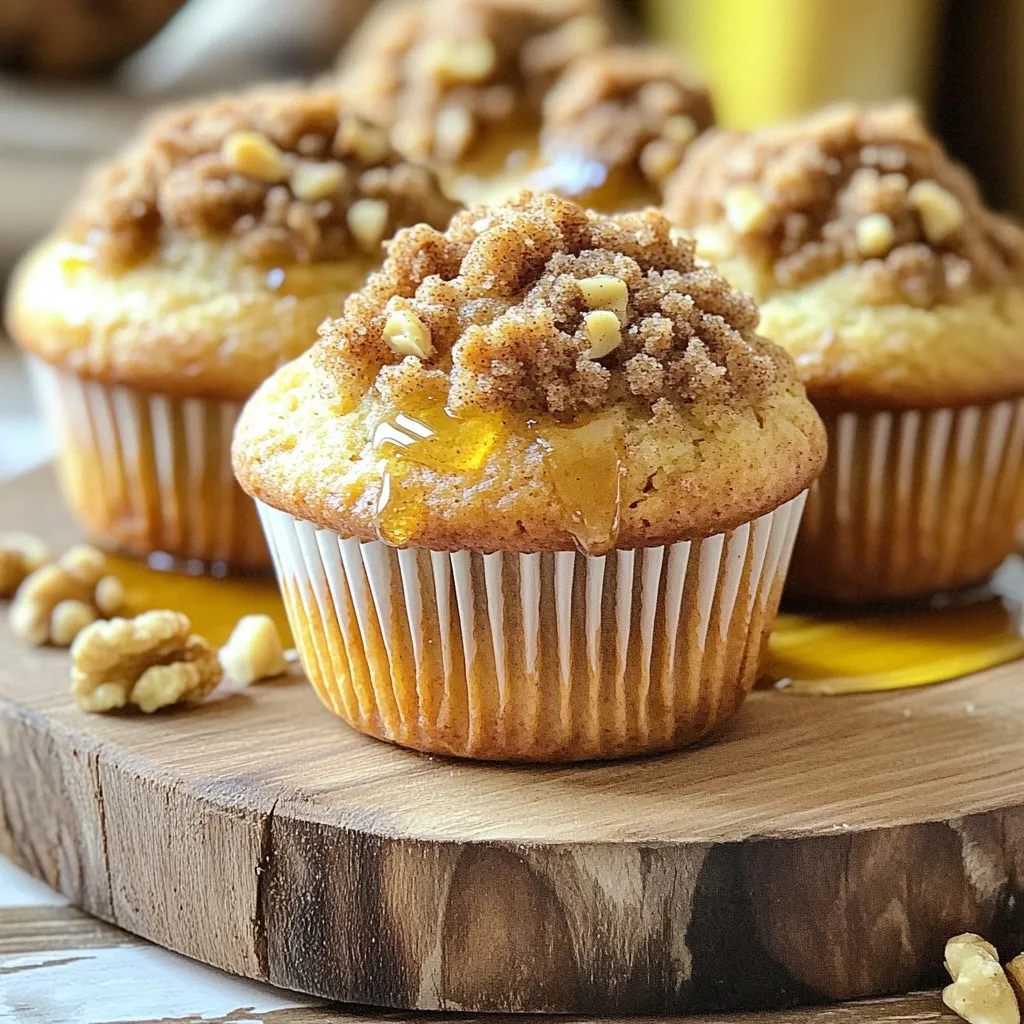
Welcome to the world of baking easy and tasty brown sugar streusel muffins! These muffins are fluffy, sweet, and topped with a crunchy streusel. You can whip them up in …

Read more

Categories Desserts

Creamy Potato Leek Crockpot Soup Nourishing Comfort Dish

October 9, 2025 by Chef Miles
- 4 large russet potatoes, peeled and cut into 1-inch cubes - 3 leeks, thoroughly cleaned and sliced (include white and light green parts) - 1 medium yellow onion, finely diced - 4 cloves garlic, minced - 4 cups vegetable broth (preferably low sodium) - 1 cup heavy cream or coconut cream (for a vegan alternative) - 2 tablespoons extra virgin olive oil - 1 teaspoon dried thyme - Salt and freshly ground black pepper, to taste - Fresh chives, chopped (for garnish) I love using russet potatoes for this soup. They break down well and create a creamy base. Leeks add a soft, sweet flavor that makes every bite special. When you slice the leeks, be sure to wash them well. They can hold dirt in their layers. A good rinse keeps your soup clean and tasty. Onions and garlic give depth to the soup. They add warmth and richness. I prefer using a medium yellow onion for this dish. Its flavor balances well with the potatoes and leeks. The garlic brings a nice kick. The vegetable broth is essential. It gives the soup a savory base. I often choose low-sodium broth. This way, I can control the salt level. Adding heavy cream gives a rich texture. If you want a lighter option, coconut cream works just as well. Don't forget the thyme! It adds a lovely herbal note. A sprinkle of salt and black pepper brings everything together. Finally, fresh chives add a pop of color and taste. They make the soup look pretty too. This mix of ingredients creates a comforting and nourishing dish that warms the heart. First, you need to clean the leeks. To do this, slice the leeks thinly. Then, place the slices in a bowl of cold water. Swirl the leeks around to remove any grit. Let them soak for a few minutes. After soaking, drain the leeks and set them aside. This method helps keep your soup clean and fresh. Next, slicing the leeks is simple. Use a sharp knife for clean cuts. You want to include both the white and light green parts. Avoid the dark green tops, as they can be tough. Thin slices will cook evenly in the soup. Now it’s time to layer the ingredients in your crockpot. Start with the diced russet potatoes. Next, add the cleaned and sliced leeks. After that, layer the diced onion and minced garlic. This order helps the flavors mix well during cooking. Even distribution is key here. Make sure each ingredient is spread out. This way, every bite of soup will be tasty. Cover the crockpot with its lid. Set it to cook on low for 6-8 hours. If you're in a hurry, choose the high setting for 3-4 hours. The potatoes should be fork-tender when done. This means they’re ready for blending into a creamy soup. Once cooking is complete, it’s blending time. Use an immersion blender for quick and easy blending. This tool lets you blend the soup right in the crockpot. If you don’t have one, use a regular blender. Pour the soup in batches into the blender. Blend until smooth but leave some chunks for texture. After blending, stir in the heavy cream or coconut cream. This adds richness to the soup. Mix until the cream is fully blended in. Next, taste the soup and adjust the seasoning. Add more salt or pepper if needed. Finally, let the soup cook on low for an extra 30 minutes. This step warms the cream and thickens the soup, making it even more delicious. To make your creamy potato leek crockpot soup shine, consider adding fresh herbs. Chopped parsley or dill can give a burst of freshness. You might also add a pinch of smoked paprika for a warm depth. Balance the creaminess by tasting as you go. If the soup feels too rich, add a splash of lemon juice. This brightens the flavors nicely. Crockpots can vary a lot. If yours cooks faster, start checking after 5 hours on low. For models that run cooler, you may need an extra hour. Your soup is ready when the potatoes are tender. Use a fork for testing. They should break apart easily. Serve your soup hot in deep bowls for a cozy feel. Garnish with fresh chives for a pop of color. A drizzle of cream adds a nice touch too. Pair the soup with crusty artisan bread. It’s perfect for dipping and makes a great meal. For a bit of crunch, serve with a simple green salad on the side. {{image_4}} If you want a vegan version of this soup, you can use coconut cream instead of heavy cream. Coconut cream adds a rich and creamy texture, just like dairy does. It also gives a nice hint of sweetness that blends well with the potatoes and leeks. You can find coconut cream in cans at most grocery stores. Just make sure to use the thick part at the top. This way, you keep the soup creamy without using any dairy. You may also add a splash of lemon juice for brightness, enhancing the overall flavor. Adding protein makes this soup heartier. If you like meat, consider adding cooked chicken or crispy bacon. Just chop them into small pieces and stir them in after blending the soup. For a vegetarian option, try adding white beans or chickpeas. They not only boost protein but also add a nice texture to the soup. You can also use lentils for a different twist. They cook well in the crockpot and take on the flavors of the soup. You can mix in other root vegetables to change the flavor. Carrots, parsnips, or sweet potatoes work great. They add sweetness and depth to the soup. You can also use seasonal vegetables like squash or pumpkin in the fall. Just peel and cube them the same way you do with potatoes. This keeps the cooking time similar. Feel free to experiment with whatever vegetables you have on hand for a unique touch! For storing your creamy potato leek soup, choose airtight containers. Glass or plastic containers work well. Make sure they seal tightly to keep the soup fresh. The soup lasts up to five days in the fridge. Check for any off smells or colors before eating. Enjoy it warm, as it tastes great even after a few days! You can freeze the soup for later use. First, let it cool completely. Then, pour it into freezer-safe bags or containers. Leave some space at the top for expansion. Label each bag with the date. The soup can last up to three months in the freezer. When you’re ready to eat, thaw the soup in the fridge overnight. To reheat, pour it into a pot and warm it on low heat. Stir occasionally to keep it smooth. If it seems thick, add a splash of broth or water to loosen it up. Enjoy your cozy meal anytime! Yes, you can easily adapt this recipe for the stove. Start by heating olive oil in a large pot. Add the diced onion, garlic, and leeks. Cook until soft, about 5 minutes. Then, add the potatoes and broth. Bring it to a boil, then reduce the heat. Let it simmer for 30-40 minutes until the potatoes are tender. Blend as you would in the crockpot and stir in the cream. This method is quicker and still tasty! If you want a thicker soup, try a few methods. First, mash some of the cooked potatoes in the pot. This adds creaminess without changing the flavor. Second, you can mix a bit of cornstarch with cold water. Stir it in while the soup cooks for a few more minutes. Lastly, using a blender will also help achieve the desired thickness. To reheat the soup, you can use the stove or microwave. On the stove, pour the soup into a pot over medium heat. Stir often until it’s hot. In the microwave, place the soup in a microwave-safe bowl and cover it. Heat it for 1-2 minutes, stirring halfway through. Both ways work well to keep the flavors intact. Yes, this soup is great for meal prep! You can make a big batch and store it in the fridge. Use airtight containers for best results. It lasts about 4-5 days. You can also freeze it for up to three months. Just thaw it overnight in the fridge before reheating. This makes for a quick and easy meal later! This blog post covered a tasty soup recipe using potatoes, leeks, and herbs. You learned how to prepare the ingredients, layer them in a crockpot, and achieve a creamy texture. I shared tips to enhance flavor and variations for different diets. Remember, this soup is easy to customize and perfect for any meal. Try it out and make it your own! Enjoy the warmth and comfort it brings.

Warm up with my creamy potato leek crockpot soup, the perfect comfort dish! This rich and hearty soup combines simple ingredients like russet potatoes and fresh leeks for a delightful …

Read more

Categories Dinner

Honey Mustard Chicken Tenders Air Fryer Recipe Delight

October 9, 2025 by Chef Miles
To make honey mustard chicken tenders, gather these simple ingredients: - 1 pound chicken tenderloin - 1/4 cup honey - 1/4 cup Dijon mustard - 1 tablespoon olive oil - 1 teaspoon garlic powder - 1 teaspoon onion powder - 1 teaspoon smoked paprika - Salt and pepper to taste - 1 cup breadcrumbs (panko for extra crunch) - Fresh parsley, finely chopped, for garnish You can swap some ingredients if needed. Here are a few ideas: - Chicken: Use chicken breasts cut into strips if you can't find tenderloins. - Honey: Maple syrup works well if you want a different sweetness. - Dijon Mustard: Yellow mustard can be a good alternative if that's what you have. - Olive Oil: Any cooking oil, like canola or vegetable oil, is fine. - Spices: Feel free to mix up spices based on your taste. Garlic salt can replace garlic powder and salt. This recipe is delicious and offers a good mix of nutrients. Here’s a rough breakdown per serving: - Calories: About 300 - Protein: 25g - Carbohydrates: 30g - Fat: 10g - Fiber: 2g These chicken tenders provide a tasty source of protein and flavor. Enjoy making them! First, grab a medium mixing bowl. In this bowl, combine: - 1/4 cup honey - 1/4 cup Dijon mustard - 1 tablespoon olive oil - 1 teaspoon garlic powder - 1 teaspoon onion powder - 1 teaspoon smoked paprika - Salt and pepper to taste Whisk these ingredients together until they blend well. This honey mustard mix gives the chicken great flavor. Next, add 1 pound of chicken tenderloin. Make sure each piece gets a nice coat of that tasty marinade. Cover the bowl with plastic wrap. Let it sit in the fridge for at least 30 minutes. If you have more time, let it marinate for up to 2 hours. This helps the chicken soak up all that flavor. While the chicken is marinating, preheat your air fryer. Set it to 400°F (200°C) and let it warm up for about 5 minutes. Preheating helps the chicken cook evenly and get crispy. Next, take the chicken tenders out of the marinade. Let any extra marinade drip off. Now, roll each tender in 1 cup of breadcrumbs. Use panko if you want extra crunch. Press gently so the crumbs stick to the chicken well. After breading the chicken, place them in the air fryer basket. Make sure to lay them in a single layer. Don’t overcrowd the basket; this helps them cook better. Air fry the chicken tenders for 10 to 12 minutes. Flip them halfway through to ensure they cook evenly. Use a meat thermometer to check that they reach an internal temperature of 165°F. When they turn golden brown, they are ready. Once cooked, take the chicken out and let them rest for a couple of minutes. This helps keep them juicy. Serve them with freshly chopped parsley on top. You can drizzle on more honey mustard sauce or serve it on the side for dipping. Enjoy! To make your chicken tenders extra crispy, use panko breadcrumbs. They create a light and crunchy coating. Before breading, let the chicken marinate well. This keeps the meat juicy. Don't skip the step of pressing the crumbs onto the chicken. It helps them stick better. Also, make sure your air fryer is preheated. This ensures a nice crispness right from the start. If your honey mustard sauce is too thin, you can add more Dijon mustard or honey. This will give it a thicker texture and enhance the flavor. If you want a spicier kick, add a pinch of cayenne pepper. For a touch of sweetness, mix in a bit more honey. Always taste as you go to find the perfect balance for your dish. Serve your chicken tenders on a rustic wooden board for a fun look. Pair them with fresh vegetable sticks like carrots and celery for crunch. A small bowl of honey mustard sauce on the side makes for great dipping. You can also add a side of crispy fries or a light salad. This makes your meal colorful and healthy. {{image_4}} You can change the coating for your chicken tenders. For a gluten-free option, use gluten-free breadcrumbs. These still give a nice crunch. You can also try crushed cornflakes. They add a fun twist. Just make sure the cornflakes are plain. Want to spice things up? You can add more flavors to your marinade. Try adding a pinch of cayenne pepper for heat. You could also mix in some Italian seasoning for a herby taste. Don't forget about lemon zest! It brings a fresh zing to the dish. Dipping sauces can change the meal. Honey mustard is great, but you can try others. Barbecue sauce adds a smoky flavor. Ranch dressing is creamy and cool. If you like heat, Sriracha sauce can give a nice kick. Mix and match to find your favorite combo. After enjoying your honey mustard chicken tenders, let them cool down. Place any leftovers in an airtight container. They will stay fresh in the fridge for up to three days. If you want to keep them longer, freezing is a great option. When you’re ready to eat leftovers, you can reheat them easily. The air fryer works best for this. Preheat it to 350°F (175°C). Place the chicken tenders in the basket and heat for about 5-7 minutes. This will keep them crispy. You can also use a microwave, but they may lose some crunch. To freeze, let the chicken tenders cool completely. Lay them on a baking sheet in a single layer, then freeze for about an hour. Once frozen, transfer them to a freezer-safe bag. They can last up to three months in the freezer. When you want to enjoy them again, thaw in the fridge overnight before reheating. You should marinate the chicken tenders for at least 30 minutes. This time helps the flavors soak in. If you want more flavor, marinate for up to 2 hours. Longer marinating makes the chicken taste better and more tender. Yes, you can bake the chicken tenders. Preheat your oven to 400°F (200°C). Place the breaded tenders on a baking sheet. Bake for about 15-20 minutes. Flip them halfway through to ensure even cooking. They will still taste great, but the texture may be less crispy than air frying. These chicken tenders pair well with many sides. Here are some tasty options: - Fresh veggie sticks: Carrots, celery, or bell peppers for crunch. - French fries or sweet potato fries: Perfect for dipping. - Salad: A light green salad adds freshness. - Rice or quinoa: For a filling meal. - Dipping sauces: Serve with extra honey mustard or ranch dressing. Feel free to mix and match based on your taste! This article covered everything you need for perfect honey mustard chicken tenders. We discussed the must-have ingredients and how to swap them. You learned to marinate, cook, and ensure crispiness. Plus, I shared tips on serving and storing leftovers. Remember, you can customize the flavors and pairings. These tenders fit many meals and occasions. Enjoy making this tasty dish your own!

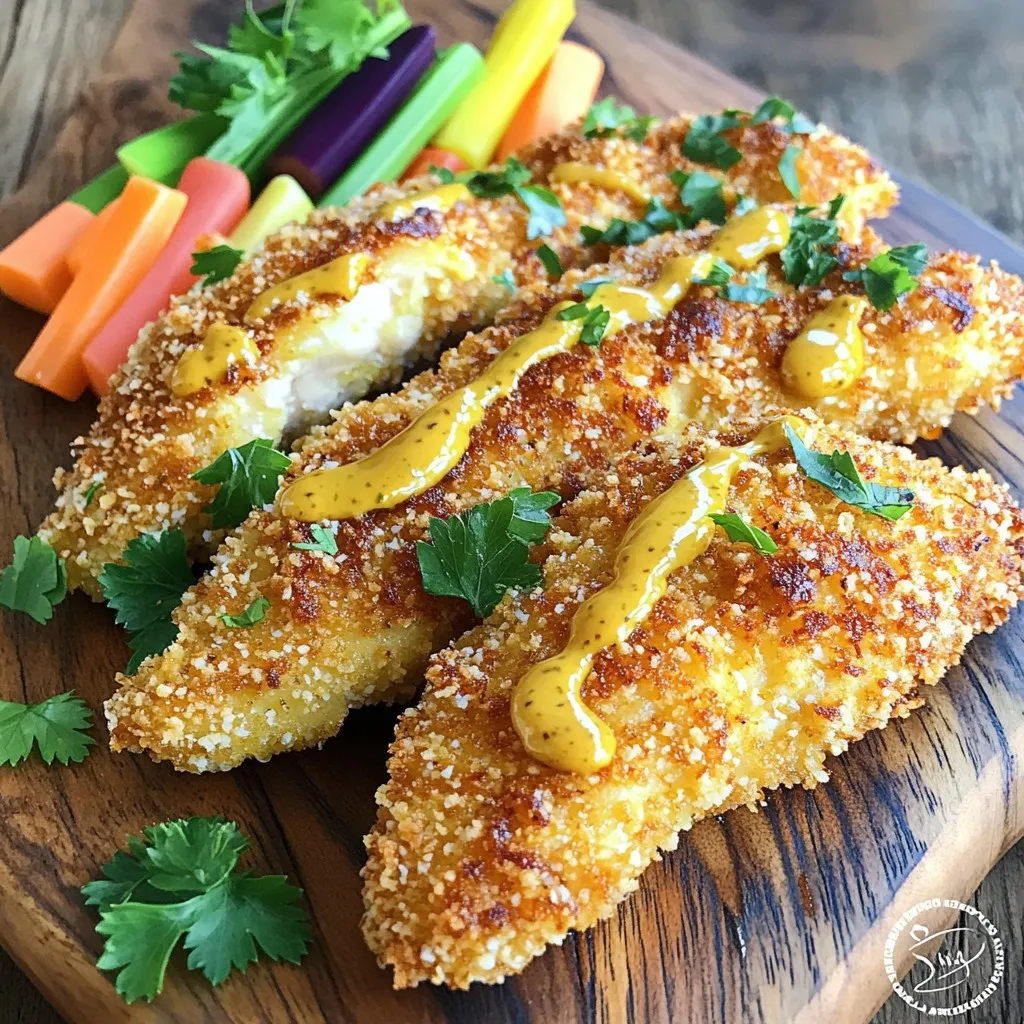
Are you ready to enjoy a tasty dish that’s quick and healthy? In this blog post, I’m sharing my easy Honey Mustard Chicken Tenders Air Fryer recipe. With simple ingredients, …

Read more

Categories Appetizers

Minute Breakfast Protein Flatbread Easy and Quick Meal

October 9, 2025 by Chef Miles
To make this tasty flatbread, you will need the following main ingredients: - 1 whole wheat flatbread - 2 large eggs, scrambled - 1/4 cup cottage cheese - 1/4 cup baby spinach, tightly packed - 2 tablespoons crumbled feta cheese - 1 tablespoon olive oil - Salt and freshly ground black pepper to taste - 1/2 ripe avocado, sliced These ingredients combine to create a balanced meal full of protein and fiber. Next, you will need some common pantry items: - Olive oil - Salt - Black pepper These staples help to bring out the flavors in your flatbread. You can also add some fun extras to suit your taste: - Red pepper flakes (for heat) - Additional veggies like bell peppers or tomatoes - A sprinkle of fresh herbs like basil or parsley These add-ons let you personalize your flatbread and make it your own! Start by cracking the eggs into a medium bowl. I like to whisk them with a pinch of salt and black pepper. This adds flavor to the eggs. Next, heat a non-stick skillet over medium heat. Add half of the olive oil to the skillet. Once it is hot, pour in the eggs. Stir gently with a spatula. Cook until the eggs are just set, which takes about 2-3 minutes. Remove them from heat right away. This helps prevent overcooking. Now, lay the whole wheat flatbread flat on a cutting board or plate. Use a spatula or the back of a spoon to spread the cottage cheese evenly over the flatbread. This creates a nice creamy base. Next, add the tightly packed baby spinach on top of the cottage cheese. Then, place the fluffy scrambled eggs over the spinach. Finally, sprinkle the crumbled feta cheese generously over the eggs. This brings a tangy flavor that really enhances the dish. To heat the assembled flatbread, return it to the skillet over low heat for 1-2 minutes. This makes sure it heats through and the edges get slightly crispy. Alternatively, you can use a broiler for about a minute. Just watch closely so it doesn’t burn. Once heated, remove the flatbread from the skillet or broiler. Slice it into wedges with a sharp knife or pizza cutter. Enjoy your tasty and nutritious breakfast protein flatbread right away! To make fluffy scrambled eggs, crack two large eggs into a bowl. Whisk them well with a pinch of salt and black pepper. Heat a non-stick skillet on medium heat and add half of the olive oil. Once it’s hot, pour in the eggs. Stir gently with a spatula. Cook until they just set, about 2-3 minutes. Remove them from heat right away. This step keeps the eggs soft and fluffy, and prevents them from getting dry. Start with the whole wheat flatbread as your base. Spread the cottage cheese evenly across the top. This creamy layer adds richness and helps hold everything together. Next, place tightly packed baby spinach on the cheese. Follow with the fluffy scrambled eggs. Finally, sprinkle crumbled feta over the eggs. Layering this way builds flavor and texture, making each bite more enjoyable. For extra flavor, don’t hold back on the salt and pepper. A good pinch of each enhances all the ingredients. If you like heat, sprinkle on some red pepper flakes. This small addition can elevate the dish and add a nice kick. Taste as you go, and adjust the seasonings to suit your taste. Finding the right balance makes your flatbread truly shine. {{image_4}} You can easily make this flatbread vegetarian. Replace the eggs with a mix of sautéed vegetables. Try bell peppers, mushrooms, or zucchini. They add great taste and color. Use plant-based cheese instead of feta for a full vegetarian dish. This way, everyone can enjoy it. To make this flatbread gluten-free, swap the whole wheat flatbread for a gluten-free option. Look for flatbreads made from rice or almond flour. These options keep the meal tasty while being kind to your tummy. Check labels to ensure they are truly gluten-free. Want to boost the protein? Use egg whites instead of whole eggs. You can also add extra cottage cheese on top. Another option is to sprinkle some hemp seeds over the flatbread. These small changes can add more protein without changing the flavor much. Enjoy your protein-packed breakfast! To keep your leftover flatbread fresh, wrap it tightly in plastic wrap. You can also use an airtight container. This way, it stays moist and tasty. Store it in the fridge for up to three days. If you want to enjoy it later, freezing is a great option. When you’re ready to eat your flatbread, reheating is easy. You can use a skillet over low heat. Just warm it for about 1-2 minutes. This keeps the edges crispy and the inside warm. If you prefer, you can use a microwave. Heat it for 30 seconds, but this may make it soft. To freeze your flatbread, let it cool first. Wrap it in plastic wrap, then place it in a freezer bag. This prevents freezer burn. It can stay in the freezer for up to one month. When you want to eat it, thaw it overnight in the fridge. Then, heat it up as mentioned above. Enjoy your quick and easy meal anytime! Yes, you can make this flatbread in advance. Cook the eggs and assemble the flatbread. Wrap it well in foil or plastic wrap. Store it in the fridge for up to two days. When ready to eat, heat it in a skillet or under the broiler. This saves you time on busy mornings. You can enjoy this flatbread with various side dishes. Here are a few ideas: - Fresh fruit salad adds sweetness. - Greek yogurt gives a creamy texture. - A simple green salad offers crunch. - Roasted potatoes can bring warmth and heartiness. These sides complement the flatbread well, adding more flavor and nutrients to your meal. To boost protein in your flatbread, try these options: - Add more eggs. Each egg has about six grams of protein. - Use higher-protein cheese, like ricotta or cottage cheese. - Include cooked chicken or turkey for extra protein. - Sprinkle hemp seeds or chia seeds on top. These ideas help you reach your protein goals while keeping your breakfast tasty and satisfying. This blog post covered how to make delicious, protein-rich flatbread. We explored main ingredients, pantry staples, and optional add-ons for customization. You learned step-by-step how to prepare eggs and assemble this tasty meal. We shared tips for fluffy eggs and flavorful seasonings. You also discovered variations, storage info, and answered frequently asked questions. These flatbreads are quick, healthy, and fun to make. Enjoy your cooking and make it your own!

Looking for a quick and tasty breakfast option? With my Minute Breakfast Protein Flatbread, you can whip up a satisfying meal in no time! This recipe is packed with protein …

Read more

Categories Breakfast

Salted Caramel Biscoff Cheesecake Cups Delight

October 9, 2025 by Chef Miles
- Biscoff cookies: These cookies create a crunchy, sweet crust. Their unique spice profile adds depth to the dessert. - Cream cheese: This ingredient gives the cheesecake its rich and creamy texture. Softened cream cheese blends smoothly, making the filling light and fluffy. - Optional garnishes and toppings: Whole Biscoff cookies make a great garnish. Drizzling extra salted caramel sauce adds a sweet touch and enhances the flavor. A sprinkle of flaky sea salt boosts the taste, balancing the sweetness. Using these ingredients, you’ll craft delightful cheesecake cups that are sure to impress! To start, grab a medium bowl. Here, you will combine the crushed Biscoff cookies with the melted butter. Mix them well until the mixture feels like wet sand. This consistency is key for a good crust. Next, take your serving cups or small jars. Evenly scoop the cookie mixture into the bottom of each cup. Use the back of a spoon or your fingers to press it down firmly. Make sure it is nice and compact. After that, set the cups aside in the refrigerator. This chilling step helps the crust firm up while you make the filling. Now, let’s make the cheesecake filling. In a large bowl, beat the softened cream cheese with the sifted powdered sugar and vanilla extract. Use an electric mixer for this task. Mix until the filling is smooth and creamy. This will take a couple of minutes. In another bowl, pour in the cold heavy whipping cream. Whip it using the mixer until soft peaks form. This should take about 2-3 minutes. Be careful not to over-whip, or it will get too stiff. Now, gently fold the whipped cream into the cream cheese mixture. Use a spatula and be gentle to keep the airiness. To add flavor, pour in the salted caramel sauce. Sprinkle in a pinch of flaky sea salt. Gently fold it into the mixture until evenly combined. Be cautious to avoid deflating your whipped cream. It’s time to fill the cups! Using a spoon or piping bag, fill each cup with the cheesecake mixture. Generously dollop it on top of the crust. Fill them to the brim for a delightful treat. Next, drizzle extra salted caramel sauce over the cheesecake layers. This adds a beautiful finish and more flavor. Finally, sprinkle a tiny pinch of flaky sea salt on top. This helps enhance the flavor contrast. For the final touch, add a whole Biscoff cookie on top of each cheesecake cup. This serves as a lovely garnish. Now, return the cups to the refrigerator. Chill them for at least 2 hours. This allows the flavors to meld and the cheesecake to set perfectly. Enjoy your delicious creations! To get the best results, start with room temperature cream cheese. Cold cream cheese can lead to lumps. It mixes better and makes your cheesecake smooth. Set it out for about 30 minutes before you start. Next, let's whip the cream. Use cold heavy whipping cream for fluffiness. Beat it until you see soft peaks forming. This usually takes 2-3 minutes. Be gentle when you fold the whipped cream into the cream cheese. You want to keep it light and airy. Adding extra flavors can make your cheesecake cups even better. Try mixing in some chocolate chips or crushed nuts. You can also add a splash of coffee or a hint of orange zest for a twist. Serve your cheesecake cups cold. This helps the flavors pop. If they sit out too long, they can get too soft. Enjoy them fresh from the fridge for the best taste! {{image_4}} You can mix things up with different cookie options. Instead of Biscoff, try Oreos for a classic taste. Graham crackers offer a simple, buttery base. If you want a nutty twist, use crushed pecan cookies. For sauces, salted caramel is a star, but chocolate sauce adds rich flavor. Fruit sauces, like raspberry or blueberry, can brighten each bite. They give a fun contrast to the creamy cheesecake. If you need a gluten-free dessert, alternative cookies are your friend. Look for gluten-free Biscoff or almond flour cookies. Both options work well for the crust. For those who follow a vegetarian or vegan diet, swap cream cheese for vegan cream cheese. Use coconut cream for a lighter touch. This keeps the dessert creamy without dairy. To keep your salted caramel Biscoff cheesecake cups fresh, use airtight containers. Glass jars or plastic containers work great. Make sure they are clean and dry before use. Store the cups in the refrigerator for up to five days. This keeps the cheesecake creamy and the crust firm. You can freeze the cheesecake cups for later. First, cover each cup tightly with plastic wrap or foil. Then, place them in a freezer-safe container. They can stay frozen for up to three months. When you're ready to enjoy, move them to the fridge to thaw overnight. Freezing may change the texture a bit. The cheesecake might be slightly less creamy, but the flavor will still shine. Enjoy your treats anytime! Yes, you can make these cheesecake cups ahead of time. I recommend chilling them for at least 2 hours before serving. You can even prepare them a day in advance. Just keep them covered in the fridge. This helps the flavors blend well and allows the cheesecake to set properly. To avoid a runny cheesecake, start with softened cream cheese. This helps it mix well. Make sure to whip the heavy cream until soft peaks form. Then, fold it gently into the cream cheese. This keeps the mixture fluffy. Also, chilling the cups for the right time helps them firm up. Yes, you can substitute Biscoff cookies. Some great alternatives include graham crackers or Oreo cookies. Both work well for the crust. If you want a different flavor, try using gingersnap cookies. They add a nice spice to the cheesecake. These cheesecake cups mix Biscoff cookies and cream cheese for a tasty treat. We covered how to make them, from preparing the crust to adding toppings. Remember to use room temperature cream cheese for the best texture. Don’t shy away from trying different flavors or dietary options. These cups store well in the fridge and can be frozen too. With these tips, you can enjoy delicious cheesecake cups anytime and impress your friends!

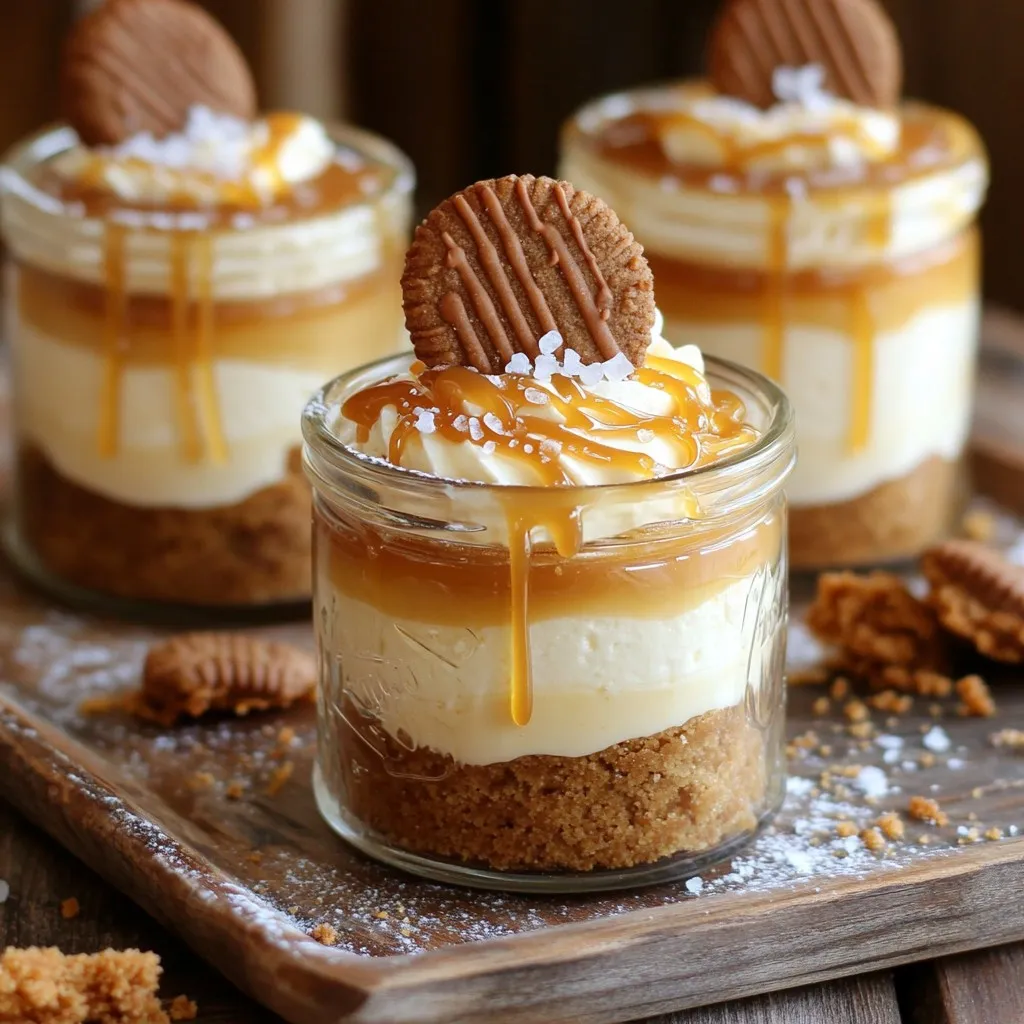
Ready for a treat that will make your taste buds dance? My Salted Caramel Biscoff Cheesecake Cups blend rich cream cheese with crunchy Biscoff cookies. Each bite is creamy, sweet, …

Read more

Categories Desserts

Caramel Apple Cheesecake Brownie Cups Irresistible Treat

October 8, 2025 by Chef Miles
- 1 box of brownie mix (plus ingredients needed per package, usually water, oil, and eggs) - 1 package (8 oz) cream cheese, softened - 1/2 cup granulated sugar - 1 teaspoon vanilla extract - 1 large egg - 1 cup Granny Smith apples, diced - 1 teaspoon ground cinnamon - 1/4 cup caramel sauce (plus extra for drizzling) - 1/2 cup chopped walnuts (optional) - Pinch of salt - For the brownie mix, follow the package instructions. Most need about 1/3 cup oil, 1/4 cup water, and 2 large eggs. - Use full-fat cream cheese for the best texture and taste. - Choose Granny Smith apples for a tart flavor that pairs well with sweet caramel. - I recommend brands like Philadelphia for cream cheese and Ghirardelli for caramel sauce. - If you want a nut-free treat, try using sunflower seeds instead of walnuts. - For caramel, you can use homemade or store-bought sauces. You can also try different apple types, like Honeycrisp or Fuji, for a sweeter taste. First, preheat your oven to 350°F (175°C). This step is key for even baking. While the oven heats, prepare your muffin tin. Line it with cupcake liners to help with easy removal later. If you don’t have liners, spray the tin with non-stick cooking spray. This will keep the brownie cups from sticking. In a large mixing bowl, prepare your brownie mix. Follow the package instructions closely. You will need water, oil, and eggs as needed. If you like, add 1/2 cup of chopped walnuts to the mix. Gently fold the walnuts into the batter for a nice crunch. Next, grab another bowl for the cheesecake layer. Beat 8 ounces of softened cream cheese until smooth. Add 1/2 cup of granulated sugar, 1 teaspoon of vanilla extract, and a pinch of salt. Blend these until they are well mixed. Now, add 1 large egg to the mix. Keep beating until the mixture is fluffy and free of lumps. Now it’s time to layer everything. Start by spooning a layer of brownie batter into each muffin cup. Fill each cup about halfway. Then, add a layer of the cream cheese mixture on top. Use about 1 tablespoon for each cup. Next, take 1 cup of diced Granny Smith apples. Toss them with 1 teaspoon of ground cinnamon and 2 tablespoons of caramel sauce. Distribute these cinnamon apples evenly on top of the cream cheese layer. Finish by adding more brownie batter on top until each cup is about 3/4 full. Place the muffin tin in your preheated oven. Bake for 20 to 25 minutes. To check if they are done, insert a toothpick into the center. It should come out with a few moist crumbs but no wet batter. This means they are ready! After baking, let the muffin tin cool for about 10 minutes. This helps them set. Then, carefully transfer the brownie cups to a wire rack to cool completely. Before serving, drizzle the tops with extra caramel sauce for that sweet touch. Enjoy these delicious treats! - Mixing the Brownie Batter: When mixing the brownie batter, blend it just until combined. Overmixing can make the brownies tough. Stir in the walnuts gently if you choose to use them. This keeps the texture light and fluffy. - Achieving a Smooth Cheesecake Layer: Make sure the cream cheese is soft. This helps it mix smoothly. Use a hand mixer to beat it well with sugar and vanilla. Blend until it is creamy without lumps. - Presentation Tips for Serving: Arrange the brownie cups on a rustic wooden platter for a cozy look. Drizzle caramel sauce on top for a shiny finish. Sprinkle a bit of cinnamon to add color and flavor. Thin apple slices make a great garnish, too. - Flavor Pairings: These brownie cups pair well with vanilla ice cream. A dollop of whipped cream also adds richness. Try serving them warm for a delicious contrast with cold toppings. - Overfilling the Muffin Cups: Fill each muffin cup only halfway with brownie batter. If you overfill, the cups may overflow as they bake. This can make a mess and affect the shape. - Baking Time Errors: Watch the baking time closely. You want a toothpick to come out with a few moist crumbs. If it comes out wet, they need more time. Overbaking can dry them out and ruin their texture. {{image_4}} You can change the flavor of your caramel apple cheesecake brownie cups easily. Try adding spices like nutmeg or ginger for a warm twist. These spices boost the taste and make your treat unique. You can also use different apple varieties. Granny Smith apples add tartness, but honeycrisp or Fuji apples bring sweetness. Each apple type gives a new flavor and texture. Experiment to find your favorite mix. If you need a gluten-free option, many brands offer gluten-free brownie mixes. This way, everyone can enjoy the treat. Read labels carefully to ensure they are safe. For a vegan cheesecake layer, swap cream cheese for a plant-based cream cheese. Use a flax egg instead of a regular egg for binding. These swaps keep the taste great while meeting dietary needs. You can turn these brownie cups into parfaits for a fun twist. Layer the brownie cups with whipped cream and fresh apples in a glass. This makes a beautiful dessert for parties. Get creative with toppings! Try adding chopped nuts, chocolate chips, or even sprinkles on top. A drizzle of extra caramel sauce makes everything taste better. You can personalize each cup to suit your taste. To keep your caramel apple cheesecake brownie cups fresh, store them in the refrigerator. Place them in an airtight container. This will help them stay moist and tasty. If you want to store them for a longer time, freezing is a great option. Wrap each brownie cup tightly in plastic wrap. Then, place them in a freezer-safe bag or container. This way, they can last up to three months in the freezer. When you want to enjoy your stored brownie cups, reheating is key. The best way to reheat them is in the oven. Preheat your oven to 350°F (175°C). Place the brownie cups on a baking sheet. Heat them for about 10 minutes. This way, they warm up nicely without drying out. If you prefer using a microwave, do so on a low setting. Heat for about 15-20 seconds, checking often to avoid overheating. After reheating, drizzle some extra caramel sauce on top for a delicious touch. These brownie cups stay fresh for about 4-5 days in the fridge. Keep an eye out for signs of spoilage. If you see any mold or an off smell, it’s best to toss them. Also, if the texture becomes dry or crumbly, they may not taste as good. Enjoy your treats while they are at their best! Yes, you can make these brownie cups ahead of time. They stay fresh for about three days in the fridge. Just cover them tightly in plastic wrap or place them in an airtight container. When you're ready to serve, let them sit at room temperature for a few minutes. This helps bring back their soft texture. If you need a substitute for cream cheese, you can use mascarpone cheese. It offers a similar creamy texture and mild taste. Another option is Greek yogurt, but it might change the flavor a bit. For a dairy-free option, try a vegan cream cheese, which works well too! To prevent sticking, line your muffin tin with good quality cupcake liners. You can also spray the liners lightly with non-stick cooking spray. This adds an extra layer of protection. Make sure to let them cool for a bit before removing them. This will help them come out easily. Caramel apple cheesecake pairs well with spices like nutmeg and ginger. You can also add a hint of lemon juice for brightness. Other flavors that work nicely include pecans, chocolate, or even a drizzle of peanut butter. Each adds a unique twist to the classic taste. Yes, you can use different nuts if you prefer. Pecans or almonds are great options. Both provide a nice crunch and flavor. If you want to skip nuts altogether, that’s fine too! The cups will still taste delicious without them. You can now easily make delicious brownie cups with cheesecake and apple. We covered all essential ingredients, measurements, and optional substitutes. You learned the step-by-step process, from mixing the batter to cooling the cups. Don’t forget the tips for serving and storing your treats. With these ideas, you can always create something new and tasty! Enjoy baking and sharing your unique brownie creations!

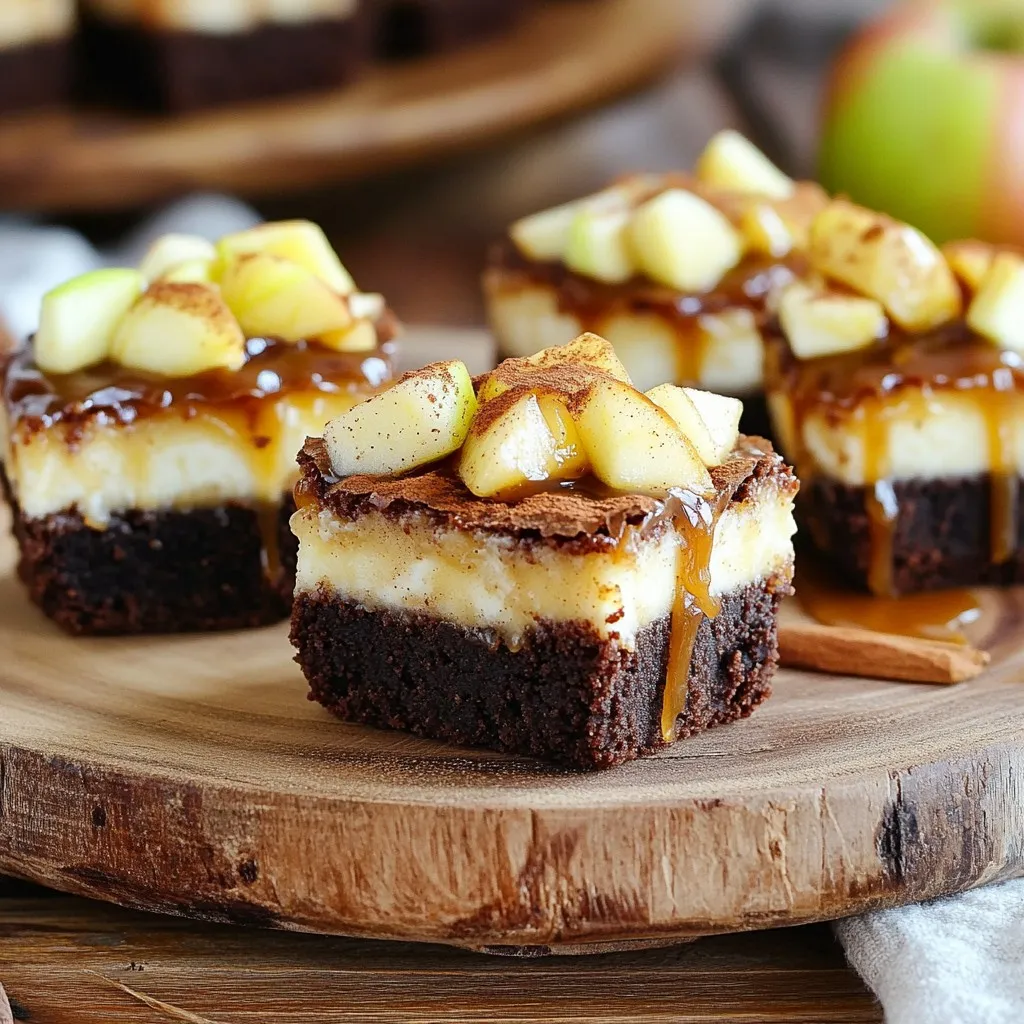
Get ready for a dessert that combines the best of fall flavors! These Caramel Apple Cheesecake Brownie Cups are a perfect treat for any occasion. Imagine moist brownie, creamy cheesecake, …

Read more

Categories Desserts

Creamy Garlic Mushroom Pasta One Pot Delight

October 8, 2025 by Chef Miles
To make the creamy garlic mushroom pasta, you need a few simple ingredients. Here is the full list: - 12 oz fusilli pasta - 2 cups sliced mushrooms (either cremini or button) - 4 cloves garlic, finely minced - 1 medium onion, finely chopped - 1 cup vegetable broth - 1 cup heavy cream (or coconut cream for a vegan alternative) - 1 cup grated Parmesan cheese (or nutritional yeast for a vegan option) - 2 tablespoons olive oil - 1 teaspoon dried thyme - 1 teaspoon dried basil - Salt and freshly ground black pepper to taste - Fresh parsley, chopped (for garnish) Each ingredient plays a key role in the dish. The fusilli pasta has ridges that hold the creamy sauce well. Mushrooms add a rich and earthy flavor that pairs perfectly with garlic. Garlic and onion bring a strong base flavor that makes the dish so tasty. Vegetable broth adds depth to the sauce. Cream makes everything smooth and rich, while Parmesan cheese gives it that classic Italian touch. Seasonings like thyme and basil lift the whole dish, giving it an aromatic touch. Olive oil helps to cook the veggies and adds a nice sheen to the final dish. Finally, parsley garnishes the pasta, giving it color and fresh taste. With these ingredients, you can create a dish that delights the senses. You will love how they come together to create creamy garlic mushroom pasta. 1. Heat 2 tablespoons of olive oil in a large pot over medium heat. 2. Add 1 medium finely chopped onion. Sauté for about 3-4 minutes. The onion should become soft and clear. 3. Mix in 4 minced garlic cloves. Then, add 2 cups of sliced mushrooms. Cook for 5-7 minutes. Stir often until the mushrooms turn golden brown. You’ll smell a nice aroma! 1. Sprinkle in 1 teaspoon of dried thyme and 1 teaspoon of dried basil. 2. Season with salt and freshly ground black pepper. Taste as you go. This step builds the dish’s flavor. 3. Pour in 1 cup of vegetable broth. Raise the heat to bring it to a gentle simmer. 1. Add 12 oz of fusilli pasta to the pot. Make sure the pasta is fully submerged in the broth. 2. Check the package for cooking time. It usually takes about 10-12 minutes. Stir occasionally to stop it from sticking together. 1. Once the pasta is al dente, lower the heat. Gradually mix in 1 cup of heavy cream. 2. Add 1 cup of grated Parmesan cheese. Stir until the cheese melts. This makes the sauce creamy and rich. 3. If the sauce looks too thick, add a splash of broth or cream. Adjust the seasoning with salt and pepper to your taste. This simple method creates a rich and creamy garlic mushroom pasta that delights every time! To make your pasta creamy, adjust the broth or cream. If the sauce is too thick, add more broth. For a richer taste, use extra cream. Stir gently while cooking. This helps mix the flavors well. Timing is key; add cream at the end for the best texture. Fresh herbs add a bright taste. They can make your dish pop. Dried herbs work too but might not be as strong. You can also try cheese alternatives like nutritional yeast. This gives a nice flavor without dairy. Experiment with what you like best! Serve your creamy garlic mushroom pasta in wide, shallow bowls. This lets the sauce shine. Garnish with chopped parsley and grated cheese on top. It looks fancy and tastes great! Adding a sprinkle of black pepper can also enhance the look and taste. Enjoy your beautiful meal! {{image_4}} To make this dish vegan, swap out the cream and cheese. Use coconut cream instead of heavy cream. This keeps the dish nice and rich. For cheese, use nutritional yeast. It adds a cheesy flavor that makes the pasta taste great. You can add protein for a heartier meal. Sauté chicken until golden and mix it in. Chicken pairs well with the creamy sauce. Tofu is another great choice. For a seafood twist, consider shrimp. Just cook them until pink, then add them to the pasta. Boost the nutrition by adding greens. Spinach or kale are both good choices. They cook down nicely and add color. You can also mix in other vegetables. Think about bell peppers, zucchini, or peas. These veggies not only taste great but also add health benefits. To store your creamy garlic mushroom pasta, let it cool first. Place it in a container with a tight lid. This keeps it fresh. I recommend using glass containers or BPA-free plastic. Both are good choices for keeping your food safe. You can store it in the fridge for up to three days. When you reheat this dish, you want to keep it creamy. The best way is to warm it on the stove over low heat. Add a splash of broth or cream to help bring back the sauce. Stir it often to mix everything well. If it feels too thick, just add a bit more broth. This helps it stay smooth and tasty. You can freeze leftover pasta, but it may change in texture. If you want to freeze it, use a freezer-safe container. Leave some space at the top for the pasta to expand. You can freeze it for up to three months. When you’re ready to eat, thaw it in the fridge overnight. Reheat gently on the stove, adding liquid as needed to restore creaminess. Yes, you can use other types of pasta. Here are some good options: - Penne - Farfalle - Spaghetti - Rotini Each pasta shape brings a unique texture. Choose what you like best! To make this dish gluten-free, select a gluten-free pasta. Here are some great choices: - Brown rice pasta - Quinoa pasta - Chickpea pasta Always check the cooking time since gluten-free pasta cooks differently. If you want a lighter or dairy-free option, try these: - Coconut cream - Cashew cream - Almond milk with cornstarch These alternatives can still give you that creamy texture. To store leftovers, follow these tips: - Let the pasta cool completely. - Place it in an airtight container. - Store in the fridge for up to three days. For longer storage, freeze it in a freezer-safe container for up to two months. This blog post has covered a simple, delicious fusilli pasta dish. We discussed the key ingredients, from mushrooms to seasonings. I shared step-by-step instructions to help you make the creamy sauce. You learned useful tips for flavor and presentation. Lastly, I provided variations and storage tips to keep your dish fresh. Now you can enjoy this meal in many ways and make it your own. Happy cooking!

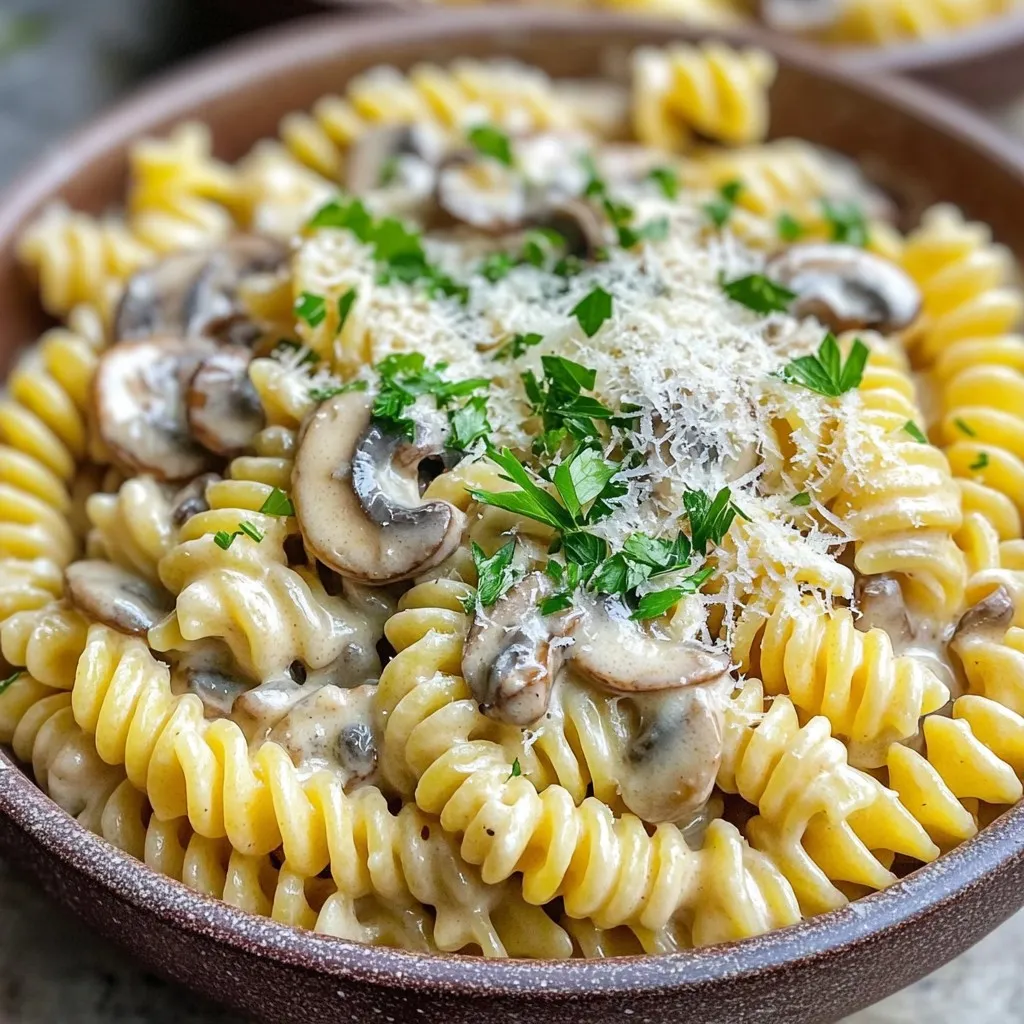
In this blog post, I’ll share my favorite one-pot dish: Creamy Garlic Mushroom Pasta. This meal combines rich flavors and simple ingredients, making it perfect for busy nights. With just …

Read more

Categories Dinner

Pumpkin Spice White Hot Chocolate Creamy Delight Recipe

October 8, 2025 by Chef Miles
- 2 cups whole milk - 1 cup heavy cream - 1 cup white chocolate chips - 1/2 cup canned pumpkin puree - 1 teaspoon vanilla extract - 1 teaspoon pumpkin spice mix - 1/4 teaspoon ground cinnamon (plus extra for garnish) - Whipped cream (for topping) - Optional: A few pumpkin spice cookies (for garnish) You can swap whole milk for almond milk or oat milk. Each option gives a different flavor. If you want a lighter drink, use low-fat milk. Dark chocolate chips can replace white chocolate for a richer taste. If you don't have pumpkin spice mix, blend cinnamon, nutmeg, and ginger for a homemade version. When picking pumpkin puree, look for 100% pure pumpkin. Check the label to avoid fillers. Canned pumpkin works well, but fresh pumpkin is great too. Roast fresh pumpkin, then blend it until smooth. For the best flavor, choose a variety like sugar pumpkin or pie pumpkin. Start by pouring 2 cups of whole milk and 1 cup of heavy cream into a medium saucepan. Heat it over medium heat. Watch closely as it warms. You want it to steam, not boil. Stir it gently to keep the milk from burning on the bottom. This step gives your drink a creamy base. Once the milk and cream are steaming, add 1 cup of white chocolate chips. Stir them in gently. Keep stirring until they melt completely. The mixture should become smooth and velvety. This is where the magic happens. The white chocolate adds sweetness and richness to your drink. Now, it’s time to mix in the fun stuff! Add 1/2 cup of canned pumpkin puree, 1 teaspoon of vanilla extract, 1 teaspoon of pumpkin spice mix, and 1/4 teaspoon of ground cinnamon. Stir well to combine everything. Make sure the mixture is heated through. This step fills your drink with warm flavors. Remove the saucepan from the heat. Pour the pumpkin spice white hot chocolate into mugs. Top each mug with whipped cream and a sprinkle of cinnamon. For a cute touch, place a pumpkin spice cookie on the rim. Enjoy this cozy drink! To get the creamiest texture, use whole milk and heavy cream. This mix makes your drink rich. Heat the milk and cream slowly. Stir often to stop burning. Once it’s warm, add the white chocolate chips. They melt best in warm liquid. Stir until smooth. Blend in the pumpkin puree next. This makes the drink thick and creamy. You can adjust the sweetness to fit your taste. Start with the recipe as is. Taste it after adding the white chocolate. If you want it sweeter, add more white chocolate chips. You can also use a bit of sugar or maple syrup. Stir well after adding. Always taste before serving to ensure it’s just right. Garnishing adds fun and flair to your drink. Top with whipped cream to make it fluffy. A sprinkle of cinnamon adds warmth and spice. For a special touch, place a pumpkin spice cookie on the mug’s rim. It not only looks great but adds a nice crunch. Remember, presentation makes your drink even more enjoyable! {{image_4}} You can easily make a vegan version of this creamy treat. Just swap out the dairy. Use coconut milk or almond milk for a great base. Replace the heavy cream with full-fat coconut cream. For the white chocolate, look for vegan chocolate chips. Enjoy all the rich flavors without any dairy! Want to make this drink a bit more fun? Add a splash of your favorite liqueur. Rum or bourbon works well with pumpkin spice. Just pour in a shot after mixing in the other ingredients. This adds warmth and a little kick to your cozy drink. You can enhance your pumpkin spice white hot chocolate with extra flavors. Try adding a pinch of nutmeg for a warm twist. Drizzle some caramel sauce on top for sweetness. These small additions can make your drink even more special. Mix and match to find your perfect combination! To store leftover pumpkin spice white hot chocolate, cool it first. Pour it into a clean container. Make sure to seal it tightly. Store it in the fridge for up to three days. This drink is a treat, so try to finish it quickly. When you're ready to enjoy your drink again, pour it into a saucepan. Heat it over low heat. Stir often to prevent burning. You can also use a microwave. Heat it in short bursts, stirring in between. This keeps it creamy and smooth. You can freeze this drink if you want it to last longer. Pour the cooled hot chocolate into ice cube trays. Once frozen, transfer the cubes to a freezer-safe bag. Use these cubes in smoothies or blend with warm milk for a quick treat. Enjoy the flavors of fall any time! Pumpkin spice white hot chocolate is a creamy drink. It blends white chocolate and pumpkin puree. This drink captures the warmth of fall with spices. You get hints of cinnamon and nutmeg. The sweetness from white chocolate pairs well with pumpkin. It’s a cozy treat that warms you up. Yes, you can switch up the milk! Almond milk, oat milk, or soy milk work well. Each milk gives a unique taste and texture. Whole milk makes it rich, while almond milk is lighter. If you choose a non-dairy milk, just ensure it is unsweetened. This keeps the pumpkin spice flavor front and center. To make more servings, simply double the ingredients. Use 4 cups of whole milk and 2 cups of cream. Increase the white chocolate chips to 2 cups. Add 1 cup of pumpkin puree and adjust spices to match. Stir well and heat slowly to keep it creamy. You can serve this drink at parties or gatherings. In this post, I covered how to make a delicious Pumpkin Spice White Hot Chocolate. We explored the key ingredients, including tips for the best pumpkin puree. I provided step-by-step instructions for a smooth blend and shared tips for creamy texture and sweetness. You can try fun variations, like vegan options or spiked versions. Finally, I discussed proper storage methods. With these insights, you can enjoy this cozy drink anytime. Happy sipping!

Craving a cozy drink that warms your heart? Look no further! My Pumpkin Spice White Hot Chocolate Creamy Delight Recipe brings together rich white chocolate and warm pumpkin spice for …

Read more

Categories Desserts
Older posts
Newer posts
← Previous Page1 … Page8 Page9 Page10 … Page110 Next →

MELTED RECIPES

where delicious ideas melt into life, from stovetop to backyard. Always warm, simple, and irresistibly satisfying. 🍳🔥🧀

PAGES

Home About Contact Privacy Policy Terms & Conditions Cookie Policy GDPR Policy Copyright Policy Disclaimer

CATEGORIES

Appetizers Desserts Salads Breakfast Dinner

Contact

  • Pinterest
  • Mail
Copyright © 2025 Melted Recipes. All rights reserved.