Skip to content
Melted Recipes
  • Home
  • Appetizers
  • Desserts
  • Salads
  • Breakfast
  • Dinner
  • Privacy Policy
  • Contact
  • About

Chef Miles

Easy Frittata Recipe Perfect for Quick Meals

June 25, 2025 by Chef Miles
- 6 large eggs - 1/2 cup milk (or dairy-free alternative) - 1 cup assorted bell peppers, diced - 1 small zucchini, diced - 1/2 cup cherry tomatoes, halved - 1/4 cup red onion, finely chopped - 1 cup fresh spinach, chopped - 1 cup shredded cheese - 2 tablespoons olive oil - Salt and pepper to taste - Fresh herbs for garnish The main ingredients for the easy frittata are simple and colorful. You need large eggs as the base. Milk adds creaminess, and you can use a dairy-free option if you prefer. The diced bell peppers, zucchini, and halved cherry tomatoes bring great flavor and texture. The red onion adds a nice bite, while fresh spinach gives it a healthy boost. Cheese is key for that gooey, delicious top. I love using a mix of cheddar and mozzarella, but you can choose what you like best. Olive oil helps cook the veggies and adds richness. Don’t forget salt and pepper to season your dish just right. Fresh herbs, like basil or parsley, will make your frittata pop in flavor and color. - Additional vegetables - Cooked meat like bacon or sausage - Different cheese varieties If you want to customize your frittata, there are many optional add-ins. You can add more vegetables, like mushrooms or kale, to enhance the taste. If you like meat, cooked bacon or sausage will add a hearty touch. Feel free to experiment with different cheeses, too, like feta or goat cheese. Each choice adds a unique flavor to your frittata. - Non-dairy milk options - Egg alternatives for vegan frittata - Low-fat cheese options For those who want to make swaps, there are great substitutions. Use almond, soy, or oat milk instead of regular milk. If you need a vegan option, replace eggs with tofu or chickpea flour. You can also pick low-fat cheese to lighten up the dish without losing flavor. - Preheat the oven to 375°F (190°C). - In a bowl, whisk the eggs and milk together until smooth. - Heat olive oil in a large skillet over medium heat. - Add finely chopped red onion. Sauté until it turns translucent. - Next, add diced bell peppers, zucchini, and halved cherry tomatoes. - Cook for 3-4 minutes, stirring now and then. - Stir in chopped spinach. Cook for 1-2 minutes until it wilts. - Carefully pour the egg mixture over the sautéed vegetables. - Gently stir to mix all the ingredients. - Sprinkle shredded cheese on top and let it cook on the stove. - Transfer the skillet to the preheated oven. - Bake for 15-20 minutes, until it sets and the top is golden. - Once baked, let it cool for a few minutes. - Slice the frittata into wedges and serve. For the complete recipe, check out the Full Recipe. Enjoy your easy frittata! To make your frittata fluffy, start with fresh eggs. Whisk them well with milk until smooth. This adds air and lightness. When cooking, keep the heat moderate. High heat can overcook the eggs. Always remove the frittata from the heat as soon as it is set. The residual heat will finish cooking it. To boost taste, use fresh herbs like basil or parsley. They add brightness and aroma. Spices like paprika or garlic powder also work well. For a zesty kick, try adding a splash of hot sauce or lemon juice. These ingredients bring out the best in your frittata. A frittata pairs wonderfully with a simple salad. Mixed greens with a light vinaigrette complement its richness. For garnish, sprinkle fresh herbs on top for color. Serve slices on a colorful plate for an eye-catching look. This makes for a fun brunch or a light dinner option. {{image_4}} You can change up the frittata to fit your taste. A Mediterranean-style frittata is a great option. Use ingredients like spinach, olives, and feta cheese. This gives a fresh and tangy flavor. You might also try adding Italian herbs, like oregano or basil. They add a warm and fragrant touch to the dish. Using seasonal veggies makes your frittata special. In spring, use fresh asparagus and peas. These bright greens add color and taste. For fall, consider squash or pumpkin. They add a nice sweetness and warmth. Mixing seasonal ingredients keeps the dish exciting year-round. If you need gluten-free options, frittatas are a good choice. Eggs are naturally gluten-free. Just make sure to avoid any added gluten in your mix. For low-carb meals, use cauliflower instead of potatoes. This adds a nice texture without the carbs. You can enjoy a tasty meal that fits your dietary needs. For more ideas, check out the Full Recipe for a vibrant vegetable frittata! To keep your frittata fresh, store leftovers in the fridge. First, let it cool completely. Then, cover it tightly with plastic wrap or aluminum foil. You can also use an airtight container. This helps keep moisture in and prevents odors from other foods. Your frittata will last up to four days in the fridge. Always check for signs of spoilage before eating. If you want to save some frittata for later, freezing is a great option. Start by cutting the frittata into slices. Wrap each slice in plastic wrap. Then, place them in a freezer-safe bag or container. Make sure to label the bag with the date. Your frittata can stay fresh for up to three months in the freezer. Thaw it in the fridge overnight before reheating. You can reheat frittata in two easy ways: the oven or the microwave. For the oven, preheat it to 350°F (175°C). Place the frittata on a baking sheet and cover it with foil. Heat for about 10-15 minutes. This keeps the texture nice. For the microwave, place a slice on a microwave-safe plate. Heat it for 30-60 seconds. The microwave is faster but may make it slightly less fluffy. Always check the temperature before serving. A frittata lasts about 3 to 4 days in the fridge. Store it in an airtight container. This keeps it fresh and safe to eat. If you see any signs of spoilage, like a strange smell or color, throw it away. Yes, you can make a frittata ahead of time. It’s a great meal prep option! Cook it, allow it to cool, and then store it in the fridge. You can also freeze it for longer storage. Just make sure to wrap it tightly. Frittatas pair well with fresh salads or crusty bread. You can also serve it with fruit for a lighter meal. Consider adding some roasted potatoes or a simple green salad. These sides can make your frittata a full meal. The frittata is done when it is set in the middle. You should see a light golden color on top. Insert a knife into the center; if it comes out clean, it is ready. The edges should also pull away from the sides of the pan. You learned how to make an easy frittata with various ingredients. I covered main items, optional add-ins, and substitutions to suit your needs. Following clear steps, you can cook, bake, and store the frittata easily. I also shared tips for better flavor and texture. Now you have the tools to create a tasty dish every time. Enjoy experimenting with flavors and ingredients. Happy cooking!

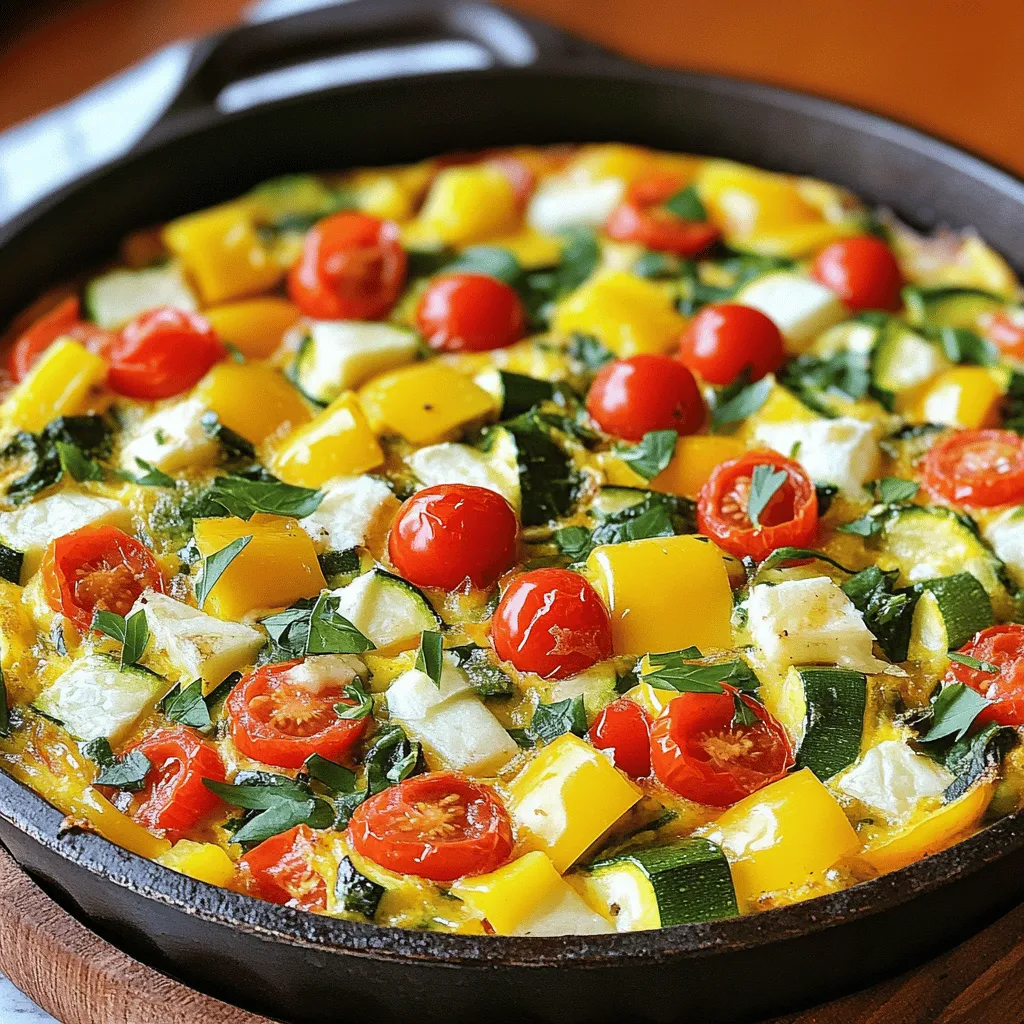
Are you looking for a quick and tasty meal that is easy to make? This Easy Frittata Recipe is perfect for busy days and will impress everyone at the table. …

Read more

Categories Breakfast

Tomato Basil Pastries Savory and Simple Treat

June 25, 2025 by Chef Miles
- Puff pastry - Cherry tomatoes - Fresh basil - Mozzarella cheese For the main ingredients, I love using puff pastry. It gives a nice crunch and is easy to handle. Cherry tomatoes are sweet and juicy, adding great flavor. Fresh basil brings a bright note to the dish. Mozzarella cheese melts beautifully and adds creaminess. - Extra virgin olive oil - Garlic powder - Salt and pepper When it comes to seasoning, I use extra virgin olive oil for richness. Garlic powder gives a nice kick without being too strong. A sprinkle of salt and pepper enhances all the flavors and makes everything taste better. - Baking sheet - Parchment paper - Rolling pin You will need a baking sheet to hold the pastries while they bake. Parchment paper prevents sticking and makes clean-up easy. A rolling pin helps roll out the puff pastry evenly, ensuring a perfect shape for each pastry. For the full recipe, check out the details on how to make these delicious treats! - Preheat the oven to 400°F (200°C). - Prepare the baking sheet with parchment paper. - Roll out the puff pastry on a floured surface. - Cut into 4x4-inch squares. - Combine halved cherry tomatoes, chopped basil, and shredded mozzarella cheese. - Add olive oil, garlic powder, salt, and pepper. Toss until well coated. - Spoon the filling onto the center of each pastry square. - Seal the corners by pinching them together. Brush with beaten egg. - Arrange the pastries on the baking sheet. - Bake for 18-20 minutes until golden brown. Enjoy the delightful flavors of tomato and basil in every bite! For the complete recipe, see the Full Recipe. - Always ensure the puff pastry is thawed properly. This helps it puff up well. - Avoid overfilling the pastries. Too much filling can make them soggy. - Use egg wash generously on top of each pastry. This gives them a nice shine. - Bake at the right temperature of 400°F (200°C). This ensures a crisp finish. - Garnish with fresh basil leaves. This adds color and flavor. - Serve with marinara sauce for dipping. It complements the pastries perfectly. For the full recipe, check out the details above! {{image_4}} You can easily change the flavor of your tomato basil pastries. Try adding feta cheese or goat cheese. Both cheeses add a creamy texture and a nice tang. You can also use sun-dried tomatoes for a twist. These add a rich, sweet flavor that pairs well with the fresh basil. If you want to mix it up, swap basil for oregano or thyme. These herbs bring a different taste that can surprise your guests. You can also add spinach for extra greenery. Spinach adds color and a healthy boost to your pastries. For those with dietary needs, there are great options. You can find gluten-free puff pastry at many stores. This makes the recipe accessible for gluten-free eaters. You can also make vegan variations using plant-based cheese. This way, everyone can enjoy these tasty treats. For the full recipe, check out the details above. Store your tomato basil pastries in an airtight container at room temperature. This keeps them fresh for a short time. If you place them properly, they will stay tasty and enjoyable. You can freeze uncooked pastries for later baking. This method allows you to enjoy them whenever you like. Just wrap each pastry well in plastic wrap before placing them in a freezer bag. If you have cooked pastries, refrigerate them for up to 3 days. Make sure they are in a sealed container to maintain their flavor. To reheat your pastries, use the oven for the best texture. Preheat it to 350°F (175°C) and bake for about 10 minutes. This keeps the pastry crisp. Avoid microwaving, as it can make the pastries soggy and less pleasant to eat. Yes, store-bought puff pastry works great. It saves time and effort. I often use it when I'm in a hurry. Just thaw it before using. It puffs up nicely and tastes fantastic. Prepare and freeze before baking. Just assemble the pastries and place them on a baking sheet. Cover them tightly and pop them in the freezer. When ready, bake straight from the freezer. This is so handy for unexpected guests! Marinara sauce and pesto are excellent choices. The savory flavors mix well with the pastries. You can even try a garlic aioli for a kick. Experiment with your favorites! Yes, they are vegetarian-friendly! The fresh tomatoes, basil, and cheese make a great combo. Even meat lovers enjoy these tasty bites. They fit well in any gathering or meal. Pair with a salad or serve as appetizers. A light side salad adds freshness. You can also offer them at parties. They are great for sharing and fun to eat. For the full recipe, check out the details above! You can create delicious tomato basil pastries easily. We explored the essential ingredients, tools, and steps to make them. I shared tips to perfect your pastries and suggested tasty variations. These treats are not only easy to store but also versatile for any occasion. Remember, using fresh ingredients makes a big difference in flavor. Enjoy making these yummy bites and impress your friends and family!

Are you ready to impress your guests with a mouthwatering treat? Tomato Basil Pastries are easy to make and bursting with flavor! Using just a few simple ingredients like puff …

Read more

Categories Appetizers

Sticky Peach Cobbler Pudding Delicious and Easy Treat

June 25, 2025 by Chef Miles
To make this tasty dessert, gather these main ingredients: - 4 ripe peaches, peeled and sliced into wedges - 1 cup packed brown sugar - 1/2 cup unsalted butter, melted - 1 cup all-purpose flour - 1 teaspoon baking powder - 1/4 teaspoon salt - 1 cup milk, at room temperature - 1 teaspoon pure vanilla extract - 1 teaspoon ground cinnamon - 1 tablespoon fresh lemon juice These ingredients are simple but create a wonderful taste. The peaches add sweetness and juice. The brown sugar gives a rich flavor. The butter makes the pudding moist. You might want to add some fun toppings. Here are a few ideas: - Whipped cream - Vanilla ice cream - Fresh mint leaves for garnish - Edible flowers for a pop of color These toppings can make your dessert even more special. They add creaminess and a fresh look. If you can't find an ingredient, don't worry! Here are some swaps you can use: - Use coconut oil instead of butter for a dairy-free option. - Almond milk or oat milk can replace regular milk. - Swap peaches for other fruits like berries or apples. These substitutions keep the recipe flexible. You can still enjoy a delicious dessert, no matter what you have on hand. For the full recipe, check out the details above. First, take your ripe peaches. You need four, so pick the best ones. Peel them and slice them into wedges. This step is key. The peaches need to be sweet and juicy. In a medium bowl, mix the sliced peaches with one tablespoon of fresh lemon juice and a quarter cup of brown sugar. Toss them gently to cover every piece. Set this bowl aside for about ten minutes. This lets the peaches soak in the flavor and release their juices. Next, grab a large mixing bowl. In this bowl, whisk together the dry ingredients. Combine one cup of all-purpose flour, one teaspoon of baking powder, and a quarter teaspoon of salt. Mix well until everything blends together. Now, slowly add in one cup of milk at room temperature, half a cup of melted unsalted butter, one teaspoon of pure vanilla extract, and one teaspoon of ground cinnamon. Stir until you get a smooth batter, with no lumps. This batter is simple but oh-so-delicious! Now, it’s time to bake! Preheat your oven to 350°F (175°C) and lightly grease a 9-inch baking dish. Pour the batter into the dish, spreading it evenly across the bottom. Then, carefully spoon the marinated peach mixture over the top. Avoid stirring; the magic happens as it bakes! Place the dish in the oven. Bake for 40 to 45 minutes. You’ll know it’s done when the top turns a lovely golden brown. A toothpick inserted into the center should come out clean. Once baked, let the pudding cool for a few minutes before serving. Enjoy your warm Sticky Peach Cobbler Pudding! For more details, check the Full Recipe. When making Sticky Peach Cobbler Pudding, avoid these common mistakes. First, do not skip peeling the peaches. The skin can make the dish tough. Second, ensure your butter is melted but not hot. Hot butter can cook the batter, which alters the texture. Lastly, be gentle when layering the peaches. Stirring can mix the layers and ruin the pudding's look. To enhance flavor, use ripe peaches. They should smell sweet and feel slightly soft. Adding a pinch more cinnamon can elevate the taste. A splash of almond extract also pairs well with peaches. For a tangy twist, increase the lemon juice slightly. This balance of sweet and tart makes every bite exciting. Baking at 350°F is key for a soft pudding. Make sure to preheat the oven fully. This step ensures even baking. Bake until you see a golden crust. A toothpick test helps too; it should come out clean from the center. If the top browns too fast, cover it with foil. This method helps it bake evenly without burning. For the full recipe, check the provided details. Enjoy making your sticky peach cobbler pudding! {{image_4}} To make a gluten-free version, swap all-purpose flour for a gluten-free blend. Look for blends that include rice flour, tapioca flour, and xanthan gum. These will give your pudding a nice texture. Ensure your baking powder is also gluten-free. This way, everyone can enjoy this tasty treat without worry. You can mix in other fruits to change the flavor. Try adding blueberries, raspberries, or sliced apples. Each fruit brings its own taste and sweetness. Just keep the fruit ratio similar to the peaches. This way, the pudding stays moist and delicious. Experimenting with different fruits can make it fun and unique! To create a vegan version, replace the milk with almond or oat milk. Use a plant-based butter or coconut oil instead of regular butter. You can also swap eggs or dairy with a flaxseed meal. Just mix one tablespoon of flaxseed with three tablespoons of water and let it sit for a few minutes. This will bind your pudding and keep it moist. With these simple swaps, you can enjoy a vegan sticky peach cobbler pudding that everyone will love. For the full recipe, check out the detailed instructions to guide you through this delightful dessert! To keep your sticky peach cobbler pudding fresh, let it cool first. Once cool, cover it tightly with plastic wrap or transfer it to an airtight container. Store it in the fridge for up to three days. This will keep the flavors intact and the pudding moist. When it's time to enjoy your leftovers, preheat your oven to 350°F (175°C). Place the pudding in an oven-safe dish. Cover it with foil to prevent drying out. Heat for about 15 to 20 minutes, or until warm throughout. If you're in a hurry, you can use the microwave. Heat in short bursts of 30 seconds, checking in between, until warm. If you want to save some for later, freezing is a great option. Allow the pudding to cool completely. Cut it into portions and wrap each piece in plastic wrap. Then, place them into a freezer-safe bag or container. It can stay frozen for up to three months. To enjoy, thaw it in the fridge overnight before reheating. This keeps the texture nice and tasty. For the full recipe, check out the detailed instructions above! You can tell your pudding is done by looking for a golden brown top. A toothpick inserted in the center should come out clean. This shows that the batter has set well. If the toothpick has wet batter on it, bake for a few more minutes. The pudding should also spring back when gently touched. These signs help ensure a perfect bake. Yes, you can use canned peaches! Just make sure they are drained well. Canned peaches can save time and still taste good. Their sweetness may be stronger, so adjust the sugar if needed. Fresh peaches give a better texture, but canned peaches can be a great option. Serve your pudding warm for the best taste. Top it with whipped cream or vanilla ice cream. This adds a creamy contrast to the warm pudding. You can also sprinkle some ground cinnamon on top for extra flavor. Fresh mint leaves or edible flowers can make it look pretty. For a fun twist, try adding a drizzle of caramel sauce! For the full recipe, check the link above. In this blog post, we explored how to make sticky peach cobbler pudding from start to finish. We discussed the main ingredients, optional toppings, and easy substitutions. You learned step-by-step instructions, avoiding common mistakes, and how to enhance flavors. We covered variations like gluten-free and vegan options. Finally, storage tips ensure your leftovers stay fresh. This dessert is flexible and fun. You can make it your own. Enjoy baking and sharing this sweet treat with others!

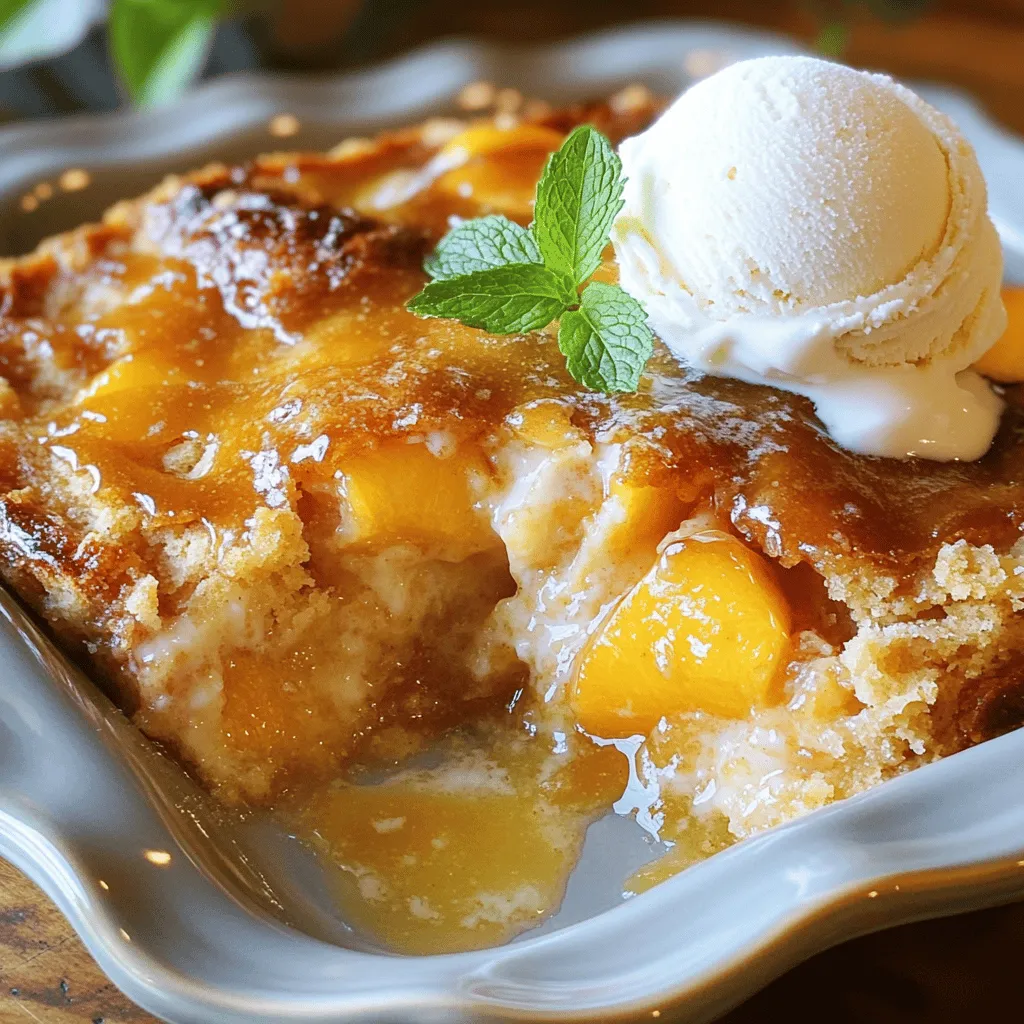
Are you ready for a dessert that will wow your friends and family? My Sticky Peach Cobbler Pudding is not only delicious, but it’s also super easy to make. You …

Read more

Categories Desserts

Air Fryer Okra Crispy and Flavorful Snack Recipe

June 25, 2025 by Chef Miles
For a perfect batch of air fryer okra, you need these main ingredients: - 1 pound fresh okra, trimmed and sliced into 1/2-inch pieces - 1 cup cornmeal - 1/2 cup all-purpose flour - 1 large egg, beaten - 1 tablespoon olive oil These ingredients make a tasty and crunchy snack. Fresh okra is key for the best texture. To make your okra flavorful, mix in these seasonings: - 1 teaspoon garlic powder - 1 teaspoon onion powder - 1/2 teaspoon smoked paprika - 1/2 teaspoon cayenne pepper (adjust to taste) - 1 teaspoon salt - 1/2 teaspoon freshly ground black pepper These spices add a kick that makes each bite pop with flavor. The cornmeal and flour give the okra a great crunch. Want to make your okra even more exciting? Consider these add-ins: - Grated Parmesan cheese for a cheesy twist - Fresh herbs like parsley or cilantro for a fresh touch - A squeeze of lemon juice for brightness These extras can turn your snack into something special. Feel free to experiment and find your favorite mix! Start by gathering your ingredients. You will need: - 1 pound fresh okra, trimmed and sliced into 1/2-inch pieces - 1 cup cornmeal - 1/2 cup all-purpose flour - 1 teaspoon garlic powder - 1 teaspoon onion powder - 1/2 teaspoon smoked paprika - 1/2 teaspoon cayenne pepper (adjust to taste) - 1 teaspoon salt - 1/2 teaspoon freshly ground black pepper - 1 large egg, beaten - 1 tablespoon olive oil First, preheat your air fryer to 400°F (200°C). This helps the okra cook evenly. In a medium bowl, mix the cornmeal, flour, garlic powder, onion powder, smoked paprika, cayenne pepper, salt, and black pepper. Whisk them together well. Next, in a separate bowl, beat the egg. Add the sliced okra to the egg and toss to coat each piece. This step ensures the coating sticks well. Now, take the egg-coated okra and transfer it to the bowl with the cornmeal mix. Toss the okra gently until all pieces are coated. Drizzle the olive oil over this mixture. Mix again to coat every piece lightly. Arrange the okra in a single layer in the air fryer basket. Make sure to leave space between the pieces. If needed, cook in batches for best results. Cook the okra for 10-12 minutes. Shake the basket halfway through to promote even cooking. Keep an eye on them. They should turn golden brown and crispy. Once done, carefully remove the okra from the air fryer. Serve the crispy okra right away. Use a colorful platter for a nice touch. You can garnish with fresh herbs like parsley or cilantro. For an extra treat, pair it with a zesty dipping sauce. A homemade garlic aioli or a tangy yogurt dip works great. Enjoy your crispy snack! To make your air fryer okra crispy, follow these steps: - Coat evenly: Make sure each okra piece gets a good mix of the egg and dry ingredients. This helps the coating stick well. - Use oil wisely: A light drizzle of olive oil enhances crispiness. Don’t skip this step! - Single layer: Place the okra in a single layer. Avoid overcrowding the basket to allow proper air flow. Here are some common pitfalls you should steer clear of: - Skipping the preheat: Always preheat your air fryer. This helps the okra cook evenly and become crispy. - Too much moisture: Ensure the okra is dry before coating. Excess moisture can lead to soggy pieces. - Ignoring cooking times: Keep an eye on the okra. Cooking times can vary. Aim for a golden brown color. For the best results, set your air fryer to: - Temperature: 400°F (200°C) - Time: Cook for 10-12 minutes. Shake the basket halfway through for even cooking. Following these tips helps you create a deliciously crispy snack. Enjoy your air fryer okra! For more detailed steps, check the Full Recipe. {{image_4}} To make spicy air fryer okra, add more cayenne pepper. Start with 1 teaspoon, or adjust as you like. You can also mix in some chili powder for extra heat. This snack packs a punch and is perfect for those who love bold flavors. The heat will balance with the natural taste of the okra, making it a great treat. For cheesy air fryer okra, sprinkle some grated cheese on top. Try using Parmesan or cheddar. Add the cheese halfway through cooking to let it melt perfectly. This gives a creamy texture and rich flavor. The cheese blends well with the crispy coating, making every bite delightful. To make vegan-friendly air fryer okra, skip the egg. Use a flax egg instead. Mix one tablespoon of ground flaxseed with three tablespoons of water. Let it sit for five minutes to thicken. This acts as a great binder for the coating. The flavor stays just as tasty, and it is a healthy option too. Enjoy this version as a guilt-free snack that pleases everyone. To keep your leftover air fryer okra fresh, let it cool first. Place it in an airtight container. This helps prevent moisture. Store it in the fridge. It will stay good for up to three days. If you want to enjoy it later, freezing is a great option. To reheat your okra and keep it crispy, use the air fryer again. Preheat the air fryer to 350°F (175°C). Place the okra in a single layer. Heat for about 5-7 minutes. This will restore its crunch. You can also use an oven. Set it to 350°F (175°C) and bake for 10 minutes. Avoid using the microwave, as it makes the okra soggy. If you have extra okra, freezing is easy. Start by blanching the okra first. Boil water, then add the okra for 3 minutes. Quickly transfer it to ice water to stop cooking. Drain and pat dry. Place the okra in a freezer bag, removing as much air as possible. Label it with the date. You can freeze it for up to six months. When you're ready to use it, cook from frozen in your air fryer. Enjoy the taste of fresh okra anytime! Yes, you can use frozen okra in the air fryer. Just make sure to thaw it first. Pat it dry with a paper towel to remove excess moisture. This helps the coating stick and keeps the okra crispy. Adjust the cooking time as frozen okra may need a few extra minutes to cook through. Air frying okra is a healthier choice than deep frying. It uses less oil, which cuts down on calories and fat. Okra is also rich in vitamins and minerals. It has fiber, which aids digestion. Plus, it contains antioxidants that help fight disease. To prevent soggy okra, follow these tips: - Use fresh, dry okra. - Coat the okra lightly with oil. - Do not overcrowd the air fryer basket. - Shake the basket halfway through cooking. These steps help circulate air and keep each piece crisp. Air fryer okra is simple and tasty. We covered ingredients, steps, and tips to make it right. You can add spice, cheese, or keep it vegan for fun flavors. Remember to store leftovers properly to keep them crisp. These tips help you enjoy okra in new ways. Now, you’re ready to impress family and friends with your delicious air fryer okra!

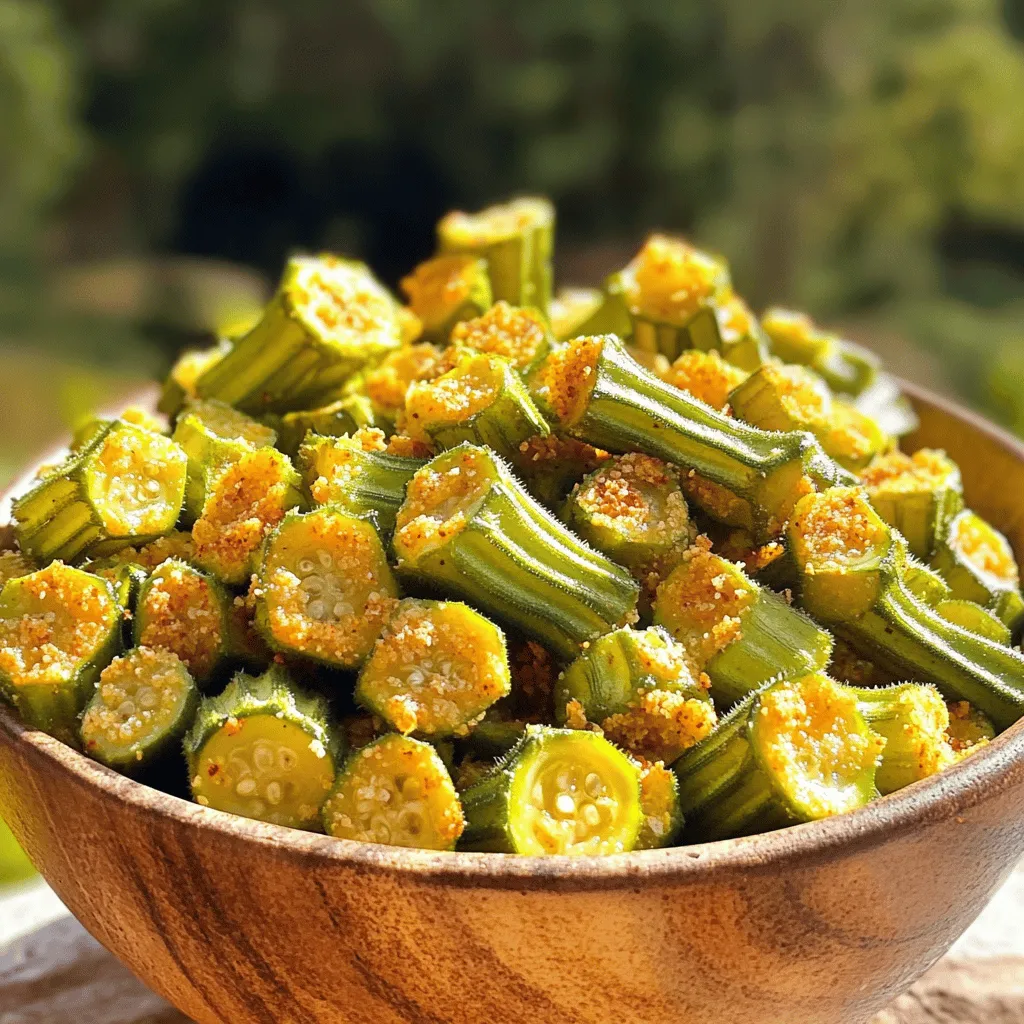
Looking for a tasty snack? Try my Air Fryer Okra! This crispy and flavorful treat is easy to make and perfect for any occasion. With just a few simple ingredients …

Read more

Categories Appetizers

Peach Cobbler Cookies Irresistible and Comforting Treat

June 25, 2025 by Chef Miles
- Fresh peaches: You need one cup of fresh peaches, peeled and diced into small pieces. Fresh peaches give the best flavor and texture. Look for ripe ones but not too soft. - Dry ingredients: Gather one cup of all-purpose flour, half a cup of rolled oats, one teaspoon of baking powder, half a teaspoon of baking soda, half a teaspoon of ground cinnamon, and a quarter teaspoon of salt. These ingredients form the base of your cookies and help them rise and stay soft. - Wet ingredients: Use half a cup of unsalted butter, softened to room temperature, half a cup of brown sugar, a quarter cup of granulated sugar, one large egg, and one teaspoon of pure vanilla extract. These add sweetness and moisture to your cookies. - Optional ingredients: For added texture, you can include half a cup of chopped pecans. Nuts give a nice crunch and pair well with the sweet peaches. With these ingredients, you can make Peach Cobbler Cookies that taste like a warm hug. The mix of sweet peaches and crunchy nuts creates a delightful treat. For the full recipe, check out the details above! First, preheat your oven to 350°F (175°C). This step is vital. It ensures even baking. Next, line a baking sheet with parchment paper. This paper stops the cookies from sticking. It also makes for easy cleanup. In a medium bowl, mix the dry ingredients. Combine the sifted flour, rolled oats, baking powder, baking soda, ground cinnamon, and salt. Use a whisk to blend them well. Set this bowl aside for now. In a large mixing bowl, use an electric mixer. Cream together the softened unsalted butter, brown sugar, and granulated sugar. Mix until it's light and fluffy, about 2-3 minutes. Then, add the egg and vanilla extract. Beat this mixture until smooth. No streaks of egg should remain. Now, gradually add the dry mixture to the wet mixture. Stir gently until just combined. Be careful not to overmix. This helps keep the cookies tender. Next, fold in your diced peaches. If you like, add chopped pecans for extra crunch. Use a spatula to mix gently. Using a tablespoon or cookie scoop, drop rounded dough onto the baking sheet. Leave about 2 inches between each cookie. This space allows them to spread. Sprinkle granulated sugar on top of the cookies for a crunchy finish. Now, bake in the preheated oven for 12-15 minutes. The edges should be lightly golden. The centers should look set. After baking, let the cookies cool on the sheet for 5 minutes. Then, move them to a wire rack. This helps them cool completely and keeps their texture. For the full recipe, check the details above. To get the best cookie texture, avoid overmixing. When you combine the wet and dry ingredients, mix just until they come together. Overmixing makes the cookies tough. You want them soft and chewy, not hard. Adjusting baking times can also make a difference. Each oven is unique. Start with the suggested time of 12-15 minutes. Keep an eye on the cookies. They should be lightly golden at the edges and set in the center. If they look too soft, give them another minute or two. Spices can really boost flavor. Ground cinnamon adds warmth, but try adding nutmeg or ginger for a twist. A pinch of cardamom can also bring out the peach's sweetness. Consider toppings or mix-ins to elevate your cookies. Chopped pecans add crunch and a nutty flavor. You could also sprinkle some sea salt on top before baking. It contrasts nicely with the sweetness of the cookies. For a fun touch, drizzle with honey or serve with a scoop of vanilla ice cream. For the full recipe, check the main article. {{image_4}} You can switch out peaches for other fruits. Blueberries bring a burst of flavor. Cherries also work well, giving a sweet-tart taste. For a fun twist, try diced apples or pears. Each fruit changes the cookie’s flavor and texture. Just remember to keep the fruit fresh and ripe. This will make your cookies even more tasty. If you need gluten-free cookies, use a gluten-free flour blend. This works well in place of all-purpose flour. You can also add more oats for texture and flavor. For those who want vegan options, replace the butter with coconut oil or vegan butter. For the egg, use a flaxseed meal or applesauce. Both options keep the cookies moist and delicious. These changes let everyone enjoy peach cobbler cookies without worry. You can find the full recipe to guide you through these variations. To keep your Peach Cobbler Cookies fresh, store them in an airtight container. This will help maintain their softness and flavor. You can keep them at room temperature for up to five days. If you want to keep them longer, consider refrigerating them. Make sure to wrap them tightly in plastic wrap or foil to prevent drying out. If you want to enjoy them later, store them with a slice of bread. The bread adds moisture and keeps the cookies from becoming hard. When you take them out, you can warm them slightly in the microwave for a few seconds to restore that fresh-baked taste. Freezing your cookies is a great way to save some for later. First, let the cookies cool completely. Then, place them in a single layer on a baking sheet and freeze for about an hour. This prevents them from sticking together. Once frozen, transfer them to a freezer bag or airtight container. They can last for up to three months in the freezer. When you are ready to enjoy them, you can thaw them in the fridge overnight. You can also warm them in the oven at 350°F (175°C) for about 5-10 minutes. This will make them taste freshly baked again. Yes, you can use canned peaches. They offer convenience and save time. However, they can be softer and more watery than fresh ones. This can change the texture of your cookies. If you choose canned peaches, look for those packed in juice, not syrup. Drain them well and pat them dry with a paper towel. This helps keep your dough from getting too wet. To make your cookies chewier, adjust a few ingredients. First, try adding more brown sugar. It adds moisture and creates a soft texture. You can also reduce the amount of flour slightly. Less flour leads to a denser cookie. Another tip is to chill the dough for about 30 minutes. Chilled dough spreads less during baking, resulting in a chewier cookie. Yes, you can prepare the dough ahead of time. After mixing, wrap it tightly in plastic wrap or place it in an airtight container. You can store it in the fridge for up to 3 days. If you want to store it longer, freeze the dough for up to 3 months. When ready to bake, thaw it overnight in the fridge. Then scoop and bake as usual. We explored a fun cookie recipe that highlights fresh peaches. You learned about key ingredients, mixing methods, and baking steps. Tips helped ensure your cookies turn out just right, while variations opened up new fruit options. Storing and freezing tips keep your cookies fresh longer. These cookies can be a delightful treat, with room for creativity. Enjoy baking these tasty peach cookies and share them with others!

Are you ready for a treat that blends sweet peaches with warm, cookie goodness? Peach Cobbler Cookies are the perfect way to enjoy summer’s favorite fruit in a fun and …

Read more

Categories Desserts

Easy Peach Cobbler Simple and Delicious Dessert Recipe

June 25, 2025 by Chef Miles
- 4 cups fresh peaches - 1 cup granulated sugar - 1 cup all-purpose flour - 1 cup milk To make a great peach cobbler, you need fresh peaches. Their sweet taste shines through. You will also need sugar to enhance the flavor. The flour gives structure, while milk keeps it moist. - Vanilla extract - Ground cinnamon - Lemon juice Adding vanilla makes your cobbler smell amazing. Ground cinnamon adds warmth, and a touch of lemon juice brightens the flavor. These extras are not must-haves but they do make a difference. - Mixing bowls - Whisk - 9x13 inch baking dish - Measuring cups and spoons You will need mixing bowls to combine your ingredients. A whisk helps mix everything well. A 9x13 inch baking dish is perfect for this recipe. Lastly, measuring cups and spoons ensure you get the right amounts. You can find the Full Recipe to follow if you want step-by-step guidance on making this simple dessert. Set your oven to 350°F (175°C). This will help your cobbler bake evenly. A hot oven makes a big difference. In a large bowl, combine the sliced peaches, ¾ cup of sugar, vanilla extract, ground cinnamon, and lemon juice. Gently toss everything together with a spatula. Let the peaches sit for about 15 minutes. This step boosts the flavor and adds sweetness. In a separate bowl, whisk together the flour, baking powder, salt, and the remaining ¼ cup of sugar. Mix until the dry ingredients are well blended. Gradually add the milk while whisking. Keep mixing until you have a smooth batter, free of lumps. Take a 9x13 inch baking dish and pour the melted butter evenly across the bottom. Next, pour the prepared batter over the butter. Do not stir! Finally, spoon the marinated peaches and their juices on top. Avoid stirring again! This will create a lovely cobbler texture. Place the baking dish in your preheated oven. Bake for 40-45 minutes. Look for a golden brown crust and bubbling peach juices around the edges. This shows your cobbler is ready. For the full recipe, you can refer back to the detailed instructions. Enjoy the process and the delicious results! When making peach cobbler, layering the ingredients is key. You want to place the batter, then the peaches, without stirring. This method helps create a nice texture. The batter rises and forms a crust while baking, allowing the juices to soak in. It gives a great contrast between the crust and the soft peaches. Remember, no stirring! To boost the flavor of your cobbler, consider adding spices. Ground nutmeg pairs well with cinnamon. A pinch of allspice can add warmth, too. If you love a bit of tartness, try adding a splash of almond extract or a few drops of orange juice. You can also mix in some blueberries or blackberries for extra fun. These little tweaks will take your cobbler to the next level. Serve your peach cobbler warm for the best taste. It pairs nicely with a scoop of vanilla ice cream. Whipped cream is another tasty option. For a twist, try drizzling honey or caramel sauce on top. You can also sprinkle some chopped nuts for crunch. Enjoy it straight from the oven, or let it cool a bit for a different texture. Check out the Full Recipe for more details! {{image_4}} You can easily switch out the peaches for other fruits. Berries work great! Try blueberries or raspberries for a fresh twist. Apples also make a nice choice, adding a crisp texture. Just remember to adjust the sugar based on the fruit's sweetness. If you want a gluten-free cobbler, use gluten-free flour instead of all-purpose flour. Many brands offer blends that work well in baking. You can also check for gluten-free baking powder. This way, you can enjoy the cobbler without worry. Just follow the same steps in the Full Recipe, and you’ll have a tasty treat! To make a vegan peach cobbler, swap out the milk for almond or oat milk. Replace the butter with coconut oil or a vegan butter substitute. Use a flax egg instead of regular eggs if you want to add some. Mix one tablespoon of flaxseed meal with three tablespoons of water. Let it sit for five minutes, and it’s ready to use! Enjoy your vegan cobbler warm, maybe with some plant-based ice cream on top. To keep your cobbler fresh, let it cool before storing. Place it in an airtight container. You can also cover it with plastic wrap or foil. Store the cobbler in the fridge. It will last for about 3 to 4 days. If you want to keep it longer, consider freezing it. To reheat your cobbler, first, take it out of the fridge. You can use the oven or the microwave. For the oven, preheat it to 350°F (175°C). Place the cobbler in a baking dish and cover it with foil. Heat for about 15 to 20 minutes. This method keeps the crust nice and crisp. If using the microwave, heat in short bursts. Check it every 30 seconds to avoid overcooking. Freezing is a great option for leftovers. First, let the cobbler cool completely. Cut it into portions and wrap each piece in plastic wrap. Then, place the wrapped pieces in a freezer-safe bag. Squeeze out as much air as possible. Label the bag with the date. It will stay good for up to three months. When you’re ready to enjoy it, thaw overnight in the fridge, then reheat as mentioned above. For the full recipe, refer to the earlier sections. Yes, you can use canned peaches if fresh ones are not available. Canned peaches are often sweeter and softer. When using canned peaches, drain the syrup to avoid excess liquid. This will keep your cobbler from becoming soggy. Fresh peaches offer a firmer texture and brighter flavor, but canned peaches are a good alternative in a pinch. Just remember to adjust the sugar, as canned peaches can be sweeter. Peach cobbler lasts about 3 to 5 days in the fridge. To keep it fresh, cover the dish tightly with plastic wrap or aluminum foil. The cobbler may lose some crispness over time but will still taste great. You can reheat it in the oven for about 10 minutes to regain some texture. This way, you can enjoy the flavors longer. Serve peach cobbler warm for the best experience. A scoop of vanilla ice cream on top adds a creamy touch. Whipped cream also works well if you prefer a lighter option. You can also sprinkle cinnamon or nutmeg on top for extra flavor. Pairing it with a fresh mint leaf adds a nice pop of color and freshness. For even more fun, try serving it with a drizzle of caramel sauce! You can find the full recipe for this delightful dessert above. You learned how to make a delicious peach cobbler. We covered key ingredients, tools, and steps. I shared tips for the best texture and flavor. You can even try fun variations like gluten-free or vegan. Remember, practice makes perfect. Don’t hesitate to experiment with flavors or fruits. Enjoy your baking journey and delight in every bite of your homemade cobbler!

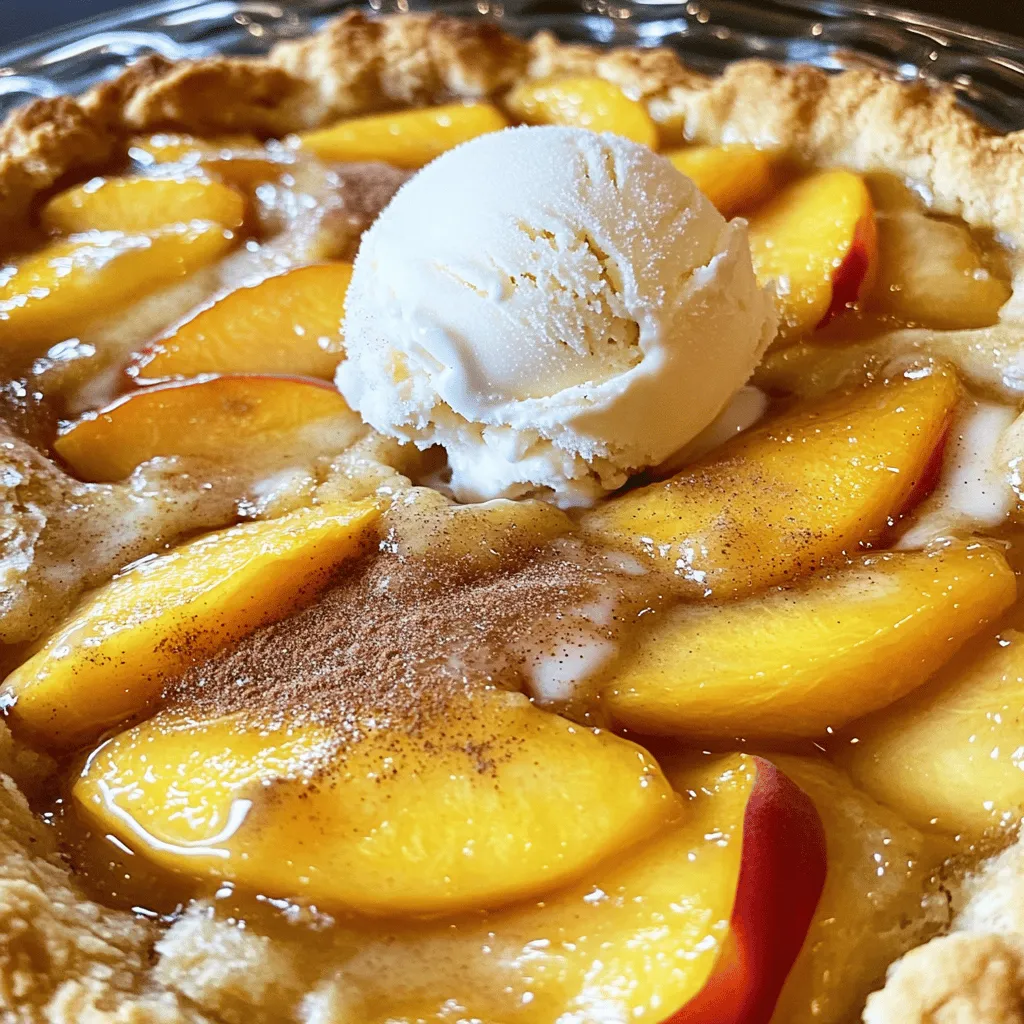
Are you craving a sweet and simple dessert? Look no further! This Easy Peach Cobbler recipe will delight your taste buds and impress your friends. With just a handful of …

Read more

Categories Desserts

Peach Crumble Will Make You Forget All About Cobblers

June 24, 2025 by Chef Miles
- 5 ripe peaches - 1 tablespoon freshly squeezed lemon juice - 1/4 cup packed brown sugar - 1 teaspoon ground cinnamon - 1/4 teaspoon freshly grated nutmeg - 1 cup rolled oats - 1/2 cup all-purpose flour - 1/3 cup granulated sugar - 1/4 teaspoon salt - 1/2 cup unsalted butter, melted - 1/2 teaspoon pure vanilla extract Using fresh ingredients makes a big difference. I love ripe peaches for their sweet juices. The lemon juice adds a bright zing to the fruit, balancing the sweetness. Brown sugar gives the peaches a rich flavor. The dry ingredients bring warmth and texture. Ground cinnamon and nutmeg create a cozy aroma. Rolled oats add a hearty crunch, while flour keeps the topping light. Sugar sweetens the crumble, and salt enhances all the flavors. Melted butter combines with the dry mix, creating a crumbly topping. Vanilla extract adds depth, making your crumble taste gourmet. You can find the full recipe to guide you through each step. Enjoy creating this delightful dish! - Preheat the oven to 350°F (175°C). - Grease the baking dish. This helps the crumble come out easily. - Combine the peaches, lemon juice, brown sugar, cinnamon, and nutmeg. - Mix gently until the peaches are coated. - Spread this mixture evenly in the baking dish. This gives a nice base for the crumble. - In a bowl, mix the oats, flour, sugar, melted butter, salt, and vanilla. - Stir until the mix is crumbly. Make sure it holds together but stays textured. - Sprinkle this topping over the peach mixture. Cover the peaches fully for even baking. - Place the baking dish in the oven. Bake for 30-35 minutes. - Look for a golden brown top and bubbling peaches. This means it’s ready. - Once done, remove the dish and let it cool slightly. This keeps the flavors fresh. For the complete experience, check the Full Recipe for more details! Choosing the right peach is key. Look for ripe, juicy peaches. They should smell sweet and feel slightly soft. Yellow peaches have a rich flavor, while white peaches are sweeter. Ensure even coverage of the crumble topping. This helps the topping bake evenly. Start by breaking the topping into small pieces. Scatter it over the peaches, covering every inch. Peach crumble shines with simple sides. Serve it warm in a bowl. Add a scoop of vanilla ice cream on top. The cold ice cream melts into the warm crumble. Fresh mint brightens the dish. Sprinkle some chopped mint on top. This adds a pop of color and flavor. Experimenting with spices can elevate your peach crumble. Try adding a pinch of allspice or ginger. These spices bring warmth and depth. Using alternative sweeteners can also change the taste. Honey or maple syrup can replace brown sugar. They add a unique twist while keeping it sweet. For the full recipe, check out the detailed instructions above. Enjoy making your peach crumble! {{image_4}} You can make peach crumble even more fun by adding other fruits. Try mixing in berries like blueberries or raspberries. Their tartness pairs well with sweet peaches. You can also use stone fruits, like plums or cherries. These fruits add unique flavors, making the crumble more exciting. Don't shy away from seasonal fruits either. Apples in fall or strawberries in spring can give your crumble a fresh twist. If you need a gluten-free dessert, you can easily adapt this recipe. Substitute regular flour with gluten-free flour blends. These blends work well and keep the crumble texture nice. You can also try almond flour or coconut flour for a different taste. Both add a lovely nuttiness to the topping, enhancing the overall flavor. Want to make your crumble healthier? Start by reducing the sugar in the recipe. You can cut the sugar in half and still enjoy great taste. Consider using honey or maple syrup as sweeteners. These options add natural flavor and sweetness. You can also swap out butter for healthier fats. Coconut oil or avocado oil can work well, giving your crumble a nutritious boost. These small changes can make a big difference! Always let your peach crumble cool before you store it. This step helps keep the topping crisp. If you store it too soon, the steam will make it soggy. Place it on a wire rack for even cooling. This allows air to circulate around the dish. When storing leftovers, use an airtight container. This keeps the peach crumble fresh and prevents it from absorbing other fridge odors. It will stay good for about 3 to 4 days. Always check for any signs of spoilage before eating. To freeze your peach crumble, let it cool completely first. Then, wrap it tightly in plastic wrap and aluminum foil. This prevents freezer burn. It can last for about 3 months in the freezer. When you are ready to eat it, thaw it in the fridge overnight. Reheat it in the oven at 350°F until warm. This keeps the topping nice and crunchy. You can also microwave it, but the topping may become soft. For best results, stick to the oven. For the full recipe, check the earlier sections. Peach crumble and peach cobbler differ mainly in texture and toppings. A peach crumble has a crunchy topping made from oats, flour, and butter. It offers a nice contrast to the soft peaches below. On the other hand, a peach cobbler usually features a biscuit-like topping. This topping is often thicker and fluffier. The crumble is more rustic, while the cobbler looks more polished. Yes, you can use frozen peaches! Just remember to thaw them first. Drain any extra liquid before mixing them with sugar and spices. This helps keep your crumble from getting soggy. If you want, you can also add a bit more flour to soak up some of the moisture. Look for two key signs. First, check the topping; it should be golden brown. Second, the peaches should be bubbling around the edges. This means the filling is hot and ready. If both signs are there, your crumble is done! Peach crumble pairs well with many treats. A scoop of vanilla ice cream adds creaminess. Whipped cream is another great option. You can also try it with a dollop of yogurt for a tangy twist. Fresh mint can add a nice touch, too! Yes, you can prepare peach crumble ahead of time! You can mix the peach filling and topping separately. Store them in the fridge. When you're ready, just combine and bake. This makes serving easy and quick. To reheat, place the crumble in an oven-safe dish. Preheat your oven to 350°F (175°C). Heat it for about 10-15 minutes. This keeps the topping crispy and the filling warm. You can also use a microwave, but the topping may not stay crunchy. Peach crumble is a tasty dessert you can easily make at home. We covered the fresh and dry ingredients, step-by-step instructions, and tips for perfecting your dish. You can even try variations like gluten-free options or mixed fruits. Storing leftovers correctly will keep them fresh. Enjoy sharing this delightful treat with others and remember, each bite should be a celebration of fresh flavors. Now it's time to enjoy your delicious peach crumble!

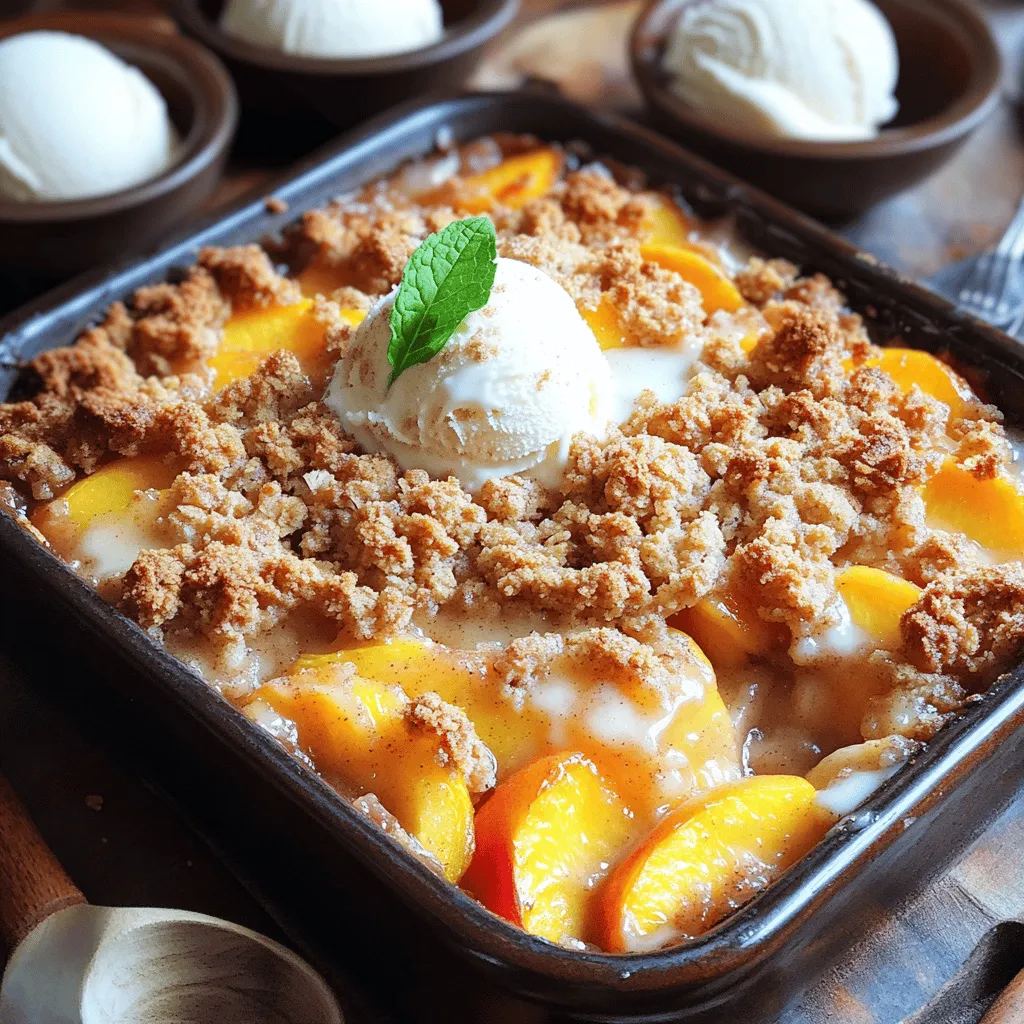
Forget cobblers! Peach crumble is your new go-to dessert. With its sweet peaches and crunchy topping, this dish packs a flavor punch you won’t forget. In this guide, I’ll show …

Read more

Categories Desserts

The Easiest Southern Peach Cobbler Simple and Sweet

June 24, 2025 by Chef Miles
To make this delightful peach cobbler, gather these simple ingredients: - 4 cups fresh peaches, peeled and sliced - 1 cup granulated sugar, divided into two portions - 1 tablespoon fresh lemon juice - 1 teaspoon ground cinnamon - 1 cup all-purpose flour - 1 tablespoon baking powder - 1/2 teaspoon salt - 1 cup whole milk - 1/2 cup unsalted butter, melted and slightly cooled - 1 teaspoon pure vanilla extract When picking peaches, look for a few key signs: - Color: Choose peaches that are vibrant and have a rich yellow or orange hue. - Feel: Gently squeeze them. They should be slightly soft but not mushy. - Aroma: Smell the peaches. A sweet, fruity scent means they are ripe and flavorful. - Season: Buy peaches during their peak season, which is late summer. That’s when they are the sweetest. If you need to make swaps, here are some easy ideas: - Peaches: Use nectarines or even canned peaches in syrup. - Granulated Sugar: You can use brown sugar for a deeper flavor. - Milk: Almond milk or oat milk can replace whole milk. - Butter: Coconut oil or vegetable oil can work instead of butter. You can find the full recipe for this cobbler to guide you through the process. Enjoy creating this sweet dish! Start by peeling and slicing four cups of fresh peaches. Choose ripe peaches for the best flavor. In a large bowl, mix the sliced peaches with half a cup of granulated sugar, one tablespoon of fresh lemon juice, and one teaspoon of ground cinnamon. Toss gently to coat the peaches. This step adds sweetness and a hint of spice. Pour the peach mixture into a greased 9x13-inch baking dish. Spread it evenly across the bottom. In another bowl, sift together one cup of all-purpose flour, the remaining half cup of sugar, one tablespoon of baking powder, and half a teaspoon of salt. Sifting helps to remove lumps and mix the dry ingredients well. This mix is key to a light, fluffy cobbler. Now, add one cup of whole milk, half a cup of melted unsalted butter, and one teaspoon of pure vanilla extract to your dry mix. Whisk gently until it is smooth and pourable. Carefully pour this batter over the peach mixture in the baking dish. Do not stir! The batter will rise while baking, forming a tasty, crispy topping. Bake your cobbler in a preheated oven at 350°F (175°C) for 45-50 minutes. Look for a golden brown top. Insert a toothpick into the center; it should come out clean. After baking, let the cobbler cool for at least 15 minutes. This cooling helps it set. For the full recipe, check the instructions provided earlier. To get a great cobbler topping, follow these tips. First, mix your dry ingredients well. This helps the baking powder spread evenly. Next, pour the batter gently over the peaches. Don’t stir the two layers. This way, the batter rises and forms a nice crust. Bake until golden brown. The cobbler should look inviting and smell sweet. Many people make simple mistakes when baking cobbler. Here are a few to watch out for: - Using unripe peaches: Always use ripe, sweet peaches for the best flavor. - Skipping the cooling time: Let your cobbler cool for at least 15 minutes. This helps it set properly. - Overmixing the batter: Mix just until combined. Overmixing can make the topping tough. - Not measuring ingredients: Accurate measurements are key to a perfect cobbler. To enjoy your cobbler fully, serve it warm. A scoop of vanilla ice cream on top makes it extra special. You can also add a dollop of whipped cream. For a burst of flavor, sprinkle some cinnamon on top. Serve with fresh mint for a pop of color. These little touches will impress your guests and make each bite memorable. For the full recipe, check out the detailed steps above. {{image_4}} You can make your peach cobbler even better by adding spices. Cinnamon is a great start, but don’t stop there. Try nutmeg or ginger for a warm touch. A pinch of cardamom can add a unique twist. Mix these spices into the peaches before baking. This will give your cobbler a rich flavor that surprises everyone. Peach cobbler is just the beginning. You can use other fruits to create new flavors. Consider using berries like strawberries, blueberries, or raspberries. Apples and pears also work well. Each fruit brings its own taste. Combine fruits for a mixed-fruit cobbler. This way, you can enjoy different flavors every time you bake. For gluten-free options, swap regular flour with a gluten-free blend. Look for blends that include rice flour or almond flour. This keeps the texture nice and tender. If you need a dairy-free option, use almond milk or coconut milk. Replace butter with coconut oil or a dairy-free margarine. These simple swaps make the cobbler suitable for everyone. For the full recipe, check out the details above. After enjoying your peach cobbler, let it cool completely. Once cooled, cover it with plastic wrap or foil. You can also place it in an airtight container. Store it in the fridge for up to five days. This keeps the cobbler fresh and ready for later. When you're ready to enjoy your cobbler again, preheat your oven to 350°F (175°C). Place the leftover cobbler in a baking dish. Cover it with foil to keep moisture in. Heat for about 15-20 minutes. This way, the topping stays crisp and the peaches warm. If you want to save your peach cobbler for longer, freezing works well. Slice the cobbler into portions. Wrap each piece tightly in plastic wrap, then place in a freezer bag. It can last up to three months in the freezer. To enjoy, thaw it in the fridge overnight before reheating. For the full recipe, check out The Easiest Southern Peach Cobbler! Yes, you can make this peach cobbler ahead. Prepare it the night before and store it in the fridge. Just cover it well to keep it fresh. When you're ready to bake, let it sit at room temp for about 30 minutes. Then, pop it in the oven. This way, you get a warm cobbler with ease. Peach cobbler shines on its own, but you can enhance it. Serve it warm with a scoop of vanilla ice cream. This adds a creamy touch. Whipped cream is another great choice. You could also sprinkle some chopped nuts for crunch. A drizzle of caramel sauce can make it fancy too. Check the top of your cobbler. It should be golden brown and firm. Insert a toothpick in the center. If it comes out clean, the cobbler is ready. It is important to let it cool for about 15 minutes. This helps it set and makes it easier to serve. For the full recipe, check out the detailed steps. In this post, we covered the best way to make the easiest Southern peach cobbler. We discussed key ingredients and how to pick ripe peaches. You learned step-by-step instructions for making and baking the cobbler. I shared tips for a perfect topping and common mistakes to avoid. Finally, we explored variations, storage tips, and frequently asked questions. Enjoy your cobbler warm with ice cream or fresh cream for the best taste. Making it right is key to a tasty treat!

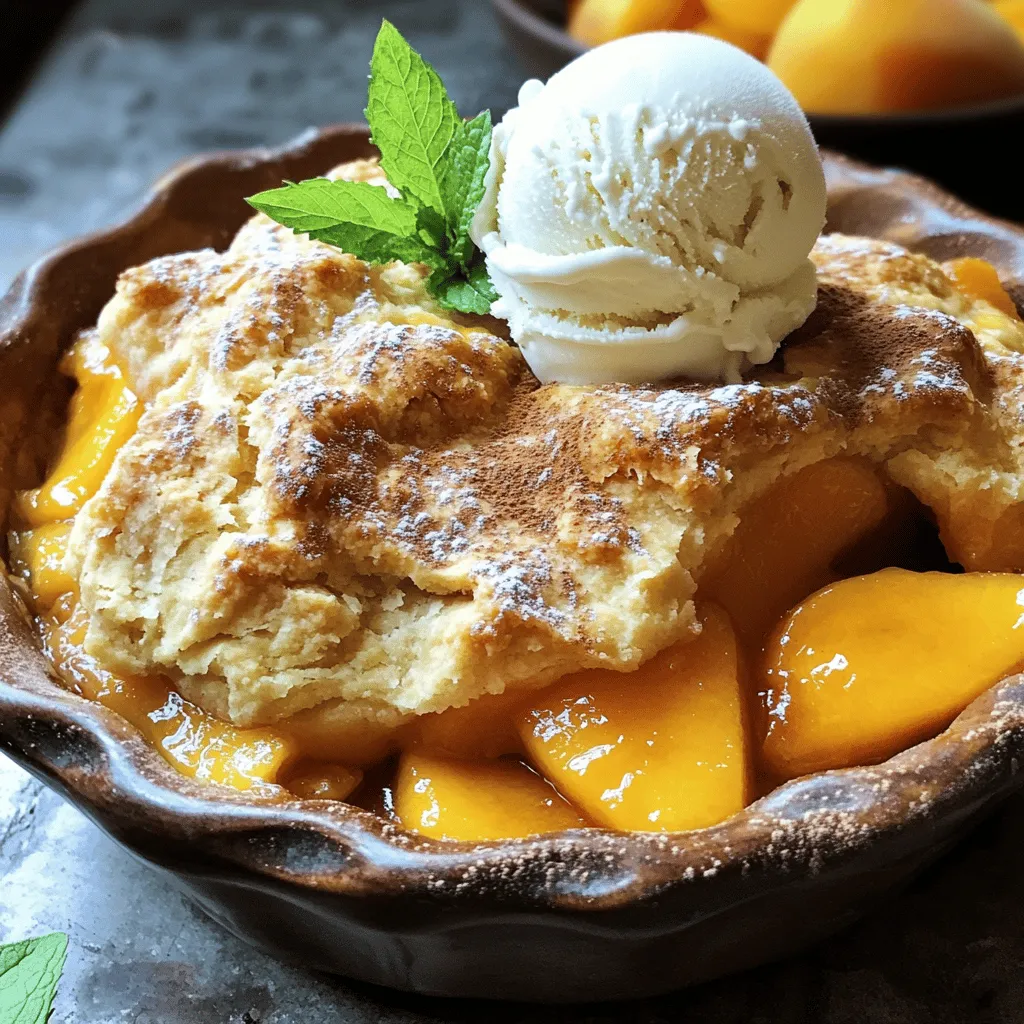
Are you ready to make the easiest Southern peach cobbler? This sweet dessert is a true crowd-pleaser. With simple steps and just a few ingredients, you can impress friends and …

Read more

Categories Desserts

Fresh Peach Cobbler Simple and Delicious Dessert Treat

June 24, 2025 by Chef Miles
- Fresh peaches: You need 5 ripe peaches. Peel them and slice into thin wedges. This brings out their sweet flavor. - Sugar: Use 1 cup of granulated sugar, split into two portions. This helps sweeten both the peaches and the batter. - Essential baking ingredients: You will need 1 cup of all-purpose flour, 1 tablespoon of baking powder, and 1/2 teaspoon of fine sea salt. These give the cobbler its structure. - Additional flavorings: Add 1 teaspoon of pure vanilla extract, 1 teaspoon of fresh lemon juice, and 1 teaspoon of ground cinnamon. These enhance the taste and aroma of the dish. - Serving suggestions: Serve with whipped cream or vanilla ice cream. This adds a rich and creamy touch that pairs well with the warm cobbler. This combination of fresh ingredients makes your peach cobbler simple and delicious. For the full recipe, check out the Peachy Paradise Cobbler section. 1. Preheat your oven to 375°F (190°C). Grease a 9x13-inch baking dish to stop sticking. 2. In a large bowl, mix the sliced peaches with 1/2 cup of sugar, vanilla extract, and lemon juice. Toss the peaches well and let them sit for about 10 minutes. This helps the peaches release their sweet juices. 3. In another bowl, whisk together the flour, the rest of the sugar, baking powder, and salt until smooth. 4. Add the milk and melted butter to the dry mix. Stir gently until just combined. It’s okay if there are small lumps. This will help the cobbler’s texture. 1. Pour the batter into the greased baking dish. Spread it evenly across the bottom. 2. Spoon the peach mixture and all the juices over the batter. Do not stir! This will let the batter rise well and create a fluffy texture. 3. Sprinkle ground cinnamon over the peaches for extra flavor. 4. Bake in the preheated oven for 40-45 minutes. The cobbler should turn golden brown. A toothpick should come out clean when tested. 5. Once done, take the cobbler out of the oven. Let it cool for a few minutes before slicing. 1. Serve warm cobbler in bowls. Top it with a scoop of vanilla ice cream or a dollop of whipped cream. 2. For a pretty touch, add a slice of fresh peach on top. This gives your cobbler a charming summer vibe. Enjoy your Peachy Paradise Cobbler! For the full recipe, check the recipe section above. Selecting ripe peaches Choose peaches that are fragrant and slightly soft to the touch. The skin should be smooth without bruises. Ripe peaches are sweet and juicy, which makes for a great cobbler. If they are too firm, let them sit at room temperature for a few days. Sugar variations and alternatives You can use different types of sugar in your cobbler. Brown sugar adds a nice caramel flavor. Coconut sugar is a great option for a lower glycemic index. If you need a sugar substitute, try using honey or maple syrup, but adjust the quantity to taste. Ensuring the perfect texture For a soft and fluffy cobbler, do not overmix the batter. Mix until just combined, leaving small lumps. This helps the cobbler rise well and stay moist. Adjusting cooking time based on oven type Ovens can vary, so keep an eye on your cobbler. If your oven runs hot, start checking for doneness a few minutes early. A toothpick should come out clean when it’s done baking. Best pairings with beverages Peach cobbler pairs well with sweet tea or a light white wine. A scoop of vanilla ice cream on top makes it even better. Ways to elevate the dessert experience To make serving special, add fresh mint leaves on top for color and flavor. A sprinkle of cinnamon or a drizzle of caramel sauce can take it to the next level. Enjoy your Peachy Paradise Cobbler! For the complete recipe, check out the Full Recipe. {{image_4}} You can use many fruits in your cobbler. Fresh berries, like blueberries or raspberries, work well. They add a nice tartness that balances the sweet peaches. You could even use apples for a cozy fall twist. Mixing peaches with berries gives a fun blend of flavors. This makes your cobbler even more exciting and colorful. Some people need to change the recipe for health reasons. If you want a gluten-free option, use almond flour instead of regular flour. You can also find gluten-free baking mixes. For those watching sugar, try using a sugar substitute like stevia or monk fruit. This change keeps the dessert sweet but lowers calories. Spices can bring your cobbler to life. Adding a pinch of nutmeg or cardamom gives a warm flavor. You can also add extracts, like almond or coconut. If you want a crunch, top your cobbler with chopped nuts, like pecans or almonds. These small changes can make your peach cobbler unique and tasty. For the full recipe, check out the Peachy Paradise Cobbler. To store leftover peach cobbler, let it cool first. Cover it tightly with plastic wrap or foil. Place it in the fridge. It will stay fresh for about three days. If you want to keep it longer, freezing is a great option. To freeze peach cobbler, slice it into portions. Wrap each slice in plastic wrap. Then place the wrapped slices in a freezer-safe bag. Be sure to label it with the date. This can last up to three months in the freezer. To reheat peach cobbler and keep its texture, the oven is best. Preheat your oven to 350°F (175°C). Place the cobbler in a baking dish. Cover it with foil to prevent it from drying out. Heat for about 20 minutes. If you want to use a microwave, it works too. Place a slice on a microwave-safe plate. Heat it for 30 seconds to 1 minute, checking often. It may not be as crisp, but it will still taste great. You can tell your cobbler is done by looking for a few signs: - The top should be golden brown. - A toothpick should come out clean when inserted in the center. - The edges may bubble slightly. When these signs appear, your cobbler is ready. Let it cool for a few minutes. This rest time lets the juices settle. Yes, you can use frozen peaches. Here are some tips: - Thaw the peaches completely before using them. - Drain any excess juice to avoid a soggy cobbler. - Add a little more sugar if the peaches are tart. Frozen peaches can work well in this recipe, but fresh ones give the best flavor. You can serve peach cobbler warm or cold. Here are some tasty ideas: - Serve it warm right out of the oven. - Top it with whipped cream or vanilla ice cream. - For a fun touch, add a slice of fresh peach on top. This dessert shines in summer, perfect for gatherings or a cozy night in. Enjoy your Peachy Paradise Cobbler with these great serving ideas! In this post, I've shared how to make a delicious peach cobbler. We covered ingredients, prep steps, and baking directions. Remember to choose ripe peaches and adjust cooking times based on your oven. You can try different fruits to switch things up or make it gluten-free. With storage tips and answers to common questions, you have all you need for a tasty dessert. Enjoy making this simple dish and impressing your friends and family. Happy baking!

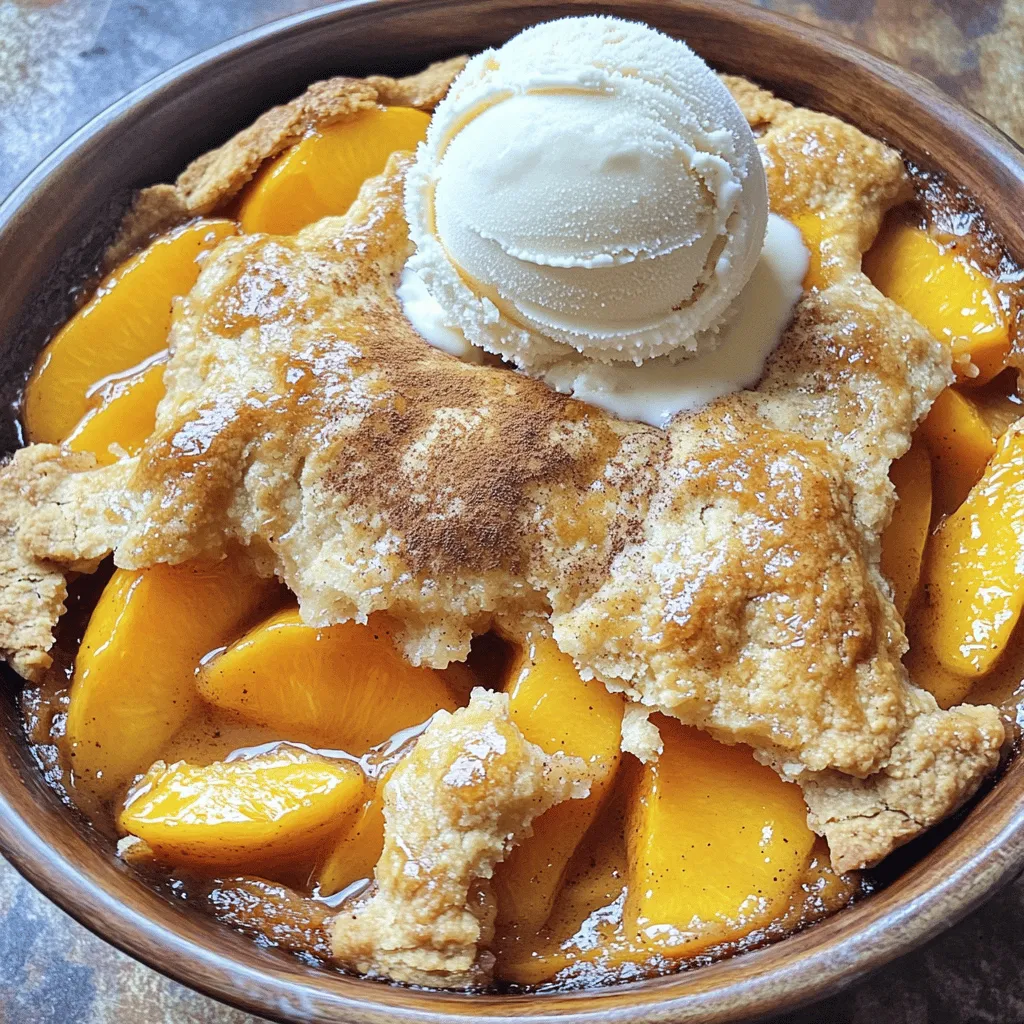
If you’re craving a sweet and warm dessert, fresh peach cobbler is a must-try! This simple recipe captures the juicy goodness of ripe peaches and combines it with a buttery …

Read more

Categories Desserts

Easy Heirloom Tomato Pie Casserole Tasty Family Dish

June 24, 2025 by Chef Miles
- 4 large heirloom tomatoes, beautifully sliced - 1 cup shredded mozzarella cheese (divided) - 1 cup creamy ricotta cheese - 1/2 cup fresh grated Parmesan cheese - 1/2 cup fresh basil leaves, chopped - 1 teaspoon dried oregano for extra flavor - 1/2 teaspoon garlic powder to enhance the taste - Salt and pepper, to taste - 1 pre-made pie crust (store-bought or homemade for a personal touch) - 1 tablespoon extra-virgin olive oil If you want to change the flavors, you can try different cheeses. Goat cheese or feta can add a nice twist. If you need a gluten-free option, look for gluten-free pie crusts in stores. You can also make your own. Fresh herbs give the best flavor, but dried herbs work too in a pinch. Choosing heirloom tomatoes is key. Look for firm tomatoes with rich color. The taste of fresh ingredients makes a big difference. Always pick ripe tomatoes and fresh herbs. These add more taste and joy to your dish. - Preheat your oven to 375°F (190°C). This ensures even cooking. - In a bowl, mix the ricotta, half of the mozzarella, Parmesan, basil, oregano, garlic powder, salt, and pepper. Blend until smooth. - Place the pie crust in a 9-inch dish, pressing it firmly against the bottom. - Arrange half of the tomato slices on the crust. Season them lightly with salt and pepper. - Spread the cheese mixture over the tomatoes, covering them completely. - Add the remaining tomato slices on top of the cheese mixture. Drizzle with olive oil for extra flavor. - Bake the casserole for 35 to 40 minutes. Look for bubbling cheese and a golden top. - Let it cool for about 10 minutes before slicing. This helps it set nicely. Feel free to check the Full Recipe for more detailed instructions! To cook your casserole evenly, use even slices of tomatoes. This helps the heat spread well. Layer your tomatoes from the bottom up, ensuring they fit snugly. To avoid a soggy crust, bake the crust for a few minutes before adding the filling. This step helps the crust stay crisp. Add fresh herbs like basil and thyme for a burst of taste. Mixing in some garlic powder also makes a big difference. You can use fresh oregano for a brighter flavor. For a richer taste, consider using aged cheeses or adding a splash of balsamic vinegar. When serving, cut the casserole into large pieces for a good presentation. Garnish with extra basil leaves for color and aroma. This dish pairs well with a light salad or crusty bread to soak up the juices. Want more tips? Check the Full Recipe for additional serving ideas! {{image_4}} You can change up the heirloom tomatoes for different types. Try using green or purple heirlooms. Each variety has its own taste and charm. You can also mix in seasonal veggies. Zucchini, bell peppers, or even corn add a nice crunch. Fresh ingredients not only boost flavor but also give you colorful layers. If you need a vegan option, swap the cheeses for plant-based ones. Cashew cheese or tofu works well in this dish. For a dairy-free choice, try coconut yogurt in place of ricotta. If you're watching carbs, use a cauliflower crust instead of a pie crust. This keeps the dish light and healthy. Adding meats can take this casserole to the next level. Cooked sausage or diced chicken blends nicely with the flavors. For a twist, use spices from different cuisines. Add cumin for a Mexican flair, or curry powder for an Indian touch. Feel free to mix and match until you find your favorite flavor! To keep your heirloom tomato pie casserole fresh, cool it down first. Once it's at room temperature, wrap it tightly in plastic wrap or place it in an airtight container. This method helps to keep moisture in and prevents the casserole from drying out. For the best results, store it in a glass or plastic container with a secure lid. These containers keep the casserole fresh longer and help avoid any fridge odors. If you have leftovers, you can freeze them for later. Cut the casserole into portions and use freezer-safe containers. Ensure to leave some space for expansion. Wrap each piece tightly with plastic wrap, followed by aluminum foil for extra protection. Label them with the date. To reheat, simply thaw the casserole overnight in the fridge. Then, bake it at 350°F (175°C) until heated through, about 25-30 minutes. In the fridge, your heirloom tomato pie casserole will last about 3 to 5 days. When frozen, it can stay good for up to 3 months. Always check for any off smells or changes in texture before enjoying your leftovers. Storing it properly helps maintain its delightful taste and quality. Can I make this casserole ahead of time? Yes, you can prepare this casserole the day before. Assemble it, cover it, and store it in the fridge. Bake it the next day when you're ready to serve. This saves time and allows the flavors to blend. What can I use if I don’t like ricotta cheese? If you don’t like ricotta cheese, you can use cottage cheese or cream cheese instead. Both options provide a creamy texture. You can even try goat cheese for a tangy flavor. How do I know when it's fully cooked? The casserole is ready when the cheese bubbles and turns golden brown. A knife inserted in the middle should come out hot. The tomatoes should be soft and juicy. What to do if the crust is burning? If the crust starts to burn, cover it with aluminum foil. This will protect it from direct heat. Make sure to check it often to avoid overbaking. How to fix too much moisture? If your casserole has too much moisture, try draining the tomatoes before adding them. You can also bake it a bit longer to help evaporate excess liquid. Caloric content per serving Each serving of this casserole has around 250 calories. This makes it a hearty yet satisfying dish. Health benefits of heirloom tomatoes Heirloom tomatoes are rich in vitamins and antioxidants. They support heart health and boost your immune system. Plus, their bright colors add nutrients to your meal! You learned how to create a delicious heirloom tomato pie casserole. We covered essential ingredients and their substitutes, plus tips for quality. The step-by-step instructions guide you through preparation and baking. We shared tricks for enhancing flavor and offered variations to suit diets. Proper storage and answers to common questions help you keep your casserole fresh. Enjoy your cooking adventure and explore different flavors. A well-made casserole can brighten any meal. Dive in, have fun, and savor each bite!

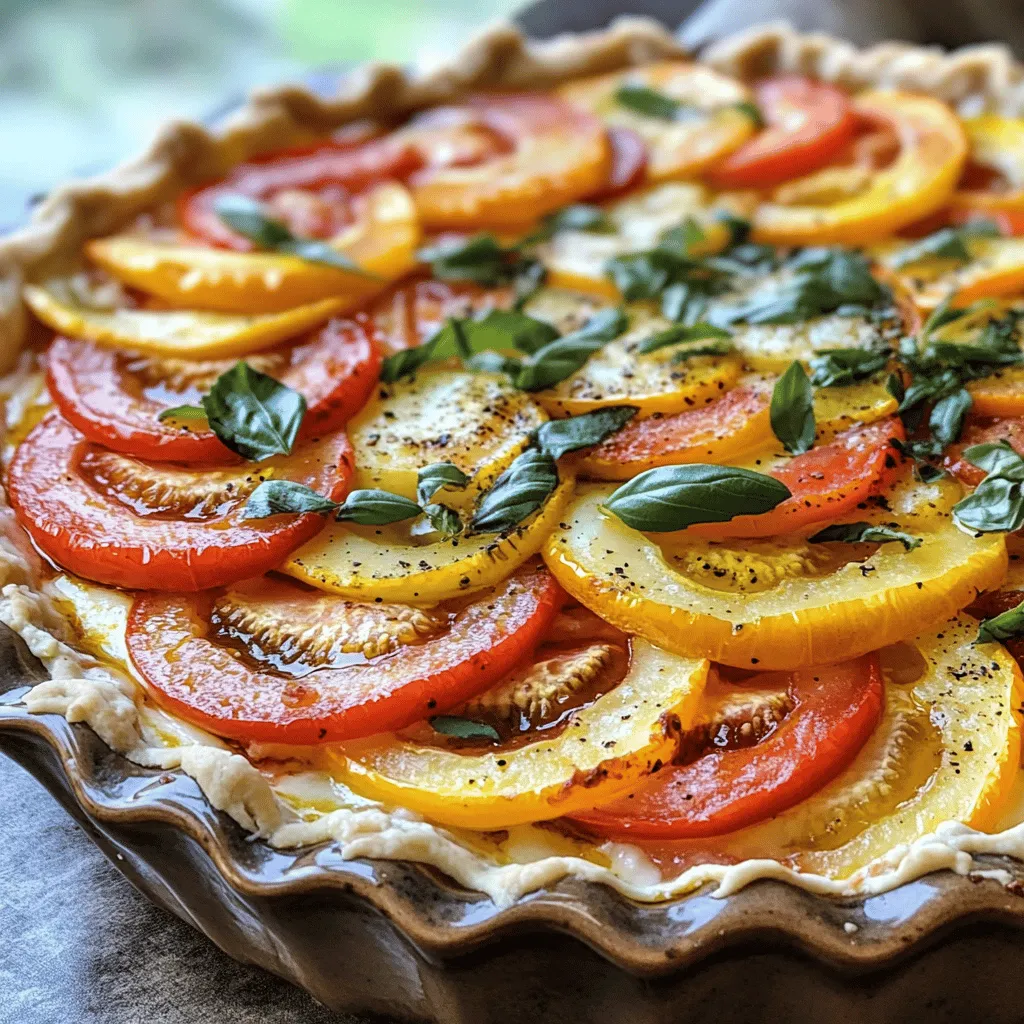
If you’re looking for a tasty family dish that celebrates fresh produce, you’ve come to the right place! This Easy Heirloom Tomato Pie Casserole is packed with flavor and uses …

Read more

Categories Dinner
Older posts
Newer posts
← Previous Page1 … Page82 Page83 Page84 … Page112 Next →

MELTED RECIPES

where delicious ideas melt into life, from stovetop to backyard. Always warm, simple, and irresistibly satisfying. 🍳🔥🧀

PAGES

Home About Contact Privacy Policy Terms & Conditions Cookie Policy GDPR Policy Copyright Policy Disclaimer

CATEGORIES

Appetizers Desserts Salads Breakfast Dinner

Contact

  • Pinterest
  • Mail
Copyright © 2025 Melted Recipes. All rights reserved.