Skip to content
Melted Recipes
  • Home
  • Appetizers
  • Desserts
  • Salads
  • Breakfast
  • Dinner
  • Privacy Policy
  • Contact
  • About

Chef Miles

Spiced Pear Upside-Down Cake Simple and Tasty Recipe

October 11, 2025 by Chef Miles
To make a delicious spiced pear upside-down cake, gather these key ingredients: - 3 ripe pears, peeled, cored, and thinly sliced - 1/2 cup unsalted butter, melted - 1/2 cup packed brown sugar - 1 teaspoon ground cinnamon - 1/2 teaspoon ground nutmeg - 1/2 teaspoon ground ginger - 1 cup all-purpose flour - 1 teaspoon baking powder - 1/2 teaspoon baking soda - 1/4 teaspoon salt - 1/2 cup granulated sugar - 1 large egg - 1 teaspoon vanilla extract - 1/2 cup milk These ingredients create a warm, spiced flavor that pairs perfectly with pears. You can make your cake even more special with these toppings: - Powdered sugar for dusting - Fresh mint leaves for color - Whipped cream for a rich texture - Vanilla ice cream for a cool contrast These extras enhance the cake's appeal and taste. To prepare this cake, you will need a few basic tools: - An 8-inch round cake pan - A mixing bowl for wet ingredients - A separate bowl for dry ingredients - A spatula for folding batter - A whisk for mixing Having these tools ready will make your baking experience smoother. Start by preheating your oven to 350°F (175°C). Grease an 8-inch round cake pan with butter. You want it to be well-coated. In a medium bowl, mix the melted butter and brown sugar. Stir until it looks smooth. Then, add the ground cinnamon, nutmeg, and ginger. This forms a sweet spiced syrup that will soak into the cake. Pour this syrup into the bottom of your pan. Next, take your ripe pears and slice them thinly. Arrange the slices over the syrup. Overlapping them looks nice and helps with flavor. In another large bowl, whisk together the all-purpose flour, baking powder, baking soda, and salt. Make sure these dry ingredients are well mixed. In a separate bowl, beat the granulated sugar and egg together. Keep mixing until it becomes light and fluffy. Then, add in the vanilla extract and milk. Mix until everything is combined. Now, gently fold the dry mixture into the wet mixture using a spatula. Be careful not to overmix; just stir until no dry bits remain. Pour the batter over the arranged pear slices in your pan. Use a spatula to spread it evenly. Place the cake in the preheated oven. Bake for 35-40 minutes. The cake should be golden brown when it’s done. A toothpick inserted in the center should come out clean. Once baked, take the cake out and let it cool for about 10 minutes. When it’s slightly cool, flip it onto a serving plate. This lets the pears sit beautifully on top. Let it cool a bit more before slicing and serving warm. To keep your Spiced Pear Upside-Down Cake moist and flavorful, focus on your ingredients. Use ripe pears for the best taste and juiciness. They help create a sweet, syrupy layer. Make sure to melt the butter fully, so it mixes well with the brown sugar. This blend adds richness to the cake. Also, don’t skip the spices. Cinnamon, nutmeg, and ginger bring warmth and depth. Remember, overmixing the batter can lead to a dry cake. Stir just until combined. Baking can be tricky, and small errors matter. First, always preheat your oven. A hot oven ensures even baking. Next, use the correct size pan. An 8-inch round pan works best for this recipe. If you use a larger pan, the cake may bake too quickly. Another mistake is not checking for doneness. Insert a toothpick into the center. If it comes out clean, your cake is ready. Lastly, let the cake cool in the pan for a bit. This helps it set and makes flipping easier. A beautiful presentation makes your dessert shine. After flipping the cake, you can lightly dust it with powdered sugar. This adds a touch of elegance. Fresh mint leaves give a pop of color and a nice aroma. For a creamy contrast, serve your cake with whipped cream or vanilla ice cream. A scoop on the side makes each bite extra special. Arrange the slices on a colorful plate for a stunning display. These small touches make your cake memorable. {{image_4}} You can swap pears for other fruits in this cake. Apples work well; they have a nice crunch. You could also try ripe peaches for a juicy twist. Pineapple gives a tropical flavor, while berries add a pop of color and tartness. Just remember to adjust the spices based on the fruit you choose. You can enhance the flavor with more spices. Try adding cardamom for a warm, sweet note. Cloves can add depth, while allspice brings a hint of warmth. For a unique twist, use almond or orange extract instead of vanilla. These flavors can brighten up the cake and make it special. To make this cake gluten-free, swap all-purpose flour for a gluten-free blend. Many mixes work well in baking. For a dairy-free option, use coconut milk or almond milk instead of regular milk. You can also replace butter with coconut oil or a dairy-free spread. These changes keep the cake tasty while meeting dietary needs. To keep your spiced pear upside-down cake fresh, store it in an airtight container. You can place it in the fridge for up to five days. If you want to keep it longer, consider freezing it. Always let the cake cool completely before storing. When you're ready to enjoy the cake again, preheat your oven to 350°F (175°C). Place a slice on a baking sheet and heat for about 10-15 minutes. This warms the cake and revives the flavors. Alternatively, you can microwave a slice for about 30 seconds. Just be careful not to overheat it, or it may dry out. To freeze the cake, wrap it tightly in plastic wrap. Then, place it in a freezer bag. It can last up to three months in the freezer. When you're ready to eat it, move the cake to the fridge overnight to thaw. Enjoy the deliciousness of your spiced pear upside-down cake anytime! You can make this cake ahead of time with ease. Bake the cake and let it cool completely. Then, wrap it tightly in plastic wrap. Store it in the fridge for up to three days. When you're ready to serve, warm it in the oven for 10 minutes at 350°F (175°C). This brings back the fresh taste and aroma. Yes, you can use canned pears! Just make sure to drain them well. Canned pears may be softer than fresh ones, so slice them carefully. You might want to reduce the baking time slightly to avoid overcooking. This option is great if fresh pears are out of season. Serving this cake can be fun! Pair it with a dollop of whipped cream or a scoop of vanilla ice cream. You can also add a sprinkle of powdered sugar for a pretty touch. Fresh mint leaves make a nice garnish, too. Enjoy the warm, spiced flavors with these tasty additions! This blog post covered how to create a delicious spiced pear upside-down cake. We discussed the key ingredients, tools, and step-by-step baking instructions. I shared tips to keep your cake moist and ideas for serving it beautifully. Don’t forget the optional variations to suit your taste or dietary needs. Finally, knowing how to store your cake ensures you enjoy it longer. Embrace your creativity and enjoy baking this delightful treat!

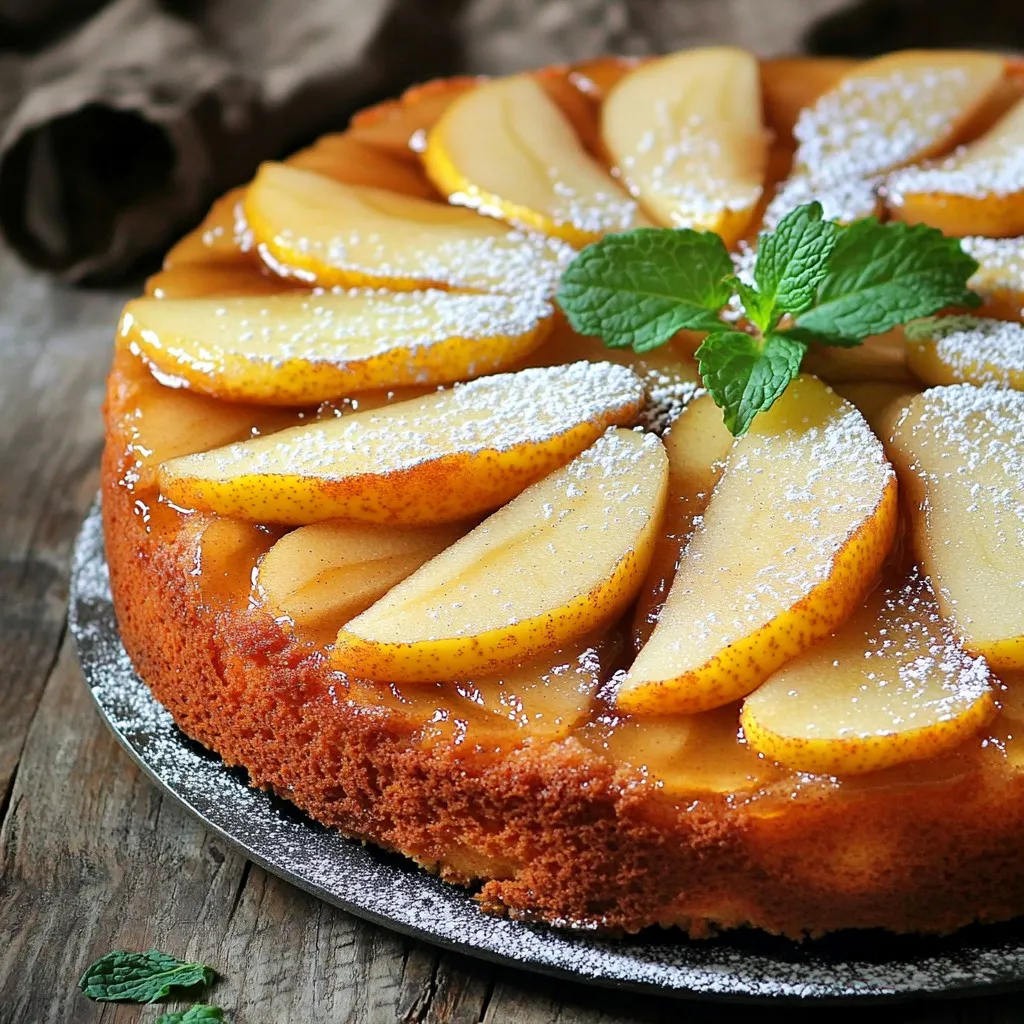
Get ready to impress your taste buds with my Spiced Pear Upside-Down Cake! This simple yet delicious recipe takes just a few ingredients and turns them into a sweet, aromatic …

Read more

Categories Desserts

High-Protein Greek Yogurt Breakfast Bark Delight

October 11, 2025 by Chef Miles
- 2 cups Greek yogurt (plain, choose non-fat or low-fat based on preference) - 1/4 cup honey or maple syrup (for natural sweetness) - 1/2 teaspoon vanilla extract (for flavor depth) - 1/2 cup mixed berries (choose a vibrant mix of strawberries, blueberries, and raspberries) - 1/4 cup chopped nuts (options include almonds, walnuts, or pistachios for crunch) - 2 tablespoons chia seeds (for added nutrition and texture) - Additional sweeteners (if you want it sweeter) - Other nut varieties (try pecans or hazelnuts) - Flavor variations (e.g., cinnamon or cocoa for extra taste) The main ingredients make a creamy base. Greek yogurt packs protein and flavor. Sweeteners like honey or maple syrup balance the tartness. Vanilla extract adds a nice touch. Toppings bring this dish to life. Mixed berries give color and vitamins. Nuts add crunch and healthy fats. Chia seeds boost nutrition and provide texture. Optional add-ins let you get creative. Sweeteners can adjust the taste. Different nuts can change the texture. Flavor variations can make each batch unique. Start by mixing the Greek yogurt with your sweetener. You can use honey or maple syrup, depending on your taste. Add 1/2 teaspoon of vanilla extract for a nice flavor. Don’t forget a pinch of fine sea salt to bring out the taste. Using a whisk or spatula, blend everything well. The goal is a smooth, lump-free mixture. This takes just a few minutes. Next, line a baking sheet with parchment paper. Make sure the edges are fully covered. Pour the yogurt mixture onto the sheet. Use a spatula to spread it evenly. Aim for a thickness of about 1/2 inch. This thickness helps it freeze well. Once you spread it, it’s time to freeze. Place the baking sheet in the freezer for at least 4 hours. You want the yogurt to be solid and firm to the touch. After the yogurt is frozen, it’s time for toppings. Evenly distribute mixed berries, chopped nuts, and chia seeds over the yogurt. Use strawberries, blueberries, and raspberries for a colorful mix. Press each topping down gently into the yogurt. This helps them stick during freezing, adding great texture to every bite. Greek yogurt packs a punch with protein. Each serving has about 20 grams of protein. This helps you feel full and keeps your energy up. Greek yogurt also has probiotics. These good bacteria help your gut stay healthy. A healthy gut can improve digestion and even boost your mood. Adding berries to your bark gives it a vibrant touch. Berries are rich in antioxidants. These help fight free radicals in your body. They also provide vitamins and fiber. Chopped nuts add a nice crunch and healthy fats. Nuts help you feel full and support heart health. Chia seeds are tiny but mighty. They are full of omega-3 fatty acids, which are great for your heart. These healthy fats can lower bad cholesterol levels. Chia seeds also offer a lot of fiber. Fiber helps with digestion and keeps you feeling satisfied longer. Plus, they absorb water, which can help keep you hydrated. {{image_4}} You can make your breakfast bark special. Choose different fruits or nuts to match your taste. Try bananas, mangoes, or even kiwi. For nuts, consider pecans or hazelnuts. Each choice adds unique flavor and texture. Adjust the sweetness to your liking. If you want it less sweet, use less honey or maple syrup. You can add cinnamon for a warm taste. This makes your bark even more enjoyable. Freezing your bark is easy. First, spread the yogurt in a thin layer. This helps it freeze evenly. Use parchment paper to avoid sticking. To store, place the pieces in an airtight container. Make sure to separate layers with parchment paper. This keeps them from sticking together. Your bark will stay fresh for up to two weeks in the freezer. Serving your breakfast bark can be fun. Cut it into squares for easy sharing. You can also break it into rustic pieces for a casual look. Pair your bark with drinks like smoothies or coffee. Fresh fruit on the side adds color and taste. For a special touch, serve on a wooden platter. Add extra berries for a vibrant display. Chocolate Greek Yogurt Bark You can turn your bark into a chocolate treat. Use cocoa powder in your yogurt mix. Add dark chocolate chips for extra richness. This version is perfect for chocolate lovers. Tropical Fruit Version Want a taste of the tropics? Try using pineapple, mango, and coconut flakes. These flavors create a fresh and bright breakfast bark. You’ll feel like you’re on a beach getaway with each bite. Vegan substitutions If you want a vegan option, use plant-based yogurt. Almond or coconut yogurt works well. Swap honey for agave syrup or maple syrup. This keeps your bark sweet and dairy-free. Nut-free options For those with nut allergies, leave out the nuts. You can use seeds like pumpkin or sunflower seeds instead. They add crunch without the risk of allergies. Holiday-inspired toppings Add festive colors with holiday toppings. Use red and green fruits like pomegranate and kiwi for Christmas. You can also sprinkle on edible glitter for a fun touch. Seasonal fruit variations Change your fruit based on the season. In spring, use strawberries and raspberries. In fall, apples and pears add a cozy feel. Adjusting your toppings keeps things fresh and exciting. You can store the breakfast bark in the freezer for up to two weeks. To keep it fresh, use an airtight container. This way, you can enjoy a quick snack anytime! Yes, you can make this recipe dairy-free! Use coconut yogurt or almond yogurt instead of Greek yogurt. These options still give you a creamy texture and great taste. Serve the breakfast bark on a wooden platter for a lovely look. Add some extra fresh berries on the side. This adds color and makes your dish pop! Absolutely! This breakfast bark is perfect for meal prep. You can make it ahead of time and store it. Just cut it into pieces and keep it in the freezer for busy mornings. Enjoying a healthy breakfast has never been easier! This blog post showed you how to make delicious Greek yogurt bark. We explored key ingredients like Greek yogurt, honey, and mixed berries. I shared steps for mixing, spreading, and topping your bark. We also covered the health benefits from yogurt, berries, and nuts. With tips for customization and freezing, you can make this treat your own. Enjoy this snack any time of year by trying different flavors or seasonal toppings. Now, you have the tools to create a tasty, healthy treat!

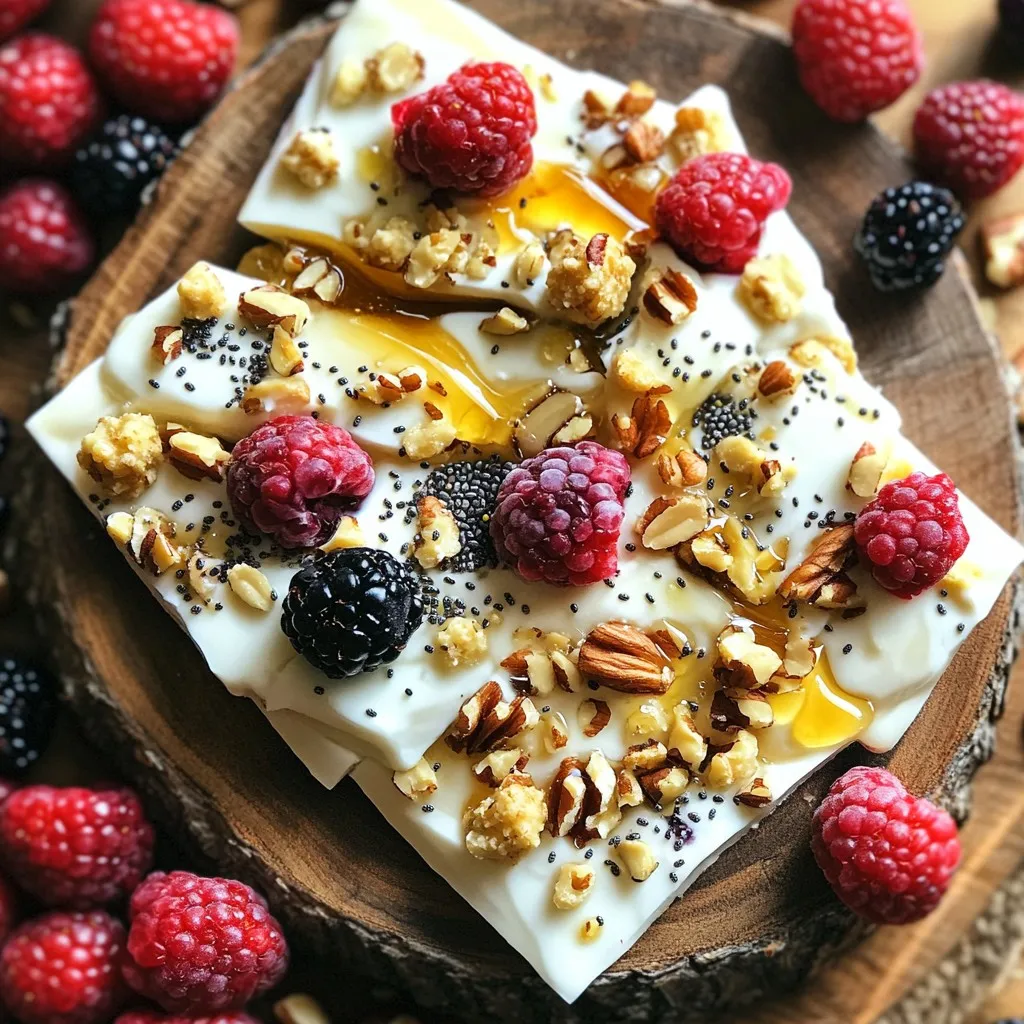
Ready for a tasty treat that’s also good for you? My High-Protein Greek Yogurt Breakfast Bark Delight is not just a snack; it’s a wholesome breakfast option! You can whip …

Read more

Categories Breakfast

No-Bake Pumpkin Cheesecake Truffles Delightfully Easy

October 11, 2025 by Chef Miles
To make no-bake pumpkin cheesecake truffles, gather these ingredients: - 1 cup cream cheese, softened to room temperature - 1 cup canned pumpkin puree (not pumpkin pie filling) - 1/2 cup powdered sugar - 1 teaspoon vanilla extract - 1 teaspoon pumpkin pie spice (or more to taste) - 1 cup graham cracker crumbs (plus extra for coating) - 1/2 cup white chocolate chips, melted - 1/4 cup chopped pecans (optional for added crunch) - Pinch of salt These ingredients blend together to create a creamy, pumpkin-flavored treat that will impress everyone. The cream cheese and pumpkin give it a rich taste, while the graham cracker crumbs add crunch. You can swap some of the ingredients if needed: - Use low-fat cream cheese for a lighter option. - Maple syrup can replace powdered sugar for a different sweetness. - Try a different nut, like walnuts, if you don't have pecans. - If you want a spiced flavor, add cinnamon or nutmeg to the mix. These swaps keep the truffles tasty while letting you use what you have on hand. For the best results, I recommend these brands: - Cream Cheese: Philadelphia is a classic choice for smooth texture. - Pumpkin Puree: Libby's is a trusted brand for pure pumpkin flavor. - Graham Crackers: Honey Maid offers a sweet crunch that works well. - White Chocolate Chips: Guittard or Ghirardelli melt nicely and taste great. - Pecans: Fisher brand pecans are fresh and ready to use. Using quality brands makes a big difference in taste. Each ingredient contributes to the overall flavor, so choose wisely for the best no-bake pumpkin cheesecake truffles. Start with a large bowl. Beat the softened cream cheese until smooth. This takes about 2-3 minutes. Next, add the canned pumpkin puree. Mix in the powdered sugar, vanilla extract, pumpkin pie spice, and a pinch of salt. Stir until the mixture is smooth and creamy. Gradually add 3/4 cup of graham cracker crumbs. Fold them in gently. This helps keep the truffles light and fluffy. Now, scoop about one tablespoon of the mixture. Roll it into a ball with your hands. Place the balls on a parchment-lined baking sheet. Continue this until you form all the truffles. Once you have all the truffles on the sheet, place it in the fridge. Chill them for at least 30 minutes. This step is key. Chilling helps the truffles firm up. They will hold their shape when you coat them later. While the truffles chill, prepare the coating. In a small bowl, mix the remaining graham cracker crumbs with the chopped pecans, if using. This adds a nice crunch to the truffles. After the truffles have chilled, dip each one into melted white chocolate. Allow any excess chocolate to drip off. Next, roll each truffle in the graham cracker and pecan mixture. This creates a delightful outer layer. Once coated, place them back on the baking sheet. Return the truffles to the fridge for another 15 minutes. This sets the chocolate coating perfectly. For a creamy texture, start with room-temperature cream cheese. Cold cream cheese will not mix well. Beat the cream cheese until smooth, about 2-3 minutes. This step is key. When you add the pumpkin puree and other ingredients, mix gently. Over-mixing can make the truffles tough. Aim for a smooth, even mixture. If you want it creamier, add a little more pumpkin puree, but not too much! Melting white chocolate can be tricky. Use a double boiler or a microwave. If using the microwave, heat in short bursts of 15 seconds. Stir after each burst until it melts. This method helps prevent burning. If it seems too thick, add a small amount of coconut oil. This will keep it smooth for dipping. Always let the chocolate cool slightly before using it on the truffles. These truffles make great gifts. Arrange them on a nice plate or in a festive box. Sprinkle extra graham cracker crumbs on top for flair. If you use pecans, add a few on the plate too. This adds a nice touch. For extra fun, label the box with a cute note. Everyone loves a personal touch! {{image_4}} You can add fun flavors to your truffles. Try mixing in some chocolate chips for extra sweetness. A bit of maple syrup can also enhance the fall flavor. For a nutty twist, add chopped almonds or walnuts. You can even fold in some dried cranberries for a fruity touch. When it comes to coating, both dark and white chocolate work well. Dark chocolate gives a rich taste. It contrasts nicely with the sweet pumpkin filling. White chocolate adds a creamy sweetness. Choose what you like best. You can even mix both types for a fun look. Want to make these truffles vegan? Swap the cream cheese for a dairy-free alternative. Use coconut cream or cashew cream for a rich texture. Instead of white chocolate, look for vegan chocolate chips. Make sure to check labels to ensure they are dairy-free. Enjoy these truffles without any animal products! You should store your No-Bake Pumpkin Cheesecake Truffles in an airtight container. This helps keep them fresh and tasty. Place parchment paper between layers if you stack them. Keep the container in the fridge. This will keep the truffles cool and firm. If you want to save your truffles for later, freezing them is a great choice. First, chill the truffles in the fridge for about 30 minutes. Once they are firm, place them in a single layer on a baking sheet. Freeze for about 1-2 hours until solid. Then, transfer them to a freezer-safe bag or container. Label the bag with the date. They can last up to three months in the freezer. When stored properly in the fridge, these truffles will stay fresh for about one week. Watch for any signs of spoilage, like changes in smell or texture. If you freeze them, thaw the truffles in the fridge before eating. This keeps their texture nice. Enjoy these treats whenever you crave something sweet! Yes, you can use fresh pumpkin. First, cook the pumpkin until it’s soft. Then, blend it until smooth. This makes a great substitute for canned pumpkin puree. Just remember to remove excess water. This helps keep your truffles from being too wet. These truffles stay fresh in the fridge for about a week. Store them in an airtight container. This keeps them from drying out and helps maintain their great taste. If you want them to last longer, you can freeze them. You can make these truffles ahead of time. They are perfect for prepping in advance. Make them a day or two before your event. Just store them in the fridge until you are ready to serve. This saves you time and stress on the big day! You learned how to make no-bake pumpkin cheesecake truffles. We covered ingredients, step-by-step instructions, and useful tips. You can create variations and store them safely, ensuring freshness. Remember, the right techniques make a big difference in taste and texture. Trust your creativity with flavor add-ins. Enjoy your truffles any time and share them with others. Happy cooking!

If you love pumpkin treats but dread baking, you’re in for a real treat! These no-bake pumpkin cheesecake truffles are simple to make and bursting with flavor. In just a …

Read more

Categories Desserts

Caramelized Onion Gruyère Flatbread Delightful Treat

October 11, 2025 by Chef Miles
- 1 large flatbread or store-bought pizza dough - 2 large onions, thinly sliced - 2 tablespoons olive oil - 1 tablespoon balsamic vinegar - 1 teaspoon sugar - 1 cup Gruyère cheese, shredded - 1/2 cup fresh arugula - Salt and pepper to taste - Fresh thyme leaves for garnish These ingredients make the flatbread truly special. The flatbread or pizza dough serves as a base. The onions bring sweetness and depth when caramelized. Olive oil helps cook the onions and adds flavor. Balsamic vinegar gives a tangy twist. Sugar aids the caramelization process and enhances the onions' natural sweetness. Gruyère cheese is rich and creamy, melting beautifully on top. Fresh arugula adds a peppery crunch, while thyme leaves give a fragrant finish. Salt and pepper round out the taste, making every bite perfect. Gather these ingredients, and let's create something amazing together! Heating the Skillet Start by heating two tablespoons of olive oil in a large skillet. Set the heat to medium. Wait until the oil shimmers. Adding Onions, Salt, and Sugar Slice two large onions thinly. Add them to the skillet with a pinch of salt and one teaspoon of sugar. Stir the onions well, coating them in the oil. Incorporating Balsamic Vinegar Cook the onions for about 20-25 minutes. You want them soft and golden brown. Near the end, pour in one tablespoon of balsamic vinegar. Stir and let it mix in. Then, take the skillet off the heat. Preheating the Oven If you use pizza dough, check the package for the right oven temperature. Preheat your oven to around 475°F (245°C). If using flatbread, you can skip this step. Rolling Out Pizza Dough If you're using pizza dough, roll it out on a floured surface. Make it as thick as you like. Lining the Baking Sheet Place the rolled dough or flatbread on a baking sheet lined with parchment paper. Ensure it lays flat and evenly. Distributing Onions and Cheese Spread the caramelized onions evenly across the flatbread. Then, sprinkle one cup of shredded Gruyère cheese on top. Cover the onions completely. Baking Time and Indicators Bake the flatbread in the oven for 12-15 minutes. Look for bubbling cheese and a golden-brown edge to know it's done. Final Touches Post-Baking Once baked, take the flatbread out of the oven. Top with half a cup of fresh arugula and a sprinkle of fresh thyme leaves. Add salt and pepper to taste. Temperature Control Keep your heat at medium. This way, onions cook evenly. If the heat is too high, they burn. Low heat can make them take too long. Aim for a steady sizzle. Timing Tips Caramelizing takes about 20-25 minutes. Stir the onions every few minutes. This prevents sticking and ensures they brown well. Watch for a rich, golden color. That’s when they are perfect. Suggested Seasonings Add salt and pepper to taste. You can also sprinkle a bit of sugar. This helps balance the onions' sweetness. A pinch of garlic powder can add depth too. Recommended Pairings Gruyère cheese pairs well with many flavors. Consider serving the flatbread with a side salad. A light arugula salad adds freshness. A drizzle of balsamic glaze also boosts flavor. Serving Suggestions Serve the flatbread on a wooden cutting board. This gives a rustic look. Cut it into squares for easy sharing. Garnishing Ideas Top with fresh arugula after baking. Sprinkle fresh thyme leaves for a pop of color. A small bowl of balsamic glaze on the side is a nice touch. {{image_4}} Substituting Gruyère You can swap Gruyère for other cheeses. Try mozzarella for a milder taste. Cheddar gives a sharp kick. Feta adds a nice tang. Each cheese changes the flavor. Adding Additional Cheeses Mixing cheeses is fun! Blend Gruyère with goat cheese for creaminess. Add Parmesan for a salty touch. Use any cheese you love to create your perfect flatbread. Incorporating Other Vegetables Feel free to add more veggies. Spinach gives a fresh taste. Roasted red peppers add sweetness. Mushrooms bring an earthy flavor. The more colors, the better! Flavor Combinations with Different Herbs Herbs make a big difference. Basil pairs well with onions. Oregano adds depth. Try rosemary for a woodsy taste. Fresh herbs brighten every bite. Alternative Dough Options For a gluten-free flatbread, use gluten-free pizza dough. Cauliflower crust is another great choice. You can even make your own dough with almond flour. Adjustments for Taste and Texture Gluten-free dough may taste different. Add extra seasonings to boost flavor. A sprinkle of garlic powder or onion powder can help. Adjust baking time as needed to get a nice crisp. - Best Storage Practices: Always cool the flatbread to room temperature before storing. This helps prevent sogginess. - Container Recommendations: Use an airtight container or wrap the flatbread tightly in plastic wrap. This keeps it fresh. - Oven vs. Microwave: I recommend using the oven for reheating. The microwave can make it soft. Preheat your oven to 350°F (175°C) for the best results. - Tips for Maintaining Crispiness: Place the flatbread directly on the oven rack or a baking sheet. This helps it stay crispy as it warms. - How Long It Lasts in the Fridge: Properly stored, your flatbread can last about 3-4 days in the fridge. - Signs of Spoilage: Look for any off smells or mold. If it feels slimy, it's best to toss it. Always trust your senses! To get great caramelized onions, start with medium heat. Use a large skillet for even cooking. Add olive oil first, then thinly sliced onions. A pinch of salt helps draw out moisture. Sprinkle in a teaspoon of sugar to boost sweetness. Stir often, allowing the onions to cook for 20-25 minutes. Watch for a rich, golden-brown color. Near the end, add balsamic vinegar for depth. This will give you a sweet and savory flavor. Yes, you can prepare the flatbread ahead of time. You can caramelize the onions and store them in the fridge for up to three days. Roll out the pizza dough or flatbread and keep it covered. When you're ready to bake, just assemble the flatbread with the onions and cheese. This will save time and make the cooking process quick and easy. This flatbread pairs well with simple side dishes and drinks. A fresh salad with arugula and lemon dressing complements the flavors nicely. You could also serve it with a light soup, like tomato or butternut squash. For drinks, a crisp white wine or sparkling water works great. Feel free to get creative with your pairings! This recipe is not vegan as it contains Gruyère cheese. However, you can make easy substitutions. Use vegan cheese shreds instead of Gruyère. You can also skip the cheese for a lighter version. The caramelized onions will still add a rich flavor. Just make sure to check the ingredients in your flatbread or dough for any animal products. This way, you can enjoy a tasty vegan flatbread! Caramelized Onion Gruyère Flatbread is more than just a dish; it’s an experience. We covered every key step: from caramelizing onions to perfecting the flatbread. Don’t forget to experiment with different cheeses and veggies for your unique twist. Proper storage will keep your leftovers fresh, letting you enjoy this dish longer. With easy reheating tips, you can savor every bite. Dive into this recipe, and let your kitchen fill with delicious scents. Happy cooking!

Are you ready for a delicious treat? This Caramelized Onion Gruyère Flatbread is a game changer! The sweet, rich flavor of caramelized onions pairs perfectly with the nutty Gruyère cheese. …

Read more

Categories Appetizers

Creamy Roasted Red Pepper Gnocchi Dreamy Dish

October 11, 2025 by Chef Miles
- 1 lb potato gnocchi (store-bought or homemade) - 2 large red bell peppers - 1 cup heavy cream - 1/2 cup freshly grated Parmesan cheese - 2 tablespoons olive oil - 2 cloves garlic, finely minced - 1 teaspoon smoked paprika - Salt and pepper, to taste - Fresh basil leaves, for garnish Gathering the right ingredients is key to making creamy roasted red pepper gnocchi. You can use store-bought gnocchi for speed or make your own for fun. The two large red bell peppers give the dish its vibrant color and sweet taste. Heavy cream makes the sauce rich and luscious. The freshly grated Parmesan cheese adds a savory touch. Olive oil and minced garlic bring depth of flavor. Smoked paprika adds a unique, smoky taste, while salt and pepper balance the dish. Fresh basil leaves are perfect for a bright, finishing touch. Every ingredient plays a role in making this dish a dreamy delight. - Preheat oven to 400°F (200°C). - Prepare the baking sheet with parchment paper. - Slice and seed the red bell peppers. - Roast in the oven for 25-30 minutes. I love watching the peppers roast. The skin gets blistered and charred, which adds great flavor. Once they cool, the skins peel away easily. This is a key step that boosts the taste of the sauce. - Blend roasted peppers with cream, smoked paprika, salt, and pepper. - Sauté garlic in olive oil. In a blender, mix the roasted peppers, heavy cream, smoked paprika, salt, and pepper. Blend until smooth. This creates a creamy and bright sauce. In a skillet, add olive oil and sauté minced garlic for about one minute. The smell will fill your kitchen and get you excited for the dish. - Cook gnocchi until they float, then drain. - Mix gnocchi with the cream sauce and Parmesan cheese. Cook the gnocchi in salted water. Once they float, they are ready! Drain them and add them to the sauce in the skillet. Toss gently to coat every piece. Then, sprinkle the grated Parmesan cheese on top. Stir until it melts. This mix makes the dish so rich and tasty. - Use fresh heavy cream for best results. - Blend until completely smooth. To get that perfect creamy texture in your sauce, fresh heavy cream is a must. It adds richness that makes each bite delightful. When blending, ensure no lumps remain. A smooth sauce coats the gnocchi better. This is key for a dreamy dish! - Experiment with adding herbs like thyme or oregano. - Consider a splash of lemon juice for brightness. Herbs can take your dish to the next level. Adding thyme or oregano brings depth. A splash of lemon juice adds a bright, fresh taste. This balance of flavors makes the dish pop! - Salt water before boiling for added flavor. - Watch for gnocchi to float as an indicator of doneness. Cooking gnocchi is simple but important. Salt your water first. This step gives flavor right from the start. When the gnocchi float, they are ready. This is your cue to drain them. Perfectly cooked gnocchi makes your meal shine! {{image_4}} You can try different cheeses in this dish. Goat cheese or feta can add a tangy flavor. They melt well and blend nicely. If you want a faster prep time, use roasted red peppers from a jar. This saves time and effort without losing flavor. Want to make your gnocchi even better? Add sautéed spinach or mushrooms for extra taste. They bring a nice texture and nutrition. You can also add protein like grilled chicken or shrimp. This makes your meal more filling and hearty. If you're looking for gluten-free options, there are many brands of gluten-free gnocchi. They taste great and work well in this dish. For those on a vegan diet, use plant-based cream and cheese. This way, everyone can enjoy this creamy roasted red pepper gnocchi! To keep your creamy roasted red pepper gnocchi fresh, store it in an airtight container in the fridge. This dish tastes best when you eat it within 2-3 days. The flavors stay rich and vibrant during this time. When you reheat your gnocchi, do it gently. Use the stove and add small amounts of cream. This helps keep the sauce smooth. If you use a microwave, be careful. Heat it in short bursts to avoid overcooking, which can ruin the texture. If you need to save some gnocchi for later, freeze it. Make sure to freeze the gnocchi separately from the sauce. This keeps both parts at their best. When you are ready to eat, thaw everything in the fridge overnight before reheating. This keeps the dish fresh and tasty. To make homemade gnocchi, you need just a few simple ingredients. You will need: - 2 lbs of potatoes - 1 ½ cups all-purpose flour - 1 egg - A pinch of salt Start by boiling the potatoes until soft. Then, peel and mash them in a bowl. Mix in the flour, egg, and salt. Knead the dough lightly. Roll it into long ropes and cut into small pieces. Use a fork to create ridges on each piece. This helps sauce stick to the gnocchi. Yes, you can use jarred roasted red peppers. They save time and are still tasty. Just drain and rinse them to remove excess liquid. Blend them with cream and spices as you would with fresh peppers. This shortcut makes the dish quicker while still full of flavor. Serve creamy roasted red pepper gnocchi in shallow bowls. This way, everyone can enjoy the sauce. Top with fresh basil and extra Parmesan cheese. This adds color and flavor. You can also serve it with a side salad or garlic bread for a complete meal. Yes, you can make this dish ahead. Prepare the sauce and gnocchi separately. Store them in airtight containers in the fridge. When ready to serve, reheat the sauce and cook the gnocchi just before mixing. This keeps the flavors fresh and delicious. This blog post shared a tasty recipe for creamy roasted red pepper gnocchi. You learned about the key ingredients, steps to prepare, and cooking tips. Each part builds a delicious dish you can enjoy. Remember, you can make variations and use different ingredients to fit your taste. Whether you choose to add protein or adjust for dietary needs, this recipe is flexible. Try it out, and enjoy cooking!

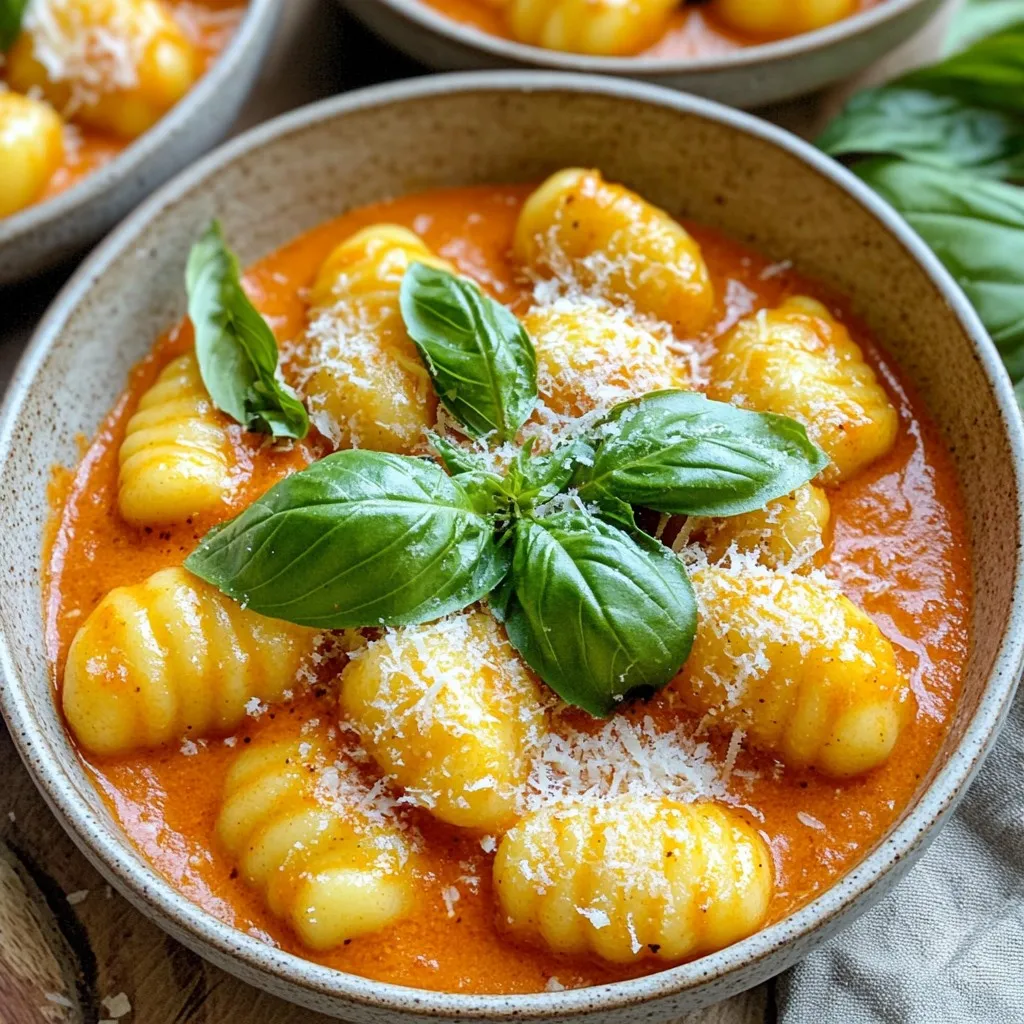
Are you ready to savor a dish that oozes comfort? My Creamy Roasted Red Pepper Gnocchi is a delightful blend of flavors that will impress anyone at your table. Made …

Read more

Categories Dinner

Cozy Caramel Apple Cider with Whipped Cream Delight

October 10, 2025 by Chef Miles
- 4 cups apple cider - 1/2 cup caramel sauce, plus extra for drizzling on top - 1 cinnamon stick - 1/2 teaspoon ground nutmeg - 1/4 teaspoon ground cloves - 1 cup heavy whipping cream - 2 tablespoons powdered sugar - 1 teaspoon vanilla extract - Sliced apples and additional cinnamon sticks for garnish For this cozy drink, I recommend using fresh apple cider. If you can’t find it, you can use store-bought cider. The caramel sauce adds sweetness and richness. You might swap it with maple syrup for a different twist. Ground nutmeg and ground cloves give warmth. If you want a milder flavor, you can reduce the amounts. For the whipped cream, heavy whipping cream is best. If you prefer a lighter option, try using coconut cream or a dairy-free alternative. Remember to adjust sugar based on your taste. You will need some key tools to make this drink: - A large pot for warming the cider - A mixing bowl for the whipped cream - An electric mixer to whip the cream - Mugs for serving the cider - A ladle to pour the cider into mugs These tools help you create a warm and delicious drink. Make sure to gather everything before you start. This makes cooking more fun and easy! To start, grab a large pot. Pour in 4 cups of apple cider. Add 1/2 cup of caramel sauce. Toss in the cinnamon stick, ground nutmeg, and ground cloves. Stir well to mix everything. This helps the caramel and spices blend. Next, place the pot on medium heat. Warm the cider gently. Stir it from time to time. Heat until you see steam rising. Avoid boiling to keep the taste rich. Once it's hot enough, remove the pot from the heat. Discard the cinnamon stick. Your cider base is ready! While the cider warms, let’s make the whipped cream. Take a mixing bowl and pour in 1 cup of heavy whipping cream. Add 2 tablespoons of powdered sugar and 1 teaspoon of vanilla extract. Use an electric mixer to whip the mixture. Beat until you see soft peaks. This creates a fluffy topping. Set the whipped cream aside. Now, it’s time to combine everything. Ladle the warm caramel apple cider into your mugs. Fill each mug generously. Then, add a big dollop of whipped cream on top. Drizzle extra caramel sauce over the whipped cream. For a lovely touch, garnish with apple slices and a cinnamon stick. This makes your drink look festive and inviting. Enjoy your cozy caramel apple cider! To get the best taste from your cozy caramel apple cider, focus on the spices. Use fresh ground nutmeg and cloves for a stronger flavor. You can also add more caramel if you love sweetness. Taste the cider before serving. That way, you can adjust the spices and caramel to your liking. Serve the cider in clear mugs. This lets everyone see the warm, rich color. Top each drink with a fluffy mound of whipped cream. Drizzle extra caramel sauce on top for a sweet finish. Garnish with a slice of apple and a cinnamon stick. This makes each mug look festive and inviting. One common mistake is boiling the cider. This can ruin the flavor. Heat it gently until it steams, then take it off the heat. Also, don’t skip the whipped cream. It adds creaminess and sweetness. Lastly, avoid using old spices. Fresh spices make a big difference in taste. {{image_4}} You can add fun flavors to your cozy caramel apple cider. Try mixing in a splash of orange juice for a bright twist. A few drops of vanilla extract can enhance the sweetness. If you love spices, add a pinch of cardamom or ginger. These flavors will make your cider unique. You can even use spiced apple cider for a more intense flavor. Want to make your apple cider a bit more festive? Add a splash of bourbon or rum. Just pour about 1 ounce into each mug after warming your cider. The warmth of the alcohol pairs well with the spices. This version is perfect for chilly nights or parties. Just remember to drink responsibly! If you need a dairy-free version, don't worry! Use coconut cream instead of heavy whipping cream. It gives a nice, rich flavor. For the caramel sauce, check for dairy-free options at the store. Some brands make great vegan caramel. Your cider will still be tasty and creamy without the dairy. Enjoy the cozy flavors without worry! To store leftover cider, let it cool first. Pour the cider into an airtight container. Make sure to seal it tightly. Store it in the fridge. It stays fresh for about three days. If you want to enjoy it later, keep it covered. When you're ready to enjoy the cider again, pour it into a pot. Heat it over medium-low heat. Stir it gently until it warms up. You want it hot but not boiling. This way, the flavors stay bright and fresh. If you want to freeze the cider, use a freezer-safe container. Leave some space at the top for expansion. It can freeze well for up to three months. To thaw, move it to the fridge overnight. Reheat it gently before serving. This method keeps the taste and texture intact. Yes, you can use store-bought caramel sauce. It saves time and tastes great. Look for a good-quality sauce for the best flavor. You can also drizzle extra on top for added sweetness. You can use apple juice instead of cider. Just heat it with the same spices and caramel. The taste will differ slightly, but it will still be delicious. You can even add a splash of apple pie spice for more flavor. The best way to garnish is with a slice of fresh apple and a cinnamon stick. This adds a nice look and aroma. You can also sprinkle a little ground cinnamon on top of the whipped cream for extra flair. Yes, you can easily double or triple the recipe. Just adjust the pot size and heat accordingly. This is great for parties or gatherings. Keep extra whipped cream ready for serving. Yes, you can use alternative sweeteners. Try maple syrup, honey, or agave nectar. Adjust the amount based on taste. Each sweetener will give a unique flavor to the cider. This blog post covered everything you need for cozy caramel apple cider. You learned about the right ingredients, measurements, and tools. I provided step-by-step instructions to prepare the cider and make whipped cream. We shared helpful tips to perfect the flavor and avoid common mistakes. Different variations give you more options, such as dairy-free or alcoholic versions. Finally, you have storage tips for leftovers and answers to FAQs. Enjoy your delicious drink, and don't be afraid to try your own twists!

As the air turns crisp and leaves fall, there’s nothing quite like a warm drink to embrace the season. Cozy Caramel Apple Cider with Whipped Cream Delight is the perfect …

Read more

Categories Desserts

Bakery Style Pumpkin Spice Donuts Irresistibly Delicious

October 10, 2025 by Chef Miles
- 1 cup all-purpose flour - 1 cup pumpkin puree - 3/4 cup granulated sugar - 1/2 cup brown sugar - 1/2 teaspoon baking powder - 1/2 teaspoon baking soda - Spices: Cinnamon, nutmeg, ginger, cloves - 1/2 cup vegetable oil - 2 large eggs - 1 teaspoon vanilla extract - 1/4 cup milk When making bakery style pumpkin spice donuts, the right ingredients matter. Start with the basics. You need one cup of all-purpose flour. This gives the donuts their perfect structure. Next, add one cup of pumpkin puree. This will add flavor and moisture. For sweetness, use three-quarters of a cup of granulated sugar. This sugar helps the donuts rise well. You also need half a cup of brown sugar. Brown sugar adds a rich flavor that pairs well with spices. Then, focus on the baking essentials. Baking powder and baking soda are key. Use half a teaspoon of each. These help your donuts rise and become fluffy. Don't forget the spices! Use cinnamon, nutmeg, ginger, and cloves. These will give your donuts that warm, cozy flavor. Next, gather the wet ingredients. You will need half a cup of vegetable oil. This keeps the donuts moist. Use two large eggs for binding. They also add richness. One teaspoon of vanilla extract will enhance the flavor. Finally, add a quarter cup of milk to adjust the batter. It should be thick but pourable. With these ingredients, you can create delicious pumpkin spice donuts. Each bite will remind you of fall. - Preheat oven to 350°F (175°C). - Grease the donut pan with cooking spray or vegetable oil. This helps them lift out easily. - In a large bowl, combine the dry ingredients: flour, sugars, baking powder, baking soda, spices, and salt. - In a separate bowl, mix pumpkin, oil, eggs, vanilla, and milk until smooth. - Carefully fold the wet mixture into the dry ingredients. Do not overmix; keep it thick. - Transfer the batter into a piping bag or zip-top bag. Fill each donut pan cavity two-thirds full. - Bake for 12-15 minutes. - Check doneness by inserting a toothpick. It should come out clean. - Cool the donuts in the pan for 5 minutes. - Transfer them to a wire rack to cool completely. - Add optional toppings like powdered sugar or maple glaze before serving. To get that bakery-style texture, you must not overmix. Overmixing makes the donuts tough. Mix just until the wet and dry ingredients combine. The batter should be thick and slightly lumpy. This is key for soft donuts. Also, use room temperature ingredients. Cold eggs and milk can affect the batter. You can use alternative sweeteners if you prefer. Honey or maple syrup works well. Just adjust the amount since they are sweeter than sugar. For gluten-free options, use a 1:1 gluten-free flour blend. This keeps the texture light and fluffy. Dust your donuts with powdered sugar for a sweet finish. It adds a nice touch and looks great. You can also garnish with colorful sprinkles. A maple glaze drizzled on top makes them more special. Arrange the donuts on a pretty plate to impress your guests. {{image_4}} You can add new flavors to your pumpkin spice donuts. Try chocolate chip pumpkin spice donuts for a sweet twist. Just fold in a cup of mini chocolate chips into the batter before baking. The chocolate adds a rich taste that pairs well with pumpkin. Another option is to make nutty pumpkin spice donuts. Add one cup of chopped nuts, like walnuts or pecans, to the batter. This gives a crunchy texture and more flavor. Nuts also boost the nutrition, making your treat a bit healthier. For Halloween, you can decorate your donuts with spooky icing. Use orange and black frosting to create fun designs. Add candy eyes or sprinkles for a festive touch. During Thanksgiving, think about flavors like maple or pecan. You can drizzle a maple glaze on top for a seasonal flavor. Or, sprinkle crushed pecans for a nice crunch. These twists make your donuts perfect for any fall celebration. If you want a lighter donut, try reducing the sugar. You can use natural sweeteners like honey or maple syrup instead. This keeps the taste but cuts down on refined sugars. Also, consider baking instead of frying. Baking keeps the donuts fluffy without extra oil. You’ll still get that delicious pumpkin spice flavor with fewer calories. Plus, baked donuts are easier to make and clean up after! To keep your bakery style pumpkin spice donuts fresh, store them in an airtight container at room temperature. This helps maintain their soft and fluffy texture. If you live in a warm area, consider refrigerating them to prevent spoilage. Just remember, refrigeration can change the texture a bit, making them less soft. To freeze pumpkin spice donuts, first let them cool completely. Then, wrap each donut tightly in plastic wrap. Place the wrapped donuts in a freezer-safe bag or container. This keeps them fresh and avoids freezer burn. When you're ready to enjoy, thaw them in the fridge overnight. You can also reheat them in the microwave for about 15 seconds for a warm treat. When stored properly, these donuts last for about 3 days at room temperature and up to 2 months in the freezer. Always check for any signs of spoilage before you eat. Enjoy your delicious treats, knowing they are well-stored! Yes, you can use fresh pumpkin. Just cook and puree it first. This gives a great taste. Fresh pumpkin may be slightly wetter, so adjust other liquids if needed. Use about the same amount as canned pumpkin. To make these donuts vegan, swap eggs with flax eggs. Mix one tablespoon of flaxseed meal with three tablespoons of water. Let it sit until it thickens. Use almond milk or oat milk instead of regular milk. The best way to reheat donuts is in the oven. Preheat your oven to 350°F. Place the donuts on a baking sheet. Heat them for about five minutes. This keeps them soft and warm. Yes, you can make the batter in advance. Store it in the fridge for up to a day. Just stir gently before filling the donut pan. This helps keep the donuts fresh and tasty. You can find pumpkin spice donuts at many bakeries and coffee shops. Check local stores or farmers' markets. Some grocery stores also sell them during fall. Look for special seasonal treats. In this post, we explored how to make delicious pumpkin spice donuts. We covered the key ingredients, steps for mixing and baking, and tips for perfecting texture. Remember to experiment with flavors and decorations for fun. Whether you choose to tweak the recipe or stick to the basics, these donuts can brighten your day. Enjoying your homemade treats will make the effort worthwhile. Happy baking!

Do you crave that warm, spicy flavor of pumpkin donuts? You’re in the right place! In this post, I’ll guide you through making the ultimate bakery-style pumpkin spice donuts. Each …

Read more

Categories Desserts

Slow Cooker Creamy Mushroom Wild Rice Soup Delight

October 10, 2025 by Chef Miles
Here’s what you need to make this creamy mushroom wild rice soup: - 1 cup wild rice, thoroughly rinsed and drained - 1 tablespoon extra-virgin olive oil - 1 medium onion, finely chopped - 3 cloves garlic, freshly minced - 8 ounces (approximately 2 cups) mixed mushrooms, sliced (cremini and button varieties) - 2 medium-sized carrots, diced into small cubes - 2 celery stalks, diced evenly - 6 cups rich vegetable broth - 1 teaspoon dried thyme - 1 teaspoon dried rosemary - 1 bay leaf - 1 cup heavy cream or coconut cream (for a dairy-free alternative) - Salt and black pepper to taste - Fresh parsley, finely chopped (for garnish) Using fresh ingredients can give your soup a bright taste. Fresh mushrooms add great flavor and texture. You can use a mix of cremini and button mushrooms for depth. Fresh herbs like thyme and rosemary also bring more aroma. However, dried herbs still work well if fresh isn’t available. They are easy to store and have a long shelf life. If you have dietary needs, there are easy swaps. Use coconut cream instead of heavy cream for a dairy-free version. For gluten-free diets, this recipe is naturally safe as it uses wild rice. If you're vegan, use vegetable broth and coconut cream. You can also add tofu for protein. Always check labels for hidden allergens. Start by preparing your vegetables. First, chop one medium onion finely. Next, mince three cloves of garlic. Slice about eight ounces of mixed mushrooms—cremini and button work great. Dice two medium carrots into small cubes and chop two celery stalks evenly. In a medium skillet, heat one tablespoon of extra-virgin olive oil over medium heat. Add the chopped onion and sauté it for about five minutes. You want the onion to be soft and translucent. Next, add the minced garlic, sliced mushrooms, diced carrots, and diced celery. Sauté this mix for another five minutes until the mushrooms are tender and smell amazing. Once you finish sautéing, transfer this vegetable medley to the slow cooker. Now, let’s cook the soup! To your slow cooker, add one cup of rinsed wild rice. Pour in six cups of rich vegetable broth. Add one teaspoon of dried thyme, one teaspoon of dried rosemary, and one bay leaf. Stir everything well to mix the ingredients. Cover the slow cooker. You can set it on low for four to five hours or high for two to three hours. Cook until the wild rice is tender and fully cooked. When the cooking time is up, it’s time for the final touches. Stir in one cup of heavy cream or coconut cream for a dairy-free option. Season the soup with salt and black pepper to taste. Before serving, remember to remove the bay leaf. Ladle the creamy soup into individual bowls. To make it beautiful, garnish each bowl with some fresh, chopped parsley. Enjoy your delicious soup! To get the best creamy texture in your soup, use heavy cream or coconut cream. Add it at the end of cooking. This way, it mixes well without curdling. If you want a lighter feel, use half-and-half. Whisk it in gently. If you want to make it vegan, stick to coconut cream. It adds a nice flavor too. Cooking wild rice well is key. Always rinse it first. This removes extra starch and helps it cook evenly. Add it to the slow cooker with the broth. Let it cook until tender; this usually takes 4 to 5 hours on low. Check it near the end. If it’s still tough, give it a bit more time. Want to amp up the taste? Add fresh herbs like thyme or parsley. You can also try a pinch of nutmeg for warmth. If you like a kick, add red pepper flakes. These extras can really make your soup shine. Experiment to find your favorite combo. Each tweak can lead to a delightful surprise. {{image_4}} You can easily make this soup vegan. Simply replace heavy cream with coconut cream. It gives a nice, rich taste without the dairy. Use vegetable broth to keep it plant-based. The mushrooms and wild rice add depth, ensuring you won’t miss the dairy. This option is tasty and kind to your tummy. Want to add protein? You can toss in cooked chicken or tofu. If you use chicken, shred it and add it at the end. It warms up quickly in the soup. For tofu, use firm or extra-firm. Cut it into cubes and add it during cooking. Both options will make your soup heartier. This soup loves extra veggies! You can add spinach, kale, or peas for a burst of color and flavor. Just chop them up and stir them in before serving. They’ll add nutrition and freshness. If you have leftover veggies from your fridge, throw them in too. This soup is very flexible and will adapt to what you have on hand. To store your leftover soup, let it cool first. Use airtight containers for best results. You can keep it in the fridge for easy access. If you want to save it longer, consider freezing some. Keep the soup in single servings to make reheating easier. When freezing, make sure to leave some space in the container. The soup will expand as it freezes. When you’re ready to enjoy it, thaw the soup overnight in the fridge. To reheat, either use the stovetop or microwave. Heat it slowly to avoid burning. Stir often to ensure even warmth. Mushroom soup lasts about 3 to 4 days in the fridge. Keep an eye out for any signs of spoilage. If it smells off or has strange colors, it's best to throw it away. Always trust your senses when it comes to food safety. Yes, you can use long-grain rice. However, the soup will taste different. Wild rice has a nutty flavor and chewy texture. Long-grain rice cooks faster. So, if you use it, check for doneness early. If your soup is too thin, try a few methods. You can mix a tablespoon of cornstarch with cold water. Stir this into the soup and let it simmer. Another option is to blend a cup of soup, then return it to the pot. This adds body without changing the taste. This soup pairs well with many sides. You can serve it with crusty bread. A simple salad adds freshness. Grilled cheese also makes a great match. Try garlic bread for a tasty twist. Each option adds flavor and makes your meal special. This post explored the key ingredients and steps to make a delicious soup. You learned how fresh ingredients can elevate flavors. We discussed tips for a creamy texture and variations for every diet. Proper storage methods keep the soup fresh longer. In the end, making soup is fun and flexible. You can adapt it to your taste or dietary needs. Now, gather your ingredients and enjoy the cooking process!

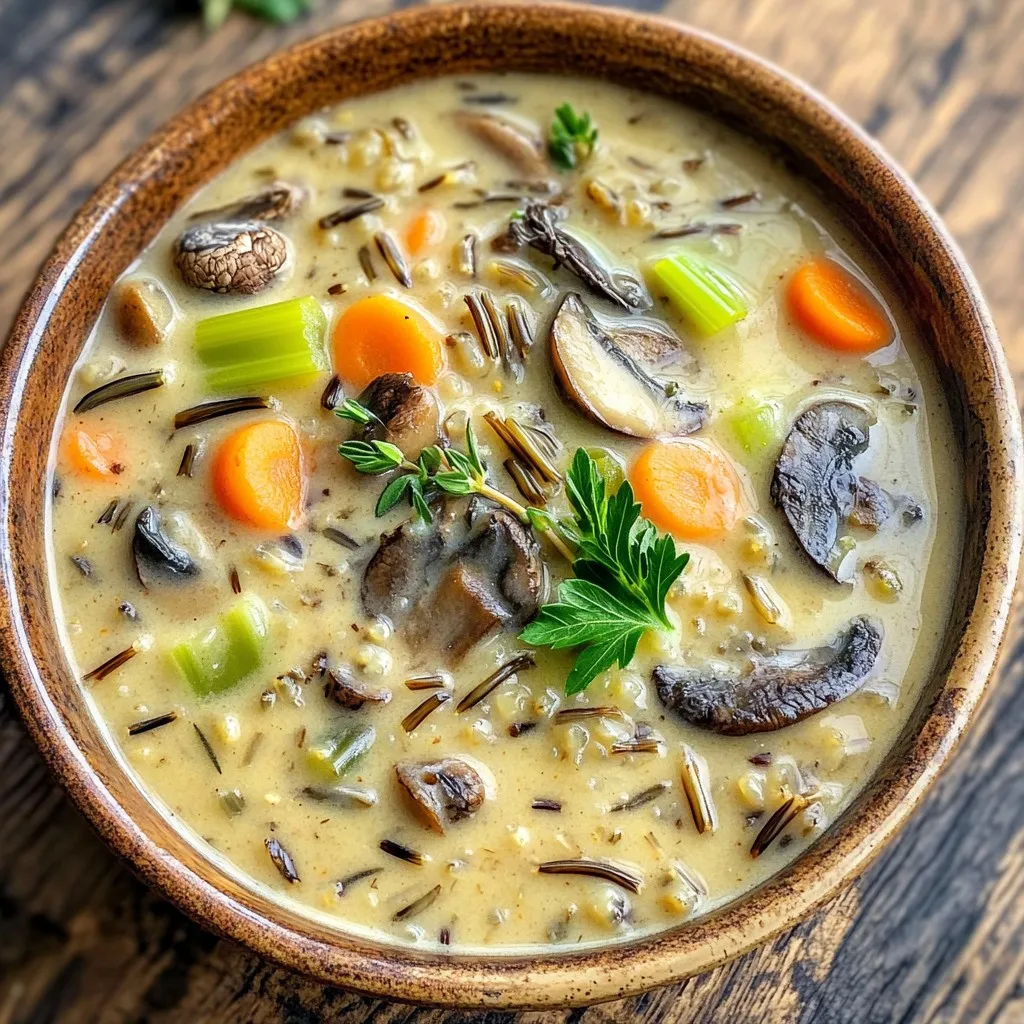
Are you ready to warm your soul with a delicious, creamy soup? This Slow Cooker Creamy Mushroom Wild Rice Soup is the perfect cozy meal. With its rich flavors and …

Read more

Categories Dinner

Air Fryer BBQ Chicken Bites Tasty and Easy Recipe

October 10, 2025 by Chef Miles
- 1 pound chicken breast, cut into bite-sized pieces - 1/2 cup BBQ sauce (homemade or store-bought) - 1 tablespoon olive oil - 1 teaspoon garlic powder - 1 teaspoon onion powder - 1 teaspoon smoked paprika - 1/2 teaspoon black pepper - 1/2 teaspoon salt - Fresh parsley, finely chopped (for garnish) These ingredients are simple but pack a lot of flavor. The chicken breast serves as a great base for the BBQ sauce. You can use your favorite sauce to suit your taste. Olive oil helps the spices stick and adds moisture. The seasonings—garlic powder, onion powder, smoked paprika, black pepper, and salt—give the chicken a nice kick. Each spice plays a role in making the dish taste great. I love adding fresh parsley on top. It makes the plate look nice and adds a bit of freshness. If you want to impress your guests, this garnish makes a big difference. With these ingredients ready, you're on your way to making tasty air fryer BBQ chicken bites. First, take 1 pound of chicken breast and cut it into bite-sized pieces. In a medium bowl, mix the chicken with: - 1/2 cup of your favorite BBQ sauce - 1 tablespoon olive oil - 1 teaspoon garlic powder - 1 teaspoon onion powder - 1 teaspoon smoked paprika - 1/2 teaspoon black pepper - 1/2 teaspoon salt Stir well to coat every piece in the marinade. Then, cover the bowl with plastic wrap and place it in the fridge. Let it marinate for at least 30 minutes. For a richer taste, leave it for up to 2 hours. Next, you need to preheat the air fryer. Set it to 400°F (200°C) and let it run for about 5 minutes. This helps your chicken bites cook crispy and evenly. Once preheated, it’s time to arrange your chicken bites. Place them in the air fryer basket in a single layer. Avoid overcrowding; this ensures they cook well. If your air fryer is small, you might need to cook in batches. Now, let’s cook the chicken! Air fry the bites for 10 to 12 minutes. Halfway through, pause and shake the basket gently. This helps the chicken cook evenly. They should be golden brown and fully cooked when done. If you want more flavor, you can add extra BBQ sauce. Toss the hot chicken bites in the sauce before serving. It’s a great way to amp up the taste! Carefully take the chicken bites out of the air fryer. Present them on a serving plate. For a nice touch, sprinkle finely chopped fresh parsley on top. It adds color and freshness. Enjoy your tasty BBQ chicken bites! To make your BBQ chicken bites extra tasty, add more flavors. You can mix in a splash of hot sauce for heat. Try adding a teaspoon of honey for sweetness. A dash of Worcestershire sauce gives depth. Fresh herbs like thyme or rosemary also enhance the flavor. You can even switch BBQ sauces for a unique twist. Preheating your air fryer is key. Set it to 400°F for 5 minutes. This step ensures the chicken bites get crispy. Cook in batches if needed to avoid overcrowding. This way, each piece gets even heat. Shaking the basket halfway through helps too. It keeps the chicken from sticking and promotes even cooking. Pair your BBQ chicken bites with fun side dishes. Crunchy celery and carrot sticks add freshness. Serve with a small bowl of extra BBQ sauce for dipping. You can also try ranch or blue cheese dressing. For a full meal, add a simple salad or fries on the side. These options make your dish even more enjoyable! {{image_4}} You can swap BBQ sauce for other tasty options. Try teriyaki sauce for a sweet twist. Honey mustard gives a nice tang, while buffalo sauce adds spice. You can even mix sauces for unique flavors. Each sauce can change the whole dish! You can boost your meal by adding veggies. Consider bell peppers, zucchini, or onions. Cut them into bite-sized pieces and toss them in with the chicken. The air fryer will cook them perfectly. They’ll add color, flavor, and crunch to your chicken bites. Want some heat? It’s easy to add spice! You can mix in cayenne pepper or chili powder with the marinade. For a fun kick, try adding hot sauce to your BBQ sauce. Adjust the heat level to match your taste. You’ll love the extra flavor it brings! After you enjoy your Air Fryer BBQ Chicken Bites, store any leftovers properly. Place the chicken bites in an airtight container. This keeps them fresh and tasty. You can keep them in the fridge for up to three days. If you want, you can also add a layer of plastic wrap before sealing the lid. This adds extra protection from air. To keep your chicken bites crispy while reheating, use the air fryer again. Set it to 350°F (175°C) and warm the bites for about 5-7 minutes. This method helps restore their crunch. You can also use a toaster oven if you don’t have an air fryer. Avoid using the microwave as it can make them soggy. If you want to freeze your chicken bites, let them cool first. Place them in a single layer on a baking sheet and freeze for about an hour. Once frozen, transfer the bites to a freezer-safe bag. Remove as much air as possible before sealing. They can last for up to three months in the freezer. To thaw, place them in the fridge overnight before reheating. Yes, you can use frozen chicken. Just remember to adjust the cooking time. Frozen chicken needs extra time to cook. Add about 5-7 minutes to the cooking time. Always check if the chicken is cooked through before serving. The best temperature for chicken in an air fryer is 400°F (200°C). This high heat gives the chicken a nice crisp. It also cooks the inside well. Always preheat your air fryer for about 5 minutes. This step ensures even cooking. To fix soggy chicken bites, make sure to preheat the air fryer. Cooking in a single layer helps too. Avoid overcrowding the basket. If the bites still come out soggy, give them a few more minutes to cook. This will help them crisp up. Marinate the chicken for at least 30 minutes. For deeper flavor, 2 hours is ideal. Longer marinating times let the flavors soak in better. You can even marinate overnight if you plan ahead. Just keep it in the fridge to stay fresh. Your air fryer BBQ chicken bites are simple and fun to make. Start with fresh chicken and your favorite BBQ sauce, then follow the steps to marinate, cook, and serve. Remember to explore variations like different sauces or adding veggies. Proper storage ensures you enjoy leftovers. Each tip helps you achieve tasty, crispy bites every time. Enjoy your cooking and impress friends with this easy recipe!

Are you ready to whip up a tasty meal in no time? These Air Fryer BBQ Chicken Bites are simple, quick, and packed with flavor! Perfect for busy weeknights or …

Read more

Categories Appetizers

Minute Egg White Scramble Bowl Simple and Quick Recipe

October 10, 2025 by Chef Miles
- 1 cup egg whites (about 8 large eggs) - 1/2 cup diced bell peppers (a mix of colors for vibrancy) - 1/4 cup finely chopped green onions - 1/4 cup cherry tomatoes, halved for sweetness - 1/4 cup fresh spinach, chopped for a nutritious boost - 2 tablespoons crumbled feta cheese for a tangy flavor - Salt and freshly ground black pepper, to taste - 1 tablespoon olive oil for sautéing The main ingredients for my Minute Egg White Scramble Bowl create a tasty dish. The egg whites offer a light base, while the colorful veggies add crunch and flavor. Bell peppers bring a sweet taste and look great. Green onions give a fresh bite, and tomatoes add a hint of sweetness. Spinach gives a healthy boost. Feta cheese brings a tangy kick that makes the dish shine. Don't forget the salt and pepper to enhance all the flavors! - Hot sauce for added spice - Additional toppings and garnishes If you like heat, hot sauce is perfect. A drizzle adds a spicy touch that wakes up the dish. You can also add toppings like more green onions or a wedge of lemon. These extras make your bowl even more special and fun! 1. Prepare the Ingredients: Start by washing your bell peppers. Dice them into small cubes. Slice the green onions finely. Halve the cherry tomatoes for sweetness. Roughly chop the spinach and set aside all these colorful veggies. Having everything ready makes cooking easier. 2. Heat the Pan: Grab a non-stick skillet. Place it over medium heat. Add one tablespoon of olive oil. Let it warm for about one minute. You want the oil to shimmer, signaling it's ready to cook. 1. Sauté the Vegetables: Once the oil is shimmering, add the diced bell peppers. Sauté them for about 2-3 minutes. Stir occasionally until they start to soften. Next, add the chopped spinach, green onions, and halved cherry tomatoes. Cook these veggies for another 2 minutes. Watch the spinach wilt and the tomatoes soften for great flavor. 2. Add the Egg Whites: Carefully pour one cup of egg whites over the sautéed vegetables. Use a spatula to gently stir everything together. Cook for 2-3 minutes until the egg whites are fluffy and fully cooked. 1. Season and Add Feta: Season your scramble with salt and freshly ground black pepper. Sprinkle two tablespoons of crumbled feta cheese over the top. Give it a moment to warm up and melt just slightly, adding a nice tangy flavor. 2. Serve: Remove the skillet from the heat. Transfer your colorful egg white scramble to a serving bowl. You can add optional hot sauce on top for a spicy kick, if you like. 3. Presentation Tips: Serve in individual bowls. Garnish with extra green onions and a wedge of lemon on the side for a fresh touch. Enjoy your meal! To create fluffy egg whites, start with fresh eggs. Room temperature egg whites whip better. Use a clean bowl and whisk. Avoid any yolk in the whites. This keeps the whites airy. When sautéing, use medium heat. Too high can burn your veggies. Add a splash of olive oil. Let it shimmer before adding your chopped bell peppers. Sauté for just a few minutes. Stir often to cook evenly. Add spinach and tomatoes next. These cook quickly, so watch them closely. For a complete meal, pair your scramble with whole grain toast. Fresh fruit makes a nice side, too. A glass of orange juice adds brightness. For presentation, serve in deep bowls. Garnish with extra green onions. A lemon wedge on the side adds color. This makes your dish pop on the table. Adding hot sauce can give it a spicy kick. Enjoy your vibrant, tasty Minute Egg White Scramble Bowl! {{image_4}} You can easily change up the veggies in your Minute Egg White Scramble Bowl. Try mushrooms or zucchini for a fun twist. Both add great taste and texture. If you want a different cheese, consider goat cheese or cheddar. Each cheese gives a new flavor to your dish. You can also mix in herbs like basil or cilantro for extra freshness. Want a faster way to make this dish? You can use the microwave! Just mix your veggies and egg whites in a bowl. Microwave on high for about 3-4 minutes. Stir halfway for even cooking. If you prefer a different texture, try baking it. Pour your mix into a greased oven-safe dish. Bake at 350°F (175°C) for about 15-20 minutes. This way, you'll get a fluffier egg white scramble that feels more like a frittata. To keep your Minute Egg White Scramble Bowl fresh, follow these steps: - Allow the dish to cool down to room temperature. - Transfer leftovers to an airtight container. - Store in the fridge for up to three days. I recommend glass or BPA-free plastic containers. These containers keep food fresh and are easy to clean. When reheating, you want to keep the texture nice. Here’s how to do it: - Use a microwave-safe dish if using a microwave. - Heat in 30-second intervals, stirring in between. - If you prefer, reheat in a non-stick skillet over low heat. Always check that the egg scramble is heated to 165°F for safety. This way, you enjoy a safe and tasty meal every time! Can I use whole eggs instead of egg whites? Yes, you can use whole eggs. Whole eggs will add richness. The dish will also have a creamier texture. Just remember to adjust the amount if you want fewer calories. How long does it take to make a Minute Egg White Scramble Bowl? This dish takes about 15 minutes to make. You can prep ingredients in 5 minutes and cook them in 10 minutes. It's fast and perfect for busy mornings. Is this recipe suitable for meal prep? Yes, this recipe is great for meal prep. You can make it ahead of time and store it in the fridge. Just reheat it in the microwave or on the stove when you are ready to eat. Health benefits of egg whites vs. whole eggs Egg whites are low in calories and high in protein. They have no fat or cholesterol, making them a healthy choice. Whole eggs have more nutrients, but they also contain fat and cholesterol. Egg whites are a great option if you want to cut calories. Caloric information and portion sizes One cup of egg whites has about 126 calories. The whole recipe serves 2, so each portion has about 63 calories. Add your vegetables and feta, and the total goes up slightly, but it stays healthy. This dish is filling and nutritious without too many calories. This blog post explored making a delicious Minute Egg White Scramble Bowl. We covered ingredients like egg whites, vegetables, and feta cheese. I explained step-by-step preparation and cooking, with tips for fluffy results. We also discussed variations and storage tips to keep your meal fresh. In closing, you now have everything you need to enjoy this healthy dish. Get creative and make it your own! Enjoy a tasty meal that fits perfectly into your life.

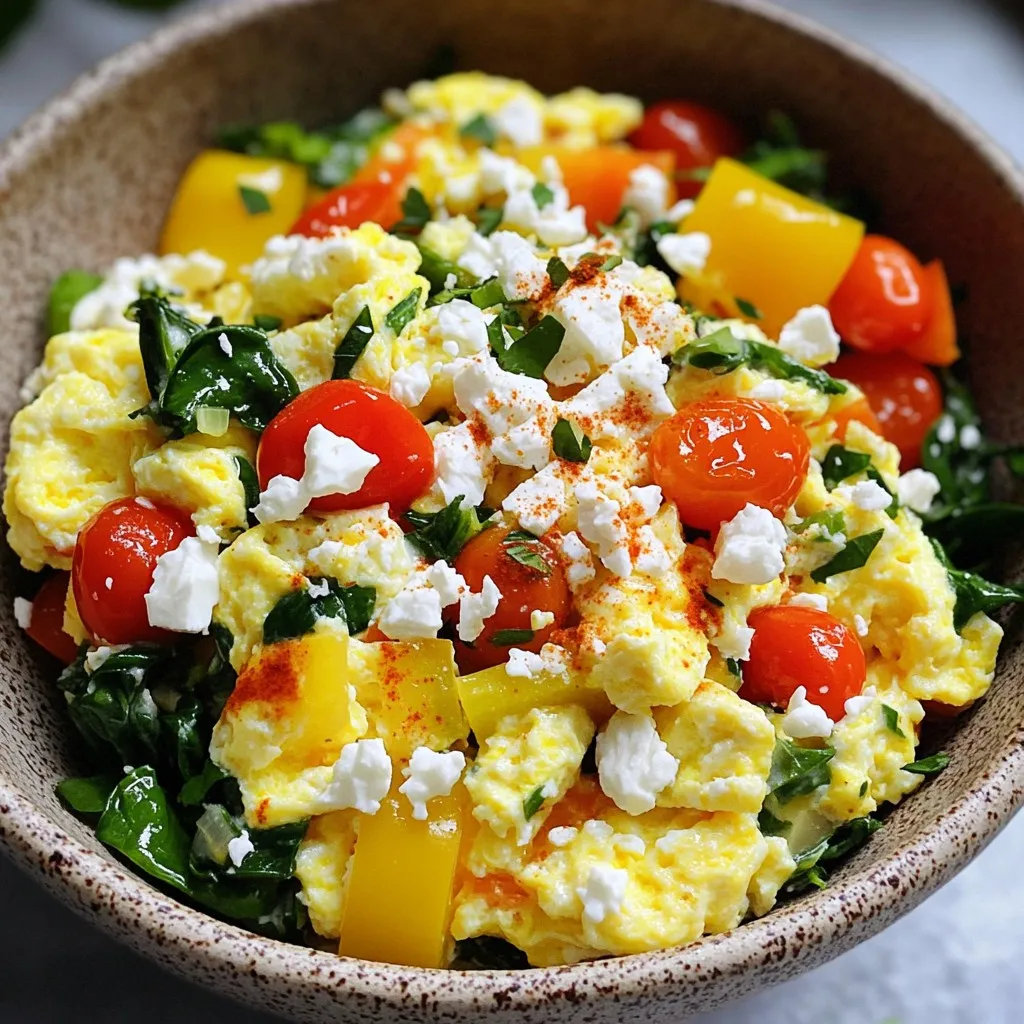
Ready for a quick, healthy meal? My Minute Egg White Scramble Bowl is perfect for busy days. Packed with protein and colorful veggies, this dish is not only easy to …

Read more

Categories Breakfast
Older posts
Newer posts
← Previous Page1 … Page7 Page8 Page9 … Page110 Next →

MELTED RECIPES

where delicious ideas melt into life, from stovetop to backyard. Always warm, simple, and irresistibly satisfying. 🍳🔥🧀

PAGES

Home About Contact Privacy Policy Terms & Conditions Cookie Policy GDPR Policy Copyright Policy Disclaimer

CATEGORIES

Appetizers Desserts Salads Breakfast Dinner

Contact

  • Pinterest
  • Mail
Copyright © 2025 Melted Recipes. All rights reserved.