Skip to content
Melted Recipes
  • Home
  • Appetizers
  • Desserts
  • Salads
  • Breakfast
  • Dinner
  • Privacy Policy
  • Contact
  • About

Chef Miles

Chocolate Marble Zucchini Bread Moist and Flavorful Treat

July 5, 2025 by Chef Miles
To make Chocolate Marble Zucchini Bread, you need: - 2 medium zucchinis, grated - 1 cup granulated sugar - 1/2 cup packed brown sugar - 1/2 cup vegetable oil - 3 large eggs - 1 teaspoon vanilla extract These ingredients give the bread its moist texture and sweet flavor. The grated zucchini helps keep the bread soft while adding nutrients. You will also need these baking essentials: - 1 1/2 cups all-purpose flour - 1 teaspoon baking powder - 1/2 teaspoon baking soda - 1/2 teaspoon salt - 1/2 teaspoon ground cinnamon These ingredients create the structure of the bread. The baking powder and baking soda help it rise, while the cinnamon adds warmth. Finally, gather these chocolate components: - 1/2 cup unsweetened cocoa powder - 1/2 cup semi-sweet chocolate chips - 1/2 cup chopped walnuts (optional) The cocoa powder creates the rich chocolate flavor. The chocolate chips add extra sweetness. You can skip the walnuts if you prefer a nut-free treat. For the full recipe, check the detailed instructions and measurements. Happy baking! 1. First, preheat your oven to 350°F (175°C). 2. Next, generously grease and flour a 9x5 inch loaf pan. This helps the bread release easily. 3. In a large bowl, mix the grated zucchini, granulated sugar, brown sugar, and vegetable oil. Stir well until smooth. 1. Now, add the eggs one at a time. Mix well after each egg. 2. Finally, stir in the vanilla extract for extra flavor. This makes the bread taste amazing. 1. In another bowl, whisk together the all-purpose flour, baking powder, baking soda, salt, and ground cinnamon. 2. Gradually add the dry mix to the wet zucchini mix. Stir just until combined. Do not overmix! This keeps the bread soft. 1. Carefully divide the batter into two equal portions. 2. To one half, mix in the unsweetened cocoa powder. Stir until smooth and chocolatey. 3. Pour the plain zucchini batter into the loaf pan. 4. Next, dollop spoonfuls of the chocolate batter on top. 5. Use a knife to gently swirl the batters together. Aim for a nice marbled effect. 1. Bake the loaf for 55-65 minutes. Check for doneness by inserting a toothpick into the center. It should come out clean or with a few moist crumbs. 2. Once baked, let the bread cool in the pan for about 10 minutes. 3. Then, transfer it to a wire rack to cool completely before slicing. For the full recipe, check the details above. Enjoy your delicious Chocolate Marble Zucchini Bread! To start, you want to grate the zucchini well. Use a box grater or a food processor. This makes it easier to mix into the batter. After grating, the zucchini holds a lot of water. To remove excess moisture, place the grated zucchini in a clean kitchen towel. Twist the towel to squeeze out the liquid. This step helps the bread stay soft and not too wet. For the best marble effect, you need to be gentle. After mixing the batters, pour the plain zucchini batter into the loaf pan first. Then, dollop spoonfuls of the chocolate batter on top. Use a knife or skewer to swirl the batters together. Make sure not to mix them too much. You want to see the layers. This will give you that beautiful marbled look. To keep your bread moist and tasty, wrap it tightly in plastic wrap or foil. You can also place it in an airtight container. This keeps out air and helps with freshness. Store it at room temperature for up to three days. For longer storage, slice the bread and freeze it. Just remember to wrap each slice well. When you’re ready to eat, you can thaw it on the counter or warm it in the oven. Enjoy your moist Chocolate Marble Zucchini Bread! For the complete recipe, check the [Full Recipe]. {{image_4}} You can make this chocolate marble zucchini bread healthier by swapping a few ingredients. Using whole wheat flour adds fiber and nutrients. It gives the bread a nutty taste and a hearty texture. You can also replace vegetable oil with coconut oil. Coconut oil brings a lovely flavor and healthy fats. It’s a great option for those who want to cut back on refined oils. Want to kick up the flavor? Try adding spices like nutmeg or cardamom. These spices add warmth and depth to the bread. You can also include chocolate extracts for a richer taste. Just a teaspoon can make a big difference. These little changes can turn a good recipe into a great one. If you need gluten-free options, you can use gluten-free all-purpose flour. This works well to keep the bread moist and delicious. For vegan versions, replace eggs with flax eggs. Mix one tablespoon of ground flaxseed with three tablespoons of water. Let it sit until it thickens. This will help bind the ingredients just like eggs do. You can still enjoy this tasty treat no matter your dietary needs. For the full recipe, check out the link! To keep your leftover Chocolate Marble Zucchini Bread fresh, wrap it tightly in plastic wrap. This helps seal in moisture. You can also store it in an airtight container. Place it at room temperature for up to three days. If you want it to last longer, put it in the fridge. It can stay good there for about a week. Just remember, cold can dry it out a bit. Freezing is a great way to save slices for later. First, let the bread cool completely. Then, slice it into individual pieces. Wrap each slice in plastic wrap. After that, place the wrapped slices into a freezer bag. Make sure to remove as much air as possible. You can freeze the slices for up to three months. When you want to enjoy a slice, just take it out and let it thaw in the fridge. To rewarm your Chocolate Marble Zucchini Bread, you have a few options. If you want it warm and cozy, preheat your oven to 350°F (175°C). Place the slice on a baking sheet and heat for about 10 minutes. You can also use a microwave. Just place the slice on a plate, cover it with a paper towel, and heat for about 15 seconds. Enjoy the taste and texture just like fresh-baked! Yes, you can use frozen zucchini. Just ensure you thaw it first. After thawing, squeeze out extra water. This keeps your bread from getting too wet. Then, use it just like fresh zucchini. Frozen zucchini works well in baked goods. Chocolate Marble Zucchini Bread lasts about 3-4 days at room temperature. Keep it in an airtight container. Look for signs of spoilage, like mold or an off smell. If it feels dry or hard, it's time to toss it. You can prepare this recipe in advance. Mix the batter and store it in the fridge for up to 24 hours. This saves you time on baking day. You can also bake it ahead and freeze slices. Just wrap them tightly in plastic wrap. This bread pairs well with a scoop of vanilla ice cream. You can also serve it with whipped cream for a treat. Fresh fruit or a dollop of yogurt make great sides too. For a drink, try pairing it with coffee or tea. Check out the [Full Recipe] for more serving ideas! This blog post covered how to make delicious Chocolate Marble Zucchini Bread. We outlined the key ingredients like grated zucchini, cocoa powder, and chocolate chips. You learned step-by-step instructions for mixing and baking, plus some essential tips and variations. Remember, this recipe is flexible. You can swap ingredients or customize it to your taste. When done right, this bread is a hit! Enjoy your baking, and I hope your loaf turns out great!

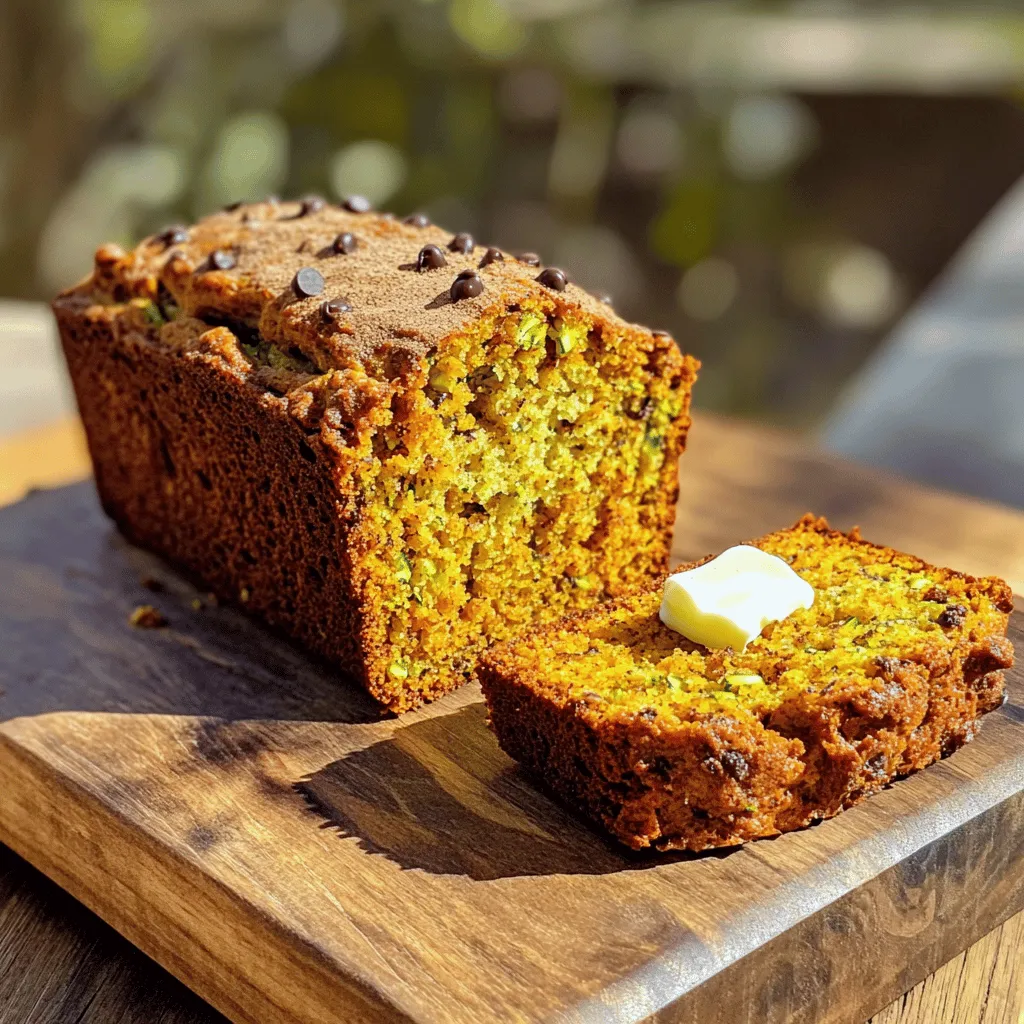
Are you ready to take your baking to the next level? This Chocolate Marble Zucchini Bread is the perfect mix of moist, rich chocolate and fresh zucchini. It’s not just …

Read more

Categories Desserts

Ridiculously Easy French Butter Cake Simple Delight

July 5, 2025 by Chef Miles
- 1 cup (2 sticks) unsalted butter, melted - 1 cup granulated sugar - 4 large eggs, at room temperature - 1 teaspoon pure vanilla extract - 2 cups all-purpose flour, sifted - 1 teaspoon baking powder - 1/2 teaspoon fine sea salt - Zest of 1 lemon (optional but adds brightness) - Powdered sugar for dusting (optional) The main star of this cake is unsalted butter. Use high-quality butter for the best flavor. Granulated sugar adds sweetness and helps with the cake's rise. Eggs bind the ingredients together and provide structure. Be sure your eggs are at room temperature for easy mixing. Vanilla extract gives a warm, rich flavor. Always opt for pure vanilla for the best taste. All-purpose flour is essential for the cake's texture. Sifting flour ensures no lumps remain. Baking powder helps the cake rise. It creates a light, airy texture. Fine sea salt enhances all the flavors in the cake. Lemon zest brightens the cake's flavor, adding a fresh twist. Powdered sugar is optional and perfect for dusting the top before serving. Each ingredient plays a vital role in creating this delicious cake. For the full recipe, check the detailed instructions. Preheating the Oven Start by preheating your oven to 350°F (175°C). This step is key. It helps the cake rise evenly. Greasing the Cake Pan Next, grease a 9-inch round cake pan. Use unsalted butter or cooking spray. For easy release, line the bottom with parchment paper. This makes removing the cake simple. Combining Butter and Sugar In a large bowl, pour in the melted butter. Add the granulated sugar next. Whisk these together until the mix is smooth and creamy. You want to see no lumps. Incorporating Eggs and Vanilla Now, crack four large eggs into the bowl, one at a time. Mix well after each egg. Then, add one teaspoon of pure vanilla extract. If you like, stir in lemon zest for extra flavor. Whisking Dry Ingredients Together In a separate bowl, whisk together two cups of all-purpose flour, one teaspoon of baking powder, and half a teaspoon of fine sea salt. This ensures that your leavening agents mix well. Folding Dry Ingredients into Wet Mixture Now, gently fold the dry mix into the wet mixture. Use a spatula for this. Be careful not to overmix. It’s okay if some flour streaks remain. Achieving the Right Batter Consistency You want a smooth batter. But remember, a few lumps are fine. This will help keep the cake light and fluffy. Pouring Batter into Pan Pour the batter into your prepared cake pan. Use your spatula to spread it evenly. The top should be level. Baking Time and Checking for Doneness Place the pan in your preheated oven. Bake for 40-45 minutes. To check if it's done, insert a toothpick into the center. It should come out clean with a few crumbs. You can find more details in the Full Recipe. To get a great texture in your French butter cake, mixing is key. When you mix, do it gently. You want to combine the wet and dry ingredients without overmixing. Overmixing makes the cake tough. Just fold until you see no dry bits. A few lumps are okay. Also, use room temperature eggs. They mix better into the batter. Cold eggs can make the mixture lumpy. Let your eggs sit out for about 30 minutes before using them. This small step helps your cake rise nicely and stay soft. Adding lemon zest is a game changer. It makes the cake taste fresh and bright. Use a fine grater to get the zest from one lemon. Just a teaspoon will add a lot of flavor. You can also try other flavors. Almond extract gives a nice nutty taste. Orange zest is another great choice. You can mix and match to find your favorite flavor. To make your cake look fancy, dust it with powdered sugar. Wait until the cake is cool. This makes the sugar sit on top nicely. Use a fine sieve to get an even dusting. For extra color, serve your cake with fresh berries. Strawberries, raspberries, or blueberries add a fun pop. They also add a fruity taste that pairs well with the cake. Enjoy it with whipped cream for a special touch. This cake is not just easy to make; it’s also a delight to share and enjoy! For the full recipe, check out the earlier section. {{image_4}} You can change the flavor of this cake to suit your taste. Here are two fun ideas: - Chocolate Variation: To make a chocolate version, add 1/2 cup of cocoa powder to the dry mix. You can also add chocolate chips for extra richness. This twist makes the cake rich and decadent. - Almond French Butter Cake: For a nutty flavor, replace the vanilla extract with almond extract. You can also add sliced almonds on top before baking. This gives a lovely crunch and aroma. If you need a gluten-free cake, you can use gluten-free flour. Look for a blend that works well in baking. Just swap the all-purpose flour with an equal amount of gluten-free flour. This keeps the texture light and fluffy, just like the original. To make your cake even more special, consider these serving ideas: - Pairing with Sauces or Creams: Serve the cake with a drizzle of chocolate sauce or a scoop of vanilla ice cream. You can also try it with fresh fruit compote for a refreshing touch. - Options for Personalizing Each Slice: You can personalize each slice with a sprinkle of nuts or a dollop of whipped cream. Fresh berries or a dusting of powdered sugar also add a lovely finish. Each bite can be unique and delicious! For the full recipe, you can refer to the earlier sections. Enjoy exploring these variations and serving ideas! To keep your leftover French butter cake fresh, wrap it well. Use plastic wrap or place it in an airtight container. This protects it from drying out. Store the cake at room temperature for up to three days. If you want it to last longer, consider freezing it. Freezing the cake is simple. First, allow the cake to cool completely. Then, wrap it tightly in plastic wrap. After that, place it in a freezer-safe bag or container. This keeps it safe from freezer burn. The cake can last for up to three months in the freezer. When you're ready to enjoy it again, take it out and let it thaw. Place it in the fridge overnight for the best results. You can also leave it on the counter for a few hours. After thawing, dust it with powdered sugar for a fresh look. Enjoy your cake as if it were just baked! To keep your French butter cake moist, I recommend a few simple tips: - Use room temperature eggs for a better blend. - Avoid overbaking; check the cake early. - Adding a bit of lemon zest can enhance moisture. - If storing, wrap the cake well to prevent drying out. These steps will help your cake stay soft and delicious! Yes, you can! Here are some common substitutions for this recipe: - Use salted butter instead of unsalted; just skip additional salt. - Swap granulated sugar for brown sugar for a richer taste. - Replace all-purpose flour with almond flour for a nutty flavor. - You can use vanilla bean paste in place of vanilla extract. Feel free to be creative with these changes! To know your cake is done, look for these signs: - The top should be golden brown. - A toothpick inserted into the center should come out clean. - The edges should slightly pull away from the pan. These clues will help you bake the perfect cake. Yes, there are some key differences between French butter cake and pound cake: - French butter cake often uses more eggs, making it lighter. - Pound cake has a denser texture and a richer taste. - French butter cake usually has added flavors like vanilla or lemon zest. Both cakes are delicious but have their own unique qualities! This blog post shared the easy way to make French butter cake. You learned about key ingredients, step-by-step instructions, and tips to get the best results. Remember to mix carefully and consider adding lemon zest for extra flavor. Whether you choose to make variations or store leftovers, this cake will impress. Baking can be fun and simple. Enjoy your time in the kitchen and treat yourself and others to a slice of this delicious cake!

Are you ready for a dessert that’s both simple and delicious? This Ridiculously Easy French Butter Cake will become your new favorite! With just a few basic ingredients, you can …

Read more

Categories Desserts

Rosemary Cheddar Squash Bread Flavorful and Easy Recipe

July 5, 2025 by Chef Miles
- 1 cup butternut squash puree (cooked and mashed) - 1 cup sharp cheddar cheese, shredded - 2 cups all-purpose flour - 1/2 cup granulated sugar (or coconut sugar for a healthier alternative) Using fresh rosemary adds a bright flavor. Dried rosemary works too but lacks the fresh taste. You can also swap sharp cheddar for other cheeses. Consider using gouda or mozzarella for a different flavor profile. Each cheese gives your bread a unique twist. To convert cups to grams, remember these key conversions: - 1 cup of all-purpose flour is about 120 grams. - 1 cup of butternut squash puree is about 240 grams. - 1 cup of sharp cheddar cheese is around 113 grams. If you want a gluten-free option, try using a gluten-free flour blend. It works well in this recipe without losing flavor. To start, preheat your oven to 350°F (175°C). This ensures the bread bakes evenly. While the oven warms up, grab a 9x5 inch loaf pan. You can either grease it lightly with some oil or line it with parchment paper. Lining the pan makes it easy to remove the bread later. Next, it’s time to mix the star ingredients. In a large bowl, add the cooked and mashed butternut squash puree and the shredded sharp cheddar cheese. Stir these two together until they blend well. In a separate bowl, whisk together the all-purpose flour, granulated sugar, baking powder, baking soda, salt, and finely chopped rosemary. Make sure these dry ingredients are mixed evenly for the best results. Now, let’s combine everything. In another bowl, whisk the milk, olive oil, and eggs until smooth. Pour this wet mix into the bowl with the squash and cheese. Stir gently until just combined; it’s okay if there are a few lumps. Slowly add the dry mix to the wet ingredients. Use a spatula to fold everything together until you no longer see dry flour. Pour the batter into your loaf pan, spreading it evenly. Bake your bread in the preheated oven for 50-60 minutes. It’s done when a toothpick inserted in the center comes out clean. Enjoy the aroma that fills your kitchen as it bakes! To get the best texture for your Rosemary Cheddar Squash Bread, do not overmix the batter. Overmixing can make your bread tough instead of soft and fluffy. When you combine the wet and dry ingredients, mix until just combined. A few lumps are okay! Using room temperature ingredients helps too. If your eggs and milk are cold, they can affect the batter. Warm ingredients mix better and help the bread rise properly. You can add more herbs for a tasty twist. Consider thyme or sage for extra flavor. They pair well with the rosemary and cheddar. For spices, a pinch of garlic powder or smoked paprika can add depth. Pair your bread with a fresh salad or a bowl of soup. It also goes great with butter or a spread of cream cheese. The flavors work well together, making each bite delightful. Watch out for overbaking. If you leave the bread in too long, it can dry out. To check for doneness, insert a toothpick into the center. If it comes out clean, your bread is ready. Always keep an eye on the time, but also trust your senses. The bread should be golden brown and smell amazing. A little practice will help you bake it just right every time. {{image_4}} You can change the main ingredients to create new flavors. Using pumpkin puree instead of butternut squash works well. This swap gives a different taste, but keeps the bread moist. If you want to try different cheeses, go for gouda or mozzarella. Each cheese adds its own unique flavor and texture. For those who need vegan or dairy-free options, you can make simple changes. Substitute the milk with almond or oat milk. Replace the eggs with flaxseed or chia seeds mixed with water. This keeps the recipe tasty and friendly for all diets. If you want a lower sugar option, use coconut sugar instead of granulated sugar. It has a lower glycemic index and adds a nice flavor. To add some crunch, consider adding nuts or seeds to the mix. Walnuts or sunflower seeds work great in this bread. They add texture and extra nutrition. You can also incorporate dried fruits like cranberries or apricots. This adds a sweet touch that balances the savory cheddar and rosemary flavors. For more details, check the Full Recipe for Rosemary Cheddar Squash Bread. To keep your Rosemary Cheddar Squash Bread fresh, store it properly. You can keep it at room temperature or in the fridge. - Room Temperature: Wrap the bread in plastic wrap or foil. Place it in a bread box or on a countertop. It stays fresh for about three days. - Refrigeration: If you live in a humid area, store it in the fridge. It can last up to a week but may dry out more quickly. Wrap it in a towel before placing it in a plastic bag. This helps keep moisture in and prevents it from getting stale. When reheating, you want to keep the bread soft and tasty. Here are two easy methods: - Oven Method: Preheat your oven to 350°F (175°C). Wrap the bread in foil and place it in the oven. Heat for 10-15 minutes. - Microwave Method: Place a slice on a microwave-safe plate. Cover it with a damp paper towel. Heat for 10-15 seconds. Check it often to avoid making it too chewy. Using the oven is best for texture. The microwave is quicker but can make the bread tough if overheated. Freezing your Rosemary Cheddar Squash Bread is a great way to save it for later. Here’s how to do it correctly: - Proper Freezing: Let the bread cool completely. Wrap it tightly in plastic wrap, then in foil. This double wrapping prevents freezer burn. - Thawing Methods: You can thaw the bread in the fridge overnight. For quick thawing, place it on the counter for a few hours. Alternatively, you can pop it in the microwave for a few seconds. This keeps the flavor and texture intact. You can enjoy your delicious bread even after freezing! For the full recipe, check out the Rosemary Cheddar Squash Bread recipe. Rosemary Cheddar Squash Bread stays fresh for about three days at room temperature. Keep it in a bread box or wrapped in a clean towel. If you store it in the fridge, it lasts about a week. However, the cold can make the bread less soft. For the best taste, eat it fresh. Yes, you can make this bread in advance. Bake it a day or two before you plan to serve it. Once cooled, wrap it tightly in plastic wrap and store it at room temperature. You can also freeze the bread. Wrap it well in foil or freezer bags. It will keep for up to three months. When you are ready, let it thaw at room temperature. This bread pairs well with many spreads. Try it with butter, cream cheese, or garlic spread. You can also serve it with soups or salads. The flavors of rosemary and cheddar add a nice touch to any meal. Yes, this bread is great for kids. It has squash, which is healthy and adds moisture. Cheddar cheese gives it a tasty kick that kids love. Plus, it's easy to slice and share. You can cut it into fun shapes for a fun lunch treat. For the full recipe, check out the Rosemary Cheddar Squash Bread recipe. In this article, we explored how to make Rosemary Cheddar Squash Bread. We covered essential ingredients like butternut squash puree and sharp cheddar cheese. We discussed helpful tips for mixing and baking. Remember to check for doneness, and don't overbake. Feel free to adapt the recipe with different ingredients. By following these steps, you will enjoy a tasty and healthy bread. Happy baking!

Are you ready to whip up a delicious and easy treat? This Rosemary Cheddar Squash Bread will impress your taste buds! With rich flavors from butternut squash and sharp cheddar, …

Read more

Categories Dinner

Pumpkin Zucchini Bread Easy and Flavorful Recipe

July 5, 2025 by Chef Miles
- 1 cup shredded zucchini - 1 cup canned pumpkin puree - 1/2 cup vegetable oil These three ingredients are the heart of the recipe. Shredded zucchini adds moisture and texture. Canned pumpkin puree gives the bread its rich flavor and color. Vegetable oil helps keep the bread soft and tender. - 1/2 cup packed brown sugar - 1/2 cup granulated sugar The combination of brown sugar and granulated sugar creates a balanced sweetness. Brown sugar adds a hint of caramel flavor. Granulated sugar provides a clean sweetness that complements the spices. - 1 1/2 cups all-purpose flour - 1 teaspoon baking soda - 1/2 teaspoon baking powder - 1 teaspoon ground cinnamon - 1/2 teaspoon ground nutmeg - 1/4 teaspoon ground ginger These dry ingredients are key for structure and flavor. All-purpose flour forms the base. Baking soda and baking powder help the bread rise. The spices bring warmth and depth, making each slice taste like fall. For the full recipe, check out the Pumpkin Zucchini Delight Bread. - Preheat the oven to 350°F (175°C). - Prepare a 9x5-inch loaf pan by greasing it with non-stick spray or lining it with parchment paper. This helps the bread come out easily after baking. - In a large bowl, combine the shredded zucchini, canned pumpkin puree, vegetable oil, brown sugar, granulated sugar, eggs, and pure vanilla extract. - Whisk these ingredients together until smooth and well mixed. This helps blend the flavors. - In another bowl, sift together the all-purpose flour, baking soda, baking powder, ground cinnamon, nutmeg, ginger, and salt. - Sifting helps aerate the flour and spreads the baking agents and spices evenly. - Gradually add the dry mixture to the wet mixture. - Stir gently until just combined. Avoid overmixing, as this can make the bread tough. - If you want, fold in chopped walnuts or pecans and mini chocolate chips. - This adds a nice crunch and sweetness to the bread. Make sure they are evenly mixed throughout. - Pour the batter into the prepared loaf pan. - Use a spatula to spread it out evenly. - Place the pan in the preheated oven and bake for 55 to 65 minutes. - To check for doneness, insert a toothpick into the center. If it comes out clean, your bread is ready. Enjoy making this delicious pumpkin zucchini bread! For the complete recipe, check out the full recipe section. - Avoid overmixing the batter: Stir gently when mixing wet and dry ingredients. Overmixing makes the bread dense. Keep it light and fluffy for the best texture. - Ensuring accurate measurements: Use measuring cups and spoons. For flour, spoon it into the cup, then level it off. This helps avoid too much flour, which can dry out your bread. - How to get a moist interior: The key is to use fresh, shredded zucchini and canned pumpkin. These ingredients add moisture to the bread. Also, don’t bake too long; check with a toothpick for doneness. - Cooling tips for optimal flavor: After baking, let the bread cool in the pan for ten minutes. Then, move it to a wire rack. This keeps the crust from getting soggy and helps keep the inside moist. - Serving ideas with toppings: Serve slices warm with a pat of butter or cream cheese. Both add a nice richness. For a fun twist, try a drizzle of honey or maple syrup on top. - Festive garnish options: Sprinkle a little ground cinnamon on top of each slice for a touch of warmth. You can also add some chopped nuts or chocolate chips to the top for a nice look! For the full recipe, check out the recipe section above! {{image_4}} If you want a gluten-free version of this bread, use gluten-free flour. Look for blends that include rice flour and tapioca. They work well for baking. You can also try almond flour or coconut flour. Adjust the liquid in the recipe. These flours absorb more moisture. To boost flavor, add spices like cloves or allspice. They add warmth and depth. You can also use extracts like almond or maple. These give a sweet note. For added texture, mix in dried fruits like raisins or cranberries. They pair nicely with pumpkin and zucchini. To make the bread healthier, cut back on sugar. You can use applesauce or mashed bananas as a sweetener. These options keep the bread moist. If you want more protein, add Greek yogurt. It enhances the texture and flavor. You can also use nuts or seeds for crunch. For the full recipe, check out the detailed instructions above. Store your pumpkin zucchini bread at room temperature. Wrap it tightly in plastic wrap. You can also use an airtight container. This helps keep the bread moist. Place it in a cool, dry spot. Avoid sunlight or heat sources. Enjoy it fresh within three days for the best taste. To freeze your pumpkin zucchini bread, first let it cool completely. Then wrap it in plastic wrap. After that, place it in a freezer bag or container. Squeeze out as much air as you can. This prevents freezer burn. You can freeze it for up to three months. When you are ready to eat it, take it out of the freezer. Leave it on the counter to thaw overnight. For best texture, slice it while it's still slightly frozen. This makes it easier to cut without crumbling. Pumpkin zucchini bread lasts about three days at room temperature. If you keep it in the fridge, it can stay fresh for about a week. In the freezer, it stays good for up to three months. Remember to check for any signs of spoilage before eating. Enjoy your tasty treat! You can find the full recipe above. Yes, you can use fresh zucchini. Just shred it using a box grater. It will add moisture and flavor to your bread. Make sure to squeeze out excess water. This helps keep your bread from being too wet. The texture will still be great! To check if the bread is done, insert a toothpick in the center. If it comes out clean or with a few crumbs, your bread is ready. The edges may pull away from the pan slightly too. This is a good sign that it's baked through. Absolutely! You can leave out the nuts and chocolate chips if you prefer. The bread will still taste delicious and moist. If you want, you can add something else, like raisins or dried cranberries, for added texture. For the best slices, use a serrated knife. A gentle sawing motion works best. Make sure the bread is cool before slicing. This helps prevent it from crumbling. Aim for slices about one inch thick for a perfect bite. Yes, you can make this bread ahead of time. It stays fresh for several days at room temperature. You can also freeze it for future use. Just wrap it well in plastic wrap and foil. Thaw it overnight when you want to enjoy it again. For the full recipe, check out the complete guide above! In this article, we explored the essentials for making Pumpkin Zucchini Bread. We covered key ingredients like shredded zucchini, pumpkin puree, and various spices. I outlined simple steps for mixing and baking, along with tips for texture and presentation. Variations allow for gluten-free options and healthier choices too. Remember, with proper storage, you can enjoy this bread for days. Embrace these methods and tips to create a delicious treat that your friends and family will love. Happy baking!

Are you ready to bake something delicious? This Pumpkin Zucchini Bread recipe is easy and packed with flavor. You’ll love it, whether for breakfast or a snack. With shredded zucchini …

Read more

Categories Desserts

Zucchini Cake with Cream Cheese Frosting Delight

July 5, 2025 by Chef Miles
To make this tasty zucchini cake, you will need these main ingredients: - 2 cups finely grated zucchini (about 2 medium zucchinis) - 1 cup granulated sugar - 1 cup packed brown sugar - 1 cup vegetable oil - 4 large eggs, at room temperature - 2 teaspoons pure vanilla extract - 2 cups all-purpose flour - 1 teaspoon baking powder - 1 teaspoon baking soda - 1 teaspoon ground cinnamon - 1/2 teaspoon ground nutmeg - 1/4 teaspoon salt These ingredients work together to create a moist and flavorful cake. The zucchini adds moisture and a subtle taste, while the sugars give it sweetness. For the creamy frosting, gather these essential ingredients: - 8 ounces cream cheese, softened - 1/2 cup unsalted butter, softened - 4 cups powdered sugar, sifted - 2 tablespoons milk - 1 teaspoon pure vanilla extract The cream cheese frosting adds richness and a tangy flavor. This combination makes the cake extra special. To make this delightful zucchini cake, you will need: - Two 9-inch round cake pans - Mixing bowls - Whisk or electric mixer - Spatula - Grater or food processor - Measuring cups and spoons - Wire rack for cooling Having the right equipment helps ensure your baking goes smoothly. It makes mixing and measuring simple and fun. For the full recipe, follow the steps to create a delicious zucchini cake with cream cheese frosting. To make great zucchini cake, start with fresh zucchini. Use two medium zucchinis for about two cups when grated. Grate the zucchini using a box grater or a food processor. This will save you time. Place the grated zucchini on a clean kitchen towel. Fold the towel over and twist it to squeeze out extra moisture. This step helps the cake stay fluffy. In a large bowl, add the granulated sugar, brown sugar, and vegetable oil. Whisk these ingredients together until they blend well. Next, crack in four large eggs, adding them one by one. Whisk well after each egg. This helps create a smooth mix. Finally, stir in two teaspoons of vanilla extract for that lovely flavor. Now, take a medium bowl to mix your dry ingredients. Combine two cups of all-purpose flour, one teaspoon of baking powder, one teaspoon of baking soda, one teaspoon of ground cinnamon, one-half teaspoon of ground nutmeg, and one-quarter teaspoon of salt. Whisk these together until they are well-mixed. Gradually add this dry mix to your wet mixture. Use a spatula to fold gently, taking care not to overmix. Once combined, fold in the drained zucchini evenly into the batter. Preheat your oven to 350°F (175°C). Grease two 9-inch round cake pans with butter or cooking spray. Lightly dust them with flour to help the cakes release easily. Evenly divide the batter between the two prepared pans. Bake in the preheated oven for 25 to 30 minutes. Check for doneness by inserting a toothpick into the center. It should come out clean or with a few moist crumbs. While the cakes are baking, you can prepare the cream cheese frosting. In a mixing bowl, place eight ounces of softened cream cheese and half a cup of softened unsalted butter. Beat these together on medium speed for about 2 to 3 minutes until smooth. Gradually add four cups of sifted powdered sugar, mixing well after each addition. Finally, stir in two tablespoons of milk and one teaspoon of vanilla extract until the frosting is light and fluffy. After the cakes cool completely, place one layer on a serving plate. Spread a thick layer of cream cheese frosting on top. Then, add the second cake layer on top. Use the remaining frosting to cover the top and sides. Smooth it out for a nice finish. For decoration, sprinkle a little ground cinnamon or lemon zest on top. You can even add thin slices of zucchini or chopped nuts around the base for an extra touch. For the full recipe, check the details for all the steps and tips to make your zucchini cake delightful! To get a moist zucchini cake, start with fresh zucchini. Grate it finely to mix well into the batter. It’s key to squeeze out extra liquid. This helps prevent a soggy cake. Also, use both granulated and brown sugars. Brown sugar adds moisture and depth of flavor. For the best cream cheese frosting, start with soft cream cheese and butter. This helps create a smooth texture. Beat them together first, then slowly add powdered sugar. This keeps the frosting fluffy and light. Use milk to adjust the consistency. If it’s too thick, add a little more milk. Serve your zucchini cake chilled or at room temperature. It pairs well with a cup of tea or coffee. Consider adding fresh mint leaves or edible flowers for a pretty touch. A light dusting of cinnamon adds flavor and looks nice too. You can even add a scoop of vanilla ice cream on the side for extra delight! For the full recipe, check out the detailed instructions above. {{image_4}} You can turn this zucchini cake into a chocolate delight. To do this, simply add 1/2 cup of unsweetened cocoa powder to the dry ingredients. This rich twist adds a deep chocolate flavor while keeping the cake moist. The cocoa balances perfectly with the sweetness of the zucchini. Your guests will be amazed at how tasty it is! If you want a nut-free version, just skip the nuts. You can still enjoy the cake's great flavors. This cake is naturally free of nuts, so it suits everyone. If you want a crunch, try adding some sunflower seeds or pumpkin seeds. They add texture without the worry of allergens. Want to make your cake even more special? You can add fruits or nuts. Chopped walnuts or pecans give a nice crunch. Dried fruits like raisins or cranberries add sweetness. You can also mix in chocolate chips for a fun surprise. Just fold them into the batter before baking. These additions make the cake even more enjoyable and unique. For the full recipe, check out the Zesty Zucchini Cake with Cream Cheese Frosting. To store your zucchini cake, let it cool completely first. Then, wrap it tightly in plastic wrap. You can also place it in an airtight container. This keeps the cake moist and fresh. Store it in the fridge if you plan to eat it within a week. For longer storage, consider freezing it. If you have leftover zucchini cake, it freezes well. Slice the cake into pieces. Wrap each slice in plastic wrap. Then, place the wrapped slices in a freezer bag. Be sure to label the bag with the date. This way, you can enjoy it later. It stays good in the freezer for about three months. To enjoy your cake warm, reheating is easy. Remove a slice from the fridge or freezer. If frozen, let it thaw in the fridge overnight. To heat, use the microwave for about 15-20 seconds. For a crispy edge, place it in a hot oven for a few minutes. Enjoy the delight of fresh cake again! For baking, I prefer medium-sized zucchinis. They are juicy and tender. Look for firm zucchinis without blemishes. Smaller zucchinis have better flavor. You can use any color, but green is most common. Just remember to wash them well before grating. Yes, you can! Use a 1:1 gluten-free flour blend as a substitute. Make sure it includes xanthan gum. This helps mimic the texture of regular flour. I find that gluten-free options work great in this cake. Zucchini cake lasts about 3 to 5 days at room temperature. Store it in an airtight container to keep it fresh. If you add frosting, it may last only a few days in the fridge. You can also freeze slices for up to three months. Just wrap them tightly! Yes, you can use mascarpone cheese or Greek yogurt instead. Both add creaminess. If using yogurt, your frosting will be lighter. You may need to adjust sugar for taste. Experiment to see what you like best! Zucchini cake has roots in home baking. It gained popularity during the vegetable cake trend of the 1970s. People wanted to use excess garden zucchinis. The addition of cream cheese frosting adds a rich flavor. It turns this simple cake into a delightful treat. You can find the full recipe in the previous sections. You now have all the steps to make a tasty zucchini cake with cream cheese frosting. We covered the main ingredients, preparation methods, and helpful tips to ensure your cake is moist and flavorful. You can explore fun variations, like chocolate or nut-free options, to fit your taste. Remember, proper storage and reheating will keep your cake fresh for longer. Bake confidently, and enjoy sharing your delicious creation!

Welcome to my delicious world of Zucchini Cake with Cream Cheese Frosting Delight! If you think veggies don’t belong in dessert, think again. This cake is moist, rich, and topped …

Read more

Categories Desserts

Easy Chicken Breast with Zucchini Quick and Delicious

July 5, 2025 by Chef Miles
For this easy recipe, you will need: - 2 boneless, skinless chicken breasts - 2 medium zucchinis, sliced into half-moons - 2 tablespoons extra virgin olive oil - 1 large lemon, both zest and juice - 3 cloves of garlic, finely minced - 1 teaspoon dried oregano - 1 teaspoon smoked paprika - Salt and freshly cracked black pepper to taste - Fresh parsley, finely chopped (for garnish) These ingredients come together to create a tasty dish that is both satisfying and healthy. The chicken is tender, while the zucchini adds a nice crunch. In addition to the main ingredients, make sure you have these kitchen staples: - Mixing bowls for combining ingredients - A whisk for mixing the marinade - A baking dish to cook everything together - A knife and cutting board for slicing the zucchini - Measuring spoons for accuracy Having these items at hand makes the cooking process smooth and fun. To make your dish even more exciting, consider these optional add-ins: - Red pepper flakes for heat - Fresh herbs like thyme or rosemary for added aroma - A splash of balsamic vinegar for tanginess - Sliced bell peppers for more color and crunch These extra touches can elevate your dish, making it even more delicious. You can find the full recipe in the section above. Start by gathering all your ingredients. You will need chicken, zucchini, olive oil, lemon, garlic, herbs, and spices. This dish is easy and quick. Preheat your oven to 400°F (200°C). This step warms the oven for even cooking. In a bowl, mix olive oil, lemon zest, lemon juice, minced garlic, oregano, smoked paprika, salt, and pepper. This zesty blend gives the chicken great flavor. Place the chicken breasts in a baking dish. Pour half the marinade over the chicken. Make sure each piece is well-coated. Let it sit for at least 15 minutes. This helps the chicken soak up the flavors. While the chicken marinates, prepare the zucchini. Slice the zucchinis into half-moons. Drizzle the remaining marinade over the zucchini and toss well. After marinating, place the zucchini around the chicken in the baking dish. This makes for a colorful dish. Bake everything in your preheated oven for 20-25 minutes. Make sure the chicken reaches 165°F (74°C). The zucchini should be tender and lightly caramelized. Once done, let it rest for a few minutes. This keeps the chicken juicy. Before serving, sprinkle fresh parsley on top for a nice finish. Enjoy this flavorful meal! Check out the Full Recipe for more details. To make your chicken breast juicy, start with quality meat. Use boneless, skinless chicken breasts for the best results. Marinate them for at least 15 minutes. This step adds flavor and keeps the meat moist. Use a mix of lemon juice and olive oil. The acid helps tenderize the chicken. Bake the chicken at 400°F (200°C). High heat locks in juices and cooks evenly. Use a meat thermometer. Check for an internal temperature of 165°F (74°C). Let the chicken rest for a few minutes before serving. This keeps the juices inside. For tender zucchini, slice them into half-moons. This shape allows even cooking. Toss the zucchini in the leftover marinade. This adds flavor and helps soften them. You can also sauté them if you prefer a quicker method. Cook them in a hot pan for about 3-4 minutes. Watch them closely to avoid overcooking. Overcooked zucchini becomes mushy and loses its bright color. Aim for a tender but firm texture. Present your dish with flair! Serve the chicken and zucchini straight from the baking dish. This gives a rustic look. For a more polished feel, plate them individually. Drizzle the remaining marinade over the top. This adds shine and flavor. Sprinkle fresh parsley on the dish for color. You can also add lemon wedges on the side. This gives a fresh touch and looks appealing. For extra crunch, consider adding toasted nuts or seeds on top. Enjoy your meal! For the complete recipe, check out the Full Recipe link. {{image_4}} You can change up this dish by adding other veggies. Try bell peppers, asparagus, or broccoli. They add color and flavor. Slice them into similar sizes as the zucchini. This way, everything cooks evenly. You can also mix in cherry tomatoes for a sweet burst. Just toss them in with the zucchini. To change the taste, swap out some ingredients in the marinade. Use lime juice instead of lemon for a different zing. Add fresh herbs like thyme or rosemary for a fragrant touch. You can also try a splash of soy sauce or balsamic vinegar for richness. These small changes can make a big difference. This recipe is naturally gluten-free. If you're on a low-carb diet, this dish fits perfectly. You can replace the chicken with firm tofu or tempeh for a veggie option. Just remember to adjust the cooking time. Always check labels on sauces and marinades to ensure they match your dietary needs. This way, you can enjoy a healthy meal without worry. For the full recipe, visit the provided link. Store any leftovers in an airtight container. Make sure the chicken and zucchini cool down first. You can keep them in the fridge for up to three days. If you want to save them longer, freezing is a great option. When reheating, use the oven for best results. Preheat your oven to 350°F (175°C). Place the chicken and zucchini in a baking dish. Cover it with foil to keep moisture in. Heat for about 15-20 minutes. Check that the chicken reaches 165°F (74°C) before eating. To freeze, slice the chicken and zucchini into portions. Place them in freezer-safe bags or containers. Remove as much air as possible. They can last up to three months in the freezer. When ready to use, thaw in the fridge overnight before reheating. You can enjoy this meal again with ease! For the full recipe, refer back to the beginning. You should bake chicken breasts with zucchini for 20 to 25 minutes. This time ensures the chicken cooks through while keeping the zucchini tender. Always check the internal temperature of the chicken; it should reach 165°F (74°C) for safety. Yes, you can use chicken thighs instead of breasts. Thighs are juicier and can add extra flavor. They may take a bit longer to cook, so check their temperature as well. Thighs should reach the same internal temperature of 165°F (74°C) for safe eating. I recommend serving this dish with a light salad or some rice. A fresh side salad can balance the meal nicely. You could also pair it with crusty bread to soak up the juices. For more ideas, check out the Full Recipe for further inspiration! In this article, we explored how to make easy chicken breast with zucchini. We covered the main ingredients, kitchen staples, and optional add-ins for flavor. You learned step-by-step instructions for marinating and baking. I shared tips for juicy chicken and tender zucchini. We discussed variations with different veggies and dietary needs. Finally, we touched on storage and reheating tips for leftovers. Enjoy your cooking! This dish is simple and tasty, making meal prep easy and fun.

If you’re looking for a quick and tasty meal, you’re in the right place! This Easy Chicken Breast with Zucchini recipe combines juicy chicken and crisp zucchini for a delightful …

Read more

Categories Dinner

Creamy Parmesan Zucchini Soup Comforting and Flavorful

July 5, 2025 by Chef Miles
- 4 medium zucchinis, chopped into bite-sized pieces - 1 medium onion, diced finely - 3 cloves garlic, minced - 4 cups vegetable broth - 1 cup heavy cream (or substitute with coconut cream for a dairy-free option) Zucchini is the star here. Its soft texture blends well with the soup. Onion adds sweetness, while garlic gives it a bold kick. The vegetable broth keeps it light and tasty, and the heavy cream (or coconut cream) makes it rich. - Nutritional yeast for vegan option - Other herbs and spices If you want a vegan twist, use nutritional yeast instead of cheese. You can also play with herbs like basil or oregano for extra flavor. - Fresh parsley - Additional cheese Garnish your soup with fresh parsley for color. If you love cheese, add more grated Parmesan on top. It makes the dish look great and taste even better. For the full recipe, check out Creamy Parmesan Zucchini Soup. Enjoy a warm bowl of comfort! Start by sautéing the onions and garlic in a large pot. Heat two tablespoons of olive oil over medium heat. Add the diced onion and cook until it turns soft and clear, about five minutes. Then, add three minced garlic cloves and one teaspoon of dried thyme. Stir for one more minute, until you smell the garlic. Next, cook the zucchinis. Add four chopped zucchinis to the pot and mix them well. Let them cook for five to seven minutes, stirring every so often. The zucchinis should soften but keep their shape. Now it's time to simmer the soup. Pour in four cups of vegetable broth and raise the heat until it boils. Once it starts to bubble, lower the heat and let it simmer for about 15 minutes. The zucchini will become tender and easy to pierce with a fork. To finish, blend the soup until smooth. Use an immersion blender for ease. If you prefer a traditional blender, blend in small batches and return the soup to the pot. Finally, mix in one cup of heavy cream and one cup of freshly grated Parmesan cheese. Stir well until the cheese melts and the soup is rich. Season with salt and black pepper to taste. For more tips, check the Full Recipe. Serve it warm, garnished with fresh parsley and extra cheese for a delightful touch. Enjoy your creamy, comforting bowl of goodness! To boost the taste of your Creamy Parmesan Zucchini Soup, consider adding fresh herbs like basil or chives. They add brightness and depth. Spices such as red pepper flakes can introduce a nice kick. When blending, always let the soup cool slightly first. This prevents splatters and ensures a smooth texture. If you want a richer flavor, blend half of the soup and leave the other half chunky for a nice contrast. For gluten-free needs, this soup is naturally safe. All your ingredients are gluten-free, so no changes are needed. If you're looking for dairy-free options, replace heavy cream with coconut cream. Nutritional yeast can stand in for Parmesan cheese, giving a cheesy taste without the dairy. Pair this soup with crusty bread or a fresh salad. A simple green salad works great. You can also try a slice of sourdough or garlic bread. This soup is best served hot. Aim for a temperature around 160°F. It gives a cozy feel on chilly days. Enjoy it in warm bowls, and don’t forget to garnish with fresh parsley! For a touch of luxury, drizzle a bit of olive oil on top just before serving. For the full recipe, check out the [Full Recipe]. {{image_4}} You can easily swap some ingredients in this creamy Parmesan zucchini soup. Seasonal vegetables can add a fresh twist. Try using: - Broccoli florets - Spinach leaves - Peas - Asparagus tips These veggies keep the soup colorful and tasty. For cheese, don’t feel limited to Parmesan. You can use: - Gruyère for a nutty flavor - Cheddar for a sharp taste - Feta for a tangy kick - Goat cheese for creaminess These options change the soup's flavor profile while keeping it rich. Want to spice things up? You can add some kick to your soup easily. Try these ideas: - A pinch of red pepper flakes for heat - Chopped jalapeños for a bold flavor - A dash of hot sauce for zest For those watching their calories, make these simple changes: - Use low-fat cream or almond milk - Skip the cream and add more broth - Use less cheese or a lighter cheese option These tweaks keep the soup delicious while making it lighter. If you're cooking for a crowd, scaling this recipe is easy. Just double or triple the ingredients. Ensure you have a larger pot to hold everything. For meal prep, make a big batch. This soup keeps well in the fridge. Store it in: - Airtight containers for easy access - Individual portions for quick meals This way, you can enjoy creamy Parmesan zucchini soup anytime! For the full recipe, see the above sections for all the steps and tips. To store leftovers, let the soup cool to room temperature. Pour it into an airtight container. Make sure to seal it well. In the fridge, it lasts about 3 to 5 days. If you want to freeze the soup, use freezer-safe containers. Leave some space at the top for expansion. This soup can last for about 3 months in the freezer. When it's time to eat, thaw the soup in the fridge overnight. To reheat, pour it into a pot and warm it on low heat. Stir often to keep it smooth. I recommend glass containers for storing soup. They don’t stain and are easy to clean. If you use plastic, ensure it’s BPA-free. To avoid freezer burn, wrap the container with plastic wrap after sealing. This keeps the soup fresh and tasty. Yes, you can use frozen zucchini. It saves time and keeps well. To use it, thaw the zucchini first. Drain any excess water to avoid a watery soup. Frozen zucchini may be softer, so adjust cooking time. You may need less time to cook it in the pot. To make this soup vegan, substitute the heavy cream with coconut cream. Use nutritional yeast instead of Parmesan cheese for flavor. This keeps the soup rich and creamy without dairy. Don't forget to check labels for hidden dairy in broth. This soup pairs well with crusty bread or a fresh salad. A light, green salad adds crunch and freshness. Grilled cheese sandwiches also make a great side. They complement the soup's creamy texture perfectly. To make the soup creamier, add more heavy cream or coconut cream. If you want a brothier soup, add more vegetable broth. Adjust the blend to your liking for the perfect texture. You can also add more zucchini to thicken it naturally. Reheat the soup on the stove over low heat. Stir often to avoid sticking. You can also use a microwave in short bursts. Cover it to keep moisture in while reheating. Make sure to stir well before serving. For the full recipe, check out the Creamy Parmesan Zucchini Soup. This blog post covered key ingredients and steps to make a creamy zucchini soup. You learned how to prepare vegetables, blend the soup, and add variation. Remember, you can adjust flavors and ingredients to fit your taste. Storing leftovers correctly helps keep your soup fresh. Whether you enjoy it creamy or vegan, this recipe is versatile. Now, it’s time to create your own delicious bowl of soup!

Cozy up with a bowl of Creamy Parmesan Zucchini Soup, where each spoonful bursts with rich flavor. This simple recipe combines fresh zucchini, garlic, and cream to create a warm …

Read more

Categories Dinner

EASY Garlic Parmesan Chicken Bites Tasty Recipe Guide

July 5, 2025 by Chef Miles
- Chicken: Use 1 pound of boneless, skinless chicken breasts. Cut them into bite-sized cubes. This ensures even cooking and easy eating. - Cheese: Choose ½ cup of freshly grated Parmesan cheese. Fresh cheese melts and flavors better than pre-grated options. - Coating: I recommend using ½ cup of seasoned breadcrumbs. These breadcrumbs add flavor and texture. Unseasoned breadcrumbs will lack flavor, so avoid them. - Garlic powder versus fresh garlic: I often use 2 tablespoons of garlic powder for its ease and strong flavor. Fresh garlic is great, too, but it can be harder to measure and may burn. - Importance of smoked paprika: Use 1 teaspoon of smoked paprika. This spice adds a lovely smokiness and depth to the dish. - Balancing salt and pepper: Add ½ teaspoon of fine sea salt and ¼ teaspoon of freshly cracked black pepper. This balance enhances all the flavors without overpowering them. - Fresh herbs: Fresh parsley works well. If you want alternatives, consider basil or chives for a different taste. - Suggested dips for serving: Marinara sauce and ranch dressing make great dips. They add extra flavor and keep things fun. Enjoy your chicken bites! Start by preheating your oven to 400°F (200°C). This temperature helps the chicken cook evenly. Make sure to set a timer for this step. While the oven heats, prepare your baking sheet. Line it with parchment paper. This paper keeps the chicken from sticking and makes cleanup easy. Take your pound of boneless, skinless chicken breasts. Cut them into bite-sized cubes, about one inch each. This size ensures they cook well and stay tender. Next, place the cubes in a bowl. Drizzle olive oil over the chicken. Use about ¼ cup. Toss the chicken gently with your hands. Make sure every piece is coated well. This step adds flavor and helps the breading stick. In a large bowl, mix the dry ingredients. Combine ½ cup grated Parmesan cheese, ½ cup seasoned breadcrumbs, 2 tablespoons garlic powder, 1 teaspoon smoked paprika, ½ teaspoon fine sea salt, and ¼ teaspoon black pepper. Stir well to blend all the flavors together. Now, take the oiled chicken cubes and place them in the bowl with the breadcrumb mix. Toss the chicken until each piece is evenly coated. This step is key for tasty bites. Spread the coated chicken on the prepared baking sheet. Arrange them in a single layer. Avoid overcrowding, as this helps them become crispy. Follow the baking instructions closely to ensure perfect chicken bites. For the full recipe, check out the provided details. To get crispy coatings, dry the chicken pieces well. Moisture can ruin the crunch. After coating, let the chicken rest for a few minutes. This helps the coating stick better. Bake the chicken at 400°F (200°C) for 20-25 minutes. The chicken should reach an internal temperature of 165°F (74°C) to be safe to eat. These chicken bites go great with dipping sauces. Marinara sauce and ranch dressing are popular choices. Serve them on a nice platter with lemon wedges. This adds color and flavor. You can also pair them with a fresh salad or veggies for a complete meal. You can prep chicken bites in advance. Coat them and place them in the fridge for a few hours. This makes them ready for baking later. If you want to store them longer, freeze the coated chicken. Just remember to thaw them in the fridge before baking. This way, you'll have a quick meal ready to go! {{image_4}} You can spice up your garlic Parmesan chicken bites with cayenne pepper. Just add a pinch to the breadcrumb mix for some heat. This small change makes a big difference. If you want to switch up the cheese, try using sharp cheddar or mozzarella. Each cheese gives a unique taste to the dish, making it fun to experiment. If you prefer a healthier option, use gluten-free breadcrumbs. They work just as well for a crispy coating. You can also swap chicken for turkey or tofu. Both options keep the dish tasty while cutting down on fat. Tofu absorbs flavors well and is a great plant-based choice. You can easily turn these chicken bites into a salad. Just toss them with greens and your favorite dressing. This makes a quick and filling meal. If you have leftovers, use them in wraps or sandwiches. They add great flavor and protein, making your lunch more exciting. For the full recipe, check out the main section. To keep your cooked chicken bites fresh, place them in an airtight container. This method helps retain moisture and flavor. You can store the chicken bites in the fridge for up to three days. If you want to enjoy them later, ensure you heat them thoroughly before serving. For longer storage, freeze the chicken bites. Place them in a freezer-safe bag or container. Make sure to remove as much air as possible to prevent freezer burn. You can freeze them for up to three months. When ready to eat, thaw them overnight in the fridge. To reheat, bake them in the oven at 350°F (175°C) until heated through. This keeps them crispy and tasty. Look for signs of spoilage, like an off smell or changes in color. If the chicken bites appear slimy or dry, it’s best to discard them. Use glass or BPA-free plastic containers for storage. These options work well to keep your food safe and fresh. Cooking these chicken bites is quick and simple. The prep time is around 10 minutes. Once you pop them in the oven, they need 20 to 25 minutes to bake. So, in total, you’ll spend about 35 minutes from start to finish. Yes, you can use frozen chicken! Make sure to thaw it safely in the fridge overnight. This way, it cooks evenly. If you use the microwave, cook it right after thawing. Avoid refreezing thawed chicken. These chicken bites taste great with many dips. Popular options include marinara sauce, ranch dressing, or creamy garlic sauce. You can also make a quick dip by mixing Greek yogurt with lemon juice and garlic powder. This adds a nice zing! To wrap it up, we covered everything you need for EASY Garlic Parmesan Chicken Bites. We explored key ingredients, essential seasonings, and clever tips. You learned how to prep, coat, and bake the chicken to get that crispy finish. I shared variations for flavor and health, plus storage tips for leftovers. When you make these chicken bites, you'll impress everyone at the table. Enjoy experimenting and finding your own spin on this dish!

Looking for a simple yet delicious meal? You’ll love these EASY Garlic Parmesan Chicken Bites! In this guide, I’ll show you how to make tender, flavorful chicken that’s perfect for …

Read more

Categories Appetizers

Roasted Zucchini and Summer Squash Flavorful Dish

July 4, 2025 by Chef Miles
- 2 medium zucchinis, sliced into ½-inch rounds - 2 medium summer squashes, sliced into ½-inch rounds - 1 red bell pepper, diced into bite-sized pieces - 1 yellow bell pepper, diced into bite-sized pieces - 3 tablespoons extra virgin olive oil - 1 teaspoon garlic powder - 1 teaspoon onion powder - 1 teaspoon smoked paprika - Sea salt and freshly cracked black pepper to taste - 2 tablespoons fresh parsley, finely chopped (for garnish) - Zest of 1 medium lemon - Juice of 1 medium lemon - Large mixing bowl - Sharp knife and cutting board - Baking sheet - Parchment paper - Measuring spoons - Serving platter Start by washing the zucchinis and summer squashes. Cut off both ends and slice them into ½-inch rounds. Next, wash the bell peppers. Cut them into halves, remove the seeds, and dice them into bite-sized pieces. When you have all your veggies ready, place them in a large mixing bowl. This helps you mix everything well later. Use your knife carefully to avoid accidents. Once the veggies are prepped, it's time to season them. This step is key for flavor. You’ll want to coat them evenly with olive oil and spices. That way, every bite bursts with taste. For extra zing, remember to zest and juice the lemon. This will add a fresh twist to your dish. Now, you're set to move on to roasting these vibrant veggies. For the full recipe, check the section above! First, preheat your oven to 425°F (220°C). This step is key for a good roast. A hot oven makes the vegetables tender and caramelized. Next, grab a large mixing bowl. Add the sliced zucchinis, summer squashes, and diced bell peppers. Mix them gently to combine. This colorful mix will add flavor and texture to your dish. Now, drizzle the extra virgin olive oil over the vegetables. You need enough oil to coat each piece well. Then, sprinkle in the garlic powder, onion powder, smoked paprika, sea salt, and black pepper. Toss everything together until the veggies are evenly coated in oil and spices. Line a large baking sheet with parchment paper. This makes cleanup much easier! Spread the vegetable mixture evenly on the sheet. Avoid overcrowding; give them space to roast properly. Place the baking sheet in your preheated oven. Roast the vegetables for 20-25 minutes. Be sure to stir them halfway through for even cooking. You want them to turn tender and golden with a nice caramelized look. Once finished, take the baking sheet out of the oven. Immediately sprinkle the lemon zest over the hot veggies. Then, squeeze the lemon juice on top. Toss gently to mix in the fresh flavors. Finally, transfer your vibrant medley to a serving platter. Garnish with finely chopped parsley for a bright touch. This dish will delight your taste buds and brighten your table. This recipe is part of the Full Recipe for Zesty Roasted Zucchini & Summer Squash Medley. To get that perfect roasted texture, cut your vegetables evenly. Slice zucchinis and summer squashes into ½-inch rounds. This size helps them cook evenly. Spread them out on the baking sheet. Avoid overcrowding, as this traps steam and makes them soggy. Stir them halfway through roasting for even browning. Roasting at 425°F (220°C) gives a nice caramelized flavor. While the recipe uses garlic powder and smoked paprika, feel free to get creative. Try adding Italian herbs like oregano or thyme for a fresh twist. For a spicy kick, sprinkle some red pepper flakes. You can also mix in lemon pepper for a bright burst of flavor. Experiment with your favorite spices to find what you love most. Garnishing adds beauty and flavor to your dish. Fresh parsley brings a nice color and a touch of freshness. You can also use grated Parmesan for a cheesy finish. If you want a bit of crunch, try toasted pine nuts or sunflower seeds. For a zesty touch, add a little more lemon juice right before serving. These simple additions will elevate your roasted zucchini and summer squash. For the complete experience, check out the Full Recipe to see how all these tips come together. {{image_4}} You can add many other veggies to your roasted zucchini and summer squash. Try carrots, bell peppers, or red onions. Broccoli or asparagus also works great. Just cut them to a similar size for even cooking. This way, all your veggies roast nicely together. Change up the flavors with different spices. Add Italian herbs like oregano or basil for a fresh taste. For a spicy kick, try chili flakes or cayenne pepper. You can also use fresh herbs like thyme or rosemary. Each spice gives the dish a new twist. You can turn this dish into a full meal easily. Add cooked quinoa or couscous for extra texture. Toss in some chickpeas or black beans for protein. If you want meat, grilled chicken or shrimp pairs well. Mix it all together for a hearty, unique dish. Don't forget to check out the Full Recipe for more tips! To store leftovers, let the roasted zucchini and summer squash cool completely. Place them in an airtight container. You can keep them in the fridge for up to three days. Make sure to separate them from other foods to avoid any flavor mix. When you’re ready to enjoy your leftovers, you can reheat them in the oven or on the stovetop. For the oven, preheat it to 350°F (175°C). Spread the vegetables on a baking sheet and heat for about 10 minutes. On the stovetop, use a pan over medium heat for about five minutes. Stir them occasionally for even warming. You can freeze roasted zucchini and summer squash for longer storage. First, let them cool and then spread them out on a baking sheet. Freeze them for about two hours until firm, then transfer to a freezer bag. They can last up to three months in the freezer. When ready to use, simply thaw in the fridge overnight before reheating. For best taste, use within a month. Yes, you can use other squash. Yellow squash, pattypan, and even acorn squash work well. Each type gives a unique taste and texture. Feel free to mix and match. This adds variety to your dish. Roasted zucchini and summer squash pair nicely with many dishes. Try serving them with grilled chicken or fish. They also go well with quinoa or rice. Consider adding them to a fresh salad too. Their vibrant flavors brighten any meal. Check the vegetables after 20-25 minutes of roasting. They should be tender and slightly golden. Use a fork to test their doneness. If it goes in easily, they are ready. Look for slight caramelization for the best flavor. For full details, check the Full Recipe. Roasting zucchini and summer squash is easy and fun. We covered the key ingredients, tools, and simple steps. I shared tips for great texture and tasty seasoning options. You can even mix in other veggies to make it your own. Remember, leftovers can be stored and reheated later. Enjoy your dish, and don't hesitate to try new ideas for your next meal. Happy cooking and savoring every bite!

Roasted zucchini and summer squash are a tasty way to enjoy fresh veggies. This colorful dish brings out rich flavors and is easy to make. Whether you’re a busy parent …

Read more

Categories Dinner

Pesto Zucchini Orzo Quick and Flavorful Dinner

July 4, 2025 by Chef Miles
- 1 cup orzo pasta - 2 medium zucchinis, diced into small cubes - 1 cup cherry tomatoes, halved - 1/4 cup fresh basil pesto - 1/4 cup Parmesan cheese, finely grated - 2 tablespoons extra virgin olive oil - 2 cloves garlic, minced - Salt and freshly ground black pepper to taste - 1/4 cup pine nuts, toasted (for garnish) - Spinach or kale for added greens - Cooked chicken or shrimp for protein - Lemon juice for extra zest I love using these ingredients for my Pesto Zucchini Orzo. They create a bright and fresh dish. The orzo pasta serves as a great base. It cooks quickly and has a nice bite. Zucchini adds a mild taste and a lovely texture. Cherry tomatoes bring a sweet burst in every bite. Fresh basil pesto ties it all together with its rich flavor. Parmesan cheese adds a salty touch. The garlic gives a hint of warmth, while the olive oil keeps everything moist. If you want to switch it up, consider adding some spinach or kale. They boost the nutrition and add color to the dish. You can even throw in some cooked chicken or shrimp for protein. A squeeze of lemon juice will brighten the flavors even more. Don’t forget, you can find the full recipe above. Make this dish your own by mixing and matching! - Bring water to a boil and add orzo. - Cook for 8-10 minutes until al dente. - Drain and set aside. Start with boiling water. Use a large pot and add salt. This step helps flavor the orzo. Once the water bubbles, toss in the orzo. Stir it gently to prevent sticking. You want it to be firm, not mushy, so keep an eye on the clock. After draining, let the orzo sit for a moment. This will help it stay fluffy. - Heat olive oil and sauté garlic. - Add zucchini and cook until tender. - Incorporate cherry tomatoes and cook briefly. In a large skillet, pour in the olive oil. Heat it over medium. When the oil shimmers, add minced garlic. It should smell great after about a minute. Next, toss in the diced zucchini. Cook it for around 4-5 minutes. You want it soft but still slightly crisp. Then, add the halved cherry tomatoes. Cook for 2-3 minutes. This will make them juicy and flavorful. - Stir in cooked orzo with vegetables. - Add pesto and mix thoroughly. - Season with salt, pepper, and Parmesan cheese. Now, add the drained orzo to your skillet. Gently stir everything together so the orzo mixes with the veggies. Next, pour in the fresh basil pesto. This adds a burst of flavor. Mix well until everything is coated. Finally, season with salt and freshly ground black pepper. Don’t forget to add the finely grated Parmesan cheese. It melts and creates a creamy texture. For the complete recipe, check out the [Full Recipe]. To make the best orzo, avoid overcooking it. Al dente is key. This gives a nice bite and keeps your dish light. Always use fresh ingredients. They boost flavor in every bite. After cooking, taste your dish. Adjust the seasoning to your liking. A dash of salt or a sprinkle of pepper can elevate your meal. Pesto zucchini orzo pairs well with grilled meats or seafood. The flavors work together beautifully. Serve it with crusty bread to make a full meal. The bread soaks up the delicious pesto sauce. For a fresh touch, add basil leaves as a garnish. This adds color and flavor to your dish. For the full recipe, check out the details above. {{image_4}} For a great vegetarian twist, skip the cheese. This change makes the dish dairy-free. You can also add more vegetables. Try bell peppers or asparagus for extra color and flavor. These veggies pair well with the orzo and pesto. If you want to boost the flavor, think about sun-dried tomatoes or olives. Both add a nice tangy taste. You can also use different nuts. Walnuts or almonds offer a crunchy surprise and change the texture. Meal prepping is a smart move for busy days. Make a large batch of pesto zucchini orzo for easy lunches. Store the orzo in individual containers. This way, you can grab a meal on the go without extra fuss. For the full recipe, check out the link above. Store any leftovers in an airtight container. This keeps the food fresh. Consume within 3-5 days for best quality. The flavors will stay bright when stored properly. You can freeze this dish for up to 3 months. Make sure it cools completely before putting it in the freezer. Thaw it in the refrigerator before reheating. This helps maintain the texture and taste. To reheat, use a microwave or heat on the stove. Add a splash of water to keep it moist. Stir well to maintain moisture while reheating. This keeps your Pesto Zucchini Orzo delightful and flavorful. Yes, alternatives like quinoa pasta can work well. Quinoa pasta cooks similarly to orzo. It adds protein and a nutty flavor. You can also try whole grain or brown rice pasta for a different taste and texture. Just adjust the cooking time as needed. Try homemade or store-bought alternatives like sun-dried tomato pesto. You can also blend fresh herbs with nuts and olive oil for a quick sauce. If you want a creamy option, consider using ricotta cheese mixed with herbs. Each choice gives a unique twist to the dish. Use gluten-free orzo or pasta made from chickpeas or lentils. These options keep the dish tasty while being gluten-free. Always check the package for cooking times. This way, you can enjoy a wholesome meal without gluten. This blog post covered a delicious orzo dish, outlining key ingredients and cooking steps. You learned about required items like orzo, zucchini, and pesto, along with optional add-ins for customization. Tips for perfecting your orzo and creative storage ideas were also provided. I hope these insights inspire you to try this recipe. Enjoy mixing flavors and personalizing your dish. Keep exploring different variations for fun and tasty meals ahead!

Looking for a quick and tasty dinner that’s packed with flavor? This Pesto Zucchini Orzo is the answer! With just a few key ingredients like orzo, fresh zucchini, and vibrant …

Read more

Categories Dinner
Older posts
Newer posts
← Previous Page1 … Page76 Page77 Page78 … Page113 Next →

MELTED RECIPES

where delicious ideas melt into life, from stovetop to backyard. Always warm, simple, and irresistibly satisfying. 🍳🔥🧀

PAGES

Home About Contact Privacy Policy Terms & Conditions Cookie Policy GDPR Policy Copyright Policy Disclaimer

CATEGORIES

Appetizers Desserts Salads Breakfast Dinner

Contact

  • Pinterest
  • Mail
Copyright © 2025 Melted Recipes. All rights reserved.