Healthy Chocolate Zucchini Bread Moist and Delicious Treat
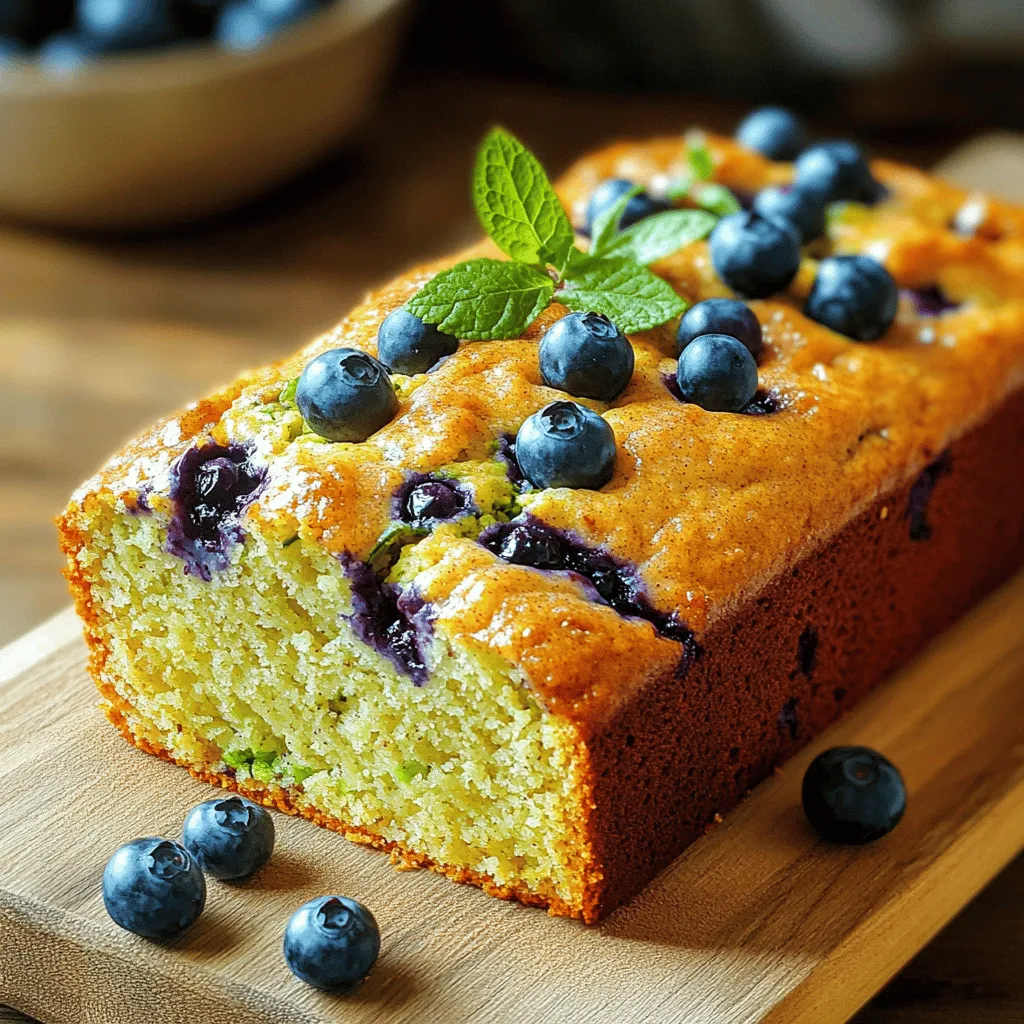
![- 1 medium zucchini, grated (about 1 cup) - 1/2 cup unsweetened applesauce - 1/2 cup pure maple syrup or honey - 1/2 cup almond milk (or your choice of milk) - 1 teaspoon pure vanilla extract - 1 cup whole wheat flour - 1/2 cup unsweetened cocoa powder - 1 teaspoon baking soda - 1/2 teaspoon baking powder - 1/2 teaspoon sea salt These ingredients make up the base of your healthy chocolate zucchini bread. The grated zucchini adds moisture while keeping it light. Unsweetened applesauce acts as a natural sweetener and keeps the loaf tender. Maple syrup or honey brings in sweetness without refined sugar. - 1/2 cup dark chocolate chips - 1/4 cup chopped nuts (like walnuts or pecans) - 1/2 teaspoon ground cinnamon (optional) If you want to kick up the flavor, add dark chocolate chips. They melt beautifully and create a rich taste. Chopped nuts give a nice crunch and extra nutrition. A dash of cinnamon adds warmth and complements the chocolate perfectly. For the full recipe, check out the [Full Recipe]. 1. Preheating the Oven Set your oven to 350°F (175°C). This temperature works well for baking. Preheating is key to even baking. 2. Preparing the Loaf Pan Use a 9x5 inch loaf pan. Lightly grease it with oil, or line it with parchment paper. This step helps the bread come out easily. 1. Combining Zucchini and Applesauce Mixture In a large bowl, grate one medium zucchini. You need about one cup. Add half a cup of unsweetened applesauce. This keeps the bread moist. 2. Incorporating Sweeteners and Milk Next, mix in half a cup of pure maple syrup or honey. Then, pour in half a cup of almond milk. Add one teaspoon of pure vanilla extract for flavor. Stir until smooth. 1. Whisking Together the Dry Ingredients In a separate bowl, whisk one cup of whole wheat flour with half a cup of cocoa powder. Add one teaspoon of baking soda, half a teaspoon of baking powder, and half a teaspoon of sea salt. If you like, include half a teaspoon of ground cinnamon. This helps mix everything evenly. 1. Method for Mixing Without Overmixing Gradually add the dry ingredients into the wet mixture. Stir gently. Stop mixing when just combined. It’s fine if the batter has a few lumps. 2. Folding in Chocolate Chips and Nuts Now, fold in half a cup of dark chocolate chips and, if you want, a quarter cup of chopped nuts. Do this carefully to keep the chips whole. You want them spread evenly. 1. Pouring Batter into the Loaf Pan Pour your batter into the prepared loaf pan. Use a spatula to spread it evenly. This makes sure it bakes nicely. 2. Baking Times and Doneness Check Place the pan in the oven. Bake for 50 to 60 minutes. To check if it’s done, insert a toothpick into the center. It should come out clean or with a few moist crumbs. This recipe gives you a moist and tasty treat. For the full recipe, check the detailed instructions above. To make this chocolate zucchini bread even healthier, try swapping sweeteners. Instead of maple syrup, use agave syrup or mashed ripe bananas. Both options can cut sugar and add flavor. For flours, you can use almond flour or oat flour. These choices boost nutrition. If you want a dairy-free version, use nut milk, like almond or cashew milk. You can also opt for coconut yogurt instead of regular yogurt. These swaps keep the bread moist and tasty while catering to dietary needs. The key to a great texture is not overmixing. Mix the batter until just combined. A few lumps are okay! This keeps the bread light and fluffy. To ensure moistness, add a little extra grated zucchini. If you like, you can also include a splash of additional almond milk. This makes each slice soft and delicious. For serving, slice the loaf on a wooden board. It looks rustic and inviting. You can dust the top with a bit of powdered sugar for a pretty touch. This bread pairs well with nut butter. Spread almond or peanut butter on warm slices. You can also add sliced bananas or fresh berries on top for extra flavor. Enjoy this delicious treat anytime! {{image_4}} You can make this healthy chocolate zucchini bread even better by choosing different flours. Here are some great options: - Gluten-Free Options: Use almond flour or coconut flour. These flours add nice flavors and are gluten-free. Just remember to mix them well with other dry ingredients. Adjust the liquid as needed. - Other Whole Grain Choices: Try spelt flour or oat flour. Both add fiber and nutrients. They also give a unique taste. You can mix them with whole wheat flour for a balanced result. Adding different flavors can make your zucchini bread special. Here are some fun ideas: - Adding Different Spices or Extracts: You can add cinnamon or nutmeg for warmth. Vanilla or almond extract can give a lovely aroma. Just a teaspoon can change the whole taste. - Using Various Types of Chocolate: Instead of dark chocolate chips, try milk chocolate or white chocolate. Each type brings a new twist. You can even mix different kinds for a chocolate lover’s dream! Enhancing your bread with healthy extras is easy. Consider these add-ins: - Additional Fruits or Nut Combinations: You can add chopped apples or mashed bananas. They add moisture and sweetness. Nuts like walnuts or pecans bring crunch and healthy fats. - Incorporating Seeds for Extra Nutrition: Flaxseeds or chia seeds can boost the nutrition. They add omega-3s and fiber. Just a couple of tablespoons can make a big difference. For the full recipe, check out the [Full Recipe]. To keep your Healthy Chocolate Zucchini Bread fresh, start with room temperature storage. Place the bread in an airtight container. This method works well for up to 3 days. If you want it to last longer, consider refrigerating. Wrap the bread tightly in plastic wrap or foil first. Then store it in a sealed bag. This can help it stay fresh for about a week. Freezing is a great way to save your bread for later. First, slice the bread into pieces. This makes it easy to thaw just what you need. Wrap each slice in plastic wrap. Then place the wrapped slices in a freezer bag. This method keeps the bread good for about 3 months. When you're ready to eat it, just take out what you need. Let it sit at room temperature for a few hours. If you want it warm, pop it in the oven for a few minutes. To maintain freshness, avoid exposing your bread to air. Use an airtight container or a sealed bag. This keeps moisture in and prevents drying out. For the best results, store your bread in a cool, dark place. A pantry or bread box works well. If you use the fridge, make sure to eat it within a week. By following these tips, you can enjoy your Healthy Chocolate Zucchini Bread longer. For the complete recipe, check out the Full Recipe section! What can I substitute for zucchini? If you don’t have zucchini, you can use applesauce or pumpkin puree. Both add moisture. They also blend well with the chocolate flavor. You might need to adjust the sugar if using applesauce. Can this recipe be made vegan? Yes! You can make this bread vegan easily. Just use plant milk and replace honey with maple syrup. Also, choose dairy-free chocolate chips. This way, you keep it tasty and friendly for all diets. How do I check if the bread is done? Insert a toothpick into the center of the bread. If it comes out clean or with a few moist crumbs, it’s done. If it has wet batter on it, bake a bit longer. What are the health benefits of zucchini in baking? Zucchini adds moisture without extra fat. It’s low in calories and high in fiber. This helps keep you full and aids digestion. Plus, it includes vitamins A and C, which are good for skin and eyes. How many calories are in a slice of this bread? Each slice contains around 150 calories. This can vary based on your ingredients. If you use less sugar or skip nuts, it can be lower too. What to do if the bread is too dry? If the bread turns out dry, try adding a bit more applesauce or milk next time. You could also reduce the baking time slightly. This helps keep the moisture locked in better. How to fix an overly dense loaf? A dense loaf may mean you overmixed the batter. Next time, mix gently and just until combined. You can also make sure your baking soda and powder are fresh. This ensures they rise properly. In this post, I covered how to make Healthy Chocolate Zucchini Bread with simple steps. We explored key ingredients, from grated zucchini to sweeteners, and variations like chocolate chips. I shared tips for perfect texture and serving ideas. Remember, small changes can boost nutrition without losing flavor. Enjoy baking this delicious treat, and don't hesitate to experiment with ingredients. Your kitchen adventure is just starting, and these tips will guide you!](https://meltedrecipes.com/wp-content/uploads/2025/07/d2de9f7a-ae47-4e56-be3f-37d3f034384e.webp)
Looking for a tasty way to sneak veggies into your diet? This Healthy Chocolate Zucchini Bread is your answer! It’s moist, chocolatey, and packed with hidden goodness. You don’t need …
![- 4 medium zucchinis, thinly sliced - 1 cup fresh dill, finely chopped - 1 cup creamy Greek yogurt - 1 cup shredded mozzarella cheese - 1 cup seasoned breadcrumbs - 2 large eggs, lightly beaten - 1 tablespoon extra virgin olive oil - 1 teaspoon garlic powder - 1 teaspoon onion powder - Sea salt and freshly cracked pepper to taste - 1/2 teaspoon red pepper flakes (optional) When you make Zucchini Dill Casserole, fresh ingredients shine. Zucchinis are the star. They bring a soft, creamy texture. Fresh dill adds a bright flavor. Greek yogurt keeps the dish light and tangy. Mozzarella cheese melts beautifully, giving a nice stretch. Seasoned breadcrumbs create a crunchy top. Eggs help bind all the ingredients. Olive oil adds richness and flavor. Garlic and onion powders are simple but pack a punch. Don't forget salt and pepper for balance. If you like heat, add red pepper flakes. They give a nice kick. You can find all these items at your local store. Follow the [Full Recipe] for a delightful cooking experience. Enjoy the process and the final dish! - Preheat oven to 375°F (190°C). - Slice the zucchinis thinly. - Chop the fresh dill finely. Start by preheating your oven. This step is key for even cooking. While the oven warms up, slice your zucchinis. Aim for thin slices; this helps them cook well. Chopping the dill finely releases its great flavor. - Combine zucchini, dill, Greek yogurt, cheese, and spices. - Mix thoroughly to coat the zucchini. In a big bowl, add the sliced zucchinis. Toss in the chopped dill, Greek yogurt, and shredded mozzarella cheese. Add the eggs, garlic powder, onion powder, salt, pepper, and red pepper flakes if you want some heat. Mix everything well. You want the zucchinis coated nicely. - Prepare the baking dish and spread the mixture. - Top with breadcrumb mixture and bake for 35-40 minutes. Grease a 9x13-inch baking dish with olive oil. This stops the casserole from sticking. Spread the zucchini mixture evenly in the dish. In a small bowl, mix the breadcrumbs with some olive oil. Sprinkle this over the top of the casserole. Bake it in the oven for 35-40 minutes. Look for a golden-brown top and soft zucchinis. Enjoy your delicious Zucchini Dill Casserole! For the full recipe, check it out [here](#). To avoid soggy zucchini, you can slice the zucchini thinly and let it drain. Place the slices in a colander, sprinkle some salt, and let them sit for about 30 minutes. This helps remove excess water. Once they are drained, pat them dry with a paper towel. Letting the casserole cool for a few minutes before serving is key. It allows the flavors to meld and makes it easier to cut. A warm casserole can fall apart when served right away. You can add other herbs or spices for a unique twist. Try fresh basil, thyme, or even a pinch of nutmeg. Each herb brings its own flavor and can brighten the dish. For toppings, consider adding a layer of crispy bacon or fried onions. These add a nice crunch and extra flavor to the casserole. Zucchini dill casserole pairs well with a light salad or crusty bread. A fresh green salad with lemon vinaigrette balances the richness of the dish. When serving, consider garnishing with a sprig of fresh dill. This simple touch enhances the dish's appearance and flavor. Remember, presentation matters! {{image_4}} You can swap Greek yogurt for sour cream or cottage cheese. Both options keep the creaminess and add a nice tang. If you want a richer flavor, try using cream cheese. For cheese options, you can use cheddar or feta. These cheeses will enhance the dish with their own unique flavors. To make the casserole gluten-free, use gluten-free breadcrumbs. This simple change keeps the dish safe for those with gluten issues. For a vegan version, replace eggs with flaxseed meal mixed with water. You can also use plant-based cheese for the creamy texture. You can mix in other vegetables like bell peppers or carrots. This makes the casserole colorful and adds more nutrients. In spring or summer, try adding fresh herbs like basil or parsley. These herbs will brighten the dish and give it a seasonal touch. For the full recipe, check out the details above. To keep your zucchini dill casserole fresh, store it in the fridge. Use an airtight container. This helps prevent the casserole from drying out. It stays good for about 3 to 4 days. If you want to save it longer, freezing is a great option. Cut the casserole into portions before freezing. Wrap each piece tightly in plastic wrap and then in foil. This way, you keep the flavors locked in. You can freeze it for up to 3 months. When it's time to enjoy your leftovers, reheating is key. The best method is to use an oven. Preheat it to 350°F (175°C). Place the casserole in an oven-safe dish. Cover it with foil to hold in the moisture. Heat for about 20 to 25 minutes. If you prefer the microwave, use a microwave-safe dish. Heat in short bursts of 1 to 2 minutes. Check often to avoid overcooking. Leftovers can be safely eaten for up to 4 days from the fridge. It takes about 35 to 40 minutes to bake. Look for a golden-brown top and tender zucchini. The casserole should bubble slightly around the edges. This shows it is ready to eat. Yes, you can prepare the casserole a day before and store it in the fridge. Just cover it tightly with plastic wrap. When you are ready to bake, remove the wrap and bake as directed. This makes meal prep easy and helps save time. Yes, this casserole freezes well. After baking, let it cool completely. Wrap it tightly in foil or plastic wrap and place it in the freezer. To defrost, move it to the fridge overnight. Reheat in the oven until hot. This casserole pairs well with light salads. Try a simple green salad with lemon vinaigrette. You can also serve it with roasted vegetables or grilled chicken. These options enhance the flavors and make a balanced meal. The zucchini dill casserole is a simple, tasty dish made from fresh ingredients. We covered essential ingredients, step-by-step instructions, and helpful tips for great results. You can customize flavors, make it gluten-free, or even vegan. In the end, this casserole is perfect for any meal. It’s a great way to enjoy vegetables while pleasing your taste buds. I hope you give this recipe a try and share it with friends and family!](https://meltedrecipes.com/wp-content/uploads/2025/07/736680b3-6847-4525-ba0d-9b4eae4c421f.webp)
. Gluten-free baking can be tricky, but I have some tips for you. Use a good gluten-free all-purpose flour. Look for blends with xanthan gum. This helps mimic gluten's stretch. Always measure your flour correctly. Use a spoon to fill your measuring cup, then level it. This ensures you don’t add too much flour. Keep in mind that gluten-free flours absorb more liquid. You may need to adjust your wet ingredients slightly. When making these muffins, be gentle. Overmixing can lead to tough muffins. After adding wet ingredients to dry, stir just until combined. You want a few lumps to stay. This keeps your muffins light and fluffy. Fold in the zucchini and any mix-ins softly. A spatula works best for this. Remember, the goal is to keep air in the batter. You can customize the sweetness of these muffins. If you like it sweeter, add a bit more honey or maple syrup. Start with an extra tablespoon. You can also use flavored applesauce for added sweetness. If you prefer, reduce the sugar a bit. The zucchini adds natural sweetness too. Taste the batter before baking, but keep in mind it will taste slightly less sweet after baking. For a unique twist, try adding a pinch of salt to balance the flavors. For the full recipe, check the link above! {{image_4}} You can boost flavor by adding fruits or nuts to your muffins. Try adding 1/2 cup of blueberries or shredded apples. These fruits bring a burst of sweetness and moisture. If you prefer crunch, mix in 1/2 cup of walnuts or pecans. They add texture and a nutty flavor that pairs well with zucchini. For a savory twist, skip the sweeteners and spices. Instead, use 1/2 cup of grated cheese, like cheddar or feta. Add herbs like thyme or rosemary for extra flavor. These savory muffins work well for breakfast or brunch. They can also be a great side for soups and salads. To make these muffins vegan, replace the eggs with flaxseed meal. Mix 1 tablespoon of flaxseed meal with 3 tablespoons of water. Let it sit for five minutes to thicken. Use maple syrup instead of honey for sweetness. This keeps the muffins moist and delicious while meeting vegan needs. For the full recipe, refer to the recipe section. Store your leftover muffins in an airtight container. This keeps them fresh and moist. You can keep them at room temperature for up to three days. If you want them to last longer, it's best to refrigerate them. Just remember to let them cool completely before storing. Freezing your muffins is easy. Wrap each muffin tightly in plastic wrap. Then, place them in a freezer-safe bag. They will stay fresh for about three months. When you are ready to enjoy them, simply take out what you need. Let them thaw at room temperature or in the fridge overnight. To reheat your muffins, you can use the microwave or oven. If using the microwave, heat for about 15-20 seconds. Check if they are warm enough. If not, heat in short bursts. For the oven, preheat it to 350°F. Place the muffins on a baking sheet and warm them for about 5-10 minutes. This will bring back that fresh-baked taste. For a special treat, you can add a bit of butter on top while they warm up. Enjoy your delicious Gluten-Free Zucchini Muffins! For the full recipe, refer to the section above. No, regular flour contains gluten. This is a problem for those with gluten issues. Gluten-free flour blends help create a nice texture while keeping the muffins safe to eat. To keep muffins moist, use fresh zucchini and applesauce. Also, don’t overbake them. Check them at 20 minutes to avoid dryness. You can use flaxseed meal or chia seeds. Mix 1 tablespoon of either with 2.5 tablespoons of water. Let it sit for a few minutes to thicken. These muffins can last for about 3 days at room temperature. If you refrigerate them, they can last up to a week. Yes, you can make the batter the night before. Just store it in the fridge. Bake the muffins fresh in the morning for a warm treat. You can find the full recipe [here](#). Enjoy making these tasty gluten-free zucchini muffins! This article covered the ingredients, steps, and tips for making gluten-free zucchini muffins. You learned how to mix wet and dry elements to create a tasty batter. We discussed storage options, variations, and answered common questions. These muffins are easy to bake and great for all diets. I hope you enjoy trying this recipe and experimenting with different add-ins. Enjoy delicious muffins today!](https://meltedrecipes.com/wp-content/uploads/2025/07/315a1b28-ac2c-48fd-ac44-6f9e229363f4.webp)
![- Zucchini: Zucchini is low in calories and high in vitamins. It adds moisture to your muffins. Make sure to wash it well. Grate it finely before adding it to the mix. This helps it blend evenly. - Blueberries: Fresh blueberries taste great, but frozen ones work too. Frozen blueberries can save time and have a long shelf life. Just toss them in a little flour to avoid clumping in the batter. - Whole Wheat Flour and Oats: Whole wheat flour is packed with fiber and nutrients. It gives the muffins a hearty texture. Rolled oats add extra fiber and a nice bite. Look for whole grain options for the best health benefits. - Honey vs. Maple Syrup: Both honey and maple syrup are good options. Honey has more sweetness, while maple syrup gives a unique flavor. Choose what you like best. - Role of Eggs and Applesauce: Eggs help bind the ingredients together. They also add moisture. Applesauce is a great substitute if you want to cut down on fat. It keeps the muffins moist without extra calories. To start, preheat your oven to 350°F (175°C). This temperature is key for baking your muffins evenly. Prepare your muffin tin by lining it with paper liners or lightly greasing each cup. This way, your muffins will come out easily after baking. Next, it’s time to mix the wet ingredients. In a medium bowl, combine the finely grated zucchini, honey or maple syrup, eggs, applesauce, and vanilla extract. Stir this mixture well until everything blends together. Combining these ingredients thoroughly ensures your muffins are moist and flavorful. Now, let’s focus on the dry ingredients. In a larger bowl, whisk together the whole wheat flour, rolled oats, baking powder, baking soda, ground cinnamon, and salt. Whisking helps spread the dry ingredients evenly. This step is important for the muffins’ texture and taste. After that, we will combine the wet and dry mixtures. Gradually fold the dry mix into the wet ingredients. Use a spatula and stir gently until just combined. Be careful not to over-mix; this keeps your muffins light and fluffy. Now, let’s bake! Place the muffin tin in your preheated oven. Bake for 18-20 minutes. Proper oven temperature matters because it helps your muffins rise and cook evenly. To test for doneness, use a toothpick. Insert it into the center of one muffin. If it comes out clean, your muffins are ready. If not, bake for a few more minutes. Once baked, let the muffins cool in the tin for five minutes. Then, transfer them to a wire rack to cool completely. Enjoy your Healthy Blueberry Zucchini Muffins as a nutritious snack! Don't forget to check the [Full Recipe]. To keep muffins moist and fluffy, use ripe zucchini. Grate it finely and squeeze out excess water. This step adds moisture without making the batter too wet. Also, don’t over-mix your batter. Stir until ingredients are just combined. Over-mixing can lead to tough muffins. Common mistakes to avoid when baking include not measuring ingredients accurately. Use a kitchen scale for best results. Another mistake is skipping the oven preheating. Always preheat to the right temperature. This ensures even baking and proper rising. For dietary preferences, you can substitute whole wheat flour with almond or oat flour for gluten-free muffins. Use flax eggs instead of regular eggs for a vegan option. Just mix 1 tablespoon of ground flaxseed with 3 tablespoons of water. Let it sit for a few minutes until it thickens. To enhance flavor, add spices like nutmeg or cardamom. You can also toss in chopped nuts or seeds for more texture. Walnuts or pecans work well with blueberries. Try mixing in some lemon zest for a bright twist. These small changes can make your muffins even more delightful. For the full recipe, you can refer to the section above. {{image_4}} You can change up the flavor of your healthy blueberry zucchini muffins. Try using other berries like raspberries or strawberries. These fruits add a different taste and color to your muffins. You can also mix in diced apples or peaches for a fruity twist. Seasonal fruits work great too! If you want a savory muffin, consider adding cheese or herbs. Cheese like feta or cheddar can make your muffins rich and tasty. Fresh herbs like basil or thyme add a nice touch. These flavors create a unique muffin that is fun to eat. You can play with muffin size and shape for fun results. Mini muffins are perfect for snacks or lunchboxes. They bake quicker, usually in just 10-12 minutes. Standard muffins take a bit longer, around 18-20 minutes. Consider using different molds too. Heart-shaped or star-shaped molds can make your muffins more exciting. You can even use a loaf pan for a big slice. The shapes can bring joy to any meal or snack time. To keep your Healthy Blueberry Zucchini Muffins fresh, cool them properly. Let them sit in the muffin tin for about five minutes after baking. Then, move them to a wire rack to cool completely. This helps them stay moist. Once cooled, store your muffins in an airtight container. You can keep them in the fridge for up to a week. They will stay soft and tasty, perfect for snacking any time. If you want to save muffins for later, freezing is a great option. To freeze, wrap each muffin tightly in plastic wrap. Then, place them in a zip-top freezer bag. Remove as much air as possible to prevent freezer burn. Label the bag with the date. Muffins can last up to three months in the freezer. When you want to enjoy one, simply take it out. Thaw it in the fridge overnight or use the microwave for a quick thaw. Reheat in the oven at 350°F for about five minutes. This helps restore that fresh-baked taste. Yes, you can use frozen blueberries. Frozen berries do save time. They are also easy to store. However, they may make your muffins a bit wetter. Fresh blueberries will give you a firmer texture. If using frozen, do not thaw them before mixing. This keeps them from breaking apart. You can lower the sugar by using less honey or maple syrup. Try using mashed bananas or applesauce as a natural sweetener. These options add moisture and flavor. You can also use stevia or monk fruit sweetener. Just remember to adjust the amounts to match the sweetness level. To help your muffins rise, use fresh baking powder and soda. These ingredients must be active to work well. Make sure your oven is preheated to 350°F (175°C). Fill the muffin cups only two-thirds full. This gives space for the muffins to rise nicely. To make these muffins vegan, replace the eggs with flax eggs. Mix one tablespoon of flaxseed meal with three tablespoons of water. Let it sit for five minutes. You can also use plant-based yogurt instead of applesauce. This keeps the muffins moist and tasty. Zucchini is low in calories but high in vitamins. It helps with hydration and digestion. Blueberries are packed with antioxidants. They support brain health and may lower blood pressure. Together, they offer a tasty way to boost your nutrition. Yes, you can make these muffins ahead of time. Bake them and let them cool completely. Store them in an airtight container for up to a week. You can also freeze them for longer storage. Just wrap them well to avoid freezer burn. When ready to eat, thaw and enjoy! For the Full Recipe, check out the complete instructions above. We explored how to make healthy blueberry zucchini muffins using fresh ingredients. Zucchini and blueberries offer great nutrition while whole wheat flour and oats add health benefits. I shared steps for preparation, mixing, and baking. You learned tips to make your muffins fluffy and moist, plus ways to customize them. The right storage will keep your muffins fresh, and I answered common questions about substitutions and storage. Now, you have the tools to create delicious muffins that fit your needs. Enjoy baking!](https://meltedrecipes.com/wp-content/uploads/2025/07/28b2ee3f-7c64-4d0b-995d-68d85ce27602.webp)
![- 2 boneless, skinless chicken breasts - 1/2 cup all-purpose flour - 1 teaspoon paprika - 1 teaspoon garlic powder - 1 teaspoon onion powder - 1/2 teaspoon dried thyme - 1/2 teaspoon dried rosemary - Salt and pepper, to taste The chicken breasts form the heart of this dish. They should be fresh and high-quality for the best flavor. The flour and seasonings create a tasty coating that gives the chicken its crispy crust. - 1/4 cup buttermilk (or substitute with milk mixed with 1/2 teaspoon lemon juice) - 2 tablespoons olive oil - 1 tablespoon butter Buttermilk helps the chicken stay juicy and tender. It adds richness and flavor that you will love. The olive oil and butter combine for the perfect frying fat, ensuring a golden crust. - Fresh parsley, finely chopped Fresh parsley adds a pop of color and a hint of freshness. A simple sprinkle on top makes the dish look inviting. You can also add some lemon wedges for a zesty touch. For more cooking tips and techniques, check out the Full Recipe. Start by butterflying the chicken breasts. This means slicing them in half horizontally. This technique helps the chicken cook evenly. When you cook them this way, they stay juicy and tender. If you skip this step, your chicken might be dry in the middle. Next, mix your seasoned flour. In a bowl, combine the flour, paprika, garlic powder, onion powder, thyme, rosemary, salt, and pepper. Whisk these together until they blend well. This mixture gives the chicken great flavor and a crispy texture. Now, it’s time for the buttermilk bath. Pour buttermilk into another bowl. Dip each chicken breast into the buttermilk. Make sure to let the extra liquid drip off. This step helps the flour stick better to the chicken. For cooking, heat a skillet over medium-high heat. Add olive oil and butter into the hot skillet. Wait until the mixture shimmers. This means it's hot enough to cook the chicken. Carefully place the coated chicken breasts in the skillet. Cook each side for around 6 to 7 minutes. You want them golden brown and crispy. Use a meat thermometer to check if they reach 165°F (75°C). This ensures the chicken is safe to eat and perfectly cooked. Once done, let the chicken rest on a plate for 5 minutes. This helps the juices stay inside the meat. If you cut them right away, they could dry out. Now your pan-fried chicken breasts are ready to serve! For the full recipe, check out the details above. Resting the chicken is key. After cooking, let it sit for about 5 minutes. This step helps juices spread evenly. You will enjoy a juicier bite. To achieve that golden brown color, you need patience. Cook the chicken on medium-high heat. Don't rush it! Let it fry for 6-7 minutes on each side. You want a nice crust without burning. Choose the right skillet for best results. A cast-iron skillet works well. It holds heat and gives even cooking. Non-stick pans are also great if you prefer easy cleanup. Use a meat thermometer to check doneness. Insert it into the thickest part of the chicken. The safe internal temperature is 165°F (75°C). This tool ensures you cook it just right every time. Pair your pan-fried chicken with sides like roasted veggies or mashed potatoes. A fresh salad also works well. These sides add balance and color to your plate. For presentation, slice the chicken and arrange it on a nice platter. Garnish with fresh parsley and lemon wedges. This adds brightness and makes your meal look stunning. Explore the Full Recipe for more ideas! {{image_4}} You can spice up your pan-fried chicken in fun ways. For a kick, add cayenne pepper to your flour mix. Just a pinch gives it some heat without being too much. You can also add grated parmesan to the flour. This gives a savory taste and a crispy crust. If you need gluten-free options, try using almond flour or gluten-free flour instead. Both can give you that nice crisp. For those avoiding dairy, use almond milk with lemon juice in place of buttermilk. It works just as well and keeps the chicken moist. To bring a bit of brightness to your chicken, add some citrus zest. Lemon or lime zest adds a fresh flavor that makes the dish pop. You can also mix in herbs like cilantro or basil for a regional touch. They can change the taste and make the dish unique. For the full recipe, check here: [Full Recipe]. To keep your pan-fried chicken breasts fresh, store them in the fridge. Place the chicken in an airtight container. This will help lock in moisture and keep out air. Eat the leftovers within three days for the best taste. When it’s time to eat your leftovers, you want them to taste great. Use the oven or a skillet to reheat. For the oven, set it to 350°F (175°C). Heat the chicken until warm, about 10-15 minutes. If you use a skillet, add a bit of oil to keep it moist. Avoid microwaving, as this can make the chicken dry. You can freeze cooked chicken for later use. Make sure it cools before placing it in a freezer bag. Squeeze out as much air as possible. This helps prevent freezer burn. Chicken can stay good in the freezer for up to three months. When ready to eat, thaw it in the fridge overnight for best results. Using buttermilk in marinades helps make chicken breasts tender. The acids in buttermilk break down proteins, making the meat softer. Soaking the chicken in buttermilk for at least 30 minutes before cooking is key. If you don’t have buttermilk, mix milk with lemon juice. Let it sit for five minutes to thicken. This simple trick works wonders for juicy chicken. Resting the chicken is crucial for keeping it juicy. When chicken cooks, juices move to the center. If you slice it right away, those juices escape. Letting the chicken rest for about five minutes allows the juices to spread throughout the meat. This way, every bite stays moist and flavorful. Yes, you can prepare this recipe ahead of time. Cook the chicken and let it cool completely. Store it in an airtight container in the fridge for up to three days. When you're ready to eat, gently reheat it in a skillet over low heat. This keeps the chicken from drying out. You can also use the microwave, but keep an eye on it to avoid overcooking. Serve pan-fried chicken breasts with fresh sides and sauces. They pair well with roasted vegetables or a crisp salad. For a great sauce, consider a simple lemon butter sauce or a tangy barbecue. Garnish with parsley for a pop of color. This not only makes the meal look nice but adds fresh flavor too. Enjoy your beautiful and tasty dish! This post highlights key steps to make great pan-fried chicken. I covered essential ingredients, like chicken, flour, and buttermilk. The cooking tips ensure the chicken stays moist and flavorful. Remember, resting the chicken is vital for juiciness. Feel free to try different flavors, dietary options, and fun serving ideas. With proper storage, your leftovers can taste just as good later. Now, you have all the tools to impress your family with delicious chicken. Happy cooking!](https://meltedrecipes.com/wp-content/uploads/2025/07/cbe6bd7e-838c-4914-98b5-a3f75bbe6b20.webp)
. {{image_4}} You can switch up your flours for more flavor and texture. Use spelt or oat flour for a nutty taste. You might mix in some rye flour for a heartier loaf. Just keep the total flour amount the same. Experimenting with flours can change the flavor profile of your bread. It makes each loaf unique and fun to bake! If you want less sugar, try maple syrup or honey. These natural sweeteners add a nice flavor. You can also use coconut sugar for a lower glycemic option. Adding fruits like diced apples or crushed pineapple gives extra sweetness. For a savory twist, try adding herbs like rosemary or thyme. Making this bread vegan is easy. Just swap yogurt for almond or soy yogurt. Use a flaxseed meal or chia seed mix instead of eggs. For gluten-free bread, use a gluten-free flour blend. Make sure to add a binding agent like xanthan gum. This keeps the bread from falling apart. These options let everyone enjoy this tasty treat! To keep your sourdough zucchini bread fresh, wrap it well in plastic wrap. This helps prevent it from drying out. You can also place it in an airtight container. Store the bread at room temperature for up to three days. If you want to keep it longer, consider freezing it. To freeze your bread, slice it first. This makes it easier to thaw just what you need. Wrap each slice in plastic wrap, then place them in a freezer bag. This method can keep the bread fresh for up to three months. To thaw, simply take out a slice and leave it at room temperature for about 30 minutes. For the best taste, reheat your bread in the oven. Preheat the oven to 350°F (175°C). Place the slices on a baking sheet and heat for about 10 minutes. This will make the crust crisp and the inside warm. You can also use a toaster for single slices if you prefer. Enjoy your warm, tasty bread! You can tell when your sourdough zucchini bread is done by checking it with a toothpick. Insert the toothpick into the center of the bread. If it comes out clean, your bread is ready. The top should look golden brown, and the bread should feel firm to the touch. The edges may pull away from the pan slightly, which is another sign of doneness. Yes, you can use other types of zucchini. Yellow squash works well and gives a similar taste. You can also use small, tender zucchini for a sweeter flavor. Just remember to grate the zucchini finely, no matter which type you choose. This helps it blend well into the batter and keeps the bread moist. Sourdough zucchini bread tastes great on its own, but you can elevate it even more. Try serving it with a dollop of yogurt or a drizzle of honey for sweetness. You can also pair it with fresh fruit or a sprinkle of cinnamon for added flavor. For a savory touch, cream cheese or herb spread works well. Enjoy it warm or at room temperature! Sourdough zucchini bread combines fresh ingredients, careful mixing, and handy tips for success. You can customize it with different flours or sweeteners. Storing leftovers correctly keeps it fresh for later. Always avoid common mistakes to enjoy the best texture and flavor. With these insights, you'll bake delicious bread every time. Happy baking!](https://meltedrecipes.com/wp-content/uploads/2025/07/2a3edbd5-2db4-44cb-8360-91bd3a912bd4.webp)
![- 1 cup grated zucchini - 1 cup finely grated carrots - 1/2 cup unsweetened applesauce - 1/2 cup packed brown sugar - 1/4 cup honey - 1/4 cup vegetable oil - 2 large eggs, at room temperature - 1 teaspoon pure vanilla extract - 1 1/2 cups all-purpose flour - 1 teaspoon baking powder - 1/2 teaspoon baking soda - 1 teaspoon ground cinnamon - 1/2 teaspoon ground nutmeg - 1/4 teaspoon ground ginger - 1/4 teaspoon salt - 1/2 cup chopped walnuts or pecans - 1/4 cup raisins or dried cranberries This spiced zucchini carrot bread uses fresh, simple ingredients. The zucchini and carrots add moisture and flavor. Applesauce keeps the bread soft and healthy. Brown sugar and honey add sweetness without being too strong. The eggs help bind everything together, creating a nice texture. In the dry ingredients, flour gives structure. Baking powder and baking soda help the bread rise. Spices like cinnamon, nutmeg, and ginger bring warmth and depth to each bite. You can add nuts or dried fruits for extra texture and flavor. If you want to see the full recipe, just click here. Enjoy making this delicious bread! - Preheat the oven to 350°F (175°C). - Grease a 9x5-inch loaf pan well to avoid sticking. - In a large bowl, combine the grated zucchini, finely grated carrots, and wet ingredients. - Whisk until smooth and well mixed. - In another bowl, whisk together the all-purpose flour, baking powder, baking soda, ground cinnamon, ground nutmeg, ground ginger, and salt. - Make sure everything mixes evenly. - Gently add the dry mixture to the wet mixture. - Mix gently; don’t overmix. Small lumps are okay. - If you want, fold in the chopped nuts and dried fruits. - Pour the batter into the prepared loaf pan. - Bake for 50-60 minutes. Check with a toothpick. It should come out clean. - Cool the bread in the pan for 10 minutes. - Transfer it to a wire rack to cool completely before slicing. To get the best flavor from zucchini and carrots, you need to grate them finely. Use a box grater or a food processor for this task. Make sure you spread the vegetables evenly across the grater. This helps you get uniform pieces. After grating, it's key to squeeze out excess moisture. Too much liquid can make your bread soggy. Place the grated zucchini in a clean towel and twist it tightly. This will remove much of the water. You can change the sweetness of your bread to suit your taste. If you want a less sweet loaf, cut back on the sugar or honey. Start by reducing the amount by a few tablespoons. You can also try using maple syrup or agave nectar instead. Both of these options give a nice flavor. If you want to go sugar-free, consider using ripe bananas or pureed dates. These will add natural sweetness without refined sugars. Getting the right texture in your zucchini carrot bread is important. First, ensure you mix the wet and dry ingredients just enough. Overmixing can lead to tough bread. Stir gently until you see no dry flour. A few lumps are okay! Also, don't forget to check the consistency of your batter. It should be thick but pourable. If it seems too dry, add a splash of milk or water. This will help create a moist, fluffy loaf. {{image_4}} If you want a gluten-free version, swap all-purpose flour with a gluten-free blend. Many brands offer a mix that works well in baking. Look for one that has xanthan gum in it. This helps mimic the texture of regular flour. You can also use almond flour or coconut flour. Just remember, these flours absorb more moisture. You may need to adjust liquid amounts in your recipe. Get creative with spices! You can try adding cardamom, cloves, or even allspice. These warm spices will give your bread a unique twist. Just a pinch can change the flavor profile. If you are a fan of spice, try adding a bit more cinnamon or nutmeg as well. This makes each bite more exciting. Want to enhance your bread? Consider adding fruits! Apples and bananas work great. Grate them finely and mix them in. This adds extra moisture and sweetness. You can also use crushed pineapple for a tropical vibe. Dried fruits like apricots or dates can add chewy texture. Each fruit brings its own flavor, making the bread even more delightful. For the full recipe, check out the details above. To store your spiced zucchini carrot bread at room temperature, wrap it tightly in plastic wrap or foil. This helps keep it fresh and moist. Place it in a cool, dry spot, away from direct sunlight. Your bread will stay tasty for about 2 to 3 days this way. If you want to keep it longer, consider freezing it. For long-term storage, freezing is the best option. First, let the bread cool completely. Then, wrap it tightly in plastic wrap, followed by aluminum foil. This double layer prevents freezer burn. You can freeze it for up to 3 months. When you’re ready to eat, just thaw it in the fridge overnight or on the counter for a few hours. To reheat your bread and keep it moist, preheat your oven to 350°F (175°C). Unwrap the bread and place it on a baking sheet. Cover it loosely with foil to avoid drying out. Heat for about 10 to 15 minutes. If you want to warm individual slices, use a toaster or a microwave. Just add a tiny bit of water to a bowl and cover it with a damp paper towel. This helps keep the bread soft while reheating. Enjoy the warm, spiced goodness! Yes, you can try using shredded carrots or apples instead of zucchini. Both options add sweetness and moisture. You might also use finely grated butternut squash for a unique flavor. Just remember to squeeze out the excess moisture, just like with zucchini. This bread can stay fresh for about 3 to 5 days at room temperature. For best results, store it in an airtight container. If you want it to last longer, you can freeze it. Just wrap it well in plastic wrap and foil. This bread pairs well with butter, cream cheese, or even a light spread of honey. You can also enjoy it with a cup of tea or coffee. If you want to make it a meal, serve it with yogurt or cottage cheese for some protein. Yes, you can make this recipe vegan. Swap the eggs with flax eggs or applesauce. Use plant-based oil and maple syrup instead of honey. This way, you can enjoy the same great taste while keeping it vegan-friendly. For the complete spiced zucchini carrot bread recipe, check out the [Full Recipe]. This blog post detailed how to make delicious spiced zucchini carrot bread. We covered the main and dry ingredients, along with optional add-ins to enhance flavor. Step-by-step instructions made it easy to follow the process, from mixing wet and dry ingredients to baking. Tips for perfecting texture, adjusting sweetness, and variations helped you customize your bread. Remember, this bread is not just tasty; it can be modified to suit your needs! Enjoy baking, and have fun experimenting!](https://meltedrecipes.com/wp-content/uploads/2025/07/7f74c365-d36c-4eb3-8194-f92985743c6d.webp)