Savory Zucchini Waffles Healthy and Flavorful Dish

If you’re looking for a tasty dish that’s both healthy and easy to make, savory zucchini waffles are the answer! With just a few simple ingredients, you can whip up …
If you’re looking for a tasty dish that’s both healthy and easy to make, savory zucchini waffles are the answer! With just a few simple ingredients, you can whip up …
. To keep your zucchini brownies fresh, follow these simple steps: - Cool Completely: Let the brownies cool completely in the pan. - Wrap Well: Use plastic wrap or aluminum foil to wrap them tightly. This keeps moisture in. - Use an Airtight Container: Store the wrapped brownies in an airtight container. This helps prevent drying out. - Keep in a Cool Place: Store in a cool, dry place away from sunlight. Freezing is a great way to save your brownies for later. Here’s how: - Slice Before Freezing: Cut brownies into squares for easy serving later. - Wrap Individually: Wrap each square in plastic wrap. This protects them from freezer burn. - Store in a Freezer Bag: Place the wrapped brownies in a freezer-safe bag. Label it with the date. - Reheat: To enjoy, let them thaw in the fridge overnight. You can warm them in the microwave for a few seconds if you like them warm. How long can you keep zucchini brownies? - At Room Temperature: They stay fresh for about 3-4 days in an airtight container. - In the Fridge: They can last up to a week when stored properly. - In the Freezer: You can freeze them for about 2-3 months without losing quality. With these tips, you can enjoy your zucchini brownies anytime! For the full recipe, check out the earlier section. Yes, you can use yellow squash. It works well in zucchini brownies. Yellow squash has a similar texture and moisture level. However, it may add a slight sweetness. This change won't harm the taste but might make the brownies a bit more delicate. Just remember to grate it finely and squeeze out excess moisture. To check if your brownies are done, look for a few signs. The top should look set and slightly cracked. Insert a toothpick into the center. If it comes out with a few moist crumbs, your brownies are ready. If it’s wet, they need more time. Bake them for 25 to 30 minutes in a preheated oven. If you want to make vegan zucchini brownies, there are great egg substitutes. You can use: - 1/4 cup unsweetened applesauce - 1/4 cup mashed banana - 1 tablespoon ground flaxseed mixed with 3 tablespoons water (let it sit for 5 minutes) These options help bind the ingredients and keep the brownies moist. Just remember to adjust the flavors slightly to match your choice. We covered how to make delicious zucchini brownies. You learned the key ingredients, the steps to bake them, and helpful tips to enhance your baking. You saw how to adapt the recipe for gluten-free or vegan diets, making it versatile for everyone. Remember, proper storage keeps your brownies fresh longer. Whether you add nuts or spices, the choices are endless. Enjoy your baking journey and the tasty treats that follow!](https://meltedrecipes.com/wp-content/uploads/2025/07/94061957-1608-4f5a-a606-7458ca768498.webp)
Looking for a moist and simple chocolate treat? Zucchini brownies are your answer! These delicious bites blend healthy zucchini with rich cocoa, creating a dessert that feels indulgent but is …
![- 1 cup grated zucchini (approximately 1 medium-sized zucchini, moisture squeezed out) - 1 cup all-purpose flour - 1/2 cup unsweetened cocoa powder - 1/2 teaspoon baking soda - 1/4 teaspoon baking powder - 1/4 teaspoon sea salt - 1/2 cup granulated sugar - 1/2 cup packed brown sugar - 1/2 cup unsalted butter, melted and slightly cooled - 1 large egg - 1 teaspoon pure vanilla extract - 1/2 cup semi-sweet chocolate chips - 1/4 cup chopped walnuts (optional, for added crunch) I love using grated zucchini in these cookies. It adds moisture and nutrients. Be sure to squeeze out excess moisture. This step keeps the cookies from being too wet. Next, all-purpose flour gives cookies their structure. Cocoa powder provides that rich chocolate flavor. Baking soda and baking powder help the cookies rise. A little sea salt balances the sweetness. For sweetness, I combine granulated sugar and brown sugar. The brown sugar adds a nice depth of flavor. The melted butter makes the dough rich and smooth. Don't forget the egg and vanilla extract! They add flavor and help bind everything together. Semi-sweet chocolate chips bring a delicious burst of chocolate in every bite. If you like a crunch, add chopped walnuts. They give extra texture and flavor. This mix of ingredients makes these cookies both tasty and unique. You can find the full recipe details in the [Full Recipe]. - Preheat oven to 350°F (175°C). - Prepare baking sheet with parchment paper. To start, I preheat the oven to 350°F. This step is key. It makes sure your cookies bake evenly. While the oven heats, I line my baking sheet with parchment paper. It helps prevent the cookies from sticking and makes cleanup easier. - Combine zucchini, melted butter, sugars, egg, and vanilla. Next, I grab a medium bowl. Into this bowl, I add grated zucchini, melted butter, and both sugars. I crack in a large egg and pour in some pure vanilla extract. Then, I whisk everything together. This creates a smooth and creamy mixture. It’s where the magic starts! - Sift flour, cocoa powder, baking soda, baking powder, and salt. In another bowl, I sift together the dry ingredients. This includes all-purpose flour, cocoa powder, baking soda, baking powder, and sea salt. Sifting breaks up clumps and makes sure everything mixes well. It’s a simple step, but it’s very important for the texture of our cookies. - Gradually mix dry ingredients into wet ingredients. Now, I take the dry mix and slowly add it to the wet mix. I stir gently, just until combined. It’s important not to over-mix. If you do, the cookies can turn dense and tough. We want them soft and chewy! - Fold in chocolate chips and walnuts. Next, I fold in semi-sweet chocolate chips and chopped walnuts if I want a bit of crunch. Folding is gentle. It helps keep the air in the batter. This makes the cookies lighter and more delicious. - Shape cookies and bake for 10-12 minutes. Now comes the fun part! I use a cookie scoop or a spoon to drop rounded spoonfuls of the batter onto the prepared baking sheet. I leave about 2 inches of space between each one. This allows them to spread as they bake. I pop the sheet in the oven for 10 to 12 minutes. The cookies should be set around the edges but still soft in the middle. Once done, I let them cool on the sheet for a few minutes before moving them to a wire rack to cool completely. Make sure to check out the Full Recipe for all the details you need! - Make sure to squeeze the grated zucchini well. This removes excess water and keeps cookies from being too wet. - Avoid over-mixing the batter. Stir just until combined. This helps keep your cookies soft. - Dust the cookies with powdered sugar. This adds a nice touch and makes them look fancy. - Serve them with cold milk. This combination is delicious and very satisfying. - Aim for a soft center with set edges. This means they will be chewy and tasty. {{image_4}} You can easily make these cookies gluten-free. Just substitute all-purpose flour with a gluten-free flour blend. This swap works well and keeps the cookies soft. Many blends on the market mimic regular flour. Check the package to ensure it works for baking. Making this recipe vegan is simple too. Replace the egg with a flax egg. To make a flax egg, mix one tablespoon of ground flaxseed with two and a half tablespoons of water. Let it sit for a few minutes until it thickens. Also, use plant-based butter instead of regular butter. This way, everyone can enjoy these delicious cookies. You can add more flavor to your cookies with spices. Try mixing in cinnamon or nutmeg for warmth. These spices give a cozy taste. You can also play with different types of chocolate. Use white or dark chocolate instead of semi-sweet for a twist. This makes the cookies even more delightful. For the full recipe, check out the details above! Store your chocolate zucchini cookies in an airtight container at room temperature. This keeps them fresh and soft. Make sure the container is sealed tightly to avoid air exposure. Enjoy them within a week for the best taste. To keep your cookies longer, freeze them for up to three months. Place them in a freezer-safe bag or container. When you're ready to eat them, simply thaw them at room temperature. This helps maintain their yummy flavor and texture. If your cookies lose some softness, don’t worry! You can reheat them in the oven for a few minutes. Set the oven to a low temperature, around 300°F (150°C). This will bring back their warm, chewy goodness without drying them out. Enjoy your cookies fresh and warm! You can use grated carrots in place of zucchini. They add sweetness and moisture. Applesauce is also a great choice, making cookies soft and tasty. Another option is mashed banana, which gives a nice flavor and texture, too. Each substitute may change the flavor slightly, but they work well. The cookies are done when the edges look set. They should still feel soft in the center. A toothpick inserted should come out with a few moist crumbs, not wet batter. Baking them too long can make them dry, so keep an eye on the time. Yes, you can add many mix-ins for extra flavor. Chopped nuts like pecans or almonds add crunch. Dried fruits like raisins or cranberries give sweetness. You can also try different chocolate types, like white chocolate or dark chocolate. Each mix-in will change the cookie’s taste and texture. Each cookie has about 120 calories. They contain around 18 grams of carbs and 5 grams of fat. The exact numbers can vary based on your ingredients. Using less sugar or butter can reduce calories and fat. Enjoy these cookies as a treat without too much worry! For the full recipe, check the section above. This article covered how to make delicious chocolate zucchini cookies. You learned the key ingredients, from grated zucchini to chocolate chips. I shared easy steps and helpful tips for baking. We also discussed fun variations for gluten-free or vegan options. Keep these tips in mind to create great cookies. Enjoy them fresh or store them for later. Baking is all about enjoying the process and sharing your treats with others. Happy baking!](https://meltedrecipes.com/wp-content/uploads/2025/07/1a44515f-7b76-405f-948b-efafa63831da.webp)
Looking for a fun, tasty way to sneak veggies into your treat? Try my Chocolate Zucchini Cookies! This delightful and easy recipe combines rich chocolate flavor with the goodness of …
![- 4 boneless, skinless chicken breasts - 6 tablespoons unsalted butter, melted - 4 cloves garlic, finely minced - 1 teaspoon dried thyme - 1 teaspoon dried rosemary - 1 teaspoon smoked paprika - Salt and freshly cracked pepper to taste - Fresh parsley, finely chopped (for garnish) - Lemon wedges (for serving) To make garlic butter baked chicken breast, you need good ingredients. Start with fresh chicken. It must be boneless and skinless. This choice ensures a tender bite. Then, melt unsalted butter. This will add rich flavor. Mince fresh garlic finely. This gives your chicken a strong garlic taste. Next, you should add herbs and spices. Dried thyme and rosemary are great choices. They add depth to the dish. Smoked paprika brings a subtle smokiness. Season with salt and freshly cracked pepper for balance. Garnishing is key for a great presentation. Use fresh parsley, finely chopped. It brightens up the dish. Serve with lemon wedges on the side. Squeezing fresh lemon juice on the chicken adds a bright flavor. For the full recipe, check the section above. This dish is easy and packed with flavor. - Preheat the oven to 400°F (200°C). - In a bowl, mix melted butter, minced garlic, thyme, rosemary, smoked paprika, salt, and pepper. Stir until smooth. - Place the chicken breasts in a baking dish. Coat each piece with the garlic butter mix. - Bake the chicken for 25-30 minutes. Check that it reaches 165°F (75°C). - Take the chicken out and let it rest for 5 minutes. This keeps it juicy. - Sprinkle fresh parsley on top and serve with lemon wedges for added zest. For the full recipe, check out the complete guide. Enjoy this juicy flavor explosion in every bite! To get juicy chicken, coat it well with the garlic butter. Make sure each piece is covered. This helps the chicken soak in all that tasty flavor. I often use a brush to spread the butter mix evenly. For the best doneness, check the internal temperature. You want 165°F (75°C) inside the chicken. This means it is cooked and safe to eat. Want to boost the taste? You can add more herbs like oregano or basil. A bit of heat from red pepper flakes can also spice things up. If you like darker meat, try chicken thighs instead. They stay juicy and add a rich flavor, too. Bone-in cuts can also work. They may take longer to cook but offer a great taste. Pair your garlic butter baked chicken with sides like rice or steamed veggies. A fresh salad also adds a nice crunch. When serving, place the chicken on a big platter. Add lemon wedges around it for a pop of color. Sprinkle some parsley on top for a beautiful finish. This makes the meal look inviting and tasty. For the complete recipe, check the [Full Recipe]. {{image_4}} You can change the taste of garlic butter baked chicken by adding new spices. Mix in some lemon zest for a fresh twist. Chili flakes add a nice kick if you enjoy heat. You can also try herbs like oregano or basil for a different flavor. Experimenting lets you find the blend that you love best. If you need a gluten-free option, this recipe is easy to adapt. Just ensure that your butter and spices are gluten-free. For a low-carb version, skip any breading and serve with veggies. If you want it dairy-free, replace the butter with olive oil or a dairy-free butter substitute. Both will keep your chicken moist and tasty. You don’t have to bake the chicken if you prefer other methods. Grilling gives a nice smoky flavor. Just marinate the chicken in the garlic butter mix and grill until cooked through. For pan-searing, use a hot skillet and cook the chicken for about 6-8 minutes on each side. You can also use a slow cooker. Just add the chicken and garlic butter mix, then cook on low for 4-5 hours. An Instant Pot is a great option too. Cook on high pressure for about 8-10 minutes, and you will have juicy chicken ready to enjoy. For the full recipe, refer back to the main article. To store leftover garlic butter baked chicken breast, let it cool first. Place the chicken in an airtight container. I recommend using glass or BPA-free plastic containers. This keeps the chicken fresh and safe. The chicken can last up to four days in the fridge. Always label the container with the date you made it. This helps you track how long it has been stored. If you want to save the chicken for later, freezing is a great option. Wrap each piece in plastic wrap and then in aluminum foil. This helps prevent freezer burn. Place the wrapped chicken in a freezer-safe bag or container. It can last up to three months in the freezer. When ready to eat, thaw the chicken in the fridge overnight. Reheat it in the oven or microwave until warm. Make sure it reaches 165°F (75°C) before serving. In the fridge, garlic butter baked chicken will stay fresh for about four days. In the freezer, it can last for up to three months. Always check for any off smells or changes in texture before eating. If you see any signs of spoilage, it’s best to discard the chicken. Enjoy your leftovers safely! How long does garlic butter baked chicken breast take to cook? This dish cooks in about 25 to 30 minutes. Preheat your oven to 400°F (200°C). The cooking time ensures that the chicken stays tender and juicy. What is the best way to measure the internal temperature of chicken? Use a meat thermometer for the best results. Insert the thermometer into the thickest part of the chicken breast. You want the temperature to reach 165°F (75°C) for safe eating. Can I use frozen chicken breasts for this recipe? Yes, you can use frozen chicken breasts. However, you should increase the cooking time to about 10 to 15 minutes. Make sure to check the internal temperature to confirm doneness. What to do if the chicken breasts are dry? If your chicken is dry, it may have cooked too long. Next time, check the temperature early. You can also try brining the chicken before cooking to add moisture. How to know if the chicken is fully cooked without a thermometer? If you don’t have a thermometer, cut into the thickest part of the chicken. The juices should run clear, and the meat should be opaque. What side dishes go well with garlic butter baked chicken breast? This chicken pairs well with rice, roasted veggies, or a fresh salad. Mashed potatoes also make a great side. Can I use the leftover garlic butter for other recipes? Absolutely! You can use leftover garlic butter in pasta, on bread, or as a drizzle over veggies. It adds great flavor to many dishes. For more details on making this delicious meal, check the Full Recipe. This blog post covered how to make garlic butter baked chicken breast. We started with the key ingredients and detailed step-by-step instructions for prep, baking, and finishing. Then, I offered tips to improve your cooking and suggested tasty variations to try. Storing and reheating leftover chicken was also discussed. I hope you feel ready to try this easy recipe. It promises great flavor and satisfaction with every bite. Enjoy your cooking adventure!](https://meltedrecipes.com/wp-content/uploads/2025/07/d2f19db0-748d-4544-a8e4-86fba747dabf.webp)
Are you ready for a juicy flavor explosion? This Garlic Butter Baked Chicken Breast recipe is a game-changer for your dinner table. With just a few simple ingredients and easy …
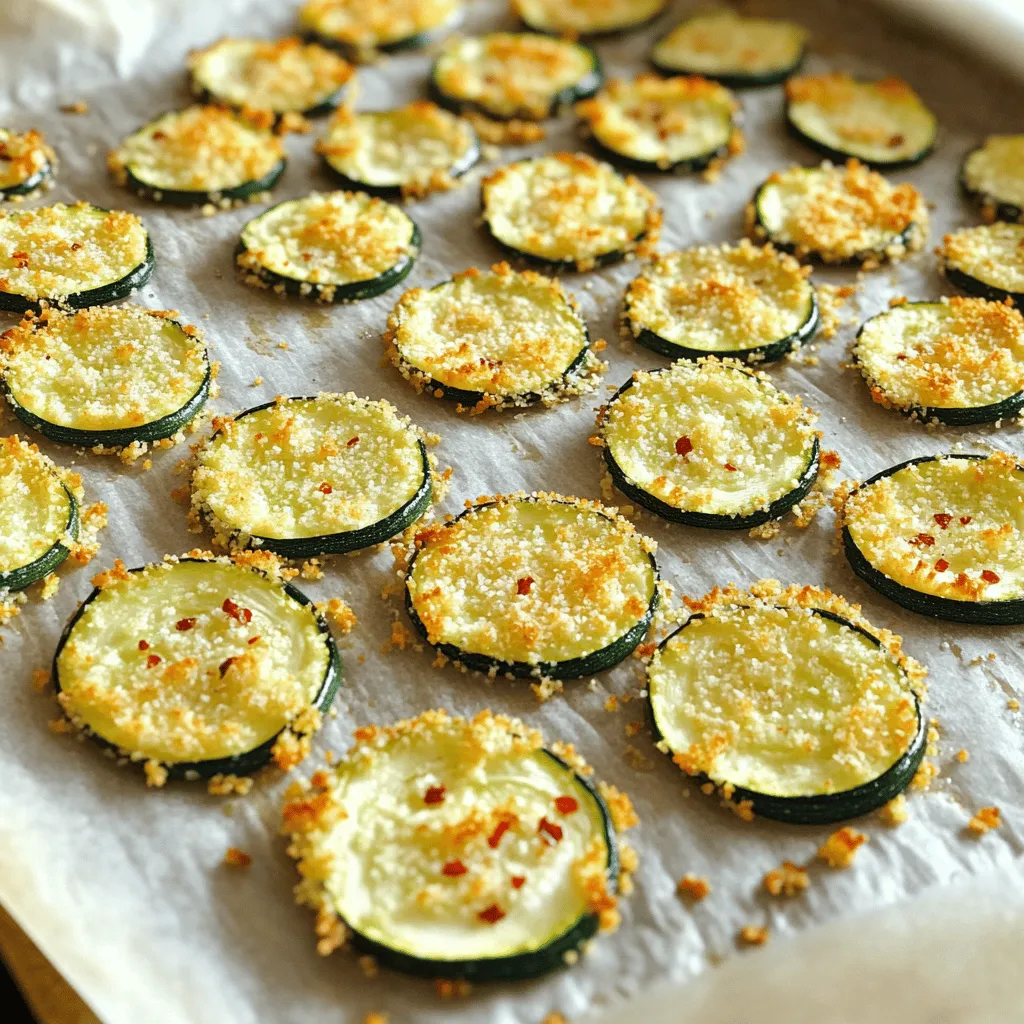
Looking for a snack that’s both tasty and healthy? Baked Parmesan Zucchini Chips are your answer! These chips are crunchy, cheesy, and easy to make. With just a few simple …

Looking for a quick and tasty dinner? One Pan Lemon Garlic Chicken is your solution! This easy weeknight recipe packs flavors that your family will love. With just a few …
![- 2 cups fresh peaches, pitted and sliced - 2 tablespoons brown sugar - 1 teaspoon ground cinnamon - 1 tablespoon fresh lemon juice - 1 1/2 cups graham cracker crumbs - 1/4 cup unsalted butter, melted - 1 tablespoon granulated sugar - 3 (8 oz) packages cream cheese, softened at room temperature - 1 cup granulated sugar - 1 teaspoon pure vanilla extract - 3 large eggs, at room temperature - 1 cup sour cream To make a great roasted peach cobbler cheesecake, you need fresh peaches. They add a sweet and juicy flavor. Brown sugar enhances the peach's taste when roasted. Ground cinnamon and lemon juice bring warmth and brightness to the dish. The graham cracker crumbs create a crunchy crust, while melted butter helps bind them. You also need cream cheese for a rich and creamy filling. Eggs help the cheesecake set nicely, while sour cream adds a slight tang. This combination gives you a smooth and delicious cheesecake. You can find the full recipe at the end for easy reference. - Whipped cream for garnish - Caramel sauce for drizzling Whipped cream is a great choice for topping. It adds a light and airy finish. Caramel sauce can bring extra sweetness and richness. Drizzling it over your cheesecake makes it look extra special. - Using other fruits instead of peaches - Alternative sweeteners options If you can't find peaches, feel free to use other fruits. Apples and berries work well in this recipe. You can also swap out the sweeteners. Try honey or maple syrup for a different flavor. These options help you customize the cheesecake to your taste. Prepping the Oven and Mixing Ingredients First, preheat your oven to 400°F (200°C). Grab your fresh peaches, and slice them. In a bowl, mix the sliced peaches with brown sugar, ground cinnamon, and lemon juice. Toss until each slice is coated. Roasting Duration and Temperature Spread the peaches on a parchment-lined baking sheet. Roast them for 20-25 minutes. The peaches will get tender and caramelized. Once they are done, take them out and let them cool. Mixing the Crust Ingredients In a medium bowl, combine graham cracker crumbs, melted butter, and sugar. Mix until everything is well combined. Proper Baking Techniques Press this mixture into the bottom of a 9-inch springform pan. Make sure it’s even. Bake the crust at 350°F (175°C) for 10 minutes. After baking, let it cool completely. Beating the Cream Cheese In a large bowl, use an electric mixer to beat the softened cream cheese. Mix it on medium speed until smooth and creamy. Incorporating Sugars and Eggs Gradually add granulated sugar and vanilla. Mix until well combined. Add the eggs one at a time, mixing well after each. Finally, fold in sour cream gently. This creates a creamy filling. For the full recipe, check out the link! For the best texture, use room temperature ingredients. This means letting your cream cheese and eggs sit out for about 30 minutes. Cold ingredients mix poorly, leading to lumps. To avoid cracks, do not overbake your cheesecake. It should set around the edges but remain slightly jiggly in the center. Cooling slowly helps too. After baking, leave the cheesecake in the oven with the door ajar. This gradual cooling prevents sudden temperature changes. Spices can take your cheesecake up a notch. Consider using nutmeg or cardamom for a warm touch. A hint of vanilla also brightens the flavor. Roasted peaches pair well with cream cheese. They bring out the sweet and tangy notes. You can also add a scoop of vanilla ice cream for a delicious contrast. Serving your cheesecake attractively is easy. Top it with whipped cream and a few reserved peach slices. A drizzle of caramel sauce adds a lovely touch too. For garnishing, use fresh mint leaves or crushed graham crackers. Fresh ingredients make your dessert pop. They add color and freshness, making your cheesecake more inviting. For the complete recipe, visit the Full Recipe section. {{image_4}} You can boost the flavors in your Roasted Peach Cobbler Cheesecake easily. - Adding Vanilla or Almond Extract: A splash of vanilla or almond extract adds depth. Use about one teaspoon to enhance the peach flavor. Mix it well into your cheesecake filling for a smooth taste. - Nut-Based Crust Options: Instead of graham crackers, try using ground nuts. Almonds or pecans work well. This gives your crust a richer flavor and a nice crunch. Don’t hesitate to swap out the peaches for other fruits. - Using Apples or Berries: Apples bring a tartness, while berries add a sweet touch. Both fruits can replace peaches in the recipe. Just make sure to adjust the sugar based on the fruit's sweetness. - Tips for Adjusting Cooking Times: Different fruits may cook at different rates. Keep an eye on your cheesecake. If you use firmer fruits like apples, you might need to roast them longer. You can easily adapt this cheesecake for different dietary needs. - Gluten-Free Versions: Use gluten-free graham crackers or nuts for the crust. This keeps the flavors intact while making it safe for gluten-sensitive eaters. - Dairy-Free Alternatives: For a dairy-free option, use vegan cream cheese. Coconut cream can substitute sour cream. This way, everyone can enjoy a slice of this delightful cheesecake. Explore the [Full Recipe] for all the details and to create your own version! To keep your roasted peach cobbler cheesecake fresh, store it carefully. Place it in an airtight container. If you don't have one, cover it tightly with plastic wrap. This helps prevent it from drying out or absorbing other smells in the fridge. The best storage temperature is between 32°F and 40°F (0°C to 4°C). To freeze your cheesecake for long-term storage, follow these steps: - First, chill the cheesecake completely in the fridge. - Next, wrap it tightly in plastic wrap, and then in aluminum foil. - This double wrap keeps it safe from freezer burn. - You can freeze it for up to three months. When you're ready to enjoy it, thaw the cheesecake in the fridge overnight. This helps maintain its creamy texture. Avoid microwaving it, as this can change its texture and taste. Roasted peach cobbler cheesecake lasts about five to seven days in the fridge. To tell if it’s spoiled, check for off smells or changes in texture. If it looks dry or has mold, it’s best to toss it. Always remember, when in doubt, throw it out! Yes, you can make Roasted Peach Cobbler Cheesecake ahead of time. This dessert tastes even better after chilling. Here are some tips for preparing ahead of time: - Bake and Chill: Make the cheesecake a day before you plan to serve it. - Cover Properly: Wrap it tightly with plastic wrap to keep it fresh. - Add Toppings Later: Wait to add whipped cream or fresh peaches until serving. If you want a lighter cheesecake, there are good substitutes for cream cheese. Here are some options: - Greek Yogurt: Use full-fat Greek yogurt for a creamy texture. - Ricotta Cheese: Blend ricotta for a light and fluffy filling. - Cottage Cheese: Puree cottage cheese for a low-fat option. Cracks in the cheesecake often happen due to a few common issues. Here’s what to check: - Overmixing: Mixing too fast can add air and cause cracks. - Baking Temperature: If the oven is too hot, it can bake unevenly. - Cooling Too Fast: Letting it cool too quickly can lead to cracks. To fix cracks, you can cover them with whipped cream or fruit. In this post, we explored how to make a delicious roasted peach cobbler cheesecake. We covered ingredients like fresh peaches, cream cheese, and crust options. I shared tips for texture, flavor enhancements, and presentation to elevate your dessert. You can even modify recipes for dietary needs. By following these steps, you can enjoy a tasty treat. Remember, the key is using quality ingredients and proper techniques. Now, get ready to impress your family and friends with this delightful cheesecake!](https://meltedrecipes.com/wp-content/uploads/2025/07/bfc42322-02ab-4ee4-9823-a9b15898738e.webp)
Are you ready to elevate your dessert game? This Roasted Peach Cobbler Cheesecake is a creamy, dreamy treat that brings together the joy of fresh peaches and the rich goodness …
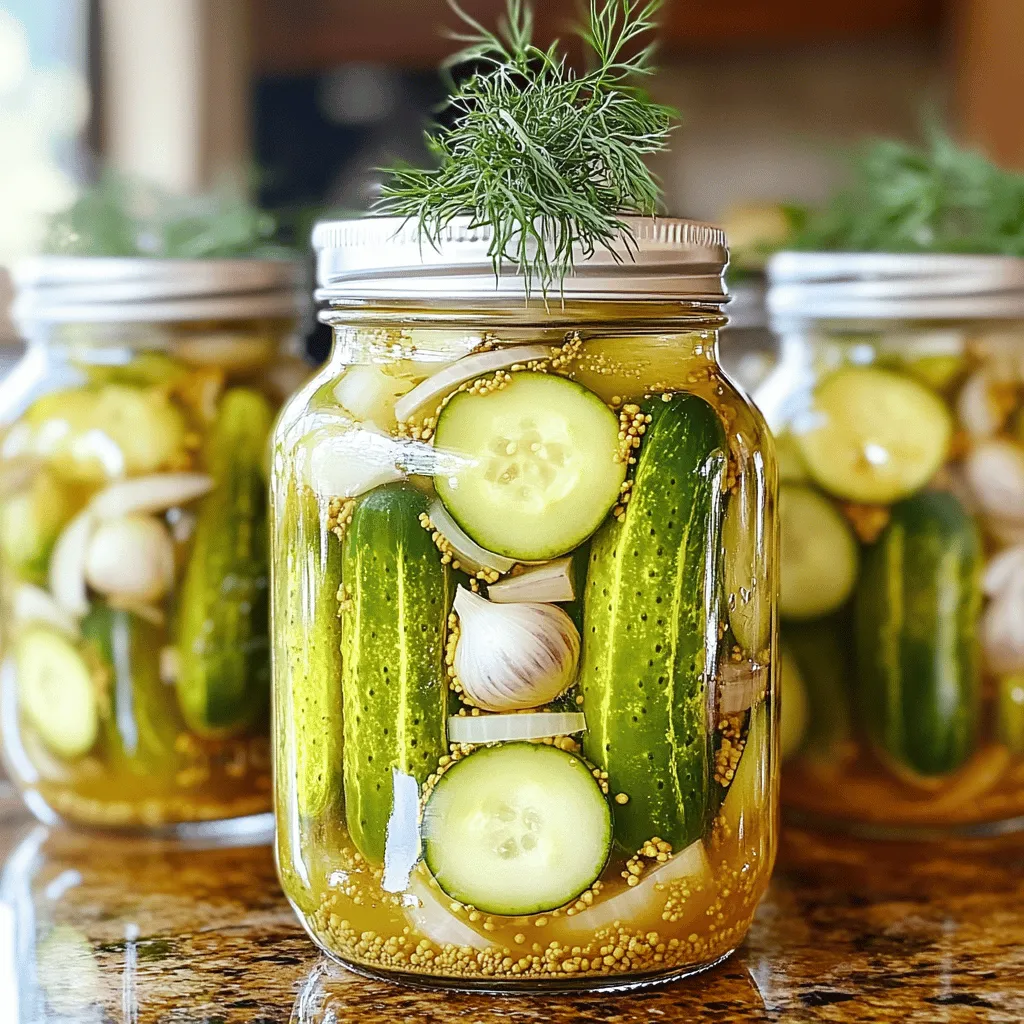
If you want to make the perfect sweet gherkin pickles, you’re in the right place. I’ll share my mom’s simple recipe that guarantees crunchy, tasty pickles every time. From selecting …
![- 1 ½ cups freshly grated zucchini - 2 large eggs - ½ cup vegetable oil (or melted coconut oil) - 1 teaspoon pure vanilla extract - 1 cup all-purpose flour - ½ cup unsweetened cocoa powder - 1 teaspoon baking soda - ½ teaspoon baking powder - ½ teaspoon sea salt - ½ cup granulated sugar - ½ cup packed brown sugar - 1 cup semi-sweet chocolate chips (plus additional for topping) Using fresh ingredients makes a big difference in taste. Grating the zucchini helps it blend in well. The moisture from the zucchini keeps the bread moist and rich. Eggs add structure and help it rise. Vegetable oil or melted coconut oil gives a nice texture. Adding vanilla extract boosts the flavor. For dry ingredients, cocoa powder is key for that deep chocolate taste. Baking soda and baking powder help the bread rise as it bakes. Sea salt enhances all the flavors. Using both granulated and brown sugar adds sweetness and depth. Optional chocolate chips bring extra flavor and richness. You can add more on top for a nice touch. For the full recipe, check the [Full Recipe]. - Preheat the oven to 350°F (175°C). - Grease or line a 9x5-inch loaf pan. - Mix grated zucchini with sea salt and rest for 10 minutes. - Squeeze out excess moisture using a kitchen towel. - Combine dry ingredients in one bowl. - Mix wet ingredients in a separate bowl. - Incorporate dry and wet mixtures, then fold in zucchini and chocolate chips. - Pour batter into prepared pan. - Bake for 45-50 minutes, checking for doneness. Following these steps will help you create a moist and rich Double Chocolate Zucchini Bread. Trust me, the extra effort to squeeze the zucchini pays off! You can find the full recipe above to ensure you have all the details needed for success. To make your double chocolate zucchini bread just right, start with the zucchini. Grate it and mix it with a pinch of sea salt. Let it sit for ten minutes. This helps draw out extra moisture. After that, you must squeeze it well in a clean kitchen towel. This step is key to getting a nice, dense bread. Next, mix your batter carefully. Overmixing can lead to tough bread. Combine your wet and dry ingredients gently. Stir until they just come together. You want a light and fluffy texture, not a heavy one. When your zucchini bread is ready, you can dust it with powdered sugar. This simple touch adds a nice look and a hint of sweetness. Serve it warm with whipped cream or soft butter. Both pair well with the chocolate. You can enjoy it with a cold glass of milk or your favorite warm drink. For a richer taste, use melted coconut oil instead of vegetable oil. This small change can elevate the flavor of your bread. You can also play with chocolate chip varieties. Dark chocolate or white chocolate chips can add a new twist. Mix and match to find your favorite combination. {{image_4}} You can make this bread a bit healthier. Try these ideas: - Substitute whole wheat flour for a nuttier flavor. - Use honey or maple syrup instead of granulated sugar. These swaps give the bread a unique taste. Whole wheat flour adds fiber, while honey or maple syrup brings natural sweetness. You can enjoy the same delicious bread with a boost in nutrients. Want to enhance the taste even more? Here are some fun options: - Add a teaspoon of cinnamon or espresso powder. - Mix in nuts or dried fruit for added texture. Cinnamon and espresso add warmth and depth. Nuts give a nice crunch, while dried fruit adds sweetness bites. These flavors can take your double chocolate zucchini bread to a new level. Need to adjust for special diets? No problem! Try these options: - Use almond flour or coconut flour for a gluten-free bread. - Swap eggs for flax eggs and use plant-based milk for a vegan option. These changes keep the bread tasty while meeting dietary needs. Enjoy a slice without worry, whether you're gluten-free or vegan. Each version remains rich and chocolatey, making it a treat for everyone. Store your double chocolate zucchini bread in an airtight container. It will stay fresh at room temperature for up to 3 days. This keeps it moist and tasty for your daily snack or breakfast. For longer storage, refrigerate the bread. It lasts up to a week in the fridge. If you want to keep it even longer, freeze the slices. Wrap each slice in plastic wrap and store in a freezer bag. You can freeze them for up to 3 months. This way, you always have a delicious treat ready! When you're ready to enjoy a slice, you can heat it up easily. Use the microwave for a few seconds to warm it. If you prefer a crispy edge, toast it for a few minutes. Both methods bring out the rich chocolate flavor. For the full recipe, check out the delightful details above! Yes, you can use frozen zucchini. Just thaw it first. After that, squeeze out any extra water. This step helps keep your bread from getting soggy. To check if the bread is done, use a toothpick. Insert it into the center of the loaf. If it comes out clean or with a few moist crumbs, your bread is ready. Double Chocolate Zucchini Bread is great with many things. I love it with a glass of milk. Coffee also pairs well. For a sweet treat, add a scoop of ice cream on the side. Yes, you can make mini loaves. Just use smaller pans. Bake for about 25-30 minutes. Keep an eye on them to make sure they don’t overbake. In this post, we explored how to make delicious Double Chocolate Zucchini Bread. We covered fresh and dry ingredients, step-by-step instructions, and tips for the best results. Consider trying different flavors and healthier alternatives to suit your taste. Remember to store leftovers properly for later enjoyment. This recipe is simple yet enjoyable, making it perfect for any baker. Don’t hesitate to experiment and make this bread your own!](https://meltedrecipes.com/wp-content/uploads/2025/07/0ba18eae-1fb8-4e1c-b0b7-5c5299df9b44.webp)
Craving a treat that’s both rich and sneaky healthy? Look no further than my Decadent Double Chocolate Zucchini Bread Recipe! Packed with moist zucchini and rich chocolate flavor, this bread …
![- Zucchini: Choose firm zucchinis with smooth skin. They should feel heavy for their size. Avoid zucchinis with soft spots or blemishes. Fresh zucchinis add great flavor and texture to the dish. - Cherry tomatoes: Look for bright red, plump tomatoes. They should feel slightly soft but not mushy. Ripe cherry tomatoes burst with flavor, enhancing your zucchini pasta. - Olive oil: Use extra virgin olive oil for the best taste. It has a rich flavor that elevates the dish. Light olive oil works too, but it lacks the depth of extra virgin. - Seasoning essentials: Keep salt and black pepper handy. They enhance the flavors of the dish. Red pepper flakes add a nice kick if you like spice. - Parmesan cheese: Freshly grated Parmesan adds creaminess and flavor. Pre-grated cheese is convenient but lacks freshness. Always go for fresh when you can. - Fresh basil: Use fresh basil for a fragrant touch. If you can't find it, try parsley or spinach. They add a nice green flavor to the dish. For the complete experience, check the [Full Recipe]. To start, we need to spiralize the zucchini. Use a spiralizer or a vegetable peeler to create long, curly noodles. This step is key for the dish's texture. After spiralizing, place the noodles in a colander. Let them drain for a bit. This helps remove excess moisture. If you skip this, your pasta may turn soggy. Next, we move to the sauce. Heat a large skillet over medium heat and add the extra virgin olive oil. Once the oil is hot, add the minced garlic. Sauté it for about one minute until it smells great. Be careful not to burn it; burnt garlic tastes bitter. Now, add the halved cherry tomatoes to the skillet. If you like a bit of heat, toss in the red pepper flakes. Cook this mixture for 3-4 minutes. You want the tomatoes to soften and release their juices. This adds a rich flavor to the sauce. After the sauce is ready, it’s time to toss in the zucchini noodles. Add them to the skillet, seasoning with salt and black pepper. Gently sauté the noodles for 2-3 minutes. They should be tender but still have some crunch. Remove the skillet from the heat. Now, fold in the chopped basil. Taste your dish and adjust the seasoning if needed. If you like cheese, sprinkle the freshly grated Parmesan on top. Toss gently and let the warmth melt the cheese. Serve your dish hot. Garnish it with fresh lemon zest. A few extra basil leaves will make it look beautiful. For the full recipe, check the details above. Enjoy your fresh and flavorful zucchini pasta! To keep zucchini noodles crunchy, avoid overcooking. Sauté them for just 2-3 minutes. If you want softer noodles, add another minute but watch closely. The goal is to preserve that delightful bite. Besides basil, try adding fresh oregano or thyme. They bring a new taste to the dish. To balance the dish, use lemon zest. It brightens flavors and gives a fresh kick. Just a little zest will enhance the overall taste. For a beautiful presentation, serve the Zucchini Noodle Delight in shallow bowls. Drizzle with olive oil for shine. Add a sprinkle of extra Parmesan and some halved cherry tomatoes on top. This not only looks nice but also makes it more inviting. Garnish with lemon zest and a few basil leaves for color and freshness. Enjoy the beauty before you dig in! {{image_4}} For a vegan twist on Stanley Tucci's zucchini pasta, skip the cheese. Instead, you can use cashew cream. Blend soaked cashews with a little water until smooth. This gives a rich, creamy texture without dairy. You can also add nutritional yeast for a cheesy flavor. It’s a great source of vitamins and has a nutty taste. Try nut-based toppings like toasted pine nuts or walnuts. They add crunch and healthy fats. Adding protein can turn this dish into a hearty meal. Grilled chicken or shrimp pairs well with zucchini noodles. They add flavor and make the dish more filling. If you prefer a vegetarian option, chickpeas are a great choice. They boost protein and fiber, making the meal satisfying. You can also try tofu or tempeh. Both options soak up flavors nicely and add texture. Feel free to mix in other veggies based on what's in season. Bell peppers, spinach, or asparagus work well with zucchini. You can also customize the dish based on what you have at home. Carrots or peas can add a pop of color and extra nutrients. This flexibility allows you to create a unique dish every time. Enjoy making it your own! After you enjoy your delicious zucchini pasta, store any leftovers in the fridge. Use an airtight container to keep the flavors fresh. The dish stays good for about three days. To maintain the texture, avoid mixing the zucchini noodles with sauce until you are ready to eat. If you want to save some for later, you can freeze zucchini noodles. First, make sure they are completely dry. Place them in a single layer on a baking sheet and freeze for one hour. Once frozen, transfer them to a freezer bag. They will stay fresh for up to three months. When you're ready to eat, thaw the noodles in the fridge overnight. To reheat, add them to a hot skillet with a drizzle of olive oil. Cook them for just a couple of minutes to heat through without losing their crunch. Preparing zucchini noodles in advance is easy. You can spiralize the zucchini and store it in the fridge for up to two days. Keep the noodles in a colander to drain moisture. Store sauce separately to keep the dish fresh longer. Consider chopping extra herbs and veggies. This way, you can whip up your meal quickly. Using fresh ingredients makes all the difference in flavor and nutrition. For more details on making this dish, check the Full Recipe. Zucchini noodles last about 2 to 3 days in the fridge. Store them in an airtight container. Check for signs of spoilage. If they feel slimy or have an off smell, it's time to toss them. To keep them fresh, try to use them soon after making them. Yes, you can use regular pasta instead of zucchini. Regular pasta has a different texture and taste. It also has more carbs. Zucchini pasta is lighter and lower in calories. Zucchini noodles soak up flavors well and are great for healthy dishes. Both options are tasty, but choose based on your dietary needs. The best way to season zucchini pasta is simple. Use salt, pepper, and olive oil. Garlic adds a nice kick. Fresh herbs like basil or parsley brighten the dish. You can also use lemon juice or zest for a fresh twist. Red pepper flakes give a bit of heat if you like spicy. For a rich flavor, top with Parmesan cheese. Each of these options enhances the taste and makes the dish more enjoyable. For the full recipe, check out Zucchini Noodle Delight. In this article, we explored how to make delicious zucchini noodles. We covered choosing fresh produce, essential pantry items, and optional toppings. I shared steps for preparing, cooking, and combining your ingredients. You learned tips for texture, flavor enhancements, and plating ideas. Feel free to experiment with variations, like vegan options or added proteins. Remember to store your noodles properly for the best flavor. With these insights, you can enjoy a tasty, healthy dish any time!](https://meltedrecipes.com/wp-content/uploads/2025/07/44f7d1ee-4760-4504-8f32-b7eddc6c0199.webp)
Are you ready to elevate your dinner game? Stanley Tucci’s Zucchini Pasta is a fresh and flavorful dish that you’ll want to make again and again. This recipe not only …