Skip to content
Melted Recipes
  • Home
  • Appetizers
  • Desserts
  • Salads
  • Breakfast
  • Dinner
  • Privacy Policy
  • Contact
  • About

Chef Miles

Caramel Pumpkin Pie Parfaits Delightful Fall Treat

October 15, 2025 by Chef Miles
- 1 cup pumpkin puree - 1 teaspoon pumpkin pie spice - 1/2 cup packed brown sugar - 1 cup whipped cream (or Cool Whip) - 1 teaspoon pure vanilla extract - 1/4 cup caramel sauce (store-bought or homemade) - 1 cup crushed graham crackers - 1/2 cup chopped pecans (optional) - Extra whipped cream for topping - 1 cup = 8 fluid ounces - 1 teaspoon = 5 milliliters - 1/2 cup = 4 fluid ounces - 1/4 cup = 2 fluid ounces These simple conversions help you when you measure your ingredients. Just remember, using the right amounts makes a big difference in taste! - Chopped pecans add a nice crunch. - Chocolate chips can give extra sweetness. - A sprinkle of cinnamon can enhance the flavor. Feel free to get creative with these options. They can make your parfaits even more special! Start by making the pumpkin mixture. In a medium bowl, mix 1 cup of pumpkin puree, 1 teaspoon of pumpkin pie spice, and 1/2 cup of packed brown sugar. Stir until smooth. Next, gently fold in 1 cup of whipped cream and 1 teaspoon of pure vanilla extract. Use a spatula to mix until creamy. Set this bowl aside for later. In another bowl, prepare the graham cracker base. Combine 1 cup of crushed graham crackers with 1/2 cup of chopped pecans, if you like. Add a few tablespoons of caramel sauce to the mixture. Stir until the crumbs feel slightly moist. Now, let’s build the parfaits. Use clear serving glasses or bowls for the best view of the layers. Start with a layer of the graham cracker mixture at the bottom. Next, spoon a generous amount of the pumpkin mix on top. Drizzle some caramel sauce over the pumpkin layer. Repeat this layering process until the glasses are full. Be sure the last layer is the pumpkin mix for a nice look. After layering, add extra whipped cream on top of each parfait. Drizzle more caramel sauce to finish. Chill the parfaits in the fridge for at least 30 minutes. This chilling time helps the flavors blend well and makes the dessert even tastier. Serve and enjoy your delightful fall treat! To make the pumpkin mixture just right, start with good pumpkin puree. I prefer using 100% pure pumpkin, not the spiced kind. Mix the pumpkin puree with pumpkin pie spice and brown sugar. Stir until smooth. This step is key. It ensures all the flavors blend well. Adding whipped cream makes it creamy and light. Fold it in gently so it stays fluffy. A good balance of sweetness and spice makes the pumpkin shine. You can use either whipped cream or Cool Whip in your parfait. Whipped cream tastes fresh and rich. It’s easy to make at home. Just whip heavy cream with some sugar and vanilla. Cool Whip is a quick option. It’s light and stays fluffy longer. If you want a homemade feel, go for whipped cream. For speed, use Cool Whip. Both choices work well, so pick what you like best! For the best look, serve the parfaits in clear glasses. This way, everyone can see the layers. Start with a layer of graham cracker mix, then the pumpkin layer, and drizzle caramel over it. Repeat this until the glass is full. Finish with a big dollop of whipped cream on top. Add a drizzle of caramel sauce and a sprinkle of crushed graham crackers for flair. These details make your dessert pop and impress your guests! {{image_4}} You can give your parfaits a twist by adding chocolate. Use chocolate graham crackers instead of regular ones. This adds a rich flavor that pairs well with pumpkin. You can also mix in cocoa powder with the pumpkin mix. The result is a delightful chocolate and pumpkin blend. This variation is great for chocolate lovers. If you want an even easier treat, try no-bake parfaits. Use store-bought pumpkin pie filling instead of making your own. Simply layer the filling with whipped cream and crushed cookies. You still get that yummy pumpkin taste without the fuss. These parfaits are perfect for quick desserts or last-minute gatherings. To make vegan pumpkin parfaits, swap out the cream for coconut whipped cream. Use maple syrup instead of brown sugar for sweetness. Ensure your graham crackers are vegan-friendly. The pumpkin mixture will still taste amazing and have a creamy texture. Everyone will love this dairy-free option! To keep your caramel pumpkin pie parfaits fresh, store them in the fridge. Use an airtight container or cover them with plastic wrap. This protects the layers and keeps them from drying out. Storing them this way helps maintain the creamy texture and flavor. You can refrigerate the parfaits for up to three days. This allows the flavors to blend nicely. If you plan to serve them later, add the extra whipped cream and caramel sauce just before serving. This keeps the toppings fresh and tasty. You can freeze these parfaits, but it's best to store the layers separately. Freeze the pumpkin mixture and the graham cracker mix in separate containers. When you are ready to eat, thaw them in the fridge overnight. Once thawed, layer them again and add fresh whipped cream and caramel sauce. Enjoy! Yes, you can prepare these parfaits a day before. Assemble them in clear glasses and chill overnight. This helps the flavors blend well. Just add the whipped cream on top right before serving. I recommend using clear glasses that hold about 6 to 8 ounces. This size shows off the beautiful layers. Clear glasses also make each parfait look great. If you have smaller glasses, you can layer less in each one. Making homemade caramel sauce is easy! You need sugar, butter, and cream. Here’s a simple method: - 1 cup granulated sugar - 6 tablespoons unsalted butter - 1/2 cup heavy cream 1. In a medium pan, heat the sugar over medium heat. Stir it until it melts. 2. Once the sugar turns golden brown, add the butter. Stir until it melts. 3. Slowly pour in the cream while stirring. Be careful; it may bubble. 4. Let it simmer for 1-2 minutes. Remove from heat and let it cool. Store any leftover sauce in a jar in the fridge. It’s great for drizzling on desserts! This blog post covered all you need to create perfect pumpkin parfaits. We discussed the key ingredients, measurements, and some fun add-ins. The step-by-step guide took you through preparation and serving tips. I shared my favorite tricks for the best pumpkin mix and discussed topping choices. You learned variations, storage methods, and answers to common questions. Now, you can impress friends and family with delicious pumpkin parfaits. Enjoy the process and get creative in your kitchen!

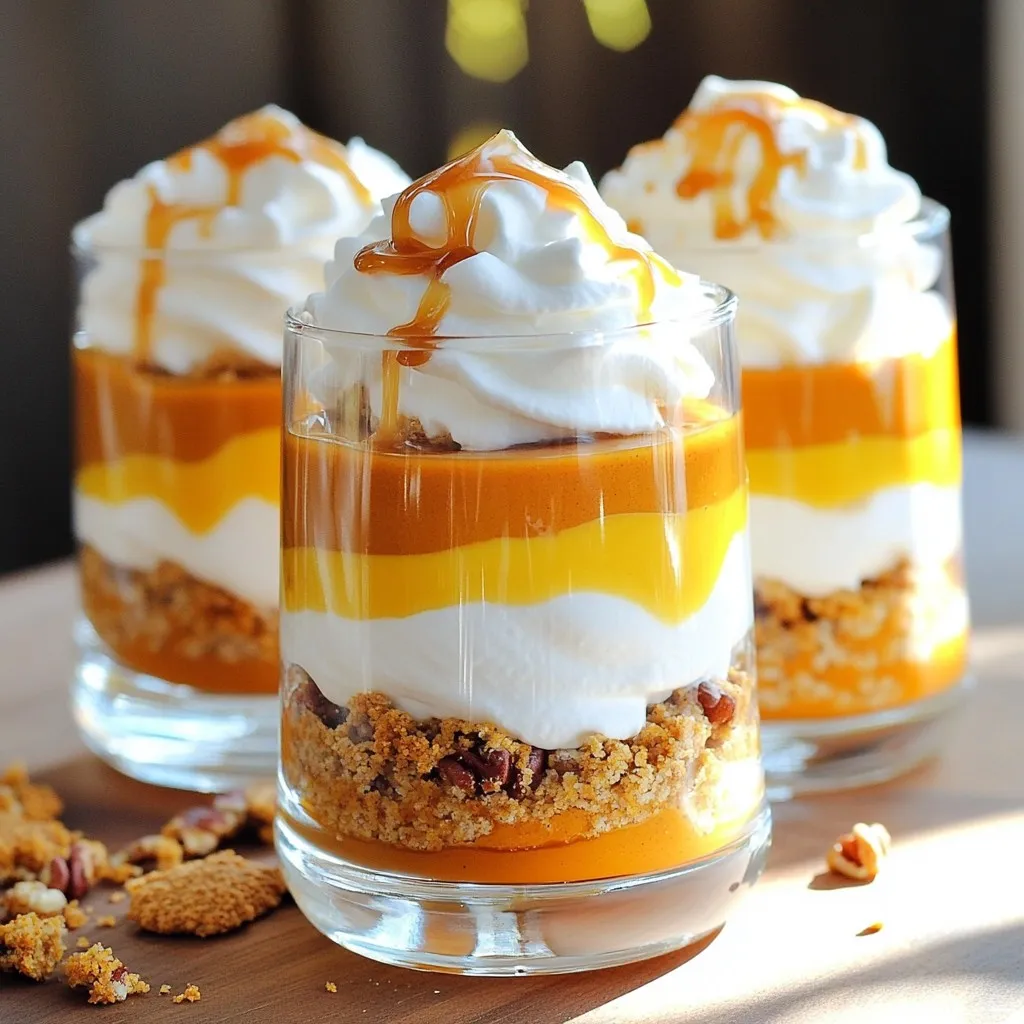
Ready to dive into fall flavors? Caramel Pumpkin Pie Parfaits are a sweet treat that blends rich pumpkin, creamy layers, and a drizzle of caramel. These delightful desserts are easy …

Read more

Categories Desserts

Slow Cooker Spiced Apple Cider Cozy and Inviting Drink

October 15, 2025 by Chef Miles
- 8 cups of apple cider - 1 fresh orange, thinly sliced - 3-4 whole cinnamon sticks - 1 tablespoon whole cloves - 1 tablespoon whole allspice berries - 1/4 cup packed brown sugar - Fresh apple slices - Additional cinnamon sticks - 1 teaspoon pure vanilla extract Gathering the right ingredients is key to making the best Slow Cooker Spiced Apple Cider. First, I start with 8 cups of apple cider. This forms the base of the drink. I like to use fresh, high-quality cider for the best flavor. Then, I slice one fresh orange. The orange adds a nice citrus note that balances the spices. Next, I add 3 to 4 whole cinnamon sticks. Their warm flavor gives the cider its cozy feel. For extra depth, I include a tablespoon of whole cloves and a tablespoon of whole allspice berries. These spices bring warmth and complexity to the drink. To sweeten my cider, I mix in 1/4 cup of packed brown sugar. You can adjust this to fit your taste. Finally, I recommend adding a teaspoon of pure vanilla extract. It adds a lovely aroma and enhances the overall flavor. For garnishes, I like to use fresh apple slices and additional cinnamon sticks. They make the drink look beautiful and inviting. With these ingredients, you are ready to create a comforting beverage that warms up any chilly day. Pour the apple cider into the slow cooker. This creates a warm and inviting base for your drink. The aroma will fill your kitchen as it heats up. Introduce the sliced orange to the cider. The fresh orange adds a bright flavor. Next, add the cinnamon sticks, whole cloves, and allspice berries. These spices will blend perfectly with the cider as it cooks. Stir in the brown sugar and vanilla extract. Mix well until the sugar dissolves. Taste the cider to adjust the sweetness as needed. You can add more sugar if you like it sweeter. Set your slow cooker to low heat. Let it simmer for 4 to 6 hours. This slow cooking allows the flavors to deepen. You will notice the comforting scent filling your home. After cooking, strain the mixture through a fine-mesh sieve. This removes the solid spices and orange slices. Now, ladle the warm spiced cider into mugs. For a lovely touch, garnish with fresh apple slices and an extra cinnamon stick. Enjoy this cozy drink with friends or on your own! You can customize your spiced apple cider to match your taste. If you want more heat, add extra whole cloves or cinnamon sticks. For a sweeter drink, increase the brown sugar. Try adding some ginger slices or nutmeg for a different twist. If you prefer a milder flavor, reduce the spices. Taste as you go to find the right balance. Serve your warm cider in festive mugs for a cozy feel. Clear glass mugs showcase the drink's rich color. Add fresh apple slices and a cinnamon stick as a garnish. This not only looks great but also boosts the flavor. For extra warmth, consider serving with a cozy blanket or by a fire. Adjust the cooking time based on how strong you want the flavors. For a light flavor, cook for 4 hours. If you like it stronger, let it simmer for 6 hours. The longer it cooks, the deeper the flavors become. Be sure to taste it at the 4-hour mark to see if it meets your preference. {{image_4}} You can make a fun adult version of spiced apple cider. Adding spirits like rum or bourbon gives the drink a warm kick. Use about 1 to 2 ounces of your chosen spirit per mug. This twist can make your cider perfect for holiday parties or cozy evenings. You don't have to stick with regular apple cider. Try pear cider for a different flavor. You can also use other fruit juices like cranberry or pomegranate to create a unique drink. Each option will bring a new taste and aroma to your cozy beverage. Feel free to experiment with spices! Instead of whole spices, use ground spices like cinnamon or nutmeg. You can also try adding ginger for a spicy zing or cardamom for a floral note. Mix and match to find your favorite flavor profile. To keep your spiced apple cider fresh, store any leftovers in the fridge. Pour the cooled cider into a clean container. Use a glass jar or a plastic pitcher. Make sure to seal it tightly. This keeps the flavors locked in, ensuring freshness. When you're ready to enjoy your spiced cider again, gently reheat it. Pour the cider into a pot or back into the slow cooker. Heat it on low to avoid boiling. Stir occasionally until it's warm. You can also microwave it in a safe mug, but watch it closely. Your spiced apple cider stays fresh for about 5 days in the fridge. If you notice any off smells or flavors, it’s best to toss it out. For longer storage, you can freeze it for up to 3 months. Just thaw in the fridge before reheating. Yes, you can use store-bought apple cider. Look for a fresh, unfiltered cider. This type has a rich flavor and aroma. Avoid ciders that contain added sugars or preservatives. For the best taste, try organic options if available. They often have a more authentic apple flavor. To make this recipe vegan, you can replace the brown sugar with coconut sugar or maple syrup. Both options add sweetness without using animal products. Ensure that your vanilla extract is pure and not mixed with any non-vegan ingredients. You can also skip the optional garnish of fresh apple slices if you prefer. Yes, you can make this recipe ahead of time. Prepare the cider and let it cool after cooking. Store it in the fridge for up to five days. When you’re ready to serve, simply reheat it in your slow cooker or on the stove. This way, you get the same cozy apple cider taste without extra fuss on busy days. This blog post guides you through making delicious spiced cider. You learned about key ingredients like apple cider, oranges, and warm spices. I shared easy steps, from preparing the base to serving. You can even customize flavors and serve different styles. Remember, this warm drink is perfect for cozy gatherings. Enjoy experimenting with variations like alcoholic options or using different ciders. With the tips I provided, you can easily store and reheat it. Now, get ready to savor the warmth and comfort of your homemade spiced cider!

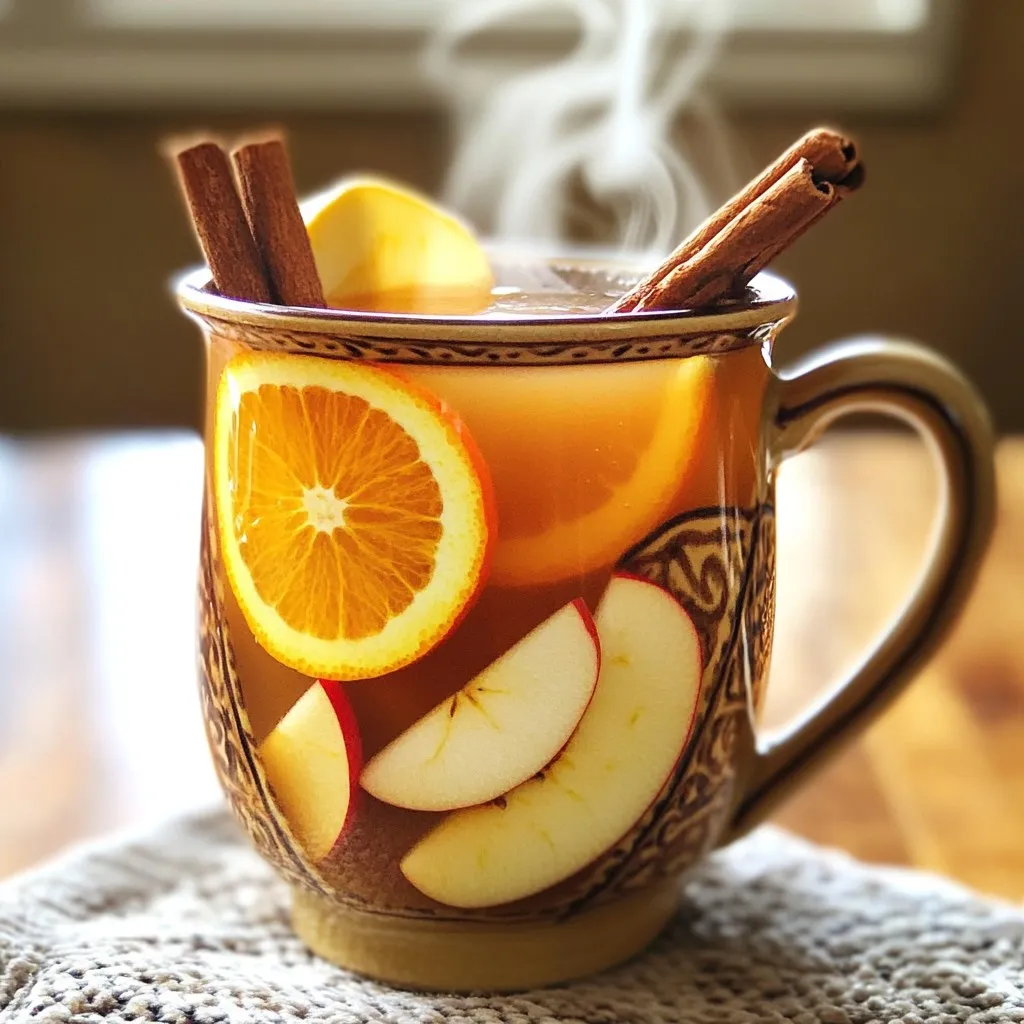
As the leaves turn and the air gets crisp, nothing warms you up like a cozy mug of spiced apple cider. This easy slow cooker recipe fills your home with …

Read more

Categories Dinner

No-Bake Oreo Cheesecake Bites Simple and Tasty Treat

October 14, 2025 by Chef Miles
- 1 package (14 Oreos) - 6 additional Oreos for decoration - 8 oz cream cheese (room temperature) - 1/3 cup granulated sugar - 1 tsp pure vanilla extract - 1 cup whipped topping (e.g., Cool Whip) - 1/2 cup mini chocolate chips (optional) - 1/4 cup unsalted butter (melted) Gathering the right ingredients is key to making tasty No-Bake Oreo Cheesecake Bites. Start with one package of Oreos. You will need 14 Oreos for the crust and 6 more for decoration. The cream cheese must be at room temperature for easy mixing. Use 8 ounces for a creamy texture. Next, add 1/3 cup of granulated sugar. This will sweeten the filling. Then, include 1 teaspoon of pure vanilla extract for flavor. The whipped topping, which is 1 cup, gives the bites a light and fluffy feel. If you like chocolate, add 1/2 cup of mini chocolate chips. This is optional but adds a nice crunch. Lastly, have 1/4 cup of melted unsalted butter to help bind the crust. By keeping these ingredients in mind, you will create a delightful treat. Each bite delivers a rich flavor that everyone loves. Enjoy making these simple, tasty treats! First, gather your Oreos. You need 14 for the crust. Use a food processor to crush them. Pulse until they turn into fine crumbs. Then, in a bowl, mix the crumbs with the melted butter. Stir well until the butter coats all the crumbs. This step is key for a tasty crust. Next, grab your mini muffin tin. Line each cup with paper liners. This makes it easy to remove the bites later. Take a teaspoon of the Oreo mixture and scoop it into each cup. Use your fingers or a spoon to press down hard. You want a firm base that holds together well. Now, let’s make the filling. In a large bowl, beat the cream cheese with an electric mixer until it’s smooth. This takes about 2 minutes. Slowly add the granulated sugar and vanilla extract while mixing. Keep going until everything blends into a fluffy mixture. Next, it’s time for the whipped topping. Take your spatula and gently fold it into the cream cheese mix. Do this slowly to keep the mixture light and fluffy. If you like chocolate chips, stir them in now. They add a fun crunch to each bite. Use a spoon to fill each muffin cup with the cheesecake mix. Be careful to fill them close to the top. Leave a tiny space at the top to avoid overflow. This ensures a nice, neat bite when you serve them later. Finally, take the 6 extra Oreos and crush them. Sprinkle these crumbs on top of each cheesecake bite. This adds a nice finish. Place the muffin tin in the fridge. Chill for at least 2 hours. This helps the bites set up and firm nicely. To make these cheesecake bites shine, focus on how you serve them. Place the bites on a nice plate. This small change makes them look fancy. You can drizzle chocolate syrup over the top for a sweet touch. This adds flair and makes them even more tempting. A few mint leaves can add a pop of color too. Mixing too much can ruin the texture. You want a smooth filling, so fold gently. Overmixing can make the cheesecake gritty. Make sure to pack the crust firmly. If the crust is loose, the bites may fall apart. Use your fingers or a spoon to press down hard. A good crust holds everything together. Feel free to get creative with toppings. You can add fresh fruit, like strawberries or raspberries, for a fresh twist. Try different cookies as well. Chocolate cookies can add an extra chocolatey taste. Even graham crackers can work for a different flavor. Mix and match to find your favorite! {{image_4}} You can switch up the flavors of your cheesecake bites. For a chocolate-lovers version, use dark chocolate and cocoa. This makes your bites even richer and more decadent. If you want a fruit-infused version, try adding strawberry puree or blueberry. These fruits add a fresh taste and bright color. If you need gluten-free options, use gluten-free Oreos. They taste great and keep the same texture. For vegan adaptations, swap cream cheese for plant-based cream cheese. Use coconut whipped cream instead of regular whipped topping. These changes make the bites suitable for everyone. You can adjust the recipe for larger gatherings. Simply double the ingredients and use a larger muffin tin. For smaller portions, use a mini muffin tin. This way, you can serve just the right size for each guest. To keep your No-Bake Oreo Cheesecake Bites fresh, store them in the fridge. Place them in an airtight container. This helps to stop moisture from getting in. If you don't have one, use plastic wrap over the muffin tin. This works well too. For longer storage, you can freeze the cheesecake bites. First, place them in a single layer on a baking sheet. Freeze them until solid. Then, transfer them to a freezer-safe container or a zip-top bag. This helps save space in your freezer. To thaw, place the bites in the fridge overnight. This keeps their texture nice and creamy. These cheesecake bites last about five days in the fridge. After that, they may start to spoil. Look for signs like an off smell or a change in texture. If they look dry or have a weird color, it's best to toss them. Enjoy your treats while they are still fresh! No-Bake Oreo Cheesecake Bites last about 4 to 5 days in the fridge. They stay fresh if stored in an airtight container. Keep them cool to maintain their taste and texture. After a few days, they may lose some flavor and firmness. Yes, you can use low-fat cream cheese. It will still work well in this recipe. The bites may be slightly less rich, but they will still taste great. Just make sure the cream cheese is soft before mixing for easy blending. Absolutely! You can make these cheesecake bites a day or two ahead. This makes them perfect for parties or gatherings. Just store them in the fridge until you are ready to serve. They will taste even better after sitting for a while. If you don't have whipped topping, you can use heavy cream. Just whip the cream until it forms stiff peaks, then fold it in gently. You can also use homemade whipped cream for a fresher taste. Both options work well in this recipe. Yes, this recipe is naturally nut-free. The main ingredients do not contain nuts. However, if you use nut-free whipped topping and chocolate chips, you can keep it safe for those with nut allergies. Always check labels to be sure. These No-Bake Oreo Cheesecake Bites are easy and fun to make. You learned how to prepare a tasty Oreo crust, mix a creamy filling, and chill them for best taste. Remember to get creative with toppings and flavors. You can also adapt this recipe for different diets. With proper storage, your cheesecake bites will stay fresh for days. Enjoy your delightful treats, and share them with friends and family! Happy baking!

Craving something sweet that requires no baking? These No-Bake Oreo Cheesecake Bites are the perfect solution! They’re quick to make and packed with delicious Oreo flavor. With just a few …

Read more

Categories Desserts

Hot Honey Brussels Sprouts Flavorful and Simple Recipe

October 14, 2025 by Chef Miles
- 1 pound Brussels sprouts, halved - 3 tablespoons olive oil - 1 teaspoon salt - 1/2 teaspoon black pepper - 1 teaspoon garlic powder - 1/2 teaspoon smoked paprika - 1/4 cup honey - 1 tablespoon red pepper flakes - 2 tablespoons apple cider vinegar - Fresh parsley, finely chopped (for garnish) To make hot honey Brussels sprouts, you need simple items. Start with one pound of Brussels sprouts. Halve each sprout to help them cook evenly. Next, gather three tablespoons of olive oil. This oil adds flavor and helps the sprouts brown. You also need one teaspoon of salt to enhance the taste. Add half a teaspoon of black pepper to give it a bit of heat. For more flavor, use one teaspoon of garlic powder and half a teaspoon of smoked paprika. These spices round out the taste. Now, let’s make the hot honey glaze. You need a quarter cup of honey for sweetness. If you enjoy spice, add one tablespoon of red pepper flakes. Adjust this amount to fit your heat level. Finally, use two tablespoons of apple cider vinegar. This will balance the sweet and spicy notes. For a fresh touch, chop some parsley to garnish the dish. This adds color and a hint of brightness. With these ingredients, you will create a dish that is both sweet and spicy, perfect for any meal. - Preheat the oven to 400°F (200°C). - Prepare Brussels sprouts by halving them. First, I mix the olive oil, salt, black pepper, garlic powder, and smoked paprika in a bowl. This blend gives the sprouts a nice flavor. Then, I spread the seasoned Brussels sprouts on a baking sheet lined with parchment paper. Make sure they are in a single layer. This helps them roast evenly. I place the baking sheet in the oven and roast for 25 to 30 minutes. Halfway through cooking, I stir the sprouts for even browning. I want them to be golden-brown and crispy. While the sprouts roast, I prepare the hot honey drizzle. I combine honey, red pepper flakes, and apple cider vinegar in a small saucepan over low heat. I stir this mix for 2 to 3 minutes until it is well combined and warmed. This step makes the sauce flavorful and ready to coat the sprouts. Once the Brussels sprouts are done, I take them out of the oven. I immediately drizzle the hot honey glaze over the roasted sprouts. I toss them gently to coat each piece. To finish, I transfer the glazed sprouts to a serving platter and sprinkle fresh chopped parsley on top. This adds a pop of color and freshness. To get the best crispness from your Brussels sprouts, follow these tips: - Preheat your oven to 400°F (200°C). This helps the sprouts cook evenly. - Spread the sprouts out on the baking sheet. Give them space. This allows hot air to flow and makes them crispy. - Stir halfway through the cooking time. This helps them brown nicely on all sides. Adjusting the spice level is simple. Here’s how: - For less heat, use fewer red pepper flakes. Start with a pinch and taste as you go. - If you love spice, feel free to add more flakes or even a dash of hot sauce. To keep the flavors bright, serve these sprouts warm. They taste best right after cooking. Serving your Brussels sprouts well can make a big difference. Try these ideas: - Use a vibrant platter or a wooden board for a rustic look. - Sprinkle extra red pepper flakes on top for a pop of color. - Garnish with fresh parsley. This adds a nice touch and a burst of freshness. These simple tricks will elevate your dish and impress your guests! {{image_4}} You can switch the sweetener in this recipe. Try maple syrup or agave instead of honey. They offer unique flavors that complement the sprouts well. Each option adds a different depth of sweetness, so feel free to experiment. You can also add other veggies to this dish. Asparagus or carrots pair nicely with Brussels sprouts. Just cut them to a similar size. This way, they cook evenly and get that nice roasted flavor. Want to brighten the flavor? Add some citrus zest. Lemon or orange zest will bring a fresh twist. Just sprinkle it over the hot honey glaze before serving. You can also play with spices to change the flavor. Adding cumin or chili powder can give it a nice, warm kick. The key is to taste as you go, so make it just right for you. To store leftover Brussels sprouts, let them cool first. Then, place them in an airtight container. I recommend using glass or plastic containers with tight lids. This helps keep them fresh for up to three days in the fridge. To reheat without losing crispness, use an oven or air fryer. Preheat your oven to 350°F (175°C). Spread the sprouts on a baking sheet and heat for about 10 to 15 minutes. In an air fryer, set it to 350°F (175°C) and heat for about 5 to 7 minutes. To reinvigorate the flavors, drizzle a little olive oil over the sprouts before reheating. You can also sprinkle a bit more red pepper flakes or fresh parsley for extra flavor. This adds a nice touch and keeps them exciting! To reduce bitterness, try these tips: - Trim the ends: Cut off the tough stem. - Soak in water: Soak them in salted water for 15 minutes. - Roast them: Roasting brings out sweetness. The high heat caramelizes the sprouts. - Add sweetness: Use honey or maple syrup to balance the flavor. Yes, you can use frozen Brussels sprouts. However, fresh sprouts taste better. If using frozen: - Thaw them first: Let them thaw in the fridge overnight. - Drain excess water: Pat them dry to avoid sogginess. - Roast longer: Frozen sprouts may need extra roasting time to crisp up. Hot Honey Brussels Sprouts pair well with many dishes: - Roasted chicken: The sweetness complements savory chicken. - Grilled fish: The heat and honey balance the fish's flavor. - Quinoa salad: A light salad adds freshness to the meal. - Mashed potatoes: Creamy potatoes contrast the sprouts' crunch. Yes, you can make the hot honey sauce ahead of time. Here’s how: - Store in a jar: Keep it in an airtight jar in the fridge. - Reheat gently: Warm it slowly in a saucepan before using. - Use within a week: The sauce stays fresh for up to one week. This recipe for Hot Honey Brussels Sprouts is both simple and delicious. You learned how to roast Brussels sprouts with spices and create a sweet, spicy glaze. Remember to space the sprouts on the baking sheet for crispiness. You can also try different ingredients or flavors. Whether you serve this dish at a party or enjoy it for dinner, it will impress everyone. Enjoy your cooking!

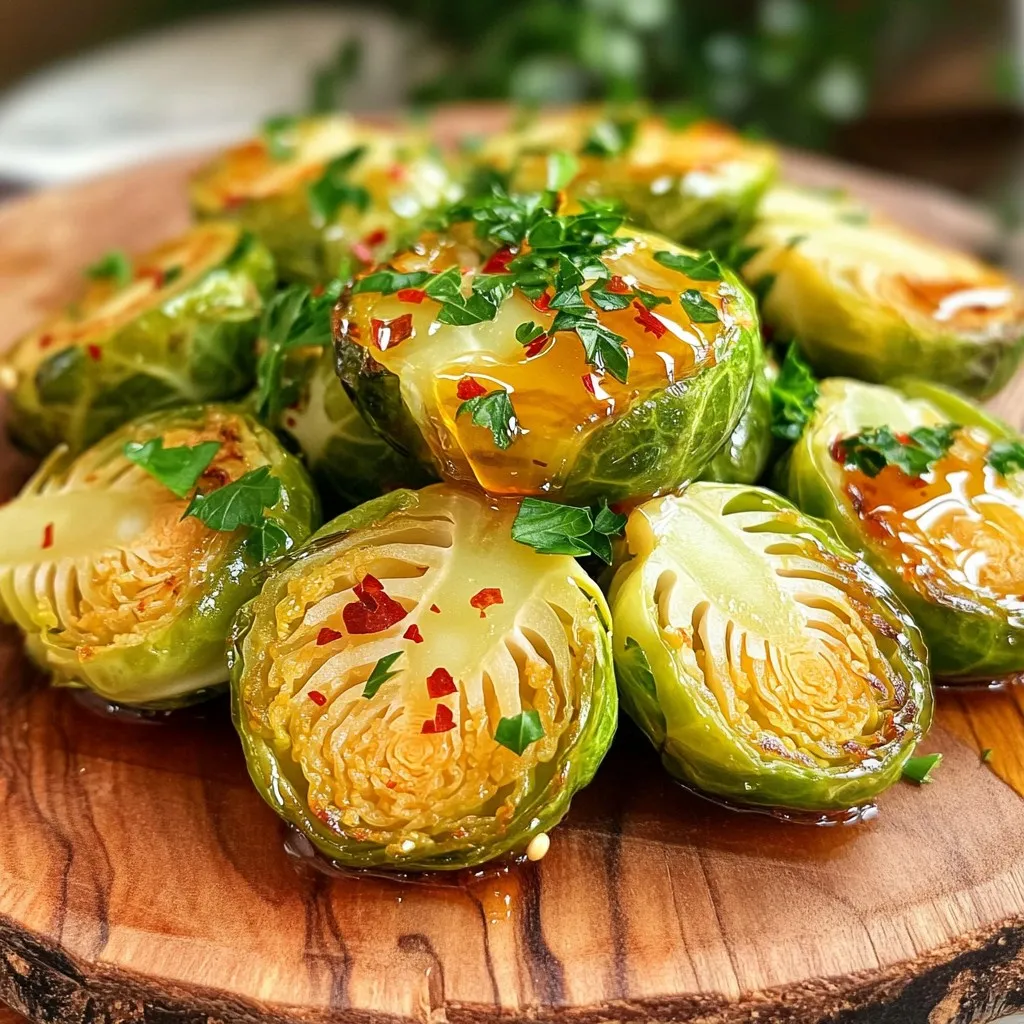
Looking for a side dish that packs a flavorful punch? You’ve found it! This Hot Honey Brussels Sprouts recipe is simple yet delicious. I’ll guide you step-by-step, from prepping the …

Read more

Categories Appetizers

Slow Cooker Beef & Mushroom Stroganoff Simple Recipe

October 14, 2025 by Chef Miles
- 1.5 lbs beef stew meat - 1 medium onion - 8 oz mushrooms - 1 cup beef broth - Worcestershire sauce - Dijon mustard - Dried thyme - Paprika - Sour cream - Fresh parsley - Cooked egg noodles or rice When I make Slow Cooker Beef & Mushroom Stroganoff, I choose my ingredients carefully. I start with 1.5 lbs of beef stew meat. This meat has great flavor and gets tender in the slow cooker. I also use one medium onion, finely diced. This adds sweetness. Then, I slice 8 oz of mushrooms. They give the dish a rich, earthy taste. Lastly, I pour in one cup of beef broth. Low-sodium broth helps control the salt level. For seasoning, I add Worcestershire sauce and Dijon mustard. Each brings a unique tang that enhances the beef. I also sprinkle in dried thyme and paprika. They add warmth and depth to my dish. To finish, I prepare garnishes. I use sour cream to make the sauce creamy and rich. Fresh parsley adds a pop of color and freshness. Finally, I serve the stroganoff over cooked egg noodles or rice. This makes a comforting meal that my family loves. To start, heat 1 tablespoon of olive oil in a large skillet over medium-high heat. Once hot, add 1 medium onion, finely diced. Sauté the onion until it becomes soft and translucent, which takes about 3-4 minutes. Next, stir in 2 cloves of minced garlic and 8 ounces of sliced mushrooms. Cook the mix, stirring occasionally, until the mushrooms turn golden brown. This should take around 5-6 minutes. Once done, set the skillet aside. Now, it's time to prepare the beef. Take 1.5 pounds of beef stew meat, cut into bite-sized chunks, and season with salt and black pepper. This adds great flavor to the dish. In your slow cooker, add the seasoned beef stew meat. Next, pour in the sautéed onion, garlic, and mushrooms. In a separate bowl, mix 1 cup of beef broth, 1 tablespoon of Worcestershire sauce, 2 teaspoons of Dijon mustard, 1 teaspoon of dried thyme, and 1 teaspoon of paprika. Season this mixture with salt and pepper to taste. Pour this savory blend over the beef and vegetables in the slow cooker. Secure the lid on your slow cooker. You can choose to cook on low for 6-8 hours or on high for 3-4 hours. I recommend low for a more tender beef. To check if the beef is tender, use a fork to pull it apart. If it easily shreds, it’s ready. About 30 minutes before serving, mix 3 tablespoons of all-purpose flour with 1 cup of sour cream in a small bowl. Stir this smooth mixture into the stroganoff. Cook covered for another 30 minutes to thicken the sauce. Enjoy your meal over cooked egg noodles or rice, and don’t forget to garnish with fresh parsley! To get the best flavor in your stroganoff, use fresh ingredients. Fresh mushrooms and onions give a great taste. Sauté them until golden brown to build flavor. If you want a lighter dish, use Greek yogurt instead of sour cream. You can also use chicken instead of beef for a different twist. For sides, cooked egg noodles or rice pair well with beef stroganoff. You can also add a side salad or steamed veggies for balance. To make your plate look nice, twirl the noodles into a nest. Ladle the stroganoff on top and sprinkle with fresh parsley. A dash of paprika adds color too. One common mistake is overcooking the beef. Keep an eye on the cooking time to ensure it's tender, not dry. Another mistake is not using enough seasoning. Make sure to taste as you go. Add salt and pepper to enhance the flavor of your dish. {{image_4}} You can have fun with ingredient swaps in your stroganoff. For mushrooms, try using shiitake or portobello for a richer taste. These mushrooms add depth and texture. You can also mix different types for a unique flavor profile. If you need a protein change, consider using chicken or tofu. Chicken breast works well and cooks quickly. Tofu is a great choice for a vegetarian option. Just press the tofu to remove excess water before cooking. This swap keeps the dish hearty and satisfying. For gluten-free options, replace all-purpose flour with cornstarch. Just mix the cornstarch with a little water before adding it to the sour cream. This helps thicken your sauce without gluten. You can also use gluten-free noodles or serve the stroganoff over rice for a complete meal. If you're looking for low-carb variations, skip the noodles. Serve the stroganoff over steamed vegetables or cauliflower rice instead. This keeps the meal light and still full of flavor. You won’t miss the carbs! To add a touch of depth, consider adding wine. A splash of red wine enhances the flavors in your beef stroganoff. Just add it before the broth for a richer sauce. You can also boost the flavor with spices. Try adding a pinch of nutmeg or a dash of cayenne for warmth. These spices complement the creamy sauce and make each bite more exciting. Experimenting with flavors keeps this classic dish fresh and fun! Store your beef stroganoff in airtight containers. Use glass or BPA-free plastic containers for best results. If you have a large batch, divide it into smaller servings. This makes it easier to reheat later. Let the dish cool down before sealing it. You can refrigerate it for up to three days. For longer storage, freeze the stroganoff. It will stay good in the freezer for up to three months. To reheat your beef stroganoff, use the microwave or a stovetop. If using the microwave, place it in a bowl. Heat it in short bursts, stirring in between. This helps the heat spread evenly. On the stovetop, warm it gently over low heat. Add a splash of beef broth or water as you heat. This keeps the sauce from drying out. If you froze it, thaw it in the fridge overnight before reheating. To restore creaminess, stir in a little extra sour cream just before serving. Leftover beef stroganoff lasts about three days in the fridge. Check for signs of spoilage before eating. Look for any off smells or changes in texture. If you see any mold, throw it away. When frozen, the sauce may separate slightly. But it should still taste great when you reheat it. Always trust your senses. If you doubt the dish's safety, it's best to discard it. You have many great options for beef. Here are some substitutes you can use: - Chuck roast: Cut it into chunks. It has good flavor and texture. - Brisket: This cut is tender and adds a nice taste. - Pork shoulder: It works well and gives a different flavor. - Chicken thighs: For a lighter version, use boneless thighs. - Mushrooms: For a vegetarian choice, use a mix of mushrooms. Each substitute will change the flavor and texture, so choose what you like best. Yes, you can! Here are some tasty alternatives to use: - Greek yogurt: It adds creaminess and a bit of tang. - Cream cheese: This gives a rich and creamy texture. - Coconut milk: This is great for a dairy-free option. - Cashew cream: Blend soaked cashews with water for a nutty flavor. These options will keep your stroganoff creamy and delicious. Yes, you can cook it on the stove! Here’s how: 1. Sauté the onions, garlic, and mushrooms in a pot over medium heat. 2. Add the beef stew meat and brown it on all sides. 3. Mix the broth and seasonings, then pour it into the pot. 4. Simmer on low heat for about 1.5 to 2 hours, stirring occasionally, until the beef is tender. 5. Stir in the sour cream and flour mixture before serving. Cooking on the stove will give you a quicker meal while still being tasty. This blog post covered everything you need to know to make beef stroganoff. We discussed key ingredients like beef stew meat, onions, and mushrooms, along with the right seasonings. I shared tips for preparing and cooking, ensuring your dish is full of flavor without mistakes. We also explored variations and storage tips for leftovers. In short, beef stroganoff is versatile and easy to enjoy. With a few tips, you can make a meal that will impress anyone.

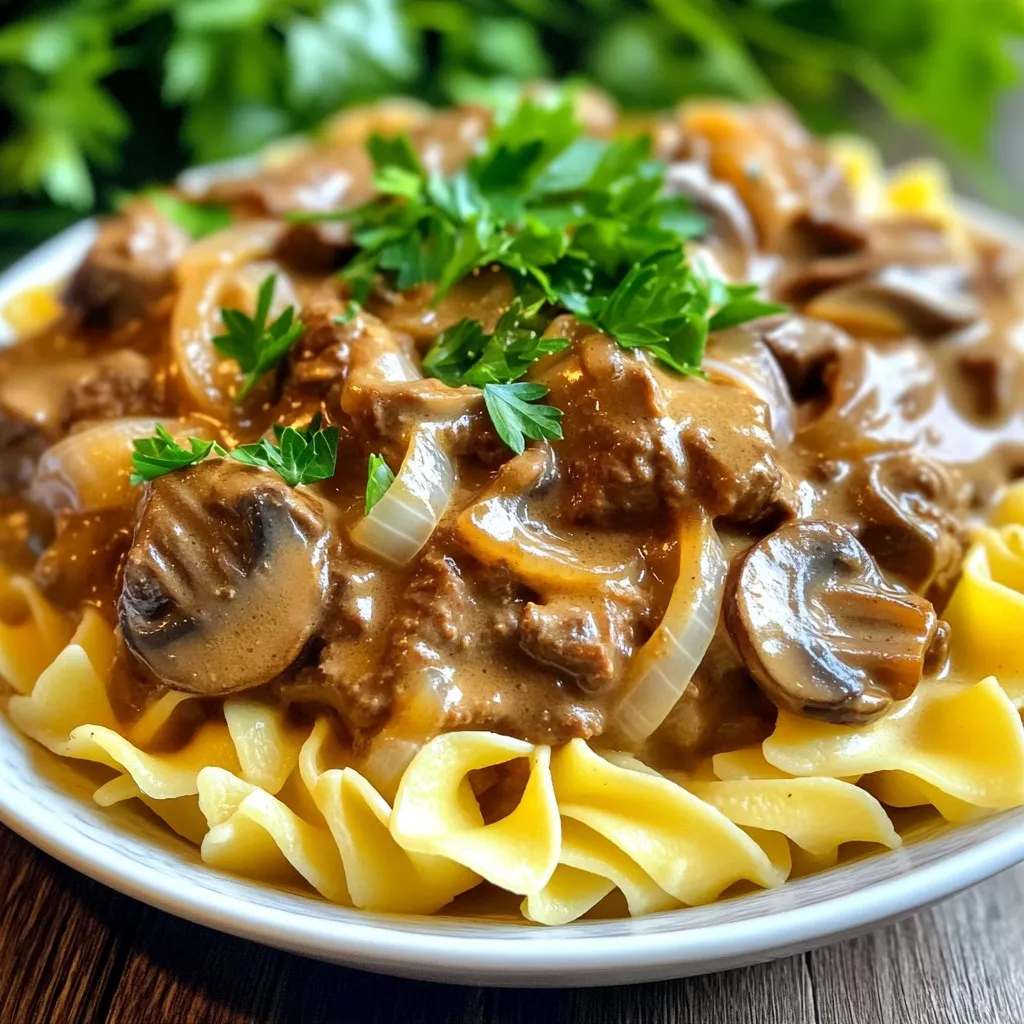
Are you looking for a cozy dinner that’s easy to make? Try my Slow Cooker Beef & Mushroom Stroganoff! This dish uses tender beef, savory mushrooms, and rich seasonings. It’s …

Read more

Categories Dinner

Sheet Pan Maple Dijon Chicken & Veggies Delight

October 14, 2025 by Chef Miles
To make the perfect Sheet Pan Maple Dijon Chicken, you need: - 4 bone-in chicken thighs, skin-on - 2 tablespoons Dijon mustard - 3 tablespoons pure maple syrup - 1 tablespoon olive oil - 1 teaspoon garlic powder - 1 teaspoon onion powder - Salt and pepper, to taste These chicken thighs bring rich flavor and a nice texture. The skin helps to keep the meat moist and tender while roasting. The key to a tasty dish lies in the seasoning. Use: - 2 tablespoons Dijon mustard for a tangy kick - 3 tablespoons pure maple syrup for sweetness - 1 tablespoon olive oil to help blend the flavors - 1 teaspoon garlic powder for a savory depth - 1 teaspoon onion powder to add warmth - Salt and pepper, to taste for balance Mix these ingredients well for a flavorful marinade. This blend makes the chicken and veggies shine. Vegetables add color and nutrition. For this recipe, I suggest: - 2 cups Brussels sprouts, trimmed and halved - 2 cups baby carrots - 1 large red bell pepper, sliced into strips These choices roast beautifully and become sweet. You can also use other veggies like broccoli or zucchini if you prefer. Just remember to cut them into similar sizes for even cooking. Start by preheating your oven to 400°F (200°C). While the oven heats, line a large sheet pan with parchment paper. This step helps with easy cleanup. It’s a small task that saves time later. In a small bowl, mix together the Dijon mustard, pure maple syrup, olive oil, garlic powder, onion powder, and a good pinch of salt and pepper. Whisk these ingredients until they blend into a smooth marinade. This marinade adds great flavor to the chicken and veggies. Next, place the chicken thighs on the sheet pan, skin side up. Use a basting brush or a spoon to spread half of the marinade over the chicken. Make sure each piece gets a good coat. In a large bowl, toss the halved Brussels sprouts, baby carrots, and sliced red bell pepper with the remaining marinade. This ensures the veggies soak up all that yummy flavor. Scatter the veggies around the chicken on the pan. This should look colorful and inviting. Now, pop the sheet pan into your preheated oven. Roast everything for 35-40 minutes. The chicken is done when it reaches an internal temperature of 165°F (75°C) and has crispy, golden skin. During this time, the veggies will caramelize and become tender. Once done, take the sheet pan out and let it rest for about 5 minutes. This helps the chicken's juices settle. If you want, sprinkle fresh thyme over the dish for a nice touch. Enjoy your meal! To get that perfect crispy chicken skin, start with bone-in thighs. The skin holds in moisture and adds flavor. Make sure to pat the skin dry with a paper towel. This helps remove extra moisture. Next, coat the chicken with your marinade evenly. The sugar in the maple syrup helps caramelize the skin. Roast the chicken at 400°F for 35-40 minutes. This high heat creates that crispy texture. Use a meat thermometer to check for doneness. The chicken should reach 165°F for safety. For tasty veggies, choose fresh ones. Trim and halve Brussels sprouts and slice the red bell pepper. Baby carrots can stay whole for a nice crunch. Toss the veggies in the remaining marinade. This gives them great flavor and helps them roast evenly. Spread them out on the sheet pan. Do not overcrowd them; this helps them caramelize. Roasting at high heat brings out their natural sweetness. To make this recipe easy, gather a few tools. You need a large sheet pan lined with parchment paper. This makes cleanup simple. Use a mixing bowl for the marinade and a basting brush for coating the chicken. A sharp knife helps with cutting veggies. Finally, keep a meat thermometer handy. It ensures your chicken is both safe to eat and perfectly cooked. {{image_4}} You can switch out chicken for other proteins. Try bone-in pork chops or turkey thighs. They will soak up the maple Dijon flavor just like chicken. For a quicker meal, use boneless chicken breasts or thighs. These will cook faster and still taste amazing. Feel free to play with the veggies. Broccoli florets or cauliflower can add great texture. You can also use sweet potatoes or zucchini for a different taste. Just keep the cooking time in mind. Some veggies might need less time than Brussels sprouts or carrots. If you want a vegan option, try using tofu or tempeh. Marinate them just like the chicken. For vegetables, add chickpeas for protein. They will also take on the sweet and tangy flavors well. You can also use hearty greens like kale or spinach. To keep your Sheet Pan Maple Dijon Chicken fresh, let it cool down. Place the chicken and veggies in an airtight container. This helps keep moisture in and air out. Store it in the fridge. It will last for about 3 to 4 days. Always label the container with the date, so you know when to eat it. When you’re ready to eat leftovers, preheat your oven to 350°F (175°C). Place the chicken and veggies on a baking tray. Cover them with foil to keep them moist. Heat for about 15-20 minutes. Check that the chicken is warm all the way through. You want it to reach at least 165°F (75°C) again. This keeps it safe and tasty. If you want to save some for later, freezing works great! First, let the dish cool completely. Then, portion it into freezer-safe bags or containers. Remove as much air as you can before sealing. It will stay good for about 2-3 months. When you're ready to eat, thaw it in the fridge overnight. Reheat using the oven or microwave for a quick meal. Sheet Pan Maple Dijon Chicken lasts about 3 to 4 days in the fridge. To store it, place the chicken and veggies in an airtight container. This keeps them fresh and safe to eat. Yes, you can make this recipe ahead of time. You can marinate the chicken and veggies the night before. Store them in the fridge until you’re ready to cook. This helps the flavors blend well. I love serving this dish with a light salad or some crusty bread. You could also pair it with rice or quinoa. These sides balance the sweet and savory flavors of the chicken. Absolutely! This recipe is great for meal prep. You can cook a big batch and divide it into meal containers. It makes lunch and dinner easy for the week ahead. Yes, you can use other mustards. Whole grain mustard or yellow mustard work well too. Each will give a different taste, so feel free to experiment! This blog post covered the tasty Sheet Pan Maple Dijon Chicken. We explored essential ingredients, helpful cooking steps, and useful tips. I shared variations and storage tips to keep your meals fresh. As you prepare this dish, remember it’s simple. Enjoy the flavors and make it your own. With the right ingredients and methods, you’ll create a meal everyone loves.

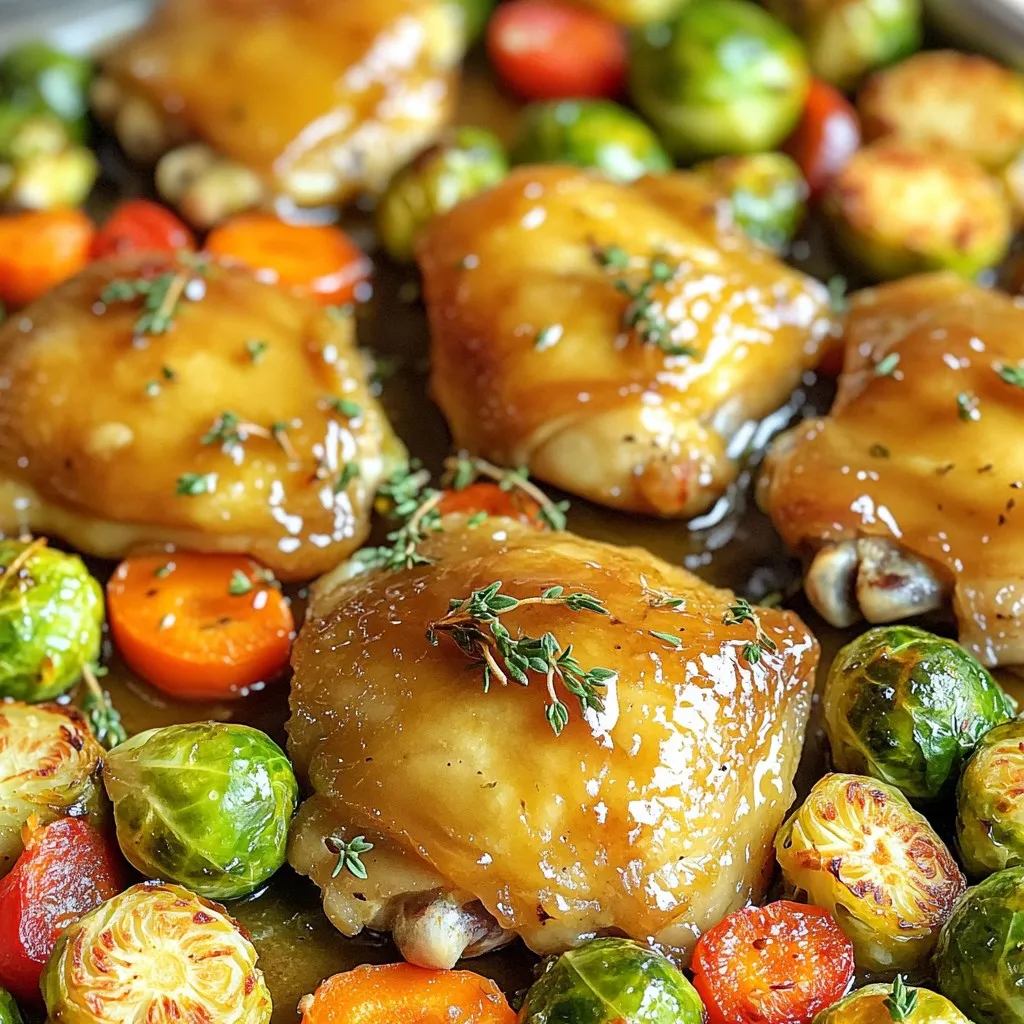
If you’re looking for a quick, tasty meal, you’ll love my Sheet Pan Maple Dijon Chicken & Veggies Delight. This dish packs a punch with sweet and tangy flavors, all …

Read more

Categories Dinner

Spinach Artichoke Dip Pasta Tasty and Easy Recipe

October 14, 2025 by Chef Miles
To make your Spinach Artichoke Dip Pasta, gather these key items: - 8 oz pasta (your choice, ideally penne or fusilli) - 1 cup fresh spinach, roughly chopped - 1 cup canned artichoke hearts, drained and chopped into small pieces - 1 cup cream cheese, softened to room temperature - 1 cup shredded mozzarella cheese - 1/2 cup finely grated Parmesan cheese - 1/2 cup sour cream - 2 cloves garlic, minced - 1 tablespoon olive oil - Salt and freshly cracked black pepper, to taste - Pinch of red pepper flakes (optional, for a spicy kick) - Fresh parsley, chopped, for garnish When choosing pasta, I suggest using penne or fusilli. These shapes hold the creamy sauce well. You can also try rotini for a fun twist. Just ensure the pasta is sturdy to support the sauce. To elevate your dish, consider adding these extras: - Sun-dried tomatoes for a tangy touch - Cooked chicken or shrimp for added protein - A squeeze of lemon juice for brightness - Italian herbs like basil or oregano for a flavor boost Feel free to mix and match these ingredients to suit your taste! First, fill a large pot with water and add salt. Bring the water to a boil. Once it boils, add 8 oz of your favorite pasta, like penne or fusilli. Cook it according to the package directions until it is al dente. This usually takes about 8-10 minutes. Once done, drain the pasta, but save a little pasta water for later. In the same pot, drizzle 1 tablespoon of olive oil and heat it over medium heat. Add 2 cloves of minced garlic. Stir it for about 1 minute. You want it to smell good but not brown. This step adds a lot of flavor. Now, add 1 cup of roughly chopped fresh spinach and 1 cup of drained, chopped artichoke hearts to the pot. Stir this mixture for about 2-3 minutes. You want the spinach to wilt down. This step gives your dish a fresh taste and nice texture. Lower the heat to low. Add 1 cup of softened cream cheese and 1/2 cup of sour cream to the pot. Stir it well until the cream cheese melts. You want a smooth and creamy sauce. This is the heart of your dish. Gradually add 1 cup of shredded mozzarella and 1/2 cup of grated Parmesan cheese. Stir gently until all the cheese is melted and mixed in. Season with salt, freshly cracked black pepper, and a pinch of red pepper flakes if you like it spicy. This adds depth to the flavor. Now it’s time to bring it all together! Add the drained pasta to the creamy sauce. Toss it well so every piece gets coated. If the sauce seems too thick, add a splash of the reserved pasta water. Cook it for another 1-2 minutes until everything is hot. This step makes sure the pasta absorbs all the delicious flavors. Transfer the pasta to serving plates. Sprinkle with freshly chopped parsley and extra Parmesan cheese if you like. Enjoy your creamy and tasty Spinach Artichoke Dip Pasta! Cooking pasta seems simple, but it needs care. Start with a big pot of water. Add a good amount of salt to the water. This helps flavor the pasta. Bring the water to a rolling boil before adding pasta. Cook the pasta according to the package time. When the pasta is al dente, drain it right away. Save a little pasta water to help your sauce later. To get a rich and creamy sauce, use room temperature cream cheese. This helps it melt easily. Stir the sauce often to keep it smooth. If the sauce gets too thick, add a splash of the reserved pasta water. This helps loosen it up. Don’t forget to mix in your cheeses slowly. This ensures they melt and blend well. Garnishing makes your dish look great. Use freshly chopped parsley for color. A sprinkle of extra Parmesan cheese adds a nice touch. For a bit of spice, add red pepper flakes on top. Serve the pasta in a shallow bowl for a nice look. Pair it with crusty bread or garlic bread for dipping. This makes the meal more enjoyable. {{image_4}} You can keep this dish vegetarian easily. Use more veggies instead of meat. Try adding mushrooms, bell peppers, or zucchini. These add flavor and color. You can also add more fresh herbs, like basil or thyme, for a fresh twist. Each adds a unique taste to the creamy sauce. If you want to add protein, there are great choices. Cooked chicken or shrimp works well. Simply stir them in with the pasta. You can also use chickpeas for a plant-based option. They add protein and fiber, making the dish more filling. Serving ideas can change your meal! Try serving it in baked dishes. Just layer the pasta and cheese, then bake until golden. You can also serve it in a bread bowl. This adds a fun touch and makes it a great party food. For a lighter option, serve it on a bed of greens for a fresh salad twist. To store leftovers, let the pasta cool down first. Then, place it in an airtight container. This keeps the pasta fresh for about 3 to 4 days in the fridge. Make sure to seal it well to prevent drying out. If you want to keep it longer, consider freezing it. When you're ready to enjoy the leftovers, there are a few ways to reheat them. You can use the microwave for quick heating. Just place the pasta in a bowl, cover it lightly, and heat for 1 to 2 minutes. Stir halfway through to heat evenly. If you prefer, you can reheat it on the stovetop. Add a splash of water or milk to the pan and heat over low heat. Stir until warm. To freeze the pasta, store it in a freezer-safe container. Make sure to use it within 2 to 3 months for the best taste. When you're ready to eat it, thaw it in the fridge overnight. Then, reheat it on the stove or in the microwave. This way, you can enjoy your creamy Spinach Artichoke Dip Pasta anytime! Yes, you can use frozen spinach. Just thaw and drain it well. Frozen spinach is already cooked, so it will save time. Make sure to squeeze out extra water to keep your dish creamy. You can use Greek yogurt or ricotta cheese instead of cream cheese. Both give a creamy texture. If you want a lighter option, try cottage cheese. Just blend it for a smoother mix. To add more heat, mix in red pepper flakes. You can also add diced jalapeños or a dash of hot sauce. Start with small amounts and taste as you go. Yes, this dish is great for meal prep. Cook it ahead and store it in the fridge. Just reheat it gently on the stove. You may need to add a little water to keep it creamy. Crusty bread or garlic bread makes a perfect side. A fresh green salad is also a great match. You can even try roasted vegetables for extra flavor. To recap, this blog covered all you need for a delicious Spinach Artichoke Dip Pasta. We tackled the right ingredients, tips for cooking, and creative variations. Remember, cooking pasta well and making a creamy sauce are key. Experiment with protein and spice for personal taste. Store leftovers wisely to enjoy later. Dive into this dish—it’s tasty and satisfying. Enjoy the process and your meal!

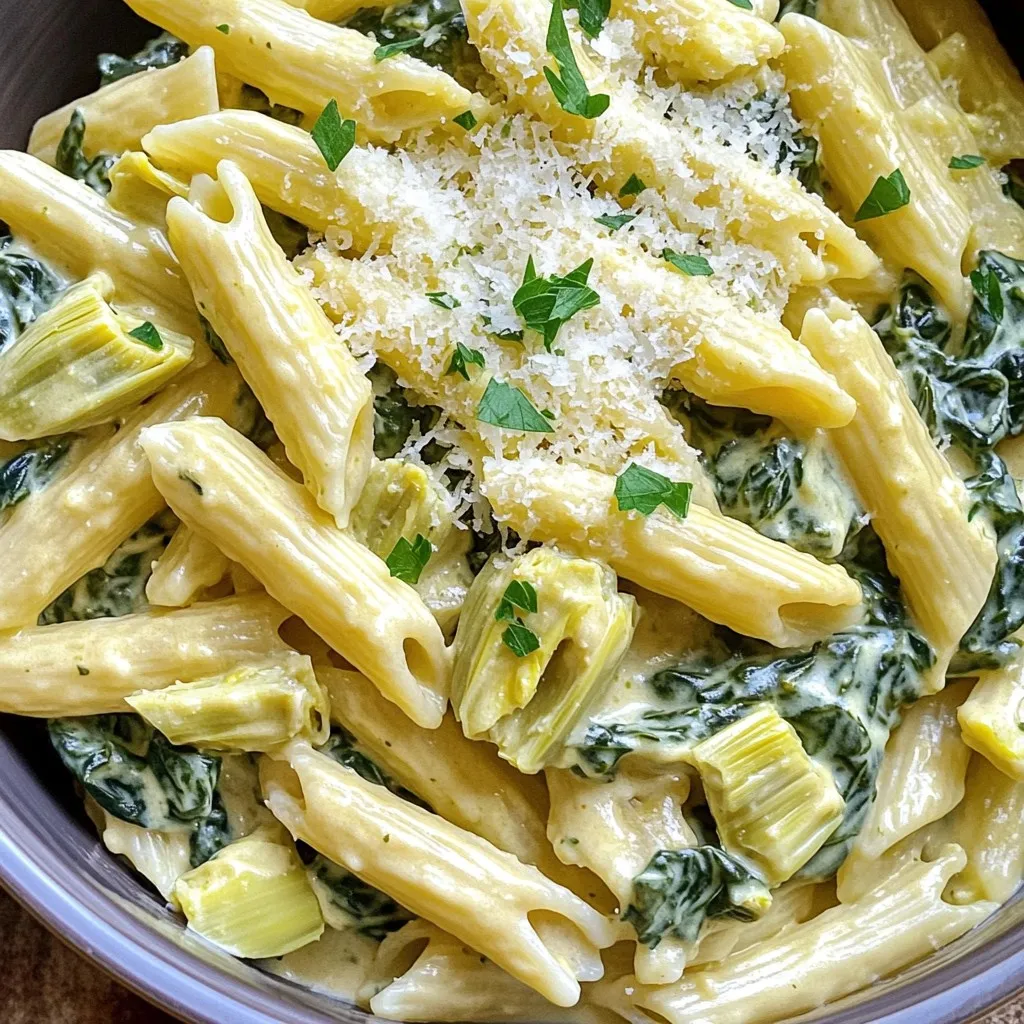
Are you ready for a pasta dish that combines creamy goodness with bold flavors? My Spinach Artichoke Dip Pasta is not just tasty; it’s easy to make, too! Perfect for …

Read more

Categories Dinner

Apple Pie Cinnamon Roll Bake Irresistible Dessert Treat

October 14, 2025 by Chef Miles
To make Apple Pie Cinnamon Roll Bake, you need these simple ingredients: - 2 cans of refrigerated cinnamon roll dough - 3 medium apples, peeled, cored, and diced into bite-sized pieces - 1 teaspoon ground cinnamon - 1/2 teaspoon ground nutmeg - 1/4 cup packed brown sugar - 1 tablespoon fresh lemon juice - 1/2 cup chopped walnuts or pecans (optional for added texture) - 1 cup granulated sugar - 1 tablespoon pure vanilla extract - 1/2 cup cream cheese, softened to room temperature - 1 tablespoon milk - Icing included in the cinnamon roll cans You can swap some ingredients if you need to. Here are some ideas: - Use apples like Granny Smith or Honeycrisp for a tart or sweet taste. - Replace walnuts or pecans with sunflower seeds for a nut-free option. - If you don’t have cream cheese, try mascarpone or Greek yogurt. - For a lighter version, use low-fat cinnamon roll dough. Choosing the right apples is key to great flavor. Here’s what I recommend: - Pick firm apples, as they hold up well during baking. - Look for apples with vibrant colors and no bruises. - If you like sweet, go for Fuji or Gala apples. - For a tart flavor, pick Granny Smith or Braeburn apples. With these ingredients and tips, you're ready to create a delicious dessert that everyone will love! Start by preheating your oven to 350°F (175°C). This step ensures even cooking. While the oven heats, take a 9x13-inch baking dish. Lightly grease it with butter or cooking spray. This will help the bake come out easily. Next, grab a mixing bowl. Peel, core, and dice three medium apples into small pieces. Add these apples to the bowl. Sprinkle in 1 teaspoon of ground cinnamon, 1/2 teaspoon of ground nutmeg, and 1/4 cup of packed brown sugar. Squeeze in 1 tablespoon of fresh lemon juice. Toss everything well. Let the mix sit for a bit. This helps the flavors blend nicely. Open two cans of refrigerated cinnamon roll dough. Separate the rolls and cut each into quarters. In a large bowl, combine the cut cinnamon rolls with the apple mixture. Gently fold them together. If you like, add 1/2 cup of chopped walnuts or pecans for crunch. Mix until the apples and cinnamon rolls are evenly spread. Transfer this mix to your greased baking dish. Spread it out evenly for the best bake. To ensure your Apple Pie Cinnamon Roll Bake is a hit, keep these tips in mind: - Use fresh ingredients. Fresh apples give the best flavor. Avoid old apples. - Preheat your oven. Always preheat to 350°F. This helps with even baking. - Grease the dish well. Use butter or non-stick spray to avoid sticking. - Cut rolls evenly. Quarter the cinnamon rolls into uniform pieces for even cooking. For that perfect texture, focus on these key points: - Do not overmix. When combining apples with cinnamon rolls, mix gently. This keeps the rolls fluffy. - Check for doneness. Insert a toothpick in the center. If it comes out clean, it’s done. - Cool slightly before serving. Let it sit for about 10 minutes. This helps the layers set. Serving this bake can be fun and creative. Here are some ideas: - Serve warm. Warm bites bring out all the flavors. - Add toppings. A dusting of powdered sugar makes it pretty. Whipped cream or ice cream is a great choice too. - Pair with coffee. A cup of coffee or tea complements the sweet flavors well. These tips will help you create a delightful and tasty dessert that everyone will love! {{image_4}} If you or someone you know has a nut allergy, you can easily swap the nuts. Just leave them out, and your bake will still taste great. You can also add seeds like pumpkin or sunflower seeds for crunch. These alternatives keep the texture while keeping it safe. Want to make your Apple Pie Cinnamon Roll Bake even better? Try adding raisins! They add a sweet and chewy touch. You can also sprinkle in some extra spices, like ginger or allspice, for depth. A tablespoon of brown sugar can enhance the caramel flavor of the apples, making each bite more delightful. To make this dish vegan, use plant-based cinnamon roll dough. You can find brands that don’t use dairy. For the cream cheese, a vegan option works well. If you need it gluten-free, look for gluten-free cinnamon roll dough. Just make sure all other ingredients are also gluten-free. This way, everyone can enjoy this tasty treat! To keep your Apple Pie Cinnamon Roll Bake fresh, store any leftovers in an airtight container. Place it in the fridge for up to three days. This helps prevent drying and keeps the flavors intact. Make sure it cools down before sealing the container. When you're ready to enjoy your leftovers, reheat them in the oven. Preheat your oven to 350°F (175°C). Place the bake in a baking dish and cover it with foil. Heat for about 10-15 minutes, or until warm. You can also microwave individual portions for about 30-45 seconds. Just be careful not to overheat, as it may dry out. If you want to save some for later, freezing works well. Cut the bake into portions and wrap each piece tightly in plastic wrap. Then, place the wrapped pieces in a freezer bag. This keeps them fresh for up to three months. When you’re ready to eat, thaw it in the fridge overnight, then reheat as mentioned above. Enjoy the flavors again! Yes, you can prepare this dish ahead of time. To do this, follow the steps up to mixing the apple and cinnamon rolls. Cover the dish with plastic wrap and place it in the fridge. This way, you can bake it fresh the next day. Just remember to remove it from the fridge 15 minutes before baking. This helps it bake evenly. For this recipe, I recommend using firm apples. Varieties like Granny Smith, Honeycrisp, or Fuji work well. These apples hold their shape and add a nice tartness. You can mix different types for more flavor. Just make sure they are fresh and crisp for the best results. To check if your bake is done, insert a toothpick into the center. If it comes out clean, it’s ready. The top should be golden and the rolls should be cooked through. Baking usually takes about 30 to 35 minutes. Keep an eye on it towards the end to avoid burning. You learned about ingredients, tips, and variations for our apple dish. Select fresh apples and customize flavors to make it your own. Follow the steps for baking success and perfect texture. Store leftovers well, and reheat easily. Now you can enjoy this tasty treat. Get creative with ingredients and share it with friends. Enjoy every bite!

If you love apple pie and cinnamon rolls, you’re in for a treat! My Apple Pie Cinnamon Roll Bake combines two favorites into one easy dessert that will wow your …

Read more

Categories Desserts

One-Pot Cajun Sausage & Rice Flavorful Home Dish

October 14, 2025 by Chef Miles
- 1 pound Cajun or andouille sausage, sliced into rounds - 1 tablespoon olive oil - 1 medium onion, finely diced - 3 cloves garlic, minced - 1 bell pepper (red or green), diced - 2 celery stalks, diced - 1 cup long-grain rice - 4 cups chicken broth (preferably low-sodium) - 1 (14.5 oz) can diced tomatoes with green chilies, undrained - 2 teaspoons Cajun seasoning - 1 teaspoon dried thyme - 1 teaspoon smoked paprika - Salt and freshly ground black pepper to taste - 2 green onions, thinly sliced (for garnish) - Fresh parsley, chopped (for garnish) - For Cajun sausage, I suggest brands like Aidells or Johnsonville for great flavor. - Use a high-quality chicken broth like Swanson or Pacific Foods for rich taste. - For spices, try McCormick or Penzeys for authentic Cajun seasoning and freshness. These ingredients combine to create a warm and hearty dish. The sausage gives a spicy kick, while the rice absorbs all those delicious flavors. You will enjoy the balance of spices and the freshness of the veggies. Each bite will transport you to a cozy kitchen, making this dish perfect for any night. - Slicing the sausage: Start by taking 1 pound of Cajun sausage. Slice it into rounds. Aim for even pieces for better cooking. - Chopping the vegetables: Dice 1 medium onion and a bell pepper. You can use red or green. Chop 2 celery stalks into small pieces. Mince 3 cloves of garlic. - Measuring rice and broth: Measure out 1 cup of long-grain rice. Pour 4 cups of chicken broth into a measuring cup. This will help keep your cooking smooth. - Heating olive oil: In a large pot, add 1 tablespoon of olive oil. Heat it over medium heat until it shimmers. This means it’s hot enough. - Browning the sausage: Add the sliced sausage to the pot. Cook it until browned on both sides for about 5-7 minutes. Once done, remove it and set it aside. - Sautéing vegetables and toasting rice: In the same pot, add the diced onion, bell pepper, and celery. Cook for 4-5 minutes, stirring often. When they soften, add the minced garlic and stir for another minute. Next, toss in the rice. Stir for 2-3 minutes to toast it lightly. - Combining ingredients and simmering: Pour in the chicken broth and add the can of diced tomatoes. Sprinkle in the Cajun seasoning, dried thyme, and smoked paprika. Add salt and pepper to taste. Stir everything well. Bring the mixture to a boil. Once it’s bubbling, add the sausage back to the pot. - Resting time after cooking: Lower the heat and cover the pot. Let it cook for about 20 minutes. This allows the rice to absorb the liquid and flavors. - Fluffing the rice: After cooking, take the pot off the heat. Let it sit for 5 minutes with the lid on. This resting time helps the flavors meld. Using a fork, fluff the rice gently to separate the grains. - Garnishing before serving: To finish, add sliced green onions and chopped parsley on top. This adds a nice color and fresh taste. Serve hot and enjoy! - Adding hot sauce for extra heat: If you like spice, add your favorite hot sauce. It boosts the dish's flavor. Mix in a few dashes right before serving. - Using fresh herbs for garnish: Fresh herbs like parsley or green onions make your dish pop. They add color and a fresh taste. Sprinkle them on top just before serving. - Techniques for toasting rice: Toasting rice adds depth. Stir it in the pot with veggies for a few minutes. This step brings out a nutty flavor that enhances the dish. - How to prevent rice from sticking: To avoid sticking, stir the rice often while cooking. This keeps it loose and fluffy. Also, make sure to use enough liquid. - Adjusting liquid based on rice type: If you use brown rice, add more broth. Brown rice takes longer to cook and needs extra liquid. Use a 1:2 rice to liquid ratio for this. - Timing adjustments for a perfect cook: Watch the rice closely. Different types may need more or less time. Check it at the 15-minute mark to see if it’s done. - Best pots for one-pot dishes: A heavy-bottomed pot or Dutch oven is best. It heats evenly and prevents burning. Look for one with a tight lid. - Suggested kitchen tools for preparation: Use a sharp knife for chopping and a cutting board. A measuring cup is vital for rice and broth. A wooden spoon helps stir without scratching your pot. {{image_4}} You can switch up the proteins in this dish. Chicken, shrimp, or tofu work great. Each protein brings a unique taste. For veggies, try adding zucchini, corn, or green beans. Each choice changes the dish's texture and flavor. You can mix and match based on what you have at home. If you need gluten-free options, choose rice that is certified gluten-free. You can also use gluten-free sausage. For vegan or vegetarian options, swap sausage for plant-based meat or mushrooms. Using vegetable broth instead of chicken broth keeps it tasty and plant-based. Want more heat? Add extra Cajun seasoning or hot sauce. Try using different spices from your pantry, like Old Bay or chili powder. Each spice adds a new twist to the dish. Explore with herbs like oregano or basil for a fresh taste. This way, you can customize the dish to suit your taste. To store leftovers properly, let the dish cool first. Then, place it in an airtight container. This keeps it fresh for up to four days in the fridge. I recommend using glass containers. They are durable, easy to clean, and do not absorb odors. When reheating one-pot dishes, always check the temperature. The dish should reach 165°F for safety. I prefer reheating on the stovetop. It warms evenly and keeps the rice from drying out. If using a microwave, cover the dish to trap steam. Stir halfway through to heat evenly. Yes, you can freeze Cajun sausage and rice! To freeze, let the dish cool completely. Then, portion it into freezer-safe bags or containers. Remove as much air as possible. When you want to eat it, thaw in the fridge overnight. Reheat on the stovetop for the best texture. Can I use dry rice instead of cooked rice? No, you cannot use cooked rice in this recipe. You need dry, long-grain rice. This helps the rice absorb flavors and cook evenly. How to adjust cooking time for different rice types? For brown rice, add 10-15 minutes to the cooking time. For quick-cooking rice, reduce time by about 5 minutes. Always check the rice package for exact times. What can I serve with Cajun sausage and rice? Try a fresh salad or some crusty bread. A side of coleslaw works well too. You can also add hot sauce for an extra kick! Is it safe to leave the dish at room temperature? No, don’t leave it out longer than two hours. Bacteria can grow quickly at room temp. Always refrigerate leftovers. How long does this dish last in the fridge? It lasts about 3 to 4 days in the fridge. Store it in an airtight container for best results. Is Cajun sausage healthy? Cajun sausage can be high in fat and sodium. Pair it with veggies for a healthier meal. Consider using turkey sausage for a lighter option. Nutrition facts for this recipe: calories, protein, and carbs One serving has about 450 calories, 20 grams of protein, and 45 grams of carbs. These numbers may vary based on specific brands used. Always check labels for accuracy. This blog post covered how to make delicious Cajun sausage and rice. I shared the main ingredients, step-by-step instructions, and tips for the best flavor. You can alter the dish with different proteins or make it vegan. Proper storage and reheating tips ensure you enjoy leftovers safely. Remember, this dish is versatile and can fit many diets. With the right ingredients and techniques, you'll create a tasty meal easy enough for any cook. Happy cooking!

Are you ready to spice up your dinner routine? This One-Pot Cajun Sausage & Rice dish combines hearty flavors with simple steps, making it a perfect weeknight meal. With smoky …

Read more

Categories Dinner

Pumpkin Spice Streusel Muffins Savory and Cozy Treat

October 14, 2025 by Chef Miles
- 1 ½ cups all-purpose flour - 1 teaspoon baking powder - ½ teaspoon baking soda - 1 teaspoon ground cinnamon - ½ teaspoon ground nutmeg - ½ teaspoon ground ginger - ¼ teaspoon ground cloves - ½ teaspoon salt - 1 cup canned pumpkin puree - ¾ cup granulated sugar - ½ cup brown sugar, packed firmly - ½ cup vegetable oil - 2 large eggs - 1 teaspoon vanilla extract - ½ cup all-purpose flour - ⅓ cup brown sugar, packed firmly - ½ teaspoon ground cinnamon - ¼ cup unsalted butter, melted - ¼ cup chopped walnuts or pecans (optional) Gather these ingredients before you start. It makes cooking easier and more fun. Make sure you use canned pumpkin puree, not pie filling. Each dry ingredient plays a role. The flour gives structure, while baking powder and baking soda help muffins rise. The spices add warmth and flavor, giving the muffins that classic pumpkin spice taste. For the wet mix, the pumpkin puree keeps the muffins moist. Granulated and brown sugar provide sweetness. Eggs bind everything together, while vanilla adds a lovely aroma. The vegetable oil keeps your muffins soft and tender. The streusel topping is what makes these muffins extra special. It adds a sweet crunch. You can add nuts to the topping for some texture. If you choose to use them, chop the walnuts or pecans finely. This will mix in well and not overpower the other flavors. This combination of ingredients ensures you get delicious muffins that are cozy and satisfying! 1. Preheat your oven to 350°F (175°C). This helps muffins bake evenly. 2. Prepare the muffin tin by lining it with paper liners or greasing it lightly. This keeps muffins from sticking. 1. In a large bowl, combine 1 ½ cups of all-purpose flour, 1 teaspoon baking powder, and ½ teaspoon baking soda. 2. Add 1 teaspoon ground cinnamon, ½ teaspoon ground nutmeg, ½ teaspoon ground ginger, ¼ teaspoon ground cloves, and ½ teaspoon salt. Whisk these until fully mixed. 3. In a separate bowl, mix ¾ cup granulated sugar, ½ cup brown sugar, and ½ cup vegetable oil until smooth. 4. Add 2 large eggs and 1 cup of canned pumpkin puree to the sugar mix. Blend well. Stir in 1 teaspoon vanilla extract for extra flavor. 5. Fold the dry mix into the wet mix gently. Be careful not to overmix; this keeps the muffins light. 1. In a small bowl, combine ½ cup of all-purpose flour, ⅓ cup of brown sugar, and ½ teaspoon of ground cinnamon. 2. Pour in ¼ cup melted unsalted butter and add ¼ cup chopped walnuts or pecans if you want crunch. Mix until you get a crumbly texture. 1. Fill each muffin cup about two-thirds full with batter. This gives them room to rise. 2. Sprinkle the streusel topping generously over the batter. This adds a nice crunch. 3. Bake in the oven for 20-25 minutes. To test for doneness, insert a toothpick into the center. It should come out clean. 4. Once baked, let the muffins cool in the tin for about 5 minutes. Then, transfer them to a wire rack to cool completely. - Avoiding overmixing: When you mix the batter, do it gently. Use a spatula to fold in the dry ingredients. Stop as soon as you see no flour. This keeps the muffins light and fluffy. Overmixing makes them tough. - Achieving the perfect rise: Fill each muffin cup about two-thirds full. This gives them room to rise. Make sure your oven is preheated to 350°F. A hot oven helps the muffins rise well. - Adding optional nuts or spices: For extra crunch, add chopped walnuts or pecans to the streusel. You can also mix in a pinch of nutmeg or ginger to the batter for added flavor. - Serving suggestions: Serve these muffins warm. A drizzle of icing or a dollop of whipped cream makes them even better. A light dusting of powdered sugar adds a nice touch too. - What to do if muffins are too dense: Dense muffins can mean you overmixed the batter. Next time, be gentle when mixing. Also, check your baking powder and baking soda for freshness. They need to be active for the muffins to rise. - Ensuring even baking: Rotate the muffin tin halfway through baking. This helps them bake evenly. Also, avoid opening the oven door too soon. It can cause the muffins to sink. {{image_4}} You can make these muffins fit many diets. For gluten-free options, use almond flour or a gluten-free blend. These swaps keep the texture light. If you want to cut sugar, try using honey or maple syrup. Both add sweetness and flavor without refined sugar. Want to mix it up? Adding chocolate chips gives a rich twist. Use dark or milk chocolate for sweetness. You can also add dried fruits like cranberries or raisins. They add chewy bites and extra flavor to each muffin. Using fresh pumpkin instead of canned can elevate these muffins. Roast and puree fresh pumpkin for the best taste. You can also change the spice mix. Try adding cardamom for a unique twist. This keeps the muffins fresh and exciting for every season. To keep your pumpkin spice streusel muffins fresh, store them in an airtight container. This will prevent them from drying out. At room temperature, they stay good for about 2-3 days. If you want to enjoy them longer, freezing is the best way. To freeze muffins, wrap each one tightly in plastic wrap. Place them in a freezer-safe bag or container. They can last up to 3 months in the freezer. When you’re ready to eat, take a muffin out and let it thaw. You can also reheat it in the microwave for about 15-20 seconds. After storage, serve muffins warm for the best taste. They go well with coffee or tea. You can also add a drizzle of icing or a dollop of whipped cream on top. For a nice touch, sprinkle some powdered sugar for a sweet finish. Yes, you can use fresh pumpkin. First, cook the pumpkin until soft. Then, mash it well. This will give you a fresh flavor. Make sure to measure the same amount as canned pumpkin. Check the muffins at 20 minutes. Insert a toothpick in the center. If it comes out clean, they are done. If it has wet batter, bake a little longer. Yes, you can prepare the batter a day in advance. Store it in the fridge. When ready to bake, let it sit at room temperature. This helps them rise well. If the streusel is too crumbly, add a bit more melted butter. Mix it in slowly. This will help the topping stick together better. You can swap all-purpose flour for gluten-free flour. Use a sugar substitute for lower sugar options. If you need a dairy-free version, replace butter with coconut oil or a dairy-free spread. In this article, we explored the ingredients and steps to make tasty muffins. We detailed dry and wet ingredients and explained how to get a perfect streusel topping. I shared baking tips and flavor variations to suit every taste. Remember, with some simple adjustments, your muffins can shine. Take the time to bake, experiment, and enjoy the delicious results. Happy baking!

Autumn is here, and with it comes the cozy, warm flavors of pumpkin spice! If you’re craving a sweet treat that captures the essence of the season, you’re in the …

Read more

Categories Breakfast
Older posts
Newer posts
← Previous Page1 … Page5 Page6 Page7 … Page110 Next →

MELTED RECIPES

where delicious ideas melt into life, from stovetop to backyard. Always warm, simple, and irresistibly satisfying. 🍳🔥🧀

PAGES

Home About Contact Privacy Policy Terms & Conditions Cookie Policy GDPR Policy Copyright Policy Disclaimer

CATEGORIES

Appetizers Desserts Salads Breakfast Dinner

Contact

  • Pinterest
  • Mail
Copyright © 2025 Melted Recipes. All rights reserved.