Skip to content
Melted Recipes
  • Home
  • Appetizers
  • Desserts
  • Salads
  • Breakfast
  • Dinner
  • Privacy Policy
  • Contact
  • About

Chef Miles

Pumpkin Biscuits Soft and Fluffy Treat Recipe

August 3, 2025 by Chef Miles
- 2 cups all-purpose flour - 1 tablespoon baking powder - 1/2 teaspoon baking soda - 1 teaspoon ground cinnamon - 1/2 teaspoon ground nutmeg - 1/4 teaspoon ground ginger - 1/2 teaspoon salt - 1/2 cup unsalted butter, cold and cubed - 1 cup canned pumpkin puree - 1/4 cup milk - 1/4 cup pure maple syrup - 1 tablespoon vanilla extract - 1/2 cup chopped pecans (optional) To make pumpkin biscuits, you need simple ingredients. First, gather all-purpose flour, baking powder, and baking soda. Add warm spices like cinnamon, nutmeg, and ginger for flavor. Salt balances the sweetness. Use cold butter for a flaky texture. Next, canned pumpkin puree adds moisture and richness. You will also need milk, pure maple syrup, and vanilla extract for sweetness and flavor. If you like, add chopped pecans for a nice crunch. With these ingredients, you are ready to create soft and fluffy pumpkin biscuits. For the complete recipe, see the Full Recipe. First, preheat your oven to 425°F (220°C). This helps the biscuits rise nicely. Then, line a baking sheet with parchment paper. This step makes cleanup easy and prevents sticking. In a large bowl, combine the following dry ingredients: - 2 cups all-purpose flour - 1 tablespoon baking powder - 1/2 teaspoon baking soda - 1 teaspoon ground cinnamon - 1/2 teaspoon ground nutmeg - 1/4 teaspoon ground ginger - 1/2 teaspoon salt Whisk these ingredients well. Make sure they are evenly mixed for a good rise. Next, add cold, cubed unsalted butter to your flour mix. Use a pastry cutter or your fingers to work the butter in. You want it to look like coarse crumbs with some small butter pieces still visible. This will help keep your biscuits light and fluffy. In a separate bowl, blend together: - 1 cup canned pumpkin puree - 1/4 cup milk - 1/4 cup pure maple syrup - 1 tablespoon vanilla extract Stir these until smooth. This mix adds flavor and moisture to your biscuits. Gently pour the pumpkin mixture into the dry ingredients. Use a spatula to fold the two together. Be careful not to overmix. You want just combined dough for a soft texture. If you like pecans, add 1/2 cup chopped pecans here for a nice crunch. Turn the dough out onto a floured surface. Knead it lightly, about 3-4 times, to bring it together. Flatten it to about 1 inch thick. Use a biscuit cutter or floured glass to cut out biscuits. Place them on the prepared baking sheet. Gather any scraps, re-roll, and cut out more biscuits. Now, bake your biscuits in the oven for 12-15 minutes. They should turn golden brown on top. Once done, remove them and let them cool for a few minutes. Enjoy your delicious pumpkin biscuits warm! For the full recipe, check the earlier section. To get soft and fluffy biscuits, cold butter is key. It helps create layers. When you mix, do it gently. Overmixing makes biscuits tough. You want small bits of butter in the dough. This creates steam when baking, making them rise beautifully. You can boost the flavor of your pumpkin biscuits with spices. Try adding ground cloves or allspice for warmth. You can also mix in chopped pecans for crunch. They add a lovely texture and taste. Another option is to fold in some grated cheese for a savory twist. Serve your biscuits warm for the best taste. Top them with whipped cream or a drizzle of maple syrup. A sprinkle of cinnamon on top adds extra flavor and charm. You can also enjoy them with a side of apple butter or cream cheese for a delightful treat. {{image_4}} You can change the spices in your pumpkin biscuits to create new flavors. Try adding clove or allspice for a warm twist. These spices give depth to the biscuits. They enhance the pumpkin taste too. You can mix and match spices to find your favorite blend. A little extra cinnamon can also be a great touch. Just a pinch can make a big difference. If you want a savory option, add cheese and herbs. Cheddar cheese pairs well with pumpkin. It adds a nice flavor and makes the biscuits extra rich. You could also use herbs like rosemary or thyme. These herbs give a fresh taste. Just mix them into the dough for a delightful surprise. For a sweeter treat, think about adding chocolate chips or dried fruits. Chocolate chips bring a rich sweetness that kids love. Dried fruits like cranberries or raisins can add chewiness. They also pair nicely with pumpkin. You can even mix both for a fun flavor explosion. These sweet variations can turn your biscuits into a dessert. To keep your leftover biscuits fresh, let them cool first. Place them in an airtight container. You can also wrap them in plastic wrap or foil. Store the container at room temperature. This way, they stay soft and fluffy. Avoid placing them in the fridge, as that can make them dry. If you want to freeze your biscuits, cool them completely. Then, wrap each biscuit in plastic wrap. Place the wrapped biscuits in a freezer bag. Remove as much air as possible. They can last up to three months in the freezer. To reheat, take them out and let them thaw at room temperature. Heat them in the oven at 350°F (175°C) for about 10 minutes. These pumpkin biscuits can last up to two days at room temperature. After that, they may start to lose their texture and taste. To keep them nice, check for any signs of mold or dryness before eating. If they look or smell off, it's best to toss them. Enjoy your biscuits fresh for the best flavor! You can use plant-based substitutes. For butter, opt for coconut oil or vegan butter. Use almond milk or oat milk instead of regular milk. These swaps work well and keep the biscuits soft. Yes, you can prepare the dough a day in advance. Wrap it tightly in plastic wrap and store it in the fridge. When ready, cut and bake them fresh. This keeps them fluffy and warm. These biscuits pair great with many options. Try them with honey or maple syrup. You can also serve them with whipped cream or cream cheese. They make a tasty breakfast or dessert treat. Look for a golden brown color on top. The biscuits should feel firm to the touch. You can also insert a toothpick into the center. If it comes out clean, they are ready. You now have a clear plan for making delicious pumpkin biscuits. We covered all the key steps, from mixing dry and wet ingredients to baking perfectly golden biscuits. Remember to use cold butter for the best texture. Feel free to try variations with spices or sweet additions. Store leftovers properly to enjoy them later. With these tips, your pumpkin biscuits will impress everyone. Enjoy the baking and the tasty treats!

Get ready to enjoy some soft and fluffy pumpkin biscuits that are perfect for any occasion! These delightful treats are simple to make and packed with autumn flavors. With just …

Read more

Categories Desserts

Gooey Caramel and Crisp Apple Cookies Delight

August 3, 2025 by Chef Miles
- 1 cup unsalted butter, at room temperature - 1 cup packed brown sugar - 1/2 cup granulated sugar - 2 large eggs, at room temperature - 1 teaspoon pure vanilla extract - 3 cups all-purpose flour - 1 teaspoon baking soda - 1 teaspoon ground cinnamon - 1/2 teaspoon salt - 1 1/2 cups diced crisp apples (such as Granny Smith or Fuji) - 1 cup caramel bits or finely chopped caramel candies - Sea salt flakes for optional topping These ingredients create a great balance of sweet and tart flavors. The butter adds a rich taste, while the apples bring freshness. Caramel bits melt into gooey pockets in every bite. Using crisp apples gives a nice crunch, which makes the cookies fun to eat. Make sure your apples are diced into small pieces. This helps them mix well in the dough. The brown sugar adds a deep sweetness, while the granulated sugar gives a light texture. Fresh eggs help bind everything together. You can find all these items in your local grocery store. Mixing them in the right order is key to a great result. For the full recipe, check out the details above. You are now ready to make your gooey caramel and crisp apple cookies! - Preheat the oven to 350°F (175°C) and prepare baking sheets. - Cream the butter and sugars until fluffy. - Incorporate the eggs and vanilla into the mixture. - Mix the dry ingredients separately. - Slowly add dry ingredients to the wet mixture. - Fold in diced apples and caramel bits. - Scoop dough onto baking sheets, leaving space. - Bake for 10-12 minutes until golden brown. - Cool and add sea salt flakes as desired. Follow these steps closely to make the best gooey caramel and crisp apple cookies. The key is in the mixing and baking times. Enjoy the process, and watch as your kitchen fills with the sweet aroma of baking cookies! For the complete recipe, check the [Full Recipe]. - Ensure butter is at room temperature for better creaming. Soft butter makes a lighter dough. - Do not over-mix the dough after adding dry ingredients. This keeps your cookies soft and chewy. - Consider adding a pinch of nutmeg for extra warmth. Nutmeg pairs well with apples and caramel. - Use different types of apples like Honeycrisp for varied flavor. Different apples can change the taste and texture. - Stack cookies on a plate and drizzle with melted caramel. This makes the cookies look extra tempting. - Serve with fresh apple slices for a balanced treat. The crispness of apples complements the gooey cookies. Try these tips to elevate your Gooey Caramel and Crisp Apple Cookies. For the complete recipe, check the Full Recipe section. Enjoy your baking journey! {{image_4}} - Use coconut oil instead of butter for a dairy-free version. - Replace granulated sugar with coconut sugar for a healthier option. You can easily swap out ingredients to fit your needs. For a dairy-free treat, coconut oil works great. It keeps the cookies moist and tasty. If you want a healthier cookie, coconut sugar is a smart choice. It gives a nice caramel flavor while lowering the glycemic index. - Add chopped nuts, such as walnuts or pecans, for crunch. - Incorporate chocolate chips for a delightful twist. Want to change up the flavor? Toss in some chopped nuts. Walnuts or pecans add a nice crunch. If you love chocolate, mix in some chocolate chips. They melt and create a gooey surprise in every bite. - Make them festive with pumpkin spice during the fall. - Create a holiday version by adding peppermint extract. Get creative with the seasons! Add pumpkin spice to make these cookies perfect for fall. The warm spices fill your home with cozy scents. For the holidays, peppermint extract is a fun twist. It brings a festive flavor that everyone will enjoy. To see how these variations come together, check out the Full Recipe. To keep your gooey caramel and crisp apple cookies fresh, store them in an airtight container at room temperature. They will stay yummy for up to 3 days. If you want them to last longer, place them in the fridge. This way, they will stay fresh for up to a week. You can also freeze the cookie dough before baking. It will stay good for up to 3 months. If you already baked the cookies, you can store them in the freezer too. This makes it easy to grab a treat later. When you're ready to enjoy your frozen cookies, just leave them out at room temperature for about 30 minutes. If you froze the dough instead, you can bake it straight from the freezer. Just add a minute or two to the bake time for the perfect cookie. Yes, use a 1:1 gluten-free baking flour as a substitute. Many brands make this easy. Just replace the all-purpose flour in the recipe with your chosen gluten-free blend. This keeps the taste and texture similar. You can enjoy these cookies without worry! Drizzle more melted caramel on top before serving. This adds sweetness and a rich finish. You can also sprinkle a bit of sea salt on top. The salt and caramel work together for a great taste! Yes, they tend to intensify in flavor after a day or two, making them even more delightful. The apples and caramel continue to meld together. Storing them helps the flavors combine. You may find them even tastier the next day. Absolutely! Pears or peaches can work well in this recipe. Both fruits add sweetness and moisture. You can even mix different fruits for a fun twist. Try your favorites and see what you like best! Store them with a slice of bread in the container to maintain moisture. The bread keeps the cookies fresh and soft. This method works great for all cookies, not just these. Enjoy your gooey caramel and crisp apple cookies longer! This guide gives you a simple way to make delicious cookies. You learned about the key ingredients, step-by-step instructions, and tips for the best texture. Variations let you get creative, while storage tips help keep them fresh. Enjoy these cookies with family and friends, and feel free to experiment with flavors. Each bite can be a new delight. Happy baking!

Craving a sweet treat that combines cozy flavors and tempting textures? Look no further! These Gooey Caramel and Crisp Apple Cookies are sure to delight your taste buds. Imagine biting …

Read more

Categories Desserts

White Chocolate Pumpkin Snickerdoodles Delightful Treat

August 3, 2025 by Chef Miles
- 1 cup unsalted butter, softened to room temperature - 1 cup granulated sugar - 1/2 cup packed light brown sugar - 2 large eggs - 1 cup pure pumpkin puree (ensure it’s not pumpkin pie filling) - 3 1/2 cups all-purpose flour - 2 teaspoons cream of tartar - 1 teaspoon baking soda - 1/2 teaspoon salt - 1 tablespoon ground cinnamon - 1 teaspoon ground nutmeg - 1 teaspoon pure vanilla extract - 1 cup white chocolate chips - 1/4 cup granulated sugar (for rolling the cookies) - 1 tablespoon ground cinnamon (for rolling the cookies) For the best results, use unsalted butter. It gives you more control over the salt level. I recommend using pure pumpkin puree, not pumpkin pie filling. This ensures your cookies stay true to flavor. If you need a substitute for white chocolate chips, try dark chocolate or butterscotch chips. Both will add unique tastes. The ingredients come together to create a cookie that is soft yet chewy, with warm spices. The white chocolate adds sweetness and creaminess, balancing the pumpkin's earthiness. Each bite is a delightful mix of flavors that captures the essence of fall. You can find the full recipe above to explore the magic of these White Chocolate Pumpkin Snickerdoodles! 1. Preheat the Oven: Set your oven to 350°F (175°C). Line two baking sheets with parchment paper to stop cookies from sticking. 2. Cream the Butter and Sugars: In a large bowl, mix the softened butter, granulated sugar, and brown sugar. Use an electric mixer on medium speed for about 3-4 minutes. The mix should be light and fluffy. 3. Incorporate Eggs and Pumpkin: Add the eggs one at a time. Then, mix in the pumpkin puree and vanilla extract. Keep mixing until everything is smooth and well combined. 1. Mix the Dry Ingredients: In a medium bowl, whisk together the flour, cream of tartar, baking soda, salt, cinnamon, and nutmeg until well mixed. 2. Combine Wet and Dry Mixtures: Gradually add the dry mix to the wet mix. Stir gently until just combined. Be careful not to overmix, or the cookies may turn tough. Fold in the white chocolate chips. 3. Prepare Cinnamon Sugar: In a small bowl, combine 1/4 cup granulated sugar and 1 tablespoon ground cinnamon. Mix until well blended. 4. Shape the Cookies: Scoop out dough with a tablespoon or cookie scoop. Roll each piece into a ball, then coat it in the cinnamon sugar mixture. Ensure each ball is fully covered. 5. Bake: Place the dough balls on the prepared baking sheets, leaving about 2 inches between them. Bake for 10-12 minutes. Look for lightly golden edges as a sign they are ready. 1. Cool the Cookies: Once baked, take the cookies out of the oven. Let them cool on the baking sheets for 5 minutes. Then, transfer them to a wire rack to cool completely. 2. Presentation Tips: Serve the warm cookies on a nice platter. For a finishing touch, dust with extra ground cinnamon. These snickerdoodles go great with a cold glass of milk, making them a perfect treat! For the full recipe, check out the section above! - Storage: Keep cookies in an airtight container at room temperature. This keeps them soft. If you want them to last longer, use the fridge. They can stay fresh for up to a week. - Texture: For soft cookies, bake them until the edges are just golden. For chewy cookies, slightly underbake them. This helps keep the center moist. - Flavor Boost: Enhance the flavor by adding more spices like ginger or allspice. You can also use flavored extracts, such as almond or maple, for a twist. - Overmixing: Mixing too much can make the cookies tough. Mix until just combined for a tender texture. - Measuring: Always measure ingredients carefully. Use a kitchen scale for accuracy. This ensures the right balance of flavors and textures. - Baking Sheet Spacing: Place dough balls about 2 inches apart on the baking sheet. This allows enough space for them to spread without sticking together. These tips will help you create the best White Chocolate Pumpkin Snickerdoodles! Enjoy the process and the delicious results. For more details, check out the Full Recipe. {{image_4}} You can change the flavor of these cookies easily. Try using dark or milk chocolate instead of white chocolate. Dark chocolate adds a rich taste. Milk chocolate makes the cookies sweeter. You can also swap spices to create new flavors. Instead of cinnamon, try adding cardamom or allspice for a warm twist. For special occasions, add gingerbread spices like ginger and cloves. This will give your cookies a festive kick. If you need gluten-free cookies, use a gluten-free flour blend. This keeps the texture light and fluffy. For vegan options, swap the butter with coconut oil and use flax eggs. Just mix one tablespoon of ground flaxseed with three tablespoons of water for each egg. You can also reduce the sugar by using natural sweeteners like honey or maple syrup. Just note that this can change the texture slightly. These options let everyone enjoy white chocolate pumpkin snickerdoodles. Don't forget to check the [Full Recipe] for all the details! To keep your White Chocolate Pumpkin Snickerdoodles fresh, store them at room temperature. Place the cookies in a sealed container. This helps keep them soft and tasty. If you want to chill them, you can put them in the fridge. Use an airtight container to stop them from drying out. For longer storage, freeze the cookie dough. Roll dough balls, place them on a tray, and freeze until firm. Then, transfer them to a zip-top bag. This way, you can bake fresh cookies anytime! At room temperature, your cookies stay fresh for about one week. In the fridge, they last around two weeks. If you freeze the dough, it can last for three months. Check for signs of staleness. If the cookies feel hard or crumbly, they are no longer fresh. A change in color or smell can also mean they have spoiled. Enjoying these treats right away is best, but knowing how to store them helps you savor each bite longer. Can I use canned pumpkin instead of fresh? Yes, you can use canned pumpkin. Just make sure it's pure pumpkin puree. Avoid pumpkin pie filling. Canned pumpkin is easy and saves time. It gives your cookies great flavor and moisture. How can I make these cookies without white chocolate? You can skip the white chocolate entirely. Use dark chocolate chips or milk chocolate chips instead. You can also add nuts, like pecans or walnuts, for a nice crunch. The cookies will still be tasty without the white chocolate. What's the best way to soften butter quickly? To soften butter fast, cut it into small cubes. Place the cubes in a bowl and let them sit at room temperature for about 10 minutes. You can also microwave it for 10 seconds. Be careful not to melt it! What to do if cookies don’t flatten while baking? If your cookies don’t flatten, check if you chilled the dough too long. The dough should be soft but not overly cold. You can gently press them down with your palm before baking. They should spread nicely in the oven. How to fix dry cookie dough? If the dough is too dry, add a little milk or water. Start with one tablespoon and mix well. If it's still dry, add more liquid slowly. Be cautious not to make it too wet. Can I make mini snickerdoodles with this recipe? Yes, you can make mini snickerdoodles! Just scoop smaller amounts of dough. Bake them for about 8-10 minutes. Keep an eye on them to avoid overbaking. They will be cute and perfect for snacking! Overview of calories per cookie Each cookie has about 120 calories. This can vary based on the size and ingredients you use. Breakdown of fats, carbohydrates, and proteins - Fats: 5 grams - Carbohydrates: 18 grams - Proteins: 1.5 grams Allergen information related to the ingredients These cookies contain common allergens like wheat and dairy. They also have eggs. If you have allergies, you can try substitutions. Use gluten-free flour or dairy-free chocolate chips. This blog post covered everything you need for perfect cookies. I shared ingredient lists, step-by-step instructions, and tips to avoid mistakes. You learned about fun variations and how to store cookies for freshness. Keep these tips in mind as you bake. Enjoy the process and share your treats with others. Happy baking!

Get ready to treat yourself with my White Chocolate Pumpkin Snickerdoodles! This cookie combines the warm spices of fall with creamy white chocolate for a delightful explosion of flavor. Perfect …

Read more

Categories Desserts

Easy Mini Corn Dog Muffins Tasty Snack for Everyone

August 3, 2025 by Chef Miles
- 1 cup cornmeal - 1 cup all-purpose flour - 1 tablespoon baking powder - 1/2 teaspoon salt - 1/4 teaspoon freshly ground black pepper - 1 cup milk - 1 large egg - 2 tablespoons honey - 1 cup hot dogs, diced into small bite-sized pieces - 1/2 cup sharp cheddar cheese, shredded - Cooking spray or mini muffin liners To make easy mini corn dog muffins, gather these ingredients first. The cornmeal gives a nice texture. The all-purpose flour helps bind everything together. Baking powder makes the muffins rise. Don't forget the salt; it enhances all the flavors. Next, add black pepper for a little kick. Milk adds moisture, while egg binds the batter. Honey adds a touch of sweetness that balances the savory. The best part? The add-ins! Diced hot dogs bring that classic corn dog taste. The sharp cheddar cheese adds creaminess and flavor. Remember to have cooking spray or muffin liners ready to prevent sticking. You have everything you need for a fun snack! For the complete recipe, check the section on instructions. - Preheat oven to 375°F (190°C). - Prepare muffin tin with liners or cooking spray. Start by preheating your oven. This step ensures even cooking. While the oven warms, prepare your mini muffin tin. You can use paper liners or spray it with cooking spray. This helps the muffins come out easily after baking. - Combine cornmeal, flour, baking powder, salt, and pepper. In a large mixing bowl, add cornmeal, flour, baking powder, salt, and pepper. Use a whisk to mix them well. Make sure there are no clumps. This blend gives your muffins a nice base. - Whisk together milk, egg, and honey. Next, grab a medium bowl. Whisk together milk, egg, and honey until smooth. This mixture adds moisture and sweetness to your muffins. - Pour wet mixture into dry ingredients and mix gently. Now, pour the wet mixture into the dry mix. Stir gently with a spatula. Be careful not to overmix. A few lumps are okay. This step ensures a light and fluffy muffin. - Fold in hot dogs and cheese. Once mixed, fold in the diced hot dog pieces and shredded cheese. This adds flavor and texture to your muffins. Make sure they are evenly spread in the batter. - Fill muffin cups and bake for 12 to 15 minutes. Using a spoon or small scoop, fill each muffin cup about two-thirds full. This gives them room to rise. Place the muffin tin in the oven and bake for 12 to 15 minutes. Check if they are done by inserting a toothpick. It should come out clean. The tops should also be golden brown. Enjoy your warm mini corn dog muffins with your favorite dips! For the full recipe, refer to the earlier section. To make great mini corn dog muffins, mix your batter just enough. Overmixing makes them tough. You want small lumps in the batter. They help keep your muffins light and fluffy. To check for doneness, insert a toothpick into the center. If it comes out clean, they are ready. The tops should be a nice golden brown. These mini corn dog muffins shine with tasty dips. Mustard and ketchup are classic choices. They add fun and flavor. You can also try honey mustard for a sweet twist. For a pop of color, sprinkle fresh parsley on top. It adds a nice touch and flavor. Serve them warm for the best taste. Using the right tools makes baking easy. A non-stick mini muffin tin works best. It ensures your muffins pop out easily. If you prefer, use muffin liners. For mixing, a large bowl and a whisk are great. A spatula helps you fold in the hot dogs and cheese. These tools make your baking smoother and more fun. If you want to see the full process, check out the Full Recipe. {{image_4}} You can easily adjust the recipe with gluten-free flour. Use a blend of rice flour and tapioca flour for a tasty option. This works well for those with gluten issues. For a dairy-free version, swap regular milk with almond milk or oat milk. You can use dairy-free cheese for a cheesy flavor without the dairy. Want to spice things up? Add a pinch of cayenne pepper or smoked paprika for extra kick. You can also mix in different proteins. Turkey dogs or veggie hot dogs work great. This lets you customize flavors to fit your taste. For a lighter version, use less honey or skip it altogether. You can reduce the cheese to cut calories. Another tip is to use turkey hot dogs. They have less fat and sodium, making your muffins healthier. Always check labels for lower sodium options when choosing hot dogs. To store leftovers, let the mini corn dog muffins cool fully. Place them in an airtight container. Keep them at room temperature for up to two days. This keeps them soft and tasty. For long-term storage, freezing is your best bet. Wrap each muffin in plastic wrap. Then, place them in a freezer-safe bag or container. They can last for up to three months in the freezer. When ready to eat, just remove the wrap and pop them in the oven to reheat. To reheat your muffins without losing their great texture, use the oven. Preheat the oven to 350°F (175°C). Place the muffins on a baking sheet and heat for about 10 minutes. This will keep them warm and soft. You can also use a microwave. Just heat them for 20-30 seconds. But be careful, as this can make them a bit chewy. Enjoy these tasty treats fresh! For the full recipe, check out the section above. Yes, you can make the batter ahead of time. Just mix the dry and wet ingredients separately. Store the wet mix in the fridge for up to 24 hours. When you’re ready to bake, combine both mixtures and fold in the hot dogs and cheese. This saves time and keeps the muffins fresh. You can tell when the muffins are done by checking their color and texture. They should be golden brown on top. Insert a toothpick into the center of a muffin. If it comes out clean, they are done. If it has batter on it, bake for another minute or two. Absolutely! You can use any cheese you like. Try mozzarella for a milder taste or pepper jack for a spicy kick. Gouda adds a nice smoky flavor, while feta brings a tangy twist. Experiment and find your favorite combo. Mini corn dog muffins go great with a variety of sides. Serve them with mustard or ketchup for dipping. You can also pair them with a fresh salad, carrot sticks, or sweet potato fries. These sides add more fun to your snack time. To adjust the recipe, simply multiply the ingredients. For a smaller batch, halve the amounts. Use the same baking time, but check for doneness a bit earlier. This way, you can easily make enough for a small snack or a big party. Enjoy the Full Recipe for details! You learned how to make tasty mini corn dog muffins, from ingredients to baking. Each step is simple and easy to follow, making it perfect for any cook. Remember to check for doneness and try different flavors. With all these tips, your muffins will shine. Enjoy making these fun bites, and share your creations! You’ll love how they please friends and family alike. Happy baking!

Looking for a fun and easy snack that everyone will love? Try making Easy Mini Corn Dog Muffins! They’re simple to whip up and packed with flavor. You’ll enjoy soft …

Read more

Categories Appetizers

20 Minute Roasted Tomatillo Salsa Verde Delight

August 3, 2025 by Chef Miles
- 10 tomatillos, husked and halved - 1/2 large white onion, quartered - 2 cloves garlic, unpeeled - 2 jalapeños, halved - 1/4 cup fresh cilantro, chopped - 1 tablespoon lime juice - Salt and olive oil - Baking sheet - Blender - Knife and cutting board When I make 20 Minute Roasted Tomatillo Salsa Verde, I gather fresh ingredients. The tomatillos bring a bright, tangy taste. The onion adds sweetness, and the garlic gives depth. Jalapeños offer a kick, but you can adjust them for less heat. Fresh cilantro adds a burst of flavor, while lime juice brightens everything up. A pinch of salt and a drizzle of olive oil tie it all together. For tools, I use a baking sheet to roast the veggies. A good blender helps mix everything smoothly. A knife and cutting board make prep quick and easy. With these ingredients and tools, you’re set to create a salsa that bursts with flavor. If you want to follow the complete process, check out the Full Recipe linked above. - Preheat the oven to 425°F (220°C). This makes sure your veggies roast well. - Prepare your baking sheet by arranging the ingredients. Place the halved tomatillos, quartered onion, unpeeled garlic, and halved jalapeños on it. - Drizzle the vegetables lightly with olive oil. This adds flavor and helps with cooking. - Sprinkle salt over them. This enhances their natural tastes. - Roast for about 15 minutes. Check the veggies to see if they soften and char slightly. - Once done, take the baking sheet out. Let the veggies cool for a few minutes to handle them safely. - Transfer the roasted ingredients into a blender. Add the chopped cilantro and lime juice for freshness. - Blend everything until you reach your desired consistency. You can make it chunky or smooth, based on your taste. - Taste your salsa. If you need more salt or lime, add it now for the best flavor. You can find the full recipe for this delightful salsa in the main article. To get tomatillos just right, look for a nice char. They should soften and take on a rich color. This means they are ready to blend. The key is to check them after about 15 minutes. If they look a bit blistered, you’re on the right track. Enhancing Flavor with Spices Add salt before roasting. This helps bring out the natural taste of the tomatillos. You can also sprinkle in some cumin or smoked paprika. These spices add depth and a hint of smokiness that elevates the salsa. Feel free to adjust based on your taste. Roasted tomatillo salsa verde is a star on its own. Serve it warm or at room temperature. It pairs wonderfully with crispy tortilla chips. Just scoop and enjoy! Pairing Ideas You can also use this salsa with tacos, grilled meats, or fish. It adds a fresh, zesty kick. For a fun twist, drizzle it over a salad or use it as a dressing. The options are endless! For the full recipe, check out the [Full Recipe]. {{image_4}} You can change the spice level of your salsa with ease. Start by adjusting the number of jalapeños. If you want more heat, add another pepper. If you prefer less heat, remove one or two jalapeños. You can also play with different peppers. Try serrano or poblano peppers for a unique flavor. Each pepper brings its own taste and heat. This way, you can make salsa that suits your taste perfectly. Want to make your salsa even more exciting? Consider adding fruits like mango or pineapple. These fruits bring a sweet twist to the tangy tomatillos. You can also use fresh herbs like oregano or thyme. They add a great aromatic flavor to your salsa. Mixing these ingredients can create a one-of-a-kind salsa. Feel free to experiment and find the mix you love best. For more ideas, check the Full Recipe to see how you can customize your dish. To keep your salsa verde fresh, use an airtight container. Glass jars work great. They help keep out air and moisture. Store your salsa in the fridge. It stays tasty for about one week. After that, the flavors may fade. Always check for smell or color changes before using. You can freeze salsa verde for later use. Start by pouring it into freezer-safe bags or containers. Leave some space at the top. Salsa expands when it freezes. Seal the bags tightly to prevent air. When ready to eat, thaw it in the fridge overnight. To use the frozen salsa, shake it well. It may separate when thawed. Stir it before serving for the best taste. You can also add fresh herbs or a splash of lime juice to refresh the flavor. For more details, check the Full Recipe. Making this salsa verde takes just 20 minutes. Here’s the breakdown: - Prep time: 5 minutes to get your ingredients ready. - Cook time: 15 minutes to roast the tomatillos and other veggies. This quick process gives you a fresh and zesty salsa in no time! Yes, you can use canned tomatillos. They save time but may change the flavor. Canned tomatillos are softer and less bright than fresh ones. If you use them, drain the liquid well. You might also add a bit more lime juice to boost the flavor. This salsa verde is super versatile. Here are some great pairings: - Tacos: Use it as a topping for chicken or fish tacos. - Grilled meats: Drizzle it over grilled chicken or pork for added zest. - Dips: Serve with tortilla chips for a tasty snack. - Rice or quinoa: Mix it in to add flavor to your grains. You can check the [Full Recipe] for more ideas and detailed instructions! You learned how to make 20 Minute Roasted Tomatillo Salsa Verde today. We covered all the key ingredients, tools, and step-by-step instructions to create a tasty salsa. We also explored tips for roasting and flavoring, plus ways to customize the recipe to fit your taste. Lastly, I shared best storage practices to keep your salsa fresh. Now, you’re ready to impress your friends and family. Enjoy this bright, zesty salsa with everything from chips to tacos. Happy cooking!

Are you ready to spice up your meals in just 20 minutes? In this blog, I’ll show you how to make a delicious roasted tomatillo salsa verde that is fresh, …

Read more

Categories Appetizers

Chicken Quesadilla Simple and Flavorful Recipe

August 3, 2025 by Chef Miles
- 2 cups cooked chicken, shredded - 1 cup mixed bell peppers, diced - 1 small red onion, finely chopped - 1 jalapeño, deseeded and minced - 1 teaspoon ground cumin - 1 teaspoon smoked paprika - 1 teaspoon garlic powder - Salt and freshly ground black pepper to taste - 1 cup shredded sharp cheddar cheese - 1 cup shredded Monterey Jack cheese - 4 large flour tortillas - 2 tablespoons olive oil, divided - Fresh cilantro for garnish - Sour cream and salsa for serving To create a flavorful chicken quesadilla, gather these ingredients first. Start with cooked chicken. I like to use shredded chicken for better texture. Choose colorful bell peppers for a vibrant look. Chop a small red onion for sweetness. If you want some heat, add a jalapeño. Make sure to deseed it to control the spice level. Next, gather your spices. Ground cumin and smoked paprika add depth. Garlic powder gives it a nice kick. Don’t forget salt and pepper to taste. For cheese, I mix sharp cheddar and Monterey Jack. They melt beautifully together. Use large flour tortillas to wrap it all up. Lastly, have olive oil ready for cooking. It helps get that perfect crisp. Fresh cilantro adds a pop of color on top. Serve with sour cream and salsa for dipping. This simple list creates a dish that is both tasty and satisfying. For the full recipe, check out Cheesy Fiesta Chicken Quesadillas. - Step 1: Combine chicken and vegetables in a bowl In a big bowl, mix 2 cups of shredded chicken with 1 cup of diced bell peppers, 1 small chopped red onion, and 1 minced jalapeño. Add 1 teaspoon of ground cumin, 1 teaspoon of smoked paprika, and 1 teaspoon of garlic powder. Then, sprinkle in salt and pepper to taste. Stir well until everything is mixed. - Step 2: Heat olive oil in a skillet Next, take a large skillet and heat 1 tablespoon of olive oil over medium heat. Wait until the oil is hot but not smoking. This helps the quesadilla cook evenly. - Step 3: Assemble the quesadilla Place one large flour tortilla in the skillet. Spread half of your chicken mixture on one half of the tortilla. Top it with half of the shredded sharp cheddar and Monterey Jack cheese. Fold the tortilla over to cover the filling. Press it down gently with a spatula to seal it. - Step 4: Cook the first side to golden brown Let the quesadilla cook for 3-4 minutes. You want it to turn a nice golden brown and get crispy. - Step 5: Flip and finish cooking Carefully flip the quesadilla over. Cook the other side for another 3-4 minutes. Keep an eye on it to make sure the cheese melts and the tortilla gets golden. - Step 6: Slice and serve Once done, take the quesadilla out of the skillet. Let it cool for a minute. Use a sharp knife or pizza cutter to slice it into wedges. You can arrange the wedges on a plate and sprinkle fresh cilantro on top. Serve it warm with sour cream and salsa for dipping. This recipe is simple and fun to make. For the full recipe, check the link above! - Use the right tortilla: Flour tortillas work best for quesadillas. They are soft and more flexible. Corn tortillas can break easily. If you prefer corn, make sure they are fresh. - Preheat skillet properly: Heat your skillet to medium before adding oil. This helps cook the quesadilla evenly. A hot skillet gives you a nice, crispy texture. - Don’t overfill: Keep your filling to a moderate amount. If you overfill, the quesadilla may tear. Aim for about half a cup of filling for each tortilla. - Pair with sides: Quesadillas taste great with Mexican rice or beans. They add texture and balance to your meal. - Garnish ideas: Besides cilantro, try lime wedges or avocado slices. These add fresh flavors and color to your plate. You can also drizzle some sour cream or salsa on top for extra zest. For a full guide on making these delicious quesadillas, check out the Full Recipe. {{image_4}} You can change the chicken in your quesadilla. Try using beef or shrimp for a new taste. Both options add unique flavors that surprise the palate. You can also mix in more veggies. Spinach adds a nice color and taste. Mushrooms give a rich, earthy flavor. Just chop your veggies and add them to the mix! Cheese makes a quesadilla special. You can play with different types of cheese. Queso blanco is creamy and melts well. Pepper jack gives a spicy kick, which some may enjoy. Mixing cheeses can create a tasty blend. Don't be afraid to experiment until you find your favorite combo! To store cooked quesadillas, let them cool first. Place them in an airtight container. You can keep them in the fridge for 3 to 4 days. This helps maintain their taste and texture. For reheating, I recommend using an oven. Preheat the oven to 350°F (175°C). Place the quesadillas on a baking sheet. Heat for about 10 minutes or until warm. This method keeps them crispy. If you use a microwave, place them on a microwave-safe plate. Heat for 30 seconds to 1 minute. The texture won’t be as crispy, but it’s quick. You can freeze both uncooked and cooked quesadillas. For uncooked ones, wrap them tightly in plastic wrap. Place them in a freezer bag. They last for up to 3 months. When ready to cook, just thaw in the fridge overnight. To freeze cooked quesadillas, let them cool completely. Wrap each one in foil. Place them in a freezer bag or container. They also last for about 3 months. When you want to eat them, thaw in the fridge. Reheat in the oven for the best texture. This keeps them nice and cheesy! What is the best cheese for quesadillas? The best cheese for quesadillas is a mix of sharp cheddar and Monterey Jack. These cheeses melt well and give a rich flavor. You can also try pepper jack for a spicy kick. Can I make quesadillas ahead of time? Yes, you can make quesadillas ahead of time. Just cook them and let them cool. Store them in the fridge for up to two days. When ready to serve, reheat in a skillet for a crispy texture. How can I make quesadillas healthier? To make quesadillas healthier, use whole wheat tortillas. Add more vegetables like spinach or zucchini. Choose low-fat cheese and skip sour cream or use Greek yogurt instead. How long do quesadillas take to cook? Quesadillas take about 6 to 8 minutes to cook. Each side should brown for 3 to 4 minutes. You want them golden and the cheese melted. Can I use gluten-free tortillas? Yes, you can use gluten-free tortillas. They work just as well for quesadillas. Just ensure they are sturdy enough to hold the filling. Enjoy the same tasty meal without gluten! In this article, we explored how to make delicious quesadillas. We covered the key ingredients, step-by-step cooking instructions, and useful tips. You learned about filling alternatives, cheese options, and how to store your creations. Remember, the right tortilla and proper cooking time are essential for great quesadillas. I encourage you to try different variations and serving ideas. Enjoy your cooking and make quesadillas that everyone will love!

If you crave a quick meal that bursts with flavor, you’ve come to the right place! In this post, I’ll share my simple and delicious Chicken Quesadilla recipe. With just …

Read more

Categories Appetizers

Popcorn Chicken Delightful Bite-Sized Treat

August 3, 2025 by Chef Miles
To make popcorn chicken, gather these simple ingredients: - 1 lb (450g) boneless chicken breast, cut into bite-sized pieces - 1 cup buttermilk - 1 teaspoon smoked paprika - 1 teaspoon garlic powder - 1 teaspoon onion powder - 1 teaspoon kosher salt - ½ teaspoon freshly ground black pepper - 1 cup all-purpose flour - ½ cup cornmeal - 1 teaspoon baking powder - ½ teaspoon cayenne pepper (optional for an extra kick) - Oil for frying (vegetable or canola preferred) If you want to mix it up, consider these swaps: - Use chicken thighs for a juicier bite. - Swap buttermilk with yogurt for a tangy flavor. - Try different spices like chili powder or oregano for unique tastes. - For a gluten-free option, use almond flour in place of all-purpose flour. This popcorn chicken is a tasty treat, but it’s good to know its nutrition. Each serving (about 4 pieces) has roughly: - Calories: 300 - Protein: 25g - Fat: 15g - Carbohydrates: 20g - Fiber: 1g This recipe provides a good protein source. Enjoy it as a snack or a meal. You can find the full recipe above to help you prepare this delightful dish! To make the marinade, start with a large bowl. Pour in 1 cup of buttermilk. Add 1 teaspoon of smoked paprika, garlic powder, onion powder, 1 teaspoon of kosher salt, and ½ teaspoon of black pepper. If you like heat, toss in ½ teaspoon of cayenne pepper. Whisk these until smooth. This mix adds flavor and moisture to your chicken. Now, take your 1 pound of chicken breast. Cut it into bite-sized pieces. Place the chicken in the buttermilk mixture. Make sure each piece is fully coated. Cover the bowl with plastic wrap or a lid. Refrigerate for at least 1 hour. If you can, let it sit overnight for deeper flavor. After marinating, it’s time to fry. In a medium bowl, mix 1 cup of flour, ½ cup of cornmeal, and 1 teaspoon of baking powder. Take the chicken out of the marinade, letting excess drip off. Dredge each piece in the flour-cornmeal mix until well coated. Heat oil in a skillet over medium heat. Aim for 350°F (175°C). Make sure the oil is deep enough to submerge the chicken pieces. Carefully add the chicken in batches to avoid overcrowding. Fry for about 4-5 minutes on each side. Look for a golden brown color and check the internal temp of 165°F (74°C). Once cooked, use a slotted spoon to move the chicken to a plate lined with paper towels. This helps drain excess oil. Serve your crispy popcorn chicken hot, with your choice of dipping sauces. Enjoy the delightful crunch! To get the best crispiness, focus on the oil temperature. Heat your oil to about 350°F (175°C). Use a thermometer to check this. If the oil is too hot, the chicken burns. If it's too cool, the chicken gets soggy. Fry in small batches. This helps keep the oil hot, ensuring even cooking. One common mistake is skipping the marinating step. Marinating adds flavor and moisture. Always let the chicken soak in the buttermilk mixture for at least one hour. Another mistake is overcrowding the pan. This lowers the oil temperature and leads to uneven frying. For frying, use a deep skillet or a heavy pot. A cast-iron skillet works great for even heat. Use a slotted spoon to remove the chicken. It allows excess oil to drip off easily. A thermometer is a must-have for checking oil temperature. You’ll find these tools essential for making perfect popcorn chicken. For the full recipe, check out the earlier section. {{image_4}} If you love heat, try adding spices to your popcorn chicken. You can use cayenne pepper in the marinade. This adds a nice kick. For more spice, mix in chili powder or hot sauce. Both options work well! Another fun idea is to toss the fried chicken in a spicy sauce. A mixture of hot sauce and melted butter makes a great coating. You can make popcorn chicken gluten-free with a few swaps. Instead of regular flour, use gluten-free flour or almond flour. Cornmeal is usually gluten-free, so keep that. Check the label to be sure! For the buttermilk, use a dairy-free option like almond milk mixed with vinegar. This way, everyone can enjoy popcorn chicken! Dipping sauces make popcorn chicken even better. Try honey mustard for a sweet touch. Ranch dressing is a classic choice, too. For something zesty, mix ketchup with sriracha. If you want something fresh, try a yogurt-based sauce with herbs like dill and parsley. Each sauce adds a unique taste to your bites. You can find more ideas in the Full Recipe. To keep your popcorn chicken fresh, store it in an airtight container. Let it cool completely before placing it inside. If you skip this step, steam can build up and make it soggy. Keep it in the fridge for up to three days. If you have leftovers, they are still tasty, but the crispiness may fade. When you're ready to enjoy your popcorn chicken again, you can reheat it easily. The best way is to use an oven. Preheat your oven to 375°F (190°C). Place the chicken on a baking sheet and heat for about 10 to 15 minutes. This method helps regain some of that crispiness. You can also use an air fryer for similar results, cooking it for about 5 to 7 minutes. If you want to save your popcorn chicken for later, freezing is a great option. Before freezing, make sure it's completely cool. Arrange the chicken on a baking sheet in a single layer. Freeze for about two hours until firm. Then transfer the pieces to a freezer bag. This method prevents them from sticking together. You can freeze them for up to three months. When you’re ready to eat, just reheat from frozen, adding a few extra minutes to your cooking time. Enjoy your delicious bites anytime! Popcorn chicken is a fun, bite-sized treat made from chicken breast. You cut the chicken into small pieces, coat them, and fry until golden. The name comes from its small size, resembling popcorn. This dish is popular for its crunchy texture and juicy center. People love it as a snack or a meal. You can enjoy it with dipping sauces like ranch or honey mustard. This makes it a hit at parties and gatherings. Yes, you can bake popcorn chicken! Baking is a healthier option. To do this, preheat your oven to 400°F (200°C). After coating the chicken, place them on a baking sheet lined with parchment paper. Spray the chicken lightly with cooking oil to help them crisp up. Bake for about 20-25 minutes, flipping halfway through. Check that the chicken is cooked through and golden. Baking gives you a tasty result with less oil. Get creative with your popcorn chicken serving! Here are some fun ideas: - Create a platter: Serve with various dipping sauces. - Make sliders: Place pieces in small buns with lettuce and sauce. - Add to salads: Toss in a salad for a crunchy topping. - Serve in a cone: Use paper cones for a fun street food vibe. - Pair with sides: Try with fries or coleslaw for a full meal. These ideas will impress your guests and make the dish even more enjoyable. For the complete recipe, check out the Full Recipe section! This blog post covered all you need to make great popcorn chicken. We explored key ingredients, marinade steps, and frying techniques. I shared tips to ensure perfect crispiness and avoided common mistakes. You learned about variations, storage methods, and answers to key questions. Popcorn chicken is a fun dish that can fit any taste. Enjoy creating your version today!

Popcorn chicken is a fun and tasty treat you can enjoy anytime. This bite-sized delight is crispy on the outside and juicy on the inside. Whether you crave a quick …

Read more

Categories Appetizers

Authentic Masala Chai Rich and Flavorful Recipe Guide

August 2, 2025 by Chef Miles
To make real masala chai, you need a few key items. Here’s what you’ll need: - 2 cups water - 1 cup milk (you can use whole, almond, or any non-dairy type) - 2 tablespoons loose black tea (try Assam or Darjeeling) - 1-2 tablespoons sugar (adjust to your taste) - 1 cinnamon stick - 4-5 green cardamom pods, lightly crushed - 4-5 black peppercorns - 1 piece of fresh ginger (about 1 inch), thinly sliced - 2-3 whole cloves These ingredients come together to create a rich and warming drink. You can add some extra flavors to your masala chai. Here are some options: - A pinch of nutmeg for warmth - A few bay leaves for depth - Aniseed for a unique twist - Vanilla extract for sweetness Feel free to experiment with these options. They can elevate your chai to new levels. Choosing the right tea is key for great masala chai. Here’s how to pick the best: - Look for loose leaf tea instead of tea bags for better flavor. - Select strong black tea varieties like Assam or Darjeeling. - Check the freshness; older tea can lose its bold taste. A good quality tea will make your masala chai truly shine. For the complete recipe, refer to the Full Recipe section. First, take a medium saucepan and add 2 cups of water. Place it on medium heat. Wait for the water to boil. As soon as it bubbles, add the sliced ginger, crushed cardamom pods, black peppercorns, whole cloves, and the cinnamon stick. Turn the heat down a bit. Let the mix simmer for about 5 minutes. This makes the spices release their flavors. Now, stir in 2 tablespoons of loose black tea. Let it steep for 2-3 minutes. You can adjust this time based on how strong you want your chai. Keep in mind, a longer steep means a stronger flavor. The tea and spices blend together nicely during this step. Next, slowly add your choice of milk. You can use whole milk, almond milk, or any non-dairy milk. Increase the heat slightly and bring it back to a gentle boil. Once it's bubbling, add 1-2 tablespoons of sugar. Stir until it dissolves completely. Let it simmer for another 2-3 minutes. This helps to blend all the flavors. Finally, remove it from heat and strain the chai into cups using a fine mesh strainer. Serve it hot! You can enjoy your masala chai with biscuits or savory snacks for a great treat. For the full recipe, check out Spiced Delight: Authentic Masala Chai. To make great masala chai, you need the right balance of spices. Start with the basics: ginger, cardamom, and cinnamon. These spices give chai its warm and inviting flavor. You can adjust the amounts based on your taste. If you like it spicy, add more ginger and black pepper. For a sweeter taste, use extra cardamom. Play with the spices until you find your perfect mix. The way you brew your chai can change its taste. Start by boiling the water with the spices first. This step releases their flavors. After that, add the tea leaves. Let them steep for 2-3 minutes. If you want a stronger chai, steep the tea longer. Remember, the longer it brews, the more flavor you will get. Finally, always add the milk after the tea has steeped. This helps keep the chai creamy and rich. Many people make simple mistakes when making masala chai. One common mistake is not boiling the spices long enough. This can lead to a weak flavor. Another mistake is adding the milk too early. Always wait until after the tea has steeped. Also, be careful with the sugar. Start with a little and taste as you go. You can always add more, but you can't take it out. Following these tips will help you create a perfect cup of masala chai every time. For a detailed recipe, check the Full Recipe. {{image_4}} You can change the spices in masala chai to fit your taste. Instead of ginger, try using fennel seeds for a sweet touch. Replace cardamom with star anise for a bold flavor. You can even add turmeric for a warm color and health boost. Each spice brings a new twist to your drink. Masala chai usually uses whole milk for creaminess. However, you can swap it for almond, oat, or soy milk. Each option brings its own flavor. Almond milk gives a nutty taste, while oat milk adds a creamy feel. Experiment to find the best match for your palate. Seasonal chai recipes make each season special. In winter, add a pinch of nutmeg or a splash of vanilla for warmth. In summer, try iced masala chai. Just brew your chai, cool it, and serve over ice. You can garnish with mint leaves for a refreshing twist. Enjoy the flavors of the season with every sip! To keep your leftover masala chai fresh, pour it into a clean container. Make sure it has a tight lid. Place it in the fridge. Use it within two days for the best flavor. This way, you can enjoy your chai later without losing its taste. For the freshest masala chai, always brew it right before serving. Use fresh spices and loose black tea for maximum flavor. If you want to make a larger batch, use the Full Recipe. Always measure your ingredients accurately. This helps create the perfect balance of flavors. When reheating masala chai, do it slowly on the stove. Avoid the microwave, as it can change the taste. Heat it until it's warm, but don’t let it boil again. This keeps the spices and flavors intact. Stir well before serving to blend everything nicely. Authentic masala chai is a spiced tea from India. It blends black tea with milk and spices. The spices usually include cardamom, cinnamon, ginger, and cloves. Each family has its own special recipe. You can adjust the spice levels to fit your taste. Masala chai is warm, rich, and comforting, perfect for any time of day. Yes, you can make masala chai without milk. Use water instead to keep it dairy-free. The taste will differ, but it can still be flavorful. You can also try plant-based milk like almond or oat. These options add a unique twist. Adjust the spices to keep the drink delicious. You can find authentic masala chai ingredients at local Indian grocery stores. Most stores stock spices like cardamom, cloves, and cinnamon. You can also buy loose black tea, such as Assam or Darjeeling, there. For convenience, shop online for specialty items. Websites often offer fresh spices. Check for quality and freshness to ensure the best flavor in your chai. For the complete recipe, see the [Full Recipe]. Masala chai is a delightful drink, rich in flavor and tradition. We explored essential and optional ingredients, ensuring a perfect blend. I shared step-by-step instructions for brewing and tips to enhance your chai experience. You can add your personal touch through variations and learn how to store it properly. Remember, good masala chai comes from using quality ingredients and avoiding common mistakes. Enjoy experimenting with your own recipes and savor each sip of this comforting beverage.

If you’re craving a warm cup of comfort, you’ve come to the right place! In my guide, Authentic Masala Chai: Rich and Flavorful Recipe, I’ll share the secrets to making …

Read more

Categories Breakfast

Cinnamon Honey Butter Sweet Potato Cornbread Delight

August 2, 2025 by Chef Miles
- 1 cup mashed sweet potatoes - 1 cup buttermilk - 2 large eggs - 1/4 cup unsalted butter - 1/2 cup honey - 1 1/2 cups yellow cornmeal - 1 cup all-purpose flour - 2 teaspoons baking powder - 1 teaspoon baking soda - 1 teaspoon ground cinnamon - 1/2 teaspoon sea salt - Choosing the right sweet potatoes: Look for firm, smooth sweet potatoes. Avoid any with soft spots or blemishes. The flavor of your cornbread starts here! - Importance of room temperature buttermilk: Room temperature buttermilk mixes better with the other wet ingredients. This helps create a smooth batter and ensures even baking. For the full recipe, check out the link. This simple approach to gathering your ingredients helps ensure success in your baking journey. Enjoy the process, and let the flavors shine! - Preheat your oven to 400°F (200°C). - Prepare a 9-inch square baking pan by greasing it with cooking spray or butter, or line it with parchment paper. - In a large bowl, mix the cooled mashed sweet potatoes, buttermilk, eggs, melted butter, and honey. - Whisk until the mixture is smooth and well combined. - In another bowl, blend the cornmeal, all-purpose flour, baking powder, baking soda, ground cinnamon, and sea salt. - Stir until everything is evenly mixed. - Gradually fold the dry mix into the wet mixture. - Stir gently. It's okay if the batter has a few lumps; don't over-mix! - Pour the batter into the prepared baking pan. - Spread it evenly with a spatula. - Bake for 20-25 minutes. - Check for doneness by inserting a toothpick in the center. It should come out clean. For the complete recipe, check out the [Full Recipe]. To get the perfect texture for your cornbread, focus on the mixing. Combine wet and dry ingredients gently. Leave a few lumps in the batter; this helps keep it fluffy. Over-mixing can create tough cornbread. Mix just until you see no dry flour. To add more depth, consider extra spices. Nutmeg or ginger can bring a warm twist. You might also add nuts like pecans or walnuts for crunch. For toppings, serve with honey butter or a sprinkle of cinnamon. You can also try adding a dollop of whipped cream for sweetness. Cornbread pairs well with chili or soup. It’s also great with roasted meats. For gatherings, slice the cornbread into squares. Serve warm on a beautiful platter. Top each piece with a slice of sweet potato for a colorful touch. It makes a lovely presentation that everyone will enjoy. {{image_4}} You can play with flavors in this cornbread. Try adding spices like nutmeg or ginger for a warm twist. These spices add depth and enhance the sweet potato flavor. You can also mix in cheese or jalapeños for a savory twist. Cheese will add creaminess, while jalapeños bring heat. Both options make your cornbread unique and delicious. If you need gluten-free options, use almond flour or gluten-free all-purpose flour. These flours give a great texture and flavor. For those avoiding dairy, you can swap buttermilk with almond milk and add a splash of vinegar. Use coconut oil or a dairy-free butter for a richer taste. These swaps keep your cornbread just as tasty. Get creative with how you serve cornbread. You can easily transform it into muffins for a fun twist. Bake them in a muffin tin for a portable snack. Cornbread can also shine in other recipes. Use it in stuffing or casseroles for a hearty meal. Each option showcases this cornbread’s flavor and texture, making every bite special. For the full recipe, check out the main article. To keep your Cinnamon Honey Butter Sweet Potato Cornbread fresh, store it in the fridge. Use an airtight container to prevent it from drying out. This method helps maintain its soft texture and sweet flavor. Your cornbread will stay good for about 3 to 5 days in the refrigerator. Always check for any signs of spoilage before you eat it. You can freeze cornbread for longer storage. First, let it cool completely. Then, wrap it tightly in plastic wrap. After that, place it in a freezer-safe bag or container. This helps protect it from freezer burn. It can last up to 3 months in the freezer. When you want to eat it, thaw it in the fridge overnight for best results. When it’s time to enjoy your cornbread again, you have two options: the oven or the microwave. - Oven: Preheat your oven to 350°F (175°C). Wrap the cornbread in foil to keep it moist. Heat for about 10-15 minutes, or until warm. - Microwave: Place a slice on a microwave-safe plate. Cover it with a damp paper towel. Heat for 20-30 seconds. This method is quick but may dry it out, so be careful. Using these methods, your cornbread will taste fresh and delicious every time! For the full recipe, check out the [Full Recipe]. Yes, you can use canned sweet potatoes. They save time and are easy to use. However, there are some pros and cons. Canned sweet potatoes are soft and already cooked. This means you can skip the cooking step. On the downside, they may have added sugars or preservatives. Fresh sweet potatoes offer more flavor and nutrients. They also let you control the sweetness. You can use several alternatives for buttermilk. Here are some options: - Milk with vinegar: Add 1 tablespoon of vinegar to 1 cup of milk and let it sit for 5 minutes. - Yogurt: Mix plain yogurt with a little water to thin it out. - Sour cream: Use sour cream for a rich flavor, thinned with water if needed. These substitutes work well in the cornbread, keeping it moist and tasty. To check if your cornbread is done, look for these signs: - A golden brown top that looks firm. - The edges may pull away slightly from the pan. - If you press the top gently, it should spring back. A toothpick test is great, but these signs help too! Yes, you can prepare this cornbread ahead of time. Make the batter and store it in the fridge for up to 24 hours. When you’re ready to bake, just pour it into the pan and bake as directed. If you have leftover cornbread, store it in an airtight container. It stays fresh for a few days. If you want to replace honey, there are several options: - Maple syrup: It has a nice flavor and works well in this recipe. - Agave nectar: This sweetener is mild and can easily swap with honey. - Brown sugar: Use it in equal amounts, but dissolve it in the wet ingredients first. Each alternative will change the flavor slightly, so choose what you like best! You can find the full recipe [here]. This recipe for sweet potato cornbread is a delight. We explored the essential ingredients and the step-by-step process to create it. I shared tips for perfect texture and storage methods, ensuring your cornbread stays fresh. You can even try flavor variations and dietary substitutions for your needs. Cornbread enhances many meals or stands alone as a star. Enjoy making this dish and sharing it with loved ones!

Get ready to elevate your baking game with Cinnamon Honey Butter Sweet Potato Cornbread! This delightful recipe combines sweet potatoes, honey, and a hint of cinnamon to create a fluffy …

Read more

Categories Desserts

Easy Churro Bites with Nutella Delightful Treat

August 2, 2025 by Chef Miles
To make Easy Churro Bites with Nutella, you need these key ingredients: - 1 cup water - 1/2 cup unsalted butter - 1 cup all-purpose flour - 1 tablespoon granulated sugar - 1/4 teaspoon salt - 2 large eggs - 1 teaspoon vanilla extract - 1 cup granulated sugar (for coating) - 1 tablespoon ground cinnamon (for coating) - Nutella (for dipping) - Oil (for frying) These simple items come together to create a delightful treat. The combination of warm, crispy churros and rich Nutella makes this recipe a favorite. If you don’t have some ingredients, don’t worry! Here are some easy swaps: - Use margarine instead of butter for a dairy-free option. - Gluten-free flour works well if you need a gluten-free version. - You can use brown sugar instead of granulated sugar for a richer flavor. - If you prefer, any hazelnut spread can replace Nutella. These alternatives let you customize the recipe to your needs while keeping it delicious. This recipe contains common allergens like gluten and dairy. If you have dietary restrictions, consider these points: - For those with egg allergies, a flaxseed egg can replace the eggs. - Use plant-based butter and a dairy-free chocolate spread to make it vegan. - Always check labels for gluten-free options if you have celiac disease. Making these adjustments allows everyone to enjoy churro bites! To start, grab a medium saucepan. Add 1 cup of water, 1/2 cup of unsalted butter, and 1 tablespoon of granulated sugar. Place the pan over medium heat. Stir until it boils. You want the butter to melt entirely. When it bubbles, remove it from heat. Now, quickly add 1 cup of all-purpose flour and 1/4 teaspoon of salt. Use a wooden spoon to stir fast. It should turn into a thick dough that pulls away from the sides in about 1-2 minutes. Let the dough cool for about 5 minutes. After cooling, add 2 large eggs, one at a time. Mix well after each egg. Finally, stir in 1 teaspoon of vanilla extract until smooth. Next, take a deep pot and fill it with about 2 inches of oil. Heat the oil to 350°F (175°C). A thermometer helps here to get it just right. Once hot, put the churro dough into a piping bag with a star tip. Pipe out 2-inch long strips into the hot oil. Use scissors to cut them free. Fry the churro bites for 2-3 minutes. Flip them halfway through so they cook evenly. When they turn golden brown, use a slotted spoon to take them out. Place them on paper towels to drain. While the churros are still warm, it's time to coat them. In a bowl, mix 1 cup of granulated sugar with 1 tablespoon of ground cinnamon. Roll each churro bite in this mixture until they are fully covered. Arrange the churro bites on a platter. Serve them warm with Nutella for dipping. This makes a wonderful treat. For a fun touch, drizzle some Nutella over the churros. Enjoy your delightful Easy Churro Bites with Nutella! For more details, check the Full Recipe. To get that ideal churro bite, focus on the dough. When you mix in the flour, stir quickly. It should form a thick, smooth dough. If it feels too runny, add a little more flour. For a crisp outside and soft inside, fry them at the right temperature—350°F (175°C) is key. Use a thermometer to check the heat. One common mistake is crowding the pan. Fry only a few churro bites at a time. This helps them cook evenly. Another mistake is not rolling them in sugar right away. Roll them when they are still warm. This helps the sugar stick better. Lastly, be careful not to overmix when adding eggs. Mix just until combined for a light texture. If you have leftover churro bites, store them in an airtight container. They can last for up to two days. To reheat, place them in a preheated oven at 350°F (175°C) for about 5-10 minutes. This keeps them crispy. You can also microwave them, but they may lose some crunch. Enjoy them fresh for the best taste! For the full recipe, check out the Easy Churro Bites with Nutella. {{image_4}} You can change the flavor of churro bites easily! Try adding zest from an orange or lemon to the dough for a fresh twist. You can also mix spices like nutmeg or cardamom for a warm taste. If you like a bit of heat, add a pinch of cayenne pepper to the cinnamon-sugar mix. This can give your churros a fun kick! Nutella is a classic choice, but you can explore other sauces too. Try caramel sauce for a sweet treat. A rich chocolate sauce can add depth, while peanut butter gives a nutty twist. For a fruity flavor, serve with a berry sauce. You can even mix cream cheese with powdered sugar for a creamy dip that pairs well with the churros. You can make churro bites in an air fryer! This method cuts down on oil and still gives a crunchy texture. Set the air fryer to 375°F (190°C) and cook for about 8-10 minutes. Flip them halfway for even cooking. Traditional frying gives a classic taste, but air frying offers a lighter option. Choose the method that suits your taste and health goals! Remember, for the full recipe, check out the complete guide. To keep your churro bites fresh, store them in an airtight container. Place a paper towel in the container to absorb moisture. This helps maintain their crispy texture. Keep the container in a cool, dry place. They will stay good for about two days. You can freeze churro bites for later enjoyment. Let them cool completely before freezing. Arrange them in a single layer on a baking sheet and freeze for about one hour. Once frozen, transfer them to a resealable freezer bag. They will last for up to three months in the freezer. To reheat churro bites, preheat your oven to 350°F (175°C). Place them on a baking sheet and warm for about 10 minutes. This will help regain their crispy texture. You can also reheat them in an air fryer at 350°F for about 5 minutes. Avoid using a microwave, as it can make them soggy. Serve with Nutella for a delightful treat. For the full recipe, check the details above. Yes, you can make churros without eggs. To do this, replace each egg with a mix of one tablespoon of flaxseed meal and three tablespoons of water. Let this sit for five minutes to thicken. This mix will help bind the dough. You can also use unsweetened applesauce as a substitute. Use one-fourth cup of applesauce for each egg. The texture may change slightly but the churros will still taste great. If you want to switch up Nutella, try peanut butter or almond butter. These will give a nutty flavor. You can also use chocolate sauce or caramel for a sweet dip. For a vegan option, look for dairy-free chocolate spreads. They offer a similar texture and sweetness without the dairy. To check if the oil is hot enough, use a thermometer. Aim for 350°F (175°C). If you don’t have a thermometer, drop a small piece of dough into the oil. If it sizzles and rises to the top, the oil is ready. If it sinks and doesn’t bubble, it needs more time. Always be careful with hot oil to avoid burns. In this article, we explored how to make churro bites. We covered essential ingredients, possible substitutes, and dietary needs. The step-by-step guide helped you prepare, fry, and serve the churros perfectly. I shared tips to avoid common mistakes and achieve great texture. You learned about storage methods and delicious flavor variations. Making churros can be fun and tasty. With these details, you can create your own treats at home. Enjoy every bite!

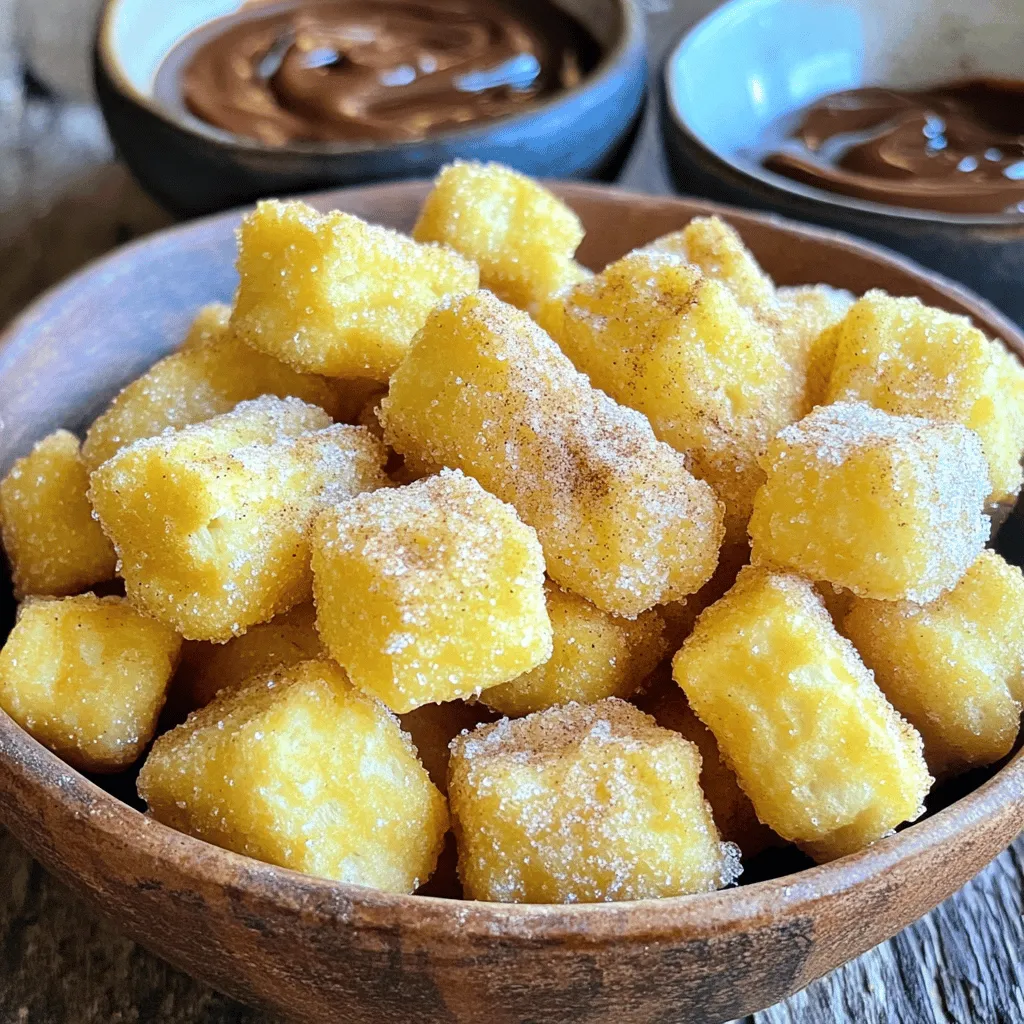
Craving a sweet treat that’s easy and fun to make? Look no further than these Easy Churro Bites with Nutella! In this guide, I’ll walk you through the simple steps …

Read more

Categories Desserts
Older posts
Newer posts
← Previous Page1 … Page51 Page52 Page53 … Page113 Next →

MELTED RECIPES

where delicious ideas melt into life, from stovetop to backyard. Always warm, simple, and irresistibly satisfying. 🍳🔥🧀

PAGES

Home About Contact Privacy Policy Terms & Conditions Cookie Policy GDPR Policy Copyright Policy Disclaimer

CATEGORIES

Appetizers Desserts Salads Breakfast Dinner

Contact

  • Pinterest
  • Mail
Copyright © 2025 Melted Recipes. All rights reserved.