Skip to content
Melted Recipes
  • Home
  • Appetizers
  • Desserts
  • Salads
  • Breakfast
  • Dinner
  • Privacy Policy
  • Contact
  • About

Chef Miles

Jalapeno Popper Corn Salad Fresh and Flavorful Dish

May 28, 2025 by Chef Miles
To make Jalapeño Popper Corn Salad, you need: - 4 cups fresh corn kernels (or 2 cans of corn, drained) - 2 jalapeños, diced and seeds removed for a milder taste - 1 cup cherry tomatoes, halved - 1/2 cup red onion, finely chopped - 1 cup cream cheese, softened at room temperature - 1/2 cup sour cream - 1 tablespoon fresh lime juice - 1 teaspoon garlic powder - 1 teaspoon smoked paprika - Salt and freshly ground black pepper to taste - 1 cup shredded sharp cheddar cheese - 1/4 cup fresh cilantro, finely chopped (optional for garnish) This mix of ingredients gives the salad its fresh taste and creamy texture. You can change some ingredients based on your taste or what's in your kitchen. - For a lighter version, swap cream cheese and sour cream with Greek yogurt. - If you want more spice, leave some seeds in the jalapeños or add a pinch of cayenne. - You can use frozen corn if fresh is not available. Just thaw it before use. - Try different cheeses, like pepper jack or gouda, for a unique twist. These options help you create a salad that fits your flavor profile. To keep your Jalapeño Popper Corn Salad fresh, follow these tips: - Use fresh corn when in season for the best flavor. - If using canned corn, rinse it well to reduce sodium. - Cut vegetables just before mixing to keep them crisp. - Chill the salad for at least 30 minutes to blend the flavors. These simple steps ensure that your salad stays vibrant and tasty. For the full recipe, check out the detailed instructions. Start with fresh corn for the best taste. Boil a large pot of water. Once it’s boiling, add 4 cups of corn kernels. Cook them for 5-7 minutes. They should be tender but still crisp. Drain the corn and let it cool. If you use canned corn, just drain and rinse it under cold water. In a big mixing bowl, combine the cooled corn, 2 diced jalapeños, 1 cup of halved cherry tomatoes, and 1/2 cup of finely chopped red onion. Stir gently, so everything mixes well. In another bowl, mix 1 cup of softened cream cheese and 1/2 cup of sour cream. Add 1 tablespoon of lime juice, 1 teaspoon of garlic powder, and 1 teaspoon of smoked paprika. Season with salt and pepper. Whisk until it’s creamy. Pour the creamy dressing over the corn and veggies. Fold the dressing in gently, so you don’t crush the vegetables. Then, add 1 cup of shredded sharp cheddar cheese and 1/4 cup of chopped cilantro. Mix until everything is well combined. Taste the salad and adjust the seasoning as needed. Cover the bowl with plastic wrap and chill for at least 30 minutes. This helps the flavors blend. For the full recipe, check out the details above! To boost the taste of your Jalapeno Popper Corn Salad, try adding some extras. Here are a few ideas: - Bacon bits: Crispy bacon adds a nice crunch and smokiness. - Avocado: Creamy avocado gives a fresh twist and richness. - Black beans: They bring protein and a hearty feel. - Corn chips: Crush them on top for a salty crunch. These additions can make your salad even more enjoyable. Mix and match to find your favorite flavors! Making this salad is simple, but it’s easy to make mistakes. Here are some tips to avoid common errors: - Overcooking corn: If you use fresh corn, don’t cook it too long. It should be tender yet crisp. - Too much dressing: Start with a little dressing. You can always add more if needed. - Skipping chill time: Letting the salad chill is key. This helps the flavors blend. Avoid these mistakes for a perfect dish every time! How you serve your salad can impress your guests. Here are some fun ideas: - Colorful bowl: Use a bright bowl to show off the salad's colors. - Garnish: Top with extra cheese or cilantro for a fresh look. - Lime wedges: Add lime wedges on the side for a burst of flavor. A well-presented salad makes your meal feel special. Enjoy the compliments! {{image_4}} You can easily make this salad vegetarian or vegan. Simply swap the cream cheese and sour cream with plant-based options. There are many good brands that offer vegan cream cheese and sour cream. You can also use cashew cream for a rich taste. This keeps the texture creamy while making it dairy-free. To control the heat, adjust the jalapeños. If you like it mild, remove the seeds and membrane. For more spice, keep the seeds or add more jalapeños. You can also include some diced serrano peppers for an extra kick. Taste as you go to find your perfect balance. Get creative with added ingredients! Here are a few ideas to enhance flavors: - Black beans: Add protein and texture. - Avocado: For creaminess and healthy fats. - Corn chips: For crunch and a fun topping. - Bacon bits: For a smoky flavor. - Red bell peppers: For sweetness and color. Feel free to mix and match these ingredients. You can discover new flavor profiles that suit your taste. For the full recipe, check out the detailed instructions above! To store leftover jalapeño popper corn salad, first let it cool down. Use an airtight container. This helps keep the salad fresh. You can store it in the fridge for up to three days. If you use fresh corn, try to eat it sooner. It tastes best when fresh. The salad lasts about three days in the fridge. You can freeze it, but the texture may change. If you freeze it, place it in a freezer bag. Remove as much air as possible to prevent freezer burn. You can store it in the freezer for up to three months. When ready to eat, thaw it in the fridge overnight. Reheating is simple but tricky. I suggest you enjoy it cold. If you prefer warm, heat it gently on low in a pan. Avoid using the microwave, as it can make the salad mushy. Stir it well to heat evenly. Enjoy the lovely flavors of your jalapeño popper corn salad! For the full recipe, check the section above. This recipe makes about 6 servings. It’s perfect for a small gathering or a family meal. Each serving is packed with flavor and texture, so everyone will enjoy it. Yes, you can make this salad in advance. It tastes even better after chilling for a while. Just cover it well and store it in the fridge. Let the salad chill for at least 30 minutes before serving. Jalapeno Popper Corn Salad pairs well with grilled meats like chicken or steak. It also goes great with tacos or barbecued dishes. The refreshing flavors balance out spicy or rich foods. You can even serve it as a dip with tortilla chips for a fun twist. For the full recipe, check out the complete guide! This blog post covered all you need for Jalapeno Popper Corn Salad. We looked at key ingredients, useful tips, and easy steps to create this dish. You can adjust flavors to fit your taste. Remember, freshness matters for the best results. Proper storage keeps your leftovers tasty longer. With these insights, you have everything to make a great salad. Enjoy mixing and sharing your delicious creation!

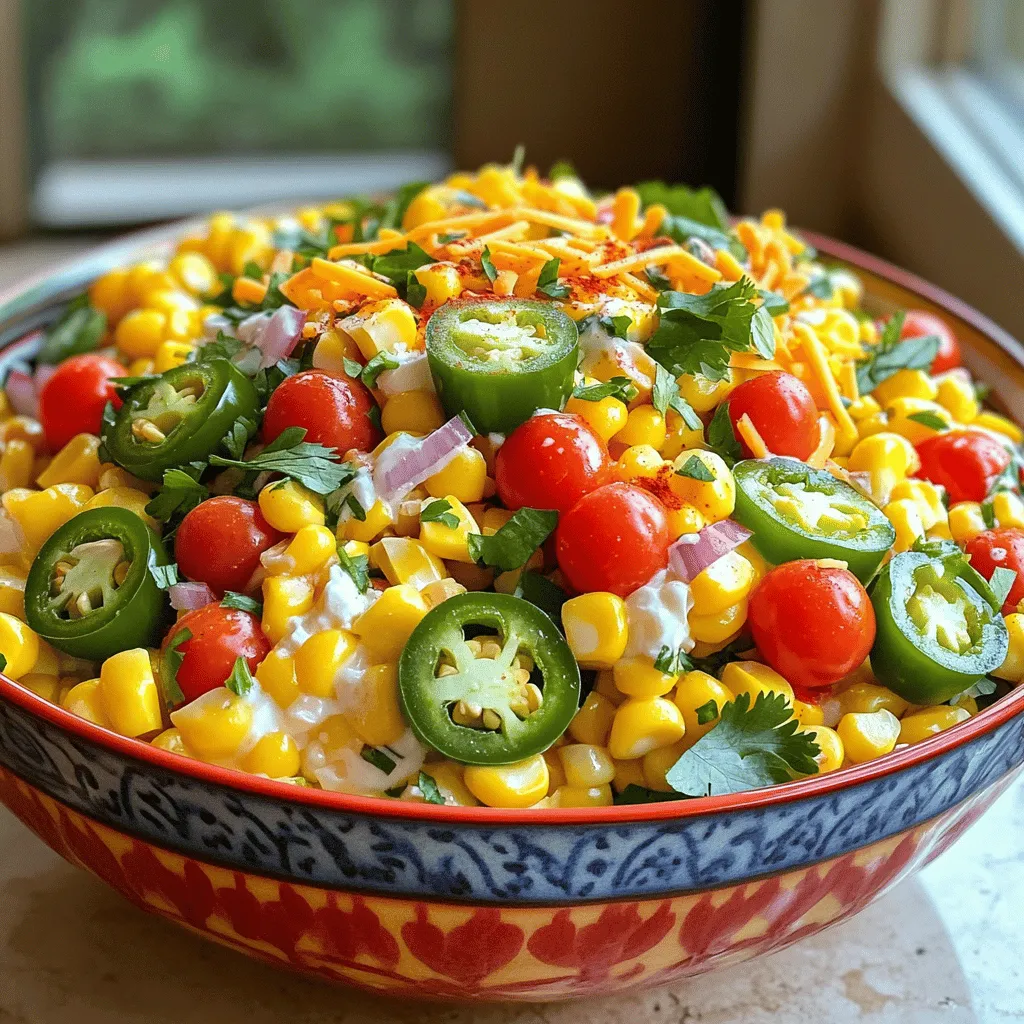
Are you ready to elevate your summer barbecues? My Jalapeno Popper Corn Salad is a fresh and flavorful dish that will wow your guests. Packed with vibrant ingredients and a …

Read more

Categories Salads

Pineapple Cucumber Lime Salad Fresh and Refreshing Dish

May 28, 2025 by Chef Miles
To make this Pineapple Cucumber Lime Salad, you need: - 2 cups fresh pineapple, diced into bite-sized pieces - 1 large cucumber, peeled and diced into cubes - 1 red bell pepper, diced for a burst of color - 1/2 red onion, thinly sliced for added flavor - 1/4 cup fresh cilantro, finely chopped - Juice of 2 limes, freshly squeezed for brightness - 1 tablespoon honey (or agave syrup as a vegan alternative) - Salt and freshly cracked pepper, to taste - Optional: 1 jalapeño, finely chopped for a spicy kick You can easily change some ingredients to suit your taste. If you want a different fruit, mango works well. For crunch, try adding radishes or carrots. You can swap red onion for green onion for a milder taste. If you prefer it sweeter, add more honey or use maple syrup. To make it spicier, increase the jalapeño or use a hotter pepper. Picking fresh ingredients is key to this salad's taste. Choose pineapples that smell sweet at the base. They should have a firm feel. The cucumber should be firm with no soft spots. For bell pepper, look for vibrant colors and smooth skin. Red onions should be firm and glossy. Cilantro should look bright green and fresh, not wilted. When you select limes, choose ones that feel heavy for their size and have smooth skin. These tips will help you make a fresh and tasty salad. For the full recipe, check the recipe section above. Start by gathering all your ingredients. You will need: - 2 cups fresh pineapple, diced into bite-sized pieces - 1 large cucumber, peeled and diced into cubes - 1 red bell pepper, diced - 1/2 red onion, thinly sliced - 1/4 cup fresh cilantro, finely chopped - Juice of 2 limes, freshly squeezed - 1 tablespoon honey or agave syrup - Salt and freshly cracked pepper First, chop the pineapple into small pieces. Make sure the pieces are the same size. This helps the flavors mix well. Next, peel the cucumber and cut it into cubes. Then, dice the red bell pepper and slice the red onion thinly. Finally, chop the cilantro finely. Now, let’s make the dressing. In a small bowl, add the lime juice and honey. Whisk them together until you see a smooth mix. This dressing adds a sweet and tangy flavor. In a large bowl, combine the pineapple, cucumber, bell pepper, and onion. Pour the lime-honey dressing over the mix. Toss everything gently with a spatula. This helps coat each piece well. Next, add the chopped cilantro. If you like spice, now is the time to add the jalapeño. Toss the salad again so all ingredients blend nicely. Let the salad sit for about 10 minutes. This time allows the flavors to mix and become tasty. Serve the salad in a colorful bowl. The bright colors will make your dish pop. You can also garnish it with extra cilantro and lime wedges for a fresh look. For the full recipe and exact measurements, check out the Full Recipe section. Enjoy your refreshing Pineapple Cucumber Lime Salad! To make this salad pop, use fresh lime juice. Fresh juice gives a bright, tangy kick. You can add a pinch of salt to bring out the sweet taste of pineapple. If you want more heat, add jalapeño. This spice gives it an extra layer of flavor. Mix the salad and let it sit for ten minutes. This time helps the flavors blend well. Cutting fruits and veggies neatly helps with the salad's look and taste. Use a sharp knife for clean cuts. Start with the pineapple. Cut off the skin, then remove the core. Dice into bite-sized pieces. For the cucumber, peel it first, then dice it. Make sure all pieces are similar in size. This way, they mix well and look nice together. Presentation matters. Serve the salad in a big, bright bowl. This lets the colors shine. Add a sprinkle of fresh cilantro on top. Lime wedges on the side are a nice touch too. They add color and give a hint of zest when served. For a fun twist, you could also use a glass jar for individual servings. It looks great and is easy to grab. For the full recipe, check out the Tropical Crunch Pineapple Cucumber Lime Salad. {{image_4}} You can switch up the ingredients in your salad for new tastes. Try adding mango for a sweeter twist. If you like crunch, toss in some celery or radishes. For a savory touch, diced avocado adds creaminess and richness. You can even swap the red bell pepper for yellow or orange peppers. Each change brings a unique flavor to your Pineapple Cucumber Lime Salad. This salad is naturally vegan and gluten-free. You can keep it simple by using honey or switch to agave syrup if you prefer. If you want a protein boost, add chickpeas or black beans. They fit well with the fresh flavors while making the dish more filling. These options make it a great choice for any diet. Change your ingredients based on the seasons. In summer, use fresh peaches or strawberries for a juicy touch. In fall, try adding diced apples or pears for a crisp bite. For winter, consider including pomegranate seeds for color and crunch. Each season brings its own flavor, so feel free to get creative. The full recipe lets you explore these variations while keeping the dish fresh and fun. To store your Pineapple Cucumber Lime Salad, place it in an airtight container. This keeps the salad fresh for about two days. If you have leftover dressing, store it separately. This helps prevent sogginess in your salad. To keep the salad fresh, avoid mixing the dressing until serving time. Store the salad and dressing in the fridge. If you notice moisture building, gently pat the salad with a paper towel. This helps maintain crispness. Freezing this salad is not ideal. The texture of the pineapple and cucumber can change when thawed. If you want to freeze ingredients, try just the pineapple. Cut it into pieces and place it in a freezer bag. This way, you can use it later in smoothies or desserts. Yes, you can make this salad ahead of time. I recommend preparing it a few hours before serving. This lets the flavors blend well. However, if you want the best texture, add the dressing just before serving. The salad can get soggy if it sits too long with the dressing. To add heat, include finely chopped jalapeño. One jalapeño adds a nice kick. If you like it even spicier, try adding a dash of cayenne pepper. You can also use chopped serrano peppers for a different flavor. This salad pairs well with grilled meats. Try it with chicken or fish. It also goes great with tacos or quesadillas. If you want a light meal, serve it with a bowl of soup. You can find the full recipe here for more details. This blog covered the key ingredients for a tasty Pineapple Cucumber Lime Salad. I shared tips on choosing fresh produce and offered substitutions to meet your needs. You learned step-by-step instructions to prepare and serve this salad. With additional tips, variations, and storage information, you now have all the tools to customize your dish. Remember, enjoying good food is all about finding the right flavors and making it your own. Happy cooking!

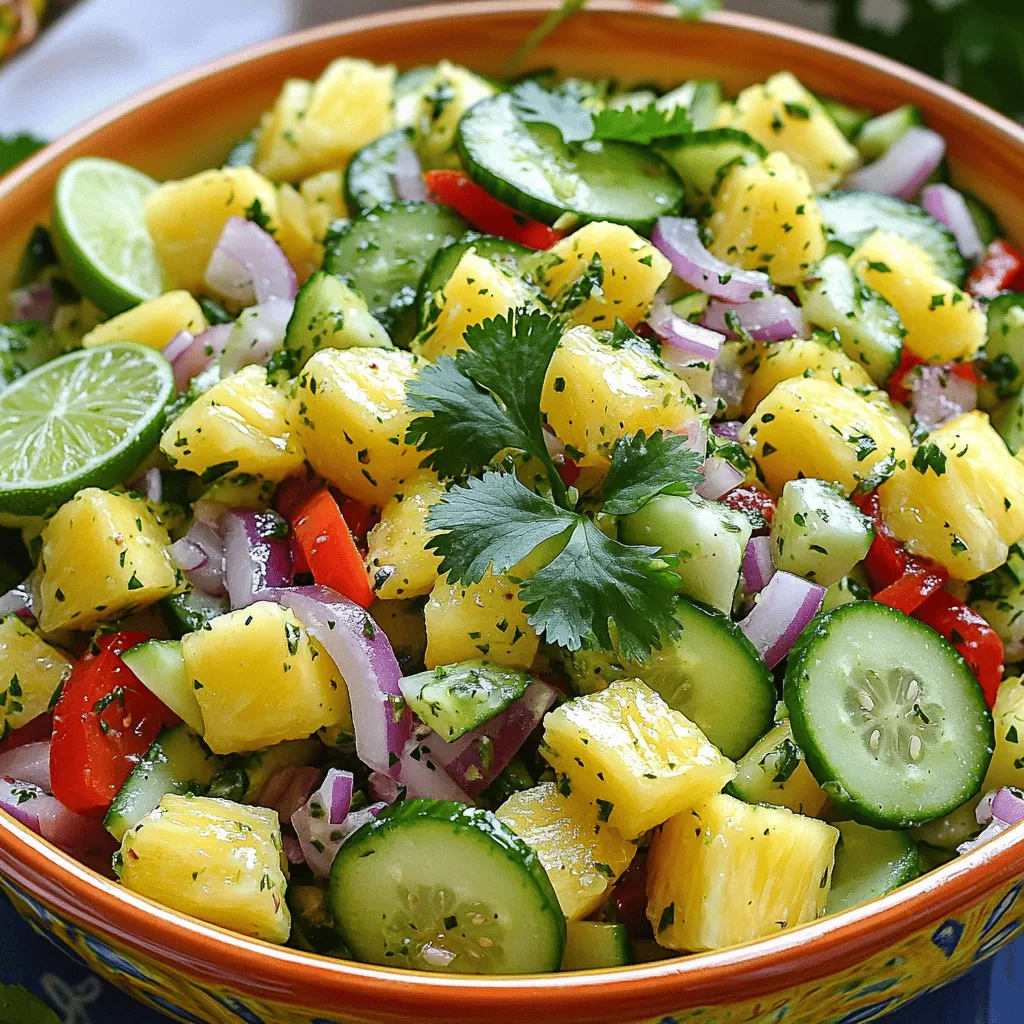
Are you ready to brighten your meals? The Pineapple Cucumber Lime Salad is a perfect blend of sweet, crisp, and tangy flavors. In this article, I’ll show you how to …

Read more

Categories Salads

Honeycrisp Apple Broccoli Salad Fresh and Crisp Delight

May 28, 2025 by Chef Miles
- 2 cups fresh broccoli florets - 1 large Honeycrisp apple, diced - ½ cup red grapes, halved - ¼ cup red onion, thinly sliced - ½ cup unsalted sunflower seeds - ½ cup plain Greek yogurt - 2 tablespoons honey - 1 tablespoon apple cider vinegar - Salt and freshly ground pepper to taste The Honeycrisp apple gives this salad a sweet crunch. Broccoli adds a fresh pop of color and nutrients. Red grapes add a lovely sweetness that balances the flavors. The red onion brings a nice bite that rounds out the mix. Sunflower seeds add a delightful crunch and healthy fats. Greek yogurt serves as a creamy base for the dressing. Honey sweetens the dressing naturally, while apple cider vinegar gives it a tangy kick. Adjust the salt and pepper to your taste for the perfect blend. - Calories: Approximately 290 per serving - Protein: 8g - Fat: 15g - Carbohydrates: 36g - Fiber: 4g This salad is not just tasty but also packed with nutrients. It provides a good amount of protein and fiber, making it a great choice for a light meal or side dish. - Medium pot - Mixing bowl - Small bowl - Whisk - Kitchen towel Having the right tools makes the process easier. Use the medium pot for blanching the broccoli. A mixing bowl helps combine all the ingredients well. The small bowl is perfect for whisking the dressing together. A kitchen towel is handy for drying the broccoli. With these tools, you are all set to create this fresh and crisp delight. You can check the Full Recipe for more details on how to prepare this salad. To start, we need to blanch the broccoli. First, bring a medium pot of salted water to a rolling boil. Then, add the 2 cups of broccoli florets. Cook them for about 1-2 minutes until they turn bright green and are tender-crisp. Blanching helps keep the broccoli's color and crunch. Next, we use an ice bath technique. Quickly drain the broccoli and plunge it into a bowl filled with ice water. This stops the cooking process right away. After a few minutes, drain the broccoli again and pat it dry with a clean kitchen towel. This step is key to keeping the broccoli crisp and fresh. Now, let’s mix the salad. In a spacious mixing bowl, combine the blanched broccoli, 1 large diced Honeycrisp apple, ½ cup halved red grapes, and ¼ cup thinly sliced red onion. Make sure to toss everything well to create a colorful base. Mixing helps each bite be full of flavor and texture. Time to prepare the dressing! In a small bowl, whisk together ½ cup of plain Greek yogurt, 2 tablespoons of honey, 1 tablespoon of apple cider vinegar, salt, and pepper. Blend until the dressing is smooth. This creamy dressing adds a nice tangy flavor to the salad. When you coat the salad, pour the dressing over the broccoli mix. Gently toss everything together with a large spoon or spatula. Be careful not to mash the apples or grapes. You want to keep them whole for a nice crunch. Now for the final touches. Sprinkle ½ cup of unsalted sunflower seeds over the top of the salad. Give it another gentle toss to spread the seeds throughout the salad. To enhance the flavor, chill the salad for at least 30 minutes. Cover it with plastic wrap or place it in an airtight container. This chilling time allows the flavors to meld beautifully. When you serve it, you’ll enjoy a fresh and crisp delight. Be sure to check out the Full Recipe for all the details! To get the best broccoli texture, blanch the florets for just 1-2 minutes. This keeps them bright green and crisp. After blanching, place them in an ice bath. This stops the cooking and locks in flavor. Chilling the salad for at least 30 minutes is key. It lets the flavors mix well and taste better. When serving, use a large bowl to show off the colors. Arrange slices of Honeycrisp apple on top for a pretty look. You can also sprinkle more sunflower seeds for a nice touch. Serve the salad over fresh spinach or arugula. This adds color and makes it more appetizing. To boost flavor, add a pinch of cinnamon or nutmeg. These spices pair well with the sweetness of the apples. You can also toss in extra nuts for crunch, like chopped walnuts or almonds. For added sweetness, consider dried cranberries or raisins. These options will make your salad even more delightful. For the full recipe, check out the complete instructions above! {{image_4}} You can change the flavors with different ingredients. Try using a Gala or Fuji apple for a sweet twist. If you want crunch, swap sunflower seeds for chopped walnuts or almonds. For the creamy dressing, you can replace Greek yogurt with silken tofu or a dairy-free yogurt. This keeps the same texture while making it vegan. To make a vegan version, use the swaps for Greek yogurt. You can also skip the honey or use maple syrup instead. For gluten-free needs, ensure your dressing is free from gluten. Most ingredients in this salad are naturally gluten-free. Add seasonal fruits like pears or pomegranate seeds for a fun touch. In the summer, toss in fresh berries for brightness. You can also change the dressing based on the season. In fall, try a spiced apple cider vinaigrette. It adds warmth and pairs well with the apples. To keep your Honeycrisp apple broccoli salad fresh, always refrigerate it. Use an airtight container to prevent moisture loss. Proper storage helps maintain the crispness of the broccoli and apples. The salad lasts about 3 days in the fridge. After that, the veggies may become soggy, and flavors can fade. You can freeze the salad, but it may lose its texture. Freezing is not ideal for salads with fresh fruits and crunchy veggies. If you still want to freeze it, do so without the apples and dressing. Store the broccoli, grapes, and onions together. Use a freezer-safe container or bag. When ready to eat, thaw it in the fridge overnight. Before serving leftovers, refresh the salad. Add fresh diced apples and a little extra dressing. This boosts flavor and crunch. Always check for any odd smells or changes in texture. If it seems off, it’s best to toss it. Enjoy your salad fresh for the best taste! For the full recipe, check the details above. You can use different dairy-free options if you want. Silken tofu works great as a creamy base. It gives a smooth texture without dairy. Another choice is cashew cream, made from soaked cashews blended until smooth. You can also use coconut yogurt for a slight sweet flavor. These options keep your salad creamy while catering to dietary needs. Adding protein sources is a smart way to make this salad more filling. You can toss in cooked chicken or chickpeas for extra protein. For a plant-based option, add beans or lentils. Nuts like almonds or walnuts also provide protein and crunch. These additions turn your salad into a full meal. Yes, you can prepare this salad ahead of time. Make it up to a day before and store it in the fridge. Just remember to keep the dressing separate until you are ready to serve. This keeps the salad fresh and crisp. When ready to eat, mix in the dressing and enjoy! This blog post covers a tasty and healthy salad with broccoli, apples, and grapes. You learned how to prepare, mix, and dress the salad to highlight the fresh flavors. I shared tips for perfecting texture and ideas for presentation. You can explore ingredient swaps and seasonal options to fit your needs. Remember, proper storage helps maintain freshness. Enjoy making this vibrant salad, and feel free to experiment for your own twist! Happy cooking!

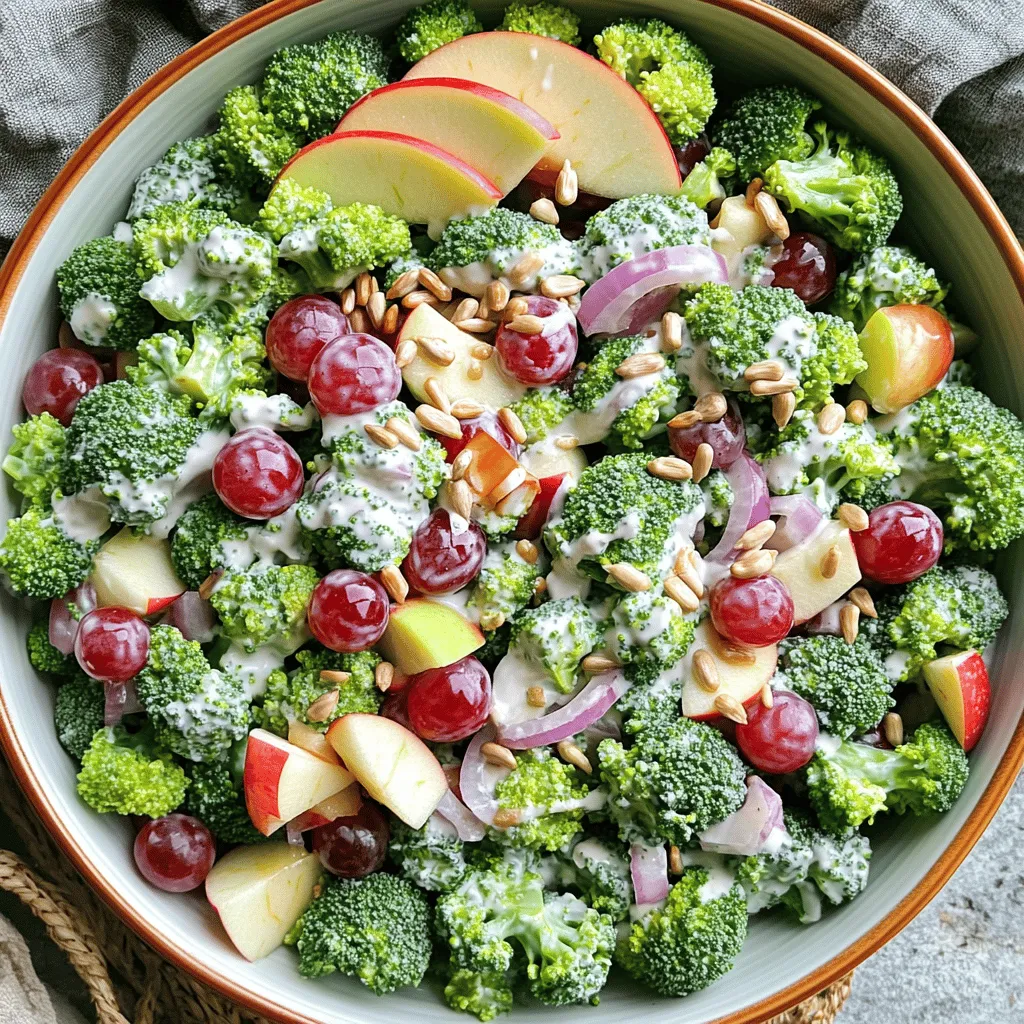
Are you ready to make a salad that’s as fresh as it is tasty? My Honeycrisp Apple Broccoli Salad offers a delightful mix of crunch and flavor that will please …

Read more

Categories Salads

Cabbage Salad for Weight Loss Healthy and Crunchy Dish

May 28, 2025 by Chef Miles
- 4 cups green cabbage, finely shredded - 1 cup red cabbage, finely shredded - 1 large carrot, grated - 1 bell pepper (your choice of color), diced - 1/2 cup cherry tomatoes, halved - 1/4 cup red onion, thinly sliced - 1/4 cup fresh cilantro, chopped - 2 tablespoons olive oil - 2 tablespoons apple cider vinegar - 1 tablespoon honey or agave syrup - 1 teaspoon Dijon mustard - Salt and pepper, to taste - A pinch of chili flakes (optional) This cabbage salad is low in calories. Each serving has about 100 calories. It’s packed with vitamins A and C, plus fiber. Cabbage is great for weight loss. It fills you up and keeps you satisfied. The fresh veggies provide a range of nutrients. They help your body function well and support your weight loss goals. Enjoying this salad can also boost your metabolism. It’s a crunchy, healthy dish that adds color to your meals. For the full recipe, be sure to check out the detailed instructions. Start by shredding the green and red cabbage. Use a sharp knife or mandoline for even shreds. Aim for thin strips to keep the salad crunchy. Place the shredded cabbage into a large mixing bowl. Next, grate one large carrot and add it to the bowl. Dice your bell pepper of choice and toss it in as well. Halve the cherry tomatoes and slice the red onion thinly. Add all these colorful veggies to the bowl with the cabbage. Finally, chop fresh cilantro and fold it in gently. In a small bowl, whisk together two tablespoons of olive oil and two tablespoons of apple cider vinegar. Add one tablespoon of honey or agave syrup for sweetness. Mix in one teaspoon of Dijon mustard. Sprinkle in salt and pepper to taste. Whisk until all ingredients blend well. The dressing should look smooth and creamy. This blend adds a zesty kick to your salad. Drizzle your prepared dressing over the colorful salad mixture. Gently toss the ingredients together. Make sure all veggies get coated with the dressing. This step is key for flavor. Allow the salad to rest for about ten minutes. This lets the flavors meld together beautifully. Serve it fresh for a crunchy, healthy dish. For the full recipe, check the details provided earlier. Enjoy your vibrant cabbage salad! To boost the taste of your cabbage salad, try adding spices and herbs. Fresh herbs like parsley or mint can bring a bright note. You might also enjoy adding a pinch of cumin for warmth or dill for a fresh twist. Letting your salad sit for 10 minutes is key. This allows the flavors to blend well. The veggies soften slightly, making each bite a delight. When serving, presentation matters. Use a large, colorful bowl to show off the salad. You can also serve it on individual plates for a nice touch. For added crunch, sprinkle some roasted sunflower seeds on top. Pair this salad with grilled chicken or fish for a full meal. It works well as a side dish too, especially with any protein. This salad is naturally vegan and gluten-free. To keep it vegan, simply use agave syrup instead of honey. For gluten-free options, all ingredients are safe. You can also add protein sources like chickpeas or tofu. This makes the salad heartier and more filling. Adjust the recipe as you like to meet your dietary needs. {{image_4}} Cabbage salad can change with different types of cabbage. Savoy cabbage has a tender and crinkly leaf. It adds a sweet flavor and a soft crunch. You can use it if you want a milder taste. Napa cabbage is another great choice. It is lighter and has a crisp texture. Napa cabbage pairs well with the other ingredients in the salad. You might find that these types make your salad feel fresh and unique. To make your cabbage salad more filling, think about adding protein. Chickpeas are a great option. They are rich in fiber and protein. Simply toss in a can of drained chickpeas. You can also add grilled chicken for a heartier dish. Just slice the chicken and mix it in. Both choices boost nutrition while keeping the salad light and tasty. Incorporating seasonal vegetables can give your salad a fresh twist. In spring, try adding snap peas or radishes for a crisp bite. In summer, add cucumbers or zucchini for a refreshing taste. Fall brings great options like roasted squash or apples. These add color and flavor while keeping the salad interesting. Explore what’s in season, and let your salad reflect that freshness. For more ideas, check out the Full Recipe to keep your meals exciting! To keep your cabbage salad fresh, store it in airtight containers. Glass containers work well, but plastic ones are fine too. Make sure you remove as much air as possible. This helps keep the salad crunchy. If you have extra dressing, store it separately. It keeps the salad from getting soggy. In the fridge, your cabbage salad lasts about 3 to 5 days. After that, it may lose its crunch. You can freeze the salad, but the texture changes. I suggest freezing only the dressing if you plan to save it. Use it within 3 months for the best flavor. If your salad wilts, add a splash of fresh dressing. This brings back some life to the leaves. Toss in some fresh herbs or a squeeze of lemon for a flavor boost. You can also add more chopped vegetables to mix things up. This way, you can enjoy a tasty salad even after a few days! Yes, cabbage salad is great for weight loss! Cabbage is low in calories and high in fiber. It keeps you full longer and helps with digestion. This salad is also packed with vitamins like C and K. These nutrients are good for your skin and bones. The fresh veggies add crunch and taste without adding many calories. You can definitely make this salad ahead of time! Just prepare the veggies and dressing separately. Store the salad in the fridge for up to two days. Keep the dressing in a jar or small bowl. Mix them together right before serving. This way, the salad stays crisp and fresh. You can add many tasty ingredients to your cabbage salad! Here are some popular options: - Sliced cucumbers for extra crunch - Avocado for creaminess - Chickpeas for plant-based protein - Feta cheese for a salty bite - Nuts or seeds for healthy fats Feel free to mix and match according to your taste! This blog post shared how to make a fresh cabbage salad. You learned about the ingredients, from fresh vegetables to a tasty dressing. I broke down the step-by-step instructions for easy preparation. We covered tips to enhance flavor and offered helpful variations. You also got valuable storage advice and answers to common questions. Try making this salad yourself. It’s simple, healthy, and perfect for any meal. Enjoy the crunch and bright flavors! You’ll feel great about eating fresh.

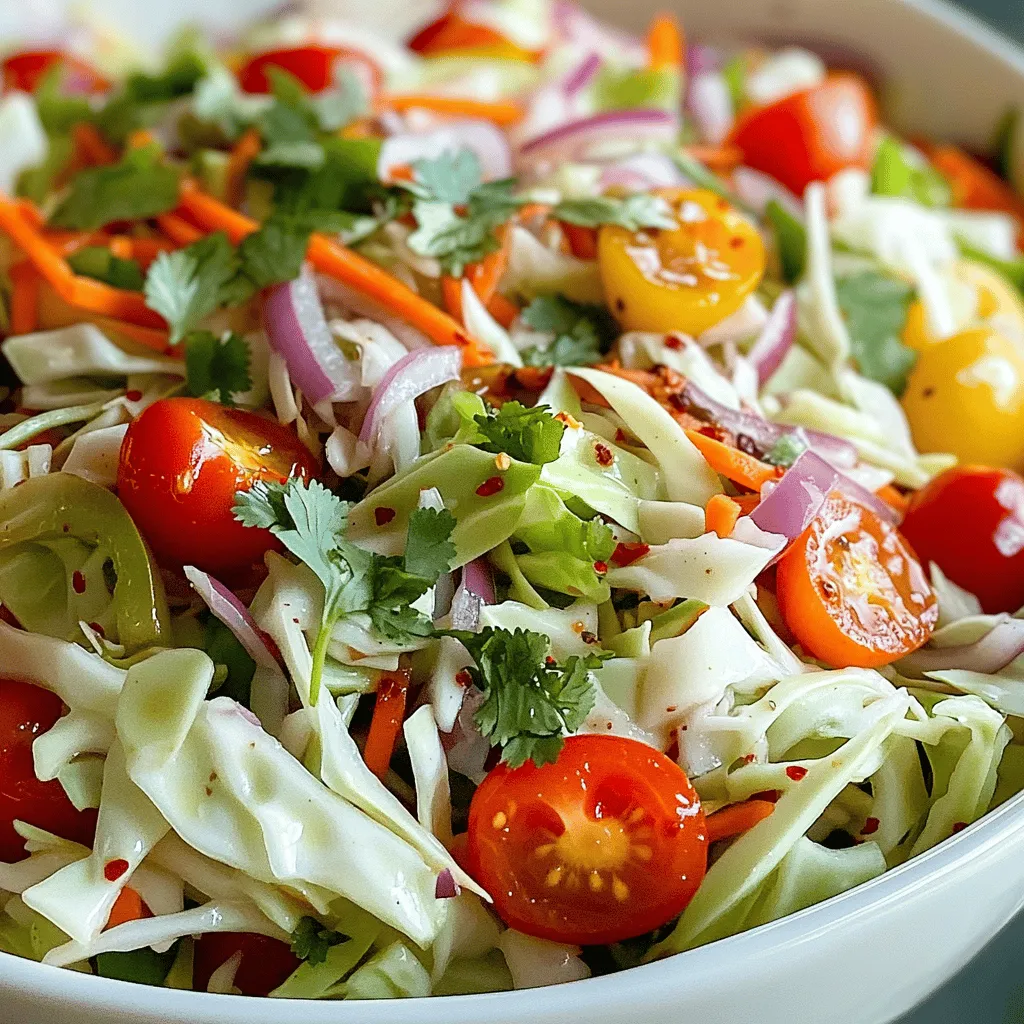
Are you ready to transform your meals with a crunchy, healthy dish? Cabbage salad is your answer! Packed with fresh vegetables and a zesty dressing, this salad is not just …

Read more

Categories Salads

Delicious Chicken Tenderloin Meals Quick and Easy Guide

May 28, 2025 by Chef Miles
- 1 lb chicken tenderloins - 1 cup panko breadcrumbs - 1/2 cup freshly grated Parmesan cheese - 2 tablespoons fresh parsley, finely chopped - 1 tablespoon fresh thyme leaves - 1 teaspoon garlic powder - 1 teaspoon onion powder - Salt and freshly ground black pepper, to taste - 2 large eggs, beaten until smooth - 1 tablespoon extra-virgin olive oil For the Zesty Herb-Crusted Chicken Tenderloins, you need chicken tenderloins, which are juicy and quick to cook. Panko breadcrumbs give a great crunch. Fresh herbs like parsley and thyme add a bright flavor. You can’t forget the Parmesan cheese, which melts and gives richness. Eggs help the coating stick well. - 1 large orange, segmented and diced - 1/2 grapefruit, segmented and diced - 1/4 of a red onion, finely chopped - 1 small jalapeño, seeded and finely minced - 2 tablespoons fresh cilantro, chopped - 1 tablespoon fresh lime juice - A pinch of salt, to taste For the Citrus Salsa, use fresh fruit like orange and grapefruit. They add sweetness and tang. Red onion gives a nice crunch, while jalapeño adds heat. Cilantro adds freshness, and lime juice brightens the whole dish. This salsa pairs well with the chicken, making it very tasty. - Baking sheet - Parchment paper - Two mixing bowls - Shallow bowl for breadcrumbs - Meat thermometer - Whisk for beating eggs You will need a baking sheet lined with parchment paper for easy cleanup. Two mixing bowls help keep things organized. A shallow bowl for the breadcrumb mix makes breading easier. A meat thermometer checks if the chicken is cooked through. A whisk helps mix the eggs smoothly for coating. For the full recipe, check out the details above. First, preheat your oven to 400°F (200°C). This step is key for crisp chicken. Next, line your baking sheet with parchment paper. This makes cleanup simple. In a shallow bowl, mix the panko breadcrumbs, Parmesan cheese, parsley, thyme, garlic powder, onion powder, salt, and pepper. Make sure everything blends well. This mix adds a tasty crunch to your chicken. Take the chicken tenderloins one at a time. Dip each piece into the beaten eggs, coating it fully. Allow any extra egg to drip off. Then, roll the tenderloin in the breadcrumb mix. Press down lightly to help the crumbs stick. Place the breaded tenderloins on your baking sheet. Drizzle them with olive oil to help with browning. Bake for 15-20 minutes. Check the chicken with a meat thermometer. It should read 165°F (75°C) when done. Enjoy the aroma as it bakes! To keep chicken tenderloins juicy, choose fresh meat. Fresh meat has more moisture. Marinate the tenderloins for at least 30 minutes. A simple mix of olive oil, lemon juice, and herbs works well. This adds flavor and helps retain moisture. Avoid overcooking the chicken. Use a meat thermometer to check for doneness. Aim for an internal temperature of 165°F (75°C). Rest the chicken for a few minutes after cooking. This allows the juices to settle back in. You can enhance the flavor of chicken tenderloins easily. Try adding herbs like rosemary or oregano. They complement the chicken well. Spices like smoked paprika add a nice kick. Experiment with your favorite seasonings. If you love heat, add a pinch of cayenne pepper. Always taste your seasoning mix before breading. This ensures the chicken will be full of flavor. To get a crispier crust, use panko breadcrumbs. They create a light and crunchy coating. Mix in some grated cheese for extra flavor. Parmesan cheese works great in this mix. Make sure to press the breadcrumbs onto the chicken well. This helps them stick during cooking. For an even crispier texture, drizzle a bit of olive oil on top before baking. The oil promotes browning and adds crunch. For the ultimate crunch, broil the chicken for a couple of minutes at the end. This will give you that perfect golden finish. {{image_4}} You can switch up your dipping sauce to match your mood. Here are some fun options: - Honey Mustard: Mix equal parts honey and mustard for a sweet kick. - Spicy Ranch: Stir in some hot sauce into ranch dressing for a zesty dip. - BBQ Sauce: Use your favorite BBQ sauce for a smoky flavor. - Tzatziki: This yogurt-based sauce adds freshness with cucumber and garlic. These sauces add flavor and fun to your chicken tenderloins. Citrus salsa is bright and refreshing, but you can change it up! Try these ideas: - Add Avocado: Diced avocado gives a creamy texture. - Use Different Citrus: Swap oranges or grapefruit for lemon or lime for a new twist. - Add Fruits: Try diced mango or pineapple for a tropical flavor. - Spice It Up: Add diced red pepper or a pinch of cayenne for heat. These tweaks keep your salsa exciting and full of flavor. You can use other proteins or vegetables with the same recipe. Here are some tasty swaps: - Turkey Tenderloins: These work great and have a similar texture. - Firm Fish: Try salmon or cod for a different taste and texture. - Cauliflower Steaks: Bread and bake cauliflower for a vegan option. - Zucchini Slices: These can be breaded and baked for a fun veggie dish. These options let you enjoy new meals while keeping the same delicious flavors. After enjoying your zesty herb-crusted chicken tenderloins, you may have some left over. Store the chicken in an airtight container. Place it in the fridge if you plan to eat it within three days. For longer storage, consider freezing. Cool the chicken to room temperature before packing it away. To reheat, keep the chicken tenderloins moist. Preheat your oven to 350°F (175°C). Place the chicken on a baking sheet and cover it with foil. This keeps the moisture in. Heat for about 15 minutes or until warmed through. You can also use a microwave for quick reheating. Just make sure to cover the chicken to avoid dryness. If you want to freeze chicken tenderloins, wrap them tightly in plastic wrap. Then, place the wrapped chicken in a freezer bag. Remove as much air as possible. They will stay good for up to three months. When you're ready to eat, thaw the chicken in the fridge overnight. Avoid thawing at room temperature to keep it safe. For more details, check the Full Recipe for the chicken tenderloins! The best way to cook chicken tenderloins is baking. Preheat your oven to 400°F (200°C) for great results. I love using a crunchy coating to add flavor and texture. For my zesty herb-crusted chicken tenderloins, I mix panko breadcrumbs with Parmesan cheese and fresh herbs. This adds a delightful crunch. Bake them for about 15-20 minutes until golden brown and juicy. Always check the internal temperature; it should reach 165°F (75°C). Yes, you can use frozen chicken tenderloins. Just make sure to thaw them first. You can do this in the fridge overnight or use the microwave. Once thawed, they cook just like fresh tenderloins. The key is to ensure they are fully thawed to achieve even cooking. Follow the same steps in my Full Recipe for the best flavor and texture. To make chicken tenderloins more flavorful, use marinades or spice rubs. You can marinate them in citrus juice, garlic, and herbs for a few hours. This helps the flavors penetrate the meat. Adding spices like paprika or cayenne can give a nice kick. You can also mix various herbs into the breadcrumb coating. Fresh basil, oregano, or even a pinch of smoked paprika can elevate your dish. Don't shy away from experimenting with different flavors! You learned how to make zesty herb-crusted chicken tenderloins with a fresh citrus salsa. You know the best ingredients and tools to use for success. We covered tips to keep the chicken juicy and how to make a crispier crust. Plus, you discovered fun variations and smart storage methods. With these techniques, you can impress anyone at your table. Cooking can be easy and rewarding. Enjoy your tasty meal and share it with those you love!

Are you ready to whip up mouthwatering chicken tenderloin meals in no time? This quick and easy guide takes you step-by-step through tasty recipes, perfect cooking tips, and fun variations. …

Read more

Categories Dinner

Flavorful Cowboy Butter Chicken Easy Weeknight Meal

May 28, 2025 by Chef Miles
To make Flavorful Cowboy Butter Chicken, you need simple, fresh ingredients. Each one plays a key role in creating a tasty meal. Here’s what you need: - 4 boneless, skinless chicken breasts - 1/2 cup unsalted butter, softened - 2 cloves garlic, finely minced - 1 tablespoon smoked paprika - 1 tablespoon brown sugar - 1 teaspoon cayenne pepper (adjust for spice) - 1 teaspoon dried parsley - 1 teaspoon dried thyme - Salt and freshly cracked black pepper to taste - Juice of 1 lemon - Fresh parsley, finely chopped, for garnish These ingredients come together to create a dish packed with flavor. The chicken is tender and juicy, while the cowboy butter adds richness and a kick. You can find the full recipe to guide you through the steps. Enjoy this easy weeknight meal that will impress everyone at the table! To start, grab a medium mixing bowl. In this bowl, blend 1/2 cup of softened butter with 2 cloves of minced garlic. Add 1 tablespoon of smoked paprika and 1 tablespoon of brown sugar for sweetness and depth. For heat, mix in 1 teaspoon of cayenne pepper. You can adjust this based on your spice level. Toss in 1 teaspoon each of dried parsley and dried thyme for herbal notes. Finally, squeeze in the juice of 1 lemon and add a pinch of salt and pepper. Use a fork or spatula to mix everything until smooth and well combined. This cowboy butter will add big flavor to your chicken. Next, preheat your oven to 375°F (190°C). While it heats, take 4 boneless, skinless chicken breasts and pat them dry with paper towels. This helps the chicken cook evenly. Don’t forget to season both sides with salt and freshly cracked black pepper. This simple step boosts the chicken's flavor and makes it taste great. Once the chicken is seasoned, take half of your cowboy butter mixture and spread it over the top of each chicken breast. Be generous! Make sure every piece gets a good coating. Place the chicken in a lightly greased baking dish, keeping them spaced apart for even cooking. Put the dish in your preheated oven and bake for 25-30 minutes. You want the chicken to reach an internal temperature of 165°F (74°C). About five minutes before it's done, carefully take the chicken out. Baste the tops with the remaining cowboy butter mixture using a spoon or brush. This adds a final burst of flavor. Once cooked, let the chicken rest for 5 minutes. This helps the juices redistribute. Before serving, sprinkle with chopped fresh parsley for a nice touch. For the full recipe, check the details above. To make the best Flavorful Cowboy Butter Chicken, start with high-quality chicken breasts. Always pat them dry. This helps them brown nicely. Preheating your oven is key. Set it to 375°F (190°C) before you start. Using a lightly greased baking dish ensures even cooking. Baste the chicken with butter halfway through. This step adds extra moisture and flavor. The cowboy butter is the star. Use fresh garlic for a bold taste. Smoked paprika gives a nice depth. Adjust the cayenne pepper for your spice preference. Adding brown sugar balances the heat nicely. Fresh lemon juice brightens the dish. Don’t skip the salt and pepper; they bring out all the flavors. For a twist, try adding a splash of hot sauce or some fresh herbs. Serve the chicken on a large platter. Drizzle with any melted butter from the dish. Freshly chopped parsley adds a pop of color. Pair it with roasted vegetables or a side salad. For a hearty touch, serve it with rice or warm bread. Lemon wedges are great for a refreshing squeeze on top. Enjoy this dish as a fun weeknight meal! For the complete recipe, check the [Full Recipe]. {{image_4}} You can make this meal even better by adding veggies. Vegetables give extra flavor and nutrition. Try adding sliced bell peppers or zucchini. You can also use broccoli or green beans. Just chop them into small pieces. Toss them in the cowboy butter mix before spreading it on the chicken. Bake them together for a colorful dish. The veggies will soak up all the tasty butter flavors. Want to turn up the heat? You can easily spice it up! Add more cayenne pepper to the cowboy butter. If you like bold flavors, toss in some crushed red pepper flakes too. You can also add chili powder for a different taste. For a smoky kick, try chipotle powder. Mix and match spices to suit your taste. Just remember, start small and add more if you need it. Looking for healthier options? You have great choices! Swap out the chicken breasts for turkey or tofu. Both options cook well and taste amazing. You can also use olive oil instead of butter. It keeps the dish light but still flavorful. Another idea is to serve it over a bed of greens instead of rice. This adds freshness and cuts calories. You can find the full recipe for this Cowboy Butter Chicken online for more ideas! After you make Flavorful Cowboy Butter Chicken, store any leftovers in the fridge. Place the chicken in an airtight container. It will stay fresh for up to three days. Always let the chicken cool to room temperature before sealing it. This helps keep it juicy and tasty. If you have more chicken than you can eat, freezing is a great option. Wrap each piece of chicken tightly in plastic wrap. Then, place them in a freezer-safe bag or container. It will stay good for up to three months. When you are ready to eat it, move the chicken to the fridge to thaw overnight. To reheat the chicken, you have a few choices. You can use an oven or a microwave. If using the oven, preheat it to 350°F (175°C). Place the chicken in a baking dish and cover it with foil. Heat for about 15-20 minutes, or until warm. If using the microwave, place the chicken on a plate and cover it with a damp paper towel. Heat in short bursts of one minute, checking often. This keeps the chicken moist and delicious. Cowboy butter is a rich and flavorful compound butter. It combines butter with spices, herbs, and garlic. This mix adds a punch of flavor to meats and vegetables. You spread it on cooked dishes or use it as a dip. The blend of smoked paprika and lemon gives it a unique twist. It makes your meal feel special without much effort. Yes, you can use chicken thighs instead of breasts. Thighs are juicier and have more flavor. They can also be more forgiving if overcooked. Just remember to adjust the cooking time. Thighs may need a bit longer to cook through. Ensure the internal temperature reaches 165°F (74°C) for safety. To adjust the spice level, you can modify the cayenne pepper. If you like it milder, use less. For more heat, add extra cayenne or try crushed red pepper flakes. You can also add a touch of hot sauce to the cowboy butter. Taste as you go to find your perfect balance. This post shared easy steps to make chicken with cowboy butter. You learned about ingredients, cooking methods, and tips to improve flavor. I also covered variations and storage to help you enjoy your meal longer. Remember, you can add veggies or spice it up to fit your taste. Use the tips to wow your family. Good cooking starts with good choices and some fun in the kitchen! Enjoy your delicious chicken and make it your own.

Looking for a quick meal that packs a punch? You’ll love this Flavorful Cowboy Butter Chicken! It’s simple to make, and the blend of spices and buttery goodness will make …

Read more

Categories Dinner

Best Caprese Pasta Salad Delightful and Simple Recipe

May 28, 2025 by Chef Miles
- Pasta and Fresh Produce - 8 oz (225 g) farfalle (bowtie) pasta - 1 cup cherry tomatoes, halved - 1 cup fresh mozzarella balls (bocconcini) - 1 cup fresh basil leaves, gently torn - Condiments and Seasoning - 3 tablespoons extra-virgin olive oil - 2 tablespoons balsamic glaze - Salt and freshly ground black pepper to taste - 1/2 teaspoon garlic powder - Zest of 1 lemon The key to a great Caprese pasta salad lies in fresh ingredients. I love using farfalle pasta for its fun shape. It holds the dressing well and looks beautiful. Cherry tomatoes bring a burst of color and sweetness. Fresh mozzarella gives that creamy texture, while basil adds a bright flavor. For the dressing, I combine olive oil and balsamic glaze. This mix gives a rich taste that complements the salad. Garlic powder and lemon zest add layers of flavor without being overpowering. Adjust the salt and pepper to suit your taste. Using fresh ingredients makes all the difference. I always encourage home cooks to choose the best quality produce. The vibrant colors and flavors will elevate your dish. You can find the full recipe for this delightful salad in the next section. To start, grab a large pot. Fill it with water and add salt. Bring this water to a rolling boil. Once it boils, toss in the farfalle pasta. Cook the pasta as the package says, usually 10-12 minutes. You want it al dente, which means firm but not hard. After cooking, drain the pasta and rinse it with cold water. This stops the cooking process. Set the pasta aside to cool completely. Next, take a large mixing bowl. Add the cooled farfalle pasta. Then, add the halved cherry tomatoes, fresh mozzarella balls, and torn basil leaves. Use a spatula or tongs to mix gently. Be careful not to crush the mozzarella. You want each piece to stay whole for the best taste and look. Now, let’s make the dressing. In a small bowl, add extra-virgin olive oil, balsamic glaze, garlic powder, and lemon zest. Season with a pinch of salt and black pepper. Whisk these ingredients together until they blend smoothly. This dressing will add a lot of flavor to your salad. Pour the dressing over the pasta mixture. Gently toss all the ingredients together. Make sure everything gets coated in the dressing. Taste the salad to see if it needs more salt or pepper. Adjust the seasoning to your liking. Cover the bowl with plastic wrap or a lid. Place it in the fridge for at least 30 minutes. This chilling time lets the flavors mix well. Before serving, give the salad a light toss. You can serve it chilled or at room temperature. For a nice touch, add a few fresh basil leaves on top. Enjoy this delightful Caprese Pasta Salad! For the full recipe, refer to the detailed list provided earlier. To get great pasta, always cook it in salted water. This adds flavor. I use farfalle for its fun shape. Cook it until it is al dente, which means firm to the bite. Drain the pasta and rinse it under cold water. This stops it from cooking more. Cooling the pasta helps keep it fresh in the salad. To boost flavor, use fresh ingredients. I love using ripe cherry tomatoes and creamy mozzarella. Adding a splash of lemon zest brightens the dish. You can also mix in a pinch of garlic powder for depth. Don’t forget to taste and adjust your seasonings. A little extra salt or pepper can make a big difference. For a stunning look, serve your salad in a large, shallow bowl. This lets the colors shine. Drizzle some balsamic glaze over the top just before serving. You can also add a few whole basil leaves for a pop of green. This makes the dish inviting and ready for any table. For the complete details on this recipe, check out the Full Recipe. {{image_4}} You can easily add protein to your Caprese pasta salad. Grilled chicken or shrimp work well. They bring a tasty twist and make this dish heartier. You can also use chickpeas or beans for a vegetarian option. Just toss them in with the pasta and veggies. This adds flavor and makes your meal more filling. If you need a gluten-free meal, swap the farfalle pasta for gluten-free pasta. There are many great options made from rice, quinoa, or chickpeas. Just cook it according to the package instructions. You will still enjoy the lovely flavors of the Caprese salad without the gluten. Want to change the dressing? You can try a lemon vinaigrette. Just mix lemon juice, olive oil, and a bit of honey. This gives a bright taste. You could also use a pesto sauce for a rich, herb-filled flavor. Experimenting with different dressings can make this dish feel new every time. For the full recipe, check out the Vibrant Caprese Pasta Salad . To store your Caprese pasta salad, place it in an airtight container. This helps keep the salad fresh. It is best if eaten within three days. The pasta can absorb the dressing over time, which may change the texture. Keep the salad refrigerated until serving. If you want to enjoy it later, store the dressing separately. Combine the salad and dressing just before serving. This keeps everything crisp and tasty. Caprese pasta salad is best served cold. If you prefer it warm, gently heat it in the microwave. Heat in short intervals, about 15 seconds at a time. Stir well to avoid hot spots. A Caprese Pasta Salad is a fresh dish that mixes pasta, tomatoes, mozzarella, and basil. It takes the classic Caprese salad and adds pasta for a filling meal. The bright colors and flavors make it fun to eat. You get creamy cheese, juicy tomatoes, and fragrant basil in every bite. Yes, you can make this salad ahead of time. It tastes great after sitting for a bit. Make it a few hours before you plan to serve it. This gives the flavors time to blend. Just keep it in the fridge until you are ready. To store leftovers, place the salad in an airtight container. Keep it in the fridge for up to three days. If the salad seems dry, you can add a little extra olive oil or balsamic glaze when serving. This keeps it fresh and tasty. You can use other cheeses if you want to mix it up. Try feta cheese for a salty kick or goat cheese for a creamy texture. You can even use parmesan for a different flavor. Each cheese gives the salad a unique taste. This blog post covered how to make a Caprese Pasta Salad. We explored the best ingredients like fresh produce, sauces, and seasonings. Then, I shared step-by-step instructions for cooking, combining, and dressing the salad. I also included tips for perfect pasta and creative variations to try. Finally, we talked about storage tips to keep your salad fresh. Choose your favorite ingredients and enjoy this dish any time!

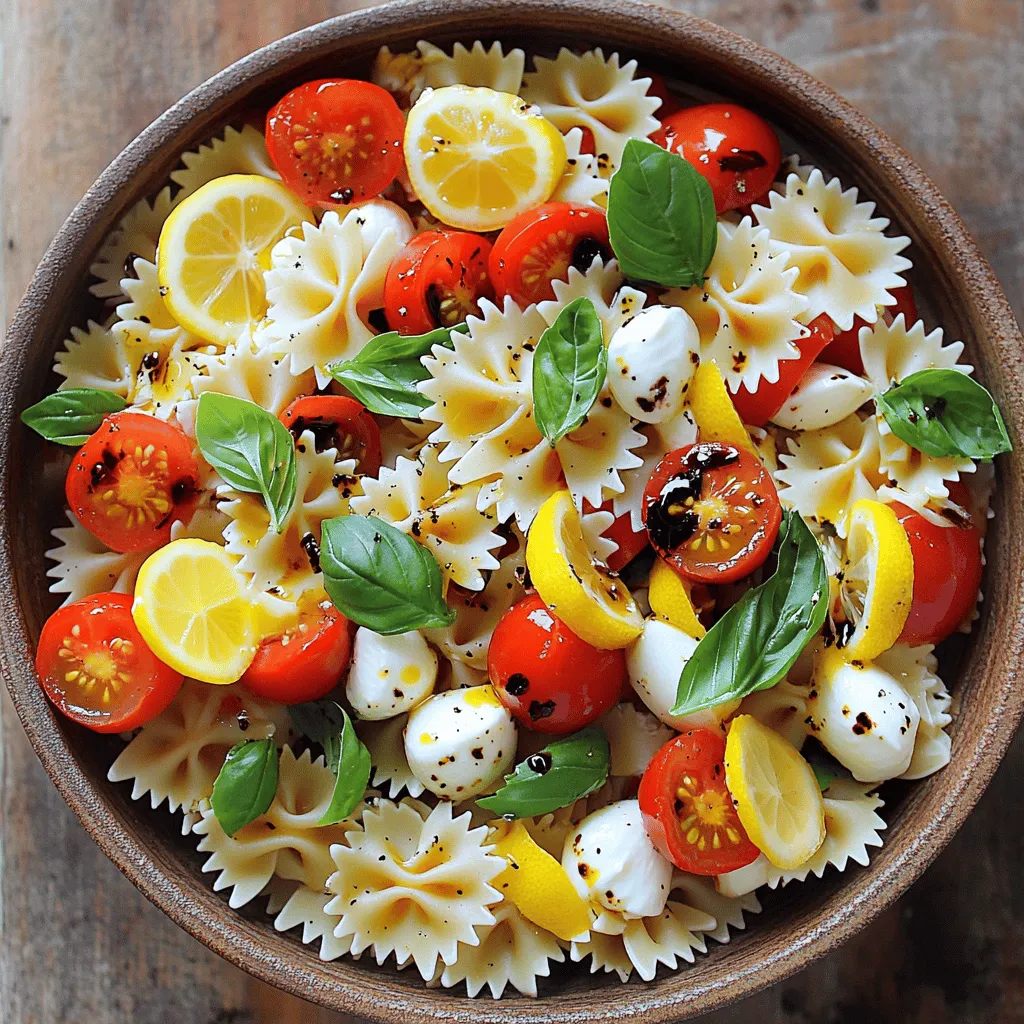
Are you ready for a dish that’s both fresh and easy? This Best Caprese Pasta Salad recipe brings together vibrant flavors and simple steps. You’ll learn how to mix pasta, …

Read more

Categories Salads

Crispy Chicken Katsu Simple and Tasty Recipe

May 28, 2025 by Chef Miles
- 2 boneless, skinless chicken breasts - 1 cup all-purpose flour - 2 large eggs, beaten - 1 ½ cups panko breadcrumbs - ½ teaspoon salt - ½ teaspoon black pepper - ½ teaspoon garlic powder - ½ teaspoon onion powder - 1 teaspoon sesame oil - Vegetable oil, for frying - Tonkatsu sauce for serving (store-bought or homemade) To make crispy chicken katsu, you need fresh ingredients. The chicken breasts should be plump and tender. Panko breadcrumbs are key for that crunch. They are lighter than regular breadcrumbs. The flour will help the chicken stick to the coating. Be sure to season your flour mix well. This step adds flavor right to the meat. I like to use sesame oil in the breadcrumbs. It gives a unique taste. You can find tonkatsu sauce in stores or make your own. This sauce adds a sweet and savory touch. It pairs perfectly with the crispy chicken. For serving, I often add a side of shredded cabbage. It adds crunch and freshness to the meal. For the full recipe, check out the complete instructions. Enjoy making this simple and tasty dish! Start by pounding the chicken breasts. Place each one between two sheets of plastic wrap. Use a meat mallet or rolling pin to pound them gently. Aim for an even thickness of about ½ inch. This step helps the chicken cook evenly and stay juicy. Next, set up your breading stations. In a shallow dish, mix the all-purpose flour with salt, black pepper, garlic powder, and onion powder. In another dish, beat the eggs until smooth. In a third dish, combine the panko breadcrumbs with sesame oil. This step adds flavor to the breadcrumbs. Now, it’s time to bread the chicken. Take one chicken breast and dredge it in the flour mixture. Make sure it’s fully coated. Next, dip it into the beaten eggs, allowing any excess to drip off. Finally, press the chicken into the panko mixture, coating both sides. Repeat this for the second chicken breast. Heat oil in a large skillet until it measures about ½ inch deep. Set the heat to medium-high. To check if the oil is ready, drop a few panko breadcrumbs in. If they sizzle, your oil is hot enough. Carefully place the breaded chicken into the hot oil. Fry each breast for about 4-5 minutes on one side until golden brown. Flip and cook for another 4-5 minutes. If your skillet is small, cook in batches. Once the chicken is golden and crispy, remove it from the skillet. Place it on a plate lined with paper towels to drain excess oil. Let the chicken rest for a minute before slicing it into strips. To serve, plate the crispy chicken katsu. You can drizzle tonkatsu sauce over it or serve it on the side. For a beautiful presentation, add finely shredded cabbage and a wedge of lemon. Enjoy your delicious creation! If you want the full recipe, check out the details above. To get that perfect crunch, use panko breadcrumbs. They are light and airy, creating a great texture. Make sure the oil is hot enough before frying. If it's too cool, the chicken absorbs oil, losing its crunchiness. Heat the oil to about 350°F (175°C) for best results. You can test it by dropping in a few breadcrumbs. If they sizzle, you’re good to go! When frying, avoid overcrowding the pan. If you add too much chicken, it lowers the oil temperature. This will lead to soggy chicken instead of crispy. Fry in batches, giving each piece plenty of space. This way, the heat stays even, and your chicken gets that perfect golden-brown color. Let the chicken rest after frying. This step is key to keeping it juicy. When you cut into hot chicken right away, the juices run out. Allow it to rest for a few minutes on paper towels. This helps the flavors settle and keeps your chicken katsu tasty and moist. {{image_4}} If you want a tasty twist, try pork katsu. Use pork loin or tenderloin instead of chicken. Just follow the same steps as for chicken katsu. Pound the pork to an even thickness first. This helps it cook well and stay juicy. Then, bread and fry as you would the chicken. The result is a crispy, savory delight that many enjoy. For a vegetarian take, swap the chicken with eggplant or tofu. If using eggplant, slice it into thick rounds. Salt the slices and let them sit for 15 minutes to draw out moisture. Then, rinse and dry them. For tofu, use firm or extra-firm blocks. Slice them into even pieces. Coat and fry just like the chicken. Both options give you a satisfying crunch and delicious flavor. You can easily change the flavors of your katsu. Try adding different spices to the breadcrumb mixture. For a kick, include some cayenne pepper or smoked paprika. You can also marinate the meat before breading. Soy sauce, ginger, and garlic make a great marinade. Let the meat soak for about 30 minutes. This will add depth to your dish and make it even more enjoyable. For more ideas, check the Full Recipe for crispy chicken katsu! To store leftover chicken katsu, first let it cool down. Place the chicken in an airtight container. This keeps it fresh and tasty. Store it in the fridge for up to three days. If you want to enjoy it later, don’t forget to save the tonkatsu sauce separately. This way, it won’t make the chicken soggy. When reheating chicken katsu, the goal is to keep it crispy. Preheat your oven to 375°F (190°C). Place the chicken on a baking sheet lined with parchment paper. Bake for about 10-15 minutes. This method helps regain that crunchy texture. Avoid using a microwave, as it can make the katsu soft and chewy. To freeze cooked katsu, follow these steps: 1. Cool Completely: Allow the chicken to cool down completely before freezing. 2. Wrap Well: Wrap each piece in plastic wrap. This prevents freezer burn. 3. Use a Freezer Bag: Place the wrapped chicken in a freezer-safe bag. Squeeze out as much air as possible. 4. Label and Date: Write the date on the bag. This helps you track how long it’s been in the freezer. 5. Freeze: Store the bag in the freezer for up to three months. When you're ready to eat it, thaw in the fridge overnight. Then, reheat as discussed to keep that crispiness. Enjoy your katsu at any time! For the full recipe, check the earlier section. Chicken katsu comes from Japan. It is a dish inspired by Western cooking. The term "katsu" means cutlet. It often features breaded and fried meat. This dish became popular in Japan after World War II. Today, chicken katsu is loved for its crispy texture and savory flavor. It often pairs with tonkatsu sauce, which adds a sweet and tangy kick. You can use regular breadcrumbs, but the texture will change. Panko breadcrumbs are lighter and crispier. They soak up less oil, which keeps the chicken crunchy. Regular breadcrumbs are denser and might make the katsu heavier. If you want that perfect crunch, stick with panko. To check if chicken is done, use a meat thermometer. Insert it into the thickest part of the chicken. It should read 165°F (75°C) for safety. If you don’t have a thermometer, cut a small slit in the chicken. The juices should run clear, not pink. This way, you ensure it is fully cooked without ruining the presentation. Chicken katsu is not gluten-free because it uses all-purpose flour and panko. However, you can make it gluten-free. Use gluten-free flour and gluten-free breadcrumbs instead. Many brands offer these alternatives. This way, you can enjoy chicken katsu without gluten. Just keep the cooking methods the same for great results. For the full recipe, check out the details above. In this post, I shared a simple recipe for chicken katsu. We covered the ingredients needed, step-by-step instructions, and tips for making it perfectly crunchy. Remember to let the chicken rest for optimal flavor. You can also try variations like pork katsu or vegetarian options. Whether you store leftovers or freeze some for later, this dish is versatile. Enjoy creating delicious meals that bring joy to the table!

If you’re craving a dish that combines crunch, flavor, and comfort, then crispy chicken katsu is for you! In this simple and tasty recipe, I’ll guide you through every step, …

Read more

Categories Dinner

Savory Slow Cooker Spaghetti Casserole Delight

May 28, 2025 by Chef Miles
- 8 ounces uncooked spaghetti - 1 pound ground beef or ground turkey - 1 medium onion, finely chopped - 2 cloves garlic, minced - 1 can (28 ounces) crushed tomatoes - 1 can (15 ounces) tomato sauce - 1 teaspoon Italian seasoning - 1 teaspoon salt - ½ teaspoon freshly ground black pepper - 1 cup cottage cheese - 1 cup shredded mozzarella cheese - ½ cup grated Parmesan cheese - Fresh basil leaves, for garnish Gather these ingredients before you start cooking. Each one plays a key role in making your spaghetti casserole rich and tasty. The ground meat gives protein, while the cheeses add that creamy texture. Tomatoes bring a bright flavor. Don't forget the fresh basil for a pop of color and taste at the end! This dish serves about six people. Each serving has around 350 calories, with a good mix of protein, carbs, and fats. The protein comes from the meat and cheeses, while the spaghetti provides the carbs. The cheese adds healthy fats, too. You will need a slow cooker to make this dish easy and hands-off. A mixing bowl works well for combining the sauce. A skillet is necessary for cooking the meat and onions. Lastly, some basic cooking utensils will help you stir and serve. For the Full Recipe, check the complete steps to ensure a perfect dish every time! First, cook the spaghetti. Follow the package instructions. You want it to be al dente. This means it should be firm when you bite it. Usually, this takes about 8-10 minutes. Drain the pasta well and set it aside. This step is crucial for the right texture later. Next, heat a skillet over medium heat. Add your ground beef or ground turkey, chopped onion, and minced garlic. Sauté this mix for about 5-7 minutes. Stir until the meat is browned and the onions are soft. It's important to drain any excess fat. This keeps the dish lighter and healthier. In a large bowl, combine the cooked meat mixture with the crushed tomatoes and tomato sauce. Add the Italian seasoning, salt, and black pepper. Stir everything together well. You want a rich sauce that brings all the flavors together. This is where the magic begins! Now, grab your slow cooker. Start by adding half of the meat sauce at the bottom. Then, layer half of the cooked spaghetti on top. Spoon half of the cottage cheese over this. Next, add half of the shredded mozzarella cheese. This layering helps the flavors mix as it cooks. Once layered, cover the slow cooker. Set it to low heat and cook for about 4-5 hours. You want the cheeses to be bubbly and golden brown. You’ll know it’s done when your kitchen smells amazing! After cooking, turn off the slow cooker. Let the casserole rest for about 10 minutes. This helps the flavors settle. For garnish, add fresh basil leaves on top. They not only look good but add a fresh taste. Enjoy your savory slow cooker spaghetti casserole! If you want the full recipe, check it out [here](Full Recipe). To achieve the perfect cheese consistency, I suggest using a mix of cottage cheese and mozzarella. This blend gives creamy richness without being too heavy. When adding the cheese, layer it gently. This helps prevent clumps and ensures even melting. Overcooking spaghetti is a common mistake. To avoid this, cook your pasta al dente. It should be firm when you bite into it. Remember, the pasta will continue to cook in the slow cooker. So, undercook it slightly for the best results. Adding fresh herbs can elevate your dish. Consider using basil or oregano for a classic Italian taste. You can also add crushed red pepper flakes for a bit of heat. This small change can make a big difference in flavor. For variety, think about adding veggies like bell peppers or mushrooms. They add texture and nutrition. You could even swap the meat for lentils or chickpeas for a vegetarian option. Set your slow cooker to low heat for the best results. This allows the flavors to meld nicely. Cooking on low for 4 to 5 hours works well. You can also check your casserole after 3 hours to see if it's ready. Common pitfalls include lifting the lid too often. Each time you do, you lose heat. Try to resist the urge to peek! Another tip is to ensure your slow cooker is not overcrowded. This can lead to uneven cooking and longer times. For the full recipe, check above. {{image_4}} You can easily make this dish meat-free. Try using lentils or chickpeas as meat substitutes. They add protein and texture. You can also include more vegetables like spinach, bell peppers, or zucchini. These veggies not only boost nutrition but also add color and flavor. Cheese lovers can switch things up! Instead of mozzarella, try gouda or fontina for a unique taste. If you want a strong flavor, use aged cheddar or blue cheese. For those avoiding dairy, there are great options. Look for plant-based cheeses made from nuts or soy. These can melt well and deliver a creamy texture. Feeling adventurous with pasta? You can use penne or fusilli instead of spaghetti. These shapes hold sauce nicely and add fun to your dish. If you need gluten-free options, choose rice or corn pasta. They cook well in the slow cooker and taste great. Check the package for cooking times to ensure perfect results. For the full recipe, you can check out the provided details. To store leftovers, let the casserole cool down first. Place it in a container with a tight lid. Use glass or plastic containers for best results. This keeps food fresh longer. You can also wrap it in plastic wrap or aluminum foil if needed. Leftovers last about 3-4 days in the fridge. To freeze this casserole, follow these steps: 1. Let the casserole cool completely. 2. Cut it into portions for easy use later. 3. Wrap each portion tightly in plastic wrap. 4. Place wrapped portions in a freezer bag or container. 5. Label the bag with the date. When you want to eat it, take out a portion. Thaw it in the fridge overnight. Then, reheat it in the oven at 350°F for about 20-30 minutes. You can also use a microwave for a faster option. In the fridge, the casserole lasts about 3-4 days. In the freezer, it stays good for about 2-3 months. Check for spoilage by looking for off smells or visible mold. If you see any signs, throw it away. Always trust your senses when it comes to food safety. Yes, you can! To prepare the casserole overnight, follow these tips: - Cook the spaghetti and meat mixture as directed. - Layer the casserole in your slow cooker. - Cover and store in the fridge overnight. - In the morning, cook it on low for 4-5 hours. You can pair this casserole with: - A fresh green salad. - Garlic bread for a crunchy side. - Steamed vegetables for added nutrients. Look for these signs: - Cheese on top is bubbly and golden. - A fork inserted in the center comes out clean. - The dish smells wonderful and inviting. Yes, you can cook it on high heat! Here’s what to do: - Cook for 2-3 hours instead of 4-5. - Check for doneness often to avoid overcooking. Yes, you can use whole wheat pasta. Keep these points in mind: - Whole wheat pasta may cook faster. - Check for a softer texture as it cooks. To reheat leftovers without losing taste: - Use the microwave in short bursts. - Alternatively, reheat in the oven at 350°F (175°C) for 15-20 minutes. - Cover with foil to keep moisture in. You can find the Full Recipe above to create this delicious meal! This spaghetti casserole is simple, tasty, and versatile. We covered ingredients, cooking steps, and storage tips. You learned to make it your own with variations and enhancements. Remember to rest the casserole for better texture and flavor. Preparing ahead makes serving easy. Enjoy sharing this dish and your cooking journey. A great meal awaits!

Get ready for a meal that warms both heart and home: Savory Slow Cooker Spaghetti Casserole Delight! With simple ingredients like ground beef, creamy cheeses, and rich tomatoes, this dish …

Read more

Categories Dinner

Meaty Texas Trash Dip Hearty and Flavorful Treat

May 27, 2025 by Chef Miles
- 1 pound ground beef - 1 can (15 oz) black beans, drained and rinsed - 1 can (15 oz) refried beans - 1 cup cream cheese, softened - 1 cup sour cream - 1 cup shredded cheddar cheese, divided - 1 cup diced tomatoes with green chilies (canned) - Seasonings: garlic powder, onion powder, chili powder, ground cumin - Salt and black pepper, to taste - Tortilla chips for serving These ingredients come together to create a hearty and flavorful treat. Each one plays a role in building layers of taste. The ground beef gives a nice, meaty base. Black beans add texture and fiber, while refried beans bring creaminess. Cream cheese and sour cream together create a rich, smooth dip. Shredded cheddar cheese melts beautifully, adding cheesy goodness on top. Diced tomatoes with green chilies add a bit of spice and freshness. The seasonings enhance all the flavors, making your taste buds dance. Don’t forget to adjust salt and pepper to your liking. Gather these ingredients, and you’ll be on your way to a delicious dip. You can find the full recipe in the article. Enjoy the process of making this dip; it’s simple and rewarding! - Heat a skillet over medium heat. - Break apart the ground beef and brown it for 6-8 minutes. - After it cooks, drain any excess fat. - Add softened cream cheese to the skillet and stir until it melts. - Incorporate sour cream to create a smooth mixture. - Mix in black beans, refried beans, and diced tomatoes. - Season with garlic powder, onion powder, chili powder, cumin, salt, and pepper. - Warm the mixture on low for 5 minutes, stirring gently. - Stir in shredded cheddar cheese until it melts. - For a bubbly top, broil for 3-5 minutes, if desired. - Serve warm with tortilla chips for dipping. This Meaty Texas Trash Dip is a hearty and flavorful treat. Make sure to check out the Full Recipe for more details! To make your Meaty Texas Trash Dip shine, start by adjusting the seasonings. Taste the mixture as you go. This way, you can add more garlic powder or chili powder if you want extra flavor. Next, use room temperature ingredients. Cream cheese and sour cream blend better when they are not cold. It helps make the dip smooth and creamy. Want to switch things up? You can substitute ground turkey for a lighter option. This keeps the dish tasty while cutting down on fat. If you like heat, add jalapeños for a nice kick. For a colorful twist, incorporate more vegetables like corn or bell peppers. These add crunch and flavor, making each bite exciting. Enjoy these changes to create your perfect Meaty Texas Trash Dip. {{image_4}} You can easily make a vegetarian version of Meaty Texas Trash Dip. Just replace the ground beef with lentils or textured vegetable protein. Both options add great texture and soak up flavors well. Lentils cook fast and are full of protein. Textured vegetable protein is a meat substitute that has a chewy texture. This way, everyone can enjoy the dip! If you love heat, try a spicy Tex-Mex twist. Add more chili powder or some diced jalapeños to the mix. This will give your dip a nice kick. Adjust the spice level to fit your taste. You can start with a little and add more if you want. The heat will blend nicely with the creamy base. Cheese lovers can explore cheesy alternatives. Instead of cheddar cheese, try using pepper jack or Monterey Jack. Both options bring unique flavors. Pepper jack adds spice, while Monterey Jack offers a mild taste. You can mix and match cheeses for a delightful experience. Get creative and find your perfect cheesy blend! For the full recipe, check out the Meaty Texas Trash Dip section. After you enjoy your Meaty Texas Trash Dip, store leftovers in an airtight container. This keeps the dip fresh. It can last up to 3-4 days in the fridge. When you're ready to eat, just scoop out the amount you want. If you want to save some dip for later, freezing is a great option. Place it in a sealed container. It can last for up to 2 months in the freezer. When you want to enjoy it again, thaw it in the fridge overnight. Reheat it in the microwave or oven until warm. Then, dig in! Yes, you can prepare it in advance and refrigerate before reheating. This dip holds its flavor well, making it a great choice for parties or game day. Just let it cool, cover it, and store it in the fridge. When you’re ready, you can reheat it easily. Reheat in the microwave or oven until warmed through. If using the microwave, heat in short bursts. Stir in between to avoid hot spots. If using the oven, place it in a safe dish and heat at 350°F until warm. Serve it with tortilla chips, veggies, or even over nachos. The crunchy chips pair well with the creamy dip. You can also try adding some sliced jalapeños or fresh cilantro for a pop of flavor. This dip is versatile and fits many tastes. For the full recipe, check out the complete guide to making Meaty Texas Trash Dip! This blog post shared a simple recipe for Meaty Texas Trash Dip. You learned about the ingredients, cooking steps, and tips for perfect flavor. I also offered variations to fit your taste and ideas for storage. This dip is fun for sharing, whether for game day or a casual gathering. By making a few adjustments, you can create a dish that everyone will enjoy. Enjoy your cooking and make this dip a new favorite!

If you’re craving a dip that’s packed with flavor and heartiness, you’re in the right place! This Meaty Texas Trash Dip combines beef, beans, and creamy goodness that will make …

Read more

Categories Appetizers
Older posts
Newer posts
← Previous Page1 … Page48 Page49 Page50 … Page52 Next →

MELTED RECIPES

where delicious ideas melt into life, from stovetop to backyard. Always warm, simple, and irresistibly satisfying. 🍳🔥🧀

PAGES

Home About Contact Privacy Policy Terms & Conditions Cookie Policy GDPR Policy Copyright Policy Disclaimer

CATEGORIES

Appetizers Desserts Salads Breakfast Dinner

Contact

  • Pinterest
  • Mail
Copyright © 2025 Melted Recipes. All rights reserved.