Skip to content
Melted Recipes
  • Home
  • Appetizers
  • Desserts
  • Salads
  • Breakfast
  • Dinner
  • Privacy Policy
  • Contact
  • About

Chef Miles

Easy Pumpkin Spice Cake Delicious and Quick Recipe

August 26, 2025 by Chef Miles
Here are the key ingredients for your easy pumpkin spice cake: - 1 ½ cups all-purpose flour - 1 cup granulated sugar - ½ cup packed brown sugar - 1 teaspoon baking powder - 1 teaspoon baking soda - 1 teaspoon ground cinnamon - ½ teaspoon ground nutmeg - ½ teaspoon ground ginger - ¼ teaspoon ground cloves - ½ teaspoon salt - 1 cup canned pumpkin puree - ½ cup vegetable oil - 2 large eggs - 1 teaspoon vanilla extract - ½ cup chopped walnuts (optional) - Powdered sugar for dusting (optional) Each ingredient plays a role in making your cake moist, flavorful, and irresistible. The pumpkin puree gives it a rich taste and moist texture. The spices add warmth and depth. The sugars balance the flavors and help with browning. When you gather your ingredients, choose high-quality ones for the best results. Fresh spices can enhance the cake’s flavor even more. If you want a nutty crunch, add chopped walnuts. Otherwise, the cake is delightful without them too! This recipe is simple, and you can find these ingredients in most stores. Enjoy baking! - Preheat the oven to 350°F (175°C). - Prepare a 9-inch round cake pan by greasing it with butter or spray. Dust it lightly with flour. You can also line the bottom with parchment paper. - In a large bowl, combine: - 1 ½ cups all-purpose flour - 1 cup granulated sugar - ½ cup packed brown sugar - 1 teaspoon baking powder - 1 teaspoon baking soda - 1 teaspoon ground cinnamon - ½ teaspoon ground nutmeg - ½ teaspoon ground ginger - ¼ teaspoon ground cloves - ½ teaspoon salt - Use a whisk to mix these dry ingredients well. This helps mix the spices and leavening agents evenly. - In a separate bowl, whisk together: - 1 cup canned pumpkin puree - ½ cup vegetable oil - 2 large eggs - 1 teaspoon vanilla extract The mixture should be smooth and creamy. - Gradually add the wet mixture to the dry ingredients. Stir gently with a spatula or wooden spoon until just combined. - Pour the thick batter into the prepared cake pan. Use a spatula to smooth the top. - Bake for 25-30 minutes. To check for doneness, insert a toothpick into the center. It should come out clean or with a few moist crumbs. - Once baked, remove the cake from the oven. Let it cool in the pan for about 10 minutes. Then, transfer it to a wire rack to cool completely. - After cooling, dust the top with powdered sugar for sweetness and a nice look before slicing. - Avoiding overmixing: When you mix the wet and dry ingredients, use a gentle hand. Stir just until the flour disappears. Overmixing makes the cake tough. You want it light and fluffy. - How to check cake doneness: Insert a toothpick into the center of the cake. If it comes out clean or with a few crumbs, it’s done. If it’s wet, bake a few more minutes. - Dusting with powdered sugar: Once the cake cools, sprinkle powdered sugar on top. This adds a sweet touch and makes the cake look fancy. - Adding whipped cream: Serve each slice with a dollop of whipped cream. It brings a creamy texture and balances the spices in the cake. - Using fresh spices: For a stronger flavor, use fresh spices instead of ground ones. Freshly grated nutmeg or cinnamon sticks can make a big difference. - Alternative nuts or mix-ins: You can add different nuts like pecans or almonds. Chocolate chips or dried fruits work well too. These add texture and surprise in every bite. {{image_4}} To make a gluten-free pumpkin spice cake, replace all-purpose flour with a gluten-free blend. This swap keeps the cake soft and tasty. You can also check if the blend contains xanthan gum. If not, add a teaspoon to help with the texture. For a vegan option, replace eggs with flax eggs. Mix one tablespoon of flaxseed meal with three tablespoons of water for each egg. Let it sit for a few minutes until it thickens. Use a plant-based oil, like coconut oil, instead of vegetable oil. This way, everyone can enjoy a slice! Want to make your cake even more exciting? Try adding a cup of chocolate chips to the batter. They melt and blend perfectly with the pumpkin spice. It adds a rich sweetness that many love. Another idea is to top the cake with cream cheese frosting. This frosting adds a tangy flavor that balances the cake's sweetness. Just mix cream cheese, butter, powdered sugar, and vanilla for a creamy topping. For a tart twist, add a cup of fresh or dried cranberries to the batter. They give a nice contrast to the sweet pumpkin flavor. You can also spice it up by using different spices. Instead of just cinnamon, try adding cardamom or allspice. These spices can give your cake a unique twist that's perfect for the season. To keep your pumpkin spice cake fresh, store it in an airtight container. You can also wrap it tightly in plastic wrap. This will help keep moisture in and prevent drying. The best place to store it is at room temperature, away from sunlight. If you want it to last longer, you can refrigerate it, but it may become a bit dry. Freezing is a great way to save leftover cake. First, let the cake cool completely. Then, slice it into pieces. Wrap each piece in plastic wrap, and place them in a freezer bag. Make sure to remove as much air as possible. When you want to enjoy a slice, take it out and let it thaw in the fridge overnight. You can also thaw it at room temperature for a few hours. This cake can last up to four days at room temperature. If you store it in the fridge, it can last about a week. Always check for mold or an off smell before eating. If you see any signs of spoilage, it's best to discard the cake. Enjoy it while it’s fresh for the best taste! Can I use fresh pumpkin instead of canned? Yes, you can use fresh pumpkin. Just make sure to cook and puree it first. Fresh pumpkin adds a lovely taste. Cut the pumpkin, roast it, and scoop out the flesh. Blend it until smooth and use it in the recipe. How do I make this cake without eggs? You can replace eggs with applesauce or mashed bananas. Use 1/4 cup per egg. This keeps the cake moist and fluffy. Yogurt or silken tofu works too. Choose whichever option you like best. What can I substitute for vegetable oil? You can use melted butter or coconut oil instead. Both give great flavor. Applesauce can also replace oil for a healthier option. Use the same amount as the recipe calls for. Can this recipe be doubled? Yes, you can double the recipe. Just use a larger pan or two smaller pans. Keep an eye on baking time. It may take longer to bake, so check for doneness with a toothpick. How do I know when the cake is baked properly? Insert a toothpick into the center. If it comes out clean or with a few crumbs, the cake is done. If it has wet batter on it, bake a bit longer. Let it cool in the pan before moving it to a wire rack. This blog post covers everything you need for a perfect pumpkin spice cake. You learned about the key ingredients, step-by-step instructions, and helpful tips to enhance your baking. We explored fun variations, storage options, and answered common questions. Each section gives you confidence for baking. I hope you feel ready to create your delicious cake. Enjoy every bite and share your results!

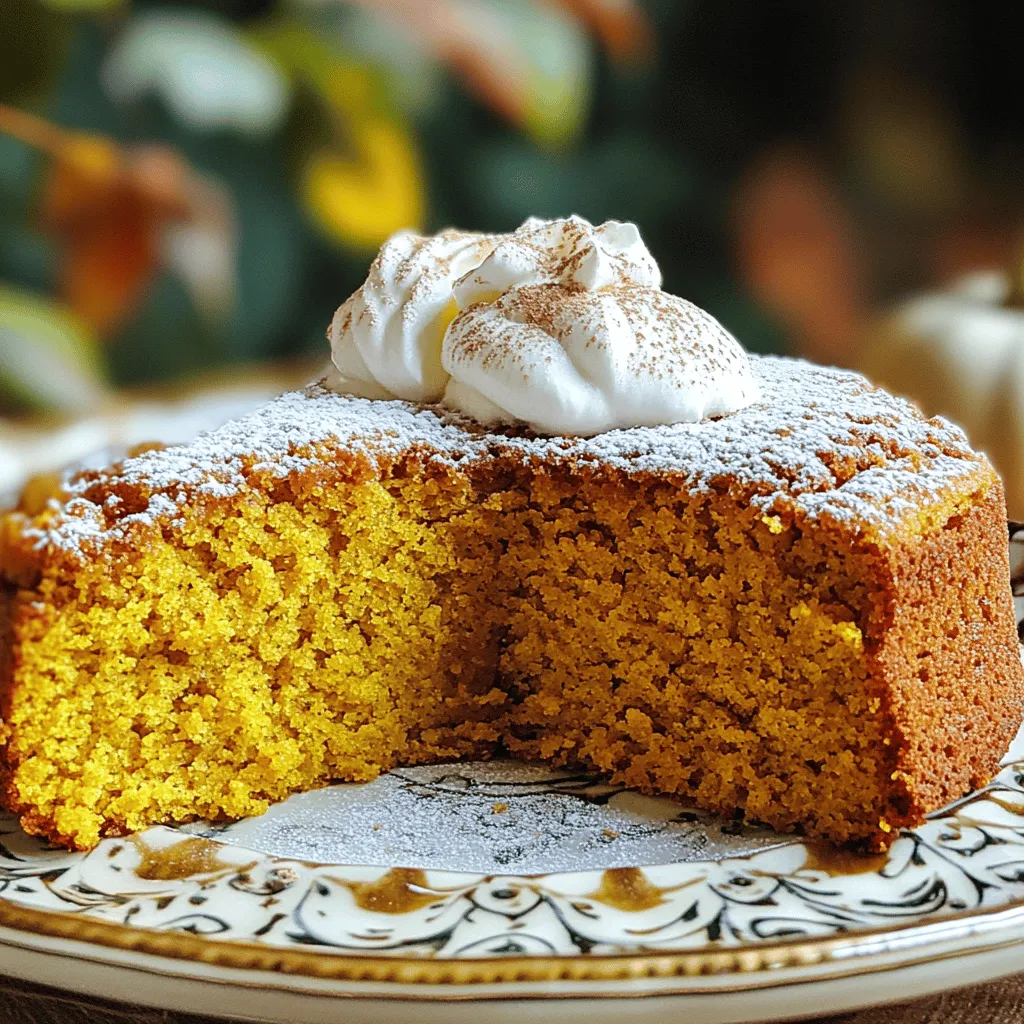
Want a sweet treat that captures the essence of fall? Look no further! This Easy Pumpkin Spice Cake is quick to make and packed with flavor. With simple ingredients and …

Read more

Categories Desserts

Apple Crisp Bars Delightful Dessert for Any Occasion

August 26, 2025 by Chef Miles
- 2 cups all-purpose flour - 1 cup rolled oats - 1 cup brown sugar - 4 medium-size apples The main ingredients form the heart of your apple crisp bars. The flour gives structure, while rolled oats add a nice chew. Brown sugar brings sweetness and depth. Fresh, medium-size apples are key for great flavor. - 1 teaspoon ground cinnamon - 1/2 teaspoon ground nutmeg - 1/2 teaspoon sea salt - 1/2 teaspoon pure vanilla extract Spices add warmth and aroma to your dessert. Cinnamon gives a cozy taste, while nutmeg adds a warm spice. Sea salt enhances sweetness and balances flavors. Vanilla extract brings everything together with its sweet, rich notes. - 1 cup unsalted butter, melted - 1 tablespoon fresh lemon juice - 1/4 cup granulated sugar - 1 tablespoon cornstarch Melted butter binds the mixture, making it rich and delicious. Lemon juice brightens the apples and adds a slight tang. Granulated sugar balances the tartness of the apples. Cornstarch helps thicken the filling, keeping it from being too runny. - Preheat your oven to 350°F (175°C). - Prepare a 9x13 inch baking pan with parchment paper. Leave some paper hanging for easy lifting later. - In a large mixing bowl, combine: - 2 cups all-purpose flour - 1 cup rolled oats - 1 cup brown sugar - 1 teaspoon ground cinnamon - 1/2 teaspoon ground nutmeg - 1/2 teaspoon sea salt - Use a whisk or fork to blend them well. - Gradually pour in 1 cup melted unsalted butter. Mix until it forms coarse crumbs like wet sand. Set aside 1 cup for topping. - Press the remaining crumb mixture firmly into the pan's bottom. Bake for about 15 minutes or until lightly golden. - While the crust bakes, prepare the apple filling. In another bowl, mix: - 4 medium apples, peeled and thinly sliced - 1 tablespoon fresh lemon juice - 1/4 cup granulated sugar - 1 tablespoon cornstarch - 1/2 teaspoon pure vanilla extract - Toss gently until the apple slices are coated. - Once the crust is ready, spread the apple mixture evenly over it. - Sprinkle the reserved crumb mixture on top of the apples for a perfect crisp. - Return the pan to the oven and bake for another 30-35 minutes. Look for tender apples and a golden topping. - After baking, let the bars cool in the pan. Use the parchment paper to lift them out and slice into squares. To make your apple crisp bars shine, use a mix of sweet and tart apples. This blend gives the bars a nice balance of flavors. I like to use Granny Smith apples for tartness and Fuji or Honeycrisp for sweetness. This mix keeps each bite exciting. Another tip is to ensure an even coating of apples with lemon juice. This step helps to brighten the flavors and keep the apples from browning. Just toss the sliced apples in lemon juice before mixing in the sugar and spices. This small step makes a big difference. These bars taste best when warm. Serve them with a scoop of vanilla ice cream. The ice cream melts slightly, adding a rich creaminess. For an extra touch, drizzle caramel sauce over the top. This adds a sweet layer that complements the apple flavors. One mistake to watch out for is overmixing the crumb mixture. You want it to be crumbly, not a paste. Mix just until combined for the best texture. Also, do not slice the bars too soon. Allow them to cool completely before cutting. This cooling time helps them hold their shape and makes for better presentation. Trust me; you want your bars to look as good as they taste! {{image_4}} You can make apple crisp bars even better. Try adding chopped nuts for extra crunch. Walnuts or pecans work great. They will give your bars a nice texture. You can also add dried fruit. Raisins or cranberries add a sweet twist. This will make every bite exciting. Want a gluten-free option? Use almond or oat flour instead of all-purpose flour. This change keeps the bars tasty and safe for gluten-free diets. If you prefer a vegan version, replace the butter and eggs. Use coconut oil and a flaxseed mixture instead. This will keep your bars soft and delicious. You can change flavors by adding seasonal spices. Try cloves or ginger for a warm taste in fall. You can also switch up the fruit. Peaches or pears can replace apples. This gives a fresh flavor that fits different seasons. Mixing fruits keeps things fun and tasty! To keep your apple crisp bars fresh, store them in an airtight container. This helps keep moisture out. You can keep the bars at room temperature for about three days. If you want them to last longer, refrigeration is a good option. Just make sure to wrap them tightly in plastic wrap or foil. You can freeze apple crisp bars for later use. First, let the bars cool completely. Then, wrap each bar in plastic wrap. Place the wrapped bars in a freezer bag. They can stay fresh in the freezer for up to three months. To enjoy them later, take out the bars and let them thaw in the fridge overnight. For a warm treat, reheat them in the oven at 350°F (175°C) for about 10 minutes. These delicious bars can last about three days at room temperature. In the fridge, they may stay fresh for up to a week. Look for signs of spoilage, like a strange smell or mold. If you see any, it’s best to throw the bars away. Yes, you can make apple crisp bars ahead of time. Prepare them a day before your event. Store the bars in an airtight container at room temperature. This helps the flavors blend well. If you need to store them longer, refrigerate them. Just make sure they are completely cool before wrapping. This will keep them fresh and tasty. The best apples for apple crisp bars are a mix of sweet and tart. I suggest using Granny Smith and Honeycrisp apples for a great balance. Granny Smith adds a tangy flavor, while Honeycrisp brings sweetness. You can also use Fuji or Braeburn apples. Both offer a nice crunch and flavor. Mixing different apples gives your bars a richer taste. To check if the bars are done, look for a golden brown topping. The apples should be tender but not mushy. You can insert a fork into the bars. If it goes in easily, they are ready. The bars will also smell amazing when done. Let them cool completely before cutting. This helps them hold their shape better. This blog post covered the key ingredients for apple crisp bars, step-by-step instructions, and helpful tips. You learned how to mix flavors and avoid common mistakes. Remember, the right apples and baking techniques make a big difference. Mixing in nuts or using seasonal fruit can boost flavor. Store your bars properly to enjoy them longer. With these insights, you can create a tasty dessert that impresses everyone. Happy baking!

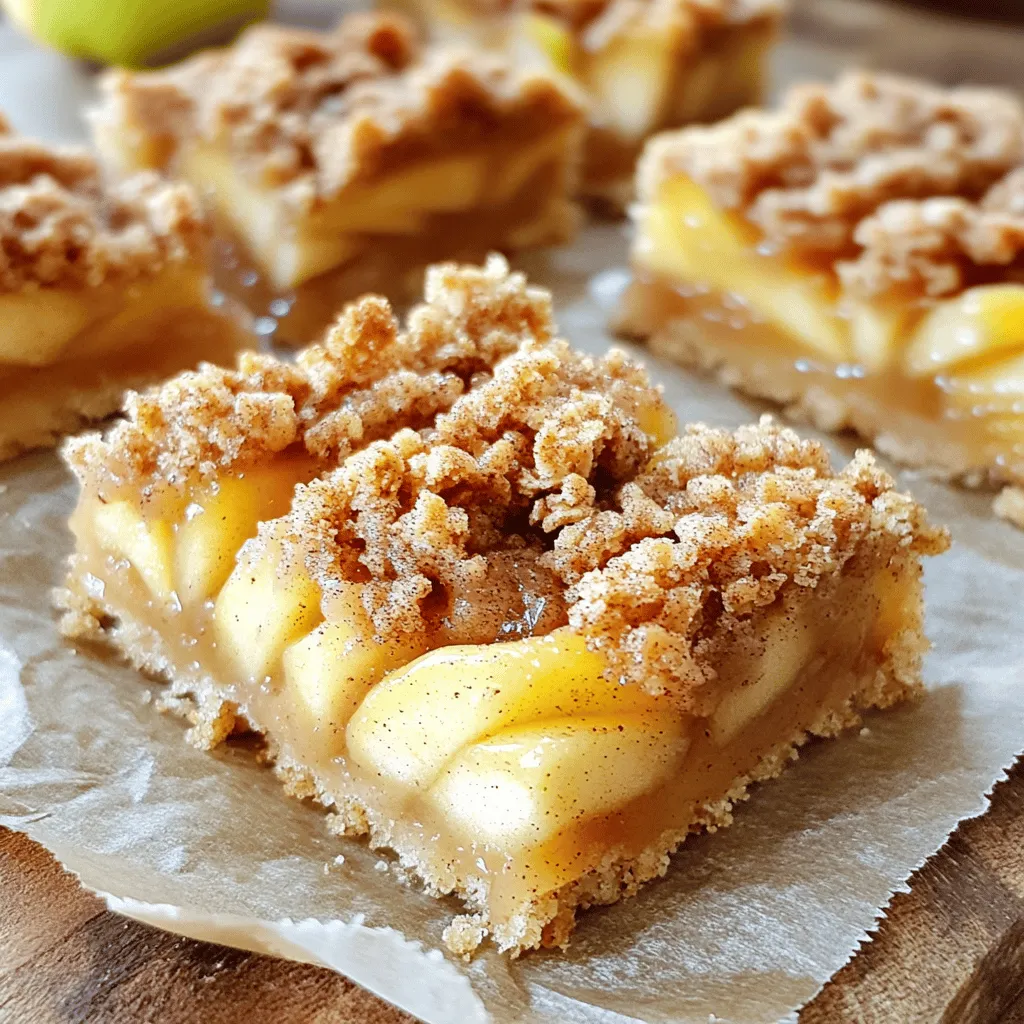
Are you ready to dive into a dessert that’s bursting with flavor? These Apple Crisp Bars are your new go-to sweet treat for any occasion. They combine the warmth of …

Read more

Categories Desserts

Pumpkin Coffee Cake Delightful and Simple Recipe

August 26, 2025 by Chef Miles
To make the pumpkin coffee cake, gather these simple ingredients: - 1 ½ cups all-purpose flour - 1 teaspoon baking powder - ½ teaspoon baking soda - 1 teaspoon ground cinnamon - ½ teaspoon ground nutmeg - ¼ teaspoon ground ginger - ¼ teaspoon salt - ½ cup unsalted butter, softened - 1 cup granulated sugar - 2 large eggs, at room temperature - 1 cup canned pumpkin puree - ½ teaspoon vanilla extract - ½ cup chopped walnuts or pecans (optional) If you need to make swaps for dietary needs, here are some options: - Use gluten-free flour to make it gluten-free. - Swap eggs with flaxseed meal or applesauce for vegan options. - Use coconut oil instead of butter for dairy-free. - Try a sugar substitute like stevia if you want less sugar. Choosing quality ingredients makes a big difference in your cake. - Fresh spices enhance the flavor. - Pure pumpkin puree gives the best taste and texture. - Real butter adds richness. - Fresh eggs help with the cake’s rise. Using high-quality items leads to a better outcome. Enjoy the process and the delicious results! First, preheat your oven to 350°F (175°C). This step is key for even baking. While the oven heats, take a 9x9-inch baking pan. Grease it well with butter or oil. You can also line the bottom with parchment paper. This makes it easy to remove the cake later. In a medium bowl, gather your dry ingredients. Combine 1 ½ cups of all-purpose flour, 1 teaspoon of baking powder, ½ teaspoon of baking soda, 1 teaspoon of ground cinnamon, ½ teaspoon of ground nutmeg, ¼ teaspoon of ground ginger, and ¼ teaspoon of salt. Use a whisk to mix everything well. Set this bowl aside. Letting the spices blend enhances the cake's flavor. Next, you will cream the butter and sugar. In a large mixing bowl, add ½ cup of softened unsalted butter and 1 cup of granulated sugar. Use an electric mixer on medium speed. Beat them until the mixture turns light and fluffy, about 3 minutes. This step adds air to the batter, making your cake light. Now, it's time to add eggs and pumpkin. Add 2 large eggs to the butter-sugar mix, one at a time. Mix well after each addition. Then, add 1 cup of canned pumpkin puree and ½ teaspoon of vanilla extract. Mix until the batter is smooth and free of lumps. Make sure you use pure pumpkin, not pie filling. Gradually add the dry mixture to your wet batter. Use a spatula or wooden spoon to fold them together. Mix just until you no longer see dry flour. Overmixing can make the cake dense. If you want, fold in ½ cup of chopped walnuts or pecans for extra crunch. Pour your batter into the prepared pan. Smooth the top for even baking. Place the pan in the oven and bake for 30-35 minutes. To test for doneness, insert a toothpick into the center. It should come out clean or with a few moist crumbs. After baking, let the cake cool in the pan for about 10 minutes. Then, carefully move it to a wire rack. This helps it cool completely and prevents sogginess. Enjoy the delightful aroma as it cools! To get a light and fluffy cake, cream the butter and sugar well. Mix them until they look pale and fluffy, about three minutes. Add the eggs slowly, beating well after each one. When you add the dry mix, fold gently. This helps keep your cake airy. Over-mixing makes it dense, so stop as soon as you see no dry flour. Store your pumpkin coffee cake in an airtight container. This keeps it moist and fresh. If you want to keep it longer, wrap it in plastic wrap and put it in the fridge. It can last for up to five days this way. For longer storage, freeze slices. Just wrap them well and use them later. Make your cake look nice by dusting it with powdered sugar. A sprinkle of cinnamon adds a lovely touch, too. Cut the cake into squares and serve it warm with coffee or tea. This makes it a cozy treat for any time of day. You can also add a dollop of whipped cream or a scoop of ice cream for extra fun. {{image_4}} You can easily make a vegan version of pumpkin coffee cake. Substitute the eggs with 1/4 cup of unsweetened applesauce for each egg. Use a plant-based butter or coconut oil instead of unsalted butter. For the milk, almond or soy milk work well. This way, you still enjoy a moist and tasty cake without any animal products. To make this cake gluten-free, replace all-purpose flour with a gluten-free flour blend. You can also add 1 teaspoon of xanthan gum to help with texture. Make sure all other ingredients are gluten-free. This keeps the cake light and fluffy, just like the original. You can add more fun to your pumpkin coffee cake with extra flavors. Here are some ideas: - Chocolate Chips: Mix in 1/2 cup of chocolate chips for a sweet twist. - Spices: Add 1/4 teaspoon of allspice or cloves for a bolder flavor. - Nuts: Use pecans or walnuts for a crunch. Fold in 1/2 cup for a nutty bite. - Cranberries: Dried cranberries give a tart contrast. Add 1/2 cup for a fruity touch. These variations help you customize your cake to suit your taste. Enjoy the fun of creating your perfect pumpkin coffee cake! To keep your pumpkin coffee cake fresh, store it in an airtight container. This helps maintain its moisture and flavor. Place the cake at room temperature for a day or two. If you want it to last longer, refrigerate it. Just be sure to cover it well to avoid drying out. You can freeze pumpkin coffee cake for up to three months. First, let the cake cool completely. Then, wrap it tightly in plastic wrap. After that, place it in a freezer-safe bag or container. When you're ready to enjoy it, let it thaw in the fridge overnight. This keeps it moist and tasty. To reheat your cake, preheat your oven to 350°F (175°C). Place slices on a baking sheet. Heat for about 10-15 minutes. You can also microwave individual slices for 20-30 seconds. This will bring back its warm, fresh taste. Enjoy it with your favorite drink for a cozy treat! You can use several options if you want to skip eggs. Here are a few ideas: - Flaxseed Meal: Mix 1 tablespoon of flaxseed meal with 2.5 tablespoons of water. Let it sit for 5 minutes. - Applesauce: Use 1/4 cup of unsweetened applesauce for each egg. - Yogurt: 1/4 cup of plain yogurt can work well too. These substitutes add moisture and help bind the cake, just like eggs. Yes, you can use fresh pumpkin! First, you need to prepare it. Cut the pumpkin into chunks and roast until soft. Then, scoop out the flesh and blend it until smooth. Make sure it is not too watery. Fresh pumpkin can have a different texture but will taste great. To keep your cake moist, follow these tips: - Don't Overmix: Mix just until combined. Overmixing can make the cake tough. - Use Room Temperature Ingredients: This helps to create a smooth batter. - Add Moist Ingredients: Ingredients like pumpkin puree and butter add moisture. Always check your cake for doneness. It should be baked just right. This cake pairs well with many treats: - Coffee: A warm cup of coffee enhances the flavors. - Tea: A soothing cup of tea works great too. - Whipped Cream: A dollop on top adds creaminess. - Ice Cream: A scoop of vanilla ice cream is a fun treat. These options make your coffee cake even more delightful. Pumpkin coffee cake stays fresh for about 3 days at room temperature. Make sure to cover it well. If you want it to last longer, store it in the fridge for up to a week. You can also freeze it for up to 3 months. Just wrap it tightly to avoid freezer burn. In this blog post, we explored how to make a delicious pumpkin coffee cake. We covered key ingredients and tasty substitutes for various diets. You learned the importance of using quality items for better flavor. I shared step-by-step instructions to ensure your cake turns out great. You got tips for texture, storage, and presentation ideas. Finally, I offered variations to suit different tastes and answered common questions. Enjoy baking your perfect pumpkin coffee cake!

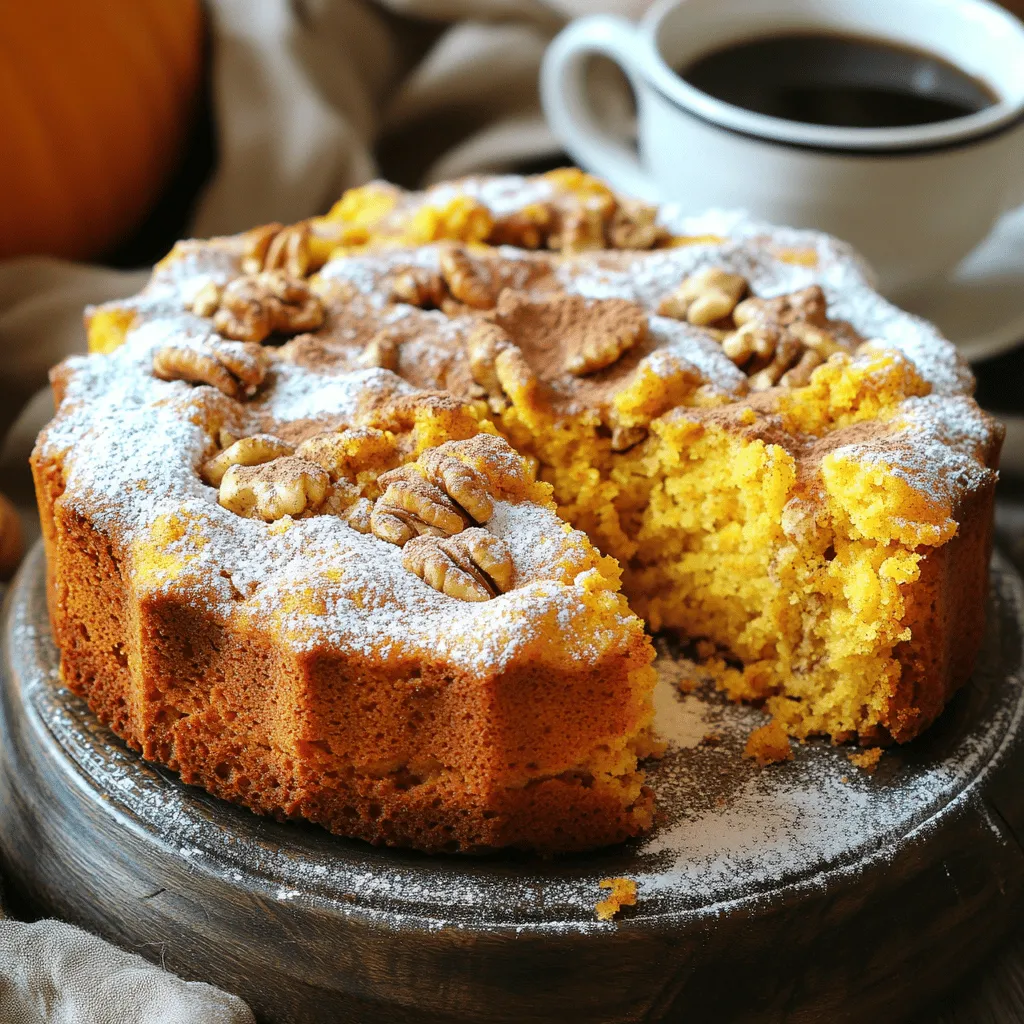
Fall brings cozy vibes, and what better treat than Pumpkin Coffee Cake? This delightful and simple recipe combines warm pumpkin flavors with rich spices, making it perfect for any gathering. …

Read more

Categories Desserts

Pumpkin Cinnamon Roll Muffins Cozy and Tasty Treat

August 26, 2025 by Chef Miles
To make these delicious pumpkin cinnamon roll muffins, gather the following: - 1 cup all-purpose flour - 1 cup whole wheat flour - 1 tablespoon baking powder - 1 teaspoon baking soda - 1 teaspoon ground cinnamon - 1/2 teaspoon ground nutmeg - 1/2 teaspoon salt - 1 cup canned pumpkin puree - 2/3 cup packed brown sugar - 1/3 cup granulated sugar - 1/2 cup milk (or non-dairy alternative) - 1/4 cup vegetable oil - 1 teaspoon vanilla extract - 1/2 cup chopped walnuts or pecans (optional) - 1/4 cup sugar for cinnamon swirl (for filling) - 1 tablespoon ground cinnamon (for filling) You can switch things up with these optional ingredients: - Chocolate chips for a sweet twist - Raisins or dried cranberries for added texture - Pumpkin pie spice for more warmth - Different nuts like almonds for new flavors Here are some smart swaps you can try: - Use almond flour or oat flour for a gluten-free version. - Swap the milk with almond milk or oat milk for dairy-free muffins. - Use coconut oil instead of vegetable oil for a different taste. - Replace brown sugar with coconut sugar for a lower glycemic index. These easy ingredient swaps keep the muffins tasty. Enjoy baking! First, heat your oven to 350°F (175°C). This step matters, as a hot oven helps the muffins rise well. Next, line a muffin tin with paper liners. If you don’t have liners, grease each cup lightly with cooking spray. This helps the muffins pop out easily after baking. In a medium bowl, mix the dry ingredients. You need 1 cup of all-purpose flour and 1 cup of whole wheat flour. Add 1 tablespoon of baking powder and 1 teaspoon of baking soda. Then, include 1 teaspoon of ground cinnamon, 1/2 teaspoon of ground nutmeg, and 1/2 teaspoon of salt. Whisk these together until no lumps remain. This mix adds flavor and helps your muffins rise. In a separate large bowl, combine the wet ingredients. Start with 1 cup of canned pumpkin puree. Add 2/3 cup of packed brown sugar and 1/3 cup of granulated sugar. Pour in 1/2 cup of milk or a non-dairy alternative, 1/4 cup of vegetable oil, and 1 teaspoon of vanilla extract. Mix these well until the mixture is smooth and creamy. This blend keeps the muffins moist and flavorful. Gradually add the dry mix to the wet ingredients. Stir gently with a spatula. You want to mix until just combined. It's okay if there are a few lumps. If you like nuts, fold in 1/2 cup of chopped walnuts or pecans at this point. In a small bowl, mix 1/4 cup of sugar with 1 tablespoon of ground cinnamon for the filling. Scoop the muffin batter into the cups, filling them about halfway. Sprinkle a teaspoon of the cinnamon sugar mix on top of each. Then, add the remaining batter, filling the cups two-thirds full. Use a toothpick or knife to swirl the batter, creating a marbled look. Bake for 18-20 minutes. Check with a toothpick; it should come out clean. Allow the muffins to cool in the pan for about 5 minutes. Then, move them to a wire rack to cool completely. Enjoy warm for the best taste! To get soft and fluffy muffins, focus on mixing. Mix until just combined. Lumps are okay; they help keep the muffins tender. Use room temperature ingredients for a better blend. It helps the batter come together smoothly. When you scoop the batter, fill each cup about two-thirds full. This allows space for rising. Avoid overmixing the batter. It can lead to tough muffins. Also, do not skip the preheating step. If the oven isn’t hot enough, your muffins may not rise well. Make sure to check the baking time, too. Every oven is different, so adjust as needed. Lastly, don’t forget to cool the muffins before serving. This lets the flavors settle. Serve these muffins warm for the best taste. Dust the tops with powdered sugar for a sweet touch. You can also drizzle a simple glaze made of powdered sugar and milk. For extra crunch, add chopped nuts on top before baking. Pair these muffins with coffee or tea for a cozy treat. Enjoy them as a snack or a breakfast delight! {{image_4}} You can make your pumpkin cinnamon roll muffins even better! Adding chocolate chips is a great choice. They melt and create sweet pockets in each muffin. You might also try dried cranberries or raisins for a fruity twist. Nuts like walnuts or pecans add crunch. Just mix them into the batter before baking. This way, you can customize each batch to your taste. If you need gluten-free options, use almond flour or a gluten-free blend. This keeps the muffins light and fluffy. For a dairy-free version, substitute the milk with almond milk or oat milk. You can also use coconut oil instead of vegetable oil. These swaps work well and still taste great. Your muffins will still be soft and delightfully spiced. You can change these muffins with the seasons. In fall, add a bit of ginger or allspice for warmth. Around the holidays, try adding orange zest for a fresh flavor. For spring, mix in a hint of lemon juice. These twists keep the recipe exciting throughout the year. Each season brings a new taste to enjoy. To keep your pumpkin cinnamon roll muffins fresh, store them in an airtight container. This helps prevent them from drying out. You can keep them at room temperature for up to three days. If you want them to last longer, consider refrigerating them. Just make sure to wrap them well to avoid absorbing odors. Freezing is a great option if you can't eat all the muffins right away. Let the muffins cool completely before freezing. Place them in a freezer-safe bag or container. Remove as much air as possible to prevent freezer burn. They can last up to three months in the freezer. When ready to enjoy, thaw them overnight in the fridge. When you're ready to eat your muffins, reheating them brings back their warm, gooey goodness. For the best results, use your oven. Preheat it to 350°F (175°C). Place the muffins on a baking sheet and heat them for about 5-10 minutes. You can also use a microwave. Just heat them for 15-20 seconds, but be careful not to dry them out. Enjoy your cozy treat warm! Yes, you can use fresh pumpkin. Start by roasting a small pumpkin. Cut it in half, remove the seeds, and roast it at 350°F for about 45 minutes. Then, scoop out the flesh and blend it until smooth. This fresh puree can replace canned pumpkin in your muffins. Fresh pumpkin gives a bright flavor and a lovely texture. The best way to check is with a toothpick. Insert it into the center of a muffin. If it comes out clean, the muffins are done. You can also gently press the top of a muffin. It should spring back. If it leaves an indent, they need a bit more time. To prevent sticking, use paper liners in your muffin tin. You can also grease the cups with cooking spray or oil. Make sure to coat the sides well. This helps the muffins slide out easily after baking. These muffins stay fresh for about three days at room temperature. Store them in an airtight container. If you want to keep them longer, place them in the fridge. They can last up to a week in there. Yes, you can make mini muffins! Just adjust the baking time. Mini muffins will bake for about 10-12 minutes. Keep an eye on them. Use the toothpick test to check for doneness. Enjoy your bite-sized treats! This blog post covered all the key steps to make great muffins. We went over the ingredients, baking instructions, and helpful tips. I shared variations to keep things fun and exciting. You learned how to store muffins for later enjoyment and answered common questions to guide your baking. Remember, the right ingredients and techniques make all the difference. Enjoy your baking journey and make delicious muffins for every occasion!

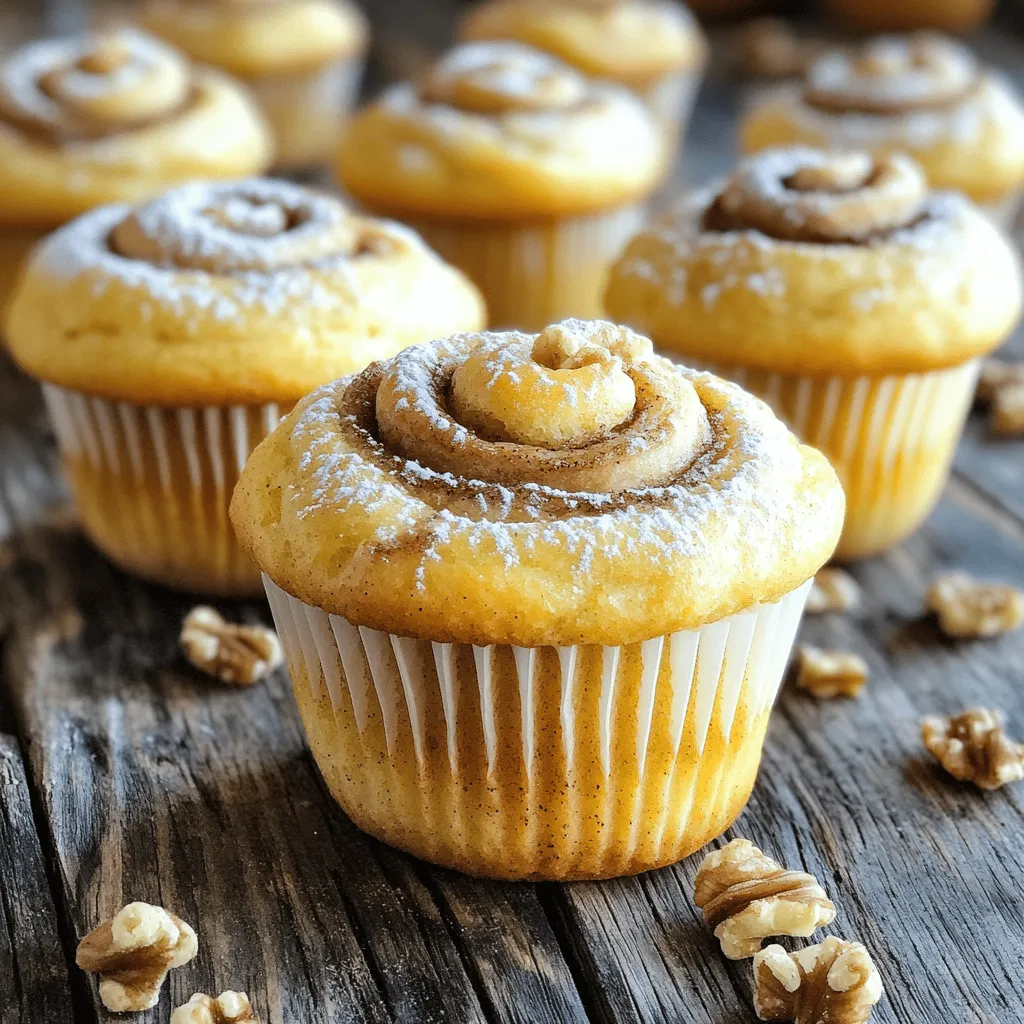
Craving a cozy, warm treat? You’ll love these Pumpkin Cinnamon Roll Muffins! They combine the soft, fluffy texture of muffins with the sweet spice of pumpkin and cinnamon. They are …

Read more

Categories Desserts

Apple Fritter Waffle Donuts Easy and Tasty Treat

August 25, 2025 by Chef Miles
To make these tasty treats, gather these essential ingredients: - 2 medium Granny Smith apples, peeled, cored, and diced - 1 cup all-purpose flour - 1/2 cup granulated sugar - 1 teaspoon baking powder - 1/2 teaspoon baking soda - 1 teaspoon ground cinnamon - 1/4 teaspoon ground nutmeg - 1/4 teaspoon salt - 1/2 cup buttermilk - 1 large egg - 1 teaspoon pure vanilla extract - 1/4 cup unsalted butter, melted - Oil for frying (for the donuts) These ingredients blend in a way that makes your waffle donuts flavorful and fun! To add a sweet finish, you may want these optional ingredients: - 1 cup powdered sugar - 2-3 tablespoons milk or water This glaze makes your waffle donuts look pretty and taste even better! Each serving of these apple fritter waffle donuts has about: - Calories: 205 - Protein: 3g - Fat: 7g - Carbohydrates: 32g - Sugar: 10g These numbers help you enjoy your treat while being mindful of what you eat. Start by peeling, coring, and dicing two medium Granny Smith apples. Place the diced apples in a medium bowl. Sprinkle 1 tablespoon of granulated sugar and 1 teaspoon of cinnamon over them. Toss the apples well to coat. This step helps boost their sweetness. Let the mixture sit for about 10 minutes. The apples will release some juice, adding great flavor. In a large mixing bowl, add 1 cup of all-purpose flour. Next, pour in the remaining granulated sugar, 1 teaspoon of baking powder, 1/2 teaspoon of baking soda, 1 teaspoon of ground cinnamon, 1/4 teaspoon of ground nutmeg, and 1/4 teaspoon of salt. Whisk these dry ingredients together until they blend evenly. This mixture forms the base for your waffle donuts. In another bowl, combine 1/2 cup of buttermilk, 1 large egg, 1 teaspoon of pure vanilla extract, and 1/4 cup of melted unsalted butter. Whisk until you achieve a smooth mixture. Now, gently pour this wet mixture into the dry ingredients. Use a spatula to fold them together until just combined. Be careful not to overmix. This keeps your waffles light and fluffy. Finally, fold in the prepared apple mixture, ensuring the apple pieces spread evenly throughout. Preheat your waffle iron as per the manufacturer’s instructions. Lightly grease it with cooking spray or a brush of melted butter. Pour approximately 1/2 cup of batter into the center of the waffle iron. Close the lid and cook until golden brown, about 4-5 minutes. Repeat this process with the remaining batter. Keep an eye on the time to ensure a perfect cook. If you have leftover batter, you can make donuts too! In a deep skillet or pot, heat oil over medium heat until it reaches about 350°F (175°C). Use a donut cutter or a large round cookie cutter to cut shapes from the batter. Carefully fry these donut shapes in batches for 1-2 minutes per side, or until they turn golden brown. Once fried, drain them on paper towels to remove excess oil. To make the glaze, combine 1 cup of powdered sugar with 2-3 tablespoons of milk or water in a small mixing bowl. Stir until you achieve a smooth, pourable consistency. This glaze should coat your donuts and waffles nicely. While they are still warm, drizzle or dip the waffle donuts into the glaze. Allow any excess to drip off before serving. Use Granny Smith apples for a tart bite. Their firm texture holds up well. Other good choices are Honeycrisp or Fuji apples. These apples add a sweet note. Make sure they are fresh for the best flavor. Do not overmix the batter. This can make the waffles dense. Gently fold the ingredients until just combined. Also, let the apple mixture sit. This helps to release juices and enhance sweetness. Preheat your waffle iron well. This helps get a nice golden color. Cook each waffle for about 4-5 minutes. For donuts, fry them for 1-2 minutes per side. Keep an eye on them to avoid burning. {{image_4}} You can change the taste of your apple fritter waffle donuts easily. Consider adding nuts like walnuts or pecans for crunch. Chopped nuts bring a nice texture. You can also try adding spices. A pinch of ginger or allspice gives a warm flavor. Another option is to mix in raisins or dried cranberries. These add sweetness and chewiness. Experiment with what you have. Each change can give a new twist to your treat. While the classic glaze is great, you can switch it up! Try a chocolate glaze for a rich taste. Just melt chocolate and mix it with some cream. This makes a smooth, tasty topping. Maple glaze is another delicious option. Mix powdered sugar with maple syrup for a sweet, earthy flavor. You can also add vanilla to any glaze for extra depth. Feel free to get creative! Mixing flavors can lead to fun new tastes you’ll love. Serve your apple fritter waffle donuts hot for the best taste. You can stack them on a plate for a fun look. Dust with more powdered sugar or cinnamon for flair. Pair them with a scoop of vanilla ice cream for dessert. The warm donuts and cool ice cream make a great match. You can also serve with coffee or tea for a cozy breakfast. Try adding fresh apple slices or mint leaves as a garnish. This makes your plate look nice and adds freshness. Enjoy exploring these serving ideas! To keep your leftover waffle donuts fresh, store them in an airtight container. Place a sheet of parchment paper between layers to avoid sticking. Store them at room temperature for up to two days. If you want to keep them longer, refrigeration is best. Just remember to eat them within a week for the best taste. You can freeze waffle donuts to enjoy later. First, let them cool completely. Then, place them in a single layer on a baking sheet and freeze until solid. Once frozen, transfer them to a freezer bag. Remove as much air as you can from the bag. They can stay in the freezer for up to three months. For best results, wrap them in plastic wrap before putting them in the bag. Reheating is simple and helps restore their original taste. For best results, use an oven. Preheat it to 350°F (175°C). Place the donuts on a baking sheet and heat for about 10 minutes. You can also use a microwave, but they might get a bit soggy. Heat in 10-second intervals until warm. Enjoy them fresh again! Yes, you can use other fruits. Pears or peaches work well. Just make sure to chop them small. This helps them cook evenly. To get crispy donuts, heat the oil to 350°F. Fry them in small batches. Avoid overcrowding the pan. This keeps the oil temperature steady. Also, drain them on paper towels right after frying. You can make a quick substitute. Mix 1/2 cup milk with 1/2 tablespoon vinegar or lemon juice. Let it sit for five minutes. This will give you a similar tangy taste. Yes, you can prepare the batter a few hours ahead. Keep it in the fridge until you’re ready to cook. Just stir it gently before using. These waffle donuts can be made gluten-free. Just swap the all-purpose flour for a gluten-free blend. For dairy-free options, use plant-based milk and butter. In this article, we explored how to make apple fritter waffle donuts. You learned about the key ingredients, step-by-step cooking methods, and useful tips. We discussed variations like adding nuts or trying different glazes. We also covered storage and reheating tips to keep your treats fresh. Enjoy making these tasty donuts. They are fun to make and share with friends. No matter your skill level, you can create delicious treats that everyone will love.

Do you love sweet and tasty treats? Then you must try my Apple Fritter Waffle Donuts! These fun desserts mix the best of apple fritters and waffles into a delicious …

Read more

Categories Desserts

Best Pumpkin Chocolate Chip Muffins Delightful Recipe

August 25, 2025 by Chef Miles
- 1 cup pure pumpkin puree - 1/2 cup vegetable oil - 1 cup packed brown sugar - 1/2 cup granulated sugar - 2 large eggs - 1 teaspoon vanilla extract - 1 1/2 cups all-purpose flour - 1 teaspoon baking powder - 1 teaspoon baking soda - 1 teaspoon ground cinnamon - 1/2 teaspoon ground nutmeg - 1/2 teaspoon salt - 1 cup semi-sweet chocolate chips To make the best pumpkin chocolate chip muffins, these main ingredients are key. The pumpkin puree gives the muffins moisture and flavor. The mix of sugars adds sweetness, while the eggs bind everything together. The spices, like cinnamon and nutmeg, bring warmth to each bite. - 1/2 cup chopped walnuts Adding walnuts gives your muffins a nice crunch. They also add healthy fats and protein. If you want a nutty twist, sprinkle them in. You can skip them if you prefer a smoother texture. Each muffin has about: - Calories: 200 - Protein: 3g - Carbohydrates: 30g - Fat: 9g - Fiber: 1g These muffins are a tasty treat. They are not just sweet; they also offer some fiber from the pumpkin. Enjoy them as a snack or a breakfast option. Start by preheating your oven to 350°F (175°C). This step helps the muffins bake evenly. Next, grab a standard 12-cup muffin tin. You can line it with cute paper liners or lightly grease it with cooking spray. This prevents the muffins from sticking. In a large mixing bowl, add 1 cup of pure pumpkin puree, 1/2 cup of vegetable oil, 1 cup of packed brown sugar, and 1/2 cup of granulated sugar. Whisk these together until smooth. I like to use an electric mixer for a creamy texture. Then, add 2 large eggs one at a time. Make sure to mix well after each egg. Finally, stir in 1 teaspoon of vanilla extract to add a lovely flavor. In a separate bowl, whisk together 1 1/2 cups of all-purpose flour, 1 teaspoon of baking powder, 1 teaspoon of baking soda, 1 teaspoon of ground cinnamon, 1/2 teaspoon of ground nutmeg, and 1/2 teaspoon of salt. This mixture gives the muffins their structure and flavor. Make sure it’s all combined well. Now, it’s time to combine the wet and dry mixtures. Gradually add the dry mix to the pumpkin mix. Use a spatula or wooden spoon to gently fold it together. Do not overmix! This keeps your muffins light and fluffy. Next, fold in 1 cup of semi-sweet chocolate chips and 1/2 cup of chopped walnuts if you want a nutty crunch. Using a spoon or ice cream scoop, divide the batter evenly among the muffin cups. Fill each cup about two-thirds full. This gives them room to rise. Bake in the preheated oven for 18-22 minutes. Check for doneness by inserting a toothpick into the center. It should come out clean or with a few moist crumbs. Once baked, take the muffins out of the oven. Let them cool in the tin for about 5 minutes. After that, transfer them to a wire rack to cool completely. For serving, enjoy them warm, lightly dusted with powdered sugar. You can also place them in a charming bakery box for a lovely gift. To make your muffins light and fluffy, mix gently. Overmixing can make them tough. Use a spatula to fold the dry ingredients into the wet ones. Stop mixing as soon as you see no dry flour. This keeps the batter airy. The right amount of moisture comes from the pumpkin puree and oil. The balance helps create that dreamy texture. Store your muffins in an airtight container. This keeps them fresh for up to three days. If you want them to last longer, freeze them. Wrap each muffin in plastic wrap and place them in a freezer bag. They can stay fresh for up to three months. When you want to enjoy one, let it thaw at room temperature or warm it in the microwave. Always preheat your oven before baking. This ensures even cooking. Line your muffin tin with liners or spray it to prevent sticking. Fill each cup about two-thirds full. This gives your muffins space to rise without spilling over. Use a toothpick to check for doneness. If it comes out clean, your muffins are ready to enjoy! {{image_4}} You can easily make these muffins gluten-free. Use a gluten-free all-purpose flour blend instead of regular flour. Make sure the blend has xanthan gum for good texture. I recommend checking the bag for the right measurements. Your muffins will taste just as good! For a dairy-free version, swap the vegetable oil with melted coconut oil. You can also use dairy-free chocolate chips. These small changes keep the muffins moist and tasty. I have made them this way, and they were a hit! Want to mix it up? Try adding different spices! A pinch of ginger or allspice can give your muffins a unique twist. You can also use dark chocolate chips or even white chocolate. Each option adds a special flavor. You might also add nuts, like pecans or almonds, for extra crunch. To keep your pumpkin chocolate chip muffins fresh, let them cool completely. Place them in an airtight container. This helps lock in moisture and keeps them soft. You can also wrap them in plastic wrap before placing them in the container. Store them at room temperature for up to three days. For longer storage, consider freezing. Freezing muffins is easy and smart. First, allow the muffins to cool fully. Next, wrap each muffin tightly in plastic wrap. Then, place them in a freezer bag. Make sure to remove as much air as possible. Label the bag with the date. You can freeze them for up to three months. To enjoy later, simply thaw them at room temperature. Reheating muffins makes them taste fresh again. For the best results, use an oven. Preheat the oven to 350°F (175°C). Place the muffins on a baking sheet. Heat them for about 10 minutes. If you are in a hurry, you can use a microwave. Heat them for 15-20 seconds. Enjoy your warm, delicious muffins! Yes, you can use fresh pumpkin. Start by cooking the pumpkin until soft. Then, blend it until smooth. This will give your muffins a fresh taste. Remember to drain any excess water for the best results. Muffins are done when a toothpick comes out clean. Insert it in the center of a muffin. If it has a few moist crumbs, it's safe to take them out. Watch for a golden top, too; that’s a good sign! Yes, you can. Use ripe bananas or applesauce as a natural sweetener. This will change the flavor, but it will still be tasty. You can also try using stevia or monk fruit for a sugar-free option. If your batter is thick, add a splash of milk. This will loosen it up. Mix gently until it reaches a smoother consistency. Be careful not to overmix, as this can make your muffins tough. You can add spices like ginger or cloves for extra warmth. Try mixing in some citrus zest for a fresh twist. A pinch of sea salt can also bring out the sweetness. Don't forget to use high-quality chocolate chips for the best taste! In this post, I covered how to make the best pumpkin chocolate chip muffins. We discussed key ingredients, step-by-step instructions, and helpful tips for great results. You also learned about storage options and variations for different diets. These muffins are easy to make and taste amazing. Whether you enjoy them fresh or freeze some for later, they offer a delicious treat for everyone. Baking can be fun, so give these muffins a try! Enjoy the delightful flavors you create.

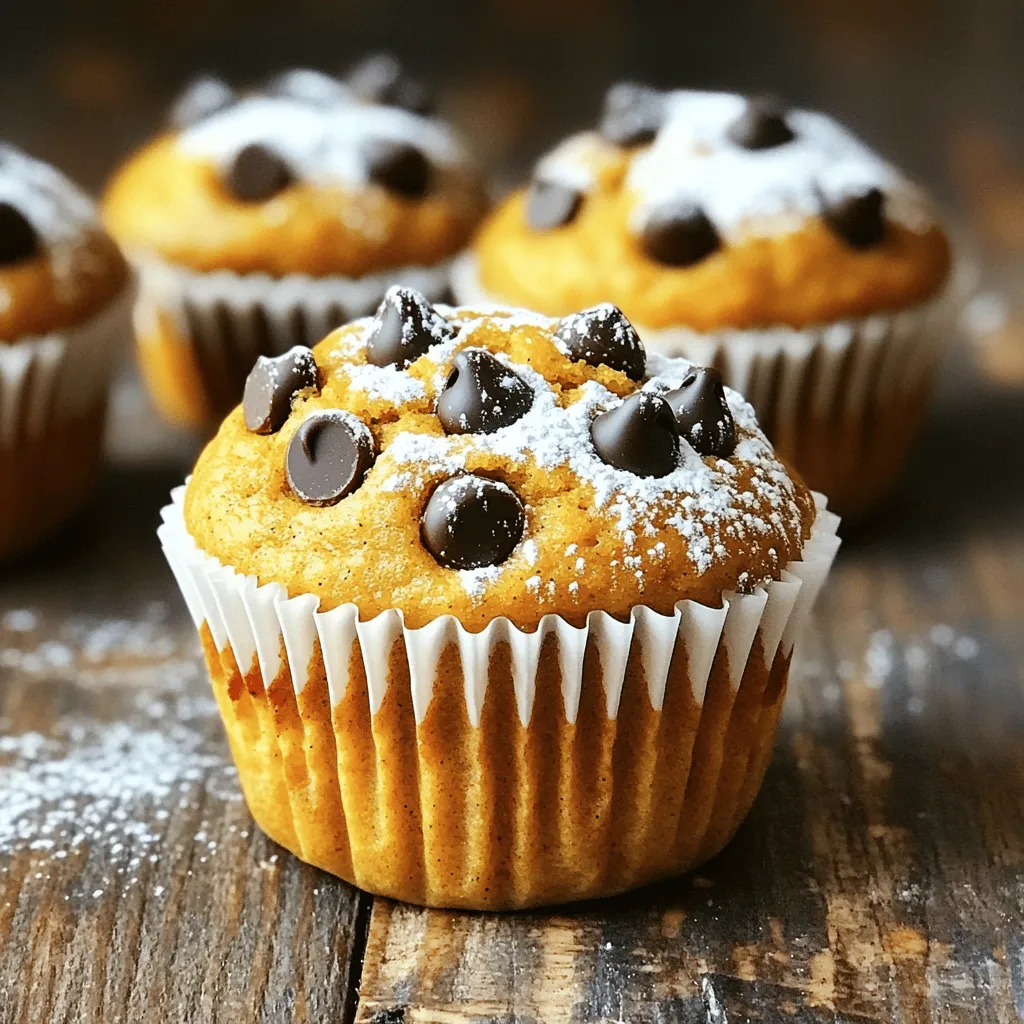
Pumpkin chocolate chip muffins are a fall must-have. Their warm spices mix perfectly with sweet chocolate. I’ll share my best recipe to make these delightful treats simple and fun. You’ll …

Read more

Categories Desserts

Quick Taco Rice Bowls Flavorful and Easy Meal Prep

August 25, 2025 by Chef Miles
To make vibrant taco rice bowls, you need a few key items: - 1 cup uncooked brown rice - 2 cups vegetable broth - 1 tablespoon olive oil - 1 small onion, finely diced - 2 cloves garlic, minced - 1 medium bell pepper, diced (any vibrant color) - 1 can (15 oz) black beans, thoroughly drained and rinsed - 1 cup corn kernels (frozen or canned) - 1 tablespoon taco seasoning (store-bought or homemade) - 1 cup cherry tomatoes, halved - 1 ripe avocado, diced - Fresh cilantro, chopped (for a fresh garnish) - Lime wedges (for a zesty finish) - Salt and pepper to taste You can mix and match toppings for more fun. Here are some ideas: - Shredded cheese (cheddar or queso fresco) - Sour cream or Greek yogurt - Jalapeños for a spicy kick - Diced red onion for crunch - Sliced olives for extra flavor To boost the taste, try these simple tricks: - Add a splash of hot sauce for heat. - Use fresh lime juice to brighten the dish. - Mix in some diced mango or pineapple for sweetness. - Top with crushed tortilla chips for crunch. - Include a sprinkle of cumin or smoked paprika for depth. To start, grab a medium saucepan. Add 1 cup of uncooked brown rice and 2 cups of vegetable broth. Bring the mix to a boil over medium-high heat. Once boiling, lower the heat. Cover the pot with a lid and simmer for 40-45 minutes. This makes the rice tender and fluffy. After cooking, let it sit for 5 minutes. Fluff it with a fork to keep it light. While the rice cooks, take a large skillet. Heat 1 tablespoon of olive oil over medium heat. Add 1 small diced onion. Cook it, stirring now and then, for about 3-4 minutes until it is soft and clear. Next, stir in 2 minced garlic cloves and 1 diced bell pepper. Continue to cook for 2-3 minutes until the pepper is soft and colorful. Now, it’s time to build your bowls! Once your rice is ready, spoon it into serving bowls as the base. On top of the rice, add the warm mixture of black beans and corn. Use 1 can of black beans and 1 cup of corn kernels. Then, add halved cherry tomatoes and diced avocado to each bowl. This adds freshness and color. Finally, sprinkle chopped cilantro on top. Serve with lime wedges for a zesty touch. Enjoy your delicious taco rice bowls! To cook brown rice well, you need water and patience. Use two cups of vegetable broth for one cup of rice. This broth adds flavor. Bring the broth to a boil first. Then, lower the heat and cover. Let it simmer for 40-45 minutes. After cooking, let it rest for 5 minutes. This helps the rice fluff up nicely. For tasty vegetables, choose fresh and colorful options. I suggest using bell peppers in bright colors. Dice them small for even cooking. Sauté onions first until they are soft. This takes about 3-4 minutes. Then, add garlic and bell peppers. Cook for another 2-3 minutes. This method brings out their sweet flavors. Mixing in black beans and corn adds heartiness. To make your bowls look great, use colorful dishes. Start with a base of fluffy rice. Layer the black bean and corn mixture on top. Add halved cherry tomatoes and diced avocado next. For a fresh touch, sprinkle chopped cilantro on top. Serve lime wedges on the side for a zesty finish. This makes each bowl pop with color and flavor! {{image_4}} You can easily swap ingredients to fit your needs. Here are some ideas: - Rice: Use quinoa or cauliflower rice for a lighter option. - Beans: Swap black beans for pinto beans or chickpeas. - Broth: For extra flavor, use chicken broth instead of vegetable broth. - Oils: Avocado oil works great if you want a different taste. This dish is super flexible for plant-based diets. Here’s how: - Protein: Replace black beans with lentils for a different texture. - Toppings: Use vegan cheese or nutritional yeast for a cheesy flavor. - Sour Cream: Opt for a vegan sour cream or cashew cream for creaminess. Mix up the protein to make it your own: - Chicken: Use shredded rotisserie chicken for a quick protein boost. - Ground Beef: Brown some ground beef or turkey with the taco seasoning. - Tofu: For a plant-based option, try sautéed tofu cubes with spices. - Shrimp: Add shrimp for a seafood twist. Cook them quickly with garlic and lime. To store leftovers, let the bowls cool down first. Place the rice and toppings in separate airtight containers. This helps keep everything fresh. The rice can last up to four days in the fridge. The toppings, like beans and vegetables, also stay good for about four days. If you mix them, the rice may become soggy. When you are ready to eat, heat the rice and toppings separately. You can use the microwave or a skillet. If using the microwave, place the rice in a bowl and cover it with a damp paper towel. Heat for about one minute, or until warm. For the toppings, heat them in a skillet over medium heat for a few minutes, stirring often. You can freeze the rice and toppings, but it's best to keep them separate. Place the rice in a freezer-safe bag or container. It stays fresh for up to three months. For the toppings, do the same. When you're ready to eat, thaw them in the fridge overnight. Reheat them as described above. This keeps the flavors fresh and tasty! Yes, you can make Taco Rice Bowls ahead of time. Cook the rice and sauté the veggies. Store each part in separate containers. This keeps everything fresh. When ready to eat, just reheat and assemble the bowls. This meal prep saves time during busy days. You can use several options instead of taco seasoning. Try a mix of chili powder, cumin, and paprika. You can also add onion powder and garlic powder. If you prefer more heat, add cayenne pepper. Customizing the spices gives you full control over flavor. To spice up your Taco Rice Bowls, add jalapeños or hot sauce. You can mix diced jalapeños into the bean and corn mixture. For a bolder flavor, add chili powder or crushed red pepper. Adjust the spice to suit your taste buds and enjoy! Creating taco rice bowls is simple and fun. You learned about the core ingredients, toppings, and how to cook rice and veggies. I shared tips for perfect flavors and good presentation. We explored variations for diets and protein options. Plus, I gave storage tips to keep leftovers fresh. In conclusion, you can enjoy this dish your way. Feel free to mix, match, and get creative. Happy cooking!

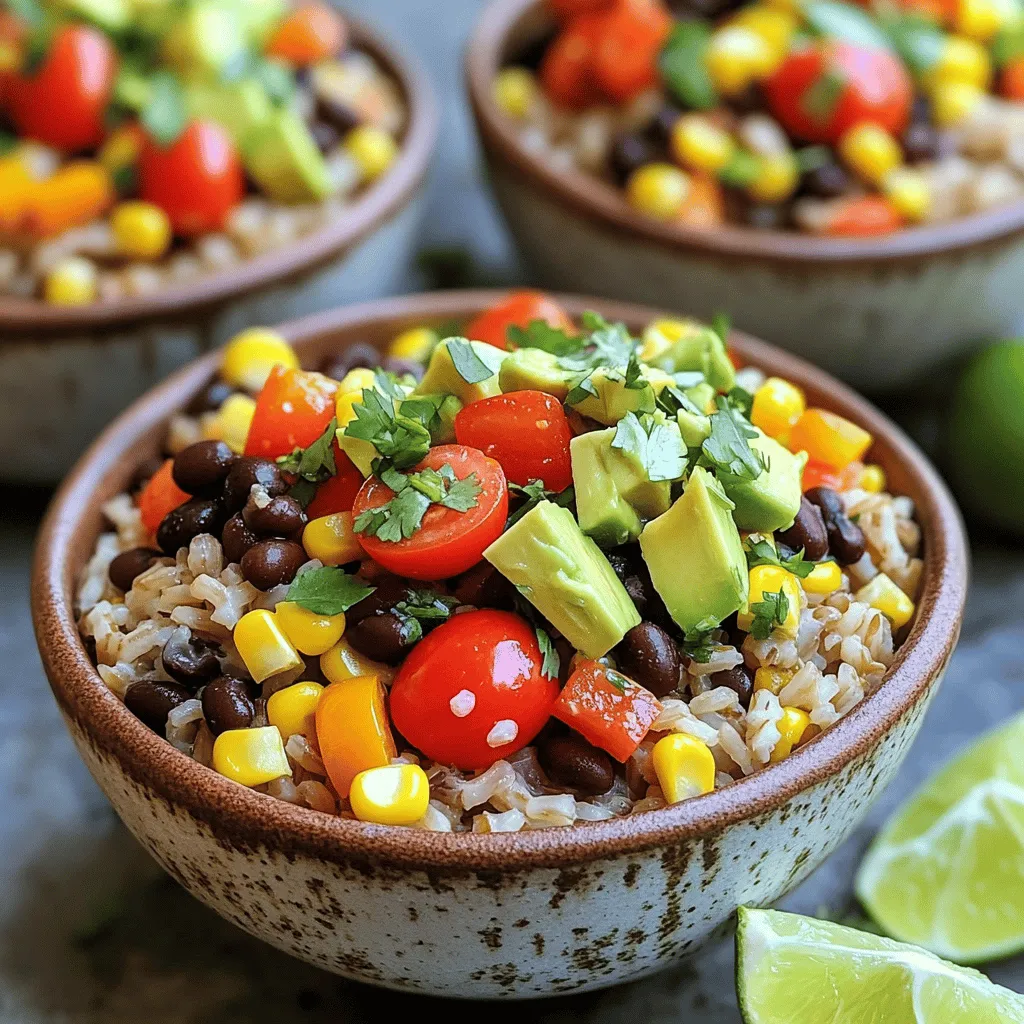
Looking for a quick and tasty meal? You’ve come to the right place! My Quick Taco Rice Bowls are not only flavorful but also perfect for meal prep. With simple …

Read more

Categories Dinner

Brown Butter Pumpkin Chocolate Chip Cookies Delight

August 25, 2025 by Chef Miles
- ½ cup unsalted butter (1 stick) - 1 cup pumpkin puree (canned or homemade) - ¾ cup packed brown sugar - ½ cup granulated sugar - 1 large egg - 1 teaspoon vanilla extract - 2 cups all-purpose flour - 1 teaspoon baking soda - ½ teaspoon baking powder - ½ teaspoon salt - 1 teaspoon ground cinnamon - ½ teaspoon ground nutmeg - 1 cup semi-sweet chocolate chips If you run low on some ingredients, here are my go-to swaps: - Use coconut oil instead of butter for a dairy-free option. - Swap granulated sugar with coconut sugar for a deeper flavor. - For a vegan version, try flaxseed meal in place of the egg. - You can replace semi-sweet chocolate chips with dark chocolate or white chocolate. - Applesauce can stand in for pumpkin puree if you want a lighter taste. Using top-notch ingredients brings out the best in these cookies. Fresh pumpkin puree adds a rich, sweet taste. Quality butter enhances the nutty flavor of brown butter. Don't skimp on the chocolate chips; they should be semi-sweet and high in cocoa content. Quality spices, like fresh cinnamon and nutmeg, elevate the flavor profile. Good ingredients make your cookies not just tasty but truly special. Start by gathering all your ingredients. This makes the process smooth. Next, preheat your oven to 350°F (175°C). Line a baking sheet with parchment paper. This helps the cookies not stick. Now, let’s make the brown butter. In a medium saucepan, melt the unsalted butter over medium heat. Watch it closely as it melts. Swirl the pan to help it cook evenly. Cook until it turns golden brown and smells nutty, about 5 to 7 minutes. Remove it from heat and let it cool for a few minutes. In a large mixing bowl, combine the cooled brown butter and pumpkin puree. Mix them well until they blend smoothly. Add the packed brown sugar and granulated sugar next. Stir until the sugars are fully mixed in. Then, add the egg and vanilla extract. Beat this mixture until it is creamy and smooth. In a separate bowl, whisk together the all-purpose flour, baking soda, baking powder, salt, ground cinnamon, and ground nutmeg. This ensures even mixing of dry ingredients. Gradually fold the dry mix into your wet mix. Stir gently until combined, but do not overmix. This can make your cookies tough. Now, fold in the semi-sweet chocolate chips carefully. This helps to spread them evenly in the dough. Use a spoon or cookie scoop to drop rounded tablespoons of dough onto the prepared baking sheet. Space them about 2 inches apart to allow spreading. Bake the cookies for 10 to 12 minutes. Look for edges that are set and centers that seem slightly underbaked. They will finish cooking while cooling. After baking, let the cookies cool on the baking sheet for about 5 minutes. This helps them firm up. Then, transfer them to a wire rack for complete cooling. For a lovely presentation, serve your cookies in a decorative jar or on a rustic wooden platter. For an extra flavor boost, sprinkle a little flaky sea salt on top before serving. This adds a nice touch to your delicious cookies! To get the best brown butter flavor, pay attention to the heat. Heat the butter on medium. Swirl it often to mix the melted fat. Watch for the color change. You want a deep golden brown. It takes about 5 to 7 minutes. The smell should be nutty and rich. If it burns, you must start again. The right brown butter adds depth and warmth to your cookies. One common mistake is overmixing the dough. Mix just until combined to keep the cookies soft. Another mistake is not measuring ingredients. Use a scale or measuring cups for accuracy. Also, do not skip the cooling time after baking. Cookies firm up as they cool, making them easier to eat. Lastly, avoid opening the oven door too early. This can cause cookies to fall. To boost flavor, consider adding mix-ins. Chopped nuts or dried fruit can add crunch and chew. For spice, try more cinnamon or a pinch of ginger. You can also add a pinch of flaky sea salt on top. This adds a nice contrast to the sweetness. If you want a richer taste, use dark chocolate chips instead. These tweaks can take your cookies to the next level! {{image_4}} You can customize your cookies by adding different mix-ins. Chopped nuts like walnuts or pecans add crunch. They also boost the flavor. Dried fruits, such as cranberries or raisins, can add a sweet and chewy texture. Just keep the total mix-ins around one cup to maintain the cookie's structure. Changing up the spices can change the whole taste. Try adding ginger or allspice for a warm kick. You can also use cardamom for a unique twist. Each spice brings a different flavor profile. This way, you can make your cookies stand out. You can easily make these cookies vegan. Replace the egg with a flax egg or applesauce. Use coconut oil instead of butter for a dairy-free option. For a gluten-free version, swap all-purpose flour with a gluten-free blend. Just ensure it has a binding agent, like xanthan gum. These adaptations let everyone enjoy the cookies, no matter their diet. Store your cookies in an airtight container. This keeps them soft and fresh. Place parchment paper between layers to avoid sticking. If you have many cookies, stack them gently. Avoid mixing different types of cookies in one container to keep flavors separate. To keep your cookies fresh, store them at room temperature. They will stay good for up to a week. If you want them even fresher, add a slice of bread to the container. The bread will help keep moisture inside. You can freeze cookies for up to three months. Let them cool completely before freezing. Wrap each cookie in plastic wrap, then place them in a freezer bag. Label the bag with the date. When ready to eat, thaw them at room temperature or heat them in the oven for a few minutes. Yes, you can use fresh pumpkin. Just make sure it is cooked and pureed. Fresh pumpkin gives a different taste and texture. To prepare, cut the pumpkin, remove the seeds, and roast it until tender. Then, blend it until smooth. Check the edges of the cookies. They should be set and slightly golden. The center may look a bit soft. This is fine; they will firm up as they cool. Set a timer for 10 to 12 minutes, but keep a close eye on them. If the dough feels too sticky, add a bit more flour. Start with one tablespoon at a time. Mix gently until the dough holds its shape. Be careful not to overmix, as this can make the cookies tough. In this post, we explored key ingredients and their importance. We walked through each step for baking perfect cookies and shared tips for brown butter flavor. You can also customize flavors and textures with various mix-ins and spices. Storing cookies correctly keeps them fresh for longer. Pay attention to these details for the best results. Now, you’re ready to bake delicious cookies that everyone will love!

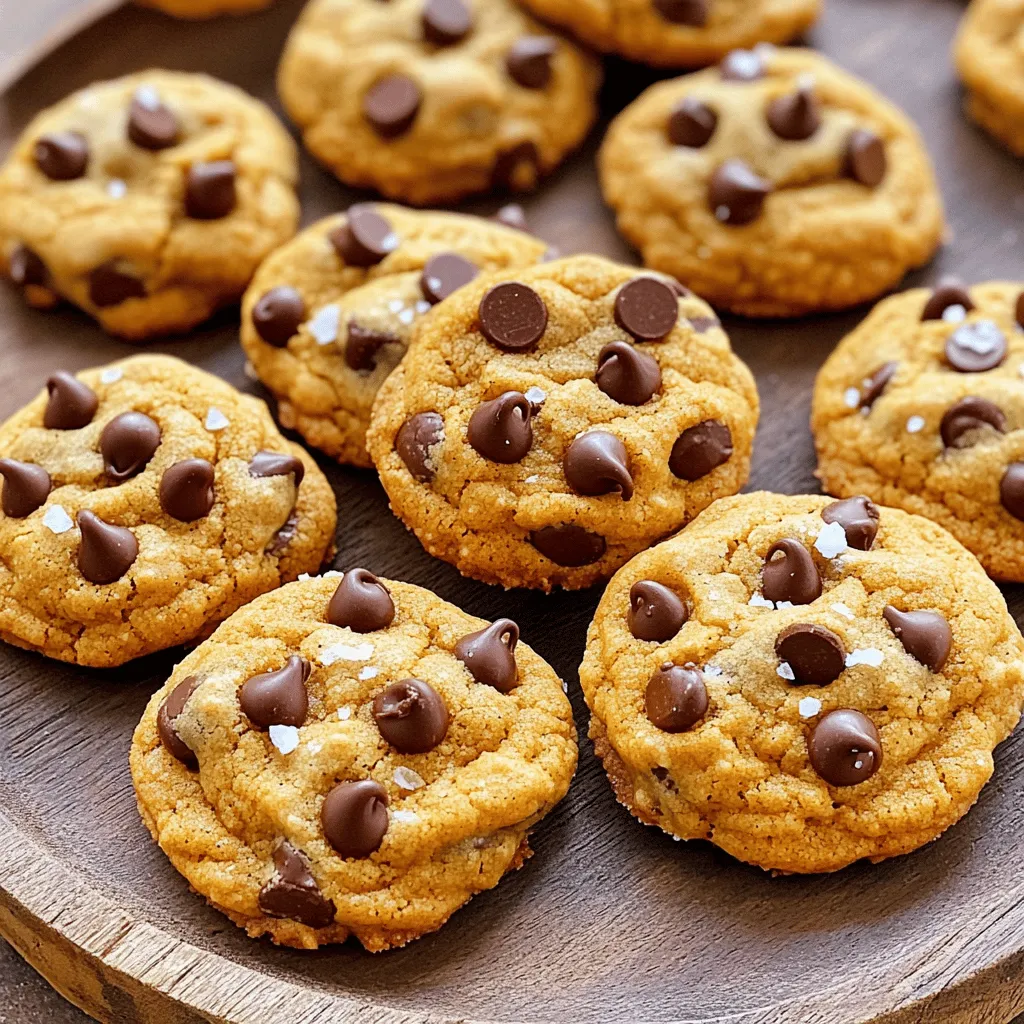
Get ready to indulge in the holiday spirit! My Brown Butter Pumpkin Chocolate Chip Cookies combine rich, nutty flavor with sweet pumpkin goodness. With every bite, you’ll enjoy warm spices …

Read more

Categories Desserts

Honey Pepper Chicken Pasta Quick and Tasty Meal

August 25, 2025 by Chef Miles
- 8 oz spaghetti or linguine - 1 lb boneless, skinless chicken breasts - 1/4 cup honey - 2 tablespoons soy sauce - Red pepper flakes - Fresh ginger and garlic - Bell peppers and snap peas or green beans - Salt and pepper to taste - Fresh cilantro or parsley For this dish, the main ingredients create a great base. The honey adds sweetness while the soy sauce brings in salty notes. You can choose spaghetti or linguine based on what you like. The optional ingredients give you a chance to spice things up. If you want heat, add red pepper flakes. Fresh ginger and garlic will add depth to the flavor. Bell peppers and snap peas or green beans add color and crunch. For seasoning, salt and pepper bring out all the flavors. Fresh cilantro or parsley will make your dish look fancy and fresh. These simple ingredients work together to make a tasty meal that is quick and easy to prepare. To cook the pasta, fill a large pot with salted water. Bring the water to a rolling boil. Once boiling, add 8 oz of spaghetti or linguine. Cook according to the package instructions until al dente, usually about 8 to 10 minutes. After cooking, drain the pasta but make sure to reserve 1/2 cup of the starchy pasta water. This water helps create a nice sauce later. For the chicken marinade, mix together 1/4 cup of honey, 2 tablespoons of soy sauce, 1 tablespoon of minced fresh ginger, and 2 minced garlic cloves. Add 1/2 teaspoon of red pepper flakes for heat. Whisk this mixture well. Next, add 1 lb of chicken strips, ensuring they are fully coated in the marinade. Let the chicken marinate for at least 15 minutes. This step is key to infusing flavor. To cook the chicken, heat 2 tablespoons of olive oil in a large skillet over medium-high heat. Once the oil shimmers, add the marinated chicken strips. Discard any leftover marinade. Sear the chicken for about 5 to 7 minutes. Look for a golden-brown surface and ensure the chicken is cooked through. This keeps it juicy and delicious. In the same skillet, add 1 cup of sliced bell peppers and 1 cup of trimmed snap peas or green beans. Sauté these for about 3 to 4 minutes. Stir them often to ensure they cook evenly. You want them tender yet still vibrant and slightly crisp. This adds great texture to your dish. Now it’s time to combine everything. Return the cooked pasta to the skillet with the sautéed vegetables. Add the seared chicken back too. Pour in a small amount of the reserved pasta water. Toss everything gently to combine. The pasta water helps create a light, glossy sauce that coats the pasta, chicken, and vegetables nicely. Before serving, taste the pasta mixture. You may want to add more salt, pepper, or even a drizzle of honey for sweetness. Stir to mix in any changes. For a lovely presentation, plate the pasta in shallow bowls. Top with chopped cilantro or parsley for a fresh touch. You can also add some extra bell pepper slices on top for color. A lime wedge on the side adds a nice zesty touch. - Marination Timing: Marinate your chicken for at least 15 minutes. If you have more time, go for 30 minutes. This gives the chicken a deeper flavor. You can also use yogurt or buttermilk as a marinade for a tender bite. - Adjusting Spice Level: Red pepper flakes add heat. Start with 1/2 teaspoon and taste. If you want more heat, add more flakes slowly. You can also use fresh chopped chili for a different kick. - Best Practices for Searing Chicken: Use medium-high heat for a good sear. Make sure the oil is hot before adding the chicken. This helps get that nice golden color. Don't overcrowd the pan; cook in batches if needed. - Techniques for Sautéing Vegetables: Keep the vegetables moving in the pan. Stir them every minute for even cooking. You want them tender but still bright and crisp. Add a splash of water to create steam if they cook too fast. - Adding Citrus for Brightness: A squeeze of lemon or lime juice adds freshness. Try adding it right before serving for a zesty finish. - Recommended Herb Substitutions: If you don’t have cilantro, use parsley or basil. Both add a nice touch to the dish. Fresh herbs elevate the look and taste of your meal. {{image_4}} You might want to switch things up with your protein. Shrimp is a great choice. It cooks fast and adds a nice flavor. Just sauté shrimp for about 3-4 minutes until they turn pink. Tofu is another excellent option. It’s perfect for a vegetarian meal. Cut it into cubes and sauté it until golden brown. You can also load up on extra veggies like broccoli, carrots, or zucchini for a colorful vegetarian dish. If you want a healthier take, consider using whole wheat pasta. It adds fiber and has a nutty taste. Gluten-free pasta works too, perfect for those with dietary needs. Or try different noodles like penne or farfalle for a fun texture. Each type brings its own flavor and feel to the dish. You can easily change the sauce to fit your taste. Instead of honey, try maple syrup for a different sweet note. Agave works too, and it has a lower glycemic index. For soy sauce, use low-sodium if you want less salt. Tamari is another option that’s gluten-free. These small tweaks can make a big difference in flavor. To keep your honey pepper chicken pasta fresh, refrigerate it as soon as it cools. Use an airtight container to prevent air from drying it out. Glass containers are great for easy reheating. They don’t stain, and you can see what’s inside. Plastic containers are also fine, but make sure they seal tightly. When you want to enjoy your leftovers, reheat them gently. You can use a microwave or a skillet. If using a microwave, add a splash of water to keep it moist. Cover it with a damp paper towel to lock in steam. If using a skillet, heat on low and stir often. This helps the pasta stay tender. Can you freeze honey pepper chicken pasta? Yes, you can! Just make sure it cools completely before you freeze it. Store it in a freezer-safe container. It can last up to three months in the freezer. Honey pepper chicken pasta lasts about three to four days in the fridge. Always check for signs of spoilage. If it smells off or looks discolored, it's best to toss it out. If you see mold, do not eat it. Keeping your food safe is key to enjoying it! Yes, you can make honey pepper chicken pasta ahead of time. To prep, cook the pasta and chicken as directed. Let them cool before storing in an airtight container. Keep the pasta and chicken separate to prevent sogginess. You can store them in the fridge for up to three days. When ready to eat, reheat in a pan with a splash of water for a fresh taste. To spice up your honey pepper chicken pasta, add more red pepper flakes. You can also try using hot sauce or chili paste. For a fresh kick, toss in some sliced jalapeños or fresh chili peppers. Start with a little and taste as you go. This way, you can find the right heat level for your taste. Yes, this recipe is great for meal prep. Portion the pasta and chicken into individual containers. You can add vegetables, too, for a complete meal. Store these in the fridge for easy grab-and-go lunches. Just remember to add a little sauce or broth when reheating to keep it moist and tasty. Absolutely! You can use any pasta you like. Spaghetti and linguine work well, but penne or fusilli can be fun, too. Just make sure to cook the pasta according to the package instructions. The sauce will stick nicely to any pasta shape, so choose your favorite! For sides, consider a simple green salad. A light vinaigrette works great. You can also serve garlic bread or a side of roasted vegetables. For a refreshing touch, try cucumber salad or a fruit salad. These sides balance the dish and add more flavors to your meal. This blog post covered a tasty honey pepper chicken pasta recipe. We explored key ingredients, cooking steps, and tips to enhance flavors. You can swap chicken with shrimp or tofu and use different pasta. Storing and reheating are simple, ensuring tasty leftovers. In the end, this recipe is adaptable, so have fun trying new variations. Happy cooking!

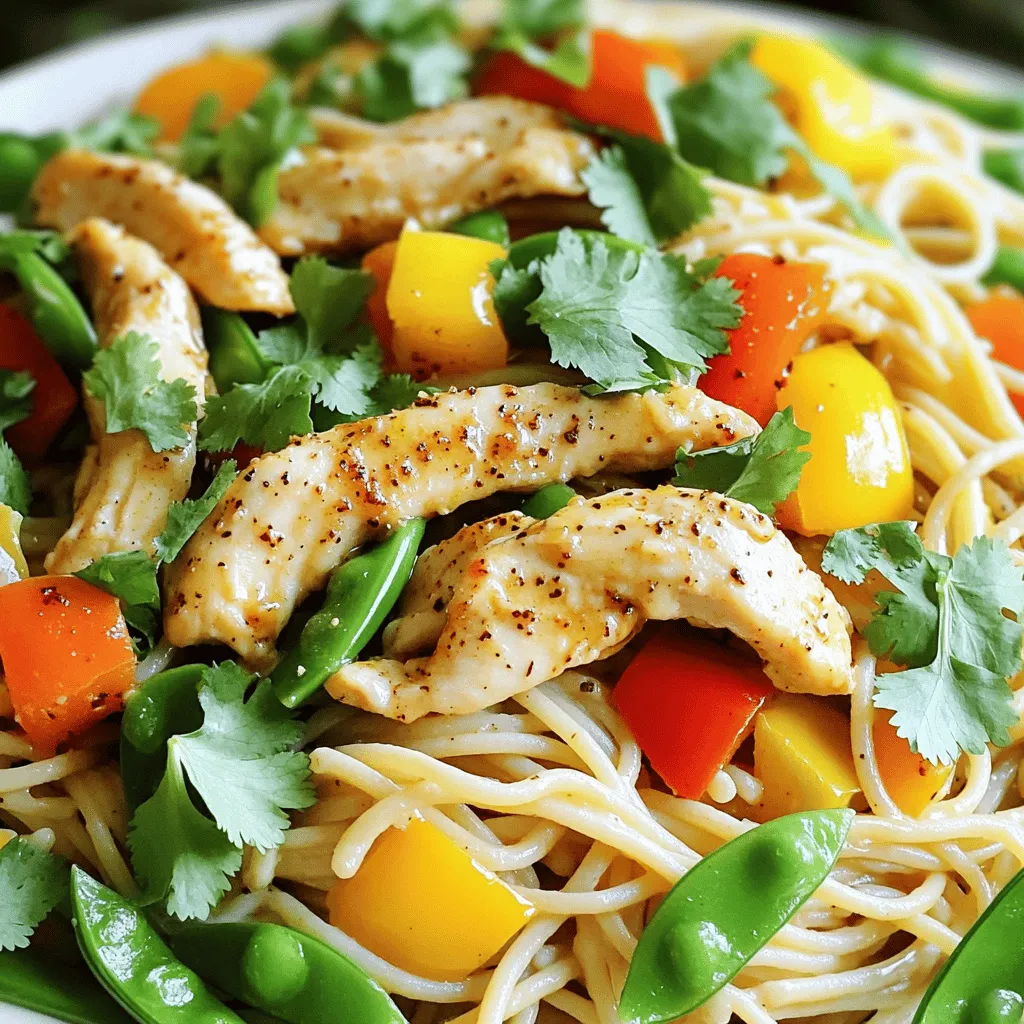
Looking for a quick and tasty meal? Honey Pepper Chicken Pasta might be just what you need! This dish combines tender chicken, sweet honey, and a hint of spice, all …

Read more

Categories Dinner

Cinnamon Sugar Pumpkin Pie Twists Delightful Treat

August 25, 2025 by Chef Miles
- 1 sheet of puff pastry, thawed - 1/2 cup canned pumpkin puree - 1/4 cup granulated sugar - 1 teaspoon ground cinnamon - 1/4 teaspoon ground nutmeg - 1/4 teaspoon ground ginger - 1/2 teaspoon vanilla extract - 1 egg, beaten (for egg wash) - 2 tablespoons melted butter - Additional cinnamon sugar for sprinkling - Powdered sugar for garnish Gathering the right ingredients is key for making these twists. Puff pastry is the star here. It gives a nice flaky texture. You'll need a sheet that's thawed for easy handling. Canned pumpkin puree is perfect for the filling. It saves time and gives rich flavor. I always use the pure stuff, not the spiced mix. Granulated sugar adds sweetness. The spices are also essential. Ground cinnamon, nutmeg, and ginger work together to create that warm, fall vibe. A splash of vanilla extract enhances the flavor. The egg wash helps the twists brown nicely. Melted butter is a must for that extra richness. For optional ingredients, I suggest adding extra cinnamon sugar on top. It makes each bite sweeter. A dusting of powdered sugar adds a nice touch for presentation. This way, you create a lovely treat that looks as good as it tastes. - Preheat the oven to 400°F (200°C). - Line a baking sheet with parchment paper. - Roll out the thawed puff pastry on a floured surface. - Cut the pastry into equal rectangles. - Combine pumpkin puree with sugar and spices. - Mix ingredients until smooth. - Add filling to the pastry rectangles. - Seal and twist the pastries. - Apply egg wash and melted butter. - Sprinkle cinnamon sugar on top. - Bake for 15-20 minutes until golden brown. - Cool on a wire rack. To prevent sticking, always use a floured surface when rolling out your puff pastry. This will keep it from clinging to your countertop. If it sticks, gently lift it with a spatula. For flaky layers, roll the pastry evenly and avoid pressing too hard. The layers need space to puff up in the oven. You can add chocolate chips or chopped nuts to the pumpkin filling for extra texture. This adds a nice crunch and depth of flavor. Using homemade cinnamon sugar makes a big difference too. Just mix granulated sugar with ground cinnamon in equal parts. This will taste fresher than store-bought. Serve your twists warm with a dollop of whipped cream or a scoop of ice cream. This adds creaminess and balances the spices. For a chic presentation, place the twists on a rustic wooden platter. Lightly dust with powdered sugar and add a few cinnamon sticks on the side. This makes your dish look inviting and festive. {{image_4}} You can change the filling to sweet potato or butternut squash. Both add a nice twist. They have a similar flavor and texture to pumpkin. You can also add fall spices like cloves or allspice. These spices enhance the warm, cozy flavor of your twists. They make each bite feel like autumn. You can easily make this recipe vegan. Just swap the egg wash with a plant-based milk. You can use almond or oat milk for this. For gluten-free options, look for gluten-free puff pastry. Many brands offer a great taste that works well with this recipe. Instead of twists, you can create small bites or pinwheels. These shapes are fun and easy to eat. To make them, simply roll the pastry with the filling. You can also use different folding techniques for unique designs. Try braiding the pastry for a fancy look or crimping the edges for a classic style. Each shape brings a new way to enjoy these tasty treats. To keep your pumpkin pie twists fresh, store them in an airtight container. This helps lock in moisture and flavor. You can also wrap them in plastic wrap before placing in the container. It prevents them from drying out. I recommend using a shallow container for easy access. You can freeze these twists before or after baking. If freezing before baking, assemble the twists and place them on a baking sheet. Freeze until solid, then transfer to a freezer bag. If freezing after baking, let them cool completely first. Then, store them in a freezer-safe container. For the best flavor, use within two months. To thaw, move the twists from the freezer to the fridge overnight. For a quick option, leave them at room temperature for a couple of hours. Reheat these twists in the oven to keep them crispy. Preheat your oven to 350°F (175°C). Place the twists on a baking sheet for about 10-15 minutes. This method helps revive their flaky texture. You can also use a microwave, but this may make them soft. If you choose the microwave, heat for 15-20 seconds. Check frequently to avoid overcooking. Enjoy the warm, tasty goodness! Yes, you can use homemade puff pastry. It will give your twists a personal touch. Just make sure to roll it out thinly to get that flaky texture. Homemade pastry can taste fresh and light, enhancing the overall flavor of your twists. If you don’t have pumpkin puree, you can use sweet potato puree. It offers a similar taste and texture. You could also try butternut squash puree for a different flavor twist. Both options work well in this recipe. The twists last for about two days at room temperature. Make sure to store them in an airtight container. This keeps them fresh and prevents them from getting soggy or stale. Yes, you can prepare the filling a day ahead. Store it in the fridge in a sealed container. When you’re ready to bake, just mix it again to ensure it’s smooth and well combined. Yes, these twists freeze well. You can freeze them before or after baking. To freeze, wrap them tightly in plastic wrap. When you’re ready to enjoy them, thaw overnight in the fridge, then reheat in the oven. In this blog post, we covered how to make delicious pumpkin twists. We discussed essential and optional ingredients, key steps for preparation, and helpful tips. You now know how to assemble and bake these treats, while exploring variations to fit your taste. For storage, we shared how to keep your twists fresh and reheat them perfectly. Try these simple steps and creative ideas to enjoy a tasty treat all season long. Enjoy your baking and impress your family and friends with your skills!

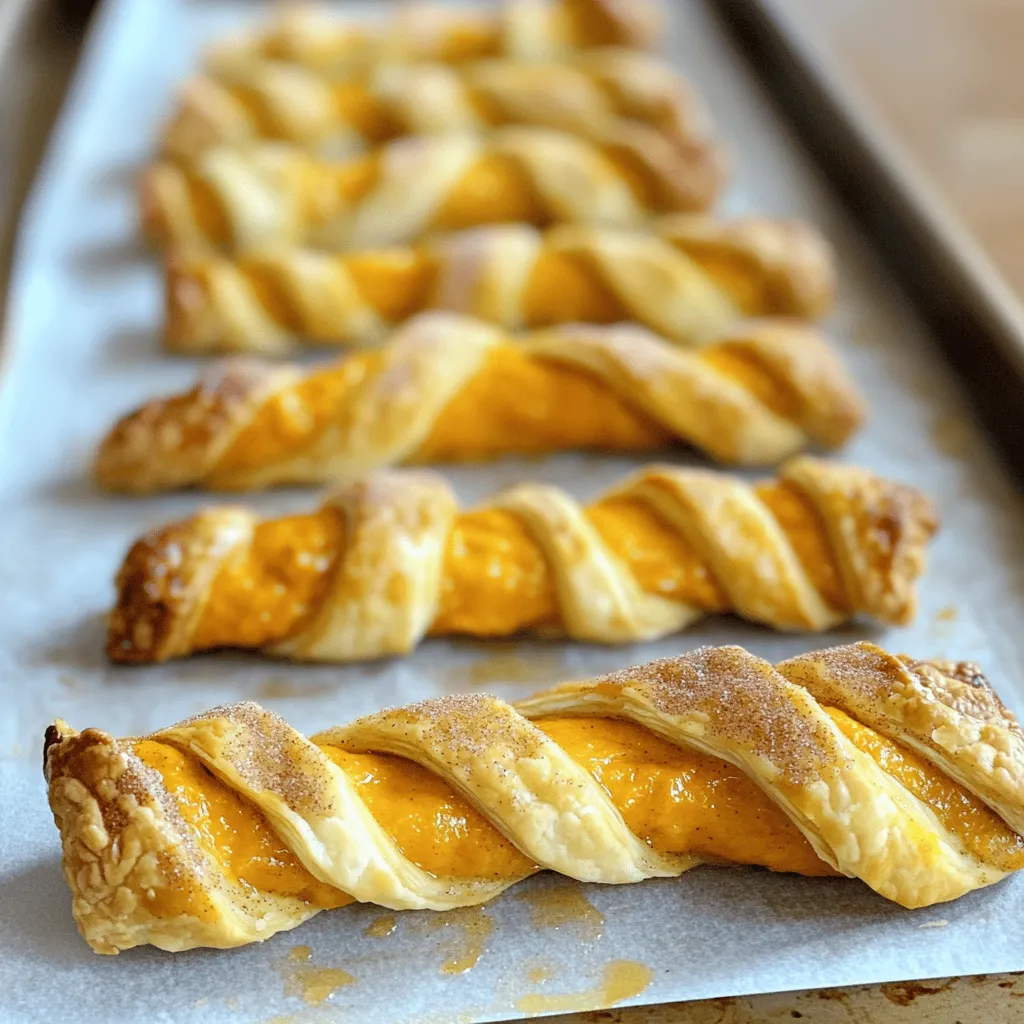
Get ready to enjoy a delightful fall treat! Cinnamon Sugar Pumpkin Pie Twists combine buttery puff pastry with creamy pumpkin filling and warm spices. In just a few easy steps, …

Read more

Categories Desserts
Older posts
Newer posts
← Previous Page1 … Page37 Page38 Page39 … Page113 Next →

MELTED RECIPES

where delicious ideas melt into life, from stovetop to backyard. Always warm, simple, and irresistibly satisfying. 🍳🔥🧀

PAGES

Home About Contact Privacy Policy Terms & Conditions Cookie Policy GDPR Policy Copyright Policy Disclaimer

CATEGORIES

Appetizers Desserts Salads Breakfast Dinner

Contact

  • Pinterest
  • Mail
Copyright © 2025 Melted Recipes. All rights reserved.