Skip to content
Melted Recipes
  • Home
  • Appetizers
  • Desserts
  • Salads
  • Breakfast
  • Dinner
  • Privacy Policy
  • Contact
  • About

Chef Miles

One-Pot Creamy Tuscan Chicken Pasta Simple and Rich

August 29, 2025 by Chef Miles
To make One-Pot Creamy Tuscan Chicken Pasta, you will need: - 2 boneless, skinless chicken breasts, diced into bite-sized pieces - 8 ounces pasta (penne or fettuccine recommended) - 2 tablespoons olive oil - 3 cloves garlic, minced - 1 cup cherry tomatoes, halved - 1 cup baby spinach - 1 cup heavy cream - 1/2 cup grated Parmesan cheese - 1 teaspoon Italian seasoning - Salt and freshly cracked pepper to taste - Fresh basil leaves, for garnish These ingredients create a rich and creamy dish. The chicken adds protein, while the pasta serves as a comforting base. The tomatoes and spinach bring freshness and color. You will need some basic tools to cook this meal: - A large pot or Dutch oven - A sharp knife for chopping - A cutting board - A wooden spoon or spatula for stirring - Measuring cups and spoons These tools help you cook efficiently and safely. A large pot ensures even heating and makes it easy to combine all ingredients. You can customize this dish based on your taste: - Use different pasta types, like bowtie or spaghetti. - Swap chicken for shrimp, sausage, or tofu for a twist. - Add vegetables like bell peppers or zucchini for extra flavor. Experimenting with different ingredients keeps the dish exciting. Each change can bring new flavors and textures to the table. Start by heating 2 tablespoons of olive oil in a large pot over medium heat. Once the oil is hot, add 2 diced chicken breasts. Sprinkle salt, pepper, and 1 teaspoon of Italian seasoning over the chicken. Cook for about 5-7 minutes, stirring often. You want the chicken to turn golden brown and be fully cooked. Once done, transfer the chicken to a plate and set it aside. In the same pot, lower the heat a little. Add 3 minced garlic cloves and sauté for 30 seconds. Stir constantly so the garlic does not burn. It should smell great! Next, toss in 1 cup of halved cherry tomatoes. Cook for 2-3 minutes. Stir occasionally to help the tomatoes soften and release their juices. Now, slowly pour in 1 cup of heavy cream while stirring. This will create a rich sauce. Bring the mixture to a gentle simmer. Stir well to blend all the flavors. Once it simmers, return the cooked chicken to the pot. Also add 1 cup of baby spinach and 8 ounces of cooked pasta. Gently fold everything together until the pasta, chicken, and spinach are well coated in the creamy sauce. Gradually sprinkle in 1/2 cup of grated Parmesan cheese. Stir continuously until the cheese melts into the sauce. Taste the dish and adjust the seasoning with more salt and pepper if needed. Remove the pot from the heat and let it sit for 2-3 minutes. This helps the sauce thicken. Serve the creamy pasta in deep bowls. Garnish with fresh basil leaves and extra Parmesan cheese for a lovely finish. Enjoy! To save time, prep all your ingredients before cooking. Chop the chicken and veggies ahead. Use pre-minced garlic for quick flavor. You can boil water faster by using a lid on the pot. This small trick helps keep the heat in. Make sure to have everything ready to go. It makes cooking much easier and faster. Cooking pasta takes just a few steps. Always use a large pot with plenty of water. Add a generous amount of salt to the water. This helps season the pasta as it cooks. Bring the water to a rolling boil before adding the pasta. Stir the pasta right away to prevent it from sticking. Follow package directions for timing, but taste it a minute early. Perfect pasta should be al dente, firm yet tender. Herbs and spices make your meal pop. Italian seasoning is a fantastic choice for this dish. It has a blend of herbs like basil and oregano. Fresh basil adds a bright, fresh flavor. You can use dried herbs too, but fresh is better. Try adding a pinch of red pepper flakes for a bit of heat. It’s all about balancing flavors to make your creamy sauce shine. {{image_4}} You can switch up the protein in this dish. If you want chicken, turkey works great too. Diced shrimp can add a nice twist, too. Cook them quickly so they stay tender. For a smoky flavor, try using diced pancetta or bacon. Each option brings a different taste, adding to the dish's richness. If you prefer a meatless meal, I have you covered. You can replace the chicken with hearty vegetables. Try using mushrooms, zucchini, or bell peppers. They add great texture and flavor. Adding extra spinach or kale will boost the nutrition. Tofu is another great option. Use firm tofu, sauté it until golden, and mix it in for protein. For those who avoid gluten, it's easy to adapt. Use gluten-free pasta made from rice or lentils. These options cook well and taste great in this dish. You can also add more veggies, like roasted cauliflower or carrots. This keeps the meal filling and delicious without the gluten. To keep your creamy Tuscan chicken pasta fresh, store it in an airtight container. Make sure the pasta has cooled down to room temperature. This helps avoid extra moisture. You can keep it in the fridge for up to three days. If you plan to eat it later, divide it into smaller portions. This makes it easy to grab and reheat. When it's time to enjoy your leftovers, reheating is simple. You can use the microwave or a stovetop. For the microwave, place the pasta in a bowl and cover it with a lid or a damp paper towel. Heat it in short bursts, stirring in between. If using the stovetop, add a splash of cream or broth to a pan. Heat gently over low heat, stirring often to avoid sticking. This keeps your pasta creamy and delicious. If you want to save some for later, freezing works well too. First, let the pasta cool completely. Then, portion it into freezer-safe bags or containers. Remove as much air as possible before sealing. Label the bags with the date. You can freeze it for up to three months. To reheat, let it thaw in the fridge overnight. Then, follow the reheating steps to enjoy it again! Yes, you can use many pasta types. Penne and fettuccine work well, but spaghetti or linguine are also great. The choice depends on your taste. Just remember to adjust the cooking time if needed. To lighten this dish, you can swap heavy cream for half-and-half or use a plant-based cream. You can also use less cheese or add more broth. Reducing the amount of pasta can help too. You can add bell peppers, zucchini, or mushrooms easily. Just chop them small and sauté them with the garlic. You can also add more spinach or use kale for a nice twist. Leftover pasta lasts about 3 to 4 days in the fridge. Store it in an airtight container. Reheat it on the stove or in the microwave until it's hot. In this blog post, we covered the key ingredients, step-by-step cooking, and useful tips for making creamy Tuscan chicken pasta. We also discussed variations for protein and dietary needs, along with best storage practices. Remember, you can customize this dish to fit your tastes. Experiment with herbs, spices, and pasta types. Enjoy trying different flavors and make it your own! With these guidelines, you can create a delicious meal everyone will love.

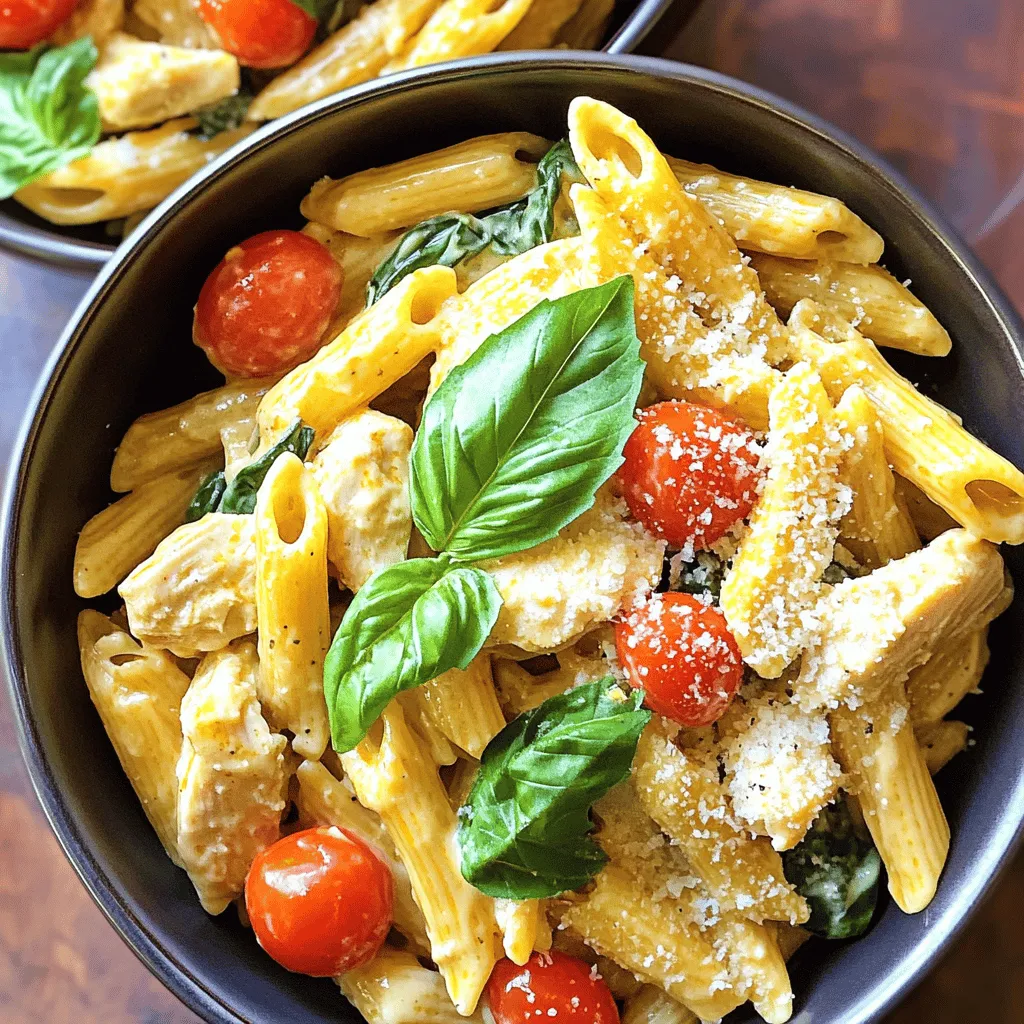
Are you ready for a meal that’s easy and full of flavor? One-Pot Creamy Tuscan Chicken Pasta is here to impress! In this dish, tender chicken meets rich cream, fresh …

Read more

Categories Dinner

Air Fryer Pumpkin Spice Donuts Tasty and Easy Recipe

August 29, 2025 by Chef Miles
- 1 cup pumpkin puree - 1 cup all-purpose flour - 1/2 cup granulated sugar - 1/4 cup brown sugar, packed - 2 teaspoons baking powder - 1 teaspoon baking soda - 1 teaspoon pumpkin pie spice - 1/2 teaspoon salt - 1/4 cup milk - 2 tablespoons unsalted butter, melted - 1 large egg, at room temperature - 1 teaspoon vanilla extract Finding the right ingredients is key to making great pumpkin spice donuts. You need pumpkin puree for that rich, fall flavor. All-purpose flour gives them structure. Granulated and brown sugar add sweetness and depth. Baking powder and baking soda help the donuts rise. Pumpkin pie spice gives them that classic taste. A pinch of salt balances the flavors. Milk adds moisture, while melted butter brings richness. The egg binds everything together, and vanilla extract adds a lovely aroma. - Alternatives for pumpkin puree: You can use sweet potato puree or butternut squash. These will change the flavor a bit, but they work well. - Gluten-free options for flour: Try almond flour or a gluten-free all-purpose blend. Just make sure it has a binding agent like xanthan gum. - Lower sugar alternatives: You can use coconut sugar or a sugar substitute like stevia. This will lower the sugar content without losing taste. Choosing the right ingredients or substitutes lets you customize this recipe to fit your needs. Enjoy making these delightful air fryer pumpkin spice donuts! In a large bowl, combine the pumpkin puree, granulated sugar, brown sugar, milk, melted butter, egg, and vanilla extract. Use a whisk to mix these until smooth. This step is key to creating a rich flavor in your donuts. In a separate bowl, whisk together the all-purpose flour, baking powder, baking soda, pumpkin pie spice, and salt. Make sure everything is evenly mixed. This helps your donuts rise and get that perfect texture. Now, gently combine the dry mix with the wet mixture. Use a spatula or wooden spoon for this. Be careful not to overmix; it’s okay if some lumps remain. This keeps your donuts light and fluffy. Set your air fryer to preheat at 350°F (175°C). Let it warm up for about 5 minutes. While it heats, lightly grease your donut pan. This step helps prevent sticking and ensures easy removal later. Spoon your batter into a piping bag or a zip-lock bag. Cut off one corner to make piping easy. Fill the donut molds about two-thirds full. This gives them room to rise without spilling over. Carefully place the filled donut pan in the air fryer basket. Cook for 5-7 minutes. Check for doneness by inserting a toothpick into the center. If it comes out clean, your donuts are ready. Once cooked, gently remove the donuts from the mold. Transfer them to a wire rack to cool completely. This step is important for the donuts to set properly and maintain their shape. For a tasty finish, mix granulated sugar with pumpkin pie spice in a small bowl. Roll the warm donuts in this mix for a sweet touch. You can also glaze them to add extra flavor. Enjoy your delicious creation! To make fluffy donuts, mixing is key. You want to blend your wet ingredients well first. Use a whisk to combine the pumpkin puree, sugars, milk, butter, egg, and vanilla. This step is crucial. Next, mix the dry ingredients separately. When you combine them, do not overmix. Gently fold the dry mix into the wet mix. If it’s a bit lumpy, that’s okay. Lumps keep your donuts soft and airy. Air frying requires attention to time and temperature. Preheat your air fryer to 350°F for five minutes. This ensures even cooking. When placing your donut pan inside, avoid overcrowding. Cook the donuts for 5-7 minutes. Check for doneness using a toothpick. If it comes out clean, your donuts are ready. Keep an eye on them to prevent overcooking. Store your leftover donuts in an airtight container. This helps keep them fresh. They stay good for about two days at room temperature. For longer storage, freeze them. Place them in a freezer-safe bag. When ready to eat, thaw at room temperature. You can also reheat them in the air fryer for a few minutes to regain that fresh taste. {{image_4}} You can make these donuts vegan by swapping out a few key ingredients. Use a flax egg instead of a regular egg. Mix 1 tablespoon of ground flaxseed with 3 tablespoons of water. Let it sit for a few minutes until it thickens. Instead of milk, choose almond milk or oat milk. For butter, use coconut oil or vegan butter. You can also play with different spice blends. If you want a twist, try cinnamon and nutmeg instead of pumpkin pie spice. You could even add ginger or cardamom for extra warmth. Want to make these donuts more exciting? Add chocolate chips or chopped nuts to the batter for a delightful crunch. Dark chocolate chips pair perfectly with pumpkin. If you like nuts, walnuts or pecans add a nice texture. For glazing, the options are endless! You can dip the warm donuts in chocolate glaze or drizzle a maple glaze over them. A simple glaze of powdered sugar mixed with milk gives a sweet finish too. Fall is the perfect time to experiment with flavors. You can add apple cider or even a touch of maple syrup to the batter. These flavors blend well with pumpkin. Another great idea is to mix in some caramel for a rich, sweet treat. Don't be afraid to try new things and make these donuts your own! To keep your donuts fresh, use an airtight container. This helps keep them soft. Store them at room temperature for up to three days. If you want to keep them longer, consider freezing. If you choose to freeze your donuts, here's how: - First, let the donuts cool completely. - Then, wrap each donut in plastic wrap. - Next, place the wrapped donuts in a freezer bag. - Squeeze out as much air as you can before sealing. To thaw, take them out and leave at room temperature for about 1-2 hours. To enjoy your leftover donuts, reheat them gently. You can use: - A microwave for about 10 seconds. - An air fryer for 2-3 minutes at 300°F. This helps restore their fluffy texture without drying them out. Enjoy every bite! Yes, you can! If you don’t have an air fryer, you can bake these donuts in a regular oven. Preheat your oven to 350°F (175°C). Grease your donut pan and fill it the same way. Bake for about 12-15 minutes or until golden. Check with a toothpick to see if they are done. To check if your donuts are done, insert a toothpick into the center. If it comes out clean, they are ready. You can also gently press the top; it should spring back. If it leaves an imprint, they need more time. To prevent sticking, make sure to grease your donut pan well with non-stick spray or oil. If they still stick, let them cool for a few minutes before trying to remove them. Use a small knife to gently loosen the edges if needed. Yes, homemade pumpkin puree works great! It can add a fresh flavor. Just make sure to strain it well to remove extra moisture. This helps keep your donuts light and fluffy compared to store-bought puree. If you want to lower the sweetness, reduce the granulated or brown sugar by a tablespoon or two. You can also add spices to enhance flavor without extra sugar. For a sweeter donut, add more sugar, but do it gradually to find the right balance. You now have all the tools to make delicious air fryer pumpkin donuts. We covered each ingredient, technique, and helpful tip to ensure your success. You learned how to substitute ingredients for different diets and flavors. Remember, mixing well and avoiding overcooking is key. With simple steps and some creativity, you can enjoy fresh donuts anytime. So grab your ingredients, and start making these delightful treats!

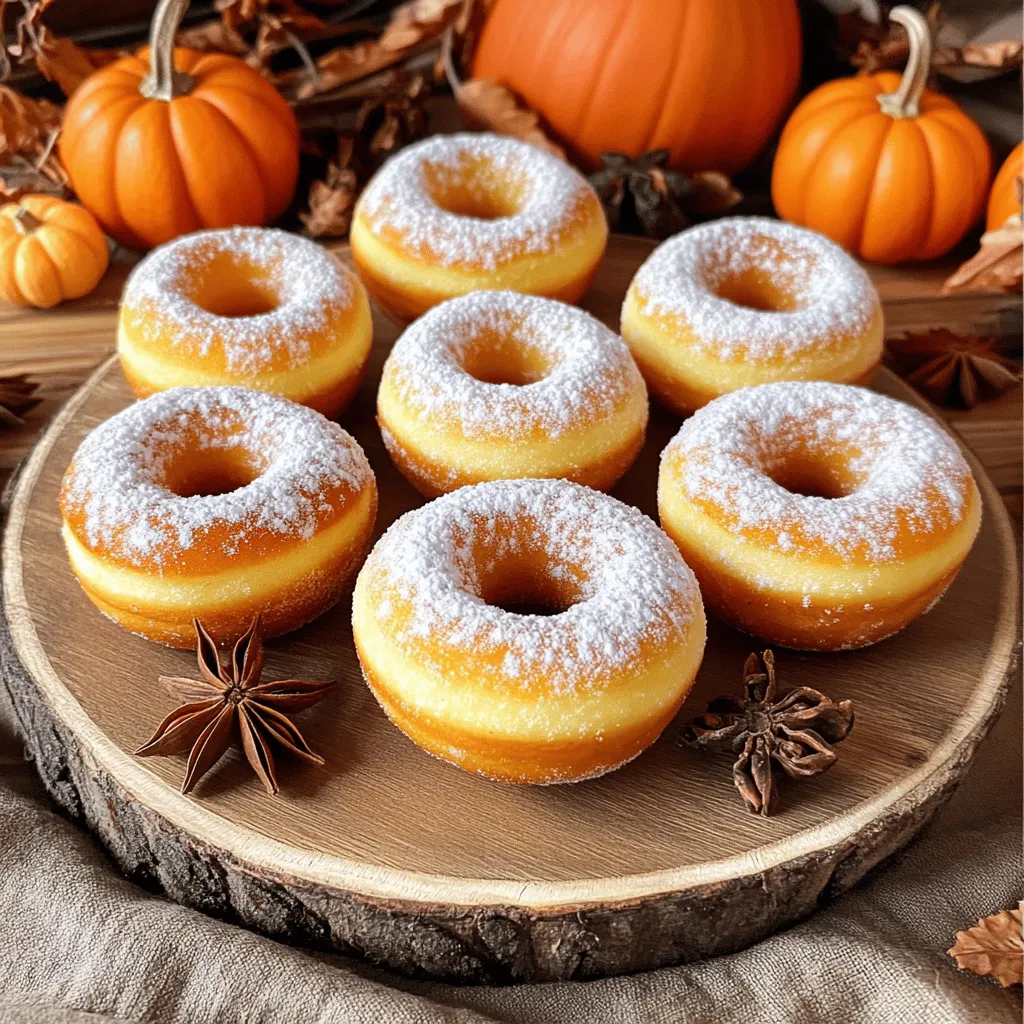
Get ready for fall with my easy air fryer pumpkin spice donuts! These donuts are fluffy, warm, and full of that perfect autumn flavor. With simple ingredients like pumpkin puree …

Read more

Categories Desserts

Maple Glazed Apple Fritters Simple and Tasty Treat

August 29, 2025 by Chef Miles
To make delicious Maple Glazed Apple Fritters, gather these ingredients: - 2 medium-sized apples (e.g., Granny Smith or Honeycrisp) - 2 cups all-purpose flour - 1 tablespoon baking powder - 1 teaspoon ground cinnamon - 1/2 teaspoon salt - 2 large eggs - 1 cup whole milk - 1/4 cup granulated sugar - 1 teaspoon pure vanilla extract - Vegetable oil for frying - 1/2 cup pure maple syrup (for glaze) - 1 cup powdered sugar (for glaze) These ingredients create a perfect mix of sweet and tart. The apples add moisture and flavor. The flour and baking powder give the fritters their fluffy texture. Cinnamon brings warmth and spice, while the maple glaze adds a sweet finish. Make sure to use fresh apples for the best taste. Each ingredient plays a role in making these fritters a treat for everyone. - Peel and dice the apples. - Place the diced apples in a bowl with lemon juice to stop browning. Start by peeling the apples, then chop them into small chunks. I like using Granny Smith or Honeycrisp apples for their sweet and tart flavor. To keep the apples fresh, sprinkle them with a bit of lemon juice. This simple trick prevents them from turning brown. - Combine dry ingredients. - Mix wet ingredients. - Combine wet and dry ingredients. In a large bowl, mix the dry ingredients: flour, baking powder, cinnamon, and salt. Use a whisk to combine them well. In another bowl, crack two eggs and beat them lightly. Add whole milk, sugar, and vanilla extract to this mixture. Stir until smooth. Now, pour the wet mix into the dry. Gently mix until just combined. It's okay if the batter is a bit lumpy; that’s normal! - Heat the oil. - Frying technique. - Testing for doneness. For frying, heat vegetable oil in a deep pan over medium heat. You want the oil to reach 350°F (175°C). To test if it’s hot enough, drop in a small piece of batter. If it sizzles and floats, it's ready. Spoon about 2 tablespoons of the batter into the oil. Fry them for 2-3 minutes on each side. Look for a golden brown color to know they are done. - Mixing maple syrup and powdered sugar. To make the glaze, whisk together maple syrup and powdered sugar in a small bowl. Mix until it’s smooth. This sweet glaze gives the fritters a delicious finish. - Drizzling technique while warm. Once the fritters are out of the oil, let them drain on paper towels. While they are still warm, generously drizzle the maple glaze over each fritter. This allows the glaze to soak in a bit, adding extra sweetness. Enjoy the delightful flavors of your homemade maple glazed apple fritters! To make the best fritters, you must avoid overmixing. Mixing too much makes the fritters tough. Instead, mix until just combined. It’s fine to have a few lumps. This keeps the fritters soft and fluffy. The optimal frying temperature is key. You want the oil at about 350°F (175°C). To check, drop a small amount of batter into the oil. If it sizzles and floats, it’s ready. If the fritters fry too slowly, they absorb oil and become greasy. You can add flavor to the glaze easily. Try mixing in vanilla extract or a pinch of cinnamon for a twist. A splash of lemon juice can brighten the taste too. For presentation, arrange the fritters on a clean plate. Lightly dust them with powdered sugar for a snowy look. Add thin apple slices or drizzle more maple syrup on top. These small touches make a big impact! {{image_4}} You can swap apples for other tasty fruits. Try pears for a soft and sweet treat. Pear fritters have a lovely flavor that mixes well with spices. You can also use mixed berries. They add a burst of color and tartness. The key is to chop the fruits into small pieces. This way, they blend well in the batter. If you need a gluten-free version, you can change the flour. Use almond flour or a gluten-free blend. Both options work well in the recipe. Start with the same amount as all-purpose flour. You may need to adjust the liquid slightly. Keep an eye on the batter. The texture should look similar to regular fritters. You can make your fritters even better by adding nuts or spices. Chopped walnuts or pecans give a nice crunch. They pair well with the sweetness of the glaze. You can also try spices like nutmeg or ginger. A pinch of these adds warmth and depth to the flavor. Just mix them into the batter before frying. Enjoy experimenting with these fun twists! To keep your apple fritters fresh, store them properly. First, let them cool completely. This prevents moisture buildup. Then, place them in an airtight container. Line the bottom with paper towels. This helps absorb any extra oil. You can keep them in the fridge for up to three days. If you want to keep them longer, freeze them. Wrap each fritter tightly in plastic wrap. Then, place them in a freezer bag. They can last up to three months in the freezer. When it’s time to enjoy your fritters again, reheating is easy. For the best results, use an oven. Preheat your oven to 350°F (175°C). Place the fritters on a baking sheet. Heat them for about 10 minutes. This keeps them crispy. You can also use a microwave if you’re in a hurry. Just heat them for 15-30 seconds. However, this may make them a bit softer. Always check the temperature before eating. Enjoy your sweet treat fresh! To make sure your fritters are crispy, follow these tips: - Use the right oil: Choose vegetable oil with a high smoke point. - Heat oil properly: Heat oil to 350°F (175°C) before frying. Test with a small batter piece. - Don’t overcrowd the pan: Fry in small batches to keep the oil hot. - Drain well: Place fried fritters on paper towels to absorb excess oil. - Serve warm: Enjoy fritters right after frying for the best texture. When you fry at the right temperature, the outside gets crispy while the inside stays soft. This makes each bite a delight. Yes, you can try different syrups for the glaze. Here are some options: - Honey: Adds a floral sweetness. - Agave nectar: A lighter, milder flavor. - Corn syrup: Gives a glossy finish without strong flavor. Feel free to mix these syrups with powdered sugar. Just keep the ratio similar to the maple glaze. Each syrup brings its own unique taste to your fritters. Peeling apples is not a must, but it changes the taste and texture. Here’s how it affects your fritters: - Texture: Peeling gives a smoother bite. Leaving skins adds a bit of chewiness. - Flavor: The skin adds a slight bitterness that some may enjoy. - Color: Skins can make the fritters look rustic and colorful. If you want a classic taste, peel the apples. If you like extra texture, keep the skins on. It's all about your personal preference! We talked about making delicious apple fritters, from ingredient lists to frying tips. You learned how to prep apples, mix batters, and create a tasty maple glaze. Each step ensures your fritters are crispy and flavorful. Remember, you can switch fruits or use gluten-free flour for variations. Storing them well keeps them fresh. With these tips, you can impress anyone with your fritters. Take these ideas, experiment, and enjoy your cooking!

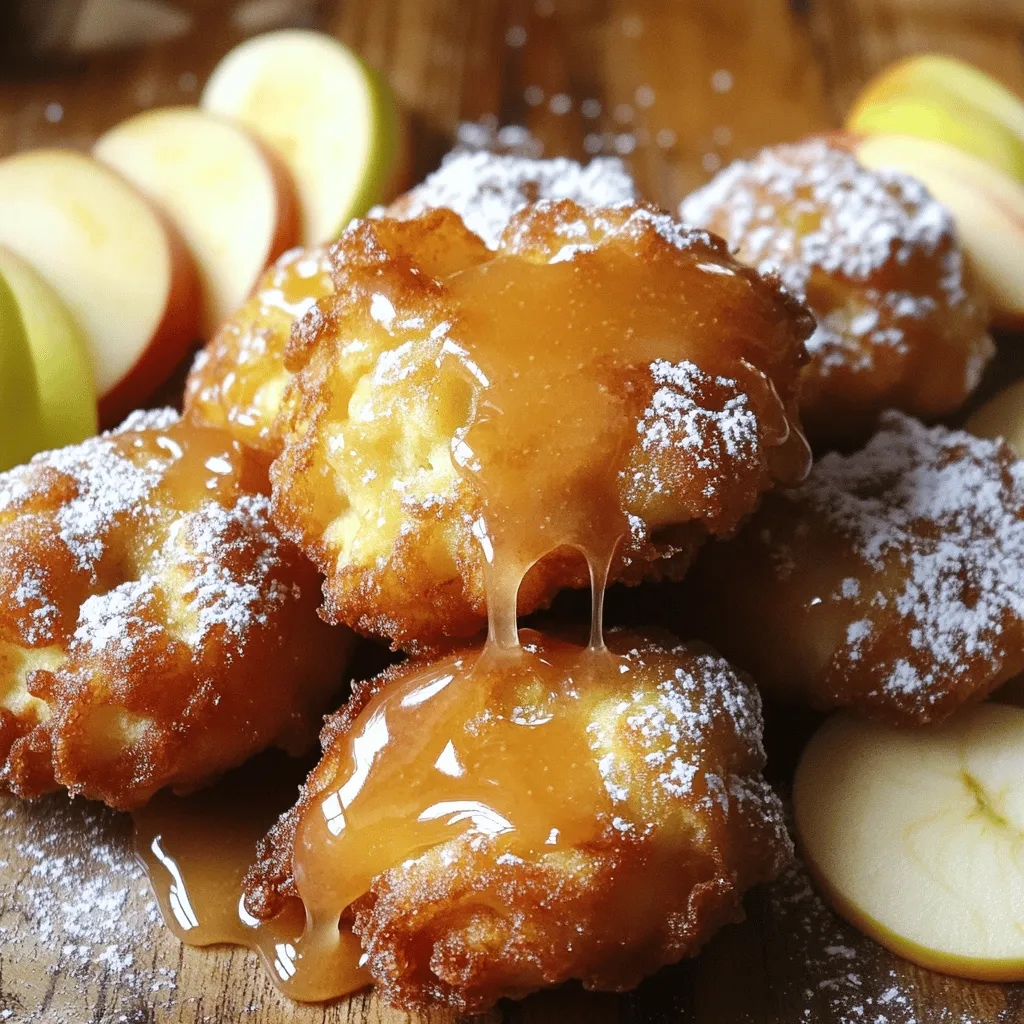
Are you ready to create a delicious treat that will wow your friends and family? These Maple Glazed Apple Fritters are a simple yet tasty delight. With just the right …

Read more

Categories Desserts

Easy Baked Apples Delightful Healthy Dessert Recipe

August 29, 2025 by Chef Miles
- 4 medium-sized apples (Honeycrisp or Granny Smith recommended) - 1/4 cup rolled oats - 1/4 cup chopped walnuts (or your favorite nuts) - 1 teaspoon ground cinnamon - 1/4 cup pure maple syrup - 2 tablespoons unsalted butter, melted - 1/4 cup dried cranberries or raisins (optional) - Pinch of sea salt - Optional toppings: whipped cream or vanilla ice cream For this easy baked apples recipe, I recommend using Honeycrisp or Granny Smith apples. They provide a nice balance of sweet and tart flavors. The rolled oats add a chewy texture, while the chopped walnuts give a nice crunch. Ground cinnamon infuses warmth and spice into the dish. Pure maple syrup offers a natural sweetness that pairs perfectly with the apples. Melted butter helps the filling stick together. If you want a burst of flavor, consider adding dried cranberries or raisins. A pinch of sea salt enhances all the flavors. To make it even more special, serve with whipped cream or vanilla ice cream on top! Gather all these ingredients before you start. This will make the cooking process smooth and fun. Plus, you can adjust the flavors based on what you like. Enjoy the process of creating this delightful dessert! - Preheat the oven to 350°F (175°C). - Core the apples, keeping bottoms intact. This helps hold the filling in. - In a bowl, combine the rolled oats, chopped walnuts, ground cinnamon, maple syrup, melted butter, and a pinch of sea salt. - If you want, add dried cranberries or raisins for extra flavor. Stir until mixed well. - Spoon the oat mixture into each cored apple. Press down gently to pack it in. - Place the filled apples in a baking dish. Drizzle extra maple syrup over the tops. - Pour about an inch of water into the bottom of the dish. This helps steam the apples. - Cover the dish tightly with foil to trap steam, then bake for 20 minutes. - After 20 minutes, remove the foil and continue baking for 15-20 more minutes. The apples should be soft and caramelized. Select apples that bake well, like Honeycrisp or Granny Smith. These apples hold their shape and flavor. Look for firm apples without bruises. Firmness ensures they stay nice and crunchy while baking. You can adjust the sweetness by adding more or less maple syrup. If you want more spice, add extra cinnamon or even nutmeg. For a twist, try different nuts like pecans or almonds. You can also use dried fruits like apricots for a new flavor. Steam is key when baking apples. It keeps them moist and tender. By adding water to the baking dish, you create steam. You can tell when the apples are done if they are soft and slightly caramelized on top. Use a fork to test their softness. Enjoy! {{image_4}} You can make baked apples even tastier! Try adding spices like nutmeg or ginger. These spices add warmth and depth to your dish. You can also switch up the nuts or dried fruits. Walnuts are great, but pecans or almonds work too. Dried cherries or figs can add a unique twist. Feel free to get creative! Want to make your baked apples a bit healthier? Use less sugar or sugar substitutes like honey or agave syrup. You can also try gluten-free oats if you prefer. This way, you keep the flavor while making it fit your diet. These small changes keep your dessert light without losing taste. Presentation is key! Serve your baked apples warm in a bowl or on a plate. You can top each apple with whipped cream or a scoop of vanilla ice cream. Drizzle extra maple syrup on top for a sweet finish. Pair your dessert with a cup of tea or coffee for a cozy meal. You can even serve it alongside a light salad for a balanced treat. Enjoy the blend of flavors and textures! To keep your baked apples fresh, store them in the fridge. Place them in an airtight container. They will stay good for about three to five days. To reheat, pop them in the microwave for about one minute. This warms them nicely. Alternatively, you can heat them in the oven at 350°F for around 10 minutes. This option makes them taste fresh again. If you want to save baked apples for later, freezing is a great choice. First, let them cool completely. Then, wrap each apple tightly in plastic wrap. Place them in a freezer bag or container. They can last for up to three months. When you want to eat them, take the apples out and thaw them in the fridge overnight. Freezing can change the texture a bit. They may become softer after thawing. However, the flavor will still be delicious. Enjoy them warm with ice cream or whipped cream! Yes, you can prepare baked apples in advance. Here’s how: - Core the apples and make the filling as usual. - Stuff the apples with the filling but don’t bake them yet. - Cover the apples with plastic wrap and store them in the fridge. - Bake them when you are ready. Let them sit for about 10 minutes before baking. To check if your baked apples are done, look for these signs: - The apples should be soft when pierced with a fork. - The skin may look wrinkled or slightly caramelized. - The filling should be bubbly around the edges. When you see these signs, your baked apples are ready to enjoy! Yes, you can use other sweeteners in your baked apples. Here are some options: - Honey adds a floral sweetness. - Agave syrup is milder and works well. - Brown sugar gives a rich flavor. Each sweetener will change the taste a bit, so feel free to experiment! You can make delicious baked apples easily with the right ingredients and steps. Start by choosing firm apples and mixing a tasty filling. Baking them with care adds flavor and warmth. Don’t forget to explore variations for some fun twists. Store leftovers wisely, freezing if needed, to enjoy later. Remember, these baked apples make a great dessert, perfect for any meal. Happy baking!

Are you craving a sweet yet healthy dessert? Look no further! My Easy Baked Apples recipe combines fresh flavors and simple ingredients for a delightful treat. Using just four medium-sized …

Read more

Categories Desserts

Rich Hot Dog Chili Hearty and Flavorful Recipe

August 29, 2025 by Chef Miles
To make this rich hot dog chili, gather these main ingredients: - 4 beef hot dogs, chopped into bite-sized pieces - 1 pound ground turkey or ground beef - 1 can (15 oz) kidney beans, rinsed and drained - 1 can (15 oz) black beans, rinsed and drained - 1 can (14.5 oz) diced tomatoes in juice - 1 medium onion, finely diced - 2 cloves garlic, minced - 1 tablespoon chili powder - 1 teaspoon ground cumin - 1 teaspoon smoked paprika - 1 teaspoon dried oregano - Salt and freshly ground black pepper, to taste - 2 tablespoons olive oil - 1 cup beef or vegetable broth Each ingredient plays a role. The hot dogs add a meaty flavor, while the beans give the chili a hearty texture. The spices and tomatoes bring warmth and depth. You can elevate your chili with these garnishes: - Shredded cheese - Sliced green onions These toppings not only add flavor but also make your dish look inviting. Cheese melts beautifully on warm chili, while green onions give a fresh crunch. If you have dietary preferences, consider these substitutions: - Ground chicken instead of turkey or beef - Vegan options like plant-based meat or lentils These swaps help you cater to different tastes. You can enjoy a delicious chili while fitting your diet. Cooking should be fun and flexible! Start by heating 2 tablespoons of olive oil in a large pot over medium heat. Once hot, add 1 medium onion, finely diced. Sauté the onion until it turns translucent, which takes about 5 minutes. This step builds a strong flavor base. Next, add 2 cloves of minced garlic and stir for about 1 minute. The garlic should smell great but not burn. After that, stir in 1 pound of ground turkey or ground beef. Cook the meat for 6-8 minutes, breaking it up with a spatula. Make sure it is fully browned before moving on. Now, chop 4 beef hot dogs into bite-sized pieces and add them to the pot. Mix well and let them cook for another 3-4 minutes until they start to brown. This step adds a nice flavor to the chili. Then, sprinkle in 1 tablespoon of chili powder, 1 teaspoon of ground cumin, 1 teaspoon of smoked paprika, and 1 teaspoon of dried oregano. Season with salt and freshly ground black pepper to taste. Stir the spices into the meat for about 2 minutes. This allows the spices to release their full flavor. Pour in 1 can of diced tomatoes (14.5 oz) along with its juice and 1 cup of beef or vegetable broth. Then, add 1 can each of kidney beans and black beans, both rinsed and drained. Mix all the ingredients well. Bring the chili to a gentle simmer, then reduce the heat to low. Let it cook uncovered for about 30 minutes. Stir occasionally until the chili thickens to your liking. Taste and adjust the seasoning with more salt and pepper if needed. Enjoy the rich, hearty flavors! To improve the flavor of your chili, start with the spices. I always taste first. If it needs more heat, add extra chili powder. For deeper flavor, try more smoked paprika. Fresh herbs can also brighten up the mix. Don’t forget to add salt! This helps to bring out all the other flavors. Remember, you can always add more, but you can't take it out. So add gradually and taste as you go. For thicker chili, let it simmer longer. This reduces liquid and concentrates flavor. If it gets too thick, add a splash of broth or water. Mix well to combine. You can also mash some beans against the pot to help thicken. If you prefer a thinner chili, simply add more broth. Adjust until you find the right balance that fits your taste. Serve your hot dog chili in warm bowls. Top with shredded cheese for a tasty finish. Sliced green onions add color and crunch. I love pairing it with crunchy tortilla chips. They add texture and make it fun to eat. You can also serve it with warm bread on the side. This helps soak up all the delicious chili goodness. {{image_4}} To make a meatless chili, swap in plant-based proteins. You can use lentils or a mix of chopped mushrooms and walnuts. Here’s how: 1. Heat olive oil in a large pot over medium heat. 2. Add diced onion. Sauté until soft, about 5 minutes. 3. Stir in minced garlic and cook for 1 minute. 4. Add your choice of plant-based protein. Cook for 6-8 minutes until heated through. 5. Follow the same steps as the original recipe, using vegetable broth and omitting the meat. 6. Add the beans, tomatoes, and spices. Simmer for 30 minutes. This version packs in flavor while keeping it veggie-friendly. To add some heat, use spices or fresh peppers. Here’s how to spice it up: 1. When adding the spices, include 1 teaspoon of cayenne pepper for heat. 2. You can also add diced jalapeños or serrano peppers when you sauté the onion. 3. Adjust the spice level based on your taste. This adds a nice kick and makes your chili stand out! If you want a chili without beans, here’s an easy way: 1. Skip the kidney and black beans from the original recipe. 2. Increase the amount of meat or add more chopped hot dogs. 3. You can also add more vegetables, like bell peppers or corn. This keeps it hearty and satisfying without the beans. Enjoy your rich hot dog chili! To store leftover chili in the fridge, wait until it cools down. Use a clean, airtight container. This keeps the chili fresh and avoids spills. Store it in the fridge for up to four days. If you want to enjoy it later, label the container with the date. This way, you will know when you made it. Freezing chili is a great way to save it for later. First, let the chili cool to room temperature. Then, scoop it into freezer-safe containers. Leave some space at the top since the chili will expand when frozen. You can also use freezer bags. Squeeze out the air before sealing. Chili can last in the freezer for up to three months. Remember to write the date on the bag or container. When you’re ready to eat, thaw the chili in the fridge overnight if frozen. For reheating, you can use a pot on the stove or a microwave. If using the stove, heat it on medium until it bubbles, stirring often. If using the microwave, heat it in short bursts, stirring in between. Make sure it is hot all the way through. Enjoy your flavorful chili right away! Yes, you can use different meats for this chili. Ground turkey or ground beef works well. If you prefer, you can use ground pork for a richer flavor. Chicken is also a good choice if you want something lighter. Just remember to adjust cooking times if needed. Each meat brings its own taste, so feel free to experiment. Hot dog chili lasts about 3 to 4 days in the fridge. Be sure to store it in an airtight container. This keeps it fresh and safe to eat. Always check for changes in smell or color before serving. If you see anything off, it’s best to throw it away. Yes, you can make this chili ahead of time. It actually tastes better the next day as flavors deepen. After cooking, let it cool down, then place it in the fridge. When you are ready to eat, just reheat it on the stove or in the microwave. Add a splash of broth if it thickens too much. Enjoy your easy meal! In this article, we explored the rich world of hot dog chili. We covered main ingredients, including hot dogs and spices, and shared tips for cooking and garnishing. You learned about variations, like vegetarian options and ways to adjust spice levels. Proper storage methods ensure your chili stays fresh for future meals. Whether you're serving a crowd or just yourself, this chili is sure to please. Enjoy creating your perfect bowl of chili and savor every bite!

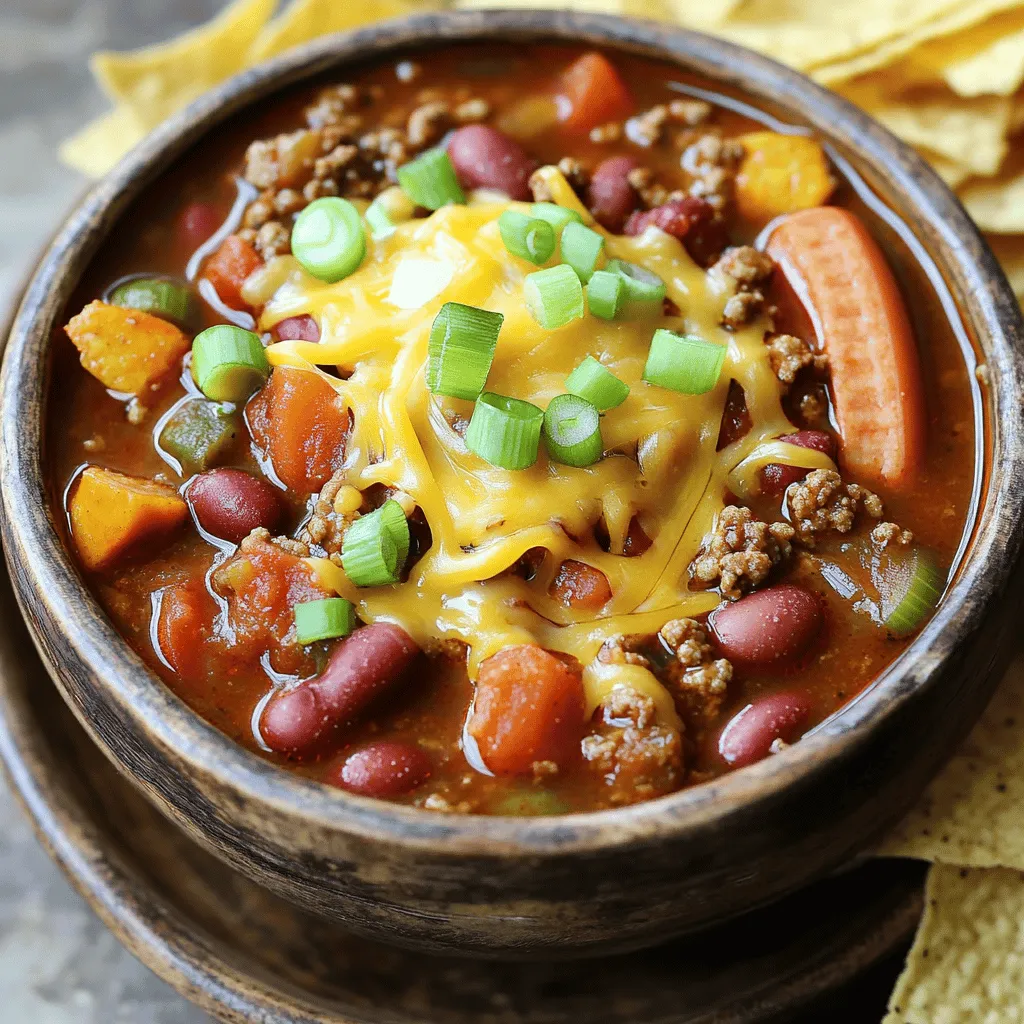
Looking for a dish that’s both hearty and easy to make? This Rich Hot Dog Chili recipe hits the spot! With simple ingredients like beef hot dogs, ground turkey, and …

Read more

Categories Dinner

Creamy White Chicken Chili Flavorful and Simple Recipe

August 29, 2025 by Chef Miles
- 1 pound boneless, skinless chicken breasts - 2 cans white beans - 2 cups low-sodium chicken broth The main ingredients form the heart of this creamy white chicken chili. The chicken breasts give it a tender bite. The white beans add a creamy texture, while the chicken broth makes the chili rich and flavorful. - Ground cumin and chili powder - Smoked paprika and dried oregano Spices bring life to this dish. Ground cumin and chili powder provide warmth and depth. Smoked paprika adds a subtle smokiness, while oregano gives a hint of earthiness. These seasonings create a balanced flavor profile. - Fresh cilantro - Lime wedges Garnishes make your chili shine. Fresh cilantro adds a burst of freshness and color. Lime wedges bring a zesty brightness that enhances the flavors. These simple extras elevate your dish and make it more appealing. 1. Heat the olive oil in a large pot over medium heat. 2. Once hot, add the diced chicken. 3. Cook for 6-8 minutes, stirring occasionally. 4. Brown the chicken until it is cooked through. 5. Remove the chicken from the pot and set it aside on a plate. 1. In the same pot, add the chopped onion. 2. Sauté the onion for about 4-5 minutes. 3. Cook until the onion is soft and translucent. 4. Stir in the minced garlic. 5. Cook for another minute until the garlic smells great but does not brown. 1. Pour in the white beans, chicken broth, and heavy cream. 2. Sprinkle in the ground cumin, chili powder, smoked paprika, and oregano. 3. Add salt and pepper to taste. 4. Use a wooden spoon to stir everything together. 5. Ensure the spices mix well with the other ingredients. 1. Bring the chili base to a gentle simmer. 2. Add the corn kernels and the cooked chicken back into the pot. 3. Let the chili cook for another 10-15 minutes. 4. Stir occasionally until it thickens to your liking. 5. Taste the chili and adjust the seasoning if needed. 6. For heat, add diced jalapeños or a bit of cayenne pepper. To get the best flavor out of your creamy white chicken chili, you can adjust the spice levels. If you like a milder dish, skip the chili powder or use less. For a spicier kick, add diced jalapeños or cayenne pepper. This chili is all about balance, so taste it as you cook. Next, let’s talk about creaminess. You want a rich texture but not too heavy. Use heavy cream for a silky feel. If it’s too thick, add more chicken broth. Stir well and let it simmer to blend the flavors. How you serve the chili can make it even better. Drizzle a little heavy cream on top of each bowl. It adds a nice look and a creamy touch. Fresh cilantro sprinkled on top brightens the dish and adds color. Consider serving the chili with warm, crusty bread. This bread is perfect for dipping and soaking up the chili. It makes the meal feel special and inviting. Using the right pots and utensils helps a lot when cooking. A large pot is great for this chili. It gives you enough space to stir and mix all your ingredients. A wooden spoon is perfect for mixing. It won’t scratch your pot and helps avoid burning. You may also want to use a slow cooker or Instant Pot. These tools can make cooking easier and more convenient. A slow cooker lets flavors develop over hours, making it rich and tasty. An Instant Pot speeds up the process, cooking everything quickly while keeping it tender. {{image_4}} To make creamy white chicken chili in a slow cooker, follow these easy steps: - Modifications for slow cooking: First, brown the chicken in a pan. Then place it in the slow cooker. Add the sautéed onion and garlic, white beans, chicken broth, heavy cream, corn, and spices. - Cooking time adjustments: Set your slow cooker to low for 6 to 8 hours or high for 3 to 4 hours. Stir occasionally if you can. This way, flavors blend well, and the chili becomes thick and creamy. Using an Instant Pot gives you a quick way to enjoy this dish. Here’s how to adapt the recipe: - Steps for using the Instant Pot: Start by using the sauté function to brown the chicken, onion, and garlic. After that, add white beans, chicken broth, heavy cream, corn, and spices. - Timing and pressure settings: Close the lid and set the Instant Pot to manual pressure for 10 minutes. Once done, use the quick-release method. That’s it! You’ll have a warm, flavorful chili ready to serve. If you need to make some changes for diets, consider these options: - Options for dairy-free or gluten-free diets: Use coconut milk instead of heavy cream for a dairy-free version. For a gluten-free option, ensure all ingredients are certified gluten-free. - Protein alternatives: Try using turkey or plant-based chicken as a protein substitute. Both options work well and add their own unique flavors. Store your leftover creamy white chicken chili in an airtight container. This helps keep it fresh and tasty. Make sure the chili cools down before you put it in the fridge. The shelf life in the fridge is about 3 to 4 days. You can check for freshness by looking for off smells or changes in color. If it seems good, it’s safe to eat. The best way to freeze chili is in individual portions. Use freezer-safe bags or containers. Leave some space for expansion as it freezes. This helps prevent freezer burn. When you're ready to eat it, thaw the chili in the fridge overnight. You can also use the microwave for quick thawing. To reheat, warm it on the stove over medium heat. Stir often to ensure it heats evenly. If it seems too thick, add a splash of chicken broth or water. This keeps it creamy and delicious. Yes, you can use other chicken types. Thighs can add more flavor. Boneless thighs take about 10-12 minutes to cook. If you prefer shredded chicken, you can use a rotisserie chicken. Just add it at the end to heat through. This chili is mild, but you can make it spicy. To add heat, try diced jalapeños or cayenne pepper. Start with small amounts and taste as you go. This way, you can get the spice just right for your taste. This chili pairs well with many sides. Try warm bread or cornbread for dipping. You can also serve it with tortilla chips. For toppings, add shredded cheese, avocado slices, or more cilantro. A wedge of lime adds a nice zesty touch too. You learned how to make creamy white chicken chili using simple ingredients and steps. We covered the main ingredients like chicken, beans, and spices. Then, we walked through cooking methods such as sautéing and simmering. Don’t forget tips for flavor and presentation. Remember the options for slow cooking and Instant Pot use. With the right storage, your leftovers can last. Enjoy this hearty dish with friends and family for a warm meal.

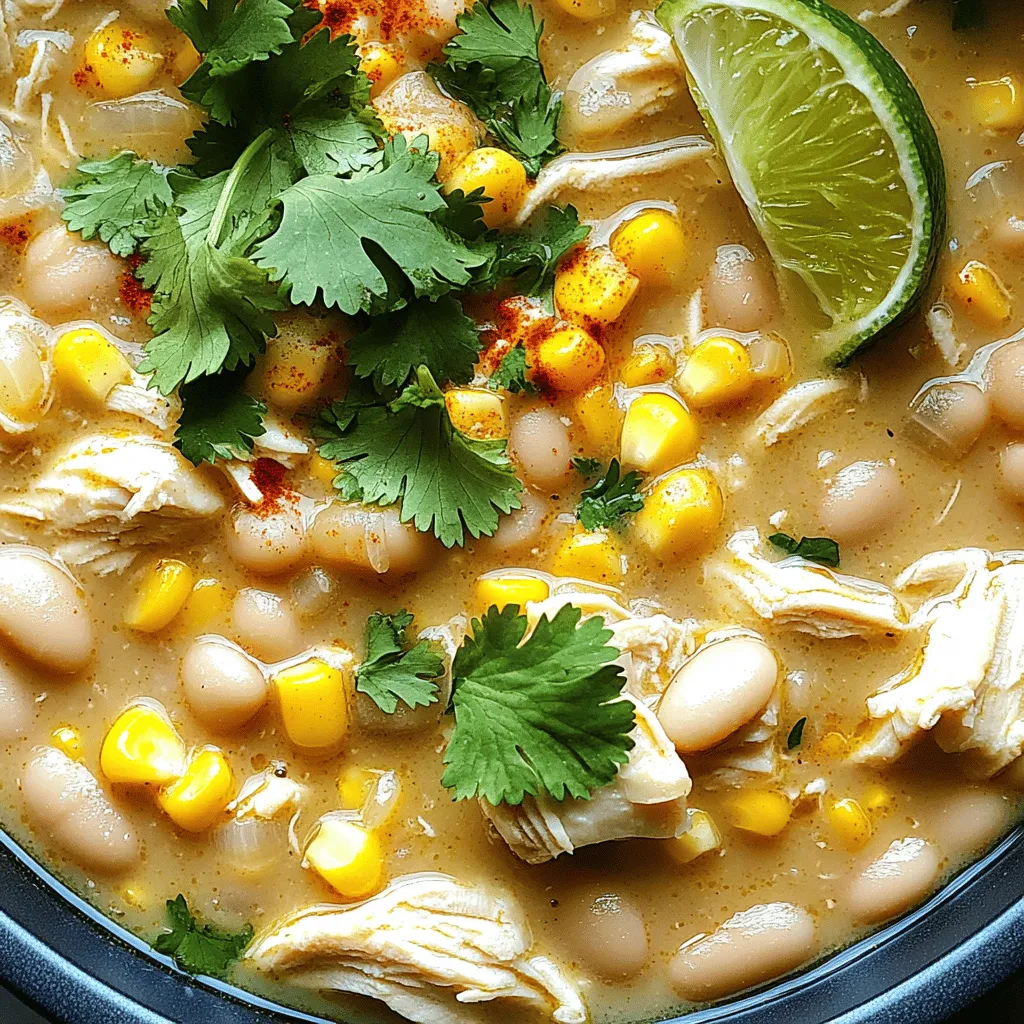
Looking for a comforting meal that’s easy to whip up? My Creamy White Chicken Chili recipe hits the spot! It’s packed with flavor, quick to make, and perfect for busy …

Read more

Categories Dinner

Healthy Sweet Potato Turkey Chili Flavorful and Easy

August 29, 2025 by Chef Miles
For this chili, you will need some key ingredients: - 1 lb ground turkey - 2 medium sweet potatoes, peeled and cut into 1/2-inch cubes - 1 can (14 oz) black beans, thoroughly rinsed and drained - 1 can (14 oz) diced tomatoes with green chilies - 1 medium onion, finely chopped - 3 cloves garlic, minced - 2 cups low-sodium chicken broth - 2 tablespoons extra virgin olive oil These ingredients form the base of your chili. The ground turkey adds protein, while sweet potatoes give it a nice sweetness and texture. Black beans add fiber, making this dish filling and healthy. Spices are essential for flavor. Here are the spices you will use: - 1 tablespoon chili powder - 1 teaspoon ground cumin - 1 teaspoon smoked paprika - Salt and freshly ground black pepper to taste Chili powder gives heat. Cumin adds earthiness, and smoked paprika lends a rich, smoky flavor. Adjust salt and pepper to your liking, ensuring a well-seasoned dish. To make your chili even better, consider these garnishes: - Fresh cilantro, coarsely chopped - Avocado, sliced Cilantro offers a fresh burst, while avocado adds creaminess. These garnishes elevate your dish, making it look and taste amazing. Start by gathering all your ingredients. You will need: - 1 lb ground turkey - 2 medium sweet potatoes, peeled and cut into 1/2-inch cubes - 1 can (14 oz) black beans, thoroughly rinsed and drained - 1 can (14 oz) diced tomatoes with green chilies - 1 medium onion, finely chopped - 3 cloves garlic, minced - 2 cups low-sodium chicken broth - 1 tablespoon chili powder - 1 teaspoon ground cumin - 1 teaspoon smoked paprika - Salt and freshly ground black pepper to taste - 2 tablespoons extra virgin olive oil - Fresh cilantro, coarsely chopped (for garnish) - Avocado, sliced (for garnish) Chopping the onion and sweet potatoes first helps speed up cooking. Rinse the beans in water to clean them. This removes extra sodium and gives you a healthier dish. In a large, heavy-bottomed pot, heat the olive oil over medium heat. Wait until the oil shimmers, then add the chopped onion. Sauté the onion for about 5 minutes until it turns soft and translucent. Next, add the minced garlic to the pot. Cook it for one more minute. You want to stir often to keep it from burning. Then, add the ground turkey. Use a wooden spoon to break it apart as it cooks. You need it to brown for about 6-8 minutes. Stir occasionally for even cooking. Now, add the diced sweet potatoes, black beans, and diced tomatoes (with juices) to the pot. Season everything with chili powder, cumin, smoked paprika, salt, and freshly ground black pepper. Stir well to mix all the flavors together. Increase the heat to bring the chili to a gentle boil. Once it boils, reduce the heat to low. Cover the pot and let it simmer for 25-30 minutes. You want the sweet potatoes to be fork-tender. After simmering, taste the chili. You may want to add more salt or pepper for flavor. If you like a thicker chili, remove the lid and let it simmer for another 10 minutes. Stir occasionally during this time. Serve the chili hot. Garnish each bowl with fresh cilantro and slices of avocado. The avocado adds creaminess and balances the spices. For an attractive presentation, use deep bowls. The bright colors of the chili and garnishes make it look appealing. Enjoy your healthy sweet potato turkey chili! To make your chili pop, focus on layering flavors. Start by sautéing the onion until it’s soft. This brings out its natural sweetness. Next, add garlic and let it cook until fragrant. This step adds depth. Use fresh spices like chili powder and smoked paprika for a rich taste. You can also add a splash of lime juice just before serving. This brightens the flavors. For added texture, top your chili with creamy avocado slices and fresh cilantro. Cooking chili is easy when you follow a few key steps. First, brown the turkey well. This forms a great base flavor. Stir often to break it apart and ensure even cooking. Then, add your sweet potatoes early. They need time to soften. Let the chili simmer on low heat. This allows the flavors to meld. If you want a thicker chili, remove the lid during the last ten minutes of cooking. Avoid rushing your cooking. If you skip sautéing the onion and garlic, your chili will lack flavor. Don’t forget to rinse the black beans well. This helps reduce sodium. Also, taste your chili before serving. Adjust the salt and pepper to your liking. Lastly, don’t skip the garnishes. They add color and freshness, making your dish more appealing. Stick to these tips, and you’ll make a delicious chili every time! {{image_4}} You can easily make this chili vegetarian or vegan. Replace the ground turkey with a mix of lentils or mushrooms. Lentils cook well and add protein. Mushrooms bring a nice umami flavor. You can also add more beans for extra texture. Use vegetable broth instead of chicken broth to keep it plant-based. This ensures a rich taste without meat. For low-carb options, skip the sweet potatoes. Instead, use zucchini or cauliflower. These veggies provide bulk without many carbs. You can also add more beans, but keep in mind their carb content. Try using ground turkey breast instead of regular turkey. This will reduce fat and calories while keeping the chili hearty. If you have dietary restrictions, consider these easy swaps. Use low-sodium beans and broth to manage sodium intake. If you're gluten-free, check labels on broth and spices. Canned tomatoes are usually safe, but always read the label. You can also swap spices to avoid allergens. For example, use fresh herbs instead of dried spices if needed. Adjusting ingredients allows everyone to enjoy this chili. To store your leftover chili, let it cool to room temperature. Transfer it to an airtight container. You can keep it in the fridge for up to five days. If you want to keep it longer, consider freezing it. Always label the container with the date for easy tracking. When you're ready to enjoy your chili again, reheat it on the stove or in the microwave. If using the stove, place the chili in a pot over medium heat. Stir often until it’s hot. In the microwave, put it in a microwave-safe bowl and cover it. Heat in one-minute intervals, stirring in between, until warm. Freezing chili is a great way to save it for later. Use freezer-safe bags or containers. Make sure to leave some space for expansion. Chili can last up to three months in the freezer. When ready to eat, thaw it overnight in the fridge. Heat it on the stove or microwave as mentioned above. Enjoy your delicious chili, even weeks later! Yes, you can use other meats in this chili. Ground beef, chicken, or pork work well. If you want a leaner option, try ground chicken or turkey. You can even use shredded rotisserie chicken for added flavor and ease. To add heat, try these simple tips: - Use more chili powder or add cayenne pepper. - Include diced jalapeños or serrano peppers. - Add a splash of hot sauce to the mix. These changes boost flavor and spice levels. There are many great sides for chili: - Warm cornbread is a classic choice. - Serve with tortilla chips for a crunchy bite. - A simple green salad adds freshness. - Top with cheese, sour cream, or avocado for extra richness. These options enhance your meal and delight your guests. This blog post covered how to make healthy sweet potato turkey chili. We discussed the main ingredients and spices you need. The cooking steps were clear and easy to follow. Tips helped enhance flavor and avoid common mistakes. You also learned about variations for different diets and how to store leftovers. Enjoy making this chili and share it with friends. You’ll love how good it tastes and how healthy it is. Cooking can be fun and rewarding!

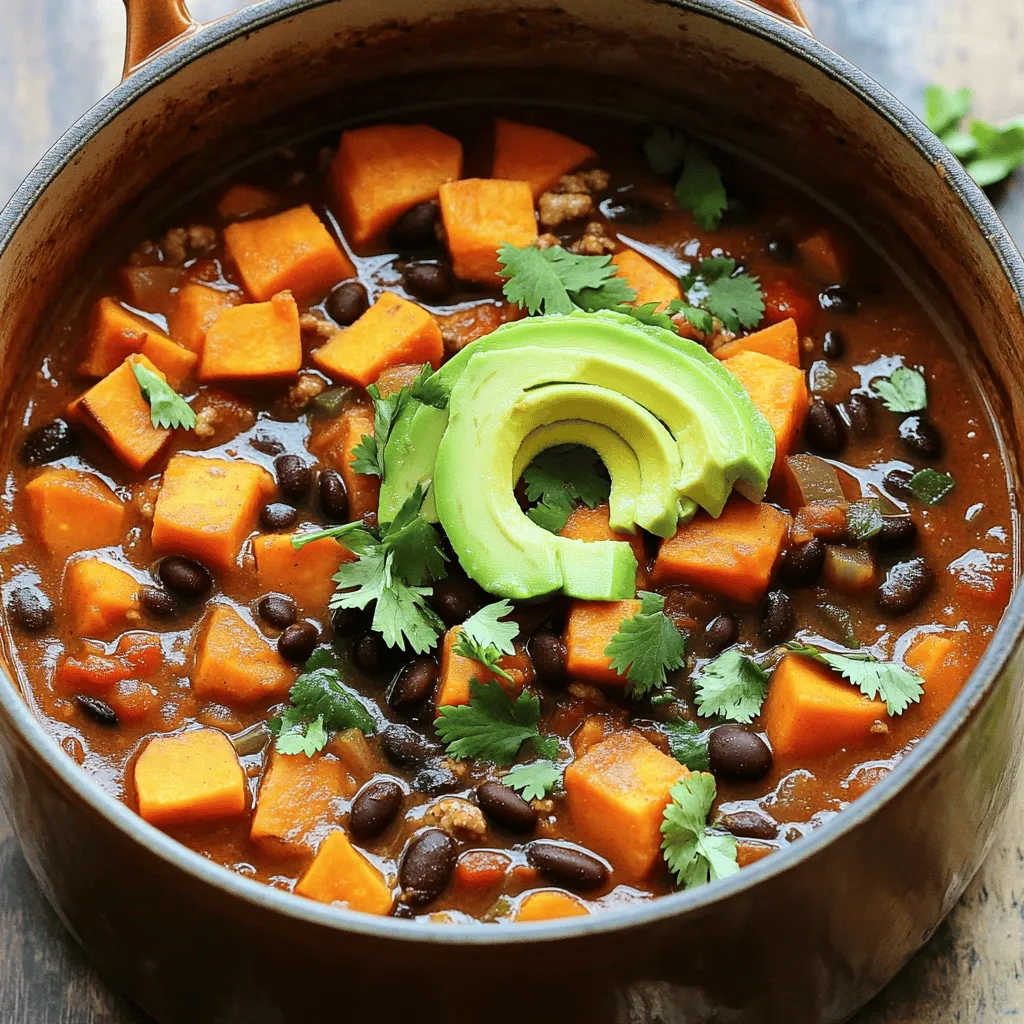
Looking for a cozy meal that’s packed with flavor? Try my Healthy Sweet Potato Turkey Chili! It’s not just tasty; it’s also easy to make and perfect for any night …

Read more

Categories Dinner

Vegan Black Bean & Lentil Chili Easy Weeknight Meal

August 29, 2025 by Chef Miles
- Dried Lentils: Use 1 cup of dried green or brown lentils. Rinse them well before cooking. They add protein and fiber to your chili. - Black Beans: Use 1 can (15 oz) of black beans. Drain and rinse them. They bring a creamy texture and rich flavor. - Fresh Vegetables: You need 1 large onion, 3 cloves of garlic, 1 bell pepper, and 2 medium-sized carrots. Dice all these to create a hearty base. - Spices and Seasonings: You will need 2 tablespoons of chili powder, 1 tablespoon of ground cumin, 1 teaspoon of smoked paprika, 1 teaspoon of dried oregano, and 1/2 teaspoon of cayenne pepper. These spices add depth and warmth to the chili. - Vegetable Broth: Use 4 cups of low-sodium vegetable broth. It enhances the flavor and keeps the chili healthy. - Garnishes: For serving, prepare fresh cilantro leaves and lime wedges. These add brightness and freshness to each bowl. This chili is simple, healthy, and full of flavor. You can mix and match ingredients as you like! 1. Heating the Olive Oil and Sautéing Vegetables Start by heating the olive oil in a large pot over medium heat. Once it’s hot, add the diced onion. Cook it for about 5 minutes until it becomes soft and clear. Then, add the minced garlic, diced bell pepper, and carrots. Stir often for another 3-4 minutes until these vegetables are tender and smell great. 2. Adding Spices for Flavor Now, sprinkle in the chili powder, ground cumin, smoked paprika, dried oregano, and cayenne pepper if you like heat. Stir well and cook for another 1-2 minutes. This helps the spices release their yummy flavors into the mix. 3. Incorporating Tomatoes and Broth Carefully pour in the crushed tomatoes with their juices and vegetable broth. Use a wooden spoon to scrape any tasty bits stuck to the pot. This adds depth to your chili's flavor. 4. Cooking Lentils and Simmering Chili Add the rinsed lentils to the pot. Turn up the heat to bring the mix to a rolling boil. Once it boils, lower the heat to a gentle simmer. Cover the pot and let it cook for 25-30 minutes until the lentils are soft. After that, stir in the black beans. Let it simmer for another 5-10 minutes to warm the beans and blend the flavors. If it looks too thick, add a splash of vegetable broth to reach your desired texture. This simple process makes a warm and hearty chili that you’ll love. Choosing the Right Vegetables Pick fresh, vibrant vegetables. I love using bell peppers and carrots. They add sweetness and color. You can also try zucchini or corn for more texture. Each vegetable adds its unique taste. Adjusting Spice Levels Start with the spices listed. You can add cayenne for heat. If you prefer less spice, skip it. Always taste as you go. This way, you can find the right balance for your chili. Perfecting Texture and Consistency For a thick chili, use less broth. If it feels too thick, add more vegetable broth. Stir it well to mix. The goal is a hearty chili that is not too watery. Recommended Pots and Utensils Use a large, heavy-bottomed pot. It helps heat evenly and prevents burning. A wooden spoon is great for stirring. It won’t scratch your pot and gives better control. Importance of a Heavy-Bottomed Pot A heavy-bottomed pot distributes heat well. This means your chili cooks evenly. It helps avoid sticking and burning. Trust me, it makes a big difference in your cooking! {{image_4}} Alternative Legumes You can swap lentils with other legumes. Try chickpeas or kidney beans for a new taste. Each legume offers its unique texture and flavor. This change keeps the dish exciting! Gluten-Free Options This chili is naturally gluten-free! Ensure that your vegetable broth is gluten-free too. It’s a great choice for those with gluten sensitivities. Adding More Vegetables Feel free to add more veggies! Zucchini, corn, or spinach all work well. They add flavor, color, and nutrients. Just chop them up and toss them in during cooking. Pairing with Sides Pair your chili with rice or quinoa for extra heartiness. Cornbread is another tasty option that complements it perfectly. You can also serve it with tortilla chips for a fun crunch. Suggested Toppings Top your chili with fresh cilantro for a burst of flavor. Avocado slices add creaminess and richness. You can also sprinkle some shredded vegan cheese or a dollop of cashew cream for added indulgence. To keep your vegan black bean and lentil chili fresh, follow these tips: - Refrigeration Guidelines: Place the cooled chili in an airtight container. It will last in the fridge for about 4 to 5 days. Make sure to let it cool before sealing. This step helps prevent condensation. - Freezing Tips: For longer storage, freeze your chili. Use freezer-safe containers or bags. It can stay frozen for up to 3 months. Remember to label containers with the date to track freshness. Thaw overnight in the fridge before reheating. When you’re ready to enjoy leftovers, here’s how to reheat your chili for the best taste: - Best Methods for Reheating Chili: The microwave is quick and easy. Place your chili in a microwave-safe bowl. Heat in 1-minute intervals, stirring in between, until hot. Alternatively, you can reheat on the stovetop. Pour the chili into a pot over medium heat. Stir often and heat until warm. If the chili seems thick, add a splash of vegetable broth or water. Enjoy your delicious chili again! Can I use canned lentils instead of dried? Yes, you can use canned lentils. They save time. If you use them, skip the first cooking steps for the lentils. Just add them when you add the black beans. This way, they stay soft and tasty. How spicy is this chili? The spice level depends on your taste. I add cayenne pepper for heat. If you like it mild, leave it out. You can also add more chili powder for extra flavor without too much heat. Always taste and adjust as needed! Can I make this chili in a slow cooker? Yes, a slow cooker works well for this chili. Start by sautéing the onion, garlic, bell pepper, and carrots in a pan. Then, add all the ingredients to the slow cooker. Cook on low for 6-8 hours or on high for 3-4 hours. Enjoy the rich flavors that develop! This blog post shared how to make a tasty vegan black bean and lentil chili. We covered key ingredients, detailed steps, and tips for enhancing flavor. You can switch ingredients and store leftovers easily. Remember, cooking is fun, and you can make this dish your own. With the right spices and veggies, your chili will be a hit. Follow these ideas, and enjoy every bite of your healthy meal!

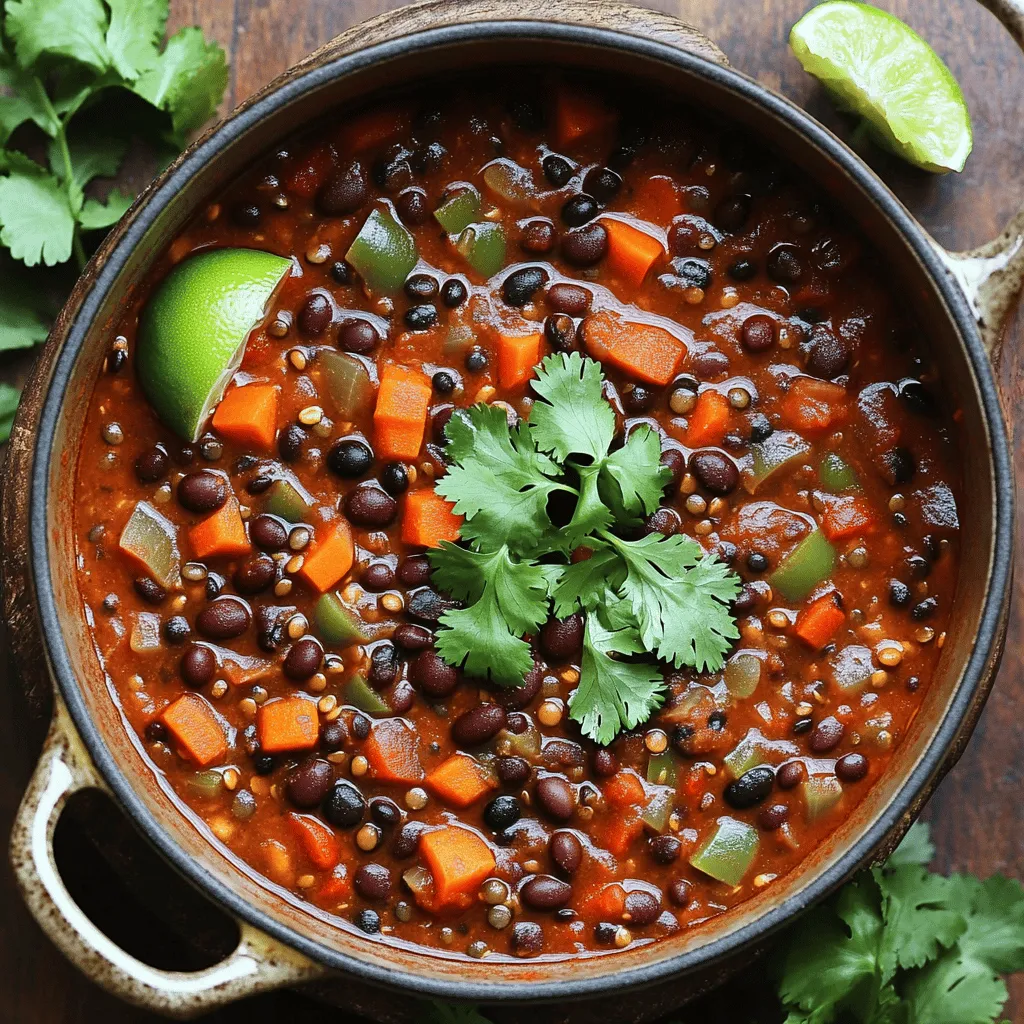
Are you looking for an easy, hearty meal that’s both delicious and plant-based? My Vegan Black Bean & Lentil Chili is just what you need! Packed with nutritious ingredients, it …

Read more

Categories Dinner

Caramel Brownie Cheesecake Irresistible Layered Delight

August 29, 2025 by Chef Miles
- 1 cup unsalted butter (2 sticks), plus extra for greasing - 2 cups granulated sugar - 4 large eggs, at room temperature - 1 teaspoon pure vanilla extract - 1 cup all-purpose flour - ¾ cup cocoa powder - ½ teaspoon salt - 16 oz cream cheese, softened to room temperature - 1 cup granulated sugar - 3 large eggs, at room temperature - 1 teaspoon pure vanilla extract - ½ cup sour cream, at room temperature - ½ cup caramel sauce (plus extra for topping) - ½ cup chocolate ganache (homemade or store-bought) - A handful of chopped pecans (optional for garnish) Start by preheating your oven to 350°F (175°C). Grease a 9-inch springform pan with butter. Line the bottom with parchment paper to stop sticking. Melt 1 cup of unsalted butter in a medium saucepan over low heat. Once melted, take it off the heat. Stir in 2 cups of granulated sugar until mixed well. Add 4 large eggs, one at a time, whisking each in. This adds air and makes it fluffy. Then, mix in 1 teaspoon of pure vanilla extract. In another bowl, whisk together 1 cup of all-purpose flour, ¾ cup of cocoa powder, and ½ teaspoon of salt. Slowly fold this dry mix into the wet mix with a spatula. Don't overmix! Pour this brownie batter into the springform pan and smooth the top. Bake for 25-30 minutes. Check if it's done by inserting a toothpick. It should come out with a few moist crumbs. In a large bowl, beat 16 oz of softened cream cheese with 1 cup of granulated sugar. Use an electric mixer until it's smooth. Add 3 large eggs, one at a time, mixing slowly. This keeps it creamy. Mix in 1 teaspoon of pure vanilla extract and ½ cup of sour cream. Gently fold in ½ cup of caramel sauce. This creates a lovely marbled look. Carefully pour the cheesecake mix over the cooled brownie layer in the springform pan. Use a spatula to smooth it out evenly. Bake the cheesecake for 50-60 minutes. The edges should set, but the center should jiggle slightly. This gives it a creamy texture. After baking, turn off the oven and leave the cheesecake inside for an hour to cool slowly. This helps avoid cracks. Cover the cheesecake with plastic wrap or foil. Refrigerate it for at least 4 hours, but overnight is best. This helps it firm up and the flavors meld. Once chilled, remove the cheesecake from the springform pan. Drizzle with chocolate ganache and extra caramel sauce. If you like, sprinkle chopped pecans on top for crunch. Serve each slice with a drizzle of caramel and a sprinkle of pecans for a nice touch. Enjoy your tasty creation! To get the best brownie texture, focus on mixing. Mix the butter and sugar until smooth. Add eggs one by one. Whisk each egg well to add air. This step matters for fluffiness. Don’t overmix after adding flour. This keeps brownies chewy. A toothpick test helps too. Look for moist crumbs, not wet batter. Bake just right; 25-30 minutes is ideal. Cracks in cheesecake can be sad. Start by using room-temperature ingredients. This helps the batter mix smoothly. Beat the cream cheese and sugar until creamy. Add eggs slowly, mixing gently. Avoid too much air in the batter. Bake it at a lower temperature. Turn off the oven and let it cool slowly inside. This gentle cooling helps prevent cracks. Making chocolate ganache is easy. Use equal parts chocolate and cream. Heat the cream until it simmers, then pour over the chocolate. Let it sit for a few minutes. Stir until smooth and shiny. For a thicker ganache, chill it slightly. Drizzle it over the cheesecake for a rich finish. You can also use store-bought ganache for convenience. {{image_4}} You can swap all-purpose flour for almond flour or coconut flour. This change makes the brownie layer gluten-free. Almond flour adds a nutty taste. Coconut flour absorbs more moisture, so use less. A good rule is to use half the amount when replacing. Toppings can change your cheesecake's look and taste. Try crushed Oreos for a fun crunch. You can also use fresh fruit like strawberries or raspberries. For a salty twist, sprinkle sea salt on the chocolate ganache. Each topping adds a new flavor layer. Want to mix it up? Add a splash of lemon juice or orange zest to the cheesecake layer. These flavors brighten the cake. You can also stir in a tablespoon of espresso powder for a coffee kick. Don’t be afraid to experiment with flavors you love! To keep your leftover caramel brownie cheesecake fresh, wrap it tightly. Use plastic wrap or aluminum foil. You can also store it in an airtight container. Place it in the fridge. It will stay good for about 4-5 days. If you want to freeze this cheesecake, slice it first. Wrap each slice well in plastic wrap. Then, put the wrapped slices in a freezer bag or container. This way, they stay fresh for up to 2 months. When you're ready to enjoy, just thaw it in the fridge overnight. Reheating cheesecake isn't always needed. If you prefer it warm, place a slice on a microwave-safe plate. Heat it for about 10-15 seconds. Check to avoid overheating, which can change the texture. Enjoy it warm or cold, as each bite is simply delicious! Yes, you can use low-fat cream cheese. The texture may change a bit. It might not be as rich, but it will still taste good. Just make sure it is softened before mixing. Check for a slight jiggle in the center. The edges should look set. A toothpick inserted in the edge should come out clean. This way, you ensure a creamy finish. You can use butterscotch sauce or chocolate sauce. Maple syrup is also a sweet option. Each will change the flavor but still taste great. Absolutely! This dessert is perfect for making ahead. It tastes even better after chilling overnight. Just store it in the fridge until you're ready to serve. Use a sharp knife to cut clean slices. Dip the knife in warm water for easy cutting. Serve each slice with a drizzle of caramel and some pecans on top for a pretty look. This blog post guides you through making a delightful brownie cheesecake. We covered the essential ingredients for both layers, ensuring a rich taste. You learned step-by-step how to bake, chill, and serve this treat. Tips helped avoid common pitfalls, and variations let you customize the recipe. Remember, proper storage keeps leftovers fresh. Enjoy this fun dessert, and impress others with your baking skills!

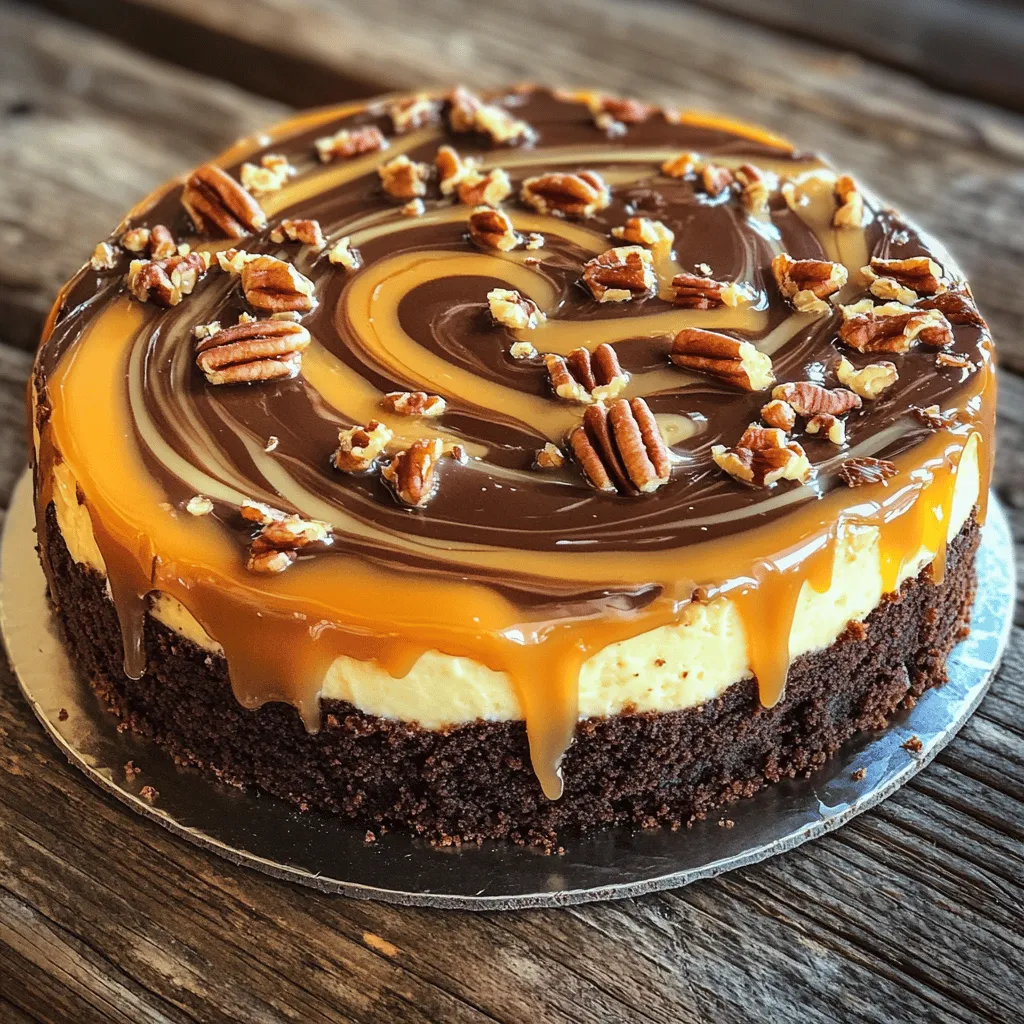
If you love rich, sweet treats, then you must try my Caramel Brownie Cheesecake. This dessert features layers of gooey brownie and creamy cheesecake, topped with luscious caramel. It’s the …

Read more

Categories Desserts

Pumpkin Chai Latte Cupcakes Delightful Fall Treat

August 28, 2025 by Chef Miles
- 1 ½ cups all-purpose flour - 1 teaspoon baking powder - ½ teaspoon baking soda - ½ teaspoon salt - 2 teaspoons ground chai spices (a blend of cinnamon, cardamom, ginger, and cloves) For the dry ingredients, I use all-purpose flour to create a great cupcake base. Baking powder and baking soda help the cupcakes rise. Salt adds balance, while chai spices bring warm flavor. - ½ cup unsalted butter, softened to room temperature - 1 cup granulated sugar - 2 large eggs, at room temperature - 1 cup canned pumpkin puree - ½ cup buttermilk, at room temperature - 1 teaspoon vanilla extract - ½ cup brewed chai tea, cooled to room temperature In the wet ingredients, I start with softened butter and sugar. Creaming them together makes the base light and fluffy. Eggs add richness. Pumpkin puree gives moisture and flavor. Buttermilk adds tang, while vanilla and brewed chai tea enhance the taste. - 1 cup unsalted butter, softened to room temperature - 4 cups powdered sugar - 3 tablespoons heavy cream - 1 teaspoon vanilla extract - A pinch of ground cinnamon for garnish For the frosting, I whip softened butter until creamy. Adding powdered sugar makes it sweet and fluffy. Heavy cream adds richness, while vanilla and cinnamon tie it back to the cupcake flavors, creating a delightful finish. - Preheat your oven to 350°F (175°C). - Line a cupcake tin with paper liners for easy serving. - In a bowl, sift together 1 ½ cups of all-purpose flour, 1 teaspoon of baking powder, ½ teaspoon of baking soda, ½ teaspoon of salt, and 2 teaspoons of ground chai spices. - Set this dry mix aside for later use. - In a large bowl, beat ½ cup of softened butter and 1 cup of granulated sugar until fluffy. - Add 2 large eggs to the mix, one at a time, and mix well after each addition. - Now, add in 1 cup of pumpkin puree, ½ cup of buttermilk, ½ cup of cooled brewed chai tea, and 1 teaspoon of vanilla extract. - Mix until everything is smooth. - Gradually fold in your dry mixture until just combined. Be careful not to overmix. - Use a scoop to fill each liner about two-thirds full with batter. - Bake in the oven for 18-20 minutes. Check with a toothpick; it should come out clean. - While the cupcakes bake, prepare the frosting. - Beat 1 cup of softened butter until creamy. Gradually add in 4 cups of powdered sugar while mixing on low speed. - Once mixed, add 3 tablespoons of heavy cream and 1 teaspoon of vanilla extract. Beat until fluffy. - Once cupcakes are cool, frost them with the chai latte buttercream. - You can use a piping bag for a fancy touch or a knife for a casual look. - Finally, sprinkle each cupcake with a pinch of ground cinnamon for a warm finish. To make soft and fluffy cupcakes, avoid overmixing the batter. Overmixing can make your cupcakes dense and tough. Mix just until you see no dry flour. Also, ensure all ingredients are at room temperature. Room temperature butter and eggs mix better, leading to a light texture. Want to adjust the spice levels? Start with the chai spice blend. You can add more or less based on your taste. For a twist, consider adding nutmeg or a pinch of allspice. These spices can deepen the warm flavors of your cupcakes. If you love pumpkin, adding a touch more pumpkin puree can also boost the flavor. For a beautiful finish, use a piping bag. This tool helps you pipe frosting with ease and creates lovely swirls. If you don't have a piping bag, a butter knife works just fine. You can use it to spread frosting smoothly on top of each cupcake. For a polished look, make sure your frosting is creamy and easy to spread. {{image_4}} You can change up the frosting for your Pumpkin Chai Latte Cupcakes. Here are two great options: - Cream cheese frosting: This frosting adds a tangy flavor. Mix 8 ounces of cream cheese with 1 cup of softened butter. Gradually add 4 cups of powdered sugar until smooth. - Whipped cream topping: For a light finish, whip 1 cup of heavy cream until soft peaks form. Add 2 tablespoons of sugar and 1 teaspoon of vanilla extract for sweetness. These frostings will give your cupcakes a new twist! If you need to adapt the recipe, here are some easy changes: - Gluten-free flour options: Use a gluten-free all-purpose flour blend instead of regular flour. Make sure it has xanthan gum for the best texture. - Egg substitutes for vegan versions: Replace eggs with 1/4 cup of applesauce or mashed banana. You can also use flaxseed meal mixed with water—1 tablespoon of flaxseed meal with 2.5 tablespoons of water equals one egg. These swaps let everyone enjoy your cupcakes! You can mix in fun flavors to make your cupcakes unique: - Adding chocolate chips or nuts: Fold in 1/2 cup of chocolate chips or chopped nuts. This adds great texture and flavor! - Suggestions for infused flavors: Try adding a splash of vanilla bean for a rich taste. A hint of nutmeg or cardamom can also enhance the chai flavor nicely. Experimenting with flavors will keep your baking exciting! To keep your pumpkin chai latte cupcakes fresh, use airtight containers. This way, the cupcakes stay moist and tasty. You can also use cake domes or cupcake carriers. Place parchment paper between layers to avoid sticking. Freezing cupcakes is simple. First, let them cool completely. Then, wrap each cupcake in plastic wrap. Place them in a freezer bag or container. Make sure to remove as much air as possible. To thaw, take a cupcake out and leave it at room temperature. This usually takes about an hour. At room temperature, your cupcakes will last about three days. If you frost them, they stay fresh for two days. Unfrosted cupcakes can last up to four days. For best results, store them in a cool, dry place away from sunlight. It takes about 25 minutes to prep and 40 minutes to cook. In total, you need about 1 hour for the whole process. You will get 12 delicious cupcakes from this recipe. Yes, you can make the batter ahead of time. Prepare the batter and store it in the fridge for up to 24 hours. When you are ready to bake, let it sit at room temperature for a bit. This helps the batter mix better and rise nicely. Cupcakes can sink for a few reasons. If you overmix the batter, it can lose air. Also, if the oven is not hot enough, they might sink too. To prevent this, mix gently and check the oven temperature before baking. You can use other teas if you want. Earl Grey adds a nice flavor. Green tea can also work for a lighter taste. Just remember, different teas will change the cupcake's taste a bit. Yes, you should refrigerate cupcakes with cream-based frostings. Store them in an airtight container. They can last in the fridge for about 3-5 days. If you use a frosting without dairy, they can stay out for a few days. You can create delicious Pumpkin Chai Latte Cupcakes using simple steps. We covered key ingredients like spices, butter, and pumpkin puree. I shared tips for baking and frosting, as well as helpful storage methods. Now you have the tools to whip up these tasty treats. Experimenting with flavors can make them your own. Enjoy baking and sharing these cupcakes with friends and family!

Fall is the perfect time for warm flavors and cozy treats. If you love pumpkin and chai, you’re in for a sweet surprise! In this post, I’ll show you how …

Read more

Categories Desserts
Older posts
Newer posts
← Previous Page1 … Page34 Page35 Page36 … Page113 Next →

MELTED RECIPES

where delicious ideas melt into life, from stovetop to backyard. Always warm, simple, and irresistibly satisfying. 🍳🔥🧀

PAGES

Home About Contact Privacy Policy Terms & Conditions Cookie Policy GDPR Policy Copyright Policy Disclaimer

CATEGORIES

Appetizers Desserts Salads Breakfast Dinner

Contact

  • Pinterest
  • Mail
Copyright © 2025 Melted Recipes. All rights reserved.