Skip to content
Melted Recipes
  • Home
  • Appetizers
  • Desserts
  • Salads
  • Breakfast
  • Dinner
  • Privacy Policy
  • Contact
  • About

Chef Miles

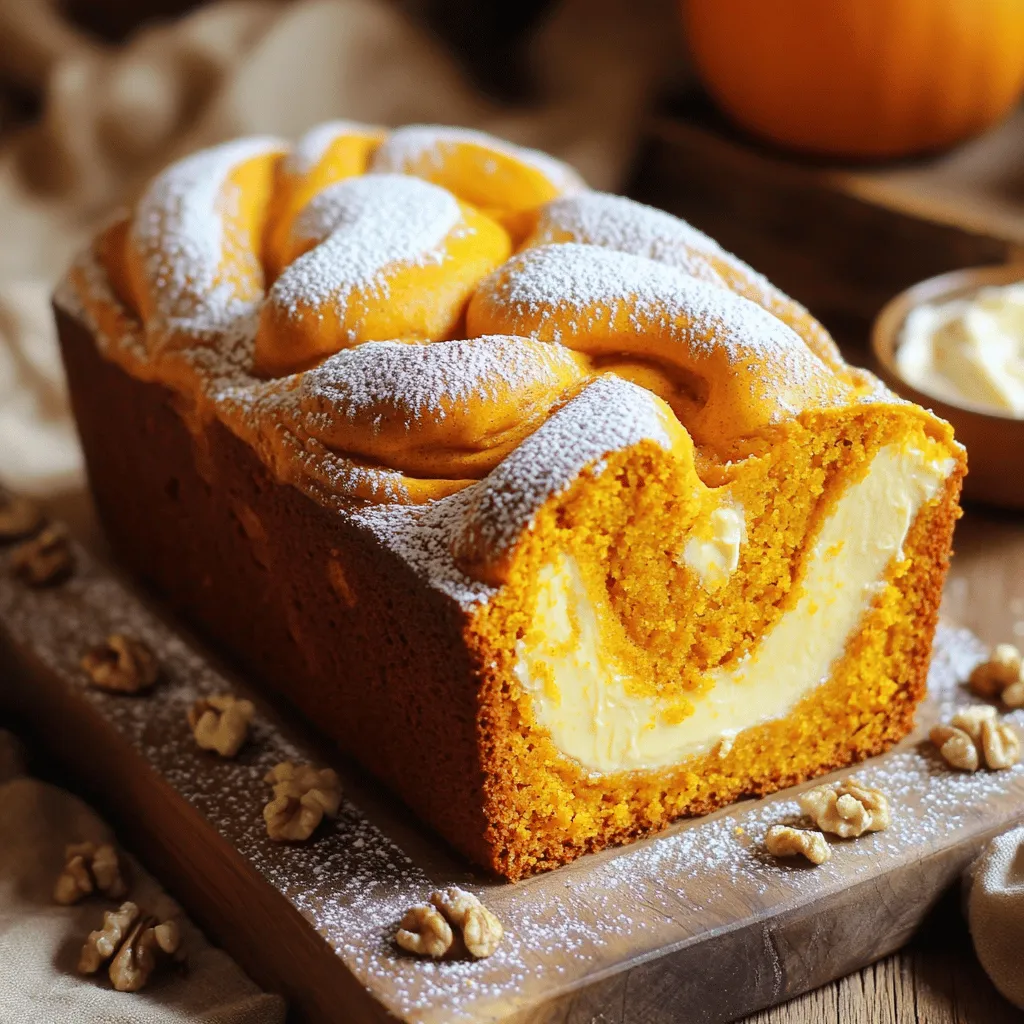
Pumpkin Cream Cheese Swirl Muffins Delightful Recipe

September 1, 2025 by Chef Miles
- 1 cup pumpkin purée - 1/2 cup granulated sugar - 1/2 cup packed brown sugar - 1/2 cup vegetable oil - 3 large eggs - 1 teaspoon vanilla extract - 1 ¾ cups all-purpose flour - 1 teaspoon baking soda - 1/2 teaspoon baking powder - 1/2 teaspoon salt - 1 teaspoon ground cinnamon - 1/2 teaspoon ground nutmeg - 1/4 teaspoon ground ginger - 1/4 teaspoon ground cloves - 8 oz cream cheese, softened at room temperature - 1/4 cup granulated sugar - 1/2 teaspoon vanilla extract - 1 large egg To make these muffins, I use simple yet flavorful ingredients. The pumpkin purée adds moisture and a rich taste. The sugars bring sweetness, and the vegetable oil keeps the muffins soft. Using three eggs helps bind the mixture. I always add vanilla extract for a hint of warmth. For the dry mix, I combine flour, baking soda, baking powder, salt, and spices. Spices like cinnamon, nutmeg, ginger, and cloves give the muffins a cozy flavor. They smell amazing as they bake. For the cream cheese swirl, I blend softened cream cheese with sugar, vanilla, and an egg. This mixture adds a creamy layer that pairs perfectly with the pumpkin base. Each ingredient plays a key role in creating a warm, comforting treat. 1. Preheat the oven and prepare muffin tin: First, set your oven to 350°F (175°C). While it heats, grab a muffin tin. You can line it with paper liners or lightly grease each cup with oil or spray. 2. Mix wet ingredients thoroughly: In a large bowl, mix 1 cup of pumpkin purée, 1/2 cup of granulated sugar, 1/2 cup of brown sugar, 1/2 cup of vegetable oil, 3 large eggs, and 1 teaspoon of vanilla extract. Whisk everything well until it’s smooth and blended. 3. Combine dry ingredients separately: In another bowl, sift together 1 ¾ cups of all-purpose flour, 1 teaspoon of baking soda, 1/2 teaspoon of baking powder, 1/2 teaspoon of salt, 1 teaspoon of cinnamon, 1/2 teaspoon of nutmeg, 1/4 teaspoon of ginger, and 1/4 teaspoon of cloves. Gradually add this dry mix to the pumpkin mixture. Fold gently with a spatula until just combined. Remember, don't overmix! 4. Beat cream cheese mixture until smooth: In a different bowl, combine 8 oz of softened cream cheese, 1/4 cup of granulated sugar, 1/2 teaspoon of vanilla extract, and 1 large egg. Beat this mixture until it’s creamy and smooth. Make sure there are no lumps. 5. Spoon pumpkin batter and cream cheese into muffin cups: Fill each muffin cup halfway with the pumpkin batter. Then, add a dollop of cream cheese mixture on top. Use a toothpick or knife to swirl the cream cheese into the pumpkin batter. This creates a beautiful marbled look. 6. Bake and cool the muffins: Place the muffin tin in the preheated oven. Bake for 18-22 minutes. The muffins are ready when a toothpick inserted in the center comes out clean. After baking, let them cool in the pan for about 5 minutes. Then, transfer the muffins to a wire rack to cool completely. Using room temperature ingredients is key. It helps your muffins rise better. Cold eggs or cream cheese can make the batter thick. Take them out of the fridge an hour before you bake. Overmixing is an easy mistake to make. When you combine the wet and dry ingredients, mix just until you see no flour. This keeps your muffins fluffy and light. If you mix too much, they can turn out dense. For a charming touch, serve your muffins warm. Dust them lightly with powdered sugar for sweetness. A sprinkle of cinnamon adds flavor and looks nice. You can also add pumpkin seeds on top for a crunchy twist. Pair your muffins with coffee or tea. They balance the sweet and creamy flavor. Enjoying them with a warm drink makes the experience even better. {{image_4}} You can easily tweak the flavor of your pumpkin cream cheese swirl muffins. Here are some ideas: - Adding chocolate chips or nuts: Mix in 1/2 cup of chocolate chips or chopped nuts. This adds a great texture and taste. Chocolate makes it sweeter, while nuts add a nice crunch. - Incorporating dried fruits: Try adding 1/2 cup of dried cranberries or raisins. They bring a chewy texture and a burst of sweetness. This can balance the spices in the muffins beautifully. Want to make your muffins more inclusive? Here are some simple swaps: - Gluten-free flour options: Use a 1:1 gluten-free flour blend instead of all-purpose flour. It keeps the muffins soft and moist. Just check that your blend has xanthan gum for better structure. - Vegan substitutions for eggs and cream cheese: Swap the eggs for 1/4 cup of unsweetened applesauce per egg. For cream cheese, use a vegan cream cheese alternative. This keeps the muffins creamy and delicious without dairy. These variations will help you create muffins that suit your taste and dietary needs. Enjoy experimenting! To keep your Pumpkin Cream Cheese Swirl Muffins fresh, store them at room temperature. Place them in an airtight container. This helps keep moisture in and prevents them from drying out. If you have leftover muffins, consume them within three days for the best taste and texture. Here are some additional tips: - Use a paper towel inside the container to absorb extra moisture. - Avoid stacking muffins directly on top of each other; this can cause them to squish. - Keep them away from direct sunlight or heat sources to maintain freshness. If you want to save muffins for longer, freezing is a great option. Make sure they are completely cool before freezing. Wrap each muffin tightly in plastic wrap or aluminum foil. Place the wrapped muffins in a freezer-safe bag or container. This method helps to prevent freezer burn. When you're ready to enjoy a muffin, simply remove it from the freezer. You can thaw it overnight in the fridge or heat it directly from frozen in the microwave for about 30 seconds. This way, your Pumpkin Cream Cheese Swirl Muffins will taste just as fresh as the day you baked them! You can use butternut squash purée or sweet potato purée. Both have a similar texture and taste. You can even make your own by roasting and blending these veggies. This gives a fresh twist to your muffins while keeping the pumpkin flavor. To keep muffins from sticking, use paper liners. They make for easy removal and cleanup. You can also grease the muffin tin with oil or non-stick spray. Make sure to coat each cup well. This ensures your muffins come out easily. Yes, you can prepare the batter ahead of time. Store it in the fridge for up to 24 hours. This saves time when you're ready to bake. Just be sure to mix it lightly before filling the muffin cups. This keeps the muffins fluffy and light. These pumpkin muffins blend warm spices and cream cheese for a tasty treat. We covered the key ingredients, step-by-step instructions, baking tips, variations, and storage methods. With room-temperature ingredients and no overmixing, you can bake perfect muffins. Try different flavors or dietary options to suit your needs. Remember to store them correctly to keep them fresh. Enjoy your cooking, and share these muffins with friends!

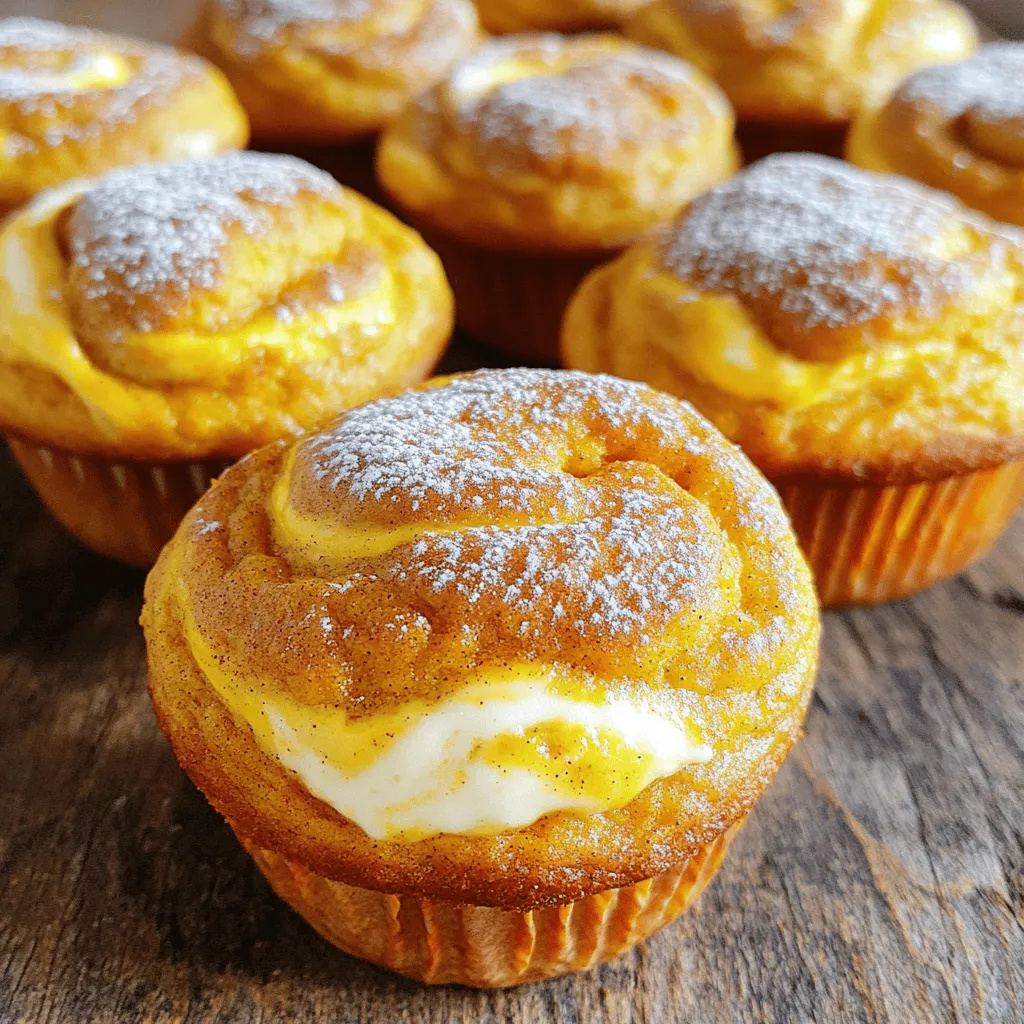
Welcome to your new favorite fall treat! This Pumpkin Cream Cheese Swirl Muffins recipe combines warm spices and creamy goodness for a delicious bite. Imagine soft muffins with a rich, …

Read more

Categories Dinner

Garlic Steak Pasta Tasty and Simple Weeknight Meal

September 1, 2025 by Chef Miles
- 8 oz fettuccine pasta - 1 lb flank steak or sirloin, thinly sliced - 4 cloves garlic, minced - 1 cup cherry tomatoes, halved - 1 cup fresh spinach leaves - ½ cup heavy cream - ½ cup freshly grated Parmesan cheese - 2 tablespoons olive oil - 1 teaspoon crushed red pepper flakes - Salt and freshly ground black pepper to taste - Fresh basil leaves for garnish I love using fresh, quality ingredients for garlic steak pasta. The fettuccine is the perfect base for this dish. It holds the sauce well and gives you that nice bite. Flank steak or sirloin adds a rich flavor. Thin slices cook quickly and stay tender. Garlic is a key player here. It brings a warm aroma and deep taste. Cherry tomatoes add a pop of color and sweetness. They soften and burst, making the sauce more vibrant. Spinach adds a nice green touch and boosts nutrition. Heavy cream is essential for a creamy sauce. It helps blend all the flavors and makes it rich. Freshly grated Parmesan cheese adds a salty depth. A sprinkle of crushed red pepper flakes gives a slight kick. Don’t forget salt and pepper! They enhance every ingredient. Fresh basil leaves are the perfect garnish. They add fragrance and a touch of freshness. Using these ingredients will make your garlic steak pasta a true delight. - Step 1: Boiling and draining fettuccine Fill a large pot with water. Add a good amount of salt. Bring the water to a rolling boil. Add the fettuccine and cook as the package says, until it is al dente. When done, drain the pasta and save about ½ cup of the water. - Step 2: Reserving pasta water for sauce This starchy water helps make the sauce creamy. Set it aside for later. - Step 3: Heating oil and seasoning the steak While the pasta cooks, heat 1 tablespoon of olive oil in a large skillet. Season the sliced steak with salt and black pepper. - Step 4: Cooking the steak until golden brown When the oil shimmers, add the steak in one layer. Cook for about 2-3 minutes on one side. Flip the steak and cook for another 2-3 minutes. Remove it from the skillet and cover with foil to keep warm. - Step 5: Sautéing garlic and red pepper flakes In the same skillet, add the other tablespoon of olive oil. Add minced garlic and red pepper flakes. Sauté for about 30 seconds until the garlic smells great. - Step 6: Adding cherry tomatoes and spinach Next, add halved cherry tomatoes. Cook for 2-3 minutes until they soften. Stir in fresh spinach leaves until just wilted. - Step 7: Incorporating heavy cream and steak Turn the heat to medium-low. Pour in the heavy cream and mix well. Add the cooked steak back into the skillet. - Step 8: Merging pasta with sauce and adjusting consistency Now, add the cooked fettuccine and freshly grated Parmesan cheese. Toss everything together. If the sauce is too thick, add some reserved pasta water until it’s creamy. To cook the best al dente pasta, use a large pot of boiling salted water. Add the fettuccine and stir it well. Follow the package instructions, but test the pasta a minute early. It should be firm but not hard. Drain and save some pasta water for later. When cooking steak, aim for the right doneness. For medium-rare, cook flank steak for about 4-6 minutes total. A meat thermometer should read 130°F. Adjust cooking time for your preferred doneness. To boost flavor, add fresh herbs and spices. Basil, parsley, or oregano can make your dish more exciting. Experiment with garlic powder or even a dash of lemon zest for zing. For cheese variations, try using pecorino Romano or a sprinkle of feta. These cheeses add unique flavors and textures to your pasta. For a stunning plate, twirl the pasta using a fork before serving. This creates a beautiful nest of noodles. Place the steak slices on top for a nice display. Garnish your dish with fresh basil leaves and extra Parmesan. A little drizzle of olive oil can enhance the look and flavor too. Aim for a colorful plate that invites everyone to dig in. {{image_4}} You can change the protein in garlic steak pasta. If you prefer chicken, use thin slices of chicken breast. Simply sear it like the steak. For shrimp lovers, add peeled shrimp to the sauce. Cook them until they turn pink. If you want a vegetarian version, tofu is a great choice. Press and cube firm tofu, then sauté it until golden. Mushrooms also work well. Slice them and cook until they are tender and juicy. Fettuccine is a classic choice, but you can switch it up. Linguine or spaghetti are both tasty options. They will hold the sauce well, making every bite delicious. If gluten is a concern, choose gluten-free pasta. There are many great brands available. Just cook them according to package instructions for the best results. The creamy sauce is great, but you can play with it. Try different cream alternatives, like half-and-half or coconut cream. These options will add unique flavors to your dish. Adding vegetables can boost nutrition and taste. Bell peppers, zucchini, or broccoli make great additions. You can also spice things up. A pinch of paprika or a dash of lemon juice can elevate the flavor. Store your garlic steak pasta in the fridge. Use an airtight container. This keeps it fresh for up to three days. Make sure to let it cool before sealing. Avoid packing it too tightly. This helps to keep the pasta from clumping together. You can freeze garlic steak pasta for up to three months. To freeze, place it in a freezer-safe container. Leave some space at the top for expansion. When you're ready to eat, thaw it overnight in the fridge. Reheat it on the stove over low heat. Add a splash of water or cream to help it warm up. This keeps the flavors and texture nice. If you use the microwave, heat it in short bursts. Stir in between to keep it from drying out. Can I make garlic steak pasta in advance? Yes, you can make garlic steak pasta ahead of time. Cook the pasta and steak, then store them in separate containers. Keep the sauce in another container. When you're ready to eat, heat everything up together. Add a splash of water or cream to refresh the sauce. How do I prevent the steak from becoming tough? To keep the steak tender, slice it thinly against the grain. This helps break down the muscle fibers. Also, avoid overcooking it. Cook just until it’s browned and no longer pink. Let it rest before slicing to keep juices in. Is this recipe suitable for a gluten-free diet? No, but you can easily make it gluten-free. Use gluten-free pasta instead of regular fettuccine. Check the sauce ingredients for any hidden gluten. Most of the other ingredients are gluten-free, but always read labels. Can I make a dairy-free version of this dish? Yes, you can make it dairy-free. Swap heavy cream for coconut milk or a plant-based cream. Use nutritional yeast instead of Parmesan cheese for a cheesy flavor. This keeps the dish creamy and tasty without dairy. What sides pair well with garlic steak pasta? Garlic steak pasta pairs well with a simple green salad. Garlic bread also makes a great side. You can serve roasted vegetables for a healthy contrast. These sides will enhance the meal and add extra flavors. Can this dish be served as a meal prep option? Yes, garlic steak pasta is great for meal prep. Store servings in airtight containers. It keeps well in the fridge for 3 to 4 days. Reheat in the microwave or on the stove with a splash of water for moisture. In this blog post, we explored how to make delicious garlic steak pasta. We covered essential ingredients like fettuccine, steak, and spices. You learned step-by-step instructions for cooking, seasoning, and combining each element. We also shared tips for enhancing flavors and making variations. Remember, cooking is about creativity. Adjust the recipe to fit your tastes. With a few simple steps, you can create a tasty dish that impresses anyone. Enjoy your cooking adventure!

Looking for a quick and tasty dinner? Garlic Steak Pasta is your solution! This dish combines tender steak, fresh spinach, and rich cream for a meal that’s both simple and …

Read more

Categories Dinner

Sweet Pumpkin Sourdough Flavorful and Heartwarming Bread

September 1, 2025 by Chef Miles
To make sweet pumpkin sourdough, you will need: - 2 cups active sourdough starter - 1 cup pumpkin puree (using either canned or fresh) - 1/2 cup warm water (around 110°F/43°C) - 1/4 cup packed brown sugar - 1/4 cup honey - 1 teaspoon ground cinnamon - 1/2 teaspoon ground nutmeg - 1/2 teaspoon ground ginger - 1 teaspoon salt - 4 cups bread flour (plus extra for dusting) - 1/4 cup chopped pecans or walnuts (optional for added texture) Pumpkin is not just tasty; it is good for you too. Here are some of its benefits: - Rich in Vitamins: Pumpkin is full of vitamin A, which helps your eyesight. - High in Fiber: It aids digestion and keeps you feeling full. - Low in Calories: A great option for healthy eating. - Antioxidants: Protects your body from harmful free radicals. Adding pumpkin puree to your sourdough not only adds flavor but boosts nutrition. You can customize this recipe with easy swaps: - Sourdough Starter: If you don’t have one, use a store-bought yeast. - Pumpkin Puree: Swap with apple sauce for a different taste. - Brown Sugar: Use white sugar or coconut sugar as alternatives. - Nuts: If you have nut allergies, leave them out. You can add seeds instead. These substitutions still let you enjoy a delicious sweet pumpkin sourdough. First, grab a large mixing bowl. Add 2 cups of active sourdough starter to the bowl. Next, spoon in 1 cup of pumpkin puree. You can use canned or fresh pumpkin. Then, pour in 1/2 cup of warm water. Make sure it's around 110°F, which is warm, but not too hot. Add 1/4 cup of packed brown sugar and 1/4 cup of honey. Stir all these ingredients together. Make sure the mixture is smooth and well blended. Now, it's time to add flavor. Sprinkle in 1 teaspoon of ground cinnamon, 1/2 teaspoon of ground nutmeg, and 1/2 teaspoon of ground ginger. Don’t forget to add 1 teaspoon of salt. Mix well to spread the spices evenly throughout the batter. This step is key for a tasty bread. After that, gradually add 4 cups of bread flour. Do this one cup at a time. Use a wooden spoon or your hands to mix until a shaggy dough forms. Next, it's kneading time. Turn the dough out onto a lightly floured surface. Knead for about 10 minutes. You want the dough to be smooth and elastic. If it sticks, add a bit more flour. Once kneaded, place the dough back in the bowl. Cover it with a damp cloth or plastic wrap. Let it rise in a warm spot for about 4-6 hours. The dough should double in size. - Shaping the Loaf After the first rise, gently punch down the dough. This releases extra air. Shape the dough into a round loaf or place it in a greased loaf pan. Make sure the surface is smooth. - Scoring the Dough and Baking Cover the shaped dough again. Let it rise for 1-2 more hours. It should puff up nicely. While it's rising, preheat your oven to 375°F (190°C). Just before baking, use a sharp knife to make slashes on top of the loaf. This helps the bread expand while baking. Place the loaf in the oven and bake for 30-35 minutes. The bread is ready when it’s golden brown and sounds hollow when tapped. After baking, cool the bread on a wire rack for at least 30 minutes before slicing. For the best rise, keep your dough warm. Aim for a spot around 75°F to 80°F. You can use your oven with the light on or a warm corner of your kitchen. Cover the dough with a damp cloth. This keeps moisture in and helps the dough rise. To get that perfect texture, knead the dough well. Knead for about 10 minutes until it feels smooth and elastic. If it sticks, sprinkle a little flour on your surface. This prevents it from becoming too dry. The dough should feel soft but not sticky when you finish kneading. If your bread doesn’t rise, check your starter first. It must be active and bubbly. If it’s too dense, you might have added too much flour. Always start with less and add more as needed. If the crust is too hard, try covering it with foil halfway through baking. This keeps moisture in and softens the crust. {{image_4}} You can make sweet pumpkin sourdough even better with spices. Besides cinnamon, nutmeg, and ginger, consider using allspice or cloves. These spices add warmth and depth. Try mixing in a pinch of cardamom for a unique twist. Adjust the amounts to match your taste. Just a little extra spice can change the whole loaf. Choosing between pecans and walnuts can change the texture of your bread. Pecans bring a sweet, buttery flavor. They add a nice crunch. Walnuts, on the other hand, have a more earthy taste. They can give a rich nutty flavor. If you want a softer bite, go for pecans. For a bolder taste, use walnuts. You can also skip nuts altogether if you prefer a smoother loaf. If you need a gluten-free option, try using gluten-free flour blends. Look for blends made from rice, almond, or oat flour. These can work well in this recipe. You may need to adjust the liquid amounts. Gluten-free dough can act differently than regular dough. Be ready to experiment to find the right balance. Consider adding xanthan gum to help with texture. To keep your sweet pumpkin sourdough fresh, wrap it in plastic wrap or foil. Place it in a bread box or a cool, dry area. This keeps moisture in and prevents it from drying out. If you have sliced the bread, store it in a resealable bag. This method helps to keep each slice soft and tasty. If you have extra bread, freezing is a great option. First, slice the sourdough into pieces. Then, wrap each slice in plastic wrap or foil. Place all wrapped slices in a freezer bag. This helps protect them from freezer burn. The bread can last up to three months in the freezer. When you are ready to enjoy it, just thaw it in the fridge or at room temperature. To reheat your sourdough, preheat your oven to 350°F (175°C). Place the bread directly on the oven rack for about 10-15 minutes. This method restores its crusty outside. If you prefer a softer crust, wrap the bread in foil before heating. For an even quicker option, you can use a toaster. Just pop in a slice until it’s warm and toasty. Enjoy the aroma as it fills your kitchen! Yes, you can use fresh pumpkin. Just cook and puree it first. Fresh pumpkin gives a nice flavor. It may be a bit moister than canned. Adjust the water if needed. Sweet pumpkin sourdough can last up to five days. Store it at room temperature in a bread bag. For longer storage, freeze it. Wrap it well in plastic wrap. Then place it in an airtight container. This bread pairs well with cream cheese or butter. You can top it with honey or jam. It also goes great with soups or salads. The sweet flavors complement savory dishes nicely. - Is it necessary to have a sourdough starter? Yes, a sourdough starter is key for this recipe. It helps the bread rise and adds flavor. You can make your own starter or buy one. Just make sure it’s active and bubbly. This blog post covered the key steps to make sweet pumpkin sourdough. We explored ingredients, mixing instructions, and tips for success. You learned about flavor variations and how to store leftovers. Remember, following these steps can help you bake amazing bread. Experiment with spices and nuts to find your perfect taste. Baking is fun. Happy sourdough making!

Looking for a cozy and delicious bread recipe? You’ve found it! Sweet Pumpkin Sourdough combines the warm flavors of pumpkin with the tangy goodness of sourdough. In this article, I’ll …

Read more

Categories Dinner

Apple Cinnamon Greek Yogurt Muffins Delightful Treat

September 1, 2025 by Chef Miles
- 1 ½ cups whole wheat flour - 1 teaspoon baking powder - ½ teaspoon baking soda - ½ teaspoon salt - 1 teaspoon ground cinnamon - 2 large eggs - ¾ cup plain Greek yogurt - ½ cup honey or maple syrup - 1 teaspoon vanilla extract - 1 apple, peeled and diced (preferably Granny Smith or Honeycrisp) - ½ cup chopped walnuts (optional) I love using whole wheat flour in these muffins. It gives them a nice, hearty texture. The baking powder and baking soda help them rise perfectly. A pinch of salt balances the sweetness, while ground cinnamon adds warmth and flavor. For the wet mix, I use Greek yogurt. It keeps the muffins moist and gives them a lovely tang. I prefer honey or maple syrup for sweetness, but you can pick your favorite. The vanilla extract adds a lovely aroma. Diced apples bring freshness and sweetness. I like using Granny Smith or Honeycrisp apples for their crispness. If you want a nutty crunch, add chopped walnuts. They make the muffins even more delightful! First, preheat your oven to 350°F (175°C). This step is key, as it ensures even baking. Next, prepare your muffin tin. You can line it with paper liners or lightly grease each cup with butter or cooking spray. This will help the muffins come out easily. In a large bowl, combine the whole wheat flour, baking powder, baking soda, salt, and ground cinnamon. Whisk these dry ingredients until they blend well and there are no lumps. This process is important for the muffins' texture. In another bowl, crack two large eggs and beat them lightly. Then, add the plain Greek yogurt, honey or maple syrup, and vanilla extract. Stir these ingredients together until you have a smooth mixture. This is where your muffins get their moist and tasty base. Now, slowly fold the dry ingredient mix into the wet mix. Use a spatula for this. Gently combine them until just mixed. Be careful not to overmix. Overmixing can make the muffins dense instead of light and fluffy. Next, fold in the diced apple. If you like, you can also add the chopped walnuts. Make sure the pieces are evenly spread throughout the batter. This will give every muffin a delightful crunch and burst of flavor. Using a spoon or measuring cup, portion the batter into your muffin tin. Fill each liner about ¾ full. This allows the muffins to rise nicely while baking. Place the muffin tin in the oven and bake for 18-20 minutes. They should turn golden brown on top. Check with a toothpick; it should come out clean when the muffins are ready. Once done, let them cool on a wire rack for a few minutes before enjoying! To get the best texture in your muffins, avoid overmixing the batter. When you mix too much, muffins can turn out dense. Instead, gently fold the wet and dry ingredients together until just combined. This keeps them light and fluffy. Also, use room temperature ingredients. This helps them mix smoothly and evenly, leading to a better rise. You can enhance the flavor of your muffins by trying different apple varieties. Granny Smith apples add a tart taste. Honeycrisp apples are sweet and juicy. Each type gives a unique taste to your muffins. You can also add spices like nutmeg or ginger. These spices add warmth and depth to the flavor, making your muffins even more delicious. For a lovely finish, dust the muffins with powdered sugar before serving. This adds a nice touch and makes them look inviting. You can also serve the muffins with a dollop of Greek yogurt. This gives extra richness and pairs well with the apple and cinnamon flavors. Enjoy your beautiful and tasty muffins! {{image_4}} If you want a nut-free muffin, just skip the walnuts. This keeps the muffins tasty and safe for those with nut allergies. The apples and spices still pack a lot of flavor. You can enjoy these muffins without worry. To make these muffins gluten-free, swap the whole wheat flour with a gluten-free blend. Many brands offer great options that work well in baking. Just check the label to ensure it suits your needs. This way, everyone can enjoy these delicious treats. For a fun twist, add chocolate chips or dried fruits to the batter. Chocolate chips bring sweetness and richness. Dried fruits, like raisins or cranberries, add a chewy texture. Either option enhances the muffins and makes them even more enjoyable. You can keep your muffins fresh for a few days. Store them in an airtight container at room temperature. They stay tasty for 2-3 days. Make sure to seal them well to avoid drying out. If you want to save some for later, freezing works great. You can freeze baked muffins for up to 2 months. Use a freezer-safe bag to keep them safe from freezer burn. When you’re ready to enjoy them, just pull out what you need! To get the best texture, reheat your muffins before serving. You can use the microwave or the oven. For the microwave, heat them for about 15-20 seconds. In the oven, warm them at 350°F (175°C) for about 5-10 minutes. This will bring back that fresh-baked taste! Yes, you can substitute Greek yogurt with regular yogurt, but the texture may vary. Greek yogurt makes the muffins moist and fluffy. If you choose regular yogurt, your muffins might not rise as well or be as rich. Increase the amount of honey or maple syrup in the recipe to enhance sweetness. You can start by adding an extra tablespoon. Taste the batter and adjust as needed. This gives you control over the sweetness level. Use a dairy-free yogurt alternative to achieve a similar texture. Options like almond yogurt or coconut yogurt work great. Just be sure to check for added sugars in these alternatives. Ensure not to overmix the batter and check your measuring techniques for accuracy. Overmixing can lead to tough muffins. Use a gentle folding motion when combining the wet and dry ingredients. Rotate the muffin tin halfway through baking for even heat distribution. This helps all muffins bake uniformly. You can also place the tin in the center of the oven for best results. These apple muffins are simple and fun to make. We start with whole wheat flour and healthy ingredients. You learned how to mix, bake, and add personal touches. Remember to avoid overmixing for fluffy muffins. Feel free to play with flavors or make variations to suit your taste. Store them right for fresh enjoyment later. Now get baking and enjoy your delicious, homemade apple muffins!

If you’re craving a sweet yet healthy snack, these Apple Cinnamon Greek Yogurt Muffins are a must-try! Packed with wholesome ingredients like whole wheat flour and Greek yogurt, they’re not …

Read more

Categories Breakfast

Pumpkin Cream Cheese Bread Irresistible Fall Recipe

September 1, 2025 by Chef Miles
This pumpkin cream cheese bread is a cozy fall treat. It needs a few key ingredients. Here’s what you will use: - 1 cup pumpkin puree (canned or homemade) - 1/2 cup granulated sugar - 1/2 cup packed brown sugar - 1/2 cup vegetable oil - 3 large eggs - 1 teaspoon pure vanilla extract - 1 1/2 cups all-purpose flour - 1 teaspoon baking soda - 1/2 teaspoon baking powder - 1/2 teaspoon fine salt - 2 teaspoons ground cinnamon - 1/2 teaspoon ground nutmeg - 1/4 teaspoon ground ginger Each ingredient adds flavor and moisture to the bread. The pumpkin puree brings a rich taste and a lovely color. Sugars add sweetness and help create a soft texture. The spices give it that warm fall aroma. The cream cheese filling takes this bread to the next level. For this, you will need: - 8 oz cream cheese, softened at room temperature - 1/4 cup powdered sugar - 1 teaspoon fresh lemon juice This filling is creamy and sweet. The lemon juice brightens the cream cheese flavor. It creates a nice contrast with the pumpkin batter. You can customize your bread even more. Consider these options: - 1/4 cup chopped walnuts or pecans for a crunchy topping - Swap vegetable oil for melted butter for a richer taste - Use almond flour for a gluten-free option Feel free to mix and match. These small changes can make your pumpkin cream cheese bread unique. Enjoy trying different flavors! Start by preheating your oven to 350°F (175°C). This step is key for even baking. Next, grab a 9x5-inch loaf pan. Grease it well with butter or non-stick spray. This will stop the bread from sticking when it's done. In a big bowl, combine the pumpkin puree, granulated sugar, brown sugar, vegetable oil, and eggs. Add in the vanilla extract for extra flavor. Use a whisk to mix everything until it feels smooth. Make sure there are no lumps left in the mixture. In another bowl, sift together the all-purpose flour, baking soda, baking powder, salt, ground cinnamon, nutmeg, and ginger. This makes sure your bread is light and fluffy. Gradually stir this dry mix into the wet ingredients. Be gentle; overmixing can make the bread tough. For the cream cheese filling, beat the softened cream cheese in a clean bowl. Mix in powdered sugar and lemon juice until the mixture is creamy and smooth. This filling adds a rich taste that pairs perfectly with pumpkin. Pour half of the pumpkin batter into your loaf pan. Spread it evenly. Next, dollop half of the cream cheese mixture over the pumpkin batter. Use a knife to swirl it gently. Then, add the rest of the pumpkin batter on top, followed by the remaining cream cheese filling. Swirl again to create a nice marbled look. Place the loaf pan in the preheated oven. Bake for 60 to 70 minutes. Check if the bread is done by inserting a toothpick in the center. It should come out clean or with a few moist crumbs. Once baked, let the bread cool in the pan for about 10 minutes. After that, transfer it to a wire rack to cool completely. Measuring ingredients right is key for great bread. Use dry measuring cups for flour and sugar. Fill the cup, then level off with a knife. For liquids, use a clear liquid measuring cup. Always check the measurement at eye level. Precision makes your bread rise and taste better. Swirling the cream cheese is a fun part of the process. After adding half the pumpkin batter, dollop the cream cheese mix on top. Use a knife to make gentle swirls, but don’t overdo it. You want pretty ribbons, not a mix. This swirl adds flavor and a lovely look. Baking time is important for perfect bread. Bake for 60-70 minutes at 350°F. Check for doneness with a toothpick. Insert it into the center of the bread. If it comes out clean or with a few crumbs, it’s done. If it’s wet, bake a bit longer. Let the bread cool for about 10 minutes in the pan. This helps it set up nicely. After that, transfer it to a wire rack to cool completely. For serving, slice the bread and arrange it on a wooden board. Dust the top with powdered sugar for a nice touch. Add a bowl of cream cheese frosting on the side for extra fun! {{image_4}} You can make this bread gluten-free with simple swaps. Use a gluten-free flour blend instead of all-purpose flour. Look for blends that include xanthan gum for better texture. This change keeps the bread moist and tasty. Always check labels to avoid cross-contamination with gluten. To make a vegan cream cheese filling, use plant-based cream cheese. Brands like Tofutti or Kite Hill work well. Replace powdered sugar with a vegan sweetener, like coconut sugar. For a tangy kick, add a splash of lemon juice. This way, you keep the creaminess without using dairy. You can play with flavors in this bread. Adding chocolate chips gives a sweet twist. Use semi-sweet or dark chocolate for a rich taste. You can also spice things up with extra cinnamon or a pinch of clove. For a fun crunch, mix in nuts like walnuts or pecans. Each twist brings a new flavor to enjoy. To keep your pumpkin cream cheese bread fresh, follow these steps: - Let it cool: After baking, let the bread cool completely on a wire rack. - Wrap it up: Use plastic wrap or aluminum foil to wrap the bread tightly. - Store in a container: Place the wrapped bread in an airtight container. This helps keep it moist. - Keep it in a cool place: Store at room temperature for up to three days. You can freeze this bread for later use. Here’s how: - Cool the bread: Make sure the bread is fully cooled. - Wrap securely: Wrap it well with plastic wrap, then with aluminum foil. This prevents freezer burn. - Label and date: Write the date on the foil. This helps you track how long it has been frozen. - Freeze for up to three months: For the best taste, enjoy it within three months. When you want to enjoy your pumpkin cream cheese bread again, follow these steps: - Thaw first: If frozen, let the bread thaw overnight in the fridge. - Use the oven: Preheat your oven to 350°F (175°C). - Warm it up: Place the bread on a baking sheet for about 10-15 minutes. This warms it through and keeps it soft. - Microwave option: For a quick fix, slice the bread and microwave for 15-20 seconds. Enjoy your warm, tasty treat! Yes, you can use fresh pumpkin. Start by roasting a small pumpkin. Cut it in half, remove the seeds, and bake it at 350°F until soft. Once cool, scoop the flesh and blend it until smooth. You will need about one cup of this fresh puree. It gives your bread a bright, fresh flavor. To make pumpkin bread egg-free, use a substitute. You can use 1/4 cup of unsweetened applesauce for each egg. Another option is to mix 1 tablespoon of ground flaxseed with 2.5 tablespoons of water. Let it sit for a few minutes until it thickens. Both options work well to bind the ingredients. You can serve the bread warm or at room temperature. Pair it with coffee or tea for a cozy treat. I also like to add a small bowl of cream cheese frosting on the side. You can sprinkle some chopped nuts on top for extra crunch. A dollop of whipped cream can be delightful too. Pumpkin cream cheese bread stays fresh for about 3 to 4 days at room temperature. Store it in an airtight container to keep it moist. If you want it to last longer, you can freeze it. Wrap slices in plastic wrap and keep them in a freezer bag. It can last up to three months in the freezer. You now have all the tools to make delicious pumpkin cream cheese bread. We covered key ingredients, step-by-step baking instructions, handy tips, and fun variations. Remember to measure your ingredients right and check for a perfect swirl. Don’t forget storage tips for keeping your bread fresh. Enjoy experimenting with flavors, too! You can make it gluten-free or vegan if needed. Now, you can impress friends and family with your baking skills. Let them enjoy each bite of your tasty creation!

Fall is the perfect time to bake something special, and this Pumpkin Cream Cheese Bread hits the mark! Its warm spices and creamy filling create an unforgettable treat. In this …

Read more

Categories Desserts

Simple Apple Crisp Delightful and Easy Dessert Recipe

September 1, 2025 by Chef Miles
- 4 medium apples (Granny Smith or Honeycrisp) - 1 tablespoon freshly squeezed lemon juice - 1/2 cup rolled oats - 1/2 cup all-purpose flour - 1/2 cup packed brown sugar - 1/2 teaspoon ground cinnamon - 1/4 teaspoon salt - 1/4 cup cold unsalted butter (diced) - 1/4 cup chopped walnuts (optional) - Vanilla ice cream or whipped cream for serving Using the right ingredients makes this apple crisp shine. I always choose Granny Smith or Honeycrisp apples. They are tart and sweet, giving a perfect flavor balance. The lemon juice brightens the taste of the apples and stops them from browning. The dry mix needs rolled oats, flour, brown sugar, cinnamon, and salt. The oats add a nice chew, while the flour binds everything. Brown sugar gives a rich sweetness. Cinnamon warms up the flavor, and salt brings it all together. I love to use cold, diced butter. It makes the topping crumbly and rich. If you want some crunch, add walnuts. Finally, serve this treat warm with vanilla ice cream or whipped cream. It’s a delight! Set your oven to 350°F (175°C). This perfect heat helps our apple crisp bake just right. Take 4 medium apples, like Granny Smith or Honeycrisp. Peel, core, and slice them. Toss the apple slices with 1 tablespoon of freshly squeezed lemon juice. This keeps them fresh and bright in flavor. In a separate bowl, whisk together 1/2 cup rolled oats, 1/2 cup all-purpose flour, 1/2 cup packed brown sugar, 1/2 teaspoon ground cinnamon, and 1/4 teaspoon salt. Mix until everything blends well. This creates a warm, inviting mix. Cut 1/4 cup of cold unsalted butter into small cubes. Add this to your dry mix. Use your fingers or a pastry cutter to mix it all together. You want a crumbly texture, like coarse crumbs. If you like, fold in 1/4 cup chopped walnuts for a nice crunch. Grease an 8-inch square baking dish. Layer your apple slices evenly in the dish. Spread the crumbly oat mixture on top. Make sure every slice gets covered nicely. Place the dish in your preheated oven. Bake for 30-35 minutes. Keep an eye on it. You want the topping to turn golden brown, and the apples should be tender and sweet. The smell will fill your kitchen with warmth! Using fresh apples is key for a great apple crisp. I love using Granny Smith or Honeycrisp. Their sweet and tart flavors shine through. Don’t skip the lemon juice! It keeps the apples from browning and boosts their taste. Just one tablespoon is all you need. Toss the apple slices in lemon juice right after slicing. This small step makes a big difference. Mixing the oat topping correctly is also important. In a bowl, combine rolled oats, flour, brown sugar, cinnamon, and salt. This creates a warm flavor base. Then, add cold butter in small cubes. Use your fingers or a pastry cutter to mix. You want it to look like coarse crumbs. This texture gives your crisp that perfect crunch. If you want a nutty crunch, add chopped walnuts. Just fold them in gently. Serving the apple crisp warm is a must. It pairs wonderfully with vanilla ice cream or whipped cream. The cold creaminess contrasts with the hot, gooey apples. For a nice touch, dust a little cinnamon on top before serving. This adds flavor and looks great. Enjoy every bite of this delightful dessert! {{image_4}} You can mix in other fruits for a fun twist. Adding pears gives a sweet and juicy touch. Berries, like blueberries or raspberries, add bright flavor and color. Try using a mix of your favorite fruits. Each choice brings a new taste to your apple crisp. If you need a gluten-free option, switch the all-purpose flour for almond flour or gluten-free all-purpose flour. Use gluten-free oats to keep it safe for those with gluten issues. These swaps keep the dish tasty while making it friendly for all diets. To make your apple crisp nut-free, simply skip the walnuts. You can add sunflower seeds for a crunchy texture instead. This way, you still enjoy the crisp without worrying about nut allergies. Your apple crisp will still be delicious and satisfying without nuts. To store your leftover apple crisp, let it cool first. Place it in an airtight container. You can also cover it with plastic wrap. Keep it in the fridge for up to four days. This helps it stay fresh and tasty. When you want to enjoy your apple crisp again, grab a microwave-safe dish. Place a portion of the apple crisp in the dish. Heat it in the microwave for about 30 seconds. If you prefer the oven, preheat it to 350°F. Bake for around 10-15 minutes. This way, the topping remains crunchy, and the apples get warm. If you want to save some for later, freezing is easy. First, make sure the apple crisp is completely cool. Cut it into serving sizes and wrap each piece tightly in plastic wrap. Then, place them in a freezer-safe bag or container. You can freeze it for up to three months. When you're ready to eat it, thaw it in the fridge overnight. Then, reheat as mentioned earlier. Enjoy that fresh-baked taste anytime! Apple crisp can last about 3 to 5 days in the fridge. Make sure to cover it well. This keeps it fresh and tasty. If you leave it uncovered, it may dry out. Use a tight lid or wrap it in plastic wrap. Enjoy it warm or cold, whichever you prefer! Yes, you can use many types of apples for your crisp. Some great choices are Granny Smith, Honeycrisp, or Fuji. Granny Smith gives a nice tart flavor. Honeycrisp is sweet and juicy. Fuji apples are also sweet and hold their shape well. Mix different types for a fun flavor combo! If you need a dairy-free option, use coconut oil or margarine. Both work well in this recipe. You can also use applesauce to add moisture. It will change the flavor a bit, but it can be tasty! Choose what fits your needs best. You learned how to make a delicious apple crisp from scratch. Fresh apples and lemon juice are key for taste. Mixing the oat topping just right gives it a perfect crunch. You have tips for serving it warm with ice cream or whipped cream. Plus, you can explore fun fruit combos and adjust for dietary needs. Enjoy this cozy dessert with family and friends or save it for later. Whatever you choose, your apple crisp will impress! Happy baking!

Are you ready for a sweet treat that’s easy to make? My Simple Apple Crisp will delight your taste buds and warm your heart. With just a few ingredients and …

Read more

Categories Desserts

Air Fryer Buffalo Cauliflower Bites Crispy Delight

August 31, 2025 by Chef Miles
- 1 large head of cauliflower, cut into bite-sized florets - 1 cup all-purpose flour - 1 cup buffalo sauce (store-bought or homemade) - 1 teaspoon garlic powder - 1 teaspoon onion powder - 1/2 teaspoon smoked paprika - 1/2 teaspoon salt - 2 tablespoons olive oil - Chopped green onions and celery sticks for serving Let’s dive into the ingredients you need to make these tasty buffalo cauliflower bites. First, you need a large head of cauliflower. This veggie is the star of the show. Cut it into bite-sized florets so they cook evenly. Next, grab one cup of all-purpose flour. This will help create a nice, thick batter. The flour coats the cauliflower and gives it that crispy texture we all love. Now, for the flavor, you can't skip the buffalo sauce. One cup of your favorite brand will do. You can also make your own if you want a unique touch. For seasoning, gather some garlic powder, onion powder, smoked paprika, and salt. Each of these adds a punch of flavor. The garlic and onion powders give a savory taste, while the smoked paprika adds a hint of warmth. If you want, you can use some olive oil to help with the cooking. It adds richness and helps the batter stick. For serving, consider chopped green onions and crunchy celery sticks. They add a fresh contrast to the spicy bites. With these ingredients, you’re set to make a delicious snack that’s sure to please everyone! First, wash the cauliflower under cold water. Remove any dirt or bugs. Cut the cauliflower into bite-sized florets. Aim for even sizes. This helps them cook evenly. In a large bowl, mix one cup of all-purpose flour with one cup of water. Add one teaspoon of garlic powder, one teaspoon of onion powder, and half a teaspoon of smoked paprika. Sprinkle in half a teaspoon of salt. Whisk until smooth. The batter should be thick enough to coat the florets well. Take each floret and dip it into the batter. Make sure it's fully covered. Let any extra batter drip off. Place the coated florets on a plate. Preheat your air fryer to 375°F (190°C). Place the cauliflower in a single layer in the air fryer basket. This ensures good air flow. Cook for 12 to 15 minutes. Shake the basket halfway through to help them brown evenly. When the cauliflower looks golden and crispy, take them out. Place the bites in a large bowl. Pour one cup of buffalo sauce over them. Toss gently until each piece is well coated. For an even crunchier bite, return the sauced florets to the air fryer. Cook for an extra 3 to 5 minutes at the same temperature. This step makes them extra crispy and delicious! To make your buffalo cauliflower bites super crispy, the batter is key. Use a thick batter made from flour and water. This helps the batter stick well. Dip each floret in the batter. Shake off extra batter before cooking. Make sure to air fry in a single layer. Overcrowding can lead to soggy bites. Shake the basket halfway through cooking to ensure even crispiness. Buffalo sauce can be spicy. You can adjust the heat to suit your taste. If you like it milder, mix in a bit of ranch dressing. For a hotter kick, add more hot sauce to your buffalo sauce. You can even mix in honey for a sweet and spicy taste. Experiment with different sauces to find your favorite blend. Serve your buffalo cauliflower with creamy dips. Ranch or blue cheese dressing pairs well. You can also add crunchy celery sticks for a fresh taste. Chopped green onions make a great garnish. These add color and flavor. Feel free to mix and match sides to enhance your snack time. {{image_4}} You can boost the flavor of your buffalo cauliflower bites by exploring different seasonings. Here are a few ideas: - Cajun seasoning: Adds heat and depth. - Italian herbs: Bring a fresh, herbal taste. - Chili powder: Spice things up with some kick. Mix and match these spices into your batter. Experimenting with flavors makes cooking fun. If you like a sweet twist, try adding honey or maple syrup. Here’s how: - After coating your bites in buffalo sauce, drizzle a bit of honey or maple syrup on top. - Toss gently to mix. This blend of sweet and spicy creates a unique taste that will surprise your palate. You can easily make this dish vegan or gluten-free. Here are some alternatives for the batter: - Chickpea flour: Mix it with water for a gluten-free option. - Almond flour: Great for a nutty flavor and gluten-free too. These options keep the dish delicious while meeting different dietary needs. To keep your buffalo cauliflower bites fresh, place them in an airtight container. Store them in the fridge for up to three days. Make sure they cool down before sealing to avoid moisture. This helps maintain their crunch. To regain that crispy texture, use your air fryer. Set it to 375°F (190°C) and heat for about 4-5 minutes. This method makes them crispy again. You can also use an oven at the same temperature for about 10 minutes. Avoid using a microwave, as it makes them soggy. If you want to freeze them, first let the bites cool completely. Arrange them in a single layer on a baking sheet, then freeze for 1-2 hours. Once frozen, transfer them to a freezer bag or container. They can last for up to three months. When ready to eat, cook them straight from the freezer in the air fryer. Yes, you can use frozen cauliflower. Just ensure it is thawed and drained well. This helps avoid excess moisture, which can make the batter soggy. Frozen cauliflower may not be as crispy, but it will still be tasty. You can use other hot sauces or BBQ sauce. Try sriracha or harissa for a different flavor. If you want a milder option, mix hot sauce with ranch dressing for a creamy twist. To increase the heat, add more buffalo sauce or mix in cayenne pepper. You can also use a spicier hot sauce or add chili flakes to the batter. Adjust to your taste for the perfect kick! Absolutely! These bites store well in the fridge. Just make sure they cool completely before storing. Pack them in an air-tight container for up to four days. The cauliflower is ready when it turns golden brown and crispy. Use a fork to test its tenderness. You should feel a slight crunch but no rawness inside. If it needs more time, continue cooking in short bursts. In this post, we explored a tasty buffalo cauliflower recipe. You learned about key ingredients, step-by-step instructions, and helpful tips. We also shared variations to customize flavors and storage ideas. Buffalo cauliflower is easy to make and fun to share. You can enjoy it any time. Try experimenting with spice levels or dips. There’s always room for creativity in the kitchen! Enjoy your cooking adventure!

Are you ready to spice up your snack game? My Air Fryer Buffalo Cauliflower Bites are crispy, tasty, and oh-so-simple to make. With just a handful of ingredients, you can …

Read more

Categories Appetizers

Garlic Parmesan Roasted Brussels Sprouts Delight

August 31, 2025 by Chef Miles
- 1 lb Brussels sprouts, trimmed and halved - 4 tablespoons extra-virgin olive oil - 4 cloves garlic, minced - 1/2 cup freshly grated Parmesan cheese - 1 teaspoon sea salt - 1/2 teaspoon freshly ground black pepper - 1/4 teaspoon crushed red pepper flakes (optional) - Fresh parsley, finely chopped (for garnish) Gather these simple ingredients to make Garlic Parmesan Roasted Brussels Sprouts. The Brussels sprouts are the star of the dish. They have a great nutty flavor when roasted. You need fresh sprouts for the best taste. The olive oil adds richness and helps the sprouts brown nicely. Garlic brings a wonderful aroma and taste to the dish. Use fresh garlic for the best flavor. Parmesan cheese adds a savory, cheesy touch. Seasoning is key to making these sprouts shine. Sea salt enhances all the flavors. Black pepper adds a bit of heat. If you like spice, add crushed red pepper flakes. Fresh parsley is for garnish. It adds color and a fresh taste. Make sure you have everything ready before you start cooking. This dish is easy and fun to make! Enjoy the process of preparing these tasty sprouts. - Preheat your oven to 400°F (200°C). - Line a baking sheet with parchment paper. Start by making your oven warm. This helps the Brussels sprouts roast well. The parchment paper on the baking sheet keeps them from sticking and makes cleaning easy. - Toss Brussels sprouts with olive oil, garlic, salt, and pepper. - Optional: Add crushed red pepper flakes for extra spice. Next, take a big bowl. Put in your halved Brussels sprouts. Add the olive oil, minced garlic, sea salt, and black pepper. Mix everything well. Make sure each sprout gets a coat of the tasty mix. If you want some heat, add crushed red pepper flakes. It gives a nice kick. - Spread Brussels sprouts on the baking sheet. - First roasting phase: 20 minutes. - Add Parmesan cheese and return to oven for an additional 10-15 minutes. Now, move the seasoned Brussels sprouts to the baking sheet. Place them cut-side down. This helps them brown nicely. Roast them in the oven for 20 minutes. After that, take them out and sprinkle the grated Parmesan cheese on top. Return them to the oven for another 10-15 minutes. Look for a golden brown color and melted cheese. It should smell amazing! To get the best results, arrange your Brussels sprouts with the cut sides down. This gives them a nice caramelized surface. Use a large baking sheet and spread them out. Always roast in a single layer. This way, the heat can reach all the sprouts evenly. If they are crowded, they will steam instead of roast. You can add other herbs and spices to boost the taste. Try rosemary, thyme, or even a pinch of garlic powder. If you want to change the cheese, use Gruyère or feta for a twist. Each cheese brings its own unique flavor, so experiment to find your favorite. Serve your Brussels sprouts in a decorative bowl for a beautiful display. Drizzle some extra olive oil on top for shine and flavor. Add a sprinkle of Parmesan cheese just before serving. This small touch makes a big difference, adding texture and taste. Enjoy the delightful look as much as the taste! {{image_4}} To make a vegan dish, swap out Parmesan with nutritional yeast. This gives a cheesy flavor that is perfect. Nutritional yeast adds a nutty taste and is packed with nutrients. You can also try different seasonings. Use garlic powder, onion powder, or smoked paprika to boost flavor. You can add extra veggies for more color and taste. Carrots and sweet potatoes work great here. They add sweetness and texture. If you add carrots, cut them into sticks. For sweet potatoes, chop them into cubes. Adjust the cooking time to about 25-30 minutes for these extras. Check for tenderness and caramelization. Want more heat? Increase the crushed red pepper flakes. A little goes a long way! For less spice, reduce the amount or skip it. You can also add other spices. Try cumin for warmth or smoked paprika for depth. Each spice gives a unique twist to the dish. To store leftovers, place the Brussels sprouts in airtight containers. This helps keep them fresh. Make sure to do this within two hours of cooking. When stored correctly, they can last for up to three days in the fridge. If you plan to eat them later, check for any signs of spoilage before enjoying. The best way to reheat roasted Brussels sprouts is to use the oven. Preheat it to 350°F (175°C). Spread the sprouts on a baking sheet. Heat them for about 10-15 minutes. This method helps maintain their crispiness. You can also use a skillet on medium heat. Just add a little olive oil to help them crisp up again. Avoid using the microwave, as it can make them soggy. Yes, you can use frozen Brussels sprouts. However, they may not be as crisp. The cooking time will also change. You should roast them longer, about 30-40 minutes. Make sure to thaw and drain them well. This helps avoid soggy sprouts. You’ll know Brussels sprouts are done when they are golden brown and tender. Look for a nice caramelization on the outside. The cheese should be melted and bubbly, adding to the flavor. A fork should easily pierce them. These Brussels sprouts pair well with many dishes. Try serving them with grilled chicken or salmon. They also go great with a hearty steak. For a meatless option, serve them with quinoa or a fresh salad. In this post, we explored how to make Garlic Parmesan Roasted Brussels Sprouts. We covered key ingredients, easy steps, and some helpful tips. Remember, the right seasoning and cooking time can make a big difference. You can even try different veggies or a vegan twist. Store your leftovers properly to enjoy them later. Now go ahead and make this tasty dish your own. Happy cooking!

If you are looking for a tasty side dish, try Garlic Parmesan Roasted Brussels Sprouts! This recipe is simple and quick, perfect for busy weeknights. The crispy sprouts paired with …

Read more

Categories Appetizers

No Bake Oreo Cheesecake Cups Quick and Easy Delight

August 31, 2025 by Chef Miles
- 16 Oreo cookies, finely crushed - 2 tablespoons unsalted butter, melted - 1 (8 oz) package cream cheese, softened - 1/2 cup powdered sugar - 1 teaspoon pure vanilla extract - 1 cup heavy cream, chilled - 1/2 cup sour cream - Pinch of salt - Extra Oreo cookies for garnish To make No Bake Oreo Cheesecake Cups, you need simple yet tasty ingredients. I love using Oreo cookies for the crust. They add a rich flavor that blends well with the creamy filling. The butter helps the crumbs stick together, making a perfect base. For the filling, I use cream cheese as it gives a smooth texture. Powdered sugar adds sweetness, while vanilla extract enhances the flavor. Heavy cream is key for a light, fluffy texture. Chilling the cream keeps it perfect for whipping. Sour cream adds a slight tang that balances the sweetness. Lastly, a pinch of salt brightens the overall taste. You can use extra Oreo cookies to top each cup. It not only looks great but also adds a crunchy texture. These ingredients come together quickly, making it easy to whip up a delightful treat. - First, take 16 Oreo cookies and crush them finely. You can use a food processor or put them in a bag and crush them with a rolling pin. - Next, melt 2 tablespoons of unsalted butter. Combine the crushed cookies with the melted butter in a medium-sized mixing bowl. Stir until all crumbs are coated. - Now, take a small spoon and measure about 1.5 tablespoons of this mixture. Press it firmly into the bottom of each serving cup. Make sure it is packed well to create a solid crust. - In a large mixing bowl, beat 1 package of softened cream cheese until it is smooth. Use a hand mixer for about 2 minutes to remove any lumps. - Gradually add 1/2 cup of powdered sugar, 1 teaspoon of pure vanilla extract, and a pinch of salt. Mix on low speed until everything is well blended. - In a separate chilled bowl, whip 1 cup of heavy cream on high speed until stiff peaks form. This step should take 2-3 minutes. - Gently fold the whipped cream into the cream cheese mixture. Use a spatula and be careful to keep the mixture light and airy. - Once mixed, add in 1/2 cup of sour cream and stir until just blended. Avoid overmixing to keep the filling fluffy. - Spoon this creamy filling into each cup over the crusts. Smooth the tops with a spatula for a nice look. - Place your cups in the refrigerator to chill for at least 4 hours. For best flavor, let them sit overnight. Just before serving, add extra crushed Oreo cookies on top for a tasty garnish. To get a great crust, press firmly when you place the Oreo mixture in the cups. A compact crust holds together well. I like using a cookie scoop to get even amounts in each cup. This way, all the cups look nice and neat. Whipping the cream is key to a fluffy filling. Start with chilled cream and use high speed. Beat it until you see stiff peaks. When you mix the whipped cream into the cream cheese, use a gentle folding motion. This keeps the airy texture. Avoid stirring too hard, or the filling will lose its lightness. For serving, I love using decorative trays. Arrange the cheesecake cups nicely and add mini spoons. It makes dessert feel more special. You can also garnish with extra crushed Oreo cookies on top. For an extra touch, place a whole Oreo on each cup. It adds charm and a tasty bite. {{image_4}} You can easily change the flavor of your No Bake Oreo Cheesecake Cups. Just add different flavored extracts. Try almond or chocolate extract for a unique twist. You can also mix in other types of cookies. Chocolate chip or mint cookies work great too. These small changes make the dessert feel new and exciting. Toppings can really change the vibe of your cheesecake cups. Fresh fruits like strawberries or blueberries add a nice touch. Whipped cream is another delicious option. For a more decadent treat, pour chocolate ganache or sauce over the top. These toppings make every bite special. If you need to make dietary changes, this recipe is flexible. Use gluten-free cookies for a gluten-free option. There are also dairy-free creams available. These swaps let everyone enjoy the dessert without worry. You can still achieve great taste while meeting dietary needs. To keep your No Bake Oreo Cheesecake Cups fresh, refrigerate them right away. Use airtight containers to store any leftovers. This keeps moisture out and helps maintain the texture. I recommend placing a piece of plastic wrap directly on top of the cups before sealing the container. This extra step helps prevent the cheesecake from drying out. These cheesecake cups stay fresh for about 3 to 5 days in the fridge. Look for signs of spoilage like a sour smell or a change in texture. If the filling appears watery or the crust feels hard, it’s best to throw it away. Enjoy your sweet treat while it's at its best! Yes, you can make this recipe ahead of time. I recommend chilling the cheesecake cups for at least four hours. For the best taste, chill them overnight. This helps the flavors blend well. Plus, it makes serving easy when guests arrive. You can use light cream cheese if you want fewer calories. It will change the texture slightly. Whipped topping can replace heavy cream but will not give the same rich taste. If you choose these options, keep in mind that the flavor may be less creamy. The cheesecake cups last for about 3 to 5 days in the fridge. Store them in an airtight container to keep them fresh. Always check for any signs of spoilage before eating. If they look or smell off, it’s best to throw them away. Yes, you can freeze these cheesecake cups. To do this, cover them tightly with plastic wrap or foil. They will last about 2 months in the freezer. When you’re ready to eat them, thaw in the fridge overnight. Avoid refreezing after thawing to keep the texture nice. You now have an easy way to make no-bake Oreo cheesecake cups. We covered the ingredients, step-by-step instructions, and tips for perfect results. You learned how to vary flavors and store leftovers safely. Remember to use firm pressure for the crust and whip cream correctly for a fluffy filling. With these simple steps, you can impress anyone with your dessert skills. Enjoy making these delicious treats and let your creativity shine!

Indulge in a sweet treat that requires no baking – No Bake Oreo Cheesecake Cups! This handy dessert combines creamy cheesecake with crunchy Oreo crusts, making it a perfect delight …

Read more

Categories Desserts

One Pot Tuscan Chicken Gnocchi Flavorful Dinner Delight

August 31, 2025 by Chef Miles
To make this tasty dish, you need: - 1 pound boneless, skinless chicken breasts, cut into bite-sized pieces - 1 tablespoon extra virgin olive oil - 2 cloves garlic, minced - 1 teaspoon dried Italian herbs (a mix of oregano, thyme, and basil) - 1 cup cherry tomatoes, halved - 2 cups fresh baby spinach - 1 cup low-sodium chicken broth - 1 cup heavy cream - 1 pound gnocchi (store-bought or homemade) - 1/2 cup grated Parmesan cheese - Salt and freshly ground black pepper to taste - Fresh basil leaves for garnish (optional) This mix of ingredients creates a rich and creamy sauce that hugs each gnocchi perfectly. The chicken adds protein and the spinach gives a nice color, too. I always choose extra virgin olive oil for this recipe. It has a rich flavor that enhances the dish. It also stands up well to the heat when you brown the chicken. If you want a hint of spice, look for a peppery olive oil. It can add extra depth to your meal. Parmesan cheese is my go-to for this dish. It melts beautifully into the sauce and adds a salty kick. You can also try pecorino Romano or even a creamy goat cheese for a twist. Each cheese brings a unique taste that can change the dish’s vibe. So feel free to experiment! Start by heating the olive oil in a large pot over medium heat. Add the chicken pieces. Season them with salt, black pepper, and dried Italian herbs. Cook the chicken for about 5 to 7 minutes. Stir often until the chicken turns golden brown and is fully cooked. Once the chicken is ready, toss in the minced garlic. Sauté it for about 1 minute. You want the garlic to smell nice and turn a light golden color. Next, add the halved cherry tomatoes. Stir them in with the chicken and garlic. Cook for 2 to 3 minutes until the tomatoes soften and release their juices. Now it’s time for the sauce! Pour in the low-sodium chicken broth and heavy cream. Stir it well to mix everything. Bring the pot to a gentle simmer. This is where the flavors start to blend perfectly. After that, add the gnocchi, making sure they are covered by the creamy sauce. Cook for about 5 minutes. The gnocchi should be tender and the sauce creamy. Fold in the fresh baby spinach gently. Cook for another 1 to 2 minutes until the spinach wilts down. Remove the pot from the heat. Stir in the grated Parmesan cheese. Mix until the cheese melts and spreads throughout the dish. Taste it and add extra salt or pepper if you need to. Serve the warm gnocchi mixture right away. For a lovely touch, garnish with fresh basil leaves. This adds color and a great smell. Enjoy this one-pot meal with family or friends. To make your gnocchi just right, follow these steps: - Use fresh gnocchi for the best taste and texture. - Cook gnocchi in salted water for flavor. - Only add gnocchi to the sauce when it is simmering. - Stir gently to avoid breaking the gnocchi. - Taste the gnocchi for doneness; they should be soft but not mushy. You can add more flavor easily. Here are some ideas: - Use fresh herbs like basil or thyme for a burst of freshness. - Add a pinch of red pepper flakes for a spicy kick. - Substitute half-and-half for a lighter sauce. - Swap the chicken for shrimp or mushrooms for different tastes. - Try sun-dried tomatoes instead of fresh ones for a deeper flavor. One pot meals save time and effort. Follow these tips: - Gather all your ingredients before cooking to stay organized. - Use a large pot to avoid spills and allow for easy stirring. - Layer flavors by cooking ingredients in stages, like browning chicken first. - Make sure to scrape the bottom of the pot for extra flavor. - Let the dish sit for a few minutes before serving to enhance the taste. {{image_4}} You can easily make this dish vegetarian. Just skip the chicken. Use mushrooms or zucchini instead. These veggies add great flavor and texture. Cook them just like you would the chicken. Sauté them until they are tender. Then, follow the rest of the recipe as written. Feel free to add more veggies for color and taste. Bell peppers and asparagus work well. Chop them up and add them when you sauté the garlic. You can also toss in frozen peas or broccoli. Just add them near the end, so they stay bright and crisp. Parmesan cheese gives a nice salty kick. But you can switch it up! Try using mozzarella for a creamier finish. Feta cheese adds a tangy twist, too. Just sprinkle it on top before serving. Each cheese brings its own charm, so feel free to experiment. Once you finish your One Pot Tuscan Chicken Gnocchi, let it cool slightly. Transfer any leftovers to an airtight container. It will stay fresh in the fridge for about 3 days. Always check for any signs of spoilage before eating. If you want to store the dish longer, freezing is a great option. Place the cooled gnocchi mixture in a freezer-safe container. It can last for up to 3 months. When you are ready to eat, thaw it in the fridge overnight. Reheat it gently on the stove over low heat. Add a splash of chicken broth or cream to restore the sauce's creaminess. Use glass or BPA-free plastic containers for storage. Glass containers are great for keeping the flavors intact. Make sure they have tight-fitting lids. For freezing, use freezer bags or containers that resist freezer burn. Label each container with the date so you can keep track of freshness. Yes, you can use homemade gnocchi in this recipe. Homemade gnocchi often tastes better than store-bought. Just make sure they are cooked until tender. They should cook in the creamy sauce, just like store-bought gnocchi. You can check if the chicken is cooked through by cutting a piece in half. The inside should be white and no longer pink. Also, a food thermometer can help. The chicken should reach an internal temperature of 165°F (75°C) for safety. If you want a lighter option, you can use half-and-half or whole milk. Coconut cream can work for a dairy-free version. For a vegan alternative, try using cashew cream or a plant-based cream. Just remember, the sauce might be less thick with these substitutes. This blog post covered the ingredients and steps for making One Pot Tuscan Chicken Gnocchi. You learned about key ingredients, cooking methods, and various flavor tips. I shared ways to adapt the recipe for different diets and how to store leftovers effectively. In conclusion, this dish offers a simple yet flavorful meal, perfect for busy nights. Enjoy making your own variations, and don’t hesitate to experiment with different ingredients! Your kitchen can turn into a little slice of Tuscany.

Looking for a quick and tasty meal? This One Pot Tuscan Chicken Gnocchi is your answer! You’ll make a creamy, flavorful dish using just one pot and simple ingredients. Perfect …

Read more

Categories Dinner
Older posts
Newer posts
← Previous Page1 … Page31 Page32 Page33 … Page112 Next →

MELTED RECIPES

where delicious ideas melt into life, from stovetop to backyard. Always warm, simple, and irresistibly satisfying. 🍳🔥🧀

PAGES

Home About Contact Privacy Policy Terms & Conditions Cookie Policy GDPR Policy Copyright Policy Disclaimer

CATEGORIES

Appetizers Desserts Salads Breakfast Dinner

Contact

  • Pinterest
  • Mail
Copyright © 2025 Melted Recipes. All rights reserved.