Skip to content
Melted Recipes
  • Home
  • Appetizers
  • Desserts
  • Salads
  • Breakfast
  • Dinner
  • Privacy Policy
  • Contact
  • About

Chef Miles

No-Bake Mocha Peanut Butter Protein Balls Delight

October 28, 2025 by Chef Miles
The secret to making No-Bake Mocha Peanut Butter Protein Balls lies in the simple yet nutritious ingredients. Each element plays a key role in flavor and texture. Here is what you will need: - 1 cup rolled oats - 1/2 cup natural peanut butter - 1/4 cup honey or maple syrup - 1/4 cup chocolate protein powder - 2 tablespoons unsweetened cocoa powder - 1 tablespoon instant coffee granules - 1/4 cup dark chocolate chips (optional) - 1/2 teaspoon pure vanilla extract - Pinch of sea salt Using rolled oats gives these protein balls a chewy texture. Peanut butter brings creaminess and healthy fats. Honey or maple syrup adds sweetness, while chocolate protein powder gives a protein boost. Cocoa powder and coffee granules enhance the mocha flavor, making each bite rich and satisfying. The dark chocolate chips are optional but highly recommended. They can add an extra depth of flavor. The pure vanilla extract helps to round out the taste. Lastly, the sea salt elevates all the flavors, making the treat even more delicious. As you gather these ingredients, think about how they work together. Each one adds a unique touch to this easy and healthy snack. Whether you make them for yourself or share with friends, these protein balls are sure to delight! First, gather all your dry ingredients. In a large mixing bowl, add: - 1 cup rolled oats - 1/4 cup chocolate protein powder - 2 tablespoons unsweetened cocoa powder - 1 tablespoon instant coffee granules - Pinch of sea salt Mix these ingredients well. Make sure they blend together evenly. This step is key to a good flavor. Next, it’s time to add the wet ingredients. Pour in: - 1/2 cup natural peanut butter - 1/4 cup honey or pure maple syrup - 1/2 teaspoon pure vanilla extract Use a wooden spoon or spatula to mix. Stir until you form a thick and cohesive dough. This will be a delicious base for your protein balls. If you love chocolate, fold in: - 1/4 cup dark chocolate chips (optional) This adds a nice touch of richness and texture. Now comes the fun part! Scoop about 1 tablespoon of the mixture. Roll it into a ball with your hands. Repeat this until you finish the mixture. Place each ball on a parchment-lined baking sheet. This keeps them from sticking and makes clean-up easy. After rolling all the balls, put the baking sheet in the refrigerator. Let them chill for at least 30 minutes. This helps the protein balls firm up nicely. Once they are set, store your protein balls in an airtight container. They will stay fresh in the fridge for up to a week. Enjoy these tasty bites as a quick snack or a post-workout treat! Adjust the coffee granules to match your taste. If you love coffee, add more. If you prefer a milder flavor, use less. This small change can make a big difference in taste. Even distribution of ingredients is key. When mixing, make sure the oats, protein powder, and cocoa are well blended. This ensures every bite is just as tasty as the last. You can add extra mix-ins to boost flavor. Consider adding chopped nuts, dried fruit, or seeds. Each mix-in adds a new texture and taste. You might also try different chocolate chips, like white or milk chocolate. For sweeteners, honey and maple syrup work well. You can also use agave syrup or stevia. These options let you adjust the sweetness to your liking. These protein balls are packed with healthy ingredients. Rolled oats offer fiber, while peanut butter provides protein and healthy fats. Cocoa powder is rich in antioxidants, making these snacks not only tasty but also good for you. Each protein ball contains about 4-5 grams of protein, depending on your mix. This makes them great for a post-workout snack. They give you energy and help with muscle recovery. Enjoy them guilt-free! {{image_4}} You can easily make these protein balls vegan. Just swap out honey for pure maple syrup. Maple syrup is a great sweetener. It adds flavor without any animal products. For gluten-free options, check your oats. Make sure they are labeled gluten-free. You can also choose gluten-free protein powder. These simple swaps keep the recipe tasty and safe for all. Want to change the taste? Try different nut butter! Almond or cashew butter works well. Each nut butter gives a unique twist to the flavor. You can also use flavored protein powders. Chocolate or vanilla flavors can enhance the taste. Feel free to mix and match to find your favorite. Out of cocoa powder? You can use carob powder instead. It has a similar taste and is a great option. If you want a different sweetener, consider agave nectar or coconut sugar. Each has its own flavor profile. These substitutions keep the protein balls delicious while adding variety. To keep your No-Bake Mocha Peanut Butter Protein Balls fresh, use an airtight container. This helps prevent moisture and keeps them tasty. Store the protein balls in the fridge. They will stay good for up to a week. This makes them perfect for quick snacks or energy boosts. You can also freeze these protein balls for longer storage. To freeze, place them in a single layer on a baking sheet. Once they are frozen solid, transfer them to an airtight container or a freezer bag. This helps keep them fresh for up to three months. When you are ready to eat them, take out the number you want. Let them thaw in the fridge for a few hours. This keeps their texture smooth and chewy. Avoid microwaving them, as this can make them too soft. Enjoy your delicious protein balls anytime! No-Bake Mocha Peanut Butter Protein Balls last up to one week in the fridge. Store them in an airtight container to keep them fresh. If you want them to last longer, you can freeze them. They stay good for up to three months in the freezer. Just let them thaw in the fridge before eating. Yes, you can use other nut butters! Almond butter gives a nice nutty taste. Cashew butter adds creaminess without too much flavor, letting the coffee shine through. Sunflower seed butter is a great option for nut allergies. Each nut butter brings its own flavor, so feel free to experiment. These protein balls are great for kids! They have healthy oats and protein from the nut butter and protein powder. The sweetness from honey or maple syrup makes them tasty. Just watch the caffeine from the coffee. You can reduce the coffee or skip it for younger kids. You have learned how to make tasty and healthy No-Bake Mocha Peanut Butter Protein Balls. We covered the ingredients, step-by-step instructions, and useful tips for perfecting your recipe. You now know how to store or freeze these treats for later. With easy variations, you can change flavors or make them fit special diets. Enjoy making these snacks that are good for you and fun to eat. Take the first step and give this recipe a try!

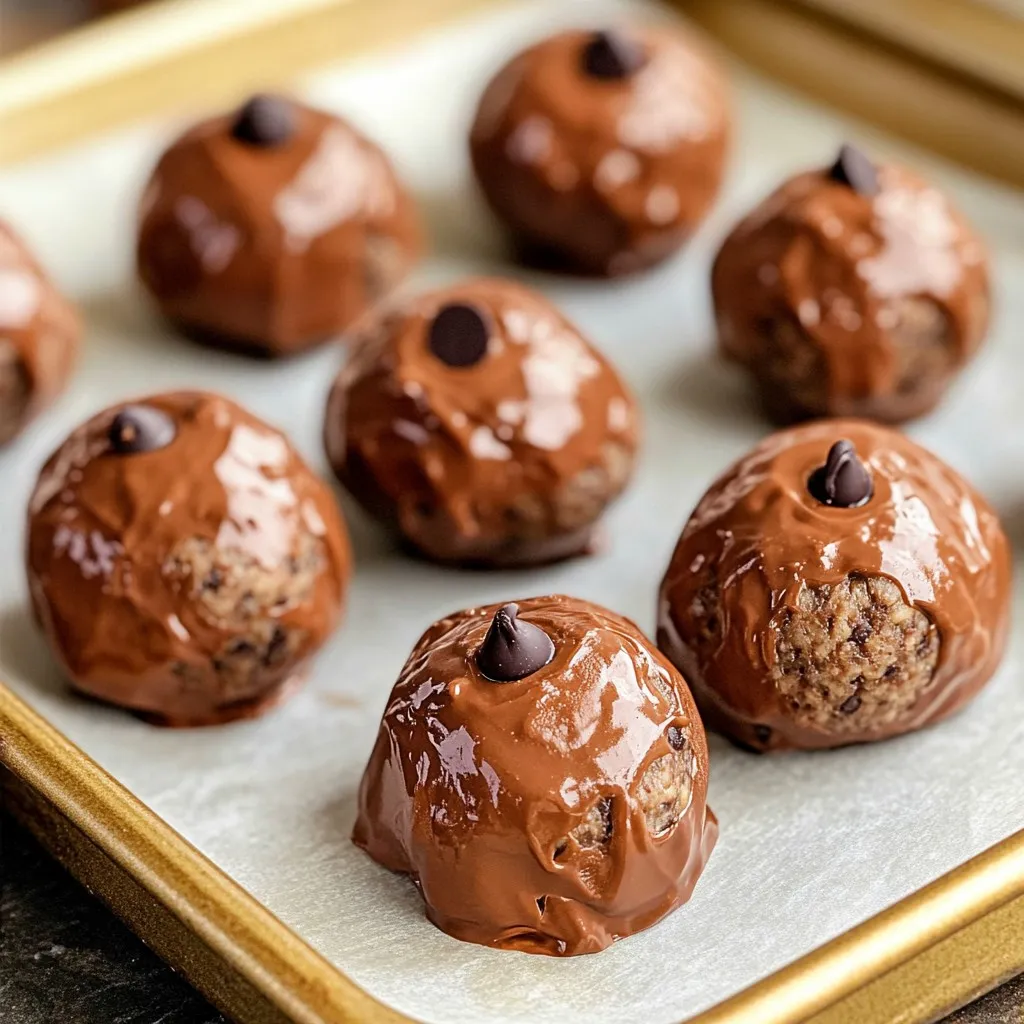
Craving a sweet yet healthy snack? Welcome to the world of No-Bake Mocha Peanut Butter Protein Balls! These delicious bites pack a punch with protein, flavor, and easy prep. Perfect …

Read more

Categories Dinner

Savory Sheet-Pan BBQ Chickpea & Sweet Potato Tacos

October 28, 2025 by Chef Miles
- 1 can (15 oz) chickpeas, thoroughly drained and rinsed - 2 medium sweet potatoes, expertly peeled and diced into bite-sized cubes - 1 tablespoon high-quality olive oil - 1 cup your favorite BBQ sauce, store-bought or homemade Chickpeas are the star of this dish. They add protein and a nice texture. Sweet potatoes bring sweetness and fiber, making these tacos hearty. Olive oil helps the veggies roast well and adds flavor, while BBQ sauce gives a smoky, tangy kick. - 1 tablespoon robust chili powder - 1 teaspoon aromatic smoked paprika - 1 teaspoon garlic powder - Sea salt and freshly cracked black pepper to taste Use chili powder for heat and depth. Smoked paprika adds a wonderful smokiness. Garlic powder brings a savory touch. Sea salt and black pepper enhance all the flavors. These spices make the dish bright and flavorful. - 8 soft corn tortillas - 1 ripe avocado, sliced into elegant pieces - Fresh cilantro, finely chopped, for a vibrant garnish - Lime wedges, for zesty serving Corn tortillas are soft and complement the filling well. Avocado adds creaminess and richness. Fresh cilantro gives a pop of color and freshness. Lime wedges add a zesty kick that brightens each bite. These toppings make the tacos even more delicious and fun to eat. Start by preheating your oven to 425°F (220°C). This high heat helps the sweet potatoes and chickpeas roast perfectly. Next, take 2 medium sweet potatoes. Peel them and cut them into small cubes. Aim for bite-sized pieces. Open a can of chickpeas, drain it, and rinse them well. Place both the sweet potatoes and chickpeas on a large baking sheet. Drizzle 1 tablespoon of olive oil over the sweet potatoes and chickpeas. Sprinkle 1 tablespoon of chili powder, 1 teaspoon of smoked paprika, and 1 teaspoon of garlic powder on top. Season with sea salt and freshly cracked black pepper. Use your hands or a spatula to mix everything well. Now, place the baking sheet in the oven. Roast for 20 minutes. Stir the mixture halfway through for even cooking. After 20 minutes, take the baking sheet out of the oven. Pour 1 cup of your favorite BBQ sauce over the roasted sweet potatoes and chickpeas. Toss them again to coat all pieces in the sauce. Return the baking sheet to the oven for an additional 10-15 minutes. The sweet potatoes should be soft and caramelized when done. As the veggies roast, warm 8 soft corn tortillas. Use a small skillet over medium heat. Heat each tortilla for about 30 seconds on each side until they are soft and pliable. To make the tacos, take a warm tortilla. Spoon in the BBQ chickpea and sweet potato mix. Top with slices of avocado and sprinkle with fresh cilantro. This adds flavor and color. Serve with lime wedges for a zesty kick! Roasting Times To get the best texture, I recommend roasting your sweet potatoes and chickpeas for a total of 30-35 minutes. Start with 20 minutes at 425°F (220°C). This gives them a nice crust. The last 10-15 minutes with BBQ sauce adds flavor and caramelization. Tossing Step Importance Tossing your sweet potatoes and chickpeas is key. It helps coat them evenly with oil and spices. Toss halfway through roasting for the best results. This step ensures even cooking and flavor on every bite. Sauce Variations Feel free to switch up your BBQ sauce. Try spicy, smoky, or sweet options. You can even mix in some hot sauce for an extra kick. Homemade sauces are also great if you want a unique flavor. Additional Toppings Get creative with toppings! Sliced radishes add crunch. Pickled onions give a tangy twist. You can also use feta cheese for a salty kick. Each addition enhances your taco experience. Serving Suggestions Serve your tacos on a rustic wooden board. Line it with parchment paper for a nice touch. Arrange lime wedges and cilantro around the tacos for a fresh look. This makes your dish inviting and appealing. Plating Ideas For plating, stack two tacos on top of each other. Add a few slices of avocado on top. Sprinkle chopped cilantro for color. This not only looks great but also keeps the flavors vibrant and fresh. {{image_4}} Using Different Beans You can swap chickpeas for other beans. Black beans or pinto beans work well. They add a nice taste and texture to your tacos. Adding Meat Options If you want meat, pull in shredded chicken or pulled pork. These meats mix well with BBQ sauce. This will add rich flavor to your tacos. Dairy-Free Toppings To keep it dairy-free, skip cheese. Instead, use guacamole for creaminess. It enhances flavor without dairy. Gluten-Free Tortilla Options For a gluten-free meal, choose corn tortillas. They are naturally gluten-free and hold the filling well. You can find them at most stores. Spicy Additions If you love heat, add jalapeños. You can slice them and toss them in before roasting. This adds a kick to every bite. Sweet Alternatives For a sweeter taste, try adding pineapple. Dice fresh pineapple and mix it with the chickpeas. This gives a unique twist to your tacos. To keep your tacos fresh, store the filling and tortillas separately. - Fridge Storage Tips: Place the BBQ chickpea and sweet potato mix in an airtight container. It lasts up to 4 days in the fridge. Make sure to cool it down before sealing. Store your corn tortillas in a sealed bag to prevent them from drying out. - Freezing Guidelines: If you want to store them longer, freeze the filling. Use a freezer-safe container or bag. It can last up to 3 months in the freezer. Thaw overnight in the fridge before reheating. To enjoy your tacos again, reheat them carefully. - Best Methods for Reheating: For the filling, use a microwave or skillet. Heat the filling in the microwave for 1-2 minutes, stirring halfway. If using a skillet, warm it over medium heat until hot. - Maintaining Texture: To keep the tortillas soft, warm them in a dry skillet for about 30 seconds on each side. This helps them stay pliable and tasty. To make these tacos gluten-free, use corn tortillas. They are naturally gluten-free. Check the BBQ sauce label too. Many store-bought sauces contain gluten. You can also make your own BBQ sauce at home using gluten-free ingredients. Absolutely! Making BBQ sauce from scratch is easy. Combine ketchup, brown sugar, vinegar, and spices. You can adjust the sweetness and tanginess based on your taste. This way, you control the flavor and ingredients. Leftovers can last about three to five days. Store them in an airtight container to keep them fresh. Reheat gently in the oven or microwave. This keeps the flavors intact and the texture nice. If you want a substitute for sweet potatoes, try regular potatoes or butternut squash. Both options work well in this recipe. They will provide a different flavor but still taste great with the BBQ sauce. This article shows you how to make tasty BBQ tacos. We discussed the key ingredients like chickpeas, sweet potatoes, and BBQ sauce. You learned the steps to prepare, roast, and assemble your tacos. With tips on texture and ways to customize, your tacos can be perfect. Remember, you can store leftovers and reheat them for another meal. Get creative with flavors and topping choices! Enjoy making these delicious tacos that fit your taste and diet. Now, grab your ingredients and start cooking!

Craving a quick and tasty meal? You’re in the right place! My Savory Sheet-Pan BBQ Chickpea & Sweet Potato Tacos will satisfy your hunger and taste buds. With just a …

Read more

Categories Dinner

One-Pan Lemon Garlic Shrimp Scampi Flavorful Delight

October 28, 2025 by Chef Miles
- 1 pound large shrimp, peeled and deveined - 8 ounces linguine or spaghetti - 4 tablespoons unsalted butter Large shrimp add a sweet, briny taste to the dish. I like to use fresh, high-quality shrimp for the best flavor. You can use linguine or spaghetti based on your preference. Both types of pasta hold the sauce well. Unsalted butter creates a rich, creamy base and enhances the dish's savory notes. - 4 cloves garlic, finely minced - 1 lemon, zested and juiced - 1 teaspoon red pepper flakes (optional for heat) - 1 cup low-sodium chicken broth Garlic brings a strong aroma and taste. I always recommend using fresh garlic for the best results. The lemon zest and juice provide a bright flavor that balances the richness of the butter. Red pepper flakes add a nice kick, but you can skip them if you prefer less heat. Chicken broth adds depth and richness to the sauce, making it more flavorful. - 1/4 cup fresh parsley, chopped - 2 tablespoons extra virgin olive oil - Salt and freshly ground black pepper, to taste Fresh parsley adds a pop of color and freshness. I love to chop it finely to mix in well. You can drizzle extra virgin olive oil for added richness. Lastly, salt and pepper enhance all the flavors, making the dish taste complete. To start, fill a large pot with water. Add a generous amount of salt to the water. Bring it to a boil. Once boiling, add the linguine. Cook it according to the package instructions until it's al dente. Keep an eye on it to avoid overcooking. Before draining, reserve 1 cup of the pasta cooking water. This water is full of flavor. Drain the pasta and set it aside for later. In a large skillet, heat 2 tablespoons of olive oil over medium heat. Wait until the oil is hot. Add the shrimp in a single layer. Season the shrimp with salt, pepper, and red pepper flakes if you want some heat. Sauté for about 2-3 minutes on each side. The shrimp should turn pink and opaque. Once done, remove the shrimp from the skillet and place them on a plate. Now, reduce the heat to medium-low in the same skillet. Add 4 tablespoons of unsalted butter and let it melt. Once melted, add 4 cloves of finely minced garlic. Sauté the garlic for about 1 minute. Stir it frequently until it becomes fragrant. This step fills your kitchen with a wonderful smell. Next, pour in 1 cup of low-sodium chicken broth and fresh lemon juice. Make sure to scrape up any bits stuck on the skillet. This adds flavor. Bring the mixture to a gentle simmer. Stir in the lemon zest and the reserved pasta water. Let it simmer for about 2-3 minutes. This allows all the flavors to meld together nicely. Finally, return the cooked pasta and shrimp to the skillet. Toss everything together. Ensure the pasta and shrimp are well coated with the sauce. If the pasta seems dry, add more reserved pasta water until you reach your desired consistency. Taste the dish and adjust with more salt and pepper if needed. Remove from heat and add 1/4 cup of chopped parsley. Let it sit for a minute to blend the flavors beautifully. To get the best shrimp, you need to pay attention to cooking time and temperature. Cook shrimp on medium heat for about 2-3 minutes per side. They will turn pink and opaque when done. Overcooking will make them tough. Peeling and deveining shrimp is easy. First, hold the shrimp firmly. Twist and pull off the shell. Use a knife to make a small cut along the back. Remove the dark vein with the knife or your fingers. This step makes the shrimp cleaner and more pleasant to eat. If you want a creamy dish, add cream or cheese. Heavy cream works well, or you can use a bit of cream cheese. Just stir it in after cooking the shrimp. Start with a little and taste. You can always add more if you like. Adjust the ratios to keep the flavors balanced. If you add cream, you might need more lemon juice to keep the dish bright. Taste as you go to find what you love. For a great presentation, serve your shrimp scampi in a large, shallow bowl. This style lets all the colors shine. Add a sprinkle of parsley and some lemon wedges on top. It makes the dish look fresh and inviting. Pair your shrimp scampi with a crisp white wine, like Sauvignon Blanc. The wine’s acidity will match well with the lemon. You can also serve it with a side salad or garlic bread to complete the meal. {{image_4}} You can use many types of pasta for this dish. Linguine is my go-to, but spaghetti works well too. You can also try fettuccine or penne. If you need a gluten-free option, use gluten-free pasta made from rice or corn. These options cook nicely and keep the same great taste. If you don’t have fresh shrimp, frozen shrimp can save the day. Just make sure to thaw them first. For the broth, chicken broth is great, but vegetable broth is a nice swap. You can also use a splash of white wine for more flavor. Olive oil can be replaced with avocado oil for a different twist. You can easily change the dish by adding veggies. Spinach brings color and nutrients. Cherry tomatoes add a fresh burst of flavor. You could also add bell peppers or asparagus. For spices, try fresh herbs like basil or oregano. A pinch of smoked paprika gives it a nice kick too. Mix and match to find your favorite! To keep your shrimp scampi fresh, store leftovers in an airtight container. This helps prevent the dish from drying out or absorbing other flavors in the fridge. It will last up to 3 days in the refrigerator. Before serving, ensure you reheat it gently on low heat to avoid overcooking the shrimp. If you want to save some for later, freezing is a great option. First, let the shrimp scampi cool completely. Then, transfer it to a freezer-safe container. You can freeze it for up to 2 months. When you're ready to eat, thaw it overnight in the fridge. Reheat it on the stove over low heat. Add a splash of chicken broth or water to help restore moisture. Yes, you can make this dish in advance. To store it, let the shrimp scampi cool completely. Then, place it in an airtight container. You can keep it in the fridge for up to three days. When ready to eat, reheat it on the stove over low heat. Add a splash of chicken broth to keep it moist. Stir gently until heated through. Yes, you can enjoy this dish without pasta. Try serving the shrimp over rice or quinoa for a tasty alternative. You can also serve it with a side of roasted vegetables. This way, you still get all the great flavors without the carbs. If you don't have shrimp, other seafood works well. Try scallops or lobster for a delicious twist. You can also use chicken or firm tofu for a different protein. Each option brings a unique flavor to the dish while keeping it delightful. This blog post covered the key ingredients for shrimp scampi and how to prepare it. You learned about cooking pasta, sautéing shrimp, and making a delicious sauce. We also explored tips for perfecting the dish and ideas for variations. As you dive into making this recipe, remember that fresh ingredients make the best flavors. Experiment with substitutions to find what you love. Enjoy the process and savor every bite of your shrimp scampi!

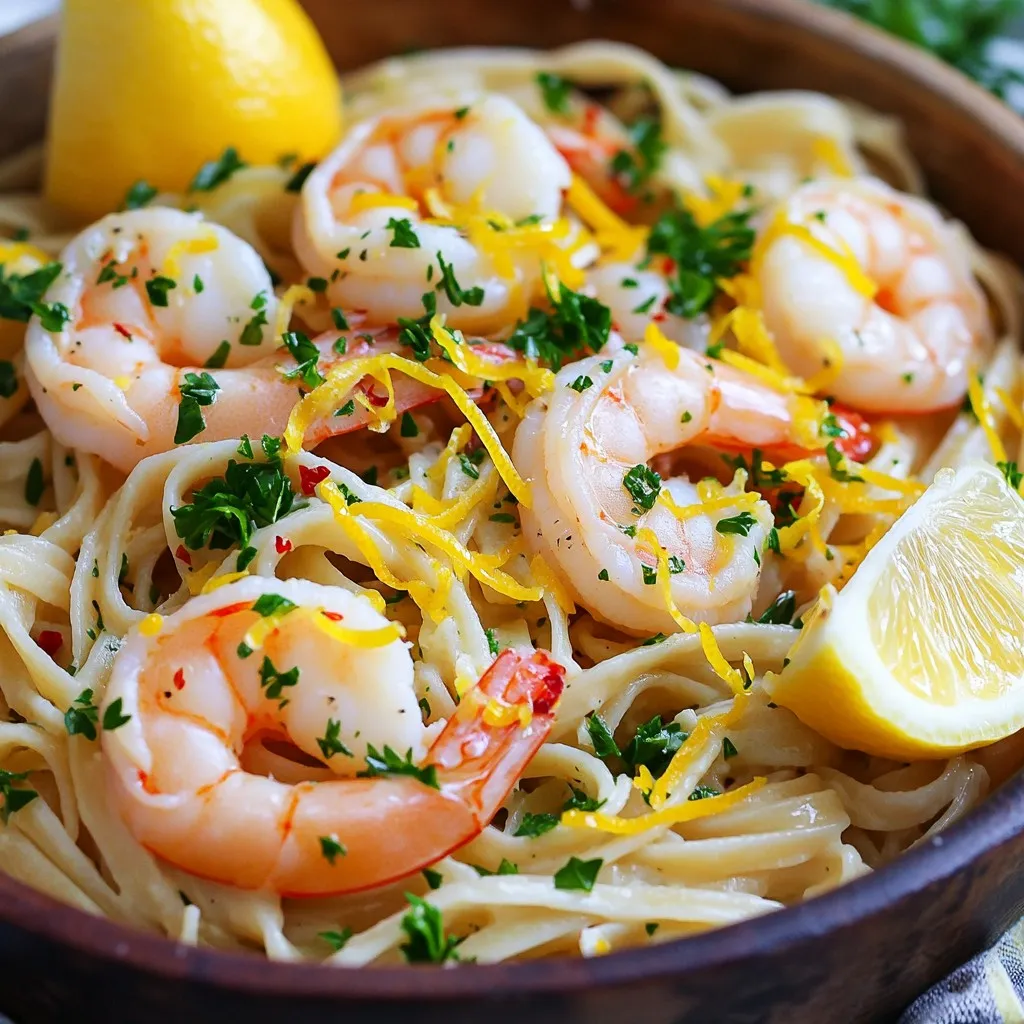
Are you ready for a delicious dinner that’s easy to make? One-Pan Lemon Garlic Shrimp Scampi brings bright flavors together in no time. With just a few main ingredients like …

Read more

Categories Dinner

Protein Chocolate Chip Mug Cake Rich and Simple Recipe

October 28, 2025 by Chef Miles
- 1 scoop of chocolate protein powder - 2 tablespoons almond flour - 1 tablespoon unsweetened cocoa powder - 1/2 teaspoon baking powder - 1 tablespoon coconut oil, melted - 1 tablespoon maple syrup or honey - 1/4 cup milk of choice (almond, soy, or dairy) - 2 tablespoons mini chocolate chips - A pinch of salt - Chocolate protein powder: This adds protein, helping to build muscles and keep you full. - Almond flour: Packed with healthy fats, it supports heart health and adds a nice texture. - Unsweetened cocoa powder: Rich in antioxidants, it may improve heart health and mood. - Baking powder: This helps the cake rise, giving it a light and fluffy texture. - Coconut oil: It provides healthy fats and adds moisture to the cake. - Maple syrup or honey: Both sweeteners are natural and add a hint of flavor. - Milk: Your choice of milk adds creaminess and helps blend the batter. - Mini chocolate chips: They bring joy with every bite, adding sweetness and fun. - Salt: A pinch of salt helps balance the sweetness and enhances flavors. - Chocolate protein powder: Use a plant-based protein for a vegan option. - Almond flour: Swap it with oat flour or coconut flour if needed. - Coconut oil: You can use melted butter or any neutral oil if you prefer. - Maple syrup or honey: Agave syrup works as a vegan sweetener. - Milk: Substitute with any non-dairy milk like oat or coconut milk for a vegan treat. First, grab your microwave-safe mug. This is where all the magic happens! In your mug, add: - 1 scoop of chocolate protein powder - 2 tablespoons almond flour - 1 tablespoon unsweetened cocoa powder - 1/2 teaspoon baking powder - A pinch of salt Use a fork or a small whisk to mix these dry ingredients well. Make sure to break up any clumps. This step is key for a smooth cake. Now, it’s time to add the wet ingredients. Pour in: - 1 tablespoon melted coconut oil - 1 tablespoon maple syrup or honey - 1/4 cup milk of your choice (almond, soy, or dairy) Stir everything together until the batter is smooth. You want no dry spots left. This ensures every bite is rich and tasty. Next, fold in: - 2 tablespoons mini chocolate chips Make sure the chocolate chips are spread out. This adds sweet bursts of flavor in each bite. Place your mug in the microwave. Heat it on high for 60 to 90 seconds. Keep an eye on it! Microwaves can cook differently. Check it after 60 seconds. The cake is done when it rises and feels firm. After cooking, let it cool for about a minute. For a fun touch, top it with Greek yogurt or more chocolate chips. Enjoy your tasty treat! To get a soft and fluffy mug cake, use the right amounts of each ingredient. Measure carefully. Too much protein powder makes it dry. Too little can make it too wet. Mixing well is key. You want a smooth batter with no lumps. This helps the cake rise evenly. Microwave it for just the right time. Start with 60 seconds, then check. If it needs more time, add just 10 seconds. One mistake is not mixing the dry ingredients well. Clumps can form, and your cake won't rise. Another error is using cold milk or oil. Warm them a bit to combine better. Don’t overcook the cake; it can turn rubbery. Keep an eye on it as it cooks. Finally, remember to let it cool for a minute. This helps the texture set up nicely. You can top your mug cake with Greek yogurt. It adds a creamy texture and a protein boost. A drizzle of honey or maple syrup can enhance sweetness. For extra chocolate, sprinkle more mini chocolate chips on top. Adding fresh berries can brighten the flavor. Try a scoop of ice cream for a fun treat. Each topping gives a new twist to your cake! {{image_4}} You can add nut butter to your mug cake for a richer taste. Just stir in 1 tablespoon of almond or peanut butter along with the wet ingredients. This will make the cake creamier and add healthy fats. The nutty flavor pairs well with the chocolate. You will enjoy every bite even more! While chocolate protein powder works great, you can switch it up. Try vanilla or peanut butter protein powder for a new twist. Each type brings a unique flavor to the cake. You can even use a blend of flavors for a fun mix! Just make sure the powder you choose still has good protein content. Want to make your mug cake even better? Toss in some fruits or nuts. Add half a banana, diced strawberries, or blueberries. You can also mix in walnuts or pecans for a crunchy texture. These additions not only taste good but also boost the nutrition. Get creative and explore different combinations to find your favorite! Store any leftover mug cake in an airtight container. Keep it in the fridge for up to three days. This keeps it fresh and tasty. If you plan to eat it later, cover the mug with plastic wrap. It helps prevent drying out. To reheat, place the mug cake back in the microwave. Heat it on high for about 20-30 seconds. Check it often to avoid overcooking. The cake should feel warm and soft. If it seems dry, add a tiny splash of milk before reheating. This helps restore moisture. You can freeze the mug cake for later use. First, let it cool completely. Then, place it in a freezer-safe container. It will stay good for up to a month. When you're ready to eat it, thaw it in the fridge overnight. Reheat it as described above. This way, you always have a quick treat on hand! Yes, you can use different types of flour. Instead of almond flour, you might try oat flour or regular all-purpose flour. Each type will change the taste and texture a bit. Oat flour makes it a bit softer. All-purpose flour can make it denser. Just make sure to adjust the liquid if needed. To make this mug cake vegan, swap the milk for a plant-based option. Almond milk or soy milk works great. Use maple syrup instead of honey for sweetness. You can also choose a plant-based protein powder. This keeps it delicious and suitable for vegans. If you don’t have protein powder, try using ground oats or almond flour. These will give some protein but won’t be as strong as protein powder. You can also use a plant-based protein powder. Just keep the measurements the same for the best results. We covered how to make a delicious mug cake, starting with the ingredient list. Each ingredient has health benefits, and I provided substitutions for dietary needs. You learned the step-by-step process for preparing and cooking the cake in the microwave. I shared tips for perfect texture and common mistakes to avoid. You also discovered fun variations and how to store leftovers effectively. Finally, I answered key questions to guide your mug cake journey. Enjoy your cake-making adventure and feel proud of your tasty treat!

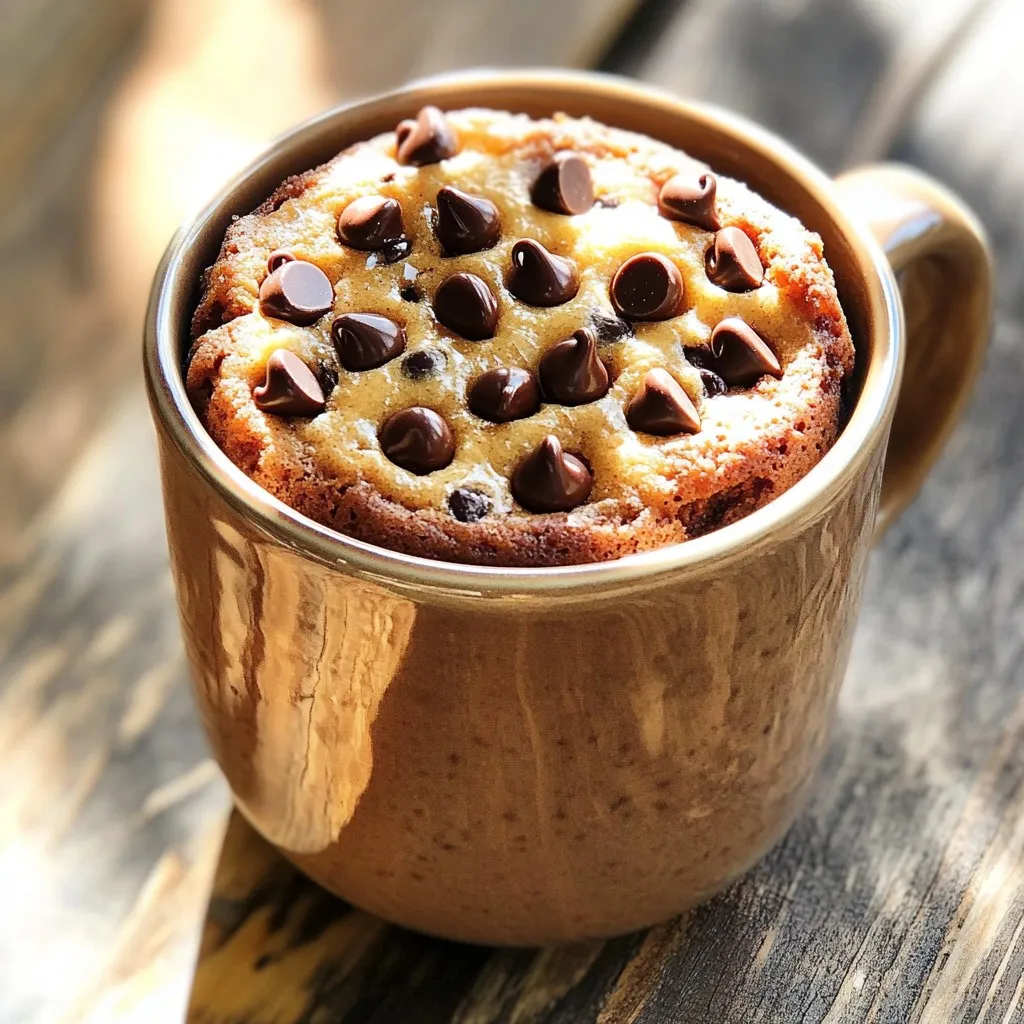
Are you craving a sweet treat that’s also healthy? Look no further! My Protein Chocolate Chip Mug Cake recipe is both rich and simple. Packed with protein and flavor, this …

Read more

Categories Desserts

Creamy Roasted Tomato Basil Soup Rich and Flavorful Meal

October 28, 2025 by Chef Miles
To make creamy roasted tomato basil soup, gather these ingredients: - 2 pounds ripe tomatoes, halved - 1 medium onion, coarsely chopped - 4 cloves garlic, peeled and left whole - 2 tablespoons olive oil - Salt and freshly ground black pepper, to taste - 1 teaspoon dried oregano - 2 cups vegetable broth, low sodium recommended - 1 cup heavy cream (or substitute with coconut cream for a lighter, dairy-free version) - 1/2 cup fresh basil leaves, roughly chopped - 1 tablespoon balsamic vinegar (optional for a hint of sweetness) You can make this soup fit your needs! Here are some easy swaps: - Dairy-Free: Use coconut cream instead of heavy cream. - Gluten-Free: This recipe is already gluten-free! - Low-Calorie: Use less cream or a lighter milk. - Herb Variations: Try using thyme or parsley if you don’t have basil. Fresh ingredients make a big difference in taste. Here’s why: - Flavor: Ripe tomatoes and fresh basil add rich flavors. - Nutrition: Fresh produce has more vitamins and nutrients. - Texture: Fresh veggies roast better, giving a nice base for the soup. Using fresh ingredients elevates your soup from good to great! Enjoy the journey of creating a warm and flavorful dish. First, set your oven to 400°F (200°C). This heat helps our soup’s flavors bloom. Next, grab a large baking sheet. Place the halved tomatoes, onion, and whole garlic cloves on it. Drizzle with olive oil for a rich taste. Add salt, pepper, and oregano to enhance the flavors. Toss gently so everything is covered. Roast these veggies for 30-35 minutes. Look for caramelized edges and soft onions. These signs mean they are ready! After roasting, let the vegetables cool for a few minutes. Transfer them to a blender with vegetable broth. Blend on high until it’s smooth and creamy. If needed, stop to scrape the sides. This ensures a perfect texture! Pour the blended mix into a medium saucepan over medium heat. Add the heavy cream, or coconut cream if you want a lighter soup. Stir well and warm until it gently simmers. Adjust the seasoning with salt and pepper to taste. Then, add the fresh basil and balsamic vinegar if you like a hint of sweetness. Cook for another 5 minutes to let the flavors blend. Serve the soup hot. For a beautiful touch, garnish with extra basil leaves or a drizzle of cream. It pairs wonderfully with crusty bread or a grilled cheese sandwich for a cozy meal! To get the best flavor, season your veggies well. Use good salt and fresh black pepper. I add dried oregano, but you can try thyme or basil, too. If you want a touch of sweetness, add balsamic vinegar. This really brings out the rich taste of the roasted tomatoes. Roasting is key for deep flavor. Preheat your oven to 400°F (200°C) to start. Spread the tomatoes, onion, and garlic evenly on the baking sheet. Make sure the cut sides of the tomatoes face up; this helps them caramelize. Roast until the edges are slightly charred. This usually takes about 30-35 minutes. For a creamy soup, blending is important. After roasting, let the veggies cool for a bit. Then, add them to your blender with the vegetable broth. Blend until it’s completely smooth. If you like a thicker soup, add less broth. Once blended, stir in the cream. This gives the soup a rich, velvety feel. {{image_4}} You can make this soup dairy-free by using coconut cream instead of heavy cream. It keeps the soup rich and creamy. Just swap the heavy cream with one cup of coconut cream. This version still delivers great taste. You can also use almond milk or cashew cream for a lighter option. Both will add a nice flavor without dairy. Want to make this soup more filling? Add protein like cooked chicken or white beans. For chicken, shred it and stir it in after blending the soup. If you choose white beans, add a cup to the blender with the vegetables. This will increase the protein while keeping the soup smooth and creamy. To boost the flavor, add spices like smoked paprika or red pepper flakes. Smoked paprika gives a warm, smoky taste. Just a teaspoon will do. Red pepper flakes add a nice kick. Start with a pinch, then adjust to your liking. You can also add fresh herbs like thyme or rosemary for more depth. These small changes can transform your soup into something special. After you enjoy your creamy roasted tomato basil soup, store any leftovers in an airtight container. Let the soup cool to room temperature before sealing it. Refrigerate the soup for up to three days. This keeps the flavors fresh while making it easy to reheat later. To reheat the soup, pour it into a saucepan. Heat it on medium-low heat, stirring often. This helps the soup warm evenly without burning. If the soup thickens, add a splash of vegetable broth or water. Stir until smooth and hot. You can also use a microwave; heat it in short bursts, stirring in between. If you want to save some soup for later, freezing is a great option. Let the soup cool completely, then pour it into freezer-safe bags or containers. Leave some space for expansion as it freezes. Label the bags with the date and freeze for up to three months. When you’re ready to enjoy it, thaw it overnight in the fridge and reheat as mentioned above. This way, you’ll always have a tasty meal on hand! Yes, you can use canned tomatoes. They work well for this soup. Choose whole or diced tomatoes for the best results. Drain excess liquid to avoid a watery soup. Roasting fresh tomatoes adds flavor, but canned tomatoes can save time. To spice up the soup, add red pepper flakes. You can also mix in diced jalapeños for a fresh kick. Another option is to include a dash of hot sauce while simmering. Taste as you go to find your perfect heat level. This soup pairs well with crusty bread or a grilled cheese sandwich. You can also enjoy it with a fresh salad or homemade croutons. For a gourmet touch, top with fresh basil or a swirl of cream before serving. In this post, we covered how to make creamy roasted tomato basil soup. We discussed the key ingredients and offered helpful substitutions. We went through step-by-step instructions, ensuring great flavor and texture. We also provided tips for storage and answered common questions. Use fresh ingredients for the best taste. Enjoy experimenting with variations, like dairy-free options. Your soup-making skills will shine as you create delicious meals. Happy cooking!

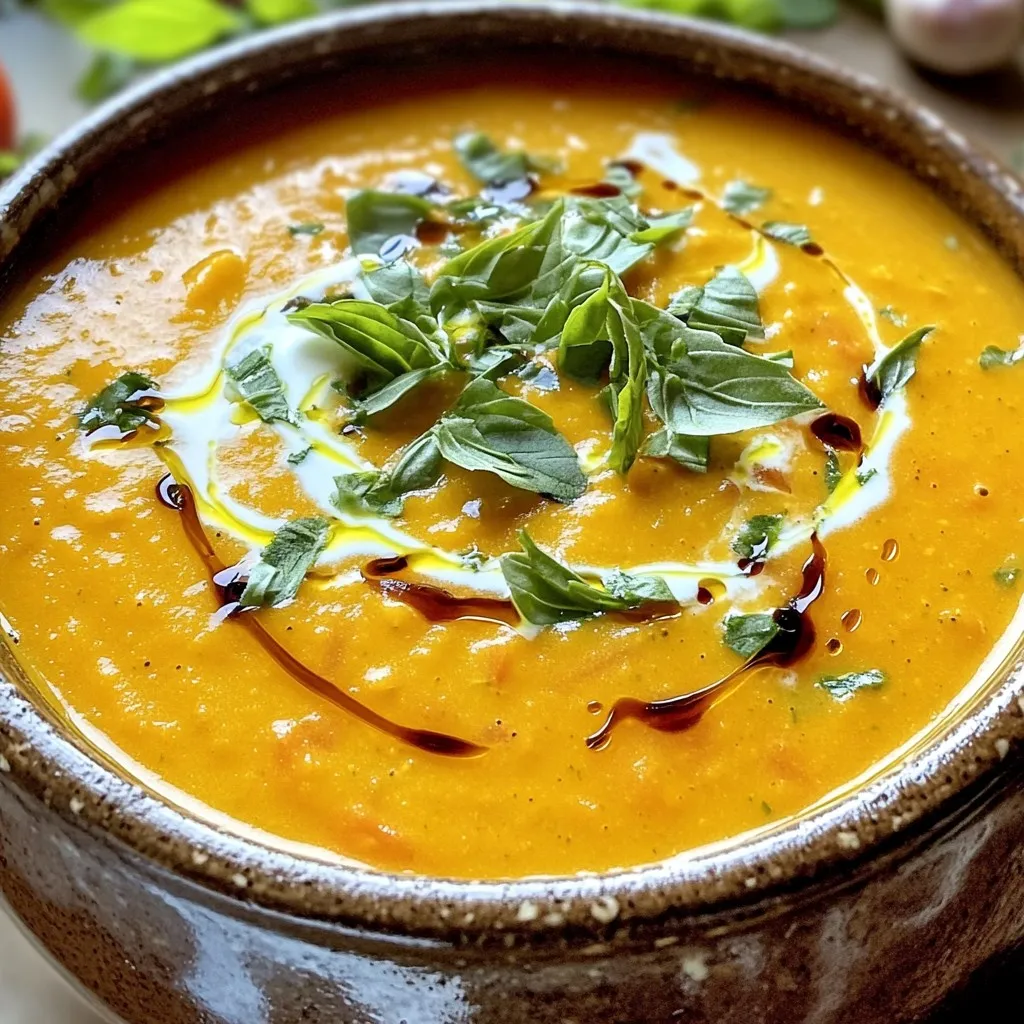
Are you ready to warm up with a rich and flavorful meal? This creamy roasted tomato basil soup is a crowd-pleaser that comes together with simple ingredients and easy steps. …

Read more

Categories Dinner

Warm Maple Pecan Baked Oatmeal Comforting and Easy Dish

October 28, 2025 by Chef Miles
To make warm maple pecan baked oatmeal, gather these items: - 2 cups rolled oats - 1/2 cup pecans, roughly chopped - 1/2 cup pure maple syrup - 2 cups almond milk (or your preferred milk) - 1/4 cup unsweetened applesauce - 1 teaspoon vanilla extract - 1 teaspoon ground cinnamon - 1/2 teaspoon ground nutmeg - 1/4 teaspoon salt - 1 large banana, sliced (optional for topping) - Extra maple syrup for drizzling (optional) You can swap ingredients for different flavors or needs: - Use walnuts instead of pecans for a unique taste. - Coconut milk works well in place of almond milk. - If you don't have applesauce, mashed banana can be a great stand-in. - For a sweeter dish, consider adding a bit more maple syrup. - You can leave out the banana and use berries instead for a fresh twist. Each serving (based on 6 servings) offers balanced nutrition: - Calories: About 250 - Protein: 6g - Total Fat: 9g - Saturated Fat: 1g - Carbohydrates: 42g - Fiber: 5g - Sugar: 10g - Sodium: 120mg This dish provides healthy energy, fiber, and flavor, making it a great choice for breakfast or a snack. Enjoy the warmth and comfort of this easy recipe, tailored for your taste! 1. First, preheat your oven to 350°F (175°C). This step is key for even baking. 2. Next, grease a 9x9 inch baking dish. Use cooking spray or a light oil. This helps prevent sticking. 3. In a large bowl, mix 2 cups of rolled oats with 1/2 cup of chopped pecans. 4. Add 1 teaspoon of ground cinnamon, 1/2 teaspoon of ground nutmeg, and 1/4 teaspoon of salt. Stir well to combine these dry ingredients. 5. In a separate bowl, whisk together 2 cups of almond milk, 1/2 cup of pure maple syrup, 1/4 cup of unsweetened applesauce, and 1 teaspoon of vanilla extract. Mix until smooth. 6. Gradually pour the wet mixture into the dry ingredients. Stir gently until everything is well combined. 7. Once mixed, pour the oatmeal mixture into the prepared baking dish. Spread it out evenly. 8. If you like, add sliced banana on top for added flavor. This step is optional but tasty! 9. Bake in the oven for 30-35 minutes. The oatmeal should be firm and golden on top. 10. After baking, take it out and let it cool for a few minutes. This helps it set. - Use rolled oats for the best texture. They absorb liquid well. - Make sure to mix the wet and dry ingredients thoroughly. This ensures even cooking. - Let the oatmeal cool slightly before slicing. This makes serving easier. - Drizzle extra maple syrup on top just before serving. This adds extra sweetness and flavor. You can make this baked oatmeal your own. Here are some fun ideas: - Fruits: Add berries, apples, or raisins for extra sweetness. - Nuts: Swap pecans for walnuts or almonds. They give a nice crunch. - Spices: Experiment with ginger or allspice for a new flavor. - Sweeteners: If you like it sweeter, use honey or agave syrup. You can even mix in some chocolate chips for a treat! Storing your baked oatmeal is easy. Here are some tips: - Cool completely: Let it cool down before storing to avoid sogginess. - Use airtight containers: This keeps it fresh longer. - Refrigeration: Store it in the fridge for up to 5 days. - Freezing: You can freeze individual portions for up to 3 months. Just wrap them well! For the best experience, serve your baked oatmeal warm. Here’s how: - Toppings: Add sliced bananas, yogurt, or more maple syrup on top. - Presentation: Serve in bowls, and sprinkle with chopped pecans. - Pair it up: Enjoy it with a side of fresh fruit or a cup of tea. These small touches can make your dish even better! {{image_4}} You can mix in some fun flavors to your baked oatmeal. Here are a few ideas: - Dried fruit: Add raisins or cranberries for sweetness. - Chocolate chips: Toss in dark or milk chocolate for a sweet treat. - Seeds: Chia or flax seeds can boost nutrition. - Spices: Try adding a pinch of ginger or cardamom for warmth. Each of these add-ins can change the taste and give your dish a personal touch. If you need a gluten-free version, it’s simple. Just use gluten-free oats. They work just like regular oats but are safe for those with gluten issues. Check the package to ensure they are certified gluten-free. This recipe is easy to make vegan! Here are some swaps: - Use almond milk or any plant-based milk. - Replace eggs with flaxseed meal mixed with water. Use 1 tablespoon of flaxseed meal with 2.5 tablespoons of water for each egg. - Ensure your maple syrup is pure and vegan. These changes keep your dish delicious and plant-based. You won’t miss the eggs or dairy! To keep your warm maple pecan baked oatmeal fresh, let it cool first. Once cooled, cover it tightly with plastic wrap or aluminum foil. You can also place it in an airtight container. Store it in the fridge for up to five days. This keeps the flavors intact while preventing it from drying out. When you’re ready to enjoy your baked oatmeal again, there are a few easy ways to reheat it. You can use a microwave for quick warming. Place a serving in a bowl and heat it for about 30 seconds. Stir and check if it's warm enough. If not, heat it in 15-second bursts. You can also reheat it in the oven. Preheat the oven to 350°F (175°C). Cover the dish with foil and heat for about 10-15 minutes. This method keeps it nice and soft. If you want to save some for later, freezing is a great option. Cut the baked oatmeal into squares after it cools. Wrap each piece in plastic wrap, then place them in a freezer-safe bag. Label the bag with the date. You can freeze it for up to three months. To eat, simply thaw in the fridge overnight and reheat as mentioned above. This way, you’ll always have a delicious breakfast ready to go! Yes, you can use any milk you like. Cow's milk works well. Soy milk or oat milk is also great. They will give a nice flavor and texture. Just keep the same amount as in the recipe. This way, you keep the same creaminess. To make this oatmeal nut-free, skip the pecans. You can replace them with seeds. Sunflower seeds or pumpkin seeds are good choices. They add crunch and nutrition without the nuts. You can also use more oats for bulk. Toppings can make this dish even better! Here are some tasty options: - Sliced banana - Chopped nuts (if not nut-free) - Fresh berries like strawberries or blueberries - A dollop of yogurt - A drizzle of extra maple syrup Feel free to mix and match your favorites! We covered a lot about baked oatmeal. We looked at key ingredients and useful substitutes. You now know how to prepare and bake it perfectly. I shared tips for storage and creative variations. Balancing nutrition with taste makes this a great dish. Enjoy exploring all the ways to customize your recipe. With these tips, your baked oatmeal will shine at any meal. Happy baking!

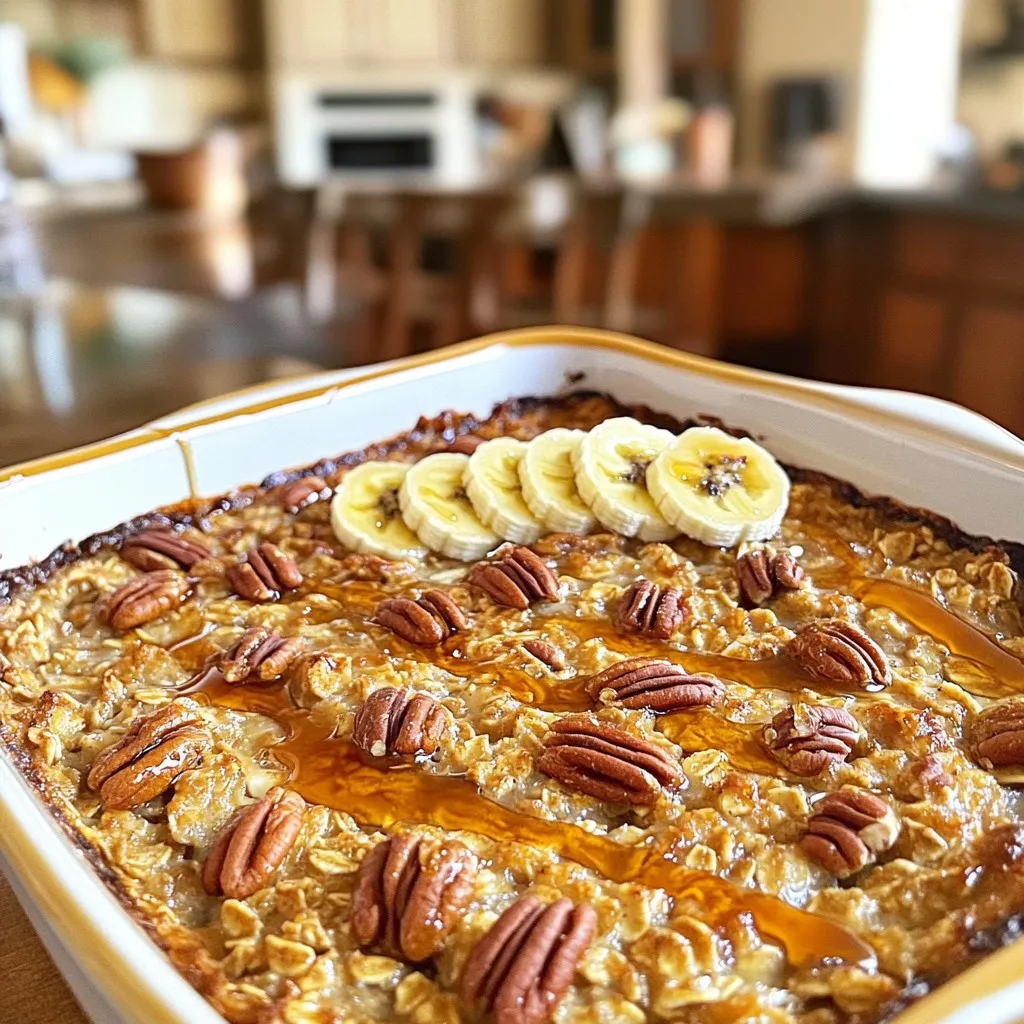
Looking for a warm and tasty breakfast that’s easy to make? You’ve found it! My Warm Maple Pecan Baked Oatmeal is the perfect comfort dish to start your day. It …

Read more

Categories Breakfast

Air Fryer Fish Tacos with Slaw Quick and Tasty Meal

October 22, 2025 by Chef Miles
- 1 lb white fish fillets (cod or tilapia) - Seasonings: Salt, pepper, paprika, garlic powder, cayenne pepper - 2 tablespoons olive oil - 1 cup panko breadcrumbs - Slaw vegetables: 1 cup green cabbage, 1/2 cup red cabbage, 1/4 cup fresh cilantro - Dressing ingredients: 1/4 cup sour cream, 1 tablespoon lime juice, 1 teaspoon honey or agave syrup - 8 small corn tortillas - Optional garnishes: lime wedges, additional cilantro When I make air fryer fish tacos, I love to focus on fresh, simple ingredients. To start, you need one pound of white fish fillets. Cod or tilapia works great. I always season the fish with salt, pepper, paprika, garlic powder, and a little cayenne for a kick. Next, I use two tablespoons of olive oil to coat the fish. This oil helps the breadcrumbs stick and gives a nice crisp when cooking. For the slaw, I like a mix of colors and flavors. You will need one cup of finely shredded green cabbage and half a cup of finely shredded red cabbage. A quarter cup of chopped fresh cilantro adds a burst of freshness. For the dressing, combine a quarter cup of sour cream, one tablespoon of lime juice, and one teaspoon of honey or agave syrup. This creamy dressing ties the slaw together perfectly. Finally, you need eight small corn tortillas. These are the perfect size for holding all the tasty fillings. If you want to garnish your tacos, add lime wedges and extra cilantro for a fresh touch. First, I dry the fish fillets with paper towels. This step helps the coating stick better. Then, I sprinkle salt and pepper on both sides for flavor. Next, I mix panko breadcrumbs with paprika, garlic powder, and cayenne in a shallow dish. I take each fillet and brush it with olive oil. Finally, I press the fillets into the breadcrumb mix to coat all sides. I preheat my air fryer to 400°F (200°C). I lay the coated fish fillets in a single layer in the basket. If my air fryer is small, I may need to cook in batches. I set the timer for 10 to 12 minutes. Halfway through, I flip the fish to ensure even cooking. The fish should be golden brown and flaky when done. In a large bowl, I mix finely shredded green and red cabbage with chopped cilantro. In another small bowl, I whisk sour cream, lime juice, and honey until smooth. I pour the dressing over the cabbage mix and toss it well. This creates a fresh and crunchy slaw that pairs perfectly with the fish. While the fish cooks, I heat a skillet over medium heat. I warm each corn tortilla for about 30 seconds on each side. This step makes the tortillas soft and easy to fold. Once the fish is ready, I break it into bite-sized pieces. I take a warmed tortilla and place some fish in the center. Then, I top it with the crunchy slaw. To get that perfect crispy fish, you need to dry the fillets well. Use paper towels to pat them dry. This helps the coating stick better. After drying, season both sides with salt and pepper. Then, coat the fish in olive oil and press it into the breadcrumb mix. Make sure to coat every side evenly. For air frying, set your machine to 400°F (200°C). This high heat cooks the fish quickly, giving it a golden brown color. Cook for about 10-12 minutes. Flip the fish halfway through to ensure even cooking. You can add fun ingredients to your slaw. Try adding shredded carrots or sliced radishes for extra color and crunch. They add a nice texture too. If you want a different dressing, Greek yogurt works well instead of sour cream. It adds creaminess with fewer calories. Corn tortillas are classic, but you can also use flour tortillas if you prefer. For a lighter option, try lettuce wraps. They are fresh and low-carb. To soften your tortillas, heat them in a dry skillet. Warm each side for about 30 seconds until they are pliable. This makes them easy to fold without breaking. {{image_4}} To keep your leftover fish tacos fresh, place them in an airtight container. Be sure to store them in the fridge. They will be good for up to two days. If you want to freeze them, wrap each taco tightly in plastic wrap and store them in a freezer bag. They can last about three months in the freezer. When you're ready to eat them, reheat in the air fryer for about 5 minutes at 350°F. This keeps the fish crispy. You can also use a skillet on medium heat. Just be careful not to overcook, or they will become dry. For leftover slaw, transfer it to a clean, airtight container. Store it in the fridge for up to three days. If you notice any wilted cabbage or off-smells, it's time to toss it out. To keep your slaw crisp, store the dressing separately. When you're ready to eat, mix the dressing with the slaw. This method helps maintain freshness and crunch. To make your fish tacos shine, focus on how you arrange them. Use a colorful platter. Place the tacos in a line or a circle. Add lime wedges and fresh cilantro between the tacos. This makes it look fun and inviting. You can also serve a small bowl of extra slaw and sauce on the side. Guests will love adding more to their tacos. For side dishes, consider options that balance flavors. Here are a few ideas: - Black beans: Serve them warm for extra protein. - Mexican rice: This adds a nice touch of flavor. - Grilled corn: A sweet and crunchy side that pairs well. Beverages can enhance your dining experience. I recommend pairing your tacos with: - Light beers: A crisp lager complements the fish well. - Margaritas: A classic choice, especially with lime. - Mocktails: A refreshing lime soda or a fruit spritzer works great too. Seasonal drinks can also enhance your meal. In the summer, try a cool fruit-infused water. In the colder months, a warm spiced cider can be comforting. These drinks make your fish taco meal even more enjoyable. Cook fish tacos in the air fryer for 10-12 minutes at 400°F (200°C). Flip the fish halfway through. This helps it cook evenly and become golden brown. The fish should be flaky when done. Use a fork to check if it flakes easily. Yes, you can use frozen fish fillets. Just thaw them first. Pat them dry with paper towels. This helps the coating stick better. Ensure the fillets are fully thawed for even cooking. You can use regular breadcrumbs if you don’t have panko. Crushed crackers work well too. Cornmeal can add a nice crunch, too. Just remember, panko gives a lighter texture, so adjust cooking time if needed. To make this recipe gluten-free, use gluten-free breadcrumbs. Check the tortillas for gluten-free options. Corn tortillas are usually safe. Also, ensure your seasonings are gluten-free. You can add many toppings to your fish tacos. Try avocado slices for creaminess. Fresh salsa adds a nice kick. Pickled jalapeños give extra heat. Chopped green onions and lime wedges can enhance flavor too! In this article, we covered how to make delicious fish tacos from scratch. We discussed each ingredient, from the fish to the slaw and tortillas. You learned how to prepare, cook, and assemble these tasty tacos step-by-step. Remember, with crispy fish and vibrant slaw, you create a perfect meal. Enjoy experimenting with flavors and serving options. Keep those tips in mind for the best results. Happy cooking!

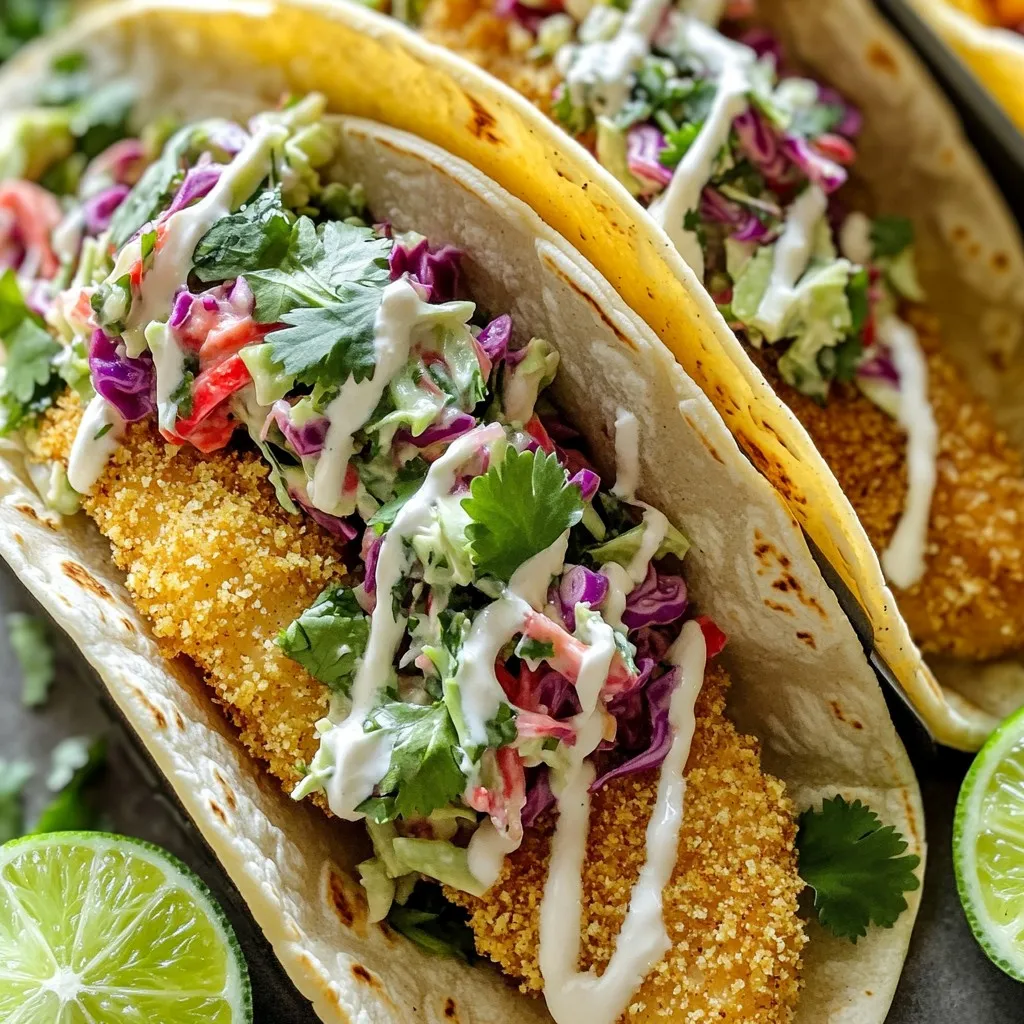
Ready to spice up your meal plan? These Air Fryer Fish Tacos with Slaw are quick, tasty, and perfect for any occasion! In just a few steps, I’ll show you …

Read more

Categories Dinner

Apple Cider Donut Baked Oatmeal Tasty Breakfast Treat

October 22, 2025 by Chef Miles
- 2 cups rolled oats - 1 ½ cups apple cider - 1 teaspoon baking powder - 1 teaspoon ground cinnamon - ½ teaspoon ground nutmeg - ¼ teaspoon salt - 2 tablespoons pure maple syrup - 1 large egg, lightly beaten - 1 cup diced apples (preferably Granny Smith or Honeycrisp for a tart flavor) - ½ cup chopped walnuts (optional for added crunch) - 2 tablespoons melted coconut oil (or unsalted butter for richness) - ¼ cup brown sugar (for a caramelized topping) This recipe brings together simple and wholesome ingredients. Rolled oats serve as the base, offering fiber and texture. Apple cider adds a sweet and tangy flavor that makes each bite special. Baking powder helps the mix rise and become fluffy. Spices like cinnamon and nutmeg bring warmth and depth to the dish. A pinch of salt balances the sweetness. Sweeteners like pure maple syrup and brown sugar give it that cozy, dessert-like taste we all love. Don’t forget the eggs! They bind everything together and add richness. Coconut oil or unsalted butter enhances the flavor and texture. If you want some extra goodness, fold in diced apples and walnuts for a delightful crunch. These ingredients come together to create a baked oatmeal that tastes just like your favorite apple cider donuts. - Preheat your oven to 350°F (175°C). Grease a 9x9-inch baking dish with cooking spray or butter. This helps with easy removal later. - In a large mixing bowl, mix together the rolled oats, baking powder, ground cinnamon, ground nutmeg, and salt. Stir until all dry ingredients are well combined. - In another bowl, whisk the apple cider, pure maple syrup, lightly beaten egg, and melted coconut oil. Make sure the mixture is smooth. - Gradually pour the wet mixture into the dry mix. Stir gently until everything is just combined. Do not overmix; this keeps the oats fluffy. - Carefully fold in the diced apples and chopped walnuts, if you choose to add them. This adds a nice crunch and flavor. - Transfer the mixture into the greased baking dish. Spread it out evenly, so it cooks well. - Sprinkle the brown sugar on top. This creates a sweet, caramelized layer when baked. - Bake for 25-30 minutes. The top should turn golden brown. Check with a toothpick; it should come out clean when done. To get the best texture, avoid overmixing. When you mix the wet and dry ingredients, do it gently. This keeps the oatmeal fluffy. For apples, I recommend using Granny Smith or Honeycrisp. They add a nice tartness that balances the sweetness. Serve the baked oatmeal warm for the best taste. You can drizzle extra apple cider over each square. Dusting with powdered sugar also adds a nice touch. For garnishing, try adding diced apples or a dollop of yogurt. This not only makes it pretty but adds creaminess. To boost flavor, consider adding spices like nutmeg or ginger. You can also mix in chocolate chips for a sweet twist. Pair this dish with yogurt or whipped cream. These add richness and make every bite more enjoyable. {{image_4}} You can easily change the oats in this recipe. Try steel-cut oats for a chewier texture. If you want a gluten-free option, use certified gluten-free oats. For sweeteners, swap maple syrup with honey or agave if you prefer. Each choice will give a unique flavor twist. If you like nuts, walnuts work great. But you can use pecans or almonds too. They will add a nice crunch. Feel free to skip the nuts altogether if you want. Fruits can change everything. Instead of apples, try pears for a softer taste. Berries mix in well, adding a burst of color and flavor. You can even add dried fruits like cranberries or raisins for extra sweetness. If you're vegan, skip the egg and use a flax egg instead. Mix one tablespoon of ground flaxseed with three tablespoons of water. Let it sit for a few minutes to thicken. This will help bind your oatmeal just like an egg. Want to switch things up? Turn this baked oatmeal into muffins or bars. Just pour the mixture into a muffin tin or a larger pan and cut it into bars after baking. This makes for easy snacks on the go. Another fun idea is to make a parfait. Layer baked oatmeal with yogurt and fresh fruit. This gives you a tasty and pretty dish. Each bite will be a mix of flavors and textures, making breakfast even more exciting! After you bake your Apple Cider Donut Baked Oatmeal, let it cool. Cut it into squares and store them in an airtight container. This helps keep it fresh. You can refrigerate it for up to five days. If you want to keep it longer, freezing is a great option. Wrap each square tightly in plastic wrap. Place the wrapped squares in a freezer-safe bag. This way, they can last up to three months. You can reheat your oatmeal in two ways: the oven or the microwave. For the oven, preheat it to 350°F (175°C). Place the squares in a baking dish and cover them with foil. Heat for about 10-15 minutes, until warm. This method helps maintain the texture. If you use a microwave, place a square on a microwave-safe plate. Heat it for about 30 seconds to 1 minute. Add a splash of apple cider to keep it moist. Enjoy your warm breakfast treat! Can I use quick oats instead of rolled oats? Yes, you can use quick oats. They will change the texture. Quick oats make the oatmeal softer and chewier. If you prefer a heartier bite, stick with rolled oats. How do I know when the oatmeal is done baking? The oatmeal is done when the top turns golden brown. Insert a toothpick in the center; it should come out clean. If it has wet batter on it, bake for a few more minutes. Can I make this recipe ahead of time? Yes, this recipe is great for meal prep! You can mix and bake it the night before. Store in the fridge and reheat in the morning for a quick breakfast. General nutritional content This baked oatmeal is rich in fiber and healthy carbs. Each serving has about 180 calories. It has a good mix of macronutrients from oats, apples, and nuts. Health benefits of key ingredients - Oats: They support heart health and help manage blood sugar. - Apples: They provide vitamins and antioxidants. - Walnuts: They are high in healthy fats and omega-3s. What to do if the mixture is too dry/wet? If the mixture is too dry, add a little more apple cider. If it’s too wet, add a few more oats. Adjust until you reach your desired consistency. Adjusting sweetness level to taste You can reduce the maple syrup or brown sugar if you want less sweet. To make it sweeter, add more maple syrup. Try to taste the mixture before baking to get it just right. This blog post covered all the critical steps to make a delicious baked oatmeal. We discussed key ingredients like oats, spices, and sweeteners. The step-by-step instructions guide you through mixing and baking. I offered tips to achieve the best texture and enhance flavors, along with various serving styles and storage tips. Remember, cooking is about experimenting. Don't be afraid to modify flavors and try new ingredients. I hope this inspires your next baking adventure!

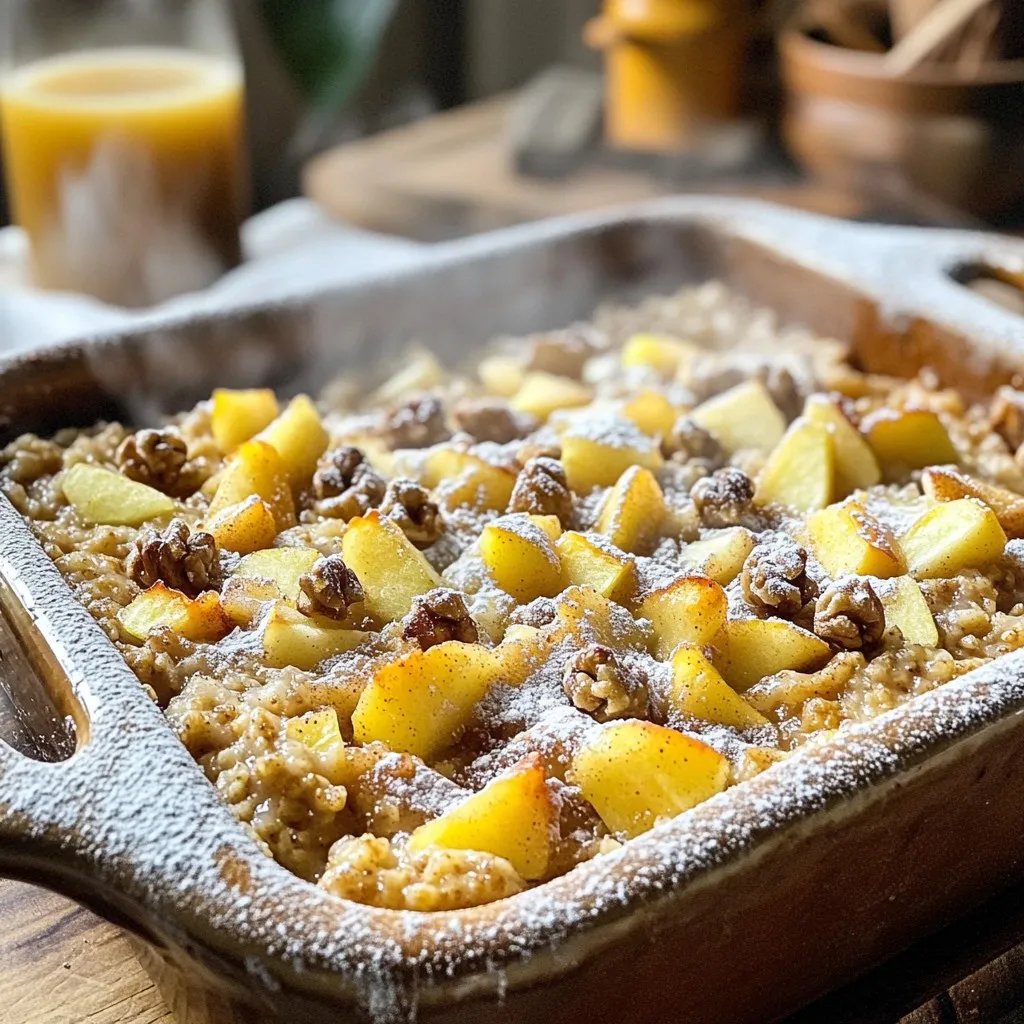
Who doesn’t love the warm, sweet taste of fall? This Apple Cider Donut Baked Oatmeal brings that cozy flavor right to your breakfast table. With simple ingredients like rolled oats, …

Read more

Categories Breakfast

Minute Chili Crisp Egg Fried Rice Flavorful Delight

October 22, 2025 by Chef Miles
- 2 cups cooked jasmine rice - 2 large eggs - 2 tablespoons chili crisp sauce - 1 tablespoon soy sauce - 1 tablespoon sesame oil - 1 small onion, finely chopped - 2 cloves garlic, minced - 1 small carrot, diced - 1/2 cup frozen peas - 2 green onions, sliced - Salt and pepper to taste You can swap jasmine rice for basmati rice. Both have great texture. If you want a different flavor, use brown rice. Instead of chili crisp sauce, try sriracha or garlic chili sauce. For a vegan option, use tofu instead of eggs. You can also skip the soy sauce and use tamari for a gluten-free choice. Day-old jasmine rice is best for fried rice. It gets dry, which helps it fry well. Basmati rice works nicely too, offering a slightly nutty taste. Avoid sticky rice, as it clumps together. The goal is to have individual grains that fry up nicely. Start by cooking 2 cups of jasmine rice. Day-old rice works best because it feels firmer. Spread the rice on a baking sheet and let it cool. For the best texture, refrigerate the rice overnight. This step helps dry it out slightly, making it perfect for frying. In a large skillet, heat 1 teaspoon of sesame oil over medium heat. Crack in 2 large eggs and scramble gently. Cook the eggs until they are just set, about 1-2 minutes. Remove the eggs and place them in a bowl. Set them aside for later. In the same skillet, add 1 tablespoon of sesame oil and heat it. Once hot, toss in 1 small onion, finely chopped, and 2 minced garlic cloves. Sauté for about 2 minutes until they are soft and fragrant. Next, add 1 small diced carrot and 1/2 cup of frozen peas. Cook this mixture for another 2-3 minutes until the vegetables look bright and tender. Now, increase the heat and add the cold rice to the skillet. Use a spatula to break apart any rice clumps. Stir-fry the rice for about 2 minutes. This gives the rice a nice color and slight toast. Pour in 1 tablespoon of soy sauce and 2 tablespoons of chili crisp sauce. Mix well to coat the rice evenly. Add the scrambled eggs back into the pan, stirring gently. Taste and season with salt and pepper as needed. When the rice is ready, remove the pan from heat. Serve the fried rice in shallow bowls or plates. For a tasty finish, sprinkle sliced green onions on top. You can add a drizzle of extra chili crisp sauce for more flavor. Lime wedges on the side add a refreshing touch! To get the best texture, use day-old jasmine rice. Fresh rice is too soft and sticky. Spread cooked rice on a baking sheet to cool it. This helps dry it out a bit. The dryer the rice, the better it fries. When you heat the rice in the pan, break up any clumps gently. This helps each grain fry evenly and get a nice color. Chili crisp sauce is key for flavor and heat. You can add more or less depending on your taste. If you want a milder dish, start with one tablespoon. Add more chili crisp sauce later if you like it spicier. You can also mix in fresh chili or hot sauce for extra heat. Taste as you go to find your perfect spice level. Using the right tools makes cooking easier. A large skillet or wok works best for frying rice. A spatula helps mix ingredients without breaking the rice. A good knife and cutting board are also essential for chopping vegetables. If you have a rice cooker, it can make perfect rice every time. A storage container is useful for keeping leftover fried rice fresh. {{image_4}} You can make this dish without eggs. Just skip the eggs and add more veggies. Use tofu for protein. Tofu adds a nice texture and absorbs flavors well. You can also use chickpeas for extra protein. They are hearty and filling, too. If you want more protein, try adding chicken or shrimp. Cook the protein first and set it aside. Then add it back when you mix in the rice. Ground turkey is another great option. It cooks fast and blends well with the flavors. Using seasonal vegetables makes this dish even better. In the spring, add asparagus or snap peas. In the fall, try diced squash or sweet potatoes. These veggies add color and taste. You can mix and match based on what you like or what you have at home. To keep your fried rice fresh, store it in an airtight container. Let it cool to room temperature before sealing it. This helps prevent moisture buildup, which can make the rice soggy. Label the container with the date so you know when to use it. For the best taste, reheat fried rice in a pan over medium heat. Add a splash of water or a bit of oil to keep it moist. Stir regularly to heat evenly. You can also use a microwave but cover it with a damp paper towel to retain moisture. Fried rice can last up to four days in the fridge. Make sure to eat it within this time frame for safety and quality. If you notice any off smells or changes in texture, it’s best to discard it. You can use fresh rice, but it may not fry well. Day-old rice has less moisture. This helps it fry up crisp and fluffy. If you use fresh rice, cool it first to reduce moisture. Chili crisp is a spicy condiment made from chili oil, crispy garlic, and onions. You can find it in Asian markets or online. Look for brands like Lao Gan Ma for a popular option. To make chili crisp, heat oil and add chopped garlic, onions, and spices. Cook until golden. Stir in chili flakes and let it cool. Store it in a jar, and use it in many dishes. Yes, this recipe is great for meal prep. It keeps well in the fridge for a few days. Just reheat it in a pan or microwave. You can double the batch for easy lunches. Chili crisp egg fried rice goes well with stir-fried vegetables or grilled meats. You can also serve it with dumplings or a simple salad. The chili crisp adds a nice kick to any meal. This blog post covered all the key steps to make great fried rice. We talked about ingredients, cooking techniques, and tips for the best texture. You can even customize it with different proteins and veggies. Don't forget how to store and reheat your leftovers for great taste. Experiment with spice levels to find what you like best. With these ideas, you can make fried rice that is fun and tasty every time. Enjoy your cooking!

Are you ready to transform your weeknight dinner? This Minute Chili Crisp Egg Fried Rice is a quick, tasty option. Bursting with flavor, this dish brings your meals to life …

Read more

Categories Dinner

Savory Slow Cooker White Chicken Chili Simple Recipe

October 22, 2025 by Chef Miles
- 1 pound boneless, skinless chicken breasts - 1 can (15 oz) white kidney beans, drained and rinsed - 1 can (15 oz) sweet corn, drained - 1 teaspoon ground cumin - 1 teaspoon chili powder - 1/2 teaspoon smoked paprika - 4 cups chicken broth - 1 cup heavy cream - 1/4 cup fresh cilantro, chopped - Sliced jalapeños and lime wedges for serving When I make slow cooker white chicken chili, I start with the main ingredients. I use one pound of boneless, skinless chicken breasts for a tender base. I also add a can of white kidney beans and sweet corn. These give the chili great texture. Next, I focus on the seasonings and broth. I add one teaspoon of ground cumin and chili powder. Smoked paprika adds a nice depth of flavor, too. Lastly, I pour in four cups of chicken broth to keep everything nice and moist. To finish, I include creamy elements and garnishes. One cup of heavy cream makes the chili rich and smooth. I also chop fresh cilantro for a pop of color and flavor. Sliced jalapeños and lime wedges add a nice touch when serving. This simple mix of ingredients creates a comforting dish that is sure to please! Start by placing the chicken breasts at the bottom of your slow cooker. This layer will give your chili a strong base. Next, add the white kidney beans and sweet corn on top of the chicken. Then, sprinkle the finely chopped onion, minced garlic, and diced green chilies evenly. Each layer adds its own special flavor. Now, it’s time to spice things up! Sprinkle ground cumin, chili powder, smoked paprika, salt, and black pepper over everything. This step ensures every bite is packed with flavor. Now, carefully pour in the chicken broth. Make sure the chicken is fully covered. This helps it cook well. Once the broth is in, cover the slow cooker with its lid. Set it to cook on low for 6-8 hours or on high for 3-4 hours. Wait patiently until the chicken is tender. You’ll know it’s done when it shreds easily with a fork. After cooking, remove the chicken breasts from the slow cooker. Use two forks to shred the chicken into bite-sized pieces. Return the shredded chicken back into the slow cooker. Next, stir in the heavy cream. This makes your chili creamy and rich. Let it cook on low for another 30 minutes. This step allows the flavors to blend perfectly. Finally, taste the chili and adjust the seasoning if needed. Make sure it’s just right for you! To ensure tender chicken in your chili, it's vital to cook it low and slow. This method helps break down the meat, making it easy to shred. Always place the chicken at the bottom of the slow cooker. This positioning allows the juices from the chicken to flavor the other ingredients. When using different slow cooker brands, adjust your cooking times. Some cook faster than others. If you notice your chicken isn't tender after the suggested time, let it cook longer. Check it often to avoid overcooking. For a kick of heat, consider adding more spices. A pinch of cayenne pepper can elevate the dish. You could also try adding diced jalapeños to the mix for a fresh bite. Incorporating other vegetables can add more depth. Try bell peppers, zucchini, or even carrots. These not only enhance the flavor but also add nutrition. Experiment with your favorites to find the best blend. Pair your chili with warm tortilla chips or crusty bread. Both options are perfect for dipping and add a nice crunch. For garnishing, fresh cilantro and sliced jalapeños can brighten the dish. A squeeze of lime adds a zesty touch. Present these on the side to let guests customize their bowls. This makes serving fun and interactive! {{image_4}} You can switch chicken for turkey. Turkey gives a nice twist to the dish. It also cooks well in the slow cooker. If you want a meatless option, use beans or lentils instead of chicken. This makes a great vegetarian chili. You still get the creamy texture and hearty taste that everyone loves. To change the spice level, use different types of chilies. For a mild flavor, use sweet bell peppers or poblano peppers. For a spicy kick, try jalapeños or serrano peppers. Start with a small amount, then taste as you go. This way, you can find the perfect heat for your family. If you want a dairy-free chili, replace the heavy cream. Use coconut milk or almond cream instead. Both options add creaminess without dairy. They also bring a unique flavor to the dish. Just stir it in at the end, like you would with heavy cream. This keeps your chili rich and delicious! To store leftover chili, let it cool first. Then, transfer it to an airtight container. Make sure to seal it well. Place it in the fridge. Enjoy it within 3-4 days. This keeps the flavors fresh and tasty. To freeze the chili, let it cool completely. Pour it into a freezer-safe container. Leave some space at the top for expansion. Seal the container tightly. You can freeze it for up to 3 months. When ready to eat, thaw it overnight in the fridge. Reheat on the stove until hot and serve. For the best flavor and texture, eat the chili within a week if refrigerated. Freezing helps extend its shelf life. Always check for any off smells or changes in texture before eating. Following these tips keeps your chili as delicious as the day you made it. The cooking time depends on your setting. If you cook on low, it takes 6-8 hours. If you use high, it takes about 3-4 hours. The chicken should be tender and easy to shred when done. Always check the chicken to make sure it is fully cooked. Yes, you can use frozen chicken breasts. Just add them directly to the slow cooker. You should increase the cooking time by about 1-2 hours. Make sure to check the chicken’s temperature before serving. It should reach 165°F to be safe to eat. You can serve it with warm tortilla chips or crusty bread. A fresh salad pairs well too. For garnishes, add lime wedges, fresh cilantro, or sliced jalapeños. These add flavor and color to your meal. You can also serve it with rice or cornbread for a hearty side. In this article, we explored creating a delicious white chicken chili. We detailed the main ingredients like chicken, beans, and corn. We provided step-by-step instructions for cooking and shredding the chicken. You learned tips for enhancing flavors and serving ideas. We also covered ingredient swaps and storage options. White chicken chili is easy and fun to make. It’s perfect for gatherings or cozy nights at home. Enjoy cooking and share your tasty creations!

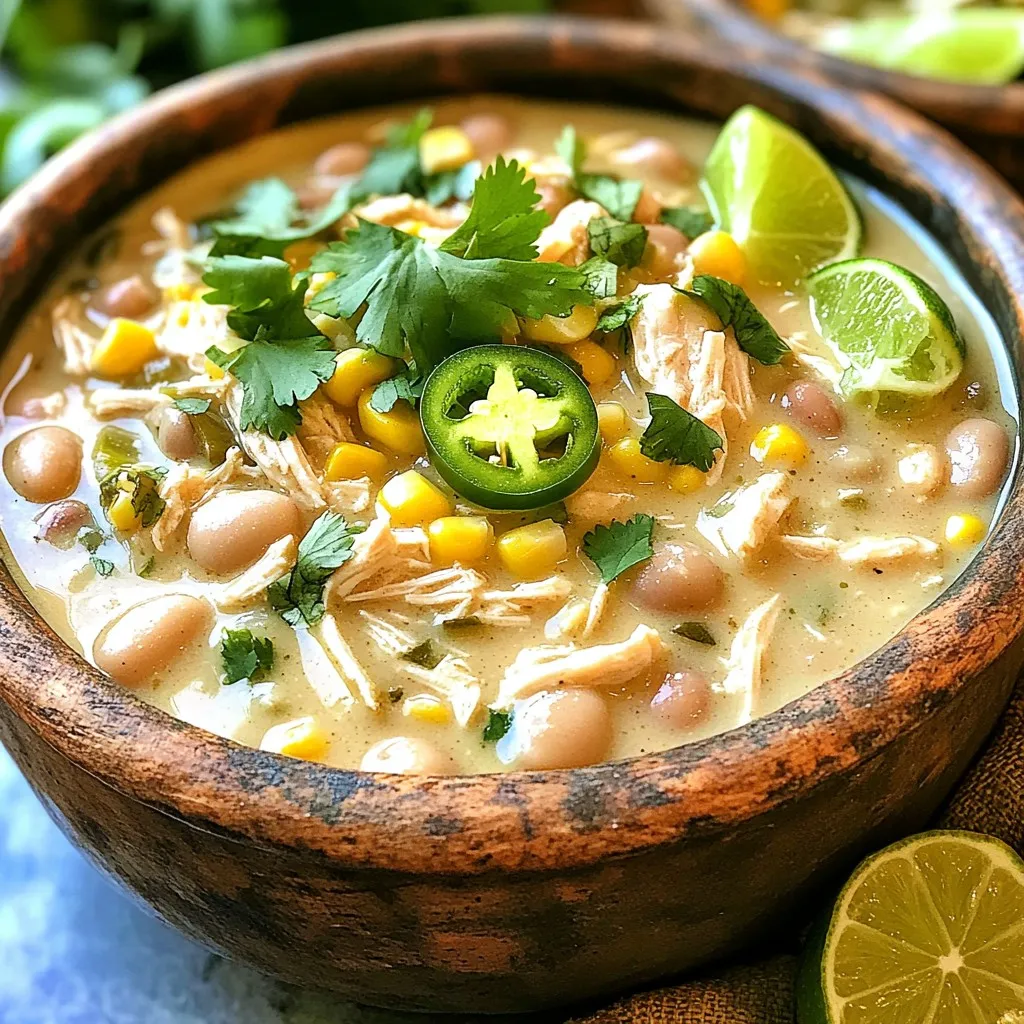
Looking for a comforting meal that’s easy to make? This Savory Slow Cooker White Chicken Chili recipe is your answer! With just a few simple ingredients, you can create a …

Read more

Categories Dinner
Older posts
Newer posts
← Previous Page1 Page2 Page3 Page4 … Page110 Next →

MELTED RECIPES

where delicious ideas melt into life, from stovetop to backyard. Always warm, simple, and irresistibly satisfying. 🍳🔥🧀

PAGES

Home About Contact Privacy Policy Terms & Conditions Cookie Policy GDPR Policy Copyright Policy Disclaimer

CATEGORIES

Appetizers Desserts Salads Breakfast Dinner

Contact

  • Pinterest
  • Mail
Copyright © 2025 Melted Recipes. All rights reserved.