Skip to content
Melted Recipes
  • Home
  • Appetizers
  • Desserts
  • Salads
  • Breakfast
  • Dinner
  • Privacy Policy
  • Contact
  • About

Chef Miles

Pumpkin Cream Cheese Bread Soft and Flavorful Delight

September 12, 2025 by Chef Miles
- 1 cup all-purpose flour - 1 cup whole wheat flour - 1 teaspoon baking powder - 1 teaspoon baking soda - 1/2 teaspoon salt - 1 teaspoon ground cinnamon - 1/2 teaspoon ground nutmeg - 1/4 teaspoon ground ginger - 1/2 cup granulated sugar - 1/2 cup brown sugar, packed - 1/2 cup vegetable oil - 3/4 cup canned pumpkin puree - 2 large eggs - 1 teaspoon vanilla extract - 4 oz cream cheese, softened - 1/4 cup powdered sugar - 1 tablespoon lemon juice The main star of this recipe is canned pumpkin puree. It gives the bread its rich flavor and moist texture. You can also use fresh pumpkin, but canned is easier. Flours play a big role too. I use both all-purpose and whole wheat flour. The mix gives a nice texture and adds some health benefits. Spices like cinnamon, nutmeg, and ginger bring warmth and depth to the bread. They make each bite taste like fall. Cream cheese adds a lovely tang and richness. The cream cheese swirl makes the bread even more special. If you don’t have all-purpose flour, use just whole wheat flour. The bread will be denser but still tasty. For sugar, you can swap granulated sugar with coconut sugar. It gives a different flavor but works well. If you prefer oil, melted butter is a great alternative. It adds a rich taste to the bread. You can replace the eggs with flax eggs for a vegan option. Use 1 tablespoon of ground flaxseed mixed with 2.5 tablespoons of water for each egg. If you’re out of lemon juice, vinegar can do the trick. It helps balance the sweetness of the cream cheese. First, turn on your oven. Set it to 350°F (175°C). While it heats, grab a 9x5-inch loaf pan. Grease it or line it with parchment paper. This step helps the bread come out easily later. In a medium bowl, mix the all-purpose flour and whole wheat flour. Add baking powder, baking soda, salt, cinnamon, nutmeg, and ginger. Whisk these dry ingredients until they blend well. Set this bowl aside for now. Take a large bowl and add granulated sugar and brown sugar. Pour in vegetable oil. Whisk this mixture until it looks smooth. Next, add pumpkin puree, eggs, and vanilla extract. Beat these together until they form a nice, smooth mix. Now, take your dry mix and slowly add it to the wet mix. Use a spatula to fold them together gently. Stir just until combined. Be careful not to mix too much, as this helps keep the bread soft and fluffy. In a small bowl, mix softened cream cheese, powdered sugar, and lemon juice. Stir until the cream cheese is smooth. This mixture will create a rich swirl in your bread. Pour half of the pumpkin batter into the loaf pan. Spread it evenly. Then, scoop spoonfuls of the cream cheese mix on top. Use a knife to swirl it into the batter. Pour the rest of the pumpkin batter over the cream cheese layer. Create another swirl on top. Place the loaf pan in the oven and bake for 60-65 minutes. Check if it’s done by inserting a toothpick in the center. If it comes out clean, your bread is ready. Let it cool in the pan for about 10 minutes. After that, move it to a wire rack. Allow it to cool completely before slicing. Enjoy your warm, soft pumpkin cream cheese bread! To keep your pumpkin cream cheese bread soft, mix gently. After adding dry ingredients, use a spatula to fold. Stop mixing as soon as you see no dry flour. Overmixing makes bread dense. For the best swirl, use softened cream cheese. Blend it with powdered sugar and lemon juice until smooth. When layering, spread cream cheese in dollops. Use a knife to swirl gently but don't overdo it. This creates a lovely marbled look. A moist pumpkin bread needs perfect baking. Preheat your oven to 350°F. Bake for 60-65 minutes. Test doneness with a toothpick; it should come out clean. Let the bread cool in the pan for about 10 minutes to keep it moist. Serve pumpkin cream cheese bread warm or at room temperature. For a fun touch, add a sprinkle of cinnamon on top. Pair it with coffee or tea for a cozy feel. A dollop of whipped cream cheese makes it even better! {{image_4}} You can easily change the flavor of your pumpkin cream cheese bread. Adding nuts gives it a nice crunch. Try 1/2 cup of chopped walnuts or pecans. Mix them into the batter before pouring it into the pan. If you love chocolate, add 1/2 cup of chocolate chips. They will melt and add a sweet surprise in each bite. Both options make the bread even more delightful and rich. If you need a gluten-free version, it's simple. Use 2 cups of gluten-free flour instead of all-purpose and whole wheat flour. Make sure your baking powder is gluten-free, too. This way, everyone can enjoy this tasty treat without worry. The bread will still taste great and remain soft. You can enhance the flavor with more spices. Try adding 1/4 teaspoon of ground cloves for a warm taste. You can also add 1/2 teaspoon of pumpkin pie spice for extra flavor. If you want a hint of sweetness, add 1 teaspoon of almond extract. These small changes can make a big difference. They will take your pumpkin cream cheese bread to the next level. To keep your pumpkin cream cheese bread fresh, wrap it tightly in plastic wrap or aluminum foil. Place it in an airtight container if you have one. Store it at room temperature for up to three days. If you want to keep it longer, refrigeration is a good option, but it may change the texture a bit. You can freeze this bread for later enjoyment. First, let it cool completely. Then, wrap it tightly in plastic wrap. After that, place it in a freezer bag or container. This bread can freeze well for up to three months. When you’re ready to eat it, simply thaw it in the fridge overnight. To reheat your pumpkin cream cheese bread, slice it first. Place the slices in the microwave for about 15-20 seconds. If you prefer, you can toast it in a toaster oven for a few minutes. This will warm it up and enhance its flavors. Enjoy it warm for the best taste! Yes, you can use fresh pumpkin. First, cook the pumpkin until soft. Then, puree it until smooth. Measure out 3/4 cup of the puree for your recipe. This gives a fresh taste. Just note, it may have more moisture than canned pumpkin. To check if the bread is done, insert a toothpick in the center. If it comes out clean, your bread is ready. If it has batter on it, bake for a few more minutes. The bread should also spring back when lightly touched. This bread pairs well with many items. You can serve it with coffee or tea for a warm drink. A dollop of whipped cream cheese on the side adds a nice touch. You can also enjoy it with honey or maple syrup. The bread stays fresh for about 3 to 4 days at room temperature. Store it in an airtight container to keep it moist. If you want to keep it longer, you can freeze it. Wrapped well, it can last for up to 3 months in the freezer. Yes, you can make this bread in mini loaf pans. Divide the batter evenly among the pans. Bake for about 25-30 minutes. Check for doneness with a toothpick. Mini loaves are perfect for sharing or gifting! This blog post covered how to make delicious Pumpkin Cream Cheese Bread. We explored key ingredients, mixing steps, and baking tips. You can try different flavors or gluten-free options. Store it properly for long-lasting freshness. Final thoughts: This recipe is fun and easy. Enjoy each slice with family and friends!

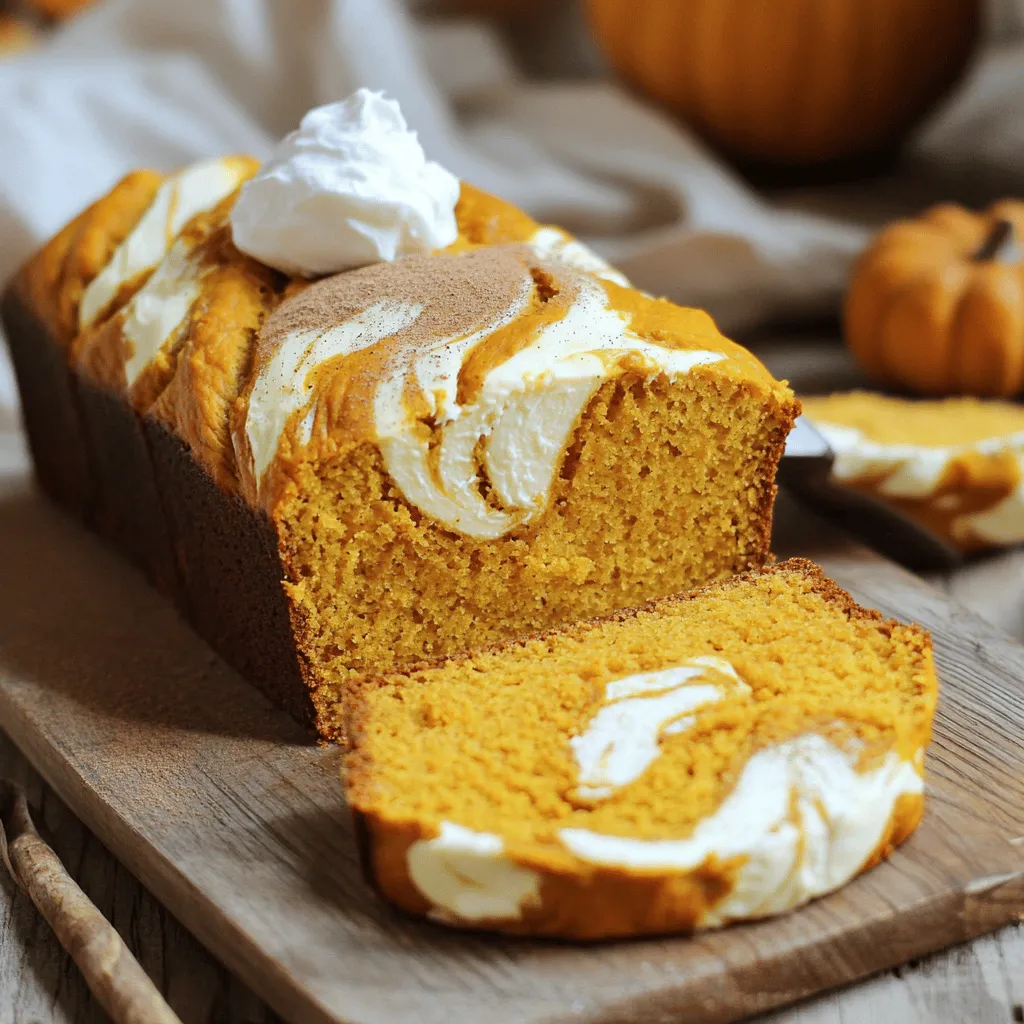
If you love warm, spiced treats, you’re in for a real treat! This Pumpkin Cream Cheese Bread is a soft, flavorful delight that captures the essence of fall in every …

Read more

Categories Desserts

Sheet Pan Sweet Sour Chicken Pineapple Easy Recipe

September 12, 2025 by Chef Miles
- 1 lb boneless, skinless chicken thighs - 1 cup pineapple chunks - 1 bell pepper (red or yellow) - 1 medium red onion - 1 cup snap peas - 3/4 cup sweet and sour sauce - 2 tablespoons soy sauce - 1 tablespoon sesame oil - 2 cloves garlic - 1 teaspoon fresh ginger - Salt and pepper - Cooked rice for serving - Chopped green onions and sesame seeds for garnish For this recipe, I use chicken thighs. They stay juicy and tender. You can also use pineapple chunks from a can or fresh fruit. Bell peppers add great color and crunch. You can pick red or yellow based on your taste. Red onion brings sweetness and flavor. Snap peas add a nice pop of green. For the sauce, I use sweet and sour sauce, soy sauce, sesame oil, garlic, and ginger. This mix gives the dish a bright taste. You can adjust the salt and pepper to your liking. If you want to make it a full meal, rice is a great choice. The rice absorbs the sauce and balances the flavors. Finally, add green onions and sesame seeds for a nice touch. They add crunch and freshness to your plate. - Preheat the oven to 400°F (200°C). - Line a large sheet pan with parchment paper. - Prepare chicken and vegetables. Cut chicken into bite-sized pieces. Chop bell pepper into strips. Slice the onion into wedges and trim the snap peas. - Combine chicken, pineapple, bell pepper, onion, and snap peas in a bowl. Toss gently until mixed. - In another bowl, whisk the sweet and sour sauce, soy sauce, sesame oil, minced garlic, and grated ginger. Add a pinch of salt and pepper. Mix until smooth. - Pour the sauce over the chicken and veggies. Toss until everything is coated. - Transfer the chicken and vegetable mixture to the sheet pan. Spread it evenly for cooking. - Bake in the oven for 25-30 minutes. Stir halfway through for even cooking. - Check the chicken's doneness by measuring the internal temperature. It should reach 165°F (75°C). - Choose chicken thighs for juiciness. They stay moist and tender. - Marinate your chicken for at least 30 minutes. This helps flavors soak in. - Spread everything evenly on the pan. This ensures proper cooking and browning. - Serve with steamed rice or quinoa for a filling meal. - Garnish with chopped green onions and sesame seeds for a pop of color. - Add lime wedges on the side for a fresh burst of flavor. - If you can't find chicken thighs, use chicken breasts. They are leaner but may dry out. - Mix in other veggies like broccoli, carrots, or zucchini for more taste and texture. - Use canned pineapple if fresh is not available; just drain it well. {{image_4}} You can make your own sweet and sour sauce. Just mix sugar, vinegar, and ketchup. Add soy sauce for a deeper flavor. This homemade sauce is fresh and tasty! If you want a twist, try teriyaki sauce or orange sauce. Both give a sweet touch and work well with chicken and veggies. You can swap chicken for different proteins. Tofu works well for a vegetarian dish. Shrimp adds a fun seafood twist. You can also use seasonal veggies. Try broccoli in winter or zucchini in summer. These changes keep the dish exciting and fresh. If you need a gluten-free option, use tamari instead of soy sauce. This keeps the flavor while meeting dietary needs. For vegan alternatives, swap chicken for chickpeas. You can also use a mix of veggies. Both options are healthy and delicious. To store leftovers, let the sweet and sour chicken cool first. Place it in an airtight container. This keeps moisture in and prevents drying out. Always cover the dish well to avoid strong fridge odors. Your chicken will stay fresh for up to three days in the fridge. If you want to freeze the sweet and sour chicken, cool it completely. Use a freezer-safe container or bag. Make sure to remove as much air as possible. This helps prevent freezer burn. It can last in the freezer for up to three months. When you're ready to eat, thaw it overnight in the fridge. Reheat in the oven at 350°F (175°C) until hot. Stir occasionally for even heating. The ingredients in this dish have varying shelf lives. Fresh chicken lasts about one to two days in the fridge. Pineapple chunks can last about three to five days when stored well. Bell peppers and snap peas last about a week. Always check for freshness before cooking or eating. Storing food correctly helps ensure safety and taste. How can I make this dish spicier? To add heat, use chili flakes or hot sauce. Stir in these before baking. You can also add sliced jalapeños or a dash of sriracha for more flavor. Can I use frozen vegetables? Yes, frozen veggies work well! They save time and still taste great. Just make sure to thaw them before mixing with the chicken and sauce. What can I serve with sweet and sour chicken? Serve sweet and sour chicken over rice or noodles. You can also pair it with a fresh salad or steamed broccoli for balance. How long does it take to cook chicken at 400°F? At 400°F, chicken usually cooks in 25 to 30 minutes. Always check if it reaches 165°F for safety. Can I use a different type of pan? Yes, you can use any baking pan. Just ensure it’s large enough for even cooking. A glass or metal pan works well too. Is sweet and sour chicken healthy? Sweet and sour chicken can be healthy. It includes protein from chicken and vitamins from veggies. Just watch the sauce portion for sugar content. How many calories are in sweet and sour chicken? One serving of sweet and sour chicken has about 350 calories. This can change based on your sauce and side choices. This blog post covered the key ingredients, steps, and tips for making sweet and sour chicken. You learned how to prepare delicious chicken with vibrant veggies and a tasty sauce. Remember, feel free to mix up ingredients to suit your taste or dietary needs. Serving it with rice or garnishing with green onions adds a nice touch. Enjoy this dish that is simple, fun, and full of flavors! Cooking is all about exploring and enjoying the process. Happy cooking!

Get ready to enjoy a delicious meal that’s both easy and fun to make! My Sheet Pan Sweet Sour Chicken Pineapple recipe brings you juicy chicken, vibrant veggies, and sweet …

Read more

Categories Dinner

Irresistible One Pot Creamy Mushroom Pasta Delight

September 12, 2025 by Chef Miles
- 10 oz (284g) fettuccine or linguine pasta - 2 tablespoons olive oil - 1 medium onion, finely chopped - 3 cloves garlic, minced The first step to making this dish is choosing your pasta. Fettuccine or linguine works best. Both types hold the creamy sauce well. Next, add olive oil to a large pot. This oil helps with flavor and cooking the onion and garlic. Chop the onion finely, and mince the garlic. Both add a great aroma and depth to your meal. - 12 oz (340g) cremini or button mushrooms, sliced - 4 cups vegetable broth - 1 cup heavy cream (or a plant-based alternative, such as coconut cream or almond milk) Mushrooms are the star of this dish. You can use cremini or button mushrooms, whichever you prefer. Slice them thinly for even cooking. Vegetable broth adds flavor and moisture. Heavy cream makes the sauce rich, but you can swap it with a plant-based cream if needed. This keeps it creamy without the dairy. - 1 teaspoon dried thyme - 1 teaspoon dried oregano - Salt and freshly ground black pepper to taste - ½ cup grated Parmesan cheese (or nutritional yeast for a vegan option) - Fresh parsley, finely chopped (for garnish) Seasoning is key to great flavor. Use dried thyme and oregano for a nice herbal note. Salt and pepper enhance all the ingredients. Grated Parmesan cheese gives creaminess and flavor. For a vegan option, use nutritional yeast instead. Finally, fresh parsley brightens the dish and makes it look lovely on your plate. 1. Start by heating 2 tablespoons of olive oil in a large pot over medium heat. Wait until the oil shimmers. 2. Next, add 1 finely chopped onion. Sauté it for 3 to 4 minutes until it turns translucent and fragrant. 3. Now, stir in 3 minced garlic cloves. Cook for about 1 minute to release the garlic flavor. 4. Add 12 ounces of sliced cremini or button mushrooms. Cook them for 5 to 7 minutes until they are tender and a bit brown. 1. Add 10 ounces of fettuccine or linguine pasta into the pot. Then, pour in 4 cups of vegetable broth and 1 cup of heavy cream. 2. Use a spoon to stir everything together until it’s well mixed. 3. Sprinkle in 1 teaspoon of dried thyme and 1 teaspoon of dried oregano. Season with salt and freshly ground black pepper to taste. 4. Increase the heat to bring the mixture to a gentle boil. 1. Once it boils, reduce the heat to medium-low. Cover the pot and let it simmer for 12 to 15 minutes. Stir occasionally until the pasta is al dente. 2. Remove the pot from heat. Stir in ½ cup of grated Parmesan cheese until it melts into the sauce, making it rich and creamy. 3. Taste the dish and adjust the seasoning if needed. Serve hot, topping it with finely chopped fresh parsley for color and flavor. To ensure your pasta is al dente, cook it just until it's firm to the bite. This means not overcooking it. Stir the pasta often while it cooks. This keeps it from sticking together. The timing depends on the pasta type, so check the package. When combining the ingredients, add them in stages. Start with the sautéed onions and mushrooms. Then, pour in the broth and cream. Mix well before adding the pasta. This helps the pasta absorb flavors. You can swap heavy cream for plant-based options. Coconut cream or almond milk works well in this recipe. Both will keep the dish creamy and rich. They add unique flavors too. For cheese, use dairy-free options like nutritional yeast. It gives a cheesy taste without dairy. This is great for a vegan version of this dish. Serve your pasta in a bowl or plate for an elegant look. Swirl the pasta in the center. Drizzle a bit of olive oil on top for shine. Sprinkle more parsley and cheese for color. To make it pop, use fresh herbs like basil or thyme. This adds visual appeal and freshness. A touch of freshly cracked pepper can also enhance the look and taste. {{image_4}} You can easily change this recipe to keep it fresh. Add some greens like spinach or kale for color and nutrition. They cook quickly and add a nice crunch. You can also try different types of mushrooms. Shiitake, portobello, or oyster mushrooms each bring a unique flavor. Mix and match to find your favorite combination! To kick up the taste, add red pepper flakes for a bit of heat. Just a pinch will do! If you like a deeper flavor, incorporate some white wine. It adds richness and pairs well with the cream. Just remember to let the wine cook down a bit before adding the pasta. Want to make this dish vegan? Swap the heavy cream for coconut cream or almond milk. For cheese, use nutritional yeast instead of Parmesan. You can also make it gluten-free by using gluten-free pasta. This way, everyone can enjoy this creamy delight! To store leftovers, cool the pasta to room temperature. Place it in an airtight container. This keeps it fresh and safe. You can keep it in the fridge for up to three days. To reheat, add a splash of broth or cream. This helps restore the creamy texture. The best method is to use the stovetop. Heat on low and stir often to prevent sticking. If using a microwave, heat in short bursts. Stir in between to ensure even heating. If you want to freeze the pasta, use a freezer-safe container. Leave some space for expansion. It can last up to one month in the freezer. When ready to eat, thaw it overnight in the fridge. Reheat it gently on the stovetop, adding a bit of liquid to help. It takes about 10 minutes to prep and 20 minutes to cook. In total, you will spend around 30 minutes. This makes it a quick and easy dish for weeknight dinners. Yes! You can use any pasta you like. Spaghetti, penne, or even gluten-free pasta work well. Just adjust the cooking time based on the pasta type. You can pair this dish with a simple salad or garlic bread. Steamed vegetables, like broccoli or green beans, also make a great side. They add color and nutrition to your meal. To make it vegan, swap the heavy cream for coconut cream or almond milk. Use nutritional yeast instead of Parmesan cheese. These swaps keep the dish creamy and delicious without dairy. This blog post explored how to make One Pot Creamy Mushroom Pasta. We covered key ingredients and easy steps to create a delicious meal. You learned about cooking tips, ingredient swaps, and fun variations to try. In summary, enjoy experimenting with ingredients and flavors. This dish is easy to customize, perfect for any dietary needs. Remember, cooking should be fun and tasty! Try it out and savor every bite.

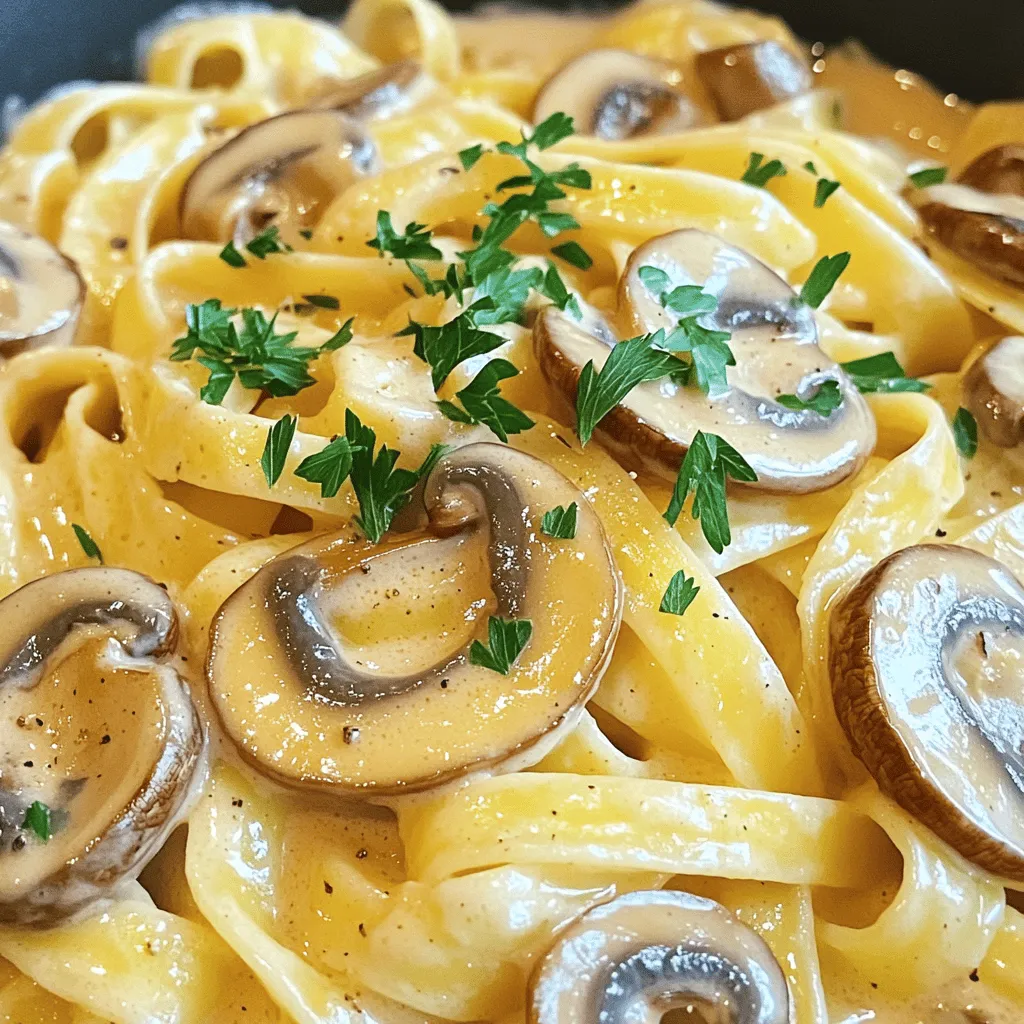
If you love creamy, comforting pasta, then my One Pot Creamy Mushroom Pasta Delight is for you! This easy recipe brings together tender pasta, rich mushrooms, and a silky sauce—all …

Read more

Categories Dinner

Air Fryer Parmesan Zucchini Chips Crispy Snack Delight

September 11, 2025 by Chef Miles
- 2 medium zucchinis - ½ cup freshly grated Parmesan cheese - ½ cup whole wheat breadcrumbs - 1 teaspoon garlic powder - 1 teaspoon smoked paprika - 1 teaspoon Italian seasoning - Salt and freshly ground black pepper - 1 large egg The recipe for Air Fryer Parmesan Zucchini Chips is simple and fun. First, gather your main ingredients. You will need fresh zucchinis, Parmesan cheese, and whole wheat breadcrumbs. The zucchinis should be firm and vibrant. Next, let’s focus on the seasonings. Garlic powder gives a savory taste. Smoked paprika adds a nice kick. Italian seasoning brings in a mix of herbs that enhances the flavor. Finally, don’t forget the additional ingredients. You need salt and black pepper to taste. The egg binds everything together. Beat the egg until it is frothy. This mix of ingredients will create a delicious and crispy snack. Wash the zucchinis under cold water. Cut off the ends. Slice them thinly, about ¼ inch thick. Thin slices help them crisp up nicely in the air fryer. Take two bowls. In the first bowl, mix the grated Parmesan cheese, breadcrumbs, garlic powder, smoked paprika, Italian seasoning, and a good pinch of salt and pepper. Stir until everything blends well. In the second bowl, beat the egg until it’s frothy and bubbly. Grab a zucchini slice. Dip it in the beaten egg, letting the excess drip off. Then, coat it well with the Parmesan breadcrumb mix. Press gently to make sure it sticks. Place the breaded slices on a clean plate in a single layer. Set the air fryer to 380°F (193°C). Preheating takes about 5 minutes. This step ensures your chips cook evenly and become crispy. Carefully add the breaded zucchini chips to the air fryer basket. Arrange them in a single layer without overlapping. You may need to cook them in batches. Air fry for 10-12 minutes. Flip them halfway through for even browning. They should be golden and crispy when done. Once cooked, remove the chips from the air fryer. Place them on a cooling rack for a couple of minutes. This helps keep them crispy. Serve them warm with your favorite dipping sauce or a zesty aioli for extra flavor! To make perfect zucchini chips, slice the zucchini thin. Aim for about ¼ inch thick. Thin slices cook better and crisp up nicely. Preheating your air fryer is key too. Set it to 380°F (193°C) for five minutes. This helps the chips cook evenly right from the start. Avoid overcrowding in your air fryer. Place the zucchini chips in a single layer. If you add too many, they won’t cook well. Flip the chips halfway through cooking. This ensures both sides get nice and crispy. Serve your zucchini chips in a fun bowl. Line it with parchment paper for style. You can sprinkle extra salt on top for a nice touch. Pair them with a tasty dip like aioli for flavor. These small details make your snack look great and taste even better. {{image_4}} You can easily spice up your zucchini chips. Adding cayenne gives a nice heat. You can also try onion powder for a savory touch. For a different flavor, use a mix of spices. Experiment and find what you like best! Parmesan is great, but other cheeses work too. Mozzarella adds a stretchy texture, while cheddar brings a sharp taste. You can mix cheeses for unique flavors. Try different options to keep it exciting! If you need gluten-free chips, swap the whole wheat breadcrumbs. Use almond flour or gluten-free breadcrumbs instead. This way, everyone can enjoy these tasty snacks. The flavor will still be fantastic! Store your zucchini chips in an airtight container. This keeps them fresh. Place a paper towel inside to absorb moisture. This step helps keep the chips crispy. The chips are best eaten within two days. After that, they may lose some crunch. To reheat, use the air fryer. Set it to 350°F (175°C). Heat for about 3-4 minutes. This method restores crispiness. Avoid using the microwave. It will make the chips soggy. You can freeze the zucchini chips for later. Lay them out on a baking sheet first. Freeze them for about an hour. Then transfer them to a freezer-safe bag. They can last up to three months. When ready to eat, air fry them straight from the freezer. No need to thaw! Air fryer zucchini chips taste best fresh. If you store them, keep them in an airtight container. They last about 2-3 days in the fridge. However, they may lose their crispiness over time. For longer storage, you can freeze them. They maintain good quality for up to a month in the freezer. Just reheat in the air fryer for a few minutes. Yes, you can use regular zucchini. However, the size affects the thickness of your chips. If you use larger zucchini, slice them thinner to keep them crispy. Thicker slices may take longer to cook and might not crisp up as well. So, choose your zucchini size based on your cooking goals. Zucchini chips pair well with many dips. Some tasty options include: - Ranch dressing - Garlic aioli - Marinara sauce - Spicy salsa - Hummus These dips enhance the flavor of the chips and add a fun twist to your snack. Yes, you can! To make zucchini chips in a conventional oven, preheat it to 425°F (220°C). Arrange the breaded chips on a baking sheet lined with parchment paper. Bake for 20-25 minutes, flipping halfway through. Keep an eye on them to avoid burning. Oven-baked chips will be crispy but may take a bit longer than air-fried ones. You now know how to make crispy air fryer zucchini chips from scratch. We covered ingredients, step-by-step instructions, tips, variations, storage, and FAQs. These chips are easy, healthy, and delicious! You can add different spices or cheeses for unique flavors. Make sure to store leftovers properly to keep them crispy. Whether you eat them as a snack or serve them with dips, enjoy your tasty creations. Take your air fryer skills to the next level with this recipe!

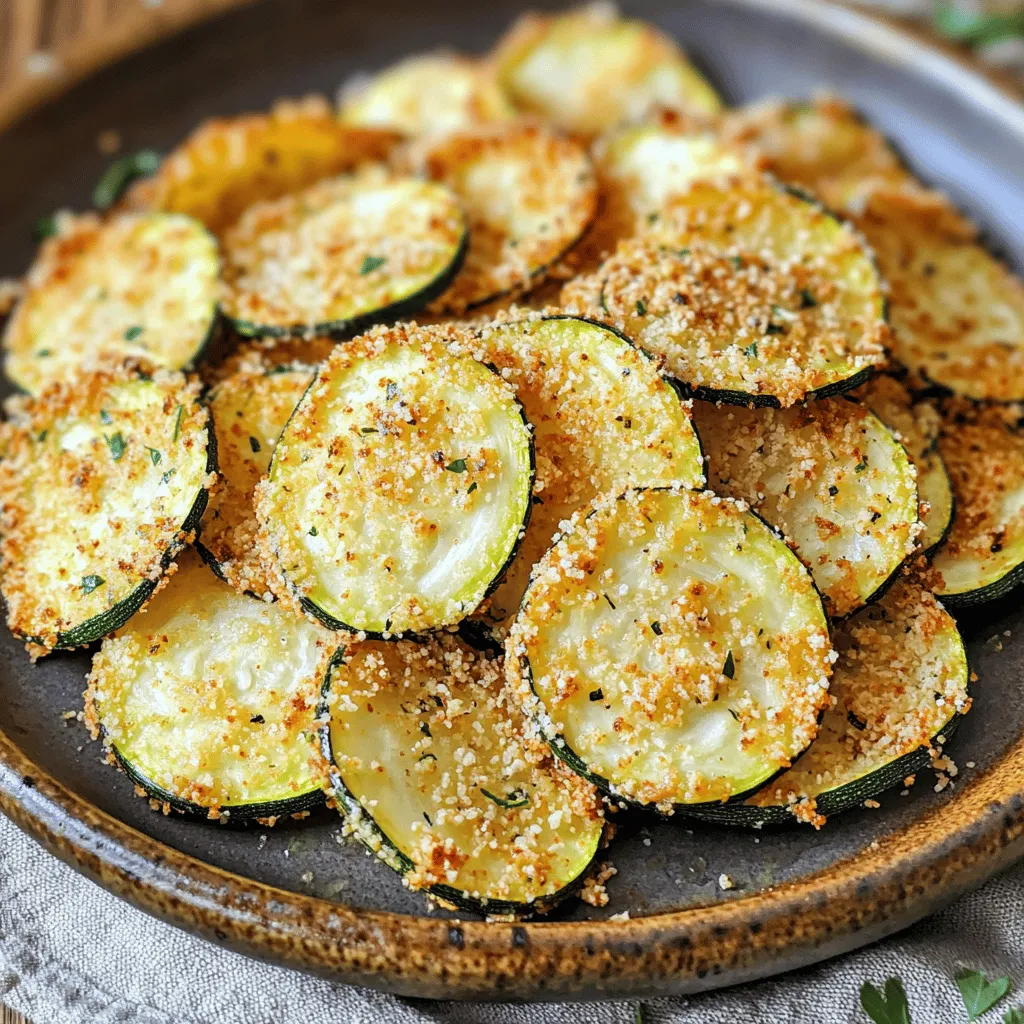
Looking for a tasty snack that’s light and crispy? You’ve come to the right place! In this guide, I’ll show you how to make Air Fryer Parmesan Zucchini Chips that …

Read more

Categories Appetizers

Cottage Cheese Cookie Dough Dip Easy and Tasty Treat

September 11, 2025 by Chef Miles
- 1 cup smooth cottage cheese - 1/4 cup creamy peanut butter - 1/4 cup pure maple syrup or honey The main ingredients create the base of our dip. Smooth cottage cheese gives a creamy texture. Creamy peanut butter adds richness and flavor. Pure maple syrup or honey provides natural sweetness. - 1/2 teaspoon almond extract for added flavor - 1/3 cup chopped walnuts or pecans for crunch - 1/2 cup mini chocolate chips You can enhance your dip with optional ingredients. Almond extract brings a lovely twist. Chopped walnuts or pecans add a nice crunch. Mini chocolate chips offer a sweet surprise in every bite. - Fresh fruit slices (apple, banana, strawberries) - Graham crackers For serving, I love using fresh fruit slices. Apples, bananas, and strawberries pair well with the dip. Graham crackers also work great for dipping. They provide a nice contrast to the creamy texture. First, grab a medium bowl. In the bowl, combine 1 cup of smooth cottage cheese, 1/4 cup of creamy peanut butter, 1/4 cup of pure maple syrup, 1 teaspoon of vanilla extract, and if you like, 1/2 teaspoon of almond extract. This mix creates a nice base. Now, use a hand mixer or a whisk. Blend until the mix is smooth. You want a creamy texture that feels like cookie dough. Next, add a pinch of salt. This little touch boosts the flavor. Then, fold in 1/2 cup of mini chocolate chips and 1/3 cup of chopped walnuts or pecans, if you want some crunch. Make sure they are evenly mixed in. This makes each dip flavorful and fun! Now, spoon the dip into a serving bowl. Use a spatula to smooth the top. This makes it look nice. Cover the bowl with plastic wrap. Chill it in the fridge for at least 30 minutes. Chilling helps the flavors blend well. When it’s time to serve, present the dip with fresh fruit slices like apples, bananas, or strawberries and some graham crackers. Enjoy your tasty treat! To get the best dip, start with smooth cottage cheese. It makes a big difference. Lumpy cheese can ruin the creamy feel. Use a hand mixer or whisk for blending. Mix until it looks like cookie dough. This smoothness is key to the dip’s texture. You can add fun flavors to your dip. Try a splash of almond extract for a twist. It adds a nice depth. You can also adjust the sweetness. If you want it sweeter, add more maple syrup or honey. Taste as you go to find your perfect balance. Make your dip look as tasty as it is! Use a nice bowl to serve it. Top with extra mini chocolate chips or walnuts for flair. Serve it with colorful fruit slices, like apples or strawberries. This adds a bright touch and makes it fun to eat. {{image_4}} You can make this dip lighter by choosing low-fat cottage cheese. It still tastes great and keeps the creamy texture. Instead of maple syrup, try using natural sweeteners like agave or stevia. These options can cut sugar without losing flavor. Want to mix it up? Different nut butters work well. Almond butter or cashew butter adds a unique twist. You can also spice it up! Adding a dash of cinnamon or nutmeg gives it warmth and a cozy feel. For those who avoid dairy, you can easily make it vegan. Use a dairy-free cottage cheese or silken tofu as a base. If you need gluten-free options, serve it with rice cakes or sliced fruits instead of graham crackers. These swaps ensure everyone can enjoy this tasty treat! To keep your cottage cheese cookie dough dip fresh, store it in an airtight container. This helps to lock in flavor and moisture. If you have leftovers, make sure to seal it tight. This dip stays good in the fridge for about 3 days. You usually don’t need to reheat this dip. It tastes best cold or at room temperature. If you want to warm it up, do it gently in the microwave. Heat it in short bursts, stirring in between. You can freeze this dip if you want to save some for later. Use a freezer-safe container and leave a little space for expansion. It can last in the freezer for up to 2 months. When you're ready to eat it, move it to the fridge overnight. After thawing, stir it well before serving. This will help bring back its creamy texture. Cottage Cheese Cookie Dough Dip is a creamy, sweet treat. The base is smooth cottage cheese, mixed with peanut butter and maple syrup. This dip tastes like cookie dough but is healthier. It has a rich flavor with hints of vanilla and chocolate. You can feel the mini chocolate chips and nuts for a nice crunch. Serve it with fresh fruit slices or graham crackers for a fun snack! Using regular cookie dough is not safe. Raw cookie dough may contain raw eggs and flour, which can cause illness. Plus, regular cookie dough lacks the creamy texture that cottage cheese offers. Stick with the cottage cheese to keep it safe and tasty. It’s much better for your health, and you still get that cookie dough vibe! To make this dip vegan, swap the cottage cheese for a plant-based alternative. Use a creamy cashew or almond yogurt. Replace the honey with maple syrup for a vegan sweetener. For the peanut butter, ensure it’s natural and free from added sugar. These swaps keep the flavor great while making it vegan-friendly! This blog post shared how to make a tasty cottage cheese cookie dough dip. We covered the main ingredients like smooth cottage cheese and creamy peanut butter. We also explored optional add-ins, from nuts to chocolate chips. The step-by-step guide helped you blend your base and add final touches. Remember, the right texture and flavors make all the difference. Enjoy personalizing your dip with healthy swaps or fun variations. Whether for a snack or party, this dip is sure to impress. Get creative and have fun with it!

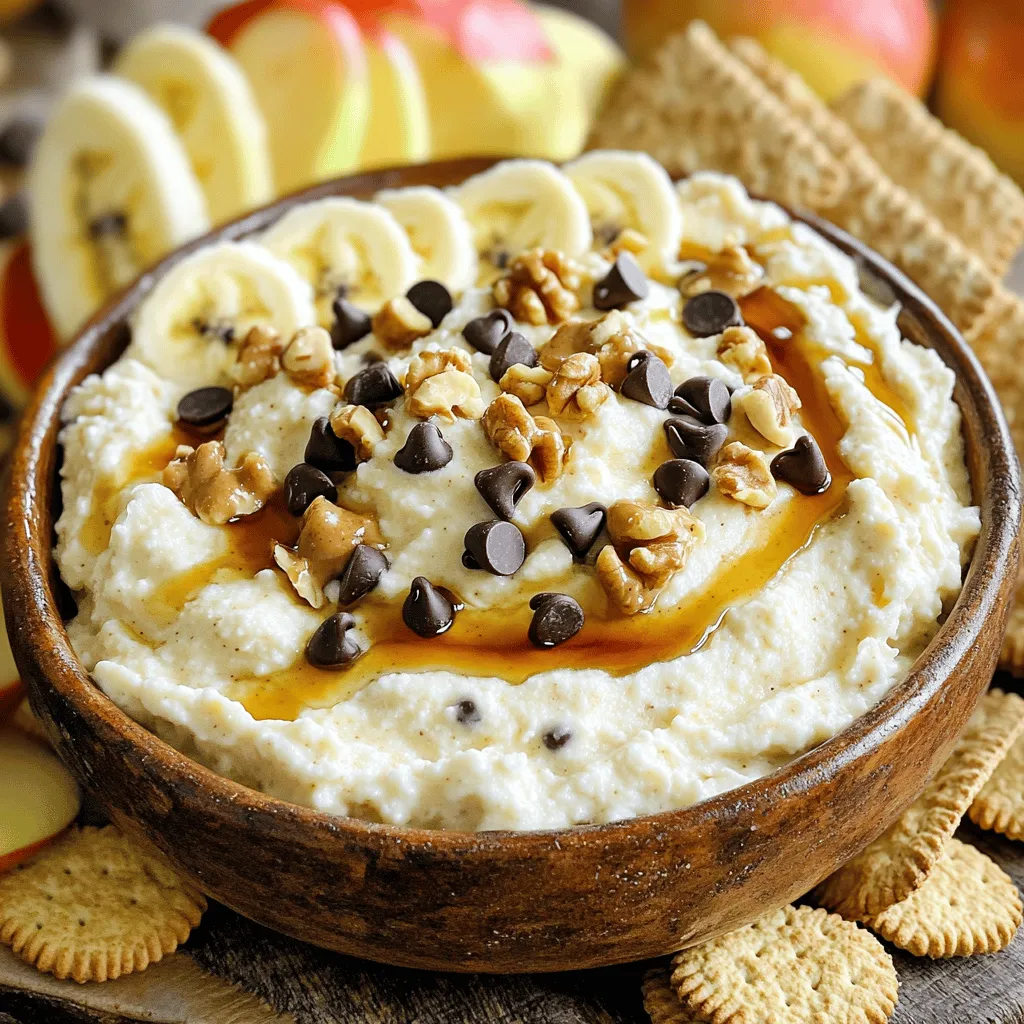
Craving a sweet treat that’s both easy and healthy? Look no further than Cottage Cheese Cookie Dough Dip! This tasty recipe blends smooth cottage cheese with creamy peanut butter and …

Read more

Categories Desserts

Cinnamon Apple Cider Doughnuts Irresistible Homemade Treat

September 11, 2025 by Chef Miles
To make these tasty cinnamon apple cider doughnuts, you will need: - 1 cup apple cider - 2 cups all-purpose flour - 1 teaspoon baking powder - 1/2 teaspoon baking soda - 1 teaspoon ground cinnamon - 1/2 teaspoon ground nutmeg - 1/2 teaspoon salt - 1/2 cup granulated sugar - 1/4 cup packed brown sugar - 2 large eggs - 1/2 cup unsweetened applesauce - 1/4 cup vegetable oil - 1 teaspoon vanilla extract - 1/4 cup granulated sugar (for coating) - 1 teaspoon ground cinnamon (for coating) You can swap some ingredients if needed. For the apple cider, you can use apple juice for a sweeter taste. If you want a gluten-free option, use gluten-free flour blends. Instead of eggs, you can use flaxseed meal mixed with water as a binder. Applesauce can be replaced with mashed bananas for a different flavor. Using fresh ingredients is key for great taste. Fresh apple cider adds a rich flavor that enhances the doughnuts. Fresh spices like cinnamon and nutmeg pack a punch. They make each bite fragrant and delightful. Fresh eggs and applesauce also improve texture. They help create a soft, fluffy doughnut that melts in your mouth. Always check the expiry dates on your ingredients. Freshness matters when you want to impress with your baking! Start by making the apple cider reduction. Pour 1 cup of apple cider into a medium saucepan. Heat it over medium heat until it gently boils. Let it simmer for 15 to 20 minutes. The goal is to reduce it to about 1/2 cup. This step brings out a rich apple flavor. Once it's reduced, take it off the heat and let it cool fully. While the cider cools, preheat your oven to 350°F (175°C). Grab a doughnut pan and grease it well with non-stick spray. In a large bowl, mix together your dry ingredients. Combine 2 cups of all-purpose flour, 1 teaspoon baking powder, 1/2 teaspoon baking soda, 1 teaspoon cinnamon, 1/2 teaspoon nutmeg, and 1/2 teaspoon salt. Whisk until they blend nicely. In another bowl, whisk together the sugars, eggs, applesauce, vegetable oil, vanilla extract, and the cooled apple cider. Mix until it's smooth. Next, pour the wet mix into the dry mix. Stir gently with a spatula. Remember, it’s okay if there are a few lumps. Now, spoon the batter into your greased doughnut pan. Fill each mold about two-thirds full. This allows space for the doughnuts to rise. Place the pan in the preheated oven and bake for 12 to 15 minutes. The doughnuts should turn golden brown. To check for doneness, insert a toothpick into the center; it should come out clean. After baking, let the doughnuts cool in the pan for about 5 minutes. Then, move them to a wire rack. While they're still warm, mix 1/4 cup sugar with 1 teaspoon cinnamon in a small bowl. Roll each doughnut in this mixture for a sweet finish. Enjoy these delicious treats warm! To keep your doughnuts light, avoid overmixing. When you combine wet and dry ingredients, stir gently. Use a spatula to fold the batter. It’s okay to have small lumps. Overmixing can make your doughnuts tough, not soft. Follow these simple tips for fluffy doughnuts: - Preheat your oven: Always preheat your oven to 350°F (175°C) before baking. This ensures even cooking. - Grease the pan well: Use non-stick spray to coat the doughnut pan. This helps them come out easily. - Fill the molds correctly: Fill each mold about two-thirds full. This allows room for rising without spilling over. - Check for doneness: Insert a toothpick into the center of a doughnut. If it comes out clean, they are ready. Serve your warm doughnuts for the best taste. Here are some fun ideas: - Pair with a hot drink like apple cider or coffee. - Try adding a drizzle of glaze for extra sweetness. - Serve with fresh fruit or whipped cream for a festive touch. - Arrange them on a platter for a beautiful display. Enjoy the cozy flavors! {{image_4}} You can mix in different flavors to make these doughnuts exciting. Try adding a dash of almond extract for a nutty taste. You might also want to fold in some finely chopped nuts or dried fruit for texture. Want to spice things up? Add a pinch of ginger or cardamom for warmth. Each option gives your doughnuts a unique twist! A simple glaze can take your doughnuts to the next level. Mix powdered sugar with a little apple cider and whisk until smooth. Drizzle this over the warm doughnuts for a sweet finish. Another idea is to use a caramel glaze. Just melt some caramel candies with a splash of cream for a rich topping. The sweet glaze pairs nicely with the cinnamon flavor! If you want a different way to finish your doughnuts, consider some alternative coatings. Instead of the classic cinnamon-sugar, try using powdered sugar or even cocoa powder. For a fun twist, roll the warm doughnuts in crushed cereal or coconut flakes. These coatings add crunch and flavor, making each bite even more delightful! To keep your cinnamon apple cider doughnuts fresh, place them in an airtight container. Make sure they cool completely before storing. This will help prevent any sogginess. Store them at room temperature for up to two days. If you want to keep them longer, consider freezing. When you're ready to enjoy your doughnuts again, reheating is easy. You can use the microwave for about 10 seconds for a quick warm-up. If you prefer a crispy texture, pop them in the oven at 350°F for around 5 minutes. This will revive their lovely golden crust. To freeze your doughnuts, first let them cool completely. Then, wrap each doughnut tightly in plastic wrap. Place the wrapped doughnuts in a freezer-safe bag or container. They can last up to three months in the freezer. When you want one, just thaw it at room temperature, then reheat as mentioned. Enjoy your homemade treats anytime! Homemade cinnamon apple cider doughnuts taste best fresh. They last about two days at room temperature. Store them in an airtight container to keep them soft. If you want them to last longer, put them in the fridge. They can last up to a week there. Just remember, the fridge can make them a bit dry. Yes, you can! To make gluten-free cinnamon apple cider doughnuts, replace all-purpose flour with a good gluten-free blend. Look for one that includes xanthan gum. This will help the doughnuts hold together well. The taste will still be great! Serve these doughnuts warm for the best flavor. They pair nicely with a cup of hot apple cider or coffee. You can also add a simple glaze or sprinkle more cinnamon on top. For a fun twist, serve them with ice cream or whipped cream for a treat! You’ve learned how to make delicious cinnamon apple cider doughnuts from start to finish. We discussed the key ingredients, ways to substitute, and the need for freshness. The step-by-step guide helped you mix, bake, and cool your doughnuts properly. Remember the tips to keep them light and fluffy, and explore fun variations. Lastly, knowing how to store and reheat can keep your doughnuts tasty. Now, you’re ready to enjoy your treats or share them with friends. Happy baking!

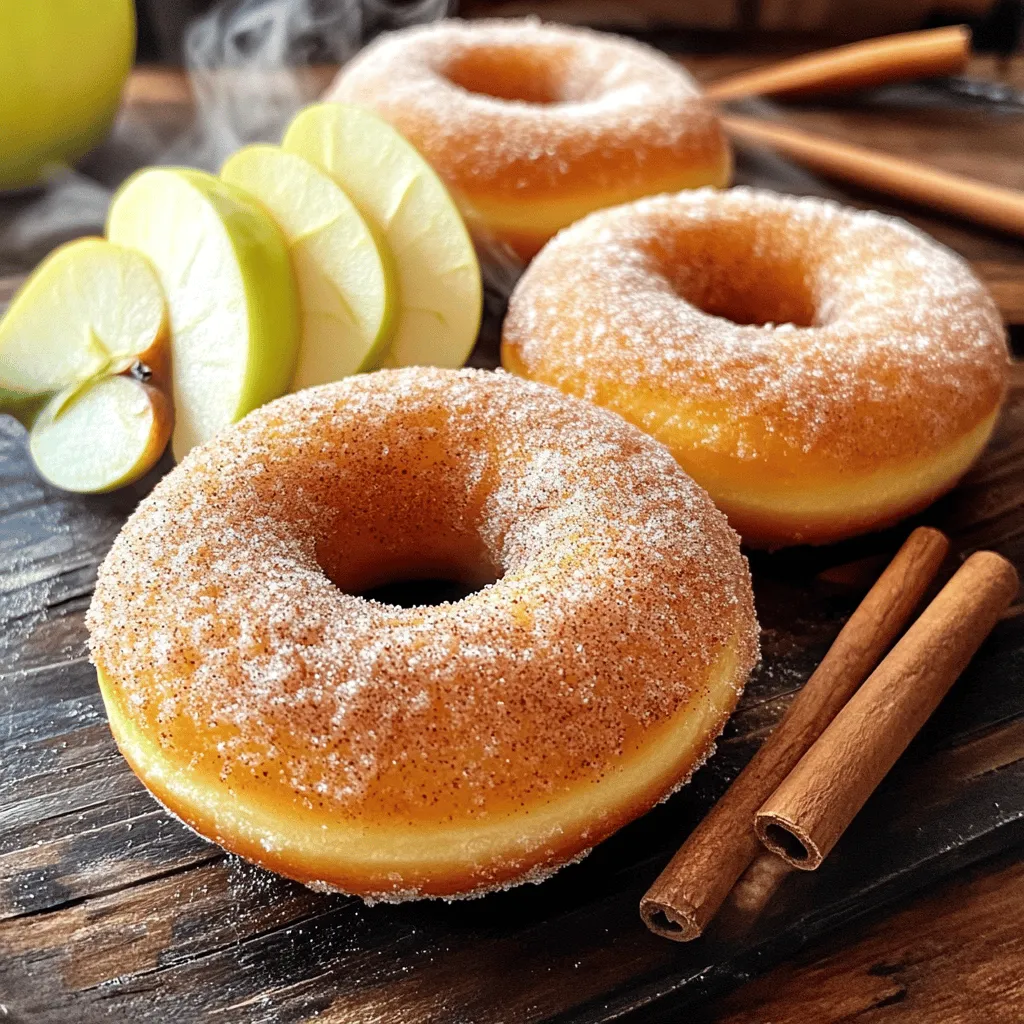
There’s nothing quite like the taste of homemade cinnamon apple cider doughnuts. Imagine biting into a warm, fluffy treat, packed with the rich flavors of fall. In this guide, I’ll …

Read more

Categories Desserts

Pesto Chicken & Roasted Potatoes Sheet Pan Delight

September 11, 2025 by Chef Miles
- 4 boneless, skinless chicken breasts - 1 cup basil pesto (store-bought or homemade) - 1 lb baby potatoes, halved - 2 tablespoons olive oil - 1 teaspoon garlic powder - 1 teaspoon paprika - Salt and pepper, to taste - 1 cup cherry tomatoes, halved - Fresh basil leaves, for garnish - Lemon wedges, for serving Gathering fresh ingredients is key to this dish. I love using baby potatoes for their sweetness and texture. You can use store-bought basil pesto, but homemade adds a special touch. If you have time, make it from scratch! The garlic powder and paprika give a nice kick. When you prep your chicken, be sure to use good quality breasts. It helps make the dish juicy. The cherry tomatoes add a pop of color and taste. Fresh basil leaves and lemon wedges are perfect for the finishing touch. They brighten the dish and add freshness. With the right ingredients, you set the stage for a meal that everyone will love. This dish is simple yet full of flavor. Each bite is a delight! - Preheat the oven to 400°F (200°C). - Line a large sheet pan with parchment paper. - In a big bowl, combine halved baby potatoes with: - 2 tablespoons olive oil - 1 teaspoon garlic powder - 1 teaspoon paprika - Salt and pepper, to taste - Toss until evenly coated. Spread the potatoes on the sheet pan. - In a small bowl, mix 1 cup basil pesto with a pinch of salt and pepper. - Coat each chicken breast with the pesto sauce. Make sure they are well covered. - Roast the potatoes in the oven for 15 minutes. - Take the pan out and add the chicken and halved cherry tomatoes. - Drizzle any remaining pesto over the top. - Return the pan to the oven and roast for another 25-30 minutes. - Make sure the chicken reaches 165°F (75°C) and the potatoes are golden brown. - Once done, let the pan rest for a few minutes. Garnish with fresh basil leaves and serve with lemon wedges. To ensure your chicken reaches 165°F (75°C), use a meat thermometer. Insert it into the thickest part of the breast. This way, you know it’s safe to eat. If you have larger chicken breasts, add 5 to 10 minutes to the cooking time. This helps them cook through without drying out. Check them around 30 minutes, then adjust if needed. To boost the potato flavor, try adding herbs like rosemary or thyme. You could also sprinkle some Parmesan cheese before serving. For crispy potatoes, spread them out on the pan. Avoid stacking them on top of each other. This allows them to roast evenly and get that nice crunch. You can also flip them halfway through cooking for extra crispiness. For a warm and inviting look, serve the dish right from the sheet pan. Make it pop by adding fresh basil leaves and lemon wedges. You can also pair this meal with a fresh salad or garlic bread. The bright flavors of the salad will balance well with the pesto chicken. {{image_4}} If you want to change the protein, you can use shrimp or tofu. Shrimp cooks fast, so reduce the cooking time. Bake shrimp for about 15-20 minutes. Tofu needs a bit more prep. Press the tofu to remove water, then cube it. Bake for 25-30 minutes. This way, you keep the meal tasty and healthy. Adding more vegetables can boost flavor and color. Bell peppers and zucchini work great. Cut bell peppers into strips and slice zucchini into rounds. Toss them with olive oil, salt, and pepper. Spread them on the pan with the potatoes. They will roast nicely and add extra nutrition. You can switch up the pesto for a fun twist. Try sun-dried tomato pesto for a rich taste. Mix in nuts or cheese to your pesto for extra flavor. You can also use herbs like oregano or thyme for a unique flavor. Experiment with different spices to find your favorite mix. Before you store your Pesto Chicken and Roasted Potatoes, let the dish cool down. Cooling helps prevent moisture build-up. To cool, just leave the sheet pan on the counter for about 30 minutes. Avoid covering it while it cools. This way, the steam can escape, and your dish stays fresh. For storing leftovers, place the chicken and potatoes in a container. Use an airtight container to keep out air and moisture. If you have extra cherry tomatoes or basil, store them separately. This helps keep their taste and texture fresh. You can keep the dish in the fridge for up to three days. If you want to store it longer, consider freezing it. To reheat your dish safely, use the oven or microwave. For the oven, preheat to 350°F (175°C). Place the chicken and potatoes on a baking sheet. Cover with foil to keep them moist. Heat for about 20 minutes or until warm throughout. If using a microwave, place a portion on a plate. Heat in short intervals, stirring in between. This helps keep the flavors and textures intact. Enjoy your tasty leftovers! Yes, you can use frozen chicken. Just remember to thaw it first. This helps the chicken cook evenly. You can thaw it in the fridge overnight or use the microwave setting. Cooking frozen chicken without thawing may lead to uneven results. You can store leftovers in the fridge for up to four days. Make sure to place them in an airtight container. This keeps the chicken and potatoes fresh. If you want to keep them longer, freeze them. They can last up to three months in the freezer. Absolutely! Making your own basil pesto is easy and fun. You need fresh basil, garlic, pine nuts, Parmesan cheese, and olive oil. Blend these ingredients until smooth. Adjust the flavors to your taste. Homemade pesto can be more vibrant and fresher than store-bought. The best way is to use a meat thermometer. Insert it into the thickest part of the chicken. It should read 165°F (75°C) for safe consumption. If you don’t have a thermometer, cut into the chicken. The juices should run clear, with no pink showing. Yes, you can use regular potatoes. Just cut them into smaller chunks. This ensures they cook evenly with the chicken. Baby potatoes are great for their size, but any potato will work. Adjust the cooking time as needed to ensure they are tender. This recipe combines tender chicken with vibrant flavors and easy prep. You learned how to season baby potatoes and coat chicken with pesto for a tasty meal. Roasting it all together brings out the best flavors. Keep experimenting with different proteins and veggies. Try your favorite spices or homemade pesto. Remember, cooking is all about having fun and making it yours. Enjoy your time in the kitchen!

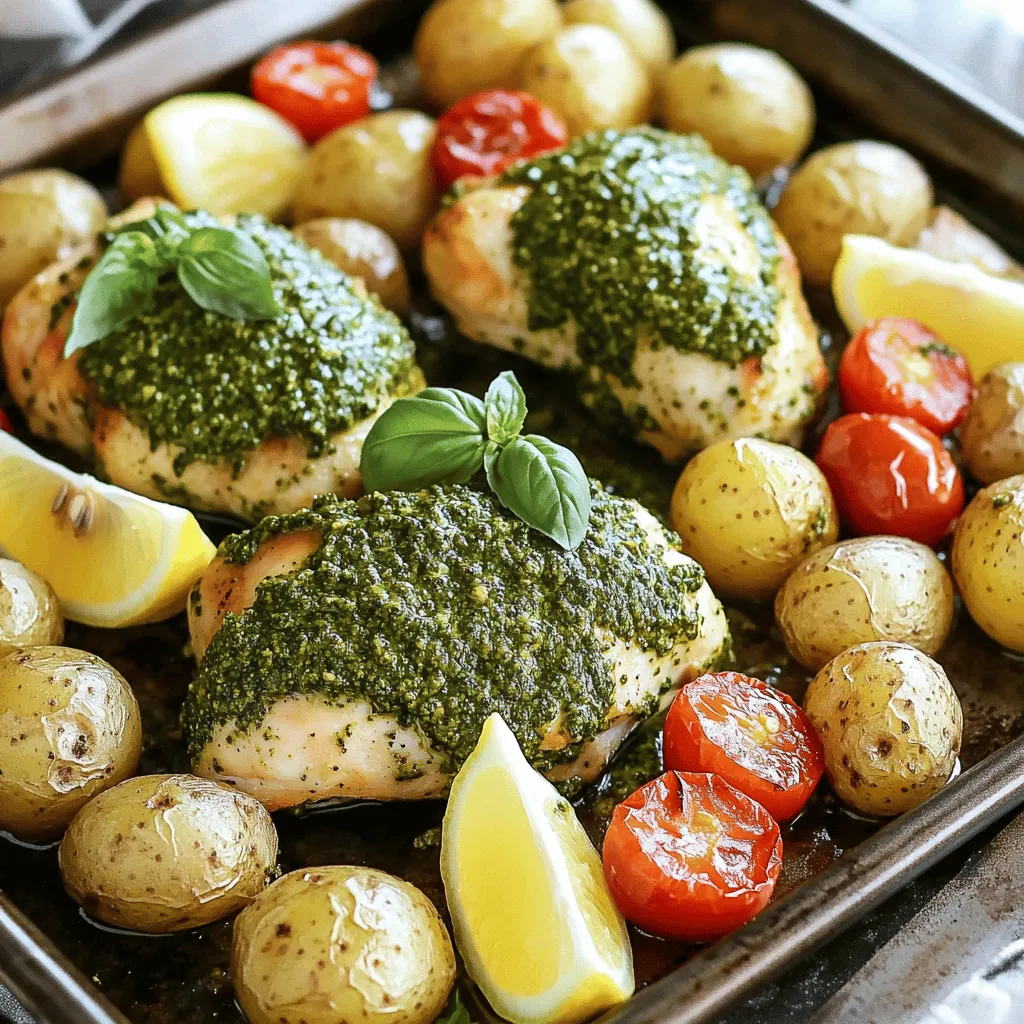
If you’re looking for a quick and tasty dinner, look no further! My Pesto Chicken & Roasted Potatoes Sheet Pan Delight is your answer. This one-pan meal combines juicy chicken …

Read more

Categories Dinner

Garlic Ginger Shrimp Stir-Fry Quick and Easy Meal

September 11, 2025 by Chef Miles
- 1 lb large shrimp, peeled and deveined - 2 tablespoons vegetable oil - 4 cloves garlic, minced - 2 tablespoons fresh ginger, grated - 1 red bell pepper, thinly sliced - 1 cup snap peas, trimmed - 1 medium carrot, julienned - 3 green onions, chopped (separate the white and green parts) - 2 tablespoons low-sodium soy sauce - 1 tablespoon oyster sauce (optional for depth of flavor) - 1 teaspoon sesame oil - Salt and pepper to taste - Cooked jasmine rice or noodles When you gather your ingredients, freshness matters. Choose large shrimp that are bright and firm. The garlic should smell strong and the ginger should be fragrant. For vegetables, pick a red bell pepper that feels heavy and has bright skin. Snap peas should be crisp with no brown spots. Carrots can be medium-sized; they should snap when bent. Each sauce adds a layer of flavor. Low-sodium soy sauce keeps it savory without being too salty. Oyster sauce deepens the taste, but you can skip it if you prefer. Sesame oil offers a nutty finish. For serving, jasmine rice is fluffy and fragrant. Noodles add a nice chew. Choose what you like best! - Heat 2 tablespoons of vegetable oil in your skillet over medium-high heat. Wait until the oil shimmers but does not smoke. - Add 4 cloves of minced garlic and 2 tablespoons of grated ginger to the hot oil. Sauté for about 30 seconds. Stir constantly until the mix is fragrant and golden. Be careful not to burn the garlic. - Add 1 pound of peeled and deveined shrimp to the skillet. Cook for 2-3 minutes. Stir often. - You’ll know the shrimp are cooked when they turn pink and opaque. Once cooked, take the shrimp out of the skillet and place them on a plate. - In the same skillet, toss in 1 thinly sliced red bell pepper, 1 cup of trimmed snap peas, and 1 julienned carrot. - Stir-fry these veggies for 3-4 minutes. You want them to be vibrant and tender, but still crisp. - Put the cooked shrimp back into the skillet with the vegetables. - Pour in 2 tablespoons of low-sodium soy sauce, 1 tablespoon of oyster sauce (optional), and 1 teaspoon of sesame oil. Stir well to coat everything. Cook for an extra 2 minutes until heated through. - Season your stir-fry with salt and pepper to taste. - Just before finishing, mix in the white parts of 3 chopped green onions for added freshness. - Serve the garlic ginger shrimp stir-fry over warm jasmine rice or noodles. Garnish with the green parts of the green onions for a pop of color. For a great stir-fry, you need the right tools. A large skillet or wok works best. These help heat the oil evenly. Use a spatula or wooden spoon to stir. This makes sure all the food cooks well. To cook evenly, keep everything moving in the pan. Add the shrimp in a single layer. This helps them cook fast. Make sure not to crowd the pan. If needed, cook in batches. If you don’t have oyster sauce, try hoisin or soy sauce. These can still make your dish tasty. You can also skip it altogether and add more soy sauce. Fresh shrimp is best for this dish. They taste sweeter and cook quickly. However, frozen shrimp work too. Just thaw them first and pat them dry. This helps avoid extra water in your stir-fry. For a lovely plate, use a large serving dish. Place the stir-fry in the center. Arrange the vegetables so the colors pop. Garnish with sliced green onions. You can also add sesame seeds or lime wedges. These add charm and make the meal more fun to eat. {{image_4}} You can switch up the shrimp for chicken, tofu, or beef. Each protein brings a new flavor. If you choose chicken, cut it into small pieces. Cook it until no pink shows, about 5-7 minutes. For tofu, use firm blocks. Cut it into cubes and pan-fry until golden. Beef should be sliced thin. Cook it quickly over high heat for just 2-3 minutes. Adjust these cooking times based on the protein you select. Feel free to change the veggies! Use seasonal options like zucchini, broccoli, or bell peppers. These add color and crunch. You can also toss in greens like spinach or bok choy. Add them at the end for a quick wilt. This boosts nutrition and flavor without much work. Want some heat? Add chili flakes or sriracha to your stir-fry. Start with a little, then taste. You can always add more if you want it spicier. For those who prefer milder dishes, skip the spice. Instead, focus on the fresh garlic and ginger for flavor. Adjusting spice levels can make this dish fit any palate. To store leftovers, place the stir-fry in an airtight container. This keeps it fresh and safe. Refrigerate it as soon as possible. It can last up to three days in the fridge. If you notice any off smells or changes in color, it's best to toss it. You can freeze the stir-fry if you want to save some for later. First, cool it completely. Then, place it in a freezer-safe bag or container. Remove as much air as you can. It can last up to three months in the freezer. To reheat, thaw it overnight in the fridge. Then, warm it up in a skillet over low heat. This helps keep the shrimp tender and the veggies crisp. For easy meal prep, you can chop veggies ahead of time. Slice your bell pepper, julienne the carrot, and trim the snap peas. Store them in separate containers. You can also peel and devein the shrimp in advance. This way, you save time when cooking. Make sure to keep the shrimp in the fridge until you are ready to use them. Yes, you can use frozen shrimp. Just make sure to thaw them first. To thaw, place the shrimp in a bowl of cold water for about 15-20 minutes. Change the water halfway through for best results. Once thawed, rinse them under cold water. This helps ensure they are clean and ready to cook. You can serve this dish with jasmine rice or noodles. Both options soak up the sauce well. For extra color and crunch, consider adding a side salad or some steamed broccoli. These sides complement the flavors nicely and add nutrition. To add heat, try adding red pepper flakes or sliced fresh chili peppers. You can also use sriracha or chili paste. Start with a small amount, then taste and adjust. This way, you can control the spice level to your liking. To make this dish gluten-free, use gluten-free soy sauce. Many brands offer tasty alternatives. You may also skip oyster sauce or find a gluten-free version. Always check labels to ensure they meet your dietary needs. Yes, leftovers can be reheated. The best way is to use a skillet over low heat. Add a little water or oil to avoid drying out. Stir frequently until heated through. You can also microwave it, but be careful not to overheat. This blog post covered how to create a tasty Garlic Ginger Shrimp Stir-Fry. You learned about the key ingredients, step-by-step cooking methods, and ways to enhance flavor and presentation. Remember, adjust vegetables, proteins, and spice levels to fit your taste. Store leftovers properly to keep them fresh. This dish is adaptable and perfect for any meal. Enjoy making it your own!

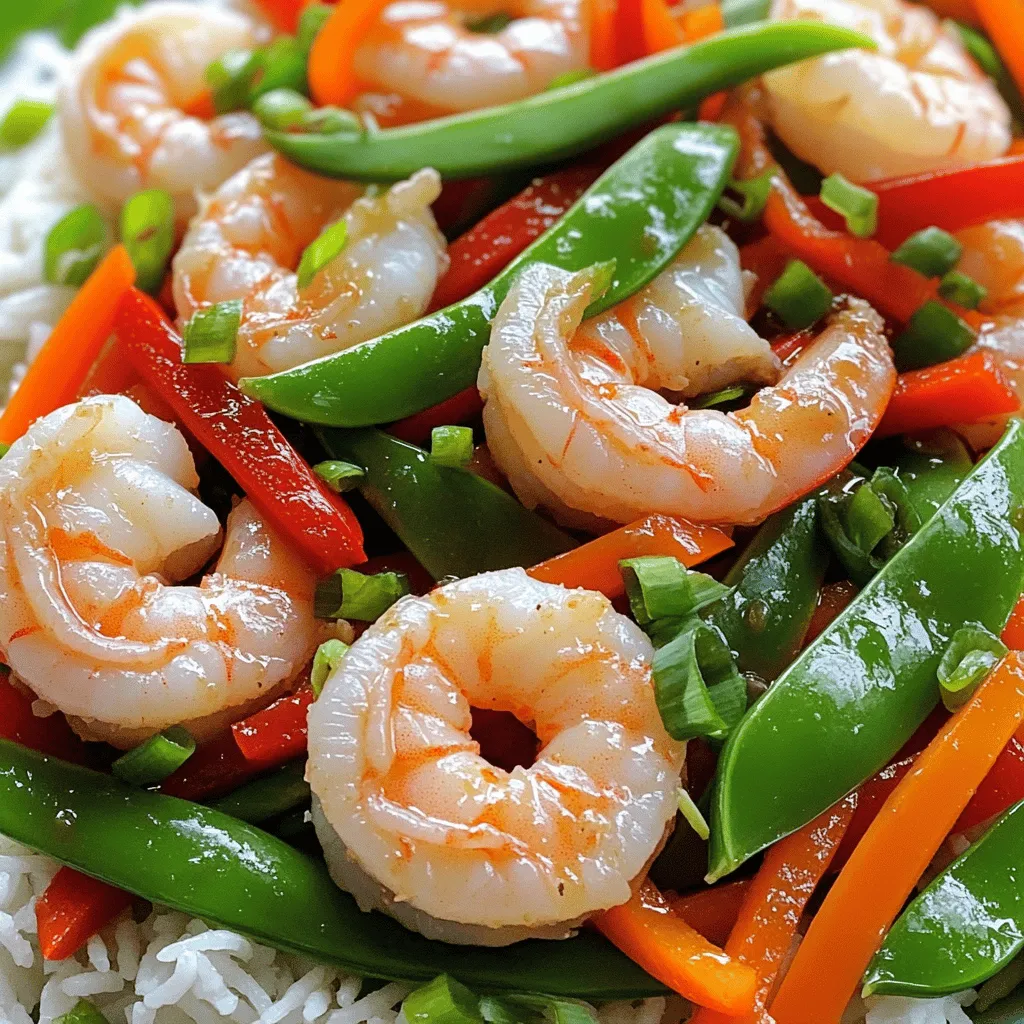
Looking for a quick and tasty meal? Garlic Ginger Shrimp Stir-Fry is your answer! With just a few simple ingredients, you can whip up a gourmet dish in no time. …

Read more

Categories Dinner

Honey Mustard Chicken Veggie Skillet Easy Dinner

September 11, 2025 by Chef Miles
To make the Honey Mustard Chicken Veggie Skillet, you will need: - 2 boneless, skinless chicken breasts - 2 tablespoons honey - 2 tablespoons Dijon mustard - 1 tablespoon olive oil - 1 red bell pepper, sliced into strips - 1 yellow zucchini, diced into cubes - 1 cup broccoli florets - 1 teaspoon garlic powder - Salt and pepper, to taste - Fresh parsley, chopped (for garnish) These ingredients create a tasty and colorful dish that is easy to prepare. You can enhance the flavor of your skillet with some optional seasonings and garnishes, such as: - Paprika for a smoky taste - Italian herbs like basil or oregano - Lemon juice for a fresh twist - Crushed red pepper flakes for heat - Extra chopped herbs like chives or cilantro Feel free to mix and match these options to suit your taste. To prepare this dish, you’ll need some essential kitchen tools: - A large skillet for cooking - A small mixing bowl for combining the honey and mustard - A cutting board for chopping vegetables - A sharp knife for slicing and dicing - A meat thermometer to check chicken doneness Having the right tools will help make your cooking experience smoother and more enjoyable. To make the honey mustard sauce, grab a small bowl. Add 2 tablespoons of honey and 2 tablespoons of Dijon mustard. Mix them well until they are smooth. This sauce adds a sweet and tangy flavor to your chicken. Set it aside for later. Next, take 2 boneless, skinless chicken breasts. Season both sides with salt, pepper, and 1 teaspoon of garlic powder. This will give the chicken a nice taste. Heat 1 tablespoon of olive oil in a large skillet over medium-high heat. Once the oil is hot, carefully place the chicken in the skillet. Cook it for about 6-7 minutes. Don’t move the chicken. This helps form a golden brown crust. After that, flip the chicken over. Drizzle the honey mustard sauce on top. Lower the heat to medium and cover the skillet. Cook for another 6-7 minutes, or until the chicken reaches an internal temperature of 165°F. When the chicken is almost done, it’s time for the veggies. Add 1 sliced red bell pepper, 1 diced yellow zucchini, and 1 cup of broccoli florets to the skillet. Stir gently to mix everything together. Let the vegetables cook for about 5 minutes. You want them to be tender-crisp and colorful. This adds not just taste, but also a lovely look to your dish. Once done, sprinkle freshly chopped parsley on top for a fresh touch. Enjoy your Honey Mustard Chicken Veggie Skillet! To get that perfect chicken crust, season well. Use salt, pepper, and garlic powder. Press the chicken into the skillet firmly. This helps it sear better. Cook it without moving for 6-7 minutes. This time lets the crust form. Flip the chicken and add your honey mustard mix. The sauce will caramelize and add flavor. I love using fresh, colorful veggies in this dish. Red bell peppers add sweetness and crunch. Yellow zucchini brings a nice texture. Broccoli florets are great for color and nutrients. You can also try carrots, snap peas, or asparagus. Mix and match for your taste. Use what you have on hand. You can change the honey mustard sauce to suit your flavor. If you like it sweeter, add more honey. For a tangier taste, add extra Dijon mustard. Taste as you mix and adjust. You can even add a splash of lemon juice for brightness. This sauce is flexible, so make it your own! {{image_4}} If you want to switch things up, try using turkey or tofu. Both options add great flavor. Turkey remains juicy and tender when cooked right. Tofu absorbs the honey mustard sauce well. This makes it tasty and satisfying. You can even use shrimp for a quick cook option. Just be careful not to overcook the shrimp. You can mix and match your veggies too! Use bell peppers, carrots, or even snap peas. Each vegetable brings its own unique taste and crunch. Asparagus or green beans can also add a nice touch. Feel free to use frozen veggies if you are short on time. They cook quickly and taste great. If you like heat, consider adding red pepper flakes. A pinch can give your dish a nice kick. You can also include sliced jalapeños for a fresh, spicy flavor. For a different approach, try a dash of hot sauce in the honey mustard mix. This will create a sweet and spicy blend that excites the taste buds. To keep your Honey Mustard Chicken Veggie Skillet fresh, store it in an airtight container. Let it cool to room temperature first. This helps prevent moisture buildup, which can make the dish soggy. Place the container in the fridge. It will stay good for up to four days. When you are ready to eat leftovers, you can reheat them easily. Use the microwave for quick reheating. Place the portion on a microwave-safe plate and cover it. Heat in 30-second bursts until warm. Stir after each interval. You can also reheat in a skillet. Warm the skillet over medium heat and add a splash of water. Cover it to steam the dish. This keeps it moist. If you want to freeze your skillet, it’s simple. Let the dish cool completely. Then, divide it into portions and place them in freezer-safe bags or containers. Squeeze out the air before sealing. This helps prevent freezer burn. You can freeze the meal for up to three months. When you’re ready to eat, thaw it overnight in the fridge. Reheat as mentioned above for the best taste. Yes, you can make this dish ahead of time. Cook the chicken and veggies as directed. After cooking, let it cool down. Store it in an airtight container in the fridge. You can keep it for up to three days. When ready to eat, just reheat it on the stove or in the microwave until hot. You can try different sauces for this dish. Barbecue sauce adds a sweet and smoky flavor. Teriyaki sauce offers a tasty Asian twist. For a tangy option, use balsamic glaze. Each sauce changes the taste, so feel free to experiment. Make sure to adjust the salt and pepper to match the sauce's flavor. Yes, this recipe is great for meal prep. It cooks quickly and stores well. You can divide it into portions. Pack it in containers for lunch or dinner throughout the week. The mix of chicken and veggies makes a balanced meal. You'll enjoy a tasty dish ready to eat anytime. In this blog post, we explored making Honey Mustard Chicken Veggie Skillet. We covered the key ingredients, step-by-step cooking instructions, and helpful tips. I shared variations for different tastes and discussed storage options for leftovers. Overall, making this dish is simple and fun. You can try new flavors or stick to your favorites. I hope you feel confident to whip it up for any meal. Enjoy your cooking adventure!

Looking for an easy dinner that bursts with flavor? This Honey Mustard Chicken Veggie Skillet packs a tasty punch with juicy chicken and colorful veggies. In just a few simple …

Read more

Categories Dinner

Pumpkin Caramel Cheesecake Trifles Delightful Treat

September 11, 2025 by Chef Miles
To create these tasty trifles, you’ll need: - 1 cup pumpkin puree - 1 cup cream cheese, softened, at room temperature - 1/2 cup powdered sugar - 1 teaspoon pure vanilla extract - 1 teaspoon pumpkin pie spice - 1 cup heavy cream - 1 cup graham cracker crumbs - 1/2 cup caramel sauce (store-bought or homemade) These ingredients give the trifles their rich flavor and creamy texture. The pumpkin puree adds warmth, while the cream cheese provides a smooth base. Consider adding these to enhance your trifles: - 1/2 teaspoon ground cinnamon, for garnish - Whipped cream, for topping - Chopped pecans, for garnish These toppings add a nice crunch and visual appeal. A sprinkle of cinnamon brings out the pumpkin spice flavor. If you need to swap ingredients, here are some ideas: - Use Greek yogurt instead of cream cheese for a lighter option. - Try maple syrup in place of powdered sugar for a natural sweetener. - Substitute almond milk for heavy cream if you want a dairy-free version. These substitutions can help you customize the trifles to your taste or dietary needs. Don't be afraid to experiment! Start by grabbing a medium mixing bowl. Add 1 cup of softened cream cheese. Then, add 1/2 cup of powdered sugar. Next, pour in 1 teaspoon of pure vanilla extract and 1 teaspoon of pumpkin pie spice. Use an electric mixer on medium speed. Mix until smooth and creamy. Make sure there are no lumps left in the mix. This will be the base of your trifle. In a separate large bowl, pour in 1 cup of heavy cream. Use a whisk or an electric mixer to whip the cream. Whip until you see soft peaks forming. This should take about 2 to 3 minutes. When the cream is ready, gently fold it into the pumpkin cream cheese mixture. Be careful not to deflate the cream. We want to keep it light and fluffy for our trifles. Now, let’s build our trifles. Get your individual serving glasses or bowls ready. Start by adding about 2 tablespoons of graham cracker crumbs to the bottom of each glass. This is your tasty base. Next, spoon about 3 tablespoons of the creamy pumpkin mixture on top. Spread it smoothly. Drizzle a thin layer of caramel sauce over the pumpkin layer. Repeat this layering: more graham cracker crumbs, then more pumpkin mix, and another drizzle of caramel. Keep layering until each glass is filled. Finish with a lovely layer of the pumpkin mixture on top. Finally, add a dollop of whipped cream on each trifle. Sprinkle a dash of ground cinnamon and some chopped pecans for crunch. Cover the trifles with plastic wrap and place them in the fridge. Chill for at least 2 hours to let the flavors mix together. To get that smooth, creamy texture, mix the cream cheese first. Blend it with powdered sugar, vanilla, and pumpkin pie spice. Use an electric mixer for even results. Mix until there are no lumps. Next, whip the heavy cream until soft peaks form. This should take 2 to 3 minutes. Gently fold the whipped cream into the pumpkin mixture. Be careful not to deflate the cream. This folding keeps your trifle light and fluffy. Layering is key to a good trifle. Start with graham cracker crumbs at the bottom of each glass. This base adds texture and flavor. Next, spoon in the pumpkin cream mixture. Spread it evenly for a nice look. Drizzle caramel sauce over the pumpkin layer. Repeat this process. Add more graham cracker crumbs and pumpkin cream until each glass is full. Finish with a layer of pumpkin cream on top. This creates a beautiful finish. For a great presentation, use a decorative tray for your trifles. This makes them look inviting. Add a dollop of whipped cream on top of each trifle. Sprinkle with ground cinnamon and chopped pecans for extra flavor. For a fancy touch, drizzle extra caramel sauce over the whipped cream. This adds a delightful shine. Chill the trifles for at least 2 hours before serving. This helps the flavors blend together. Enjoy this delicious treat with friends or family. {{image_4}} You can give your trifles a twist by adding more spices. Try adding nutmeg or ginger for a warm touch. You can also use maple extract instead of vanilla for a richer flavor. Just a little change can make a big difference. If you like it spicy, add more pumpkin pie spice to the mix. This will enhance the pumpkin flavor and add depth. If you need a gluten-free option, swap out the graham crackers. Use gluten-free cookies or crushed nuts for the base. You can also check the caramel sauce. Make sure it’s gluten-free if you buy it. This way, everyone can enjoy the treat without worry. Want to serve these trifles in jars? It's a fun idea! Use small mason jars for a cute touch. Layer the ingredients just like you would in glasses. This makes it easy to grab and eat. Plus, it looks great at parties. You can even give them as gifts! To keep your Pumpkin Caramel Cheesecake Trifles fresh, store them in the fridge. Use an airtight container to avoid drying out. If you used clear glasses, cover them with plastic wrap. This keeps the trifles moist and tasty. Always place them on a flat shelf to prevent spills. When stored properly, your trifles will stay fresh for up to three days. After that, the texture may change. The whipped cream can lose its fluffiness, and the flavors may fade. It’s best to enjoy them within this time for the best taste. You can freeze these trifles for later enjoyment. However, the texture may change. To freeze, place them in airtight containers. Avoid the whipped cream and toppings before freezing. Thaw in the fridge before serving. Enjoy them within a month for the best flavor and quality. Yes, you can make these trifles a day in advance. This helps the flavors blend. Store them in the fridge, covered with plastic wrap. They will taste even better after chilling overnight. Serve the trifles in clear glasses or bowls. This allows everyone to see the beautiful layers. Top each trifle with whipped cream, a sprinkle of cinnamon, and some chopped pecans. This adds a nice crunch and flavor. For a special touch, drizzle more caramel sauce over the whipped cream. To lighten the trifles, you can use reduced-fat cream cheese. You can also swap heavy cream for whipped coconut cream. Use a sugar substitute in place of powdered sugar if you want to cut down on sugar. Adding fresh fruit like apple slices can also boost the health factor while adding flavor. In this article, we explored how to craft delicious Pumpkin Caramel Cheesecake Trifles. We covered the key ingredients, preparation steps, and essential tips for perfect layering. You learned about various flavor variations and how to customize the recipe for different dietary needs. Lastly, we discussed storage tips to keep your trifles fresh. Making these trifles is fun and easy. Now you can enjoy a tasty treat that impresses everyone! Enjoy your dessert adventure!

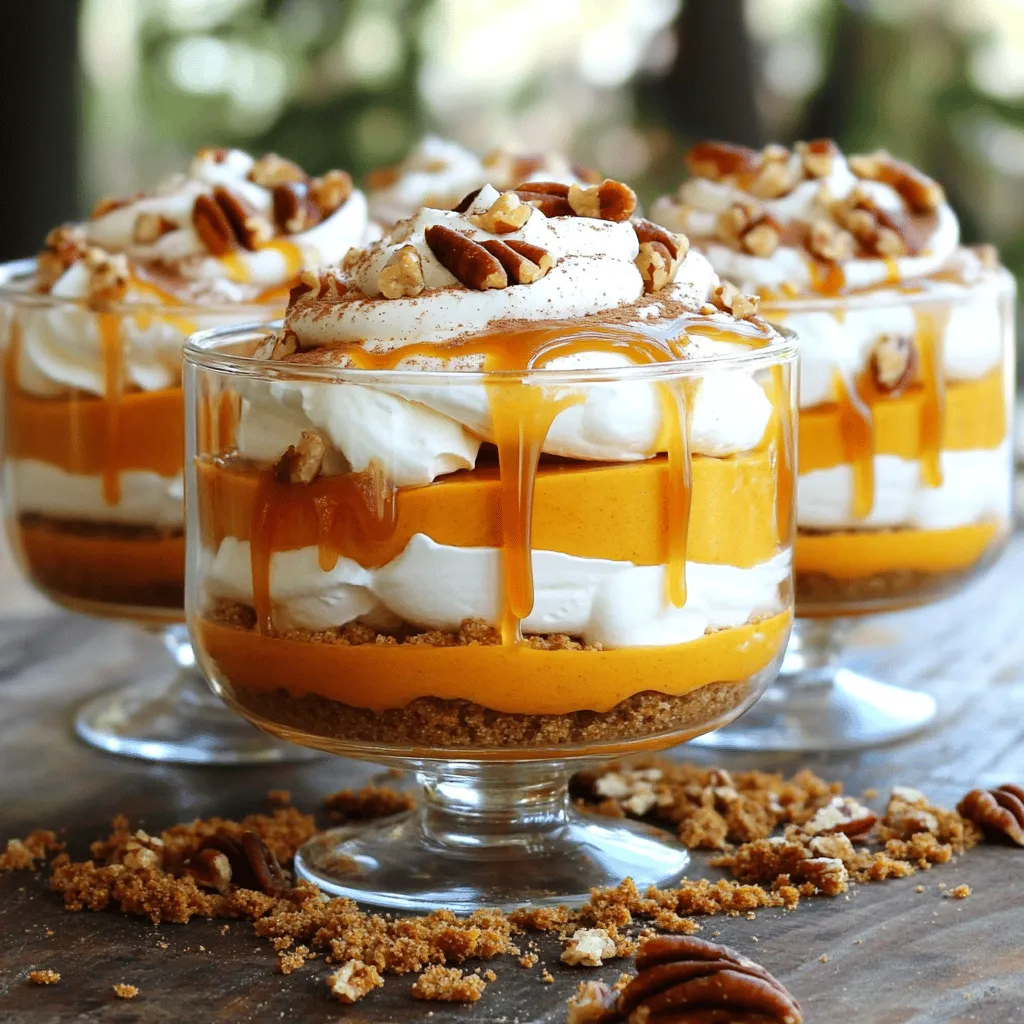
Ready to impress your friends and family with a stunning dessert? Pumpkin Caramel Cheesecake Trifles are a delicious treat that combines creamy cheesecake, spiced pumpkin, and rich caramel. You can …

Read more

Categories Desserts
Older posts
Newer posts
← Previous Page1 … Page25 Page26 Page27 … Page112 Next →

MELTED RECIPES

where delicious ideas melt into life, from stovetop to backyard. Always warm, simple, and irresistibly satisfying. 🍳🔥🧀

PAGES

Home About Contact Privacy Policy Terms & Conditions Cookie Policy GDPR Policy Copyright Policy Disclaimer

CATEGORIES

Appetizers Desserts Salads Breakfast Dinner

Contact

  • Pinterest
  • Mail
Copyright © 2025 Melted Recipes. All rights reserved.