Skip to content
Melted Recipes
  • Home
  • Appetizers
  • Desserts
  • Salads
  • Breakfast
  • Dinner
  • Privacy Policy
  • Contact
  • About

Chef Miles

Buffalo Ranch Chicken Wraps Tasty and Simple Meal

September 16, 2025 by Chef Miles
To make Buffalo Ranch Chicken Wraps, you need a few key ingredients. Here is the list: - 2 cups cooked chicken, shredded - 1/2 cup buffalo sauce - 1/2 cup ranch dressing - 1 cup shredded romaine lettuce - 1/2 cup ripe tomatoes, diced - 1/2 cup sharp cheddar cheese, shredded - 4 large flour tortillas - 1/4 cup green onions, finely chopped - Salt and freshly ground pepper, to taste Each ingredient plays a role in making these wraps tasty and filling. The cooked chicken adds protein. The buffalo sauce brings a spicy kick. Ranch dressing adds creaminess and coolness. Fresh vegetables like romaine lettuce and tomatoes balance the flavors. Shredded cheddar cheese gives a rich taste. The flour tortillas hold it all together. Green onions add a touch of freshness. A pinch of salt and pepper enhances the overall flavor. Feel free to adjust the ingredients to suit your taste. Want less spice? Cut back on the buffalo sauce. Want more crunch? Add extra lettuce or tomatoes. This recipe is flexible and fun! In a medium bowl, take the cooked chicken. Add the buffalo sauce to it. Mix well until the chicken is fully coated. You can taste the mixture and add salt and pepper as you like. In another bowl, blend ranch dressing with a tablespoon of buffalo sauce. This gives it a nice kick. Mix until it is smooth, then set it aside. Now, lay out the flour tortillas on a clean surface. Take a tablespoon of the ranch mixture and spread it in the center of each tortilla. Make sure it covers the middle evenly. Next, distribute the buffalo chicken mixture on top of the ranch dressing. Spread it out so every wrap gets enough chicken. On top of the chicken, add shredded lettuce, diced tomatoes, and shredded cheddar cheese. Make sure each wrap has a good amount of these toppings. Finally, sprinkle the chopped green onions on top for extra flavor. To roll the wraps, first, fold the sides of the tortilla inward. Then, start rolling it tightly from the bottom up. This keeps all the good stuff inside. If you want to grill them for extra crunch, place the wraps seam-side down in a skillet over medium heat. Grill them for 2-3 minutes until they are golden and crispy. After grilling, slice each wrap diagonally in half. This makes them easier to hold and eat. To get the best flavor in your Buffalo Ranch Chicken Wraps, adjust the buffalo sauce to your liking. Some like it spicy, while others prefer a milder taste. Start with 1/2 cup of buffalo sauce, then taste and add more if you want extra heat. For the chicken, use salt and pepper to enhance its flavor. You can also try adding garlic powder or onion powder for a deeper taste. When serving your wraps, keep them neat on a bright platter. This adds color to your meal and makes it look more inviting. Consider serving extra ranch dressing in a small bowl for dipping. You can also garnish the platter with fresh parsley or cilantro. This simple touch makes your dish pop and impresses your guests. {{image_4}} You can switch up the buffalo sauce if you like. Try a spicy Sriracha or a tangy barbecue sauce. Both will give your wraps a unique twist. For tortillas, you can use whole wheat or corn tortillas instead of flour. Each option adds a different flavor and texture. If you want a lighter meal, opt for grilled chicken instead of fried. Grilled chicken has less fat and still tastes great. You can also choose low-fat ranch dressing. This keeps the flavor while cutting calories. Feel free to add more veggies for crunch. Avocado slices or bell peppers can make your wrap even better. If you love spice, add jalapeños or a dash of hot sauce. For a milder taste, use less buffalo sauce or pick a sweet sauce instead. These changes keep your wraps exciting and fun! To keep your Buffalo Ranch Chicken Wraps fresh, store them in the fridge. Place the wraps in an airtight container. They can last for 3 to 4 days in the fridge. If you have leftovers, you can freeze them too. Wrap them tightly in plastic wrap. Then, place them in a freezer bag. They should stay good for about 2 to 3 months in the freezer. When it's time to eat, reheating your wraps is easy. The best way is to use a skillet. Heat the skillet over medium heat. Place the wrap seam side down and cook for 2 to 3 minutes. This will keep the wrap crispy. You can also use a microwave. However, this may make the wrap a bit soggy. To avoid this, place a damp paper towel over the wrap while reheating. This will help keep it moist while preventing it from getting too soft. Yes, you can prepare these wraps ahead of time. Wrap them tightly in plastic wrap. Store them in the fridge for up to a day. This can save time during busy days. Just remember to eat them within that time for best taste. These wraps pair well with many sides. You can serve them with: - Fresh veggie sticks - Potato chips - Sweet potato fries - A light salad - Extra ranch dressing for dipping Choose sides that you enjoy. They will balance the spicy flavor of the wraps. Absolutely! Store-bought rotisserie chicken is a great time saver. Just shred the chicken and mix it with buffalo sauce. This makes the prep super quick and easy. The spice level is up to you! You control the heat by adjusting the buffalo sauce amount. Use a mild sauce for less heat. For more spice, add extra buffalo sauce or choose a hotter brand. Yes, you can make a tasty vegetarian version. Use cooked jackfruit or tofu instead of chicken. Mix them with buffalo sauce for flavor. Add the same toppings for a delicious wrap everyone will love. In this article, I shared a tasty buffalo ranch chicken wrap recipe. We covered the ingredients, step-by-step instructions, and tips to enhance your meal. Remember, you can tweak flavors and try different add-ins. Whether you grill your wraps or use store-bought chicken, you have options. Enjoy these wraps as is or with your favorite sides. Now, go ahead, make these wraps your own, and savor every delicious bite!

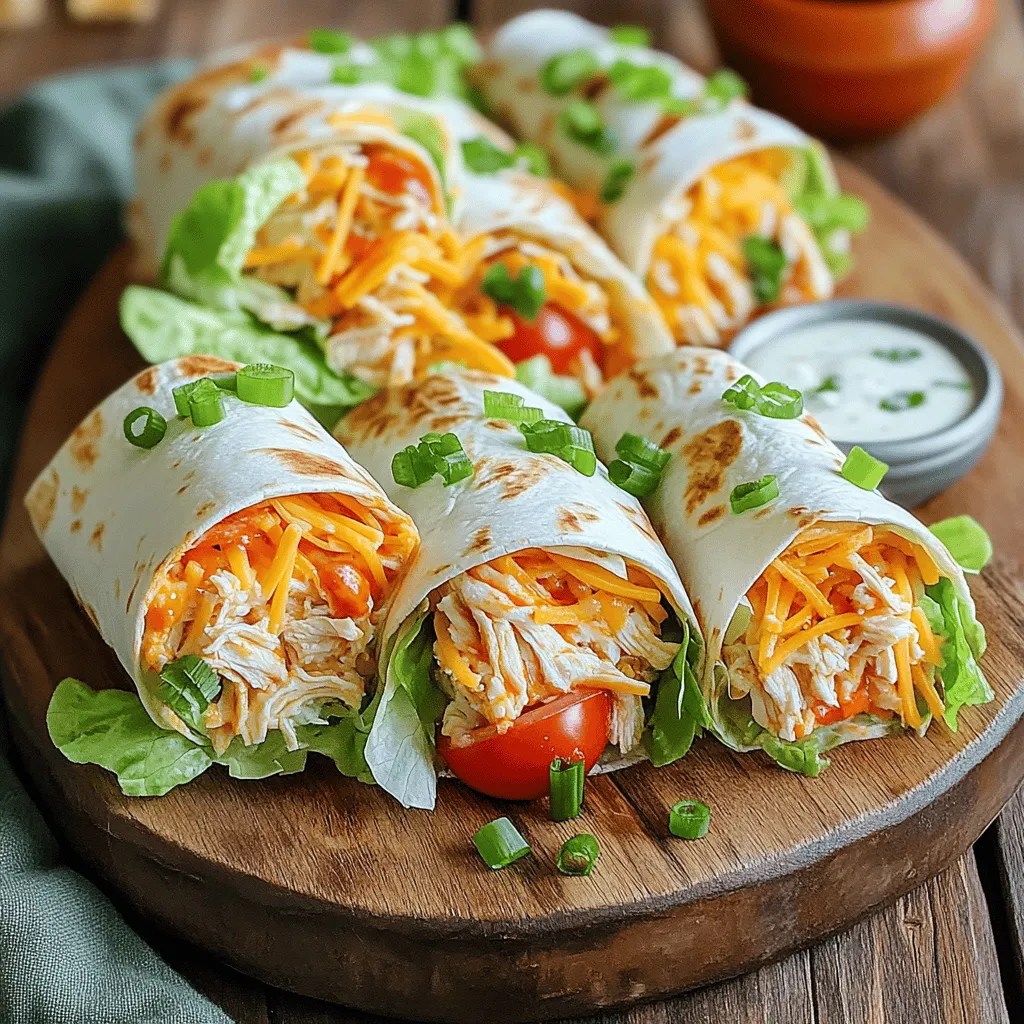
Looking for a quick and tasty meal? You’re in the right place! Buffalo Ranch Chicken Wraps are simple to make and packed with flavor. With just a few ingredients, you …

Read more

Categories Appetizers

Carrot Cake Energy Bites Nutritious Energy Boost

September 16, 2025 by Chef Miles
To make Carrot Cake Energy Bites, you need the following ingredients: - 1 cup rolled oats - 1 cup finely grated carrots (about 3 medium carrots) - ½ cup almond butter (or any nut/seed butter) - ½ cup pitted dates, finely chopped - ½ teaspoon ground cinnamon - ¼ teaspoon ground nutmeg - ¼ teaspoon pure vanilla extract - ¼ cup unsweetened shredded coconut - ¼ cup walnuts or pecans, chopped - A pinch of salt These ingredients create a tasty and nutritious snack. They pack flavor and energy. When measuring, use dry measuring cups for oats and nuts. A kitchen scale can help too. For grated carrots, ensure they are finely grated. This helps the bites hold together better. Use a knife to chop the dates finely. If they are too sticky, soak them in warm water for a few minutes. This makes chopping easier. For the spices, always use fresh ground. They bring out the best flavor. You can swap ingredients based on your taste or needs: - Nut/Seed Butter: Try peanut butter, sunflower seed butter, or cashew butter. - Sweetener: Use maple syrup or honey instead of dates. - Nuts: Substitute walnuts with almonds or leave them out for a nut-free option. - Coconut: Omit shredded coconut if you dislike it. These swaps make the recipe more flexible. You can adjust it to suit your diet or preferences. Start by gathering all your ingredients. You need rolled oats, grated carrots, almond butter, chopped dates, and spices. In a large mixing bowl, add: - 1 cup rolled oats - 1 cup finely grated carrots - ½ cup almond butter - ½ cup pitted dates, finely chopped - ½ teaspoon ground cinnamon - ¼ teaspoon ground nutmeg - ¼ teaspoon pure vanilla extract - ¼ cup unsweetened shredded coconut - ¼ cup walnuts or pecans, chopped - A pinch of salt Mixing them well is key. Use a spatula or your hands. Ensure everything combines evenly. If it feels too dry, add a bit more almond butter or a splash of water. The mixture should hold together nicely. Once the mixture is ready, it's time to form the bites. Clean your hands, then scoop out about one tablespoon of the mixture. Roll it into a ball using your palms. Place each ball on a parchment-lined baking sheet. For extra flair, consider rolling some bites in shredded coconut or chopped nuts. This gives them a fun texture and look. Now, let’s chill! Place the baking sheet in the fridge for at least 30 minutes. This step helps the energy bites firm up and makes them easier to handle. Once chilled, serve them in a decorative bowl or on a platter. You can even sprinkle some shredded coconut around for a pop of color. Store any leftovers in an airtight container in the fridge. Enjoy your tasty and nutritious Carrot Cake Energy Bites! To make the best Carrot Cake Energy Bites, texture is key. Start with rolled oats. They provide a hearty base. Use finely grated carrots for sweetness and moisture. If your mix feels dry, add more almond butter. A splash of water can help too. Mix it well until it sticks together. You want a firm but soft bite. One common mistake is not measuring ingredients correctly. Too many dates can make the bites overly sweet. Use only half a cup of pitted dates. Another mistake is skipping the chilling time. Chilling helps the bites firm up for better handling. Don’t forget to roll the bites into balls evenly. This ensures they cook and chill uniformly. To boost flavor, try adding a pinch of sea salt. It brings out the natural sweetness. You can also mix in a bit of shredded coconut. It adds texture and a slight tropical taste. For a fun twist, add mini chocolate chips. They’ll make your bites more indulgent. Remember, flavor is all about balance. {{image_4}} You can change the nuts in your energy bites. Try using almonds, cashews, or pumpkin seeds. Each nut adds a different flavor and texture. Walnuts bring a rich, earthy taste, while pecans add a sweet crunch. If you want a nut-free option, sunflower seeds work great too. They give protein and healthy fats without nuts. Adding flavors makes these bites even better. You can mix in dark chocolate chips for a sweet touch. Dried fruits like raisins or cranberries add a chewy texture. They also bring extra sweetness. You can even use spices like ginger or cloves for warmth. These small changes create new taste experiences with each batch. Making these bites gluten-free is simple. Just use gluten-free rolled oats. For a vegan treat, stick to plant-based nut or seed butter. You can use maple syrup instead of honey for sweetness. All these options keep the bites tasty while meeting different diets. This way, everyone can enjoy this healthy snack! To keep your Carrot Cake Energy Bites fresh, store them in an airtight container. This helps lock in moisture and flavor. Place the container in your refrigerator. Keeping them cold keeps them safe to eat longer. You can also layer them with parchment paper to avoid sticking. For longer storage, freeze your energy bites. Place them on a baking sheet in a single layer. Freeze them for about an hour until solid. After that, transfer the bites to a freezer-safe bag or container. Label it with the date. They will stay good for up to three months in the freezer. When ready to eat, thaw them in the fridge overnight. These energy bites last about a week in the fridge. After that, they may lose their taste and texture. Always check for any off smells or changes in color. If they look or smell strange, it’s best to toss them. Enjoying them fresh ensures you get the best flavor and nutrients! Carrot Cake Energy Bites stay fresh for about one week. Store them in an airtight container in the fridge. This keeps them tasty and safe to eat. If you want to enjoy them longer, you can freeze them. They can last for up to three months in the freezer. Yes, you can make these energy bites nut-free. Just swap the almond butter with sun butter or soy nut butter. These are great options and will still give you a nice taste. You can also skip the nuts altogether if you prefer. Rolled oats are best for this recipe. They provide a nice texture and hold up well. Quick oats can work too, but they may make the bites softer. Avoid instant oats, as they can make the mixture too mushy. In this post, we explored the key ingredients and their measurements for making energy bites. We outlined step-by-step instructions, from mixing to serving. I shared tips for achieving the perfect texture and common mistakes to avoid. Variations let you customize flavors and dietary needs. Proper storage ensures freshness and extends shelf life. Energy bites are easy to make and a fun treat. Experiment with your favorite add-ins to find what you love best. Enjoy your tasty snacks!

Are you ready to fuel your day with a tasty treat? Carrot Cake Energy Bites are packed with flavor and nutrients, making them the perfect snack for busy people like …

Read more

Categories Desserts

One-Pot Creamy Cajun Chicken & Rice Delicious Meal

September 15, 2025 by Chef Miles
- 1 lb boneless, skinless chicken thighs, diced - 1 cup long-grain white rice - 1 medium onion, finely chopped - 3 cloves garlic, minced - 1 bell pepper, diced The heart of this meal is the chicken and rice. Chicken thighs bring rich flavor and moisture. The long-grain white rice absorbs all the tasty juices. Onion, garlic, and bell pepper add depth to the dish. These ingredients make your plate lively and colorful. - 2 tablespoons Cajun seasoning - 1 teaspoon smoked paprika - 2 cups chicken broth - 1 cup heavy cream - 1 can diced tomatoes (14.5 oz) Seasonings transform the dish from ordinary to amazing. Cajun seasoning adds a spicy kick. Smoked paprika gives it a hint of smokiness. Chicken broth and heavy cream create a creamy texture. The diced tomatoes add sweetness and acidity, balancing the flavors. - 2 green onions, sliced - Fresh parsley, chopped Garnishes elevate your meal's look and taste. Green onions add a fresh crunch. Fresh parsley brightens up the dish with color. These toppings make your plate more appealing and inviting. First, heat olive oil in a large pot over medium heat. Then, add the diced chicken thighs. Season them with salt and black pepper. Sauté the chicken for about 5 to 7 minutes. Cook until they turn golden brown and are fully done. Once cooked, take the chicken out and place it on a plate. In the same pot, add the chopped onion, minced garlic, and diced bell pepper. Sauté this mix for about 3 to 4 minutes. You want the vegetables to soften and smell great. Next, add the Cajun seasoning and smoked paprika. Cook this for 1 minute. This step helps the spices release their amazing flavors. Now it's time to bring it all together. Add the rinsed rice to the pot. Stir well to coat the rice with those tasty spices and veggies. Then, pour in the diced tomatoes with their juices, chicken broth, and heavy cream. Mix everything together until well combined. Return the browned chicken to the pot. Make sure it is submerged in the mixture. Bring the dish to a gentle boil, then lower the heat to a simmer. Cover the pot and let it cook for 20 to 25 minutes. This time allows the rice to become tender and absorb most of the liquid. After cooking, fluff the rice gently with a fork. Mix it with the creamy sauce and chicken. Taste the dish and add more salt or pepper if needed. To make sure your dish cooks evenly, cut the chicken into small, uniform pieces. This helps it brown nicely and cook well. When you add seasoning, sprinkle it evenly over the chicken and vegetables. Taste the dish before serving. If it needs more flavor, add salt or Cajun seasoning. To serve this dish elegantly, use deep bowls. This makes the meal look great and keeps it warm. Top each bowl with a bit of chopped parsley and a sprinkle of Cajun seasoning for extra color. This small touch makes a big difference in how it looks. Save time by using pre-chopped vegetables. Many grocery stores sell these, and they can cut your prep time in half. You can also meal prep by cooking the chicken and rice ahead. Store them in the fridge for easy reheating on busy nights. {{image_4}} For a twist, you can use chicken breasts instead of thighs. Chicken breasts are leaner and cook quickly. Just make sure to adjust the cooking time so they don’t dry out. You can also try shrimp or sausage for a different taste. Shrimp cooks fast and adds a nice flavor. Sausage gives a hearty touch and pairs well with Cajun spices. If you want to make this dish gluten-free, ensure your chicken broth is gluten-free. Many brands offer gluten-free options. For a vegan version, swap the chicken with chickpeas or tofu. Use vegetable broth and coconut cream instead of heavy cream. This keeps the creamy texture while making it plant-based. To boost the flavor, add extra Cajun seasoning or a splash of hot sauce. This adds heat and depth to the dish. You can also toss in vegetables like spinach, peas, or corn. They add color and nutrition, making your meal even better. Try different veggies based on what you have or love! To store your One-Pot Creamy Cajun Chicken & Rice, let it cool first. After cooling, transfer the dish to an airtight container. This keeps the flavors fresh and helps avoid spills. I recommend using glass containers. They are sturdy and do well in the fridge. For smaller portions, use smaller containers to save space. If you want to freeze this dish, follow these steps: 1. Let the chicken and rice cool completely. 2. Portion the meal into freezer-safe bags or containers. 3. Remove as much air as possible before sealing. This helps to avoid freezer burn. To thaw, move the dish to the fridge overnight. For reheating, you can use the microwave or stovetop. Add a splash of chicken broth to keep it creamy and moist while reheating. In the fridge, your leftovers will stay good for about 3-4 days. If you freeze the dish, it can last up to 2-3 months. Just be sure to label your containers. This way, you know when to use them. Enjoy your meal later without worry! Yes, you can prepare this dish ahead of time. Make it fully and cool it down. Store it in an airtight container in the fridge for up to three days. When ready to eat, simply reheat it on the stove or microwave. If you want a lighter option, use half-and-half or whole milk. For a dairy-free choice, try coconut milk or a cashew cream. These will still give a nice creaminess to the dish. To add more heat, consider these ideas: - Add more Cajun seasoning. - Mix in some cayenne pepper or hot sauce. - Toss in diced jalapeños for extra spice. Start small, and adjust to your taste! You can use brown rice, but the cooking time will change. Brown rice takes longer to cook. Increase the simmering time to about 35-40 minutes. You may need to add more broth too. This dish pairs well with: - A simple green salad. - Steamed vegetables like broccoli or green beans. - Crusty bread for dipping. These sides complement the creamy flavors perfectly! This blog post guides you through making One-Pot Creamy Cajun Chicken & Rice. We explored key ingredients, including chicken thighs, rice, and flavorful seasonings. You learned step-by-step instructions for cooking and combining everything into a delicious dish. We also shared helpful tips for cooking, presentation, and time-saving tricks. Don’t forget the variations and storage info to customize your meal and keep it fresh. You can create a tasty and enjoyable dish with just a few simple steps. Happy cooking!

Looking for a tasty meal that comes together in one pot? One-Pot Creamy Cajun Chicken & Rice is your answer! This dish combines tender chicken thighs, colorful veggies, and rich …

Read more

Categories Dinner

Pumpkin Spice Baked Oatmeal Cups Healthy Breakfast Joy

September 15, 2025 by Chef Miles
To make Pumpkin Spice Baked Oatmeal Cups, gather these simple ingredients: - 2 cups rolled oats - 1 cup pumpkin puree - 2 cups almond milk (or any milk of choice) - 1/4 cup maple syrup - 1/4 cup brown sugar - 1/4 cup melted coconut oil - 2 teaspoons vanilla extract - 2 teaspoons baking powder - 1 teaspoon cinnamon - 1/2 teaspoon nutmeg - 1/4 teaspoon ginger - 1/4 teaspoon salt - Optional: 1/2 cup chopped nuts (walnuts or pecans) - Optional: 1/2 cup raisins or chocolate chips These ingredients come together to create a warm and tasty breakfast. The oats give a hearty base. Pumpkin puree adds flavor and nutrition. Almond milk keeps it creamy. Sweeteners bring sweetness without being overpowering. The spices create that cozy pumpkin spice taste. Optional add-ins like nuts or chocolate chips let you customize your cups. You can mix and match according to your taste. This recipe is flexible and fun! - Preheat your oven to 350°F (175°C). - Prepare a muffin tin by greasing it or lining it with paper liners. - In a large bowl, combine the rolled oats, baking powder, cinnamon, nutmeg, ginger, and salt. Mix them well. - In a separate bowl, whisk together the pumpkin puree, almond milk, maple syrup, brown sugar, melted coconut oil, and vanilla extract until smooth. - Gradually pour the wet mixture into the dry ingredients. - Stir gently until everything is well combined. - If you want, fold in the chopped nuts and raisins or chocolate chips for extra flavor. - Using a spoon, fill each muffin cup about 3/4 full with the mixture. - Bake in the oven for about 25-30 minutes. - Check for doneness by inserting a toothpick in the center. It should come out clean. - Let the oatmeal cups cool in the pan for 5 minutes before moving them to a wire rack. To achieve the perfect texture, watch the baking time closely. Each oven is unique. Check the cups at 25 minutes. They should look golden and firm. If they jiggle too much, bake for a few more minutes. This will help you avoid dry or soggy spots. I love serving these cups warm. A dollop of Greek yogurt adds a nice creaminess. You can also try almond butter for a nutty twist. If you want a warm, inviting look, sprinkle extra cinnamon on top. For a vegan option, use almond milk or any plant-based milk. You can also substitute maple syrup with agave syrup. If you like it less sweet, cut back on the brown sugar. Adjusting sweetness works well with your taste. {{image_4}} You can change the taste of your pumpkin spice baked oatmeal cups. Adding cardamom gives it a warm, spicy twist. You can also mix in different nuts. Try almonds or hazelnuts for a crunchy bite. Each nut adds a unique flavor, making your cups even more enjoyable. If you want your oatmeal cups less sweet, reduce the brown sugar. You can also use sugar alternatives like honey or agave syrup. These options keep the flavor rich without the extra sugar. Adjusting sweetness helps tailor the recipe to your taste and health goals. Incorporating seasonal fruits or nuts can keep your oatmeal interesting. During fall, try adding diced apples or pears for a fresh touch. In winter, walnuts or dried cranberries add a festive feel. These modifications let you enjoy the flavors of each season in every bite. To keep your pumpkin spice baked oatmeal cups fresh, store them in the fridge. Place the cooled cups in an airtight container. This helps keep them moist and tasty. If you want to save some for later, freezing is a great option. Wrap each cup tightly in plastic wrap or foil. Then, place them in a freezer-safe bag or container. Reheating these oatmeal cups is easy. You can use the microwave for quick warming. Heat each cup for about 30 seconds to 1 minute. Alternatively, you can use the oven. Preheat it to 350°F (175°C). Place the cups on a baking sheet and warm them for about 10 minutes. This method helps maintain their texture. In the fridge, the oatmeal cups last about 5 days. Make sure they are well-sealed to prevent drying out. If you freeze them, they can last up to 3 months. Just remember to label your containers with the date. This way, you’ll know when to enjoy them! Yes, you can make these oatmeal cups ahead of time. Prepare the batter and fill the muffin tin. Cover it and store it in the fridge overnight. Bake the next morning for a quick breakfast. You can tell the oatmeal cups are done when they turn golden brown on top. Insert a toothpick in the center. If it comes out clean, they are ready to enjoy. Yes, you can swap pumpkin puree with applesauce or mashed banana. Both options add moisture and sweetness, but they will change the flavor slightly. If you don’t have maple syrup, honey or agave syrup works well. You can also use coconut sugar or any sweetener you prefer. Yes, these oatmeal cups can be gluten-free. Just use certified gluten-free rolled oats. This way, you can enjoy a safe and tasty breakfast. These oatmeal cups are easy to make and taste great. You learned about the ingredients, steps to bake, and tips to get it right. You can change flavors and even store them for later. Enjoy serving them warm or with your favorite toppings. Baking these cups is a fun way to enjoy healthy food at home. Try them out and share with friends and family. You’ll love how simple and tasty they are!

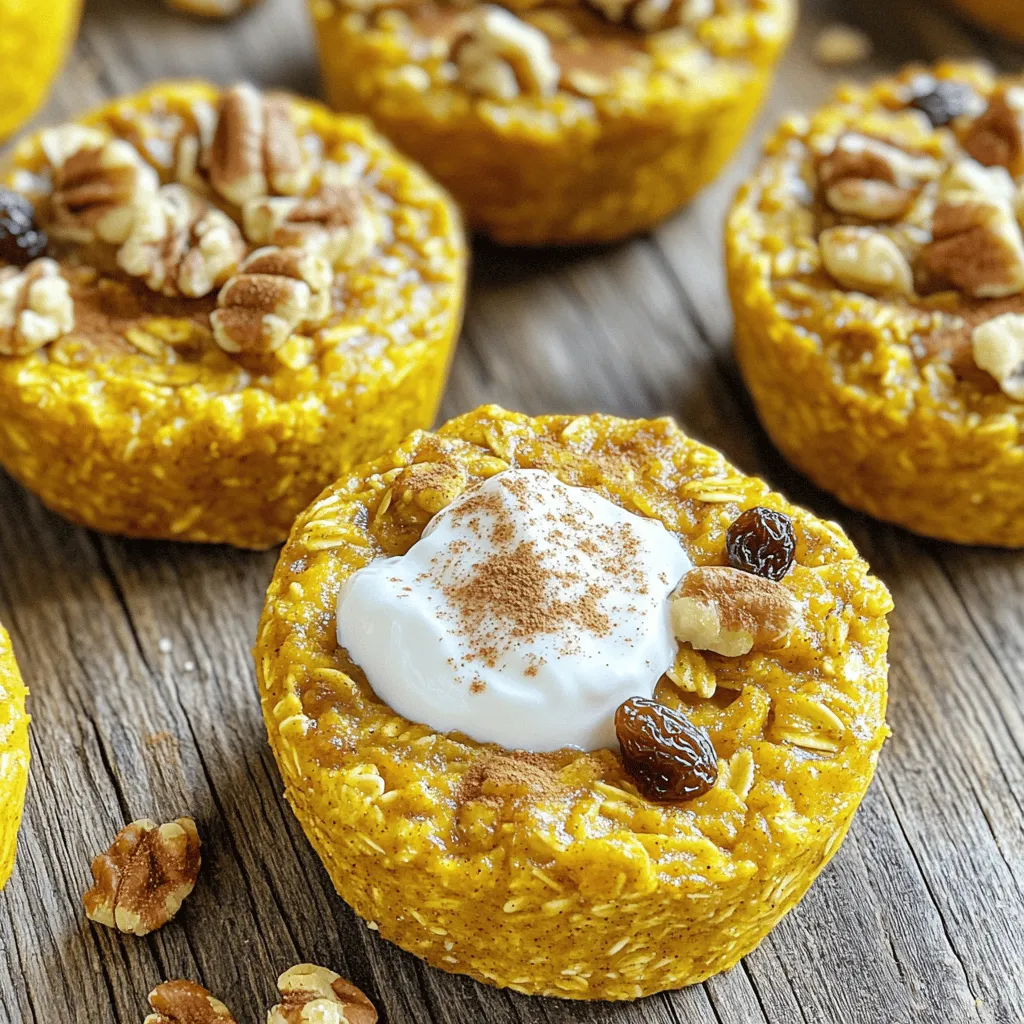
Are you ready for a delicious, healthy breakfast that feels like a treat? These Pumpkin Spice Baked Oatmeal Cups are the perfect blend of cozy flavors and nutritious ingredients. Packed …

Read more

Categories Breakfast

Roasted Red Pepper Tomato Bisque Comforting Delight

September 15, 2025 by Chef Miles
- 4 large red bell peppers - 2 tablespoons olive oil - 1 small onion, finely chopped - 2 cloves garlic, minced - 2 cans (14 oz each) diced tomatoes, undrained - 2 cups vegetable broth - 1 teaspoon dried basil - 1 teaspoon dried oregano - Salt and freshly ground black pepper to taste - 1 cup heavy cream (or coconut cream for a dairy-free option) - Fresh basil leaves for garnish I love using fresh ingredients in my Roasted Red Pepper Tomato Bisque. The red bell peppers bring a sweet and smoky flavor. Choosing ripe, red peppers is key. You want peppers that feel firm and heavy when you pick them. Olive oil adds richness and helps sauté the onions and garlic. I prefer using a small onion because it blends well and adds a nice depth. Garlic makes everything better and gives the bisque a warm aroma. Canned tomatoes save time and add a rich flavor. I use diced tomatoes that are undrained for extra moisture. Vegetable broth brings the whole dish together. I like to use low-sodium broth to control the salt. Spices like dried basil and oregano enhance the taste. Salt and freshly ground black pepper are essential for balancing flavors. Finally, cream adds a velvety texture. For a lighter option, you can use coconut cream, which works just as well. Don’t forget fresh basil leaves for garnish. They add a beautiful touch and a hint of freshness. This bisque is comforting and perfect for a cozy night in. - Preheat the oven and prepare the baking sheet: First, set your oven to 425°F (220°C). While it heats up, grab a baking sheet. Line it with parchment paper. This will help keep your peppers from sticking. - Roast the red bell peppers: Take four large red bell peppers and slice them in half. Remove the seeds and stems. Place them cut side down on the lined baking sheet. Roast them for 25-30 minutes. You want the skins to bubble and char. When done, let them cool for easier handling. - Sauté the onions and garlic: In a large pot, heat 2 tablespoons of olive oil over medium heat. Once hot, add one small chopped onion. Sauté it for about 5 minutes. You want it soft and translucent. - Combine all soup ingredients: Next, stir in 2 minced garlic cloves. Sauté for one more minute. After that, peel the cooled red peppers. Chop them into bite-sized pieces. Add them to the pot along with 2 cans of undrained diced tomatoes, 2 cups of vegetable broth, 1 teaspoon of dried basil, and 1 teaspoon of dried oregano. Stir well and bring the mixture to a gentle boil. - Simmer and blend the bisque: Reduce the heat to a simmer. Let it cook for about 15 minutes. This allows all the flavors to come together. After simmering, use an immersion blender to puree the soup until smooth. If you don’t have one, you can carefully blend it in batches. - Finish with cream and seasoning: Stir in 1 cup of heavy cream or coconut cream. Season with salt and freshly ground black pepper to taste. Gently heat the bisque through but do not let it boil again. Now, your Roasted Red Pepper Tomato Bisque is ready to serve! Enjoy it hot with a garnish of fresh basil leaves. - You can adjust seasonings to fit your taste. Try adding more basil or oregano. - A splash of balsamic vinegar adds a nice depth to the flavor. It brightens the soup. - For the perfect creamy texture, blend the soup until it is silky and smooth. - If you want a lighter option, use coconut cream instead of heavy cream. It adds a sweet touch without the heaviness. {{image_4}} You can change a few ingredients to fit your needs. If you want a dairy-free bisque, swap heavy cream for coconut cream. It adds a nice, creamy texture without dairy. The coconut flavor is subtle and blends well with the roasted peppers. For the broth, use chicken broth instead of vegetable broth, if you prefer. This adds a rich flavor that pairs well with the tomatoes and peppers. You can also try low-sodium options to control the saltiness. To make your bisque even better, consider some tasty add-ins. Croutons or toasted bread add a nice crunch. They are great for dipping and add texture to each spoonful. You can also include other vegetables. Try adding spinach or kale for some greens. These vegetables cook quickly and blend well into the bisque. You can even stir in some cooked corn or zucchini for a sweet bite. To store leftover bisque, let it cool first. Place the cooled bisque in an airtight container. Make sure to leave some space at the top for expansion. Store it in the fridge for up to five days. I recommend using glass containers. They keep the flavor fresh and are easy to clean. For freezing, use freezer-safe containers. Leave some room at the top since liquids expand when frozen. You can also use freezer bags. Just squeeze out as much air as possible before sealing. The bisque will last in the freezer for about three months. When you're ready to enjoy it, thaw the bisque in the fridge overnight. To reheat, warm it slowly on the stove. Stir it gently to keep the texture nice and creamy. You can also add a splash of water or broth if it seems too thick. Enjoy your warm, comforting bisque! How long does Roasted Red Pepper Tomato Bisque last in the fridge? Roasted Red Pepper Tomato Bisque stays fresh for about 3 to 4 days in the fridge. Store it in an airtight container. This way, it keeps its rich flavors and creamy texture well. Can I use fresh tomatoes instead of canned? Yes, you can use fresh tomatoes! Use about 4 cups of chopped fresh tomatoes. Make sure to peel them first for a smooth soup. They will add a vibrant taste to the bisque. What are the best side dishes to serve with bisque? I love pairing this bisque with crusty bread or a fresh salad. Grilled cheese sandwiches also make a great match. These sides complement the soup's rich, creamy flavors. How can I make this recipe vegan? To make the bisque vegan, swap heavy cream for coconut cream. Use vegetable broth, and ensure all ingredients are plant-based. This keeps the soup creamy while staying true to vegan principles. This blog post covered how to make a delicious Roasted Red Pepper Tomato Bisque. You learned about the main ingredients, step-by-step cooking instructions, and tips for extra flavor. I also shared storage tips and answered common questions. In conclusion, this bisque is easy and fun to make. Feel free to experiment with ingredients and flavors. Enjoy the comforting taste with your family and friends!

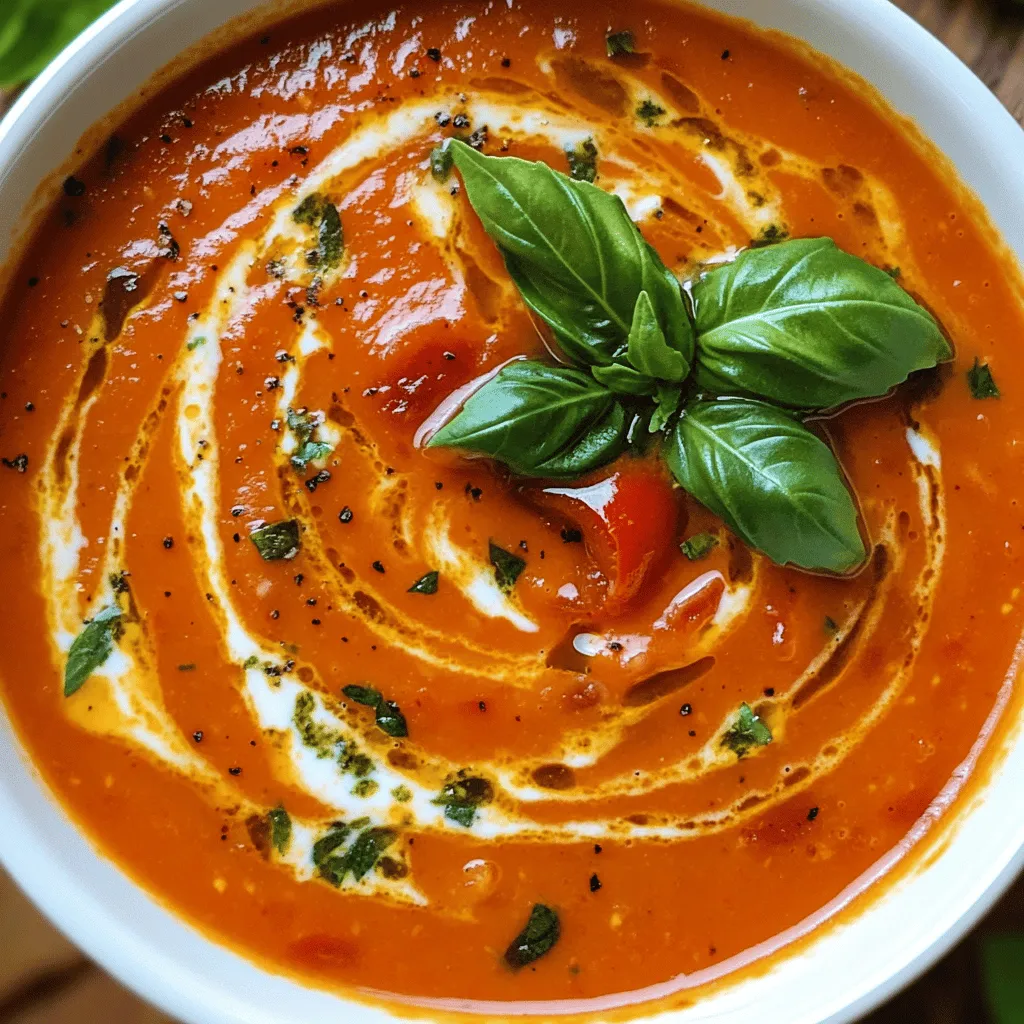
Craving a warm and comforting bowl of soup? You’re in the right place! This Roasted Red Pepper Tomato Bisque is a perfect blend of flavors that will delight your taste …

Read more

Categories Dinner

Apple Cheddar Puff Pastry Pinwheels Easy and Tasty

September 15, 2025 by Chef Miles
To make Apple Cheddar Puff Pastry Pinwheels, you need simple ingredients. Here’s a list to get you started: - Puff pastry - Apples (Granny Smith or Honeycrisp) - Shredded sharp cheddar cheese - Brown sugar - Ground cinnamon - Egg for egg wash - Salt - Optional: Chopped walnuts or pecans You will want to choose fresh apples for the best taste. Granny Smith gives a tart flavor, while Honeycrisp adds sweetness. The sharp cheddar cheese pairs well with the apples. Brown sugar and cinnamon enhance the natural sweetness. If you want a bit of crunch, add some chopped walnuts or pecans. These ingredients come together to make a delicious snack. - Preheat your oven to 400°F (200°C). - Line a baking sheet with parchment paper. - Lightly flour your work surface. - Roll out the thawed puff pastry. Make sure to smooth out any creases and enlarge it slightly. - In a bowl, mix the thinly sliced apples with brown sugar and ground cinnamon. - Add a pinch of salt to enhance the flavor. Toss gently until the apples are evenly coated. - Lay the rolled-out puff pastry flat. Evenly sprinkle the shredded cheddar cheese over it, leaving a small border. - Distribute the apple mixture over the cheese. If you want, add chopped walnuts or pecans for extra crunch. - Roll the pastry from one edge to form a tight log. Keep the filling contained. - Use a sharp knife to slice the log into 1-inch pinwheels. Place each pinwheel cut-side up on the baking sheet, spaced apart. - Brush the tops of each pinwheel with the beaten egg for a shiny finish. - Bake in the oven for 15-20 minutes, or until they puff and turn golden brown. Enjoy the lovely aroma as they bake! Thaw the puff pastry before using it. This helps it roll out better. Roll it out gently on a floured surface. You want it smooth, with no creases. A well-rolled pastry puffs up nicely. If it’s too thick, your pinwheels won’t cook well. To avoid a soggy bottom, keep the filling dry. Make sure to sprinkle a little salt. It helps balance the sweetness of the apple. Try adding a pinch of nutmeg for extra warmth. It blends well with cinnamon and apple. If you want a crunchy bite, add nuts. Walnuts or pecans work great. Chop them up and sprinkle on top of the apple mixture. This adds texture and flavor to your pinwheels. Serve the pinwheels warm on a wooden board. This rustic look is inviting. You can garnish with fresh apple slices. A sprinkle of cinnamon on top makes it pretty. For a fun touch, try a small bowl of honey for dipping. It’s a great way to impress your guests! {{image_4}} You can switch up the cheddar cheese for other types. Try mozzarella for a milder taste. Gouda adds a nice smoky flavor. Feta cheese brings a tangy kick. Mixing different cheeses can create new flavors. Combine cheddar and mozzarella for a creamy texture. Add fruits like pears or cranberries for a twist. Pears bring sweetness and a soft bite. Cranberries add a tart flavor that pairs well with cheese. You can also include savory items. Try cooked bacon or spinach for a different taste. These additions will surprise your guests. You can make sweet or savory pinwheels. For sweet ones, keep the apples and sugar but add nuts. For savory, skip the sugar and try herbs. Use fresh thyme or rosemary for a fragrant touch. These pinwheels work great for breakfast or brunch. They are perfect for gatherings or casual get-togethers. To keep your leftover pinwheels fresh, place them in an airtight container. Make sure they cool completely before sealing. This helps prevent moisture buildup and keeps the pastry crisp. You can also wrap them in plastic wrap if you prefer. If you want to freeze the pinwheels for later, arrange them on a baking sheet in a single layer. Freeze them for about an hour until firm. Then, transfer the frozen pinwheels to a freezer bag. This way, they won’t stick together. To reheat, simply thaw them in the fridge overnight and bake at 350°F (175°C) for about 10-12 minutes. In the fridge, your pinwheels will stay fresh for up to three days. If frozen, they can last for about three months. To know if they are spoiled, check for an off smell or unusual texture. If it feels slimy or the cheese has changed color, it’s best to toss them. Yes, you can use homemade puff pastry. It might take more time, but the taste is worth it. If you make it right, your pinwheels will be flaky and light. Just remember to roll it out thin, like store-bought pastry. Yes, these pinwheels freeze well. After baking, let them cool completely. Place them in a single layer on a baking sheet. Once frozen, transfer them to a freezer bag. They can last up to three months in the freezer. You can serve these pinwheels with a fresh salad. A simple mixed greens salad pairs nicely. You might also try dipping sauces like honey or a spicy mustard. These add a fun twist to the flavors. To make them ahead, prepare the pinwheels and slice them. You can cover them and keep them in the fridge for a few hours. Bake them right before serving for the best taste and texture. Yes, you can make these pinwheels without cheese. Try adding more apples or nuts for flavor. You might also consider adding a layer of cream cheese for a different taste. Apple Cheddar Puff Pastry Pinwheels are fun and tasty. You learned about the key ingredients and how to prepare them. We covered baking tips, flavor variations, and storage ideas too. You can make these pinwheels for any meal. Try new flavors or toppings to keep it exciting. Enjoy making and sharing this dish with others. Happy baking!

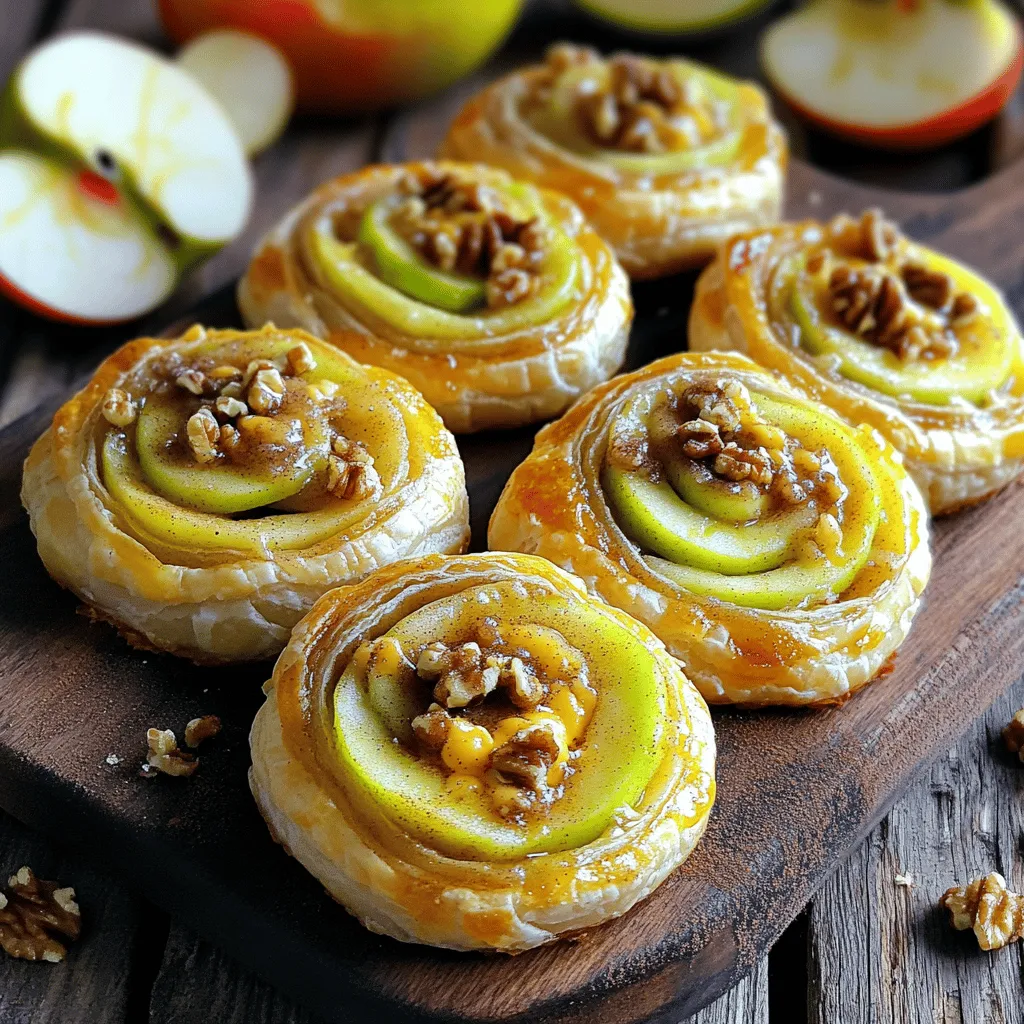
If you love quick and tasty snacks, Apple Cheddar Puff Pastry Pinwheels are for you! These little treats combine crisp apples and sharp cheddar in flaky pastry. They are simple …

Read more

Categories Appetizers

Garlic Butter Shrimp Tacos with Pineapple Slaw Delight

September 15, 2025 by Chef Miles
For these tacos, you need: - 1 lb large shrimp, peeled and deveined - 4 tablespoons unsalted butter - 4 cloves garlic, minced - 1 teaspoon paprika - 1 teaspoon chili powder - Salt and pepper to taste - 8 small corn tortillas These ingredients create a tasty base for your tacos. The shrimp gives a nice protein boost, while the garlic and butter add rich flavor. Paprika and chili powder bring warmth and depth. The slaw adds a fresh crunch. You will need: - 1 cup shredded red cabbage - 1 cup fresh pineapple, finely chopped - ½ cup carrot, shredded - 2 tablespoons fresh cilantro, chopped - 2 tablespoons lime juice - 1 tablespoon honey This slaw is bright and zesty. The pineapple gives sweetness, while the lime juice adds tang. Red cabbage and carrot provide color and crunch. To elevate your tacos, consider adding: - Slices of lime - Extra cilantro These garnishes boost the flavor and presentation. Lime adds a citrusy zing, while cilantro gives freshness. To make the pineapple slaw, get a medium mixing bowl. Add the shredded red cabbage, fresh pineapple, and shredded carrot. Then, toss in the chopped cilantro. Drizzle the lime juice and honey over the mix. Stir gently until everything is combined well. Let the slaw sit for a few minutes. This helps the flavors meld together, making it tasty and refreshing. Start by heating a large skillet over medium heat. Add the unsalted butter to the skillet. Let it melt completely. Once melted, add the minced garlic and sauté for about 30 seconds. Keep stirring to prevent the garlic from burning. Now, add the peeled and deveined shrimp to the skillet. Sprinkle the shrimp with paprika, chili powder, salt, and pepper. Cook for about 4-5 minutes. Stir occasionally until the shrimp turn pink and opaque. Next, take a separate skillet and warm the corn tortillas. Heat it over medium heat. Cook each tortilla for about 15-30 seconds on each side. You want them pliable and slightly charred. This adds a nice flavor and makes them easy to fold. Now it's time to assemble the tacos! Take a warm tortilla and place a few shrimp in the center. Top it generously with the pineapple slaw. If you like, add slices of lime and extra cilantro for garnish. This adds a bright touch and makes your tacos look beautiful. Enjoy your tasty creation! To cook perfect shrimp, start with fresh or thawed shrimp. You want them peeled and deveined. Heat your skillet to medium. Add butter and let it melt. Then, add minced garlic. Cook it for 30 seconds. This keeps the garlic fragrant without burning. Next, add shrimp and sprinkle paprika, chili powder, salt, and pepper. Cook them for 4-5 minutes. They should turn pink and opaque. This shows they are done. A great slaw needs balance. Use fresh ingredients for the best taste. Combine shredded red cabbage, pineapple, and carrot in a bowl. Add cilantro for freshness. Drizzle lime juice and honey over the mix. Toss gently to mix the flavors. Let it rest for a few minutes. This helps the flavors meld nicely. Warming the tortillas is key. It makes them soft and easy to fold. Heat a separate skillet over medium heat. Place each tortilla in the skillet for 15-30 seconds per side. You want them to be pliable with slight char spots. This adds flavor that enhances your tacos. {{image_4}} You can swap shrimp for other proteins. Chicken works great in this recipe. Use about 1 pound of diced chicken breast. Cook it in the same garlic butter mix. Fish is another option. Try firm white fish like tilapia or cod. Use the same method for cooking, but adjust the time. If you want a meat-free option, use mushrooms. They soak up the flavors well. While pineapple slaw is tasty, you can get creative. Try using red cabbage alone for a crunchier slaw. Add some apples for a sweet twist. Shredded brussels sprouts offer a nice texture too. If you love spice, add jalapeños to your slaw. You can change the dressing too. Swap honey for agave for a vegan option. Want more heat? Add a pinch of cayenne pepper to the shrimp. You can also use spicy paprika instead of regular. If you like less spice, cut back on chili powder. Serve your tacos with hot sauce on the side. This way, everyone can adjust to their taste. To keep your leftover tacos fresh, place them in an airtight container. Store the shrimp and slaw separately. This prevents sogginess. You can keep them in the fridge for up to three days. If you want to keep them longer, consider freezing. When you’re ready to eat your leftovers, heat the shrimp in a skillet. Use medium heat and stir often. This should take about 3-4 minutes. You want them warm but not overcooked. For the slaw, give it a quick toss and serve cold. You can also add a splash of lime juice to freshen it up. If you want to freeze your tacos, do so right after cooking. Wrap the shrimp tightly in plastic wrap or foil. Place the slaw in a separate airtight container. They can last up to three months in the freezer. When you’re ready to enjoy them, thaw them in the fridge overnight and reheat as directed. Yes, you can use frozen shrimp. Just thaw them first. Place the shrimp in the fridge overnight or run them under cold water. Ensure they are peeled and deveined. This helps with even cooking. Frozen shrimp work well and save time. You can use flour tortillas if you prefer. Lettuce wraps are another great option for a lighter choice. Both will hold the shrimp and slaw nicely. Just remember to warm them up before serving. This dish has mild heat from the chili powder. It’s not too spicy, so most people can enjoy it. If you like heat, add more chili powder or jalapeños. You can adjust it to fit your taste. Yes, you can prepare the slaw ahead of time. Make it up to a day before serving. Store it in the fridge in an airtight container. This allows the flavors to blend and taste even better. Just give it a quick toss before serving. This article covered how to make garlic butter shrimp tacos. You learned about essential ingredients, like shrimp and slaw, and garnishes. I shared step-by-step instructions, tips for cooking, and variations to try. Remember to store leftovers properly for the best taste. Whether you spice them up or change proteins, these tacos are delightful. You can customize them to fit your taste. Enjoy making and sharing these tasty tacos with friends and family.

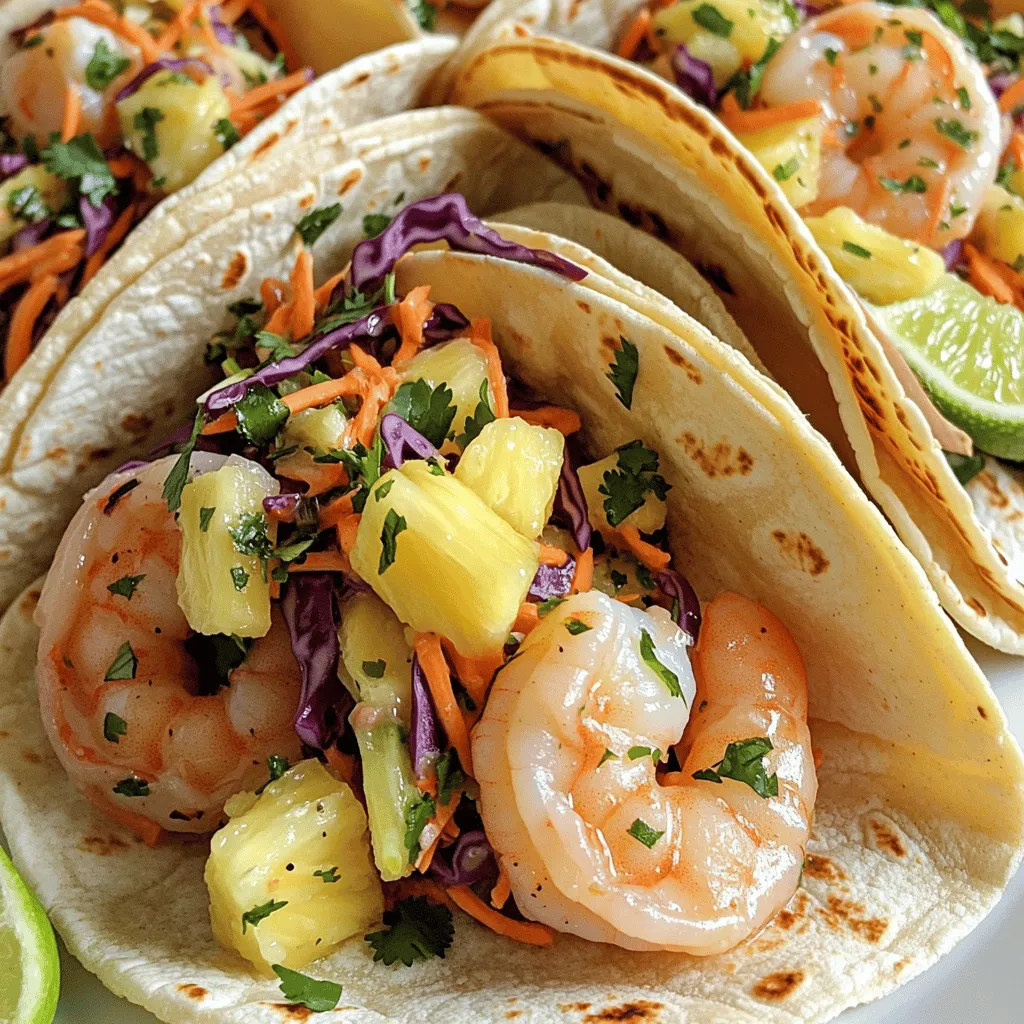
If you crave a tasty meal that’s quick and easy, you’ve found it! Garlic Butter Shrimp Tacos with Pineapple Slaw Delight are a perfect mix of fresh flavors. Imagine juicy …

Read more

Categories Dinner

Slow Cooker French Onion Soup with Gruyère Toasts Delight

September 15, 2025 by Chef Miles
- 4 large yellow onions, thinly sliced - 4 cloves garlic, minced - 4 cups beef broth (or vegetable broth for a lighter option) - 1 teaspoon dried thyme - 1 tablespoon balsamic vinegar - 2 tablespoons olive oil - Salt and pepper to taste - 8 slices of crusty baguette - 1 cup shredded Gruyère cheese - Fresh parsley for garnish The heart of this Slow Cooker French Onion Soup lies in its simple yet rich ingredients. Onions provide the base flavor. I always prefer yellow onions for their natural sweetness. When you caramelize them, they turn golden brown and sweeten up. Garlic adds a nice kick, enhancing the depth of flavor. Broth is key too. I use beef broth for a hearty taste. If you want a lighter soup, vegetable broth works well. For added flavor, I mix in dried thyme and balsamic vinegar. They bring balance and a hint of acidity. Next, the Gruyère toasts are a must. The crusty baguette makes a great base. Topping it with melted Gruyère makes it extra special. Fresh parsley adds color and freshness, making each bowl look inviting. Gather these ingredients, and you're on your way to a comforting meal that warms the soul. Caramelizing the Onions: Start by heating olive oil in a large skillet over medium heat. Add the thinly sliced onions. Stir them occasionally. Cook for about 15-20 minutes. The onions should turn soft and develop a rich, caramel color. This step is key for a deep, sweet flavor in your soup. Incorporating Garlic: Once your onions are perfectly caramelized, add the minced garlic to the skillet. Sauté it for one more minute. This timing helps release the garlic's strong aroma. Then, transfer the blend into the slow cooker. Pouring in Broth and Seasoning: In your slow cooker, pour in the beef broth. You can also use vegetable broth for a lighter option. Add the dried thyme, balsamic vinegar, salt, and freshly cracked pepper. Stir everything together until well combined. This ensures that all the flavors mix well. Mixing everything in the slow cooker: Make sure you mix until the broth is well blended with the onions and garlic. This step helps in achieving a balanced flavor throughout. Setting the Slow Cooker: Cover your slow cooker. Set it to low heat for 6-8 hours. This slow cooking time allows the flavors to deepen and the soup to thicken nicely. Tips for checking doneness and flavor development: About an hour before serving, taste the soup. If it needs more seasoning, add salt and pepper as needed. This step helps you adjust the flavor to your liking. Preheating the Oven: About 30 minutes before serving, preheat your oven to 350°F (175°C). This temperature is perfect for making toasts. Assembling and Baking Toasts: Place the baguette slices on a baking sheet in a single layer. Generously top each slice with shredded Gruyère cheese. Bake for 10-12 minutes. The cheese should melt, turn golden, and bubble nicely. Adjusting Seasoning: After the cooking time is up, taste the soup again. Adjust the seasoning with more salt or pepper if needed. This ensures the soup is flavorful. Garnishing Tips for Presentation: Ladle the hot soup into bowls. Place one cheesy baguette slice on top of each bowl. For a lovely touch, sprinkle freshly chopped parsley over each serving. Enjoy the warm, comforting flavors! To make your French onion soup shine, caramelizing onions is key. Start by heating olive oil in a skillet over medium heat. Add the sliced onions and stir them often. This process takes about 15 to 20 minutes. You want the onions to turn soft and golden brown. This deep color adds a rich flavor to the soup. For extra flavor, consider adding herbs and spices. Fresh thyme works well, but you can also try bay leaves or even a pinch of nutmeg. A splash of balsamic vinegar adds a tangy twist, balancing the sweetness of the onions. When it’s time to serve, use rustic bowls for a cozy feel. Ladle the hot soup into each bowl. Place a slice of cheesy baguette on top for that perfect melt. A sprinkle of fresh parsley adds a pop of color and freshness. Pair this soup with a light salad or a side of roasted vegetables. A crisp white wine also complements the rich flavors. This meal is not just filling; it’s a treat for the senses. Prep ahead to save time on busy days. Slice your onions and mince the garlic in advance. Store them in the fridge until you are ready to cook. You can also make the soup a day ahead. Once cooked, let it cool and store it in the fridge. When you’re ready to enjoy, simply reheat it on the stove. The flavors will meld even more overnight, making the soup taste even better. {{image_4}} You can make this soup vegetarian. Simply swap the beef broth for vegetable broth. This change keeps the soup light and flavorful. For added texture and depth, include some mushrooms. They add a nice umami taste. Sauté the mushrooms with the onions for the best results. This option still gives you a rich and comforting soup. Gruyère cheese is classic, but you have options. Consider using Swiss cheese for a milder flavor. It melts well and gives that gooey texture. Cheddar is also a good choice for a sharp twist. For a fun flair, try a mix of cheeses. Blend different textures and flavors to make each bowl unique. Experiment and find your favorite! Baguette is great, but don’t stop there. You can use sourdough for a tangy kick. Rye bread adds a nice earthy flavor, too. Consider ciabatta for a chewy texture. Toast any bread of your choice to create a perfect base for your soup. Each bread type changes the taste and adds a new twist to the dish. Enjoy trying different varieties! To keep your soup fresh, let it cool before storing. Use an airtight container. Place it in the fridge. It will last for about three to four days. If you want to enjoy it later, consider freezing. When you're ready to eat, reheat the soup on the stove. Use medium heat and stir often. This prevents sticking. You can also use the microwave. Heat it in short bursts, stirring in between. This method keeps the flavor intact. You can freeze French onion soup for up to three months. Pour the cooled soup into freezer-safe containers. Leave some space at the top for expansion. For the Gruyère toasts, freeze them separately. Wrap each slice in plastic wrap, then place them in a bag. This keeps them from getting soggy. Yes, you can use many cheeses for the toasts. Some great options include mozzarella, cheddar, or fontina. Each cheese brings its own taste. Mozzarella gives a creamy texture, while cheddar adds sharpness. Fontina melts beautifully and has a rich flavor. Choose what you like best! You can store the soup in the fridge for up to five days. Make sure to keep it in an airtight container. This way, it stays fresh and tasty. If you want to keep it longer, consider freezing it. Yes, you can make this soup on the stovetop! Start by caramelizing the onions in a large pot. Then, add the garlic and broth. Bring it to a boil, then lower the heat. Let it simmer for about 30-40 minutes. Stir occasionally and taste for seasoning. This method saves time but still gives great flavor! This blog post covered how to make a delightful onion soup with Gruyère toasts. We discussed key ingredients like onions, garlic, and broth, along with flavor enhancers like thyme and balsamic vinegar. I shared step-by-step instructions, tips for the perfect soup, and ideas for variations and storage. In the end, you can customize your soup and toasts for your taste. Enjoying this meal can be a tasty adventure in your kitchen. Happy cooking!

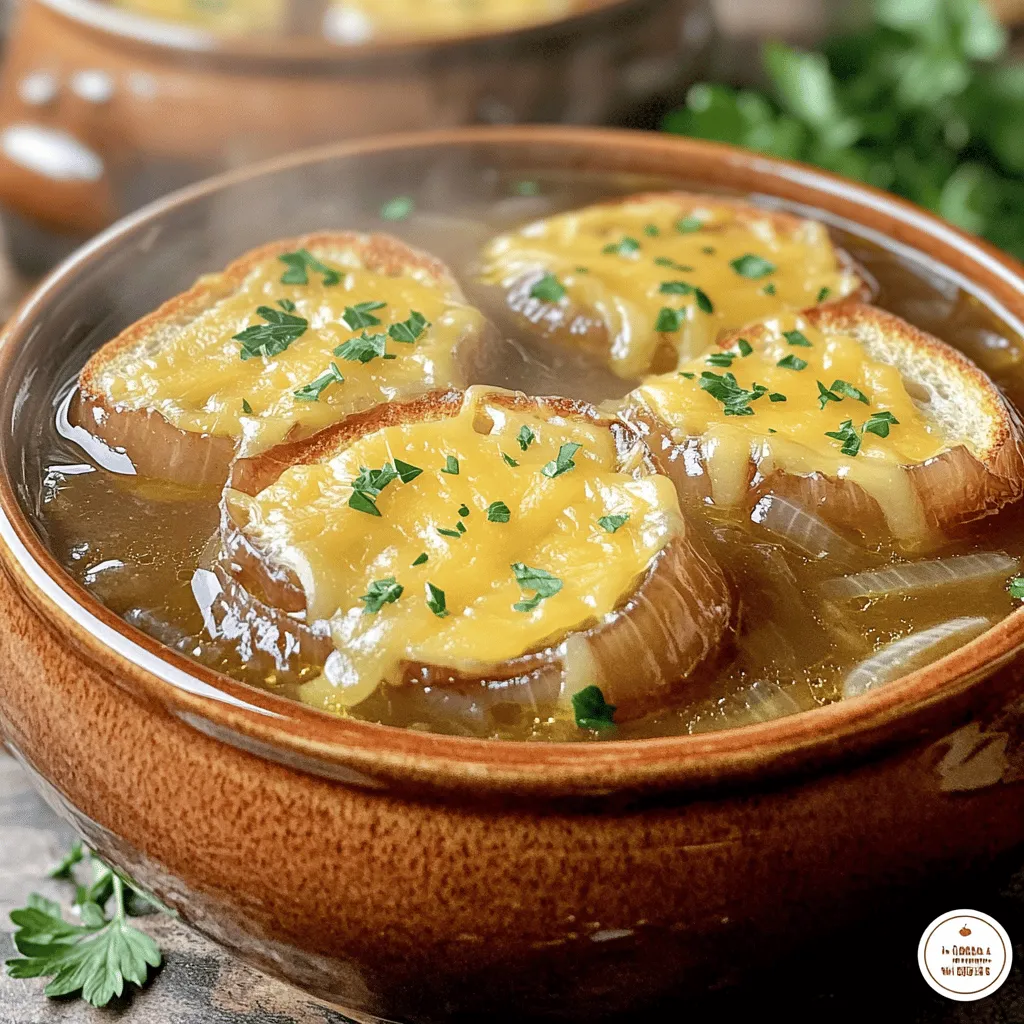
Get ready to warm your soul with my Slow Cooker French Onion Soup with Gruyère Toasts! This tasty dish combines sweet caramelized onions, garlic, and rich broth. Topped with cheesy, …

Read more

Categories Dinner

Crispy Lemon Pepper Air Fryer Wings Flavorful Delight

September 15, 2025 by Chef Miles
- 2 lbs chicken wings - 2 tablespoons baking powder - 1 tablespoon lemon pepper seasoning - 1 teaspoon garlic powder - 1 teaspoon onion powder - 1 teaspoon salt - ½ teaspoon black pepper - 1 tablespoon olive oil - Zest of 1 lemon - Fresh parsley, chopped (for garnish) Crispy Lemon Pepper Air Fryer Wings start with fresh chicken wings. You need 2 pounds to serve four. The wings are coated with a mix of dry seasonings. This includes baking powder, lemon pepper seasoning, garlic powder, onion powder, salt, and black pepper. The baking powder makes the wings crispy. It helps absorb moisture. The lemon pepper gives a nice zesty flavor. You also need olive oil for added richness. Don't forget the lemon zest! It adds a bright, fresh taste. Fresh parsley is great for garnish. It makes the dish look pretty and adds a nice touch. Gather these ingredients for a flavorful delight that everyone will love. Start by patting the chicken wings dry with paper towels. This step is key. Removing extra moisture helps the wings become crispier when cooked. If you skip this, your wings may turn out soggy. Trust me, crispiness is what we all want! In a large mixing bowl, combine the dry ingredients. Use baking powder, lemon pepper seasoning, garlic powder, onion powder, salt, and black pepper. Whisk these together well. This ensures each bite of your wings will burst with flavor. You want that even taste in every wing! Now, it's time to add the chicken wings to the bowl with your seasoning mix. Drizzle the olive oil over the wings and add the lemon zest too. Toss everything together until each wing is coated well. You want the seasoning to stick. This step really makes a difference in flavor. Preheat your air fryer to 375°F (190°C). Run it for about five minutes to get it hot. Once it’s ready, place the seasoned wings in the air fryer basket. Lay them in a single layer. This helps them cook evenly and get that nice crunch. Cook those wings for 25-30 minutes. Flip them halfway through cooking. This helps both sides get that golden brown color. You'll know they’re ready when they look beautifully crispy. The smell will also be hard to resist! After cooking, carefully take the wings out of the air fryer. Let them rest for a few minutes. Just before serving, sprinkle fresh parsley on top. This not only looks nice but adds a fresh taste. Enjoy your crispy lemon pepper wings! To make your wings super crispy, start by drying them well. You can use paper towels to remove all moisture. This step is very important. Moisture makes it hard to get that crunchy texture we love. Next, use baking powder in your seasoning mix. It helps create a light and crispy skin. When you place the wings in the air fryer, make sure you space them out. If they touch, they won’t cook evenly. Good airflow is key! While lemon pepper seasoning is fantastic, you can add more flavor. Try adding paprika for a smoky touch. Or, toss in some cayenne pepper for heat. For extra taste, consider marinating your wings before cooking. A simple mix of olive oil, lemon juice, and your favorite herbs works well. Let the wings soak for at least 30 minutes to absorb those flavors. Crispy lemon pepper wings go great with many sides. Serve them with a fresh salad or crunchy veggies. They also pair well with classic fries or creamy coleslaw. For a fun presentation, arrange the wings on a large platter. Add lemon wedges and sprinkle fresh parsley on top. This not only looks nice but also adds a bit of flavor. {{image_4}} You can change the flavor of your wings in many ways. For a spicy kick, add hot sauce to the seasoning. Mix in a tablespoon of your favorite hot sauce with the olive oil before coating the wings. This will give them a nice heat. You can also try unique citrus blends. Use lime or orange zest in place of lemon. This will give your wings a fresh twist. Mix these citrus zests with the garlic and onion powders. You can even add a pinch of thyme for a herbal touch. While air frying is great, you can also bake these wings. Baking takes longer but can be just as tasty. Preheat your oven to 425°F (220°C). Line a baking sheet with foil and place a rack on top. Spread the wings evenly on the rack. Bake for 30-35 minutes, flipping halfway through. This method gives you crispy wings with a nice roasted flavor. If you want to fry them, you can use a deep fryer. Heat oil to 375°F (190°C). Fry the wings in batches for about 8-10 minutes. Make sure to drain them on paper towels after frying. This method gives you crunchy wings but adds more oil. Choose the cooking method that fits your taste best! To keep your crispy lemon pepper air fryer wings fresh, store them in the fridge. Place the wings in an airtight container. This helps maintain their flavor and texture. They will last up to three days in the refrigerator. When reheating, use your air fryer. It keeps the wings crispy. Preheat the air fryer to 350°F (175°C) and cook for about 5-7 minutes. This method revives the crunch and warms them through. If you have extra wings, freezing is a great option. First, let the wings cool completely. Then, place them in a freezer-safe bag. Remove as much air as possible before sealing. This way, they won't get freezer burn. You can freeze them for up to three months. When you're ready to eat, thaw the wings in the fridge overnight. For cooking from frozen, preheat the air fryer to 375°F (190°C). Cook the wings for about 30-35 minutes. Flip them halfway through for even cooking. Enjoy the crispy goodness straight from the freezer! Cook the wings for 25 to 30 minutes at 375°F (190°C). Halfway through, flip them for even crispiness. This timing gives you perfectly golden-brown wings. Yes, you can use frozen wings. Cook them for about 30 to 35 minutes at the same temperature. You may need to check for doneness with a meat thermometer. They should reach 165°F (74°C) to be safe. If you lack lemon pepper seasoning, try a mix of garlic powder and zest from a lemon. Alternatively, use a blend of paprika, salt, and a touch of lemon juice for a different flavor. Add cayenne pepper or hot sauce to the seasoning mix. You could also toss cooked wings in a spicy glaze for an added kick. Adjust to your taste for the perfect heat level. In this article, we covered how to make crispy air fryer chicken wings. We discussed the key ingredients, step-by-step instructions, and tips for the best results. Don’t forget to play with flavors by using different seasonings or cooking methods. Proper storage keeps your wings fresh for later. With these simple techniques, your wings can be a hit at any gathering. Enjoy creating and sharing this tasty treat!

Get ready to enjoy a crispy treat that’ll make your taste buds dance! My Crispy Lemon Pepper Air Fryer Wings are not just easy to make, they’re bursting with flavor. …

Read more

Categories Appetizers

Maple Roasted Carrot & Farro Salad Vibrant Delight

September 15, 2025 by Chef Miles
- 1 cup farro - 4 large carrots, peeled and cut into sticks - 3 tablespoons olive oil, divided - 2 tablespoons pure maple syrup - 1 teaspoon ground cinnamon - Sea salt and freshly cracked black pepper to taste - 1 cup baby spinach - 1/2 cup feta cheese, crumbled - 1/4 cup walnuts, roughly chopped - 1/4 cup dried cranberries - 2 tablespoons apple cider vinegar - Fresh parsley, chopped for garnish Farro is the star of this salad. You need one cup. It adds a nutty flavor and chewy texture. For the carrots, use four large ones. Peel them and cut them into sticks. This shape helps them roast evenly. You will also need three tablespoons of olive oil. This adds richness to the dish. Mix in two tablespoons of pure maple syrup. It brings a sweet touch that pairs well with the carrots. For spice, add one teaspoon of ground cinnamon. It gives warmth to each bite. Use sea salt and black pepper to taste. These will enhance the salad's flavors. Next, grab one cup of baby spinach for freshness. You'll also want half a cup of crumbled feta cheese. It adds creaminess and a salty kick. Use a quarter cup of roughly chopped walnuts for crunch. They provide a nice texture contrast. Finally, include a quarter cup of dried cranberries. They add sweetness and color. Drizzle two tablespoons of apple cider vinegar over the salad. This brightens the flavors. Don’t forget fresh parsley for a pop of green on top! 1. Preheat your oven to 400°F (200°C). This helps the carrots get a nice caramel color. 2. Boil water in a medium saucepan, using 4 cups. Add 1 cup of farro with a pinch of sea salt. Cover and let it simmer on low for 30 minutes. The farro should be tender but still chewy. Drain it and let it cool a bit. 3. Prepare the carrots by peeling and cutting them into sticks. On a large baking sheet, mix the carrot sticks with 2 tablespoons of olive oil, 2 tablespoons of maple syrup, 1 teaspoon of ground cinnamon, sea salt, and pepper. Make sure all pieces are coated well. 4. Roast the carrots for 25-30 minutes, stirring halfway. They should become tender and caramelized. 5. Combine ingredients in a big bowl. Add the cooked farro, roasted carrots, 1 cup of baby spinach, 1/2 cup of crumbled feta cheese, 1/4 cup of chopped walnuts, and 1/4 cup of dried cranberries. Gently mix to avoid bruising the spinach. 1. Whisk the dressing in a small bowl. Use 1 tablespoon of olive oil and 2 tablespoons of apple cider vinegar. Make sure to mix until it is well combined. 2. Adjust seasoning if needed. Taste the salad before serving. Add more salt or pepper to enhance the flavors. To get the best caramelization from your carrots, cut them into sticks. This helps them cook evenly. Toss them with olive oil, maple syrup, and ground cinnamon. Make sure every piece is coated well. Roast at 400°F (200°C) for 25-30 minutes. Stir halfway through to ensure even cooking. The carrots should be tender and lightly browned. For farro, start by boiling 4 cups of water with a pinch of sea salt. Add 1 cup of farro and reduce the heat. Cover and let it cook for about 30 minutes. You want it chewy but tender. Drain well and let it cool before adding it to your salad. To make your salad look great, use a large, shallow bowl. Place the roasted carrots on top in a nice pattern. This creates a beautiful display. For extra flair, add edible flowers or soft greens around the edges. Fresh parsley on top adds color and freshness. These small touches make your dish stand out at any table. {{image_4}} If you want to change things up, you can swap feta cheese. Try goat cheese or even a vegan cheese. Both options bring their own tasty twist. For nuts, consider almonds or pecans instead of walnuts. They add great crunch and flavor. Dried apricots or cherries can replace cranberries. This adds a fruity touch to your salad. Use seasonal veggies to keep your salad fresh. In spring, add fresh peas or asparagus for a pop of green. Summer is perfect for cherry tomatoes or zucchini. In fall, roasted sweet potatoes or beets can add color and sweetness. For winter, add kale or Brussels sprouts to give it a hearty feel. You can also adapt this salad for special events. Serve it at potlucks or holiday dinners. Add a splash of citrus for summer gatherings. Use spices like nutmeg for cozy winter meals. This salad is flexible and delicious for any occasion! To store your Maple Roasted Carrot & Farro Salad, place it in an airtight container. This helps keep it fresh longer. You can enjoy the salad for up to four days in the fridge. Just make sure to check for any signs of spoilage before serving. If the salad looks or smells off, it’s best to toss it. Can this dish be frozen? Yes, you can freeze this salad, but it’s not ideal. The farro and carrots may lose some texture after thawing. If you want to freeze it, do so without the spinach, feta, and walnuts. Add those fresh before serving. For freezing, place the salad in a freezer-safe container. Make sure to remove as much air as possible to prevent freezer burn. When ready to eat, thaw it overnight in the fridge. Reheat gently in a pan or microwave. Add fresh spinach and feta after reheating for best results. Can I make this salad vegan? Yes, you can make this salad vegan. Simply leave out the feta cheese. You can add extra nuts or seeds for creaminess. Use more veggies for a hearty bite. How to cook farro in a rice cooker? To cook farro in a rice cooker, rinse 1 cup of farro first. Add it to the cooker with 2 cups of water and a pinch of salt. Turn it on and let it cook until tender, about 30 minutes. Can I use other grains instead of farro? Yes, you can use other grains. Quinoa, barley, or brown rice work well. Just adjust cooking times based on the grain you choose. Is this salad gluten-free? No, this salad is not gluten-free because farro contains gluten. If you need a gluten-free option, use quinoa or rice. How to enhance the flavors without added sugar? To enhance flavors without sugar, try using more spices like cumin or garlic. Fresh herbs like basil or mint can add brightness too. Lemon juice can give a nice zing without any sweetness. This post shared an easy recipe for a tasty farro salad. We covered the ingredients, preparation steps, and essential tips. You learned how to roast carrots and create a flavorful dressing. We also explored storage methods and variations for different seasons and diets. Try this recipe to impress your family and friends. With simple tweaks, you can customize it to your liking. Enjoy making this salad an exciting part of your meals!

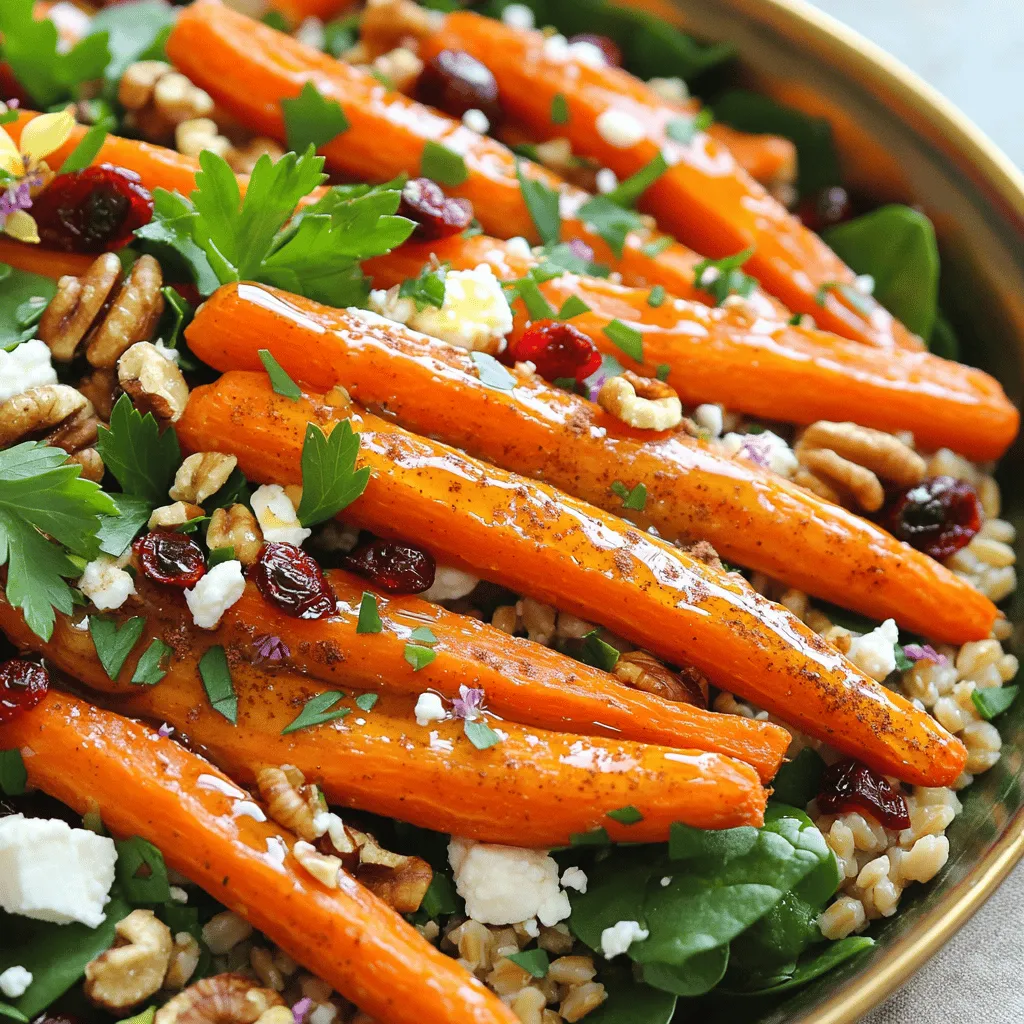
Looking for a colorful dish that bursts with flavor? Try my Maple Roasted Carrot & Farro Salad! This vibrant delight pairs sweet, caramelized carrots with nutty farro for a healthy, …

Read more

Categories Salads
Older posts
Newer posts
← Previous Page1 … Page23 Page24 Page25 … Page112 Next →

MELTED RECIPES

where delicious ideas melt into life, from stovetop to backyard. Always warm, simple, and irresistibly satisfying. 🍳🔥🧀

PAGES

Home About Contact Privacy Policy Terms & Conditions Cookie Policy GDPR Policy Copyright Policy Disclaimer

CATEGORIES

Appetizers Desserts Salads Breakfast Dinner

Contact

  • Pinterest
  • Mail
Copyright © 2025 Melted Recipes. All rights reserved.