Skip to content
Melted Recipes
  • Home
  • Appetizers
  • Desserts
  • Salads
  • Breakfast
  • Dinner
  • Privacy Policy
  • Contact
  • About

Chef Miles

Teriyaki Salmon Rice Bowls Fast and Flavorful Meal

September 19, 2025 by Chef Miles
- 2 salmon fillets (about 6 oz each) - 1 cup cooked jasmine rice (or any white rice) - 4 tablespoons teriyaki sauce - 1 tablespoon sesame oil - 1 cup fresh broccoli florets - 1 medium carrot, julienned - 2 green onions, thinly sliced - 1 tablespoon sesame seeds (for garnish) - Salt and freshly ground black pepper, to taste You can swap salmon for chicken or tofu. Both work well with teriyaki sauce. For rice, use brown rice if you want more fiber. Broccoli can be replaced with snap peas or bell peppers. Carrots can be left out or replaced with zucchini. This dish is rich in protein and healthy fats. Each serving has about 400 calories. It provides essential vitamins from the vegetables. Salmon offers omega-3 fatty acids, great for heart health. The meal is balanced with carbs from rice and fiber from veggies. Start by cooking your jasmine rice if it's not already done. You want it warm for the bowls. Next, rinse the fresh broccoli florets under cold water. This step keeps them crisp and fresh. Then, julienne the carrot into thin strips. Aim for matchstick sizes so they cook evenly. Heat the sesame oil in a medium pan over medium heat. Once hot, add your broccoli and julienned carrots. Sauté them for about 3-4 minutes. You want them tender yet still crisp. Season lightly with salt and black pepper. After cooking, set the vegetables aside on a plate. In the same pan, place the salmon fillets skin-side down. Cook for about 2-3 minutes until you see a nice crust. Gently flip the fillets to the other side. Pour the teriyaki sauce over the salmon. Let it cook for another 3 minutes. This lets the sauce caramelize on the fish. Grab your serving bowls and divide the warm jasmine rice as the base. Place a salmon fillet on top of each rice portion. Spoon any leftover teriyaki sauce from the pan over the salmon. This adds flavor and makes the dish shine! Pile the sautéed broccoli and carrots on top of the salmon. Finally, sprinkle sliced green onions and sesame seeds for a crunchy finish. Enjoy your beautiful bowls! To make great teriyaki salmon, start with fresh fillets. Look for bright color and firm texture. This ensures flavor and quality. Cooking time is key. Cook the salmon skin-side down first. This helps keep it moist. A crispy skin adds texture, which is nice. Pour teriyaki sauce over the salmon to glaze it. This adds sweetness and depth. Jasmine rice is my go-to choice for this dish. It has a lovely scent and soft texture. You can also use white rice or brown rice if you prefer. Cook it ahead of time for ease. You can even use leftover rice. Make sure it’s warm when you serve. This helps the salmon flavors mix well with the rice. Garnishes can elevate your rice bowl. Thinly sliced green onions add freshness and color. Sesame seeds give a nice crunch. You can add lime wedges for a zesty kick. A drizzle of extra teriyaki sauce on top is also a great idea. These little touches make your meal look and taste better. {{image_4}} You can swap salmon for chicken or tofu. Both options work well. Chicken fillets cook nicely with teriyaki sauce. Use about 6 oz of chicken breast. Cook it the same way as salmon. For tofu, use firm tofu. Press it to remove excess water. Cut it into cubes and sauté it in sesame oil. Cook until golden brown for great flavor. Mix and match your vegetables for variety. Try bell peppers, snap peas, or zucchini. Bell peppers add a nice crunch and color. Snap peas bring sweetness and freshness. Zucchini cooks quickly and absorbs flavors well. Just remember to cut them into small pieces for even cooking. You can also use spinach or bok choy for a nutrient boost. To make this dish gluten-free, choose gluten-free teriyaki sauce. Many brands offer great gluten-free options. Check the label to be sure. For rice, jasmine rice is naturally gluten-free. You can also use brown rice or quinoa. Both options add extra fiber to your meal. Enjoy this dish without worry about gluten! To keep your teriyaki salmon rice bowls fresh, store leftovers in an airtight container. Place the salmon, rice, and veggies together. This way, flavors blend well. Keep them in the fridge for up to three days. If you plan to eat them soon, don’t mix the rice and salmon until you’re ready to serve. This keeps the rice fluffy and the salmon moist. When it's time to enjoy your leftovers, heat them gently. You can use a microwave or a stove. For the microwave, place the food in a bowl. Cover it with a damp paper towel. Heat on medium power for 1-2 minutes, checking often. On the stove, use a non-stick pan over low heat. Add a splash of water to keep it moist. Stir until heated through, about 3-5 minutes. If you want to save your rice bowls for later, freezing is a great option. First, let the dish cool completely. Then, separate the salmon, rice, and veggies into different containers. This keeps everything fresh. Use freezer-safe bags or containers. They can stay in the freezer for up to one month. When you're ready to eat, thaw overnight in the fridge before reheating. You can tell salmon is cooked when it turns from bright pink to a light, opaque color. The flesh should flake easily with a fork. If you have a meat thermometer, the internal temperature should reach 145°F. Always trust your senses; if it looks and feels done, it likely is! Yes, you can make teriyaki sauce at home! Combine soy sauce, honey, garlic, and ginger for a simple version. Mix equal parts soy sauce and honey, then add minced garlic and ginger. Simmer until thickened. This homemade sauce is fresh and can be adjusted to your taste! Jasmine rice is a great choice for teriyaki bowls due to its fragrant nature and fluffy texture. You can also use sushi rice or basmati rice if you prefer. Both options hold up well under the salmon and sauce. Absolutely! These teriyaki salmon rice bowls are perfect for meal prep. You can cook the salmon and veggies ahead of time and store them in separate containers. Just reheat before serving. Keep the rice warm, and enjoy a quick and tasty meal all week! This blog post covered how to make teriyaki salmon bowls. We talked about the right ingredients and good swaps. You learned step-by-step how to prepare, cook, and assemble your dish. We shared tips to get the best flavor and texture. The recipe can also be varied with different proteins, veggies, and storage methods. By following these guidelines, you can create tasty and healthy meals. Enjoy the cooking process and the delicious bowls you’ll share.

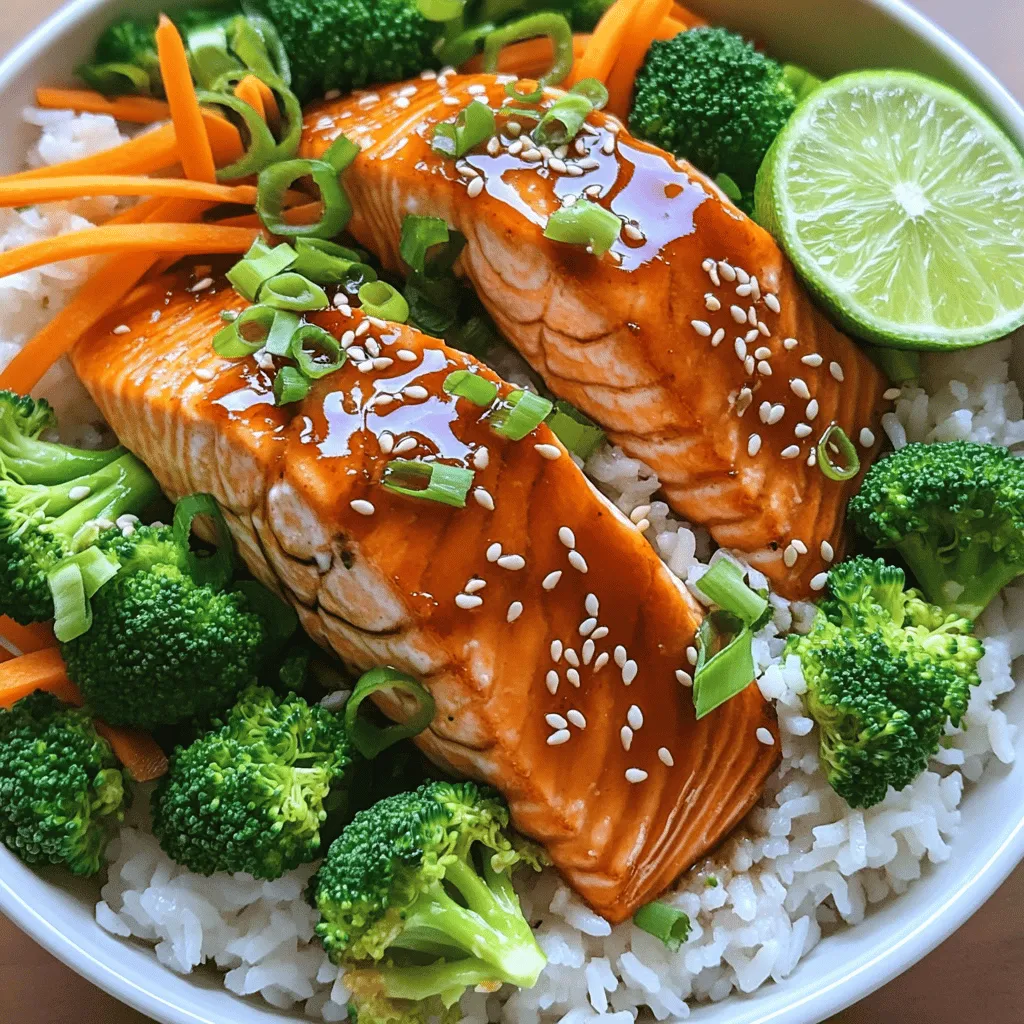
Are you craving a dish that’s both fast and delicious? You’re in luck! I’ll show you how to whip up Teriyaki Salmon Rice Bowls in just 15 minutes. This meal …

Read more

Categories Dinner

One Pot Creamy Mushroom Spinach Orzo Delight

September 19, 2025 by Chef Miles
- 1 cup orzo pasta - 2 tablespoons extra virgin olive oil - 1 medium onion, finely diced - 3 cloves fresh garlic, minced - 8 oz cremini mushrooms, sliced - 4 cups vegetable broth - 1 cup heavy cream - 3 cups fresh baby spinach - ½ teaspoon dried thyme - Salt and freshly ground black pepper to taste - ½ cup freshly grated Parmesan cheese - Fresh parsley, chopped (for garnish) You will need a large pot for this dish. A wooden spoon works well for stirring. A sharp knife and cutting board help with prepping your ingredients. A measuring cup ensures you use the right amounts. Finally, keep a serving spoon handy for dishing out your creamy orzo. To boost flavor, try adding cooked chicken or shrimp. You can also mix in sun-dried tomatoes for a tangy twist. For extra veggies, consider adding peas or roasted bell peppers. If you love spice, a pinch of red pepper flakes will add some heat. Start by heating two tablespoons of extra virgin olive oil in a large pot. Use medium heat until the oil shimmers. Add one finely diced medium onion. Sauté for about three to four minutes. You want the onion to be soft and clear. Next, add three minced garlic cloves. Stir them in and let them cook for one minute. This will fill your kitchen with a lovely aroma. Now it’s time to add eight ounces of sliced cremini mushrooms. Stir them in well. Cook for five to seven minutes. Keep stirring often. You want the mushrooms to become soft and start to turn golden. This step adds depth to your dish. Once the mushrooms are ready, add one cup of orzo pasta to the pot. Stir it well to coat the orzo in the mix. Let it toast for about one minute. This step enhances the nutty flavor of the orzo. Next, pour in four cups of vegetable broth. Bring the mixture to a gentle boil. Once boiling, reduce the heat. Let it simmer uncovered for about ten to twelve minutes. Stir occasionally until the orzo is al dente. By following these steps, you build a rich and flavorful base for your creamy mushroom spinach orzo. Enjoy the process! To make your sauce creamy, use high-quality heavy cream. It adds richness. Stir it in after cooking the orzo. This keeps the sauce smooth and thick. If you want more flavor, add more Parmesan cheese. It melts well and blends nicely. Cook orzo just until it is al dente. This means it should have a slight bite. Stir it often while it cooks. This helps it cook evenly and prevents sticking. If the mixture gets too thick, add a splash of broth. It will help loosen the sauce. Store leftovers in an airtight container. Keep it in the fridge for up to three days. When reheating, add a little broth or cream. This will bring back the creamy texture. Heat gently on the stove or in the microwave. Stir well to mix everything again. {{image_4}} You can boost your dish by adding protein. Chicken or shrimp works well. For chicken, use cooked, diced breast. Stir it in just before serving. For shrimp, add peeled and deveined shrimp during the last few minutes of cooking. They cook quickly and soak up flavors. Both options make your dish heartier and more filling. If you want a vegan dish, swap heavy cream for coconut milk or cashew cream. Both give a rich texture without dairy. Coconut milk adds a hint of sweetness. Cashew cream brings a nutty flavor. To make cashew cream, blend soaked cashews with water until smooth. This keeps your orzo creamy and delicious while being plant-based. You can change the veggies based on the season. In spring, add peas or asparagus for a fresh taste. In summer, cherry tomatoes or zucchini brighten the dish. In fall, consider roasted butternut squash or kale. In winter, use hearty greens like Swiss chard. This allows you to enjoy fresh flavors all year round. Plus, it keeps your meal exciting! Pair your creamy mushroom spinach orzo with a light salad. A simple arugula salad works well. A squeeze of lemon adds freshness. You can also serve it with crusty bread. Garlic bread or focaccia are great choices too. These pairings enhance the flavors of your dish. To impress your guests, use deep, elegant bowls for serving. A sprinkle of extra Parmesan cheese adds a classy touch. You can also add a few fresh spinach leaves on top. This adds color and makes the dish look inviting. A drizzle of olive oil can also enhance the look. Roasted vegetables make a perfect side dish. Try roasted carrots or zucchini for a tasty addition. For protein, grilled chicken or shrimp works well too. If you want a lighter option, serve a side of steamed broccoli. Each of these sides balances the creaminess of the orzo. Yes, you can make this dish gluten-free. Simply swap the orzo pasta for a gluten-free pasta. Many brands offer gluten-free orzo made from rice or corn. Make sure to check the packaging for cooking times, as they may vary. To store leftovers, let the orzo cool to room temperature. Place it in an airtight container and refrigerate. It will stay fresh for about three days. Reheat it on the stove or in the microwave. Add a splash of broth or cream to keep it creamy. You can use different cheeses to change the flavor. Try mozzarella for a stretchier texture. Feta adds a salty touch, while goat cheese gives a tangy taste. Grated cheddar works too, giving a rich and bold flavor. Yes, you can prepare this dish in advance. Cook the orzo and let it cool. Store it in the fridge for up to two days. When ready to eat, heat it gently on the stove. Add fresh spinach and cream just before serving for the best taste. This blog covered how to make One Pot Creamy Mushroom Spinach Orzo. We went over ingredients, tools, and optional add-ins for flavor. I shared step-by-step cooking instructions and tips for a creamy sauce. You learned about variations, serving ideas, and answers to common questions. Incorporate these tips to create a dish that your family will love. Enjoy each bite as you make this easy, tasty meal.

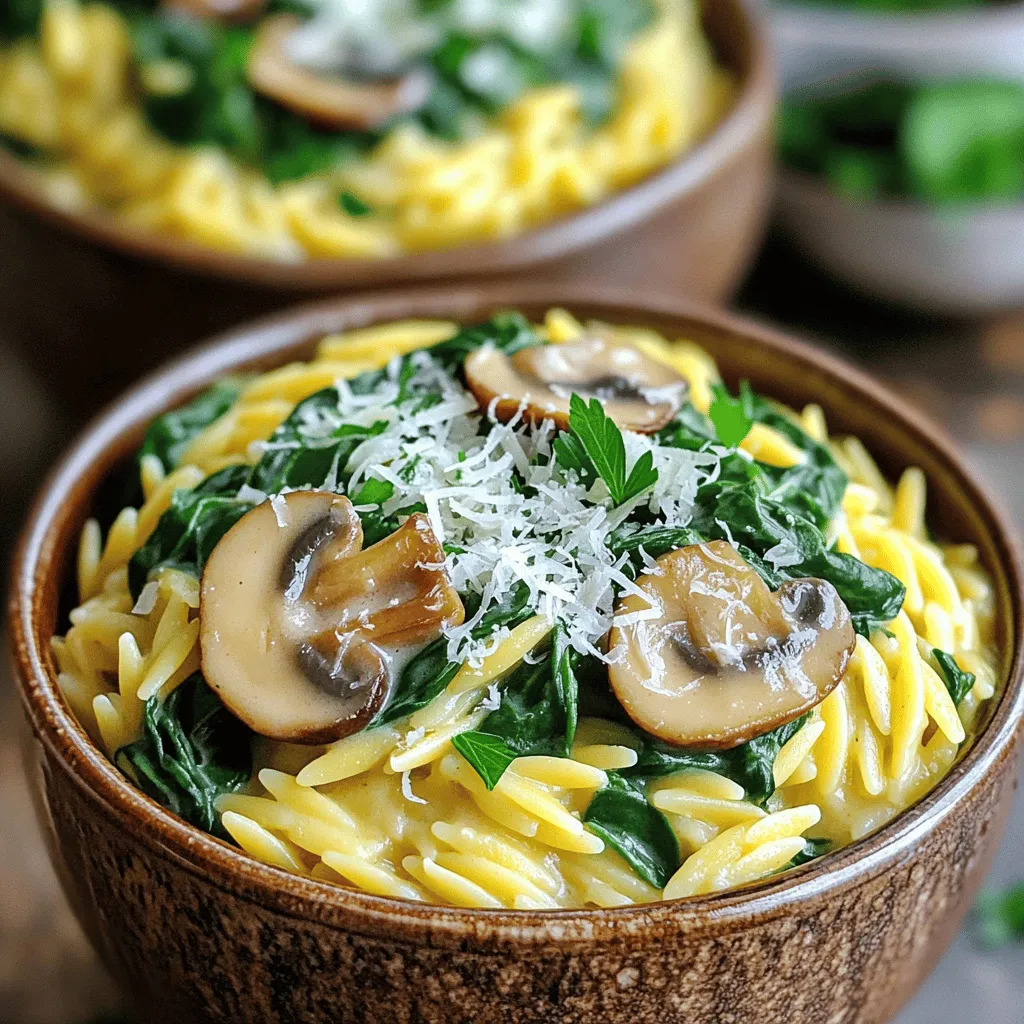
Are you ready to elevate your dinner game? My One Pot Creamy Mushroom Spinach Orzo Delight is a delicious and easy meal that you can whip up in no time. …

Read more

Categories Dinner

Classic Chicken Pot Pie Soup Hearty and Flavorful Dish

September 17, 2025 by Chef Miles
- 1 lb boneless, skinless chicken breasts - 1 medium onion, finely chopped - 2 cloves garlic, minced - 3 medium carrots, peeled and diced - 2 stalks celery, diced - 1 cup frozen peas - 4 cups chicken broth (low-sodium recommended) - 1 cup heavy cream - 1 teaspoon dried thyme - 1 teaspoon dried rosemary - 1/4 cup all-purpose flour - 2 tablespoons olive oil - 1/2 cup frozen pie crust pieces You need these main ingredients to make a tasty chicken pot pie soup. The chicken gives a hearty base, while the onion and garlic add depth. Carrots and celery bring sweetness and crunch. For creaminess, use heavy cream. The peas add a pop of color and flavor. - Salt and freshly cracked black pepper - Fresh parsley for garnish Seasoning is key to great flavor. Use salt and black pepper to taste. Fresh parsley not only brightens the soup but also adds a fresh touch. It makes your dish look appealing too. Don't skip these essential touches! 1. Start by heating olive oil in a large pot on medium heat. 2. Add finely chopped onion and minced garlic. Sauté them until the onion is clear and smells good, about 3-4 minutes. 3. Next, add diced chicken to the pot. Cook the chicken until it is no longer pink, which takes about 5-6 minutes. Stir it often to cook evenly. 1. Now, it's time to mix in the diced carrots and celery. Cook them for another 4-5 minutes until they soften a bit. 2. Sprinkle the all-purpose flour over the chicken and veggies. Stir well to coat everything. Let it cook for a minute to remove the raw flour taste. 3. Gradually pour in the chicken broth while stirring. This helps avoid lumps. Add dried thyme, dried rosemary, salt, and black pepper. Increase heat to bring the soup to a gentle simmer. 1. Once the soup simmers, lower the heat and slowly stir in the heavy cream. Let it cook for about 10 minutes to blend the flavors. 2. Add frozen peas and pie crust pieces to the pot, stirring gently. Cook for another 5 minutes until everything is hot and the pie crust pieces are soft. 3. Serve the soup hot in bowls. Don’t forget to garnish with fresh parsley for a bright touch. Using low-sodium chicken broth is key. It lets you control the salt levels. This broth lets the flavors shine without being too salty. I always recommend checking the label before buying. To ensure even cooking, cut your chicken and veggies into similar sizes. This helps everything cook at the same rate. Stir often while cooking. This prevents sticking and ensures even heat. For seasoning adjustments, taste as you go. Add a pinch of salt or pepper if needed. You can also try adding a dash of lemon juice for brightness. To make the soup thicker, increase the flour slightly or reduce the broth. For a creamier texture, add more heavy cream. You can also blend a portion of the soup and return it to the pot for a smooth finish. {{image_4}} You can make chicken pot pie soup your own by changing a few ingredients. If you want, swap out chicken for turkey or use leftover rotisserie chicken. Both options give great flavor. You can also change the veggies. Try adding corn or green beans for extra taste and color. Peas are a classic, but other vegetables work too. Get creative with what you have! The herbs and spices you use can change the whole dish. For a fresh twist, try adding sage or dill instead of thyme and rosemary. This small change can brighten the soup. You can also tweak the creaminess. If you want a lighter soup, use whole milk instead of heavy cream. For a rich flavor, consider half-and-half or coconut cream. Each choice gives you a new taste experience! To store leftover soup, let it cool first. Use an airtight container, and it will keep well in the fridge for about 3 to 4 days. When you want to reheat it, pour the soup into a pot. Heat it on medium until it warms through. Stir often to avoid sticking. You can also use the microwave. Heat it in 1-minute bursts, stirring in between, until hot. If you want to freeze portions, let the soup cool completely. Use freezer-safe containers or bags. Leave some space at the top for expansion. It can last for up to 3 months in the freezer. To thaw, move it to the fridge overnight. For quick thawing, run the container under cold water. When ready to reheat, use a pot on low heat. Stir gently as it warms up to avoid burning. How long does chicken pot pie soup last in the fridge? Chicken pot pie soup can last about three to four days in the fridge. Store it in an airtight container. Make sure it cools down first before sealing. This keeps the soup fresh and safe to eat. Can I make this soup ahead of time? Yes, you can make this soup ahead of time. It tastes even better after some time in the fridge. Just reheat it gently on the stove. If it thickens too much, add a little extra broth or cream. Is there a vegetarian version of chicken pot pie soup? You can make a vegetarian version easily. Swap the chicken for diced mushrooms or tofu. Use vegetable broth instead of chicken broth. Add more veggies like corn or green beans for texture and flavor. What goes well with chicken pot pie soup? Several things pair well with chicken pot pie soup. Fresh, crusty bread is a great choice. You could also serve a simple side salad for a light touch. For a twist, try cornbread for a fun, sweet side. This article covered how to create delicious chicken pot pie soup. We explored key ingredients like chicken, vegetables, and herbs. You learned step-by-step cooking methods and tips to enhance flavor. Variations allowed for personal touches, and storage info ensured long-lasting enjoyment. Now, you can easily make this comforting soup at home. Experiment with flavors and share it with others. Happy cooking!

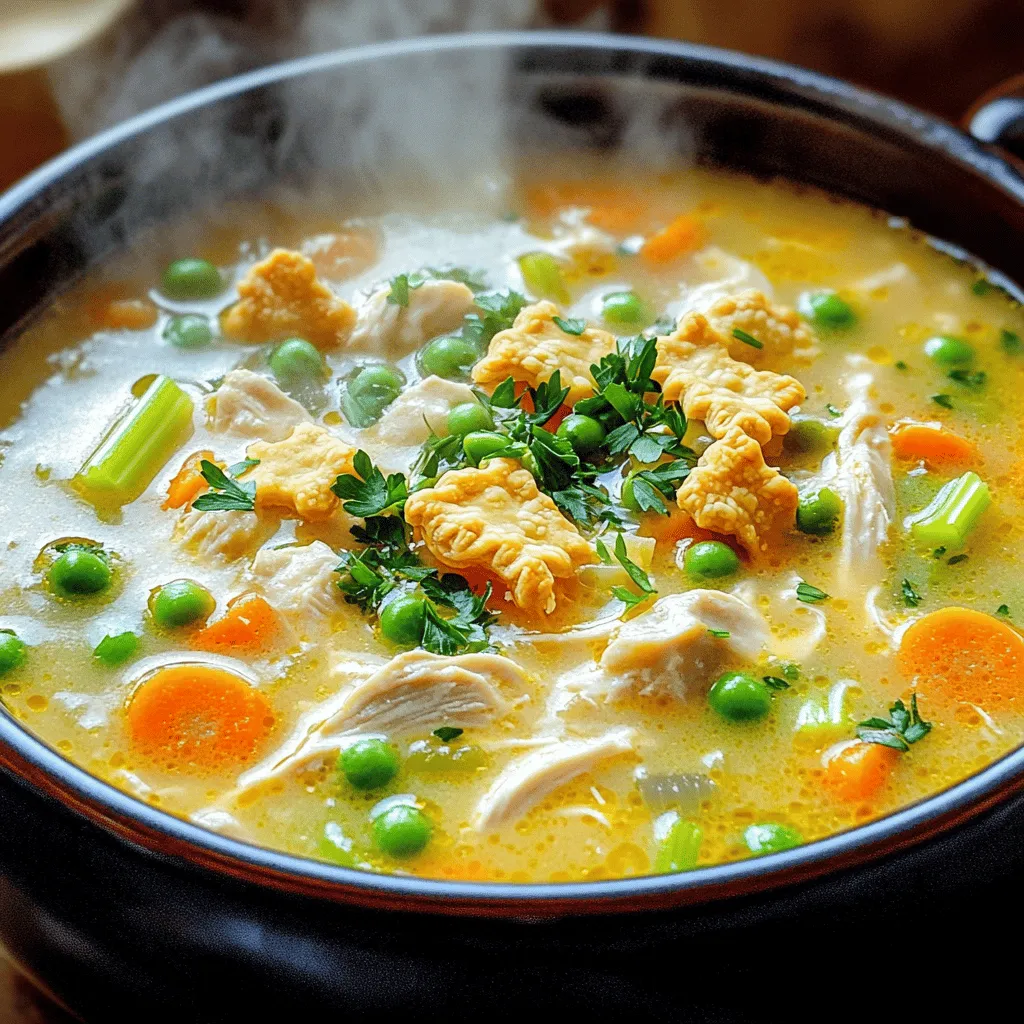
Looking for a cozy and comforting meal? Look no further! My Classic Chicken Pot Pie Soup is just what you need. This dish brings all the heartiness of traditional chicken …

Read more

Categories Dinner

Spicy Buffalo Cauliflower Bites Crunchy and Tasty Treat

September 17, 2025 by Chef Miles
To make spicy buffalo cauliflower bites, you need: - 1 large head of cauliflower, cut into bite-sized florets - 1 cup all-purpose flour - 1 teaspoon garlic powder - 1 teaspoon onion powder - 1 teaspoon smoked paprika - 1/2 teaspoon cayenne pepper (adjust for desired spiciness) - 1 cup plant-based milk (or regular milk) - 1 cup breadcrumbs (preferably panko for an extra crunchy texture) - 1 cup buffalo sauce (store-bought or homemade) - 2 tablespoons olive oil - Salt and pepper to taste You can add some freshness to your bites by using: - Chopped fresh parsley for garnish If you want to make this recipe gluten-free, I recommend: - Using gluten-free flour in place of all-purpose flour - Choosing gluten-free breadcrumbs instead of regular ones For a vegan option, stick with plant-based milk and buffalo sauce. First, preheat your oven to 450°F (230°C). This high heat helps make the bites crispy. Line a baking sheet with parchment paper. This prevents sticking and helps with cleanup. In a large bowl, mix together the following dry ingredients: - 1 cup all-purpose flour - 1 teaspoon garlic powder - 1 teaspoon onion powder - 1 teaspoon smoked paprika - 1/2 teaspoon cayenne pepper - Salt and pepper to taste Stir these well to blend the flavors. Gradually whisk in 1 cup of plant-based milk or regular milk. Keep whisking until the batter is smooth and lump-free. This coating will stick to the cauliflower. Take each cauliflower floret and dip it into the batter. Make sure it is fully covered. Let any extra batter drip back into the bowl. Next, roll each floret in breadcrumbs. Use 1 cup of panko for extra crunch. Place the coated florets on the baking sheet in a single layer. Drizzle with 2 tablespoons of olive oil. This will help them crisp up nicely. Once baked, move the cauliflower to a large bowl. Pour 1 cup of buffalo sauce over the hot florets. Toss gently until each piece is coated. Return the sauced cauliflower to the baking sheet. Bake for another 10 minutes. This helps the sauce set and flavors blend. After baking, let them cool for a few minutes. This step allows the flavors to develop even more. To get your cauliflower bites super crispy, use panko breadcrumbs. They give a great crunch. Make sure to coat each floret well in the batter before rolling it in the breadcrumbs. Drizzling olive oil on top helps too. This oil creates a golden crust as they bake. If you want your bites spicier, add more cayenne pepper to the batter. Start with half a teaspoon and taste. You can always add more if you like heat. If you prefer mild bites, use less cayenne. You can also try a milder sauce or skip the buffalo sauce entirely. When you dip each cauliflower piece, make sure to let excess batter drip off. This step keeps the coating light. For an even layer, roll the floret in breadcrumbs gently. Press them slightly to ensure they stick. This way, every bite stays crispy and tasty. {{image_4}} You can make spicy buffalo cauliflower bites vegan by using plant-based milk and flour. Use almond, soy, or oat milk for the batter. For the coating, ensure your breadcrumbs are vegan. This way, you skip any animal products while keeping the flavor. To make these bites gluten-free, swap all-purpose flour with gluten-free flour. You can also use gluten-free breadcrumbs to keep that crunch. This way, everyone can enjoy the dish without worries. Want to spice things up? Try BBQ sauce instead of buffalo sauce. This gives a sweet and smoky flavor. You can also use garlic parmesan for a cheesy twist. Just mix grated parmesan cheese into your breadcrumbs for extra flavor. Each variation brings a new taste, so have fun experimenting! After enjoying your Spicy Buffalo Cauliflower Bites, let them cool completely. Place any leftovers in an airtight container. Store them in the fridge for up to three days. This keeps them fresh and tasty for your next snack or meal. To reheat, preheat your oven to 350°F (175°C). Spread the cauliflower bites on a baking sheet. Bake for about 10-15 minutes. This helps them regain their crunch. You can also use an air fryer for about 5 minutes at 350°F (175°C). This method works well too. If you want to save some bites for later, freezing is a great option. Place the cooled cauliflower bites in a single layer on a baking sheet. Freeze them for about an hour. Once frozen, move them to a freezer bag. They can stay in the freezer for up to three months. When you're ready to eat, bake them straight from the freezer. Cook them at 450°F (230°C) for about 20-25 minutes, until heated through. Spicy Buffalo Cauliflower Bites can be as spicy as you want. The heat comes from cayenne pepper in the batter. You can adjust this amount to suit your taste. If you prefer mild bites, use less cayenne. If you love heat, add more. The buffalo sauce also adds spice, so consider that when choosing your heat level. Yes, you can make these bites ahead of time. Prepare the cauliflower and batter and coat them earlier. Store the coated florets in the fridge for a few hours. When you’re ready to bake, just follow the baking steps. This saves time and makes them a great snack for parties. These bites pair well with many dips. Creamy ranch or blue cheese dressing are classic choices. Fresh veggies like celery and carrots also make great sides. You can serve them on a platter for a fun appetizer. Don’t forget to add chopped parsley for color! Yes, Spicy Buffalo Cauliflower Bites can be healthy. Cauliflower is low in calories and high in fiber. The batter and breadcrumbs do add some carbs, but you can use whole grain options. Baking instead of frying keeps them lighter. Enjoy them as a snack or side dish for a nutritious choice! This post covered all you need to make Spicy Buffalo Cauliflower Bites. We explored key ingredients, easy steps, and helpful tips for crispiness. You learned about fun variations, like vegan options and garlic flavors. I also shared storage tips to keep your bites fresh. With these details, you can enjoy a tasty treat anytime. Dive into your kitchen and create your own spicy bites!

Are you ready to take your snacking game up a notch? These Spicy Buffalo Cauliflower Bites are the perfect crunchy and tasty treat for any occasion. They pack a punch …

Read more

Categories Appetizers

Mediterranean Chickpea Salad Wraps Fresh and Tasty Meal

September 17, 2025 by Chef Miles
- 15 oz can of chickpeas - 1 cup cherry tomatoes - 1 cucumber - ½ red onion - ½ cup kalamata olives - ½ cup feta cheese - 2 tablespoons fresh parsley - 2 tablespoons olive oil - 1 tablespoon lemon juice - 1 teaspoon dried oregano - Salt and pepper to taste - 4 large whole wheat tortillas or wraps These ingredients create a fresh and tasty meal. Each item adds its unique flavor. Chickpeas give protein and heartiness. Cherry tomatoes bring a sweet burst. Cucumber adds a crunchy bite. The red onion offers a hint of sweetness. Kalamata olives give a salty, briny touch. Feta cheese adds creaminess, while parsley freshens the dish. For the dressing, olive oil creates richness. Lemon juice brings brightness to the salad. Dried oregano adds a lovely herb flavor. Salt and pepper balance all the tastes. Whole wheat tortillas wrap everything up. They make it easy to eat. You can switch them out for other wraps if you like. Enjoy the mix of flavors and textures in every bite! - Mixing base ingredients: Start by rinsing and draining the chickpeas. In a large bowl, combine the chickpeas, cherry tomatoes, diced cucumber, chopped red onion, sliced kalamata olives, crumbled feta, and parsley. Use a spoon to mix gently. This keeps the veggies whole and fresh. - Preparing the dressing: In a small bowl, whisk together olive oil, lemon juice, and dried oregano. Add salt and pepper to taste. This dressing adds brightness and flavor to the salad. - Spoon salad mixture onto tortillas: Take a whole wheat tortilla and lay it flat. Spoon a generous amount of the chickpea salad mixture into the center. Make sure it is colorful and full of flavor. - Folding and rolling technique: Fold the sides of the tortilla gently. Then, roll it from the bottom up. Make sure it is tight enough to hold the filling but not too tight to break the tortilla. - Presentation tips: Serve the wraps on a rustic wooden board. Sprinkle extra crumbled feta on top for a nice look. You can also add a small bowl of hummus for dipping. Fresh lemon wedges around the platter add a zesty touch. - Cutting and serving options: When ready to serve, cut each wrap in half diagonally. This makes them easy to hold and eat. Enjoy your fresh and tasty meal! To get a great mix, combine all the ingredients gently. This step keeps your chickpeas whole. You want a nice balance of flavors without squishing everything. For tortillas, I recommend using large whole wheat ones. They hold the filling well and add a nutty taste. You can also try spinach or herb wraps for added flavor. You can easily swap ingredients to fit your taste. If you don’t have feta, try goat cheese or a dairy-free option. For a kick, add diced jalapeños or chopped bell peppers. Fresh herbs, like mint or dill, can also brighten your dish. Don’t forget to taste as you go; this helps you adjust the salt and pepper. Store any leftovers in an airtight container in the fridge. They’ll stay fresh for about three days. If you want to reheat, unwrap the wrap and heat it in a pan for a few minutes. This way, the tortilla stays crispy. Enjoy your wraps cold or warm; both options taste great! {{image_4}} You can easily boost your wraps with protein. Adding grilled chicken or tofu gives a hearty touch. Just slice the chicken or cube the tofu, then grill until golden. This addition keeps the wraps filling and satisfying. You can also incorporate tuna or shrimp for a seafood twist. Drain canned tuna or cook fresh shrimp until pink. Mix any of these protein options right in with the chickpea salad. These simple swaps will enhance flavor and nutrition. If you need a gluten-free wrap, look for rice or corn tortillas. These options work great and still hold the filling well. You won’t feel like you’re missing out. For a dairy-free alternative to feta cheese, try using almond or cashew-based cheese. These options offer creaminess without dairy. You can also sprinkle nutritional yeast for a cheesy taste that fits a vegan diet. Feel free to get creative with your ingredients. Adding different veggies or beans can change the whole salad. Try bell peppers, carrots, or even black beans for a fun twist. Each new ingredient brings unique flavors and textures. Experimenting with different dressings can also elevate your wraps. Try tahini, balsamic vinaigrette, or even a spicy harissa. These dressings add layers of flavor that keep your meal exciting. To keep your Mediterranean Chickpea Salad Wraps fresh, wrap them tightly in plastic wrap or foil. Place them in an airtight container. This will help prevent them from drying out. Store the wraps in the fridge. They stay good for about three days. After that, the flavors may fade, and the texture may change. You can freeze these wraps for later. If you want to freeze them, do it before adding the dressing. Wrap each one in plastic wrap, then place them in a freezer bag. They can last for up to three months in the freezer. When you're ready to eat, take them out and let them thaw in the fridge overnight. For a quick heat, unwrap and microwave for about one minute. Check for signs of spoilage before eating. If you see mold or a strange smell, toss them out. The veggies may become mushy, and the cheese may smell sour. Always follow good food safety practices. If in doubt, it's better to throw it away than to risk getting sick. You can try non-dairy cheese options like almond or cashew cheese. These options have a nice texture. For a tangy flavor, use a mix of lemon juice and nutritional yeast. This gives a cheesy taste without dairy. Yes, you can make these wraps ahead of time. Just store the salad and wraps separately. This keeps the wraps fresh and not soggy. Wrap them in foil or plastic wrap. Store them in the fridge for up to two days. These wraps can last for about three days in the fridge. Make sure they are in an airtight container. Check for any signs of spoilage, like a bad smell or slimy texture. If they look good, they are safe to eat. This blog post covered how to make Mediterranean Chickpea Salad Wraps from fresh ingredients. You learned about the base ingredients, dressing, and assembly steps. We also shared tips for flavor and storage, and variations to customize your wraps. In summary, these wraps are simple to prepare, tasty, and versatile. Feel free to mix and match ingredients based on your taste. Enjoy making these wraps that are both healthy and fun to eat!

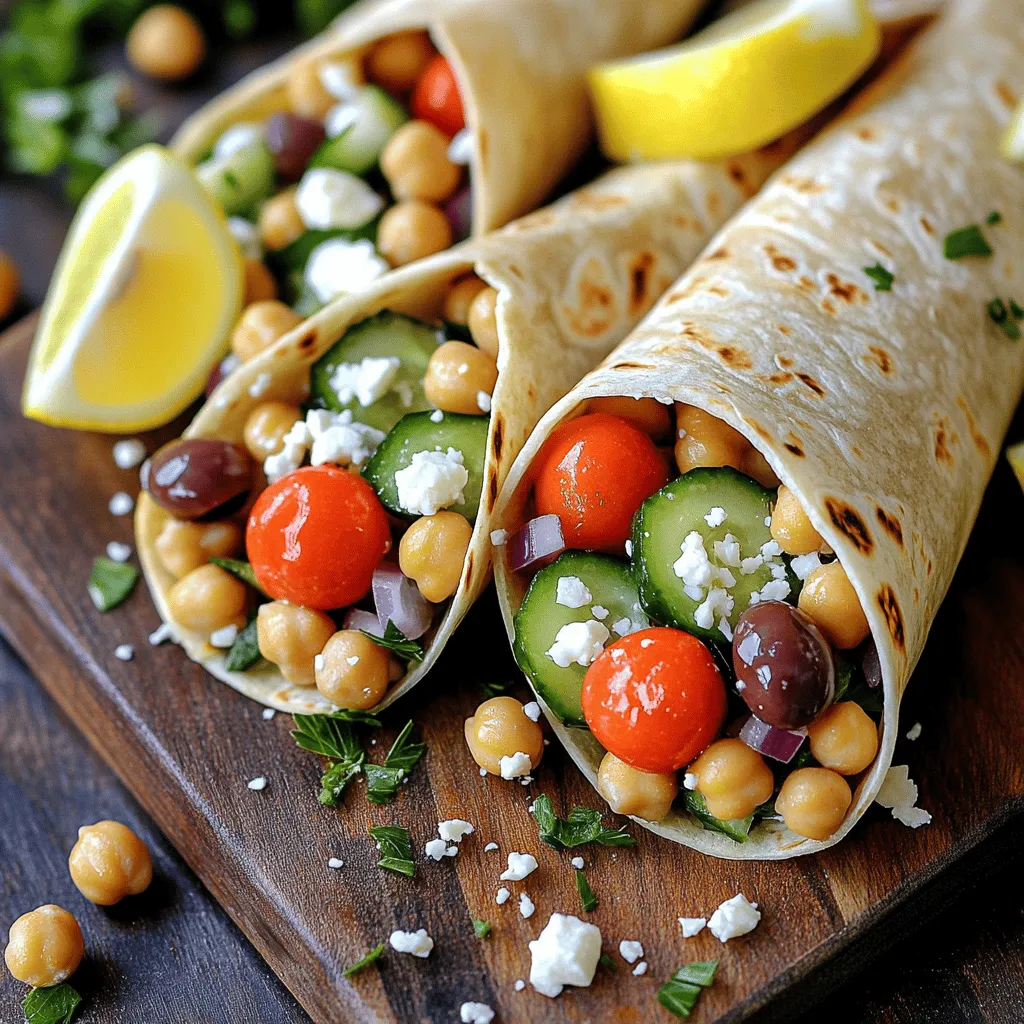
Are you looking for a fresh, tasty meal that’s easy to make? My Mediterranean Chickpea Salad Wraps are perfect! Packed with healthy ingredients like chickpeas, cherry tomatoes, and olives, these …

Read more

Categories Salads

Thai Coconut Curry Ramen Flavorful and Easy Recipe

September 17, 2025 by Chef Miles
- 2 packs of fresh ramen noodles - 1 can (400ml) full-fat coconut milk - 2 cups vegetable broth - 2 tablespoons red curry paste - 1 tablespoon soy sauce - 1 tablespoon lime juice - 1 teaspoon brown sugar - 1 cup bell peppers, sliced - 1 cup baby spinach leaves - 1 cup mushrooms, sliced - 1 can (15 oz) chickpeas, rinsed - Fresh basil leaves for garnish - Lime wedges for serving - Optional: chili flakes or fresh chili For the best flavors, I recommend using Thai Kitchen for red curry paste and Native Forest for coconut milk. Both brands provide rich flavors that enhance your dish. For soy sauce, Kikkoman offers a great choice, or go for Tamari if you need a gluten-free option. You can customize your ramen in many ways. Try adding tofu for protein or zucchini for extra veggies. For a unique twist, consider adding a splash of fish sauce or a dash of sesame oil. If you're a spice lover, fresh chilies or sriracha can really amplify the heat in your bowl. Start by taking a large saucepan. Heat it over medium heat. Pour in one can of full-fat coconut milk and two cups of vegetable broth. Whisk them together gently until they mix well. Bring the mixture to a gentle simmer. This step is key. The warm broth will help release the flavors as you add more ingredients. Next, add two tablespoons of red curry paste. You can adjust this based on your spice preference. Then, stir in one tablespoon of soy sauce and one tablespoon of freshly squeezed lime juice. Don’t forget to add one teaspoon of brown sugar. This will balance the heat from the curry paste. Keep stirring until everything is smooth and fragrant. Once your broth is ready, add one cup of thinly sliced bell peppers. A mix of red and yellow adds color and taste. Then, toss in one cup of sliced mushrooms. Shiitake or button mushrooms work best. Let the mixture simmer for about five minutes. This will soften the veggies and meld the flavors beautifully. After five minutes, add one can of drained and rinsed chickpeas. Stir well to combine. Let it cook for three more minutes. This will heat the chickpeas and let them soak up the broth's tasty flavors. Lastly, stir in one cup of rinsed baby spinach leaves. Allow them to wilt for about one to two minutes. This adds a fresh touch to your dish. While your broth is simmering, prepare the ramen noodles. Cook them according to the package instructions. This usually takes just a few minutes. Once cooked, drain the noodles and set them aside. Now, it’s time to serve! Place a generous amount of cooked ramen noodles in each bowl. Ladle the aromatic coconut curry broth over the noodles. Make sure to include the vibrant vegetables and chickpeas. Finish each bowl with fresh basil leaves for garnish. Serve hot, with lime wedges on the side. If you want extra heat, add chili flakes or sliced fresh chili. Enjoy your tasty Thai coconut curry ramen! To adjust spice levels, start with less red curry paste. You can use 1 tablespoon if you prefer mild flavors. Taste the broth after adding the paste. If you want more heat, add more paste or chili flakes. Remember, you can always add more, but it’s hard to take away. This recipe is almost vegan. Just use soy sauce or tamari for gluten-free. For a vegan option, ensure your red curry paste has no fish sauce. Most brands make vegan options. You can also swap chickpeas with tofu for extra protein. Tofu will soak up flavors well. To boost flavor, add fresh herbs like cilantro or basil. These bring brightness to the dish. A splash of lime juice before serving adds a fresh zing. You can also experiment with spices like ginger or garlic. They add depth and warmth to the overall taste. {{image_4}} You can add protein to your Thai coconut curry ramen for a heartier meal. Here are some options: - Chicken: Slice cooked chicken breast and add it to the broth. Use rotisserie chicken for quick prep. - Shrimp: Add peeled shrimp during the last few minutes of cooking. They cook quickly and add great flavor. - Tofu: Cube firm tofu and sauté it before adding. This gives a nice texture and absorbs the curry flavors well. - Egg: Soft-boiled eggs make a perfect topping. Just cook them separately and place on top when serving. Feel free to swap in different veggies based on what you have at home. Here are some tasty ideas: - Carrots: Thinly slice or julienne carrots for added crunch and sweetness. - Zucchini: Cut zucchini into small rounds or half-moons. They cook fast and add a nice texture. - Broccoli: Use small florets for a fresh crunch. Just add them a bit earlier so they cook through. - Snap Peas: Toss in snap peas for a burst of color and sweetness. They only need a minute or two to cook. How you serve your ramen can change the whole experience. Here are some ideas: - Bowls: Use deep bowls to hold the broth and noodles. This keeps everything warm and cozy. - Garnishes: Top with fresh basil and lime wedges. You can also add sliced green onions or sesame seeds for extra flavor. - Side Dishes: Serve with a light salad or spring rolls. This adds variety and rounds out the meal. - Drinks: Pair with Thai iced tea or a light beer. These drinks complement the curry’s rich flavors nicely. After you make your Thai coconut curry ramen, let it cool first. Once cool, place it in an airtight container. Store it in the fridge for up to three days. This will keep the flavors fresh. If you want the best taste, eat it within two days. You can freeze the leftovers too. But, avoid freezing the noodles. They become mushy when thawed. Instead, freeze the curry broth and veggies together. Use a freezer-safe container. It can last for up to three months. When you are ready to eat, thaw it in the fridge overnight. To reheat, pour the curry into a pot. Heat it on low until warm. If it's too thick, add a splash of vegetable broth or coconut milk. Cook until it's steaming hot. For the noodles, boil them fresh or microwave them for a quick fix. Combine them with the reheated broth and enjoy! Yes, you can use different types of noodles. If you want a gluten-free option, try rice noodles. Soba noodles also work well and add a nutty flavor. Just follow the package instructions for cooking times. You can even use pasta if you’re in a pinch. If you don’t have coconut milk, you can use almond milk or soy milk. These will change the taste slightly but still add creaminess. For a thicker texture, mix in some cashew cream. If you like it rich, try heavy cream or half-and-half. To make your ramen spicier, add more red curry paste. You can also toss in sliced fresh chili or chili flakes. Try adding a dash of sriracha or hot sauce. Adjust the spice level to your taste, but start small. You can always add more! This blog post explored each step in creating delicious ramen. We covered the ingredients, cooking instructions, and helpful tips. You learned how to customize flavors and adjust spice levels. I also shared storage tips and answered common questions. Embrace these ideas and make ramen that suits your taste. Enjoy cooking!

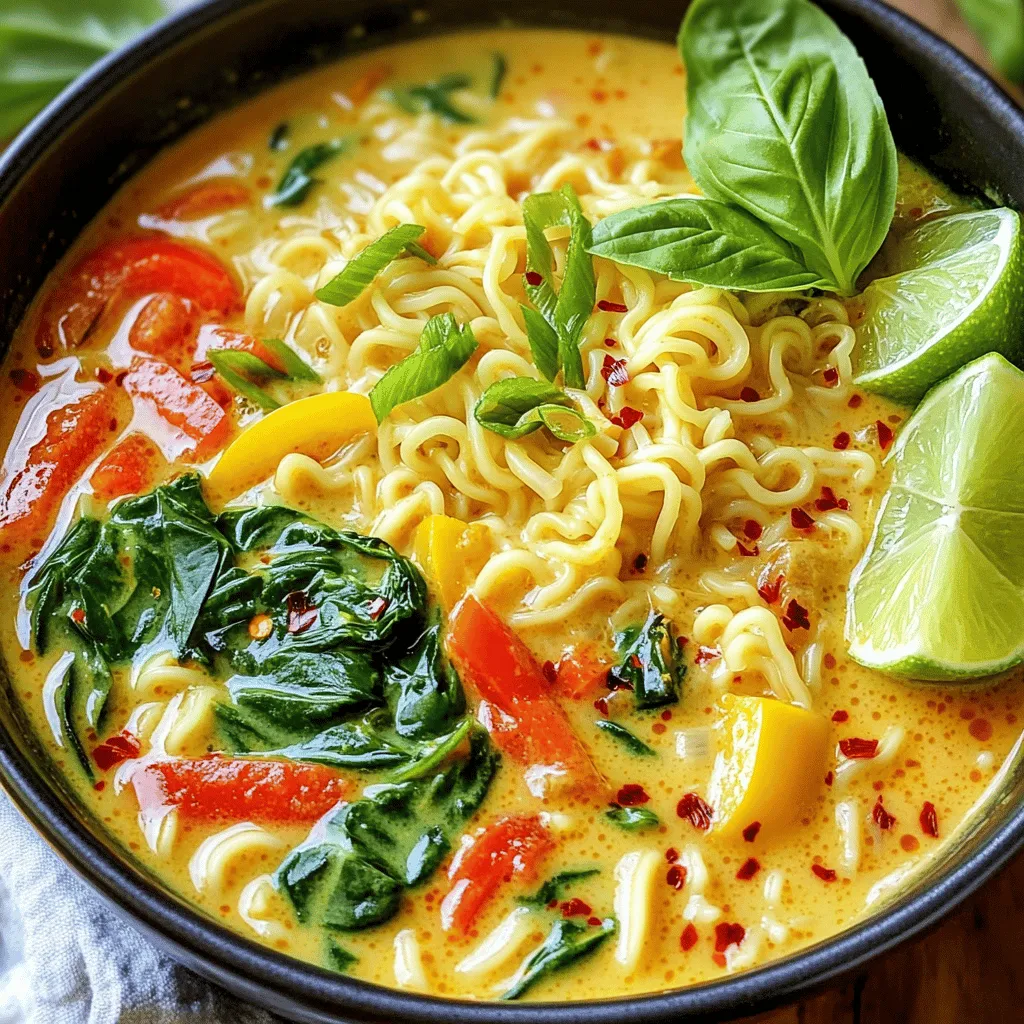
Are you ready for a delicious twist on ramen? This Thai Coconut Curry Ramen is rich, creamy, and packed with flavor. You can make it in just a few simple …

Read more

Categories Dinner

Chocolate Chip Banana Oatmeal Bars Tasty and Simple Recipe

September 17, 2025 by Chef Miles
To make the Chocolate Chip Banana Oatmeal Bars, you will need: - 2 ripe bananas, thoroughly mashed - 1 cup old-fashioned rolled oats - 1/2 cup almond butter (or your choice of nut butter) - 1/4 cup honey or maple syrup - 1 tsp pure vanilla extract - 1/2 tsp baking powder - 1/2 tsp ground cinnamon - 1/4 tsp fine salt - 1/2 cup dark chocolate chips - Optional: 1/4 cup chopped walnuts or pecans Each bar contains key nutrients. It has healthy fats from the nut butter. The oats provide fiber. Bananas add potassium and natural sweetness. The dark chocolate gives a touch of indulgence. Each bar is roughly 120 calories. It has about 4 grams of protein and 5 grams of fiber. You can swap ingredients as needed: - Use peanut butter instead of almond butter if preferred. - Maple syrup can replace honey for a vegan option. - If you don’t have dark chocolate, use milk chocolate or white chocolate. - For a nut-free version, leave out nuts or use sunflower seed butter. These swaps keep the bars tasty and fun! 1. Preheat your oven to 350°F (175°C). 2. Lightly grease an 8x8-inch baking pan or line it with parchment paper. 3. In a large bowl, mash the ripe bananas until smooth. 4. Add almond butter, honey or maple syrup, and vanilla extract. 5. Mix with a fork or whisk until creamy. 6. Stir in rolled oats, baking powder, cinnamon, and salt. 7. Make sure no dry bits remain in the mixture. 8. Gently fold in dark chocolate chips and nuts, if using. 9. Spread the mixture evenly in the prepared pan. 1. Place the pan in your preheated oven. 2. Bake for 20 to 25 minutes. 3. Check for doneness by looking for golden edges. 4. Insert a toothpick in the center; it should come out mostly clean. 1. Let the bars cool in the pan for 10 minutes. 2. Use the parchment paper to lift the bars out. 3. Allow them to cool completely on a wire rack. 4. Once cool, slice into squares or bars. 5. Serve them plain or with banana slices on top. To make the best Chocolate Chip Banana Oatmeal Bars, follow these tips: - Use ripe bananas. They add more sweetness and flavor. - Measure oats correctly. Too many oats can make bars dry. - Mix well but don’t overmix. This keeps the bars light and fluffy. - Bake until golden brown. This gives them a nice texture and taste. Keep your bars fresh with these storage tips: - Store them in an airtight container. This helps them stay soft. - Place parchment paper between layers. This prevents sticking. - Refrigerate for longer freshness. They stay good for up to one week. - You can freeze them too. Wrap in plastic wrap and keep in a freezer bag. Enjoy your bars in fun ways: - Serve warm with a glass of milk. - Add a dollop of yogurt on top. - Pair with fresh fruit for added flavor. - Cut into small squares for snacks or treats. These ideas make your bars even more enjoyable! {{image_4}} You can change up the flavor of your bars easily. Swap almond butter for peanut or cashew butter. Each nut butter gives a unique taste. You can add nuts, too, like walnuts or pecans. They bring a nice crunch. Try adding dried fruit like raisins or cranberries for a sweet twist. You can also mix in seeds, like chia or flaxseeds, for extra health benefits. To make these bars healthier, you can replace honey or maple syrup with a sugar substitute. Use stevia or monk fruit sweetener if you want fewer calories. These options still add sweetness without the extra sugar. You can reduce the chocolate chips as well. This keeps the bars tasty but lowers the sugar content. To make your bars gluten-free, check that your oats are certified gluten-free. Most oats are safe, but it’s good to double-check. For vegan options, use maple syrup instead of honey. Choose a plant-based butter or omit it entirely for a simple recipe. These changes help everyone enjoy the bars, no matter their diet. To keep your chocolate chip banana oatmeal bars fresh, store them in an airtight container. You can leave them at room temperature for up to three days. For longer freshness, place them in the fridge. They can last about a week this way. Make sure they cool fully before storing. This helps avoid sogginess. If you want to enjoy these bars later, freezing is a great option. First, cut the bars into squares. Then, wrap each piece tightly in plastic wrap. Place them in a freezer-safe bag or container. They will stay good for up to three months. When you’re ready to eat, just thaw them in the fridge overnight. To enjoy warm bars, you can reheat them easily. Place a bar in the microwave for about 10-15 seconds. Check to see if it’s warm enough. If not, heat for another few seconds. You can also warm them in the oven. Set the oven to 350°F (175°C) and heat for about 5-7 minutes. This will make them soft and gooey again! Yes, you can use other fruits. Applesauce, berries, or even pumpkin work great. Just make sure the fruit is mashed or pureed. This keeps the right texture. Each fruit brings its own flavor, too. So, feel free to experiment! To adjust for fewer servings, cut the ingredients in half. Use a smaller pan, like a 6x6 inch one. This keeps the baking time similar, about 20 minutes. Always check for doneness with a toothpick. Adjusting ensures you get fresh bars every time. You can use any nut butter you like. Peanut butter, cashew butter, or sunflower seed butter are great options. Each will change the taste a bit, but they all work well. Just make sure the substitute is smooth for best results. These bars last about a week when stored in an airtight container. Keep them at room temperature or in the fridge for extra freshness. If you freeze them, they can last up to three months. Just thaw before enjoying! This post covered the key steps to make delicious bars. We looked at ingredients, like nut butters and sugar options. I shared tips for baking, storing, and serving your bars. You can even try fun variations! With these easy steps, you can feel confident in your baking skills. Remember to adjust for your taste and needs. Enjoy creating your own bars and sharing them with others!

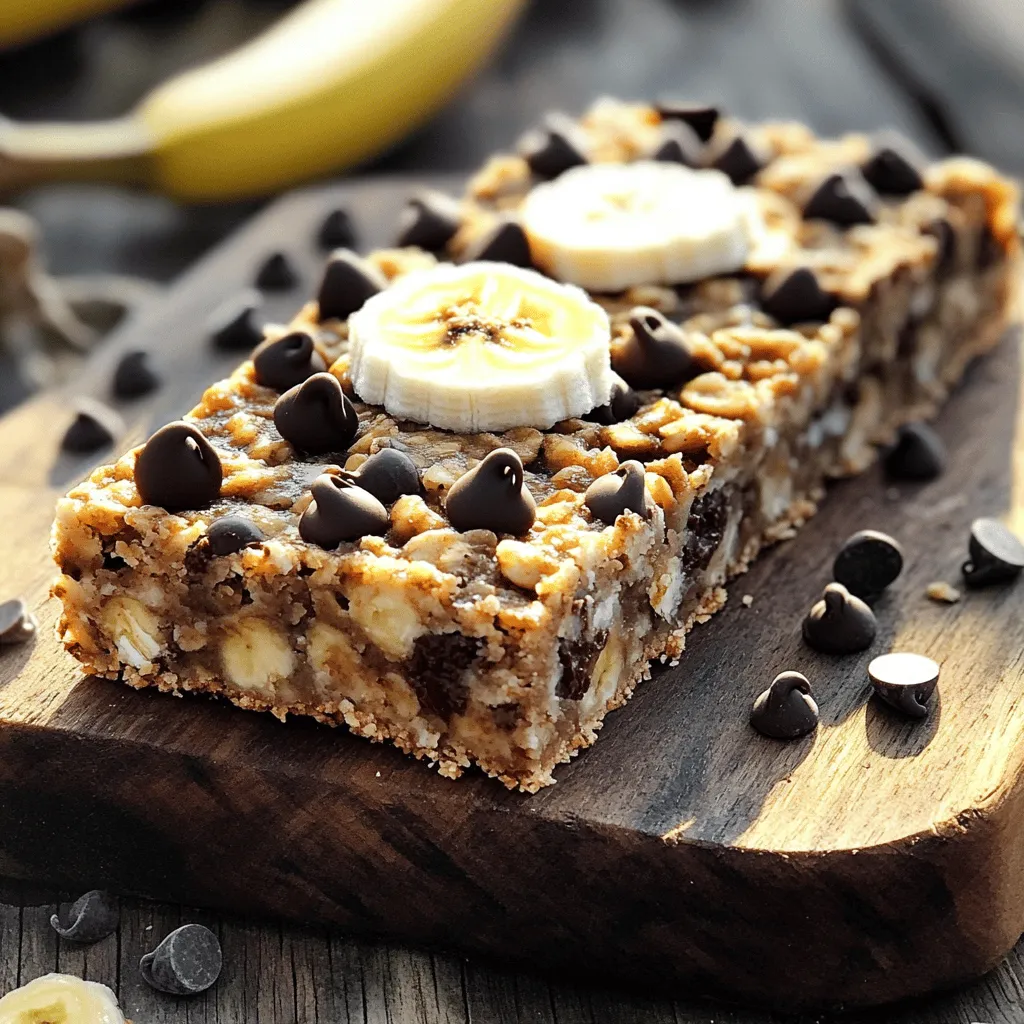
Welcome to your next favorite treat: Chocolate Chip Banana Oatmeal Bars! I’ll show you how to make these tasty snacks that are easy to whip up and packed with flavor. …

Read more

Categories Desserts

Pumpkin Cream Cheese Brownies Irresistibly Moist Treat

September 16, 2025 by Chef Miles
- 1 cup all-purpose flour - 1 cup granulated sugar - 1/3 cup unsweetened cocoa powder - 1 teaspoon baking powder - 1/2 teaspoon salt - 1/2 cup unsalted butter, melted - 2 large eggs - 1 teaspoon vanilla extract - 1 cup canned pumpkin puree - 1 teaspoon pumpkin pie spice - 8 oz cream cheese, softened - 1/4 cup powdered sugar - 1 egg yolk These ingredients create a rich and moist brownie. The pumpkin adds flavor and moisture. The cream cheese gives a nice, creamy layer. - Chopped nuts, like walnuts or pecans - Chocolate chips, for extra sweetness - A pinch of cinnamon for warmth Adding these ingredients can make your brownies even better. Nuts add crunch, while chocolate chips enhance sweetness. A touch of cinnamon gives a warm flavor that pairs well with pumpkin. - 1 cup = 240 ml - 1/3 cup = 80 ml - 1 teaspoon = 5 ml - 1/2 teaspoon = 2.5 ml - 1/4 cup = 60 ml Conversions help if you use different measuring tools. Keep these handy for easy reference while baking. Start by preheating your oven to 350°F (175°C). Grab an 8x8 inch baking pan. Lightly grease it with butter or oil. Then, line the bottom with parchment paper. Leave some paper hanging over the edges. This makes it easy to lift the brownies out later. In a large bowl, combine the following dry ingredients: - 1 cup all-purpose flour - 1 cup granulated sugar - 1/3 cup unsweetened cocoa powder - 1 teaspoon baking powder - 1/2 teaspoon salt Whisk these ingredients together until they blend well. Make sure there are no clumps left. In another bowl, mix the wet ingredients: - 1/2 cup unsalted butter, melted - 2 large eggs - 1 teaspoon vanilla extract Whisk them together until smooth. Slowly pour this mixture into the bowl with dry ingredients. Stir gently until just combined. Avoid overmixing to keep the brownies soft. Carefully fold in: - 1 cup canned pumpkin puree - 1 teaspoon pumpkin pie spice Make sure the pumpkin and spice are mixed in well. In a separate bowl, beat together: - 8 oz cream cheese, softened - 1/4 cup powdered sugar - 1 egg yolk Use a mixer or a whisk. Mix until smooth and creamy with no lumps. Spoon half of the pumpkin batter into the prepared pan. Spread it evenly with a spatula. Next, dollop spoonfuls of the cream cheese mix over the batter. Use a knife to swirl the cream cheese into the brownie layer. Pour the remaining pumpkin batter on top. Smooth it out to cover the cream cheese layer. Bake in your preheated oven for 30-35 minutes. Check for doneness by inserting a toothpick in the center. It should come out clean or with a few moist crumbs. Once baked, remove the brownies from the oven. Let them cool in the pan for about 15 minutes. Use the parchment paper to lift them out. Transfer to a wire rack to cool completely before slicing. For serving, dust with powdered sugar or add whipped cream. A sprinkle of pumpkin pie spice adds a nice touch! When making pumpkin cream cheese brownies, some mistakes can spoil your treat. Here are a few to watch for: - Overmixing the batter: Mix just until combined. Overmixing makes brownies tough. - Skipping the parchment paper: Always line your pan for easy removal. - Using cold cream cheese: It should be soft and at room temperature. Cold cream cheese won’t blend well. - Not checking doneness: Use a toothpick to test. A few crumbs are okay, but no wet batter. These brownies shine when served right. Here are some fun ideas: - Dust with powdered sugar: A light sprinkle adds charm and sweetness. - Top with whipped cream: A dollop makes each bite creamy and rich. - Garnish with pumpkin pie spice: A sprinkle on top brings in extra flavor. - Serve warm with ice cream: The warmth and creaminess create a cozy dessert. Using the right tools helps your brownies turn out perfectly. Here’s what I recommend: - 8x8 inch baking pan: This size is perfect for even baking. - Mixing bowls: Use at least two bowls for dry and wet ingredients. - Whisk: A good whisk helps blend dry ingredients smoothly. - Spatula: This tool helps spread the batter evenly. - Toothpick: Essential for checking if the brownies are done. These tips and tools will guide you to make the best pumpkin cream cheese brownies. Enjoy the process and the tasty results! {{image_4}} You can make these brownies gluten-free by swapping the all-purpose flour. Use a gluten-free flour blend instead. Make sure it has a good binding agent like xanthan gum. This will help keep the brownies moist and tasty. The rest of the recipe stays the same. You won’t lose any flavor. I love to add chocolate chips or nuts for extra texture. You can mix in half a cup of chocolate chips. Choose dark or semi-sweet for a rich taste. Chopped walnuts or pecans also work well. Just fold them into the batter before baking. This adds a nice crunch to each bite. For a vegan version, swap the eggs and cream cheese. Use flax eggs instead of regular eggs. Mix one tablespoon of ground flaxseed with three tablespoons of water. Let it sit for a few minutes to thicken. For cream cheese, try a vegan cream cheese or blend silken tofu with a bit of lemon juice. This keeps the brownies creamy and delicious without any dairy. To keep your pumpkin cream cheese brownies fresh, place them in an airtight container. Make sure they are completely cool before you cover them. This way, they won’t get soggy. You can store them at room temperature for up to three days. If you want to keep them longer, refrigeration is best. Just remember that cold brownies can lose some of their moistness. Freezing these brownies is simple and a great option for later. First, let the brownies cool completely. Then, cut them into squares. Wrap each square tightly in plastic wrap. After that, place them in a freezer-safe bag or container. They can last in the freezer for up to three months. When you want to enjoy a brownie, just take one out and let it thaw at room temperature. If you want to enjoy your brownies warm, reheating is easy. Preheat your oven to 350°F (175°C). Place the brownies on a baking sheet. Heat them for about 10 minutes. You can also use the microwave. Just heat for 15-20 seconds. Be careful not to overheat them, or they might dry out. Enjoy your warm, gooey brownies! Yes, you can use fresh pumpkin. Start by cooking and mashing the pumpkin. After that, ensure it is smooth and has no excess water. This helps mimic the texture of canned pumpkin. Check the brownies with a toothpick. Insert it into the center. It should come out clean with maybe a few moist crumbs. If there is wet batter, bake them a bit longer. You can use Greek yogurt or silken tofu as a cream cheese substitute. They give a similar creamy texture. Adjust the sweetness if needed, based on your choice. Homemade brownies last about 3-4 days at room temperature. Store them in an airtight container to keep them fresh. You can also refrigerate them for up to a week. Yes, you can prepare these brownies ahead of time. Bake them, then cool completely. Store them in an airtight container. They will taste great for several days. You learned how to make tasty Pumpkin Cream Cheese Brownies. We covered key ingredients, step-by-step instructions, and tips to avoid common mistakes. I shared ways to change the recipe, like making it gluten-free or vegan. These brownies can be stored or frozen for later. Enjoy baking and sharing these treats with family and friends. With these tricks, you’ll master this recipe in no time!

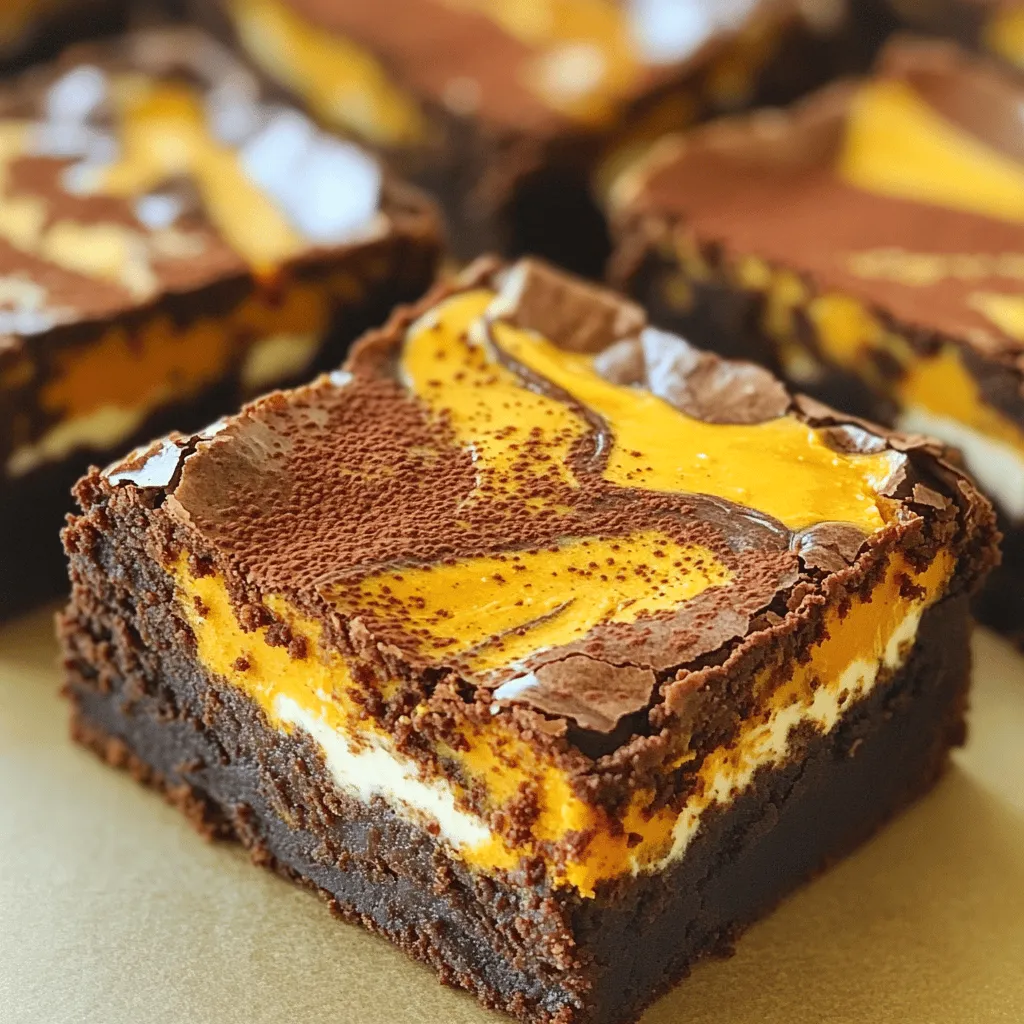
Craving a treat that’s both rich and festive? These Pumpkin Cream Cheese Brownies are your answer! With a soft, moist texture and a delightful cream cheese swirl, they are perfect …

Read more

Categories Desserts

Spicy Garlic Butter Udon Noodles Quick and Tasty Meal

September 16, 2025 by Chef Miles
To make Spicy Garlic Butter Udon Noodles, gather these items: - 300g udon noodles - 4 tablespoons unsalted butter - 5 cloves garlic, minced - 1 teaspoon red pepper flakes - 2 tablespoons soy sauce - 1 tablespoon sesame oil - 1 tablespoon rice vinegar - 1 green onion, thinly sliced - 1/4 cup fresh cilantro, chopped - Salt and freshly ground black pepper - Sesame seeds, for garnish You can swap some ingredients if needed: - Use olive oil instead of unsalted butter for a lighter option. - If you don’t have udon noodles, try using ramen or soba noodles. - For a vegan version, replace butter with vegan butter or margarine. - Instead of soy sauce, use tamari for a gluten-free choice. To ensure your dish tastes great: - Use fresh garlic for the best flavor. - Choose udon noodles that are firm and not overcooked. - Buy fresh herbs like cilantro and green onion; they should look vibrant. - Store ingredients in a cool place to keep them fresh longer. These simple steps will enhance your cooking and make your meal shine. Try to use fresh ingredients whenever you can. Enjoy cooking! To start, bring a large pot of water to a rolling boil. This ensures the noodles cook evenly. Add 300 grams of udon noodles to the boiling water. Cook them according to the package instructions until they are tender but still have a slight bite. This is called al dente. Once cooked, drain the noodles using a colander. Rinse them under cold running water. This step cools the noodles and stops the cooking process, so they don't get mushy. Set the drained noodles aside for later. Next, we need to create the tasty garlic butter sauce. In a large skillet or frying pan, melt 4 tablespoons of unsalted butter over medium heat. Watch closely as it melts and starts to bubble. Once it’s melted, add 5 cloves of minced garlic to the pan. Sauté the garlic for about 1-2 minutes. You want it to smell amazing, but don’t let it brown. Browned garlic can taste bitter, and we don’t want that! Then, it’s time to add some heat. Stir in 1 teaspoon of red pepper flakes. Let them cook with the garlic butter for about 30 seconds. This helps to release their flavor into the butter, making it spicy and fragrant. Now, it’s time to combine everything. Carefully add the drained udon noodles to the skillet. Toss them gently in the garlic butter mixture. Make sure every noodle gets coated well. Keep stirring for about 1-2 minutes. This warms the noodles and spreads the flavor throughout. Next, pour in 2 tablespoons of soy sauce, 1 tablespoon of sesame oil, and 1 tablespoon of rice vinegar over the noodles. Toss everything together thoroughly. Make sure the noodles are evenly coated and heated through. Taste the noodles and adjust the seasoning with salt and freshly ground black pepper if needed. Finally, remove the pan from heat. Gently fold in 1 thinly sliced green onion and 1/4 cup of chopped fresh cilantro. Serve the noodles hot in bowls or on a large platter. Don’t forget to sprinkle sesame seeds on top for a crunchy finish! To get udon noodles just right, start by boiling water. Use a large pot and bring it to a rolling boil. Cook the udon noodles as per the package instructions. Drain them well and rinse under cold water. This stops the cooking process and keeps the noodles firm. Aim for the al dente texture; they should have a slight bite. You can easily add more flavor to your udon noodles. Consider adding: - Sliced bell peppers - Shredded carrots - Mushrooms - Snow peas These veggies bring color and crunch. You can also try adding protein, like chicken or tofu, for a heartier meal. A squeeze of lime just before serving brightens the dish. When making spicy garlic butter udon noodles, avoid these common errors: - Overcooking the Noodles: This makes them mushy. Stick to the time on the package. - Burning the Garlic: Keep an eye on the garlic as it cooks. It should be fragrant, not brown. - Not Tossing Enough: Ensure all noodles get coated with the garlic butter. Toss them well for the best flavor. - Skipping the Rinse: Don’t forget to rinse the noodles. This keeps them from sticking together. By following these tips, you can whip up a delicious meal that impresses! {{image_4}} You can easily make this dish vegetarian or vegan. Simply swap the butter for plant-based butter. For a vegan option, ensure your soy sauce is gluten-free. You can also add more veggies. Try bell peppers, broccoli, or snap peas. These will add color and crunch. They also boost nutrition. Cook the veggies in the garlic butter before adding the noodles. This way, they soak up the flavor. Want to add protein? Tofu works great in this recipe. Use firm tofu, cut into cubes. Sauté it until golden brown before adding the noodles. If you like chicken, use boneless chicken breast. Cook it in the garlic butter until it’s no longer pink. Shrimp is another tasty option. Add peeled shrimp to the pan and cook until they turn pink. Each of these proteins makes the dish heartier and more filling. You can adjust the spice level to suit your taste. If you prefer milder flavors, reduce the red pepper flakes. You could start with just half a teaspoon. For a little more heat, add more flakes or even some chili paste. You can also serve chili oil on the side for those who like it hot. This way, everyone can enjoy their meal just how they like it! To keep your Spicy Garlic Butter Udon Noodles fresh, store them in a container. Make sure the container is airtight. Place the noodles in the fridge if you plan to eat them within a few days. They will last about 3 to 5 days this way. If you want to keep them longer, consider freezing them. When you’re ready to enjoy your leftovers, reheat them in a pan. Add a splash of water or broth to keep them moist. Heat them over medium-low heat. Stir gently until warmed through. You can also use the microwave. Just cover them with a damp paper towel and heat for 1 to 2 minutes, checking often. If you want to freeze your udon noodles, cool them completely first. Place them in a freezer-safe bag or container. Remove as much air as possible before sealing. You can freeze them for up to 2 months. When ready to eat, thaw them in the fridge overnight before reheating. This way, they will taste fresh and delicious! Yes, you can use other noodles. If you can't find udon, try rice noodles or soba. Just be sure to adjust cooking times. Each type has its own texture and flavor. For example, soba noodles are thinner and have a nutty taste. Rice noodles can be softer and lighter. Experiment to find what you like best! To reduce the heat, simply cut back on red pepper flakes. You can start with half a teaspoon. You might also add more butter or soy sauce to balance the spice. Another option is to mix in a dollop of sour cream or yogurt. This will cool down the dish while adding creaminess. These noodles are great on their own, but you can add sides. Try serving them with a simple salad or steamed veggies. Grilled chicken, shrimp, or tofu also pair well for a full meal. For a crunchy touch, some pickled vegetables work nicely too. Enjoy mixing and matching! In this blog post, we explored the key ingredients for Spicy Garlic Butter Udon Noodles. We discussed swaps for ingredients, tips for freshness, and how to prepare and combine the noodles with sauce. I shared ways to get the perfect texture and enhance flavor, plus common mistakes to avoid. You can also try various adaptations, from vegetarian options to protein choices. Finally, we covered storage and reheating tips. Remember, enjoy the cooking process and have fun experimenting with flavors and textures!

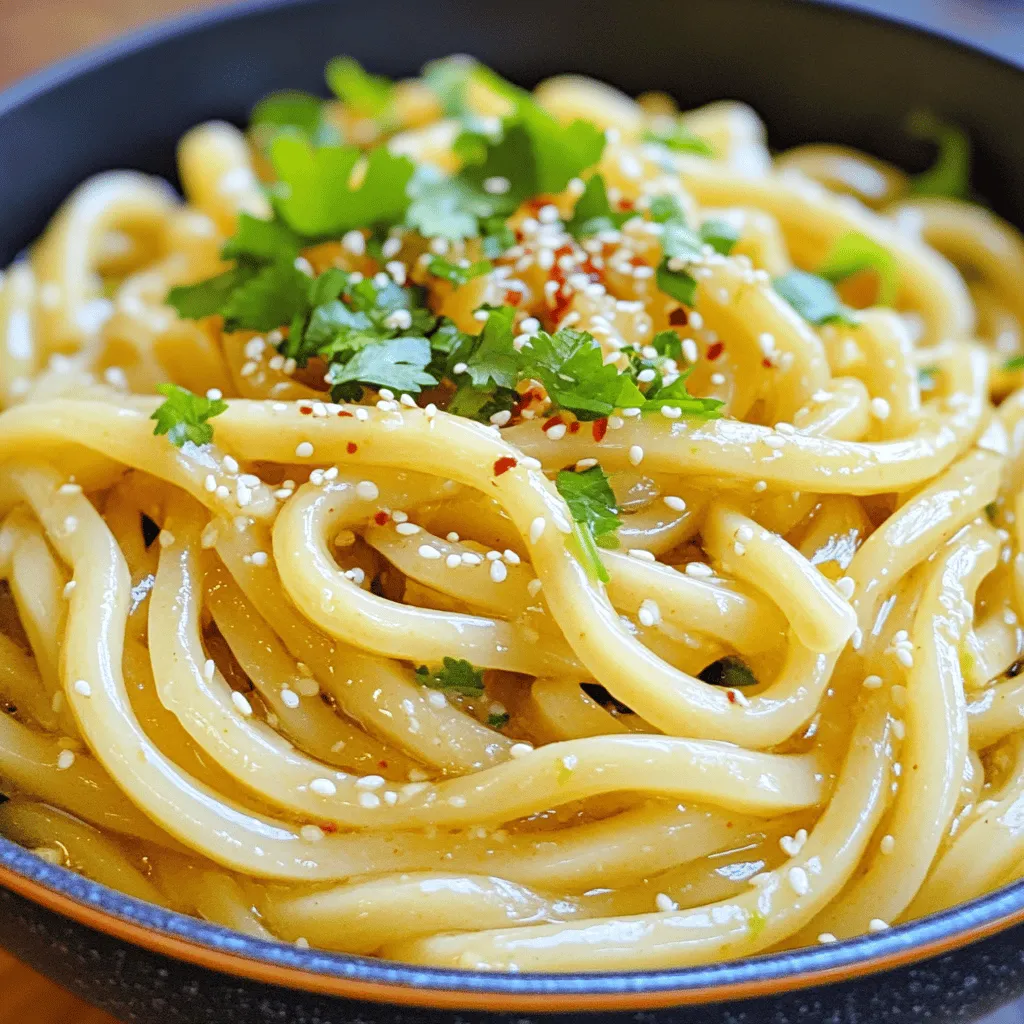
Craving a meal that’s quick, tasty, and full of flavor? Look no further! These Spicy Garlic Butter Udon Noodles will satisfy your hunger and awaken your taste buds. With just …

Read more

Categories Dinner

Maple Glazed Donut Holes Irresistible Sweet Treat

September 16, 2025 by Chef Miles
- 1 cup all-purpose flour - 1/4 cup granulated sugar - 1 teaspoon baking powder - 1/2 teaspoon baking soda - 1/4 teaspoon salt - 1/2 teaspoon ground cinnamon - 1/4 teaspoon nutmeg - 1/2 cup buttermilk (or milk mixed with 1/2 tablespoon vinegar) - 1 large egg - 2 tablespoons unsalted butter, melted - 1 cup powdered sugar - 3 tablespoons pure maple syrup - 1/4 teaspoon vanilla extract These ingredients create the perfect balance for maple glazed donut holes. The dry mix combines flour, sugar, and spices to build flavor and texture. Baking powder and soda help the holes rise. The buttermilk adds moisture and a slight tang, which pairs well with the sweet glaze. Using butter adds richness while the egg binds everything together. The glaze, made with maple syrup and powdered sugar, brings a sweet finish. This combo makes each bite a delightful treat. Make sure to gather your ingredients before you start. This will help you stay organized and make the process smooth. Happy baking! First, preheat your oven to 350°F (175°C). This temperature will help the donut holes rise well. Next, grease a mini muffin tin or a donut hole pan. You can use cooking spray or butter. This step helps the donut holes pop out easily after baking. Start by combining the dry ingredients. In a large bowl, sift together: - 1 cup all-purpose flour - 1/4 cup granulated sugar - 1 teaspoon baking powder - 1/2 teaspoon baking soda - 1/4 teaspoon salt - 1/2 teaspoon ground cinnamon - 1/4 teaspoon nutmeg Whisk these ingredients together well. This ensures that the leavening agents and spices mix evenly. Next, mix the wet ingredients. In a separate bowl, whisk together: - 1/2 cup buttermilk (or milk mixed with 1/2 tablespoon vinegar) - 1 large egg - 2 tablespoons unsalted butter, melted Make sure these are smooth and well combined. Now, pour the wet mixture into the bowl with the dry ingredients. Gently stir with a spatula. Be careful not to overmix. It’s okay if a few lumps remain. Using a small spoon or cookie scoop, fill each muffin tin cavity about 3/4 full with batter. This gives enough room for the donut holes to rise. Place the tin in the oven and bake for 10-12 minutes. They are ready when the tops turn golden brown. A toothpick should come out clean when inserted in the center. After baking, let them cool in the pan for about 5 minutes. Then, transfer them to a wire rack to cool completely. While the donut holes cool, prepare the glaze. In a small bowl, whisk together: - 1 cup powdered sugar - 3 tablespoons pure maple syrup - 1/4 teaspoon vanilla extract Keep whisking until the mixture is smooth and glossy. Once the donut holes are cool, dip each one into the glaze. Let any excess glaze drip off before placing them back on the wire rack to set. Enjoy the sweet and rich flavor of these maple glazed donut holes! To make perfect donut holes, follow these tips: - Avoid overmixing batter: Mix until just combined. A few lumps are okay. This keeps the donut holes light and fluffy. - Ensure even cooking by not overfilling muffin tins: Fill each cavity about three-quarters full. This allows them to rise without spilling over. Getting the glaze right is key to a great finish. Here’s how: - Tips for a smooth glaze application: Make sure the donut holes are cool before glazing. Dip each hole in the glaze, letting the excess drip off. - How to achieve a glossy finish: Whisk the glaze until smooth. Use pure maple syrup for a rich flavor and sheen. A beautiful presentation makes your treats even more inviting. Try these ideas: - Arranging on a platter: Place donut holes on a decorative platter. Group them in clusters for a more appealing look. - Garnishing ideas: Sprinkle chopped nuts or a dusting of powdered sugar on top. This adds color and texture to your sweet display. {{image_4}} You can customize your donut holes easily. Add chocolate chips for a sweet twist. Dried fruit adds a chewy texture. You can also switch spices. Try cardamom instead of cinnamon for a warm flavor. Each change gives a new taste! The glaze is where you can get creative. Try a vanilla glaze for a classic taste. A chocolate glaze offers a rich flavor. If you want to use different sweeteners, honey or agave syrup work well. Each option changes the flavor while keeping that sweet touch. Donut holes pair perfectly with coffee or tea. The warmth of coffee complements the sweetness. For events, stack them on a tiered stand for a fun look. You can also serve them with a small bowl of extra glaze for dipping. These options make your dessert stand out! To store your leftover donut holes, use an airtight container. This keeps them fresh. Place a paper towel at the bottom of the container. This absorbs any moisture. You can store them at room temperature for up to two days. For longer storage, move them to the fridge for up to a week. When you're ready to enjoy your donut holes again, heat them up for best taste. You can use the microwave for quick reheating. Place them on a microwave-safe plate and cover with a damp paper towel. Heat for about 10-15 seconds. This keeps them soft. If you want a crisp outside, use an oven. Preheat your oven to 350°F (175°C). Place them on a baking sheet and heat for about 5 minutes. Enjoy the freshness! Yes, you can use regular milk. Mix 1/2 cup of milk with 1/2 tablespoon of vinegar. Let this sit for about 5 minutes. It will mimic buttermilk's tangy flavor and help the donut holes rise well. These donut holes stay fresh for about 2 to 3 days when stored properly. Keep them in an airtight container at room temperature. This helps maintain their soft texture and sweet flavor. Yes, you can freeze these donut holes. Place them in a single layer on a baking sheet. Freeze until solid, then transfer them to a freezer-safe bag. They can last up to 3 months. To thaw, leave them at room temperature for a few hours. Now you know how to make delicious donut holes from scratch. We covered the main ingredients, step-by-step instructions, and useful tips. Remember, avoid overmixing and get creative with flavors and glazes. These donut holes are great for any occasion, from breakfast to parties. Store leftovers properly to keep them fresh. Enjoy sharing your tasty treats with family and friends! You’ll impress everyone with your baking skills and warm flavors. Happy baking!

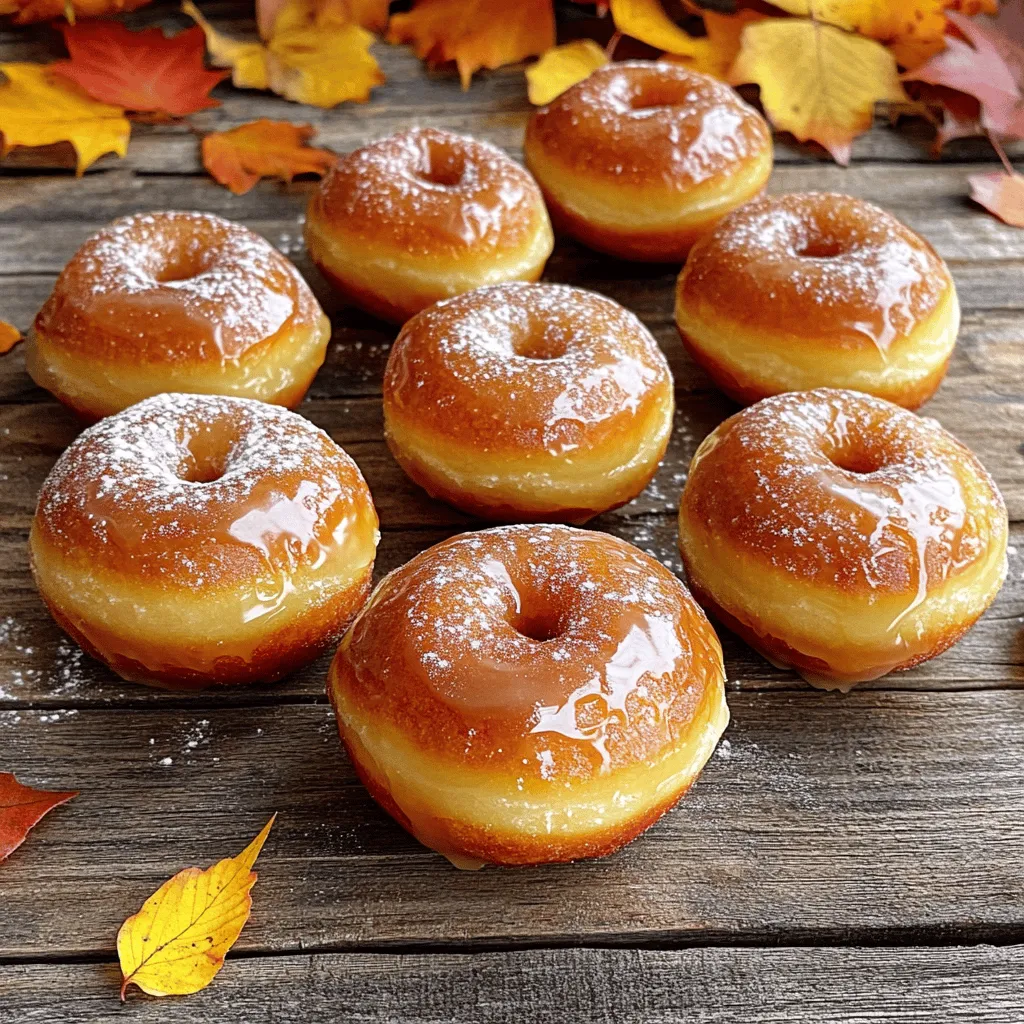
If you’re craving a sweet treat that melts in your mouth, you’ve found it! These maple glazed donut holes are soft, fluffy, and bursting with rich maple flavor. Made with …

Read more

Categories Desserts
Older posts
Newer posts
← Previous Page1 … Page22 Page23 Page24 … Page112 Next →

MELTED RECIPES

where delicious ideas melt into life, from stovetop to backyard. Always warm, simple, and irresistibly satisfying. 🍳🔥🧀

PAGES

Home About Contact Privacy Policy Terms & Conditions Cookie Policy GDPR Policy Copyright Policy Disclaimer

CATEGORIES

Appetizers Desserts Salads Breakfast Dinner

Contact

  • Pinterest
  • Mail
Copyright © 2025 Melted Recipes. All rights reserved.