Skip to content
Melted Recipes
  • Home
  • Appetizers
  • Desserts
  • Salads
  • Breakfast
  • Dinner
  • Privacy Policy
  • Contact
  • About

Chef Miles

Caramel Pecan Cheesecake Brownie Bars Delightful Treat

September 21, 2025 by Chef Miles
- 1 cup unsalted butter, melted - 2 cups granulated sugar - 4 large eggs - 1 teaspoon vanilla extract - 1 cup all-purpose flour - 1 cup unsweetened cocoa powder - 1/2 teaspoon salt - 16 oz cream cheese, softened - 1 cup powdered sugar - 2 large eggs - 1 teaspoon vanilla extract - 1 cup pecans, coarsely chopped - 1 cup caramel sauce Each ingredient plays a big role in the flavor and texture of these bars. The melted butter adds richness. Sugar gives sweetness, and eggs provide structure. Cocoa powder brings that deep chocolate taste. For the cheesecake layer, cream cheese is key. It gives a smooth, creamy texture. Powdered sugar helps sweeten it without being gritty. The eggs set the cheesecake, keeping it firm yet soft. The topping is where the magic happens. Chopped pecans add crunch and a nutty flavor. Caramel sauce gives sweetness and a sticky finish. You can use store-bought or homemade caramel, depending on your time and taste. These ingredients work together to create a delightful treat that’s sure to impress. Each layer adds something special, and the combination is simply irresistible. - Preheat the oven to 350°F (175°C) - Grease or line a 9x13 inch baking pan First, I set my oven to 350°F. This step warms the oven so the treats bake evenly. I like to grease my baking pan or use parchment paper. The parchment helps me lift the bars out easily later. - Combine melted butter and sugar, add eggs and vanilla - Mix in dry ingredients and pour into the pan Next, I mix melted butter and sugar in a bowl. I whisk until smooth and glossy. Then, I add eggs one by one, mixing well each time. I pour in vanilla for extra flavor. After that, I sift in flour, cocoa powder, and salt. I fold these dry ingredients into the wet mix gently. I want the batter thick but well combined. Finally, I pour the brownie base into the prepared pan, spreading it out evenly. - Cream the softened cream cheese, add powdered sugar and eggs - Spread cheesecake mixture over the brownie base Now, I move to the cheesecake layer. In a clean bowl, I beat softened cream cheese until creamy. I add powdered sugar slowly, mixing until fluffy. Then, I add eggs one at a time, followed by vanilla. I mix just until smooth. I carefully pour this cheesecake mixture over the brownie base, spreading it evenly. - Sprinkle pecans and drizzle caramel sauce over the cheesecake layer - Swirl caramel into the cheesecake for effect Once the cheesecake layer is set, I sprinkle chopped pecans on top. Then, I drizzle warm caramel sauce over the pecans. To make it pretty, I use a knife to swirl the caramel into the cheesecake. This step adds a nice design and extra flavor. - Bake for initial 30-35 minutes, check for doneness - Cool, then bake for an additional 5-10 minutes - Chill in the refrigerator for at least 2 hours before serving I bake the bars for 30-35 minutes. I check if the cheesecake is set with a slight jiggle in the center. When done, I let the pan cool for about 10 minutes. I return it to the oven for another 5-10 minutes. This warms the pecans and caramel. After cooling completely, I chill the bars in the fridge for at least 2 hours. This helps them set nicely for slicing. - Avoid overmixing the brownie batter: Mix just until combined. This keeps the brownies soft and fudgy. Overmixing can make them dry. - Use high-quality cocoa powder for rich flavor: A good cocoa powder adds depth. Look for a brand that is labeled "Dutch-process" or "natural" for the best taste. - Ensure cream cheese is at room temperature for easy mixing: This helps it blend smoothly. Cold cream cheese can lead to lumps in your cheesecake. - Don't overmix after adding eggs to prevent cracking: Mix just until the eggs are combined. Overmixing adds air, which can cause cracks as it bakes. - Use homemade caramel sauce for a fresh taste: Making caramel at home adds a special touch. It is easy and tastes amazing. - Toast pecans for enhanced flavor: Toasting brings out the nuts' natural oils. Just a few minutes in the oven makes a big difference. {{image_4}} You can make your cheesecake more exciting. Add chocolate chips to the cream cheese mixture for extra sweetness. This gives a nice burst of chocolate in every bite. You can also incorporate flavors like almond or coffee into the cheesecake. A splash of almond extract or a bit of brewed coffee adds depth. These small changes can change the whole taste. If you want a lighter treat, you can substitute butter with coconut oil. This change keeps the bars moist while adding a hint of coconut flavor. You can also use a sugar alternative, like stevia or monk fruit, for a healthier version. It helps reduce calories without losing taste. You can swap pecans with walnuts or almonds for a nutty twist. Each nut brings its own flavor and texture. Drizzling with chocolate sauce instead of caramel is another fun option. It gives the bars a rich chocolatey finish that many will love. Feel free to mix and match these ideas to create your perfect dessert! To keep your Caramel Pecan Cheesecake Brownie Bars fresh, store them in an airtight container in the refrigerator. This helps to seal in all the yummy flavors. If you want to save some for later, you can freeze them for up to 2 months. Just make sure to wrap them well in plastic wrap before putting them in a freezer bag. If you freeze your bars, thaw them overnight in the refrigerator. This way, they will be ready to eat when you want them. You can serve them at room temperature. For a warm treat, heat them slightly in the microwave. Just be careful not to overheat; we want them soft, not melted! These bars taste amazing with a scoop of ice cream on the side. The cold ice cream pairs perfectly with the sweet, rich flavors of the bars. You can also garnish them with whipped cream and sprinkle some extra pecans on top. This adds a nice touch and makes them look extra special! You can store these bars in an airtight container. Keep them in the fridge for about one week. If you want to keep them longer, you can freeze them. They will stay fresh for up to two months in the freezer. Just make sure to wrap them well. Yes, you can make these bars ahead of time! Bake them, let them cool, and then chill in the fridge. Chilling will help the flavors blend and set the layers well. You can enjoy them the next day or even a few days later. If you overbake the brownies, they can become dry and crumbly. The texture will change from soft and fudgy to hard and tough. This can make enjoying the bars a bit less fun. Keep an eye on them while baking. You want a slight jiggle in the cheesecake layer when you take them out. In this post, we covered how to make Caramel Pecan Cheesecake Brownie Bars. We looked at the ingredients, like butter, cream cheese, and pecans. You learned step-by-step instructions to bake these treats. I shared helpful tips for the best texture and flavor. These bars are fun to make and delicious to eat. Try different variations or toppings to make them your own. Enjoy baking, and don’t forget to share with friends!

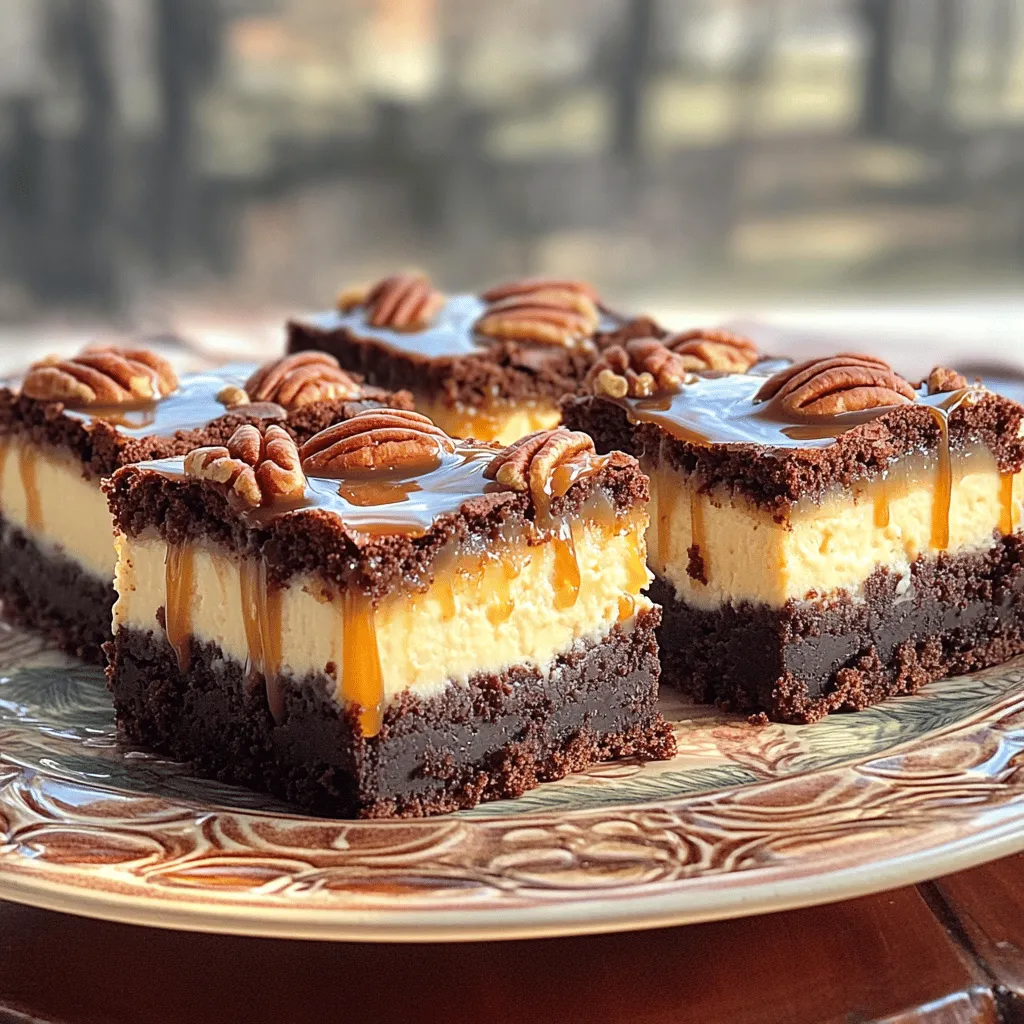
Looking for a dessert that will wow your friends and family? Try these Caramel Pecan Cheesecake Brownie Bars! They combine rich, fudgy brownies with a creamy cheesecake layer and a …

Read more

Categories Desserts

Slow Cooker Honey Garlic Chicken Thighs Delicious Meal

September 21, 2025 by Chef Miles
- 6 bone-in, skin-on chicken thighs - 1/2 cup honey - 1/4 cup low-sodium soy sauce - 4 cloves garlic, minced - 1 tablespoon fresh ginger, finely grated - 2 tablespoons rice vinegar - 1 tablespoon sesame oil - 1 teaspoon ground black pepper - 1 teaspoon salt - 1 tablespoon cornstarch (optional) - 2 green onions, thinly sliced (for garnish) - Toasted sesame seeds (for garnish) Using the right ingredients makes this dish shine. The chicken thighs give a rich flavor. The honey adds sweetness, while the soy sauce gives depth. Garlic and ginger bring a nice zest. Rice vinegar adds a bit of tang. Sesame oil lends a nutty touch. Black pepper and salt round out the flavors. If you want a thicker sauce, use cornstarch. Don't forget garnish! Green onions and sesame seeds make a pretty finish. Each part of the dish works together to create a meal you will love. To start, grab a medium bowl. Add in 1/2 cup honey, 1/4 cup low-sodium soy sauce, and 4 minced garlic cloves. Next, add 1 tablespoon of fresh ginger and 2 tablespoons of rice vinegar. Pour in 1 tablespoon of sesame oil, then sprinkle 1 teaspoon of ground black pepper and 1 teaspoon of salt. Use a whisk to mix everything well. Whisk until it becomes smooth. This ensures that all the flavors blend together nicely. Now, take 6 bone-in, skin-on chicken thighs and place them in the slow cooker. Be sure to arrange them skin-side up. Pour the marinade over the chicken. Make sure to cover each piece fully. This step is key because it helps the chicken soak up all the tasty flavors. Cover your slow cooker with its lid. You can cook the chicken on low for 6 to 7 hours or on high for 3 to 4 hours. I recommend using the low setting for tender chicken. To check if the chicken is done, use a meat thermometer. The chicken should reach an internal temperature of 165°F (75°C). This ensures it is safe to eat and perfectly cooked. If you want a thicker sauce, carefully take the chicken out once it’s done. Place it on a plate. Pour the leftover sauce into a small saucepan. Heat it over medium heat until it boils gently. In a separate bowl, mix 1 tablespoon of cornstarch with 2 tablespoons of cold water until smooth. Slowly whisk this into the boiling sauce. Keep stirring until it thickens to your liking. You can return the chicken to the slow cooker to soak up the thickened sauce. Alternatively, serve the chicken right away. Drizzle the sauce over each piece on the plate. For a nice touch, sprinkle sliced green onions and toasted sesame seeds on top. This adds color and flavor to your dish. Serve it over fluffy jasmine rice or alongside steamed broccoli for a complete meal. Using a slow cooker for chicken is simple. Here are some best practices: - Choose bone-in, skin-on chicken thighs for extra flavor. The bones add depth, and the skin keeps the meat moist. - Avoid overcrowding the slow cooker. Leave space for heat to circulate. This ensures even cooking. - Cook on low for best results. This method lets the flavors meld beautifully. To enhance flavor, marinate the chicken thighs. Let them soak in the marinade for at least 30 minutes or overnight if time allows. This step infuses the chicken with rich honey garlic notes. You can add herbs and spices to elevate the dish: - Fresh herbs like thyme or cilantro work well. Add them right before serving for a fresh taste. - Chili flakes can spice things up. Start with a pinch and adjust based on your heat preference. Adjust the sweetness or saltiness to suit your taste. If you like it sweeter, add more honey. For saltiness, a splash of soy sauce can help. When it comes to serving, think about great pairings: - Serve these chicken thighs over fluffy jasmine rice. The rice soaks up the yummy sauce. - Steamed broccoli adds a vibrant, healthy touch. The green color contrasts well with the dish. For garnishing, sprinkle sliced green onions and toasted sesame seeds on top. This not only adds flavor but also makes the plate look more inviting. A well-presented dish is always more enjoyable! {{image_4}} If you want to change the flavor, try using maple syrup instead of honey. This swap gives a rich taste. You can also use agave nectar for a different sweet note. For soy sauce, consider tamari if you need a gluten-free option. It has a similar taste, keeping the dish flavorful. Coconut aminos is another great choice. It’s slightly sweeter and less salty, which many people enjoy. You can make this dish in an Instant Pot if you’re short on time. Pressure cooking takes about 10 minutes. Just follow the same marinade steps, then seal the pot and cook on high for 10 minutes, then let the steam release naturally. Oven-baking is also a simple method. Preheat your oven to 375°F (190°C). Place the marinated chicken in a baking dish, cover it with foil, and bake for 45 minutes. Remove the foil to let the skin crisp up for the last 15 minutes. If you love heat, add a pinch of chili flakes to the marinade. This kick will balance the sweetness of honey. You can also throw in some red pepper flakes if you want extra spice. For a bright twist, consider adding fresh lemon juice or zest. The citrus adds zest and freshness. Lime juice works well too, giving a different layer of flavor that brightens the dish. Store any leftovers in an airtight container. This keeps the chicken fresh. You can enjoy it for up to three days in the fridge. If you want to save some for later, make sure it cools down first. Then, seal it well. To freeze the cooked chicken thighs, let them cool completely. Place them in freezer bags or containers. Try to remove as much air as you can. They will stay good for about three months. When you're ready to eat, thaw the chicken overnight in the fridge. To reheat, place the chicken in the oven at 350°F (175°C) for 20-25 minutes. This helps keep it juicy and tasty. You can also use the microwave. Just make sure to cover it to keep moisture in. You can easily add this dish to your weekly meals. Serve it with rice or veggies for a quick lunch. You can also shred the leftover chicken. Use it in tacos, salads, or sandwiches. It makes a great filling for wraps too. Think about mixing the chicken with some sautéed veggies for a stir-fry. The sweet and savory flavor works well in many dishes. Use your creativity to enjoy your leftovers in new ways! Yes, you can use boneless chicken thighs. They cook faster than bone-in thighs. If you use boneless thighs, reduce the cooking time. Cook on low for about 4 to 5 hours or on high for 2 to 3 hours. This change helps keep your chicken tender and juicy. To add some heat, you have a few options. First, mix in red pepper flakes when you make the sauce. You can also use a spicy sauce like sriracha. If you want more flavor, add fresh chopped chili peppers. These options let you control the spice level to fit your taste. Honey garlic chicken pairs well with many sides. Serve it over fluffy jasmine rice or brown rice for a filling meal. Steamed broccoli or green beans add a nice crunch and color. You can also try a simple salad for freshness. These sides enhance the dish while keeping it balanced. Use a meat thermometer to check the chicken's doneness. The internal temperature should reach 165°F (75°C). This ensures the chicken is safe to eat. Insert the thermometer into the thickest part of the thigh for the best reading. Trust the thermometer for perfectly cooked chicken every time. Yes, you can use apple cider or white vinegar instead of rice vinegar. Each type gives a unique flavor. Apple cider vinegar adds a fruity note, while white vinegar is sharper. Adjust your other seasonings based on the vinegar you choose. This helps keep the balance of flavors just right. You now have a complete guide to making honey garlic chicken thighs. We covered ingredients, cooking methods, and even tips for storing leftovers. You can adjust the recipe to your taste or cooking style. Experiment with different flavors or cooking methods as you see fit. Enjoy this tasty dish with sides like jasmine rice or steamed broccoli. With practice, you'll become a pro at this recipe. Most importantly, have fun while cooking!

Are you ready to elevate your dinner game? Slow Cooker Honey Garlic Chicken Thighs are the perfect choice! This dish combines tender, juicy chicken with a sweet and savory sauce …

Read more

Categories Dinner

Cinnamon Sugar Maple Glazed Donut Holes Delight

September 19, 2025 by Chef Miles
- 2 cups all-purpose flour - 1/3 cup granulated sugar - 2 teaspoons baking powder - 1/2 teaspoon ground cinnamon - 1/4 cup unsalted butter, melted - 1 large egg - 3/4 cup milk - 1 teaspoon pure vanilla extract - 1/2 cup pure maple syrup - 1/4 cup powdered sugar - Additional granulated sugar and ground cinnamon for coating - Flour alternatives: You can use whole wheat flour or almond flour if needed. - Sweeteners variations: Swap granulated sugar with brown sugar or coconut sugar for a richer flavor. - Dairy-free options: Use almond milk or oat milk in place of regular milk. Substitute the butter with coconut oil or a dairy-free spread. These ingredients come together to create a delightful treat. Each one plays an important role in flavor and texture. The all-purpose flour gives structure, while the butter adds richness. The egg helps bind the dough, and the maple syrup lends a sweet, warm taste. If you can’t find a specific item, try using one of the substitutions mentioned above. This way, you can still enjoy these tasty cinnamon sugar maple glazed donut holes! Set your oven to 350°F (175°C). Grab a mini muffin pan or a donut hole pan. Lightly grease it with cooking spray. This step helps the donut holes pop out easily after baking. In a large bowl, combine the following dry items: - 2 cups all-purpose flour - 1/3 cup granulated sugar - 2 teaspoons baking powder - 1/2 teaspoon salt - 1/2 teaspoon ground cinnamon - 1/4 teaspoon nutmeg Whisk these together well. Proper mixing gives your donut holes a nice uniform texture. Whisking is key! It adds air and makes your batter lighter. In another bowl, mix: - 1/4 cup unsalted butter, melted and slightly cooled - 1 large egg, at room temperature - 3/4 cup milk, at room temperature - 1 teaspoon pure vanilla extract - 1/2 cup pure maple syrup Whisk until smooth. Make sure your butter cools a bit before adding eggs. This avoids cooking them. Room temperature helps mix better too! Slowly pour the wet mix into the dry mix. Use a spatula or wooden spoon to stir gently. Stop when just combined. A few lumps are okay! Overmixing makes tough donut holes. Now, fill each pan cavity about two-thirds full. You can use a spoon or a piping bag for this. A piping bag gives you more control. Put the filled pan in your preheated oven. Bake for about 10-12 minutes. They should turn lightly golden. Use a toothpick to check doneness. It should come out clean. While baking, whisk together: - 1/2 cup pure maple syrup - 1/4 cup powdered sugar Mix until smooth. This glaze adds a sweet touch. For the cinnamon sugar coating, mix: - 1/4 cup granulated sugar - 1 teaspoon ground cinnamon Once the donut holes cool for about 5 minutes, roll them in the cinnamon sugar. This creates a delicious outer layer. Drizzle the maple glaze over the top for extra sweetness. Enjoy the delightful flavors! To make the best donut holes, avoid overmixing your batter. Mix it just until you see no dry flour. This keeps your donut holes soft. Use room temperature ingredients for better mixing. Cold ingredients can lead to lumpy batter. Let your eggs and milk sit out for 30 minutes before you start. Store your donut holes in an airtight container. This keeps them fresh for up to three days. If you want to keep them longer, freeze them. To freeze, place them in a single layer on a baking sheet first. Once frozen, move them to a freezer bag. When you're ready to eat, reheat in an oven at 350°F for 5-7 minutes. This warms them without making them soggy. Make your donut holes look great! Arrange them on a decorative plate or a tiered stand. This catches the eye and makes them look fancy. You can also sprinkle a little extra cinnamon on top for a professional touch. A drizzle of maple glaze adds even more appeal and sweetness. {{image_4}} You can make these donut holes even more special. Try adding spices like nutmeg or pumpkin spice for a warm twist. These spices enhance the sweetness and bring a cozy feel. You can also incorporate citrus zest, like orange or lemon. This adds a fresh note that brightens the flavor. Want a healthier treat? You can reduce the sugar in the recipe. This makes the donut holes less sweet but still tasty. Another option is to use whole wheat flour. It adds fiber and a nutty flavor, making your donut holes a bit more wholesome. Switch up the glaze for new tastes. A chocolate glaze can add a rich, decadent touch. To make it, simply melt chocolate with a bit of cream. For something unique, try a maple-bourbon glaze. Mix maple syrup with a splash of bourbon for a bold flavor that pairs well with the donuts. To keep your Cinnamon Sugar Maple Glazed Donut Holes fresh for a few days, follow these tips: - Allow the donut holes to cool completely after baking. - Place them in an airtight container. - Store at room temperature for up to three days. - If you live in a humid area, consider refrigerating them to prevent sogginess. For long-term storage, freezing is a great option. Here’s how to do it: - Let the donut holes cool completely. - Arrange them in a single layer on a baking sheet. - Freeze them for about two hours until solid. - Transfer the frozen donut holes to a freezer-safe bag or container. - Label with the date and freeze for up to three months. To thaw and reheat your donut holes: - Remove the desired amount from the freezer. - Let them sit at room temperature for about 30 minutes. - For a warm treat, reheat in the oven at 350°F (175°C) for 5-7 minutes. - Enjoy them with fresh glaze or cinnamon sugar! To keep your donut holes light, focus on a few key tips: - Use room temperature ingredients. Warm eggs and milk mix better. - Don't overmix the batter. Stir until just combined. A few lumps are okay. - Bake at the right temperature. Set your oven to 350°F (175°C). - Fill the pan correctly. Only fill each cavity two-thirds full. This allows room to rise. Yes! You can prep these donut holes in advance: - Make the batter ahead. Store it in the fridge for a few hours. - Bake ahead of time. Keep them in an airtight container for up to two days. - Glaze just before serving. This keeps the donut holes fresh and tasty. You can find these delightful treats at many places: - Local bakeries. Check for shops that specialize in donuts. - Farmers markets. Some vendors sell homemade treats. - Grocery stores. Look in the bakery section for fresh options. You can use a muffin pan, but here are some points to consider: - Pros: A muffin pan is easier to find and use. - Cons: Donut holes may be larger and less round. - Baking time may vary. Keep an eye on them as they bake. Adjust the time if needed. You learned how to create delightful cinnamon sugar maple donut holes. We covered the main ingredients, alternatives, and step-by-step instructions for baking. You now have tips for perfect texture, storage, and presentation. Remember to experiment with flavors and glazes for variety. Whether you want a sweet treat or a healthier twist, this recipe fits the bill. Enjoy your baking adventure and delight your taste buds with these delicious donut holes!

Are you ready to fall in love with a sweet treat? My Cinnamon Sugar Maple Glazed Donut Holes are soft, fluffy, and coated in a warm, sugary goodness. They make …

Read more

Categories Desserts

Carrot Cake with Cream Cheese Frosting Bakery Style Delight

September 19, 2025 by Chef Miles
- 2 cups all-purpose flour - 2 cups granulated sugar - 1 teaspoon baking powder - 1 teaspoon baking soda - 1/2 teaspoon salt - 1 teaspoon ground cinnamon - 1/2 teaspoon ground nutmeg - 4 large eggs - 1 cup vegetable oil - 2 cups finely grated carrots - 1 cup crushed pineapple, well-drained - 1/2 cup chopped walnuts or pecans - 1/2 cup raisins - 8 oz cream cheese, softened - 1/2 cup unsalted butter, softened - 4 cups powdered sugar, sifted - 1 teaspoon vanilla extract Gathering the right ingredients is key. I love how the dry ingredients form the cake's structure. Flour, sugar, baking powder, and baking soda give the cake its lift and sweetness. The spices add warmth and depth. Ground cinnamon and nutmeg create that cozy flavor we all love. Next, the wet ingredients bring the cake to life. Eggs and vegetable oil add moisture and richness. Grated carrots give the cake its signature texture and sweetness. The crushed pineapple adds a burst of fruity flavor that keeps the cake moist. If you want to add more texture, consider the optional add-ins. Walnuts or pecans add crunch, while raisins lend a chewy sweetness. You can mix and match based on your taste. Lastly, the cream cheese frosting is a game-changer. The soft cream cheese and butter blend together to create a smooth and creamy topping. Sifting the powdered sugar helps it blend perfectly. The vanilla extract rounds out the flavor, making it irresistible. With these ingredients, you set the stage for a delicious and stunning carrot cake. Enjoy the process of preparing these elements, as they all work together to create pure delight. - Preheat your oven to 350°F (175°C). - Grease two 9-inch round cake pans with butter or oil. Dust them with flour to help the cake come out easily. - In a large bowl, mix the dry ingredients. Combine the flour, sugar, baking powder, baking soda, salt, cinnamon, and nutmeg. Whisk them well until blended. - In a separate bowl, crack the eggs and beat them until mixed. Slowly whisk in the vegetable oil until fully combined. - Pour the wet mixture into the dry ingredients. Use a spatula to mix gently. Be careful not to overmix; this keeps the cake tender. - Fold in the finely grated carrots and the drained crushed pineapple. If you like, add chopped walnuts and raisins too. Mix gently to ensure everything is evenly spread in the batter. - Divide the batter evenly between the two prepared pans. - Bake in the preheated oven for 25-30 minutes. Check for doneness by inserting a toothpick in the center; it should come out clean. - Let the cakes cool in the pans for about 10 minutes. Then, transfer them to a wire rack to cool completely. This step is key to avoid steaming. - While the cakes cool, prepare the frosting. In a mixing bowl, beat the softened cream cheese and butter together until smooth. - Gradually add the sifted powdered sugar and vanilla extract. Mix on low speed until just combined. Then, increase to medium speed and beat until fluffy and smooth. - Once the cakes are cool, place one layer on a serving plate. Spread a generous layer of cream cheese frosting on top. - Carefully place the second cake layer on top. Frost the top and sides of the entire cake with the remaining frosting. - For a lovely finish, consider garnishing with extra chopped nuts, grated carrot, or a light dusting of cinnamon. This adds a nice touch to your cake. - Avoiding overmixing: Mix your batter gently. When you combine wet and dry ingredients, stop as soon as they blend. Overmixing makes the cake dense and tough. You want a light, fluffy cake. - Checking doneness: Insert a toothpick into the center of the cake. If it comes out clean, your cake is ready. If not, bake a bit longer. Keep an eye on the time too. It usually takes between 25 and 30 minutes. - Ensuring smooth consistency: Start with room-temperature cream cheese and butter. Beat them together until creamy. This step helps you avoid lumps. Gradually add powdered sugar. This keeps the frosting smooth and fluffy. - Tips for spreading evenly: Use an offset spatula for frosting. This tool helps you spread evenly and smoothly. Apply a thick layer between cake layers and on the top. For the sides, use a light touch. - Decorative cake stand suggestions: Choose a stand that matches your kitchen style. A white stand makes the colors pop. A wooden stand adds warmth. Place the cake in the center for the best look. - Choosing garnishes for visual appeal: Top your cake with chopped nuts or grated carrots. You can also sprinkle some cinnamon for extra flair. Edible flowers can add a beautiful touch too. {{image_4}} You can give your carrot cake a new twist. Here are two ideas: - Spiced Carrot Cake: Add more spices like ginger and cloves. This gives a warm kick to your cake. Mix in some cardamom for extra flavor. - Tropical Twist with Coconut: Fold in shredded coconut. It adds a chewy texture and a hint of sweetness. You can also swap the crushed pineapple for fresh mango for a fruity surprise. Catering to different diets is easy with a few swaps: - Gluten-Free Flour Substitutions: Use a gluten-free blend instead of all-purpose flour. Make sure it has xanthan gum for structure. This helps your cake rise and stay fluffy. - Vegan Substitutions for Eggs and Butter: Replace eggs with flax eggs or applesauce. Use coconut oil or vegan butter in place of regular butter. These swaps keep your cake moist and tasty. How you serve your carrot cake can make it even better: - Pairing with Beverages: A cup of tea or coffee goes well with carrot cake. Try herbal tea for a fresh taste. - Serving with Ice Cream or Whipped Cream: A scoop of vanilla ice cream adds creaminess. Whipped cream on top gives lightness. Both choices elevate your dessert. Explore these variations and serving ideas to make your carrot cake unique! To keep your carrot cake fresh, store leftovers in the refrigerator. Use an airtight container. This helps maintain moisture and flavor. If your cake is frosted, place it in the fridge right away. Cover it with plastic wrap or foil. This protects the frosting from drying out. Use your leftover cake within five days for the best taste. If you want to save carrot cake for later, freezing is a great option. Wrap each cake layer tightly in plastic wrap. Then, place them in a freezer-safe bag or container. This keeps out air and avoids freezer burn. You can freeze the cake for up to three months. When you're ready to enjoy it, thaw the cake in the fridge overnight for the best texture. If your cake feels dry, don't worry! You can revive it. Try adding a simple syrup made from sugar and water. Brush it lightly on each layer. This adds moisture back without changing the flavor. If you have leftover slices, place them in a sealed container with a slice of bread. The bread helps keep the cake moist. Enjoy your delicious carrot cake, even after a few days! To keep your carrot cake moist, use fresh ingredients. Make sure your carrots are finely grated. They should add moisture as they bake. Also, do not overmix the batter. Overmixing can make the cake dense and dry. Lastly, let the cake cool completely before frosting. This helps maintain moisture. Yes, you can use fresh pineapple. Just make sure to chop it into small pieces and drain any excess juice. This keeps the batter from becoming too wet. Fresh pineapple brings a bright flavor to the cake. To soften cream cheese quickly, cut it into small cubes. Place the cubes in a microwave-safe bowl. Heat on low power for about 10-15 seconds. Check to see if it’s soft enough. Repeat if needed, but be careful not to melt it. You can tell the cake is done by inserting a toothpick into the center. If it comes out clean or with just a few crumbs, the cake is ready. Another sign is the edges pulling away from the pan. You can also gently press the top; it should spring back. Yes, you can add other fruits and nuts to the batter. Chopped apples or raisins work well. You can also add nuts like pecans or walnuts for crunch. Just keep in mind to chop them finely for even distribution. This adds extra flavor and texture to your cake. This blog post covered how to make a delicious carrot cake. We explored key ingredients like flour, eggs, and spices. I shared steps for preparing, mixing, baking, and frosting. Plus, I offered tips for texture and presentation. Remember, make it your own with fun variations. Enjoy creating your perfect carrot cake. Happy baking!

Are you ready to take your baking skills to the next level? With my easy recipe for Carrot Cake with Cream Cheese Frosting Bakery Style, you’ll impress friends and family …

Read more

Categories Desserts

Matcha Coconut No Bake Energy Bites Simple Recipe

September 19, 2025 by Chef Miles
- 1 cup rolled oats: Oats give energy and fiber, making these bites filling. - 1/2 cup almond butter: This nut butter adds healthy fats and creaminess. You can swap it for peanut butter or sunflower seed butter if needed. - 1/4 cup honey or maple syrup: This acts as a natural sweetener. It holds the bites together. If avoiding sugar, try agave syrup. - 1/4 cup shredded unsweetened coconut: Coconut adds texture and flavor. You can use finely chopped nuts for a crunchier bite. - 1 tablespoon matcha green tea powder: Matcha gives a vibrant green color and a boost of antioxidants. You can use spirulina for a different flavor and color. - 1/4 cup mini chocolate chips (optional): They add sweetness and a fun treat. You can leave them out if you prefer less sugar. - Pinch of salt: Salt enhances the flavors of the other ingredients. - 1/4 teaspoon vanilla extract: This adds a lovely aroma and depth to the bites. You can skip it if you don’t have any. - For nut allergies, use sunflower seed butter or soy nut butter. - For gluten-free needs, ensure oats are labeled gluten-free. - If you avoid honey, use maple syrup or agave for sweetness. - You can replace chocolate chips with dried fruit like cranberries or raisins for a fruity twist. These ingredients work together to create a tasty and healthy snack. You can mix and match to suit your taste. Enjoy making your energy bites! 1. Mix the Ingredients: Start with a large mixing bowl. Add the rolled oats, almond butter, and honey (or maple syrup). Also, include the shredded coconut, matcha green tea powder, and a pinch of salt. Use a spatula to mix well. Make sure every ingredient combines nicely. 2. Add Vanilla: Pour in the vanilla extract. This step boosts the flavor. Mix it in until the mixture is smooth and even. 3. Incorporate Chocolate Chips: If you want a sweet touch, gently fold in mini chocolate chips. This step is optional but adds a nice surprise. 4. Shape the Bites: Grab small amounts of the mixture using your hands. Roll them into balls about 1 inch in size. Ensure they are compact so they hold their shape. 5. Prepare for Chilling: Place the energy bites on a baking sheet lined with parchment paper. This makes cleanup easy. 6. Chill: Put the baking sheet in the refrigerator. Let the bites chill for at least 30 minutes. This helps them firm up. 7. Store Your Bites: After chilling, move them to an airtight container. They stay fresh in the fridge for up to 2 weeks. Enjoy them as a quick snack! - Mixing Bowl: A large bowl makes mixing easier. - Spatula: Use a spatula for thorough mixing. - Baking Sheet: A sheet lined with parchment paper helps with easy removal. - Measuring Cups: Accurate measurements ensure great taste. - Refrigerator: Essential for chilling and firming up the bites. These tools help create a fun cooking experience. To make perfect Matcha Coconut No Bake Energy Bites, the mixing is key. Start by using a large bowl. This allows enough space for all your ingredients. How to Achieve the Perfect Consistency - Mix rolled oats and almond butter well. This helps to bind everything. - Add honey or maple syrup slowly. This keeps the mixture moist but not too sticky. - When adding matcha, sprinkle it evenly. This ensures each bite has that lovely green tea flavor. - Don’t forget a pinch of salt! It enhances sweetness and flavor. Common Mistakes to Avoid - Using too much nut butter can make the bites greasy. Stick to half a cup. - Forgetting to chill them is a mistake. This step firms them up and makes them easier to eat. - Not rolling them tight enough can cause them to fall apart. Make sure to compress each ball well. Adding a twist to your energy bites is fun and easy. You can personalize your bites for a unique taste. Suggestions for Adding More Variety - Try swapping almond butter for peanut butter or sunflower seed butter. This changes up the flavor nicely. - Add dried fruits like cranberries or apricots for a sweet touch. They pair well with the matcha. - For a spicy kick, mix in a pinch of cinnamon or ginger. This adds warmth and depth. Using Different Nut Butters or Sweeteners - If you're avoiding honey, use agave nectar or brown rice syrup. Both work well. - Different nut butters can alter the taste. Cashew butter gives a creamy texture, while hazelnut offers a nutty flavor. - Experiment with coconut sugar for a deeper sweetness. It blends well with the energy bites. Enjoy mixing and making these delicious bites your own! {{image_4}} You can easily switch things up in this recipe. Want it vegan? Use maple syrup instead of honey. Choose almond butter or any nut butter that suits your taste. If you need a gluten-free option, ensure your oats are certified gluten-free. Incorporating other superfoods can also boost nutrition. Consider adding chia seeds or flaxseeds for extra fiber. They blend well and add a nice crunch. You could also try using spirulina for added nutrients and a vibrant color. Adding extra mix-ins can make your energy bites even more exciting. Dried fruits like cranberries or apricots add a sweet bite. Seeds like pumpkin or sunflower seeds give a crunchy texture. For creative flavor combinations, think outside the box! Try adding a pinch of cinnamon for warmth. Swap in peanut butter for a different nutty flavor. You can even mix in a bit of cacao powder for a chocolate twist. The options are endless, so feel free to experiment! To keep your matcha coconut no-bake energy bites fresh, store them in an airtight container. Place them in the refrigerator right after they set. This helps maintain their firmness and flavor. If you want to keep them longer, you can freeze them. Just place the energy bites in a freezer-safe container. Separate layers with parchment paper to prevent sticking. They freeze well for up to three months. These energy bites last in the fridge for about two weeks. After that, they may start to lose flavor and texture. Check for signs that they have gone bad. If you notice an off smell or any mold, it's best to discard them. Fresh energy bites should feel firm and moist but not sticky or dry. Enjoy these tasty snacks while they are at their best! Can I make these without honey? Yes, you can. Substitute honey with maple syrup. Both sweeteners work well. You can also use agave nectar for a vegan option. Just keep the same amount for the best results. How do I make them more protein-rich? To boost protein, add protein powder to the mix. One scoop blends nicely with the other ingredients. You can also use peanut butter instead of almond butter for more protein. Chia seeds or hemp seeds are great additions too. Nutritional Benefits of Each Key Ingredient - Rolled oats: Great source of fiber, which helps with digestion. - Almond butter: Offers healthy fats and protein. - Honey or maple syrup: Natural sweeteners that provide quick energy. - Shredded coconut: Adds fiber and healthy fats. - Matcha green tea powder: Packed with antioxidants and boosts metabolism. - Mini chocolate chips: Adds sweetness and a touch of joy. Caloric Breakdown per Serving Each energy bite has about 100 calories. With 12 bites in total, this recipe gives a nutritious snack without too many calories. This blog post covers how to make great energy bites. We explored each ingredient and its purpose, along with substitutions for allergens. I provided step-by-step instructions for mixing and shaping, along with useful tools. We discussed tips and tricks for perfect consistency and flavor. Variations include vegan and gluten-free options, plus creative add-ins. You learned how to store your bites for freshness and the signs of spoilage. With this knowledge, you can create tasty energy bites tailored to your taste and needs. Enjoy your energy bites!

Are you looking for a quick, healthy snack? These Matcha Coconut No Bake Energy Bites are the answer! Packed with flavor and energy, they’re simple to make and require no …

Read more

Categories Dinner

Creamy White Chicken Chili Slow Cooker Delight

September 19, 2025 by Chef Miles
- 1.5 lbs boneless, skinless chicken breast - 1 can (15 oz) white beans, drained and rinsed - 1 can (4 oz) diced green chilies - 1 medium onion, finely chopped - 3 cloves garlic, minced - 1 cup corn (fresh or frozen) - 4 cups chicken broth - 1 cup heavy cream - 1 teaspoon ground cumin - 1 teaspoon chili powder - ½ teaspoon smoked paprika - Salt and pepper to taste - Fresh cilantro, chopped - Lime wedges, for serving This creamy white chicken chili recipe is simple and delightful. The main ingredients anchor the flavor. The chicken gives a hearty base. White beans add creaminess, while green chilies bring a mild kick. Onions and garlic add depth. Corn gives it a sweet crunch. Chicken broth makes it warm and rich. Heavy cream finishes the dish with a luscious texture. Spices like cumin and chili powder boost the flavor. Smoked paprika adds warmth without heat. Don't forget salt and pepper to enhance all the tastes. For garnishes, fresh cilantro brightens up each bowl. Lime wedges give a zesty touch that livens up the chili. Each ingredient plays a role in creating a cozy meal you’ll love. To start, place the boneless, skinless chicken breasts flat in the slow cooker. This gives the chicken a nice base. Make sure they are not overcrowded so they cook evenly. Next, add the chopped onion, minced garlic, diced green chilies, corn, and drained white beans. Spread these evenly over the chicken. Each ingredient adds its own flavor, making your chili rich and tasty. Now, pour the chicken broth over everything. It should cover the ingredients well. Season with ground cumin, chili powder, smoked paprika, salt, and pepper. Stir gently to combine. Be careful not to move the chicken too much. Secure the lid and set the cooker to low for 6-7 hours or high for 3-4 hours. When the cooking time is up, shred the chicken with two forks right in the slow cooker. Mix it well into the chili. Pour in the heavy cream and stir until smooth. Let it heat through for a bit longer. Taste and adjust seasoning if needed, then serve hot! To boost flavor in your creamy white chicken chili, try these simple adjustments: - Increase cumin to 1.5 teaspoons for a deeper taste. - Add a pinch of cayenne pepper for a kick. - Use smoked salt instead of regular salt for a unique twist. - Squeeze in fresh lime juice for added brightness. Experiment with spices to find your perfect mix. You can change the thickness of your chili by adjusting the cream: - For a creamier texture, add more heavy cream. - If you want it lighter, reduce the cream to ½ cup. - You can also add more chicken broth for a soupier feel. - To thicken, mash some of the white beans before mixing. These small tweaks can make a big difference. Serve your chili with tasty sides to enhance the meal: - Cornbread is perfect for dipping. - Top with crunchy tortilla chips for texture. - Add a dollop of sour cream for creaminess. - Fresh avocado slices add creaminess and flavor. - Pair with a fresh salad for a light touch. These options not only complement the chili but also make it more fun. {{image_4}} You can change the beans in this recipe. Try black beans or pinto beans instead of white beans. You can also use shredded turkey instead of chicken. If you want a vegetarian dish, swap the chicken for extra veggies like zucchini or bell peppers. Just keep the same spices to keep the flavor strong. To make it milder, skip the diced green chilies. You can also use fewer spices. If you like heat, add more chili powder or diced jalapeños. A pinch of cayenne pepper can also give your chili a nice kick. Just remember to taste as you go! For gluten-free options, check the broth label. Most chicken broths are gluten-free. To make it dairy-free, replace the heavy cream with coconut milk or a dairy-free cream. You can still enjoy rich flavors without the dairy. Adjust the salt and spices after these swaps to keep it tasty. Store leftovers in an airtight container. This keeps the chili fresh and tasty. Let it cool before sealing. Place it in the fridge within two hours after cooking. It will stay good for up to four days. When reheating, add a splash of broth to keep it creamy. To freeze, let the chili cool completely. Pour it into freezer-safe bags or containers. Leave space at the top for expansion. Seal tightly and label with the date. To reheat, thaw it in the fridge overnight. Warm it on the stove over low heat. Stir often to keep it smooth. When stored properly, creamy white chicken chili lasts about four days in the fridge. In the freezer, it can last up to three months. For best taste, eat it within one month. Always check for any off smells or colors before eating. Yes, you can use frozen chicken. Just add an extra hour to the cook time. Make sure the chicken is fully submerged in the broth. This will help it cook evenly. Thawing beforehand will give you a shorter cooking time. To make this in an Instant Pot, layer the ingredients as you would in the slow cooker. Set it to pressure cook for 15 minutes. After cooking, let the pressure release naturally for 10 minutes. Shred the chicken, add cream, and stir well. Absolutely! For a vegetarian version, swap the chicken for mixed vegetables or tofu. Use vegetable broth instead of chicken broth. This keeps the dish hearty and flavorful. You can also add more beans for protein. You can use many toppings to enhance your chili. Consider adding shredded cheese, diced avocado, or sour cream. Fresh jalapeños add heat, while crispy tortilla strips give crunch. Experiment and find your favorites! Check the chicken's internal temperature with a meat thermometer. It should reach 165°F (75°C) to be safe. You can also shred the chicken; it should fall apart easily. If it’s pink or tough, keep cooking until done. This blog laid out a simple recipe for a tasty chili. We explored the key ingredients like chicken, beans, and spices. I shared easy steps to prepare, layer, and cook your dish. Tips on enhancing flavors and variations were also included. Remember, cooking is fun and can be flexible. Use the suggestions to make it your own. Enjoy your delicious chili with family or friends!

Are you ready for a warm, hearty meal that’s incredibly easy to make? This Creamy White Chicken Chili Slow Cooker Delight will be your new go-to dish. Packed with tender …

Read more

Categories Dinner

Chocolate Chip Protein Pancakes Tasty Breakfast Boost

September 19, 2025 by Chef Miles
For the best chocolate chip protein pancakes, gather these ingredients: - 1 cup rolled oats - 1 scoop chocolate protein powder - 1 ripe banana, thoroughly mashed - 1 cup almond milk (or your preferred milk) - 2 large eggs - 1 teaspoon baking powder - 1/2 teaspoon vanilla extract - 1/4 cup dark chocolate chips - Pinch of salt - Coconut oil or non-stick cooking spray for greasing the skillet These ingredients work together to create a tasty and nutritious breakfast. While the main ingredients are key, you can switch things up: - Protein powder: Use vanilla or plant-based powder instead of chocolate. - Milk: Regular milk or oat milk are great substitutes. - Sweetener: Add honey or maple syrup if you want more sweetness. - Nut butters: Stir in almond or peanut butter for extra flavor. Feel free to mix and match based on what you have. Each ingredient contributes to a healthy start: - Rolled oats: Provide fiber, helping you feel full longer. - Chocolate protein powder: Adds protein, which aids muscle recovery. - Banana: Offers potassium, great for energy and heart health. - Almond milk: Low in calories and dairy-free. - Eggs: Packed with protein and essential nutrients. - Baking powder: Helps pancakes rise and stay fluffy. - Vanilla extract: Adds flavor without extra calories. - Dark chocolate chips: Provide antioxidants and a touch of indulgence. - Coconut oil: Healthy fat for cooking without sticking. By choosing these ingredients, you pack in nutrition while enjoying a delicious meal. To make the batter, gather your ingredients. You need rolled oats, chocolate protein powder, a ripe banana, almond milk, eggs, baking powder, vanilla extract, a pinch of salt, and dark chocolate chips. First, place the rolled oats into a high-speed blender. Add the chocolate protein powder, baking powder, and the thoroughly mashed banana. Pour in the almond milk and add the eggs and vanilla extract. Finally, sprinkle in a pinch of salt. Blend this mixture on high until it is smooth. If it seems too thick, add a splash of almond milk. Next, gently fold in the dark chocolate chips with a spatula. This helps keep the chocolate chunks intact. Now it’s time to cook! Preheat your non-stick skillet or griddle over medium heat. Lightly grease the surface with coconut oil or non-stick spray. This step helps to prevent sticking. Pour about 1/4 cup of batter onto the hot skillet for each pancake. Cook them for around 2-3 minutes. Look for bubbles forming on the surface, which is a sign they are ready to flip. Gently flip the pancakes with a spatula. Cook for another 2-3 minutes until they turn golden brown and are fully cooked through. Repeat this with the rest of the batter, greasing the skillet as needed. Now, let’s make these pancakes look great! Create a tall stack on a nice plate. Drizzle pure maple syrup or your favorite nut butter on top. For a fun touch, finish with extra dark chocolate chips and freshly sliced bananas. This not only adds flavor but also looks appealing. Enjoy your tasty breakfast boost! For fluffy pancakes, blend your ingredients well. Use a high-speed blender for this. Mix until the batter is smooth but not too thin. If the batter is too thick, add a splash of almond milk. This small change can make a big difference! Let the batter rest for a few minutes. This helps the oats absorb moisture and soften. It also allows the baking powder to activate. Your pancakes will rise and become light. One mistake is overmixing the batter. This can make your pancakes tough. Blend just until combined. Avoid blending in the chocolate chips. Fold them in gently to keep the chunks intact. Another common error is cooking at too high a heat. Medium heat works best. If your skillet is too hot, the outsides will burn while the insides stay raw. Finally, don’t skip greasing the skillet. Add coconut oil or non-stick spray each time. This helps each pancake cook evenly and prevents sticking. To boost flavor, add a pinch of cinnamon or nutmeg to the batter. This simple addition can elevate your pancakes. Use ripe bananas for natural sweetness and creaminess. You can also try different types of protein powder for varied tastes. For extra nutrition, top your pancakes with sliced fruit or nuts. Fresh berries, bananas, or almonds can add color and flavor. Drizzle with pure maple syrup or nut butter for a tasty finish. Enjoy your pancakes with a side of yogurt for added protein! {{image_4}} You can customize your pancakes by using different protein powders. For these chocolate chip protein pancakes, I recommend three types: - Whey protein: This is a popular choice. It blends well and adds great flavor. - Plant-based protein: Use pea or rice protein for a vegan option. They work well and taste good. - Casein protein: This type digests slowly. It gives a nice texture and keeps you full longer. Experiment with what you have. Each type changes the flavor and texture a bit. You can make these pancakes even more fun by adding fruits and spices. Here are some ideas: - Blueberries: Fold in fresh or frozen blueberries for a burst of flavor. - Apples: Add diced apples and a sprinkle of cinnamon for a sweet twist. - Pumpkin: Mix in pumpkin puree and pumpkin spice for a cozy fall treat. - Nuts: Walnuts or pecans add crunch and extra protein. Feel free to get creative. The right fruit or spice can take your pancakes to the next level. Want to make these pancakes vegan or dairy-free? It’s easy! Here’s how: - Replace the eggs: Use flaxseed meal or chia seeds mixed with water. This works well as a binder. - Use plant-based milk: Almond, oat, or soy milk are great choices. They will keep the batter moist. - Choose vegan chocolate chips: Look for dairy-free chocolate chips. They melt well and taste great. With these simple swaps, you can enjoy tasty pancakes that fit your dietary needs. To keep your chocolate chip protein pancakes fresh, let them cool first. Place them in an airtight container. If you have many pancakes, layer them with parchment paper. This helps prevent them from sticking together. Store the container in the fridge. They will stay good for about three days. When you want to enjoy your pancakes again, reheating is easy. You can use a microwave or a skillet. For the microwave, place the pancakes on a plate and cover them with a damp paper towel. Heat them for 20-30 seconds. For the skillet, warm it over low heat and add a little oil. Cook each pancake for about one minute on each side. This keeps them soft and tasty. If you want to save pancakes for later, freezing works great. Start by letting them cool completely. Then, stack the pancakes with parchment paper between each one. Place them in a freezer-safe bag or container. Make sure to squeeze out any air before sealing. They will last in the freezer for up to three months. When you’re ready to eat, thaw them in the fridge overnight. Reheat as mentioned above, and enjoy! Each serving of these chocolate chip protein pancakes has about 20 grams of protein. This comes mainly from the chocolate protein powder and eggs. Protein helps build muscle and keeps you full longer. If you want more protein, add a bit more protein powder to the mix. Yes, you can use regular flour if you prefer. However, using rolled oats gives a nice texture and adds fiber. If you switch to flour, you might need less liquid. Start with less almond milk and add more if the batter is too thick. To make these pancakes gluten-free, use gluten-free rolled oats. Make sure your protein powder is also gluten-free. This way, you can enjoy the same great taste without gluten. Always check labels to ensure all ingredients are safe for your diet. These chocolate chip protein pancakes are a tasty and healthy option. We discussed the main ingredients, optional tweaks, and their nutritional benefits. I covered step-by-step instructions for making, cooking, and serving them. You learned tips for great texture and common mistakes to avoid. I shared flavor variations and storage tips for leftovers. In closing, these pancakes are not only delicious but also easy to customize. Enjoy your cooking and make these pancakes a regular treat!

Looking for a tasty boost to your breakfast? These Chocolate Chip Protein Pancakes are the answer! Packed with protein and delicious chocolate chips, they fit perfectly into your morning routine. …

Read more

Categories Breakfast

Honey Garlic Shrimp and Veggies Sheet Pan Delight

September 19, 2025 by Chef Miles
- 1 lb (450g) large shrimp, peeled and deveined - 2 tablespoons honey - 3 tablespoons low sodium soy sauce - 3 cloves garlic, finely minced - 1 teaspoon fresh ginger, grated - 1 red bell pepper, diced - 1 yellow bell pepper, diced - 1 medium zucchini, sliced into half-moons - 1 cup broccoli florets - 2 tablespoons olive oil - Salt and freshly cracked black pepper to taste - 1 tablespoon sesame seeds (for garnish) - Fresh cilantro or parsley, chopped for garnish - The shrimp should be large for a nice bite. - Use two tablespoons of honey for the perfect sweetness. - Three tablespoons of soy sauce adds the needed saltiness. - Use three cloves of garlic for strong flavor. - One teaspoon of fresh ginger gives a warm taste. - Diced bell peppers add color and crunch. - One medium zucchini works well for texture. - One cup of broccoli florets brings nutrition and green color. - Use two tablespoons of olive oil to help veggies roast. - Salt and black pepper should be used to taste. - Sesame seeds and fresh herbs are for garnish. - You can swap shrimp with chicken or tofu if you prefer. - Agave syrup or maple syrup can replace honey for a vegan option. - Tamari can be a gluten-free substitute for soy sauce. - Garlic powder can replace fresh garlic in a pinch. - Any crunchy vegetables, like carrots or snap peas, can work. - Use any cooking oil in place of olive oil, like avocado oil. - You can skip sesame seeds and herbs if you don’t have them. Start by preheating your oven to 400°F (200°C). This step is key for roasting. A hot oven helps the shrimp cook fast and keeps the veggies crisp. In a medium bowl, mix honey, soy sauce, minced garlic, and grated ginger. Whisk it well. Next, add the shrimp and toss to coat. Let them marinate for about 15 minutes. This makes the shrimp tasty and flavorful. While the shrimp marinates, take a large sheet pan. Spread out the diced red and yellow bell peppers, sliced zucchini, and broccoli florets. Drizzle with olive oil. Season with salt and fresh black pepper. Toss to mix, then arrange the veggies in a single layer. This helps them roast evenly. After the shrimp has marinated, place them evenly over the veggies on the pan. Drizzle any leftover marinade over both. This adds more flavor to the dish. Put the sheet pan in your preheated oven. Roast for about 15-20 minutes. Check that the shrimp are opaque and cooked through. The veggies should be tender but still a bit crisp. When done, take the pan out of the oven. Sprinkle with sesame seeds and chopped cilantro or parsley. This adds color and freshness. Serve right from the sheet pan for a casual feel, or place on individual plates for a nicer look. A wedge of lime on the side can also brighten the dish. Cooking times can vary with your oven. If your shrimp are larger, add a few extra minutes. You can check if they are done by looking for their pink color. If the shrimp is opaque, they are ready to eat. For veggies, they should be tender but still crisp. If they need more time, keep them in the oven for a few extra minutes. To get the best shrimp, don’t overcook them. They cook fast, usually in about 15 to 20 minutes. Start checking them at the 15-minute mark. If you see the shrimp turning pink and curling slightly, they are done. Remove them quickly to avoid rubbery shrimp. You can boost the flavor in many ways. Add more garlic or ginger to the marinade for a stronger taste. A dash of red pepper flakes adds heat. Lemon juice or lime juice can brighten up the dish nicely. If you want a sweet twist, mix in a bit of orange juice. Garnishing with fresh herbs like cilantro or parsley adds a fresh touch. {{image_4}} You can mix in other veggies to make this dish your own. Try adding snap peas, carrots, or asparagus. You can even use cauliflower or mushrooms for a unique twist. Just make sure to cut them into similar sizes for even cooking. This way, every bite has a mix of flavors and textures. The key is to balance the dish with colorful options that roast well. If you like heat, try adding chili flakes or a diced jalapeño to the marinade. You can also use sriracha or a spicy garlic sauce. Start with a small amount and taste as you go. This way, you can control the heat level. The spice will add a fun kick to the sweet honey and garlic flavors. Your taste buds will thank you! Switching up the sauce can give this dish a whole new vibe. Use teriyaki sauce for a sweet and savory twist. You could also try a citrus marinade with orange juice and zest. This will brighten the dish and add a fresh taste. Another option is a peanut sauce for a nutty flavor. Just remember to adjust the cooking time if you add thicker sauces. Each choice will make your honey garlic shrimp and veggies feel new and exciting! After cooking, let the honey garlic shrimp and veggies cool down. Store leftovers in an airtight container. They can stay fresh in the fridge for up to three days. When storing, separate the shrimp from the veggies if possible. This helps keep both items fresh longer. If you want to keep the dish longer, freezing is a great option. Place the cooled shrimp and veggies in a freezer-safe container. Make sure to remove as much air as you can. This helps prevent freezer burn. You can freeze them for up to two months. When you’re ready to eat, thaw them in the fridge overnight. To reheat, you have a few options. The oven works best to keep everything crispy. Preheat it to 350°F (175°C). Spread the shrimp and veggies on a baking sheet. Heat for about 10-15 minutes or until warm. You can also use a microwave for quick heating. Just place them in a microwave-safe bowl and heat in short bursts, stirring in between. Yes, you can use frozen shrimp for this recipe. Just make sure to thaw them first. I recommend placing the shrimp in the fridge overnight. If you need to thaw them faster, place the shrimp in a bowl of cold water for about 15-20 minutes. Once thawed, pat them dry with a paper towel before marinating. This helps the marinade stick better and makes the shrimp tasty. To make this dish gluten-free, swap the low sodium soy sauce with tamari or coconut aminos. Both options work well and keep the flavors intact. Double-check all your ingredients to ensure they are gluten-free. The rest of the recipe stays the same, so you still get that sweet and savory kick! Several sides go perfectly with honey garlic shrimp. Here are some great options: - Steamed rice or cauliflower rice for a low-carb choice. - Quinoa for a healthy grain option. - A fresh green salad with a light vinaigrette. - Garlic bread to soak up the delicious sauce. These sides enhance the meal and balance the flavors of the shrimp and veggies. Enjoy your cooking! In this post, we explored the ingredients needed for honey garlic shrimp, including their measurements and possible substitutes. I provided step-by-step instructions for marinating and roasting shrimp and veggies. We discussed tips for perfect cooking and creative variations to customize your dish. Finally, I shared storage info and answered common questions. Remember, cooking is fun and easy. You can make this recipe your own. Enjoy your dish, and feel proud of your tasty creation!

Are you ready for a meal that’s as easy to make as it is tasty? My Honey Garlic Shrimp and Veggies Sheet Pan Delight brings together sweet shrimp and colorful …

Read more

Categories Dinner

Chai Spice Banana Bread with Maple Glaze Delight

September 19, 2025 by Chef Miles
- 3 ripe bananas, thoroughly mashed - 1/2 cup granulated sugar - 1/2 cup packed brown sugar - 1/3 cup melted coconut oil - 2 large eggs, at room temperature - 1 teaspoon vanilla extract The main ingredients in this recipe are simple yet vital. Ripe bananas add natural sweetness and moisture. The mix of granulated and brown sugar gives depth to the flavor. Coconut oil keeps the bread rich while eggs bind everything. Vanilla extract adds a lovely aroma that enhances the overall taste. - 1 1/2 cups all-purpose flour - 1 teaspoon baking soda - 1/4 teaspoon salt - 1 teaspoon ground cinnamon - 1/2 teaspoon ground ginger - 1/4 teaspoon ground cardamom - 1/4 teaspoon ground cloves - 1/4 teaspoon freshly ground black pepper The dry ingredients bring the magic to this banana bread. All-purpose flour gives structure. Baking soda helps it rise, creating a fluffy loaf. Salt balances sweetness. The chai spices—cinnamon, ginger, cardamom, cloves, and black pepper—make the bread warm and comforting. Each spice plays a role in creating that cozy chai flavor. - 1/2 cup chopped walnuts Chopped walnuts are a delightful option. They add crunch and nuttiness. If you want a richer texture, fold them in when combining wet and dry ingredients. They pair well with the spices and banana, making every bite a treat. First, preheat your oven to 350°F (175°C). This step warms the oven for even baking. Next, take a 9x5 inch loaf pan. Grease it with oil or line it with parchment paper. This helps the bread come out easily after baking. In a large bowl, add 3 ripe bananas. Make sure they are well mashed—no lumps, please! Add 1/2 cup of granulated sugar and 1/2 cup of brown sugar. Mix these until the sugars blend well with the bananas. Now, pour in 1/3 cup of melted coconut oil. Crack in 2 large eggs and add 1 teaspoon of vanilla extract. Stir this mixture until it is smooth and creamy. In another bowl, whisk together 1 1/2 cups of all-purpose flour, 1 teaspoon of baking soda, and 1/4 teaspoon of salt. Then, add your spices: 1 teaspoon of ground cinnamon, 1/2 teaspoon of ground ginger, 1/4 teaspoon of ground cardamom, 1/4 teaspoon of ground cloves, and 1/4 teaspoon of black pepper. Mix well to ensure the spices are evenly spread throughout. Now, gently fold the dry mix into the banana mixture. Use a spatula and mix just until combined. Be careful not to overmix! This keeps the bread light and fluffy. If you want to add walnuts, now is the time to fold in 1/2 cup of chopped walnuts. Pour the batter into your prepared loaf pan. Use a spatula to smooth the top. Put the pan in your preheated oven and bake for 60-70 minutes. To check if it’s done, insert a toothpick into the center. It should come out clean or with a few moist crumbs. While the banana bread cools in the pan for about 10 minutes, prepare the maple glaze. In a small bowl, mix 1 cup of powdered sugar and 2 tablespoons of pure maple syrup. Add 1 tablespoon of milk at a time until you get a smooth, thick glaze that is easy to drizzle. To get the best banana bread, use ripe bananas. They should be soft and brown. This adds natural sweetness and flavor. Avoid overmixing the batter. Overmixing can lead to dense bread. Mix until just combined for a light texture. Want more spice? Add an extra 1/4 teaspoon of cinnamon or ginger. If you prefer less spice, cut back on the chai spices by half. This way, you can control the flavor to suit your taste. Serve the banana bread warm or at room temperature. Slice it into thick pieces for a nice look. Place the slices on a rustic wooden board. Drizzle extra maple glaze over the top. Sprinkle chopped walnuts or whole spices for a festive touch. This makes your dish not just tasty but also beautiful! {{image_4}} You can swap sugars for other sweeteners. Honey adds a floral note. Maple syrup gives a rich taste. Agave syrup is another good option. Each sweetener changes the flavor a bit. You might prefer one over the others. Just keep the amount similar to sugar. Feel free to mix in other spices or flavors. Nutmeg brings warmth to the bread. Vanilla bean paste adds extra depth. You can also try adding a hint of orange zest. This brightens the taste and pairs well with chai spices. Get creative and find your favorite blend. To make this bread nut-free, skip walnuts or replace them with seeds. For a vegan version, use flax eggs instead of real eggs. Mix 1 tablespoon of ground flaxseed with 2.5 tablespoons of water. Let it sit for a few minutes to thicken. Use coconut oil or applesauce as a substitute for oil. These changes keep the bread moist and tasty. Store your Chai Spice Banana Bread at room temperature. Wrap it tightly in plastic wrap or put it in an airtight container. This keeps it fresh for about 3 days. Avoid putting it in the fridge, as cold air can dry it out. For long-term storage, freezing is best. Wrap the banana bread in plastic wrap, then in aluminum foil. This prevents freezer burn. You can also slice it for easy servings. To thaw, remove it from the freezer and let it sit at room temperature for 2-3 hours. You can also microwave slices for a quick defrost. To keep your banana bread fresh, add a slice of bread to the container. This keeps the moisture in. For the best flavor, enjoy it within a week. If it starts to dry out, toasting it can bring back some moisture. Yes, you can use frozen bananas. First, let the bananas thaw at room temperature. This usually takes about an hour. Once they are soft, peel them and mash them well. You want a smooth consistency for the best flavor. To test if your banana bread is done, use a toothpick. Insert it into the center of the bread. If it comes out clean or with a few moist crumbs, the bread is ready. If it has wet batter on it, bake a little longer. Absolutely! You can use gluten-free flour instead of all-purpose flour. Look for blends that work well in baking. They usually have a mix of rice flour, potato starch, and tapioca flour. This will keep your banana bread soft and tasty. This blog post covers how to make Chai Spice Banana Bread. We discussed key ingredients, step-by-step instructions, and tips for great results. I shared ways to customize the flavor and adjust spice levels. You also learned about storage options and how to keep your banana bread fresh. Enjoy baking this delicious twist on a classic! With minor tweaks, you'll create a treat everyone loves. Happy baking!

Welcome to a cozy kitchen adventure with my Chai Spice Banana Bread with Maple Glaze Delight! This recipe combines the sweetness of ripe bananas with warm chai spices for a …

Read more

Categories Desserts

Pumpkin Pie Oatmeal Energy Balls Nutritious Snack Delight

September 19, 2025 by Chef Miles
- 1 cup rolled oats - 1/2 cup canned pumpkin puree - 1/2 cup almond butter or peanut butter - 1/4 cup honey or maple syrup - 1 teaspoon pure vanilla extract - 1 teaspoon pumpkin pie spice - 1/4 cup ground flaxseed - 1/4 cup mini chocolate chips (optional) - A pinch of salt - 1/4 cup chopped pecans or walnuts (optional) These ingredients come together to create a tasty snack that packs a punch. Each item plays a key role in flavor and nutrition. Each serving of these energy balls has about 120 calories. The macronutrients break down to roughly: - 4g protein - 6g fat - 15g carbohydrates This mix offers a great source of energy without added sugars. Oats are great for your heart. They have fiber that helps keep you full. Pumpkin adds vitamins and minerals. It's low in calories but high in taste. Flaxseed brings omega-3 fatty acids to the mix. These healthy fats help with heart health. Nuts add protein and crunch, turning a simple snack into a superfood treat. In a large bowl, combine the rolled oats, canned pumpkin puree, almond butter, and honey. Stir these ingredients until they blend smoothly. Use a wooden spoon or spatula for the best results. Make sure there are no lumps. This step is key for a nice texture. Now it’s time for the fun part! Add the pumpkin pie spice, ground flaxseed, and a pinch of salt. If you want, toss in mini chocolate chips and chopped nuts. These extras add great flavor and texture. The chocolate chips give a nice sweetness that balances the spices. After mixing, wet your hands slightly. This prevents the mixture from sticking to your fingers. Now, form small balls about one inch wide. Keep them uniform for the best bite. Place each ball on a baking sheet lined with parchment paper. This step helps them stay in shape. Once you shape all the balls, chill them in the fridge for about 30 minutes. Chilling firms them up, making them easier to handle and eat. When I make Pumpkin Pie Oatmeal Energy Balls, I use simple tools. A large bowl works best for mixing. A wooden spoon helps blend all the ingredients well. I find a spatula great for scraping down the sides. These tools keep the work easy and make clean-up a breeze. One common pitfall is overmixing. Mix just until everything is combined, then stop. If you mix too much, the texture can get tough. You want a nice, sticky mix that holds together well. For storing, choose airtight containers. Glass jars or plastic containers work well. They help keep your energy balls fresh. I like to use a jar because it looks nice too. You can refrigerate your energy balls for up to a week. For longer storage, freeze them. They stay good in the freezer for up to three months. Just let them thaw a bit before munching. Presentation adds charm to these energy balls. I like to arrange them on a colorful plate. It makes them pop! You can also use a rustic wooden board for a cozy look. For gift-giving, pack them in a decorative box or glass jar. You can even add a ribbon for a special touch. A light dusting of pumpkin pie spice on top looks festive. Drizzling melted chocolate over them gives a sweet finish too. {{image_4}} You can switch up the spices in these energy balls. Instead of pumpkin pie spice, try ground cinnamon, nutmeg, or ginger. Each spice adds a unique taste. You can also mix them to create your own blend. When it comes to nut butter, almond butter is delicious, but peanut butter works great too. Peanut butter gives a stronger flavor. Cashew or sunflower seed butter are also tasty options. Each nut butter changes the energy ball's taste and creaminess. Want some crunch? Add seeds or dried fruits to the mix. Chia seeds or sunflower seeds add a delightful crunch. Dried cranberries or apricots bring sweetness and chewiness. You can also add chopped nuts like pecans or walnuts for a nutty flavor. If you need a gluten-free option, swap rolled oats for gluten-free oats. This change keeps the recipe safe for those with gluten allergies. The texture stays the same, and they still taste amazing. You can easily change the sweetness in these energy balls. Use honey for a classic taste or maple syrup for a unique flavor. If you like it sweeter, add more sweetener to your mix. For less sweetness, cut back on honey or syrup. Taste the mixture before rolling it into balls to get the right flavor for you. You want your energy balls to fit your taste perfectly! To keep your Pumpkin Pie Oatmeal Energy Balls fresh, use airtight containers. Glass jars work well, too. Make sure they are sealed tightly. Storing them in the fridge helps maintain their texture and flavor. If you want them to last longer, you can freeze them. Just place them in a freezer-safe bag or container. In the fridge, these energy balls last about a week. If you freeze them, they can last up to three months. Always check for signs of spoilage. If they smell off or change color, it is time to toss them out. These energy balls are perfect for meal prep. You can make a big batch and use them as snacks throughout the week. Portion them into small bags for easy grab-and-go snacks. This way, you always have a healthy treat ready when hunger strikes! Yes, you can make these energy balls vegan. To do this, substitute honey with maple syrup. This change keeps the sweetness while ensuring it’s plant-based. For the nut butter, almond butter works great. However, if you prefer a different taste, use peanut butter. Both options add protein and flavor. These energy balls last about one week in the fridge. Store them in an airtight container to keep them fresh. If you want them to last longer, place them in the freezer. They can keep for up to three months in the freezer. Just thaw them in the fridge before enjoying. Yes, you can use rolled oats instead of quick oats. However, the texture will change slightly. Rolled oats will give a chewier bite. Quick oats blend into the mixture more smoothly. If you prefer a softer texture, stick with quick oats. Both options are healthy and tasty. These energy balls offer a tasty way to fuel your day. We covered ingredients, benefits, and easy steps to make them. You learned how to customize flavors and store them well. Keep exploring these recipes to find your perfect snack. Healthy eating can be delicious, simple, and fun.

If you’re searching for a tasty and nutritious snack, look no further! Pumpkin Pie Oatmeal Energy Balls bring together the warmth of fall flavors and healthy goodness. These little bites …

Read more

Categories Desserts
Older posts
Newer posts
← Previous Page1 … Page21 Page22 Page23 … Page112 Next →

MELTED RECIPES

where delicious ideas melt into life, from stovetop to backyard. Always warm, simple, and irresistibly satisfying. 🍳🔥🧀

PAGES

Home About Contact Privacy Policy Terms & Conditions Cookie Policy GDPR Policy Copyright Policy Disclaimer

CATEGORIES

Appetizers Desserts Salads Breakfast Dinner

Contact

  • Pinterest
  • Mail
Copyright © 2025 Melted Recipes. All rights reserved.