Skip to content
Melted Recipes
  • Home
  • Appetizers
  • Desserts
  • Salads
  • Breakfast
  • Dinner
  • Privacy Policy
  • Contact
  • About

Chef Miles

Air Fryer Chicken Parmesan Sandwiches Simple Delight

September 23, 2025 by Chef Miles
- 2 boneless, skinless chicken breasts - 1 cup Italian-style breadcrumbs - 1/2 cup grated Parmesan cheese - 1 teaspoon garlic powder - 1 teaspoon Italian seasoning - 1/2 teaspoon salt - 1/2 teaspoon black pepper - 1 cup marinara sauce (store-bought or homemade) - 1 cup shredded mozzarella cheese - 4 slices of your favorite sandwich bread (ciabatta or brioche recommended) - 2 tablespoons olive oil - Fresh basil leaves - Side salad - Crispy fries - Garlic bread The ingredients for this dish come together to create a crispy delight. Each item plays a key role in building flavor and texture. The chicken breasts provide protein, while the breadcrumbs and cheese add crunch and richness. For garnishes, fresh basil adds a lovely aroma. Pair your sandwiches with a side salad or crispy fries for a complete meal. Garlic bread is also a great option. Enjoy crafting this tasty dish! 1. Preheat your air fryer to 375°F (190°C). This helps cook the chicken evenly. 2. In a shallow dish, mix these items: - 1 cup Italian-style breadcrumbs - 1/2 cup grated Parmesan cheese - 1 teaspoon garlic powder - 1 teaspoon Italian seasoning - 1/2 teaspoon salt - 1/2 teaspoon black pepper This mix adds great flavor to your chicken. 3. Dry the chicken breasts with paper towels. This step helps the coating stick. 4. Brush both sides of each chicken breast with 2 tablespoons of olive oil. This oil gets the breadcrumbs nice and crispy. 5. Dredge each chicken breast in the breadcrumb mix. Press down lightly to make sure it sticks well. 6. Place the coated chicken breasts in the air fryer basket. Make sure they are in a single layer and not touching. This helps them cook evenly. 7. Air fry the chicken for 12-15 minutes. Flip them halfway through. They are done when golden brown and the internal temperature reaches 165°F (74°C). 8. In the last 2 minutes, spoon 1 cup of marinara sauce over the chicken. Top with 1 cup of shredded mozzarella cheese. Cook until the cheese is melted and bubbly. 9. While the chicken cooks, toast 4 slices of your favorite sandwich bread (ciabatta or brioche) in the air fryer for 2-3 minutes. They should turn golden brown and crisp. 10. To build your sandwiches, place the chicken on the toasted bread. Add fresh basil leaves for extra flavor if you like. 11. Cap your sandwiches with the top slice of bread. Serve hot for the best taste! Using an air fryer can make cooking fun and easy. Here are some tips to get the best results: - Preheat your air fryer: Set it to 375°F (190°C) before cooking. This helps the chicken cook evenly. - Do not overcrowd: Place chicken breasts in a single layer. This allows hot air to circulate and cook the chicken well. - Use olive oil: Brushing chicken with olive oil helps the coating stick and become crispy. A crispy coating makes your sandwich delightful. Follow these steps for the best crunch: - Dry the chicken: Pat the chicken dry with paper towels. This removes moisture and helps the breadcrumbs stick. - Press the breadcrumbs: After dredging the chicken in the breadcrumb mix, press down lightly. This ensures the coating sticks well during cooking. - Use the right mixture: Combine Italian-style breadcrumbs with grated Parmesan cheese for extra flavor and crispiness. Cooking times can vary based on your air fryer. Here are some guidelines: - Chicken breasts: Air fry for 12-15 minutes. Flip them halfway to ensure even cooking. - Final touches: Add marinara sauce and mozzarella cheese in the last 2 minutes. This allows the cheese to melt perfectly. - Check doneness: Ensure the chicken reaches an internal temperature of 165°F (74°C). Use a meat thermometer for accuracy. These tips will help you create the best Air Fryer Chicken Parmesan Sandwiches. Enjoy your cooking! {{image_4}} You can easily change some ingredients to fit your taste. For a lighter option, use baked chicken instead of fried. You can swap Italian breadcrumbs for panko for extra crunch. If you want less salt, use low-sodium marinara sauce. You can also use fresh herbs instead of dried ones for a fresh taste. Want a twist? Use spicy breadcrumbs for a kick! The type of bread can change your sandwich game. Ciabatta or brioche works great for a soft, buttery bite. You can also try whole grain bread for a nutty flavor. If you like a bit of crunch, sourdough is a good choice. For a gluten-free option, use gluten-free bread. Each bread adds its own unique flavor and texture. Add more to your sandwich for extra flavor. Try sliced tomatoes for freshness. Avocado adds creaminess and healthy fats. You can also add roasted red peppers for a sweet touch. If you like spice, jalapeños or banana peppers work well. Don't forget about pickles for a tangy crunch! Mix and match toppings to create your perfect sandwich. To store your chicken Parmesan sandwiches, let them cool first. Place them in an airtight container. You can keep them in the fridge for up to three days. If you want to keep them longer, consider freezing. Just be sure to wrap them well in plastic wrap before placing them in a freezer bag. Reheating is easy! You can use your air fryer again for the best results. Heat it to 350°F (175°C). Place the sandwich in the basket for about 5-7 minutes. Check it often to avoid burning. You can also use a microwave, but it may not keep the bread crisp. For freezing, wrap each sandwich tightly in plastic wrap. Then place them in a freezer bag. They can last up to three months in the freezer. To enjoy later, thaw in the fridge overnight before reheating. This keeps the flavors fresh and the bread nice. Yes, you can use frozen chicken breasts. However, you need to thaw them first. Thawing the chicken helps it cook evenly. You can thaw chicken in the fridge overnight or use the microwave. After thawing, follow the same steps in the recipe. To check if the chicken is ready, use a meat thermometer. The thickest part of the chicken should reach 165°F (74°C). If you don’t have a thermometer, cut into the chicken. The meat should be white, not pink. If it’s still pink, cook it a bit longer. Many sides go well with Chicken Parmesan Sandwiches. Here are some tasty options: - Side Salad: A fresh salad adds crunch and flavor. - Crispy Fries: French fries are a classic choice. - Garlic Bread: Toasted garlic bread pairs well with the marinara sauce. - Roasted Vegetables: Veggies add color and nutrition to your meal. These sides balance the meal and keep it fun! In this blog post, we explored key ingredients for Chicken Parmesan Sandwiches and how to prepare them. You learned step-by-step instructions for cooking and assembling. We also shared tips for achieving that perfect crispy coating. You can customize your sandwich with various ingredient swaps and toppings. Lastly, proper storage and reheating methods are covered. Remember, with a little patience and care, you can make a delicious meal your family will love. Enjoy your time in the kitchen!

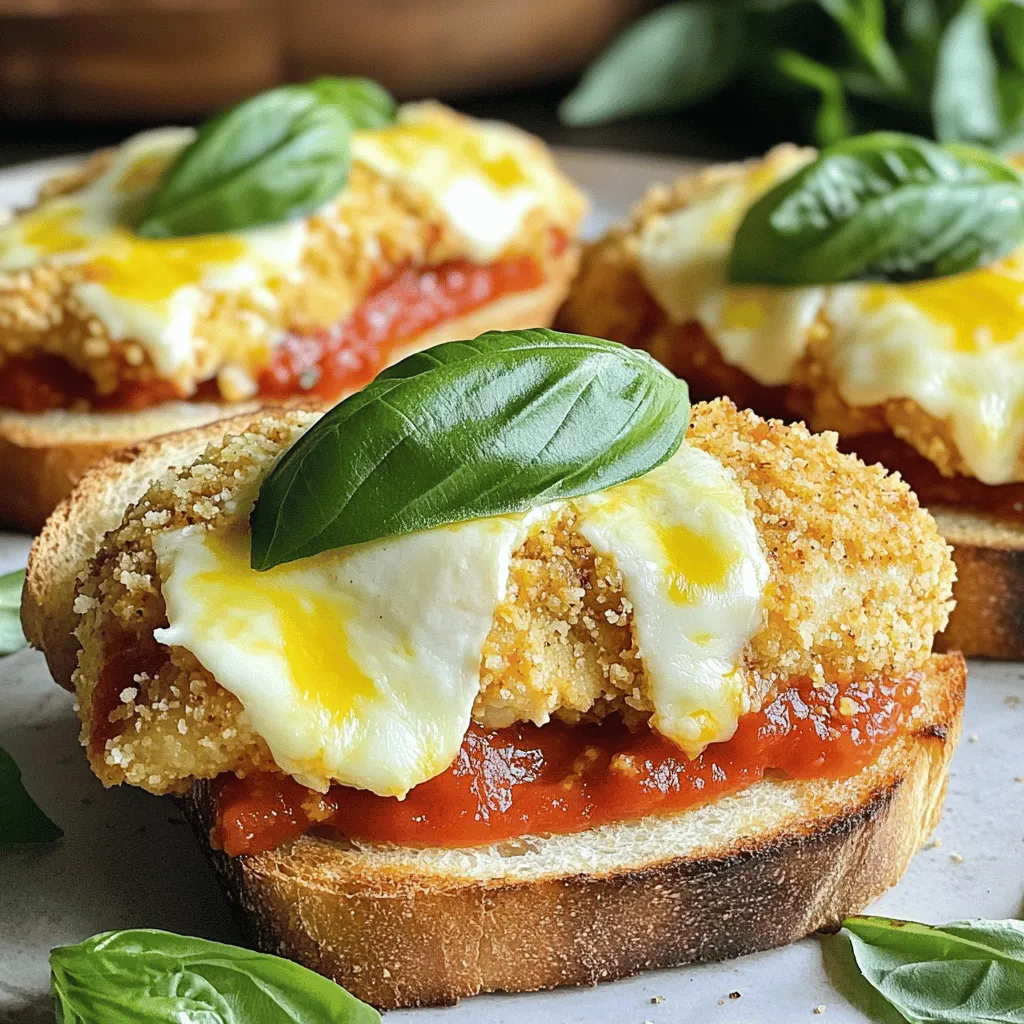
Are you ready to bite into an Air Fryer Chicken Parmesan Sandwich that’s simple yet delicious? You’ll love how easy this recipe is. It combines crispy chicken, tangy sauce, and …

Read more

Categories Dinner

Cinnamon Swirl Banana Bread Recipe You Will Love

September 23, 2025 by Chef Miles
- 3 ripe bananas, well-mashed - 1/3 cup unsalted butter, melted - 3/4 cup granulated sugar - 1 large egg, beaten - 1 teaspoon baking soda - Pinch of sea salt - 1 1/2 cups all-purpose flour - 1 tablespoon ground cinnamon - 1 tablespoon brown sugar - 1/2 cup chopped walnuts The main ingredients bring rich flavor to the bread. Ripe bananas add natural sweetness. The melted butter makes it moist. Granulated sugar gives a nice sweetness. The beaten egg binds the mix. Dry ingredients help the bread rise. Baking soda gives it lift. Sea salt enhances taste. Flour holds it all together. Ground cinnamon adds warmth and spice. Brown sugar gives a hint of caramel. Chopped walnuts add a nice crunch. They also enhance flavor. You can skip them if you want. Enjoy this delightful mix of ingredients! - Preheat the oven to 350°F (175°C). - Prepare a 9x5 inch loaf pan. Grease it with butter or use parchment paper. - In a large bowl, combine melted butter and well-mashed bananas. Stir until smooth. - Add 1 teaspoon of baking soda and a pinch of sea salt. Mix well to blend. - Now, pour in 3/4 cup of granulated sugar, 1 beaten egg, and 1 teaspoon of pure vanilla extract. Stir until combined. - Gradually add 1 1/2 cups of all-purpose flour. Mix gently to keep it fluffy. - Pour half of the batter into your prepared pan. Spread it out evenly. - In a small bowl, mix 1 tablespoon of ground cinnamon with 1 tablespoon of brown sugar. Sprinkle half of this mixture over the batter. - Carefully spoon the rest of the batter on top. Then, add the remaining cinnamon-sugar mix. - Use a knife or skewer to swirl the batter gently. This creates a lovely marbled effect. - Place the pan in the oven. Bake for 50 to 60 minutes. - Check if it’s done by inserting a toothpick. If it comes out clean, it's ready. - Once baked, let the bread cool in the pan for about 10 minutes. - Transfer the bread to a wire rack to cool completely. Enjoy the smell! To get the best swirl in your banana bread, you need to layer your batter right. First, pour half of the banana batter into the pan. Then, sprinkle half of the cinnamon-sugar mix on top. Next, add the rest of the batter and finish with the remaining cinnamon-sugar. Now, here comes the fun part! Grab a knife or skewer. Insert it into the batter and gently swirl it around. Make sure not to mix it too much. You want to see the beautiful swirls. Storing your banana bread properly keeps it fresh. First, let it cool completely. Wrap the bread in plastic wrap or foil. If you have leftover slices, an airtight container works well too. This keeps the bread moist and delicious. Want to save some for later? You can freeze slices! Wrap each slice in plastic wrap, then place them in a freezer bag. This way, you can enjoy banana bread anytime. Banana bread is great on its own, but toppings make it even better. Spread some butter on warm slices. You can also add a drizzle of honey or maple syrup. For a nice touch, garnish each slice with banana slices or a dusting of powdered sugar. This adds color and makes it look fancy. Enjoy your tasty banana bread! {{image_4}} You can add fun flavors to your banana bread. For a sweet touch, mix in chocolate chips or dried fruit, like raisins or cranberries. They add bursts of sweetness. You can also switch nuts. Try pecans or almonds instead of walnuts. Each nut gives a different taste and crunch. If you want a different taste, swap coconut oil for butter. It makes the bread moist and adds a light coconut flavor. For those who avoid gluten, use gluten-free flour. It works well in this recipe and keeps the bread soft and tasty. Seasonal spices can change the mood of your bread. Add nutmeg for a warm, fall flavor. It pairs well with cinnamon. In summer, brighten things up with lemon zest. This will give your banana bread a fresh and zesty twist. Each variation brings new joy to the table! Store your cinnamon swirl banana bread at room temperature. Wrap it in plastic wrap or foil. This keeps it fresh for about three days. For best results, use an airtight container. This helps maintain moisture and flavor. You can freeze banana bread for later. Slice it first for easy thawing. Place the slices in a freezer bag. Remove as much air as possible. This way, it stays fresh for up to three months. To reheat, let it thaw in the fridge overnight. Then, warm it in the oven or microwave. This helps restore its soft texture. Cinnamon swirl banana bread stays fresh for about three days at room temperature. After that, it may dry out or become stale. Check for signs of spoilage. Look for mold or an off smell. If you notice these, it's best to toss it. Enjoy your banana bread while it’s still tasty! To keep banana bread moist, use ripe bananas. They add natural sweetness and moisture. Also, do not over-mix your batter. Over-mixing can make the bread dense. Adding a little more butter can help too. You can even add a splash of milk for extra moisture. Yes, you can use frozen bananas. Just thaw them first. Drain any extra liquid before mashing. The texture will still be great in your bread. Frozen bananas can add sweetness just like fresh ones. You have many choices for egg replacements. You can use 1/4 cup of applesauce for each egg. Mashed bananas also work well. Chia seeds mixed with water can be another great option. Mix one tablespoon of chia seeds with three tablespoons of water, let it sit, and use. Dense banana bread often results from over-mixing or too much flour. Make sure you measure flour correctly. Use the spoon and level method for best results. Also, check your baking soda's freshness. Old baking soda can affect the rise of your bread. Yes, you can easily double the recipe. Just double all the ingredients. Use a larger loaf pan or two pans. Make sure to check the baking time, as it may change. Use a toothpick to check if it's done. Making banana bread is simple and fun. We covered the essential ingredients, steps, and tips to get it just right. You learned how to mix, bake, and store your bread for maximum freshness. Remember, you can customize your loaf with flavors and substitutions. Enjoy your baking adventure! With a few changes, every loaf can be unique. I can't wait to see how your banana bread turns out!

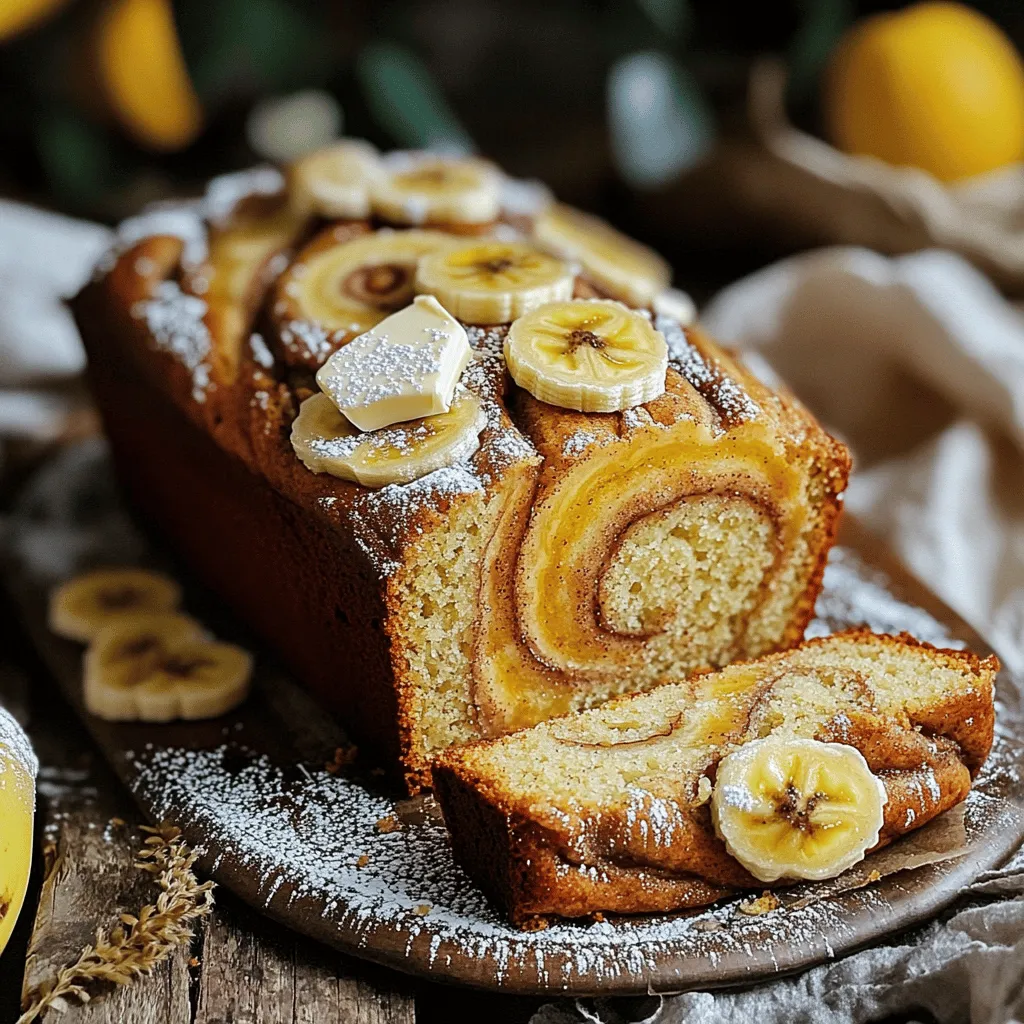
Are you ready to bake a treat that fills your home with warmth and sweet aroma? This Cinnamon Swirl Banana Bread recipe is a delightful twist on a classic favorite. …

Read more

Categories Desserts

Sheet Pan Maple Mustard Salmon & Sprouts Delight

September 23, 2025 by Chef Miles
To make Sheet Pan Maple Mustard Salmon & Sprouts, you need fresh and simple ingredients. Here’s a complete list: - Salmon Fillets - 4 salmon fillets (5-6 oz each) - Brussels Sprouts - 1 lb Brussels sprouts, trimmed and halved - Maple Mustard Glaze Ingredients - 3 tablespoons Dijon mustard - 3 tablespoons pure maple syrup - 2 tablespoons extra virgin olive oil - 2 cloves garlic, finely minced - Seasoning and Garnishes - Salt and freshly cracked black pepper, to taste - 1 teaspoon smoked paprika for added depth - Fresh parsley, chopped (for garnish, optional) Each ingredient brings its own flavor. The salmon is rich and fatty. The Brussels sprouts are crisp and slightly bitter. The glaze adds a sweet and tangy kick. Mixing these flavors creates a dish that sings! If you want to make it even better, use high-quality maple syrup and fresh herbs. They add depth and freshness. Enjoy crafting this tasty meal! First, preheat your oven to 400°F (200°C). This helps cook the salmon and Brussels sprouts evenly. Next, line a large baking sheet with parchment paper. This makes cleanup easy and keeps your food from sticking. In a small bowl, whisk together the Dijon mustard and pure maple syrup. Add the extra virgin olive oil, minced garlic, smoked paprika, and a pinch of salt and pepper. Mix until smooth. This glaze gives the salmon a sweet and tangy flavor. Place the salmon fillets skin-side down on one side of the baking sheet. Use a brush or spoon to coat each fillet with the maple mustard glaze. Let some glaze drip down the sides for extra flavor. In another bowl, toss the halved Brussels sprouts with olive oil, salt, and pepper. Make sure each sprout is coated well. Spread the Brussels sprouts cut-side down on the other side of the baking sheet. This helps them brown and crisp nicely. Bake everything in the preheated oven for about 15-20 minutes. Check that the salmon is cooked through; it should reach 145°F internally. The Brussels sprouts should be tender with crispy edges. Once done, take the sheet pan out of the oven and let it rest for a few minutes. If you want, sprinkle freshly chopped parsley on top of the salmon before serving. Enjoy the beautiful colors and flavors on your plate! To cook salmon just right, start with fresh fillets. Look for bright color and firm texture. Make sure the fillets are about the same size for even cooking. I recommend checking the internal temperature. It should reach 145°F for safe eating. When in doubt, use a fork to check for flakiness. If it flakes easily, it's done! For the best Brussels sprouts, choose ones that are firm and bright green. Trim the ends and cut them in half. This helps them cook evenly. Toss them in olive oil and season well with salt and pepper. Place them cut-side down on the baking sheet. This position helps them get crispy and caramelized. Bake until they're tender and golden brown for great flavor. Don’t waste that tasty maple mustard glaze! After baking, you can drizzle any leftover glaze over the salmon and sprouts. It adds extra flavor and looks nice on the plate. If you have more glaze than you need, save it in a jar. Use it for other dishes, like chicken or roasted veggies. It's a quick way to add a sweet and tangy kick! {{image_4}} You can swap salmon for other proteins. Chicken breasts work well. They soak up the maple mustard glaze nicely. You can also use firm white fish like cod or halibut. These fish cook quickly and keep their flavor. For a plant-based option, try tofu. Just press it to remove excess water. Then marinate in the same maple mustard glaze. Brussels sprouts are great, but you can try other veggies too. Asparagus adds a nice crunch and cooks quickly. Broccoli florets or green beans are also good choices. These options can bring new flavors and textures. Just make sure to adjust cooking time for different vegetables. To boost flavors, think about adding different spices. A sprinkle of chili flakes can give a nice kick. You can also add a splash of lemon juice for brightness. Fresh herbs like thyme or dill can enhance the dish too. For a sweet twist, toss in sliced apples or pears with the veggies. These additions can elevate the meal and make it more fun. Store leftover salmon and Brussels sprouts in an airtight container. This keeps them fresh. Allow the dish to cool down before sealing. You can keep it in the fridge for up to three days. If you have extra glaze, store it separately in a small container. To reheat, place the salmon and Brussels sprouts on a baking sheet. Preheat your oven to 350°F (175°C). Bake for about 10-15 minutes or until heated through. You can also reheat in the microwave. Place on a microwave-safe plate and cover with a damp paper towel. Heat in 30-second intervals until warm. If you want to freeze the dish, wrap the salmon and Brussels sprouts tightly in plastic wrap. Then, place them in a freezer bag. This helps prevent freezer burn. You can freeze it for up to two months. To enjoy, thaw in the fridge overnight before reheating. You can pair this dish with many sides. Here are some great options: - Quinoa or rice for a filling base. - A fresh green salad for crunch and color. - Mashed potatoes for a creamy touch. - Roasted carrots or sweet potatoes for sweetness. These sides will enhance the meal and make it special. Yes, you can prep some parts in advance. You can mix the glaze a day before. Store it in the fridge for better flavor. You can also cut the Brussels sprouts ahead of time. Just keep them in a sealed bag. This will save time when you are ready to cook. The best way to check is to use a meat thermometer. Insert it into the thickest part of the salmon. It should read 145°F for done salmon. If you don't have a thermometer, check for flakiness. The fish should flake easily with a fork. It should look opaque and not glossy. Yes, this recipe is gluten-free! All the ingredients are safe for a gluten-free diet. The Dijon mustard is usually gluten-free, but check the label. This ensures everyone can enjoy this tasty dish without worry. This article covered how to make a tasty sheet pan meal with salmon and Brussels sprouts. We shared details on ingredients, cooking steps, and even tips for the best results. You can swap proteins or veggies, and I included storage tips too. Now that you know the process, I hope you’ll enjoy making this dish. It’s simple, healthy, and sure to impress anyone at your table. Dive into this fun cooking project and savor every bite!

Ready to impress your taste buds? This Sheet Pan Maple Mustard Salmon & Sprouts Delight is a game-changer! With its sweet and tangy glaze, this dish brings flavor and nutrition …

Read more

Categories Dinner

No-Bake Peanut Butter Pretzel Bars Simple and Tasty

September 23, 2025 by Chef Miles
To make these no-bake peanut butter pretzel bars, you will need: - 1 ½ cups crushed pretzels - 1 cup peanut butter - ½ cup honey or maple syrup - 2 cups rolled oats - 1 cup chocolate chips - ½ teaspoon salt - ½ teaspoon vanilla extract - ¼ cup mini chocolate chips for topping (optional) These ingredients create a perfect mix of sweet and salty. The pretzels add crunch, while the peanut butter binds everything together. You can easily switch things up! Use almond or cashew butter instead of peanut butter. Try agave syrup or brown sugar for different sweetness. For a nut-free version, sunflower seed butter works great. Want to add a bit more flair? Sprinkle some sea salt on top for a salty kick. You can also drizzle melted chocolate or caramel over the bars. Chopped nuts or dried fruit can give extra texture and taste. Start by crushing 1 ½ cups of pretzels. You can use a rolling pin or your hands to do this. Place the crushed pretzels in a large bowl. Next, add 2 cups of rolled oats to the bowl. Mix them well with a spoon. This blend creates a crunchy base for your bars. In a small saucepan, combine 1 cup of peanut butter, ½ cup of honey or maple syrup, ½ teaspoon of salt, and ½ teaspoon of vanilla extract. Heat this over low flame. Stir the mix often until it is smooth. Avoid boiling it. This mixture gives your bars a sweet and nutty flavor. Once your peanut butter mix is ready, pour it over the pretzel and oat mixture. Stir well until everything is coated. Next, gently fold in 1 cup of chocolate chips. Line an 8x8 inch baking pan with parchment paper. Pour the mixture into the pan and press it down firmly. If you want, sprinkle ¼ cup of mini chocolate chips on top. Press them in lightly. Place the pan in the fridge for at least 2 hours. This helps the bars firm up. After they set, lift them out and cut them into squares. Enjoy your tasty treat! Mixing is key to great bars. Start with dry ingredients. Combine crushed pretzels and oats first. This helps them mix well. Then, warm the peanut butter mix in a saucepan. Stir it until smooth. Pour this over the dry mix. This ensures even coating. Use a spatula to fold in the chocolate chips last. This keeps them from breaking. Peanut butter adds flavor and texture. You can choose creamy or crunchy. Creamy peanut butter gives a smooth bite. Crunchy peanut butter adds a fun crunch. Look for natural options with no added sugars or oils. This choice boosts the bars' taste and health. Serve these bars chilled for the best taste. Cut them into fun shapes for kids. Pair them with a glass of cold milk. This makes a tasty snack or dessert. You can also wrap them individually for on-the-go treats. These bars are fun to share at parties or picnics! {{image_4}} You can make these bars gluten-free by using gluten-free pretzels. Many brands offer great options that taste just as good. Check the label to ensure they are certified gluten-free. You can also swap out the oats for gluten-free rolled oats. This simple change keeps your bars tasty and safe for those with gluten issues. To make these bars vegan, use maple syrup instead of honey. Maple syrup is a great sweetener that works well in this recipe. For the chocolate chips, look for vegan chocolate chips. They taste amazing and keep the bars plant-based. Using these swaps makes the bars suitable for everyone! You can jazz up your bars with some fun flavors! Try adding a pinch of cinnamon for warmth. You might also enjoy a dash of sea salt on top for a sweet-salty mix. If you want, mix in nuts or seeds for extra crunch. Dried fruit can also add sweetness and chewiness. Get creative and make these bars your own! To keep your no-bake peanut butter pretzel bars fresh, store them in an airtight container. You can layer the bars with parchment paper to prevent them from sticking together. Place the container in the fridge. This way, they stay cool and firm. These bars last about one week in the fridge. If you want them to last longer, try freezing them. Wrap each bar tightly in plastic wrap. Then, place them in a freezer-safe bag. They can stay in the freezer for up to three months. When you want to eat one, thaw it in the fridge overnight. These bars are best enjoyed cold or at room temperature. If you prefer them warm, you can microwave a bar for about ten seconds. This will soften the chocolate and make it gooey. Just be careful not to overheat, as they can lose their shape. Enjoy every bite! Yes, you can use other nuts! Almonds, walnuts, or cashews work well. Just chop them up small. This adds different flavors and textures. If you like crunch, choose nuts that are roasted. You can even mix nuts for more variety. Just keep in mind that each nut has a unique taste. Experiment to find your favorite blend! To keep your bars from sticking, use less peanut butter or honey. Try adding more oats to the mix. This extra bulk helps absorb moisture. Make sure to press the mixture firmly into the pan. A well-packed layer reduces stickiness. You can also chill the bars longer. The colder they are, the firmer they will be! Yes, these bars are great for making ahead! You can prepare them up to a week in advance. Just store them in the fridge. Cut them into bars only when you are ready to serve. This keeps them fresh and tasty. Wrap them in plastic or keep them in an airtight container to prevent drying out. In this post, I shared how to make tasty no-bake peanut butter pretzel bars. We covered key ingredients, simple steps, and useful tips to enhance your bars. You can even try different flavors and toppings to suit your taste. These bars are easy to make and fun to enjoy. Experiment with variations and find what you love best. With the right storage, they stay fresh and delicious. Enjoy creating your perfect treat!

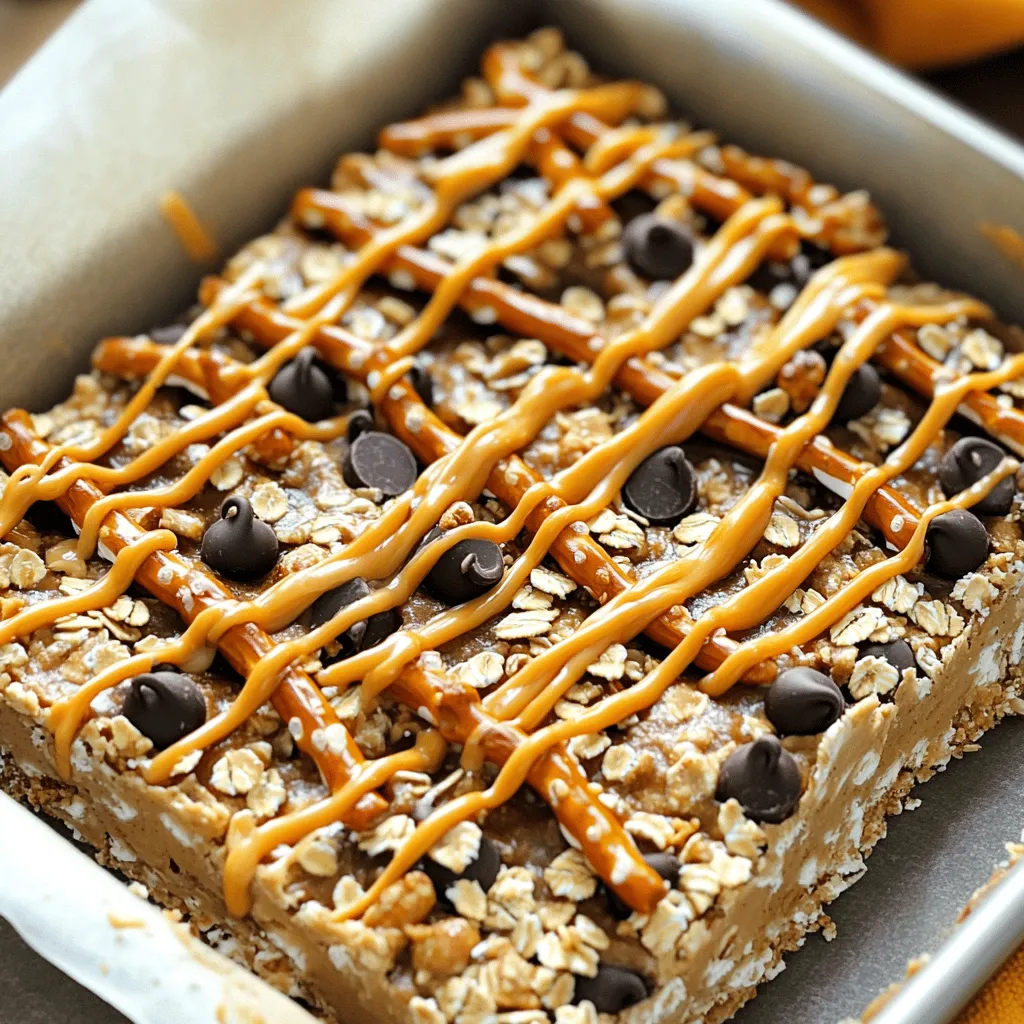
Are you ready for a sweet treat that’s simple to make? These No-Bake Peanut Butter Pretzel Bars combine salty and sweet for a tasty snack everyone loves. You’ll need just …

Read more

Categories Desserts

Slow Cooker Loaded Chili Mac Flavorful Comfort Meal

September 23, 2025 by Chef Miles
- 1 pound ground beef or turkey - 1 can (15 oz) kidney beans, rinsed and drained - 1 can (15 oz) black beans, rinsed and drained - 1 can (14.5 oz) diced tomatoes with green chilies - 1 can (6 oz) tomato paste - 2 cups beef or vegetable broth - 1 cup elbow macaroni For the heart of this dish, the main ingredients are key. I often choose ground beef or turkey for a hearty base. Both options give great flavor. Then, I add kidney beans and black beans for extra protein and fiber. They make the chili mac filling and satisfying. Diced tomatoes add a juicy touch, while tomato paste thickens the mix. Finally, broth brings everything together, and elbow macaroni provides that comforting texture. - 1 tablespoon chili powder - 1 teaspoon ground cumin - 1 teaspoon smoked paprika - 1 teaspoon garlic powder - 1 teaspoon onion powder - Salt and pepper to taste To boost flavor, I rely on spices. Chili powder is a must for warmth. Ground cumin adds earthiness, while smoked paprika gives a hint of smoke. Garlic powder and onion powder add depth and sweetness. I adjust salt and pepper to bring all these flavors to life. - 1 cup shredded sharp cheddar cheese - 1/2 cup sour cream (for serving) - Green onions, sliced (for garnish) Once cooked, I love to top the chili mac with shredded sharp cheddar cheese. It melts beautifully, adding richness. A dollop of sour cream cools the heat and adds creaminess. Sliced green onions not only add color but also a fresh crunch. Together, these garnishes create a dish that looks as good as it tastes. Start by browning 1 pound of ground beef or turkey in a skillet. Use medium heat to cook until it is no longer pink. This will take about 5 to 7 minutes. Season it with salt and pepper for extra flavor. If there's any fat left, drain it from the skillet. Once cooked, transfer the meat to your slow cooker. This step gives your chili mac a hearty base. Now, add the good stuff! Into the slow cooker, put: - 1 can (15 oz) kidney beans, rinsed and drained - 1 can (15 oz) black beans, rinsed and drained - 1 can (14.5 oz) diced tomatoes with green chilies - 1 can (6 oz) tomato paste - 2 cups beef or vegetable broth Stir these ingredients well. This creates a rich, flavorful mixture. Next, mix in 1 cup of elbow macaroni along with: - 1 tablespoon chili powder - 1 teaspoon ground cumin - 1 teaspoon smoked paprika - 1 teaspoon garlic powder - 1 teaspoon onion powder Make sure everything combines evenly. This ensures every bite is packed with flavor! Cover your slow cooker with its lid. Set it to cook on low for 6 to 8 hours or on high for 3 to 4 hours. You want the macaroni to be tender and the chili to be hot. About 15 minutes before serving, add 1 cup of shredded sharp cheddar cheese. Stir gently until the cheese melts. This makes the dish creamy and rich. Don’t forget to taste and adjust the seasonings with salt and pepper as needed. Serve your loaded chili mac hot. Top it with sour cream and sliced green onions for a fresh touch. Enjoy this comforting meal! To make your chili mac even better, tweak the spices. You can add more chili powder if you love heat. A pinch of cayenne pepper or red pepper flakes also works well. These will give it a nice kick. Adding a splash of hot sauce at the end can really elevate your dish. If you want it smoky, try more smoked paprika. Mix and match until you find your best flavor. If you want to switch things up, use ground chicken or a plant-based meat. Both options taste great and keep the dish light. For perfect macaroni, add it halfway through cooking. This way, it won't get too soft. Stir gently when you add it to the pot. Pair your chili mac with a fresh salad or some cornbread. These sides add nice texture and flavor. For leftovers, try topping a baked potato with chili mac. It’s a fun twist! You can even make chili mac tacos with tortillas. Just scoop it in, and enjoy! {{image_4}} You can easily make a vegetarian version of Slow Cooker Loaded Chili Mac. Just replace the ground beef or turkey with plant-based protein like lentils or veggie crumbles. - For a heartier dish, add these vegetables: - Bell peppers - Zucchini - Corn These options will add color and nutrition. Plus, they taste great! If you love cheese, try different types for a richer flavor. Sharp cheddar is a classic choice, but you can switch it up with: - Pepper jack for a spicy kick - Mozzarella for a creamy texture - Gouda for a smoky flavor Mix in fresh herbs like basil or parsley for a gourmet touch. It will elevate your dish and impress your guests! Want some heat? Add jalapeños or a splash of hot sauce to give it a zesty kick. - You can also try different beans like: - Pinto beans for a creamier texture - White beans for a mild flavor Feel free to mix in barbecue sauce or salsa for a fun twist! These additions will make your chili mac truly unique. To store your leftover Slow Cooker Loaded Chili Mac, let it cool first. Use an airtight container for best results. This keeps the flavors fresh and prevents spills. You can refrigerate it for up to four days. Make sure to label the container with the date. This way, you know when to eat it! Freezing is a great option if you have more than you can eat. To freeze, let the chili mac cool completely. Then, pack it into freezer-safe containers. You can use freezer bags as well. Squeeze out the air to avoid freezer burn. It can last in the freezer for up to three months. When you are ready to eat, thaw it in the fridge overnight. To reheat, use a pot or microwave. Add a splash of broth to keep it moist. This helps keep the flavor and texture. When reheating your leftovers, the stove is the best method. Heat it on low, stirring often. This way, it warms evenly. If using a microwave, heat in short intervals. Stir between each interval to avoid hot spots. To keep the macaroni from getting soggy, don’t overheat. Just warm it enough until it’s hot. You want to enjoy that perfect texture! To make your Slow Cooker Loaded Chili Mac gluten-free, choose gluten-free pasta. Rice pasta or lentil-based pasta works well. You can also replace regular broth with gluten-free broth. Always check labels on canned goods to ensure they are gluten-free. For extra substitutions, use lentils instead of beans for added protein. You can swap the ground meat for a gluten-free meat alternative, like ground turkey or a plant-based option. These changes keep the dish tasty while meeting gluten-free needs. Yes, you can use canned chili in your Slow Cooker Loaded Chili Mac. Canned chili saves time and adds flavor. However, it may have more salt and spices than you want. Consider this when mixing with other ingredients. Adjustments to the recipe include reducing added spices like chili powder. You might want to taste the mixture before adding salt. This ensures the flavors blend well without overwhelming the dish. To adjust the spice level, you can add or reduce chili powder in the mix. Start with a smaller amount if you're unsure. Taste and add more if needed. This way, you control the heat. You can also add jalapeños or hot sauce for an extra kick. For milder flavors, consider adding sour cream while serving. This balances the heat and makes the meal creamy and rich. This blog post outlined how to make a delicious Slow Cooker Loaded Chili Mac. You learned about the key ingredients, tasty spices, and creative garnishes. The step-by-step instructions guided you through each process from browning meat to serving. Tips helped enhance your dish's flavor and showed variations like vegetarian options. Storing and reheating tips ensure your leftovers stay tasty. Enjoy making this comforting meal, and feel free to adapt it to your taste. Happy cooking!

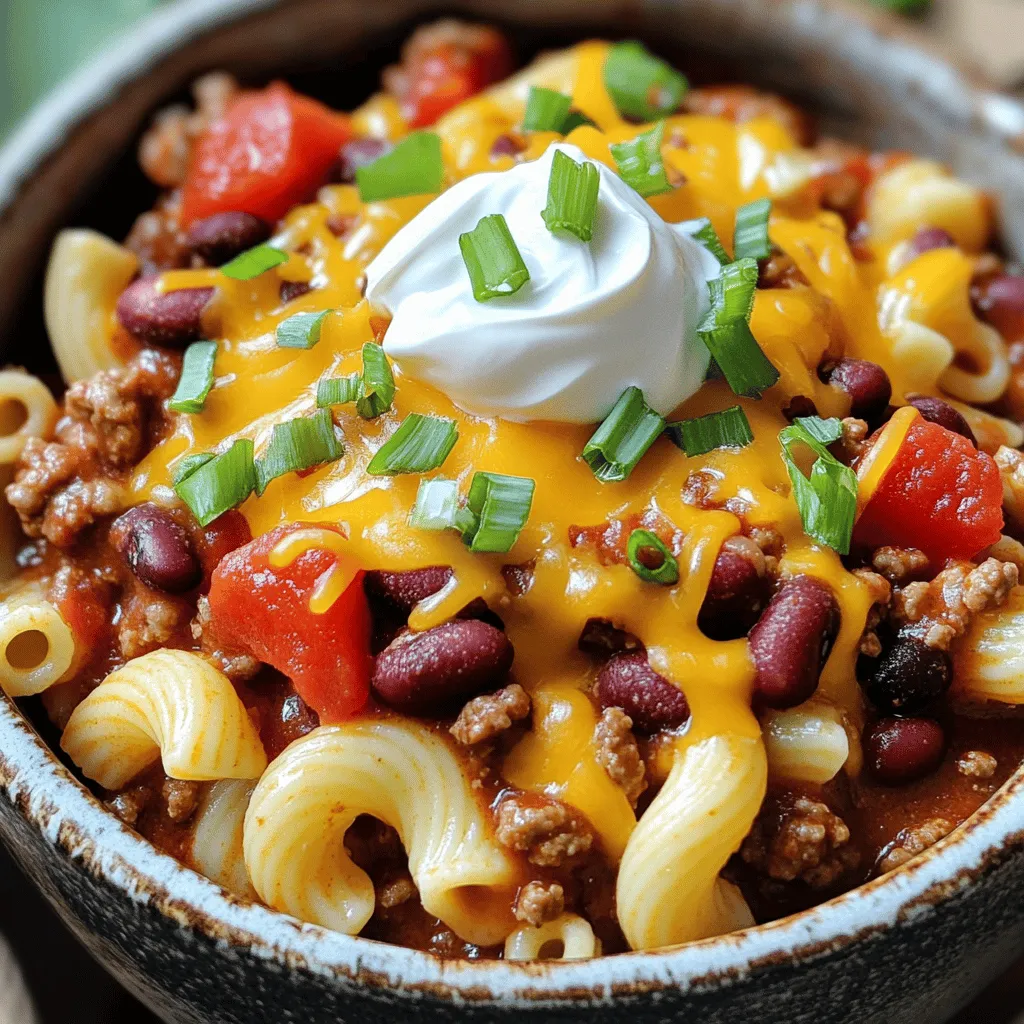
Are you ready for a warm, hearty meal that’s easy to make? Slow Cooker Loaded Chili Mac is just what you need. With ground meat, beans, and pasta simmered in …

Read more

Categories Dinner

Teriyaki Shrimp Veggie Stir-Fry Quick and Easy Recipe

September 23, 2025 by Chef Miles
- Shrimp specifications: Use 1 lb of shrimp, peeled and deveined. Fresh shrimp gives the best flavor. - Vegetables required: You need 1 bell pepper (any color), 1 cup broccoli florets, and 1 cup snap peas. These veggies add color and crunch. - Additional garnishes: For a tasty finish, add 2 sliced green onions and 1 tablespoon sesame seeds. - Vegetable oil types: I prefer using vegetable oil or canola oil. Both work well for stir-frying. - Teriyaki sauce options: Choose a low-sodium teriyaki sauce to control salt levels. This keeps the dish healthier. - Rice or quinoa alternatives: Serve the stir-fry over cooked rice or quinoa. Both options are filling and complement the dish. - Prepping shrimp and vegetables: Start with 1 pound of shrimp. Make sure they are peeled and deveined. Next, wash and slice your bell pepper. You can choose any color you like. Rinse 1 cup of broccoli florets and 1 cup of snap peas. These veggies add color and crunch. - Cooking rice or quinoa: You can choose either rice or quinoa as your base. If you pick rice, cook it according to package directions. For quinoa, rinse it well and use a 2:1 water to quinoa ratio. Bring water to a boil, add quinoa, cover, and simmer for about 15 minutes. - Heating oil and cooking shrimp: Grab a large skillet or wok. Heat 1 tablespoon of vegetable oil over medium-high heat. Once the oil shimmers, add the shrimp. Cook for about 2-3 minutes on each side. Look for them to turn pink and opaque. When done, set the shrimp aside on a plate. - Stir-frying vegetables with aromatics: In the same skillet, add the second tablespoon of vegetable oil. Heat it and toss in your sliced bell pepper, broccoli, and snap peas. Stir-fry these for 4-5 minutes. You want them to be tender but still crisp. Then add 2 minced garlic cloves and 1-inch grated ginger. Stir for about 1 minute until fragrant. - Adding teriyaki sauce and finishing touches: Return the shrimp to the skillet. Pour in 1/4 cup of low-sodium teriyaki sauce. Gently toss everything to coat. Let it cook for an additional 2 minutes to heat through. - Serving suggestions: Remove the skillet from heat. Garnish with sliced green onions and a sprinkle of sesame seeds. Serve the stir-fry over a mound of warm rice or quinoa. This makes for a colorful and tasty meal. Cooking shrimp perfectly To cook shrimp just right, start with a hot skillet. Add a tablespoon of vegetable oil. When the oil shimmers, place the shrimp in the pan. Cook them for 2-3 minutes on each side. Look for that lovely pink color. Once they are opaque, they are done. Overcooking makes shrimp tough, so watch them closely. Achieving the ideal vegetable texture For crisp vegetables, stir-fry them quickly. After the shrimp, use the same skillet. Heat another tablespoon of oil, then add bell pepper, broccoli, and snap peas. Cook for about 4-5 minutes. Keep the heat high and stir often. You want them to stay bright and crunchy. Recommended seasonings For extra taste, add minced garlic and grated ginger to the veggies. This adds a nice aroma. You can also sprinkle in a pinch of red pepper flakes for heat. If you like more depth, try adding a dash of soy sauce. It boosts the umami flavor. Adjusting sauce levels for taste The teriyaki sauce is key. Use 1/4 cup for a balanced flavor. If you love a stronger taste, add more sauce. Taste as you go. It’s easy to adjust based on your preference. Just remember, too much sauce can make it soggy. Enjoy finding your perfect balance! {{image_4}} You can easily swap shrimp for other proteins. Chicken works well and is tasty. To keep it plant-based, use tofu instead. Just make sure to press the tofu to remove excess water. Feel free to mix up the vegetables too. Try adding carrots, bell peppers, or zucchini. Each veggie brings its own flavor and crunch. You can also use frozen vegetables if fresh ones aren't available. Want to make your own teriyaki sauce? It's simple! Mix 1/4 cup soy sauce, 2 tablespoons honey, 1 tablespoon rice vinegar, and a teaspoon of cornstarch. This sauce will give you a sweet and savory kick. For a low-calorie option, use low-sodium soy sauce. You can also add a bit of honey or agave syrup for sweetness without too many calories. This keeps your stir-fry healthy and delicious. To keep your teriyaki shrimp veggie stir-fry fresh, follow these steps: - Allow the stir-fry to cool down to room temperature. - Store leftovers in an airtight container. This helps keep out moisture and air. - Use glass or plastic containers that seal well. They prevent spills and odors from spreading. - Label the container with the date. This helps you track how long it has been stored. You can keep the stir-fry in the fridge for up to three days. After that, the taste and texture may change. Reheating your stir-fry properly is key for the best taste. Here’s how: - Use a skillet for the best results. Heat it over medium heat. - Add a splash of water or broth to keep it moist. - Stir the mixture gently to heat it evenly. This should take about 5-7 minutes. You can also use a microwave if you’re in a hurry: - Place the stir-fry in a microwave-safe bowl. - Cover it loosely with a lid or paper towel. - Heat for 1-2 minutes, stirring halfway through. Make sure it is heated all the way through before serving. Enjoy your delicious meal again! Yes, you can use frozen shrimp for this recipe. Just make sure to thaw them first. Place the shrimp in a bowl of cold water for about 15-20 minutes. Once thawed, pat them dry before cooking. This way, they will cook evenly and not release too much water into the stir-fry. You can serve teriyaki shrimp veggie stir-fry with warm cooked rice or quinoa. Both options soak up the delicious sauce well. You can also add a side of steamed edamame or a fresh salad. This adds more color and nutrients to your meal. The recipe can be made gluten-free by using gluten-free teriyaki sauce. Many brands offer gluten-free options, so look for those in stores. Also, choose gluten-free rice or quinoa, which are naturally gluten-free. Enjoy this dish without worry! In this article, we covered how to make a delicious teriyaki shrimp veggie stir-fry. We discussed fresh ingredients like shrimp and vegetables, pantry staples like oils and sauces, and essential preparation and cooking steps. I shared tips for perfecting your stir-fry and suggested ingredient swaps and sauce alternatives. Remember to store leftovers properly and follow reheating tips for the best taste. Enjoy experimenting with flavors and combinations, and I hope you create a meal that delights you!

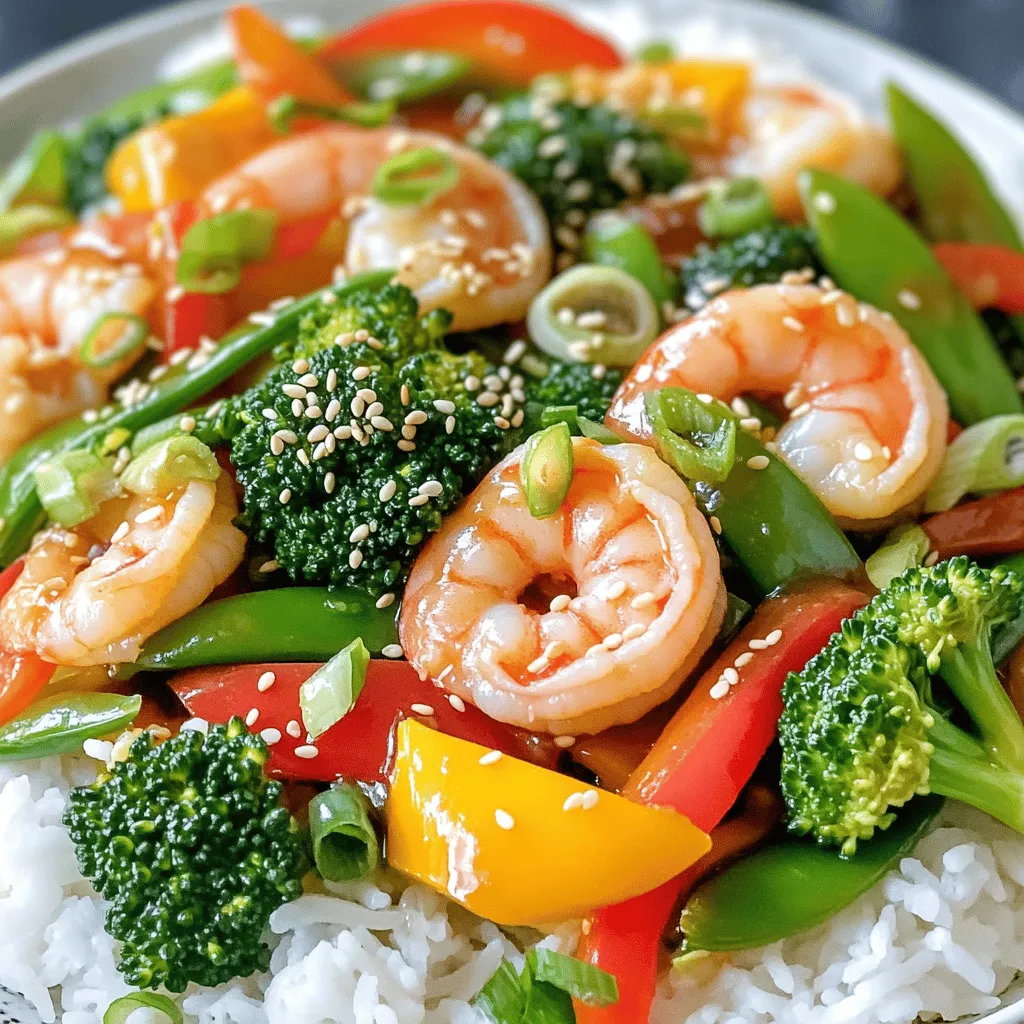
If you’re looking for a quick meal that’s filled with flavor and goodness, this Teriyaki Shrimp Veggie Stir-Fry is for you! It’s an easy recipe that combines juicy shrimp and …

Read more

Categories Dinner

No-Bake Oreo Peanut Butter Bars Easy Dessert Recipe

September 21, 2025 by Chef Miles
- 24 Oreo cookies, finely crushed - 1 cup creamy peanut butter - 1/2 cup unsalted butter, melted - 1 cup powdered sugar - 1 teaspoon vanilla extract - 1 cup semi-sweet chocolate chips - 2 tablespoons coconut oil (optional for a smoother chocolate layer) These simple ingredients create a treat that everyone loves. The process starts with crushed Oreo cookies, which add a nice crunch and sweet flavor. I always use creamy peanut butter for a smooth texture. Unsalted butter helps bind everything together. The powdered sugar sweetens the mix, while vanilla extract adds depth. For the chocolate layer, semi-sweet chocolate chips are perfect. If you want the chocolate to be smoother, you can add coconut oil. It makes the chocolate shine and pour easily. Each ingredient plays a key role in making these bars delicious and easy to enjoy. - Mixing Crushed Oreos and Butter: First, take 24 Oreo cookies and crush them finely. Place the crushed cookies in a large bowl. Melt 1/2 cup of unsalted butter. Pour the melted butter over the crushed Oreos. Mix them until it looks like wet sand. This mix will be the base for our bars. - Incorporating Peanut Butter & Sugar: Now, add 1 cup of creamy peanut butter to the cookie mix. Next, pour in 1 cup of powdered sugar. Add 1 teaspoon of vanilla extract for flavor. Stir well until you have a smooth mixture. Make sure there are no lumps left. - Preparing the Baking Dish: Grab an 8x8-inch baking dish. Line it with parchment paper. Leave some paper hanging over the sides to lift the bars out later. This makes it easy to cut and serve. - Pressing the Mixture into the Dish: Transfer the Oreo peanut butter mix into the dish. Use a spatula or the back of a measuring cup to press it down firmly. Spread it evenly across the bottom. Make sure to pack it tightly so it holds its shape. - Melting Chocolate and Coconut Oil: In a microwave-safe bowl, add 1 cup of semi-sweet chocolate chips. If you want, include 2 tablespoons of coconut oil for a smoother topping. Heat the bowl in the microwave for 30 seconds. Stir well and heat again until the chocolate is fully melted. - Spreading Chocolate Over the Bars: Carefully pour the melted chocolate over the peanut butter layer. Use a spatula to spread it evenly across the top. Ensure every part is covered with chocolate. Now, place the dish in the fridge for at least 2 hours. This step is key to getting your bars nice and firm. Enjoy the process! To ensure smoothness without lumps, mix the crushed Oreos and melted butter first. Stir until it looks like wet sand. When you add peanut butter, powdered sugar, and vanilla, mix well. Use a sturdy spoon or spatula to break up any lumps. Keep mixing until the mixture is creamy and smooth. For the proper packing method for the base, use a spatula or the back of a measuring cup. Press the mixture firmly into the dish. Make sure it is packed tightly. This helps the bars hold their shape when you cut them. Timing for refrigeration is key. Chill the bars for at least two hours. This time helps the bars set up well. If you want firmer bars, chill them longer. Signs the bars are ready to cut include a firm touch. They should feel solid but not rock hard. If they still feel soft, give them more time in the fridge. For serving options, arrange the bars on a nice platter. You can cut them into squares or rectangles. This makes them easy to grab. Garnishes and drizzles can enhance the look of your bars. Sprinkle some crushed Oreos on top for a fun texture. A drizzle of extra melted chocolate or peanut butter adds flair. This makes your dessert not just tasty but also beautiful! {{image_4}} You can make these bars nut-free by swapping peanut butter for sunflower seed butter. This change keeps the creamy texture while removing allergens. Sunflower seed butter has a lovely, mild flavor that pairs well with Oreos. It works perfectly in this recipe, so feel free to try it! To add a twist, think about mixing in different extracts or flavors. Almond or mint extracts can give a fun taste boost. You can also mix in chopped nuts or candies for extra crunch and flavor. Try adding mini chocolate chips or crushed candies to make it even more exciting! You have choices for the chocolate topping too. Dark chocolate offers a rich taste, while milk chocolate is sweeter. Both pair well with the creamy peanut butter. If you want something unique, consider a white chocolate layer. It adds a nice contrast and sweetness. - Storing in the Refrigerator After making your No-Bake Oreo Peanut Butter Bars, let them chill in the fridge. Wrap the bars tightly with plastic wrap or foil. This keeps them fresh and stops them from drying out. The cold helps them stay firm and tasty. - Freezing the Bars for Longer Shelf Life For longer storage, you can freeze these bars. Cut them into squares first. Then, place them in an airtight container or freezer bag. Make sure to separate layers with parchment paper. They can last up to three months in the freezer. - How Long Do They Last? In the fridge, these bars stay fresh for about one week. If you freeze them, they can last for three months. Just remember to check your bars before eating. - Signs of Spoilage to Look For Look for any change in color or smell. If the bars feel sticky or have a weird taste, it's best to throw them away. Always trust your senses when deciding if food is safe to eat. Yes, you can use gluten-free Oreos. They work just like regular Oreos. The taste and texture remain delicious. This makes the bars a great option for those with gluten allergies. Absolutely! You can swap peanut butter with sun butter or almond butter. These options give a nice flavor while keeping the bars creamy. Just ensure your choice has a similar texture to peanut butter. If your bars are too hard, let them sit at room temperature. This makes them easier to cut. You can also warm them slightly in the microwave for a few seconds. Be careful not to melt them. You can use granulated sugar blended until fine. This creates a similar texture. You can also try coconut sugar for a different flavor. Just make sure it dissolves well in the mixture. Yes, you can easily double the recipe. Just use a larger baking dish to hold more mixture. Keep the same ratios for all ingredients. This way, everyone gets more of these tasty bars! These no-bake Oreo peanut butter bars are easy and fun to make. You mix Oreos, peanut butter, and a few other simple ingredients. Then, you chill them for the perfect treat. Remember, you can experiment with flavors and toppings. Store them well for lasting taste. Enjoy these bars at gatherings or just for yourself. With this guide, you can whip up a tasty dessert in no time!

Looking for a sweet treat that’s easy and delicious? I’ve got you covered with No-Bake Oreo Peanut Butter Bars! This simple dessert combines creamy peanut butter and crunchy Oreos for …

Read more

Categories Desserts

One-Pot Creamy Lemon Shrimp Risotto Delight

September 21, 2025 by Chef Miles
- 1 cup Arborio rice - 4 cups low-sodium chicken broth - 1 pound shrimp, peeled and deveined - 1 medium onion, finely chopped - 2 cloves garlic, minced - 1 cup frozen peas - 1 tablespoon olive oil - 1 tablespoon unsalted butter - 1/2 cup freshly grated Parmesan cheese - Zest of 1 lemon - 2 tablespoons fresh lemon juice - Salt and freshly cracked black pepper, to taste - Fresh parsley, finely chopped (for garnish) Fresh ingredients make a big difference in flavor. Using fresh shrimp brings a sweet taste and a firm texture. Fresh lemon juice brightens the dish and adds zing. When you use fresh herbs like parsley, you get a burst of color and flavor. Always pick the best ingredients you can find. They lead to a better meal and more enjoyment. To cook this risotto, you need a few key tools. - A large pot or deep skillet is a must. It helps to stir the rice and cook it evenly. - A wooden spoon works well for stirring. It helps prevent sticking. - A sharp knife and cutting board help with chopping onions and garlic. - Lastly, a measuring cup and spoons ensure you add the right amounts of each ingredient. These simple tools make the cooking process smooth and fun! First, gather your ingredients. You need: - 1 cup Arborio rice - 4 cups low-sodium chicken broth - 1 pound shrimp, peeled and deveined - 1 medium onion, finely chopped - 2 cloves garlic, minced - 1 cup frozen peas - 1 tablespoon olive oil - 1 tablespoon unsalted butter - 1/2 cup freshly grated Parmesan cheese - Zest of 1 lemon - 2 tablespoons fresh lemon juice - Salt and freshly cracked black pepper, to taste - Fresh parsley, finely chopped (for garnish) Chop the onion and mince the garlic. This will help the flavors mix well. Start by heating the olive oil in a large pot over medium heat. Once the oil shimmers, add the chopped onion. Sauté it for about 3-4 minutes until it becomes soft and clear. Then, stir in the minced garlic. Cook for one more minute. You want it fragrant but not burnt. Next, add the Arborio rice. Toast it gently for 1-2 minutes. Stir it often so every grain gets a bit of heat. Now, slowly pour in the chicken broth. Turn up the heat until it simmers. Once it simmers, lower the heat and cover the pot. Let it cook for 18-20 minutes. Stir it occasionally. The rice should be creamy and firm. While the risotto cooks, grab a separate pan. Melt the butter over medium heat. Add the shrimp and season with salt and black pepper. Cook for 5-6 minutes. They should turn pink and opaque. Take them off the heat and set them aside. When your risotto is ready, gently fold in the frozen peas, cooked shrimp, lemon zest, and lemon juice. Stir in the Parmesan cheese until it melts into the risotto. Taste it and add more salt and pepper if you want. Serve the risotto hot. Garnish it with fresh parsley for a nice touch. Enjoy your creamy, lemony delight! To make your risotto creamy, use Arborio rice. This rice has a high starch content. When you cook it slowly, it releases this starch. Stir often, as this helps create that creamy texture. Always add warm broth, not cold, to maintain a steady temperature. This helps the rice cook evenly. For perfect shrimp, start with fresh or well-thawed shrimp. Cook them in a hot pan with butter. They only need about 5-6 minutes. Look for a lovely pink color. Overcooked shrimp gets tough. Season them with salt and pepper for extra flavor. One mistake is not stirring enough. Stirring helps the rice absorb broth and become creamy. Another error is adding cold broth. Always use warm broth to ensure even cooking. Lastly, don't skip the cheese! Parmesan adds creaminess and flavor. Enjoy your cooking! {{image_4}} You can easily make a vegetarian version of this dish. Replace shrimp with mushrooms. I love using cremini or shiitake mushrooms. They add a nice, earthy flavor. You can also use zucchini or asparagus for a fresh touch. For protein, add some chickpeas or white beans. This keeps the dish hearty. Don’t forget to use vegetable broth instead of chicken broth. It gives the same creamy texture and flavor. To make this risotto pop, think about adding more flavors. Try using fresh herbs like basil or thyme. They add brightness to the dish. You can also add sun-dried tomatoes for a sweet and tangy taste. If you want a kick, sprinkle in some red pepper flakes. For a richer flavor, consider adding a splash of white wine when cooking the rice. It gives depth and pairs well with lemon. If you need a substitute for Parmesan cheese, no problem! Nutritional yeast gives a cheesy flavor for a vegan option. You can also try Pecorino Romano for a sharper taste. If you don’t have either, just use any hard cheese you enjoy. Grated cheddar or gouda works well too. Just remember, each cheese will change the flavor slightly. Always taste as you go to ensure it meets your liking. After enjoying your One-Pot Creamy Lemon Shrimp Risotto, store leftovers in an airtight container. Let the risotto cool down to room temperature first. It will stay fresh in the fridge for up to three days. Be sure to label the container with the date, so you know when to eat it. To reheat, you can use the stove or microwave. For the stove, add the risotto to a pot. Stir in a splash of broth or water. Heat it over low heat, stirring often until warm. If using a microwave, place the risotto in a microwave-safe bowl. Cover it and heat in short intervals, stirring in between. This helps keep it creamy. You can freeze risotto, but it may lose some creaminess. To freeze, let it cool completely. Portion it out in airtight containers or freezer bags. Make sure to remove as much air as possible. It can stay in the freezer for up to two months. When you’re ready to eat, thaw it in the fridge overnight, then reheat as described above. Yes, you can use other rice types. However, Arborio rice is best for risotto. It has a high starch content, which gives the dish its creamy texture. If you choose a different rice, like long-grain, it won’t be as creamy. Stick with Arborio for the best results. To add spice, try these simple ideas: - Add red pepper flakes while cooking the shrimp. - Mix in diced jalapeños when sautéing onions. - Serve with a spicy sauce on the side. These options will give your risotto a nice kick without overpowering the lemon flavor. This risotto pairs well with several sides: - A simple green salad with a light vinaigrette. - Steamed asparagus or broccoli for a healthy touch. - Garlic bread for a comforting addition. Choose one or two sides to complete your meal and enjoy a balanced dinner. In this post, we explored making a delicious One-Pot Creamy Lemon Shrimp Risotto. We covered the essential ingredients, the importance of freshness, and the tools you'll need. You learned the step-by-step process, tips for creaminess, and how to avoid common mistakes. Plus, we shared variations for different tastes and storage tips. Cooking can be fun and easy with the right info. Remember, practice makes perfect, and soon you’ll impress everyone with your risotto skills.

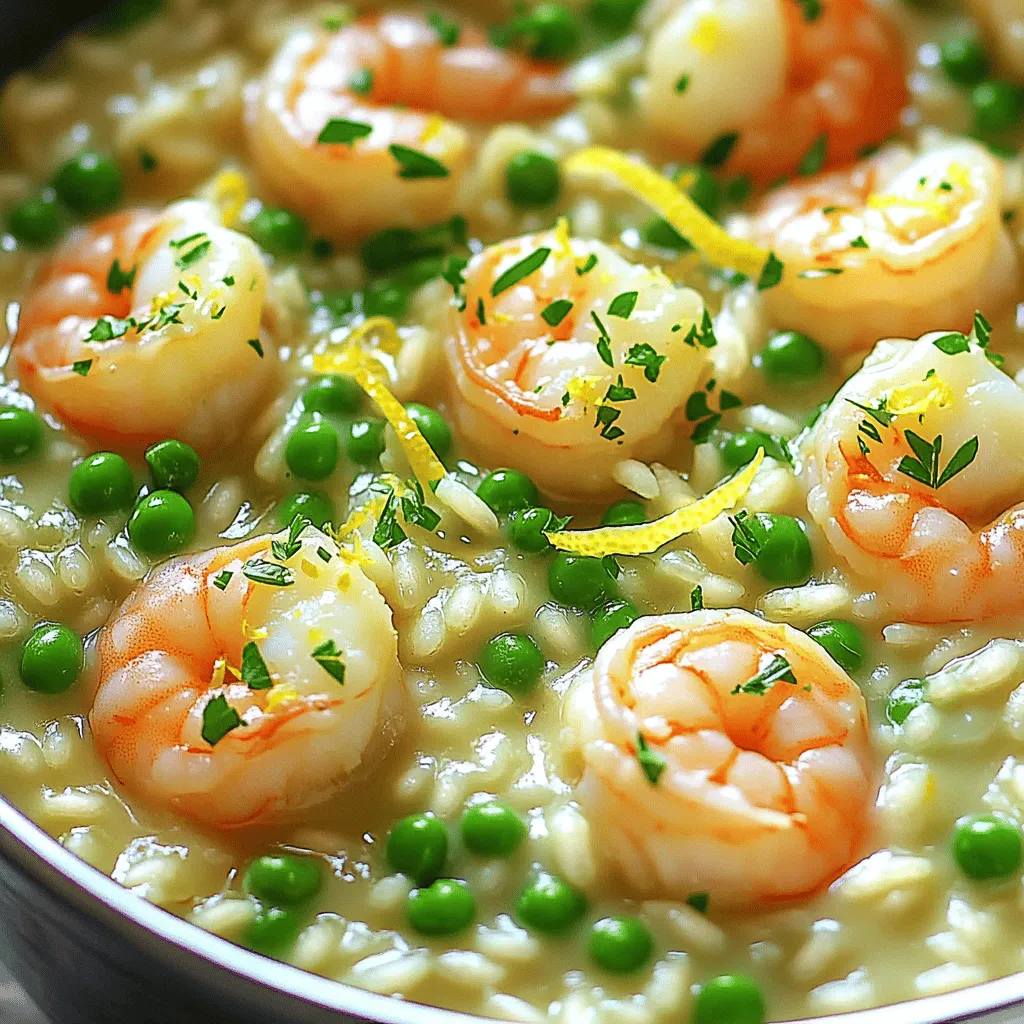
Welcome to your new favorite dinner recipe: One-Pot Creamy Lemon Shrimp Risotto Delight! If you want a dish that’s rich, easy to make, and bursting with fresh flavors, you’re in …

Read more

Categories Dinner

Spicy Kung Pao Tofu Better Than Takeout Delight

September 21, 2025 by Chef Miles
- 14 oz firm tofu, pressed and cut into cubes - 3 tablespoons low-sodium soy sauce - 1 tablespoon cornstarch - 2 tablespoons vegetable oil - 1 tablespoon sesame oil - 1 red bell pepper, diced - 1 green bell pepper, diced - 1 cup unsalted roasted peanuts - 4 green onions, chopped (keep white and green parts separate) - 2 cloves garlic, minced - 1 tablespoon fresh ginger, finely minced - 3 dried red chilies, deseeded and chopped - 2 tablespoons rice vinegar - 1 tablespoon honey or maple syrup - 1 teaspoon hoisin sauce - Salt and pepper to taste - Sesame seeds - Extra green onions I love using firm tofu in this recipe. It holds its shape well and soaks up all the flavors. The soy sauce and cornstarch create a great marinade. The vegetable oils add richness and help to crisp up the tofu. I pick fresh veggies like red and green bell peppers for color and crunch. Don't skip the peanuts; they add a nice texture. The garlic and ginger give a fantastic aroma. Adjust the dried red chilies to make your dish as spicy as you like. The rice vinegar and sweetener balance the heat and add depth. For a beautiful finish, I like to sprinkle sesame seeds on top. Extra green onions not only look nice but also add a fresh kick. These ingredients come together to make a dish that is truly better than takeout. 1. Marinating with soy sauce and cornstarch Start with 14 oz of firm tofu. Press it to remove excess water. Cut the tofu into small cubes. In a large bowl, mix the tofu with 3 tablespoons of low-sodium soy sauce and 1 tablespoon of cornstarch. Toss until the tofu is well-coated. Let it marinate for 15 minutes. This step helps to absorb the flavors. 2. Pan-frying for crispiness Heat a large skillet or wok over medium-high heat. Add 2 tablespoons of vegetable oil and let it get hot. Carefully add the marinated tofu cubes. Cook them for about 8-10 minutes. Turn them until they are golden brown and crispy on all sides. Once done, remove the tofu and set it aside on a plate. 1. Sautéing aromatics and peppers In the same skillet, lower the heat a bit. Add 1 tablespoon of sesame oil. Then, add 2 cloves of minced garlic, 1 tablespoon of minced ginger, and 3 chopped dried red chilies. Sauté for about 30 seconds. This will release a wonderful aroma. 2. Stir-frying technique Now, add 1 diced red bell pepper, 1 diced green bell pepper, and the white parts of 4 chopped green onions. Stir-fry these for 3-4 minutes. This keeps the colors bright while softening the veggies a bit. 1. Creating the sauce In a small bowl, whisk together 2 tablespoons of rice vinegar, 1 tablespoon of honey (or maple syrup), and 1 teaspoon of hoisin sauce. Add a splash of water to make it smooth. This sauce will bring the dish together. 2. Final mixing and garnishing Return the crispy tofu to the skillet. Pour the sauce over the tofu and veggies. Stir everything well for about 2-3 minutes. This helps the sauce thicken and coat the ingredients. Finally, fold in 1 cup of unsalted roasted peanuts and the green parts of the green onions. Season with salt and pepper to taste. Toss everything together one last time. Serve hot, garnished with sesame seeds for a lovely touch. - Pressing tofu is key. It removes excess water. This helps the tofu absorb flavors. - For crispy tofu, pan-fry it in hot oil. Aim for golden brown on all sides. - Choose dried red chilies based on your heat preference. Deseed them if you want less spice. - Balance heat with sweetness. Honey or maple syrup works well. This adds a nice touch. - Add more vegetables like carrots or snap peas for extra flavor and crunch. - Use fresh herbs like basil or cilantro for a burst of freshness. They brighten the dish. {{image_4}} - Vegan modifications: This recipe is already vegan since it uses tofu and no animal products. You can easily replace honey with maple syrup for a fully vegan option. - Gluten-free options: Use tamari instead of soy sauce to keep the dish gluten-free. This small swap ensures you enjoy the same great taste without gluten. - Using different vegetables: Feel free to swap in your favorite veggies. Broccoli, snap peas, or carrots can add great color and flavor. Just remember to cut them into small pieces for even cooking. - Alternative protein sources: If you want variety, try tempeh or seitan as protein options. Both provide different textures and flavors that can work well in this dish. - Recommended side dishes: Serve your spicy Kung Pao tofu with steamed jasmine rice or noodles for a complete meal. Both options soak up the sauce nicely. - Creative presentation ideas: Make your dish pop by using a large serving bowl. Arrange the Kung Pao tofu in the center and sprinkle sesame seeds on top. Add a few green onion slices for color. To keep your spicy kung pao tofu fresh, store it in an airtight container. This helps prevent moisture loss and keeps flavors intact. You can refrigerate leftovers for up to four days. Make sure to let the tofu cool down before sealing it. If you want to save some for later, freezing is a great option. Place the cooled kung pao tofu in a freezer-safe container. It can last up to three months in the freezer. When you're ready to eat, thaw it in the fridge overnight. To reheat, warm it in a skillet over low heat. You can add a splash of water to help revive the sauce. Stir often to avoid sticking. This method keeps the flavors bright and tasty. Serve your kung pao tofu hot for the best flavor and texture. If you have leftovers, reheat them gently. Use the stovetop or microwave with a damp paper towel to keep it moist. This way, the dish stays delicious and enjoyable. Yes, you can prepare Kung Pao Tofu ahead of time. Here are some tips: - Marinate the tofu and store it in the fridge for up to 24 hours. - Cook the tofu and veggies, then let them cool. - Store everything in an airtight container for up to three days. - Reheat in a pan with a splash of water for moisture. To kick up the heat, try these methods: - Increase the number of dried red chilies. - Add fresh chopped chilies like jalapeños. - Use chili paste or hot sauce in the sauce mix. Just remember, add heat slowly to keep flavors balanced. For a complete meal, consider these side dishes: - Steamed jasmine rice or brown rice for a hearty base. - Noodles tossed in sesame oil for a tasty twist. - Stir-fried greens like bok choy or broccoli for freshness. These pairings enhance the flavors and add variety. You can use other tofu types based on your preference: - Silken tofu offers a softer texture and creaminess. - Extra-firm tofu gives a denser bite and holds shape well. - Tempeh can be a great substitute for a nutty flavor. Just adjust cooking times as needed for each type. You learned how to make Kung Pao Tofu with firm tofu, tasty veggies, and spices. We covered prepping, cooking, and combining all the key parts. Plus, I shared tips to enhance texture and flavor. Remember, you can mix and match ingredients to fit your diet. Store leftovers properly, and reheat for the best taste. This meal is fun, tasty, and easy to make. Now, go ahead and enjoy your delicious Kung Pao Tofu!

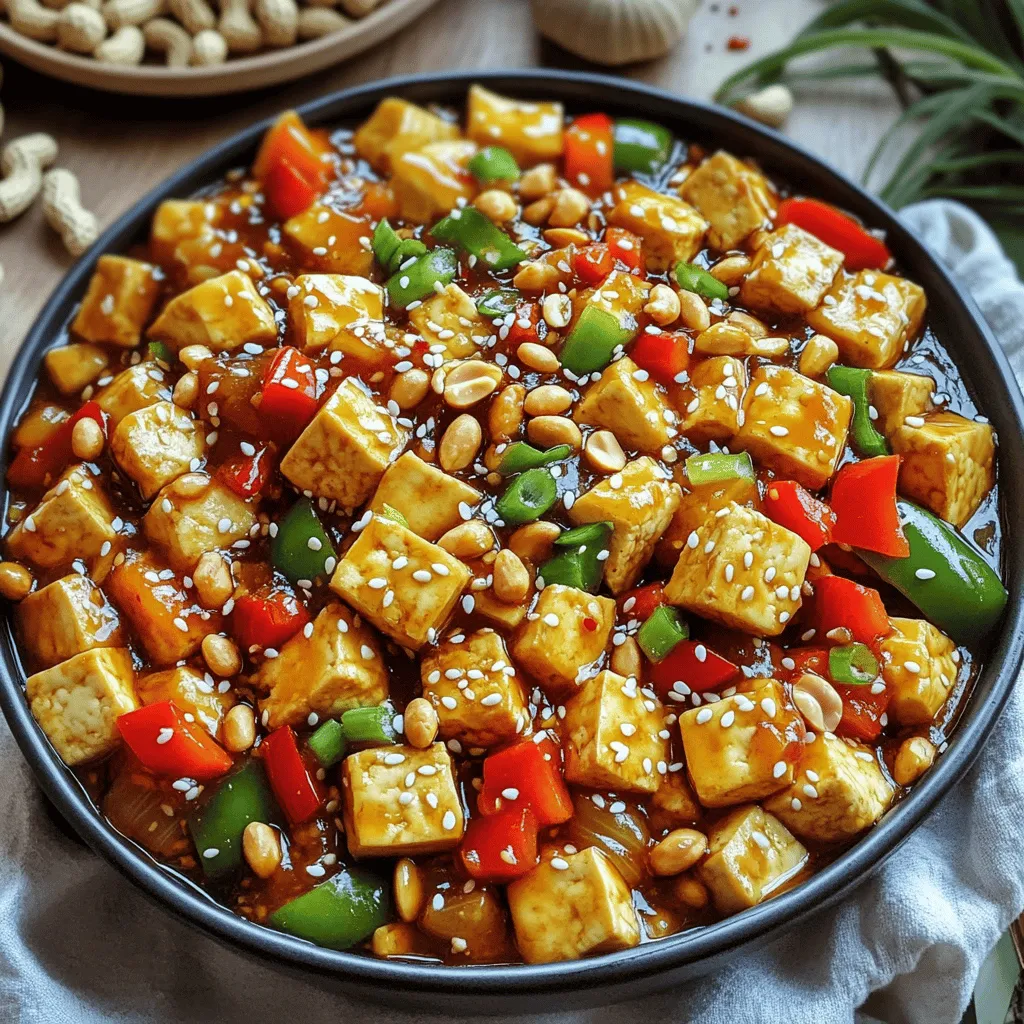
Are you craving a dish that packs a spicy punch and leaves takeout in the dust? Look no further! My Spicy Kung Pao Tofu is not just better than takeout; …

Read more

Categories Dinner

Pumpkin Cinnamon Roll Pancakes with Cream Cheese Bliss

September 21, 2025 by Chef Miles
- 1 cup all-purpose flour - 1 tablespoon baking powder - 1/2 teaspoon baking soda - 1 teaspoon ground cinnamon - 1/4 teaspoon ground nutmeg - 1/4 teaspoon ground ginger - 1/2 teaspoon salt - 1 cup pumpkin puree (canned or fresh) - 3/4 cup milk - 1 large egg - 2 tablespoons granulated sugar - 1 teaspoon vanilla extract - 1/4 cup brown sugar - 1 tablespoon ground cinnamon - 2 ounces cream cheese, softened - 1/2 cup powdered sugar - 1 tablespoon milk When it comes to making these delightful pumpkin cinnamon roll pancakes, the ingredients matter a lot. First, you need a mix of dry and wet ingredients. The dry ingredients include all-purpose flour, baking powder, and baking soda. These help the pancakes rise and stay fluffy. The spices, like cinnamon, nutmeg, and ginger, bring warmth and flavor. Don’t forget the salt; it brings all the flavors together. Next, we have the wet ingredients. Pumpkin puree is key for that rich, fall flavor. It also keeps the pancakes moist. Milk adds creaminess, while the egg is crucial for binding. Granulated sugar and vanilla extract give sweetness and depth. For the cinnamon swirl, brown sugar and cinnamon unite to create that signature roll taste. It’s fun to swirl into the pancakes. Finally, the cream cheese drizzle is a must! Softened cream cheese, powdered sugar, and a splash of milk create a sweet topping to elevate your pancakes. This drizzle ties together the flavors beautifully. Gather all these ingredients, and you are ready to make a breakfast that feels like a warm hug! In a small bowl, combine 1/4 cup of brown sugar and 1 tablespoon of ground cinnamon. Mix them well. This blend will add a sweet and spicy swirl to your pancakes, making each bite a treat. Grab a large mixing bowl. Whisk together 1 cup of all-purpose flour, 1 tablespoon of baking powder, 1/2 teaspoon of baking soda, 1 teaspoon of ground cinnamon, 1/4 teaspoon of ground nutmeg, 1/4 teaspoon of ground ginger, and 1/2 teaspoon of salt. This mix gives your pancakes structure and flavor. Make sure there are no lumps! In another bowl, add 1 cup of pumpkin puree, 3/4 cup of milk, 1 large egg, 2 tablespoons of granulated sugar, and 1 teaspoon of vanilla extract. Whisk until the mixture is smooth and fully blended. The pumpkin adds moisture and a rich taste. Carefully pour the pumpkin mixture into the dry ingredients. Gently stir them together until just combined. Don’t overmix! A few lumps are okay. This step keeps the pancakes fluffy and tender. Heat a non-stick skillet or griddle over medium heat. Lightly grease it with cooking spray or a small pat of butter to prevent sticking. For each pancake, pour 1/4 cup of batter onto the skillet. Immediately sprinkle about 1 tablespoon of your cinnamon swirl mix on top. Use a toothpick or knife to create gentle swirls. In a small bowl, beat 2 ounces of softened cream cheese until smooth. Gradually add 1/2 cup of powdered sugar and 1 tablespoon of milk. Stir until you reach a creamy, drizzle-able consistency. If you want it thinner, add a bit more milk. Stack your cooked pancakes on a plate. Generously drizzle the cream cheese mixture over the top. For an extra touch, sprinkle some cinnamon or pumpkin pie spice before serving. This adds a lovely visual and flavor boost. Enjoy! To make fluffy pancakes, avoid overmixing the batter. When you combine the wet and dry ingredients, stir gently. A few lumps are okay; they help keep the pancakes light. Overmixing can lead to tough pancakes. For cooking temperature, preheat your skillet to medium heat. If it’s too hot, your pancakes will burn outside but stay raw inside. You can test the heat by sprinkling a drop of water. If it sizzles, you’re ready! To adjust the drizzle's consistency, add more milk for a thinner glaze. Start with one tablespoon; mix until smooth. If it’s too runny, add a bit more cream cheese to thicken it. You can flavor your cream cheese drizzle too! Consider adding vanilla extract or a pinch of cinnamon. Even maple syrup can add a sweet twist. For the best experience, serve these pancakes with a dollop of whipped cream on top. Fresh fruit like sliced bananas or berries pairs well too. A hot cup of coffee or chai is perfect alongside your pancakes. The warmth of the drinks complements the spices in the pancakes. Enjoy your delicious stack with your favorite beverage! {{image_4}} You can easily change some ingredients in this recipe. Here are a few ideas: - Gluten-free options: Use a gluten-free flour blend instead of all-purpose flour. This makes the pancakes safe for those with gluten allergies. Look for a blend that includes xanthan gum for the best results. - Dairy-free alternatives: Swap milk with almond milk or oat milk. For the cream cheese drizzle, use a dairy-free cream cheese to keep it creamy without dairy. To make your pancakes even tastier, try these fun additions: - Adding chocolate chips or nuts: Fold in some chocolate chips or chopped nuts like walnuts or pecans into the batter. This adds texture and makes them even more satisfying. - Using different spices: Mix in a pinch of allspice or cloves. These spices can add warmth and depth to your pumpkin pancakes, making them unique. You can adjust flavors based on the season. Here are two ideas to try: - Incorporating cranberries or pecans for fall flavors: Toss in dried cranberries or chopped pecans into the batter. This gives a festive flair and pairs well with pumpkin. - Adapting for holiday celebrations: During the holidays, add a splash of eggnog or maple syrup to your batter. This creates a holiday twist that everyone will love. To keep your pancakes and cream cheese drizzle fresh, store them properly. Place leftover pancakes in an airtight container. Layer parchment paper between pancakes to prevent sticking. For the cream cheese drizzle, store it in a small container with a lid. You can refrigerate both for up to three days. When it’s time to enjoy leftovers, reheat pancakes gently. Use a skillet over low heat. Heat each pancake for about 1-2 minutes on each side. This method keeps them soft and moist. You can also use the microwave. Place pancakes on a plate, cover with a damp paper towel, and microwave for 20-30 seconds. Freezing pancakes is a great way to save time. First, let them cool completely. Then, stack them with parchment paper in between. Place the stack in a freezer-safe bag. Remove as much air as possible before sealing. To thaw, simply leave them in the fridge overnight or microwave straight from the freezer for a quick breakfast. Yes, you can make these pancakes ahead of time. To meal prep, cook the pancakes and let them cool. Then, stack them between sheets of parchment paper. Place the stack in an airtight container and refrigerate. You can also freeze them for longer storage. Just remember to thaw them in the fridge before reheating. To make your pancakes fluffy, you should avoid overmixing the batter. Mix until just combined. A few lumps are okay! Also, make sure your baking powder is fresh. This helps create air pockets that add lightness to your pancakes. You can adjust the cream cheese drizzle easily! For a sweeter drizzle, add more powdered sugar. If you want a different flavor, try adding vanilla extract or a pinch of cinnamon. You can also mix in a little maple syrup for extra sweetness. Yes, you can use fresh pumpkin. If you choose fresh, roast or steam the pumpkin first. After it cools, mash it until smooth. This gives you a great flavor. Just note, fresh pumpkin can be a bit wetter than canned, so adjust the milk if needed. These pancakes are a mix of warm spices and rich flavors. We combined all-purpose flour, baking powder, and spices to create a perfect base. The pumpkin puree adds moisture while sugar and vanilla enhance taste. Our step-by-step guide helped you through making a creamy drizzle for finishing touches. Remember, you can customize these pancakes to fit your taste. Whether you add nuts or swap out ingredients, the options are endless. Enjoy these pancakes for breakfast, a snack, or special occasions. Your kitchen will smell amazing, and everyone will love them!

Start your mornings with a taste of fall! These Pumpkin Cinnamon Roll Pancakes with Cream Cheese Bliss blend soft, fluffy pancakes with warm spices and a sweet drizzle. I’ll guide …

Read more

Categories Breakfast
Older posts
Newer posts
← Previous Page1 … Page20 Page21 Page22 … Page112 Next →

MELTED RECIPES

where delicious ideas melt into life, from stovetop to backyard. Always warm, simple, and irresistibly satisfying. 🍳🔥🧀

PAGES

Home About Contact Privacy Policy Terms & Conditions Cookie Policy GDPR Policy Copyright Policy Disclaimer

CATEGORIES

Appetizers Desserts Salads Breakfast Dinner

Contact

  • Pinterest
  • Mail
Copyright © 2025 Melted Recipes. All rights reserved.