Skip to content
Melted Recipes
  • Home
  • Appetizers
  • Desserts
  • Salads
  • Breakfast
  • Dinner
  • Privacy Policy
  • Contact
  • About

Chef Miles

No-Bake Caramel Pecan Cheesecake Cups Delight

September 24, 2025 by Chef Miles
- Cream cheese - Heavy whipping cream - Caramel sauce - Toasted pecans - Crushed graham crackers - Unsalted butter - Additional caramel sauce - Extra chopped pecans - Sea salt For the main ingredients, cream cheese gives a rich base. Heavy whipping cream adds fluffiness. Caramel sauce brings sweetness and depth. Toasted pecans add a nice crunch and nutty flavor. For the crust, crushed graham crackers provide a buttery crunch. Unsalted butter helps bind it all together, creating a sturdy base. You can elevate your dessert with optional garnishes. A drizzle of caramel sauce makes it look fancy. Extra chopped pecans add texture. A sprinkle of sea salt balances sweetness and enhances flavor. These ingredients create a dessert that is both delicious and visually appealing. Enjoy the process and have fun while mixing and layering these components! - Mix 1 cup of crushed graham crackers with 4 tablespoons of melted unsalted butter. - Stir until all crumbs are well coated with butter. - Press this mixture firmly into the bottom of serving cups or jars. - Chill the cups in the refrigerator while you make the cheesecake filling. - In a large bowl, beat 16 ounces of softened cream cheese until smooth. - This will take about 2-3 minutes with an electric mixer. - Gradually add in 1 cup of powdered sugar and 1 teaspoon of vanilla extract. - Mix until the filling is creamy and free of lumps. - In a separate bowl, whip 1 cup of heavy cream until soft peaks form. - This should take about 3-4 minutes at medium speed. - Gently fold the whipped cream into the cream cheese mixture. - Drizzle in 1 cup of caramel sauce and add a pinch of sea salt, then mix gently. - Spoon the creamy mixture into the chilled crusts. - Smooth the tops with a spatula for an even finish. - Generously drizzle more caramel sauce on top and sprinkle with 1 cup of chopped toasted pecans. - Chill the cheesecake cups for at least 4 hours, or until firm. - Before serving, garnish with extra pecans and a drizzle of caramel sauce. - For a beautiful display, arrange the cups on a platter with extra pecans and caramel. Using cream cheese at room temperature is crucial. Cold cream cheese makes mixing hard. It can lead to lumps. Soft cream cheese blends smoothly with other ingredients. This creates a creamy filling. Whipping the heavy cream until soft peaks form is key. Soft peaks mean the cream holds some shape. If you whip it too much, it can become grainy. Mix at medium speed for about 3–4 minutes. Be gentle when folding it into the cream cheese. This keeps your filling light and fluffy. For caramel sauce, I recommend using a rich, homemade version. Store-bought sauce can work too, but make sure it’s high quality. It should have a deep, sweet flavor. You can also try salted caramel for a tasty twist. Toasting pecans adds more flavor and crunch. Spread them on a baking sheet. Bake at 350°F for about 8-10 minutes. Watch them closely; they can burn quickly. Toasting brings out their nutty taste. For serving, you can arrange the cheesecake cups on a pretty platter. Scatter extra chopped pecans around the cups for a nice look. Drizzle caramel sauce on the platter too. This adds a gourmet touch. Use garnishes to make your dessert pop. You can add extra pecans on top. A light sprinkle of sea salt can also enhance the flavor. These small details make your cheesecake cups look extra special. {{image_4}} You can easily switch up the flavors in your No-Bake Caramel Pecan Cheesecake Cups. For a mocha twist, add chocolate chips to the cheesecake filling. The chocolate adds richness and depth to each bite. If you prefer a different nut, try using almonds or walnuts instead of pecans. Each nut brings its own unique taste and crunch. If you need gluten-free options, use crushed gluten-free cookies for the crust. This change keeps the dessert tasty without losing any flavor. For a dairy-free version, swap out the cream cheese for a dairy-free cream cheese alternative. You can also use coconut cream in place of heavy cream. These swaps make the dessert accessible to more dietary needs. To elevate your cheesecake cups, pair them with different sauces. A drizzle of chocolate sauce or berry compote can add a fun twist. Fresh fruit toppings, like sliced strawberries or blueberries, also brighten the dessert. If you want a creamy touch, serve the cups with a scoop of ice cream. The mix of textures and flavors creates a delightful experience. To keep your no-bake caramel pecan cheesecake cups fresh, store them in the refrigerator. Place them in an airtight container to prevent any odors from seeping in. This method helps maintain their creamy texture and rich flavor. If you don’t have a container, you can cover the cups tightly with plastic wrap. These cheesecake cups stay fresh for about 3 to 5 days in the fridge. If you want to enjoy them later, you can freeze the cheesecake cups. Just make sure to wrap them well in plastic wrap and then place them in a freezer-safe bag. To thaw, move them to the fridge for several hours or overnight. This way, they retain their delightful taste! You can use crushed cookies or nuts instead of graham crackers. Try digestive biscuits for a similar taste. Almond flour mixed with melted butter also works well for a gluten-free option. The cheesecake cups need to chill for at least four hours. This time allows the filling to firm up and become creamy. You can chill them overnight for the best results. Yes, you can use a sugar substitute like stevia or erythritol. Make sure it measures cup for cup like sugar. Keep in mind that the taste may vary slightly from the original recipe. These cheesecake cups are best served cold. If you have leftovers, keep them in the fridge. When serving, add more caramel sauce and pecans for freshness. Absolutely! You can make these cheesecake cups a day or two in advance. Just store them in the fridge until you are ready to serve for a hassle-free dessert. In this post, we explored how to make delicious no-bake caramel pecan cheesecake cups. We covered ingredients, step-by-step instructions, tips for perfecting flavors, and storage info. You can enjoy different flavors or dietary variations too. These cheesecake cups are easy to make and sure to impress. Try them at your next gathering or treat yourself tonight!

Indulge in a sweet escape with my No-Bake Caramel Pecan Cheesecake Cups! These easy cups blend creamy cheesecake with rich caramel and crunchy pecans, perfect for any occasion. You won’t …

Read more

Categories Desserts

Slow Cooker Cheesy Chili Mac Delightful Comfort Meal

September 24, 2025 by Chef Miles
- 1 pound ground beef or turkey - 3 cups elbow macaroni - 2 cups shredded sharp cheddar cheese - 1 cup shredded mozzarella cheese - 1 medium onion, diced - 1 bell pepper, diced - 2 cloves garlic, minced - 1 can (15 oz) kidney beans, drained - 1 can (15 oz) black beans, drained - 1 can (14.5 oz) diced tomatoes with green chilies - 1 can (15 oz) tomato sauce - 3 cups chicken or vegetable broth - 2 tablespoons chili powder - 1 teaspoon ground cumin - Salt and freshly ground black pepper to taste When I create my Slow Cooker Cheesy Chili Mac, I focus on fresh, delicious ingredients. The ground beef or turkey is the star of the show. It gives a hearty base. I like to use elbow macaroni because it holds the sauce well. The blend of sharp cheddar and mozzarella makes it creamy and cheesy. Next, I add vegetables for flavor and color. Diced onion and bell pepper bring sweetness. Minced garlic adds a nice kick. These fresh veggies make the dish colorful and bright. For canned goods, I use kidney and black beans to add protein and fiber. They also help make the meal filling. Diced tomatoes with green chilies give it a slight heat. Tomato sauce and broth tie everything together, creating a rich sauce. The spices I use, like chili powder and cumin, add warmth and depth. Salt and pepper round out the flavors. With these ingredients, my Slow Cooker Cheesy Chili Mac becomes the perfect comfort meal. First, you want to brown the ground beef or turkey. Heat a large skillet over medium heat. Add the meat and cook until it turns brown. Use a spatula to break it into small pieces. Next, add the diced onion and bell pepper. Stir these in and cook for about 4 to 5 minutes. This helps the veggies soften. Finally, add the minced garlic and let it sauté for 2 minutes until it smells great. Now, it’s time to transfer the meat and vegetable mix to your slow cooker. Make sure to scrape all the bits from the skillet. Add in the drained kidney beans and black beans. Then, pour in the diced tomatoes with their juices and the tomato sauce. This will add moisture and flavor. Next, sprinkle in the chili powder, ground cumin, salt, and pepper. Stir everything well to coat the ingredients evenly. Pour in the chicken or vegetable broth and mix until there are no dry spots. Cover your slow cooker with the lid. Cook on low for about 5 to 6 hours. This gives the flavors time to blend. After that, add in the uncooked elbow macaroni. Cover it again and cook for another 30 to 40 minutes. You want the pasta to be tender. When it's ready, slowly stir in the shredded cheddar and mozzarella cheese. Keep stirring until the cheese melts into a creamy mix. If you like, you can stir in some sour cream for extra creaminess. To boost the taste of your chili mac, I suggest using fresh spices. Add a pinch of smoked paprika for depth. If you like heat, add cayenne pepper to the mix. Always brown the meat well. This adds a rich, savory flavor. Cook it until it’s fully browned. This step takes about 5 to 7 minutes. For a creamier dish, sour cream works wonders. Stir in ½ cup right before serving. This will give your chili mac a rich, smooth texture. When melting cheese, add it gradually. Stir continuously to help it blend evenly. The heat from the dish will help it melt perfectly. Serve the chili mac in bright bowls for a fun look. Top with extra cheese and fresh green onions. These add color and crunch. You can also sprinkle cilantro for a fresh taste. Pair it with crispy tortilla chips for a tasty side. The chips add a fun crunch that everyone will love. {{image_4}} If you want a vegetarian version of this dish, you can skip the meat. Use more beans and veggies instead. Try these options: - 1 can (15 oz) chickpeas, drained and rinsed - 1 cup corn (canned or frozen) - 1 cup diced zucchini or mushrooms Mix the beans and veggies into the slow cooker. They will add texture and flavor. You can also add more spices to boost the taste. Cheese makes this meal creamy and rich. You can switch up the cheese for fun flavors. Consider these options: - Pepper jack for a spicy kick - Gouda for a smoky taste - Cream cheese for extra creaminess If you need a dairy-free option, try vegan cheese. It melts well and keeps the dish creamy. Just ensure it has a good flavor to complement the chili. Want more heat? You can easily adjust the spice level. Add more chili powder or throw in sliced jalapeños. Here are some ideas: - 1 extra tablespoon of chili powder - 1-2 chopped jalapeños, seeds removed If you prefer a milder dish, reduce the chili powder. You can also add some sour cream on top to cool it down. This makes it family-friendly and tasty for everyone. To store leftovers, let the chili mac cool to room temperature. Then, transfer it to an airtight container. Place it in the fridge. It will stay fresh for up to four days. Make sure to label the container with the date. This helps you track its freshness. You can freeze this cheesy chili mac for up to three months. Use a freezer-safe container. Leave some space at the top, as the dish may expand. For best results, freeze it as soon as it cools. To thaw, move it to the fridge overnight. This allows it to thaw slowly and safely. When you're ready to enjoy it again, use the stovetop or microwave. For the stovetop, heat in a pot over low heat. Stir often to keep it from sticking. If using the microwave, place it in a microwave-safe bowl. Heat in short bursts, stirring in between. This helps keep the texture creamy and delicious. Yes, you can! You can prep the ingredients ahead of time. Chop the veggies and store them in the fridge. You can also brown the meat the day before. Once cooked, let it cool, then store it in a sealed container. For the best taste, use it within three days. Just reheat before serving. Absolutely! For gluten-free elbow macaroni, use any gluten-free pasta shape you like. Look for brands made from rice, corn, or lentils. Just make sure to check the cooking time. Some gluten-free pastas cook faster. You want them to stay firm and not mushy. If you need more servings, just double the ingredients. For example, use two pounds of ground meat and six cups of macaroni. If you want fewer servings, you can halve the ingredients. Remember to adjust the cooking time if needed. Keep an eye on it to make sure everything cooks well. This recipe combines easy ingredients and steps for a delicious meal. You can enjoy the warmth of ground beef or turkey, tasty veggies, and rich cheese all made simply in a slow cooker. Whether you want to spice it up or make it vegetarian, this dish suits everyone. Don’t forget the storage tips to keep leftovers fresh! With these great ideas, you can create meals your family will love. Give this recipe a try, and make it your own!

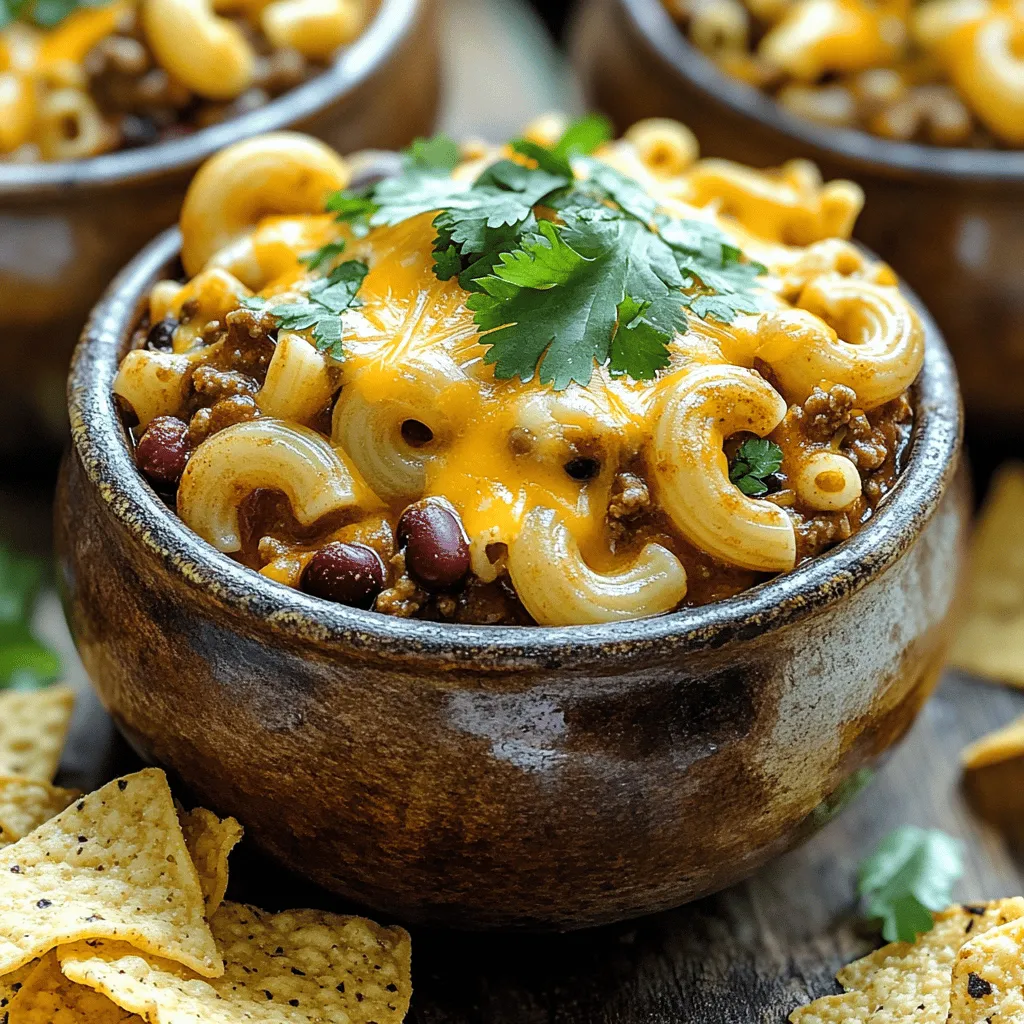
Looking for a warm, satisfying meal that’s easy to make? Try my Slow Cooker Cheesy Chili Mac! This dish combines ground meat, pasta, and rich cheese, all cooked to perfection …

Read more

Categories Dinner

Irresistible Apple Fritter Donuts with Glaze Recipe

September 23, 2025 by Chef Miles
- 2 cups all-purpose flour - 1 tablespoon baking powder - ½ teaspoon salt - 1 teaspoon ground cinnamon - ¼ teaspoon ground nutmeg - ½ cup granulated sugar - 2 large eggs - ½ cup whole milk - 1 teaspoon pure vanilla extract - 1 large Granny Smith apple, peeled and finely diced - 1 cup apple cider - Oil for frying (vegetable or canola) The base of these donuts starts with all-purpose flour. This helps give them a nice structure. Baking powder gives them lift. Salt enhances the sweetness. The spices, like cinnamon and nutmeg, add warmth and depth. Granulated sugar gives sweetness to the batter. The eggs help bind all the ingredients together. Whole milk adds creaminess to the mix, while vanilla gives flavor. I love using Granny Smith apples. They are tart and crisp, perfect for these donuts. Apple cider adds extra apple flavor and moisture. Finally, you'll need oil for frying. This ensures a crispy outside and soft inside. - 1 cup powdered sugar - 2 tablespoons whole milk - ½ teaspoon pure vanilla extract The glaze is simple yet tasty. Powdered sugar is the star. It gives the glaze that smooth finish. Whole milk thins the glaze for easy dipping. Vanilla extract adds that lovely flavor that ties everything together. With these ingredients, you're all set to make delicious apple fritter donuts! To start, we need to mix the dry ingredients. In a medium bowl, combine: - 2 cups all-purpose flour - 1 tablespoon baking powder - ½ teaspoon salt - 1 teaspoon ground cinnamon - ¼ teaspoon ground nutmeg - ½ cup granulated sugar Whisk these together until they blend well. Set this aside for later. Next, let’s combine the wet ingredients. In another bowl, crack 2 large eggs. Whisk in ½ cup whole milk and 1 teaspoon pure vanilla extract until the mixture is smooth. Now, we need to fold in the apples and apple cider. Gradually add the dry mixture to the wet mixture. Stir gently with a spatula. Be careful not to overmix. This keeps the donuts light and fluffy. Then fold in 1 large finely diced apple and 1 cup apple cider. Make sure everything is evenly mixed. Now, it’s time to fry. First, heat oil in a deep pot or fryer to about 350°F (175°C). Use a cooking thermometer to check the temperature. Once the oil is hot, scoop about 2-3 tablespoons of batter using a tablespoon. Gently drop the batter into the oil. Fry only a few at a time to avoid overcrowding. This helps them cook evenly. Fry the donuts for 2-3 minutes on each side. Look for a lovely golden brown color. Adjust the heat as needed to keep the oil at the right temperature. When done, use a slotted spoon to take the donuts out of the oil. Place them on paper towels to drain excess oil. While the donuts cool, let’s make the glaze. In a small bowl, whisk together: - 1 cup powdered sugar - 2 tablespoons whole milk - ½ teaspoon pure vanilla extract Mix until you achieve a smooth consistency with no lumps. Now, dip each warm donut into the glaze. Let any extra glaze drip back into the bowl. Place the glazed donuts on a wire rack to cool and set. Allow them to sit for a few minutes. This helps the glaze firm up, making them extra tasty. To make great apple fritter donuts, avoid overmixing the batter. Overmixing can lead to dense donuts that are not fluffy. Mix until just combined. You want a light, airy texture. Next, pay close attention to the frying temperature. Heat the oil to about 350°F (175°C). If it’s too hot, the donuts will burn outside and stay raw inside. If it’s too low, they will soak up too much oil. Use a cooking thermometer for the best results. For the perfect glaze, aim for a silky smooth consistency. Start with one cup of powdered sugar. Add two tablespoons of whole milk and half a teaspoon of vanilla extract. Whisk until there are no lumps. If it’s too thick, add a bit more milk. If it’s too thin, add more sugar. You can also try alternative glazing methods. A light drizzle of caramel or a chocolate glaze can add a fun twist. Experiment to find your favorite! When serving, arrange the donuts in a nice pattern on a plate. A decorative plate adds charm to your dish. You can also sprinkle a little extra ground cinnamon on top for a sweet touch. To enhance the look, garnish with fresh apple slices. They add color and a refreshing taste to the warm donuts. This makes your dish not just tasty, but also beautiful! {{image_4}} You can easily switch up the taste of your apple fritter donuts. Adding nuts or raisins can give them a nice crunch. Walnuts or pecans work best. Just chop them small and mix them in with the batter. This adds a new layer of flavor. Another fun idea is to use different apple varieties. While Granny Smith apples are tart and crisp, you could try Honeycrisp for a sweeter taste. You can even mix apples for a range of flavors. Each apple brings its unique twist to your donuts! If you want to play with flavors, try making a chocolate or maple glaze. For chocolate, melt some chocolate chips and mix them with a little milk. This creates a rich, sweet topping. A maple glaze is easy too! Just mix in some maple syrup with the powdered sugar and milk. You can also drizzle caramel sauce on top of your donuts. This adds a lovely sweetness and a sticky texture. It’s perfect for those who love caramel! For those who want a healthier option, you can bake instead of fry. Preheat your oven to 350°F (175°C). Spoon the batter onto a baking sheet lined with parchment paper. Bake for about 15-20 minutes until golden. This method cuts down on oil and makes them lighter. If you’re vegan, you can swap eggs and dairy. Use flaxseed meal mixed with water for eggs. For milk, almond or oat milk works great. These swaps keep the flavor while making the recipe suitable for everyone. Store your apple fritter donuts at room temperature. They taste best fresh and warm. If you have leftovers, place them in an airtight container. This helps keep them soft for a day or two. Avoid refrigerating them. The cold air will dry them out. To maintain freshness, you can wrap each donut in plastic wrap. This way, they stay moist and tasty. If you want to serve them later, just warm them up in the oven for a few minutes. You can freeze apple fritter donuts, too! To do this, let them cool completely first. Then, place them in a single layer on a baking sheet. Freeze them for about an hour. Once frozen, transfer the donuts to a freezer bag. Make sure to squeeze out as much air as you can. To reheat, take them out and let them thaw at room temperature. For a warm treat, pop them in the oven at 350°F (175°C) for about 10 minutes. This keeps them soft and delightful. For the glaze, it’s best to freeze the donuts without it. You can glaze them after reheating. This way, the glaze stays fresh and shiny. To check the oil's heat, use a cooking thermometer. Aim for 350°F (175°C). If you don't have a thermometer, drop a small amount of batter into the oil. If it bubbles and rises, the oil is ready. Yes, you can prepare some parts in advance. Mix the dry ingredients and store them in an airtight container. You can also chop the apples ahead of time. Keep them in a bowl of water with a bit of lemon juice to prevent browning. Store the batter in the fridge for up to a day. Fry them fresh when you are ready. You can use gluten-free flour blends as a substitute. Look for a blend that has xanthan gum in it. Adjust the amount of apple cider as needed, since gluten-free flours can absorb more liquid. Now you have a clear path to make delicious apple fritter donuts. You learned about the key ingredients, steps for frying, and tips for texture and glaze. You can also explore fun variations and smart storage methods. Don’t be afraid to get creative with flavors or glazes. These donuts can be a fun treat for any occasion. Enjoy your baking journey and share your tasty results! You’ll impress everyone with your homemade treats.

Are you ready to dive into the world of donuts? Today, I’m sharing my irresistible recipe for Apple Fritter Donuts with Glaze. These treats are sweet, warm, and packed with …

Read more

Categories Desserts

Sheet Pan Maple Roasted Chicken and Sweet Potatoes Dish

September 23, 2025 by Chef Miles
- 4 bone-in chicken thighs, skin-on - 2 large sweet potatoes, peeled and diced into 1-inch cubes - 2 tablespoons olive oil - 1/4 cup pure maple syrup - 2 tablespoons Dijon mustard - 1 teaspoon garlic powder - 1 teaspoon smoked paprika - 1/2 teaspoon ground cinnamon - Salt and pepper to taste - 1 cup Brussels sprouts, halved - Fresh parsley, finely chopped 1. Preheating the oven: Start by preheating your oven to 425°F (220°C). This step is key for roasting. A hot oven helps the chicken and sweet potatoes cook evenly. 2. Mixing the marinade: In a small bowl, whisk together pure maple syrup, Dijon mustard, garlic powder, smoked paprika, ground cinnamon, and a pinch of salt and pepper. This mix will give your chicken a sweet and spicy flavor. 1. Coating the sweet potatoes: Take a large bowl and add your diced sweet potatoes. If you're using Brussels sprouts, add them too. Pour in half of the maple marinade and drizzle one tablespoon of olive oil over the sweet potatoes. Toss gently until all pieces are coated well. 2. Arranging on the baking sheet: On a large baking sheet, place the chicken thighs on one side. Drizzle the remaining tablespoon of olive oil over the chicken. Season it with salt, pepper, and a light sprinkle of garlic powder. Spread the sweet potato mixture on the other side of the baking sheet for even roasting. 1. Baking instructions: Place the baking sheet in the preheated oven. Bake for 35-40 minutes. Your chicken should reach an internal temperature of 165°F (75°C). The sweet potatoes should be tender and caramelized. 2. Broiling for crispiness: For added crispiness, switch your oven to broil for the last 2-3 minutes. Keep a close eye on the chicken to avoid burning. After cooking, let your dish rest for 5 minutes. This resting time helps the flavors come together. Enjoy your tasty sheet pan meal! To boost the taste of your chicken, consider adding extra spices. You can use rosemary or thyme for a fresh touch. For a bit of heat, sprinkle in some cayenne pepper. To get that perfect crispy skin, make sure to pat the chicken dry with paper towels. This helps the skin crisp up nicely. Also, let the chicken rest before serving. This keeps the juices inside. Baking chicken and veggies on a sheet pan is easy and fun. Arrange the chicken in a single layer. This helps it cook evenly. Spread the sweet potatoes out too. Crowding the pan can lead to steaming instead of roasting. To check if the chicken is done, use a meat thermometer. The internal temperature should be 165°F (75°C). You can also cut into the thickest part of the chicken. If the juices run clear, it’s ready. For a cozy look, serve the dish right from the pan. You can also place it on a nice serving platter for a fancier feel. Drizzle a little extra maple syrup over the chicken just before serving. This adds sweetness and makes it look great. Consider pairing this dish with a simple salad or steamed green beans. These sides balance the sweet flavors and add freshness to your meal. {{image_4}} You can switch up the protein in this dish. Try using bone-in chicken breasts instead of thighs. If you want a lighter option, use turkey thighs. If you prefer a meat-free meal, roasted chickpeas or tofu work well, too. For vegetables, sweet potatoes are great, but you can mix in others. Carrots add sweetness and color. Cauliflower florets bring a nice texture. Broccoli can also be a tasty addition. If you want a sweeter dish, add more maple syrup. For a savory twist, reduce the maple syrup and add balsamic vinegar instead. You can also play with spices. Add cayenne pepper for heat or extra garlic for depth. Herbs can brighten the flavor. Fresh thyme or rosemary adds nice notes to the chicken. You can also sprinkle fresh basil or cilantro just before serving for that pop of freshness. This dish can easily fit into a gluten-free diet. Just ensure your Dijon mustard is gluten-free. Most brands are safe, but check the label for any hidden gluten. For those on a low-carb diet, skip the sweet potatoes and use zucchini or bell peppers instead. They roast well and keep the dish colorful and tasty. Store leftovers in an airtight container. This keeps the dish fresh. You can refrigerate it for up to four days. For longer storage, freeze the portions. Use freezer-safe bags or containers. Make sure to remove as much air as possible. This prevents freezer burn and keeps flavors intact. To reheat, use an oven or microwave. For the oven, preheat to 350°F (175°C). Place the chicken and sweet potatoes in a baking dish. Cover with foil to keep moisture in. Heat for about 20 minutes or until warm. If using a microwave, place portions on a safe plate. Heat in short bursts, checking often. This helps keep the texture and flavor. In the fridge, this dish lasts about four days. After that, it may spoil. Look for changes in color or smell. If the chicken has a slimy texture, throw it away. Sweet potatoes should remain firm and not mushy. Always trust your senses to guide you on freshness. To make your chicken skin crispy, focus on a few key steps. First, start with bone-in, skin-on chicken thighs. The bones help keep the meat juicy. Pat the skin dry with paper towels before cooking. This removes excess moisture. Next, season the skin with salt. Salt draws out moisture and helps crisp the skin. Finally, broil the chicken for the last few minutes of cooking. This adds a great crunch. Yes, you can use boneless chicken. However, it will change the cooking time. Boneless pieces cook faster than bone-in thighs. Check the chicken at 25 minutes. If it reaches 165°F (75°C), it is done. The texture may also differ. Boneless chicken can be less juicy but still tasty. Adjust your cooking time based on the size of the pieces. This dish pairs well with several sides. Here are some ideas: - Steamed green beans: They add a fresh crunch. - Quinoa or rice: These grains soak up the flavors. - Simple salad: A light salad balances the meal. - Crusty bread: Perfect for mopping up juices. Feel free to mix and match! This meal combines tasty chicken thighs, sweet potatoes, and a flavorful marinade. You learned ways to enhance flavors and tried new cooking methods. Variations let you customize the dish to fit your needs. Storing and reheating tips help you enjoy leftovers without losing taste. With these steps, you can create a delicious sheet pan meal any night. Try this recipe and make it your own!

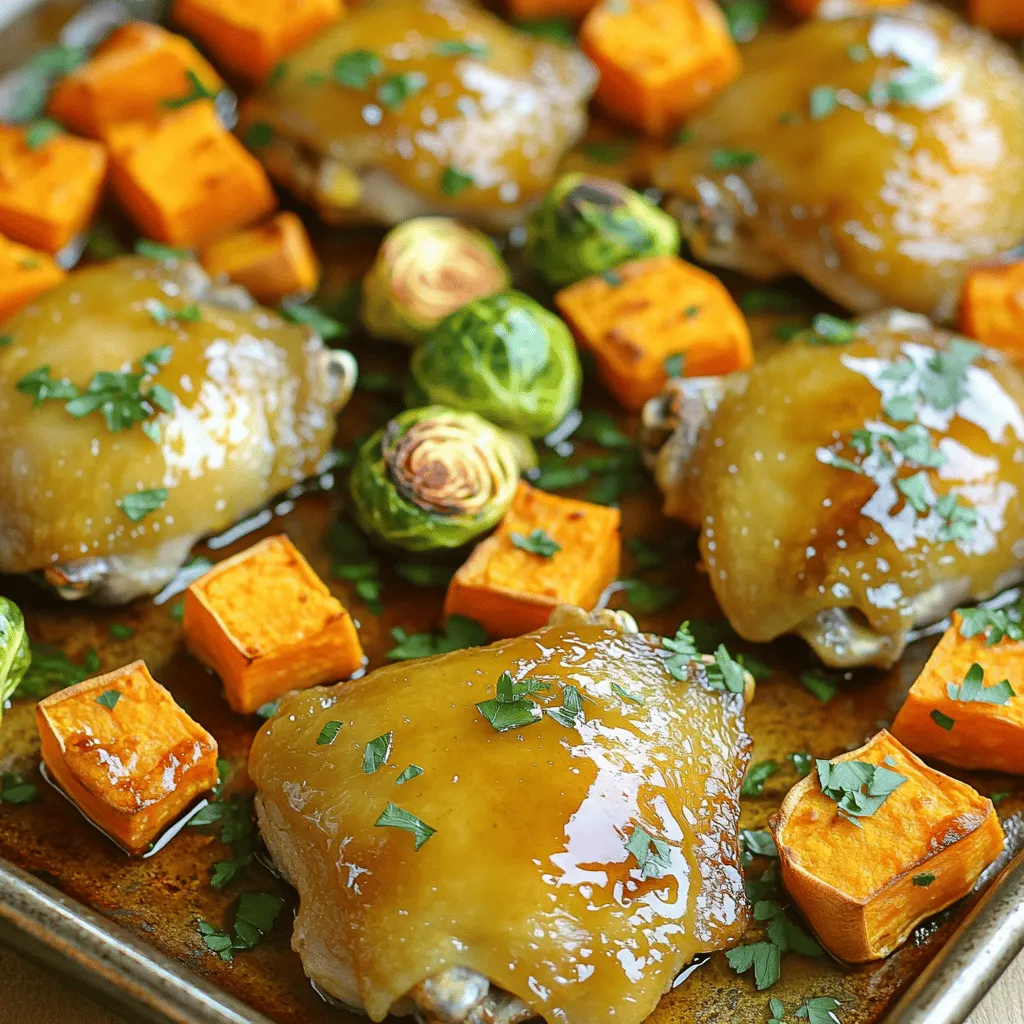
Get ready to impress your family with my Sheet Pan Maple Roasted Chicken and Sweet Potatoes dish! This easy recipe combines juicy chicken thighs and sweet, tender potatoes, all drizzled …

Read more

Categories Dinner

No Bake Pumpkin Spice Granola Bars Tasty and Simple

September 23, 2025 by Chef Miles
To make these tasty granola bars, gather these main ingredients: - 1 ½ cups rolled oats - ½ cup pumpkin puree - ½ cup almond butter (or any nut/seed butter of your choice) - ¼ cup honey or maple syrup - 1 teaspoon vanilla extract - 1 teaspoon pumpkin pie spice - ¼ teaspoon salt These ingredients create a chewy and flavorful base for your bars. The oats give a nice texture. Pumpkin puree adds moisture and a lovely fall flavor. Almond butter binds everything together while providing healthy fats. You can customize your granola bars with some fun add-ins: - ½ cup chopped nuts (such as walnuts or pecans) - ½ cup dried cranberries or raisins - ¼ cup chocolate chips (optional for extra sweetness) Try different nuts or fruits based on what you like. You can even add seeds for a crunch. If you want a sweeter treat, toss in chocolate chips. They melt slightly and create a rich flavor. If you have dietary needs, here are some good substitutes: - Use sunflower seed butter instead of almond butter for nut-free bars. - Swap honey for agave syrup or maple syrup for a vegan option. - Replace rolled oats with gluten-free oats if you need them gluten-free. These swaps keep your bars tasty while meeting your needs. Always check labels to ensure your substitutes fit your diet. Start by gathering your ingredients. In a large bowl, add: - 1 ½ cups rolled oats - ½ cup pumpkin puree - ½ cup almond butter - ¼ cup honey or maple syrup - 1 teaspoon vanilla extract - 1 teaspoon pumpkin pie spice - ¼ teaspoon salt Using a spatula, mix these items together well. You want everything to blend into a sticky mass. This mixture gives your bars that rich pumpkin flavor and helps them stick together. Next, you will fold in the fun stuff. Add: - ½ cup chopped nuts (like walnuts or pecans) - ½ cup dried cranberries or raisins - ¼ cup chocolate chips (if you like extra sweetness) Gently mix these ingredients in. This step adds crunch and sweetness. Make sure the nuts and fruits are evenly spread throughout the mixture. Now, it’s time to prepare your baking dish. Grab an 8x8-inch dish and line it with parchment paper. Leave some paper hanging over the sides. This helps you lift the bars out later. Pour your granola mix into the dish. Use a spatula or your hands to press it down firmly. You want a smooth, even layer. This step is key to getting nice, firm bars. Place the dish in the fridge for at least 2 hours. This helps the bars set up nicely. Once they’re firm, lift the parchment paper to remove the block of granola. Transfer it to a cutting board. Slice into bars or squares, depending on how big you want them. Enjoy your delicious no bake pumpkin spice granola bars! To get the best texture for your bars, use a mix of ingredients. Rolled oats give a nice chewiness, while pumpkin puree adds moisture. Make sure to mix well until everything sticks together. Press the mixture firmly into the dish to help it hold its shape. If the bars feel too crumbly, add a bit more almond butter or honey. This will help bind everything better. Store your granola bars in an airtight container. Keep them in a cool, dry place. This helps maintain their freshness. You can also keep them in the fridge if you like a cooler snack. For longer storage, wrap them in parchment paper before placing them in a container. This keeps them from sticking together. For a fun presentation, arrange your bars on a wooden board. Sprinkle some pumpkin pie spice on top for a pop of flavor. Add a few dried cranberries for color. You can serve them with yogurt or alongside a warm cup of tea. This adds a cozy touch and enhances the fall vibe. {{image_4}} You can switch almond butter with other nut butters. Try peanut butter for a classic taste. Cashew butter adds a creamy touch. Sunflower seed butter is great for nut allergies. Each option brings its own flavor and texture to the bars. If you want a healthier choice, try using agave syrup. Coconut nectar is another option that adds depth. You can also use mashed bananas for natural sweetness. These swaps keep your granola bars tasty and nutritious. Pumpkin spice is delicious, but don’t stop there. Add cinnamon for a warm kick. Try cocoa powder for a chocolatey twist. You can even mix in dried fruits like apples or apricots. Each variation can create a new favorite snack. To store your leftover granola bars, wrap them tightly in plastic wrap or foil. You can also place them in an airtight container. This keeps them fresh and helps prevent them from drying out. Store the bars in a cool, dry place like your pantry or kitchen shelf. If you want to keep the granola bars longer, freezing is a great option. First, cut the bars into pieces. Next, wrap each piece in plastic wrap. Then, place them in a freezer bag or container. Label the bag with the date. You can freeze them for up to three months. When you are ready to enjoy them, just thaw them in the fridge overnight. When stored properly, these granola bars can last about one week at room temperature. If you keep them in the fridge, they can stay fresh for up to two weeks. Remember, the fresher they are, the tastier they will be! Yes, you can easily make these granola bars vegan. Just swap honey for maple syrup. Almond butter is already vegan, but you can use any nut or seed butter. This change keeps the bars yummy and plant-based. For nut allergies, use sunflower seed butter or soy nut butter. If you can't have oats, try puffed rice or quinoa flakes. You can also switch dried cranberries for seeds or any safe fruit. Just keep the same ratios to maintain texture. I love serving these bars on a wooden board. You can add a sprinkle of pumpkin pie spice on top. A dollop of yogurt or a warm cup of tea makes a great pair. They are perfect for breakfast or a snack. These granola bars stay fresh for about one week at room temperature. If you store them in the fridge, they can last up to two weeks. For longer storage, freeze them. They will keep well for up to three months in the freezer. No bake pumpkin spice granola bars are easy to make and delicious. I covered important ingredients, step-by-step instructions, and helpful tips. You can customize the recipe with different add-ins to fit your taste. These bars store well and freeze easily. Remember, you can adjust ingredients for dietary needs. Have fun experimenting with flavors and presentations. Enjoy your tasty treats!

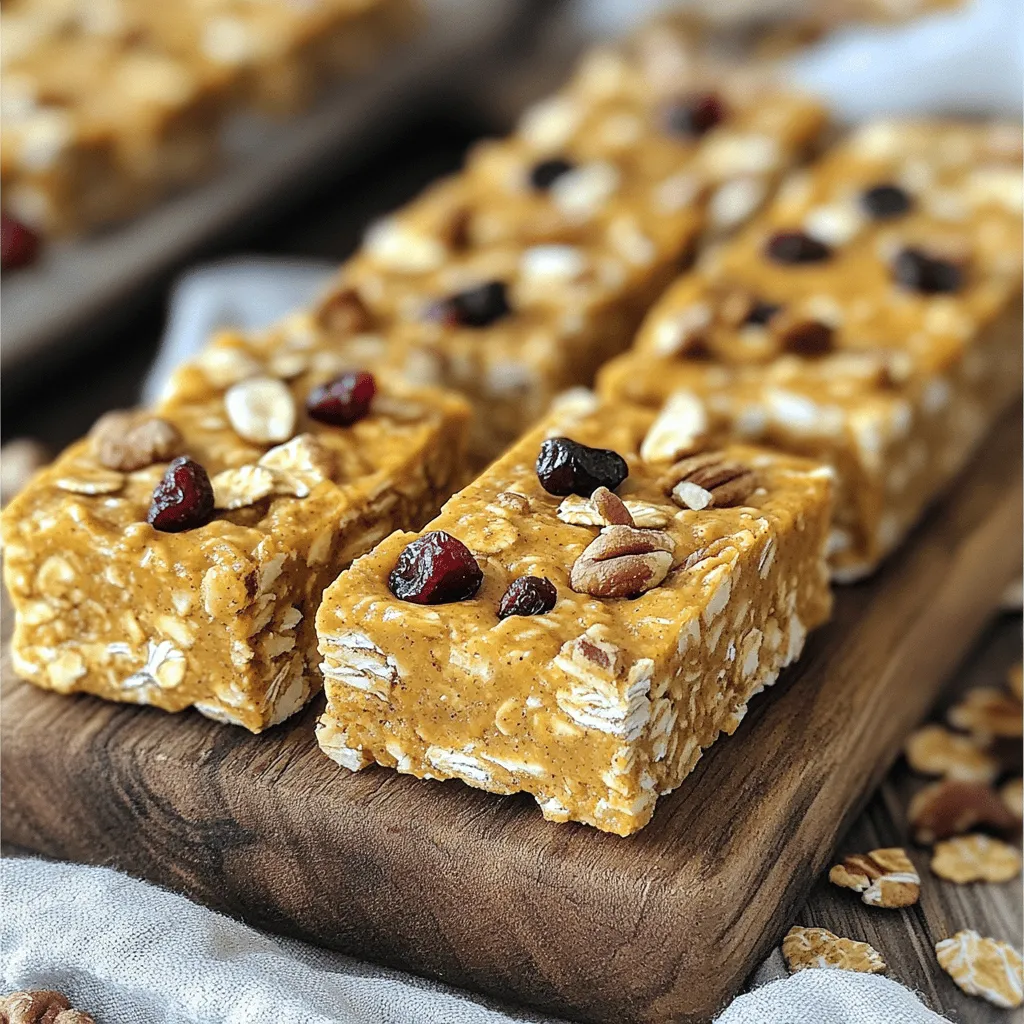
Looking for a tasty, no-bake treat? You’ll love these No Bake Pumpkin Spice Granola Bars! They are easy to make and perfect for snacking. In this post, I’ll guide you …

Read more

Categories Desserts

Garlic Butter Shrimp Scampi Linguine Delightful Meal

September 23, 2025 by Chef Miles
- 8 ounces linguine pasta - 1 pound shrimp, peeled and deveined - 4 tablespoons unsalted butter, divided - 4 cloves garlic, finely minced - 1/2 teaspoon red pepper flakes - Zest and juice of 1 lemon - 1/4 cup fresh parsley, finely chopped - 1/4 cup grated Parmesan cheese - Salt and pepper to taste This dish shines with its simple yet flavorful ingredients. Linguine pasta gives a nice base. The shrimp adds protein and a touch of luxury. Unsalted butter creates a rich sauce, while garlic brings a warm aroma. Red pepper flakes add a gentle kick, perfect for flavor lovers. Fresh lemon zest and juice brighten the dish. They add a zesty note that balances the richness. Parsley adds color and freshness on top. If you want a cheesy finish, sprinkle some grated Parmesan. Adjust salt and pepper to suit your taste. These ingredients work together for a delightful meal. Each bite bursts with flavor and comfort. Start by boiling water in a large pot. Make sure to add salt for flavor. Once the water boils, add 8 ounces of linguine pasta. Cook it according to the package instructions, usually about 8 to 10 minutes. Stir the pasta occasionally to keep it from sticking. When the pasta is al dente, drain it in a colander. Don’t forget to reserve about 1/2 cup of that starchy pasta water. It will help make the sauce creamy. In a large skillet, heat over medium heat. Melt 2 tablespoons of unsalted butter in the skillet. Once the butter melts, add 4 cloves of finely minced garlic and 1/2 teaspoon of red pepper flakes. Sauté the mixture for about 1 minute. Stir it constantly until the garlic becomes fragrant but not browned. This adds a great depth of flavor to your dish. Now, season 1 pound of peeled and deveined shrimp with salt and black pepper. Add the shrimp to the skillet in a single layer. Cook them for about 2 to 3 minutes on one side until they turn pink. Then flip the shrimp over and cook for another 2 to 3 minutes. They are done when they are fully cooked and opaque. Remove the shrimp from the skillet and set them aside on a plate. In the same skillet, add the remaining 2 tablespoons of butter. Squeeze in the juice from 1 lemon and add its zest. Stir well to combine everything. Now, pour in the reserved pasta water and bring it to a gentle simmer. This will help the flavors meld together. Next, add the cooked linguine and the shrimp back into the skillet with the sauce. Gently toss everything together. Make sure the shrimp and linguine are well coated with the sauce. Taste it to see if you need more salt or pepper. Adjust the seasoning to your liking. Once all is combined and heated through, remove the skillet from the heat. Stir in 1/4 cup of finely chopped fresh parsley for a burst of color and flavor. If you like, add a sprinkle of grated Parmesan cheese before serving. Serve this delightful dish hot. A wedge of lemon on the side adds a nice zesty kick. A light green salad goes well with this rich meal too. - Ensuring perfect linguine texture: To get the best texture, cook the linguine in salted water. Bring the water to a rolling boil. Stir the pasta often while it cooks. Follow the package instructions for timing. You want it to be al dente, which means it should still have a slight bite. - Avoiding overcooked shrimp: Overcooked shrimp become rubbery. Cook them for only 2-3 minutes on each side. Look for pink color and opaque flesh. When the shrimp curl into a C shape, they are done. - Suggestions for additional herbs or spices: You can add fresh basil or thyme for extra flavor. Chopped chives also work well. If you like a bolder taste, try adding a pinch of smoked paprika. - Tips for adjusting heat level: To make the dish spicier, increase the red pepper flakes. Start with a little, taste, and add more if needed. You can also serve sliced jalapeños on the side. - Make-ahead tips: You can prep the shrimp and sauce ahead of time. Store them in the fridge. Just cook the linguine fresh when you are ready to eat. This keeps everything tasting great. - Efficient kitchen tools: Use a large skillet to cook the shrimp and sauce together. A pasta pot with a strainer makes draining the linguine easy. A microplane is perfect for zesting lemons quickly. {{image_4}} You can change up the pasta in this dish. Try fettuccine or spaghetti for a twist. Each type gives a different bite and feel. If you want, you can swap the shrimp. Scallops or chicken work great too. Just adjust the cooking time based on your choice. For a gluten-free option, use gluten-free pasta. Many brands offer a great taste and texture. If you need a dairy-free version, swap the butter for olive oil or vegan butter. You can skip the cheese or use a dairy-free alternative. Want to add more color? Toss in some fresh spinach or sweet cherry tomatoes. They add great flavor and nutrients. You can also try different sauces. A splash of white wine or a dash of soy sauce can change the dish entirely. Adding herbs like basil or thyme can give it a fresh twist too. To store leftovers, place them in an airtight container. This keeps the shrimp and pasta fresh. It is best to eat the leftovers within three days. The flavors will still be nice, but freshness is key. When reheating, use a skillet over low heat. This method helps the shrimp stay tender. Add a splash of water or broth to keep it moist. Stir gently to avoid overcooking the shrimp. You can freeze Garlic Butter Shrimp Scampi, but be cautious. First, let it cool completely. Then, place it in a freezer-safe container. It will keep for up to three months. To thaw, move it to the fridge overnight. Reheat gently in a skillet for the best results. Garlic Butter Shrimp Scampi Linguine is a simple yet tasty dish. It features juicy shrimp tossed with linguine pasta in a buttery garlic sauce. This dish shines with the zing of lemon and the warmth of red pepper flakes. It's perfect for a quick weeknight meal or a special dinner. Yes, you can use frozen shrimp. Just thaw them in cold water before cooking. It saves time and makes meal prep easy. Always check that the shrimp are peeled and deveined for the best results. To spice up the dish, add more red pepper flakes. You can also include a splash of hot sauce. Adjust the heat to fit your taste. Remember to taste as you go for the best flavor. This meal pairs well with a light green salad or garlic bread. A crisp white wine also complements the flavors nicely. For an extra kick, serve lemon wedges on the side. Shrimp are done when they turn pink and opaque. They should also curl into a C-shape. Avoid overcooking, as that makes them tough. Use a timer for perfect results. Yes, you can prep some parts ahead. Cook the pasta and shrimp first, then store them separately. Combine everything just before serving to keep it fresh. Enjoying this dish is best right after it's made. This blog post covered how to make Garlic Butter Shrimp Scampi Linguine step by step. You learned about key ingredients, from linguine to fresh parsley. I shared useful tips to make cooking easy and fun. You can even tweak the recipe for special diets or flavor twists. Now, you can enjoy this dish with confidence. Happy cooking!

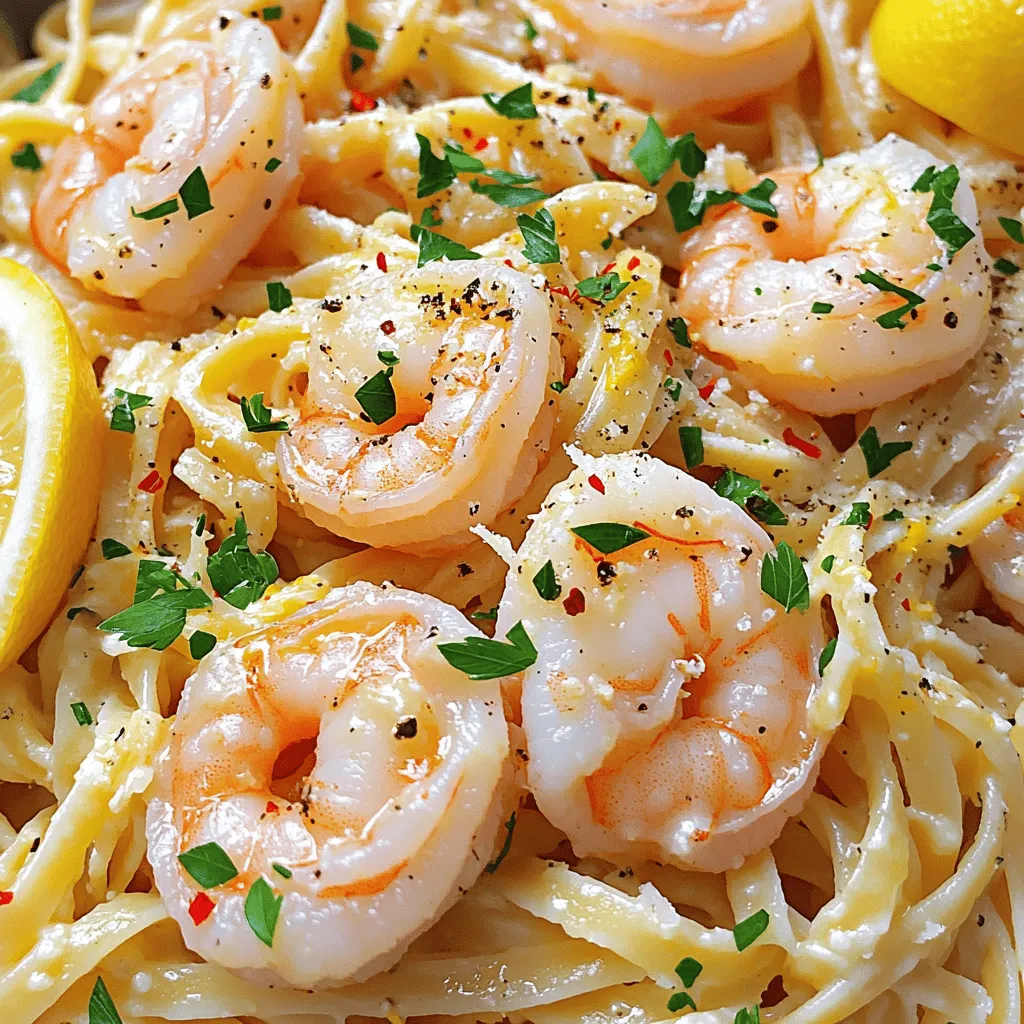
Are you ready to take your dinner game to the next level? Garlic Butter Shrimp Scampi Linguine is a delightful dish that bursts with flavor. With simple ingredients like shrimp, …

Read more

Categories Dinner

Caramel Pecan Cheesecake Brownie Cups Delightful Treat

September 23, 2025 by Chef Miles
- 1/2 cup unsalted butter, melted - 1 cup granulated sugar - 2 large eggs - 1 teaspoon vanilla extract - 1/3 cup unsweetened cocoa powder - 1/2 cup all-purpose flour - 1/4 teaspoon salt - 1/4 teaspoon baking powder - 8 oz cream cheese, softened to room temperature - 1/2 cup granulated sugar - 1 large egg - 1 teaspoon vanilla extract - 1/2 cup caramel sauce (store-bought or homemade) - 1/2 cup pecans, roughly chopped - Sea salt for optional sprinkling You need these simple ingredients to create caramel pecan cheesecake brownie cups. The brownie layer makes a rich base, while the cheesecake layer adds a creamy touch. The caramel and pecans on top bring a sweet and crunchy finish. Gather the brownie layer items first. Melt the butter and mix it with sugar. Then, add eggs and vanilla. Sift the dry ingredients next, and fold them into the wet mix. For the cheesecake layer, beat the cream cheese and sugar until smooth. Add egg and vanilla, mixing until it’s all blended nicely. Finally, for the topping, find your favorite caramel sauce. Chop pecans to sprinkle on top. Sea salt can add a fun twist. Each ingredient plays a key role in making these delightfully tasty treats! - Preheat your oven to 350°F (175°C). - Prepare a muffin tin with cupcake liners. - In a bowl, combine melted butter and sugar. Mix them well. - Add two eggs one at a time. Mix in vanilla extract. - In a separate bowl, sift cocoa powder, flour, salt, and baking powder. - Fold dry ingredients into the wet mixture. Do not overmix. - In another bowl, beat softened cream cheese and sugar until smooth. - Add one egg and vanilla extract. Mix until creamy. - Spoon cheesecake mix over brownie batter in each muffin cup. - Use a small dollop of brownie batter on top to create a marbled effect. - Place the muffin tin in the oven and bake for 20-25 minutes. - Check with a toothpick. It should come out clean. - Cool the brownie cups in the tin for 10 minutes. Transfer to a wire rack to cool completely. - Once cooled, drizzle caramel sauce over each cup. - Sprinkle chopped pecans on top. - For added flavor, sprinkle a pinch of sea salt on each cup. - Mix the melted butter and sugar until smooth. - Add eggs one at a time for better blending. - Be careful not to overmix your brownie batter. This keeps them fluffy. - Use butter that is melted but not hot. Hot butter changes the texture. - Always use room temperature cream cheese. This helps avoid lumps. - Beat the cream cheese and sugar until creamy. A smooth mix is key. - Add your egg and vanilla, mixing until everything is well combined. - For a great display, serve on a colorful platter. - Drizzle extra caramel sauce on top for flair. - Add whole pecans around the cups for a nice touch. - These brownie cups are tasty at room temperature or chilled. Enjoy them both ways! {{image_4}} You can switch pecans for almonds or walnuts. Almonds add a light crunch and a hint of sweetness. Walnuts bring a rich, earthy flavor. Both nuts work well with the caramel topping. Just chop them roughly like you do with pecans. Sprinkle them on top for a tasty twist. Want to make your brownie cups even yummier? Try adding chocolate chips or toffee bits to the brownie layer. Chocolate chips make it extra chocolaty. Toffee bits will add a buttery crunch that makes each bite special. Mix them in with your brownie batter for a fun surprise. If you need a gluten-free option, swap the all-purpose flour for a gluten-free blend. Many brands offer great alternatives. For a vegan cheesecake layer, use a mix of silken tofu and vegan cream cheese. Blend them until smooth and creamy. This way, everyone can enjoy your delicious treats! Store your caramel pecan cheesecake brownie cups in an airtight container. I recommend refrigeration. This keeps them fresh and tasty for longer. If you want to keep them longer, you can freeze them. Just wrap each cup in plastic wrap before putting them in a freezer-safe bag. In the fridge, these treats will stay fresh for about five days. You can enjoy them chilled or at room temperature. If you freeze them, they can last for up to three months. Just remember to let them thaw in the fridge overnight before enjoying. If you want to serve them warm, just pop them in the microwave. Heat for 10-15 seconds at a time. Check to see if they are warm enough after each interval. Avoid overheating, as this can ruin the creamy cheesecake layer. Enjoy your delightful treat! Yes, you can make these brownie cups ahead of time. To do this, follow the recipe and let them cool completely. Once cool, place them in an airtight container. You can store them in the fridge for up to five days. If you want to store them longer, freeze them for up to three months. Just remember to wrap each cup well to prevent freezer burn. For those who can’t have cream cheese, try these options: - Use Greek yogurt for a tangy flavor. - Cottage cheese works well; blend it for smoothness. - Silken tofu can replace cream cheese in vegan recipes. Absolutely! Homemade caramel sauce adds a nice touch. To make your own, cook sugar in a pan until it melts and turns golden. Slowly add cream and stir until smooth. Let it cool before drizzling it on the brownie cups. Homemade sauce adds rich flavor and warmth to this dessert. Check for doneness by inserting a toothpick into the center of a brownie cup. If it comes out clean or with a few moist crumbs, they are ready. Be careful not to overbake them. Overbaking can lead to dry brownie cups. Let them cool in the tin for ten minutes before transferring to a wire rack. These brownie cups combine rich layers of chocolate, creamy cheesecake, and crunchy pecans. First, you made a fluffy brownie mix and then topped it with smooth cheesecake. Finally, you added gooey caramel and pecans for extra flavor. Remember to serve them warm or chilled for the best taste. Feel free to experiment with toppings and storage options to suit your needs. Enjoy making and sharing these delightful treats!

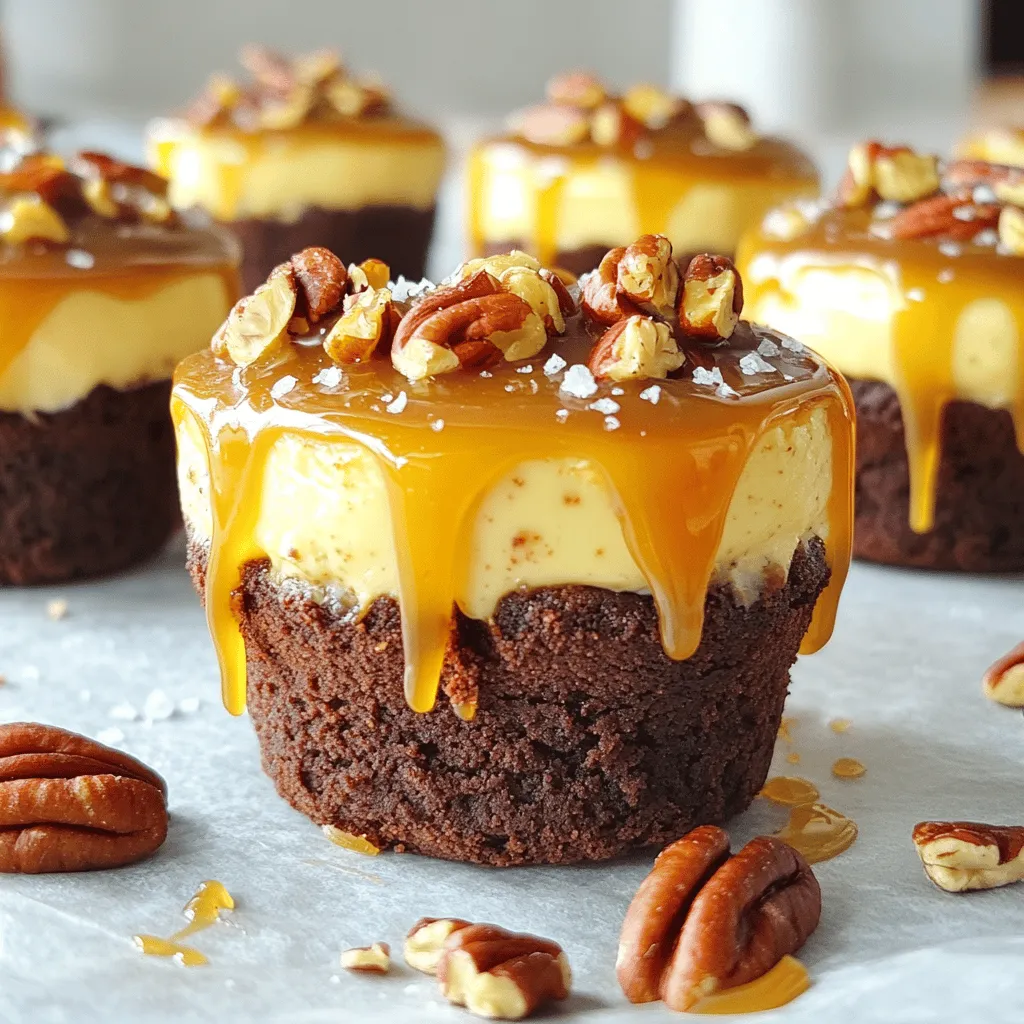
Are you ready to indulge in a dessert that will impress everyone? Caramel Pecan Cheesecake Brownie Cups are the perfect blend of rich brownie, creamy cheesecake, and crunchy pecans, all …

Read more

Categories Desserts

Slow Cooker Sweet and Spicy Korean Chicken Delight

September 23, 2025 by Chef Miles
- 2 lbs boneless, skinless chicken thighs - 1/2 cup low-sodium soy sauce - 1/4 cup honey - 2 tablespoons gochujang (Korean red chili paste) - 3 cloves garlic, finely minced - 1 tablespoon fresh ginger, finely minced - 1 tablespoon sesame oil - 1/2 cup green onions, chopped (plus extra for garnish) - 1 tablespoon sesame seeds (for garnish) - Salt and pepper to taste - Boneless, skinless chicken thighs: They stay moist and tender during cooking. - Low-sodium soy sauce: It adds a salty depth without overwhelming the dish. - Honey: This brings sweetness and balances the heat. - Gochujang: This is the heart of the dish, adding spice and flavor. - Garlic and ginger: They enhance the aroma and add warmth. - Sesame oil: This adds a nutty flavor that rounds out the dish. - Green onions: They offer freshness and crunch as a garnish. - Sesame seeds: They provide a nice texture and visual appeal. - Soy Sauce: Kikkoman is a trusted brand for low-sodium soy sauce. - Honey: Local raw honey often has the best flavor and quality. - Gochujang: Look for brands like Chung Jung One for authentic taste. - Sesame Oil: Kadoya sesame oil delivers great flavor for your dishes. - Fresh Ingredients: Try to source organic garlic and ginger for the best taste. These ingredients come together to create a dish that’s packed with flavor. Enjoy exploring this recipe! First, grab a medium mixing bowl. Add 1/2 cup of soy sauce, 1/4 cup of honey, and 2 tablespoons of gochujang. Gochujang is a Korean chili paste that brings heat. Then, add 3 cloves of minced garlic and 1 tablespoon of minced ginger. Finally, mix in 1 tablespoon of sesame oil. Whisk these ingredients together until they blend well. This sauce will give your chicken that sweet and spicy kick. Now, take 2 pounds of boneless, skinless chicken thighs. Place them on a clean cutting board. Generously season both sides with salt and pepper. This step is key to making the chicken taste great. Next, transfer the seasoned chicken to your slow cooker. Pour the sauce over the chicken, making sure each piece gets coated. This ensures the chicken absorbs all that amazing flavor. Cover your slow cooker with its lid. Set it to low heat for 6-7 hours or high heat for 3-4 hours. Cooking it low and slow makes the chicken tender. The chicken should be easy to shred when it’s done. After cooking, remove the chicken and place it on a cutting board. Use two forks to shred the chicken into bite-sized pieces. Return the shredded chicken to the slow cooker. Stir it well to mix with the sauce. Now, it’s ready to serve! To get the best shredded chicken, use boneless, skinless thighs. They stay moist and tender. After cooking, let the chicken sit for a few minutes. This step keeps the juices locked in. Use two forks to shred the chicken. Pull apart the meat gently for nice, even pieces. Mix the shredded chicken back in the sauce. This adds flavor to every bite. If you want less heat, cut the gochujang in half. You can also add more honey to balance the spice. For extra kick, try adding a pinch of cayenne pepper. Taste as you go to find your perfect heat level. Remember, you can always add more spice, but it’s hard to take it out! Serve the chicken over fluffy steamed rice for a filling meal. You can also spoon it into fresh lettuce wraps for a fun twist. Garnish each plate with chopped green onions and a sprinkle of sesame seeds. For a pop of color, add lime wedges on the side. This adds a zesty flavor that brightens the dish. Use colorful veggies around the chicken on the platter for a beautiful display. {{image_4}} You can easily switch the chicken for other meats. Try using pork or beef. Both work well with the sweet and spicy sauce. If you prefer seafood, shrimp is a great option too. Just adjust the cooking time. Shrimp cooks much faster than chicken. Aim for 1 to 2 hours on low heat. To make this dish vegan, replace the chicken with tofu. Firm tofu holds up well in the slow cooker. First, press the tofu to remove extra water. Then cut it into cubes. Use the same sauce to coat the tofu. Cook it for 4 to 5 hours on low. You can also try tempeh for a nutty flavor. This dish is very versatile. You can serve it in many ways. One option is to make lettuce wraps. Use large leaves to hold the chicken and toppings. Another fun way is to make rice bowls. Layer the chicken over steamed rice. Add your favorite veggies for color and crunch. Don't forget to top with green onions and sesame seeds! To store leftovers, first let the chicken cool down. Place it in an airtight container. Make sure to cover it well. The chicken will stay fresh for about three to four days in the fridge. This way, you can enjoy it later without losing flavor. When you are ready to eat the leftovers, reheating is easy. You can use the microwave or the stove. If using a microwave, heat in 30-second bursts. Stir between each burst to heat evenly. If using the stove, place the chicken in a pan over low heat. Add a splash of water to keep it moist. Heat until warm, then serve! You can also freeze the sweet and spicy Korean chicken. Use a freezer-safe container or freezer bags. Make sure to remove as much air as possible. The chicken can last up to three months in the freezer. When you want to eat it, thaw it overnight in the fridge. Then, reheat as mentioned above. This way, you can enjoy a tasty meal anytime! Yes, you can use chicken breasts. They cook faster than thighs. The meat may dry out more easily. Thighs stay juicy and tender. If using breasts, check for doneness early. You might need to reduce cooking time by 30 minutes. Gochujang is a Korean red chili paste. It adds a deep, sweet heat to dishes. You can find it in Asian markets. Many grocery stores also carry it. Look in the international aisle. It often comes in a red tub. This recipe has a mild to medium spice level. Gochujang provides heat but also sweetness. You can adjust the spice by using less gochujang. If you want it spicier, add more. Everyone’s taste is different, so find what works for you. This blog post covered all you need for a successful dish. You learned about the complete ingredient list and the roles of key ingredients. We explored step-by-step instructions for preparing the sauce and cooking. I shared tips to perfect your shredded chicken and adjust spice levels. You saw fun variations, including vegetarian options, and ways to serve. Lastly, we discussed how to store leftovers properly. With this knowledge, you can cook with confidence and creativity. Enjoy your cooking journey!

Are you ready to spice up your dinner plans? This Slow Cooker Sweet and Spicy Korean Chicken Delight will take your taste buds on a wild ride. With just a …

Read more

Categories Dinner

One-Pot Sun-Dried Tomato Spinach Tortellini Delight

September 23, 2025 by Chef Miles
To make One-Pot Sun-Dried Tomato Spinach Tortellini, you need a few simple items. Gather these ingredients before you start cooking: - 12 oz fresh or frozen cheese tortellini - 1 cup sun-dried tomatoes, chopped (choose oil-packed for enhanced flavor) - 2 cups fresh baby spinach leaves - 3 cloves garlic, finely minced - 1 cup vegetable broth (low-sodium recommended) - 1 cup heavy cream - 1 tablespoon extra virgin olive oil - 1 teaspoon dried basil - 1/2 teaspoon red pepper flakes (optional, for a hint of heat) - Salt and freshly ground black pepper to taste - Grated Parmesan cheese for serving - Fresh basil leaves for garnish (optional) Each ingredient plays a key role. The tortellini gives a nice base, while sun-dried tomatoes add tang. Spinach brings freshness, and garlic adds warmth. Heavy cream makes the dish rich and creamy. You can also adjust seasoning to fit your taste. First, I heat one tablespoon of extra virgin olive oil in a large pot over medium heat. As the oil warms, I finely mince three cloves of garlic. Once the oil is hot, I add the garlic to the pot. I sauté it for about one minute. I want the garlic to smell great, but it should not turn brown. Next, I chop one cup of sun-dried tomatoes. I add these to the pot and cook them for about two minutes. This step brings out their rich flavor. After the sun-dried tomatoes are ready, I pour in one cup of vegetable broth and one cup of heavy cream. I stir everything well. I let the mixture come to a gentle simmer. Once I see bubbles, I add 12 ounces of fresh or frozen cheese tortellini. If I use fresh tortellini, it cooks in about five to seven minutes. Frozen tortellini takes about ten to twelve minutes. I stir gently every few minutes, so nothing sticks to the pot. When the tortellini is almost al dente, I fold in two cups of fresh baby spinach. I also add one teaspoon of dried basil and, if I want some heat, half a teaspoon of red pepper flakes. I stir well until the spinach wilts, which takes about two minutes. Now, I taste the dish and season it with salt and freshly ground black pepper. After that, I remove the pot from heat. I serve the tortellini hot, topped with grated Parmesan cheese and a few fresh basil leaves for a pop of color and extra flavor. To boost flavor, choose oil-packed sun-dried tomatoes. They add richness and depth to your dish. If you use dry sun-dried tomatoes, soak them in hot water for ten minutes. This step helps rehydrate them and enhances their taste. Adjust seasonings to your liking. Taste your dish before serving. A pinch of salt or a dash of black pepper can make a big difference. If you like heat, add red pepper flakes. Start with a little and increase to your comfort level. For perfect tortellini texture, check the package for cooking times. Fresh tortellini usually cooks in 5-7 minutes. Frozen tortellini may take about 10-12 minutes. Stir gently to avoid sticking. Look for signs of doneness. The tortellini should float and feel tender. If you bite into one, it should be soft but not mushy. Pair this dish with a simple salad or garlic bread. A light side complements the rich flavors of the tortellini. For presentation, serve in shallow bowls. Sprinkle grated Parmesan cheese on top. Add fresh basil leaves for color. This makes your meal look as good as it tastes! {{image_4}} You can change the proteins in this dish to suit your taste. For a heartier meal, try adding cooked chicken or shrimp. Both options add great flavor and protein. You can also switch up the vegetables. Instead of spinach, use kale or arugula for a different twist. Zucchini or bell peppers can add color and crunch too. Mix and match until you find your favorite combo! If you want to make this dish vegan, swap out the cheese tortellini for a plant-based version. Use coconut cream or cashew cream in place of heavy cream. This keeps the dish creamy while being dairy-free. For those needing gluten-free options, look for gluten-free tortellini. Many brands offer tasty alternatives made from rice or chickpeas. This way, everyone can enjoy this one-pot delight without worry! To keep your One-Pot Sun-Dried Tomato Spinach Tortellini fresh, use airtight containers. Glass or plastic containers work well. Make sure they seal tightly to keep out air. Store in the fridge for up to three days. If you need to keep it longer, freeze the leftovers. Use freezer-safe bags or containers for best results. This way, you can enjoy it later without losing taste. When reheating, keep the flavor intact. The best method is using the stovetop. Place the tortellini in a pan over medium heat. Add a splash of broth or cream to help it warm up. Stir often to avoid sticking. You can also use the microwave if you're short on time. Just cover the dish with a microwave-safe lid. Heat in short bursts, stirring in between. This keeps the tortellini's texture nice and creamy. Avoid cooking it too long, as this can make it mushy. Yes, you can use frozen tortellini for this dish. When cooking frozen tortellini, make sure to adjust the cooking time. Frozen tortellini usually takes about 10-12 minutes to cook. Check the package for details. Start cooking them in the broth and cream mixture. Stir them gently to prevent sticking. The total time for this dish is about 20 minutes. It includes 10 minutes for prep and 10 minutes for cooking. First, gather all your ingredients. Then, follow the steps to sauté the garlic, add the sun-dried tomatoes, and cook the tortellini. You can serve it hot in no time. Yes, this dish is great for meal prep. You can make it ahead of time and store it in the fridge. Use airtight containers for best results. To reheat, warm it gently on the stove or in the microwave. Add a splash of cream if it seems dry. Enjoy your tasty tortellini anytime! This blog post provides a detailed guide on making sun-dried tomato spinach tortellini. You learned about the key ingredients, step-by-step instructions, and helpful tips for flavor and texture. I shared easy variations and smart storage methods, so your dish stays fresh and tasty. This one-pot meal is versatile and easy to prepare. Enjoy experimenting with different flavors and ingredients. Your cooking will amaze family and friends! Dive in and savor every bite.

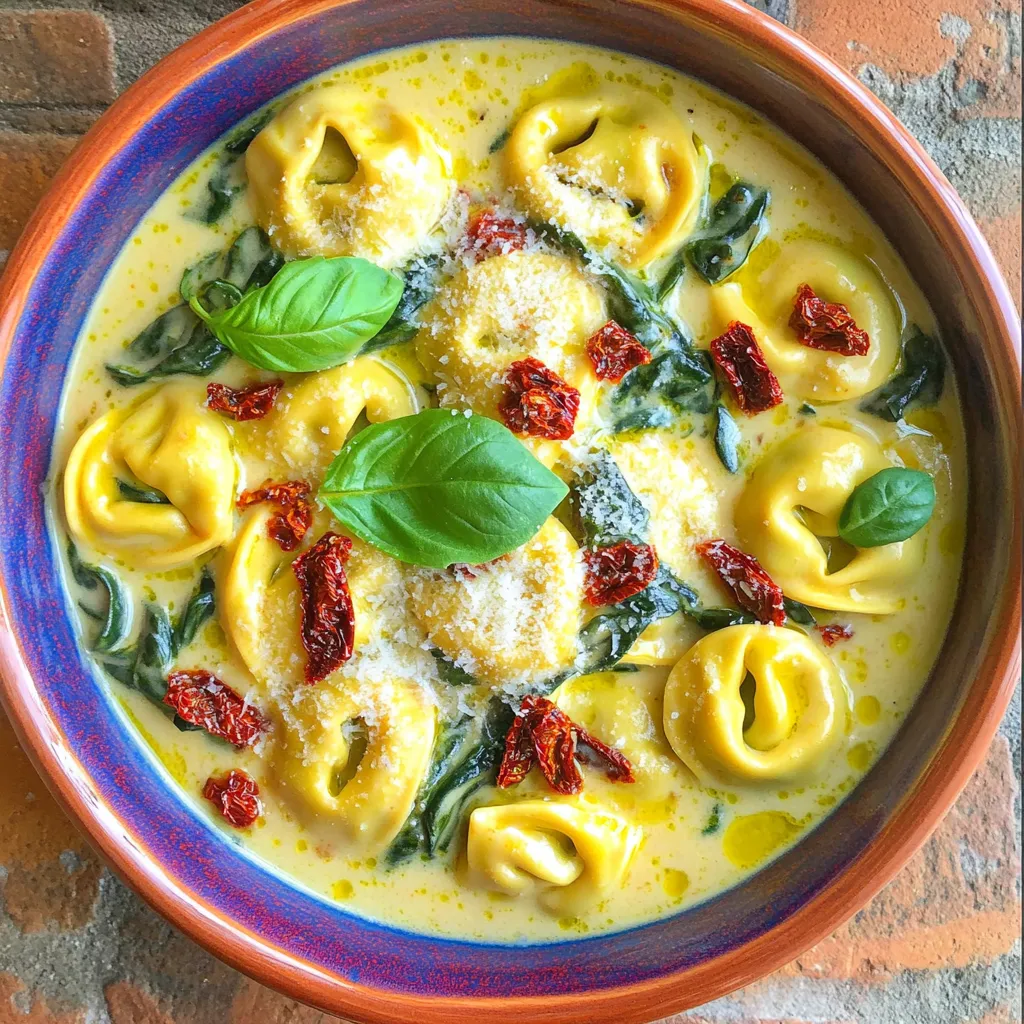
Get ready to savor a delicious meal with my One-Pot Sun-Dried Tomato Spinach Tortellini Delight! This easy recipe combines creamy tortellini with sun-dried tomatoes and fresh spinach, all cooked in …

Read more

Categories Dinner

Protein Cookie Dough Yogurt Bowl Easy and Tasty Recipe

September 23, 2025 by Chef Miles
- 1 cup Greek yogurt - 1 scoop protein powder - 2 tablespoons peanut butter or almond butter - 2 tablespoons maple syrup or honey - 1/4 cup rolled oats - 1/4 cup mini chocolate chips - 1 teaspoon vanilla extract - A pinch of sea salt - Sliced bananas - Chia seeds - Crushed nuts - Additional chocolate chips To make the Protein Cookie Dough Yogurt Bowl, you need simple, tasty ingredients. Greek yogurt is the base. It gives you creaminess and protein. You can choose plain or vanilla yogurt based on what you like. Protein powder adds extra nutrition. Vanilla or chocolate flavors mix well. Peanut butter or almond butter is next. It brings a rich, nutty taste. You can also add maple syrup or honey for sweetness. Then, we have rolled oats. They make the bowl hearty and filling. Mini chocolate chips are a fun treat that adds sweetness. Vanilla extract enhances the flavor, while a pinch of sea salt balances it all. For toppings, you can slice bananas for freshness. Chia seeds add health benefits, while crushed nuts give crunch. If you want more chocolate, sprinkle on extra mini chocolate chips. Gather these ingredients, and you will create a tasty and nutritious bowl! - Start with 1 cup of Greek yogurt. This is your base. - Add 1 scoop of protein powder. I like vanilla or chocolate. - Grab a whisk and mix until smooth. You want no lumps here. - Now, add 2 tablespoons of peanut butter. Almond butter works too. - Pour in 2 tablespoons of maple syrup or honey for sweetness. - Add 1 teaspoon of vanilla extract for a nice flavor boost. - Sprinkle in a pinch of sea salt. It balances the taste. - Stir this mix until it is creamy and well blended. - Gently fold in 1/4 cup of rolled oats. They add heartiness. - Then, toss in 1/4 cup of mini chocolate chips for a sweet treat. - Make sure everything is mixed evenly. - Carefully transfer your cookie dough yogurt into a serving bowl. - Smooth the top with a spatula for a nice finish. You can choose between plain or flavored yogurt. Plain yogurt gives a creamy base. Flavored yogurt adds a sweet twist. Each choice affects the bowl's taste. I prefer plain Greek yogurt for a rich texture. Sweeteners like honey or maple syrup enhance flavor. You can also use agave for a lighter taste. If you want a nut-free option, try sunflower seed butter. This can keep the flavor rich and tasty. Layer your ingredients for a nice look. Start with yogurt, then add oats, and top with chocolate chips. This creates a colorful bowl. For crunch, add nuts or for sweetness, slice bananas on top. {{image_4}} You can change the flavor of your Protein Cookie Dough Yogurt Bowl easily. Different protein powder flavors can make a big difference. Try chocolate, strawberry, or even cookie dough protein powder. Each type adds a unique twist to the bowl. You can also substitute nut butters. While peanut butter is great, almond butter or cashew butter works well too. Each nut butter has its own taste and creaminess. To make it vegan-friendly, swap Greek yogurt for coconut yogurt. Use plant-based protein powder, and maple syrup as your sweetener. This way, you keep the flavors while making it plant-based. For gluten-free eaters, rolled oats are usually safe. Just ensure they are certified gluten-free. This way, everyone can enjoy the bowl without worries. You can make your yogurt bowl fun with seasonal fruits. In the summer, top it with fresh berries or peaches. In fall, add sliced apples or pears for a cozy feel. For holiday-themed bowls, think about adding festive flavors. In winter, a sprinkle of cinnamon or nutmeg can create warmth. Top with pomegranate seeds in December for a splash of color and flavor. To keep your Protein Cookie Dough Yogurt Bowl fresh, store it in an airtight container. This helps prevent moisture loss and keeps flavors intact. Make sure to place it in the fridge right after you prepare it. In the fridge, the yogurt bowl lasts for about three days. If you want to enjoy it later, make sure to check for any changes in smell or texture before eating. You can easily make this yogurt bowl ahead of time. Prepare a larger batch and store it in individual containers. This way, you can grab one when you're in a hurry. If you want to freeze it, portion the yogurt into freezer-safe containers. It can last for about a month in the freezer. Just remember to let it thaw in the fridge overnight before enjoying. If you have leftovers, don’t worry! You can get creative. Mix the leftover yogurt into a smoothie for a quick breakfast. Add some fruit or spinach for extra nutrition. You can also use the yogurt as a topping on pancakes or waffles. Just spread it on top and add your favorite fruits or nuts for a new twist. Yes, you can! Here are some great options: - Greek yogurt: Thick and creamy, great for texture. - Regular yogurt: Lighter, but still tasty. - Dairy-free yogurt: Almond or coconut yogurt works well. - Skyr: A high-protein Icelandic yogurt, very thick. Try different types to find your favorite! There are several easy ways to boost protein: - More protein powder: Add an extra half scoop. - Cottage cheese: Mix in some for creaminess and protein. - Chia seeds: Add a tablespoon for extra protein and fiber. - Nuts: Top with crushed almonds or walnuts. These options help you reach your protein goals! Absolutely! Here are some tips for meal prep: - Make in bulk: Double the recipe for more servings. - Store in jars: Use mason jars to keep them fresh. - Add toppings later: Keep toppings separate until serving. This way, your yogurt bowl stays yummy and fresh! You learned how to create a tasty and versatile yogurt bowl. We covered ingredients, mixing steps, and tips to customize your bowl. You can even explore variations for different seasons or diets. Don’t forget about storage advice to keep your bowls fresh. This dish is not just easy to make but also perfect for meal prep. Enjoy your yogurt bowl full of flavor and nutrition!

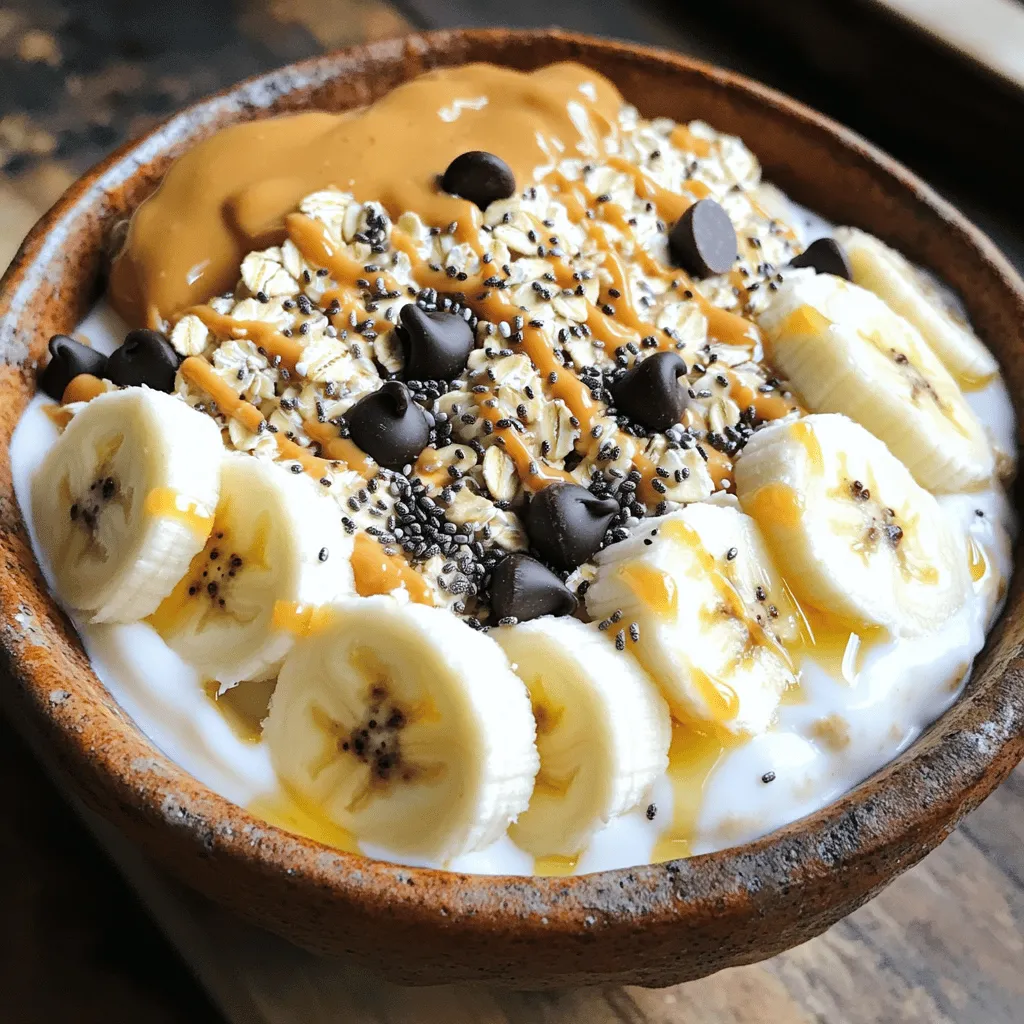
Craving a healthy treat that’s easy to make? Look no further! This Protein Cookie Dough Yogurt Bowl is your answer. Packed with tasty ingredients like Greek yogurt, protein powder, and …

Read more

Categories Desserts
Older posts
Newer posts
← Previous Page1 … Page19 Page20 Page21 … Page112 Next →

MELTED RECIPES

where delicious ideas melt into life, from stovetop to backyard. Always warm, simple, and irresistibly satisfying. 🍳🔥🧀

PAGES

Home About Contact Privacy Policy Terms & Conditions Cookie Policy GDPR Policy Copyright Policy Disclaimer

CATEGORIES

Appetizers Desserts Salads Breakfast Dinner

Contact

  • Pinterest
  • Mail
Copyright © 2025 Melted Recipes. All rights reserved.