Skip to content
Melted Recipes
  • Home
  • Appetizers
  • Desserts
  • Salads
  • Breakfast
  • Dinner
  • Privacy Policy
  • Contact
  • About

Chef Miles

Sheet Pan Garlic Butter Shrimp & Zucchini Delight

September 28, 2025 by Chef Miles
- 1 pound large shrimp, peeled and deveined - 2 medium zucchinis, sliced into half-moons - 4 cloves garlic, finely minced - 1/4 cup unsalted butter, melted - 2 tablespoons extra virgin olive oil - 1 teaspoon freshly grated lemon zest - 1 tablespoon fresh lemon juice - 1 teaspoon smoked paprika - 1 teaspoon dried oregano - Salt and freshly ground black pepper, to taste - Fresh parsley, finely chopped (for garnish) This dish shines with its simple yet bold flavors. The shrimp brings a sweet briny taste, while the zucchini adds a fresh crunch. Garlic, lemon, and spices elevate the dish, making it truly memorable. When choosing shrimp, go for large ones. They cook quickly and have a nice bite. Zucchini is best when firm and bright. The garlic should be fresh to give the most flavor. You can swap in other ingredients, too. Try bell peppers or asparagus for a different twist. - Preheat oven to 400°F (200°C) - Line baking sheet with parchment paper Start by heating your oven. This step ensures your shrimp and zucchini cook evenly. While the oven warms, cover your baking sheet with parchment paper. This makes cleanup easier and stops sticking. - Combine melted butter, olive oil, minced garlic, lemon zest, lemon juice, smoked paprika, oregano, salt, and pepper Next, make the garlic butter mixture. In a large bowl, mix melted butter and olive oil. Add minced garlic, lemon zest, and lemon juice. Then, sprinkle in smoked paprika and oregano. Finish with salt and pepper. Whisk everything together until it smells great. - Toss shrimp in garlic butter mix and marinate for 15 minutes - Lightly drizzle zucchini with olive oil, salt, and pepper Now, it’s time to marinate the shrimp. Add them to the garlic butter mix and toss gently. Let them sit for 15 minutes. This helps the shrimp soak up all the flavors. While they marinate, grab your zucchini. Drizzle it with olive oil and sprinkle with salt and pepper. Toss to coat them well. - Place zucchini on one side and shrimp on the other side of the baking sheet Once the shrimp are ready, arrange the zucchini on one side of your baking sheet. Place the marinated shrimp on the other side. Keep them separate to cook properly. - Bake for 10-12 minutes until shrimp are pink and zucchini is tender Put the baking sheet in the oven. Bake for 10-12 minutes. The shrimp will turn pink and opaque, while the zucchini becomes tender. Keep an eye on them! - Garnish with fresh parsley before serving When done, take the sheet out of the oven. Sprinkle fresh parsley on top. This adds a nice touch and enhances the dish’s look. Your sheet pan garlic butter shrimp and zucchini is now ready to enjoy! Marinating shrimp is key. It adds flavor and keeps them moist. Use the garlic butter mix for this. Let them sit for 15 minutes. This short time helps the shrimp soak up the taste. For the best texture, choose large shrimp. They stay juicy and cook evenly. Do not overcook them. When shrimp turn pink and opaque, they are done. Watch closely to avoid rubbery shrimp. Slice zucchini into half-moons. This shape helps them cook evenly. Aim for uniform pieces to ensure they roast well together. Season the zucchini with olive oil, salt, and pepper. This simple mix enhances its natural flavor. Toss the slices gently for even coating. Cook them until tender and slightly caramelized. This adds a nice sweetness to the dish. For a stunning presentation, use a large, shallow bowl. Arrange the shrimp and zucchini side by side. Drizzle any leftover garlic butter on top. This adds flavor and makes the dish shine. Pair this meal with a light white wine or iced tea. A fresh salad on the side complements the dish nicely. Enjoy the burst of flavors and beautiful colors! {{image_4}} Cooking is all about creativity. You can easily change this dish to fit your taste. Here are some fun variations to try. You can swap shrimp for other proteins. Chicken works great in this recipe. Use boneless, skinless chicken thighs or breasts. Scallops are another tasty option. They cook quickly and have a sweet flavor. You can also change the veggies. Try bell peppers for a sweet crunch. Asparagus adds a nice green touch. Broccoli or carrots could work too. Mix and match to find your favorite combo! Want more flavor? Add extra seasonings. A pinch of garlic powder or onion powder can boost taste. Fresh herbs like thyme or basil also add depth. If you like heat, sprinkle in some chili flakes. They add a spicy kick that pairs well with shrimp. You can also use hot sauce for a zesty twist. This dish can fit many diets. For gluten-free needs, just check your butter and seasonings. Most are naturally gluten-free. If you follow a low-carb or ketogenic diet, this dish is perfect. Shrimp and zucchini are low in carbs. You can replace the butter with a healthy fat like avocado oil. Enjoy a tasty meal that meets your dietary needs! To keep shrimp and zucchini fresh, store them in an airtight container. Place them in the fridge right after your meal. Leftovers will stay good for up to three days. Make sure to cool the dish down before sealing it. When reheating, use the oven or stovetop. The oven keeps the shrimp and zucchini from getting soggy. Heat at 350°F (175°C) for about 10 minutes. If using the stovetop, warm gently over low heat. To avoid overcooking the shrimp, heat just until warm. Shrimp cook fast, so keep an eye on them. Yes, this dish can be frozen! To freeze, place the leftovers in a freezer-safe container. Leave some space for expansion. Label it with the date and eat within three months. When you’re ready to eat, thaw it overnight in the fridge. Reheat as mentioned above for the best taste. To devein shrimp, first, use a sharp knife. Make a cut along the back of the shrimp. You will see a dark vein. This is the digestive tract. Carefully pull it out with your fingers or the knife. Rinse the shrimp under cold water afterward. This method is quick and keeps your shrimp clean and fresh. Yes, you can use frozen shrimp. Just make sure to thaw them first. Place the shrimp in a bowl of cold water. Let them sit for about 15-20 minutes. If you have more time, leave them in the fridge overnight. After thawing, pat them dry with paper towels before cooking. This helps ensure they cook evenly. Absolutely! This recipe works well for meal prep. You can cook a larger batch and store it. Place the shrimp and zucchini in airtight containers. They will last in the fridge for up to three days. Just reheat them in the oven or microwave before serving. This makes it easy to enjoy a tasty meal later. You can serve this dish with many sides. Here are a few ideas: - Rice: White or brown rice pairs well. - Quinoa: A healthy, protein-packed option. - Salad: A fresh mixed green salad adds crunch. - Bread: Crusty bread is great for soaking up garlic butter. These sides will complement the shrimp and zucchini nicely. Shrimp are fully cooked when they turn pink and opaque. They should also curl slightly into a C shape. If they remain gray or translucent, they need more time. Be careful not to overcook them. Overcooked shrimp can become tough and rubbery, which is not pleasant. This recipe for sheet pan garlic butter shrimp and zucchini is simple and tasty. You learned about the key ingredients, easy steps, and helpful tips. Remember to marinate the shrimp for the best flavor and texture. You can also mix in different veggies or proteins to make it your own. Enjoy this dish warm, and don’t forget to pair it with your favorite sides. With fresh ingredients and straightforward steps, you can create a delicious meal that family and friends will love.

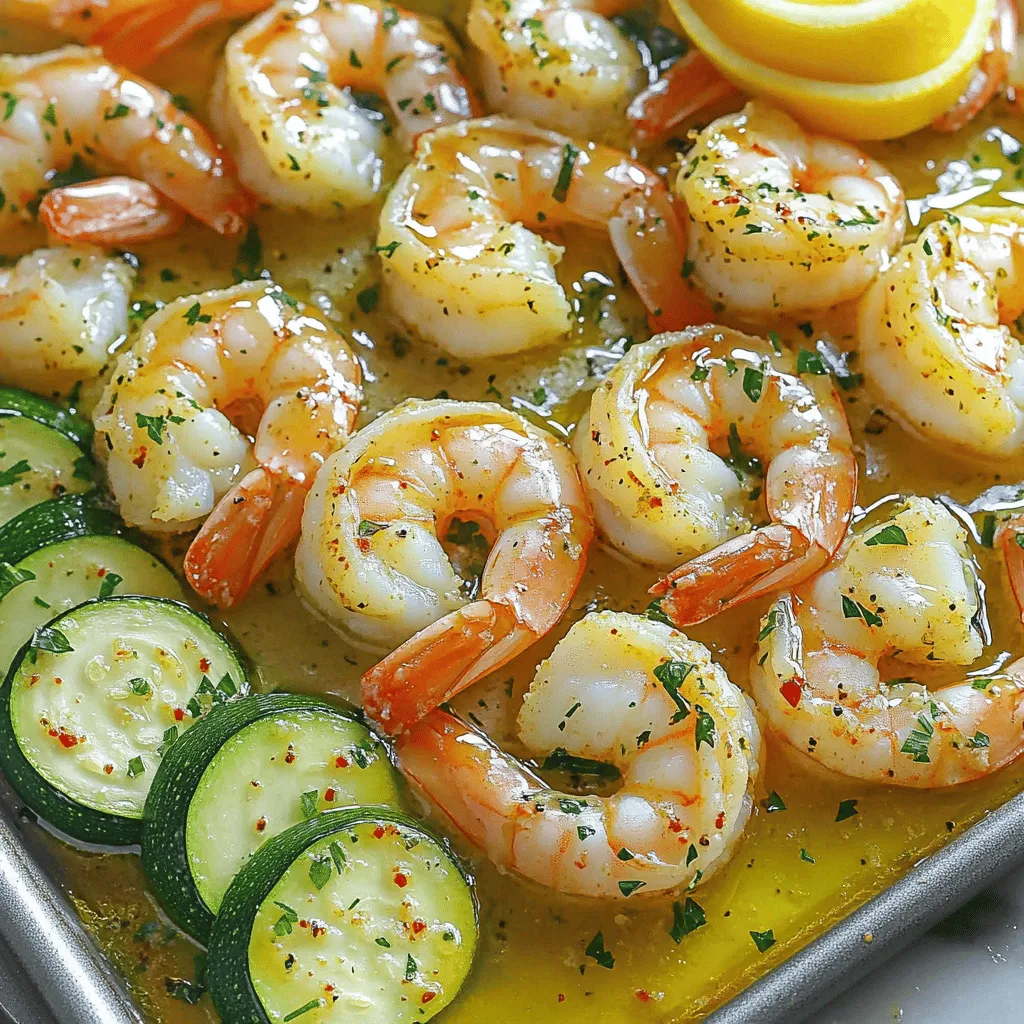
Looking for a quick, tasty dinner? Try my Sheet Pan Garlic Butter Shrimp & Zucchini Delight! This dish is packed with flavor and easy to make. You’ll enjoy juicy shrimp …

Read more

Categories Dinner

Air Fryer Buffalo Cauliflower Bites Tasty Snack Recipe

September 27, 2025 by Chef Miles
- 1 medium head of cauliflower - 1 cup all-purpose or gluten-free flour - 1 cup cold water - 1 teaspoon garlic powder - 1 teaspoon onion powder - 1 teaspoon smoked paprika - Salt and pepper to taste - 1 cup buffalo wing sauce - 2 tablespoons extra virgin olive oil - Fresh parsley for garnish To make Air Fryer Buffalo Cauliflower Bites, gather these ingredients. Start with a medium head of cauliflower. Cut it into bite-sized florets. This helps with even cooking. You can also use one cup of flour. All-purpose flour works well, but gluten-free flour is fine too. Use one cup of cold water to mix with the flour. Next, for flavor, add one teaspoon of garlic powder. Onion powder adds a nice touch too, so use one teaspoon. Smoked paprika gives a smoky taste, so add another teaspoon. Season with salt and pepper to your liking. For the sauce, you will need one cup of buffalo wing sauce. This will give the bites that spicy kick. You can adjust the heat by choosing a mild or hot sauce. Finish with two tablespoons of extra virgin olive oil for a rich flavor. Don’t forget fresh parsley to sprinkle on top. This adds color and freshness to your dish. - Rinse and dry the florets. - Cut into bite-sized pieces. Start by rinsing the cauliflower under cold water. This helps remove dirt and makes it clean. After that, dry the florets with a clean towel. This step is key for the batter to stick well. Next, cut the cauliflower into bite-sized pieces. Aim for uniform sizes so they cook evenly. - Mixing dry ingredients. - Adding cold water for consistency. In a large bowl, mix the flour, garlic powder, onion powder, smoked paprika, salt, and pepper. These spices add great flavor. Once mixed well, slowly add the cold water. Stir until you have a smooth batter. It should be thick but pourable, like a pancake batter. - Dipping cauliflower in batter. - Arranging in the air fryer basket. - Cooking time and temperature. Take each cauliflower piece and dip it into the batter. Make sure it’s fully coated. Shake off any extra batter to avoid clumps. Preheat your air fryer to 400°F (200°C) for about 5 minutes. Lightly spray the basket with cooking spray to prevent sticking. Place the battered cauliflower in a single layer. Cook for 10 minutes, shaking the basket halfway through for even cooking. - Transferring to a bowl. - Coating with buffalo sauce. When the cauliflower bites are golden and crispy, transfer them to a bowl. Pour the buffalo wing sauce over them while warm. Toss gently to ensure each piece is coated well. The sauce gives them that signature spicy flavor. - Returning to the air fryer. - Crisping up the coated bites. Now, put the coated cauliflower bites back into the air fryer basket. Air fry them for another 5 minutes. This step helps the sauce caramelize and makes the bites extra crispy. - Presentation ideas. - Recommended dipping sauces. Carefully take the bites out of the air fryer. Drizzle them with olive oil for extra flavor. Sprinkle freshly chopped parsley on top for a nice touch. Serve these bites on a platter with celery sticks. A small bowl of ranch or blue cheese dressing pairs well for dipping. This makes your dish not only tasty but also eye-catching! To get that perfect crunch, preheat your air fryer to 400°F (200°C). This step helps the cauliflower get crispy and golden. The heat creates a nice outer layer, sealing in moisture. Airflow is key in the air fryer. Make sure not to overload the basket. This allows hot air to circulate, cooking the bites evenly. Choosing the right buffalo sauce is crucial for flavor. Some sauces are hotter than others. If you want a milder taste, look for sauces labeled as "mild" or "medium." You can also mix in some ranch dressing or yogurt to tone down the heat. To coat the cauliflower evenly, dip each floret fully into the batter. Make sure each piece is covered well. After dipping, gently shake off any extra batter. This step stops clumps from forming and gives you a nice, even coating. If you notice clumps, you can use a fork to break them apart before cooking. {{image_4}} You can change the coating to suit your taste. Try using panko breadcrumbs for a crunchier texture. Panko gives a great bite. You can mix it with spices for extra flavor. For a vegan option, substitute the flour with chickpea flour. This creates a light batter that holds well. Want to add a cheesy taste? Try adding nutritional yeast to the batter. It gives a nice umami kick without dairy. You can also experiment with spices like cayenne or cumin. Adding these spices can create a unique twist on the classic flavor. These bites are perfect with different sauces. Pair them with ranch or blue cheese for dipping. You can also use a spicy aioli for a kick. If you want to be fancy, serve them on a salad. They make a fun appetizer or a tasty topping for greens. To keep your buffalo cauliflower bites fresh, store them in an airtight container. Place a paper towel in the container to absorb moisture. This helps maintain their crispiness. Your leftover bites will stay good for up to three days. When ready to eat, try to reheat them instead of eating cold. To reheat your bites, use an air fryer or oven. Preheat the air fryer to 350°F (175°C) and cook for about 5 minutes. This method helps keep them crispy. If using an oven, place them on a baking sheet. Bake at 375°F (190°C) for 10 minutes. Avoid using the microwave, as it can make them soggy. To freeze your buffalo cauliflower bites, first let them cool completely. Arrange them in a single layer on a baking sheet. Freeze for about an hour until solid. Then, transfer them to a freezer-safe bag. They can last for up to three months. To thaw, place them in the fridge overnight. Reheat using the methods above for best results. Yes, you can make this recipe gluten-free. Just substitute the all-purpose flour with gluten-free flour. Many brands offer great options that work well. Look for a flour blend that is designed for baking. It will help keep the texture light and crispy. To keep the batter on your cauliflower, dry the florets well after rinsing. Excess moisture can make the batter slide off. Make sure to coat each piece evenly but not too thick. You can also let the coated florets sit for a few minutes before air frying. This helps the batter stick better. Yes, you can bake them. Preheat your oven to 425°F (220°C). Arrange the battered cauliflower on a baking sheet lined with parchment paper. Bake for about 25-30 minutes, flipping halfway through. Keep an eye on them to make sure they crisp up nicely. To boost the heat, use a hotter buffalo sauce. You can also add cayenne pepper to the batter for extra kick. Another option is to toss the finished bites in a bit of hot sauce right before serving. This gives a fresh burst of flavor. To wrap up, we covered how to make crispy buffalo cauliflower bites. We discussed essential ingredients like cauliflower, flour, and spices. You learned the step-by-step instructions, plus tips for crispiness and storage. Experiment with flavors and dipping options to make them your own. Enjoy these bites as a snack or appetizer. With a few simple steps, you can impress your friends or family with this tasty dish.

Are you craving a tasty snack that’s easy and healthy? Look no further! My Air Fryer Buffalo Cauliflower Bites are a perfect choice. These delicious bites combine the crunch you …

Read more

Categories Appetizers

One-Pot Creamy Pesto Chicken Gnocchi Delight

September 27, 2025 by Chef Miles
- 1 lb (450g) boneless, skinless chicken breast, cut into bite-sized pieces - 1 tablespoon extra virgin olive oil - 3 cloves garlic, finely minced - 1 cup cherry tomatoes, sliced in half - 1 cup low-sodium chicken broth - 1 cup heavy cream - 1 cup store-bought basil pesto - 1 lb (450g) potato gnocchi - 1 cup fresh baby spinach - 1/2 cup freshly grated Parmesan cheese - Sea salt and freshly ground black pepper to taste - Fresh basil leaves, for garnish You can swap the chicken for turkey or tofu for a vegetarian dish. Use vegetable broth instead of chicken broth to keep it plant-based. If you’re out of heavy cream, try coconut milk or a dairy-free cream. For a lighter option, use half-and-half or whole milk. If you can't find gnocchi, you can use small pasta like orzo or cavatappi. Fresh spinach can be replaced with kale or arugula for a different flavor. To make this dish, you need a large pot or a Dutch oven. A wooden spoon is great for stirring the ingredients. A sharp knife makes cutting the chicken and tomatoes easy. You also need a cutting board for prep work. A measuring cup is important for accurate ingredient measurement. Lastly, a cheese grater will help you get fresh Parmesan for topping. Start by heating olive oil in a large pot. Use medium heat. Once hot, add the chicken pieces. Season them well with sea salt and black pepper. Cook for about 5-7 minutes. Stir occasionally until the chicken gets brown and is fully cooked. When done, remove the chicken from the pot and set it aside on a plate. In the same pot, add minced garlic. Sauté it for about 1 minute. You want it fragrant but not burned. Next, add the halved cherry tomatoes. Cook them for 2-3 minutes. You want them to soften and release some juices. After that, pour in the chicken broth. Bring the mix to a gentle simmer. Now, add the heavy cream and basil pesto. Stir them together to make a creamy sauce. Slowly fold in the gnocchi. Make sure they are fully covered in the sauce. Increase the heat slightly until it gently boils. Then, lower the heat and cover the pot. Let it cook for 3-5 minutes. You want the gnocchi to be tender and puffed. Finally, stir in the cooked chicken, spinach, and Parmesan cheese. Mix until the cheese melts and the spinach wilts. Taste and adjust the seasoning if needed. To cook gnocchi just right, start with boiling water. Add a pinch of salt for flavor. Drop the gnocchi in the pot. When they float, they’re ready! This usually takes 2-3 minutes. Drain them gently. Make sure not to overcook, or they will turn mushy. To get a rich, creamy texture, use heavy cream. Adding it to the pot with the pesto brings a lovely flavor. Stir well to mix everything. Let it simmer on low heat. This helps the sauce thicken without burning. If it seems too thick, add a splash of chicken broth. For leftovers, let the dish cool first. Then, transfer it to an airtight container. It can stay in the fridge for 3-4 days. When reheating, use low heat. Add a little broth or cream to keep it moist. Avoid microwaving too long, or it may dry out. {{image_4}} You can make this dish even better by adding veggies. Try bell peppers, zucchini, or mushrooms. These add color and flavor. You can sauté them with garlic before adding the broth. Spinach is a great option too. It wilts quickly and gives extra nutrients. If you want to switch up the protein, use shrimp or tofu. Shrimp cooks fast and pairs well with pesto. Just toss them in after the garlic and tomatoes. For a plant-based choice, use cubed tofu. Make sure to press it to remove extra water. For a gluten-free meal, swap potato gnocchi with gluten-free gnocchi. You can find this in many stores now. Just check the package for cooking times. This way, you can enjoy the same creamy dish without worry. After enjoying this creamy pesto chicken gnocchi, let leftovers cool down. Transfer them to an airtight container. Store the container in your fridge. Use it within 3 days for the best taste. Make sure to label the container with the date. To reheat, scoop the gnocchi into a pot over low heat. Add a splash of chicken broth or cream to keep it moist. Stir gently until warm. You can also microwave it in a bowl. Cover with a microwave-safe lid and heat in short bursts, stirring in between. If you want to freeze the dish, do it before adding the spinach and Parmesan. Let it cool, then place it in a freezer-safe container. It will keep well for up to 3 months. When ready to eat, thaw it overnight in the fridge. Reheat gently and add the fresh spinach and cheese before serving. Yes, you can prepare this dish ahead of time. Cook the chicken and sauce first. Then, store them in the fridge. When you’re ready, heat the sauce and add the gnocchi. This keeps the gnocchi from getting mushy. Just follow the last steps when you serve. You can use half-and-half or whole milk for a lighter option. For dairy-free versions, try coconut milk or almond milk. These swaps change the flavor a bit, but they still work well. Just remember to adjust the seasoning to match your taste. Absolutely! Kids love the soft gnocchi and creamy sauce. The chicken is tender, and the flavors blend nicely. If you want, you can reduce the garlic for a milder taste. Serve it with a side of veggies for a balanced meal. This blog post covered all you need to know about making a delicious recipe. We discussed the key ingredients, step-by-step instructions, and helpful tips for a creamy texture. You also learned about different variations and how to store leftovers safely. In summary, you now have the tools to make a great meal. Enjoy experimenting and sharing it with family and friends. Cooking can be fun and rewarding, so get started in your kitchen today!

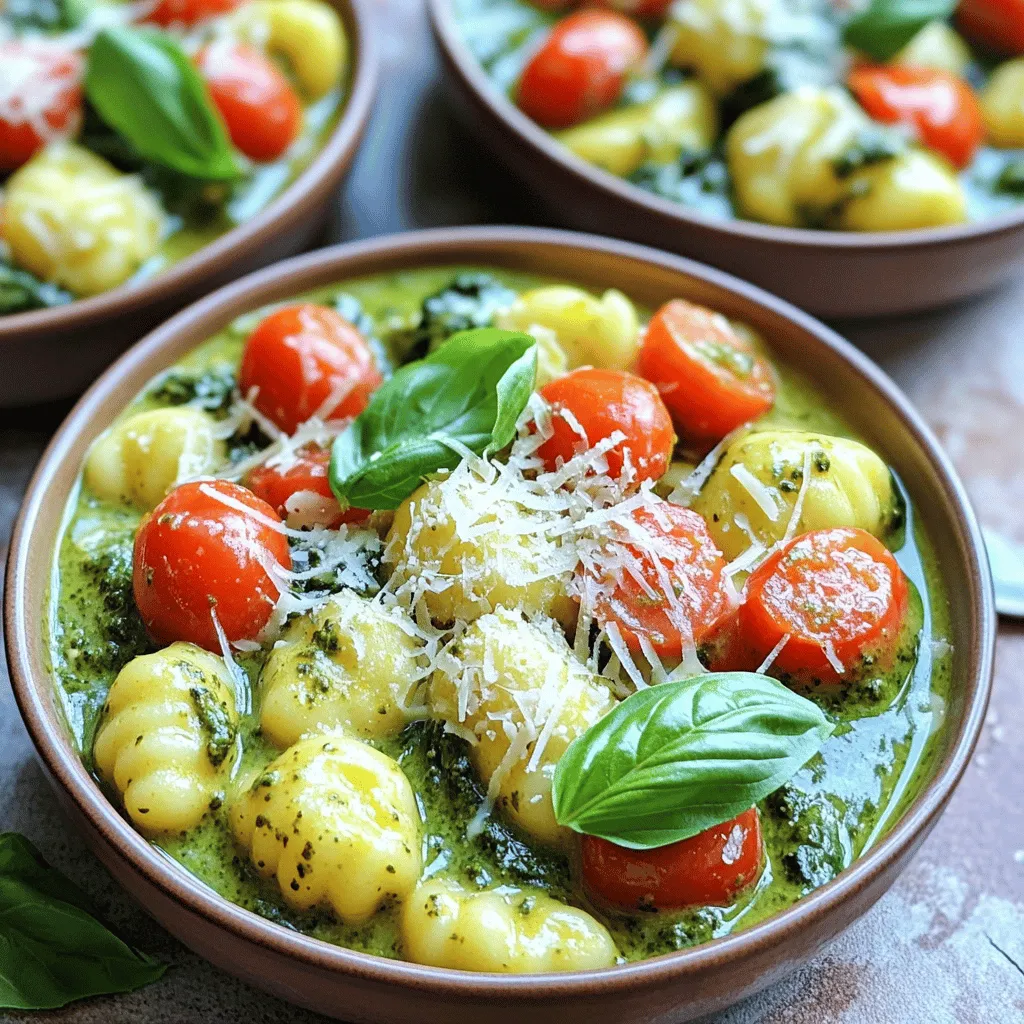
Ready for a meal that’s simple, creamy, and oh-so-delicious? My One-Pot Creamy Pesto Chicken Gnocchi Delight will make your dinner dreams come true! In just one pot, you’ll whip up …

Read more

Categories Dinner

Holiday Sprinkle Sugar Cookies Festive and Fun Treat

September 27, 2025 by Chef Miles
- 2 ¾ cups all-purpose flour - 1 teaspoon baking powder - ½ teaspoon baking soda - ¼ teaspoon salt - 1 cup unsalted butter, softened to room temperature - 1 cup granulated sugar - ½ cup powdered sugar - 1 large egg - 2 teaspoons pure vanilla extract - 1 teaspoon pure almond extract - ½ cup assorted holiday sprinkles - Extra granulated sugar for rolling Gathering the right ingredients is key to making great cookies. I use all-purpose flour for a soft texture. Baking powder and baking soda help them rise just right. A little salt brings out the sweet flavors. For the fats, I prefer unsalted butter. It gives the cookies a rich taste. I blend granulated sugar and powdered sugar for the perfect balance of sweetness. The egg binds everything together, making the dough smooth. Vanilla and almond extracts add depth to the flavor. The holiday sprinkles make these cookies festive and fun. Don’t forget the extra sugar for rolling. It gives the cookies a nice crunch on the outside. With all these ingredients, your kitchen will smell amazing! First, set your oven to 350°F (175°C). While it heats, prepare your baking sheets. Line two sheets with parchment paper. This step helps prevent the cookies from sticking. In a small bowl, mix the dry ingredients. Combine 2 ¾ cups of all-purpose flour, 1 teaspoon of baking powder, ½ teaspoon of baking soda, and ¼ teaspoon of salt. Use a whisk to blend everything well. Set this bowl aside for later. In a large bowl, cream the butter and sugars. Use an electric mixer to beat 1 cup of softened unsalted butter, 1 cup of granulated sugar, and ½ cup of powdered sugar. Mix until it looks light and fluffy. This takes about 3-4 minutes. Next, add the wet ingredients to the butter-sugar mix. Crack in 1 large egg and pour in 2 teaspoons of vanilla extract and 1 teaspoon of almond extract. Mix until everything is well combined and smooth. Now, it's time to add the dry mix. Gradually pour the dry ingredients into the wet mixture. Mix on low speed until just combined. Be careful not to overmix. This keeps the cookies tender. It's time for the fun part! Gently fold in ½ cup of assorted holiday sprinkles. Use a spatula to mix them in evenly. This step adds color and joy to your cookies! Using a tablespoon, scoop out portions of dough. Roll each portion into a ball with your hands. Then, roll each ball in extra granulated sugar before placing them on the prepared sheets. Leave about 2 inches between each cookie. Place the baking sheets in the oven. Bake for 10-12 minutes. Look for lightly golden edges. This means your cookies are ready to come out. After baking, remove the cookies from the oven. Let them cool on the sheets for about 5 minutes. Then, transfer them to wire racks. Let them cool completely before enjoying. To avoid common baking mistakes, start by measuring ingredients correctly. Use a scale for precision. Make sure your butter is at room temperature for easy mixing. When creaming butter and sugars, mix until light and fluffy. This step helps cookies rise well. Always preheat your oven to the right temperature. This ensures even baking. The texture of cookies comes from several factors. First, the type of flour matters. All-purpose flour gives good results. Second, the amount of butter affects softness. Too much butter can make cookies greasy. Third, avoid overmixing the dough. Mix just until combined to keep cookies tender. Lastly, baking time is key. Take cookies out when the edges are lightly golden. For a fun display, drizzle icing on your cooled cookies. Mix powdered sugar with a splash of milk for a simple icing. Use a spoon to drizzle it on top. Arrange cookies on a colorful platter. Scatter extra holiday sprinkles around them for a festive look. This makes the cookies even more inviting for guests. {{image_4}} You can make these cookies even more fun by changing the flavors. Here are some ideas to try: - Chocolate Chips: Add about 1 cup of chocolate chips to the dough. This gives a sweet, rich flavor. - Citrus Zest: Grate some lemon or orange peel into the mix. This adds a bright, fresh taste. - Nut Flavors: Try adding chopped nuts like pecans or walnuts. They give a nice crunch and flavor. - Spices: Mix in a pinch of cinnamon or nutmeg for a warm, cozy flavor. These spices work great for the holidays. Decorating these cookies can be a blast! Here are some ideas to make them festive: - Icing: Drizzle a simple icing made from powdered sugar and milk. Use festive colors like red and green. - Sprinkles: Use different holiday sprinkles. You can find stars, snowflakes, or even candy canes. - Edible Glitter: Add some edible glitter for a shiny finish. It makes them look magical. - Marshmallows: Top cookies with mini marshmallows for a fun twist. They add a soft texture and sweetness. You can also change these cookies to fit your diet. Here are some options: - Gluten-Free: Use gluten-free flour instead of all-purpose flour. This keeps the cookies tasty and safe for those with gluten issues. - Vegan: Replace the egg with a flax egg or applesauce. Use vegan butter instead of regular butter. This makes the cookies vegan-friendly. - Lower Sugar: You can cut back on the sugar if you want a less sweet treat. Just reduce the granulated sugar by a little. These variations make the holiday sprinkle sugar cookies perfect for everyone! To keep your holiday sprinkle sugar cookies fresh, store them in an airtight container. Place parchment paper between layers to prevent sticking. Keep the container in a cool, dry place. Avoid direct sunlight, as it can dry out the cookies. This method helps maintain their soft texture and flavor. You can freeze these cookies for future joy. First, let the cookies cool completely. Then, place them in a single layer on a baking sheet and freeze for about an hour. Once frozen, transfer them to a freezer-safe bag or container. Label the bag with the date. They can last up to three months in the freezer. When stored correctly, these cookies can last about one week at room temperature. If you freeze them, they will stay fresh for up to three months. This allows you to enjoy them during the busy holiday season or any time you crave a sweet treat. These cookies shine because of the colorful holiday sprinkles. They add joy and fun to each bite. The sprinkles make the cookies look festive and bright. This extra touch makes them perfect for any holiday gathering. Plus, the sprinkles can add a slight crunch, enhancing the texture. Absolutely! You can use any sprinkles you like. Try chocolate, rainbow, or even themed sprinkles for different holidays. Each type will give the cookies a new look and taste. Feel free to mix and match for a fun twist. Look for lightly golden edges on your cookies. The centers may still look soft, and that's okay! They will firm up as they cool. If you notice the edges turning brown, it's time to take them out. Overbaking will make them too hard. Yes, making the dough ahead is a great idea! You can store it in the fridge for up to three days. Just wrap it tightly in plastic wrap. If you want to keep it longer, freeze the dough for up to three months. Thaw it overnight in the fridge before baking. This way, you can enjoy fresh cookies whenever you want! You have all the tools to bake delicious sugar cookies. This guide covered ingredients, easy steps, and helpful tips. You learned how to mix, shape, and bake. I shared ways to customize flavors and decorate for any occasion. Proper storage keeps your cookies fresh longer. Follow these steps, and you’ll bake cookies everyone loves. Remember, practice makes perfect. Enjoy your baking journey and share your treats with friends and family!

Get ready to make the holidays sweeter with my Holiday Sprinkle Sugar Cookies! These festive treats are easy to bake and fun to share. You’ll love the way they look …

Read more

Categories Desserts

Honey Garlic Chicken Fajitas Sheet Pan Delight

September 27, 2025 by Chef Miles
- 1 pound boneless, skinless chicken breast - 2 tablespoons extra virgin olive oil - 3 tablespoons honey - 3 cloves garlic, minced - 1 red bell pepper - 1 green bell pepper - 1 medium red onion - 3 tablespoons low-sodium soy sauce - 1 teaspoon ground cumin - 1 teaspoon smoked paprika - Salt and black pepper - 8 small flour tortillas - Fresh cilantro and lime wedges The ingredients for Honey Garlic Chicken Fajitas are simple yet full of flavor. The chicken breast is the star of this dish. It cooks up tender and juicy. Choosing boneless and skinless makes prep easy. The fresh vegetables add color and crunch. Red and green bell peppers bring sweetness. The red onion gives a nice bite. Together, they create a tasty mix. The marinade is where the magic happens. Olive oil adds richness. Honey brings a sweet glaze. Garlic boosts the flavor with a savory kick. Soy sauce adds depth with its umami taste. Cumin and smoked paprika give warmth and a hint of smokiness. For serving, small flour tortillas are perfect. They wrap around the filling nicely. Fresh cilantro and lime wedges add a fresh touch. The lime juice brightens the flavors, making each bite pop. Gather these ingredients, and you’re ready to create a delicious meal. Whether it’s a family dinner or a gathering with friends, these fajitas will impress everyone. - Preheat the oven to 400°F (200°C). - Line a baking sheet with parchment paper. - Mix sliced chicken with red bell pepper, green bell pepper, and onion in a bowl. - Whisk together 2 tablespoons of olive oil, 3 tablespoons of honey, 3 tablespoons of soy sauce, 3 cloves of minced garlic, 1 teaspoon of ground cumin, and 1 teaspoon of smoked paprika. - Pour the marinade over the chicken and vegetables. - Toss until everything is coated well. - Spread the mixture evenly on the baking sheet. - Bake for 20-25 minutes, stirring halfway through. - Toast 8 small flour tortillas in a skillet for about 30 seconds on each side. - Fill the warm tortillas with the chicken and vegetable mix. - Garnish with fresh cilantro and lime wedges. This process brings out the best in each ingredient, making each bite full of flavor and joy. Enjoy your cooking! To make your Honey Garlic Chicken Fajitas really shine, marinate your chicken for longer. Letting it sit for at least an hour helps the flavors soak in. If you find the dish too sweet, add more lime juice. This will balance the honey's sweetness and brighten the taste. While baking, stir the mix halfway through. This step ensures even cooking and helps the chicken and veggies roast nicely. Always check the chicken's internal temperature. It should reach at least 165°F to be safe and juicy. When serving, arrange the warm tortillas on a platter. Place the fajita mix in the center to create a beautiful display. Use fresh cilantro and lime wedges around the plate. The colors make the dish look inviting and fun. This small touch makes a big difference in how your meal feels. {{image_4}} You can switch up the protein in this dish. Substitute chicken with shrimp or tofu for a lighter meal. Shrimp cooks fast and brings a sweet taste. Tofu is great for a plant-based option. You can also try beef strips or pork. Both will give your fajitas a rich, savory flavor. To add more color and taste, include different vegetables. Mushrooms, zucchini, or corn can brighten your dish. Each adds a unique flavor and texture. You can also mix in various colored bell peppers. Use yellow or orange peppers for extra sweetness. Don’t feel limited to baking. Try grilling the chicken and veggies for a smoky flavor. Grilling adds a nice char and enhances the taste. If you're short on time, use an air fryer. It gives a crispy texture and cooks quickly, making it a fun alternative. Store any leftover Honey Garlic Chicken Fajitas in an airtight container. You can keep them in the fridge for up to 3 days. This way, you can enjoy the tasty meal again without much hassle. For the best texture, reheat the fajitas in a skillet on the stove. This method keeps them warm and crisp. If you’re in a hurry, you can use a microwave. Just know that the microwave may make them a bit soggy. You can freeze the cooked chicken and vegetable mix. It will stay good for up to 2 months. When you’re ready to eat, thaw the mixture in the fridge overnight. After that, you can reheat it to enjoy. Yes, you can prepare the chicken and vegetables ahead of time and bake them before serving. This saves you time on busy nights. Just mix the chicken and veggies, then store them in the fridge. When you're ready, bake them for a quick meal. Consider serving with rice, beans, or a fresh salad. These sides add color and balance to your meal. You can also add some avocado or guacamole for creaminess. Use a meat thermometer to ensure it reaches an internal temperature of 165°F. This keeps your chicken safe to eat. If you don’t have a thermometer, cut into the chicken. It should be white, not pink. Absolutely, whole wheat tortillas can be a healthier alternative. They add fiber and taste great with the chicken and veggies. You can also try corn tortillas if you prefer. This blog post covered a simple and tasty recipe for honey garlic chicken fajitas. We explored the main ingredients, step-by-step instructions, and some useful tips. You can make these fajitas your own by swapping proteins or adding vegetables. Storing and reheating leftovers is also easy, so nothing goes to waste. Enjoy cooking and sharing this flavorful dish with friends and family. I hope you feel inspired to try it today!

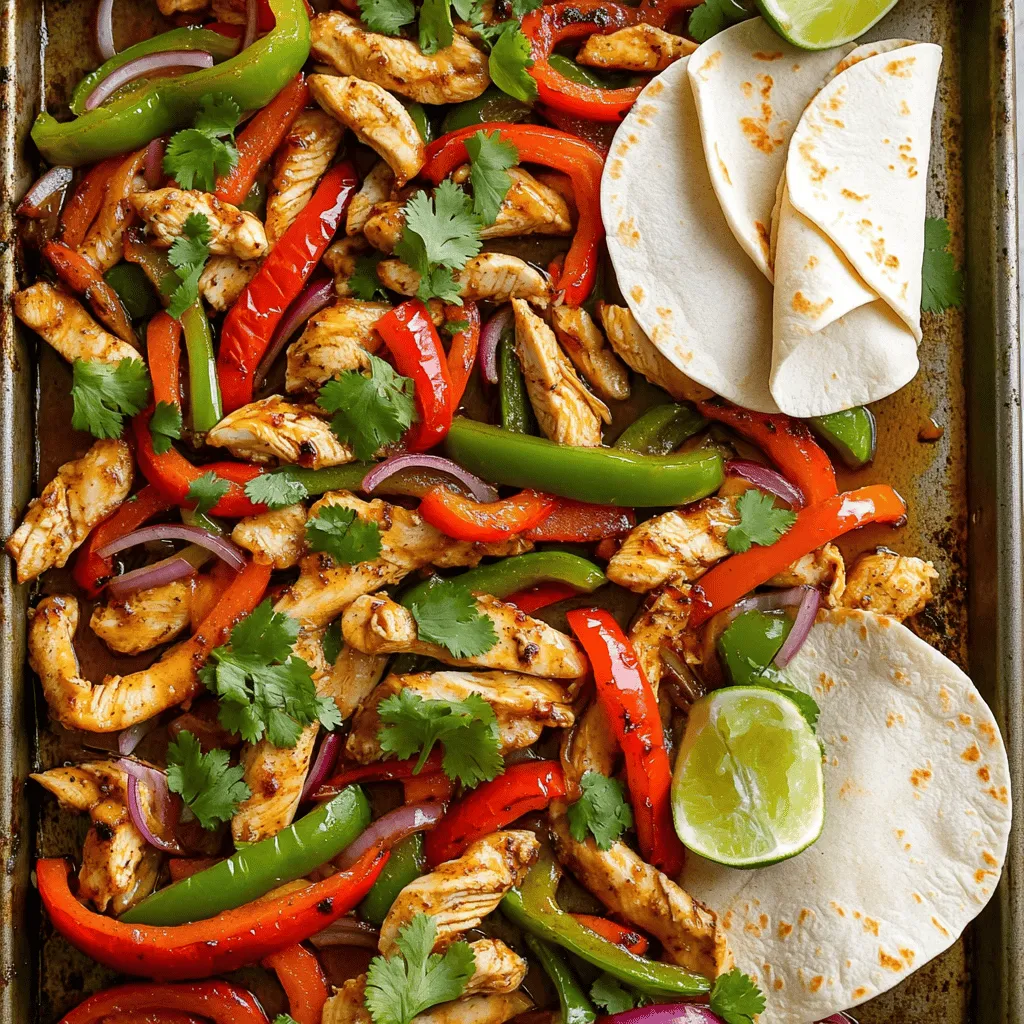
Ready to savor a scrumptious meal that comes together in one pan? The Honey Garlic Chicken Fajitas Sheet Pan Delight is the answer! With juicy chicken, fresh veggies, and a …

Read more

Categories Dinner

No-Bake White Chocolate Cranberry Oat Bars Delight

September 27, 2025 by Chef Miles
- 2 cups rolled oats - 1 cup almond butter (or nut/seed butter) - 1/2 cup honey or maple syrup These main ingredients form a solid base for your oat bars. Rolled oats bring a hearty texture. Almond butter adds creaminess and healthy fats. Honey or maple syrup sweetens the mix naturally. - 1 cup dried cranberries - 1 cup white chocolate chips - 1/2 cup sliced almonds (or nuts of your choice) Mix-ins provide flavor and crunch. Dried cranberries add a sweet-tart kick. White chocolate chips melt softly, making each bite delightful. Sliced almonds introduce a nice crunch, but any nuts will work too. - 1 teaspoon vanilla extract - A pinch of salt Flavor enhancements elevate the taste. Vanilla extract brings warmth and depth. A pinch of salt balances the sweetness, making the bars even tastier. These simple additions make a big difference! Combining the base ingredients Start by grabbing a large mixing bowl. Add 2 cups of rolled oats, 1 cup of almond butter, and 1/2 cup of honey or maple syrup. Use a spatula or wooden spoon to mix these ingredients well. You want them to blend into a smooth, sticky mixture. Folding in the mix-ins Now it’s time to add some fun! Fold in 1 cup of dried cranberries, 1 cup of white chocolate chips, 1/2 cup of sliced almonds, 1 teaspoon of vanilla extract, and a pinch of salt. Mix gently until everything is evenly spread throughout the oat base. Every bite should have a little bit of each flavor. Preparing the baking dish Next, get a 9x9 inch square baking dish. Line it with parchment paper. Let some paper hang over the edges. This extra paper will make it easy to lift out the bars later. Transferring mixture to the dish Carefully take your oat mixture and pour it into the prepared dish. Use the back of a spatula or your hands to spread it out evenly. Firmly packing and smoothing out Press the mixture down firmly. This step is important. Make sure it is packed tightly and smooth on top. A good press helps your bars hold together better. Refrigeration time Now, cover the dish and place it in the refrigerator. Chill for at least 2 hours. This helps the bars set and become firm. Removing and slicing the bars After the chill time, lift the bars out using the overhanging parchment paper. Place them on a cutting board. Use a sharp knife to cut them into squares or rectangles. Enjoy your delicious creation! - Adjusting sweetness: You can choose honey or maple syrup for your bars. Honey gives a rich flavor, while maple syrup adds a nice twist. Try both to see which you like best. - Choosing the right nut butter: Almond butter works great, but feel free to use peanut butter or sunflower seed butter. Each will change the taste a bit, so experiment. - Best practices for pressing the mixture: Always press the mixture firmly into the dish. This helps the bars hold their shape when cut. Use a spatula or your hands to make it smooth. - Presentation ideas for special occasions: Place the bars on a nice platter. Add a sprinkle of dried cranberries on top, or drizzle with melted white chocolate. It makes them look fancy! - Pairing with beverages: These bars go well with tea or coffee. Try serving them with a glass of almond milk for a tasty treat. - Not packing the mixture tightly: If you don't pack the mixture well, the bars will crumble when you cut them. Press down firmly! - Skipping the refrigeration step: Chilling the bars is key. Without it, they won’t hold together. Be patient and let them chill for at least two hours. {{image_4}} You might want nut-free options for your No-Bake White Chocolate Cranberry Oat Bars. Seed butters work great here. Try sunflower seed butter or pumpkin seed butter. They give a nice flavor without nuts. For additives, you can swap sliced almonds with seeds. Chia seeds or pumpkin seeds add crunch. They also boost nutrition. You can even leave out the nuts or seeds. The bars will still taste yummy! You can change the flavors of your bars easily. Using different dried fruits adds variety. Try raisins, apricots, or even dried cherries. Each fruit brings its own taste and texture. Adding spices or citrus zest can make a big difference too. A dash of cinnamon or nutmeg adds warmth. Zest from oranges or lemons brings brightness. These small changes can make your bars special! If you love chocolate, consider a twist. Dark chocolate is a great option. Instead of white chocolate chips, use dark ones. They add richness and a deeper flavor. You can also add cocoa powder to your mix. Just a few tablespoons makes the bars chocolatey. This twist is perfect for those who love chocolate! To keep your No-Bake White Chocolate Cranberry Oat Bars fresh, follow these tips: - Store bars in an airtight container. - Use parchment paper to separate layers. - Keep the container in a cool, dark place. I recommend using glass containers or sturdy plastic ones. They help maintain the bars' shape and flavor. When stored in the refrigerator, these bars last about one week. You’ll know they have gone bad if you see mold or if they smell off. Always check before you enjoy! Freezing your oat bars is easy. Here’s how: 1. Wrap each bar tightly in plastic wrap. 2. Place the wrapped bars in a freezer bag or container. 3. Label with the date for reference. To thaw, take a bar out and leave it in the fridge overnight. This keeps the texture just right. Enjoy your treats later! Yes, you can use gluten-free oats. Just make sure they are labeled gluten-free. This swap keeps your bars safe for those with gluten allergies. The texture and flavor will remain the same. Enjoy your delicious treat without worry! You can use any nut or seed butter. Peanut butter, cashew butter, or sunflower seed butter work well. Each option gives a different flavor, so choose what you like best. The bars will still taste great, no matter the butter you pick! The bars need to chill for at least 2 hours. This time helps them firm up and hold their shape. If you want them extra firm, you can chill them longer. Just be patient; the wait is worth it for that perfect bite! Absolutely! Feel free to add nuts, seeds, or other dried fruits. Just remember to keep the total amount the same. This keeps the balance of flavors and texture right. Get creative and enjoy the fun of personalizing your bars! The bars are ready when they are firm to the touch. If they feel soft, give them more time in the fridge. Once they hold their shape, they are perfect for slicing. Then you can enjoy your tasty creation! Store any leftover bars in an airtight container. Keep them in the refrigerator to stay fresh. They will last up to a week this way. Enjoy them as a quick snack or a sweet treat anytime! These delicious bars use rolled oats, nut butter, and sweeteners as the base. Mix-ins like cranberries and white chocolate add flavor and texture. Remember to pack them tightly before chilling in the fridge. You can customize these bars by using different nuts or sweeteners. Don't skip the refrigeration step; it ensures the bars stay firm. With a few tips, you can avoid common mistakes and enjoy tasty, healthy snacks anytime. Happy making!

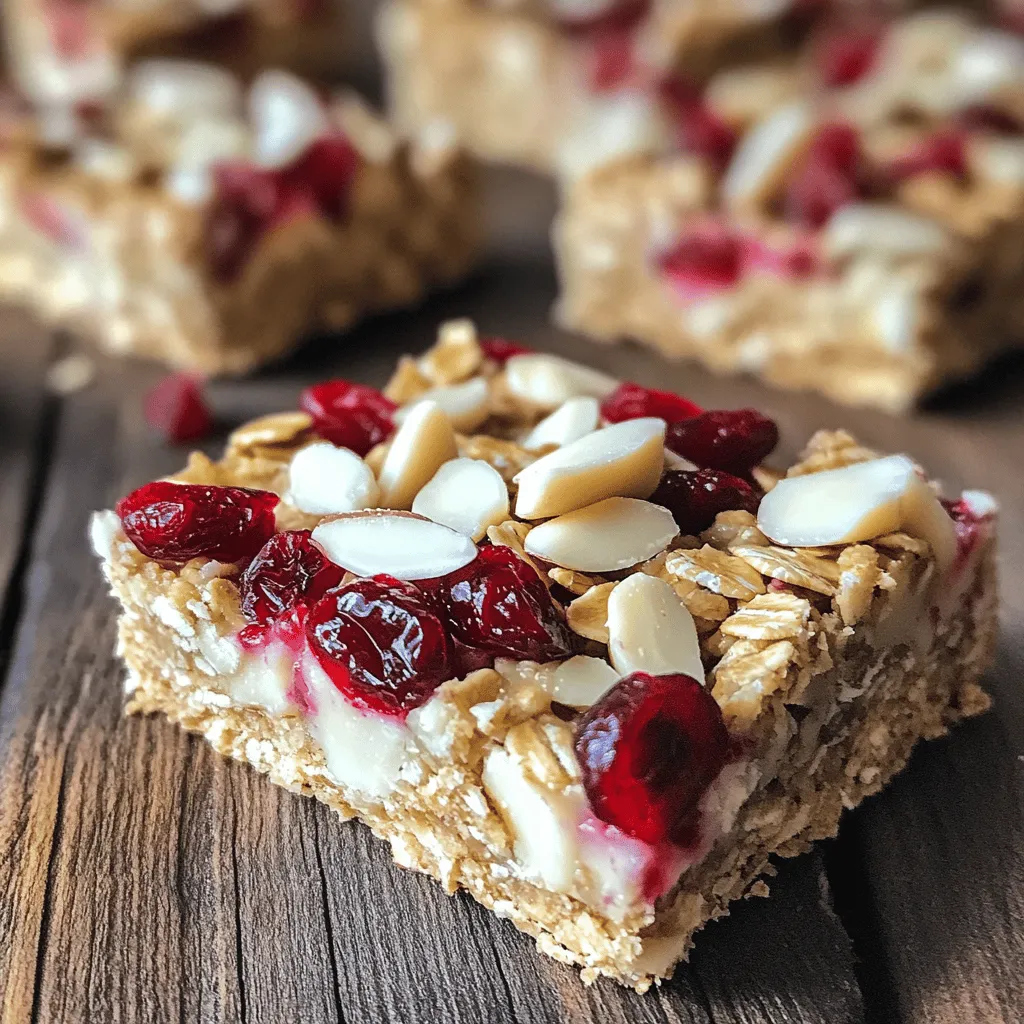
Looking for a sweet treat that’s both easy and delicious? These No-Bake White Chocolate Cranberry Oat Bars are the answer! Packed with wholesome oats, creamy almond butter, and a touch …

Read more

Categories Desserts

Minute Chili Garlic Tofu Stir-Fry Flavorful Delight

September 26, 2025 by Chef Miles
- 14 oz block of firm tofu, pressed and cut into 1-inch cubes - 2 tablespoons vegetable oil (such as canola or sunflower) - 3 cloves garlic, finely minced - 1 tablespoon fresh ginger, grated finely - 1 red bell pepper, sliced into thin strips - 1 cup snap peas, trimmed and cleaned - 2 green onions, sliced (white and green parts separated) - 3 tablespoons soy sauce (or tamari for a gluten-free option) - 1 tablespoon sriracha (adjust according to your spice tolerance) - 1 tablespoon sesame oil - 1 tablespoon honey or maple syrup (for a vegan option) When I create Minute Chili Garlic Tofu Stir-Fry, I focus on fresh, bright flavors. The firm tofu acts as a great base. It soaks up all the taste from the sauces. I love pressing the tofu first. It removes excess water, ensuring the tofu gets nice and crispy. I use vegetable oil for frying. It has a high smoke point, which helps brown the tofu quickly. Garlic and ginger are key. They add a punch of flavor when sautéed. I like to mince the garlic finely for a burst of taste. For vegetables, I choose red bell pepper and snap peas. The red bell pepper adds sweetness and color. Snap peas give a nice crunch. I also slice green onions. I use the white parts while cooking and save the green parts for garnish. Sauces bring everything together. Soy sauce or tamari adds umami. I adjust the heat with sriracha. A bit of sesame oil gives a nutty finish. Honey or maple syrup balances the spice. This mix makes each bite a flavorful delight! - Pressing the tofu: Start by removing extra moisture. Place the tofu between paper towels. Use a heavy item, like a skillet, to press down. Let it sit for about 15 minutes. - Cutting into cubes: Once pressed, take the tofu and cut it into 1-inch cubes. This size helps it cook evenly. - Browning the tofu: Heat 2 tablespoons of vegetable oil in a large skillet. Wait until the oil shimmers. Add the tofu cubes in a single layer. Cook for 4-5 minutes. Turn occasionally until golden brown on all sides. Remove the tofu and set it aside. - Sautéing garlic and ginger: In the same skillet, add 3 cloves of minced garlic and 1 tablespoon of grated ginger. Stir for about 30 seconds until you smell the nice aroma. Be careful not to burn them. - Stir-frying vegetables: Now, add the sliced red bell pepper and snap peas. Stir-fry for 2-3 minutes. You want them to be tender but still bright and crisp. - Adding sauces and seasonings: Return the browned tofu to the skillet. Pour in 3 tablespoons of soy sauce, 1 tablespoon of sriracha, 1 tablespoon of sesame oil, and 1 tablespoon of honey or maple syrup. Stir well to coat everything. Heat for an extra 2 minutes. - Finishing touches: Toss in the chopped white parts of 2 green onions. Mix gently. Serve the stir-fry over cooked rice or quinoa. Top it off with sesame seeds and the green parts of the green onions for a fresh look. Tofu can be tricky if you don't prep it right. Pressing is key to getting rid of moisture. Place the tofu between two paper towels. Add a heavy weight on top, like a cast-iron skillet. Let it sit for about 15 minutes. This step helps the tofu absorb flavors better. To achieve golden, crispy tofu, use high heat when you cook it. After pressing, cut the tofu into 1-inch cubes. When you add it to the hot oil, make sure the cubes are in a single layer. Cook for about 4-5 minutes. Turn them occasionally until they are golden brown on all sides. Want more spice? Adjust the sriracha to fit your taste. Start with 1 tablespoon and add more if you like heat. Sriracha gives the dish a nice kick. If you prefer a touch of sweetness, consider alternatives to honey. Maple syrup works well for a vegan option. Both options blend nicely with the soy sauce and sesame oil. To make your stir-fry shine, serve it over rice or quinoa. Both options soak up the sauce well. For a fun twist, use deep bowls for serving. Garnish with sesame seeds for crunch and green onion slices for color. Add a lime wedge on the side for a fresh taste. Diners can squeeze it over their dish just before eating. This brightens the flavors and makes the meal even more delicious! {{image_4}} You can swap tofu for chicken or shrimp if you want. Both add great flavor. To use chicken, cut it into bite-sized pieces. Cook it until golden, just like the tofu. For shrimp, add it in the last few minutes of cooking. This way, it stays juicy. If you're looking for plant-based options, use tempeh instead. Tempeh has a nutty taste and is very filling. Feel free to mix up the veggies in this stir-fry. Broccoli works well; it adds crunch and color. Bell peppers give sweetness and a nice bite. You can also use seasonal veggies. Try asparagus in spring or zucchini in summer. Just remember to cut them into small pieces for quick cooking. If you need gluten-free options, use tamari instead of soy sauce. It tastes similar and is safe for gluten-free diets. To make it vegan, replace honey with maple syrup. This keeps your dish sweet and tasty. Always check labels to ensure your sauces fit your diet. To keep your stir-fry fresh, store leftovers in an airtight container. Place it in the fridge within two hours of cooking. This helps prevent harmful bacteria. When reheating, use a skillet or microwave. Heat until it’s hot throughout. Stir to ensure even warming. Yes, you can freeze stir-fry! However, some veggies may lose their crunch. For best results, freeze the tofu and sauce separately. Cut the tofu into cubes and place it in a freezer bag. Squeeze out excess air to prevent freezer burn. For the sauce, store it in a jar. It’s best to freeze sauces in small portions. Leftovers can last in the fridge for about three to four days. Check for signs of spoilage, like a sour smell or a slimy texture. If you see any mold, toss it out. Always trust your senses when it comes to food safety. Making Minute Chili Garlic Tofu Stir-Fry takes about 25 minutes total. Here’s the breakdown: - Prep Time: 15 minutes - Cook Time: 10 minutes You’ll spend most of your time pressing the tofu and chopping the veggies. Once you start cooking, everything comes together quickly. Yes, you can make this stir-fry ahead of time. For meal prepping: - Cook and Cool: Make the stir-fry, let it cool, then store it in an airtight container. - Refrigerate: Keep it in the fridge for up to 3 days. When ready to eat, just reheat it on the stove or in the microwave. This makes it easy for busy days! If you need a soy sauce substitute, here are a few options: - Tamari: Great for a gluten-free option. - Coconut Aminos: A sweeter, soy-free choice. - Liquid Aminos: A mild alternative with similar flavor. These options work well in the recipe and keep the taste delicious! In this article, we explored how to make Minute Chili Garlic Tofu Stir-Fry. We covered the main ingredients, step-by-step instructions, and helpful tips for tasty results. You learned how to perfect tofu and enhance its flavor with sauces and spices. You also found variations to suit your tastes and dietary needs. Lastly, we discussed storage tips for leftovers. With these insights, you can create a quick, satisfying meal any day. Enjoy your cooking and the delightful meal you create!

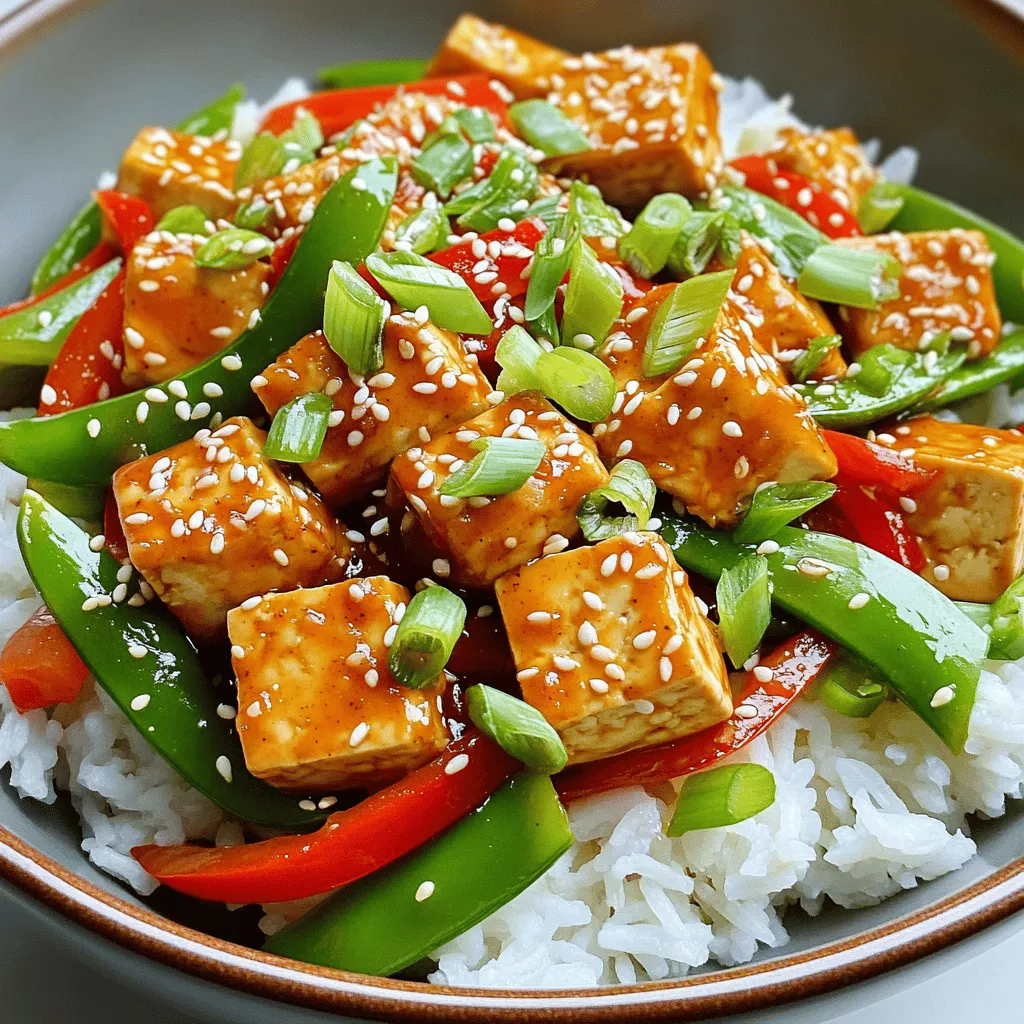
Are you ready to spice up your weeknight meals? My Minute Chili Garlic Tofu Stir-Fry delivers bold flavors in minutes! Packed with crunchy veggies and crispy tofu, this dish is …

Read more

Categories Dinner

Caramel Apple Cheesecake Cookie Cups Delightful Treat

September 26, 2025 by Chef Miles
To make these tasty treats, gather the following ingredients: - 1 cup all-purpose flour - 1/2 teaspoon baking soda - 1/4 teaspoon salt - 1/2 cup unsalted butter, softened - 1/3 cup brown sugar, packed - 1/4 cup granulated sugar - 1 teaspoon vanilla extract - 1 large egg - 1/2 teaspoon ground cinnamon - 1/2 cup apple, peeled and finely chopped - 8 oz cream cheese, softened - 1/2 cup powdered sugar - 1/4 cup sour cream - 1/2 teaspoon vanilla extract (for cheesecake) - 1/2 cup caramel sauce (plus extra for drizzling) You can add some extra fun with these optional ingredients: - Chopped nuts, like pecans or walnuts - Extra spices, such as nutmeg or allspice - Chocolate chips for a sweet twist - Different fruits like pears or peaches Make sure you have the right tools to help you: - A standard muffin tin - Mixing bowls (one large and one medium) - Electric mixer for easy blending - Measuring cups and spoons for accuracy - A spoon or spatula for folding ingredients - An oven for baking the cookie cups First, preheat your oven to 350°F (175°C). Grease a muffin tin well to stop sticking. In a bowl, mix 1 cup of flour, 1/2 teaspoon of baking soda, 1/4 teaspoon of salt, and 1/2 teaspoon of ground cinnamon. This will be your dry mix. In another bowl, cream 1/2 cup of softened butter, 1/3 cup of packed brown sugar, and 1/4 cup of granulated sugar for about 2-3 minutes. It should look light and fluffy. Next, add 1 large egg and 1 teaspoon of vanilla extract to the butter mix. Stir well. Now, gently fold the dry mix into the wet mix. Be careful not to overmix. Finally, fold in 1/2 cup of finely chopped apple. In a separate bowl, beat 8 oz of softened cream cheese with 1/2 cup of powdered sugar until creamy. Then, add 1/4 cup of sour cream and another 1/2 teaspoon of vanilla extract. Mix until it’s smooth and silky. This filling will be rich and tasty. Take a tablespoon of cookie dough and press it into the bottom and sides of each muffin cup. Make sure to form a cup shape. Bake in the oven for 10-12 minutes until the edges are golden brown. Once done, let them cool completely in the tin. After cooling, spoon the cheesecake filling into each cookie cup. Drizzle some 1/2 cup of caramel sauce on top. You can add more caramel for a sweet touch. For fun, sprinkle some chopped apples or cinnamon on top for flair. Enjoy your delightful treats! To get the best cookie cup texture, focus on mixing. First, cream the butter and sugars well. This step adds air, making your cups light. After adding the egg and vanilla, mix just until combined. Overmixing can make them tough. When you scoop the dough, press it firmly into the muffin tin. This makes a nice cup shape. Bake until the edges turn golden brown. Let them cool in the tin to keep their shape. For a smooth cheesecake filling, start with softened cream cheese. Use an electric mixer to beat it with powdered sugar. Beat until creamy and smooth, which helps avoid lumps. Adding sour cream makes the filling rich and soft. Remember to mix well after adding the vanilla. This step ensures a silky texture that pairs well with the cookie cups. Serve your cookie cups on a nice plate. Drizzle extra caramel sauce over the top for a sweet touch. Adding a sprinkle of chopped apples gives a nice crunch. For added flavor, dust with ground cinnamon. These little details make your dessert look stunning and taste even better. Enjoy them warm or chilled; both ways are delicious! {{image_4}} You can switch out apples for other fruits. Try pears for a soft texture or berries for a tart twist. Chopped peaches or cherries also bring a sweet freshness. Make sure to adjust the sugar levels if you use tart fruits. This keeps your cheesecake filling balanced and tasty. Not all caramel sauces are the same. You might use salted caramel for a sweet and salty mix. Dark caramel adds depth with a rich flavor. If you want a lighter touch, try butterscotch sauce instead. Each sauce can change the whole vibe of your cookie cups. Spices can bring new life to your cookie cups. Adding nutmeg or ginger gives warmth and a cozy feel. You can also use almond extract for a unique twist. Vanilla is classic, but a splash of maple can add fun. Experiment and find the blend that makes you smile! To keep your Caramel Apple Cheesecake Cookie Cups fresh, store them in an airtight container. Line the container with parchment paper to absorb any excess moisture. This method helps maintain their soft texture and prevents sogginess. In the refrigerator, these cookie cups last about 3 to 4 days. Make sure to keep them sealed well. The flavors deepen as they sit, making each bite even more delightful. If you want to save some for later, freezing is a great option. Place the cookie cups in a single layer on a baking sheet. Freeze them for 1-2 hours until firm. Once frozen, transfer them to a freezer-safe bag or container. They can stay good for up to 2 months. When ready to eat, thaw them in the fridge overnight. Enjoy the deliciousness when you crave a sweet treat! Yes, you can! To make gluten-free cookie cups, use a gluten-free flour blend. This works well in most recipes. Just ensure the blend has a good mix of starches and proteins. Check that all other ingredients are also gluten-free. This way, everyone can enjoy these tasty treats. To prevent sticking, grease the muffin tin well. I recommend using butter or cooking spray. You can also line the muffin cups with paper liners for easy removal. Let the cookie cups cool a bit before taking them out. This will help them firm up and keep their shape. Absolutely! You can make the cheesecake filling a day in advance. Store it in an airtight container in the fridge. When you are ready, spoon it into the cooled cookie cups. This saves time and makes assembly easier. To reheat cookie cups, use an oven set to 350°F (175°C). Place them on a baking sheet for about 5-7 minutes. This warms them without making them soggy. You can drizzle more caramel sauce on top after reheating for extra flavor. This article guides you through making Caramel Apple Cheesecake Cookie Cups. We discussed the needed ingredients, tools, and steps to create these treats. You learned tips for a great texture and serving ideas to make them shine. We also explored fun variations and storage tips to keep them fresh. Remember, these cookie cups are easy to customize. Enjoy sharing them with friends and family, or savor them all for yourself! Happy baking!

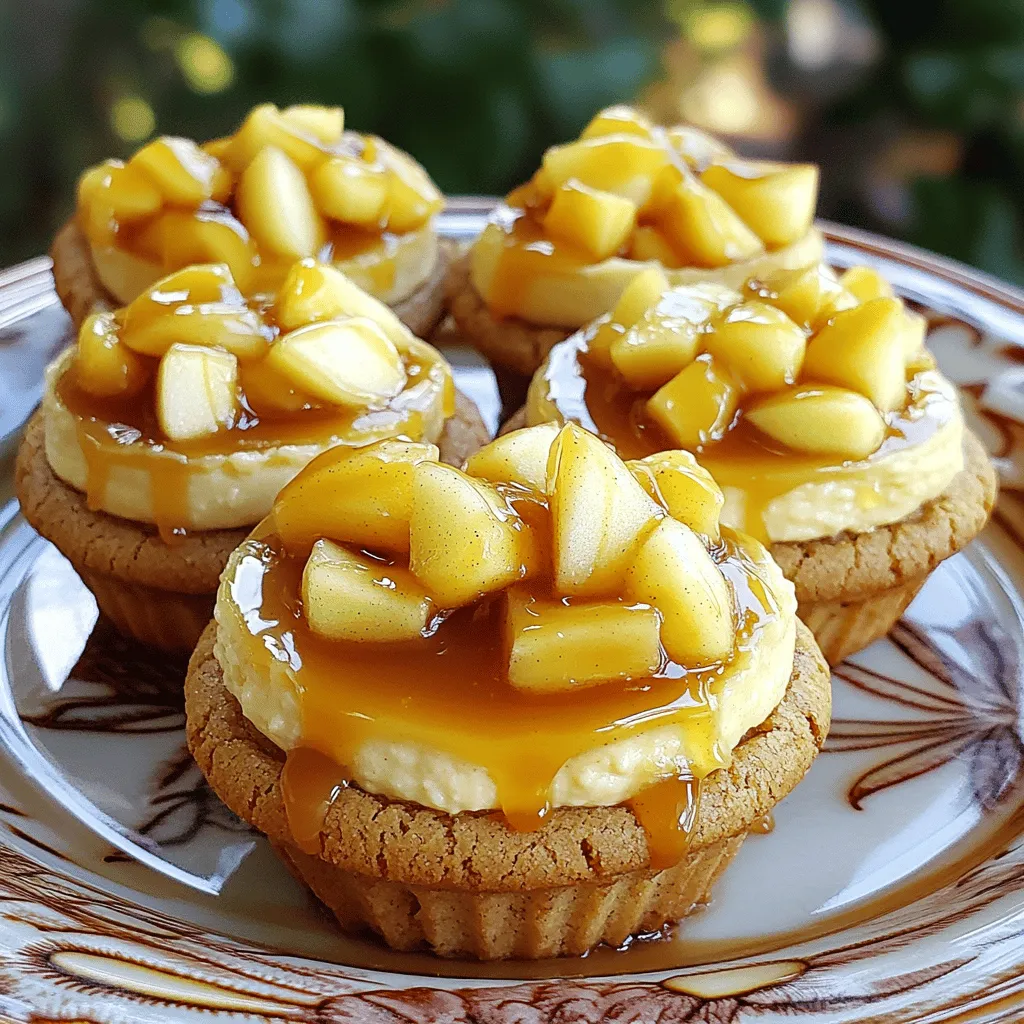
Get ready to indulge in a sweet treat that combines your favorite flavors! My Caramel Apple Cheesecake Cookie Cups are the perfect blend of creamy cheesecake, warm caramel, and crisp …

Read more

Categories Desserts

One-Pot Creamy Pesto Shrimp Pasta Delight Recipe

September 26, 2025 by Chef Miles
- 12 oz linguine or spaghetti - 1 lb shrimp, peeled and deveined - 1 cup heavy cream In this recipe, you can choose between linguine or spaghetti. Both work well with the creamy sauce. Next, the shrimp adds a nice touch of seafood flavor. Make sure they are fresh and peeled. Heavy cream is the secret to making the pasta rich and creamy. - 1/2 cup basil pesto (store-bought or homemade) - 1 cup cherry tomatoes, halved - 1 cup fresh spinach leaves - 1/2 cup grated Parmesan cheese - 2 tablespoons extra virgin olive oil Pesto gives this dish its bright flavor. You can use store-bought pesto for ease or make your own for freshness. Cherry tomatoes add sweetness and color. Fresh spinach is a great way to add some greens. Grated Parmesan boosts the creaminess, while olive oil adds richness. - Salt and pepper - Fresh basil leaves for garnish Seasoning is key. Salt and pepper bring out the flavors. For a fresh touch, use basil leaves as a garnish. They add a lovely aroma and make your dish look beautiful. This simple garnish can elevate your meal presentation. To start, heat the olive oil in a large pot over medium heat. Once the oil is hot, add the minced garlic. Sauté the garlic for about one minute. You want it fragrant but not brown. Next, add the shrimp to the pot. Season them with salt and pepper. Cook the shrimp for 2 to 3 minutes. They should turn pink and opaque. Once done, remove them from the pot and set them aside. In the same pot, add your linguine or spaghetti. Pour in enough water to cover the pasta, around 4 to 5 cups. Bring the water to a boil. Cook the pasta according to the package instructions until it is al dente. When the pasta is ready, reduce the heat to low. Drain the excess water, but keep about half a cup of the cooking water in the pot with the pasta. Now it’s time to make the creamy sauce! Stir in the heavy cream and basil pesto. Mix well until fully combined. Then, add in the halved cherry tomatoes and fresh spinach leaves. Stir until the spinach wilts and the tomatoes soften a bit. This brings a lovely burst of color and flavor. Return the cooked shrimp to the pot. Sprinkle the grated Parmesan cheese over the mixture. Gently mix everything until the shrimp are heated through. The sauce should become creamy and cohesive. Taste the pasta and adjust the seasoning with salt and freshly ground black pepper. Let it rest off the heat for a few minutes. This allows the sauce to thicken slightly before serving. To cook pasta just right, aim for al dente. This means it should be firm but not hard. Here are some tips: - Use a big pot with plenty of water. This helps the pasta cook evenly. - Add salt to the water once it boils. It enhances the pasta's flavor. - Check the package for cooking time. Sample it a minute early. To keep shrimp from overcooking, follow these steps: - Cook shrimp for just 2-3 minutes. Their pink color tells you they’re ready. - Remove them from heat right away. They will continue to cook in the pot's heat. For extra flavor, consider these seasonings: - A pinch of red pepper flakes adds a nice kick. - A squeeze of lemon juice brightens the dish. When it comes to herbs, fresh is best. Fresh herbs like basil will give a bold taste. Dried herbs work too but use less. About one-third of the amount will do. For a beautiful dish, serve it in shallow bowls. - Top with extra Parmesan cheese. It looks great and tastes amazing. - Add fresh basil leaves for a pop of color. A light drizzle of olive oil on top enhances the richness. It makes the dish look even more inviting. {{image_4}} You can change the pasta in this dish. If you're gluten-free, try brown rice pasta or chickpea pasta. These options taste great and fit your diet. You can also use penne or fusilli for a fun twist. Both will hold the sauce well. If shrimp isn't your thing, swap it out! Chicken works well. Just cook the chicken the same way. Tofu is another good choice for a plant-based meal. It adds protein and absorbs all those tasty flavors. For a vegetarian option, mix in lentils or chickpeas. Both are tasty and filling. Add your favorite vegetables for extra color and taste. Bell peppers, zucchini, or asparagus are great choices. You can also spice it up! Try red pepper flakes for heat or lemon zest for brightness. Don't forget to experiment with pesto flavors too. Sun-dried tomato pesto or arugula pesto can give a new twist. Get creative and make it your own! Store any leftover pasta in an airtight container. This keeps your dish fresh and tasty. Place it in the fridge within two hours of cooking. It will stay good for up to three days. When reheating pasta, use a microwave or stovetop. If using a microwave, heat in short bursts to avoid overcooking. On the stovetop, add a splash of water or cream to keep it creamy. Stir often to heat evenly. Yes, you can freeze this dish! To freeze, let it cool completely. Then, transfer it to a freezer-safe container. It can last up to three months in the freezer. To reheat, thaw it in the fridge overnight. Then, warm it on the stovetop, adding a bit of cream if needed. This keeps your sauce rich and smooth. Yes, you can use frozen shrimp. Just thaw them first. Place them in cold water for about 15 minutes. Pat them dry before cooking. Using frozen shrimp is quick and easy. They still taste great in this dish. If you need a substitute for heavy cream, try these options: - Whole milk mixed with butter - Half-and-half - Coconut cream for a dairy-free choice These replacements will still give you a nice creamy texture. To fix a runny sauce, try these tips: - Add more grated Parmesan cheese. It helps thicken the sauce. - Mix in a bit of cornstarch and water. Stir until it thickens. - Cook the sauce longer over low heat to reduce excess liquid. These methods will help your sauce become rich and creamy. Yes, you can prep this dish in advance. Cook the pasta and shrimp, then store them separately. Mix the sauce on the day you plan to serve it. This keeps the pasta from getting soggy. You can enjoy fresh flavors when you are ready to eat! In this post, we explored how to make One-Pot Creamy Pesto Shrimp Pasta. You learned about the main ingredients, like shrimp and heavy cream, as well as optional add-ins. We covered step-by-step instructions, from sautéing garlic to perfecting the sauce. Tips helped you enhance flavors and present the dish beautifully. Finally, we discussed variations and storage tips. This dish is simple, tasty, and perfect for busy nights. Give it a try, and enjoy a creamy delight!

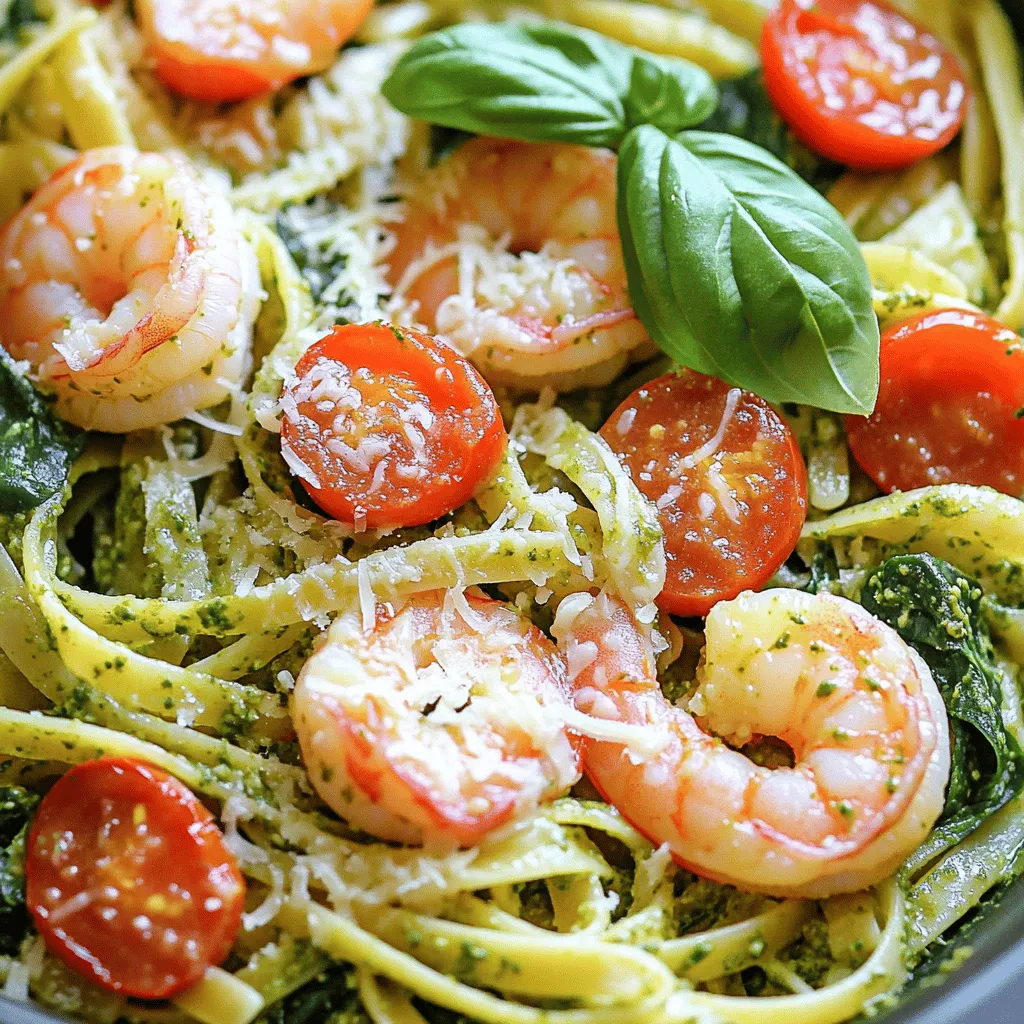
Craving a delicious meal that’s quick and easy? Let me introduce you to my One-Pot Creamy Pesto Shrimp Pasta Delight! With just a few simple ingredients, you can whip up …

Read more

Categories Dinner

High-Protein Chocolate Peppermint Smoothie Bowl Delight

September 26, 2025 by Chef Miles
This smoothie bowl is rich in protein and flavor. You will need the following main ingredients: - 1 frozen banana - 1 cup unsweetened almond milk - 1 scoop chocolate protein powder - 1 tablespoon unsweetened cocoa powder - 1/4 teaspoon peppermint extract - 2 tablespoons Greek yogurt - 1 tablespoon chia seeds These ingredients come together to create a smooth, creamy base that packs a protein punch. The frozen banana adds natural sweetness and a nice texture. Almond milk keeps it light and dairy-free. The chocolate protein powder and cocoa powder give it a deep chocolate flavor. Greek yogurt adds creaminess and extra protein. Chia seeds provide fiber and healthy fats. If you want to make your smoothie bowl sweeter, you can add one of these optional ingredients: - 1 tablespoon honey - 1 tablespoon maple syrup Adding honey or maple syrup is a great way to enhance the flavor. You can adjust the sweetness to your taste. Just blend it in with the other ingredients. Toppings make this bowl even more fun and tasty. Here are some great options: - Fresh peppermint leaves - Dark chocolate shavings - Sliced almonds - Granola Garnishing with fresh peppermint leaves gives a nice pop of color. Dark chocolate shavings add richness and a touch of luxury. Sliced almonds or granola provide a lovely crunch. These toppings not only look great but add different textures and flavors to your smoothie bowl. To start, gather all your ingredients. You need one frozen banana, one cup of unsweetened almond milk, and one scoop of chocolate protein powder. Next, add one tablespoon of unsweetened cocoa powder and a quarter teaspoon of peppermint extract. Then, include two tablespoons of Greek yogurt and one tablespoon of chia seeds. If you want it sweeter, add one tablespoon of honey or maple syrup. Place all of this in your high-speed blender. Turn on your blender at high speed. Blend until the mixture is smooth and creamy. Stop every so often to scrape down the sides. This helps mix everything well. If the mix feels too thick, add more almond milk, one tablespoon at a time. Keep blending until you reach your desired consistency. After blending, taste it. If you want it sweeter, add more honey or maple syrup. Blend again for a few seconds to mix it in. Once your smoothie is ready, carefully pour it into a bowl. Aim for an even layer across the bowl for a nice look. Now comes the fun part: decorating! Start by topping with dark chocolate shavings. Then, sprinkle sliced almonds or granola for some crunch. Finally, add fresh peppermint leaves on top. They give a nice splash of color and flavor. Enjoy your beautiful and tasty high-protein chocolate peppermint smoothie bowl! To get the best texture for your smoothie bowl, use a frozen banana. It adds creaminess and chill. Blend all your ingredients on high speed. Stop to scrape the sides often to mix everything well. If it feels too thick, add almond milk slowly. This keeps it smooth and easy to eat. You can sweeten your smoothie bowl to fit your taste. I like honey for a warm flavor. Maple syrup gives a nice touch too. Add these sweeteners when blending. Taste it after blending and adjust if needed. Just blend a bit more if you add more sweetener. Make your smoothie bowl look great! Use a colorful bowl or a fun shape. When you pour your smoothie in, make it even on top. For toppings, arrange them nicely. Spread dark chocolate shavings, almonds, and peppermint in sections. This makes your bowl pop on Instagram! {{image_4}} You can change flavors in your smoothie bowl easily. Swap the chocolate protein powder for vanilla or berry flavor. Use coconut milk instead of almond milk for a tropical taste. Instead of peppermint extract, try vanilla extract for a sweeter aroma. You can also add a spoonful of peanut butter for a nutty twist. To boost protein, use silken tofu instead of Greek yogurt. You can also mix in some cottage cheese for creaminess and protein. If you want a dairy-free option, try using a plant-based protein powder. Each option will keep your smoothie bowl rich in protein and delicious. Use seasonal fruits for extra flavor and nutrition. In fall, add pumpkin puree for a cozy taste. In summer, toss in some fresh berries for a burst of color and sweetness. In winter, try adding some cinnamon for warmth. Seasonal swaps make your smoothie bowl fresh and fun all year round. You might have some smoothie bowl left after enjoying it. Store the leftovers in an airtight container. Keep it in the fridge for up to 24 hours. The bowl may separate slightly, but it will still taste great. When ready to eat, give it a good stir to mix everything back together. If you want to make your smoothie bowl ahead, freeze individual parts. Pour leftover smoothie into ice cube trays for easy use later. Once frozen, pop the cubes into a bag. You can also freeze ripe bananas before using them. They add great texture and flavor to your future smoothies. To enjoy your leftover smoothie, reblend it for a fresh taste. Add a splash of almond milk if it seems thick. Blend until smooth and creamy again. If you prefer, you can serve it cold without blending. Just stir it well and add fresh toppings to make it appealing. You can use any plant-based milk. Coconut, soy, or oat milk work great. Each type adds its own flavor. If you're not dairy-free, regular milk is also fine. Just make sure it’s unsweetened for the best taste. Yes, you can swap the chocolate protein powder. Vanilla or unflavored powder also works well. Just know that it may change the taste slightly. If you have a favorite brand, give it a try! To make it vegan, use plant-based yogurt instead of Greek yogurt. Check that your protein powder is vegan too. Use maple syrup instead of honey for sweetness. With these swaps, you’ll enjoy a tasty vegan treat. Chia seeds add fiber, protein, and healthy fats. They help keep you full longer. They also add a nice texture to your smoothie bowl. Plus, they are a great source of omega-3 fatty acids. This blog post covered the key steps to making a smooth and tasty smoothie bowl. We explored main and optional ingredients, along with perfect toppings. I shared how to blend for the best texture and presented helpful tips for making it visually appealing. As you try this at home, remember to have fun with flavors and toppings. Enjoy each bowl as a canvas for your creativity and taste. You can make it healthy and delicious every time!

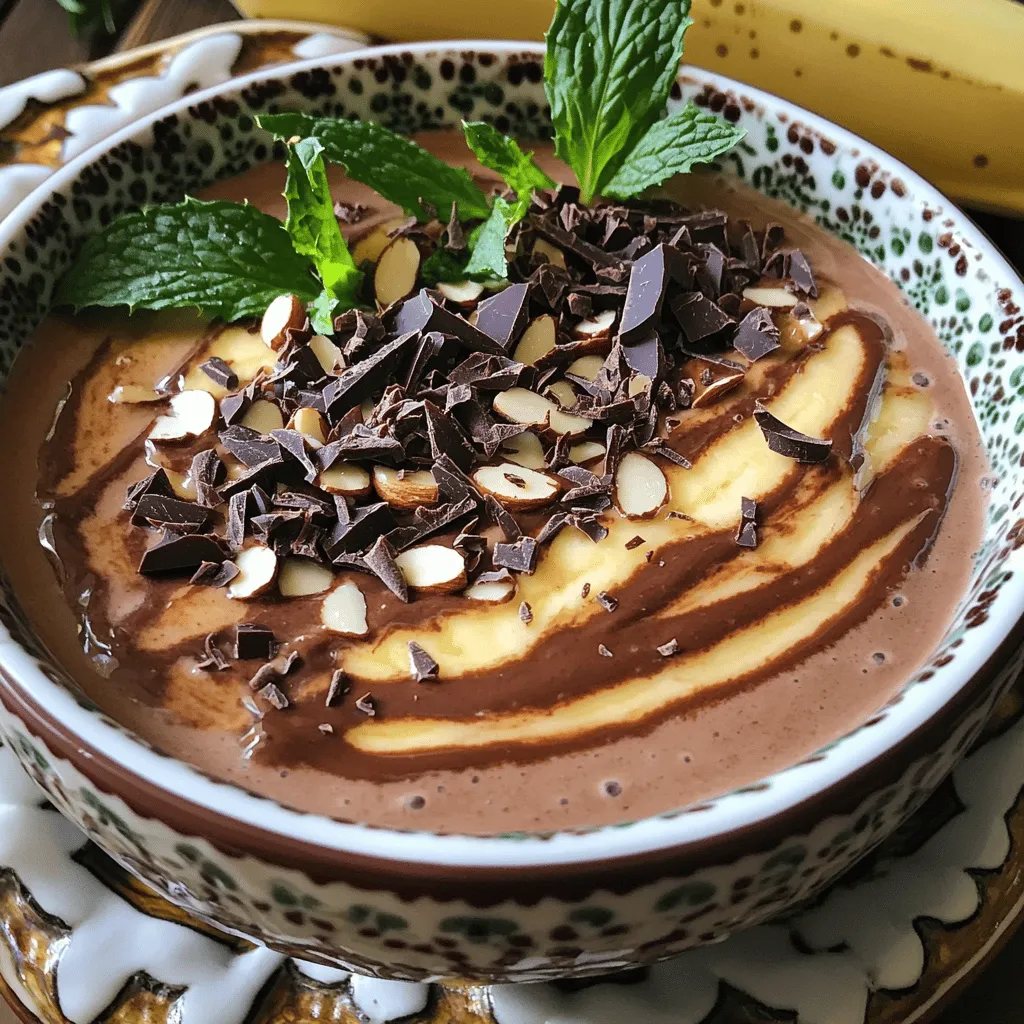
Craving a tasty treat that’s packed with protein? Let me introduce you to my High-Protein Chocolate Peppermint Smoothie Bowl Delight! This easy recipe is perfect for anyone wanting a sweet …

Read more

Categories Breakfast
Older posts
Newer posts
← Previous Page1 … Page16 Page17 Page18 … Page112 Next →

MELTED RECIPES

where delicious ideas melt into life, from stovetop to backyard. Always warm, simple, and irresistibly satisfying. 🍳🔥🧀

PAGES

Home About Contact Privacy Policy Terms & Conditions Cookie Policy GDPR Policy Copyright Policy Disclaimer

CATEGORIES

Appetizers Desserts Salads Breakfast Dinner

Contact

  • Pinterest
  • Mail
Copyright © 2025 Melted Recipes. All rights reserved.