Skip to content
Melted Recipes
  • Home
  • Appetizers
  • Desserts
  • Salads
  • Breakfast
  • Dinner
  • Privacy Policy
  • Contact
  • About

Chef Miles

Air Fryer Buffalo Tofu Wraps Flavorful and Easy Meal

October 6, 2025 by Chef Miles
- 1 block (14 oz) firm tofu, drained and pressed - 1/2 cup buffalo sauce - 1 tablespoon olive oil - 1 teaspoon garlic powder - 1 teaspoon onion powder - Salt and pepper to taste - 4 large whole wheat tortillas or wraps - 1 cup lettuce, shredded - 1/2 cup diced tomatoes - 1/4 cup red onion, thinly sliced - 1/2 cup vegan ranch dressing (optional) When making Air Fryer Buffalo Tofu Wraps, gather your ingredients first. This helps keep things organized. Start with firm tofu. I recommend using a block of 14 oz. Drain and press it well to remove extra moisture. This step is key for a crispy texture. Next, you need buffalo sauce. Choose a brand that you enjoy. A half cup will add that spicy kick. Olive oil is also essential. Just one tablespoon will help the tofu crisp up nicely. For seasoning, garlic powder and onion powder are must-haves. Each one teaspoon adds great flavor. Don’t forget to season with salt and pepper to taste. Now for the wrap, pick four large whole wheat tortillas. They will hold all the tasty filling. You’ll also want one cup of shredded lettuce for crunch. Diced tomatoes and thinly sliced red onion add freshness. If you like it creamy, add half a cup of vegan ranch dressing on top. This combination of ingredients makes for a flavorful and easy meal. Start by cutting the pressed tofu into bite-sized cubes. This shape helps the tofu cook evenly. Use a sharp knife for clean cuts. Next, mix the seasonings. In a large bowl, combine the tofu cubes with olive oil, garlic powder, onion powder, salt, and pepper. Toss everything well, ensuring each piece is coated. This step makes the tofu flavorful. Now, preheat your air fryer to 375°F (190°C). Preheating is key for a good crisp. Once preheated, put the seasoned tofu in a single layer in the basket. Cook the tofu for 15 to 18 minutes. Shake the basket halfway through. This helps the tofu cook evenly. You want it crispy and golden brown. Lay a tortilla flat on a clean surface. In the center, add a layer of shredded lettuce. This keeps the wrap fresh. Next, add the buffalo-flavored tofu on top. Then, sprinkle on diced tomatoes and sliced red onion. If you like, drizzle some vegan ranch dressing for creaminess. To wrap it up, fold the sides of the tortilla inward first. Then roll it tightly from the bottom to the top. This keeps all the filling inside. For a nice touch, slice the wraps in half diagonally. Serve them with extra buffalo sauce or vegan ranch for dipping. Enjoy your tasty meal! - To get the best texture, start with firm tofu. - Drain and press the tofu to remove excess water. This helps it crisp up. - Cut the tofu into bite-sized cubes for even cooking. - Cook your tofu at 375°F (190°C) in the air fryer. - Shake the basket halfway to ensure all sides get crispy. - For the best buffalo sauce, try Frank's RedHot or any other brand you love. - Add a splash of lime juice for a zesty kick. - You can sprinkle some smoked paprika for a richer taste. - Mixing in some chopped green onions adds freshness. - Slice your wraps in half diagonally for a nice look. - Serve them on a colorful plate for a fun vibe. - Add extra buffalo sauce or ranch dressing for dipping. - Pair with carrot and celery sticks for crunch and color. {{image_4}} You can change the protein in these wraps. Tempeh is a great choice. It has a nutty taste and can soak up the buffalo sauce well. Seitan works too; it has a chewy texture that mimics meat. If you prefer non-vegan options, use chicken or turkey. Just cook them until they are golden and toss them with the buffalo sauce. Want to make these wraps gluten-free? Look for gluten-free tortillas. They taste just as good! You can also add different veggies. Try bell peppers, cucumbers, or carrots for a crunchy bite. These swaps make your wraps colorful and tasty. Do you like it spicy? Add more buffalo sauce to heat things up. For milder heat, mix the sauce with some ranch dressing. Want more flavors? Top your wraps with avocado, cilantro, or jalapeños. Each topping brings a new taste and makes your meal exciting. To keep your Air Fryer Buffalo Tofu Wraps fresh, store them in the fridge. Wrap them tightly in plastic wrap or place them in an airtight container. This helps prevent them from drying out. They will stay good for about 3 days. If you want to save them longer, you can freeze the wraps. Just make sure to wrap each one in foil or freezer-safe bags. They can last up to 3 months in the freezer. To reheat your wraps, the air fryer gives the best results. Preheat the air fryer to 350°F (175°C). Place the wraps in a single layer and heat for about 5-7 minutes. This brings back the crispiness. You can also reheat them in a microwave for a quicker option. Just place the wraps on a plate and cover with a damp paper towel. Heat for about 1-2 minutes. However, this method may make the wraps less crispy. You can tell when the tofu is cooked by its texture and color. Perfectly crispy tofu has a golden-brown outer layer. It should feel firm when you press it. The edges should look crunchy, while the inside stays soft. If your tofu meets these signs, it's ready to enjoy. Yes, you can prep this recipe ahead of time. Cut and season the tofu a day before. Store it in the fridge until you are ready to cook. You can also assemble the wraps early. Just keep the components separate to avoid sogginess. Combine them right before serving for the best taste. You can serve many tasty sides with these wraps. Here are some ideas: - Fresh vegetable sticks like carrots and celery. - A crunchy side salad with your favorite dressing. - Sweet potato fries for a fun twist. - Homemade coleslaw for a creamy contrast. These sides pair well and add more flavor to your meal. This blog post covered a tasty air fryer buffalo tofu wrap recipe. You learned about key ingredients like firm tofu and buffalo sauce. I shared steps to prepare, cook, and assemble the wraps. You also got tips for texture and flavor boosts. In closing, this dish is simple, fun, and customizable. Enjoy experimenting with different proteins and veggies. Make it your own and enjoy every bite.

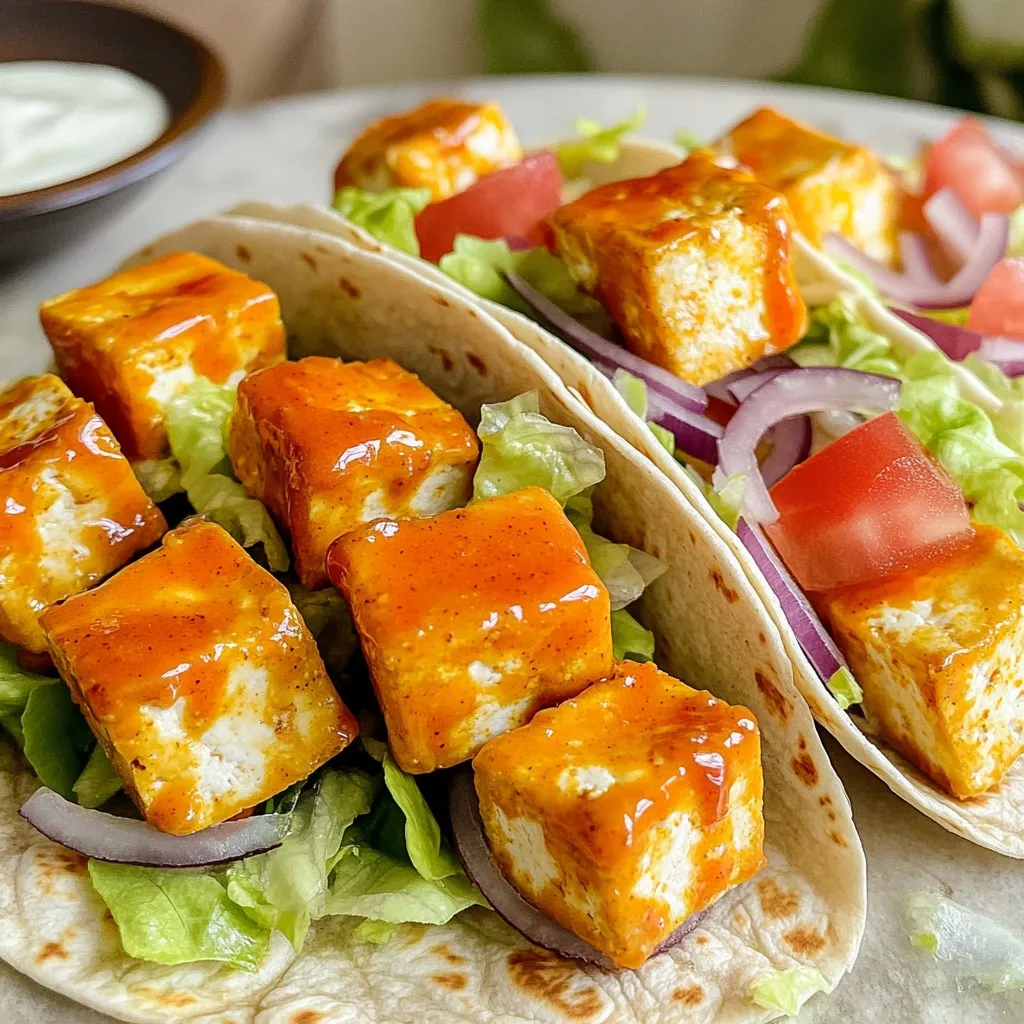
Craving a tasty meal that’s easy to whip up? Try my Air Fryer Buffalo Tofu Wraps! This dish combines crispy tofu with zesty buffalo sauce, all wrapped in a soft …

Read more

Categories Dinner

Caramel Apple Oatmeal Bake Warm and Cozy Delight

October 6, 2025 by Chef Miles
To make this warm and cozy caramel apple oatmeal bake, you will need: - 2 cups old-fashioned oats - 2 cups unsweetened almond milk (or regular milk) - 2 medium apples, peeled and diced - 1/2 cup brown sugar - 1/4 cup maple syrup - 1 teaspoon vanilla extract - 1 teaspoon ground cinnamon - 1/2 teaspoon ground nutmeg - 1/4 teaspoon salt - 1/2 cup chopped walnuts (optional) - 1/2 cup caramel sauce (for drizzling) - 1/4 cup raisins (optional) You can easily change some ingredients for your taste or needs: - Oats: Use quick oats if you prefer a softer texture. - Milk: Any milk works, like oat or soy milk. - Apples: Swap Granny Smith with Honeycrisp or Fuji for sweetness. - Sweeteners: Replace brown sugar with coconut sugar for a healthier option. - Nuts: Use pecans or almonds instead of walnuts. - Raisins: Try dried cranberries or leave them out for less sweetness. When it comes to baking, the right apple makes a big difference. Here are my top picks: - Granny Smith: Tart and crisp, perfect balance with sweet flavors. - Honeycrisp: Juicy and sweet, adds natural sweetness to your bake. - Fuji: Firm and sweet, holds up well during baking. - Braeburn: Offers a nice mix of sweet and tart, great for depth of flavor. Using the right apples helps your oatmeal bake shine and taste delicious! Start by preheating your oven to 350°F (175°C). This step is vital for even baking. Next, grab a 9x9-inch baking dish. Grease it with butter or cooking spray. This will help prevent the oatmeal bake from sticking. Make sure to coat the bottom and sides well. A non-stick surface ensures easy serving later. In a large mixing bowl, combine 2 cups of old-fashioned oats with 2 cups of unsweetened almond milk. Stir this mixture gently. Let the oats absorb some of the milk. This will create a creamy base. Next, add in 2 peeled and diced apples. Granny Smith apples are my favorite for their tartness. Now, mix in 1/2 cup of brown sugar, 1/4 cup of maple syrup, and 1 teaspoon of vanilla extract. Don't forget the spices! Add 1 teaspoon of ground cinnamon, 1/2 teaspoon of ground nutmeg, and 1/4 teaspoon of salt. Stir everything together until well mixed. If you like, gently fold in 1/2 cup of chopped walnuts and 1/4 cup of raisins for extra texture and flavor. Transfer this oat mixture into your prepared baking dish. Spread it out evenly for uniform cooking. Place the dish in your preheated oven. Bake for 30 to 35 minutes. The top should be set and light golden brown when done. To check for doneness, insert a toothpick. It should come out clean. Once baked, remove the dish from the oven and let it cool for about 5 minutes. Drizzle caramel sauce over the warm oatmeal bake before slicing. This adds a sweet touch that ties everything together. To get the best texture in your caramel apple oatmeal bake, use old-fashioned oats. They soak up the liquid well and create a nice chewy base. If you want it softer, use a bit more almond milk. Let the oats sit in the milk for about 10 minutes. This helps them absorb moisture before baking. You can also add chopped walnuts for a crunchy bite. Just fold them in gently before baking. Garnishing makes your dish look great and adds extra flavor. Drizzle more caramel sauce on top right before serving. A sprinkle of cinnamon elevates the taste too. Fresh apple slices can add color and freshness. For a creamy touch, add a dollop of whipped cream. These simple steps make your oatmeal bake even more appealing. Store any leftovers in an airtight container. This keeps your oatmeal bake fresh for up to three days. You can reheat it in the microwave or oven. Just add a splash of almond milk to keep it moist. If you want to enjoy it cold, it tastes great straight from the fridge too! {{image_4}} For a gluten-free version, use certified gluten-free oats. This swap makes the oatmeal bake safe for those with gluten sensitivities. Pair it with almond milk for a creamy texture. To make this dish vegan, stick with almond milk. Replace the brown sugar with coconut sugar. You can also use maple syrup as a sweetener. This keeps your bake plant-based and delicious. You can customize your Caramel Apple Oatmeal Bake with fun toppings. Try adding a sprinkle of shredded coconut for a tropical twist. You might enjoy fresh berries for a pop of color and flavor. Whipped coconut cream adds a nice touch, too. If you love nuts, toss in some pecans or almonds for crunch. These toppings enhance both taste and texture, making every bite special. Caramel apple oatmeal bake works for breakfast or dessert. For breakfast, cut it into squares and serve warm. Drizzle some caramel sauce on top. Add a sprinkle of cinnamon for extra flavor. For dessert, serve it in bowls. Top with whipped cream and apple slices. This makes it look special and inviting. Pair your oatmeal bake with drinks that enhance its taste. For breakfast, try a hot cup of coffee or tea. The warmth of the drink complements the bake. For dessert, serve with cold milk or warm apple cider. Both drinks balance the sweet and creamy flavors. This dish shines at special gatherings. For brunch, bake it in a large dish and serve it family-style. Guests can help themselves, creating a cozy vibe. At holiday dinners, add festive touches, like cinnamon sticks or decorative apple slices. Everyone will love the warm, inviting smell and taste of this treat. Yes, you can use different types of milk. While I recommend unsweetened almond milk, regular milk works great too. You can also try oat milk or soy milk for a dairy-free option. Each type of milk will give a slightly different flavor, so choose what you love best! To check if the oatmeal bake is done, look for a light golden brown top. Insert a toothpick into the center. If it comes out clean, the bake is ready. If there is wet batter on the toothpick, give it a few more minutes in the oven. Yes, you can prepare this recipe ahead of time. Mix the ingredients and store them in the fridge overnight. When you’re ready, pour the mixture into the baking dish and bake it. This method saves time and makes breakfast or dessert easier to manage! This blog post covered how to create a delicious oatmeal bake. We discussed the best ingredients and how to mix and bake for optimal results. I also shared tips for storage and garnishing, plus fun variations like gluten-free and vegan options. Remember, baking can be adjusted to fit your needs. Feel free to experiment with different flavors and toppings. Enjoy this treat for breakfast or dessert—it's sure to please everyone. Happy baking!

Craving a warm and sweet treat? Let me introduce you to Caramel Apple Oatmeal Bake! This delightful dish blends chewy oats, fresh apples, and gooey caramel. Perfect for breakfast or …

Read more

Categories Desserts

One-Pot Cajun Sausage Pasta Flavorful Dinner Delight

October 6, 2025 by Chef Miles
- 8 oz penne pasta - 2 tablespoons olive oil - 1 lb smoked sausage, sliced into rounds - 1 medium onion, diced - 3 cloves garlic, minced - 1 red bell pepper, diced - 1 green bell pepper, diced - 1 can (14.5 oz) diced tomatoes, undrained - 4 cups chicken broth - 2 teaspoons Cajun seasoning - 1 teaspoon dried oregano - Salt and black pepper, to taste - 1/2 cup heavy cream - 1 cup shredded cheddar cheese - Fresh parsley, chopped (for garnish) Gather these ingredients first. Each one plays a key role in making this dish sing with flavor. The smoked sausage adds depth, while the bell peppers give it a fresh crunch. The Cajun seasoning brings the heat, and the cream and cheese make everything creamy and rich. To get the best flavor, start by sautéing the sausage. Use medium heat and let it brown well. Cook it for about 5-7 minutes. This step adds richness to your dish. After that, remove the sausage and sauté the onion and garlic in the same pot. This lets the flavors mix. Cook them until the onion is soft, about 3 minutes. Then, add the bell peppers. Keep stirring for another 5 minutes. This softens them and brings out their sweetness. Simmering is key for great taste. After adding the tomatoes and broth, let everything simmer gently. This helps all the flavors blend together. The longer you simmer, the better the taste. You want the mixture to be hot but not boiling. If you want a different flavor, change the sausage. Chicken or turkey sausage works well. They are leaner but still tasty. For a vegetarian dish, swap in plant-based sausage or skip the meat entirely. You can add more veggies like mushrooms or zucchini instead. If you need alternatives, consider using different broth. Vegetable broth can replace chicken broth. This keeps the dish light yet flavorful. Want it spicier? Adjust the Cajun seasoning to your liking. You can add more if you love heat. Hot sauce or red pepper flakes are great too. Start with a little and taste as you go. This way, you can find the perfect heat level for you. Don’t have penne? Use any pasta shape you like. Fusilli or rotini can work just as well. They hold sauce nicely too. You can also add seasonal vegetables. Fresh spinach or asparagus can add color and nutrition. Just toss them in with the other veggies for a new twist. To keep your One-Pot Cajun Sausage Pasta fresh, store leftovers in an airtight container. This helps to lock in flavor and moisture. You can safely enjoy your pasta for up to 3 days in the refrigerator. Just make sure to let it cool to room temperature before sealing it up. If you want to reheat, add a splash of chicken broth to keep it creamy. For longer storage, you can freeze your One-Pot Cajun Sausage Pasta. First, let it cool completely, then portion it into freezer-safe containers. This way, you can thaw only what you need later. It’s best to consume frozen pasta within 2-3 months for the best taste. When you’re ready to enjoy, simply thaw it in the fridge overnight. Reheat on the stove over low heat, adding a bit of chicken broth or cream to restore its creamy texture. {{image_4}} This recipe makes 4 to 6 servings. Each serving has about 450 calories. The breakdown is as follows: - Protein: 20 grams - Carbohydrates: 40 grams - Fats: 25 grams This dish packs a good amount of protein from the sausage and cheese. The penne pasta provides hearty carbs to keep you full. If you need gluten-free options, you can use gluten-free penne pasta. This swap keeps the dish tasty and safe for those with gluten issues. For lower fat or dairy-free choices, try using coconut milk instead of heavy cream. You can also use dairy-free cheese. These options let you enjoy the dish without compromising your diet. Yes, you can! While I love penne for this dish, any pasta works. You could use rotini, fusilli, or even spaghetti. Just keep in mind that cooking times may change. Check the package instructions to make sure your pasta cooks perfectly. To add heat, try these tips: - Use spicy smoked sausage instead of mild. - Add red pepper flakes while cooking. - Mix in hot sauce before serving. These steps will give your dish a nice kick! Absolutely! You can prepare this dish in advance. Just cook it, let it cool, and store it in the fridge. When you're ready to eat, simply reheat it on the stove. Add a splash of chicken broth to bring back the creaminess. Enjoy your easy meal! This blog post took you through the key ingredients, steps, and tips for making One-Pot Cajun Sausage Pasta. You learned about key items like penne pasta, smoked sausage, and aromatic vegetables. I shared simple steps for combining flavors and provided tips for ingredient swaps. Experiment with spice levels and ingredients to match your taste. Enjoy your cooking journey! Your next delicious meal is just a pot away.

Looking for a quick, tasty dinner that packs a punch? This One-Pot Cajun Sausage Pasta is your answer! With just a few simple ingredients, you can create a flavorful meal …

Read more

Categories Dinner

Pumpkin Hot Chocolate Cozy and Comforting Drink

October 6, 2025 by Chef Miles
Here’s what you need to make this cozy drink: - 2 cups of milk (dairy or non-dairy options) - 1/2 cup pure pumpkin puree - 1/4 cup unsweetened cocoa powder - 1/4 cup granulated sugar (to taste) - 1 teaspoon vanilla extract - 1 teaspoon pumpkin pie spice (plus more for garnish) - A pinch of salt - Optional toppings: whipped cream, dark chocolate shavings Each ingredient plays a role in making this drink special. The milk provides creaminess, while pumpkin puree adds a rich, earthy flavor. Cocoa powder gives it that classic hot chocolate taste. Sugar sweetens it just right, and vanilla and pumpkin pie spice bring warmth and depth. Feel free to adjust the sugar based on your taste. If you like it sweeter, add more sugar. The pumpkin pie spice is key to that fall flavor. You can add more if you want a stronger spice kick. For toppings, whipped cream adds a light, fluffy touch. Dark chocolate shavings make it look fancy. You can mix and match these ingredients based on what you have at home. Enjoy creating your own cozy twist on pumpkin hot chocolate! Start by pouring 2 cups of your milk choice into a medium saucepan. Add in 1/2 cup of pure pumpkin puree. Set the pan over medium heat. Use a whisk to mix the milk and pumpkin well. Keep whisking until the mix is warm and smooth. This step is key to making it creamy. Now, it’s time to add flavor. Stir in 1/4 cup of unsweetened cocoa powder and 1/4 cup of granulated sugar. You can adjust the sugar to fit your taste. Add in 1 teaspoon of vanilla extract and 1 teaspoon of pumpkin pie spice. Don’t forget a pinch of salt! Whisk until all the cocoa dissolves. Your drink should feel smooth and rich at this point. Carefully heat the mix, stirring often. This helps it not stick to the pan. Aim for a hot temperature but do not let it boil. Heat it just enough to mix the flavors well. Once heated, take the pan off the stove. Taste your hot chocolate and tweak it if needed. You can add more sugar or pumpkin pie spice to make it perfect for you. To make your pumpkin hot chocolate great, adjust the sweetness and spice. Start with the listed sugar, then taste. If you want it sweeter, add more sugar. For a spice kick, add more pumpkin pie spice. This will enhance the warm flavors. Whisking is key here. It helps mix everything well and makes the drink smooth. Whisk in a circular motion while heating to keep it creamy. Use clear glass mugs for serving. This shows off the rich color of the drink. It makes your hot chocolate look fancy. For a fun touch, add a cinnamon stick in each mug. It gives a nice aroma while sipping. You can also sprinkle extra pumpkin pie spice on top. Dark chocolate shavings are a great finish too. They add a touch of elegance and taste. Pair your pumpkin hot chocolate with sweet treats. Cookies or brownies go well with it. They add a nice crunch and balance the drink's creaminess. This hot chocolate is perfect for fall gatherings. Serve it at parties or cozy nights in. It brings warmth and comfort to any occasion. You can even enjoy it while watching a movie. {{image_4}} You can easily make this drink dairy-free. Use coconut milk or almond milk instead of regular milk. Both options add a unique flavor while keeping it creamy. Coconut milk gives a rich taste, while almond milk adds a hint of nuttiness. To make this hot chocolate vegan, switch the whipped cream with whipped coconut cream. It adds a light, sweet touch without dairy. You can whip the coconut cream until fluffy for the best results. Want to change up the flavor? Try adding peppermint or caramel. A splash of peppermint extract gives a festive kick. Drizzling caramel on top adds sweetness and a lovely look. These twists will make your pumpkin hot chocolate even more special! After enjoying your pumpkin hot chocolate, you might have some left. Store it in a clean, airtight container. Place it in the fridge. It will stay fresh for up to three days. Make sure to stir it well before serving again. When you want to enjoy your hot chocolate again, use the stovetop or microwave. If using the stovetop, heat it over low heat. Stir often to keep it smooth. For the microwave, heat it in short bursts. Stir in between to avoid hot spots. You can also freeze your pumpkin hot chocolate for later. Pour it into ice cube trays or freezer-safe bags. Leave some space for expansion. When you want to use it, thaw in the fridge overnight. Reheat it on the stove or microwave. Enjoy this cozy drink anytime! Pumpkin hot chocolate is a warm drink that mixes rich chocolate with pumpkin. It has a creamy texture and a blend of spices. The key flavors come from cocoa powder and pumpkin puree. You also get hints of vanilla and pumpkin pie spice. This drink is perfect for chilly days and adds a cozy touch. Yes, you can easily make pumpkin hot chocolate vegan! Just swap regular milk with your favorite non-dairy milk. Almond, soy, or oat milk work great. Also, use a vegan whipped cream for topping. This way, you can enjoy the same tasty flavors without any dairy. To make your pumpkin hot chocolate spicier, add more pumpkin pie spice. You can also sprinkle in a bit of cayenne pepper for kick. Another option is to add a dash of cinnamon. Adjust the spice level to match your taste, and enjoy the warmth! You can get creative with toppings! Besides whipped cream, try using marshmallows or chocolate shavings. Crushed graham crackers add a fun crunch. For a holiday twist, use candy canes or nutmeg. The toppings can make your drink even more special. Store leftover pumpkin hot chocolate in the fridge for up to three days. Keep it in a sealed container for best results. When you’re ready to enjoy it again, gently reheat it on the stove. Stir well to mix the flavors before serving. In this post, we explored how to make a delightful pumpkin hot chocolate. We covered ingredients, step-by-step instructions, and tips to enhance flavor and presentation. Variations like dairy-free and vegan options open up new tastes. Storing leftovers properly ensures you can enjoy it later. Embrace this cozy drink as a fall favorite. With these simple steps, you can craft a perfect cup anytime. Enjoy your warm creation with a friend or a good book.

As the cozy season rolls in, nothing warms you up quite like pumpkin hot chocolate. This drink combines the sweet taste of pumpkin with rich cocoa for a treat you …

Read more

Categories Desserts

Slow Cooker Creamy Garlic Mash Simple and Savory Dish

October 6, 2025 by Chef Miles
- 2 pounds Yukon Gold potatoes, peeled and cut into 1-inch chunks - 6 cloves garlic, finely minced - 1 cup low-sodium chicken or vegetable broth Yukon Gold potatoes are key to this dish. They are creamy and smooth. Their buttery flavor makes the mash rich. Garlic adds a nice punch, enhancing the taste. The chicken or vegetable broth gives moisture and depth. - 1/2 cup cream cheese, softened to room temperature - 1/4 cup unsalted butter, at room temperature - 1/2 cup milk (plus extra for desired creaminess) Cream cheese and butter make the mash velvety. They add richness and help bind everything together. The milk helps achieve your perfect texture. You can add more if you want it creamier. - Sea salt and freshly ground black pepper, to taste - Fresh parsley, finely chopped (for garnish) Salt and pepper are vital for flavor. They bring out the best in the potatoes. Fresh parsley adds color and a hint of freshness on top. It brightens the dish and makes it look inviting. 1. Chopping the potatoes Start by peeling 2 pounds of Yukon Gold potatoes. Cut them into 1-inch chunks. This size helps them cook evenly. 2. Minced garlic preparation Take 6 cloves of garlic and finely mince them. The garlic adds a rich flavor to the mash. 1. Layering ingredients in the slow cooker Place the chopped potatoes and minced garlic in the slow cooker. Spread them out evenly for even cooking. 2. Setting the cooking time and temperature Pour 1 cup of low-sodium chicken or vegetable broth over the potatoes. Make sure they are covered. Secure the lid. Set the slow cooker to low for 6-8 hours or high for 4-5 hours. Cook until the potatoes are tender when pierced with a fork. 1. Draining excess broth After cooking, check the broth level. If there is too much, drain some off. Keep a few tablespoons to help with creaminess. 2. Mashing the mixture Add 1/2 cup of softened cream cheese, 1/4 cup of unsalted butter, and 1/2 cup of milk to the pot. Use a potato masher or an electric mixer. Mash until you reach your desired smoothness. Taste and season with sea salt and black pepper. If you want it creamier, add more milk. 3. Serving Transfer the mash to a serving dish. Garnish with finely chopped fresh parsley. This adds color and brightens the dish. Enjoy your creamy garlic mash! To get smooth mashed potatoes, choose Yukon Gold potatoes. They mash well and have a creamy texture. Cut them into 1-inch chunks for even cooking. When the potatoes are tender, drain excess broth but keep some for creaminess. For a silkier finish, add more milk or cream. Mix until you reach your desired smoothness. Remember to taste and adjust as needed. Want more flavor? Add spices like garlic powder or onion powder. Fresh herbs like thyme or rosemary also work well. These boost the taste without much effort. Using roasted garlic instead of raw garlic gives a richer and sweeter flavor. Roast the garlic until soft, then mix it in for a deeper taste. Creamy garlic mash pairs perfectly with meats like roast chicken or beef. You can also serve it with veggies for a vegetarian meal. For a nice touch, create a swirl in the mash with a spoon. Top it with extra parsley and a drizzle of olive oil. This simple step makes it look fancy and appetizing. {{image_4}} You can add different cheeses to your creamy garlic mash. Cheddar gives a sharp taste, while mozzarella adds stretch. For a tangy kick, try goat cheese. If you prefer a vegan option, use nutritional yeast or vegan cream cheese. Both options keep the dish rich without dairy. Don't be afraid to experiment with herbs and spices. Rosemary or thyme adds a nice touch. You can also try garlic powder for an extra garlic punch. Adding veggies like spinach or roasted cauliflower boosts nutrition and flavor. Just chop them small and mix them in before mashing. If you need gluten-free options, this recipe is already safe. Just check your broth for gluten. To make a low-fat version, swap cream cheese for Greek yogurt. It keeps the creaminess while cutting calories. You can also reduce the butter or use a plant-based margarine. To store your creamy garlic mash, let it cool first. Use an airtight container for storage. This keeps the mash fresh and prevents odors. You can keep it in the fridge for up to three days. If you want to enjoy it later, consider freezing it. When it's time to reheat, there are some easy methods. You can use the microwave or stovetop. If using the microwave, heat it in short bursts. Stir often to keep it even. On the stovetop, add a splash of milk to help maintain creaminess. Stir it gently over low heat until warmed through. For long-term storage, freezing is a great option. Place the mash in a freezer-safe container. Make sure to leave some space for expansion. It can last up to three months in the freezer. When you're ready to enjoy it, thaw it in the fridge overnight. Reheat it gently, adding a bit of milk if needed to restore its creamy texture. Yes, you can make this dish ahead. To meal prep, follow these tips: - Cook and cool: Make the mash and let it cool down. - Store properly: Place it in an airtight container. Refrigerate for up to 3 days. - Reheat with care: When ready to serve, heat it gently on the stove or in the microwave. Add a splash of milk for creaminess. This way, you save time and still enjoy great flavor. Lumpy mashed potatoes can be fixed easily. Try these common solutions: - Mash longer: Use a potato masher or mixer. Keep mashing until smooth. - Add liquid: If needed, stir in more milk or broth. This helps with texture. - Use a ricer: For super smooth mash, pass the potatoes through a ricer. These fixes will help you achieve that creamy texture you want. Yes, you can use different potatoes. Here are some pros and cons: - Russet potatoes: They are fluffy and absorb flavors well. However, they can be too starchy for some. - Red potatoes: These are waxy and hold their shape. They make a creamy mash but can be less fluffy. - Sweet potatoes: They add a sweet flavor and bright color. But, they change the dish's taste. Choose the type you like best for your creamy garlic mash. Slow Cooker Creamy Garlic Mash is simple and delicious. We explored the essential ingredients like Yukon Gold potatoes and garlic. The cooking steps keep it easy to follow, ensuring a creamy finish. We shared tips to make them perfect and variations to suit your taste. Storing and reheating are also straightforward. With these ideas, you'll impress at any meal. Enjoy creamy garlic mash that’s sure to please everyone!

Welcome to the creamy comfort of Slow Cooker Creamy Garlic Mash! If you crave a dish that’s rich, smooth, and bursting with flavor, you’re in the right place. This dish …

Read more

Categories Dinner

Air Fryer Parmesan Green Beans Tasty and Easy Recipe

October 6, 2025 by Chef Miles
To make Air Fryer Parmesan Green Beans, you need these simple ingredients: - Fresh green beans - Extra virgin olive oil - Grated Parmesan cheese - Garlic powder - Onion powder - Smoked paprika - Sea salt and black pepper - Lemon zest Each ingredient plays an important role in this recipe. The fresh green beans bring a crisp texture and vibrant color. Extra virgin olive oil adds richness and helps the spices stick. Grated Parmesan cheese gives a savory flavor and crispy finish. Garlic powder and onion powder add depth and warmth. Smoked paprika provides a hint of smokiness. Sea salt and black pepper enhance all the flavors. Finally, lemon zest brightens the dish and adds a fresh note. Start by preheating your air fryer to 400°F (200°C). This step takes about 5 minutes. Preheating helps the green beans cook evenly and become crispy. Next, wash 1 pound of fresh green beans under cold water. Trim off the ends with a knife or kitchen scissors. After trimming, dry them with a paper towel. This removes extra moisture, which helps them crisp up nicely. In a large bowl, mix together 2 tablespoons of extra virgin olive oil, 1 teaspoon of garlic powder, 1 teaspoon of onion powder, 1/2 teaspoon of smoked paprika, and sea salt and black pepper to taste. Stir until all ingredients blend well. Add the prepared green beans to the bowl with the seasoning mix. Toss them well so every bean gets a nice coat. This step ensures all the flavors stick to the green beans. Then, sprinkle 1/2 cup of grated Parmesan cheese over the beans. Toss gently to distribute the cheese evenly. Now, place the coated green beans in the air fryer basket. Make sure they are in a single layer. Avoid overcrowding the basket for even cooking. Air fry the beans at 400°F (200°C) for 8-10 minutes. Halfway through, shake the basket gently to help with the crispiness. Once the green beans are crispy and golden brown, remove them from the air fryer. Garnish with fresh lemon zest for added brightness. Serve them on a colorful platter, topped with parsley. You can also add extra lemon wedges on the side for a zesty kick! To get your green beans super crispy, start by drying them well. After washing, use a paper towel to remove any water. The dryer they are, the better they crisp up in the air fryer. Preheat your air fryer to 400°F (200°C). This helps the beans cook evenly. A good tip is to cook them in a single layer. If they overlap, they won’t crisp as well. When you coat your green beans, use a large bowl. First, mix the olive oil and spices well. Then, add the beans to this mix. Toss them gently to coat each bean. Make sure to sprinkle the grated Parmesan cheese evenly. This way, every bite has that cheesy flavor. Don’t rush this step; take your time to coat them well. You can change up the seasoning to fit your taste! If you love heat, add red pepper flakes. Want a fresh twist? Use fresh herbs like thyme or basil. You can also swap smoked paprika for regular paprika if you prefer a milder flavor. Don’t be afraid to experiment! Just remember to keep the balance so that the green beans shine through. {{image_4}} You can change the cheese to mix up the flavor. Try using a mix of mozzarella and Parmesan for a gooey texture. If you want something sharper, consider aged cheddar. You can also use feta cheese for a tangy twist. Each cheese will add its unique taste to the green beans. Just remember, adjust the amount based on how strong you want the flavor. Spices can really change up your dish. If you enjoy a kick, add some cayenne pepper or chili powder. For a more earthy taste, try adding cumin or coriander. You can also switch the smoked paprika for regular paprika if you prefer a milder flavor. Experiment with different spices to find your favorite mix! Green beans are great, but feel free to try other veggies. Asparagus works well and cooks in the same time. Broccoli florets are another fantastic option; just cut them small. Carrots can also be air-fried, but cut them thin to ensure they cook evenly. Mixing different veggies can create a colorful and tasty dish! After cooking your crispy air fryer Parmesan green beans, let them cool to room temperature. This helps keep them crispy. Once cool, place them in an airtight container. Make sure to layer them with parchment paper to absorb moisture and keep them crunchy. Store the container in the fridge for best results. To reheat your green beans, use the air fryer again. Preheat it to 350°F (175°C). Place the beans in the basket and heat for about 3-5 minutes. This will help them regain their crispiness. You can also use a microwave, but be aware that they may lose their crunch. Cooked green beans will last in the fridge for about 3-4 days. If you want to keep them longer, consider freezing them. They can stay fresh in the freezer for up to 3 months. Just remember to thaw them in the fridge before reheating for the best texture. Yes, you can use frozen green beans. Just thaw them first and pat them dry. This steps helps in getting the best crisp. Cooking time may need to be adjusted. Start with 10 minutes and check for crispness. Air Fryer Parmesan Green Beans pair well with many dishes. Here are some ideas: - Grilled chicken - Salmon fillets - Quinoa salad - Pasta dishes - Tofu stir-fry These options bring balance and flavor to your meal. You’ll know the green beans are done when they turn golden brown and crispy. If you want, you can taste one to check the texture. They should be tender with a nice crunch. Yes! To make this dish vegan, skip the Parmesan cheese. Instead, try nutritional yeast for a cheesy flavor. You can also add more spices, like cumin or chili powder, for extra taste. You can experiment with various herbs and spices. Here are some tasty options: - Italian seasoning - Red pepper flakes - Thyme - Oregano - Dill Feel free to mix and match to find your favorite flavor profile! Now you know how to make crisp and tasty Air Fryer Parmesan Green Beans. We covered the great ingredients, easy steps, and tips for success. You can adjust the seasonings to match your taste. Feel free to add other veggies or cheeses for fun variations. Remember to store leftovers properly for the best taste later. I hope you enjoy making this dish. It’s quick, healthy, and perfect for any meal!

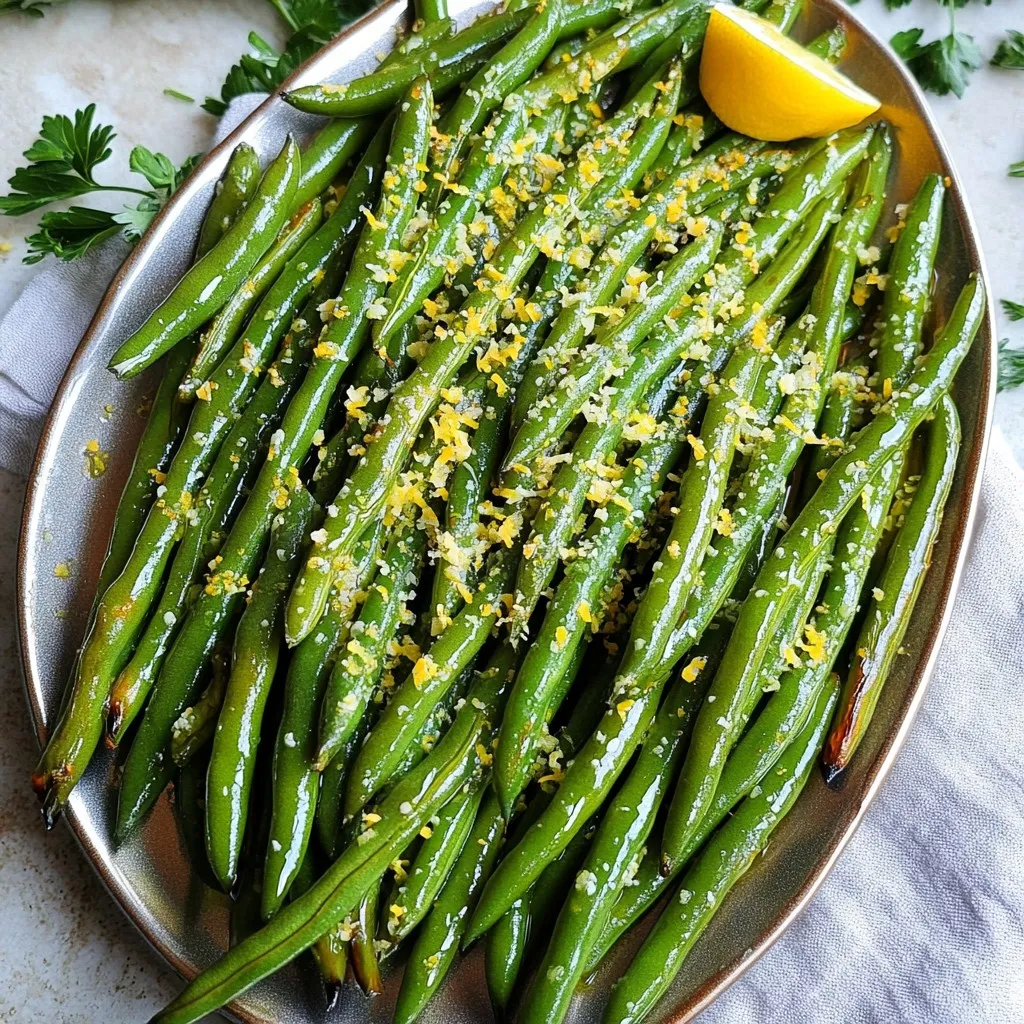
Looking for a tasty and easy side dish? You’ve found it! Air Fryer Parmesan Green Beans are crispy, cheesy, and packed with flavor. With just a handful of simple ingredients …

Read more

Categories Appetizers

Protein Cottage Cheese Smoothie Bowl Healthy Delight

October 6, 2025 by Chef Miles
- 1 cup cottage cheese - 1 ripe banana, peeled - 1/2 cup frozen mixed berries Cottage cheese is the star here. It gives a creamy base and packs protein. Choose low-fat for a lighter bowl or full-fat for a richer taste. The ripe banana adds natural sweetness and a smooth texture. Frozen mixed berries bring a burst of color and flavor. They also add antioxidants, making your bowl even healthier. - 1 tablespoon honey or maple syrup - 1/2 cup almond milk If you like a sweeter taste, add honey or maple syrup. Just one tablespoon will do. Almond milk helps blend everything together. You can use any milk you prefer for a personalized touch. - Fresh berries (strawberries, blueberries) - Granola - Unsweetened coconut flakes - Hemp seeds Toppings make your bowl fun and pretty. Fresh berries add color and extra nutrition. Granola gives a nice crunch, while coconut flakes add a tropical twist. Don’t forget hemp seeds for a boost of healthy fats and protein. Enjoy crafting your perfect Protein Cottage Cheese Smoothie Bowl! - How to Combine Ingredients Start by gathering your ingredients. You need: - 1 cup cottage cheese - 1 ripe banana - 1/2 cup frozen mixed berries - 1 tablespoon chia seeds - 1 tablespoon honey or maple syrup (optional) - 1/2 cup almond milk Place all these ingredients into a blender. Make sure the banana is peeled and the berries are frozen for a nice chill. - Blending Technique Blend on high speed for about 30 to 45 seconds. You want the mixture smooth and creamy. If it gets stuck, stop and scrape down the sides. If it's too thick, add a little more almond milk. Blend again until you reach the right texture. - Tips for Thickening or Thinning If your smoothie bowl is too thick, add a splash of almond milk and blend again. If it’s too thin, add a bit more cottage cheese or a few more frozen berries. The goal is a thick, creamy base that holds toppings well. - Pouring into the Bowl Once you achieve that perfect blend, pour the smoothie into a bowl. Use a spatula to spread it evenly. This makes it look nice and gives you more space for toppings. - Decorating with Toppings Now, let’s get creative! Start with a layer of fresh berries and banana slices. Add a handful of granola for crunch. Sprinkle some unsweetened coconut flakes on top, and finish with a dash of hemp seeds. This not only looks good but adds texture and nutrition. Enjoy your colorful and tasty Protein Cottage Cheese Smoothie Bowl! - Best Blending Practices: Use a high-speed blender for a smooth mix. Start on low and slowly increase the speed. This helps blend all the bits well. If you see chunks, stop and scrape the sides. Blend again until creamy. - Ingredient Temperature Considerations: For a rich texture, use ingredients at room temperature. If using frozen berries, let them sit out for a few minutes. This helps blend them easier and creates a smoother bowl. - When to Add More Sweetener: After blending, taste your smoothie bowl. If it needs a sweet touch, add honey or maple syrup. Blend briefly again to mix in the sweetness. Adjust until it suits your taste. - How to Arrange Toppings for Visual Appeal: Use fresh berries and banana slices as a base. Spread them evenly for a colorful look. Add granola in one area for crunch and sprinkle coconut flakes on top. Finish with hemp seeds for a fun texture. A well-arranged bowl makes your meal even more inviting. {{image_4}} Using Different Types of Berries You can switch up the berries in your smoothie bowl. Try strawberries or raspberries for a twist. Blackberries add a tart flavor. Each berry brings its own taste and benefits. Mixing berries also gives your bowl a colorful look. Exploring Other Fruits Besides berries, consider using other fruits. Mango or pineapple can add a tropical flair. Apples or peaches can give a sweet crunch. Experimenting with different fruits keeps your smoothie bowl exciting. Plant-Based Cottage Cheese Options If you want a vegan option, look for plant-based cottage cheese. There are many brands that use nuts or soy. These alternatives provide that same creamy texture without dairy. Just ensure you pick one with good protein content. Vegan Sweetener Suggestions For sweetening your smoothie bowl, you can use agave syrup or date syrup. Both are great vegan options. They add sweetness without refined sugars. Taste your smoothie to find the right amount. Incorporating Nut Butters Adding nut butter can enhance flavor and protein. Almond or peanut butter blend well with the smoothie. Just a tablespoon can make your bowl richer and creamier. Plus, it adds healthy fats that keep you full. More Seed Options for Nutrition Chia seeds are great, but you can add flaxseeds or pumpkin seeds too. Flaxseeds boost omega-3s while pumpkin seeds add crunch. Seeds not only add nutrition but also texture. Feel free to mix and match for the best results. To keep your smoothie bowl fresh, store leftovers in the fridge. Use an airtight container. This helps prevent it from drying out or absorbing other smells. It’s best to eat the smoothie bowl within 24 hours for optimal taste and texture. If you see any changes in color or smell, toss it out. You can freeze your smoothie bowl if you want to save it for later. Pour it into a freezer-safe container. Leave some space at the top for expansion. Smoothie bowls can last up to three months in the freezer. When you’re ready to eat, just take it out and let it thaw in the fridge overnight. Thaw your frozen smoothie bowl slowly in the fridge. This keeps the texture creamy. If you're in a hurry, you can use the microwave. Heat it in short bursts at a low setting to avoid cooking it. Stir often to ensure even warming. Avoid high heat, as it can make the bowl watery. Cottage cheese is packed with protein. One cup has about 28 grams! This makes it great for muscle repair and growth. It also contains calcium, which helps your bones stay strong. Cottage cheese is low in fat, especially if you choose the low-fat kind. This makes it a smart option for a healthy diet. Plus, it has probiotics that support gut health. Yes, you can easily make this smoothie bowl vegan! Just swap cottage cheese for plant-based alternatives like tofu or almond yogurt. Use maple syrup instead of honey for sweetness. Almond milk or oat milk can replace regular milk. These swaps keep the flavor and nutrition while making it vegan-friendly. To boost protein in your smoothie bowl, add a scoop of protein powder. You can also mix in nut butter like almond or peanut. Chia seeds are another great option; they add protein and healthy fats. You can even sprinkle some hemp seeds on top for an extra protein punch. You can get creative with toppings! Try adding kiwi or mango for a tropical twist. Nuts like almonds or walnuts add crunch and healthy fats. You can also use granola for a nice texture. For more flavor, sprinkle cinnamon or cacao nibs on top. The options are endless! In this blog post, we covered how to make a tasty protein cottage cheese smoothie bowl. You learned about the main ingredients like cottage cheese, banana, and mixed berries. We discussed optional flavors, toppings, and how to blend it all right. I shared tips for creamy texture and presentation. With variations to explore, you can always keep it fresh. Remember, storing your bowl properly helps you enjoy it later. I hope these tips make your smoothie bowl fun and delicious!

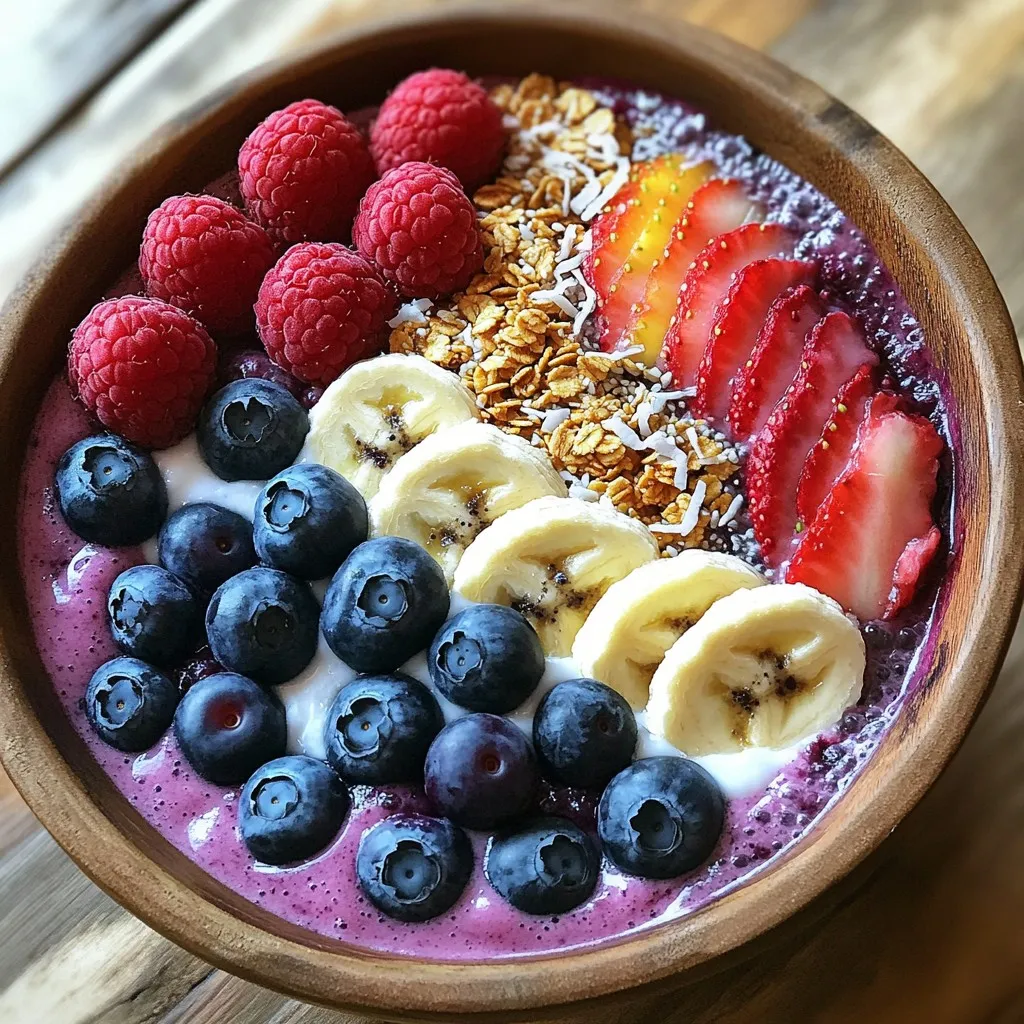
Looking for a tasty way to fuel your day? The Protein Cottage Cheese Smoothie Bowl is your answer! Packed with essential nutrients, this bowl is both delicious and healthy. With …

Read more

Categories Breakfast

No-Bake Biscoff Pumpkin Cheesecake Bites Delightful Treat

October 5, 2025 by Chef Miles
To make these bites, gather these key ingredients: - 1 cup Biscoff cookies, finely crushed - 1/2 cup unsalted butter, melted - 1 cup cream cheese, softened to room temperature - 1 cup pumpkin puree (canned or homemade) - 1/2 cup powdered sugar - 1 teaspoon vanilla extract - 1 teaspoon pumpkin pie spice - A pinch of salt Each ingredient plays an important role in the flavor and texture. The Biscoff cookies give a sweet, spiced base. Cream cheese and pumpkin provide creaminess and richness. The spices add warmth and depth. For a little extra flair, consider these garnishes: - Additional Biscoff cookies, crumbled - Whipped cream Crumbling extra Biscoff cookies adds a crunchy texture. Whipped cream makes the bites even creamier. These add-ons enhance the visual appeal and taste. If you need substitutions, here are some ideas: - Use graham crackers instead of Biscoff cookies for the crust. - Swap cream cheese with Greek yogurt for a lighter option. - Replace powdered sugar with honey or maple syrup for natural sweetness. These substitutions can change the flavor slightly but will still create a tasty treat. Feel free to experiment based on your preferences or dietary needs. To make the crust, start with 1 cup of Biscoff cookies. Crush them finely in a bowl. Next, melt 1/2 cup of unsalted butter. Mix the melted butter with the cookie crumbs until they are fully coated. This mix will hold together well. Use clean hands or a spoon to press the mix into mini muffin tins or silicone molds. Make sure the layer is even and firm. After pressing, chill them in the fridge. This helps the crust set while you make the filling. Now it’s time for the filling. In a large bowl, add 1 cup of softened cream cheese. Use an electric mixer to beat it until it is smooth. Gradually add in 1 cup of pumpkin puree, 1/2 cup of powdered sugar, 1 teaspoon of vanilla extract, and 1 teaspoon of pumpkin pie spice. Don’t forget a pinch of salt! Mix everything together until it is light and fluffy. This filling should taste like fall! Take your chilled crusts from the fridge. Carefully spoon the pumpkin cream cheese filling into each mold. Use a spatula to smooth the tops. Make sure each bite is filled to the top. Once filled, place the molds back in the fridge. Let them chill for about 2-3 hours. This helps them set and become firm. When they are ready, gently pop them out of the molds. If you used silicone molds, they should come out easily. Enjoy your delightful treats! When mixing your ingredients, always start with room-temperature cream cheese. This helps it blend smoothly. Use an electric mixer for the best results. Mix until the filling is light and fluffy. Once mixed, fill your molds right away to keep the mixture fresh. After filling, chill the molds for at least 2-3 hours. This step is key to setting the bites nicely. For a creamy texture, ensure you blend the filling well. The pumpkin puree and cream cheese should be fully combined. Use a spatula to pack the mixture into the molds. This helps prevent air pockets, which can make the bites uneven. If the bites seem too soft after chilling, they may need more time in the fridge. Serve these bites on a colorful platter for a festive look. Crumble extra Biscoff cookies on top for added crunch. You can also add a dollop of whipped cream for extra creaminess. If you're feeling creative, sprinkle some pumpkin pie spice around the platter. This makes for a stunning presentation that will impress your guests. {{image_4}} You can mix up the flavor of these bites easily. Try adding melted chocolate or maple syrup. To make chocolate Biscoff pumpkin cheesecake bites, stir in 1/4 cup of melted chocolate into the filling. For maple flavor, add 2 tablespoons of maple syrup instead of powdered sugar. Both options bring a sweet twist to the classic taste. If you need gluten-free options, swap Biscoff cookies for gluten-free cookies. Many brands offer gluten-free varieties that taste great. Use gluten-free flour if needed in your crust. This way, everyone can enjoy these cheesecake bites without worry. You can serve these bites in fun ways. Try layering the filling in clear cups for a parfait style. Just alternate layers of crust and cream cheese filling. You can also make a larger cheesecake in a pie dish. Adjust the chilling time and serve slices. Both styles add visual flair and make for a great presentation. To keep your no-bake pumpkin cheesecake bites fresh, place them in an airtight container. Make sure to layer parchment paper between bites to avoid sticking. Store them in the fridge. They stay tasty and ready for a quick treat. If you want to save some bites for later, freezing works great. Simply place the bites in a freezer-safe container. You can also wrap them in plastic wrap for extra protection. They can stay frozen for up to three months. When you're ready to enjoy, let them thaw in the fridge overnight. These cheesecake bites last about five days in the fridge. To keep them fresh, avoid leaving them out at room temperature for too long. I always recommend enjoying them chilled for the best taste and texture. Yes, you can use homemade pumpkin puree. Just make sure it is smooth. If it's too watery, it may make the filling runny. Drain any excess liquid before mixing it with the other ingredients. Homemade puree brings a fresh flavor that many love. You can prepare these cheesecake bites up to two days ahead. Just store them in the fridge after you fill the molds. This allows the flavors to meld and the bites to set properly. Keep them covered to stay fresh. They make a great treat ready for any gathering! If you want a dairy-free option, use a vegan cream cheese. Silken tofu blended until smooth is another choice. Both will give you a creamy texture. Just taste and adjust the sweetness if needed. You learned the key ingredients for a tasty no-bake Biscoff pumpkin cheesecake. I shared tips for making the crust and filling, plus ways to serve it. Technical details on storage and variations keep your bites fresh and fun. You can easily adapt the recipe to fit your tastes or needs. Enjoy making this dessert your own! It's simple, fun, and perfect for any occasion.

Get ready to indulge in a sweet and easy treat! My No-Bake Biscoff Pumpkin Cheesecake Bites bring together the warmth of pumpkin and the spice of Biscoff cookies, perfect for …

Read more

Categories Desserts

Sheet Pan Garlic Herb Salmon & Veggies Delight

October 5, 2025 by Chef Miles
- 4 salmon fillets, skin-on preferred - 2 tablespoons extra virgin olive oil - 4 cloves garlic, minced finely - 1 teaspoon dried thyme - 1 teaspoon dried rosemary - 1 teaspoon smoked paprika - Zest and juice of 1 lemon - Sea salt and freshly cracked black pepper to taste - 1 cup cherry tomatoes, halved - 1 medium zucchini, sliced into half-moons - 1 bell pepper, sliced thinly - Fresh parsley, chopped The ingredients for Sheet Pan Garlic Herb Salmon & Veggies are simple but full of flavor. The salmon fillets, especially with the skin on, give that rich taste. The olive oil helps the herbs stick and adds healthy fats. I love using garlic in this dish. It gives a bold kick. Thyme and rosemary bring a lovely aroma and taste. The smoked paprika adds a hint of warmth and depth. The lemon zest and juice brighten the whole dish. It balances the flavors well. Sea salt and black pepper add the perfect seasoning. For the veggies, I like using cherry tomatoes, zucchini, and bell pepper. They roast well and add color to the plate. Each bite is a mix of tender salmon and vibrant veggies. Finally, I always garnish with fresh parsley. It adds a pop of color and freshness to the dish. This combination makes the meal not just tasty but also visually appealing. - Preheat oven to 400°F (200°C). - In a small bowl, mix 2 tablespoons of extra virgin olive oil, 4 cloves of minced garlic, 1 teaspoon of dried thyme, 1 teaspoon of dried rosemary, and 1 teaspoon of smoked paprika. - Add zest and juice of 1 lemon. Whisk until combined. Season with sea salt and freshly cracked black pepper. - Place 4 salmon fillets on one side of a large baking sheet. - Drizzle half of the garlic herb mixture over the fillets. Make sure each fillet is coated well. - In another bowl, combine 1 cup of halved cherry tomatoes, 1 medium zucchini sliced into half-moons, and 1 thinly sliced bell pepper. - Pour the remaining garlic herb mixture over the veggies and toss gently. - Spread the seasoned vegetables on the other side of the baking sheet. - Place the baking sheet in your preheated oven. Roast salmon and veggies for 15-20 minutes. - Check the salmon; it is done when it flakes easily with a fork. The veggies should be tender and bright. - For crispier salmon skin, broil for an extra 2-3 minutes at the end. - When finished, remove the baking sheet from the oven. The aroma will be amazing! - Garnish with chopped fresh parsley for a splash of color and freshness before serving. How to know when salmon is done? Salmon is done when it flakes easily with a fork. The flesh should change from a bright pink to a nice opaque color. This usually takes 15 to 20 minutes at 400°F. You can also use a food thermometer. The safe internal temperature is 145°F. Tips for getting crispy salmon skin: To get crispy skin, start with skin-on fillets. Dry the skin with a paper towel before cooking. Drizzle some olive oil on the skin side. You can also broil the salmon for the last 2 to 3 minutes. This will give it a nice crunch. Rustic vs. elegant presentation options: For a rustic look, serve the salmon and veggies directly from the baking sheet. Let your guests help themselves. For a more elegant touch, plate each piece of salmon with a colorful mix of veggies. Add a lemon wedge for a fresh pop. Pairing ideas for sides or sauces: Serve with a side salad or some fluffy rice. Garlic bread also pairs nicely. For sauces, a simple lemon-dill sauce works wonders. You can also try a creamy garlic sauce for extra richness. Substitute fish or vegetables: You can swap salmon for trout or cod. Both have great flavor and cook well on a sheet pan. For vegetables, try asparagus, broccoli, or carrots. They roast nicely and add great color. Options for seasoning changes: Feel free to change the herbs. Basil and oregano give a fresh taste. For a spicy kick, add red pepper flakes. You can also use fresh herbs instead of dried ones for a brighter flavor. {{image_4}} To keep your leftovers fresh, place them in an airtight container. Make sure the salmon and veggies cool down before sealing. This prevents moisture build-up, which can affect taste and texture. Store the container in the fridge. You can keep leftovers for 2 to 3 days. After that, the salmon may lose its flavor and texture. Always check for any signs of spoilage before eating. When it's time to reheat, I recommend using the oven. Preheat it to 350°F (175°C). Place the salmon and veggies on a baking sheet. Heat them for about 10 minutes or until hot. This method helps maintain moisture and flavor. If you prefer the microwave, use a microwave-safe dish. Cover it with a damp paper towel to keep it from drying out. Heat in short bursts, checking often until hot. Enjoy your meal without losing that delicious taste! Salmon is a super fish. It is packed with omega-3 fatty acids. These fats are good for your heart and brain. Omega-3s help lower blood pressure and reduce inflammation. They can boost your mood and improve brain function. Salmon also contains vitamins and minerals. It has vitamin D, which helps keep your bones strong. You can also find B vitamins, which help turn food into energy. Salmon is rich in selenium, a mineral that supports your immune system. A serving of this dish has about 350 calories. Each serving contains: - Protein: Around 30 grams, helping to build and repair muscles. - Fat: About 20 grams, mostly healthy fats from salmon and olive oil. - Carbohydrates: Roughly 10 grams, mainly from the veggies. This meal is balanced and nutritious. It provides essential nutrients while being low in carbs. Enjoy a tasty dish that benefits your health! Salmon cooks quickly on a sheet pan. Generally, it takes about 15 to 20 minutes at 400°F (200°C). The fish should flake easily with a fork when done. You want it to have a lovely opaque color. Yes, you can use frozen salmon! Just remember to thaw it first. Place it in the fridge overnight or use cold water for a quick thaw. Once thawed, follow the same steps as fresh salmon. You can use many vegetables in this dish. Some great options include broccoli, asparagus, or carrots. Just cut them into similar sizes for even cooking. Feel free to get creative with what you have! It’s not required, but skin-on salmon adds extra flavor. The skin helps keep the fish moist while cooking. If you prefer skinless, that’s perfectly fine. Just adjust your cooking time slightly. Yes, you can prep it ahead of time. You can marinate the salmon and chop the veggies a few hours in advance. Just cover them and keep them in the fridge. When you’re ready, pop everything on the sheet pan and bake! This post highlights a simple and tasty salmon dish. We covered essential ingredients, easy steps, and helpful tips. You learned how to prepare salmon with delicious veggies and herbs. Remember, you can experiment with different vegetables and seasonings to suit your taste. This dish is not just good for you; it’s fun to make! Try it out and enjoy every bite. Eating healthy can be simple and delicious. Enjoy your cooking journey!

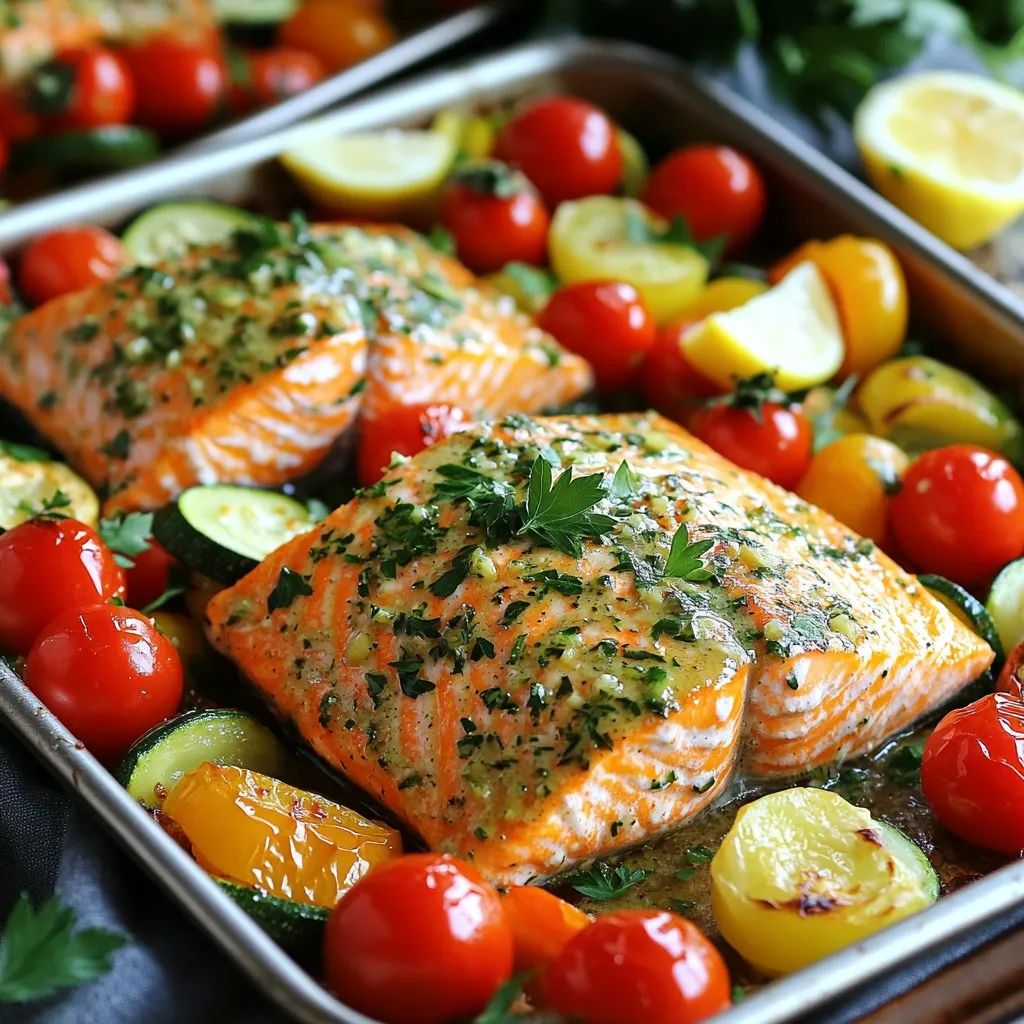
Are you ready to elevate your dinner game? This Sheet Pan Garlic Herb Salmon & Veggies Delight is a dream come true for busy cooks. With just a few simple …

Read more

Categories Dinner

Teriyaki Chicken Noodle Bowls Tasty and Quick Meal

October 5, 2025 by Chef Miles
- 2 boneless, skinless chicken breasts, thinly sliced into strips - 8 oz. soba noodles (or your noodle preference) - 1 cup broccoli florets - 1 bell pepper, thinly sliced (any vibrant color) - 1 carrot, julienned - 3 green onions, chopped into small pieces - 4 tablespoons soy sauce - 2 tablespoons honey - 2 tablespoons sesame oil - 1 tablespoon fresh ginger, finely grated - 2 cloves garlic, minced - 1 teaspoon cornstarch - Salt and freshly ground pepper to taste - 1 tablespoon toasted sesame seeds - Medium bowl for marinating - Pot for cooking noodles - Large skillet or wok for stir-frying - Whisk for mixing cornstarch slurry - Deep serving bowls for presentation Gathering the right ingredients and tools makes this dish easy and fun. With fresh chicken and vibrant veggies, you create a colorful bowl that is tasty and quick. Enjoy the process of cooking and the joy of sharing this meal! To start, you need to mix the chicken with the sauce. In a medium bowl, combine the sliced chicken, soy sauce, honey, grated ginger, and minced garlic. Add a pinch of salt and pepper to taste. This simple blend gives the chicken amazing flavor. Let it marinate for at least 15 minutes. This time helps the chicken soak up the taste. The longer you marinate, the better it becomes. Next, cook the noodles. Boil a pot of salted water. Add the soba noodles and cook them until they are al dente. This means they should still have a slight bite. Follow the package instructions for timing. After cooking, drain the noodles. Rinse them under cold water to stop the cooking process. This keeps them from getting mushy. Set them aside for later. Now, let’s stir-fry the veggies. Heat sesame oil in a large skillet over medium-high heat. Once the oil is hot, add the broccoli florets, sliced bell pepper, and julienned carrot. Stir-fry these for 5-7 minutes. You want them tender but still crisp. This keeps their vibrant colors and crunchy texture. It’s time to cook the chicken. Push the cooked veggies to one side of the skillet. On the other side, add the marinated chicken. Cook it for 5-6 minutes. Stir it occasionally to ensure even cooking. The chicken should be fully cooked and lightly browned. This step develops the flavor, making the dish even better. Now, let’s combine everything. In a small bowl, whisk the cornstarch with a tablespoon of water to make a slurry. Pour this into the skillet with the chicken and veggies. Then, add the cooked noodles. Use tongs or a spatula to gently toss everything together. This mixes the flavors well. Cook for one more minute until the sauce thickens and coats the noodles. For serving, use a large spoon to divide the noodle mix into deep bowls. Garnish with chopped green onions and sprinkle with toasted sesame seeds if you like. Drizzle a little extra soy sauce on top for added flavor. Arrange the toppings artfully for a beautiful presentation. Enjoy your homemade Teriyaki chicken noodle bowls! For busy cooks, marinating chicken can feel like a chore. To save time, consider marinating overnight. This helps build flavor and makes meal prep easier. If you need a quicker option, try a minimum of 15 minutes. This still enhances the taste. Balancing sweetness and salt is key. Use two tablespoons of honey for a nice sweet touch. The soy sauce adds saltiness. Adjust these to fit your taste. If you like it sweeter, add a bit more honey. For less salt, reduce soy sauce. If you want to change things up from soba noodles, use rice noodles or udon. Both work great in this dish and change the look and taste. To keep noodles from sticking, rinse them under cold water after cooking. This helps stop the cooking process. You can also toss them with a bit of sesame oil. This adds flavor and keeps them loose. Seasonal veggies can brighten your bowl. Try snap peas in spring or zucchini in summer. Fall brings great options like butternut squash. In winter, use hearty greens like kale. Adding more vegetables boosts nutrition. Carrots add crunch and color. Broccoli gives you fiber. Bell peppers provide vitamins. Mix and match to fit your diet needs. More veggies mean more flavor and health benefits! {{image_4}} Substituting Chicken with Other Proteins You can switch the chicken for other meats. Try beef or shrimp for a tasty twist. Thinly slice the beef or use peeled shrimp. Both cook fast and pair well with teriyaki sauce. Vegetarian Options For a meatless meal, use tofu or tempeh. Both options soak up flavors well. Cut them into small cubes and marinate just like chicken. You can also use chickpeas for added protein and fiber. Adding Spices or Heat Want more kick? Add red pepper flakes or sriracha to the sauce. A little goes a long way. You could also sprinkle some black pepper for a gentle spice that won't overpower. Incorporating Citrus for Freshness Adding citrus can brighten the dish. Squeeze fresh lime or lemon juice before serving. You can even add zest for an extra zing. It balances the sweetness of the teriyaki sauce. Making it Gluten-Free To make this dish gluten-free, choose tamari instead of soy sauce. Tamari has a similar taste and works well in this recipe. Be sure to use gluten-free noodles too, like rice noodles. Low-Carb Noodle Options For a low-carb choice, swap regular noodles with zucchini noodles or shirataki noodles. Both options are light and healthy. They let the teriyaki flavor shine through without the carbs. To store your Teriyaki chicken noodle bowls, first let them cool down. Place the leftover food in shallow containers. This helps it cool faster and keeps it safe. Use airtight containers to keep the flavors fresh. I recommend glass containers for safe reheating. You can also use BPA-free plastic containers. When reheating, use the microwave for convenience. Place the leftover in a microwave-safe bowl. Cover it with a damp paper towel to keep moisture in. Heat for one minute, then stir. If it needs more time, heat in 30-second bursts. This method helps keep the chicken tender and the noodles from drying out. To reheat in a pan, add a splash of water. Heat on medium until warmed through. Stir gently to avoid overcooking. This keeps everything tasty and fresh. For long-term storage, freezing works great. Divide the noodle bowls into portions. Use freezer-safe containers or bags. Make sure to remove as much air as possible to prevent freezer burn. Label each container with the date for easy tracking. When you're ready to eat, thaw in the fridge overnight. For a quicker method, place the sealed bag in cold water. Once thawed, reheat using the microwave or stovetop methods mentioned earlier. Enjoy your meal as if it were fresh! To make Teriyaki sauce from scratch, mix soy sauce, honey, ginger, and minced garlic. For thickness, add a bit of cornstarch mixed with water. This simple blend gives you a fresh sauce. You can adjust the sweetness by adding more honey, if you like. Yes! You can use many types of noodles. Soba noodles are great, but rice noodles or udon work too. Choose what you enjoy or have at home. Each type adds a unique taste, making your bowl special. Teriyaki chicken lasts about three to four days in the fridge. Make sure to store it in an airtight container. This keeps it fresh and tasty for your next meal. You can add many vegetables! Broccoli, bell peppers, and carrots are great choices. Other options include snap peas, mushrooms, or spinach. Use what you like or what is in season. This adds color, flavor, and nutrition. Yes, you can prepare parts of this recipe in advance. Marinate the chicken a day before and chop vegetables ahead of time. Cook the noodles and stir-fry everything when you are ready to eat. This saves time on busy days. Teriyaki chicken noodle bowls go well with simple sides. Try steamed edamame or a fresh cucumber salad. You can also serve it with miso soup for a full meal. These pairings complement the flavors nicely. In this post, I shared how to make tasty Teriyaki chicken noodle bowls. We covered key ingredients, step-by-step cooking methods, and helpful tips. You'll find options for protein choices and ways to customize flavors. Plus, I provided storage and reheating advice to keep your meals fresh. Making this dish can be quick and fun! Experiment with ingredients based on your taste. Enjoy these bowls for any meal, and don't hesitate to share your results!

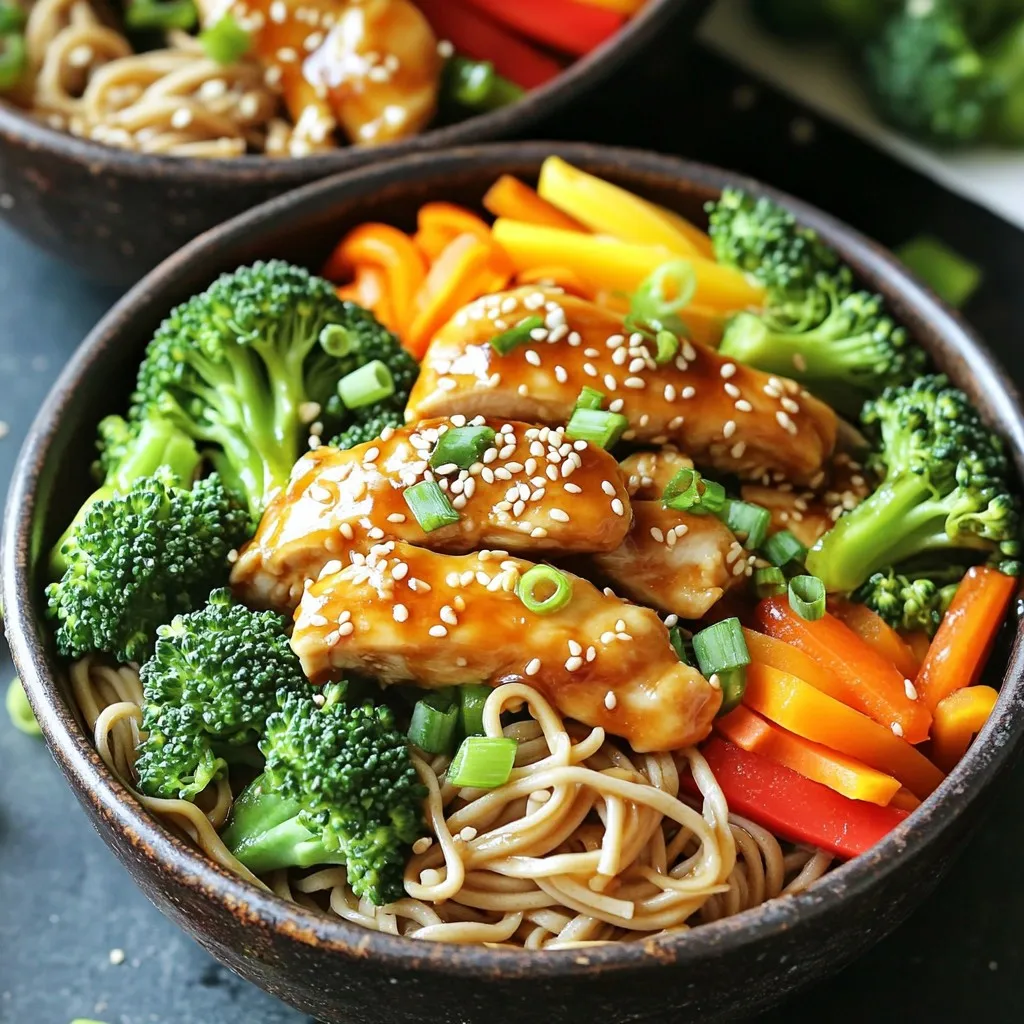
Craving a quick and delicious meal? Teriyaki Chicken Noodle Bowls might be your new favorite dish! This simple recipe packs flavor, color, and nutrients, all in one satisfying bowl. I’ll …

Read more

Categories Dinner
Older posts
Newer posts
← Previous Page1 … Page11 Page12 Page13 … Page111 Next →

MELTED RECIPES

where delicious ideas melt into life, from stovetop to backyard. Always warm, simple, and irresistibly satisfying. 🍳🔥🧀

PAGES

Home About Contact Privacy Policy Terms & Conditions Cookie Policy GDPR Policy Copyright Policy Disclaimer

CATEGORIES

Appetizers Desserts Salads Breakfast Dinner

Contact

  • Pinterest
  • Mail
Copyright © 2025 Melted Recipes. All rights reserved.