Skip to content
Melted Recipes
  • Home
  • Appetizers
  • Desserts
  • Salads
  • Breakfast
  • Dinner
  • Privacy Policy
  • Contact
  • About

Chef Miles

Maple Pecan Bakery Muffins Rich and Flavorful Recipe

October 8, 2025 by Chef Miles
To make delicious Maple Pecan Bakery Muffins, you need the following ingredients: - 1 ½ cups all-purpose flour - ½ cup brown sugar, packed - ½ cup pure maple syrup - ½ cup milk (or your preferred non-dairy alternative) - 1/3 cup vegetable oil - 1 large egg - 1 teaspoon vanilla extract - 1 teaspoon baking powder - ½ teaspoon baking soda - ½ teaspoon salt - 1 cup pecans, chopped (set aside a few for topping) - Optional: ½ teaspoon ground cinnamon for a warm flavor enhancement Each ingredient plays a key role in making these muffins rich and flavorful. For example, the maple syrup adds sweetness and a unique taste. The chopped pecans give a nice crunch, while the cinnamon can enhance the overall warmth of the muffins. Using fresh ingredients will result in the best flavor and texture. 1. Preheat your oven to 350°F (175°C). 2. Prepare a muffin tin by lining it with paper liners or greasing each cup with butter or oil. 3. In a large bowl, sift together the all-purpose flour, brown sugar, baking powder, baking soda, salt, and optional cinnamon. Mix well until no lumps remain. 1. In another bowl, whisk together the maple syrup, milk, vegetable oil, egg, and vanilla extract. Keep whisking until the mixture is smooth and well combined. 1. Pour the wet mixture into the dry ingredients. 2. Stir gently with a spatula until just combined. A few lumps are okay; they help keep the muffins tender. 3. Fold in the chopped pecans carefully. Ensure they spread evenly in the batter without overmixing. 1. Use a scoop or spoon to fill the muffin cups about two-thirds full. 2. Top each muffin with reserved chopped pecans for added crunch. 3. Place the muffin tin in the preheated oven. Bake for 18-20 minutes. 4. Check for doneness by inserting a toothpick into the center of a muffin. If it comes out clean, they are ready. 5. Remove the muffins from the oven and let them cool in the pan for 5 minutes. Then transfer them to a wire rack to cool completely. - Importance of not overmixing: When you mix the batter, do it gently. Overmixing creates tough muffins. Just stir until the flour disappears. A few lumps are okay; they help keep the muffins soft and fluffy. - How to know when muffins are done: Use a toothpick to check doneness. Insert it into the center of a muffin. If it comes out clean or with a few crumbs, they are ready. If it has wet batter, bake them a bit longer. - Dusting with powdered sugar: After the muffins cool, sprinkle a light dusting of powdered sugar on top. This makes them look fancy and appealing. - Serving suggestions with maple syrup: Serve the muffins warm with a side of maple syrup. It adds extra sweetness and enhances the maple flavor. It’s a delightful treat for breakfast or snack time. - Overfilling muffin cups: Fill each muffin cup only two-thirds full. If you fill them too much, the muffins will overflow while baking. This messes up the shape and makes them hard to remove. - Not cooling muffins properly: After baking, let the muffins cool in the pan for five minutes. Then, transfer them to a wire rack. Cooling them properly keeps them from getting soggy. Enjoy your perfect Maple Pecan Bakery Muffins! {{image_4}} You can switch out the pecans for other nuts. Walnuts work well with maple flavors. Almonds add a nice crunch, too. Hazelnuts give a unique taste that many enjoy. Just chop them up like you would with pecans. This small change can give your muffins a fresh twist. Want to make your muffins even better? Try adding chocolate chips. Dark or semi-sweet chocolate pairs great with maple. Dried fruits like cranberries or raisins also bring a sweet contrast. They add a chewiness that complements the muffin's texture. You can mix and match, so get creative! If you need gluten-free muffins, use a gluten-free flour blend. Many of these blends work just as well as all-purpose flour. For vegan muffins, replace the egg with a flax egg. Mix one tablespoon of ground flaxseed with three tablespoons of water. Let it sit for a few minutes to thicken. Use a non-dairy milk in place of regular milk. These small swaps allow everyone to enjoy these tasty muffins. To keep your maple pecan muffins fresh, use an airtight container. This will help them stay moist and tasty. Place the muffins in the container once they cool completely. You can stack them, but avoid squishing them. Store at room temperature for up to three days. If you want to keep them longer, freezing is a great option. To freeze muffins properly, first let them cool fully. Wrap each muffin in plastic wrap. Then, place them in a freezer-safe bag. Make sure to remove as much air as you can. This prevents freezer burn. You can freeze muffins for up to three months. When you want to enjoy one, take it out and let it thaw in the fridge overnight or at room temperature for a few hours. To warm up leftover muffins, you can use a microwave or an oven. For the microwave, place a muffin on a plate and heat it for about 15-20 seconds. If you prefer the oven, preheat it to 350°F (175°C). Wrap the muffin in foil and heat for about 10 minutes. This helps keep the muffin moist and brings back its fresh-baked flavor. Enjoy your muffins warm! Yes, you can use whole wheat flour. It will give a nuttier taste. The muffins may be denser, but they will still be delicious. You might need to add a bit more liquid, as whole wheat absorbs more moisture. To make these muffins vegan, replace the egg with a flax egg. Mix 1 tablespoon of ground flaxseed with 2.5 tablespoons of water. Let it sit for 5 minutes until thick. Use a non-dairy milk, like almond or oat milk, and ensure your maple syrup is pure. Store leftover muffins in an airtight container at room temperature. They stay fresh for about 2-3 days. For longer storage, place them in the fridge. Just remember to reheat them before enjoying for the best taste. Absolutely! To make mini muffins, reduce the baking time to about 10-12 minutes. Fill the mini cups halfway to allow room for rising. These bite-sized treats are fun and perfect for sharing! This blog post covered easy steps to make tasty muffins. We talked about key ingredients like flour, maple syrup, and nuts. I shared tips to avoid common mistakes and ways to store muffins for freshness. You can even adjust recipes for various diets. In the end, baking muffins can be fun and rewarding. With these guidelines, you'll make perfect muffins every time. Enjoy the process and share your delicious results!

Craving a sweet treat that’s both rich and easy to make? Look no further! My Maple Pecan Bakery Muffins are the perfect blend of nutty pecans and sweet maple syrup. …

Read more

Categories Breakfast

Flavorful Slow Cooker Creamy Tuscan Sausage Soup Recipe

October 8, 2025 by Chef Miles
To make this soup, you will need: - 1 pound Italian sausage (mild or spicy) - 1 medium onion, finely chopped - 3 cloves garlic, minced - 3 medium carrots, peeled and sliced - 3 celery stalks, diced - 4 cups low-sodium chicken broth - 1 can (14.5 oz) diced tomatoes, undrained - 1 teaspoon Italian seasoning blend - 1/2 teaspoon red pepper flakes (optional) - 2 cups fresh baby spinach, roughly chopped - 1 cup heavy cream - Salt and freshly ground black pepper to taste - Fresh parsley, chopped (for garnish) These ingredients create a rich and satisfying base for the soup. The Italian sausage adds depth, while the fresh vegetables bring balance. You can enhance the soup's taste with: - A squeeze of lemon juice for brightness - A dash of Worcestershire sauce for umami - Grated Parmesan cheese for serving These additions can take your soup to the next level. They add layers of flavor that elevate each bite. When choosing ingredients, look for: - Fresh Italian sausage from a trusted butcher or store - Organic vegetables for better taste and quality - Low-sodium chicken broth to control salt levels Always check the freshness dates on packaged items. Quality ingredients will make your soup shine and ensure a delicious result. Start by heating a large skillet over medium heat. Add 1 pound of Italian sausage to the pan. Use a wooden spoon to break the sausage into smaller pieces. Cook it for about 5 to 7 minutes until it turns brown and no longer pink. This step helps build flavor. Once cooked, drain any extra fat from the sausage. Now, transfer it to your slow cooker. Next, in the same skillet, add the onion, garlic, carrots, and celery. You will need 1 finely chopped onion, 3 minced garlic cloves, 3 sliced carrots, and 3 diced celery stalks. Sauté these veggies for 3 to 4 minutes. Stir often until the onion looks soft and clear. This softening brings out the natural sweetness. After that, add the sautéed mix to the slow cooker with the sausage. Now, it's time to add the rest of the ingredients. Pour 4 cups of low-sodium chicken broth into the slow cooker. Next, add 1 can of undrained diced tomatoes. Sprinkle in 1 teaspoon of Italian seasoning and, if you want a little heat, 1/2 teaspoon of red pepper flakes. Stir everything well to mix it together. This mix will be the base of your soup. Cover the slow cooker with its lid. You can cook the soup on low for 6 to 7 hours. If you are short on time, you can also use the high setting for 3 to 4 hours. This slow cooking allows all the flavors to blend beautifully. About 30 minutes before you serve, stir in 2 cups of roughly chopped fresh baby spinach and pour in 1 cup of heavy cream. Cover the slow cooker again until the spinach wilts and the soup heats up. Before serving, taste the soup. Adjust with salt and freshly ground black pepper to your liking. This simple step ensures the soup is full of flavor. Enjoy your creamy, savory Tuscan sausage soup! To boost the taste of your soup, try these tips: - Use fresh herbs: Add fresh basil or thyme for a bright flavor. - Add lemon juice: A squeeze of lemon gives a nice zing that brightens the dish. - Experiment with spices: Try adding smoked paprika or a dash of cayenne for warmth. - Layer flavors: Sauté your veggies before adding them to the slow cooker. This brings out their natural sweetness. Here are some common pitfalls to watch out for: - Skipping the browning step: Browning the sausage adds rich flavor. Don’t rush this step. - Overcooking spinach: Add spinach near the end to keep it vibrant and fresh. - Not seasoning enough: Always taste before serving. Adjust salt and pepper to your liking. - Using low-quality broth: A good broth is key. Go for low-sodium options to control the salt. To make your meal even better, consider these pairings: - Serve with crusty bread: A warm, crusty loaf is perfect for dipping. - Add a side salad: A fresh salad balances the soup's richness. - Top with cheese: Grate some Parmesan over your bowl for added flavor. - Pair with wine: A light white wine, like Pinot Grigio, complements the dish nicely. These tips will help you create a creamy Tuscan sausage soup that stands out and delights the taste buds! {{image_4}} You can switch the Italian sausage for turkey or chicken sausage. These options reduce fat but keep flavor. Cook them the same way you would with pork sausage. Ground turkey or chicken works best. Both give a lighter taste, but they still pair well with spices and veggies. For a vegetarian soup, replace the sausage with hearty vegetables or legumes. Try using mushrooms, lentils, or chickpeas for protein. Instead of heavy cream, use coconut milk or cashew cream for richness. This keeps the soup creamy while making it plant-based. Feel free to experiment with herbs and spices. You can add basil or thyme for extra depth. A splash of lemon juice brightens the flavors. For a spicy kick, try adding more red pepper flakes. Each change can create a new taste experience, making this soup fun to customize. After enjoying your delicious soup, store any leftovers in an airtight container. Let the soup cool to room temperature first. This helps keep your soup fresh and prevents sogginess. Place it in the fridge if you plan to eat it within a few days. Consume it within 3-4 days for the best taste. When reheating your soup, do it slowly on the stove. Pour the soup into a pot and heat it over medium-low heat. Stir occasionally to prevent sticking. If you prefer the microwave, use a microwave-safe bowl. Heat in short bursts of 1-2 minutes, stirring in between. This method helps keep the flavors balanced and the cream smooth. If you want to freeze your soup, do so before adding the cream and spinach. This step helps maintain the soup's texture. Use a freezer-safe container, leaving some space for expansion. When you're ready to enjoy it, thaw the soup in the fridge overnight. Reheat it gently on the stove and add cream and spinach before serving. Enjoy your hearty soup at a later date! Yes, you can make this soup ahead of time. Cook it as directed and let it cool. Store it in an airtight container in the fridge for up to three days. The flavors will deepen as it sits. When ready to serve, reheat it gently on the stove or in the microwave. If your soup is too watery, there are a few quick fixes. You can blend a portion of the soup with an immersion blender. This will create a creamy texture. Another option is to add a cornstarch slurry. Mix one tablespoon of cornstarch with two tablespoons of water. Stir this into the soup, then cook for a few more minutes. You have several tasty options to replace heavy cream. A good choice is full-fat coconut milk if you want a dairy-free version. You can also use half-and-half for a lighter option. Greek yogurt adds creaminess too, but stir it in just before serving to avoid curdling. This blog post covered how to make Slow Cooker Creamy Tuscan Sausage Soup. We explored essential and optional ingredients, giving you tips on choosing the best ones. I shared easy steps on preparation, cooking, and ways to enhance flavor. We also discussed variations and storage tips. In closing, I hope you feel ready to create a warm and tasty soup that suits your taste. Enjoy cooking and sharing this meal with loved ones!

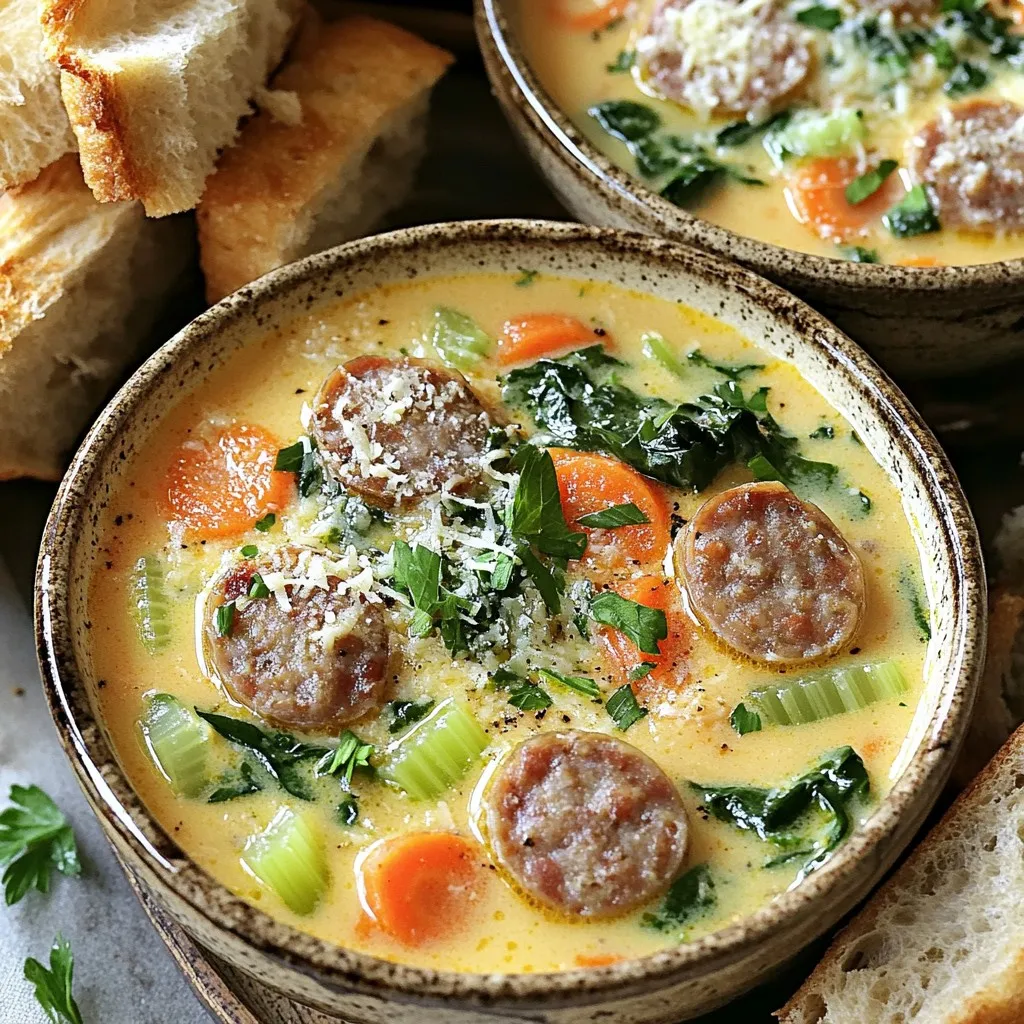
Looking for a hearty meal that practically makes itself? My Flavorful Slow Cooker Creamy Tuscan Sausage Soup is just what you need. This cozy dish combines rich sausage, tender veggies, …

Read more

Categories Dinner

One-Pan Mediterranean Lemon Chicken Thighs Delight

October 7, 2025 by Chef Miles
- 4 bone-in chicken thighs, skin-on - 2 tablespoons extra-virgin olive oil - 1 teaspoon sweet paprika - 1 teaspoon dried oregano - 1 teaspoon garlic powder - 1 cup cherry tomatoes, halved - 1 bell pepper, sliced (any color, such as red, yellow, or green) - 1 medium red onion, cut into wedges - 1 cup Kalamata olives, pitted and halved - Fresh parsley, finely chopped (for garnish) - Juice and zest of 1 large lemon - Salt and freshly cracked black pepper The key to this dish is using quality ingredients. The bone-in chicken thighs bring rich flavor and moisture. I prefer skin-on thighs because they crisp up nicely in the oven. The extra-virgin olive oil adds a fruity taste that enhances the dish. Sweet paprika and garlic powder lend warmth and depth. Dried oregano gives it that classic Mediterranean touch. For the veggies, I love using halved cherry tomatoes. They burst with juice as they roast. Sliced bell peppers add sweetness and color. The red onion caramelizes beautifully, giving a rich flavor contrast. Kalamata olives add briny goodness, making every bite exciting. Lemon juice and zest brighten the dish. They cut through the richness and tie all flavors together. Salt and freshly cracked black pepper are essential. They help to balance all the tastes in this vibrant meal. - Preheat your oven to 400°F (200°C). - In a large bowl, mix the olive oil, sweet paprika, dried oregano, garlic powder, salt, pepper, lemon juice, and zest. Whisk until smooth. - Add the chicken thighs to the marinade. Make sure each thigh is well coated. - Let the chicken marinate for at least 20 minutes. For better flavor, marinate overnight in the fridge. - Place the marinated chicken thighs skin-side up in an oven-safe skillet. - Add cherry tomatoes, bell pepper, onion wedges, and Kalamata olives around the chicken. - Pour any leftover marinade over the vegetables. - Roast everything in the oven for 35-40 minutes. The chicken is ready when it hits 165°F (75°C) and is golden brown. - Once cooked, take the pan out of the oven. Let the chicken rest for 5 minutes. - Sprinkle chopped parsley over the dish to add color. Serve the chicken hot with roasted veggies and olives. To get the best flavor, marinate your chicken thighs well. Use a big bowl for mixing. Combine olive oil, spices, salt, and lemon juice. Whisk until it’s smooth. Add the chicken and coat each piece. Let it sit for at least 20 minutes. For deeper taste, marinate overnight in the fridge. This helps the flavors soak in. For crispy skin, make sure you start with dry chicken. Pat it dry with paper towels before marinating. When cooking, place the chicken skin-side up in the skillet. The oven should be hot at 400°F (200°C). Roast for 35-40 minutes until golden brown. Use a meat thermometer to check. The chicken must reach 165°F (75°C) inside to be safe. Serving family-style makes it fun. Keep the chicken and veggies in the skillet. This way, everyone can help themselves. Add lemon wedges on the side. They brighten the dish and add extra zest. You can also sprinkle fresh parsley on top for color. This makes your meal look as good as it tastes. {{image_4}} You can switch up the veggies in this dish. Try using zucchini or asparagus for a fresh twist. Carrots can also add sweetness and color. If you're not in the mood for chicken, you can use bone-in pork chops or even firm tofu. Both options will soak up the flavors well. To kick up the flavor, consider adding spices like cumin or coriander. Fresh herbs, such as thyme or rosemary, can also brighten the dish. For marinades, mix in some yogurt or honey for a unique taste. You can even add a splash of balsamic vinegar for a tangy kick. This dish pairs well with fragrant rice or a light couscous salad. A crunchy green salad with lemon vinaigrette can balance the rich chicken. For wine, a chilled Sauvignon Blanc or a light Pinot Grigio complements the meal nicely. Both wines enhance the lemony notes in the chicken. After you enjoy your One-Pan Mediterranean Lemon Chicken Thighs, save any leftovers. Place the chicken and vegetables in an airtight container. This helps keep them fresh. Store in the fridge for up to three days. If you want to keep them longer, freezing is a great option. To reheat, I recommend using an oven or a skillet. Preheat your oven to 350°F (175°C). Place the chicken and veggies on a baking sheet. Heat for about 15-20 minutes. This keeps the chicken juicy and the skin crispy. If you use a skillet, heat on medium-low. Add a splash of water or broth to keep moisture. Stir gently to warm up. Yes, you can freeze this dish! To freeze, let the chicken and veggies cool completely. Place them in freezer-safe bags or containers. Make sure to remove as much air as possible. This helps prevent freezer burn. You can freeze for up to three months. When you’re ready to eat, thaw in the fridge overnight. Reheat as mentioned before for best flavor and texture. You should marinate chicken thighs for at least 20 minutes. For the best taste, let them sit overnight in the fridge. This time allows the flavors to soak in deeply. Yes, you can use boneless chicken thighs. They will cook faster, so reduce roasting time by about 10 minutes. Always check the internal temperature for safety. If you don’t have Kalamata olives, try green olives or black olives. Each type adds a unique taste, but they all work well in this dish. Check the internal temperature of the chicken thighs. They are done when they reach 165°F (75°C). The skin should also look crispy and golden brown. Yes, you can cook this dish in a slow cooker. Place the marinated chicken and vegetables in the slow cooker. Cook on low for 6-8 hours or on high for 3-4 hours. This recipe highlights simple, fresh ingredients, like chicken thighs and vibrant vegetables. You learned how to prepare, marinate, and roast your dish for perfect flavor. Remember to use fresh herbs and seasonings for a tasty finish. Feel free to mix in different veggies or proteins for variety. Whether you keep leftovers or serve it fresh, this dish will impress. Embrace these steps, and enjoy delicious meals that bring joy to your table!

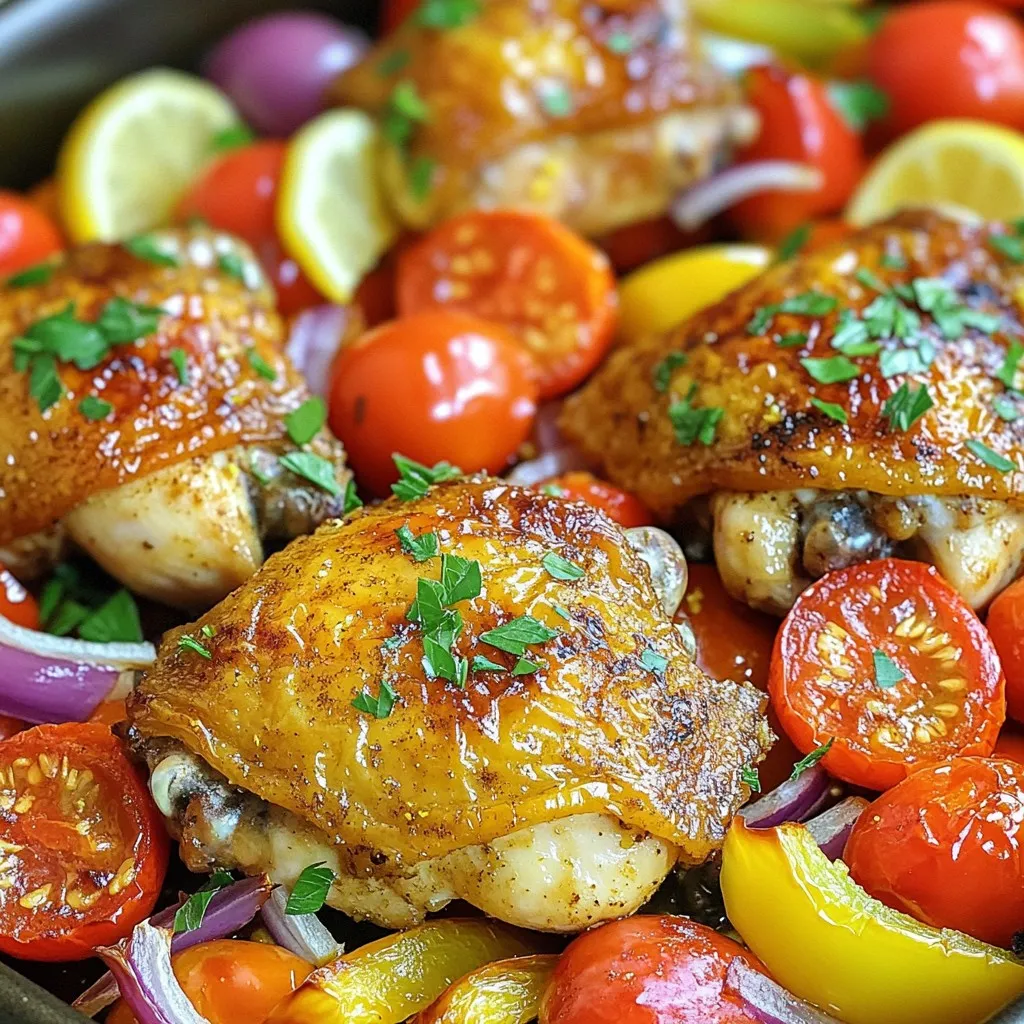
Looking for a quick and tasty dinner? Try my One-Pan Mediterranean Lemon Chicken Thighs! This dish bursts with vibrant flavors, thanks to fresh ingredients like lemon, garlic, and colorful veggies. …

Read more

Categories Dinner

Cheesy Taco Stuffed Peppers Flavorful and Easy Recipe

October 7, 2025 by Chef Miles
- Bell Peppers: Choose large bell peppers. Red, yellow, or green all work well. Each color has a unique flavor, with red being the sweetest. Make sure the peppers are firm and bright. - Ground Meat Options: You can use ground turkey or beef. Turkey gives a lighter taste. Beef adds a richer flavor. Both are tasty, so pick what you like best. - Essential Fillings: This recipe needs cooked rice, black beans, and corn. Rice gives a nice base. Black beans add protein and fiber. Corn brings sweetness and crunch. Don't forget the taco seasoning for that classic flavor! Preheating the Oven: Importance and Temperature Start by preheating your oven to 375°F (190°C). This step warms the oven before you bake. It ensures even cooking and makes your peppers tender and tasty. Cleaning and Brushing the Peppers: Technique Next, take your bell peppers and slice off the tops. Remove all seeds and membranes inside. This helps the peppers cook evenly. Brush the outsides with olive oil. This adds flavor and helps them brown nicely in the oven. Stand them upright in a baking dish, so they fit snugly. Browning the Meat: Techniques for Flavor and Texture In a large skillet, add your ground turkey or beef over medium heat. Cook it for about 5-7 minutes. Stir and break it apart with a spatula. You want it to turn brown and lose its pink color. Once it’s browned, drain any excess fat to keep your filling light and healthy. Mixing the Ingredients: Order of Addition and Timing Now, stir in your taco seasoning. Then, add the diced tomatoes, cooked rice, black beans, and corn. Mix everything together and cook for 3-4 minutes. This will heat your filling well. Taste and add salt and pepper as needed. Filling Techniques: Packing and Layering Remove the skillet from heat. Fold in half of the shredded cheddar cheese and half of the sliced green onions. This makes the filling creamy and flavorful. Then, fill each pepper with your taco mixture, pressing it down slightly to pack it in well. Cheese Topping: When to Add for Best Results Sprinkle the remaining cheddar cheese on top of each stuffed pepper. This will create a tasty, cheesy crust as they bake. Covering with Foil: Why It Helps Cover the baking dish tightly with aluminum foil. This helps trap moisture inside, keeping your peppers juicy. Place the dish in the preheated oven and bake for 25 minutes. Checking for Doneness: Visual and Timing Cues After 25 minutes, carefully remove the foil. Return the peppers to the oven for another 10-15 minutes. Look for melted, bubbly, and golden brown cheese. This shows your peppers are done. Once baked, let them cool for a few minutes before serving. Spice Level Adjustments: How to Modify for Heat You can change the spice level in your taco stuffed peppers. If you like it spicy, add chopped jalapeños to the meat mix. You can also use spicy taco seasoning instead of the regular kind. For less heat, use mild salsa or skip the peppers altogether. Taste the filling as you go to find your perfect heat level. Adding Extra Veggies: Recommendations for Inclusion Boost the nutrition and flavor by adding more veggies. Zucchini, mushrooms, or spinach work well. You can mix them into the filling. Just chop them small so they cook evenly. This way, you add color and crunch without losing the taco taste. Avoiding Soggy Peppers: Tips on Pre-cooking To keep your peppers firm, pre-cook them slightly. After cutting the tops off, you can boil them for 3-5 minutes. This softens them without making them mushy. Drain them well and let them cool before filling. This step helps them stay upright while baking. Achieving a Cheesier Dish: Cheese Options and Amounts For a cheesier dish, mix different cheeses. Cheddar is great, but try Monterey Jack or pepper jack for a twist. Use about 1 ½ cups of cheese total: half in the filling and half on top. This gives you layers of cheesy goodness that melt beautifully. Enjoy the gooey texture with every bite! {{image_4}} Substitutes for Meat: Vegetarian Options If you want to skip meat, try using vegetables. You can use extra black beans or corn. Both add texture and flavor. You might also try lentils. They have a great taste and are filling. Quinoa is another option. It cooks fast and is healthy. Alternative Protein Sources: Beans, Lentils, Quinoa Beans can be a star in your stuffed peppers. They pack protein and fiber. Lentils are quick to cook and mix well. Quinoa adds a nutty flavor. You can switch these proteins in any recipe. Just keep the seasoning the same for great taste. Tex-Mex Additions: Jalapeños, Avocado Want to spice things up? Add jalapeños to the filling. They give a nice kick. Avocado on top adds creaminess. You can also use salsa for extra flavor. These additions will make your dish stand out. International Variations: Mediterranean, Italian-Inspired Explore flavors from other regions! For a Mediterranean twist, add feta cheese and olives. Mix in some herbs like oregano and basil. An Italian spin could include marinara sauce and mozzarella cheese. Both variations keep the stuffed peppers exciting and new. After enjoying your cheesy taco stuffed peppers, you may have some left. To keep them fresh, first, let them cool to room temperature. Then, place them in an airtight container. They can last in the fridge for about 3 to 4 days. This way, you can enjoy them later without losing flavor. For best results, use glass or plastic containers with tight lids. This prevents air from entering and keeps the peppers moist. Avoid using metal containers, as they can react with the food and affect taste. If you want to save some stuffed peppers for later, freezing is a great option. You can freeze them before or after cooking. If freezing before cooking, prepare the peppers and filling as usual. Then, fill the peppers and place them in a single layer on a baking sheet. Freeze until solid, about 1 to 2 hours, and then transfer to a freezer bag. If you freeze them after cooking, let them cool completely. Wrap each pepper in plastic wrap, then place them in a freezer bag. They can stay in the freezer for up to 3 months. To enjoy frozen stuffed peppers, thaw them overnight in the fridge. After thawing, reheat them in the oven at 375°F (190°C) for about 20 minutes. Check that they are heated through. You can also microwave them for a faster option, but the oven keeps the peppers nice and firm. Can I make these ahead of time? Yes, you can prepare the stuffed peppers a day in advance. Just fill them and store them in the fridge. Bake them when you are ready to eat. What toppings work best? Toppings can really boost flavor! I love using fresh cilantro, diced avocado, and sour cream. You can also try salsa or extra cheese for added taste. Can I use different types of beans? Absolutely! You can swap black beans for kidney beans or pinto beans. Chickpeas also work well for a different texture. How do I make this recipe gluten-free? To make it gluten-free, use a gluten-free taco seasoning mix. Ensure your canned ingredients are labeled gluten-free, especially beans and corn. What side dishes pair well with stuffed peppers? These stuffed peppers go well with a simple salad or some Mexican rice. You could also serve them with tortilla chips and guacamole for extra flavor. This article explored how to make cheesy taco stuffed peppers. We covered choosing fresh ingredients, prepping bell peppers, cooking the filling, and baking. You learned tips for customizing flavors and perfecting textures, along with variations to suit your taste. In summary, stuffed peppers are fun, tasty, and easy to make. Whether you stick to the recipe or get creative, enjoy your delicious creation.

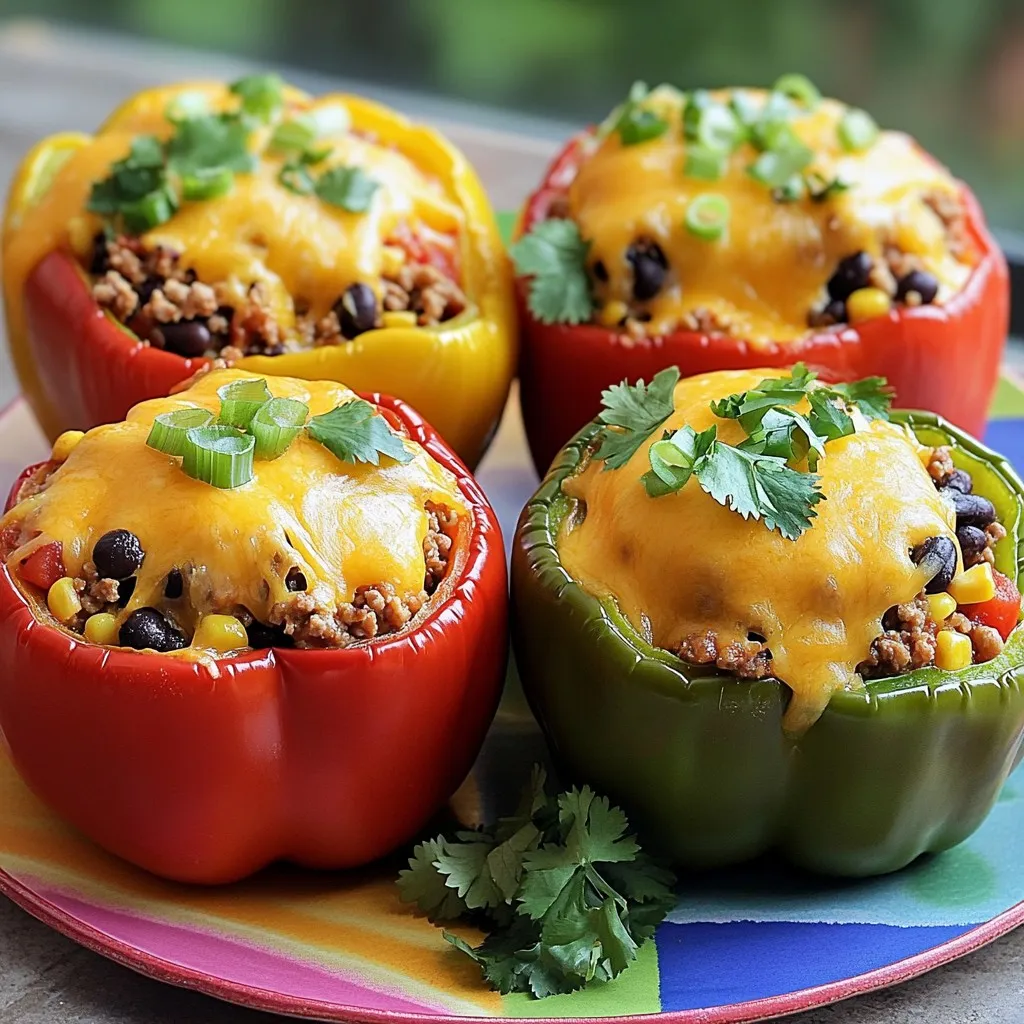
If you’re looking for a fun and tasty meal, you’ve landed in the right place! I’ll show you how to make Cheesy Taco Stuffed Peppers that are full of flavor …

Read more

Categories Dinner

No-Bake Chocolate Hazelnut Cheesecake Bars Delight

October 7, 2025 by Chef Miles
- 1 ½ cups hazelnut cookies, finely crushed - ¼ cup unsalted butter, melted - 1 cup cream cheese, softened to room temperature - ½ cup powdered sugar - 1 cup hazelnut spread (such as Nutella) - 1 teaspoon pure vanilla extract - 1 cup heavy cream, whipped to soft peaks - ½ cup dark chocolate chips, melted - Chopped hazelnuts, for garnish - Mixing bowls - Electric mixer - 8x8-inch square pan - Spatula - Plastic wrap To make these no-bake chocolate hazelnut cheesecake bars, you need a few key ingredients. The hazelnut cookies give the crust a rich, nutty base. Melted unsalted butter binds the cookie crumbs together, making a sturdy layer. Cream cheese forms the cheese filling, while powdered sugar adds sweetness. Hazelnut spread is the star flavor, and vanilla extract enhances it. For the creaminess, we use heavy cream. Whipped to soft peaks, it keeps the filling light. Dark chocolate chips add a touch of decadence, while chopped hazelnuts provide a crunchy garnish. You also need basic kitchen tools. Mixing bowls are a must for combining ingredients. An electric mixer helps to make the cream cheese filling smooth. An 8x8-inch square pan forms the bars. A spatula is key for spreading the filling evenly, and plastic wrap keeps everything fresh while it chills. With these ingredients and tools, you're ready to create a dessert that impresses everyone! To make the crust, first, take 1 ½ cups of hazelnut cookies and crush them finely. In a bowl, mix the crushed cookies with ¼ cup of melted unsalted butter. Stir well until all the crumbs are moist. Next, press this mixture firmly into the bottom of an 8x8-inch square pan. Make sure you create an even layer. Put the pan in the refrigerator while you prepare the filling. Now, let’s focus on the filling. In a large bowl, beat 1 cup of softened cream cheese with ½ cup of powdered sugar. Use an electric mixer on medium speed. Keep mixing until the mixture is smooth and creamy. Then, add 1 cup of hazelnut spread and 1 teaspoon of pure vanilla extract. Mix again until everything is well combined and no lumps remain. Next, we will add some fluffiness. Take 1 cup of heavy cream that has been whipped to soft peaks. Gently fold this whipped cream into the cream cheese mixture. Be careful not to deflate the whipped cream. This step is key for a light and airy filling. It’s time to bring everything together. Carefully pour the cheesecake filling over the chilled cookie crust. Use a spatula to smooth it out evenly. Then, drizzle ½ cup of melted dark chocolate over the top. With a knife or a toothpick, create swirls for a marbled effect. This adds a beautiful touch to your bars. Cover the pan with plastic wrap. Place it in the refrigerator and let it chill for at least 4 hours. This time allows the cheesecake to firm up completely. Once the cheesecake is firm, lift it from the pan using the overhanging parchment paper. Cut it into 9 equal bars. Before serving, sprinkle generously with chopped hazelnuts. This adds a nice crunch and makes your dessert look even more appealing. To get the best texture in your cheesecake bars, start with softened cream cheese. Soft cream cheese mixes easily, leading to a smooth filling. If it is cold, you will end up with lumps. Leave it out for at least 30 minutes before mixing. When you fold the whipped cream into the cream cheese mixture, do it gently. Use a spatula and scoop from the bottom. This keeps the mixture light and airy. If you mix too hard, your filling may turn out dense. You can boost the flavor of your cheesecake bars in many ways. Try adding a splash of almond extract for an extra nutty taste. For a chocolate twist, use dark chocolate, milk chocolate, or even white chocolate chips. Each type will change the flavor profile, so choose what you love best. For toppings, consider fresh berries or a sprinkle of sea salt. These will add a nice contrast to the rich cheesecake. You can also try using flavored hazelnut spreads if you want to explore different taste combinations. A beautiful presentation makes your dessert shine. Serve your cheesecake bars on a decorative platter. Arrange them neatly and add a drizzle of extra melted chocolate on top. This creates a lovely effect that will impress your guests. For added flair, sprinkle chopped hazelnuts on top. This not only looks great but adds a nice crunch. Use a knife or toothpick to swirl the chocolate into fun patterns. This little detail will elevate the look of your bars! {{image_4}} You can easily make this recipe fit your needs. Here are some great swaps: - Gluten-free options for cookies: Use gluten-free hazelnut cookies. Look for brands that offer this option. You can also use almond flour or gluten-free graham crackers as a base. - Dairy-free alternatives for the cream cheese: Try using dairy-free cream cheese made from nuts or soy. It provides a similar texture and creamy taste. Want to change the flavor? Here are some ideas: - Adding fruit purees for a different taste: Blend strawberries or raspberries into a puree. Swirl it into the cheesecake filling for a fruity twist. - Mixing in spices like cinnamon or coffee: Add a teaspoon of cinnamon or instant coffee to the cheesecake mix. This gives a warm, cozy flavor that pairs well with chocolate. Adjusting the recipe for your needs is simple: - Adjusting ingredients for larger or smaller batches: If you want more bars, double the ingredients. For fewer bars, cut everything in half. Just remember to keep the same ratios for the best result. To keep your cheesecake bars fresh, store them in the fridge. Place the bars in an airtight container. This will help prevent them from drying out. The bars will stay good for up to five days. Make sure to seal the container well. Yes, you can freeze cheesecake bars! They freeze well and stay tasty. Cut the bars into pieces before freezing. Wrap each piece in plastic wrap, then place them in a freezer-safe bag. This extra layer helps keep them fresh for up to three months. To thaw cheesecake bars, place them in the fridge overnight. This method keeps the texture nice and creamy. If you're in a hurry, you can leave them at room temperature for about an hour. Avoid using a microwave, as it can make the bars too soft or melt them. You can use regular cream, but the texture will change. Heavy cream has more fat. This fat gives the cheesecake a rich and creamy feel. Regular cream has less fat, so it may not whip as well. For the best result, heavy cream is the way to go. The cheesecake usually needs about 4 hours to set in the fridge. If you want it firmer, you can leave it longer. Just make sure to cover it well with plastic wrap. This keeps it fresh and prevents it from absorbing other smells in the fridge. Yes, you can add many toppings to make it your own! Here are some ideas: - Chopped nuts like almonds or pecans - Fresh fruits like strawberries or raspberries - Drizzles of caramel or chocolate sauce These toppings can add flavor and make your bars look even more delicious. You can make this recipe fit special diets. To go vegan, use dairy-free cream cheese and a plant-based cream. For gluten-free, choose gluten-free hazelnut cookies. Just check the labels to ensure they fit your diet needs. If your filling is too runny, try these tips: - Make sure the cream cheese is very soft. Cold cream cheese won’t mix well. - Mix the filling just until combined. Overmixing can cause it to lose air. - If it’s still runny, chill it longer. The filling will firm up as it cools. These hazelnut cheesecake bars are a treat that anyone can enjoy. We covered all the steps: making the crust, filling, and assembling your dessert. Plus, I shared tips for texture, flavor, and presentation. I hope these ideas inspire you to try them. Whether you use classic ingredients or explore fun variations, you’ll create a dessert that delights everyone. Enjoy making these bars and share them with friends and family. You’ll impress all who taste them!

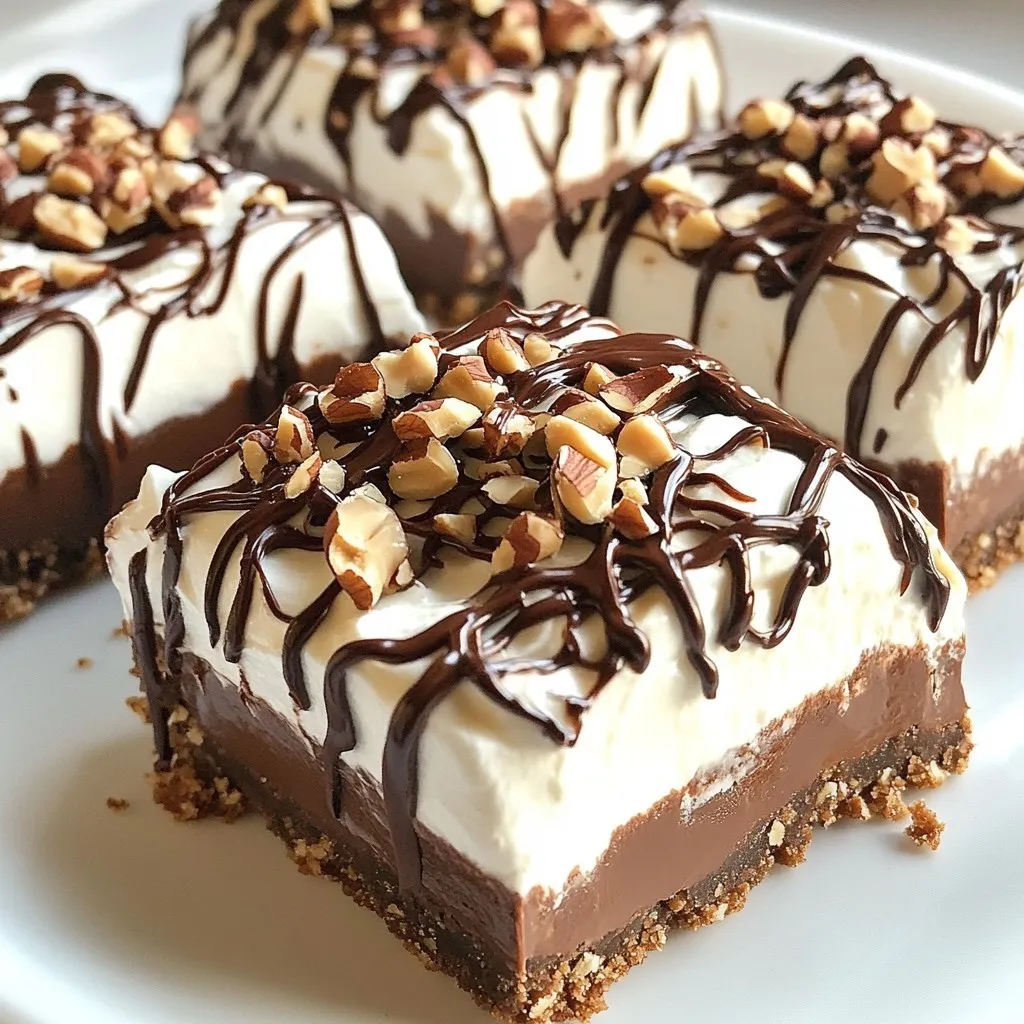
Get ready for a sweet treat with my No-Bake Chocolate Hazelnut Cheesecake Bars! This easy recipe combines rich hazelnut cookies, creamy cheesecake filling, and swirls of decadent chocolate. You won’t …

Read more

Categories Desserts

Brown Butter Apple Muffins Savory Fall Delight

October 7, 2025 by Chef Miles
To make these delightful Brown Butter Apple Muffins, gather the following: - 1/2 cup unsalted butter - 1 cup all-purpose flour - 1/2 cup whole wheat flour - 1 teaspoon baking soda - 1/2 teaspoon baking powder - 1/4 teaspoon salt - 1 teaspoon ground cinnamon - 1/2 cup brown sugar, packed - 1/4 cup granulated sugar - 2 large eggs - 1 teaspoon vanilla extract - 1 cup apples, peeled and diced (about 1 medium apple) - 1/2 cup walnuts or pecans, chopped (optional) - 1/4 cup apple cider (or milk) You can elevate your muffins with some fun add-ins. Here are a few ideas: - Chopped dried fruits, like cranberries or raisins - A sprinkle of nutmeg for more spice - Chocolate chips for a sweet twist - Lemon zest for a fresh flavor To bake these muffins, you will need some basic kitchen tools: - Medium saucepan for browning butter - Large mixing bowl for dry ingredients - Whisk for mixing - Spatula for folding ingredients - Muffin tin to bake the muffins - Paper liners or non-stick spray for muffin cups - Wire rack for cooling the muffins These simple yet essential tools will help you create perfect Brown Butter Apple Muffins. Enjoy the process! Start by melting the unsalted butter in a medium saucepan over medium heat. Stir the butter often. Keep an eye on it as it transforms into a rich golden brown. This process takes about 5-7 minutes. You will know it’s ready when it gives off a lovely nutty smell. Once it reaches that stage, take it off the heat and let it cool slightly. In a large bowl, whisk together the all-purpose flour, whole wheat flour, baking soda, baking powder, salt, and ground cinnamon. Make sure to blend them well. This step helps create a uniform texture in your muffins. In a separate bowl, mix the packed brown sugar and granulated sugar with the warm brown butter. Stir until the mixture looks smooth and well combined. Allow it to cool for a few minutes before moving to the next step. Once your butter mixture is cool, add the two large eggs and vanilla extract. Whisk everything together until you have a smooth blend. This step ensures the eggs mix well without cooking from the warm butter. Gently add the diced apples and chopped nuts to the mixture. Use a spatula to fold them in carefully. Make sure they are evenly spread throughout the batter. This adds great flavor and texture to each bite. Preheat your oven to 350°F (175°C). While the oven heats up, prepare your muffin tin. Line it with paper liners or lightly grease each cup with non-stick spray. This will help the muffins come out easily after baking. Spoon the batter evenly into the muffin cups. Fill each cup about two-thirds full. This allows room for the muffins to rise. Bake them in the oven for 18-20 minutes. Check if they’re done by inserting a toothpick into the center. It should come out clean. Once baked, cool the muffins in the tin for 5 minutes. Then transfer them to a wire rack to cool completely. To make brown butter, heat unsalted butter in a medium saucepan. Stir it often. Watch for it to turn a deep golden brown. This takes about 5 to 7 minutes. The nutty aroma tells you it is ready. Remove it from the heat and let it cool. This step adds rich flavor to your muffins. Mix dry ingredients well. This helps the baking soda and powder work evenly. Do not overmix when you combine wet and dry ingredients. Stop mixing when you see no dry flour. This keeps your muffins soft. Also, be careful with oven temperature. Preheat it to 350°F (175°C) for best results. Store leftover muffins in an airtight container. They stay fresh for about 2 to 3 days at room temperature. If you want them to last longer, freeze them. Wrap each muffin tightly in plastic wrap. Place them in a freezer bag. They can last up to 3 months in the freezer. Just thaw them at room temperature when ready to eat. {{image_4}} You can switch up the flour for different tastes. If you want a gluten-free version, try almond flour or oat flour. These options add a nice flavor and texture. You can also use a mix of all-purpose and whole wheat flour. This mix gives a hearty feel while keeping the muffins light. While apples shine in this recipe, feel free to swap them out. Pears work well too, bringing sweet juiciness. You can also use ripe bananas for a fun twist. If you want a tart bite, add cranberries or blueberries. Just make sure to adjust the sugar if your fruit is very sweet or tart. For a nut-free treat, simply leave out the walnuts or pecans. You can replace them with chocolate chips for a special touch. Sunflower seeds are a great nut-free option, adding a nice crunch. They also pack a protein punch. If you prefer a smoother texture, just skip the nuts altogether. Each muffin packs about 180 calories. Here's how it breaks down: - Fat: 8 grams - Carbohydrates: 27 grams - Protein: 3 grams - Fiber: 1 gram This means each muffin gives you a nice sweet treat without too many calories. Perfect for fall mornings! These muffins are not gluten-free or vegan. They contain wheat flour and eggs. If you want gluten-free muffins, swap the all-purpose flour with a gluten-free blend. For a vegan option, replace eggs with flax eggs and use plant-based butter. Enjoy making these muffins to fit your diet! Yes, you can freeze these muffins. Let them cool completely first. Then, wrap each muffin tightly in plastic wrap or foil. Place them in a freezer-safe bag. They will stay fresh for about three months. When ready to eat, thaw them in the fridge or microwave. To check if the muffins are done, insert a toothpick into the center. If it comes out clean or with a few crumbs, they are ready. The tops should also look golden brown. If they are still wet, bake for another minute or two. You can use other sweeteners if you like. White sugar works well but will change the flavor. Maple syrup or honey can also be used, but you may need to adjust the liquid in the recipe. Keep in mind that brown sugar adds moisture and flavor. No, it is not necessary to use whole wheat flour. You can use all-purpose flour for a lighter texture. Whole wheat flour adds fiber and a nutty flavor, but it's your choice. If you want more nutrition, keep it in the mix. To store leftover muffins, place them in an airtight container. Keep them at room temperature for up to three days. For longer freshness, refrigerate them. If you want to keep them longer, freeze them as mentioned earlier. Enjoy them warm for the best taste! This blog post covers how to make delicious muffins from start to finish. We explored key ingredients, important steps, and useful tips. You learned how to perfect brown butter and avoid common mistakes. We also discussed variations and nutritional info, helping you find what works best for your diet. Use these steps to bake tasty muffins that suit your taste. Remember, baking is as much about having fun as it is about following rules. Enjoy each bite and keep experimenting with flavors to make these muffins your own!

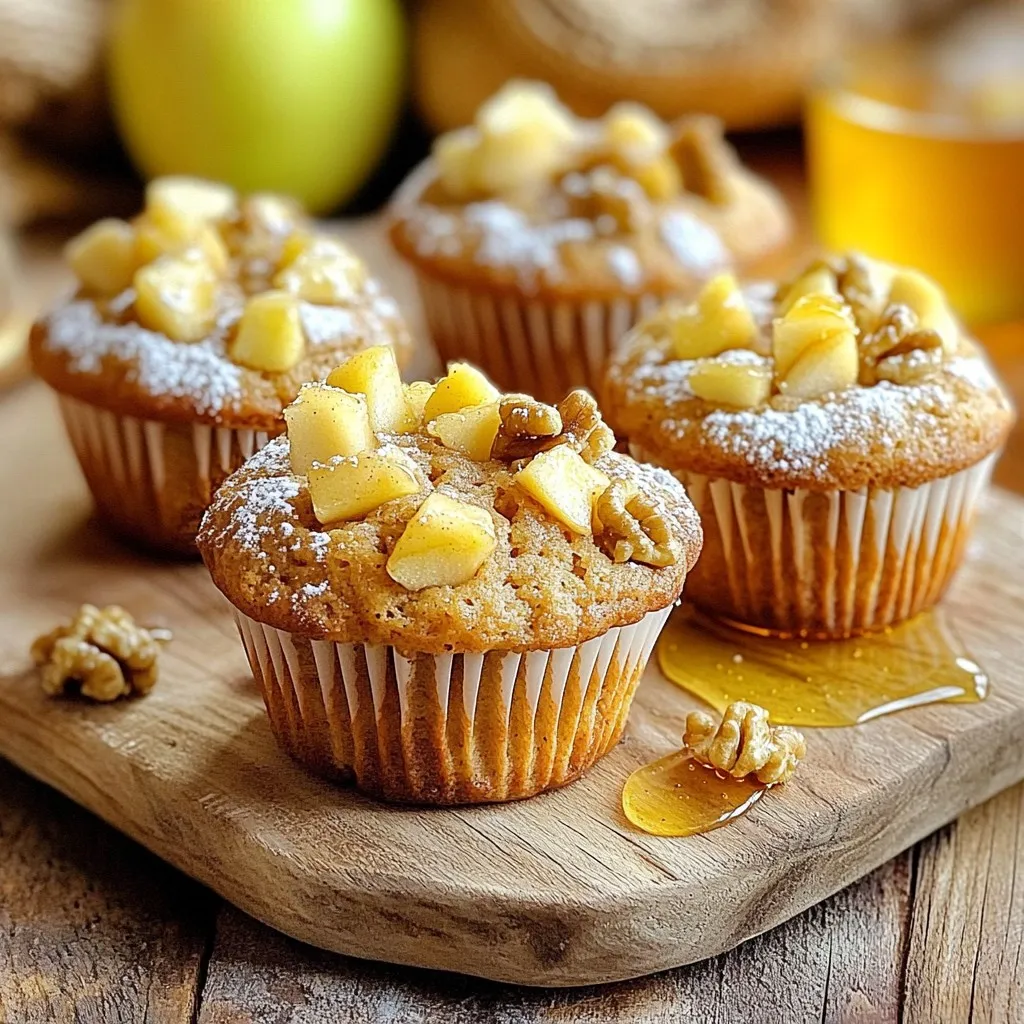
Fall is the perfect time for warm, comforting treats, and these Brown Butter Apple Muffins deliver just that. With rich flavor from brown butter and sweet apples, they make a …

Read more

Categories Desserts

Maple Glazed Chicken Drumsticks Savory Slow Cooker Recipe

October 7, 2025 by Chef Miles
- 8 chicken drumsticks - 1/2 cup pure maple syrup - 1/4 cup soy sauce (or coconut aminos for gluten-free) - 2 tablespoons apple cider vinegar - 2 cloves garlic, minced - 1 teaspoon ground ginger - 1 teaspoon smoked paprika - 1/2 teaspoon black pepper - 1/2 teaspoon salt - 1 tablespoon cornstarch (optional, for thickening) - 2 tablespoons chopped green onions (for garnish) These main ingredients create a sweet and savory flavor profile. The maple syrup adds sweetness, while the soy sauce gives depth. Garlic and ginger help boost the taste. Smoked paprika adds a nice touch of warmth. - Red pepper flakes (for heat) - Honey (for extra sweetness) - Fresh herbs like thyme or rosemary (for added aroma) Feel free to mix in these optional ingredients. Red pepper flakes will add a kick, while honey will enhance sweetness. Fresh herbs can elevate the dish's scent and flavor. - Use coconut aminos instead of soy sauce for gluten-free. - Swap chicken drumsticks for thighs or breasts if preferred. - For a lower sugar option, use a sugar substitute that measures like sugar. These substitutes help cater to dietary needs without losing flavor. Coconut aminos are a great gluten-free choice. Chicken thighs or breasts can also work well in this recipe. To make the maple glaze, start with a medium bowl. Add 1/2 cup of pure maple syrup. Next, pour in 1/4 cup of soy sauce. If you want a gluten-free dish, use coconut aminos instead. Then, add 2 tablespoons of apple cider vinegar. Mince 2 cloves of garlic and add them to the bowl. Sprinkle in 1 teaspoon of ground ginger and 1 teaspoon of smoked paprika. Finish with 1/2 teaspoon of black pepper and 1/2 teaspoon of salt. Whisk everything together until it blends well. This glaze gives your chicken a sweet and savory taste. You have two options when cooking this dish: low heat or high heat. If you choose low heat, let it cook for 4 to 6 hours. This method makes the chicken extra tender. If you are short on time, set it to high heat for 2 to 3 hours. Regardless of the method, always check the chicken's internal temperature. It should reach at least 165°F (75°C) to be safe to eat. To ensure your chicken drumsticks are juicy, coat each piece well with the maple glaze. This helps lock in moisture. Do not lift the lid during cooking. This keeps the heat in and helps the chicken cook evenly. If you want a thicker glaze, mix 1 tablespoon of cornstarch with 1 tablespoon of cold water. Add this mixture to the slow cooker in the last 30 minutes. This trick gives you a rich glaze that clings nicely to the chicken. Finally, serve the drumsticks on a platter and drizzle any extra glaze on top for added flavor and shine. To get the perfect glaze, you need to whisk well. Mix the maple syrup, soy sauce, and other ingredients until smooth. If you want a thicker glaze, use cornstarch. Make a slurry by mixing cornstarch with cold water. Add this to the slow cooker near the end of cooking. Stir gently to blend it in. This will give your glaze a nice, thick texture. When serving, place the drumsticks on a large platter. Pour any remaining glaze over them for extra flavor. Add a sprinkle of green onions for color. You can also use fresh herbs like parsley or thyme. These touches make the dish look fancy and inviting. For a pop of color, serve with bright green veggies or fluffy rice. These chicken drumsticks pair well with many sides. Try steamed broccoli, garlic mashed potatoes, or a fresh salad. For drinks, consider iced tea, lemonade, or a light white wine. Each of these options enhances the meal and complements the sweet glaze. Enjoy experimenting with different sides and drinks to find your favorite combinations! {{image_4}} You can swap maple syrup with honey or agave nectar. Both work well and add sweetness. Each sweetener gives a different taste. Honey adds a floral note, while agave is milder. You can also try brown sugar mixed with water. This mix can mimic the thickness and flavor of maple syrup. Change the spice mix to fit your taste. For a sweet heat, add cayenne pepper or chili powder. If you like a fresh taste, consider lemon zest or fresh herbs. Experimenting with different spices can make the dish unique. You may also try adding cumin for a warm, earthy flavor. Each spice can change the whole vibe of your meal. While drumsticks are great, other chicken cuts can also shine. Chicken thighs are juicy and flavorful, making them an excellent choice. You can also use chicken wings for a fun appetizer. Breasts can work too, but they need careful cooking to stay moist. No matter the cut, adjust the cooking time accordingly for the best results. To keep your maple glazed chicken drumsticks fresh, let them cool first. Place them in an airtight container. Make sure the lid is tight to keep out air. Store them in the fridge for up to four days. This way, you can enjoy the sweet taste later. When you are ready to eat the leftovers, use the oven or microwave. For the oven, preheat it to 350°F (175°C). Place the drumsticks on a baking sheet. Warm them for about 15-20 minutes. If using the microwave, heat them for 1-2 minutes, checking often. This keeps the chicken juicy and tasty. If you want to keep the drumsticks longer, freezing is a good option. Wrap them tightly in plastic wrap. Then, place them in a freezer bag. Be sure to remove as much air as possible. They can stay in the freezer for up to three months. When you are ready to eat, thaw them overnight in the fridge before reheating. Yes, you can use frozen chicken drumsticks. Just be aware that cooking time will increase. When using frozen chicken, cook on high heat for about 3 to 4 hours. Always check the internal temperature to ensure it reaches 165°F (75°C). You can tell the chicken is cooked when it reaches an internal temperature of 165°F (75°C). Use a meat thermometer inserted into the thickest part of the drumstick. The meat should be tender and juices should run clear, not pink. Yes, you can make this dish in an Instant Pot. Cook the drumsticks with the maple glaze on high pressure for about 10 to 12 minutes. Make sure to use the natural release method for best results. This will keep your chicken moist and flavorful. If the glaze is too sweet, add a splash of vinegar or a little soy sauce. Both will help balance the sweetness. You can also mix in some spices like black pepper or smoked paprika for an extra kick. Absolutely! Adding vegetables like carrots or potatoes can enhance your dish. Just chop them into even pieces and place them in the slow cooker with the chicken. They will absorb the delicious glaze and add more flavor to your meal. You now have all the tools to make maple glazed chicken drumsticks. We covered the main ingredients, different cooking methods, and tips for perfecting the glaze. Remember to customize the recipe with optional ingredients that fit your taste. If you have leftovers, store them right for the best flavor later. With this guide, you can impress family and friends with a meal that’s juicy and sweet. Enjoy experimenting, and don’t hesitate to try new flavors!

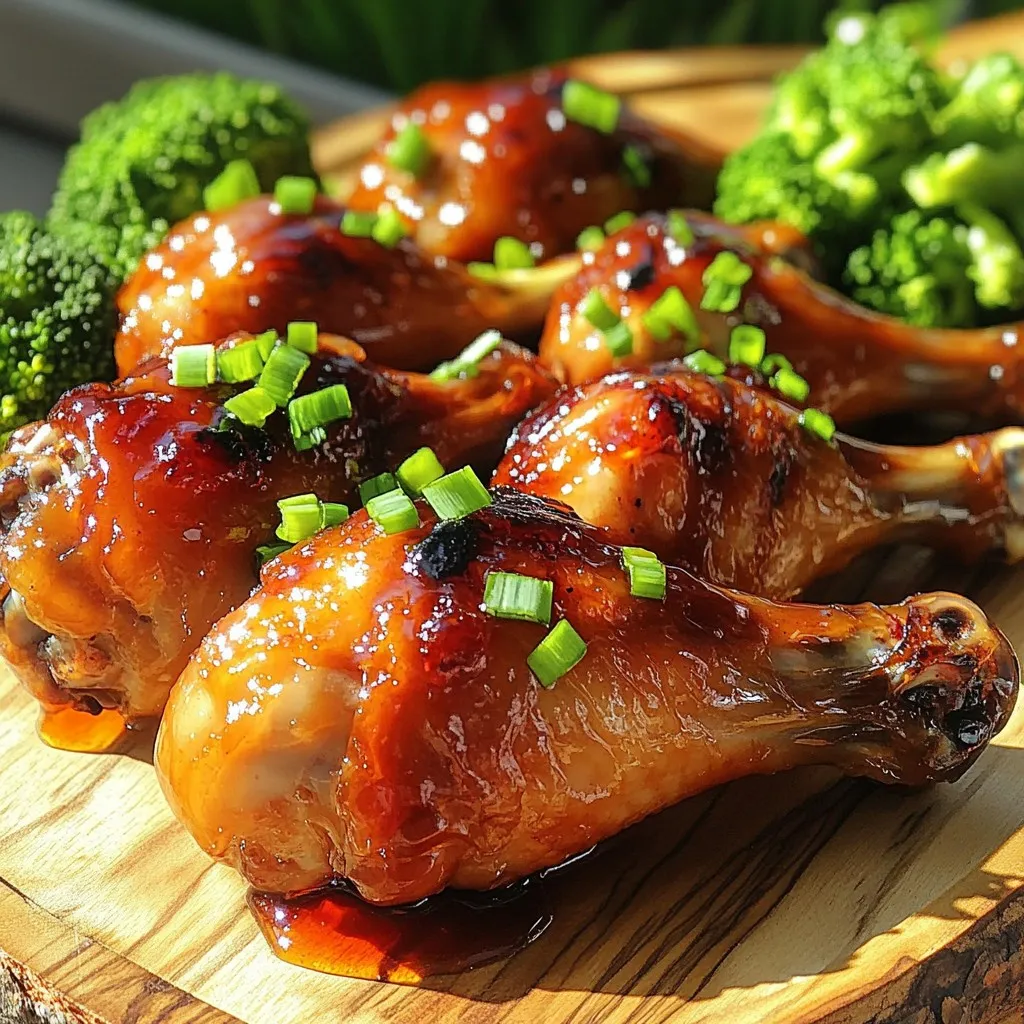
If you crave a sweet and savory dish that’s simple to prepare, you’re in for a treat! My Maple Glazed Chicken Drumsticks recipe in the slow cooker will make your …

Read more

Categories Dinner

Buffalo Cauliflower Tacos Air Fryer Crunchy Delight

October 7, 2025 by Chef Miles
- 1 medium head of cauliflower, cut into bite-sized florets - 1 cup buffalo sauce - 1 teaspoon garlic powder - 1 teaspoon onion powder - 1 teaspoon smoked paprika - 1/2 teaspoon salt - 1/2 teaspoon black pepper - 1 tablespoon olive oil - 8 small corn or flour tortillas - 1/2 cup shredded cabbage - 1/4 cup crumbled feta cheese - Fresh cilantro leaves - Lime wedges You start with cauliflower, which gives these tacos a crunchy feel. The buffalo sauce adds a spicy kick. Garlic and onion powder boost the flavor, while smoked paprika adds depth. Olive oil helps everything stick and crisp up nicely. Don’t forget the tortillas; they cradle all the goodness. Cabbage adds crunch, and feta brings creaminess. - Avocado slices - Sliced jalapeños - Sour cream or yogurt - Hot sauce for extra heat You can jazz up your tacos with some avocado slices. Sliced jalapeños add more spice if you like it hot. A dollop of sour cream or yogurt adds creaminess too. Hot sauce can take things to the next level. - Use Greek yogurt instead of feta for a tangy twist. - Swap olive oil for avocado oil for a different flavor. - Corn tortillas can be replaced with whole wheat tortillas for a healthier option. - Try a homemade buffalo sauce using less sodium to control the spice. If you want to make it lighter, use Greek yogurt instead of feta. Avocado oil offers a unique taste and is a great swap for olive oil. Whole wheat tortillas add fiber and nutrients. Making your buffalo sauce lets you control the salt and heat. Start by washing the cauliflower. Cut it into bite-sized florets. Make sure the pieces are even in size. This will help them cook well. In a large bowl, mix the cauliflower florets with olive oil. Add garlic powder, onion powder, smoked paprika, salt, and black pepper. Use your hands to toss everything together. Each floret should be coated with the spices. This gives the cauliflower a great flavor. Preheat your air fryer to 400°F (200°C). This step is key for crispy cauliflower. Once hot, place the cauliflower in the basket. Make sure they are in a single layer. If your air fryer is small, cook in batches. Air fry for 12-15 minutes. Halfway through, shake the basket. This helps all sides get crispy. Keep an eye on them. You want them golden brown and tender. While the cauliflower cooks, warm the tortillas. Use a dry skillet over medium heat. Heat each tortilla for about 20-30 seconds on each side. This makes them soft and easy to fold. To build your tacos, take a tortilla and add the crispy buffalo cauliflower. Top it with shredded cabbage. Sprinkle crumbled feta cheese over the top. Finally, add fresh cilantro leaves for a pop of flavor. Serve your tacos hot with lime wedges. Squeeze lime juice over them for extra zest! To get your buffalo cauliflower super crispy, follow these steps: - Preheat your air fryer: Always start with a hot air fryer at 400°F (200°C). This step is key for crispiness. - Use the right oil: Olive oil helps achieve that crunch. Toss the florets well to coat. - Single layer: Place cauliflower in a single layer in the basket. This allows hot air to reach all sides. - Shake it up: Shake the basket halfway through cooking. This helps all pieces cook evenly. - Monitor time: Air fry for 12-15 minutes. Check for golden brown color to know when they're done. If you have leftovers, here’s how to store and reheat them: - Cool first: Let the cauliflower cool completely before storing it. - Use airtight containers: Store in airtight containers to keep them fresh. - Reheat in the air fryer: For best results, reheat in the air fryer at 350°F (175°C) for about 5-7 minutes. This keeps them crispy. - Microwave option: You can use the microwave, but they may lose some crunch. Buffalo cauliflower tacos can shine with the right sides and toppings: - Fresh toppings: Add avocado slices or diced tomatoes for extra flavor. - Creamy sauce: Drizzle ranch or blue cheese dressing for a rich finish. - Crunchy sides: Serve with tortilla chips or a fresh salad for a complete meal. - Beverage pairings: Try pairing with a light beer or sparkling water to balance the heat. These tips help make your buffalo cauliflower tacos even better! Enjoy the crunch and flavor! {{image_4}} You can switch up the flavor of your buffalo cauliflower tacos by trying different sauces. Here are a few fun ideas: - BBQ Sauce: Use your favorite BBQ sauce for a sweeter flavor. - Honey Mustard: This sauce adds a tangy twist that's hard to resist. - Sriracha: For heat lovers, sriracha brings a fiery kick to your tacos. - Ranch Dressing: Drizzle ranch over the top for a creamy finish. Mixing sauces can create a whole new dish! Want to boost your tacos with protein? Try adding these options: - Chickpeas: Roasted chickpeas add crunch and fiber. - Black Beans: These provide a hearty base that pairs well with cauliflower. - Shredded Chicken: For meat lovers, shredded chicken is a great addition. - Tofu: If you want a plant-based option, marinated tofu works well. These proteins can make your tacos more filling and nutritious. You can enjoy your buffalo cauliflower in many ways. Here are some fun styles to try: - Wraps: Use large tortillas or lettuce to make a fresh wrap. - Taco Bowls: Serve the cauliflower over rice or quinoa for a delicious bowl. - Nachos: Layer the buffalo cauliflower over tortilla chips with cheese and toppings. - Salads: Toss the cauliflower into a salad for an added crunch. These variations let you mix things up and keep your meals exciting! To keep your buffalo cauliflower tacos fresh, store them in the fridge. Place the leftover tacos in an airtight container. Make sure to eat them within 2-3 days for best taste. If you separate the toppings from the cauliflower, they will stay fresh longer. This way, you can reheat the cauliflower without soggy tortillas. You can freeze buffalo cauliflower tacos for later use. To do this, first, let the tacos cool completely. Wrap each taco in plastic wrap or aluminum foil. Then, place them in a freezer-safe bag or container. They will keep well for up to 2 months. When you are ready to eat, thaw them overnight in the fridge and reheat in the oven or air fryer. Use glass or plastic containers with tight-fitting lids. These containers help keep your food fresh. If you want to freeze, choose freezer-safe bags or containers. Labels are helpful to mark the date. This way, you know when you need to eat them. These simple steps ensure that your buffalo cauliflower tacos stay delicious for days! Yes, you can prep the cauliflower ahead of time. Cut the cauliflower into florets and season it with spices. Store it in the fridge for up to a day. Just remember to add the buffalo sauce right before cooking. This keeps the cauliflower crispy. You can also warm the tortillas in advance. Assemble the tacos when you're ready to serve. Any air fryer works well for buffalo cauliflower tacos. Look for one with a good temperature range, ideally 400°F (200°C). A basket-style air fryer allows for even cooking and crispiness. If you have a smaller air fryer, cook in batches. This helps ensure all the cauliflower gets nice and crispy. To make these tacos vegan, simply use vegan feta cheese or leave it out. For gluten-free options, opt for corn tortillas. Check the labels to ensure they are certified gluten-free. The rest of the ingredients are naturally vegan and gluten-free, keeping your meal tasty and safe for everyone! Buffalo cauliflower tacos are easy to make, tasty, and healthy. We covered the main ingredients, cooking steps, and tips for the best results. Remember, you can mix it up with sauces and proteins. Store leftovers properly for quick meals later. You can prepare these tacos ahead of time and adapt them to fit your diet. Enjoy your cooking, and don’t hesitate to experiment!

Are you ready for a tasty twist on taco night? Buffalo Cauliflower Tacos made in an air fryer are here to bring some crunch and flavor to your table. I’ll …

Read more

Categories Dinner

Chocolate Chip Pumpkin Scones Irresistible Fall Treat

October 6, 2025 by Chef Miles
Creating Chocolate Chip Pumpkin Scones requires a few key ingredients. Here’s what you need: - 2 cups all-purpose flour - 1/2 cup brown sugar, packed - 1 tablespoon baking powder - 1/2 teaspoon baking soda - 1/2 teaspoon salt - 1 teaspoon ground cinnamon - 1/2 teaspoon ground nutmeg - 1/4 teaspoon ground ginger - 1/2 cup unsalted butter, cold and cubed - 1/2 cup pumpkin puree - 1/4 cup heavy cream - 1/2 teaspoon vanilla extract - 1/2 cup semi-sweet chocolate chips - Optional: 1 egg for egg wash Each element plays a role. The all-purpose flour provides structure. The brown sugar adds sweetness and moisture. Baking powder and baking soda help the scones rise. The spices give that warm, cozy fall flavor. Butter adds richness and helps create a flaky texture. Pumpkin puree brings moisture and a lovely color. Heavy cream adds fat, making the scones tender. Vanilla extract enhances flavor, while chocolate chips give sweetness and a delightful contrast. If you want a shiny finish, use the optional egg wash. It makes the scones look beautiful and appetizing. Gather these ingredients, and you are ready to make a delicious fall treat! First, set your oven to 400°F (200°C). This hot temperature helps the scones rise well. Line a baking sheet with parchment paper for easy cleanup later. In a large bowl, whisk together the flour, brown sugar, baking powder, baking soda, salt, and spices. Whisking is important; it blends all the dry ingredients evenly. Set this mixture aside to keep it ready for the next steps. Now, take the cold, cubed butter and add it to the dry mixture. Use your fingers or a pastry cutter to blend it in. You want the mix to look like coarse crumbs. Leave some pea-sized pieces of butter; they add flakiness. In a separate bowl, mix pumpkin puree, heavy cream, and vanilla extract. Stir until it is smooth and creamy. This mix brings moisture and taste to the scones, so make sure it is well combined. Gently pour the pumpkin mix into the dry ingredients. Use a spatula or wooden spoon to mix until just combined. Avoid overmixing to keep the scones tender. Then, fold in the chocolate chips carefully. Move the dough onto a lightly floured surface. Knead it gently two or three times to form a ball. Pat it down into a circle that is about 1 inch thick. With a sharp knife or pizza cutter, slice the dough into 8 wedges. Place each wedge on the prepared baking sheet, leaving space between them. For a shiny top, brush each scone with a beaten egg, if you like. Put the baking sheet in your hot oven and bake for 15 to 20 minutes. They are ready when they turn golden brown. You can check doneness with a toothpick; it should come out clean from the center. After baking, let the scones cool on the baking sheet for a few minutes. Then, move them to a wire rack to cool completely. Serve them warm or at room temperature for a delightful treat. - Avoiding overmixing: Mix the dough just until combined. Too much mixing makes scones tough. - Texture tips: Aim for a crumbly texture. You want some small pieces of butter to remain. - Gluten-free options: Swap all-purpose flour for a gluten-free blend. Look for one that includes xanthan gum for best results. - Vegan alternatives: Use coconut oil instead of butter and almond milk in place of heavy cream. - How to serve scones: Serve warm on a decorative platter. Dust lightly with powdered sugar for a touch of elegance. - Optional garnishes: Offer extra chocolate chips in a small bowl for dipping. You can also add a drizzle of chocolate on top for flair. {{image_4}} You can make these scones even more delightful. Consider adding nuts or dried fruits. Chopped walnuts or pecans add crunch. Dried cranberries or raisins bring a sweet chewiness. You can also switch up the chocolate types. Try dark chocolate for a richer taste. White chocolate creates a sweet contrast with the pumpkin flavor. If you want a healthier option, you can substitute whole wheat flour for all-purpose flour. You can also use coconut oil instead of butter. This change can make the scones dairy-free. Adjusting sweetness is easy too. If you like less sugar, use less brown sugar. Honey or maple syrup can replace some sugar and add more flavor. These scones work well any time of day. Pair them with a warm drink, like coffee or tea. They also go great with apple cider in the fall. Serve them fresh from the oven for breakfast or as a snack. They also make a lovely afternoon treat. Just remember to share! Store leftover scones in an airtight container. This keeps them fresh and moist. You can use a plastic container or a resealable bag. If you stack them, use parchment paper between layers. This prevents sticking and keeps the scones looking nice. To freeze scones, first let them cool completely. Wrap each scone in plastic wrap. Place the wrapped scones in a freezer bag. Press out the air before sealing. For best results, eat them within three months. When ready to enjoy, take a scone out and let it thaw at room temperature. This keeps them tasty and fresh. To reheat scones, use an oven or toaster oven. Preheat to 350°F (175°C). Place the scones on a baking sheet. Heat for about 10 minutes. This method keeps them crisp on the outside and soft inside. If you need a quick option, use a microwave. Heat for 15-20 seconds. However, this may make them a bit chewy. Enjoy your warm scones with coffee or tea! Look for a golden brown color on the tops of the scones. They should feel firm to the touch. You can also use a toothpick to check for doneness. Insert it into the center of a scone. If it comes out clean, the scones are ready. This simple test helps ensure you don’t underbake or overbake. Yes, you can use pumpkin spice as a substitute! If you want a quick fix, swap out the individual spices for 1 to 2 teaspoons of pumpkin spice. This will still give your scones that warm, fall flavor we love. You have great options! Try using nuts like walnuts or pecans for a nice crunch. You can also use dried fruits like cranberries or raisins for a sweet twist. Each mix-in offers a different flavor profile, so feel free to get creative with what you like. These scones last about 2 to 3 days at room temperature. Store them in an airtight container to keep them fresh. If you want them to last longer, consider freezing them. They can stay good for up to 3 months in the freezer. Absolutely! You can prepare the dough a day in advance. Just wrap it tightly in plastic wrap and keep it in the fridge. When you’re ready, simply shape and bake the scones. This saves time and helps you enjoy fresh scones anytime! You now have a complete guide to making delicious pumpkin scones. We covered essential ingredients, step-by-step baking instructions, and handy tips for perfect results. You can even try different variations or storage options. Remember, successful baking requires practice and a bit of creativity. Don’t hesitate to experiment with flavors. Enjoy your baking journey and the tasty treats you create. Trust me, your friends and family will appreciate your efforts!

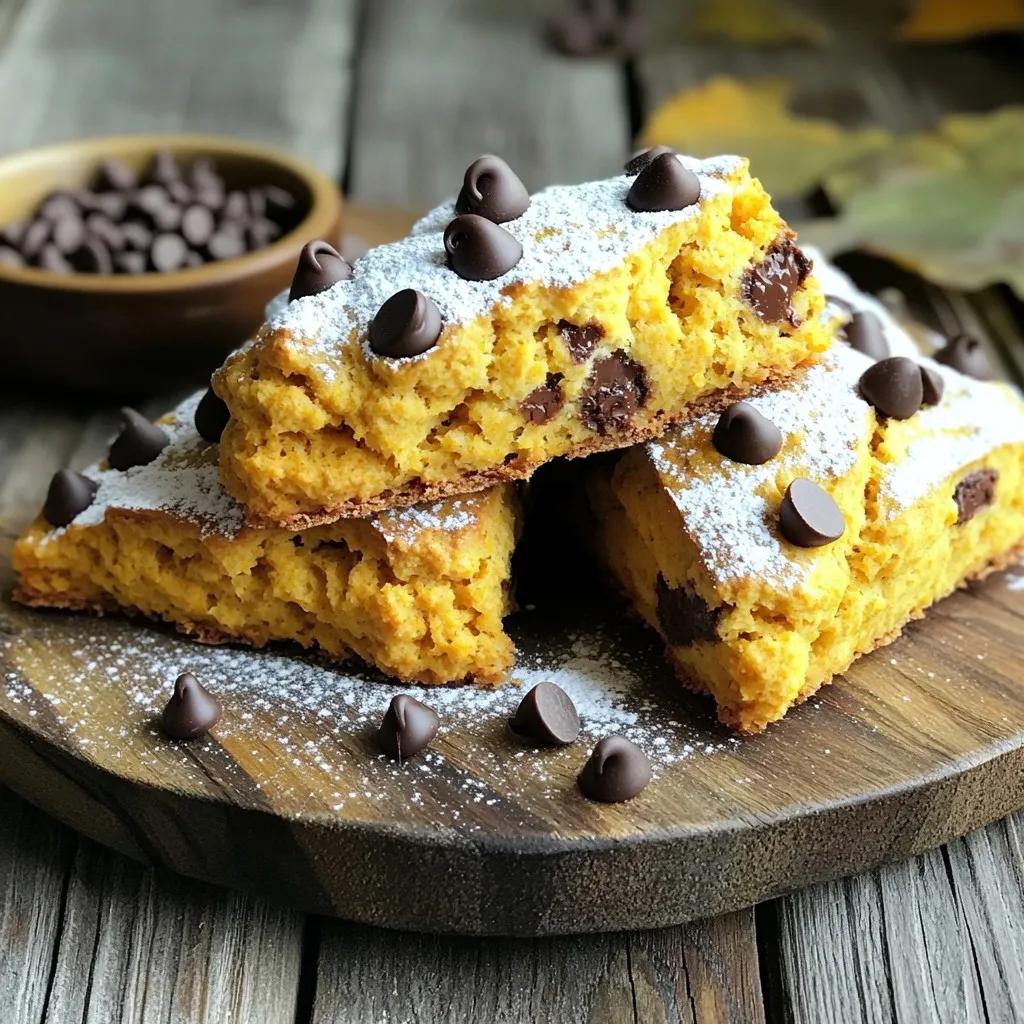
Fall is here, and it’s time to indulge in warm, comforting treats! If you love pumpkin and chocolate, then my Chocolate Chip Pumpkin Scones are perfect for you. These scones …

Read more

Categories Desserts

Slow Cooker Potato Leek Soup Hearty and Comforting Dish

October 6, 2025 by Chef Miles
To make a great potato leek soup, you need fresh and tasty ingredients. Here’s what you will need: - 4 large russet potatoes, peeled and chopped - 3 leeks, cleaned and sliced (use only the white and light green parts) - 1 medium onion, diced - 4 cloves garlic, finely minced These fresh items provide the base flavors that make this soup hearty. You also need some pantry staples to enhance your soup's taste. Gather these items: - 4 cups vegetable broth - 1 cup heavy cream or coconut milk (for a dairy-free option) - 2 tablespoons extra virgin olive oil - 1 teaspoon dried thyme - Sea salt and freshly cracked black pepper These staples help to create a rich and creamy texture. Garnishes add a nice finishing touch. Here’s what I suggest: - Fresh chives, finely chopped Chives give a pop of color and brightness to your soup. Add them just before serving for the best effect! Start by peeling and chopping the potatoes into bite-sized pieces. I like to use russet potatoes for their creamy texture. Next, clean the leeks and slice only the white and light green parts. They add a sweet flavor. Dice the onion and finely mince the garlic. Set everything aside for now. In your slow cooker, pour in the extra virgin olive oil. Set it to medium-high heat. Add the diced onions and sliced leeks. Sauté them for about 5-7 minutes until soft and fragrant. If you’re in a hurry, skip this step. Just add the onions and leeks with the other ingredients straight away. Now, add the chopped potatoes, minced garlic, dried thyme, and vegetable broth. Season with sea salt and cracked black pepper. This step brings out all the great flavors. Cover the slow cooker with its lid. Let it cook on low for 6-8 hours or on high for 3-4 hours. The potatoes should be soft and easily pierced with a fork. After cooking, use an immersion blender to puree the soup. Blend until it reaches your desired smoothness. If you like some texture, blend just half of it. Next, stir in the heavy cream or coconut milk. Make sure it is well mixed in. Taste the soup and adjust the seasoning with salt and pepper if needed. Allow the soup to cool slightly before serving. This helps enhance the flavors. Serve it hot in bowls, garnished with chopped chives. They add color and freshness to your dish. Sautéing the leeks and onions adds depth. The heat wakes the flavors up. You can skip this step if time is tight. Just toss everything in the slow cooker. If you sauté first, cook for 5-7 minutes. This makes your soup richer and more fragrant. Add sea salt and freshly cracked black pepper. These simple seasonings make a big difference. Try adding fresh herbs like thyme or chives. Fresh herbs boost the soup’s taste. You can also stir in a dash of lemon juice before serving. This adds brightness to the dish. For a creamy texture, blend the soup until smooth. If you like some chunks, blend only half. This gives a nice contrast in texture. You can also add a few crispy croutons on top. They add crunch and make the dish more fun to eat. {{image_4}} You can make this soup dairy-free by using coconut milk. It adds a creamy texture and a hint of sweetness. Replace the heavy cream with one cup of coconut milk. This option is great for those who are lactose intolerant or prefer plant-based meals. The flavor remains rich, and you still get that comforting mouthfeel. If you want to make the soup heartier, add protein. You can stir in cooked bacon, sausage, or chicken. For a vegetarian option, mix in white beans or lentils. These choices bring in extra nutrients and make the dish more filling. Just add the protein during the last 30 minutes of cooking to heat it through. Get creative with spices and herbs to change up the flavor. You can add a pinch of cayenne pepper for heat or smoked paprika for a smoky touch. Fresh herbs like dill, parsley, or rosemary can replace dried thyme. Just remember to adjust the amounts, as fresh herbs are more potent. These swaps give your soup a unique twist with every batch you make! After enjoying your delicious potato leek soup, it's key to store leftovers right. Let the soup cool down first. Then, transfer it into an airtight container. This helps keep the flavors fresh. You can store it in the fridge for up to five days. Be sure to label the container with the date. This way, you know when it was made. When you want to enjoy the soup again, reheating is easy. Pour the soup into a pot over medium heat. Stir it often to heat it evenly. If the soup seems thick, add a splash of vegetable broth or water. You can also use the microwave. Place the soup in a microwave-safe bowl. Heat it in short bursts, about one minute at a time. Stir in between each burst until it's hot enough. Freezing potato leek soup is a great way to save some for later. Use freezer-safe containers or bags. Leave some space at the top of the container. Soup can expand when frozen. It stays good for up to three months. When you're ready to eat it, move it to the fridge overnight to thaw. You can also reheat it straight from the freezer, just add a few extra minutes to the cooking time. It takes about 6-8 hours on low heat or 3-4 hours on high. This gives the potatoes time to soften. When they are fork-tender, the soup is ready. The slow cook method makes the flavors rich and deep. Yes, you can make this soup ahead of time. It keeps well in the fridge for a few days. Just let it cool before storing it in an airtight container. Reheat it on the stove or in a microwave when you're ready to serve. This soup pairs well with crusty bread or a fresh salad. You can also enjoy it with a side of roasted veggies. For a gourmet twist, add a swirl of cream or coconut milk on top. Garnishing with fresh chives adds color and flavor. We explored how to make a rich, tasty Potato Leek Soup. Fresh ingredients bring the best flavor. We learned step-by-step instructions, from prepping to blending. Tips helped enhance flavors and textures. We saw fun variations like a dairy-free option and adding protein. Proper storage keeps leftovers fresh for future meals. With this guide, you can create a comforting soup any time. Enjoy sharing it with friends and family!

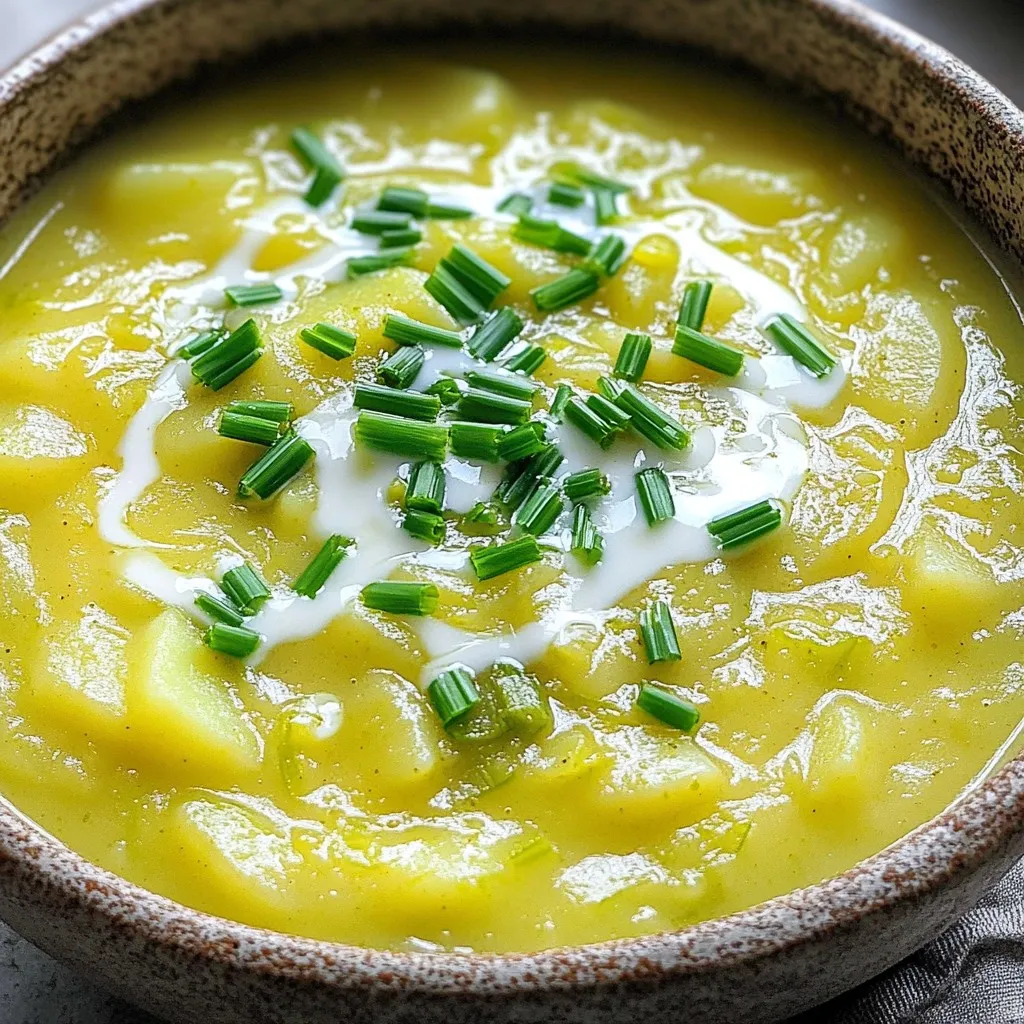
Are you ready to warm up with a bowl of comfort? Slow Cooker Potato Leek Soup is hearty, creamy, and packed with flavor. Not only is it easy to make, …

Read more

Categories Dinner
Older posts
Newer posts
← Previous Page1 … Page9 Page10 Page11 … Page110 Next →

MELTED RECIPES

where delicious ideas melt into life, from stovetop to backyard. Always warm, simple, and irresistibly satisfying. 🍳🔥🧀

PAGES

Home About Contact Privacy Policy Terms & Conditions Cookie Policy GDPR Policy Copyright Policy Disclaimer

CATEGORIES

Appetizers Desserts Salads Breakfast Dinner

Contact

  • Pinterest
  • Mail
Copyright © 2025 Melted Recipes. All rights reserved.