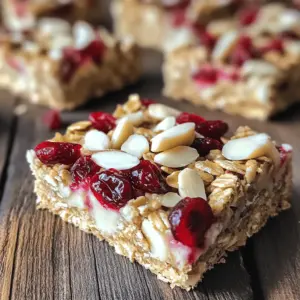
Looking for a sweet treat that’s both easy and delicious? These No-Bake White Chocolate Cranberry Oat Bars are the answer! Packed with wholesome oats, creamy almond butter, and a touch of sweetness, these bars make for a perfect snack or dessert. I’ll guide you through each step, from mixing to chilling, and share tips for even better bars. Get ready to enjoy a delightful, no-bake dessert that you can whip up in no time!
Ingredients
Main Ingredients
– 2 cups rolled oats
– 1 cup almond butter (or nut/seed butter)
– 1/2 cup honey or maple syrup
These main ingredients form a solid base for your oat bars. Rolled oats bring a hearty texture. Almond butter adds creaminess and healthy fats. Honey or maple syrup sweetens the mix naturally.
Mix-Ins
– 1 cup dried cranberries
– 1 cup white chocolate chips
– 1/2 cup sliced almonds (or nuts of your choice)
Mix-ins provide flavor and crunch. Dried cranberries add a sweet-tart kick. White chocolate chips melt softly, making each bite delightful. Sliced almonds introduce a nice crunch, but any nuts will work too.
Flavor Enhancements
– 1 teaspoon vanilla extract
– A pinch of salt
Flavor enhancements elevate the taste. Vanilla extract brings warmth and depth. A pinch of salt balances the sweetness, making the bars even tastier. These simple additions make a big difference!
Step-by-Step Instructions
Preparation Steps
Combining the base ingredients
Start by grabbing a large mixing bowl. Add 2 cups of rolled oats, 1 cup of almond butter, and 1/2 cup of honey or maple syrup. Use a spatula or wooden spoon to mix these ingredients well. You want them to blend into a smooth, sticky mixture.
Folding in the mix-ins
Now it’s time to add some fun! Fold in 1 cup of dried cranberries, 1 cup of white chocolate chips, 1/2 cup of sliced almonds, 1 teaspoon of vanilla extract, and a pinch of salt. Mix gently until everything is evenly spread throughout the oat base. Every bite should have a little bit of each flavor.
Preparing the baking dish
Next, get a 9×9 inch square baking dish. Line it with parchment paper. Let some paper hang over the edges. This extra paper will make it easy to lift out the bars later.
Pressing and Setting
Transferring mixture to the dish
Carefully take your oat mixture and pour it into the prepared dish. Use the back of a spatula or your hands to spread it out evenly.
Firmly packing and smoothing out
Press the mixture down firmly. This step is important. Make sure it is packed tightly and smooth on top. A good press helps your bars hold together better.
Chilling and Cutting
Refrigeration time
Now, cover the dish and place it in the refrigerator. Chill for at least 2 hours. This helps the bars set and become firm.
Removing and slicing the bars
After the chill time, lift the bars out using the overhanging parchment paper. Place them on a cutting board. Use a sharp knife to cut them into squares or rectangles. Enjoy your delicious creation!
Tips & Tricks
Recipe Enhancement Tips
– Adjusting sweetness: You can choose honey or maple syrup for your bars. Honey gives a rich flavor, while maple syrup adds a nice twist. Try both to see which you like best.
– Choosing the right nut butter: Almond butter works great, but feel free to use peanut butter or sunflower seed butter. Each will change the taste a bit, so experiment.
– Best practices for pressing the mixture: Always press the mixture firmly into the dish. This helps the bars hold their shape when cut. Use a spatula or your hands to make it smooth.
Serving Suggestions
– Presentation ideas for special occasions: Place the bars on a nice platter. Add a sprinkle of dried cranberries on top, or drizzle with melted white chocolate. It makes them look fancy!
– Pairing with beverages: These bars go well with tea or coffee. Try serving them with a glass of almond milk for a tasty treat.
Common Mistakes to Avoid
– Not packing the mixture tightly: If you don’t pack the mixture well, the bars will crumble when you cut them. Press down firmly!
– Skipping the refrigeration step: Chilling the bars is key. Without it, they won’t hold together. Be patient and let them chill for at least two hours.

Variations
Nut-Free Versions
You might want nut-free options for your No-Bake White Chocolate Cranberry Oat Bars. Seed butters work great here. Try sunflower seed butter or pumpkin seed butter. They give a nice flavor without nuts.
For additives, you can swap sliced almonds with seeds. Chia seeds or pumpkin seeds add crunch. They also boost nutrition. You can even leave out the nuts or seeds. The bars will still taste yummy!
Flavor Variations
You can change the flavors of your bars easily. Using different dried fruits adds variety. Try raisins, apricots, or even dried cherries. Each fruit brings its own taste and texture.
Adding spices or citrus zest can make a big difference too. A dash of cinnamon or nutmeg adds warmth. Zest from oranges or lemons brings brightness. These small changes can make your bars special!
Chocolate Lovers Twist
If you love chocolate, consider a twist. Dark chocolate is a great option. Instead of white chocolate chips, use dark ones. They add richness and a deeper flavor.
You can also add cocoa powder to your mix. Just a few tablespoons makes the bars chocolatey. This twist is perfect for those who love chocolate!
Storage Info
Storage Tips
To keep your No-Bake White Chocolate Cranberry Oat Bars fresh, follow these tips:
– Store bars in an airtight container.
– Use parchment paper to separate layers.
– Keep the container in a cool, dark place.
I recommend using glass containers or sturdy plastic ones. They help maintain the bars’ shape and flavor.
Refrigerator Storage Duration
When stored in the refrigerator, these bars last about one week. You’ll know they have gone bad if you see mold or if they smell off. Always check before you enjoy!
Freezing Instructions
Freezing your oat bars is easy. Here’s how:
1. Wrap each bar tightly in plastic wrap.
2. Place the wrapped bars in a freezer bag or container.
3. Label with the date for reference.
To thaw, take a bar out and leave it in the fridge overnight. This keeps the texture just right. Enjoy your treats later!
FAQs
Can I use gluten-free oats?
Yes, you can use gluten-free oats. Just make sure they are labeled gluten-free. This swap keeps your bars safe for those with gluten allergies. The texture and flavor will remain the same. Enjoy your delicious treat without worry!
What can I substitute for almond butter?
You can use any nut or seed butter. Peanut butter, cashew butter, or sunflower seed butter work well. Each option gives a different flavor, so choose what you like best. The bars will still taste great, no matter the butter you pick!
How long do the bars need to chill?
The bars need to chill for at least 2 hours. This time helps them firm up and hold their shape. If you want them extra firm, you can chill them longer. Just be patient; the wait is worth it for that perfect bite!
Can I add other mix-ins?
Absolutely! Feel free to add nuts, seeds, or other dried fruits. Just remember to keep the total amount the same. This keeps the balance of flavors and texture right. Get creative and enjoy the fun of personalizing your bars!
How do I know when the bars are ready to cut?
The bars are ready when they are firm to the touch. If they feel soft, give them more time in the fridge. Once they hold their shape, they are perfect for slicing. Then you can enjoy your tasty creation!
How should I store leftover bars?
Store any leftover bars in an airtight container. Keep them in the refrigerator to stay fresh. They will last up to a week this way. Enjoy them as a quick snack or a sweet treat anytime!
These delicious bars use rolled oats, nut butter, and sweeteners as the base. Mix-ins like cranberries and white chocolate add flavor and texture. Remember to pack them tightly before chilling in the fridge.
You can customize these bars by using different nuts or sweeteners. Don’t skip the refrigeration step; it ensures the bars stay firm. With a few tips, you can avoid common mistakes and enjoy tasty, healthy snacks anytime. Happy making!