No-Bake Oreo Peanut Butter Bars Easy Dessert Recipe

WANT TO SAVE THIS RECIPE?

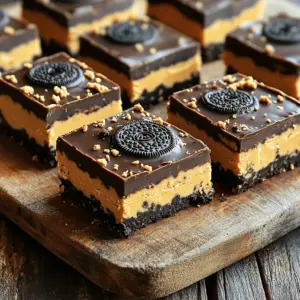
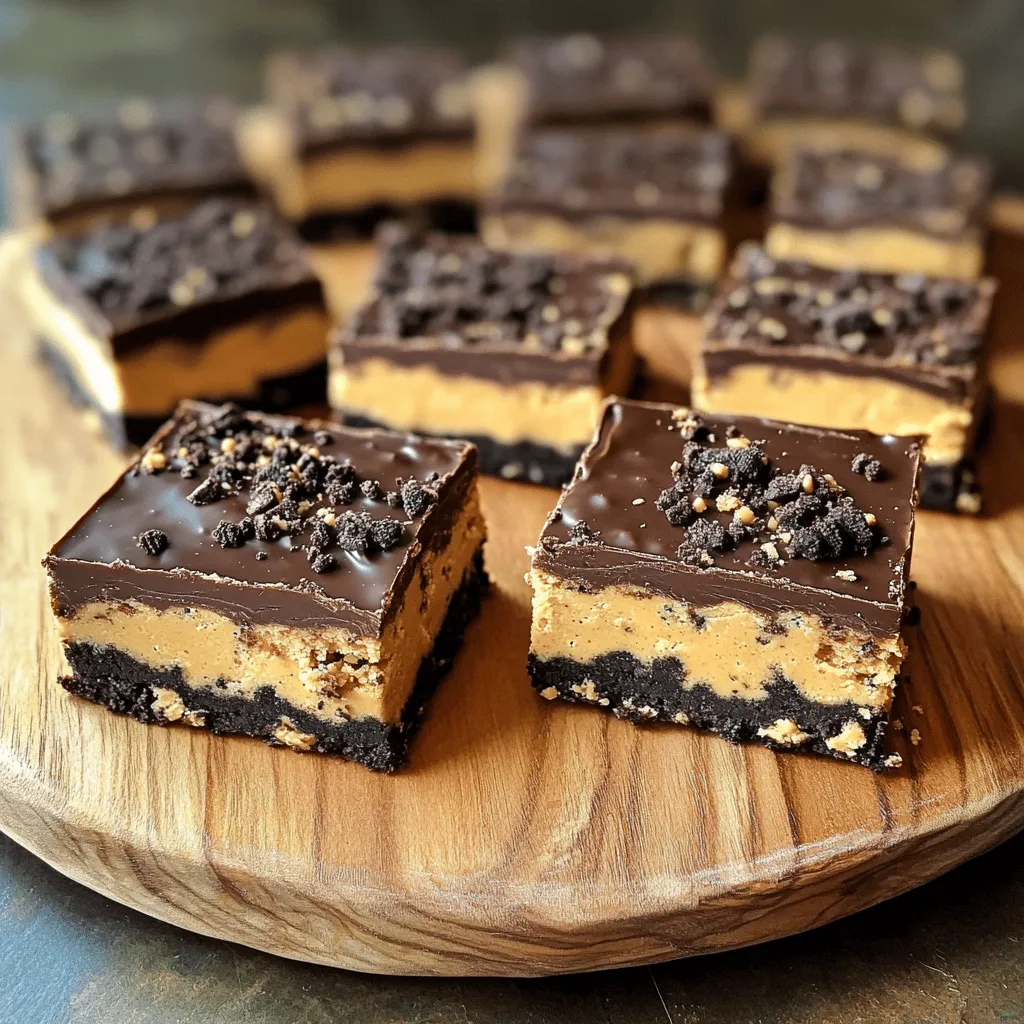
Looking for a sweet treat that’s easy and delicious? I’ve got you covered with No-Bake Oreo Peanut Butter Bars! This simple dessert combines creamy peanut butter and crunchy Oreos for a treat you won’t be able to resist. With just a few ingredients and no baking required, you’ll have a tasty snack in no time. Let’s dive into this easy recipe and satisfy your sweet tooth!

Ingredients

Main Ingredients for No-Bake Oreo Peanut Butter Bars

– 24 Oreo cookies, finely crushed

– 1 cup creamy peanut butter

– 1/2 cup unsalted butter, melted

– 1 cup powdered sugar

– 1 teaspoon vanilla extract

– 1 cup semi-sweet chocolate chips

– 2 tablespoons coconut oil (optional for a smoother chocolate layer)

These simple ingredients create a treat that everyone loves. The process starts with crushed Oreo cookies, which add a nice crunch and sweet flavor. I always use creamy peanut butter for a smooth texture. Unsalted butter helps bind everything together. The powdered sugar sweetens the mix, while vanilla extract adds depth.

For the chocolate layer, semi-sweet chocolate chips are perfect. If you want the chocolate to be smoother, you can add coconut oil. It makes the chocolate shine and pour easily. Each ingredient plays a key role in making these bars delicious and easy to enjoy.

Step-by-Step Instructions

Preparation of the Cookie Base

Mixing Crushed Oreos and Butter: First, take 24 Oreo cookies and crush them finely. Place the crushed cookies in a large bowl. Melt 1/2 cup of unsalted butter. Pour the melted butter over the crushed Oreos. Mix them until it looks like wet sand. This mix will be the base for our bars.

Incorporating Peanut Butter & Sugar: Now, add 1 cup of creamy peanut butter to the cookie mix. Next, pour in 1 cup of powdered sugar. Add 1 teaspoon of vanilla extract for flavor. Stir well until you have a smooth mixture. Make sure there are no lumps left.

Assembling the Bars

Preparing the Baking Dish: Grab an 8×8-inch baking dish. Line it with parchment paper. Leave some paper hanging over the sides to lift the bars out later. This makes it easy to cut and serve.

Pressing the Mixture into the Dish: Transfer the Oreo peanut butter mix into the dish. Use a spatula or the back of a measuring cup to press it down firmly. Spread it evenly across the bottom. Make sure to pack it tightly so it holds its shape.

Chocolate Topping Preparation

Melting Chocolate and Coconut Oil: In a microwave-safe bowl, add 1 cup of semi-sweet chocolate chips. If you want, include 2 tablespoons of coconut oil for a smoother topping. Heat the bowl in the microwave for 30 seconds. Stir well and heat again until the chocolate is fully melted.

Spreading Chocolate Over the Bars: Carefully pour the melted chocolate over the peanut butter layer. Use a spatula to spread it evenly across the top. Ensure every part is covered with chocolate.

Now, place the dish in the fridge for at least 2 hours. This step is key to getting your bars nice and firm. Enjoy the process!

Tips & Tricks

Ideal Mixing Techniques

To ensure smoothness without lumps, mix the crushed Oreos and melted butter first. Stir until it looks like wet sand. When you add peanut butter, powdered sugar, and vanilla, mix well. Use a sturdy spoon or spatula to break up any lumps. Keep mixing until the mixture is creamy and smooth.

For the proper packing method for the base, use a spatula or the back of a measuring cup. Press the mixture firmly into the dish. Make sure it is packed tightly. This helps the bars hold their shape when you cut them.

Chilling for Perfect Consistency

Timing for refrigeration is key. Chill the bars for at least two hours. This time helps the bars set up well. If you want firmer bars, chill them longer.

Signs the bars are ready to cut include a firm touch. They should feel solid but not rock hard. If they still feel soft, give them more time in the fridge.

Presentation Tips

For serving options, arrange the bars on a nice platter. You can cut them into squares or rectangles. This makes them easy to grab.

Garnishes and drizzles can enhance the look of your bars. Sprinkle some crushed Oreos on top for a fun texture. A drizzle of extra melted chocolate or peanut butter adds flair. This makes your dessert not just tasty but also beautiful!

Variations

Nut-Free Version

You can make these bars nut-free by swapping peanut butter for sunflower seed butter. This change keeps the creamy texture while removing allergens. Sunflower seed butter has a lovely, mild flavor that pairs well with Oreos. It works perfectly in this recipe, so feel free to try it!

Flavor Experimentations

To add a twist, think about mixing in different extracts or flavors. Almond or mint extracts can give a fun taste boost. You can also mix in chopped nuts or candies for extra crunch and flavor. Try adding mini chocolate chips or crushed candies to make it even more exciting!

Different Chocolate Options

You have choices for the chocolate topping too. Dark chocolate offers a rich taste, while milk chocolate is sweeter. Both pair well with the creamy peanut butter. If you want something unique, consider a white chocolate layer. It adds a nice contrast and sweetness.

Storage Info

Best Storage Practices

Storing in the Refrigerator

After making your No-Bake Oreo Peanut Butter Bars, let them chill in the fridge. Wrap the bars tightly with plastic wrap or foil. This keeps them fresh and stops them from drying out. The cold helps them stay firm and tasty.

Freezing the Bars for Longer Shelf Life

For longer storage, you can freeze these bars. Cut them into squares first. Then, place them in an airtight container or freezer bag. Make sure to separate layers with parchment paper. They can last up to three months in the freezer.

Shelf Life Guidance

How Long Do They Last?

In the fridge, these bars stay fresh for about one week. If you freeze them, they can last for three months. Just remember to check your bars before eating.

Signs of Spoilage to Look For

Look for any change in color or smell. If the bars feel sticky or have a weird taste, it’s best to throw them away. Always trust your senses when deciding if food is safe to eat.

FAQs

Can I use gluten-free Oreos for this recipe?

Yes, you can use gluten-free Oreos. They work just like regular Oreos. The taste and texture remain delicious. This makes the bars a great option for those with gluten allergies.

Is it possible to make these bars without peanut butter?

Absolutely! You can swap peanut butter with sun butter or almond butter. These options give a nice flavor while keeping the bars creamy. Just ensure your choice has a similar texture to peanut butter.

How do I soften the bars if they are too hard after chilling?

If your bars are too hard, let them sit at room temperature. This makes them easier to cut. You can also warm them slightly in the microwave for a few seconds. Be careful not to melt them.

What can I use as a substitute for powdered sugar?

You can use granulated sugar blended until fine. This creates a similar texture. You can also try coconut sugar for a different flavor. Just make sure it dissolves well in the mixture.

Can I double the recipe for a larger batch?

Yes, you can easily double the recipe. Just use a larger baking dish to hold more mixture. Keep the same ratios for all ingredients. This way, everyone gets more of these tasty bars!

These no-bake Oreo peanut butter bars are easy and fun to make. You mix Oreos, peanut butter, and a few other simple ingredients. Then, you chill them for the perfect treat. Remember, you can experiment with flavors and toppings. Store them well for lasting taste. Enjoy these bars at gatherings or just for yourself. With this guide, you can whip up a tasty dessert in no time!

- 24 Oreo cookies, finely crushed - 1 cup creamy peanut butter - 1/2 cup unsalted butter, melted - 1 cup powdered sugar - 1 teaspoon vanilla extract - 1 cup semi-sweet chocolate chips - 2 tablespoons coconut oil (optional for a smoother chocolate layer) These simple ingredients create a treat that everyone loves. The process starts with crushed Oreo cookies, which add a nice crunch and sweet flavor. I always use creamy peanut butter for a smooth texture. Unsalted butter helps bind everything together. The powdered sugar sweetens the mix, while vanilla extract adds depth. For the chocolate layer, semi-sweet chocolate chips are perfect. If you want the chocolate to be smoother, you can add coconut oil. It makes the chocolate shine and pour easily. Each ingredient plays a key role in making these bars delicious and easy to enjoy. - Mixing Crushed Oreos and Butter: First, take 24 Oreo cookies and crush them finely. Place the crushed cookies in a large bowl. Melt 1/2 cup of unsalted butter. Pour the melted butter over the crushed Oreos. Mix them until it looks like wet sand. This mix will be the base for our bars. - Incorporating Peanut Butter & Sugar: Now, add 1 cup of creamy peanut butter to the cookie mix. Next, pour in 1 cup of powdered sugar. Add 1 teaspoon of vanilla extract for flavor. Stir well until you have a smooth mixture. Make sure there are no lumps left. - Preparing the Baking Dish: Grab an 8x8-inch baking dish. Line it with parchment paper. Leave some paper hanging over the sides to lift the bars out later. This makes it easy to cut and serve. - Pressing the Mixture into the Dish: Transfer the Oreo peanut butter mix into the dish. Use a spatula or the back of a measuring cup to press it down firmly. Spread it evenly across the bottom. Make sure to pack it tightly so it holds its shape. - Melting Chocolate and Coconut Oil: In a microwave-safe bowl, add 1 cup of semi-sweet chocolate chips. If you want, include 2 tablespoons of coconut oil for a smoother topping. Heat the bowl in the microwave for 30 seconds. Stir well and heat again until the chocolate is fully melted. - Spreading Chocolate Over the Bars: Carefully pour the melted chocolate over the peanut butter layer. Use a spatula to spread it evenly across the top. Ensure every part is covered with chocolate. Now, place the dish in the fridge for at least 2 hours. This step is key to getting your bars nice and firm. Enjoy the process! To ensure smoothness without lumps, mix the crushed Oreos and melted butter first. Stir until it looks like wet sand. When you add peanut butter, powdered sugar, and vanilla, mix well. Use a sturdy spoon or spatula to break up any lumps. Keep mixing until the mixture is creamy and smooth. For the proper packing method for the base, use a spatula or the back of a measuring cup. Press the mixture firmly into the dish. Make sure it is packed tightly. This helps the bars hold their shape when you cut them. Timing for refrigeration is key. Chill the bars for at least two hours. This time helps the bars set up well. If you want firmer bars, chill them longer. Signs the bars are ready to cut include a firm touch. They should feel solid but not rock hard. If they still feel soft, give them more time in the fridge. For serving options, arrange the bars on a nice platter. You can cut them into squares or rectangles. This makes them easy to grab. Garnishes and drizzles can enhance the look of your bars. Sprinkle some crushed Oreos on top for a fun texture. A drizzle of extra melted chocolate or peanut butter adds flair. This makes your dessert not just tasty but also beautiful! {{image_4}} You can make these bars nut-free by swapping peanut butter for sunflower seed butter. This change keeps the creamy texture while removing allergens. Sunflower seed butter has a lovely, mild flavor that pairs well with Oreos. It works perfectly in this recipe, so feel free to try it! To add a twist, think about mixing in different extracts or flavors. Almond or mint extracts can give a fun taste boost. You can also mix in chopped nuts or candies for extra crunch and flavor. Try adding mini chocolate chips or crushed candies to make it even more exciting! You have choices for the chocolate topping too. Dark chocolate offers a rich taste, while milk chocolate is sweeter. Both pair well with the creamy peanut butter. If you want something unique, consider a white chocolate layer. It adds a nice contrast and sweetness. - Storing in the Refrigerator After making your No-Bake Oreo Peanut Butter Bars, let them chill in the fridge. Wrap the bars tightly with plastic wrap or foil. This keeps them fresh and stops them from drying out. The cold helps them stay firm and tasty. - Freezing the Bars for Longer Shelf Life For longer storage, you can freeze these bars. Cut them into squares first. Then, place them in an airtight container or freezer bag. Make sure to separate layers with parchment paper. They can last up to three months in the freezer. - How Long Do They Last? In the fridge, these bars stay fresh for about one week. If you freeze them, they can last for three months. Just remember to check your bars before eating. - Signs of Spoilage to Look For Look for any change in color or smell. If the bars feel sticky or have a weird taste, it's best to throw them away. Always trust your senses when deciding if food is safe to eat. Yes, you can use gluten-free Oreos. They work just like regular Oreos. The taste and texture remain delicious. This makes the bars a great option for those with gluten allergies. Absolutely! You can swap peanut butter with sun butter or almond butter. These options give a nice flavor while keeping the bars creamy. Just ensure your choice has a similar texture to peanut butter. If your bars are too hard, let them sit at room temperature. This makes them easier to cut. You can also warm them slightly in the microwave for a few seconds. Be careful not to melt them. You can use granulated sugar blended until fine. This creates a similar texture. You can also try coconut sugar for a different flavor. Just make sure it dissolves well in the mixture. Yes, you can easily double the recipe. Just use a larger baking dish to hold more mixture. Keep the same ratios for all ingredients. This way, everyone gets more of these tasty bars! These no-bake Oreo peanut butter bars are easy and fun to make. You mix Oreos, peanut butter, and a few other simple ingredients. Then, you chill them for the perfect treat. Remember, you can experiment with flavors and toppings. Store them well for lasting taste. Enjoy these bars at gatherings or just for yourself. With this guide, you can whip up a tasty dessert in no time!

No-Bake Oreo Peanut Butter Bars

Indulge in a sweet treat with these No-Bake Oreo Peanut Butter Bars! Perfect for satisfying your cravings, this simple recipe combines crushed Oreo cookies, creamy peanut butter, and rich chocolate layers. With just a few easy steps, you can create a delicious dessert that will impress your family and friends. Ready to whip up these mouthwatering bars? Click through to explore the full recipe and sweeten your day!

Ingredients
  

24 Oreo cookies, finely crushed

1 cup creamy peanut butter

1/2 cup unsalted butter, melted

1 cup powdered sugar

1 teaspoon vanilla extract

1 cup semi-sweet chocolate chips

2 tablespoons coconut oil (optional for a smoother chocolate layer)

Instructions
 

Begin by placing the finely crushed Oreo cookies into a large mixing bowl. Pour the melted unsalted butter over the cookies and mix well until the combination resembles wet sand and is thoroughly incorporated.

    To the cookie mixture, add the creamy peanut butter, powdered sugar, and vanilla extract. Stir vigorously until the mixture is smooth and uniformly blended, with no lumps remaining.

      Prepare an 8x8-inch baking dish by lining it with parchment paper, ensuring there’s enough paper overhanging the sides for easy lift-out later.

        Transfer the Oreo peanut butter mixture into the prepared dish. Using a spatula or the back of a measuring cup, firmly press the mixture down into an even layer at the bottom of the dish. Make sure to pack it tightly to form a solid base.

          In a microwave-safe bowl, combine the semi-sweet chocolate chips with coconut oil, if using. Heat in the microwave in 30-second intervals, stirring after each interval, until the chocolate is completely melted and smooth.

            Carefully pour the melted chocolate over the peanut butter layer in the baking dish. Use a spatula to spread the chocolate evenly across the top, ensuring complete coverage.

              Place the baking dish in the refrigerator and chill for at least 2 hours, or until the bars are firm to the touch.

                Once the bars have set, carefully lift them out of the dish using the parchment paper overhang. Cut into squares using a sharp knife for clean edges.

                  Prep Time: 20 minutes | Total Time: 2 hours 20 minutes | Servings: 12

                    - Presentation Tips: For an enticing presentation, arrange the bars artfully on a serving platter. Sprinkle some crushed Oreo crumbs on top for a delightful texture and visual contrast. For a decadent touch, consider drizzling a bit of extra melted chocolate or creamy peanut butter over the surface just before serving. Enjoy your sweet creation!

                      WANT TO SAVE THIS RECIPE?