Looking for a dish that’s both hearty and easy to make? This Rich Hot Dog Chili recipe hits the spot! With simple ingredients like beef hot dogs, ground turkey, and savory spices, you’ll enjoy a delightful blend of flavors. Perfect for game day or family meals, it’s comforting and filling. Join me as I guide you step-by-step through making this delicious chili that everyone will love!
Ingredients
Main Ingredients List
To make this rich hot dog chili, gather these main ingredients:
– 4 beef hot dogs, chopped into bite-sized pieces
– 1 pound ground turkey or ground beef
– 1 can (15 oz) kidney beans, rinsed and drained
– 1 can (15 oz) black beans, rinsed and drained
– 1 can (14.5 oz) diced tomatoes in juice
– 1 medium onion, finely diced
– 2 cloves garlic, minced
– 1 tablespoon chili powder
– 1 teaspoon ground cumin
– 1 teaspoon smoked paprika
– 1 teaspoon dried oregano
– Salt and freshly ground black pepper, to taste
– 2 tablespoons olive oil
– 1 cup beef or vegetable broth
Each ingredient plays a role. The hot dogs add a meaty flavor, while the beans give the chili a hearty texture. The spices and tomatoes bring warmth and depth.
Optional Garnishes
You can elevate your chili with these garnishes:
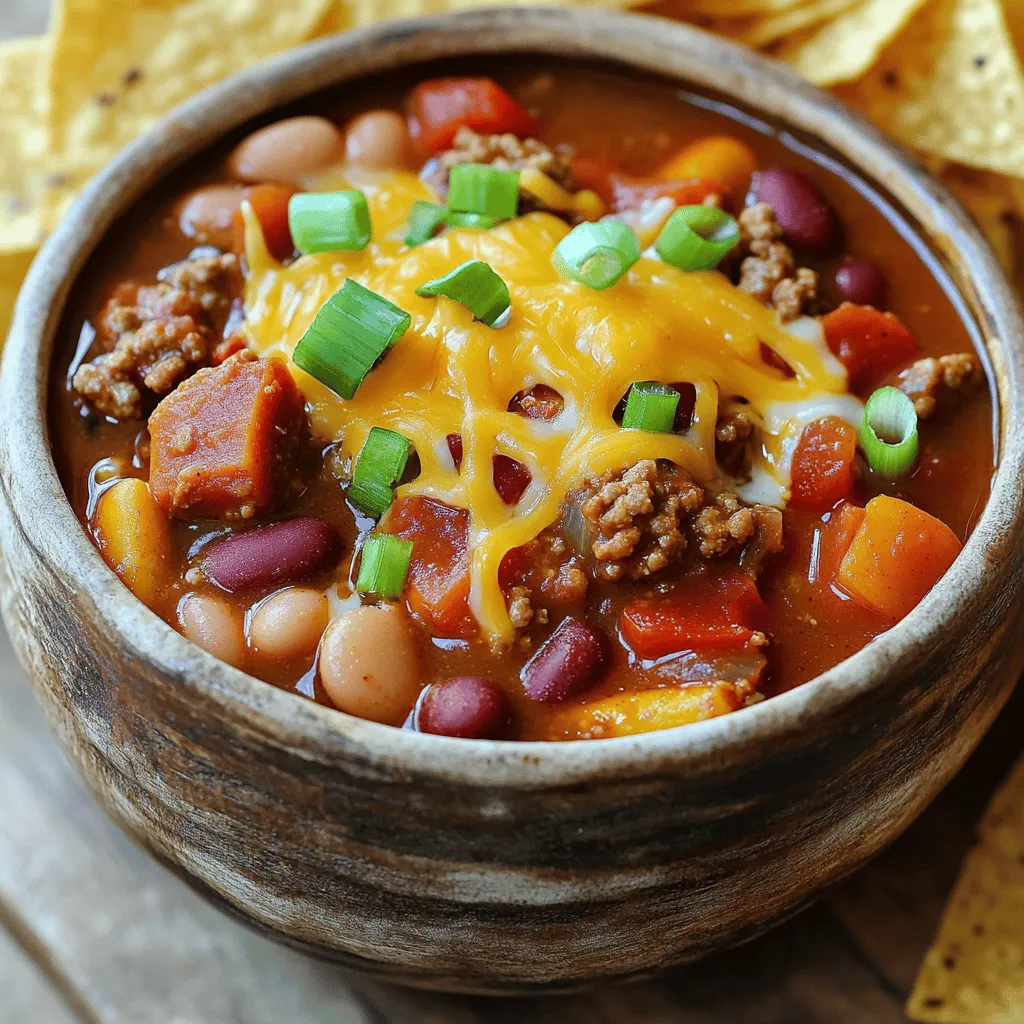
– Shredded cheese
– Sliced green onions
These toppings not only add flavor but also make your dish look inviting. Cheese melts beautifully on warm chili, while green onions give a fresh crunch.
Ingredient Substitutions
If you have dietary preferences, consider these substitutions:
– Ground chicken instead of turkey or beef
– Vegan options like plant-based meat or lentils
These swaps help you cater to different tastes. You can enjoy a delicious chili while fitting your diet. Cooking should be fun and flexible!
Step-by-Step Instructions
Cooking the Base
Start by heating 2 tablespoons of olive oil in a large pot over medium heat. Once hot, add 1 medium onion, finely diced. Sauté the onion until it turns translucent, which takes about 5 minutes. This step builds a strong flavor base. Next, add 2 cloves of minced garlic and stir for about 1 minute. The garlic should smell great but not burn. After that, stir in 1 pound of ground turkey or ground beef. Cook the meat for 6-8 minutes, breaking it up with a spatula. Make sure it is fully browned before moving on.
Adding Hot Dogs and Spices
Now, chop 4 beef hot dogs into bite-sized pieces and add them to the pot. Mix well and let them cook for another 3-4 minutes until they start to brown. This step adds a nice flavor to the chili. Then, sprinkle in 1 tablespoon of chili powder, 1 teaspoon of ground cumin, 1 teaspoon of smoked paprika, and 1 teaspoon of dried oregano. Season with salt and freshly ground black pepper to taste. Stir the spices into the meat for about 2 minutes. This allows the spices to release their full flavor.
Simmering the Chili
Pour in 1 can of diced tomatoes (14.5 oz) along with its juice and 1 cup of beef or vegetable broth. Then, add 1 can each of kidney beans and black beans, both rinsed and drained. Mix all the ingredients well. Bring the chili to a gentle simmer, then reduce the heat to low. Let it cook uncovered for about 30 minutes. Stir occasionally until the chili thickens to your liking. Taste and adjust the seasoning with more salt and pepper if needed. Enjoy the rich, hearty flavors!
Tips & Tricks
Perfecting Flavor
To improve the flavor of your chili, start with the spices. I always taste first. If it needs more heat, add extra chili powder. For deeper flavor, try more smoked paprika. Fresh herbs can also brighten up the mix. Don’t forget to add salt! This helps to bring out all the other flavors. Remember, you can always add more, but you can’t take it out. So add gradually and taste as you go.
Achieving the Right Consistency
For thicker chili, let it simmer longer. This reduces liquid and concentrates flavor. If it gets too thick, add a splash of broth or water. Mix well to combine. You can also mash some beans against the pot to help thicken. If you prefer a thinner chili, simply add more broth. Adjust until you find the right balance that fits your taste.
Serving Suggestions
Serve your hot dog chili in warm bowls. Top with shredded cheese for a tasty finish. Sliced green onions add color and crunch. I love pairing it with crunchy tortilla chips. They add texture and make it fun to eat. You can also serve it with warm bread on the side. This helps soak up all the delicious chili goodness.
Variations
Vegetarian Version
To make a meatless chili, swap in plant-based proteins. You can use lentils or a mix of chopped mushrooms and walnuts. Here’s how:
1. Heat olive oil in a large pot over medium heat.
2. Add diced onion. Sauté until soft, about 5 minutes.
3. Stir in minced garlic and cook for 1 minute.
4. Add your choice of plant-based protein. Cook for 6-8 minutes until heated through.
5. Follow the same steps as the original recipe, using vegetable broth and omitting the meat.
6. Add the beans, tomatoes, and spices. Simmer for 30 minutes.
This version packs in flavor while keeping it veggie-friendly.
Spicy Chili Option
To add some heat, use spices or fresh peppers. Here’s how to spice it up:
1. When adding the spices, include 1 teaspoon of cayenne pepper for heat.
2. You can also add diced jalapeños or serrano peppers when you sauté the onion.
3. Adjust the spice level based on your taste.
This adds a nice kick and makes your chili stand out!
Bean-Free Alternative
If you want a chili without beans, here’s an easy way:
1. Skip the kidney and black beans from the original recipe.
2. Increase the amount of meat or add more chopped hot dogs.
3. You can also add more vegetables, like bell peppers or corn.
This keeps it hearty and satisfying without the beans. Enjoy your rich hot dog chili!
Storage Info
Refrigeration Guidelines
To store leftover chili in the fridge, wait until it cools down. Use a clean, airtight container. This keeps the chili fresh and avoids spills. Store it in the fridge for up to four days. If you want to enjoy it later, label the container with the date. This way, you will know when you made it.
Freezing Instructions
Freezing chili is a great way to save it for later. First, let the chili cool to room temperature. Then, scoop it into freezer-safe containers. Leave some space at the top since the chili will expand when frozen. You can also use freezer bags. Squeeze out the air before sealing. Chili can last in the freezer for up to three months. Remember to write the date on the bag or container.
Reheating Tips
When you’re ready to eat, thaw the chili in the fridge overnight if frozen. For reheating, you can use a pot on the stove or a microwave. If using the stove, heat it on medium until it bubbles, stirring often. If using the microwave, heat it in short bursts, stirring in between. Make sure it is hot all the way through. Enjoy your flavorful chili right away!
FAQs
Can I use different types of meat?
Yes, you can use different meats for this chili. Ground turkey or ground beef works well. If you prefer, you can use ground pork for a richer flavor. Chicken is also a good choice if you want something lighter. Just remember to adjust cooking times if needed. Each meat brings its own taste, so feel free to experiment.
How long does hot dog chili last in the fridge?
Hot dog chili lasts about 3 to 4 days in the fridge. Be sure to store it in an airtight container. This keeps it fresh and safe to eat. Always check for changes in smell or color before serving. If you see anything off, it’s best to throw it away.
Can I make this chili in advance?
Yes, you can make this chili ahead of time. It actually tastes better the next day as flavors deepen. After cooking, let it cool down, then place it in the fridge. When you are ready to eat, just reheat it on the stove or in the microwave. Add a splash of broth if it thickens too much. Enjoy your easy meal!
In this article, we explored the rich world of hot dog chili. We covered main ingredients, including hot dogs and spices, and shared tips for cooking and garnishing. You learned about variations, like vegetarian options and ways to adjust spice levels. Proper storage methods ensure your chili stays fresh for future meals. Whether you’re serving a crowd or just yourself, this chili is sure to please. Enjoy creating your perfect bowl of chili and savor every bite!