![- Whole chicken (4-5 pounds) - Apple cider (2 cups) - Salt (¼ cup) - Brown sugar (¼ cup) - Garlic (3 cloves, minced) - Fresh herbs (rosemary, thyme) - Whole black peppercorns (1 tablespoon) - Lemon (1, sliced) - Onion (1, quartered) The heart of this dish lies in its simple yet flavorful ingredients. The whole chicken, between 4 to 5 pounds, is the star. The apple cider adds a sweet and tangy taste. Salt is crucial for brining, as it helps the chicken hold moisture. I love adding brown sugar to balance the saltiness. Garlic brings in a rich aroma, while fresh herbs like rosemary and thyme add depth. Whole black peppercorns bring a subtle spice. Slicing a lemon and quartering an onion helps infuse the chicken with fresh flavors while roasting. Each ingredient plays an important role in creating a juicy and flavorful dish. If you want to explore the full recipe, check out the details above. To start, I combine the apple cider, salt, brown sugar, minced garlic, chopped rosemary, chopped thyme, and whole black peppercorns in a large pot. This mix brings out a rich flavor. Next, I heat the mixture over medium heat. I stir it until the salt and sugar dissolve completely. Once they dissolve, I remove the pot from the heat and let the brine cool to room temperature. After the brine has cooled, I carefully submerge the whole chicken in the mixture. I use a large container or a resealable plastic bag. It is important that the chicken is fully covered by the brine. Then, I seal the bag tightly. I place it in the refrigerator to marinate for at least 4 hours. For the best flavor, I recommend letting it sit overnight. When I’m ready to cook, I preheat my oven to 425°F (220°C). After brining, I take the chicken out. I gently pat it dry with paper towels to remove excess moisture. I discard the brine responsibly. I then rub olive oil all over the chicken. This helps create crispy skin while it cooks. Next, I stuff the cavity of the chicken with lemon slices and onion quarters. Their flavors will infuse into the meat while it roasts. I place the chicken breast side up in a roasting pan. To help it cook evenly, I tie the legs together with kitchen twine. I roast the chicken for about 1 hour and 15 minutes. I check the internal temperature in the thickest part of the breast. It should reach 165°F (75°C). Halfway through, I baste the chicken with its own juices. Once it’s perfectly roasted, I remove the chicken from the oven. I let it rest on a cutting board for 15-20 minutes before carving. This resting time keeps the chicken moist and full of flavor. For serving, I enjoy it with roasted vegetables or fresh greens. I often garnish it with extra sprigs of rosemary or thyme. This dish is truly a feast! For the complete recipe, check the Full Recipe. For the best flavor, brine the chicken for at least four hours. If you have time, overnight works even better. This longer soak helps the chicken absorb all the delicious flavors. To ensure even brine coverage, use a large container or a resealable bag. Make sure the chicken is fully submerged. If needed, weigh it down with a plate. This simple step boosts the flavor throughout the meat. Basting the chicken is key to a juicy roast. Halfway through roasting, use a spoon to drizzle the chicken with its own juices. This keeps the skin crispy and the meat moist. After cooking, let the chicken rest for 15-20 minutes. Resting lets the juices redistribute. This step is crucial for a tender bite. Enhance the flavor by adding more herbs. Try using sage or parsley alongside the rosemary and thyme. These herbs add depth and aroma. To balance flavors, consider the cider's sweetness. You can add a bit of tart apple or a splash of vinegar to cut the sweetness. This balance ensures a well-rounded taste in every bite. For the full recipe, refer to the detailed instructions. {{image_4}} You can change the brine for new tastes. Try using different liquids like herbal tea or beer. Each option adds a unique flavor to the chicken. For fruits, think about adding sliced oranges or pears to the brine. These fruits give a sweet and tangy twist. You can also mix spices like cinnamon or cloves for a warm touch. This will add depth and interest to your cider brined roast chicken. Want to try a different way to cook your chicken? Use a slow cooker. This method keeps the chicken juicy and tender. Just add the brined chicken to the slow cooker with some broth and cook on low for 6-8 hours. Another option is grilling. It gives the chicken a nice smoky flavor. Just be sure to watch the heat. You want the chicken cooked through but not dry. Both methods can create a delicious meal. Pair your roast chicken with tasty sides. Roasted vegetables like carrots and Brussels sprouts work well. You can also serve it over a bed of creamy mashed potatoes. For a fresh touch, add a salad with mixed greens and a light vinaigrette. Sauces can enhance the meal too. A simple apple chutney or a tangy barbecue sauce adds great flavor. You can also try a garlic aioli for a creamy dip. These sides and sauces make the meal special. For the full recipe, refer back to the main sections above. For leftover cider brined roast chicken, store it in an airtight container. This keeps it fresh and prevents drying. Place the container in the fridge. Your leftovers will last about three to four days. If you plan to eat them later, consider freezing instead. To reheat without drying out, use your oven or a skillet. Preheat your oven to 350°F (175°C). Place the chicken in a baking dish and cover it with foil. This keeps moisture in. Heat for about 20 minutes, or until warm. If using a skillet, add a bit of broth or water. This adds moisture and flavor while reheating. You can freeze brined chicken for up to three months. Wrap it tightly in plastic wrap, then place it in a freezer bag. To thaw, move the chicken to the fridge for a day. This slow thawing keeps it juicy and tasty. Avoid thawing in the microwave as it may cook unevenly. For more details, check out the Full Recipe for cider brined roast chicken. Yes, you can brine the chicken overnight. Brining overnight gives the chicken more flavor and moisture. The salt and sugar work together to break down the meat. This process helps keep the chicken juicy. If you have time, brining for longer makes a big difference. For brining, use non-alcoholic apple cider. Look for fresh, pure cider without added sugars or flavors. A sweeter cider works well, as it balances the salt. You can choose local brands for better taste. These ciders enhance the chicken’s flavor. To check if the chicken is done, use a meat thermometer. Insert it into the thickest part of the breast. The temperature should reach 165°F (75°C). This ensures the chicken is safe to eat. If you do not have a thermometer, make sure the juices run clear when you cut into the chicken. This method helps confirm that it is fully cooked. For a detailed guide on how to prepare this delicious dish, refer to the [Full Recipe]. Brining and roasting chicken transforms your meal into something special. We covered key ingredients, step-by-step instructions, and valuable tips. You now know how to prepare the perfect brine, roast the chicken, and enhance flavors. By exploring variations and storage options, you ensure great meals even on busy days. Remember, the right brining methods can elevate your dish. Use this knowledge to create delicious, juicy chicken every time. Enjoy your cooking journey and share it with others!](https://meltedrecipes.com/wp-content/uploads/2025/07/439863b6-e0fd-48fb-b552-c9db425b5847.webp)
Looking for a delicious and easy way to spice up your dinner? Cider Brined Roast Chicken is your answer! This juicy and flavorful dish enhances a simple chicken with the sweet notes of apple cider and fresh herbs. You’ll discover how to brine, roast, and serve this perfect meal. From beginners to seasoned cooks, you’ll find tips and tricks to impress your family and friends. Let’s dive into this tasty recipe!
Ingredients
Main Ingredients
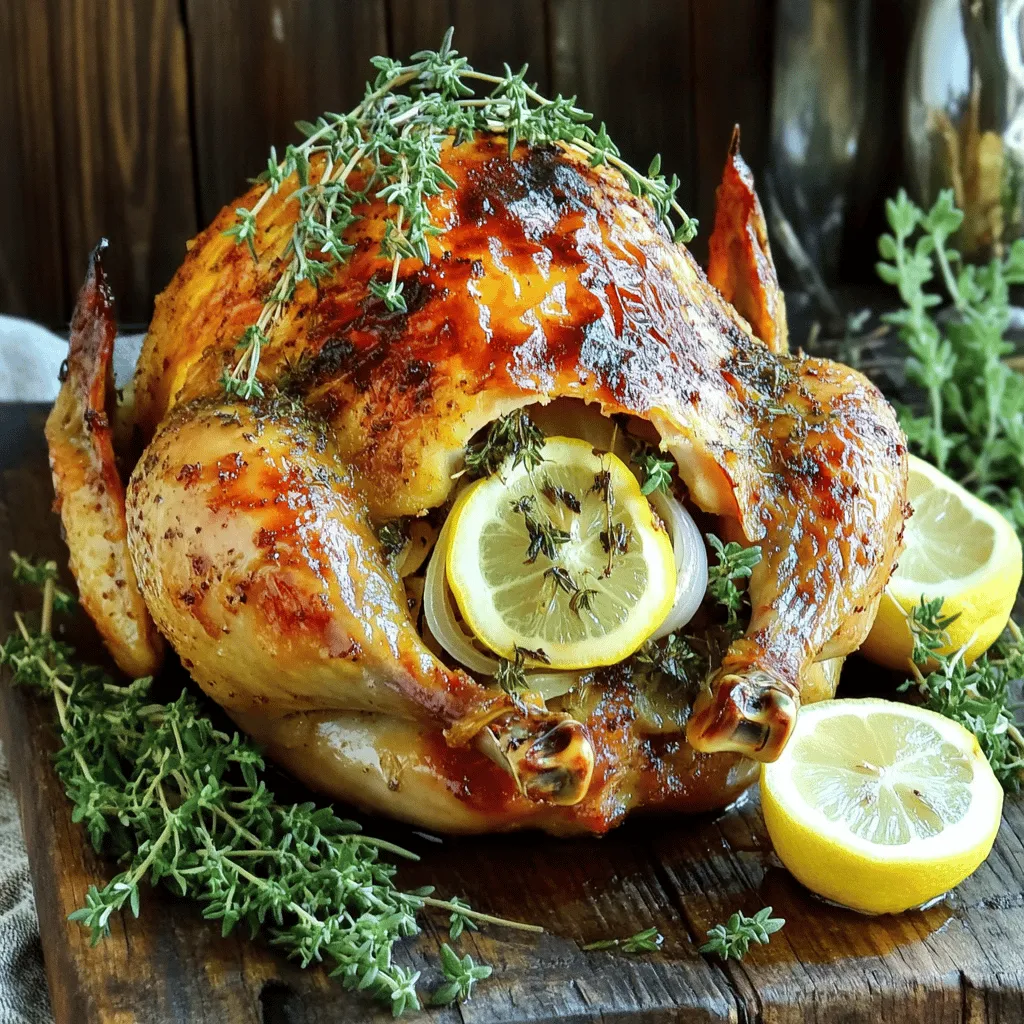
– Whole chicken (4-5 pounds)
– Apple cider (2 cups)
– Salt (¼ cup)
Seasoning Components
– Brown sugar (¼ cup)
– Garlic (3 cloves, minced)
– Fresh herbs (rosemary, thyme)
Additional Flavor Enhancers
– Whole black peppercorns (1 tablespoon)
– Lemon (1, sliced)
– Onion (1, quartered)
The heart of this dish lies in its simple yet flavorful ingredients. The whole chicken, between 4 to 5 pounds, is the star. The apple cider adds a sweet and tangy taste. Salt is crucial for brining, as it helps the chicken hold moisture.
I love adding brown sugar to balance the saltiness. Garlic brings in a rich aroma, while fresh herbs like rosemary and thyme add depth. Whole black peppercorns bring a subtle spice.
Slicing a lemon and quartering an onion helps infuse the chicken with fresh flavors while roasting. Each ingredient plays an important role in creating a juicy and flavorful dish. If you want to explore the full recipe, check out the details above.
Step-by-Step Instructions
Preparing the Brine
To start, I combine the apple cider, salt, brown sugar, minced garlic, chopped rosemary, chopped thyme, and whole black peppercorns in a large pot. This mix brings out a rich flavor.
Next, I heat the mixture over medium heat. I stir it until the salt and sugar dissolve completely. Once they dissolve, I remove the pot from the heat and let the brine cool to room temperature.
Brining the Chicken
After the brine has cooled, I carefully submerge the whole chicken in the mixture. I use a large container or a resealable plastic bag. It is important that the chicken is fully covered by the brine. Then, I seal the bag tightly.
I place it in the refrigerator to marinate for at least 4 hours. For the best flavor, I recommend letting it sit overnight.
Roasting Process
When I’m ready to cook, I preheat my oven to 425°F (220°C).
After brining, I take the chicken out. I gently pat it dry with paper towels to remove excess moisture. I discard the brine responsibly.
I then rub olive oil all over the chicken. This helps create crispy skin while it cooks.
Next, I stuff the cavity of the chicken with lemon slices and onion quarters. Their flavors will infuse into the meat while it roasts.
I place the chicken breast side up in a roasting pan. To help it cook evenly, I tie the legs together with kitchen twine.
I roast the chicken for about 1 hour and 15 minutes. I check the internal temperature in the thickest part of the breast. It should reach 165°F (75°C). Halfway through, I baste the chicken with its own juices.
Once it’s perfectly roasted, I remove the chicken from the oven. I let it rest on a cutting board for 15-20 minutes before carving. This resting time keeps the chicken moist and full of flavor.
For serving, I enjoy it with roasted vegetables or fresh greens. I often garnish it with extra sprigs of rosemary or thyme. This dish is truly a feast! For the complete recipe, check the Full Recipe.
Tips & Tricks
Optimal Brining Practices
For the best flavor, brine the chicken for at least four hours. If you have time, overnight works even better. This longer soak helps the chicken absorb all the delicious flavors. To ensure even brine coverage, use a large container or a resealable bag. Make sure the chicken is fully submerged. If needed, weigh it down with a plate. This simple step boosts the flavor throughout the meat.
Achieving Perfect Roast
Basting the chicken is key to a juicy roast. Halfway through roasting, use a spoon to drizzle the chicken with its own juices. This keeps the skin crispy and the meat moist. After cooking, let the chicken rest for 15-20 minutes. Resting lets the juices redistribute. This step is crucial for a tender bite.
Flavor Enhancement Techniques
Enhance the flavor by adding more herbs. Try using sage or parsley alongside the rosemary and thyme. These herbs add depth and aroma. To balance flavors, consider the cider’s sweetness. You can add a bit of tart apple or a splash of vinegar to cut the sweetness. This balance ensures a well-rounded taste in every bite. For the full recipe, refer to the detailed instructions.
Variations
Different Flavors
You can change the brine for new tastes. Try using different liquids like herbal tea or beer. Each option adds a unique flavor to the chicken. For fruits, think about adding sliced oranges or pears to the brine. These fruits give a sweet and tangy twist. You can also mix spices like cinnamon or cloves for a warm touch. This will add depth and interest to your cider brined roast chicken.
Cooking Method Alternatives
Want to try a different way to cook your chicken? Use a slow cooker. This method keeps the chicken juicy and tender. Just add the brined chicken to the slow cooker with some broth and cook on low for 6-8 hours. Another option is grilling. It gives the chicken a nice smoky flavor. Just be sure to watch the heat. You want the chicken cooked through but not dry. Both methods can create a delicious meal.
Serving Suggestions
Pair your roast chicken with tasty sides. Roasted vegetables like carrots and Brussels sprouts work well. You can also serve it over a bed of creamy mashed potatoes. For a fresh touch, add a salad with mixed greens and a light vinaigrette. Sauces can enhance the meal too. A simple apple chutney or a tangy barbecue sauce adds great flavor. You can also try a garlic aioli for a creamy dip. These sides and sauces make the meal special.
For the full recipe, refer back to the main sections above.
Storage Info
Leftover Storage
For leftover cider brined roast chicken, store it in an airtight container. This keeps it fresh and prevents drying. Place the container in the fridge. Your leftovers will last about three to four days. If you plan to eat them later, consider freezing instead.
Reheating Instructions
To reheat without drying out, use your oven or a skillet. Preheat your oven to 350°F (175°C). Place the chicken in a baking dish and cover it with foil. This keeps moisture in. Heat for about 20 minutes, or until warm. If using a skillet, add a bit of broth or water. This adds moisture and flavor while reheating.
Freezing Options
You can freeze brined chicken for up to three months. Wrap it tightly in plastic wrap, then place it in a freezer bag. To thaw, move the chicken to the fridge for a day. This slow thawing keeps it juicy and tasty. Avoid thawing in the microwave as it may cook unevenly. For more details, check out the Full Recipe for cider brined roast chicken.
FAQs
Can I brine the chicken overnight?
Yes, you can brine the chicken overnight. Brining overnight gives the chicken more flavor and moisture. The salt and sugar work together to break down the meat. This process helps keep the chicken juicy. If you have time, brining for longer makes a big difference.
What kind of apple cider should I use?
For brining, use non-alcoholic apple cider. Look for fresh, pure cider without added sugars or flavors. A sweeter cider works well, as it balances the salt. You can choose local brands for better taste. These ciders enhance the chicken’s flavor.
How do I know when the chicken is fully cooked?
To check if the chicken is done, use a meat thermometer. Insert it into the thickest part of the breast. The temperature should reach 165°F (75°C). This ensures the chicken is safe to eat. If you do not have a thermometer, make sure the juices run clear when you cut into the chicken. This method helps confirm that it is fully cooked.
For a detailed guide on how to prepare this delicious dish, refer to the [Full Recipe].
Brining and roasting chicken transforms your meal into something special. We covered key ingredients, step-by-step instructions, and valuable tips. You now know how to prepare the perfect brine, roast the chicken, and enhance flavors. By exploring variations and storage options, you ensure great meals even on busy days. Remember, the right brining methods can elevate your dish. Use this knowledge to create delicious, juicy chicken every time. Enjoy your cooking journey and share it with others!
![- Whole chicken (4-5 pounds) - Apple cider (2 cups) - Salt (¼ cup) - Brown sugar (¼ cup) - Garlic (3 cloves, minced) - Fresh herbs (rosemary, thyme) - Whole black peppercorns (1 tablespoon) - Lemon (1, sliced) - Onion (1, quartered) The heart of this dish lies in its simple yet flavorful ingredients. The whole chicken, between 4 to 5 pounds, is the star. The apple cider adds a sweet and tangy taste. Salt is crucial for brining, as it helps the chicken hold moisture. I love adding brown sugar to balance the saltiness. Garlic brings in a rich aroma, while fresh herbs like rosemary and thyme add depth. Whole black peppercorns bring a subtle spice. Slicing a lemon and quartering an onion helps infuse the chicken with fresh flavors while roasting. Each ingredient plays an important role in creating a juicy and flavorful dish. If you want to explore the full recipe, check out the details above. To start, I combine the apple cider, salt, brown sugar, minced garlic, chopped rosemary, chopped thyme, and whole black peppercorns in a large pot. This mix brings out a rich flavor. Next, I heat the mixture over medium heat. I stir it until the salt and sugar dissolve completely. Once they dissolve, I remove the pot from the heat and let the brine cool to room temperature. After the brine has cooled, I carefully submerge the whole chicken in the mixture. I use a large container or a resealable plastic bag. It is important that the chicken is fully covered by the brine. Then, I seal the bag tightly. I place it in the refrigerator to marinate for at least 4 hours. For the best flavor, I recommend letting it sit overnight. When I’m ready to cook, I preheat my oven to 425°F (220°C). After brining, I take the chicken out. I gently pat it dry with paper towels to remove excess moisture. I discard the brine responsibly. I then rub olive oil all over the chicken. This helps create crispy skin while it cooks. Next, I stuff the cavity of the chicken with lemon slices and onion quarters. Their flavors will infuse into the meat while it roasts. I place the chicken breast side up in a roasting pan. To help it cook evenly, I tie the legs together with kitchen twine. I roast the chicken for about 1 hour and 15 minutes. I check the internal temperature in the thickest part of the breast. It should reach 165°F (75°C). Halfway through, I baste the chicken with its own juices. Once it’s perfectly roasted, I remove the chicken from the oven. I let it rest on a cutting board for 15-20 minutes before carving. This resting time keeps the chicken moist and full of flavor. For serving, I enjoy it with roasted vegetables or fresh greens. I often garnish it with extra sprigs of rosemary or thyme. This dish is truly a feast! For the complete recipe, check the Full Recipe. For the best flavor, brine the chicken for at least four hours. If you have time, overnight works even better. This longer soak helps the chicken absorb all the delicious flavors. To ensure even brine coverage, use a large container or a resealable bag. Make sure the chicken is fully submerged. If needed, weigh it down with a plate. This simple step boosts the flavor throughout the meat. Basting the chicken is key to a juicy roast. Halfway through roasting, use a spoon to drizzle the chicken with its own juices. This keeps the skin crispy and the meat moist. After cooking, let the chicken rest for 15-20 minutes. Resting lets the juices redistribute. This step is crucial for a tender bite. Enhance the flavor by adding more herbs. Try using sage or parsley alongside the rosemary and thyme. These herbs add depth and aroma. To balance flavors, consider the cider's sweetness. You can add a bit of tart apple or a splash of vinegar to cut the sweetness. This balance ensures a well-rounded taste in every bite. For the full recipe, refer to the detailed instructions. {{image_4}} You can change the brine for new tastes. Try using different liquids like herbal tea or beer. Each option adds a unique flavor to the chicken. For fruits, think about adding sliced oranges or pears to the brine. These fruits give a sweet and tangy twist. You can also mix spices like cinnamon or cloves for a warm touch. This will add depth and interest to your cider brined roast chicken. Want to try a different way to cook your chicken? Use a slow cooker. This method keeps the chicken juicy and tender. Just add the brined chicken to the slow cooker with some broth and cook on low for 6-8 hours. Another option is grilling. It gives the chicken a nice smoky flavor. Just be sure to watch the heat. You want the chicken cooked through but not dry. Both methods can create a delicious meal. Pair your roast chicken with tasty sides. Roasted vegetables like carrots and Brussels sprouts work well. You can also serve it over a bed of creamy mashed potatoes. For a fresh touch, add a salad with mixed greens and a light vinaigrette. Sauces can enhance the meal too. A simple apple chutney or a tangy barbecue sauce adds great flavor. You can also try a garlic aioli for a creamy dip. These sides and sauces make the meal special. For the full recipe, refer back to the main sections above. For leftover cider brined roast chicken, store it in an airtight container. This keeps it fresh and prevents drying. Place the container in the fridge. Your leftovers will last about three to four days. If you plan to eat them later, consider freezing instead. To reheat without drying out, use your oven or a skillet. Preheat your oven to 350°F (175°C). Place the chicken in a baking dish and cover it with foil. This keeps moisture in. Heat for about 20 minutes, or until warm. If using a skillet, add a bit of broth or water. This adds moisture and flavor while reheating. You can freeze brined chicken for up to three months. Wrap it tightly in plastic wrap, then place it in a freezer bag. To thaw, move the chicken to the fridge for a day. This slow thawing keeps it juicy and tasty. Avoid thawing in the microwave as it may cook unevenly. For more details, check out the Full Recipe for cider brined roast chicken. Yes, you can brine the chicken overnight. Brining overnight gives the chicken more flavor and moisture. The salt and sugar work together to break down the meat. This process helps keep the chicken juicy. If you have time, brining for longer makes a big difference. For brining, use non-alcoholic apple cider. Look for fresh, pure cider without added sugars or flavors. A sweeter cider works well, as it balances the salt. You can choose local brands for better taste. These ciders enhance the chicken’s flavor. To check if the chicken is done, use a meat thermometer. Insert it into the thickest part of the breast. The temperature should reach 165°F (75°C). This ensures the chicken is safe to eat. If you do not have a thermometer, make sure the juices run clear when you cut into the chicken. This method helps confirm that it is fully cooked. For a detailed guide on how to prepare this delicious dish, refer to the [Full Recipe]. Brining and roasting chicken transforms your meal into something special. We covered key ingredients, step-by-step instructions, and valuable tips. You now know how to prepare the perfect brine, roast the chicken, and enhance flavors. By exploring variations and storage options, you ensure great meals even on busy days. Remember, the right brining methods can elevate your dish. Use this knowledge to create delicious, juicy chicken every time. Enjoy your cooking journey and share it with others!](https://meltedrecipes.com/wp-content/uploads/2025/07/439863b6-e0fd-48fb-b552-c9db425b5847-300x300.webp)