WANT TO SAVE THIS RECIPE?
Are you ready to indulge in a warm, flaky delight? This Homemade Cheese Danish recipe is simple, flavorful, and perfect for breakfast or a sweet treat. With easy-to-follow steps and helpful tips, you’ll learn how to make the best cheese filling and golden pastry. Whether you want classic or unique variations, I’ve got you covered. Let’s dive into this tasty adventure together!
Why I Love This Recipe
- Effortless Elegance: This cheese Danish elevates any breakfast or brunch with minimal effort, making you look like a pastry pro.
- Flaky Perfection: The puff pastry creates a beautifully flaky texture that contrasts perfectly with the creamy cheese filling.
- Customizable Delight: Feel free to personalize with your favorite fruits or add a drizzle of glaze for extra sweetness.
- Quick and Easy: With a prep time of just 20 minutes, you can whip up these delicious treats in no time.
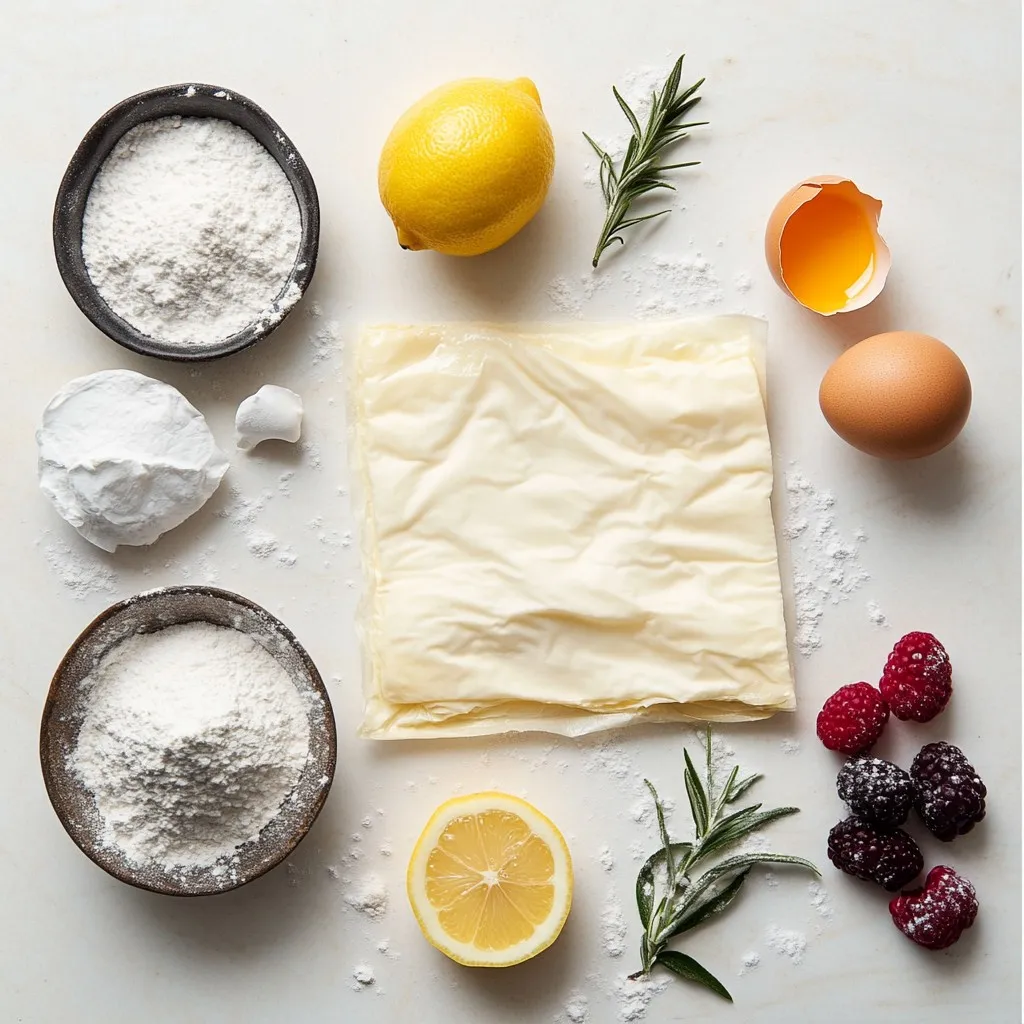
Ingredients
List of Ingredients
– 1 sheet of puff pastry (thawed)
– 8 oz cream cheese, softened
– 1/2 cup powdered sugar
– 1/4 cup granulated sugar
– 1 teaspoon vanilla extract
– 1 egg yolk
– 1 tablespoon fresh lemon juice
– 1 egg (beaten, for egg wash)
– Optional: assorted fresh berries (such as raspberries, blueberries, or strawberries) for garnish
Measurements and Alternatives
When making your cheese Danish, use a standard sheet of puff pastry. If you cannot find puff pastry, try using croissant dough instead. For the cream cheese, you can substitute with mascarpone for a richer flavor. If you want less sweetness, cut down on the powdered sugar.
Optional Toppings and Variations
Fresh berries make great toppings. You can use raspberries, blueberries, or strawberries. You can also drizzle honey or chocolate sauce on your Danish. For a twist, add a sprinkle of cinnamon or nutmeg to the cheese filling. This will give it a warm flavor that pairs well with coffee or tea.
Step-by-Step Instructions
Preparing the Puff Pastry
First, preheat your oven to 400°F (200°C). This helps to get the pastry nice and crisp. Next, take your thawed puff pastry and place it on a clean, lightly floured surface. Roll it out gently to smooth out any creases. Aim for an even thickness. After that, cut the sheet into 4 equal squares. This will be the base for your cheese filling.
Making the Cheese Filling
In a mixing bowl, combine 8 oz of softened cream cheese, 1/2 cup of powdered sugar, and 1/4 cup of granulated sugar. Add 1 teaspoon of vanilla extract, 1 egg yolk, and 1 tablespoon of fresh lemon juice. Use a hand mixer or whisk to beat the mixture until it is smooth and creamy. This filling is what makes your Danish so tasty.
Assembling and Baking the Danish
Spoon a generous amount of the cheese filling into the center of each pastry square. Be careful not to overfill. Fold the corners of each square toward the center to create a little bundle. Pinch the corners to seal them tightly. Then, brush the tops with a beaten egg for a golden finish. Place the Danish on a parchment-lined baking sheet. Bake for 15-18 minutes until they puff up and turn golden brown. Let them cool for a few minutes before serving. You can add fresh berries on top for extra flavor and color.
Tips & Tricks
Ensuring Flakiness in Puff Pastry
To get a flaky puff pastry, always keep it cold. Warm pastry won’t puff well. Thaw the pastry in the fridge, not on the counter. When you roll it out, use a light touch. This helps keep the layers intact. If you notice the dough getting warm, pop it back in the fridge for a bit. This small step makes a big difference.
Perfecting the Cheese Filling Consistency
The cheese filling needs to be smooth and creamy. Start with softened cream cheese for the best texture. Mixing in powdered sugar helps sweeten it without lumps. Adding an egg yolk gives it richness. Use fresh lemon juice for a nice zing. Mix until it is completely smooth. If it’s too thick, add a bit of milk to thin it out. This will help it spread nicely in the pastry.
Achieving the Ideal Golden Finish
A golden finish is key to a great cheese Danish. Use a beaten egg wash to brush the tops. This gives them that shiny, golden look. Make sure to cover the whole surface. Be careful not to let the egg wash drip down the sides. This can cause the pastry to stick to the baking sheet. Bake until they puff up and turn a lovely golden brown. Keep an eye on them in the last few minutes. Enjoy that beautiful finish!
Pro Tips
- Keep Your Puff Pastry Cold: Make sure your puff pastry is well-chilled before rolling out. This helps achieve maximum flakiness when baked.
- Don’t Overfill: When adding the cheese mixture, be careful not to overfill the pastry squares. This prevents them from bursting open during baking.
- Use a Pastry Brush: Applying the egg wash with a pastry brush ensures an even coating for a beautiful golden-brown finish.
- Experiment with Flavors: Feel free to add a dash of almond extract or a sprinkle of cinnamon to the cheese mixture for a unique twist on the classic flavor.

Variations
Fruit-Infused Cheese Danish Options
You can add fruit to your cheese filling for a tasty twist. Berries like raspberries, blueberries, or strawberries work great. Just mash the fruit slightly before mixing it with the cheese. This gives a burst of flavor and a pretty look. You can also use fruit jams. Spread a thin layer on the puff pastry before adding the cheese mix. Peach or cherry jam adds a sweet touch.
Savory Cheese Danish Ideas
For a savory option, skip the sugar in your cheese mix. Add herbs like chives, thyme, or dill instead. You can also mix in some cooked spinach or sautéed mushrooms. This creates a delicious brunch item. Consider adding a sprinkle of cheese on top before baking. Feta or goat cheese can bring extra flavor.
Vegan or Dairy-Free Adaptations
You can make these Danish vegan by swapping out a few ingredients. Use a plant-based cream cheese instead of dairy cream cheese. For the egg yolk, try a flaxseed egg. Mix one tablespoon of ground flaxseed with three tablespoons of water. Let it sit until it thickens. Use plant-based milk instead of regular milk in your recipe. Ensure that your puff pastry is dairy-free as well.
Storage Info
Best Practices for Storing Cheese Danish
Store your Cheese Danish in an airtight container. This keeps them fresh. Place them in the fridge if you plan to eat them in a few days. If you want to keep them longer, freezing is the best option. Avoid stacking them to prevent squishing.
Freezing Instructions for Long-Term Storage
To freeze Cheese Danish, let them cool completely first. Wrap each Danish tightly in plastic wrap. Then, place them in a freezer bag or container. Label the bag with the date. They can stay in the freezer for up to three months. When ready to enjoy, thaw them in the fridge overnight.
Reheating Tips for Freshness
To reheat your Cheese Danish, preheat your oven to 350°F (175°C). Place the Danish on a baking sheet. Heat for about 10-15 minutes. This keeps the pastry flaky. You can also microwave them for about 20-30 seconds, but the texture might not be as good. Enjoy your warm, cheesy treat!
FAQs
Can I use store-bought puff pastry?
Yes, you can use store-bought puff pastry. It saves time and effort. Just make sure to thaw it before use. Follow the package instructions for best results. This makes your cheese Danish easy to prepare. You still get that flaky texture and buttery taste.
How do I make the cheese filling less sweet?
To make the cheese filling less sweet, cut down on the sugar. You can reduce the powdered sugar to 1/4 cup. You can also leave out the granulated sugar entirely. Adding a pinch of salt can balance the flavor. You might also try more lemon juice for a tart kick.
Can I prepare the Danish in advance?
Yes, you can prepare the Danish ahead of time. Assemble them, then place them in the fridge. Bake them just before serving for the best taste. If you want to freeze them, wrap each Danish well. You can bake them straight from the freezer; just add a few extra minutes to the baking time.
This post covered how to make a cheese Danish. We explored the right ingredients, measurements, and optional toppings. I shared step-by-step instructions for preparing puff pastry, making the filling, and baking your Danish.
Remember, simple tips can enhance flakiness, filling consistency, and browning. Try out variations, like fruit-infused or dairy-free options.
With the right storage methods, your Danish can stay fresh longer. Enjoy bakin
Deliciously Flaky Homemade Cheese Danish
A delightful pastry filled with a creamy cheese mixture, perfect for breakfast or dessert.
Course Dessert
Cuisine American
Servings 4
Calories 250 kcal
- 1 sheet puff pastry (thawed)
- 8 oz cream cheese, softened
- 0.5 cup powdered sugar
- 0.25 cup granulated sugar
- 1 teaspoon vanilla extract
- 1 egg yolk
- 1 tablespoon fresh lemon juice
- 1 egg beaten (for egg wash)
- to taste assorted fresh berries (for garnish)
Preheat your oven to 400°F (200°C). Prepare a baking sheet by lining it with parchment paper to prevent sticking.
On a lightly floured surface, carefully roll out the thawed puff pastry sheet to smooth out any creases and ensure even thickness. Once rolled, cut the sheet into 4 equal squares.
In a mixing bowl, use an electric mixer or a whisk to combine the softened cream cheese, powdered sugar, granulated sugar, vanilla extract, egg yolk, and fresh lemon juice. Beat until the mixture is smooth, creamy, and well-blended.
Spoon a generous amount of the creamy cheese mixture into the center of each puff pastry square, ensuring not to overfill to allow for proper sealing.
Fold the corners of each square toward the center, enveloping the cheese filling and creating a small bundle. Make sure to pinch the corners securely to seal them and prevent leakage while baking.
Using a pastry brush, gently apply the beaten egg on top of each Danish to achieve a beautiful golden-brown finish once baked.
Carefully transfer the prepared Danish to the lined baking sheet. Bake in the preheated oven for 15-18 minutes, or until the pastry is puffed up and turns a lovely golden brown.
Once baked, remove from the oven and allow the Danish to cool for a few minutes on the baking sheet before transferring to a wire rack. Just before serving, feel free to top with fresh berries for a pop of color and an added burst of flavor.
Feel free to add fresh berries for garnish.
Keyword breakfast, cheese danish, dessert, pastry
WANT TO SAVE THIS RECIPE?